

Tuesday, January 16, 2018
In the art room: art room tour before and after (part 1).

10 comments:

Cassie, I have no idea how you get SO MUCH done! Your room is A-MA-ZING! Donna Staten
What a great space and it looks amazing with all that color! I've been doing the same, paring down to fewer, more impactful pieces. Or trying to at least, lol!
Do you sleep? Lovely art room!!!

Amazing!!!!!!!!!Lovely, lovely, lovely!!!!!!!
You AHHHHHHMAZE me!
Can I come live in your art room for a bit? Even just a weekend might do it because when I see it I just want to head on in and find something to start creating! I admit I'm also envious of your space. This is my first year teaching art and I'm in a pretty small classroom with no sink and they have said I'm possibly moving to a portable next year. (I see a smaller space with less storage and no sink ahead, but I'm trying to brainstorm other ways to make things happen in there or another place to be. After all if I come up with some great alternative they won't have any problem letting me do it right? :0) Hee hee PS I love your name by the way! Cassie Irwin Art Teacher TLCA Abilene, TX
Soooo inspiring. Thanks!
Amazing Art Room, I love it!!Thanks for sharing. wait till you see Camelot Fishing Charters
Your so artistic, i like the design of your artroom.. wait till you see Shoretel Reseller
Hi Cassie, An amazing tour! I'm wondering what kind of document camera (make & model) that you use?
Thank you so much for your comments. I appreciate each and every one :)
Note: Only a member of this blog may post a comment.
My New Book!

Available NOW!

Clay Lab: 52 Clay Projects for Kids!

Cassie Stephens Podcast

Search This Blog!
Popular posts.

Blog Archive
- ► May (1)
- ► April (2)
- ► March (3)
- ► January (2)
- ► December (2)
- ► October (5)
- ► September (4)
- ► August (5)
- ► July (3)
- ► June (1)
- ► April (8)
- ► March (2)
- ► November (3)
- ► October (3)
- ► September (6)
- ► June (2)
- ► March (1)
- ► February (3)
- ► January (1)
- ► December (3)
- ► November (6)
- ► October (4)
- ► September (1)
- ► August (2)
- ► June (3)
- ► May (2)
- ► April (3)
- ► March (4)
- ► February (5)
- ► January (6)
- ► December (6)
- ► October (1)
- ► September (2)
- ► August (3)
- ► June (4)
- ► May (30)
- ► April (41)
- ► March (17)
- ► February (2)
- ► January (3)
- ► December (5)
- ► October (7)
- ► September (10)
- ► August (11)
- ► July (9)
- ► May (5)
- ► February (4)
- ► January (11)
- ► November (4)
- ► October (8)
- ► September (8)
- ► June (5)
- ► May (8)
- ► April (9)
- ► March (9)
- ► February (12)
- Art Teacherin' 101, Episode 42:Grab and Go, Sketch...
- How to Teach Paper Weaving!
- Gallery of Gratitude, Part 1
- In the Art Room: Artists with Heart!
- In the Art Room: Dean Russo-Inspired School Mascot!
- DIY: Latch Hook Jacket!
- In the Art Room: Art Room Tour Before and After (P...
- DIY: A Needle Felted Color Wheel Coat!
- In the Art Room: "I Am..." Mobiles
- Sweater Weather! Top Ten Fave Needle Felted Sweaters
- DIY: Yarn Bombing in the Art Room
- In the Art Room: Top 15 Fave Valentine's Day Lessons!
- In the Art Room: Gallery of Gratitude Portraits!
- In the Art Room: Spilled Glue Bottle Sculptures!
- Field Trip! In the Studio with Becca Jane Koehler
- ► December (10)
- ► November (9)
- ► October (18)
- ► September (15)
- ► August (16)
- ► July (14)
- ► June (14)
- ► May (16)
- ► April (14)
- ► March (11)
- ► February (20)
- ► January (17)
- ► December (14)
- ► November (17)
- ► October (14)
- ► September (14)
- ► August (15)
- ► July (8)
- ► June (9)
- ► May (14)
- ► April (10)
- ► February (8)
- ► December (11)
- ► October (10)
- ► June (8)
- ► May (9)
- ► April (12)
- ► March (8)
- ► February (10)
- ► January (13)
- ► December (18)
- ► November (12)
- ► October (12)
- ► September (13)
- ► August (12)
- ► July (13)
- ► June (11)
- ► May (11)
- ► March (12)
- ► September (9)
- ► August (8)
- ► July (7)
- ► May (10)
- ► March (10)
- ► October (15)
- ► July (12)
- ► February (15)
- ► January (12)
- ► February (1)
Cassie Stephens

Shabby Art Boutique
May 27, 2014 By Shabby Art Boutique 47 Comments
Craft Room Tour–part 2
Filed Under: Craft Room , Creativity , handmade , Organisation , Shabby , Studio Tagged With: craft room , creative space
Hello my friends,
Welcome to day 2 of having a little look around my creative space.
Yesterday I shared my patchwork papered doors and my Tilda storage area.
I’ve been quite spoilt over the past 22 years to have had two large studio spaces, so last year when we moved to the resort and I had to make do with a spare bedroom to craft in, I wondered how I would do it…
But it turned out okay and I’m quite comfortable now in what has become my little romantic look, shabby craft room.
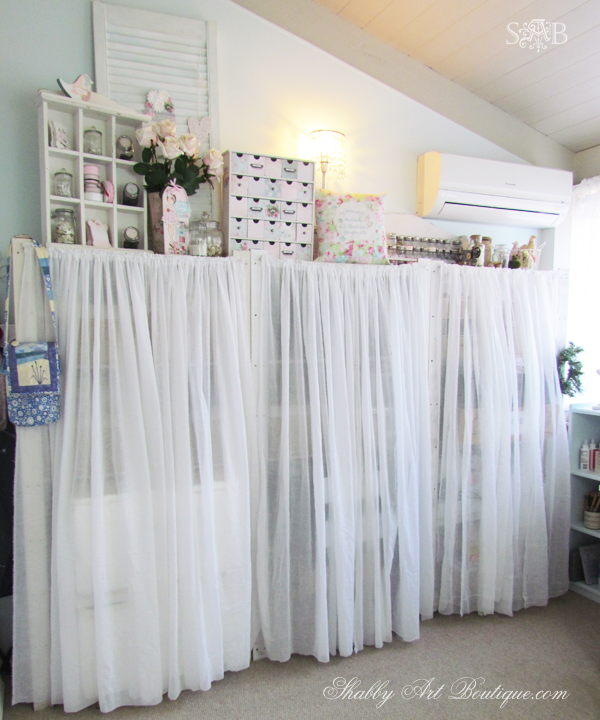
I’ve managed to amass quite a large collection of crafting and art supplies over a 30 year career in this industry, but I don’t use all of the things, all of the time.
The first thing I did was sort, box and label everything into two groups; my infrequently used supplies are now in our storage unit and the things I use all the time are here in my craft room.
As you can see, on this wall I have 3 shelf units that house my paper craft collection, sewing machines and sewing supplies and haberdashery.
My fabric stash is in the double cupboard I shared yesterday with the patchwork doors.
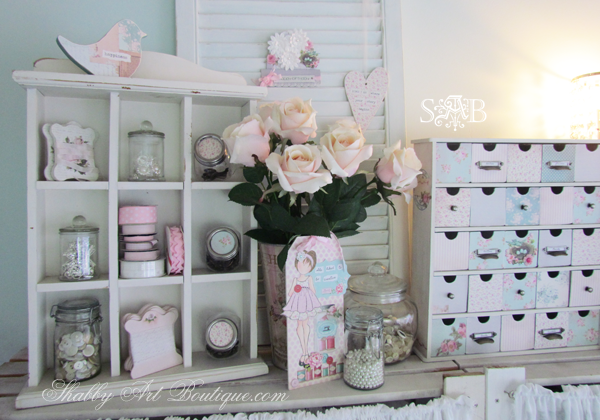
Living opposite the beach is problematic in that the sea air rusts all metal, so it is important to keep my tools boxed and stored correctly.
On the plus side, having everything in labeled boxes appeals to my neat freak tendencies! [giggle]
I like having the muslin curtains on all my shelving units too, as it adds a lovely soft and romantic feel to the room.
The top of the shelving units was utilized for more storage space for my vast button collection and my scrapbooking embellishments.
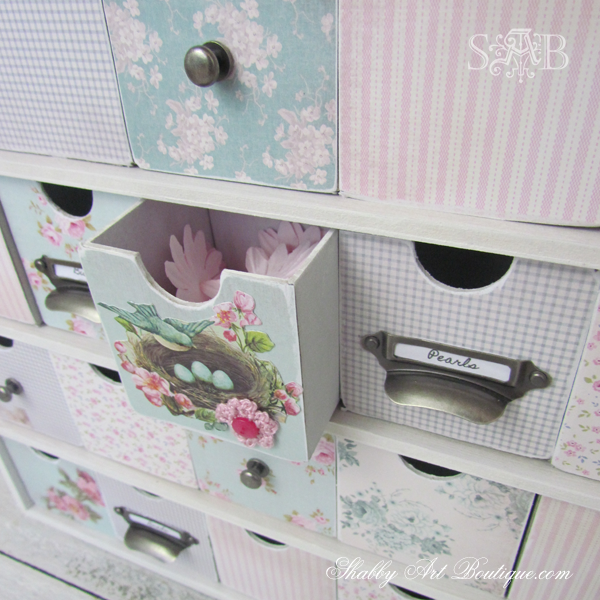
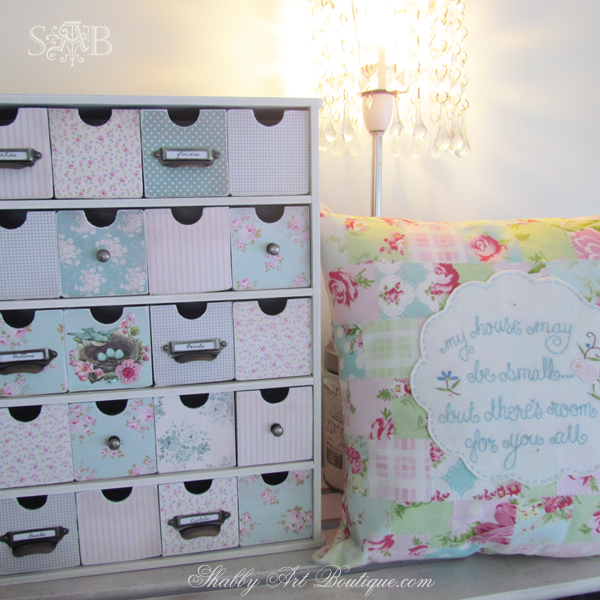
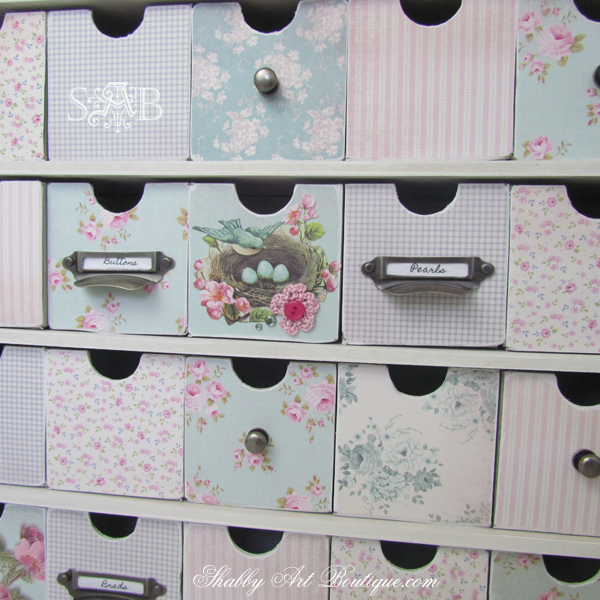
I used more of the lovely papers from the Tilda Country Escape paper pad to make this 25 drawer storage unit.
It holds all my scrapbooking embellishments… like paper flowers, brads, eyelets, pearls and rhinestones etc. I suspect you all know by now that I like to organize and sort things, so it’s the perfect solution for sorting all my bits and pieces into their own little drawer.
When I’m paper crafting, I lift it down and keep it on my desk.
I’ll be back tomorrow to show you the other side of my creative space, where I like to work.
Added: Craft Room Tour day 1 & Craft Room Tour day 3.
Until then,
Shabbilicious hugs ~ Kerryanne
Don’t miss out!
Reader interactions.
May 27, 2014 at 10:09 pm
O MY!!! Love your creative space… Your area is truley Romantic Shabby Chic. The papers you used for the little cubbie drawers are so BEAUTIFUL!!! I love love your blog.
May 28, 2014 at 6:05 pm
Thank you Michelle. I’m quite happy with the atmosphere of my room. It is such a pleasure to spend time in there. Hugs ~ Kerryanne
May 27, 2014 at 11:30 pm
Oh, Kerryanne, it’s beautiful! What a wonderful place to create. I love your storage drawers & the paper you selected. Pure happiness! Have a lovely one, Lin
May 28, 2014 at 6:02 pm
Thanks Lin 🙂 Got to agree with you… any time spent in my craft room does give me ‘pure happiness’. Hugs ~ Kerryanne
May 28, 2014 at 2:19 am
I love your craft room Kerryanne! The storage drawers are lovely…such pretty papers! It must be so delightful to work in your studio. 😉 LuAnn
May 28, 2014 at 6:00 pm
Got to say LuAnn that I do love spending time in my craft room. Wish I had more time in there, but any time is better than none. I’m very happy with how the storage unit turned out. The Country Escape paper pad is my current favourite from the Tilda range. The colours and patterns just work so well together… totally shabbilicious! Hugs ~ Kerryanne
May 28, 2014 at 2:59 am
Your craft room looks fantastic Kerryanne. I never seem to be able to remain that organized. I’m a sloppy creator. LOL
May 28, 2014 at 5:58 pm
Thank you Rosemary. Well my friend, you are a master creator, so obviously ‘sloppy’ works for you. I suspect most artistic people tend to be messy during the creative process… I’m a little unique in that area with my neat freak tendencies. 🙂 Hugs ~ Kerryanne
May 28, 2014 at 6:11 am
I love the drawer unit Kerryanne – so pretty and the muslin really does give a lovely soft look to the room. Toni xx
May 28, 2014 at 5:56 pm
Thanks Toni. I love the muslin curtains… I think they add to the softness and romanticism of the room. They are semi see through, but do offer a little covering for the shelf units. Means I can hide away all the not so pretty aspects of crafting supplies 😉 Hugs ~ Kerryanne
May 28, 2014 at 11:11 am
I love your craft room. While my children were growing up I had to use the dining room table and store my supplies in plastic tubs. I now have a craft/quilting room. It’s nice to be able to spread out projects and leave them when you get interrupted. Unfortunately, that means my little ones are grown and gone. Sigh. I just discovered your blog a couple of days ago and you are already a favorite! Keep up the inspiring posts. Clara
May 28, 2014 at 5:54 pm
Hi Clara and welcome to Shabby Art Boutique! I like being able to leave my projects out too. It means you can grab just short snippets of crafting time that you might mot otherwise have had if you had to get everything out and set it all up. I hope you’ll continue to visit with me and join me on my creative journey here at Shabby Art Boutique. Hugs ~ Kerryanne
May 29, 2014 at 5:49 am
so very charming, kerryanne! love the curtains hiding the shelves!
June 5, 2014 at 10:50 am
Lynn, it looked quite different before I put up the curtains. I think the curtains kind of unify the shelving units and hides all the different types of boxes stored in them. I’m pleased too that I decided to go with the light weight muslin as curtain material. It’s a little see through and looks light and floaty. K xx
June 4, 2014 at 8:53 pm
so sweet and organized! 🙂
June 5, 2014 at 10:27 am
Thank you Stephanie. I have to admit to being a bit of a ‘neat freak’…. but it works for me.
June 4, 2014 at 10:27 pm
Love your room just beautiful
Thank you Tammy. I appreciate you visiting Shabby Art Boutique 🙂
June 16, 2014 at 8:25 pm
I love your craftroom! Did you make the 25 drawer storage unit? If so, do you have plans for it that you would share? Thanks! Kym
June 23, 2014 at 7:58 pm
Thank you Kim… I’m loving my craft room too. The 25 drawer storage unit is made by Kaisercraft and is sold as a raw kit. You can buy them online, as well as from craft outlets and scrapbooking stores.
June 25, 2014 at 8:26 pm
Lovely, the floral drawers are so special, very beautiful!
June 26, 2014 at 8:45 am
Thank you Virginia 🙂
June 25, 2014 at 9:12 pm
You had me at Button Collection!!!! Your beautiful craft space makes me want to explore and create… and isn’t that exactly what a creative space should do!?! I love it!
June 26, 2014 at 8:44 am
Thank you Cynthia. I agree… I like to have my pretty supplies out on show so they inspire me to keep creating. I’m totally in love with my little creative retreat too 🙂
June 25, 2014 at 10:05 pm
It is so pretty and organized! I would love a space like this! Pinning too!
June 26, 2014 at 8:41 am
Thanks for visiting DeDe and I’m thrilled that you are inspired by my pretty craft room. 🙂
June 25, 2014 at 10:19 pm
Wow! What a lovely and inspiring place. I love how beautiful and shabby chic it is! I need to get to organizing my basement a bit better! It is where I paint my furniture. Thanks for the inspiration. x
June 26, 2014 at 8:39 am
Danielle, I believe that to be creative you have to feel inspired and your surroundings are an important part of that. Obviously the décor that inspires is different for everyone, but for me it needs to be pretty. Hugs ~ Kerryanne
June 25, 2014 at 11:05 pm
This is so organized and gorgeous! Such a calm and beautiful space.
June 26, 2014 at 8:35 am
Thanks for visiting my craft room Sonya. It definitely is a calming room with those pastel colours.
June 26, 2014 at 12:48 am
Oh my gosh… what an amazing idea for those little storage cubbies! They are beautiful! Your entire space is… you must love ‘playing’ there! 🙂
June 26, 2014 at 8:34 am
Thanks for visiting Donna. Yep… could spend every day in my craft room quite happily, but alas, the resort and guests keep me pretty busy these days. If only we didn’t have the day job!
June 26, 2014 at 1:10 am
That is like the “dream” craft room!!! I love it.
June 26, 2014 at 8:29 am
Awww… thanks Nancy. I only wish I had time to work in there every day… now that would be the perfect dream!! Hugs ~ Kerryanne
June 26, 2014 at 1:58 am
Kerryanne, this entire room is to-die for and I especially love the patchwork door and cubbies . I think Hometalkers would go CRAZY over this, btw. Do share!
June 26, 2014 at 8:26 am
Hi Miriam, Thanks for checking out my shabbilicious craft room. I’m still swooning over my patchwork doors 😉 I did 3 posts on Hometalk about my craft room last month. You can see this one here http://www.hometalk.com/3813682/my-creative-space-part-2 Hugs ~ Kerryanne
June 26, 2014 at 2:29 am
Fabulousness! Love your soft beautiful colors!
June 26, 2014 at 8:28 am
Thank you Toni. This is quite a change for me and one that I’m really enjoying. These colours are very calming and relaxing. 🙂
June 26, 2014 at 4:35 am
Absolutely gorgeous, Kerryanne! Such a fun, inspiring place to create! :o)
June 26, 2014 at 8:27 am
Thank you Larissa and I appreciate you popping over to visit the Shabby Art Boutique. 🙂
December 30, 2015 at 7:24 pm
Would you mind telling me where I could get the boxes you store embellishments, buttons, etc. Thank you. Im trying to organize my new area. Any suggestions would be very much appreciated.
December 30, 2015 at 8:42 pm
Joan, this 25 box kit is made by Kaisercraft. In Australia they are available at Spotlight and scrapbooking stores. Overseas they can be purchased through Amazon.
January 2, 2018 at 4:51 pm
Can u tell us how you made the lityle cabinet for your embellishments?
January 4, 2018 at 2:37 pm
Hi Lori, the embellishments cabinet is made by Kaisercraft Beyond The Page and contains 25 box drawers. Hope this helps you track one down in your area. Kerryanne
[…] 9. Craft Room Storage Drawers with Shabby Chic Inspired Paper Decoupage Image via: shabbyartboutique […]
[…] These storage units were as modern and industrial as can be, and they only really filled the shabby requirement. After the makeover, however, they are a true shabby chic dream. Get the tutorial via shabbyartboutique. […]
Leave a Reply Cancel reply
Your email address will not be published. Required fields are marked *
Save my name, email, and website in this browser for the next time I comment.
Notify me via e-mail if anyone answers my comment.
I consent to Shabby Art Boutique collecting and storing the data I submit in this form. (Privacy Policy) *
This site uses Akismet to reduce spam. Learn how your comment data is processed .

Subscribe to My Newsletter
Get a private pass to all things "shabbilicious!" Sign up today for my weekly newsletter and get instant access to my FREE printables library.
Putting homemade back into everyday life
Let’s be friends on instagram, shabbyartboutique.
Australian artist - lover of shabby, vintage & cottage style – Blogger and graphic designer at Shabby Art Boutique ♥


The Cult - Part 2
The Cult - Part 2 is a Quest in Escape from Tarkov .
- 2 Requirements
- 3 Objectives
- 5.1 Customs
- 5.3 Shoreline
Dialogue [ ]
What you have discovered in the village is very interesting, it looks like some kind of occult sect. I’ve heard rumors before that there is some group actively spreading the news of approaching cataclysm and that kind of hysteria. Now, they often make sacrifices to their gods, and what would you think they offer as sacrifice? Weapons. It is not clear where they take it from or what they do in the rest of their time. We only know that they have several such sacrificial altars everywhere. Find them and mark with beacons, and we will try to trace the activities of this organization in detail, to learn how much democracy they have.
Requirements [ ]
- Must be level 12 to start this quest.
Objectives [ ]
- Locate and mark the first ritual spot with an MS2000 Marker on Woods
- Locate and mark the ritual spot with an MS2000 Marker on Customs
- Locate and mark the second ritual spot with an MS2000 Marker on Woods
- Locate and mark the the ritual spot with an MS2000 Marker on Shoreline

Rewards [ ]
- Peacekeeper Rep +0.03
- 893 Dollars with Intelligence Center Level 1
- 978 Dollars with Intelligence Center Level 2
- 1× Knight's Armament Company SR-25 7.62x51 marksman rifle
Got any news? Great, then let's deal with those fanatics. We will contact you regarding that cult when the time comes.
The objective of this quest is to plant a MS2000 Marker at each of the four ritual spots on the maps Customs , Woods , and Shoreline . Their markings look identical to the one shown in the quest banner. These locations are known to have high-value and rare loot, so proceed with caution.
Customs [ ]
The first ritual spot is located in the marked room (dorm room 314) on the third floor of the 3-story dorms on Customs . A Dorm room 314 marked key is required to unlock the door. The room is at the end of the hallway and easily identified by the lit candles and markings all over and around the door.
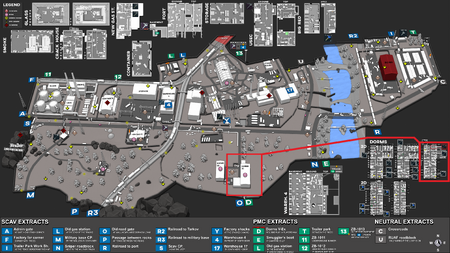
Location marked on map
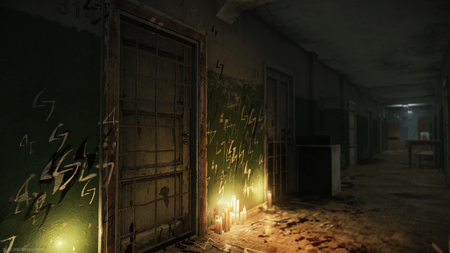
Door to the marked room
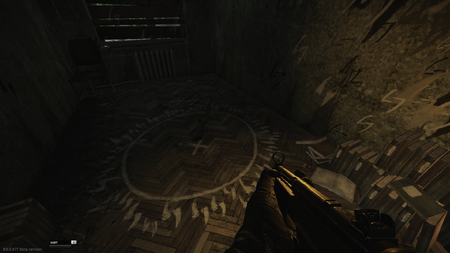
Inside the room where the marker needs to be placed
The second and third ritual spots are located on Woods .
- One can be found in the woods west of the sawmill near the checkpoint. This spot can easily be located when you go to the checkpoint, stay at the barrier and line your view up with a big stone south of it. See pictures below.

Location marked on map (bottom)
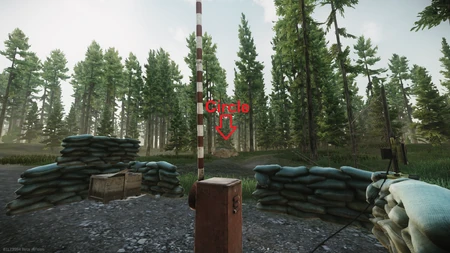
View from the checkpoint towards the ritual spot
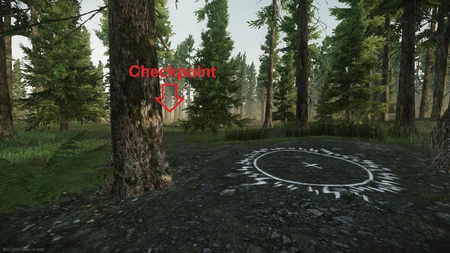
View from the ritual spot towards the checkpoint
- The other one is located at the dilapidated village in the north. The circle itself is north of the church in the backyard of a house.

Location marked on map (top)
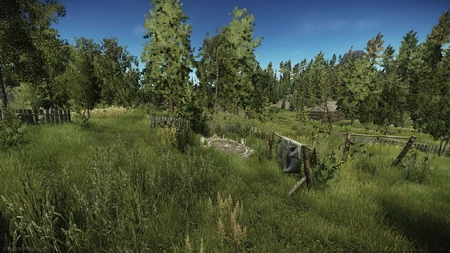
The second ritual spot in the dilapidated village
Shoreline [ ]
The fourth ritual spot is located in the pig room (East Wing Room 321) on the third floor of the health resort on Shoreline . Like on Customs , the room is easily identified by candles and numerous markings on the door. Inside the room are multiple slaughtered pigs and a Dead Scav with a pig's head. The spot to plant the MS2000 Marker surrounds the bathtub with the Dead Scav .

Health resort east wing location marked on map
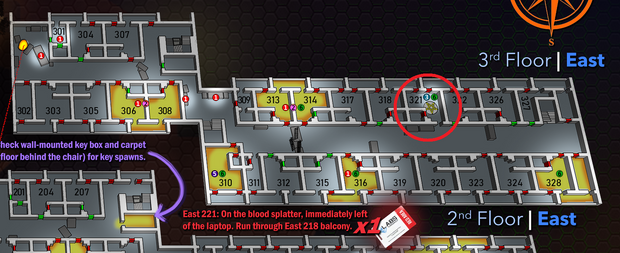
Room location marked on east wing map
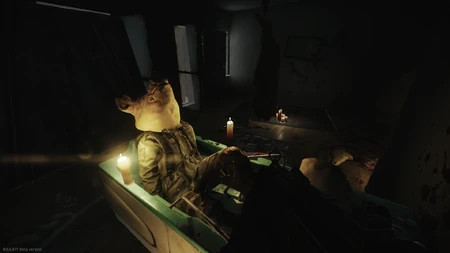
The ritual spot where the marker needs to be placed
- You can buy additional MS2000 Markers from Prapor or Ragman if needed.
- It is recommended that the player keeps the MS2000 Markers in their special slots or pouch so they are not lost in the event of their death.
- The MS2000 Markers will automatically be used out of the players' inventory when needed, similar to how keys work
- 3 A key to salvation
busy mockingbird
- Buy the Book
- Inspirations
An Art Room Tour!
Having so many hobbies comes with a small price…where the heck do you put all your ART STUFF??? I’ve been lucky enough that everywhere we lived, my husband helps me make space for an entire art room or art area of some sort, to house all my art supplies.
So in the spirit of sharing, I thought it’d be fun to walk you through my art room…
When we were young & first married and lived in a tiny one-bedroom apartment, my workspace was just a big ‘ol industrial tool box. I kept all my paints, paintbrushes and tools in there, and they were in really bad shape. But I’d drag them out, lay them on the floor, and paint or draw whenever and whereever the mood struck.
Over the years, my work space has been everything from just a spot on one end of the couch, to the middle of the floor, to a rickety old art table in our very first house, and I’ve been grateful for every bit of it. I’ve had many many work areas.
But when we first moved to Texas, this is what my art space looked like:

But then when my parents moved to a smaller house, they got rid of a TON of furniture, and offered me a big wooden corner desk they had. I didn’t really have a concept of what it looked like, but I figured it’d be good and sturdy, and probably make for a much better arrangement than what I had setup. So after hauling it in pieces from Oklahoma in our truck, and after much toil and frustration, I finally installed the desk completely and did a huge art room overhaul.
The desk space now: BOYYYYYY was I glad we adopted that desk–what a difference a good desk space makes! There’s SOOO much room to spread out several projects at one time….
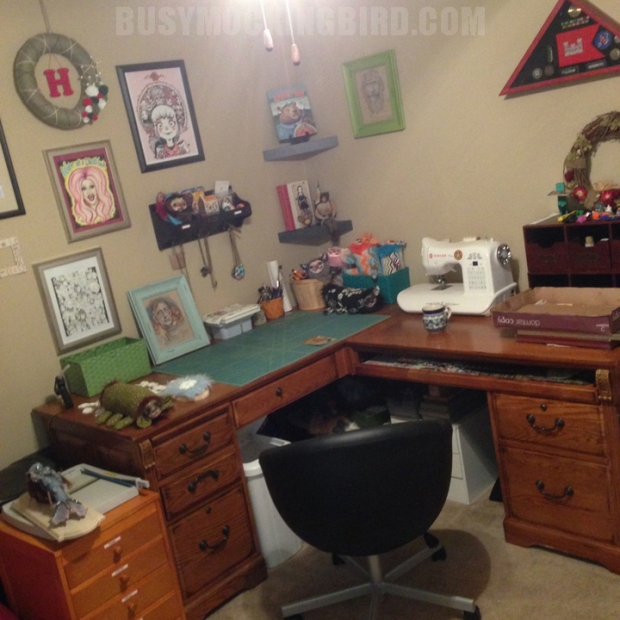
(Also pictured below: the Boston Terrier, who assumes when you have the camera out, it is to take a photo of her.)
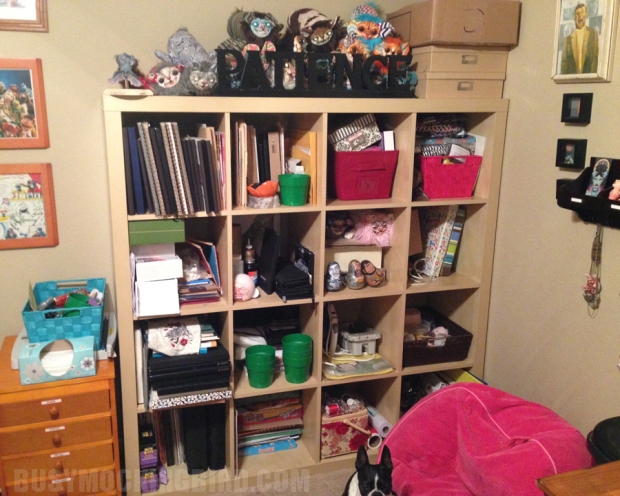
To the left of the bookshel f , is Myla’s little workstation . It’s basically a flat end of the wooden panel from the black IKEA desk laid flat on the floor (since she usually spreads her stuff all over the floor anyway). I “acquired” the window panel from my mom (thanks, Mom!), who got it on a visit to Japan…There are signed photos on the wall of Jim Henson (one from when I sent him a fan letter as a kid).
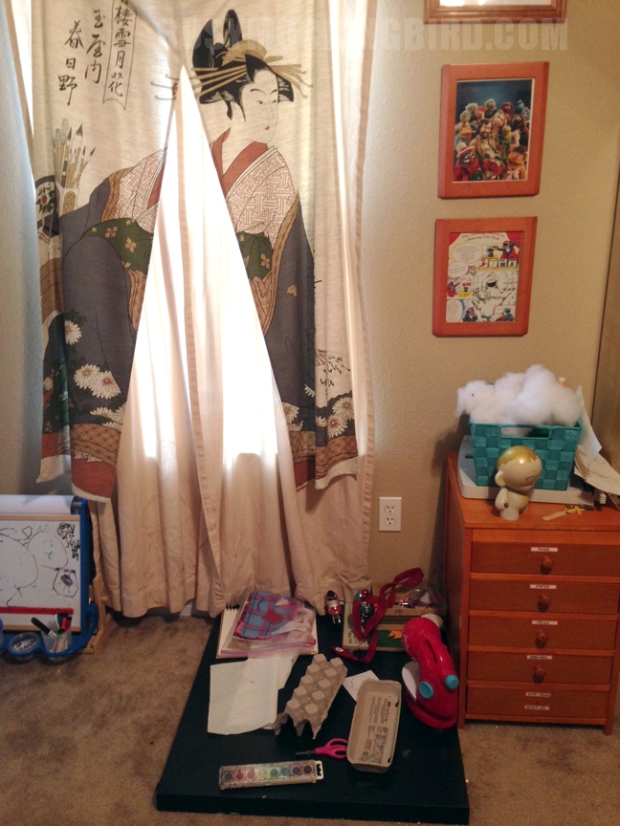
To the left of Myla’s space is the TV . (There’s also a closet full of mostly fabric, but don’t open that or everything will fall out.) The TV holds cutout stands that Myla and I did for the Austin convention last year. On the walls are some of my favorite roller derby shirts, mounted in embroidery hoops (a SUPER easy & fun project). And there’s one of the little plastic drawer bins for Myla’s stickers and paper and art supplies.

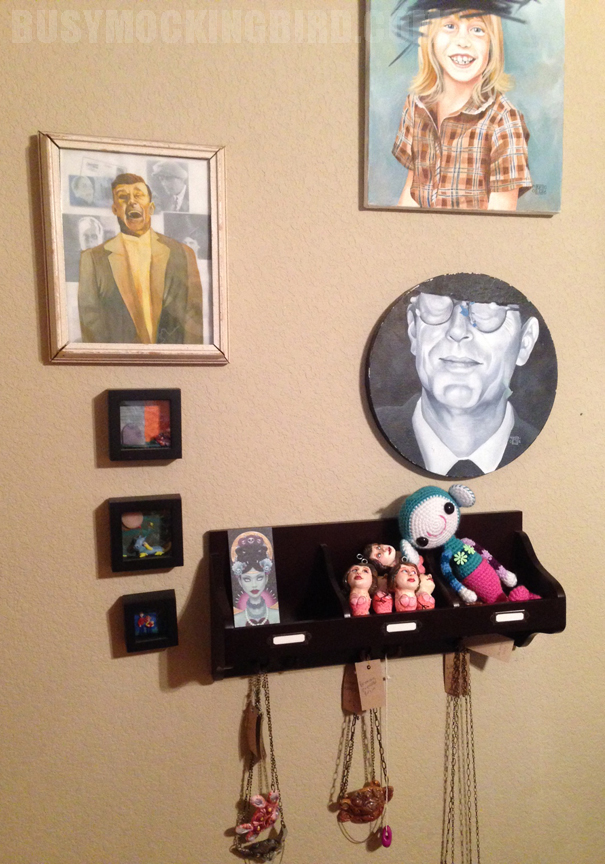
My “new” big ol’ desk: As for the desk area itself, I’ll walk you through it, from left to right. On the wall are some old paintings, along with three little shadow box sculptures my sister & nieces did for me. The hanging shelf holds a few of the ornaments and necklaces in my Etsy shop . There’s also an adorably colorful monkey-mermaid made by the very multi-talented Kendyl from BreakfastJones .
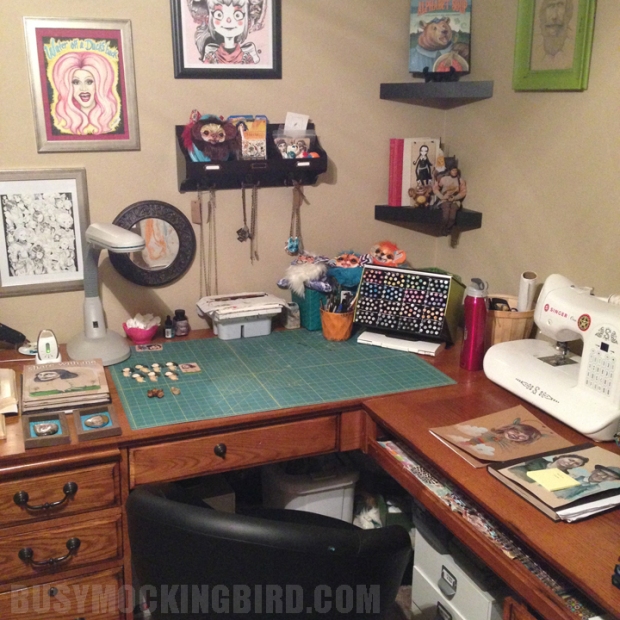
The edge of my desk: There’s an old Ottolight my mom gave me to try out, some portfolio booklets stuffed with some of the nicer finished drawings and collaborations. And I decided not to TOTALLY mess up this desk, and got a cutting mat. Tucked in the corner are my paintbrushes and my full set of Prismacolor Brush-tip markers (thankyouverymuch, Jerry’s Artarama in Austin !). There are about four in-progress projects on that desk. And those little mirrors next to the lamp? No, they’re not so I can stare adoringly at myself as I work…They’re actually so I can look up at the reflected image of the TV every now & then as I paint, since the only down side of this layout is that the TV is positioned BEHIND me, and it’s too much work to reroute the cable to face it the other way. Usually, though, I just listen to podcasts or audiobooks on my headphones anyway.
On the wall is artwork by Sarah Soh , the magnificent Aaron McMillan , Eduardo Vieira , and a portrait of another inspiration–Tom Waits–by John Mueller from BigPigInk. On the corner shelf, there’s a beautiful little tattooed lady sculpture by Goreilla (Sean Regalado), a little Wednesday paper doll by Ann Lim ( Itzbitzart ), and (although you can baaaaarely see it, a teeny weeny little hippo sculpture (cute little hippo butt cheeks and all) by Cassandra Jerman . Nearly all the artwork I’ve started collecting is from art trades done with artists I’ve “met” through Instagram. (Have I mentioned how inspirational IG has been for me? It has been.)

And the right side of my desk, with my sewing machine . The end of the desk holds some little shelves that a friend gave me when she moved, as well as a stack of projects and…well…STUFF.
On the wall is artwork by Zack from Oldesoul (who shares my love of Jim Henson), the very talented Maria / Bokkei (who did a derby portrait of me, as well as one of Myla and Donkey), and a print from the fantastically magical Lori Nelson (whose art space I had the pleasure of seeing firsthand when I visited in New York–I LOVE seeing where people create!). Oh and all my army stuff in the big red triangle.

So there it is! My lovely little workspace. And while I oftentimes STILL just spread out on the living room floor or curl up at the end of the couch with a sketchbook to spend time watching shows in the evenings with my husband, the new work area is a “happy space.” It makes me feel GOOD to go in there.
It’s my happy place to be. Sometimes, I just go in there and look around, and it makes me want to create things. So hooray for happy spaces! Where’s your happy place? Does your space inspire you? Is it a small little peaceful area, a big studio space, or a tiny spot in your room? Where do you like to create?
Share this:
- Click to share on Facebook (Opens in new window)
- Click to share on Pinterest (Opens in new window)
- Click to share on Twitter (Opens in new window)
- Click to email a link to a friend (Opens in new window)
9 responses
What a lovely space! Thanks for the inside peek! Its always nice to see the inner workings of where someone is most creative.
Thank you for the tour. Glad to see that cutting board, but still can’t see the terrier. Kind of like a hunt for treasures. What a nice way to get me inspired on a foggy winter day.
I love seeing people’s creative spaces! I have a trumpet studio that serves as my art space too. It has a yellow wall, natural light, and I don’t get to spend as much time in there as I’d like.
Wish my studio were as neat as yours! Mine’s a perpetual work-in-progress, in both cleanliness and arrangement… but there’s a fairly good organizational system beneath the clutter. There are those who are more creative in a cluttered environment, and those who aren’t; I still haven’t decided which I am. Thanks for the tour — finally found the hippo! 😉
It’s so great to have a dedicated art space! When we bought our condo, one thing that appealed to me was having a “room of one’s own,” to quote Virginia Woolf. I have a loft space that serves much the same as yours–sewing machine, drawing table, desk etc. I don’t have a dedicated spot for my granddaughter, and we do a lot of art together, but the dining room table, with a sturdy plastic tablecloth, serves the purpose when she visits. Thanks for sharing.
Thanks for sharing your space. I just finished my new art room. What a difference it makes. I loved to read your description. Happy creating.
This inspires me to clean my “office,” and reclaim my workspace. It’s time.
I love to see pictures of studio spaces!! I like yours, it reminds me a bit of mine which has so much stuff and so many different kinds of art and craft making supplies (like a sewing machine that takes up a big chunk of desk space but simply can’t be hidden away or I’d never use it..) but still set up neatly with some kind of order to it. My space is currently the ‘dining area’ next to the kitchen. I have a set of drawers and cupboards FULL of supplies, a large table (that also has cut marks!) and is always covered in several projects at a time.. oh hell I’m just going to write up a blog post about my space now because you’ve gone and got me all excited 🙂 ART SPACE ROCKS!
Thanks for sharing pics of your work space. Always nice to see where the artist finds his/her creativity. I myself have a very large table in my work room which sometimes allows me to leave more clutter out than necessary. I have finally scored some very large real wood cabinets with doors. They look like fine pieces of furniture. Scarfed them up at a yard sale for $15 each. The gang was moving and did not want to take them. So yay for me. Now I am organized, all neat little baskets and boxes and such and it’s hidden in my new space. Let the creative juices flow.
Leave a comment Cancel reply

busymockingbird
Buy the book!
Instagram pics.
No Instagram images were found.
Follow me on Twitter
- A little about me
Follow Blog via Email
Enter your email address to follow this blog and receive notifications of new posts by email.
Email Address:
Blog at WordPress.com.

- Already have a WordPress.com account? Log in now.
- Subscribe Subscribed
- Copy shortlink
- Report this content
- View post in Reader
- Manage subscriptions
- Collapse this bar

Subscribe to Blog via Email
Enter your email address to subscribe to this blog and receive notifications of new posts by email.
Email Address

A Tour of My Art Room
GUYS! I am SO EXCITED! Our new addition is complete and the physical space of our school has doubled. It is so nice to not have to push your way through the halls. It’s like there’s breathing room now. We also have a new art room, so I HAVE MY OWN ROOM NOW. I’m so thrilled that we don’t have to share a room anymore and all of our supplies can spread out. I have the old room and our middle school teacher has the other room. The rooms are connected by a mutual storage room in between. My room is not super fancy, but I’ve spent hours and hours and hours cleaning, organizing and moving supplies & furniture to get things ready for school. This post has a million pictures, but I wanted to show you them.

I found a nice place for this banner I made . This is in the hallway outside the art room.
Welcome to my Art Room!

Here is a view of the room. The colored puff balls above the tables tell the kids what color table they are sitting at. I call the kids up by their table colors and they are assigned jobs based on colors.

This is the storage room. The kiln room is off to the right side.

My new green storage cabinets. Since I got green storage cabinets, I decided on a green color scheme for my room. Green bulletin board, green chairs, etc.

This is my teacher desk and my new book shelf! I have a lot more books, but I am going to rotate them out as the year goes on to keep the choices fresh. I have already noticed more kids looking at the books than when they were all in tubs.

This purple shelf I found at the college swap store for $20. SCORE! Next summer I’m going to spray paint it green to match my room. No time now for that. The apron I got from Cafe Press. Someone posted about it on the Facebook art teacher group, and I thought it was cool. I will not order from them again. The first time it came, the colors were all faded and wrong, like the ink was running out. They sent me another one, but again the colors are not as vibrant as the ones shown on the website.

This is what I rigged up for storing artwork. Each grade level has a box for the artwork and I will put all their paper projects in these boxes that fit. The boxes fit size 12″x18″ papers. I bought them from Walmart. The wire shelf I got from Menards.

I made this display area by nailing in two nails and stringing a wire between them. Then, I just used clothespins to hang pictures. Easy-peasy. The colorful signs are from my Art Discussion Signs set .

I also found this rolling cart at the college swap store for $15. Double score!

Sink area and paints.

This is my view out the window. It’s so nice!

This is the supply shelf for student use. They are free to take whatever they need during class. I bought the colored baskets at Really Good Stuff.

This is the paper shelf for student use. They are free to take any paper they need for use during class. It’s also the collage center they can use for their art journals and soon I will have building materials in those blue buckets.

This is my “ What Do I Do When I’m Done ” board.

This is part of my one bulletin board in my room. I love this picture!

I explained the noise chart to the kids this way: When they come in the room, they need to be on Noise Level 1 (Ninja Silence). They are to look at the board and start their art warm-up right away in their art journal. They will have 5 minutes to start the art warm-up in complete silence. They probably will not finish it, but can come back to it later at another time. Then, when I’m demonstrating or talking, they should be on Noise Level 1. When they are working on an art project, they can be at Noise Level 2 or 3 (their choice.) Noise Level 4 is outdoor voices and should never take place in the art room. If it gets too loud, then the whole class will have to go back to Ninja Silence.

These are my art room rules and the job chart. To make the job chart, I print off these pictures , glued them to a long piece of poster board and laminated the whole thing. Then, I painted the clothespins to match the colors of the tables and I can change the jobs each day or week. The kids who sit at those tables will have that particular job for the day. The teacher’s helper just means any extra random jobs that I didn’t have a picture for! I obviously won’t need to assign jobs to every table every day, but I think it will help with those extra jobs I end up needing help with.

Well, that’s it! I hope you’ve enjoyed my room tour! I’ve totally enjoyed seeing all the art rooms posted online in the Art Teacher Facebook group .
Share this:
Discover more from art is basic | an elementary art blog.
Subscribe to get the latest posts to your email.
Type your email…
About Marcia Beckett
14 responses to a tour of my art room.
Your room looks great & ready to go! Have a wonderful start to school!
Thanks Jeanne! You too!
I have seen the Power of Art in my regular classroom teaching during the last umpteen years. I am inspired by your ideas!
Thanks! I’m glad you are using art in your classroom!
Enjoy your new space! It looks great! Just picked up a couple things from your tpt page! Thanks! You always have great products! Have a great year! 🙂
Thanks, I am pleased with how it all turned out. And thanks for your orders! TPT is helping me pay for 2 kids in daycare!
Thank you for the inspiration! I loved seeing how you set your room up. Lots of great ideas.
Thank you for sharing your art room pics. I am ten years in and looking for some reorganization inspiration. Am definitely borrowing some of your bulletin board ideas!
Cool! I love organizing and changing things around!
This is great! I’m about to start my first year as an art teacher, and I stealing some of your ideas! 🙂
Excellent! Glad I could help 🙂
HI! Where are those storage cabinets (with the green doors) from?
I don’t know where the school ordered them from. Honestly, they are just standard utility cabinets. They are not super great and I can’t imagine them lasting for the long haul.
Pingback: Art Class & Art Room Bulletin Board Ideas – Prepper Stories
I'd love to hear your thoughts! Cancel reply
This site uses Akismet to reduce spam. Learn how your comment data is processed .
Follow Art is Basic

Art Journal Supplies

As an Amazon Associate, I earn from qualifying purchases at no extra cost to you. I only link to products I personally recommend and proceeds earned go to maintain the website.

IMAGES
VIDEO
COMMENTS
Hey guys! Today I am finishing my long-awaited ART ROOM TOUR!!! You guys have been BEGGING me for months to do this, so I really hope you enjoy it. I am so e...
Hey Guys! Today I am doing PART 2 pf the highly requested art studio/room/craft room/squishy room/workstation tour....LOL. This is where I film my videos, pa...
Hey guys! Today I am finishing my long-awaited ART ROOM TOUR!!! You guys have been BEGGING me for months to do this, so I really hope you enjoy it. I am...
Hi! Welcome to my channel! In this video I describe how items in my art room were built, like the island and the shelves in the closet. My dad helped me with...
My long-awaited ART ROOM TOUR!!! You guys have been BEGGING me for months to do this, so I really hope you enjoy it. I am so excited to show you my new...
Welcome to my Art Room! It's full of fun Crafts and adorable Squishies!
Art Room Tour 2022 (part 2) 1.9K subscribers in the MoriahElizabeth community. Anything related to Moriah Elizabeth post it here! Post your own squishy makeovers, fanart, or….
2) Video by. Moriah Elizabeth. on. youtube. ·. Hey Guys! Today I am doing PART 2 pf the highly requested art studio/room/craft room/squishy room/workstation tour....LOL. This is where I film my videos, pa...
Spa Tour - Part 2 is a Quest in Escape from Tarkov. Must be level 12 to start this quest. Mark the helicopter at the Health Resort with an MS2000 Marker on Shoreline Mark the safe road to the helicopter with an MS2000 Marker on Shoreline Survive and extract from the location +6,300 EXP Peacekeeper Rep +0.02 900 Dollars 945 Dollars with Intelligence Center Level 1 1,035 Dollars with ...
Hey Guys! Today I am doing the highly requested art studio/room/craft room/squishy room/workstation tour....LOL. This is where I film my videos, paint my squ...
NellVeil on DeviantArt https://www.deviantart.com/nellveil/art/RWBY-Ascension-AU-Without-Accessories-967658487 NellVeil
NellVeil on DeviantArt https://www.deviantart.com/nellveil/art/Getting-Popular-Part-1-2-Whiterose-990451566 NellVeil
One of the posters was falling down (as all things do on those cinder block walls) and it inspired me. Before I could stop myself, I was tearing it ALL down until the wall was blank. Hearing the commotion, my custodian buddy, Mr. Joe, walks in and asks me what I'm doing. Decluttering!
9.6K views, 289 likes, 99 loves, 15 comments, 15 shares, Facebook Watch Videos from Moriah Elizabeth: Today I am finally doing my long-awaited ART ROOM TOUR!!! You guys have been BEGGING me for...
Craft Room Tour-part 2. Filed Under: Craft Room, Creativity, handmade, Organisation, Shabby, Studio Tagged With: craft room, creative space. 325. Hello my friends, Welcome to day 2 of having a little look around my creative space. Yesterday I shared my patchwork papered doors and my Tilda storage area. I've been quite spoilt over the past ...
The Cult - Part 2 is a Quest in Escape from Tarkov. Must be level 12 to start this quest. Locate and mark the first ritual spot with an MS2000 Marker on Woods Locate and mark the ritual spot with an MS2000 Marker on Customs Locate and mark the second ritual spot with an MS2000 Marker on Woods Locate and mark the the ritual spot with an MS2000 Marker on Shoreline +7,500 EXP Peacekeeper Rep +0. ...
Hello Lovelies, I did originally film this but could not find where I uploaded it so If I am refilming the same thing you already know I am sorry, It is ...
That is right it is another edition of my craft room tours series! It has been almost 2 years since our last series and it was past time to see where your favorite bloggers create! If you are interested, you can click here to see the last craft room tours series. If you don't want to miss a minute of our series this week, be sure to subscribe ...
Linda La Rocco Class Videos. Lynne Andrews Class Videos. Mary Svenson CDA Class Videos. Maxine Thomas Class Videos. Paulette DiGesare Class Videos. Rosemary West CDA Class Videos. Elisabetta De Maria CDA Class Videos. White Mountain 2024 Seminars & Programs. Gypsy Tolers 2024 painting programs.
Part 1: https://bit.ly/2m2SglHCraft room playlist: https://bit.ly/2kroGG4Check out my website! : https://www.meganweller.orgProducts I used: purple chair: ht...
An Art Room Tour! By busymockingbird on January 22, 2015. Having so many hobbies comes with a small price…where the heck do you put all your ART STUFF??? I've been lucky enough that everywhere we lived, my husband helps me make space for an entire art room or art area of some sort, to house all my art supplies.
I call the kids up by their table colors and they are assigned jobs based on colors. This is the storage room. The kiln room is off to the right side. My new green storage cabinets. Since I got green storage cabinets, I decided on a green color scheme for my room. Green bulletin board, green chairs, etc. This is my teacher desk and my new book ...