Travel Dollhouse in a Suitcase


Introduction: Travel Dollhouse in a Suitcase

Thanks for stopping by! In this Instructable, I will show you how to create a travel dollhouse in a small suitcase. This is a really fun toy to have for your child to play with - it can be taken everywhere. It promotes independent play and imagination!
Supplies are rather limited and you can use many things around the house - cardboard, plastic containers, scraps of fabric. The project does take some time, but you can encourage your child to help you, so they can be part of the creative process as well!
- a cardboard suitcase. You can in principle make one, but it might not be stable enough. So I recommend buying it, usually it runs about $10, which was the biggest purchase for this project
- a doll or an animal to live in the suitcase. I recommend the height of the toy to be half of the shortest side of the suitcase
- cardboard
- plastic containers. I used one from strawberries
- scraps of fabric
- air dry clay and acrylic paint
- chopsticks or bamboo skewers
- coloured paper
- scotch tape, hot glue gun, superglue, and paper glue
- pompoms. For another idea on what to do with pompoms, see my Cutie Pi Baby Mobile Instructable https://www.instructables.com/Cutie-Pi-Pompom-Bab...
Step 1: Line the Suitcase Interior and Make a Ceiling for the First Floor

Pick your favourite colour and line the interior of the suitcase. I used yellow, green, and blue. The easiest way to do this is to trace the outside of the suitcase, cut the necessary shapes, and then glue them in.
For the floor, take two rectangular pieces of cardboard. Length is 2/3 of the length of your suitcase, width is the same as that of the suitcase. Glue two pieces together and then wrap them in coloured paper. I used red and yellow (see pictures).
Step 2: Make the Staircase

Cut out 30 rectangles with dimensions of 2'' by 1/2''. Take three, stack on top of each other, and tape with scotch tape. Wrap in coloured paper (see pictures). Secure the edges with scotch tape. I made 10 stairs, but I used 3 of them for other parts around the house. So I recommend making a bit more than you think you'll need.
Take 3 chopstick of the same length and offset them slightly - see picture. Secure with a piece of scotch tape. Attach top and bottom stairs at an angle. Remove the scotch tape from the wooden parts and continue filling in the stairs. In the end, your staircase should look like the one I show in the last picture.
Step 3: Making Windows

Pick your favourite images from a magazine or newspaper - you want them to be about 2''x1'' . I went with views of Dresden. Cut them out and make sure their size is the same.
Cut out window panes from a plastic container. Trace your images with a sharpie, then cut the plastic.
Make the frame from cardboard - you want to have about 1/4'' frame so sketch it out on the cardboard first. See an example in the picture. Colour the frames on one side - I used dark yellow acrylic paint. Let them dry.
Assembles the windows. Place window frame with the painted side on the bottom. Add plastic panels and then the images you cut out. Use super glue at the corners and let dry.
Step 4: Make Picture Frames

For the "art". I used pictures of sea life from the chopstick wrappers. Of course you can use anything you want. The size is approximately the same as that of windows - 2''x1/2''. Cut out the images.
Make the "glass" panels from plastic containers - trace out and cut.
Make 12 pieces of the frame - rectangles with the length matching the length of the images (see pictures). I wanted the frames to be different so I made different patterns on each. For patterning, I used chopsticks, pen, and a knife. Once you are happy with the shape and pattern, let the frame dry overnight.
I wanted a shiny look for the frame, so I used a nail polish. Acrylic paints would also work. Coat and let dry.
Assembly the "art" - frame, then plastic, then pictures. Glue the corners together with the superglue and let dry.
Step 5: Make the Mirror

Use cardboard to make a circle. Mine was 3'' in diameter. Take some aluminium foil and glue it on top of the cardboard. I used paper glue. Make sure to smooth the surface by getting rid of all of air bubbles - use a credit card or a ruler.
Make the frame of the mirror from clay. Roll a piece that will cover the whole circumference of the mirror. Add a pattern of your choosing - I went with lines and dots. Let the frame dry.
Paint the frame - I used the same nail polish as I used for the picture frames. Let the frame dry. Then use super glue to attach the frame to the mirror part.
Step 6: Attach the Stairs, Hang Art and Windows

For all of this step, I used hot glue gun. Attach the stairs first - you want to glue the parts of the steps that are exposed to the wall. Then attach the top floor. It needs to be glued to the stairs and the walls.
Then you can attach your windows - I used two on the first floor and two on the bottom floor.
Hang the art around the house - note that I left a spot empty for the mirror as it was not dried yet.
Step 7: Make the Bed

The bed is fairly straightforward - just make a frame (see images). Make sure your bed is long enough to fit your doll, the rest doesn't really matter. I choose not to paint mine, but I made it out of white cardboard. I think it looks good, but it would have also been nice to paint it! I attached beads as door legs, using glue gun. I then attached the bed to the second floor. I also made some bedding by sewing two pieces of fabric together.
Step 8: Make the Armchairs

I wanted to have some storage space in the furniture, so I used lids from face wipes, since they can open and close easily. For the seat, I added some padding by using an old piece of thick fleece - just outline the lid and cut out a matching piece. For the back, I used a piece of cardboard. Both the seat and the lid were then covered in fabric - see pictures.
I have then glued the back and the cushion to the lid - see pictures.
To make the bottom part of the armchair, I decided to create a box out of cardboard. You can see that I made a regular box, cut the cardboard, and glued it together. Once the box was done, I have placed my lied on top of it and secured with hot glue.
As you can see, I initially painted the armchair. But in the end, I did not like the colour, so I glued some glitter paper on top. I think this matched better with the rest of the house interior.
I made two armchairs - so repeat the above steps twice. If you have some extra fabric, make some pillows!
Step 9: Make the Couch

For the couch, the procedure is basically the same as for the armchairs. First, make the bottom part by tracing out the lid on a piece of cardboard. Then, make the sides from a rectangle - width should be the same as the cardboard part of the armchairs and the length should be the circumference of the couch lid.
Secure with scotch tape and then put glue around the seam - see pictures. Let it dry and apply another layer.
Meanwhile you can work on the seat cushion and back. Same idea as with the armchairs - take a piece of thick fleece for the cushion and wrap it in fabric. I used yellow fabric this time around. Glue on the cushion and let it dry - I used clips to make sure things don't move in the process. Glue the cushion on the lid. Glue the top part to the bottom part and let everything dry overnight.
Either paint the cardboard part of the couch or glue some paper - I used glitter paper this time as well.
Step 10: Make the Coffee Table

I used an old cap from a tea can for the coffee table. Take a piece of fabric that cover the top part. Stretch it out and secure with clips. Start adding another colour on the side by gluing it downright below the top of the table - see pictures. Continue around the perimeter and make the ends meet. Wrap around and secure on the bottom with super glue. Secure with clips and let it dry.
Step 11: Make Cake and Pies

I wanted to make one cake and two pies, so I used three bottle caps. Paint all bottles caps - I used golden nail polish, it took only two coats. Let the bottle caps dry.
Fill two of the bottle caps with some clay - just like you would for a pie shell, about 2/3 of the total volume. Let it dry and then paint it in the yellowish colour to resemble pie crust.
For the cherry pie, you will need to make the cherries first. Roll a thin tube and then cut it up into small pieces - see pictures. Roll the pieces into small balls. Let them dry. Once they are dry, put them into the pie shell and dump some red colour on it. I used nail polish in this case as well. Swirl around to cover all berries and let dry. In the meantime, make the dough lattice - cut thin strips of clay. Intertwine them - see pictures. Then place on top of the cherry pie. Pain the lattice in the same doughy colour.
For the other pie, you only need to make the border and the central flower. Same idea here - mould out of the clay, let dry, glue onto the pie shell and paint - see pictures.
For the cake stand, you also need to make the base. It has two parts - a circle and a leg. Mould both out of clay, let dry, and paint in the same colour as the cake holder top.
For the cake, make a cylinder with a slightly smaller diameter, than the bottle cap. Add some texture to the edge of the cake by piercing it slightly with a knife - we want to simulate frosting. Add a spiral on top for decoration. Let it dry and paint - I used dark chocolate colour for the cake, and some red and white for the decorations. Glue the cake to the base. It is ready to be served!
Step 12: Make Fruits and Vegetables

For pineapple, make oval-shaped pieces out of clay. With a knife, make diagonal dents - see pictures. With scissors, pinch the centre of the diamonds to create pineapple look. For the top part of the pineapple make slightly smaller ovals. Make longer cuts with scissors to imitate the green leaves. Paint with yellow and green paints. Add some brown to the centres of the yellow diamonds - see pictures.
For the corn, make long cones first - they do not have to be perfect and can have some cracks. Make a thin, long thread-like piece out of clay. And then wrap it around the cylinder - see pictures. Make small indents along the length of the cylinder with a knife to imitate corn kernels. At this point, I suggest painting the corn yellow. While the paint is drying, cut out triangles from the clay - see pictures. Those will be leaves and they should not be the same size. Attach one by one to the corn, make sure the edges are smooth and well-connected. Paint the leaves in green colour - see pictures. You might need a couple of layers to make it look great.
Step 13: Make Cutting Boards and a Bread Box

Use a matchbox to trace out a rectangle on a thin piece of clay. This will be the base of the board. Cut out a slit with a knife and smooth out the edges - see pictures. Make a similar rectangle for the second board, but this time attach a handle instead. Smooth out edges and make a little hole in the handle - see pictures. Once the boards are dry, paint them with brown paint.
For the bread box, take the box part out of the match box and paint it. I used a brown colour to simulate wood. Use tissue paper to line the inside of the bread box.
Step 14: Make Pastries and Bread

For the donuts, make thin rods out of clay. Wrap into a donut shape and connect, smoothing out the edges - see pictures. Let them dry.
For croissants, make clay triangles first - see pictures. Then, roll up, starting from the longer edge. Let them dry. It helps if you have some real croissants - both for inspiration and for snacking ;)
For the berry rolls, take thin rods and wrap them in a spiral. Let them dry.
For the bread, make an oval shape and squish it slightly from the top. Use a knife to add some texture to the top - see pictures. Let it dry.
Paint all pastries and bread with a beige colour - you might need two coats. I give an approximate colour combination you could use in one of the images. For the donuts, I added chocolate glaze - brown acrylic paint. For the berry buns, first paint the top white and then add some red paint. Arrange all in a bread box you made in the previous step.
Step 15: Make Flower Pots and Vases

For the flower pots, make a cylinder from clay. Make a hole in one side - see pictures. Smooth out edges and let the pots dry. I made three, so repeat for the remaining pots. Let them dry and paint - I used same colour as the pie dishes and cake stand.
To make the plants, cut up triangles of different shades of green. Make a bouquet, secure with scotch tape and place inside the pots. To secure in place, add some hot glue into the pot. Arrange flower pots around the house.
For the vases, make the top part by cutting out a flower from clay - see pictures. For the bottom, take a cylinder of a similar diameter and make some small cuts around the edge. Let both parts dry separately and then glue them together - see pictures. Paint, let them dry and place your vases around the house!
Step 16: Make Plates

Take a small bottle cap - a deodorant cap or one from essential oils would do. Cut out a circle from a thin layer of clay. It you have a cap of smaller diameter, make an indentation on the plate - see picture. Now the plate is flat, to make it a bit more concave twist up the edges a bit. Let it dry upside down, keeping the shape intact. Repeat for as many plates as you'd like, I made 7. Let plates dry and paint - I used golden nail polish from the previous steps.
Step 17: Make the Books

Make some rectangles out of clay - these will be the base of the books. Add some texture by gently touching the edges with a knife - this will resembles book pages. For each of the books, make a cover by cutting out a thin rectangular-shaped piece that is big enough to wrap around the book - see pictures. Wrap around the book and let dry. Repeat for other books.
First, paint the white part of the books, then add some colour for the covers - see pictures. Put the books in the house and glue them down with a glue gun.
Step 18: Make the Carpet and Outside Cover

Trace out a circle in the lid part of the house - see picture. Start in the centre - glue down several pompoms. Continue working in circles, gluing down the pompoms both to the floor and to the other pompoms. Make sure they don't stick out, you can put something heavy on top to weigh the pompoms down a bit. Let everything dry.
I did not like the cardboard look on the outside of the suitcase, so I decided to cover it in fun cartoon wallpaper. I just searched Google for free high-resolution images of kids cartoon wallpaper and printed the results. I then glued the wallpaper on the outside of the suitcase - I also added some glitter glue!
Step 19: Make Sure Everything Fits!

This is highly important, check that you can close the suitcase with all of the contents included. I put food into couch and armchairs, the doll goes in the bed.
Step 20: Time to Play!

You are done! Time to throw an awesome tea party - in a park, in a car, on a plane, or in your living room! You decide :)

Participated in the Toys & Games Contest
Recommendations

Water Contest

Paper and Cardboard Contest

Pets and Animals Contest


- Work With Me
- Privacy Policy
February 13, 2020 / 4 Comments
How to Make a Suitcase Dollhouse from Vintage Luggage
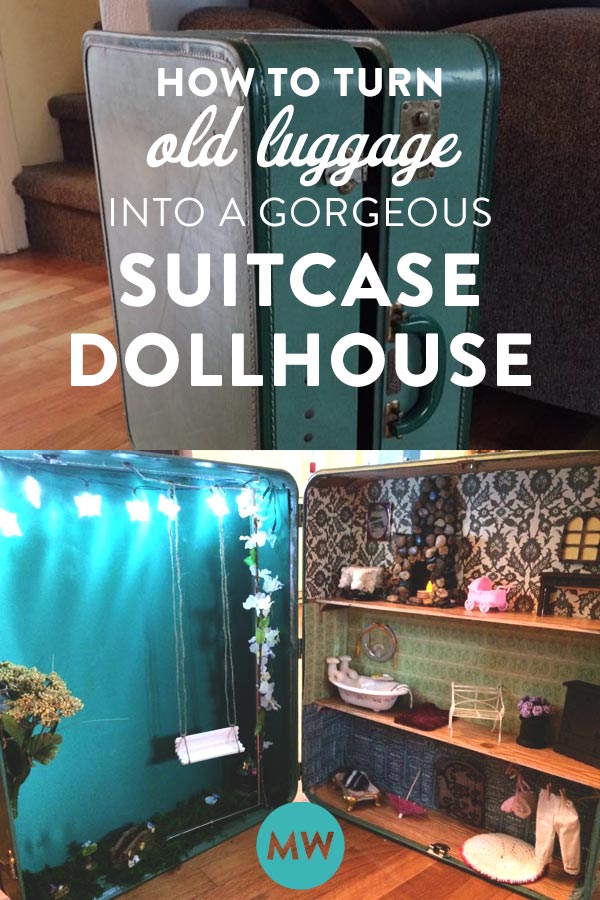
Today I’m going to show you how to make a suitcase dollhouse!
Using an old vintage suitcase, some Dollar Tree craft supplies, and random thrift store finds, here’s our DIY suitcase dollhouse.
Suitcase Dollhouse DIY
One of my favorite toys growing up were my dollhouses.
My sister and I had a few, and they were packed with homemade furniture and all sorts of dolls and My Little Ponies.
Our ponies were allowed in the house, of course.
Step 1: Get an Old Suitcase
So when I was looking at these old vintage suitcases I had originally bought at a junk shop to use as decor on some high plant shelves, I wondered how to repurpose them.
And then I thought… foldable, upcycled dollhouses!
Take ’em to Gramma and Grampa’s house for sleepovers, move them from room to room. Fold away when not in use. What could be more perfect?
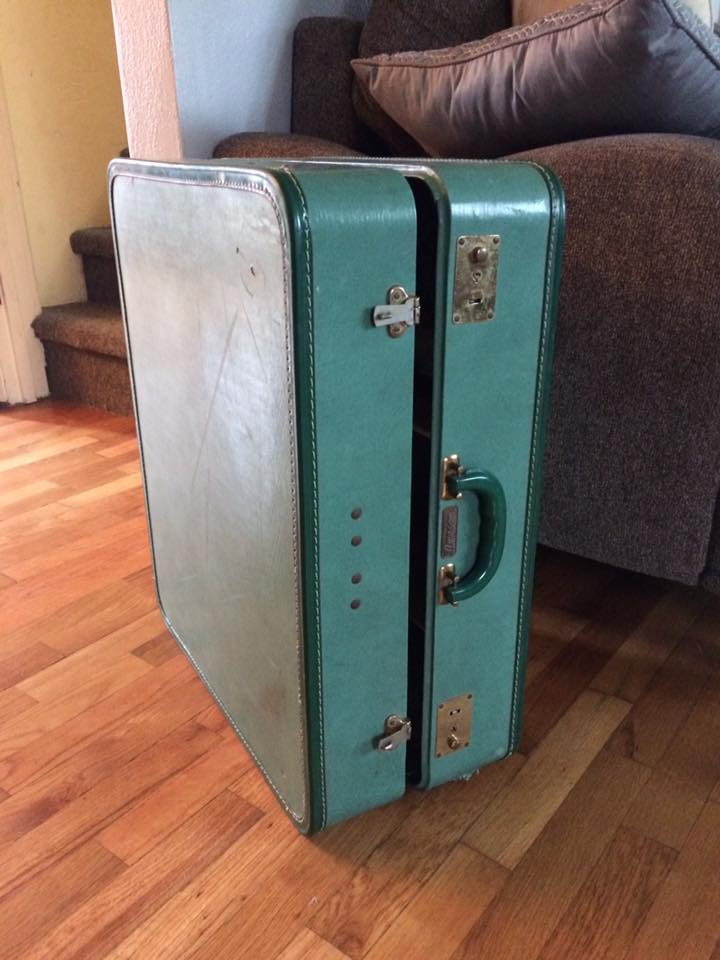
That’s one of them.
I don’t have a photo of the other one, but it was basically the same size in a rose/mauve pink shade.
Step 2: Clean
The first thing I did was clean them thoroughly.
Those things can get nasty… dirt buildup, stains, crumbs. Vacuum and scrub it out with some Lysol.
Step 3: Choose Your Theme
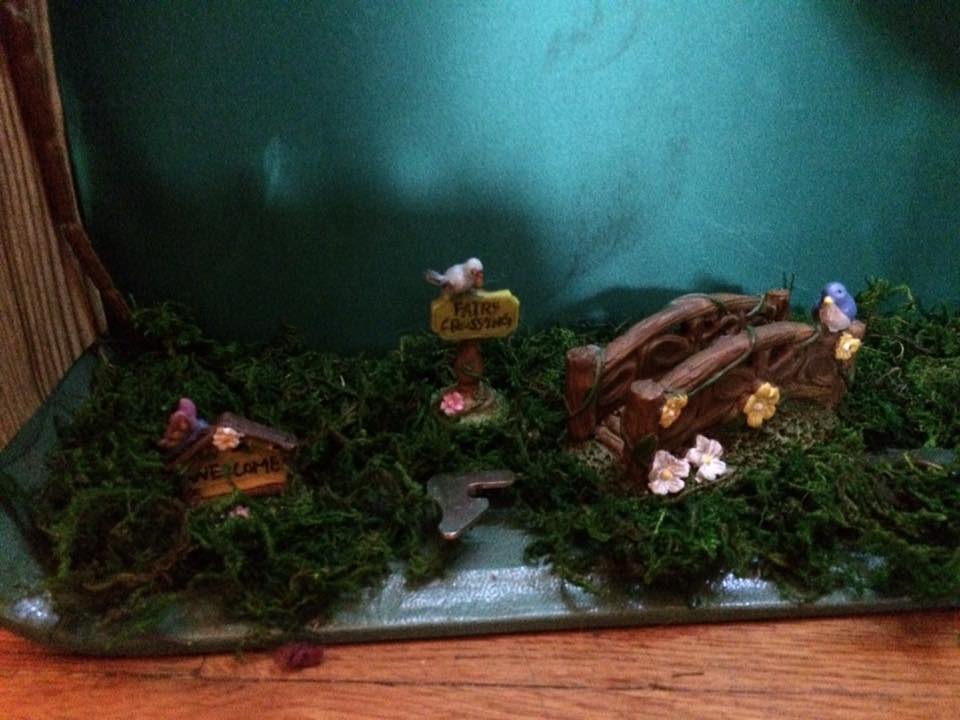
The green one had one side that was covered in green/blue silk. I decided to leave that as the “outside,” and make a fairy garden out of it.
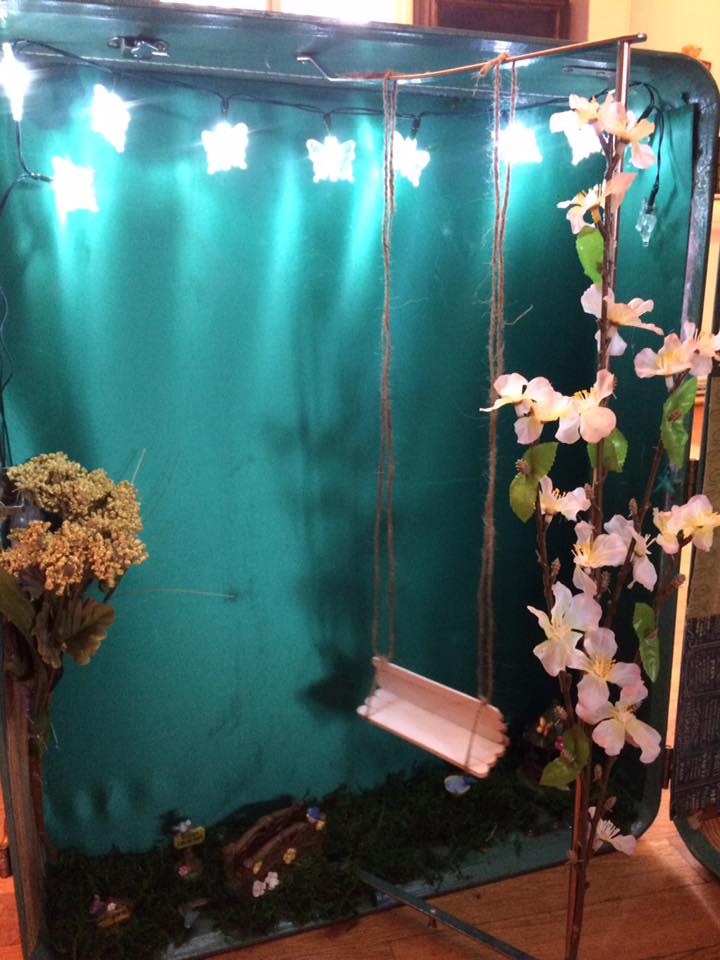
With moss, flowers, and decor from the Dollar Tree, I constructed a sweet porch swing out of Popsicle sticks, and hung a strand of butterfly shaped fairy lights.
The battery packet for the lights were hidden behind the flowers.
Depending on the color and look of your suitcase, the style that you’re into, and what crafting materials you have or find, you can go all sorts of different routes.
Magical fairyland, haunted Halloween , modern, vintage chic, antique, sporty, 1950’s, 1970’s, and so on. Find your groove and go with it!
Step 4: Create Rooms/Stories
I separated the right side of the suitcase into three stories by cutting a piece of plywood to form the floors/ceilings.
Cut to size, then nail, screw, or woodglue it together.
Hey there! Yes, you! Have you read my books yet? You should! Check out my works here .
Step 5: Wallpaper Interior
Then I wallpapered each room differently. Use scrapbook paper, which usually comes in large enough sheets, or print out patterns from the internet.
Paste in with glue or mod podge and you’re good to go!
Step 6: Furnish Interior
This is where you’ll have to use your creativity.
For my suitcase dollhouse, I used the mirror from half of a broken compact as a wall accent.
The furniture came from basically haunting the toy aisle at thrift shops, like Goodwill and St. Vincent de Paul’s.
Look in the knickknack section too, and try to reimagine and repurpose things!
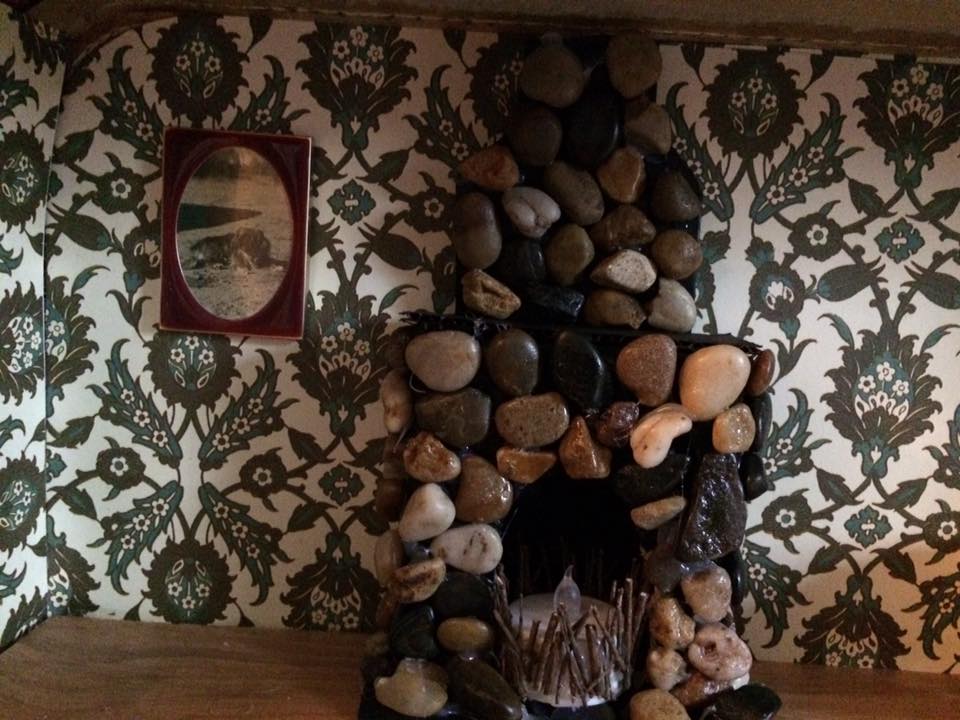
The wallpaper is scrapbook paper, and the fireplace was constructed out of a small empty box, covered in little pebble rocks from the Dollar Tree.
The battery operated “fire” (a teeny candle) also came from the Dollar Tree, and I simply glued small twigs around it.
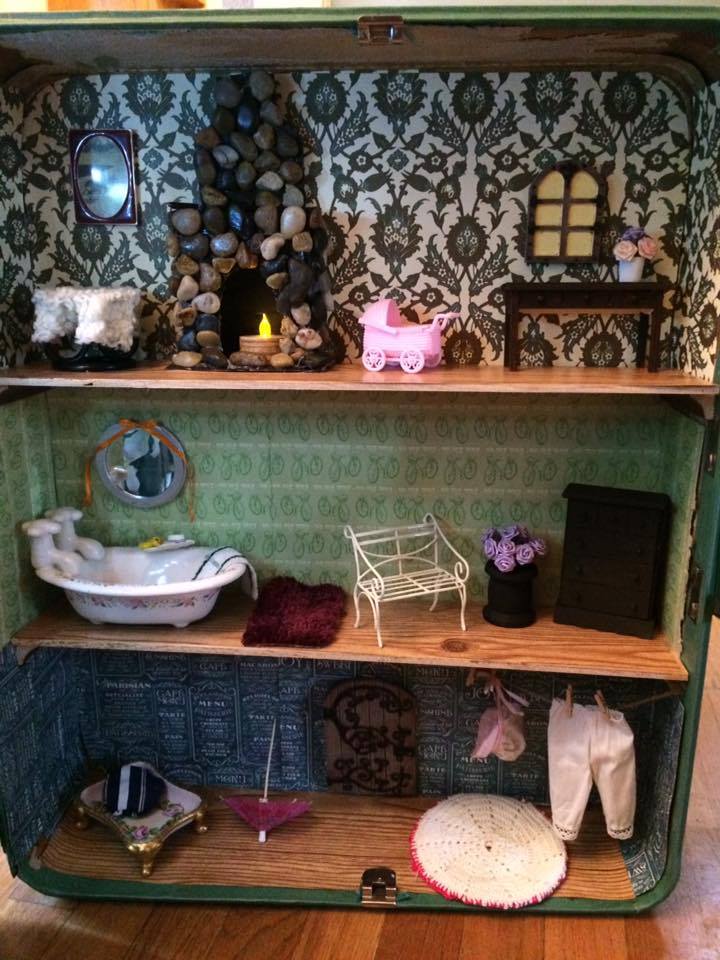
The little flowers can be found in the craft section of Walmart.
To make the vases, I simply used a toothpaste cap as one, and a wooden spool of thread (empty) as another!
The tub was just a lucky find, but a soap dish works as well, or a butter dish.
See the “soap”? That there is an Altoid mint.
The rubber ducky is actually just one half of a pair of earrings.
I added a “drain” to the tub, which is a tiny snap, like you would use on baby clothes and the like.
The towel is simply a snippet cut from an old terrycloth towel I had.
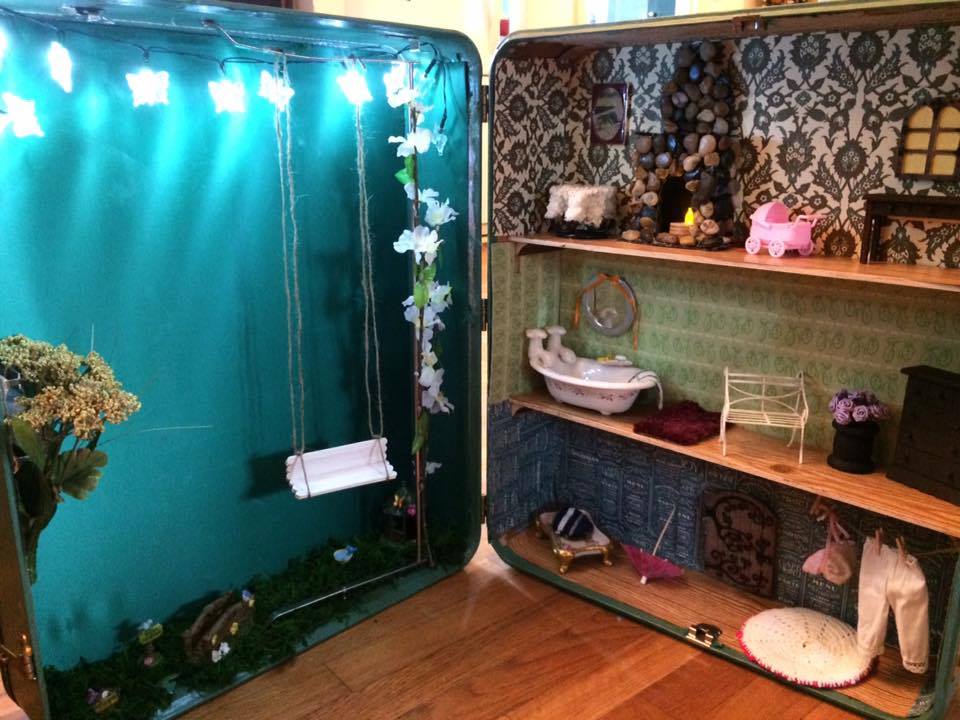
With one side the indoors and the other side the outdoors, this is the perfect play/display area for your mini dolls and decor.
It turned out so cute!
More Suitcase Dollhouse DIY Examples!
Now onto the mauve one!
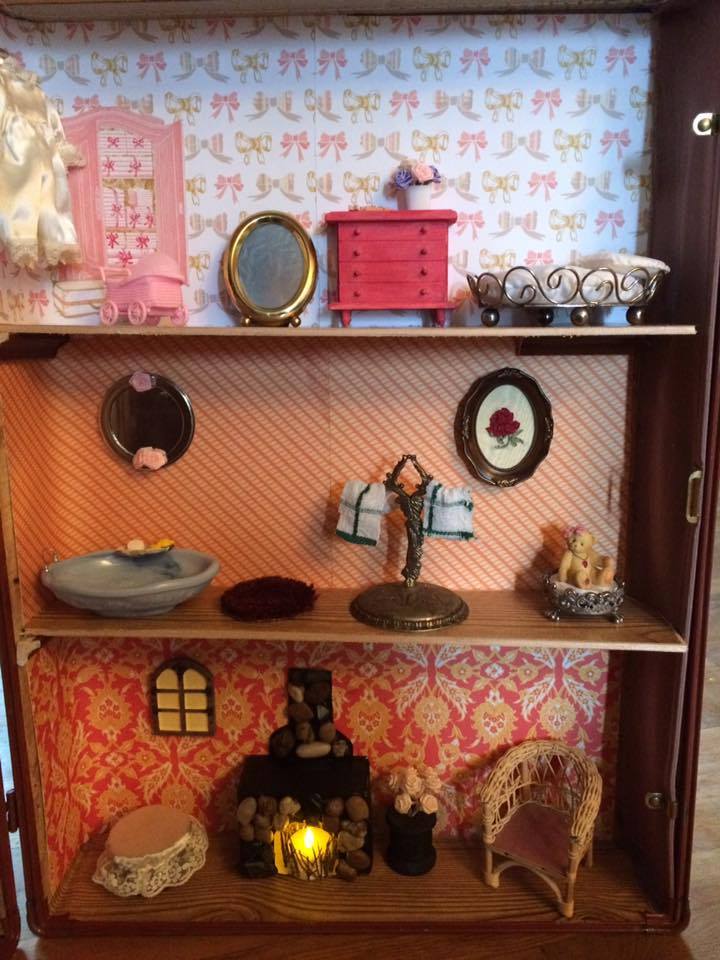
This suitcase dollhouse was more little girly, but I used a lot of the same ideas.
I made three shelves to form three stories, and decorated each “room” in the dollhouse a little differently.
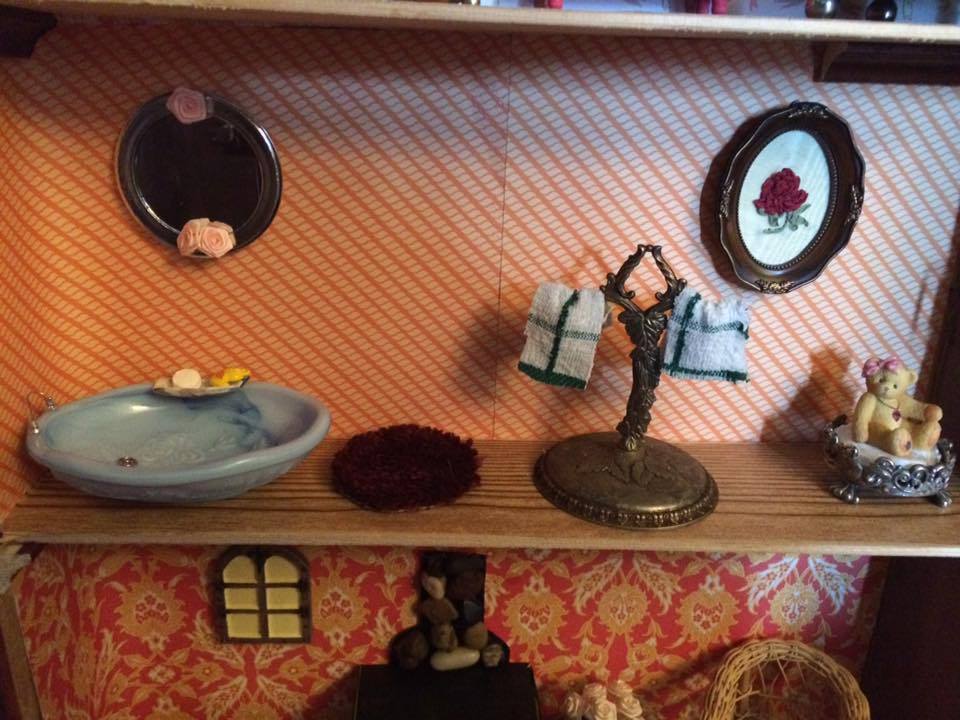
Above, the rug is cut from an actual full size rug I was going to throw out anyway.
The towel holder is an earring holder (I think??) I got at Goodwill.
As for the bathtub, it’s a soap dish with a dangly earring “loop” as the faucet.
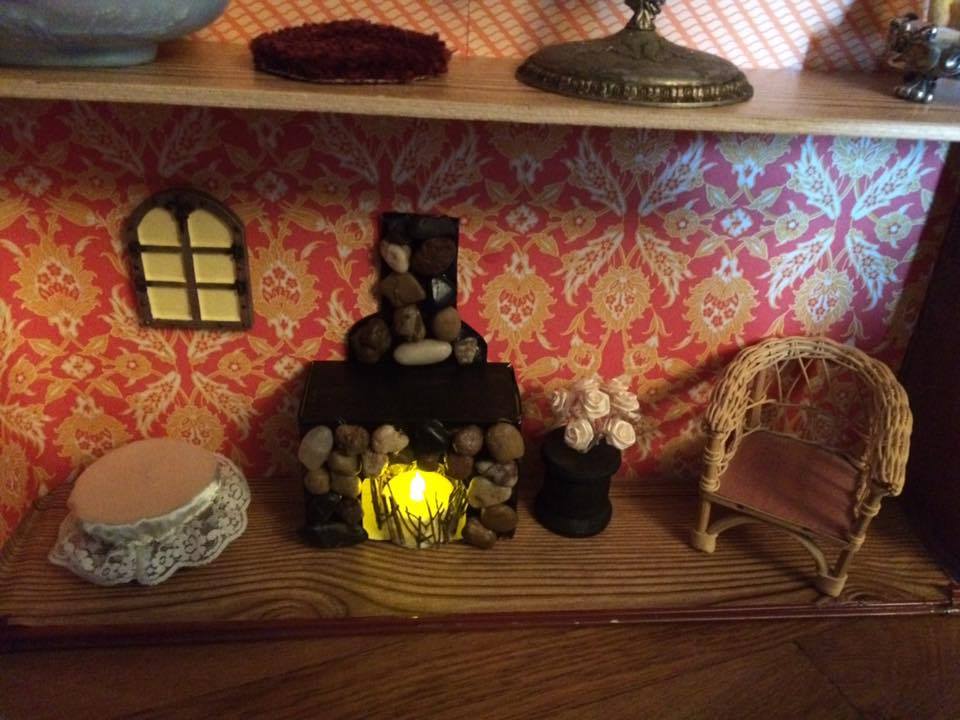
It’s been a while since I sold this one, but if I remember correctly, the other half was lined with satin pockets.
They made great storage for the furniture and dolls, if you only wanted to decorate half like I did!
Suitcase Dollhouse: A Fun & Easy Project!
There you go. It was such a fun and easy project, and it cost hardly any money at all.
The fun part is customizing your dollhouse! Want a ballet room? An art studio? A fancy dressing room? The sky’s the limit!
For more inspiration, to ask questions, or to commission me to build a dollhouse like these ones for you , feel free to drop me a comment!
And if these are far too delicate and sweet for your taste, get ready to see my haunted suitcase dollhouse here !
- Author info
Add yours →
Tamara says:
Hi How do you make the Floorboards in the green suitcase
February 9, 2023 — 10:52 pm
Melyssa Williams says:
Hi there! So sorry it took me so long to see this comment. I used a roll of sticky paper (like what you would use to line your kitchen drawers, I forget what it’s called). Just cut to size, peel, and stick!
September 14, 2023 — 10:19 pm
Michelle says:
Hi these are so cool. Im gonna make one for my grandaughter. How deep/tall, should the inner part be….is 6.5 inches be fine?
November 30, 2023 — 3:06 pm
melyssa m williams says:
Should be fine! Find the suitcase first and go from there! Have fun!
December 2, 2023 — 6:37 pm
Leave a Reply Cancel reply
Your email address will not be published. Required fields are marked *
47 Educational Movies for Homeschool So You Can, Um, Educate. Or Take a Shower.
Previous post

15 Coffee Table Books That Are Better Than Anything You Can Read on Your Phone
Melyssa Williams
Administrator
Shadows Gray

Shadows Falling

Shadows Lost

This isn't a normal newsletter. It's, like, really neat. You should probably sign up.
- Skip to primary navigation
- Skip to main content
- Skip to primary sidebar
The Craft Patch
Crafts, Home Decor, DIY's and Recipes
DIY Suitcase Miniature Dollhouse Tutorial
Turn a miniature suitcase into a dollhouse with these step-by-step instructions..
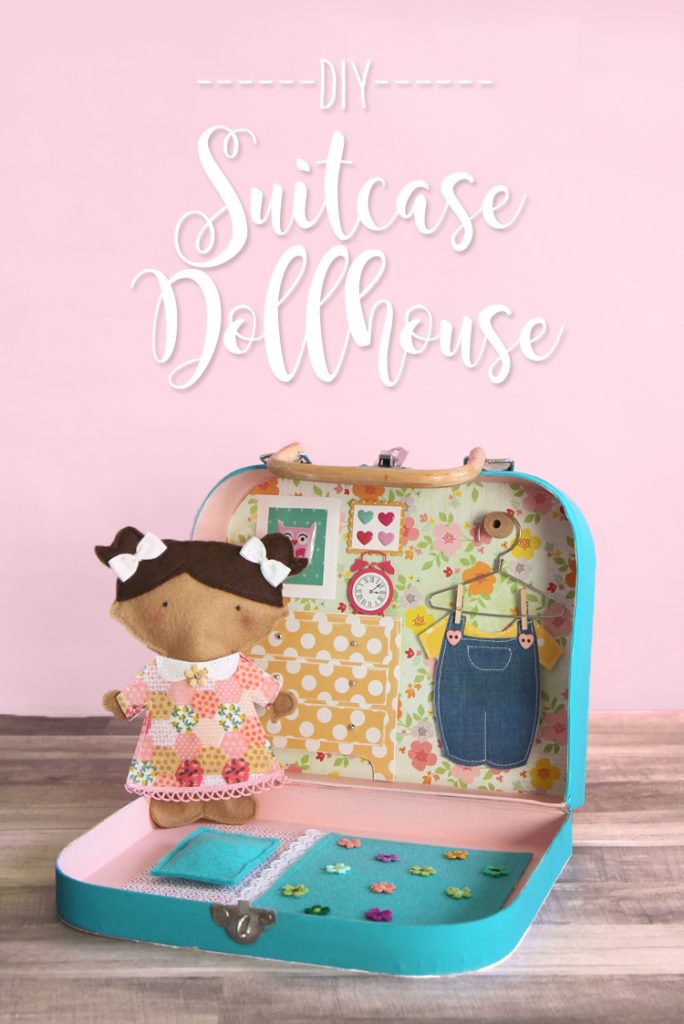
Are you ready for cuteness overload? Today I’m sharing a fun miniature dollhouse made inside of a suitcase! This fun DIY craft project is easy to make, allows for endless customization and is the perfect handmade gift idea for little girls. Heck, I’m a grown woman and I want to play with it too!
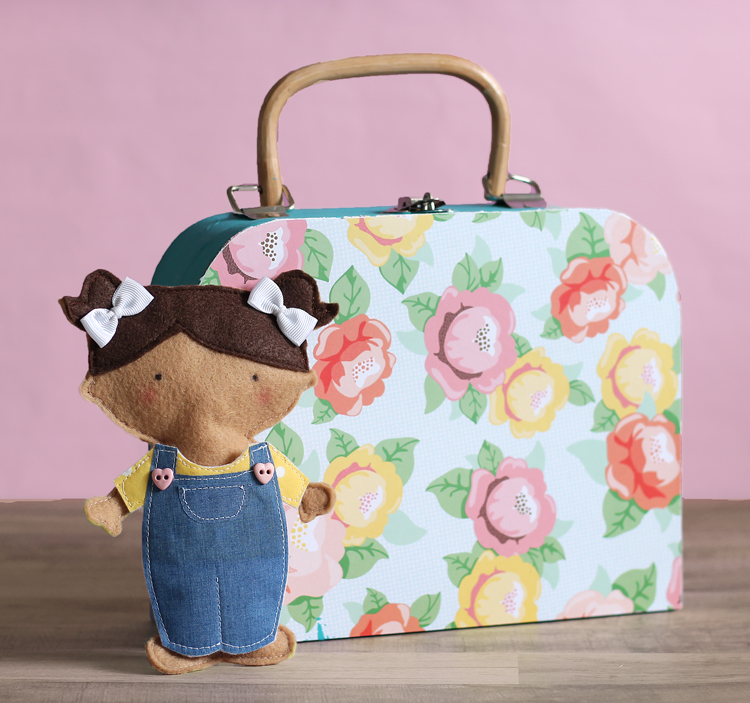
The dolly, her clothes, and her little bed all fit nicely inside of this cute paper mache suitcase:
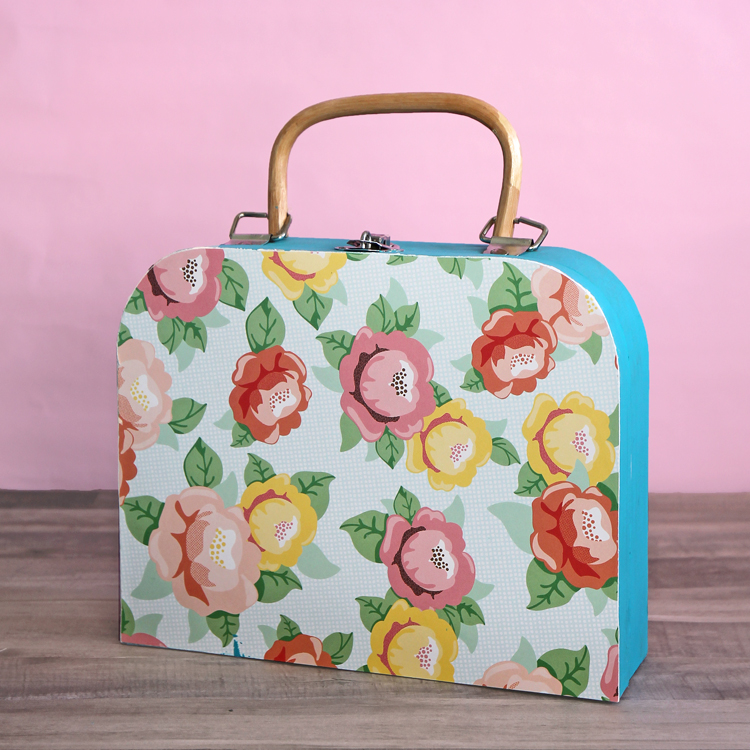
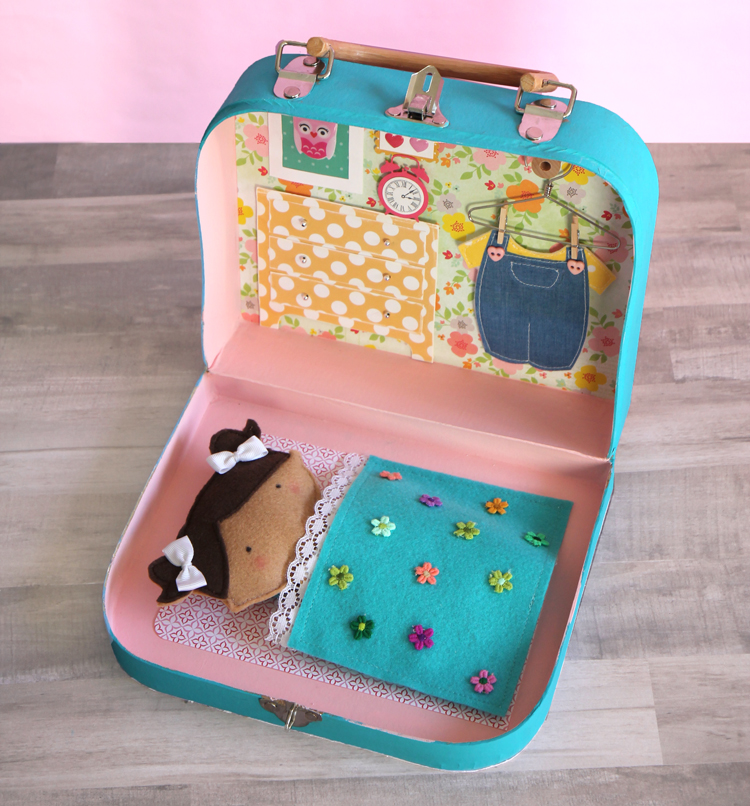
When it’s time to play, just open the suitcase up and there’s the doll’s home!
To make your own dollhouse suitcase, you will need the following materials. (affiliate links)
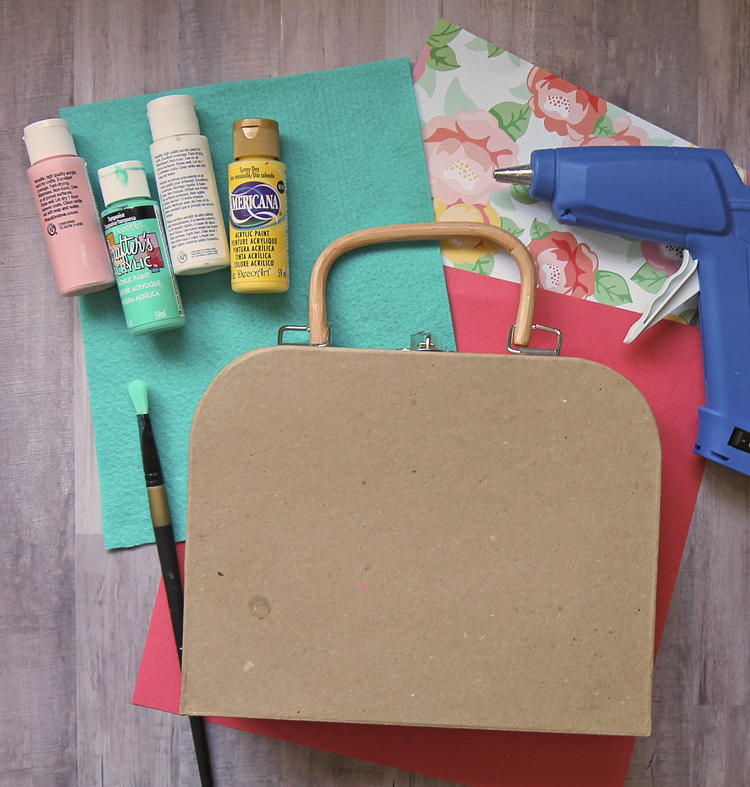
Materials Needed
- Paper Mache Craft Suitcase **See details below**
- Mini Wooden Spool
- Mini Metal Hangers
- Mini Clothespins
- Assorted Craft Paint and Paintbrushes
- Hot Glue Gun
- Scrapbook Paper
- Assorted Sewing Trims (lace, pom poms, etc.)
The exact paper mache suitcase I used in the product is no longer being sold. Here are a few ideas for substitutions:
Mini Suitcase Options
- Mini Wooden Purse (7″ x 1.8″ x 6.5″)
- Paper Mache Suitcase (9.4″ x 13.8″ x 4″)
- Basswood Boxes (Add your own handles to make a suitcase. Various sizes available.)
- Rainbow Suitcases (11.8″ x 8.6″ x 4.7″)
- Decorative Vintage Suitcase (8″ x 5″ x 3″)
- Gingham Print Mini Suitcases (7″ x 10″ x 3.25″)
- Fruit Suitcases (7″ x 11″ x 4″)
- Blue Rainbow Suitcase (9.4″ x 5.7″ x 3.5″)
- Set of Three Pink Suitcases
Instructions
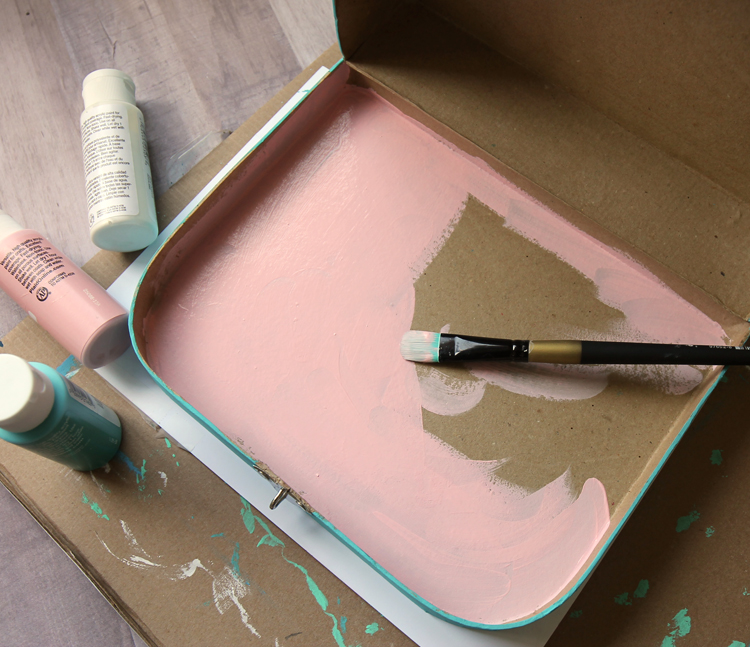
Begin by painting the entire box with craft paint, inside and out. Avoid getting paint on the silver handle hardware or on the handle itself. You can skip this step if you bought a pre-decorated suitcase.
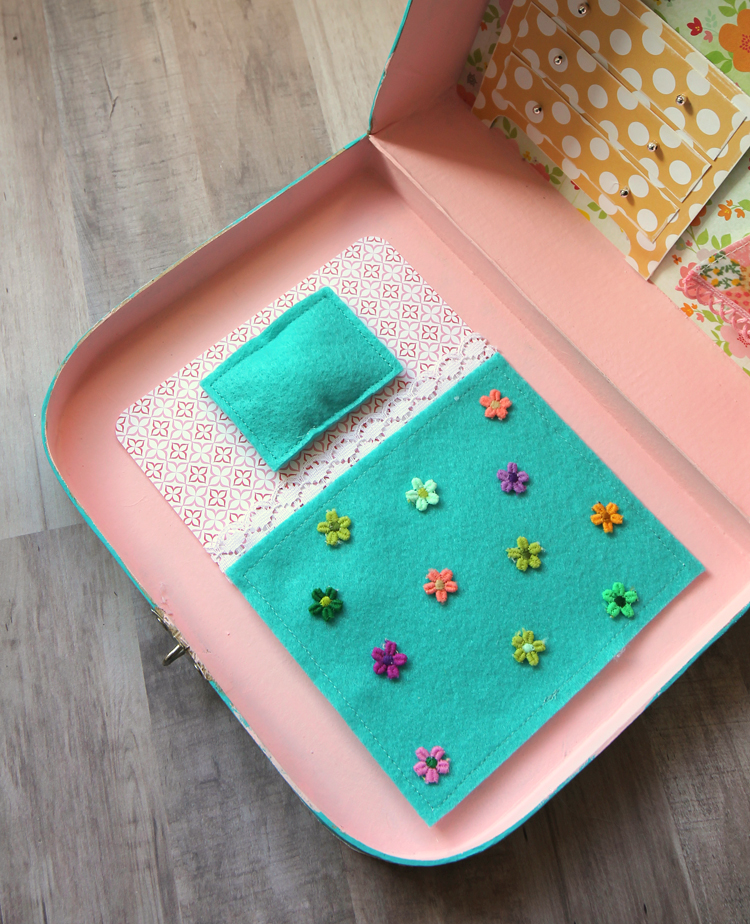
Next comes the fun part… creating a dollhouse scene inside! I made a little “bed” on the inside of the lid with a felt blanket and pillow. I glued the pillow and one edge of the blanket down so that it won’t fall out and get lost.
Then I made a little yellow polka dot dresser out of scrapbook paper and added tiny silver beads for handles. I also created a little gallery wall and clock using stickers and other goodies I found in my scrapbooking stash. Do you see that little clock? I cut it out using my Silhouette machine, then printed a real clock face. I just love little details, don’t you?!
To make a place to store extra doll clothes, I attached the mini wooden spool to the wall using hot glue. It’s the perfect place to hang all of the little outfits. The doll I made is a felt paper doll, so I added clothespins to the hangers since the clothes are all flat.
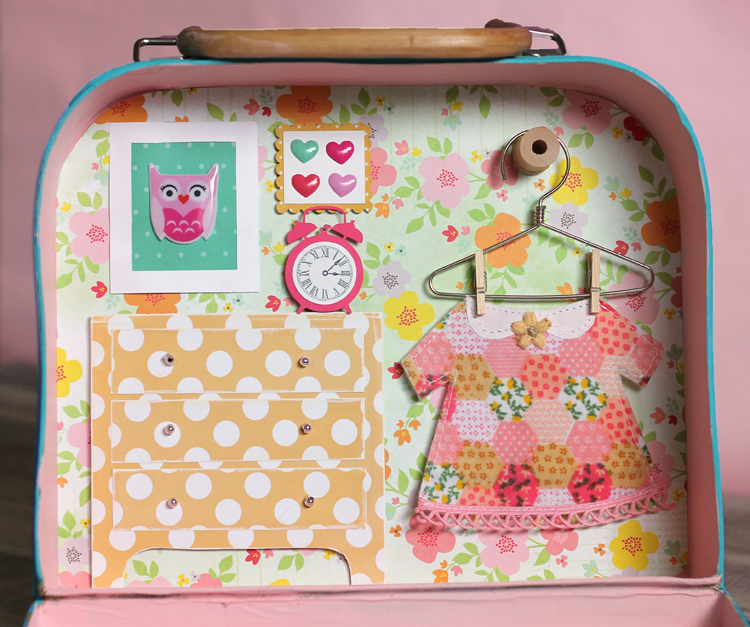
Making all of the little details was the most fun part of this whole project. You could even make different room scenes for that back area that aren’t glued into place so you can swap them out. How fun would that be?!
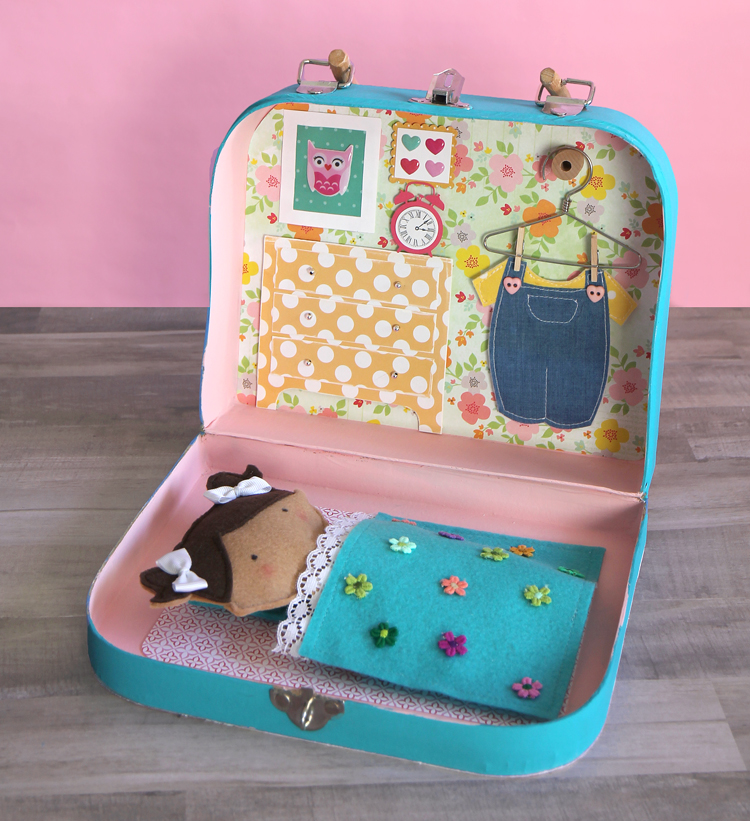
Isn’t this felt doll so sweet? I shared a detailed tutorial and free pattern to make your own doll here:
GET THE DOLL PATTERN & TUTORIAL HERE
Check out this short video to see the doll and suitcase in action.
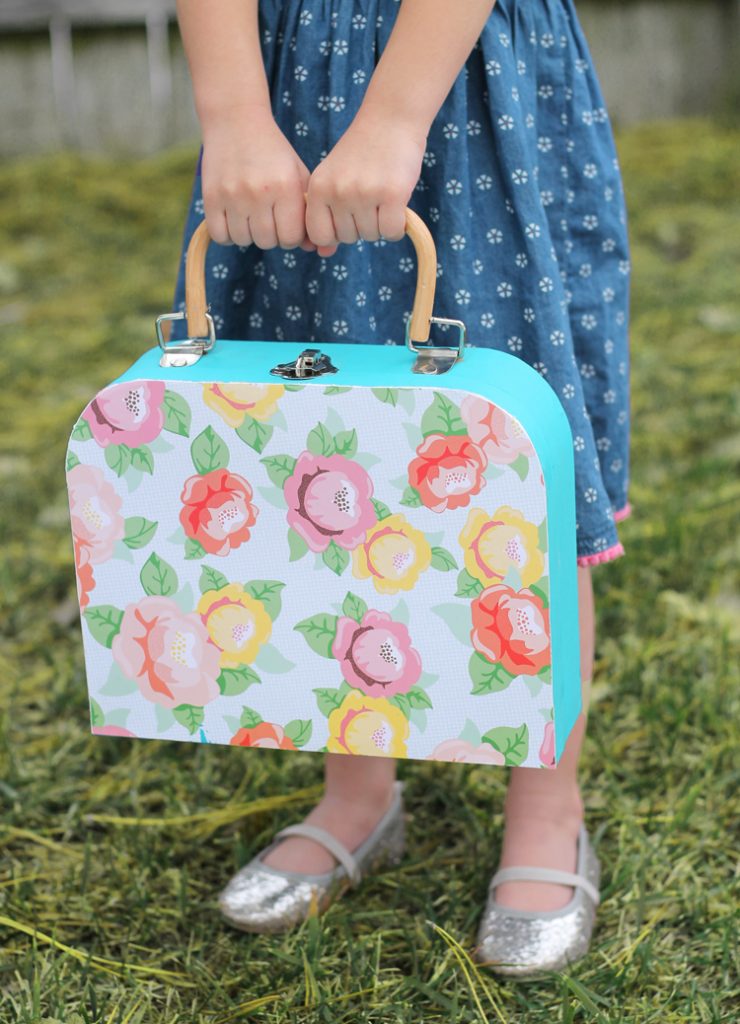
My preschool aged daughter loves this little dollhouse.
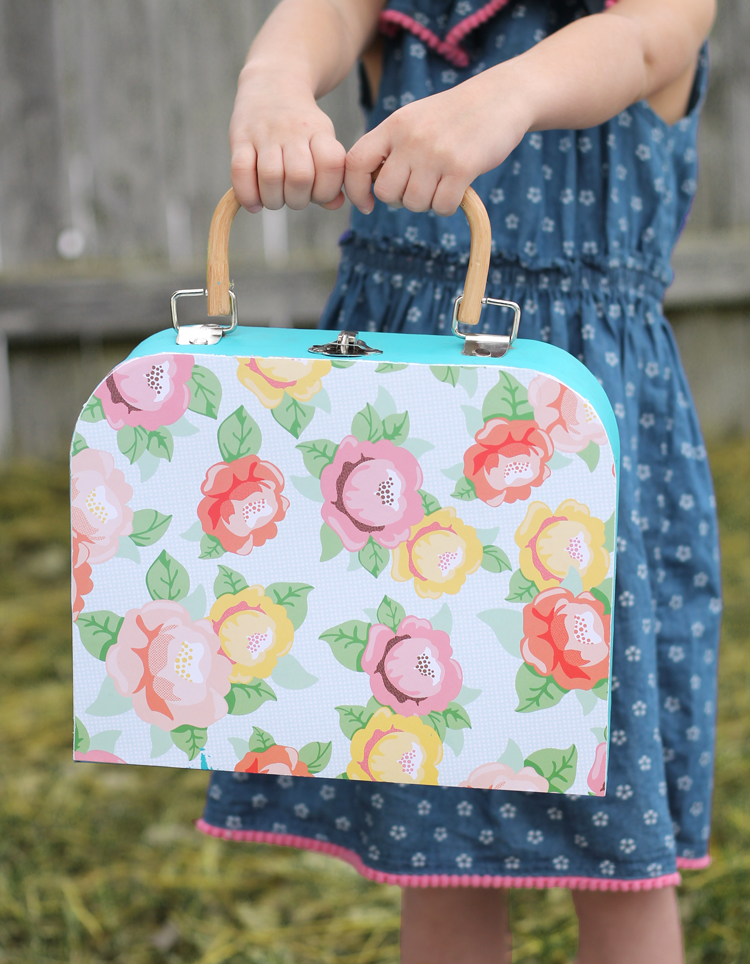
She is having so much fun playing pretend with her little doll, changing her clothes and hauling this cute little suitcase all around.
Reader Interactions
Let’s get social.
I’m sharing tons of bonus content on my social channels and I’d love for you to join me there.
Leave A Reply! Cancel reply
Save my name, email, and website in this browser for the next time I comment.
Comments & Reviews
March 28, 2017
SO adorable. I am 74 and have collected Dolls ALL my life. This is one of the sweetest things ever! I am going to make one for ME! Grandkids are Techy. How sad!!
I know what you mean. I love this little doll too! I really made it for myself and it's just a bonus that my daughter likes to play with it. 😉
April 5, 2017
Looking for the giant flower cut files.
They are in this post: https://www.thecraftpatchblog.com/2017/04/3d-paper-flower-window-treatment.html
April 12, 2017
This is so cute! I just shared it on my Facebook page because I love it!!
Thank you Lisa!
July 16, 2018
Muy creativa para las niñas
July 19, 2018
Hi where anm i able to source the suitcase the link had an error code I am in Australia
Here they are on Amazon: https://www.amazon.com/Darice-9150-93-Stands-Natural-8-Inch/dp/B004MTKWGC/ref=sr_1_1?ie=UTF8&qid=1532046913&sr=8-1&keywords=wooden+clothespin+doll+stands
August 3, 2018
Amazing!!! Thanks for this tutorial! Where can I buy this suitcase to decorate?
Here’s all the info on the suitcase dollhouse: https://www.thecraftpatchblog.com/diy-suitcase-miniature-dollhouse/
August 9, 2018
Please where did you find the suitcase. All of the links above do not state where
August 11, 2018
I found one on Amazon! Aff. link: https://amzn.to/2Otlkvu
August 28, 2018
Every time I hit the link for the suitcase it just gives me an error message
Dang… the suitcases are out of stock! You’ll have to hunt at your local craft stores to find one!
December 24, 2018
I’m in Canada, and the closest city has one craft store. Michael’s, and they just don’t get things like this there. I don’t think many people would have use for them. So, hence they don’t carry things like this suitcase. Can you help?
December 26, 2018
I would look on Amazon and Consumer Crafts. They carry so many craft supplies!
January 24, 2019
This is just adorable. I will be making one for myself. I still have my baby dolls, Barbies etc from childhood and loved playing with paper dolls. I’m almost 59, but still love to create such cute things!
August 24, 2019
This is exquisite! Do you sell these already made as I have so many projects to attend to now. My 3 year old Granddaughter would love it!
August 26, 2019
Sorry Deborah, I don’t sell them already made. I don’t have the time either! 😉
February 22, 2021
Squeeeeeal!!! Ooooh my this is adorable! I want to make it right. Now. Love it. Gonna pin it on my Instagram page.
April 24, 2021
Found the pattern for the doll and the clothes. Tks
July 7, 2021
This is absolutely adorable and I have two granddaughters that would love to have their own little dollies with cases! Thanks so much for sharing!!
January 18, 2023
I love your creativity and look forward to visiting your website often. I am trying to find the suitcases. I think Amazon may have a few left. All the other sites your mentioned either are no longer in service or the product is not available. I will keep looking. Thank you for sharing the Felt doll pattern. Have a wonderful year filled with much joy.
April 22, 2023
LOve it !!!!!!!! Thank you for sharing!
- Crafts for Kids
- Crochet & Knitting
- Paper Crafts
- Fall – Thanksgiving
- Fourth of July
- Mother’s Day
- St. Patrick’s Day
- Valentines Day
Join The Craft Club
Subscribe to get all the best ideas sent straight to your inbox.
You have successfully joined our subscriber list.
The Craft Patch is a participant in the Amazon Services LLC Associates Program, an affiliate advertising program designed to provide a means for sites to earn advertising fees by advertising and linking to amazon.com. “This site uses cookies from Google to deliver its services and analyze traffic. Your IP address and user-agent are shared with Google along with performance and security metrics to ensure quality of service, generate usage statistics, and to detect and address abuse.”
- Pattern Shop
- All Tutorials
- Cross Stitch
- Pattern Hacks
- Sewing for Baby
- Sewing for Boys
- Sewing for Girls
- Sewing for Women
- Video Tutorials
- 30 min projects
- House to Home
- Inspired By Project Runway
- Instagram Friday
- Photoshop Tutorials
- Project Toddler Runway
- This to That
Shwin & Shwin
Mid Century Modern || Travel Dollhouse
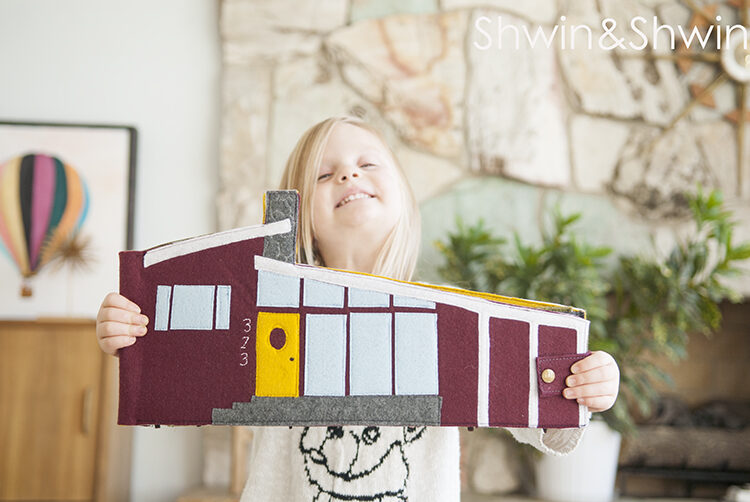
I have seen a lot of these little travel dollhouses around. I love the concept of them but I haven’t loved the style of them. I decided to go ahead and make my own version modeled after our home. (loosely)
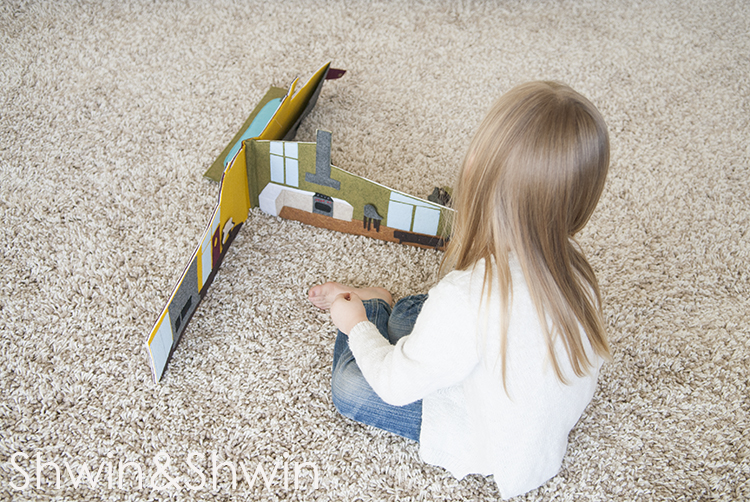
The house opens up like a book and stands up so it can be played with like a real doll house.
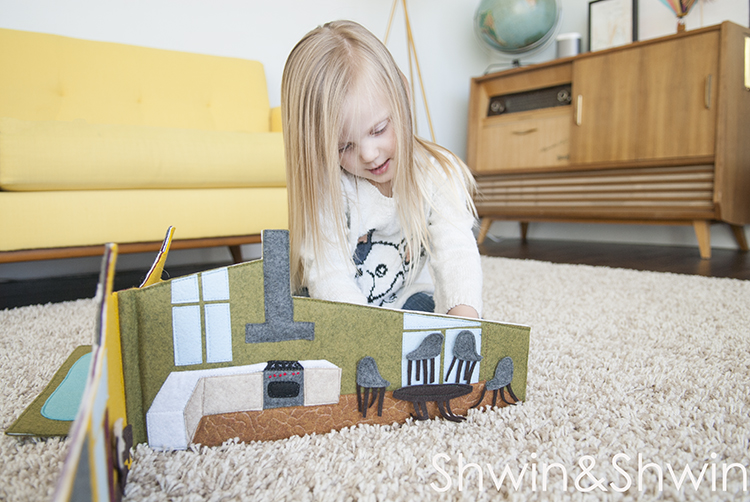
The walls and decor are all made from felt so they stick to each other and this means she can place the dining room furniture in the dining room and it stays. The walls are all stabilized so they are still soft but firm enough to stand up.
To make one you will need:
Mid Century Modern Dollhouse Pattern
Felt by the yard for the pages. I used 3 colors 1/4 yard each.
Felt pieces for the furniture and details. I used an array of colors many picked by my daughter but the important one to have is a light blue or light gray for the windows. I ran out of my light blue and so I had to leave off a few window details.
Heavyweight interfacing (something like this)
Freezer paper to trace the pattern
Washable glue stick
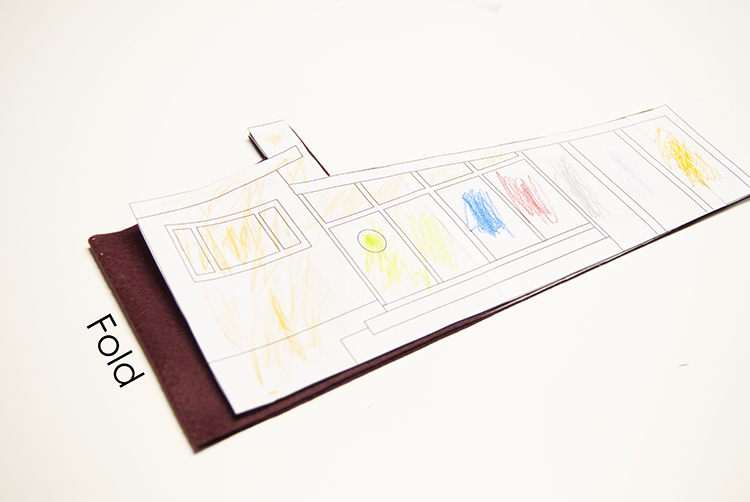
To cut the pages, cut out the house on a fold but move the page about 1″ from the folded edge. You will be cutting 3 of these so you have 3 pages.
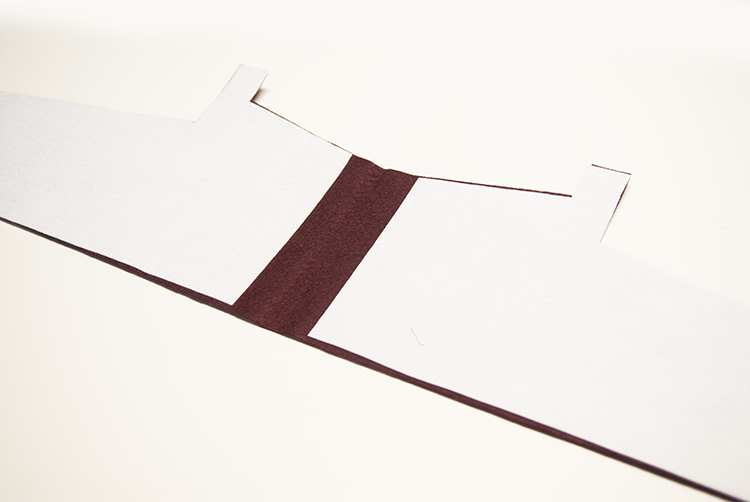
Then cut out the interfacing the size of the house pattern, you will need 6 of those. Iron them on to each page as shown above.
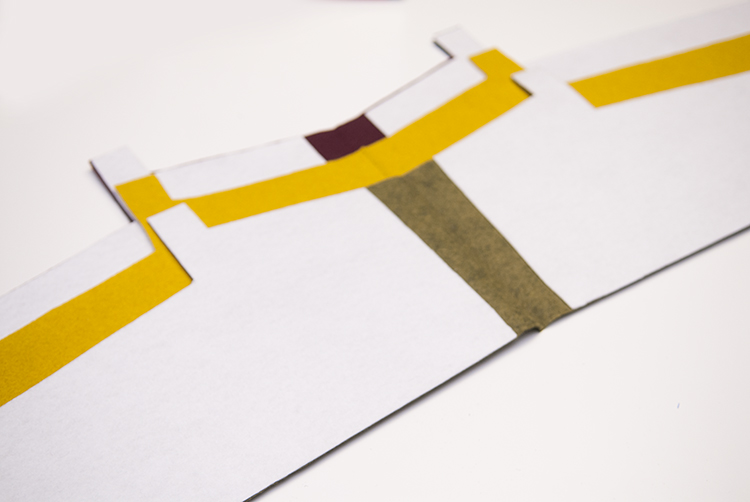
Then stack the pages so the front and back of the house is first with the interfacing side facing up, then the next page is on top with the interfacing facing down, or face to face with the other interfacing. Lastly put the third page with the interfacing face up.
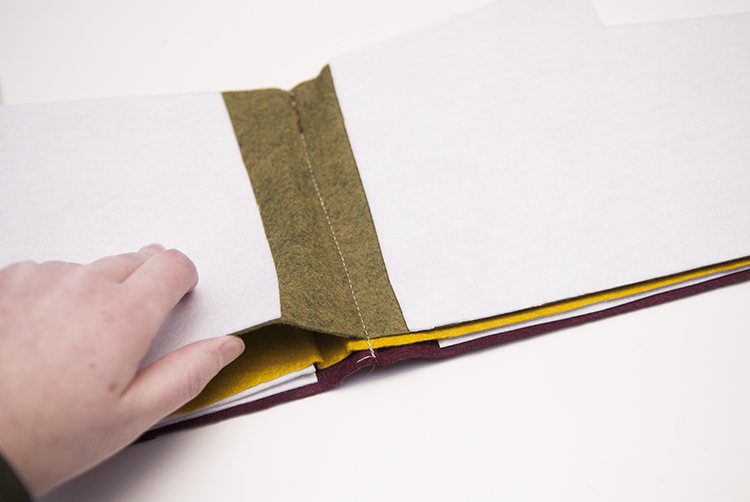
Then sew one line sewing all three pages together along the fold line.
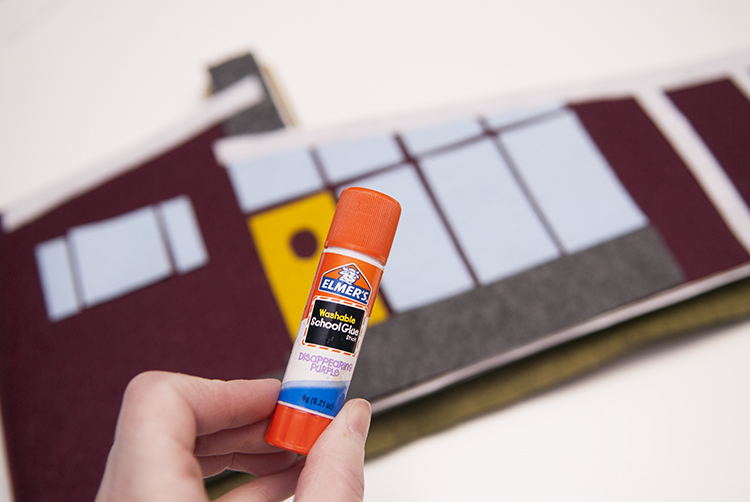
Now start adding the details to each page. Starting with the front I traced all the design elements on to freezer paper and then ironed the freezer paper on to the felt to cut them out. Then following the template I placed all the elements on the front page and used a washable glue stick to hold them in place until I stitched them on.
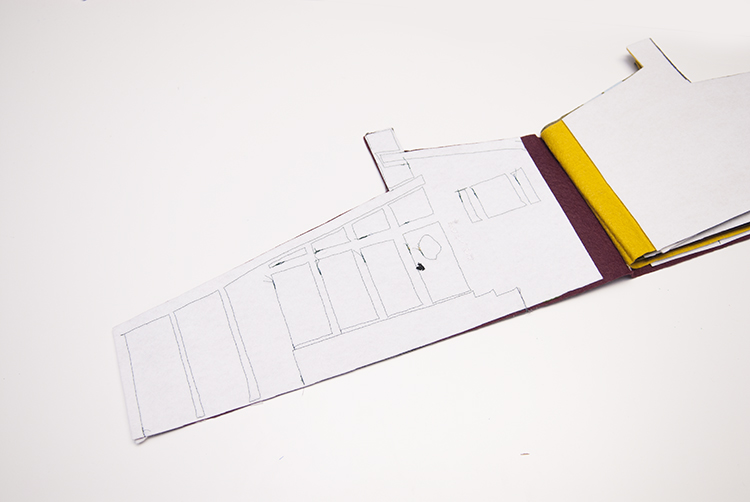
Once they were all glued on I stitched each piece in place. Then with embroidery floss I added details like a door knob and house numbers. *Also note it’s best to add the snap now for the tab to close the book.

Once the front page was done I moved on to the next page, the living room. I again added all the elements with glue, and then stitched them down. I added stitch detailing like lines in the floor for a wood floor, but I liked using textured felt like the pebble felt for stone detail on the fire place. Once all the details were sewn on I stitched the front of the house and living room page together by sewing around the outside edge of the page.
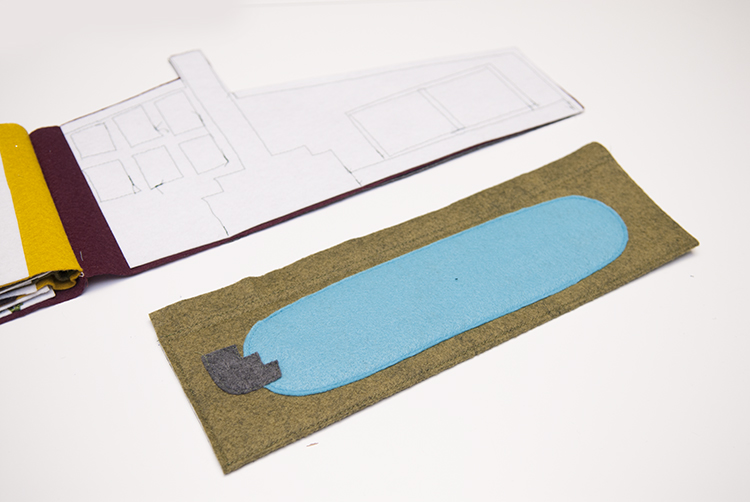
You will continue adding the details and sewing them down and then sewing the pages together, so the middle pages will be sewn together so the interfacing is in the middle. Keep going until you get to the last page, here is where I added the pool, which also doubles as the holder of all the furniture and dolls when the house is folded up. Sew all the pool details on, and finish the back page of the house.
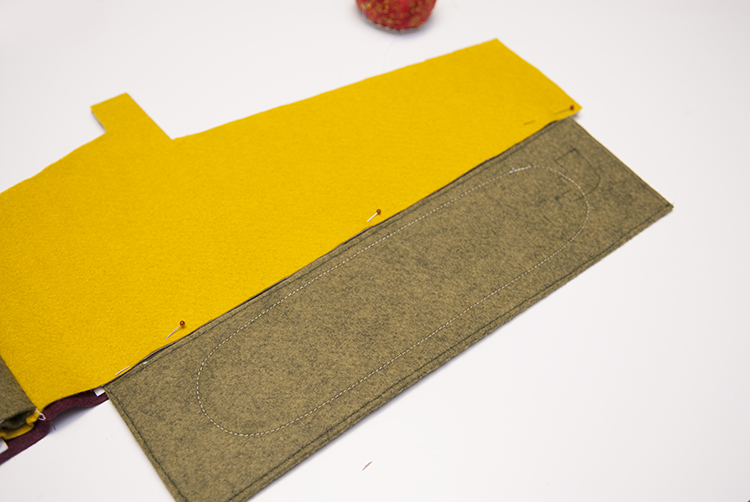
Then sandwich the pool face down between the back page and the “storage room” page. Then sew the two pages together around the edge sewing the pool in place.
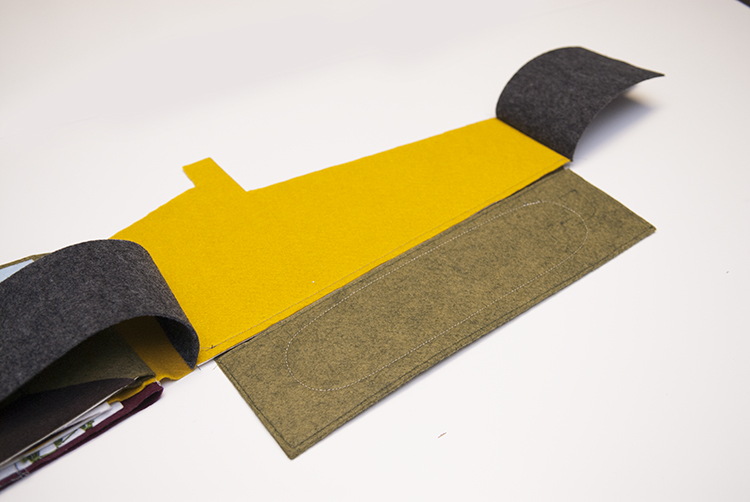
Then add the back flaps to the storage page.
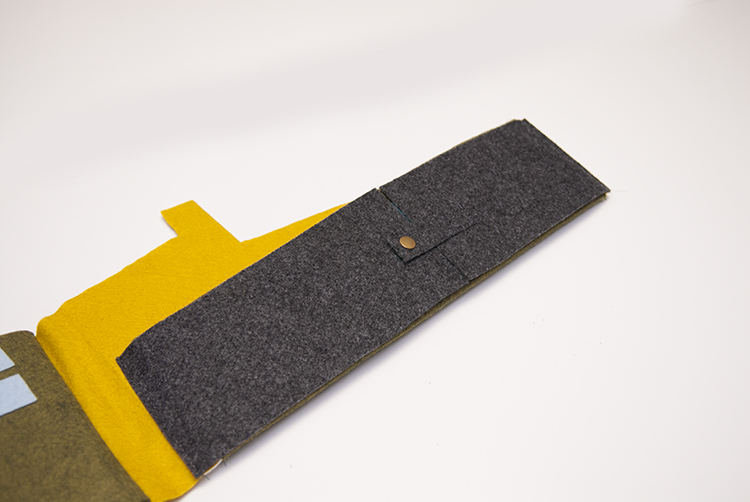
Add a tab and snap closure so the back flaps can stay closed.
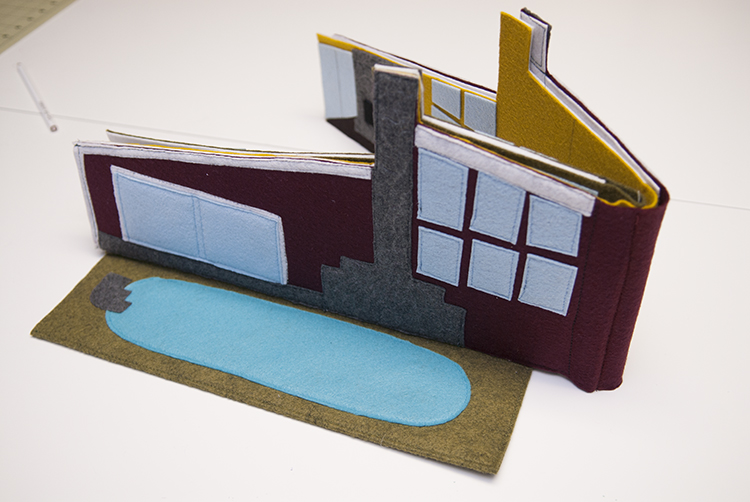
Then the pool can flip out toward the back and be a play area, or flip toward the storage page and under the flaps to help hold all the people and furniture in the house. The final thing to do on the house is to add the tab and snaps so the book can close. I simply cut a felt strap and sewed it on to the back page adding a snap to the tab and the front page so it could stay closed when not in use.
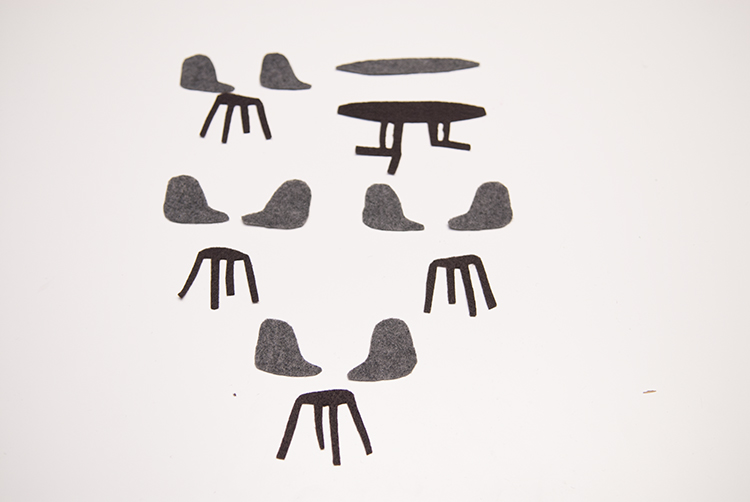
Now for the accessories. For the dining set, I cut 2 seat pieces and 1 leg piece for each chair. I cut the leg pieces so they had a bit of a base to them.
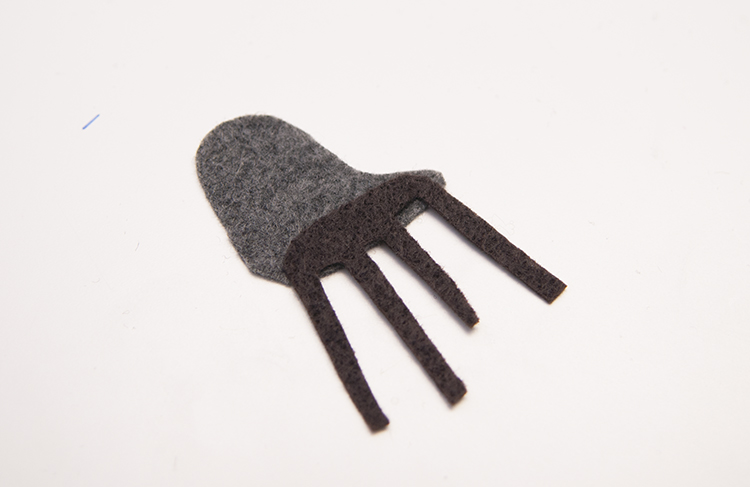
Then take one chair piece, and stack the legs on top.
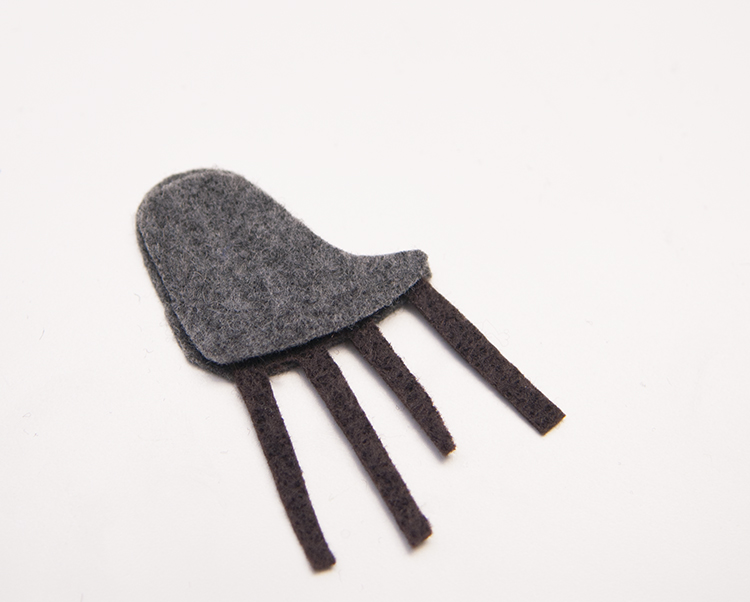
Place another seat piece on top of that and sew the two seat pieces together.
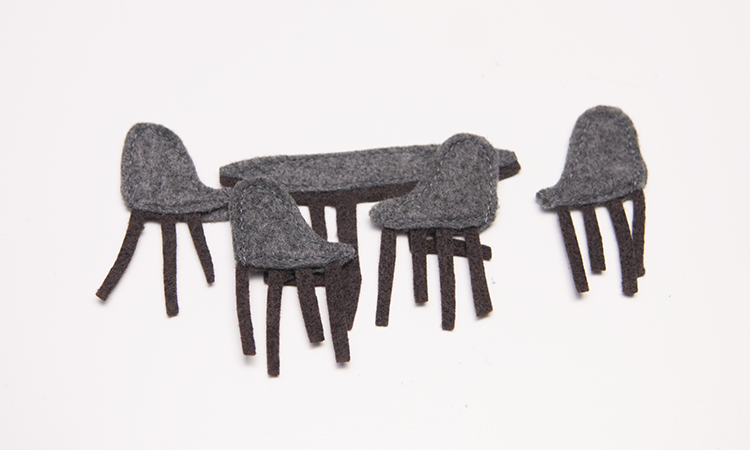
Continue this same method for the rest of the chairs. I did the same for the table making just the table top a different color.
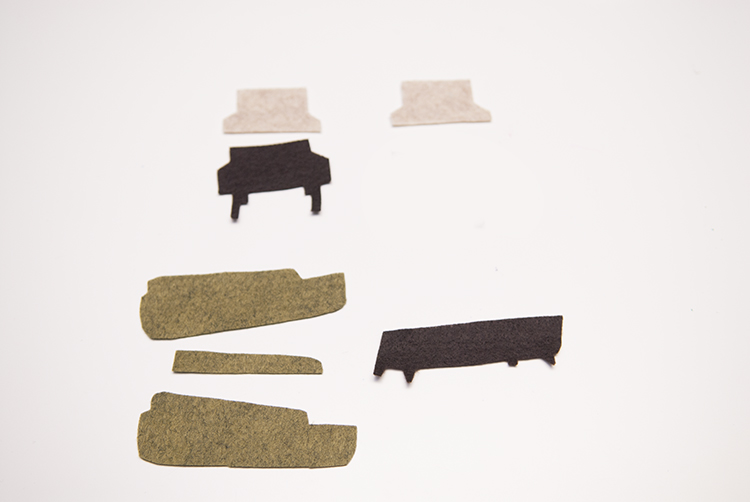
For the living room, I cut 2 main parts of the couch out, then cut out the cushion and for the legs I again made a larger base for them. For the chairs I traced out the full size of the back and legs and then cut out the cushions, 2 cushions per chair.
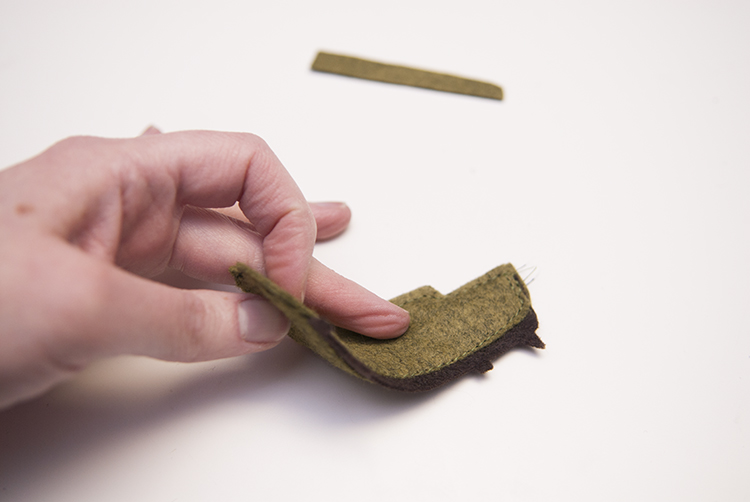
Sandwich the two main cushion layers around the leg base and sew them together. Then sew the smaller cushion on top.
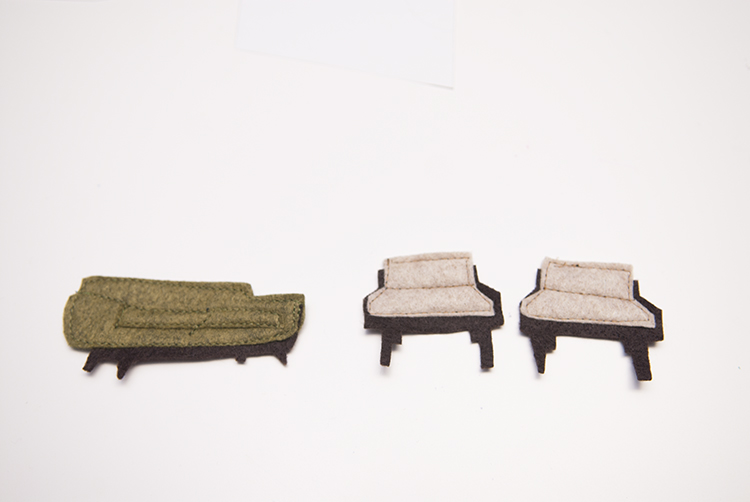
The chairs are done the same as the dining chairs. Adding stitch lines to show dimension of the cushions helps.
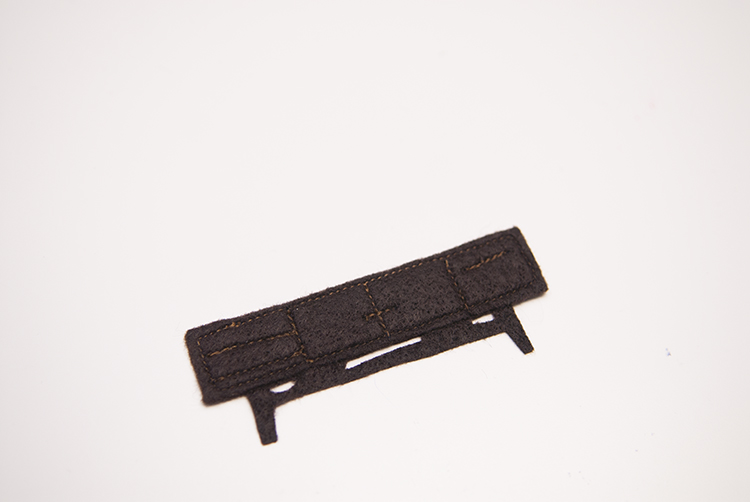
The credenza is just a rectangle stitched on top of the whole piece with the stitch lines showing all the details.
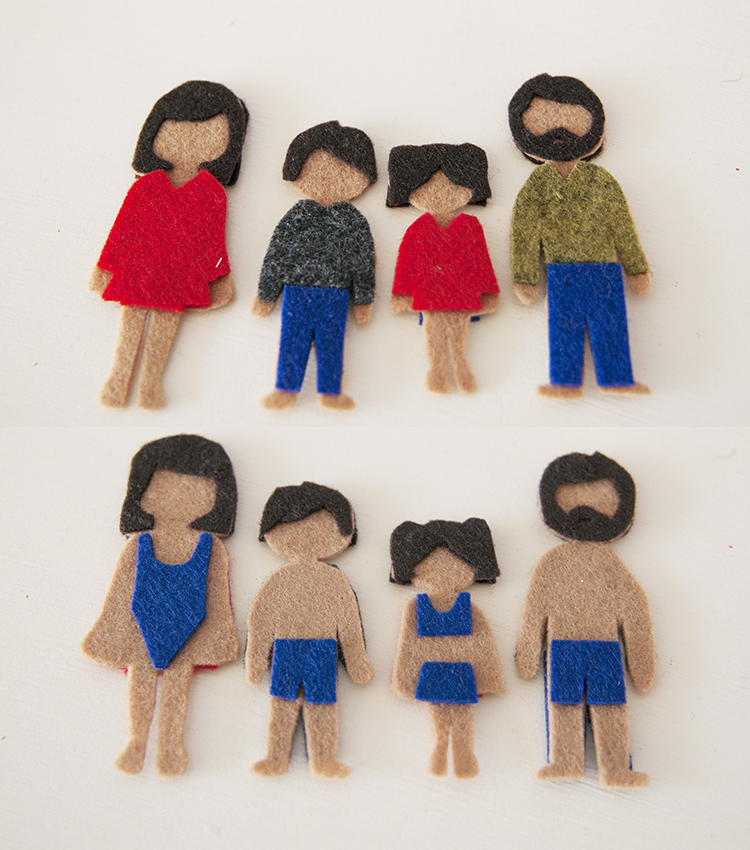
Lastly for the family, I cut out all the pieces and for these I just used felt glue to assemble them because they are so small stitching would be annoying and the felt glue holds well and is fast. I did the whole body cut out and then added hair and outfits. One side clothes and one side swim suits. (as per penny’s request since they do have a pool after all)
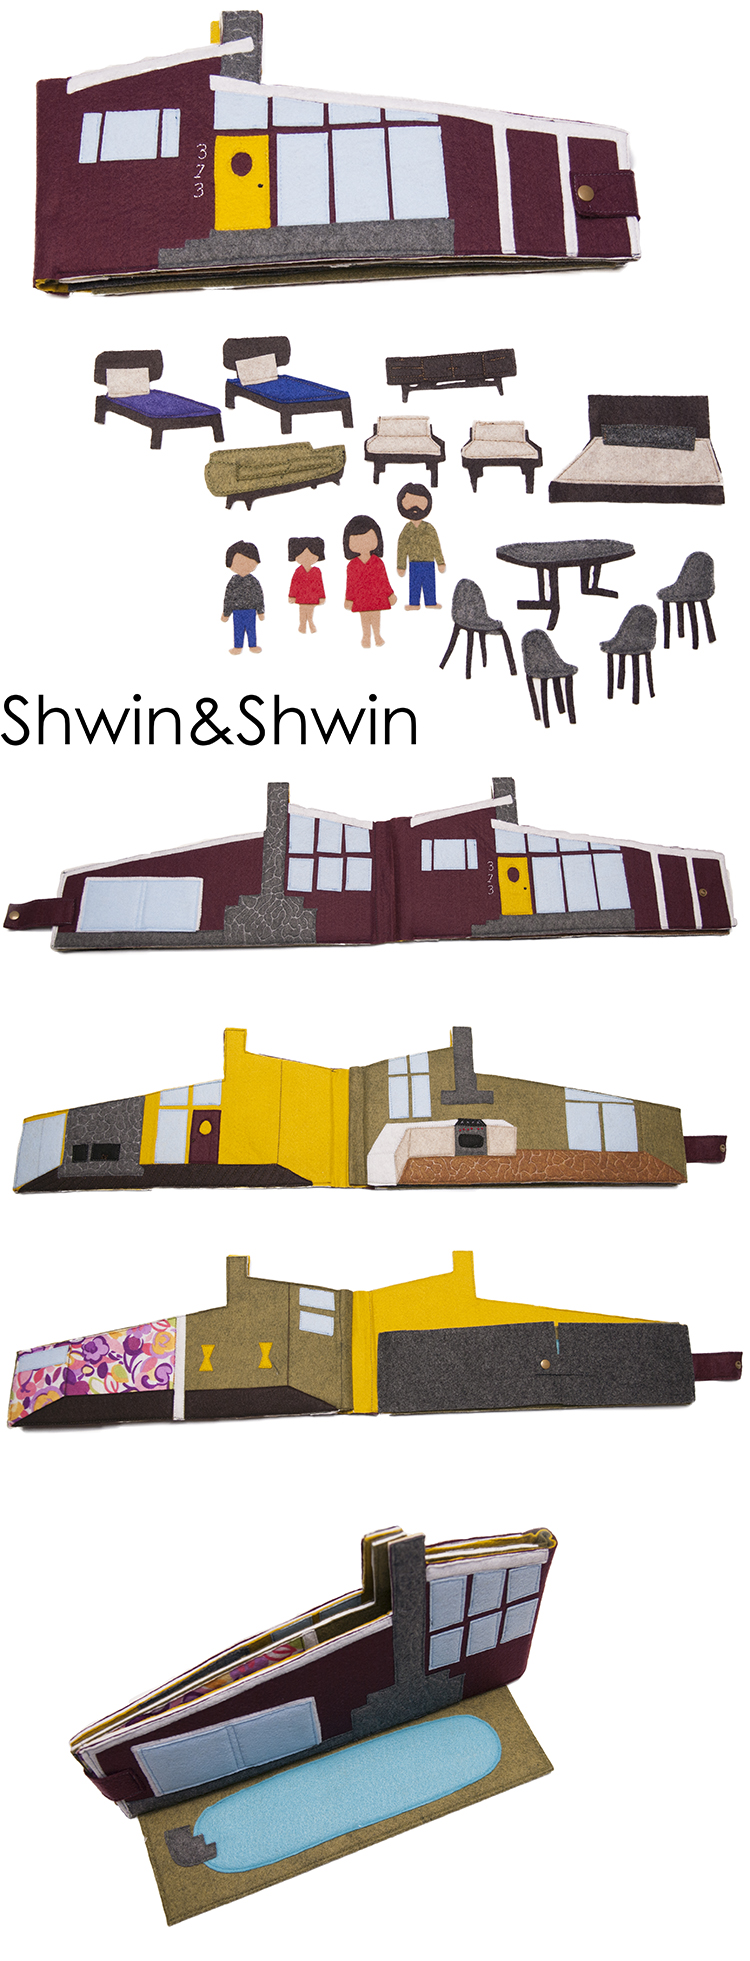
That’s all there is to it. The project came along very quickly and you can be as detailed or as simple as you want. I like that the colors and style make it boy or girl friendly since boys like dollhouses too. Oh and the beds, which I forgot to take step by step photos of, are just cut out full size and then the bedding and pillow stitched on top.
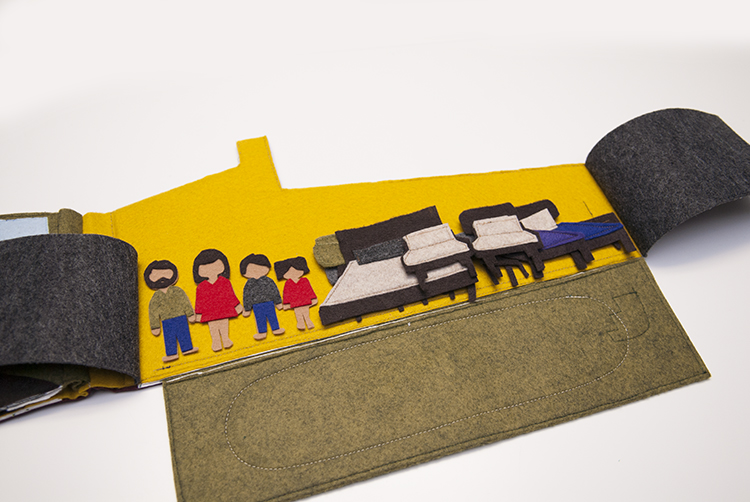
My favorite part of the house is the storage room, which holds all the stuff. When they are ready to pack it up you just put all the pieces in the page, fold up the pool and then close the flaps with the snap. It’s the perfect little pocket.
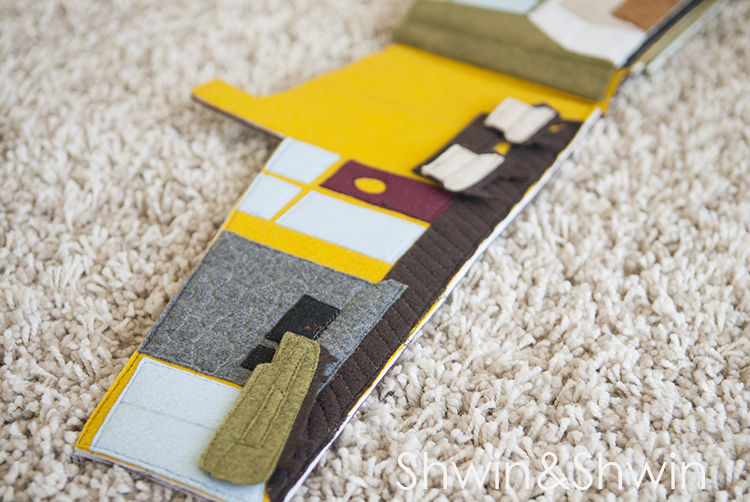
Penny loves playing with the house, either as a book flat on the ground and she can flip through the pages.
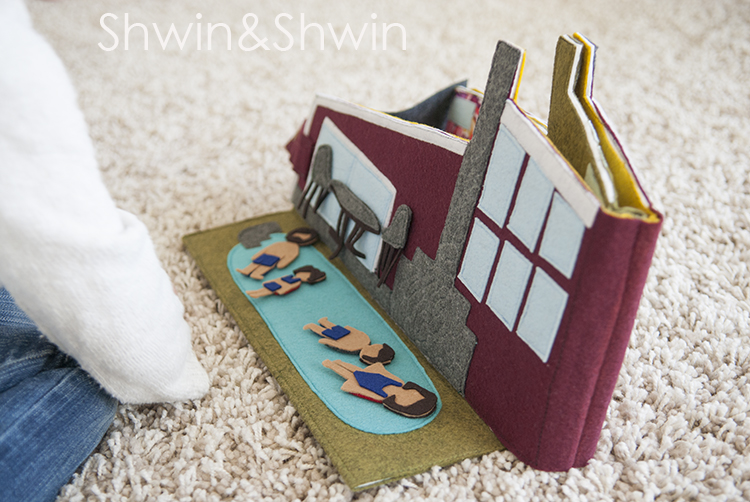
Or propped up as a house. Either way it provides a lot of fun and play and you can always add more accessories at any time so she can decorate more.
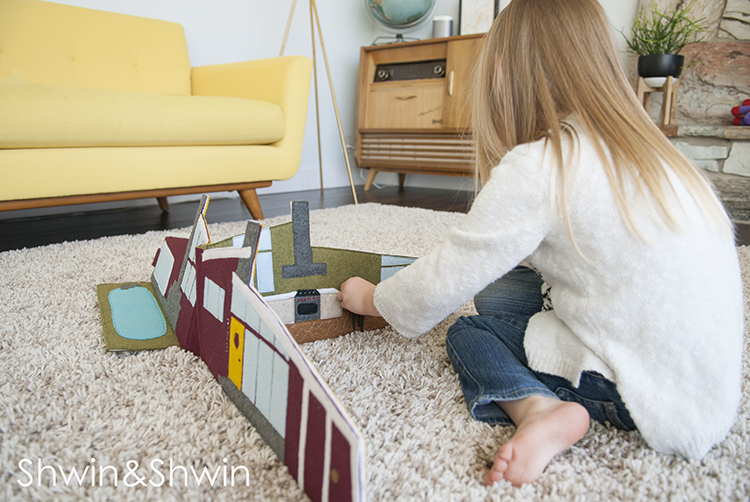
I love that it travels well. When you are done playing you just fold it all up and stick it on the bookshelf.
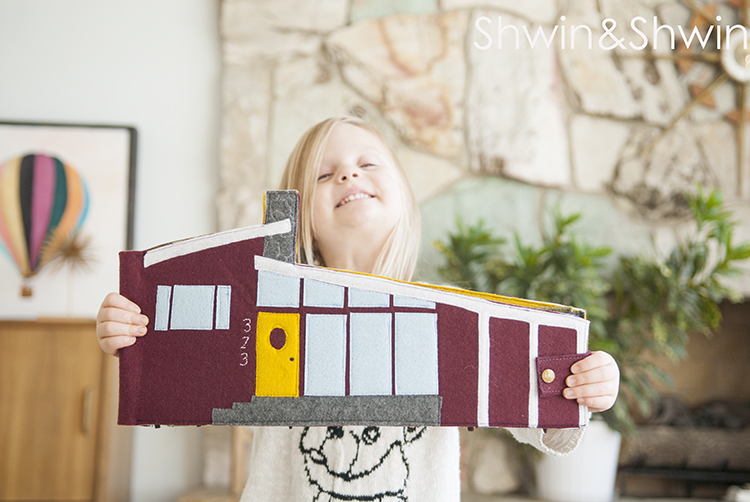
Or carry it with you everywhere you go.
Love this? Share it:
Related posts, nesting doll applique || free pdf pattern, olaf quilt pattern || free pattern, the abbey dress || remixed.
The ADVENTURE DOLLHOUSE is a modular dollhouse for creative play
- Oct 29, 2021
DIY Kit: Travel Dollhouse

I am so excited to offer these Travel Dollhouses as a DIY Kit! One of the most requested items are the suitcases themselves so now I'll be offering them through my shop. You can click here to see available Travel Dollhouses. To fill the suitcase, you can purchase DIY Kits and/or assembled furniture and decor from my shop. DIY Kits make a great gift for crafty kids.
Each kit includes:
-Paper template for floor/wallpaper
-Personalized wooden luggage tag
You'll need:
-Paper to use for floors and wallpaper
-Furniture and Decor to fill your suitcase

To make the floor for your travel dollhouse, you'll need both paper templates and your flooring of choice. I recommend scrapbook paper from Hobby Lobby or Michaels. Jessica Chloe Miniatures offers beautiful flooring downloads, and I sell digital downloads in my shop as well (click here to see your options). Place the template on the paper, trace it, and cut it out.

You can use double-sided tape or Mod Podge to attach your paper. The tape would be less permanent if you think you'd want to change it out. Use a foam brush to apply a thin layer of Mod Podge to the back rectangle of the floor. Don't apply paper to the crease where the suitcase folds up because it'll distort the paper and make it wrinkle.

Press the paper onto the floor and push out any wrinkles or air bubbles. Repeat this process for the front part of the floor and allow the glue to dry before applying the wallpaper.

Turn the suitcase so the back wall is on the table and repeat the same process you did for the floor. Allow the glue to dry completely before adding any furniture or decor to the travel dollhouse.

For travel dollhouse inspiration, check out my Pinterest account by clicking here . Be sure to tag me on Instagram @mini.adentures.co so I can see your amazing Travel Dollhouses. It's so much fun seeing how each suitcase is customized.
Recent Posts
The Secret Garden Adventure: March 2024 Subscription Box
DIY Kit: Insertable Frames
Instant Curb Appeal: Floors & Wallpaper for The Adventure Dollhouse
Can you purchase the travel doll house kit?
- forum posts
patterns > 123fionadolls McDonald Ravelry > Travel Doll
- Viewing as a guest user. What am I missing?

Travel Doll
- written-pattern

- First published: August 2012
- Page created: August 10, 2012
- Last updated: July 23, 2014 …
- visits in the last 24 hours
- visitors right now
Printable Miniatures for Dollhouses and More
Printables or "Printers" are a quick, inexpensive way to use a computer printer to produce paper miniatures and models. There are also reference sheets and boxes to help you keep track of or organize your collection.
Many of these printables can also be used to try out a project on a particular scale before creating a more permanent version. The projects shown here are all suitable for beginners and are available in several common scales. Designs for boxes, small gifts, and treats are useful for wedding favors or gift packaging , all of which are included in this list.
Printable Accessories Including Hats, Aprons, and Books
Lesley Shepherd
These printable miniature accessories can be used for a range of dolls house scenes. There is everything on this list from flower pots and ice cream cakes to photo frames, souvenirs and horse rugs:
- Beach Hut Photo Frames
- Miniature Photo Cakes
- Miniature Popcorn Machine
- Printable Candle Lanterns
- Parisian Souvenirs
- Miniature Hockey Jerseys
- Spiral Bound School Notebooks
- Travel Guides and Airplane Tickets
- French Floral Containers
- Miniature Chef's Hat and Aprons
- Miniature Graduation Cap (Mortar Board)
- Printable Ladies Hats With Brims
- Versailles Planter Boxes
- Printable Model Horse Blankets or Rugs
Printable Dollhouse and Play Scale Kitchenware
Printable kitchenware is currently available in several patterns. The Christmas Rose/Hellebore pattern group currently has:
- Tea or Coffee Set
- Dinner Plates and Kitchen Canisters
- Kitchen Casseroles Serving Dishes and Dessert Plates
- Shelf Edgings and Wallpaper.
The Country Blue Kitchen Set has:
- Country Blue Canisters and Plates
- Country Blue Casseroles and serving dishes
- Country Blue Coffee or Tea Service
- Country Blue Wallpaper and Fabric Coordinates
The Shamrock Pattern is available in:
- Shamrock Coffee/Tea Service
- Shamrock Casseroles and Serving Dishes
- Shamrock Canisters and Plates
The Red With Gold Hearts Service Currently has:
- Kitchen Canisters and Plates
- Casseroles, Serving Dishes and Plant Pots
- Tea, Coffee and Dessert Service
Halloween/Witch's Kitchen Printables are available similar to the sets above but with a Halloween theme.
Printable Miniature Decorations
These decorations can be used for a variety of seasons. There are more decorations for Christmas and Halloween, including miniature glitter houses, on the second page of this list.
- Patriotic and Celebratory Bunting
- Cut Paper Trees
- Snowflake Trees
Printable Miniature Buildings
Everything from 1:144 ("N" scale) gothic Halloween houses and vampire castles, to scale miniature buildings from other makers is on this list. There are links to carousels, theaters, and famous buildings in a range of sizes.
Printables for Miniature Teacup Scenes
Use these printables along with a teacup to make complete miniature scenes:
- A Teacup Beach Shop and Pier
- A Winter Log Cabin Teacup
Designs for Printable Miniature and Dollhouse Scale Fabrics
Small-scale fabric designs are sometimes hard to come by. These printable fabric designs are available as PDF (acrobat reader) files set in 1:12 scale. They can be scaled with a printer for smaller scale designs. Some of these patterns are also suitable for wallpaper, especially for smaller scales.
Printable Dollhouse Wallpapers
The wallpapers and backdrops in this list are designed for doll houses, scale shops or model horse or fashion doll backdrops in a range from 1:6 to 1:48 scale. There are French style papers, traditional stripes, country florals, and photo backdrops in various scales. All the designs can also be printed on an inkjet or laser fabric sheets to make coordinating fabric as well.
Free Printable Boxes For Treats, Favors, Gifts and Packaging
These printable boxes are large enough to use for weddings or party favors as well as for invitations, small treats, preparing special gifts. They can also be used as a unique way to package miniature products at shows and most make good place cards.
- Miniature Heart Shaped Boxes - These will hold tiny Valentine's gifts or candy treats for wedding or shower favors. They are sized in several scales for dollhouse valentine displays.
- Spring and Summer Favor Boxes and Rose Garland Boxes - They are available in two colors as well as a tiny stone cottage shaped box for gifts or treats.
- Coffin Box - It's suitable for gothic parties and invitations and weddings as well as for special Halloween treats or dollhouse displays.
- Pumpkin boxes - They can have Jack-O-Lantern or plain styles for Halloween, Thanksgiving, and Harvest displays.
- Christmas Gift Boxes - They are available in a holly wreath and tiny gingerbread house styles.
Printable Paper Plates and Cups
Patriotic Paper Plates and Cups - Printable paper plates and cups in 1:12 scale with a variety of international designs. There is a set of blank plates that can be decorated with personal designs as well as with themes for the following countries: Canada, France, Germany, Italy, United Kingdom, United States, and the Netherlands.
Seasonal Printables
There are a number of printable decorations and seasonal items for the holidays.
Valentine's Day
- Miniature Heart-Shaped Boxes in Several Scales or for Party Favors
St. Patrick's Day
- St. Patrick' Day Tea Set
Mother's Day
- Mother's Day Cards, Gift Boxes, and Other Projects
- Graduation Caps or Mortar Boards
- Miniature Coffin Shaped Boxes
- Miniature Pumpkin Boxes
- Halloween Decorations
- Printable Treat Bags, Cups and Plates
- Halloween Plates
- Candle Screens and Traditional Baba Yaga Witch designs
- Haunted House Parts
- Halloween Gothic Glitter House
- Haunted Miniature Farmhouse and Barn
- Parts for a Miniature Halloween Glitter Village
- Printable Christmas Village (see 1:144 scale buildings above)
Buildings in 1:48 Scale
- Shop with a full interior is available in 1:48 scale for dollhouse enthusiasts or O-scale railroad modelers.
- Tea Cup Front Porch Scene
- Landscaping for the Teacup Front Porch Scene
Printable 1:144 Scale Buildings
These printable miniature buildings come in two styles. One set features realistic historic buildings, with interior wall finishes and floors, for model railroads, or to be used as a doll house inside a dollhouse. Second set features fantasy Christmas buildings from the 1920's to 1950's in the same scale, which can be used for Christmas tree decorations, a dollhouse Christmas display, or set up as a model or railroad village.
There are more printable village buildings in the Halloween list.
Printables For Miniature Shops
Printables for Shops and Commercial Establishments
- Shopping bags in various color schemes.
- Shop Boxes - They come with removable lids in various color schemes to match the bags.
- Robin's Egg Blue and Lavender - These printable designs are for wallpapers, papers, and fabrics.
- Sherbet Pink and Yellow - These printable designs are also for wallpapers, papers, and fabrics
- Edwardian Greens and Salmon - Likewise, these printable designs are for wallpapers, papers, and fabrics
- Pink Ribbon Wallpaper and Border - This one is designed for Erin's Cancer Project.
Reference Sheets and Organizers
Here are some printable reference sheets for a collection:
- Dollhouse Wiring Layout Diagram Blanks and Samples
- Doll House Room Blank Sample Design Sheets
- Blank Grid Dolls House Room Layout Sheets
- Blank Collectible Reference Sheets
- Printable Figures to Check Scale
- Printable Drawer Organizers and Storage Boxes
- Printable 6 Ring Planner Pages, Dividers, and Envelopes
More from The Spruce Crafts
- 13 Free Dollhouse Plans
- Online Resources for Printable Miniature Buildings
- Easy Ways to Make Dioramas or Models for School or Group Projects
- Free Christmas Stationery and Letterheads to Print
- Instructions for Making Miniature Plants and Flowers
- Determining Dollhouse Scale and Sizes of Miniatures
- Materials for Scale Models and Dollhouses
- 9 Sets of Free First Day of School Signs
- 7 Printable Gift Tag Designs for All Occasions
- 11 Free, Printable Christmas Thank You Cards
- Free Printable Activities for Kids
- 9 Best Places for Free Easter Egg Coloring Pages
- Free Printable Rulers
- How to Build Room Boxes for Dollhouses or Model Scenes
- 12 Free 'You've Been Booed' Printables
- Craft, Art, and Building Materials for Miniatures
makerist functions better when JavaScript is activated.

- Includes Doll, house, and dresses!
- Endless customization options
Materials you need at home:
- fabric for the inner house piece and 2 pockets for inner house, *Lace trim and/or rickrack for pockets and dresses(opt)., *Batting for between inside and outside house pieces, *Fabric for outer house piece, *Felt scraps of various colors, , *Various colorful buttons for doorknobs, flowers, dresses (opt.), , *Lace, giant rickrack, or bias tape for roof trim, *1 inch of velcro for closing the house, *Skin-tone fabric for doll , *Stuffing, *yarn for hair, *tiny sew-on snaps for dresses, *Acrylic paint, fabric paint, or embroidery thread for doll's face, *Any tiny objects around the house or from the craft store for doll accessories (opt.)
- Great scrapbuster!
- fabric paint or embroidery floss for face
This listing is for a PDF sewing pattern to make this charming doll house set including a soft house, a doll to live in it, and her dresses. It is an instant download, so start your project right away!
This little doll is just over 5 inches tall, and has a small house all her own with as many dresses as you would like to make for her. Her house (which, closed, is 9.5"x 7") opens like a book and closes with velcro. It has two roomy pockets inside, one for dolly to sleep in, and the other to store her dresses. Use your imagination and feel free to make your house and doll as simple or as detailed as you wish!
GREAT NEWS! **Your purchase of this pattern includes a license to sell items made from this pattern under the following conditions: 1) Please credit Hen and Chick / @henandchick as the designer on your tags, shop descriptions, and social media. 2) The item MUST be made by the hands of the person selling the item. You may not share the pattern; each seller/maker must purchase a pattern.
A wonderful idea for a take-along to the doctor's office waiting room, a quiet toy for church, or to leave at grandma's house as a special visiting treat. Welcome to a tiny world!
This pattern is adaptable to all sewing ability levels! The pattern comes with step by step instructions, including photos for every step. There are dozens of ideas and tips included to make your doll and her house completely individualized and as simple or as detailed as possible.
Take Along Doll House Sewing Pattern
Rachel Linquist
I come from a long line of crafty, do-it-yourself women. I love the process of creating things, and that joy is doubled when others enjoy those things. I hope you enjoy what I've designed for you to create!
- Share full article

Unconventional Sex Let Anglerfish Conquer the Deep Ocean
During a chaotic period some 50 million years ago, the strange deep-sea creatures left the ocean bottom and thrived by clamping onto their mates.
A female anglerfish, with a bioluminescent lure, in waters off Hawaii. Credit... Doug Perrine/Alamy
Supported by

By William J. Broad
- May 30, 2024
How did the ghoulish creatures known as anglerfish pull off the evolutionary feat that let them essentially take over the ocean’s sunless depths?
It took peculiar sex — extremely peculiar sex.
Scientists at Yale University have discovered that a burst of anglerfish diversification began some 50 million years ago as the ancestral line developed a bizarre strategy to ensure successful reproduction in the dark wilderness.
To mate, tiny males would clamp with sharp teeth onto the bellies of much larger females. Some males would let go after mating while others would permanently fuse into the females. The males that stayed attached became permanent organs for sperm production.
“We found that a cascade of traits, including those required for sexual parasitism, allowed anglerfishes to invade the deep sea,” Chase D. Brownstein , a graduate student in the ecology and evolutionary biology department at Yale who was the study’s lead author, said in a news release.
Today, there are more than 300 species of anglerfish, which makes them the most varied family of vertebrates in the ocean’s lightless zone. The region starts about 1,000 feet down — just beneath the photic zone, which gets enough sunlight to support photosynthesis and most of the sea’s plants — and descends for miles. The team’s study was published last week in the journal Current Biology.
Finding a mate in the deep sea can be extremely difficult because of the environment’s incomprehensibly vast size. By some estimates, the dark zone amounts to more than 97 percent of the planetary space inhabited by living things, mainly because the ocean plunges to a maximum depth of nearly seven miles. In contrast, land habitats make up less than 1 percent of the planet’s biosphere because the band of life is so narrow, making its volume quite small.

The anglerfish’s bizarre mating routine is seen as counteracting the otherwise slim chances of finding a mate in the world’s largest ecosystem. It is the only known vertebrate that employs sexual parasitism, and that gave it an evolutionary edge.
Over time, the male can physically fuse with the female, connecting to her skin and bloodstream. Eventually, he loses his eyes and all internal organs except for his testes. A female can carry several males on her body.
The Yale team documented how immune systems that attack foreign threats changed over time so the female hosts would not reject the parasitic males.
Anglerfish get their name from how females use rodlike appendages with glowing tips to lure prey into their needlelike teeth. They’re fish that fish . Their mouths are so large and their bodies so flexible that they can swallow prey up to twice their size.
The Yale team used fossils and genetic data from more than 100 living anglerfish species to determine that the burst of diversification came during a major global heat spike between 50 million and 35 million years ago. The world’s oceans were thrown into turmoil, and the bottom-walking ancestors of the anglerfish began to explore the wider oceanic world.
“It happened in the blink of an evolutionary eye about 50 million years ago,” Mr. Brownstein said in an interview. “It was like whales going back into the ocean. It was amazing.”
The team found that, simultaneously, the fish developed their unusual reproductive skills. It was unable to determine which came first — temporary or permanent attachment.
Some female anglerfish can grow quite large, reaching more than three feet in length, but most are smaller. The free-swimming males typically are a few inches long.
How do they find the females in the perpetual darkness of the deep sea?
Mr. Brownstein said the males have enlarged nasal organs that are thought to let them follow faint trails of female pheromones through the darkness in order to find their partner.
“You sniff out your mate, literally,” he said.
William J. Broad has reported on science at The Times since 1983. He is based in New York. More about William J. Broad
Explore the Animal Kingdom
A selection of quirky, intriguing and surprising discoveries about animal life..
Scientists expect the large, brightly colored joro spider to arrive in the Northeast sometime this year. Here’s what to know about these spider invaders .
Wombats build extensive burrow networks and don’t seem to mind when other woodland creatures use them as flameproof bunkers, offering a possible way for other animals to survive wildfires.
An analysis of elephant calls using an A.I. tool suggests that the animals may use and respond to individualized rumbles .
How did the ghoulish creatures known as anglerfish pull off the evolutionary feat that let them essentially take over the ocean’s sunless depths? It took extremely peculiar sex .
The Lord Howe Island stick insect vanished from its home, but an effort at zoos in San Diego and Melbourne highlights the possibilities and challenges of conserving invertebrate animals.
Advertisement
Dismantling The Dollhouse Castle Under 30 Seconds
Dismantling dollhouse under 30 seconds.
- Photo Gallery
- Time-Warner Exhibition
- Within a year, Astolat will be on display again. If interested, click here

IMAGES
VIDEO
COMMENTS
Enjoy Doll From Paper of Temu's best price, superior quality & full range of services. Browse thousands of brands and find deals on Doll From Paper at Temu®, Shop Now.
Free 2-day Shipping on Millions of Items. No Membership Fee. Shop Now! Save Money. Live Better. Shop Popular Items on Toys & Games at Walmart®.
Step 1: Line the Suitcase Interior and Make a Ceiling for the First Floor. Pick your favourite colour and line the interior of the suitcase. I used yellow, green, and blue. The easiest way to do this is to trace the outside of the suitcase, cut the necessary shapes, and then glue them in.
Pin your longest strip to the curved edges of the smallest main piece and sew it in place. With your smaller strip, hem the short edges. Hem one long edge. Sew the Velcro to the wrong side of the strip. Hem the straight edge of the larger piece. Sew the other half of your Velcro onto the right side of the fabric.
Step 3: Choose Your Theme. The green one had one side that was covered in green/blue silk. I decided to leave that as the "outside," and make a fairy garden out of it. With moss, flowers, and decor from the Dollar Tree, I constructed a sweet porch swing out of Popsicle sticks, and hung a strand of butterfly shaped fairy lights.
You can make the complete set for the special little girls and boys in your life. Even better, invite them to learn how to sew by making this with them. Click Here for the Sewing Pattern. Project Type Make a Project. Time to Complete In an evening. Sewn by Both Hand and Machine.
Daisy Lane Dolls | Quiet Book Pattern, Busy Book Pattern, Travel Toys, Dollhouse (900) $ 8.00. Add to Favorites dollhouse pdf pattern/tutorial (338) $ 16.50. Add to Favorites Tiny felt doll with dollhouse and clothes PDF pattern and tutorial (80) $ 3.00. Add to Favorites Amigurumi Doll in Crochet House Necklace, PDF PATTERN (English Only) ...
Check out our travel dollhouse pdf pattern selection for the very best in unique or custom, handmade pieces from our dollhouse making shops.
It's a crochet suitcase travel doll house. After doing my first quiet book last year I have had a few ideas on similar projects. That's how this little house...
Instructions. Begin by painting the entire box with craft paint, inside and out. Avoid getting paint on the silver handle hardware or on the handle itself. You can skip this step if you bought a pre-decorated suitcase. Next comes the fun part… creating a dollhouse scene inside! I made a little "bed" on the inside of the lid with a felt ...
Check out our dollhouse travel pattern selection for the very best in unique or custom, handmade pieces from our dollhouse miniatures shops.
To make one you will need: Mid Century Modern Dollhouse Pattern. Felt by the yard for the pages. I used 3 colors 1/4 yard each. Felt pieces for the furniture and details. I used an array of colors many picked by my daughter but the important one to have is a light blue or light gray for the windows. I ran out of my light blue and so I had to ...
The "Traveling Dollhouse" was designed and made by a young mom who wanted to give her two-year-old daughter a dollhouse that she could take with her on a move halfway around the world. ... Any pattern contained herein may not be sold by others or distributed without purchase in any other form. About this pattern Traveling Dollhouse. by Kate ...
You can click here to see available Travel Dollhouses. To fill the suitcase, you can purchase DIY Kits and/or assembled furniture and decor from my shop. DIY Kits make a great gift for crafty kids. Each kit includes: -Suitcase. -Paper template for floor/wallpaper. -Personalized wooden luggage tag. You'll need: -Paper to use for floors and ...
UK Lass in US has a great pattern and tutorial for this adorable travel doll house for you to make. She made a barn as well so be sure to check it out :) 12/16/2008 in Gifts to Make, Parent Made, Pretend Play, Textiles | Permalink. Comments.
US 2½ - 3.0 mm. Hook size. 3.0 mm. Languages. English. written-pattern. search patterns with these attributes. This pattern is available as a free Ravelry download. Ravelry download.
Check out our traveling dollhouse pattern selection for the very best in unique or custom, handmade pieces from our dollhouse miniatures shops.
Blank Grid Dolls House Room Layout Sheets. Blank Collectible Reference Sheets. Printable Figures to Check Scale. Printable Drawer Organizers and Storage Boxes. Printable 6 Ring Planner Pages, Dividers, and Envelopes. Check out these free printable miniature projects and tutorials for original accessories to use in dollhouse or model scenes.
Description. This listing is for a PDF sewing pattern to make this charming doll house set including a soft house, a doll to live in it, and her dresses. It is an instant download, so start your project right away! This little doll is just over 5 inches tall, and has a small house all her own with as many dresses as you would like to make for her.
Mr. Brownstein said the males have enlarged nasal organs that are thought to let them follow faint trails of female pheromones through the darkness in order to find their partner. "You sniff out ...
Announcement. Within a year, Astolat will be on display again. If interested, click here. Check out our video online about NY Dismantling Dollhouse in under 30 seconds! Serving New York Minature Castle to any one from New Jersey & Colorado areas!
Papa's Travel Store, Secaucus, New Jersey. 491 likes · 16 were here. http://www.papastravel.com Papa's Travel specializes in cruise, leisure and...
SALE 3 Pattern Combo - Ellie Baby Elephant PDF Doll Pattern, Wardrobe and Travel Case (3.3k) $ 13.75. Digital Download Add to Favorites Vintage Knickerbocker Soft House Toy Portable Fabric Dollhouse Preschool Toy Vintage Doll Cottage Set (2.2k) Sale Price $28.00 ...
Travel Agency. Hudson Travel Agency, Secaucus, New Jersey. 18 likes · 2 talking about this. Travel Agency ...
Top 10 Best Travel Agents in Secaucus, NJ 07094 - May 2024 - Yelp - Papa's Travel Store, CIRE Travel - Vacations & Business Travel, Transoceanic Travel Agency, FlightOm Travel & Tours, Seven Hills Global, InterConnect USA, Hudson Travel Agency, H & S Travel & Tours, Valentino Services, Aspire Down Under