
- Air Compressors
- Air Systems Accessories
- Tire Accessories
- Awning Accessories
- Awning Rooms
- Awning Wind Breaks
- Camping Gear
- Fridge Parts & Accessories
- Fridge Slides
- Fridge Transit Bags
- Roof Rack Accessories
- Rooftop Tent Accessories
- Air Locker Parts & Accessories
- Air Locker Tools
- Differential Covers
- Front Bumper
- Rear Bumper
- Bumper Accessories
- Recovery Points
- Side Rails & Steps
- Skid Plates
- Floor Liners
- Seat Covers
- Drawer Systems
- Storage Accessories
- Driving Lights
- Auxiliary Lighting
- Lighting Accessories
- Off-Road Recovery Kits
- Recovery Boards
- Recovery Straps
- Trail Jacks
- Winch Accessories
- Coil Springs
- Leaf Spring Bushing
- Panhard Rod Bushing
- Shock Absorber Bushing
- Strut Bushing
- Suspension Stabilizer Bar Bushing
- Greasable Shackles
- Panhard Rod
- Suspension Hardware Kit
- Suspension Stabilizer Bar Spacer
- Control Arms
- Leaf Springs
- Torsion Bars
- Merchandise
- Advance search result
- Catalog Search
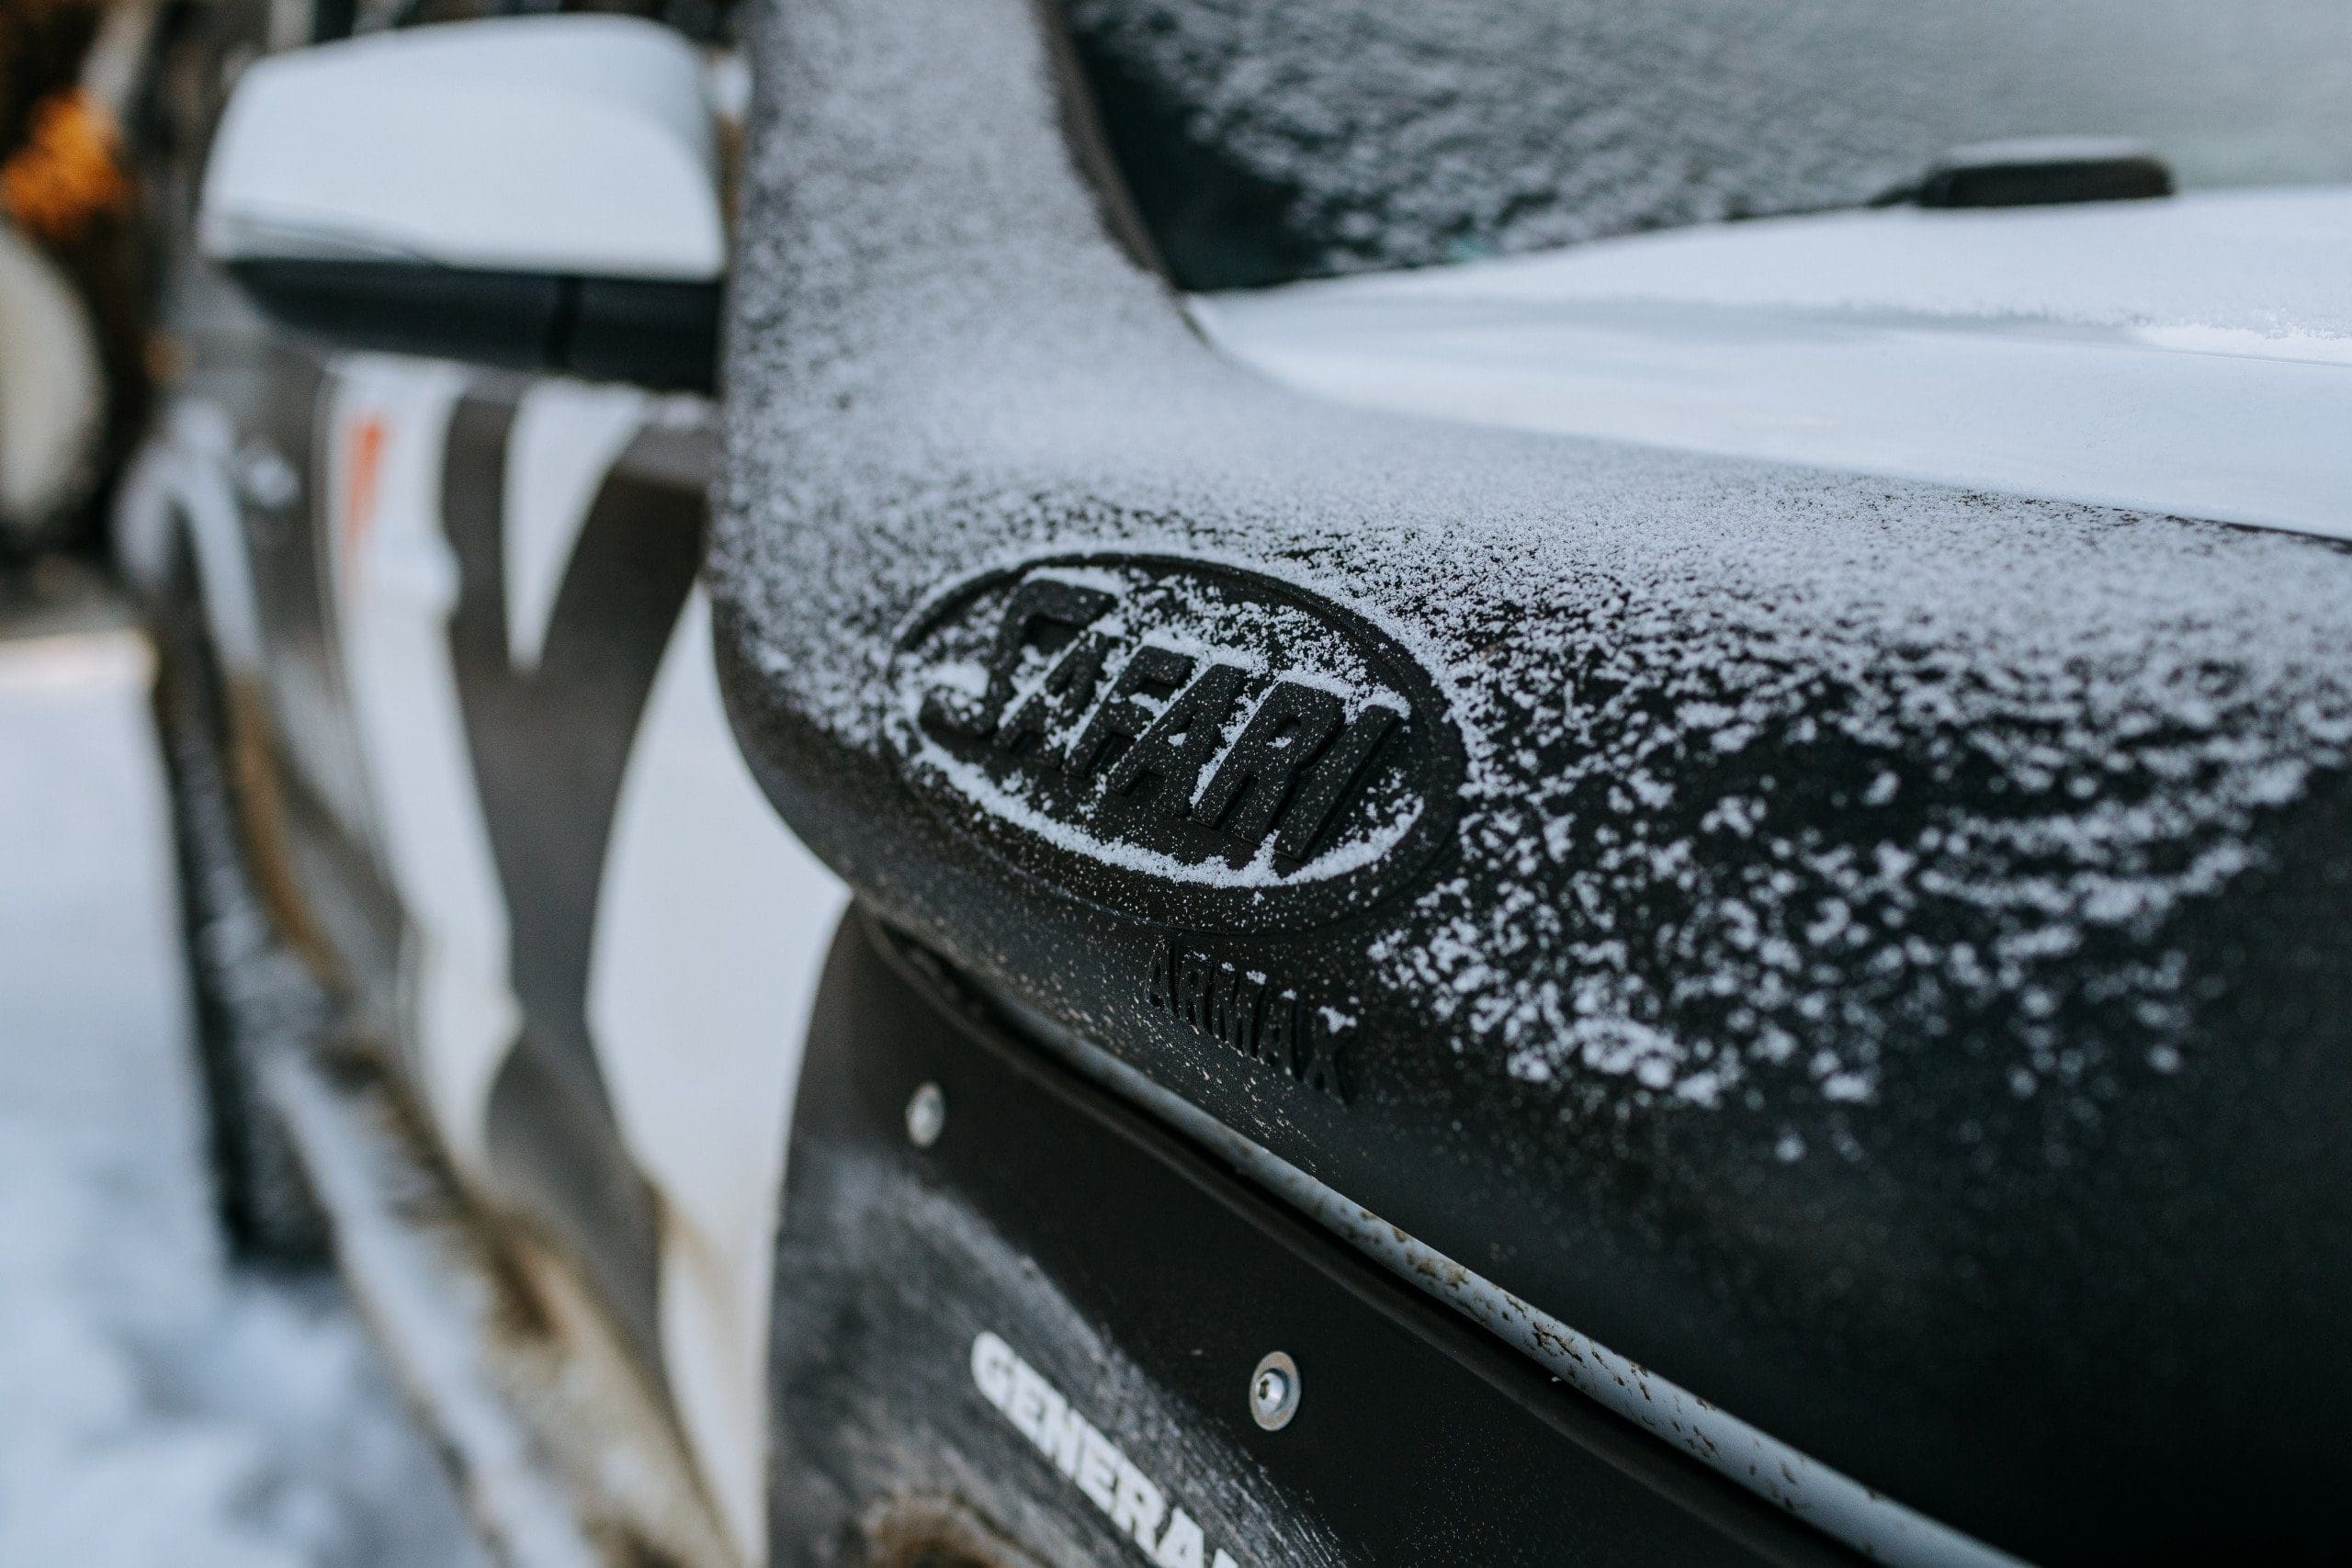
Breathe easy and roll through rivers; Safari 4x4 off-road snorkels deliver cold, clean air to your engine.
Showing 32 products on the page

- Create New Wish List

Safari RSPEC Snorkel SS82R

Safari ARMAX Snorkel SS450HP

Safari VSPEC Snorkel SS1080HF

Safari ARMAX Snorkel SS172HP

Safari Snorkel Air Ram Grill 000135500

Safari Snorkel Air Ram Grill 000135600

Safari Snorkel Pre Cleaner PBH000253

Safari VSPEC Snorkel SS420HF

Safari ARMAX Snorkel SS88HPE

Safari VSPEC Snorkel SS1070HF

Safari VSPEC Snorkel SS170HF

Safari ARMAX Snorkel SS171HP

Safari ARMAX Snorkel SS88HP

Safari ARMAX Snorkel SS89HP

Safari ARMAX Snorkel SS89HPE

Safari Snorkel Air Entry Hose 315-024-500

Safari Snorkel Air Entry Hose 320-024-200

Safari Snorkel Air Entry Hose 362-024-000

Safari Snorkel Pre Cleaner PBH024256

Safari Snorkel Upper Mounting Bracket 337-032-000

Safari VSPEC Snorkel SS1000HF

Safari VSPEC Snorkel SS1066HF

Safari VSPEC Snorkel SS1130HF

Safari VSPEC Snorkel SS1135HF

Safari VSPEC Snorkel SS190HF

Safari VSPEC Snorkel SS385HF

Safari VSPEC Snorkel SS440HF

Safari VSPEC Snorkel SS445HF

Safari VSPEC Snorkel SS79HFZ

Safari VSPEC Snorkel SS89HF

Safari VSPEC Snorkel SS983HF

Safari VSPEC Snorkel SS56HF
- Get Started
- Accessories
- Acc Lighting
- Front Bumpers
- Rear Bumpers
- Rock Sliders
- Skid Plates
- Trail Tested
- Maintenance
3rd Gen , Accessories , Install , Off-Road , Overland , Review
Arb safari snorkel 3rd gen tacoma review.

Alright, here we go… a mod that I probably waited too long to do. The snorkel.
Before my Tacoma, I had a 4th Gen 4Runner. That truck ran a snorkel for two, call it main reasons.
- 1. It sealed up my exposed air box (missing fender liners) and lifted the air intake to the roof line.
- 2. It looked super rad (in my opinion).
However, that snorkel was a cheap Amazon find. It was for an 80 series (I think). It worked ok. Got the job done. Didn’t sit well or really have any instructions or anything. It also needed a ton of modification. For example, I had to cut into the body to make room for the new tubing – there was no way it was going to fit any other way. The point is.. it worked, but not in a very calculated fashion.
This time, I knew what I wanted (needed). A tried and true, tested system with EVERYTHING I needed, right off the bat. And the ARB warranty and support – which has always been good to me.
Enter the ARB Safari Snorkel. Let’s run through a quick installation guide (ARB also provides one) and review.
ARB is currently sold only through retailers. I got this one from Mudify. These guys stock a ton of ARB products for fast shipping, and also have good customer service.
Find It Online
- ARB Safari Snorkel (3rd Gen Tacoma): Check Price
Table Of Contents
Why should you add a snorkel.

What Is A Snorkel?
A snorkel is a series of tubing, connections, and airways that takes the point of air intake from a lower point on the vehicle (passenger wheel well, under fender liner) and moves it closer to the roof line. The result is a sealed system that allows temporary exposure to water that may have otherwise been taken into the intake, and immediately into the motor. This would cause catastrophic failure in the form of hydro-lock. Yes, that means a new motor. Not cheap.
Think of it as cheap insurance – especially if you wheel your truck. Exposing your intake to water, especially as a newer driver, is easier than you might think. And freak accidents can happen. Investing in one is a great preventative measure.
Why Would You Want One?
I’m not going to go into anything crazy complicated here. There are a few main reasons to add a snorkel, and a few secondary reasons that I’m sure are up for debate.
First, and most obviously, as described, is moving the air intake out of harm’s way from potential water intrusion. This can protect your vehicle and decrease the likelihood of water getting into your motor. It can also allow you to risk doing deeper water crossings. This can be expanded to include dust, since the fenders are typically more exposed to dust off-road than the roof. So you are avoiding unnecessary dust intake. This can further be improved upon with a pre-cleaner.
Many would argue that a snorkel is a sort of “cold air intake” where air in the fender can potentially be warmer than the ambient air outside. I would guess this applies more to slower driving, as the air movement as you drive 50, 60, 70+ mph on the highway may negate that. However, I still think there is somewhat of a valid point here.
A different line of thinking could also suggest that since the new intake head on the snorkel is bigger than the factory opening, and that it usually faces the rushing air as you drive, that is allows the motor to “breathe” easier. Don’t quote me. I’m not saying you’re getting any true forced induction. But another idea I’ve seen discussed.
Key takeaway – snorkels have value relative to their cost to the decreased risk involved with off-road and overland travel. With some secondary effects. Pretty simple.
This is all reinforced the harder you wheel, and the more water/dust you see. One is especially useful if you lose your fender liners like I did, when I trimmed my fenders/flare for tire clearance.
Installation

Install is not as bad at you might think. The right tools are important. You should have a good understanding of hand tools. But there is some room for error when it comes to cutting and drilling. Just move carefully, and really make sure everything lines up. Check it ten times if you have too. Worst case – you can buy a new fender. But we don’t want to do that. So use this guide and take your time.
ARB also gives you detailed instructions.
Required Tools
- Mechanic’s toolset
- Drill + bits
- Cutting tool (jig saw, or similar)
- Dremel (or some kind of smaller saw/cutting tool)
- Screwdrivers
- Utility knife
- Painter’s tape
- Double-sided exterior automotive molding tape (optional)
Step 1. Remove Air Box

To start, I’ve seen people get really into removing extra components. Wiring, separating the top of the airbox from the intake, etc.
While you can do that for peace of mind, there is plenty of slack to work with, and you should be able to save some time.
Unclip and open the airbox. Pull out your filter. Check to see if it needs replacing.

Next, take out the bottom portion of the airbox. There are three screws total. Two are pictured here. One is to the left of the box.
Step 2. Remove Air Inlet & Trim Air Box

Once you have the airbox out, remove the inlet, seen in the picture above on the bottom. You can dispose of this.

You will need to trim the mounting tabs for the inlet you just removed. I used a Dremel. Simple and easy. Final cuts seen above.
Step 3. Apply Template & Mark Holes

Now apply the provided template to your passenger’s side fender. Make sure that all the lines are evenly matched to the ends of the fender.
Carefully tape it into place. Second set of hands here is nice.
Take a marker and mark all the holes.
Step 4. Drill & Cut Holes

Now drill the holes. Use a step bit, or step up your drill bit size for a clean hole. I used two drill bits to make the smaller holes.
I also make a hole in the larger circle with enough room to get my jigsaw into. Then I made the entire cut. This helps to make it look cleaner.
You don’t have to use a handheld jigsaw, but it is quick and easy.
DO NOT use a hole saw here. It’s a terrible mistake and you will do damage.

Clean up any burrs. I also used a Q-tip dipped in a small cup of some black spray paint to protect the bare metal on all my cuts. I would not skip this step.
Step 5. Install & Secure Flexible Tube

It’s important to note, if you don’t have an aftermarket bumper or cut fenders/flares like I do, you will need to remove your liner beforehand. There are several clips and a few screws to pop the liner out.
Once the liner is removed, take the large rubber connector tube and insert it through the factory intake inlet hole. There is a notch on the tubing so you understand its orientation. A good reference photo is seen above.

A shot from the inside of the engine bay. Make sure to put the hose clamp on before you reinstall the airbox.

Attach the airbox to the new intake tubing. This can be tedious. Install the tube before you secure the airbox again.
The hose clamp might give you a hard time. Make sure it is sitting in the groove on the tube all the way around. You will have to feel around to make sure. This is crucial because you need a good seal here.
Once that is done, you can reattach the airbox, and reassemble the filter, cover, etc.
Step 7. Prepare Body

Prepare the snorkel body with blue thread locker and the threaded studs.

This is another key step. Above you can see the bracket that ARB wants you to bolt to the snorkel, and rivet to the A-pillar.
I chose to use double sided exterior 3M automotive tape. I found it at my local auto parts store. Added a piece along the bracket, and trimmed to fit.
Not necessarily recommended, and not that I am afraid to drill into my truck, I did not want to this time and wanted to test this alternative.
Note: This fitment works okay. I could have done a better job lining it all up with the truck, but there is some movement above 30-40 mpg and at highway speeds. I’m not currently bothered, but know that this is a risk. You can always go back and add rivets. You can’t undo drilling the holes and placing rivets as easily. I do think I could get it a little tighter though, and get less movement – the tape could have better contact.
Step 8. Attach Body To Fender

Take your snorkel body and align with the holes. Depending on how well you did, it may slide right in. It may not. You might need to drill out some of the smaller holes. This did happen to me, but no big deal. Only a small delay.
Eventually, with a little physical persuasion (lol), we got it all to line up nicely. Don’t panic if it doesn’t work the first time. Again, some margin for error here.
Obviously be mindful that you also need to get the plastic intake end to meet the new tube. Another set of hands will help here.

Take all the washers and nuts and tighten the snorkel down to the fender.

Add the other hose clamp to the connection between the new tubing and snorkel body.

Bam! Almost there.
Step 9. Mount Head

Finally, take the snorkel head and the black clamp, and attach it appropriately to the body. That’s it! Not so bad.
Finished Product

I love it! I’ve done this before, and become more comfortable with cutting trucks. But even with documentation, this was pretty straightforward and we were able to move along.

A quick close up shot of the 3M tape and bracket. It attaches relatively well, but again, the contact could be better. I could easily redo the tape though. We will see.

The real question…? Have I crossed any super deep water? The answer… Not yet! However, I don’t need to submerge the truck under a huge amount of water to note that this system fits great, seals really well, and will do the job when expected to.
I’ve used a snorkel before, and I can tell you that I certainly felt better on the occasions where we were wheeling along, many states from home, and unexpectedly dropped into a deeper than anticipated river. The same goes for nights where we saw flooding and I accidentally hit massive pools of water late at night, that could have ended badly.
The fit and finish is awesome. ARB stands behind their products. And to top it off, I absolutely love how it looks. How could you go wrong?
Final Thoughts

Bottom line? Protect your engines. Invest in a snorkel if you plan on wheeling and adventuring hard to remote places.
I’m stoked with how this turned out – no complaints whatsoever. Let me know if you have any questions!

Konrad Chojnowski
Nothing like a day on the trails and a night under the stars! I'll drive just about anywhere to disconnect and have a rad experience.

Self tapping stainless screws and RTV on the pillar. Honestly will you ever remove your snorkel? If you do you have to replace your fender and filling two small holes and blending in your fender to match the door and pillar you would paint anyway is not a big deal. Best to have a secure fitment so nothing vibrates loose or rubs paint away leading to rust. Last note, deburr all the holes. Installing a cyclone greatly improves dust performance otherwise you are literally scooping it up. Sure, the intake is higher and helps but it’s really not effective without. … Read more »
You’re not wrong about mounting the snorkel directly. And as I mentioned, I’m not opposed to drilling into my truck. I was in part experimenting with this alternative, since I know many people have had the same idea. I agree with what you are saying in general. I did mention under the photo about painting the holes to remove all burrs. A pre-cleaner surely helps to eliminate the majority of dust exposure. But the idea of getting less dust is considering that there is much more dust at wheel/fender level than there is at the roof line. I can say … Read more »

It might be worth noting that snorkels aren’t as useful for fording water in the Tacoma as many think without additional and extensive modifications in the engine bay. The Tacoma (and most Toyota trucks) have a critical [and incurable] design flaw for water fording, which is the location of the alternator below/at the level of the top of the tire. Adding a snorkel to the Tacoma to put your intake at six feet high (or thereabout) without extensive waterproofing to the engine, and carrying a spare alternator for the almost certain contamination of bearings and destruction of most of the … Read more »
Man. A lot to unpackage here, haha. To start, while I understand the textbook logic behind this answer, the real-world application is a bit different and may relay the wrong message to someone reading it. You absolutely can ford water in a Tacoma, relatively safely (albeit there is always risk) despite the concerns you mentioned. I’ll explain why. While the alternator (and other components) may be exposed, the only time that this will be a concern is if the vehicle (unfortunately) gets stuck in the water and there is no motion. With the proper technical approach, even if the water … Read more »
Right! And I don’t disagree with what you say here. To be clear, I’m not saying that crossing water deeper than your alternator will damage it immediately and in the moment; I’m saying: (a) that could happen, and (b) the damage will be there and will more likely manifest over the longer-term. As in, you submerge a bunch of unprotected electrical connections and your spinning alternator, it will diminish the life of your alternator and other components in ways most users will not understand is connected to a prior decision to float their Tacoma/Toyota truck. Notice how many caveats there … Read more »
Totally. I think we are on the same page. We certainly want to present as much information as possible. Only so much that I can put into a quick install and review without losing the user in the technicalities. Ultimately, we should cover this to every length possible under – “everything you need to know” – like everyone else, I invite you to write a post for us. I think you would be a good fit for this post and other technical ones. Shoot me an email! We pay for this kind of stuff. [email protected] The only thing I want … Read more »

Now you have me thinking a snorkel would have been a good investment for my last build. I was on the fence about weather to snorkel or not. This article has opened my eyes to things never considered before. With the amount of snow runoff this year a snorkel would almost be an essential element for river crossings. I’m not sure if the new build would benefit from one though. Going a different direction this time. Thanks again for expanding my knowledge of useful Tacoma products. Great site, really enjoy it
I would say that anyone who spends any time near dust or water could benefit. Ultimately, it’s for peace of mind and insurance in case something happens. I’d be lying if I didn’t account for the looks too, haha. Thanks for commenting and being involved!
GET 20% OFF
Take up to 20% off at the 4runner store.
SALE ITEMS, CLICK HERE!
- [email protected]
- (941) 260-5229
- Create Account
- All Categories
- Accessories
- Camping Gear
- Performance
- Wheels & Tires

03-09 4th Gen 4Runner V8 ARB Safari Snorkel
Adding product to your cart
SKU: SS440HF
A safari snorkel system relocates your engine’s air intake point from the relatively low and vulnerable position under the hood to a much higher and safer location where a constant source of cool, clean, dry air is available. Manufactured from premium quality polyethylene, safari snorkels are incredibly resilient and UV stable. Install one before your next trip and breathe easier knowing that your engine is protected by a safari snorkel.
UV stable crosslinked polyethylene body for the ultimate in strength. High flow air ducting and body ensures air supply in excess of engine requirements. Each component is designed for maximum dust and water sealing stainless steel and plated hardware for corrosion resistance. Unique evacuation system effectively disperses rain and unwanted moisture. Completely Australian designed and manufactured
Subscribe to our newsletter
Promotions, new products and sales. Directly to your inbox.
- Choosing a selection results in a full page refresh.
- Press the space key then arrow keys to make a selection.
Shopping Cart
No products in the cart.
- Mods 1 – Getting Started
- Mods 2 – Tire Size Guide
- Mods 3 – Tire Buying Guide
- Mods 4 – Performance
- Mods 5 – Lift & Level Kits
- Mods 6 – Grille Kits
- Mods 7 – Headlights
- Mods 8 – Fog Lights
- Mods 9 – Rock Sliders
- Mods 10 – Roof Racks
- Mods 11 – Front Bumpers
- Mods 12 – Rear Bumpers
- Mods 13 – Skid Plates
- Mods 14 – Wheels
- Switch Systems
- Rooftop Tents
- Acc Lighting
- Tail Lights
- Rock Sliders
- Skid Plates
- Front Bumpers
- Rear Bumpers
- Accessories
- Recovery Gear
- Refrigerators
- Trail Tested
- Maintenance
5th Gen Mods , Accessories , DIY , Expeditions , Install , Off-Road , Overland , Performance , Reviews , Trail Tested
Arb safari snorkel install & review – 5th gen 4runner.

ARB Safari Snorkel Step-By-Step Install On The 5th Gen 4Runner: Full Review & Product Overview
While the majority of 4Runners sold here in North America will sadly spend most of their miles on pavement, there are some that will see a lot of time off-road, either out of necessity or for recreation.
For those on dirt, there are certain modifications that are smart to consider to extend the life and comfort of your 4Runner. Suspension upgrades, tougher tires, bolt-on armor, etc… While all of these upgrades are valid, what upgrades are being made to protect the motor while on the trail? The motor only has a few points of entry or exit that will cause damage or wear over time: the intake and the exhaust. The exhaust side of the equation is less of a concern because it’s pushing gasses away from the motor, so let’s focus on the intake side as its job is to feed the engine with clean air.
ARB Safari Snorkel for 5th Gen 4Runner
Benefits of a snorkel.

The stock air intake on the 4Runner pulls air from the space between the inner and outer front fender on the passenger side. With the plastic fender liner installed, a good amount of dust and water will be averted from the open intake hole. But take a long trip through the dust, or ford a river and you risk a clogged air filter or worse—water in your intake box.
If you have aftermarket front fenders and no longer have the factory fender liner, you can take that risk and increase it. How do you minimize or eliminate the risk? Like many great answers to overland questions — ask the Aussies! There’s no coincidence that one thing you’ll see on many Australian vehicles who spend time off-grid is a raised intake or snorkel. Drawing clean air from a windshield height intake will help prolong your engine life, reduce filter replacement, and eliminate water intake problems. Many vehicle manufacturers offer raised intakes from the factory for overseas applications, but unfortunately, Toyota hasn’t made an option for the 4Runner, but we’re not lost.
ARB Safari Snorkel

Safari Snorkel has been one of the leaders in the snorkel aftermarket for decades and has an extensive product offering that includes our 5th Gen 4Runners. They use a UV-stable polyethylene material that has been CAD-designed for optimal fitment and airflow specific to the 4Runner. Paired with their signature Air Ram head, the snorkel is designed to work in the harshest conditions keeping dirt, debris, rain, and rivers out of your vehicle’s intake.
Find it online:
- Safari Snorkel Kit (Part #SS450HP) 5th Gen 4Runner: Check Price
Install Overview

- Safari Snorkel SS450HP
- Air Ram head
- Adapter boot
- Hole/cutting template
- Upper mounting plate
- Miscellaneous hardware
Tools and Materials
- Painter’s tape
- Permanent marker
- Marking punch
- #5 step drill bit
- Miscellaneous drill bits up to 5/16”
- Right angle drill (optional)
- Body saw (air reciprocating saw)
- 80-grit sandpaper
- Deburring tool
- Loctite Blue 242
- Rustoleum black paint
- Silicone sealant
- Rubber mallet
- Body clip tool
Step 1. Prep Surface

To start, go ahead and prep the area you’ll be working on by washing the front passenger side of the 4Runner. This will remove any contaminants and make sure you have a nice “seal” between the snorkel and the body panel when you’re all finished.
Step 2. Remove Airbox

Remove the upper half of the factory airbox loosening the 10mm clamp on the intake hose closest to the airbox, and removing the factory MAF harness from the intake. You can leave the intake hose attached to the throttle body, but put a nitrile glove over the hose to prevent any contaminants from entering the intake while you’re working.
Remove the three 12mm bolts attaching the airbox to the fender, and roll the airbox towards the firewall to gain access to the bottom of the intake wiring harness. There is one clip to undo here. Remove the lower section of the airbox.
Step 3. Remove Factory Intake Duct

While you have the airbox handy, remove the factory intake duct using a small pry tool. This is where the new adapter hose will attach later on. After removing the inlet, give the whole lower section a thorough cleaning from debris that might have been in the airbox from before. This will also allow you to have a benchmark for how well the snorkel is performing after you’ve installed it.
Step 4. Seal Factory Drain Holes

The factory airbox has two drain holes in it, one on the side that faces the front of the vehicle and one on the bottom. It’s optional, but I would recommend using silicone caulking to fill these holes to seal up the intake. This will keep your intake sealed during water crossings, but will also keep any water that goes into the snorkel (unlikely) in the intake. So if you do seal the intake, make sure you check it occasionally if you’re operating in heavy rain or snow to make sure it’s dry. Once the silicone is applied, set it aside and let it dry while you work.
Step 4. Mask Off Work Area

Next, use the painter’s tape to tape off the area of the fender that you’ll be working on. Use the template as a guide, going all the way down to the fender flare. Make sure you add some tape over the seam between the fender and flare so metal shavings don’t pile up in them when you drill. Taping the whole work area will help keep your fender from being accidentally scratched while working. It’s not a required step, but it’s a smart step to take to protect your 4Runner.
Step 5. Put Layout Over Tape

Take the template out of the box and line it up on the back of the snorkel to make sure all of the holes match up. This preventive step helps to ensure you’re not drilling the wrong holes if you were supplied the wrong template! Attach the template to the fender using painter’s tape, aligning the left edge with the door jam and the top with the top of the fender. Make sure you thoroughly tape the edges so everything lines up properly and matches the contours of the fender.
Step 6. Outline Layout

With the template installed, mark the holes with a permanent marker. Once marked, remove the template and set it aside.
Step 7. Install Studs into Snorkel

Before getting into the drilling portion of the install, grab the six 8mm studs from the hardware bag. Apply some Loctite 242 to one half of the thread on the stud, and install them into the snorkel. Doing this ahead of time will allow the Loctite to set a bit before you add the nyloc nuts during install.
Step 8. Remove Inner Fender

Remove the plastic inner fender liner from the front to the back starting with the body screws under the factory bumper working through the plastic clips and screws towards the firewall. Use a body clip tool to pry the factory clips without breaking the heads off. You’ll only need to pull the fender liner a little more than halfway down. Just far enough to be able to reach back to the rear-most mounting bolt.
Step 9. Drill Holes into Fender

Back to the outer fender… With the holes now marked take a marking punch and punch a mark in the center of each pen mark. This will help keep the drill bit centered when you begin to drill. With the center punched, take your step drill and drill the six mounting holes in the fender. Make sure you are wearing safety glasses for this task as metal in your eye will ruin your weekend install. Take your time and once the appropriate diameter has been reached, spin the bit lightly a couple more revolutions to clean up the hole edge. You’ll want to drill to 16mm, or 5/8” for the mounting holes. No turning back now!
When drilling the hole closest to the passenger door, make sure you have enough clearance behind the fender so you don’t hit the inner fender. Have someone you trust poke their head in the fender to watch while you drill. Make sure they’re wearing safety glasses as well.
Step 10. Drill Cut Start Point

With the mounting holes drilled, mark your hole for the starting point for the inlet hole. You’ll need to choose a size that’s large enough to accommodate your saw blade of choice. Make sure when you mark your hole, mark it on the INSIDE of the area to be cut and far enough from the cut line to make sure you’re not drilling into the portion of the fender you’re keeping.
Step 11. Cut Out Big Hole

After drilling the starter hole, it’s time for the main event. I would recommend taking this moment to enjoy some liquid courage as you’re about to cut a big hole in your 4Runner. Beverage consumed (and then some time to re-group), grab your body saw. I used a pneumatic reciprocating air saw for this task because it’s a precision saw that leaves a thin kerf and a very smooth finish. Use good lighting for this job to make the line more visible. Take your time, adjusting your position to get the best stability during the cut. You can use a magnet across a cut section of the hole to hold the inner piece in place when you finish your cut so it won’t fall through. Breathe easy, the hardest part is over!
Step 12. Clean Cut Holes

Use the deburring tool to remove any metal burrs from the holes you just cut/drilled. Lightly use your finger to feel the inside of the holes for burrs. On the larger intake hole, use 80-grit sandpaper to smooth off the edge of the hole, if needed. Remove the painter’s tape when you’ve finished cleaning the holes.
Step 13. Test Fit Snorkel

Take your snorkel with the studs pre-installed and line it up with the fender to check the fit with the new holes. With any luck, you’ll have a perfect fit with no adjustments needed. If your holes are off, use a die-grinder to adjust them.
Step 14. Mark Drill Holes on A-Pillar

Use this time to mark your A-pillar mounting plate. Mockup the snorkel, and look at where you’ll need to apply painter’s tape. Remove the snorkel, and apply the tape with a few inches on each side. Then reapply the snorkel with the upper plate installed to mark where the plate will be attached to the A-pillar. Use your permanent marker to mark the top, bottom, and windshield edge of the plate. Remove the snorkel and the plate from it. You’ll come back to this in a bit.
Step 15. Paint Drill Holes

With the holes cleaned up, use a Q-tip to apply a layer of paint on all bare edges of metal. This will help prevent any rust from eating away your fender underneath the snorkel. Let the paint dry while you move on to the next step.
Step 16. Drill Pilot Holes into A-Pillar

Take the upper mounting plate and realign it with the marks you made earlier. Then using your permanent marker, mark the three holes you’ll need to drill in the A-pillar. With the holes marked, use the marking punch to set the center of the holes to drill. Starting with a small drill bit (1/16”) drill a pilot hole with your right angle drill. You can use a standard drill for this, but the right angle drill will allow for more depth control when drilling. You’ll want to just break the surface with these holes, but you won’t need to worry about any airbags in the A-pillar.
Step 17. Drill Final Holes into A-Pillar

After drilling your pilot holes, you can get ready to drill the holes for the plastic clips supplied in the snorkel kit. My final hole size was 5/16” to where the clips fit snugly with a hammer tap to set them. I would recommend drilling a 9/32” hole first, checking for snugness with the clip, then widening to 5/16” if needed. You want these to be as snug as possible to help hold them in place. Remove the painter’s tape.
Step 18. De-Burr Drill Holes

With your three holes drilled, use the deburring tool to clean up your holes and paint them as you did with the holes on the fender. Let them sit for a good 10-30 minutes, depending on how warm your workspace is. I used a heat gun to help cure the paint a little quicker.
Step 19. Silicone Clips into Holes

Paint cured, grab the silicone that you used for the airbox and apply a bead around the bottom of the clip. Line it up with the hole, and use a rubber mallet to tap it into place. Gently rotate the clip once it’s seated to even out the silicone at the interface. Repeat this for the other two clips. You can remove any silicone residue by lightly wiping it off with a paper towel damp with Acetone.
Step 20. Install A-Pillar Bracket

Install the upper plate with the supplied stainless steel screws by hand. Be sure to not spin too fast or the clip will start spinning. If it does, take a thin pair of pliers to lightly grip the edges of the clip while you screw in from above. Snug up all 3 screws evenly.
Step 21. Remove Stock Airbox Tabs

You’ll need to modify the stock airbox by removing the retaining and alignment tabs where the factory inlet used to be. I used a die grinder to remove the tabs as described in the instructions and smoothed them with some sandpaper to ensure a clean fit. This is where the snorkel adapter will slide onto the airbox.
Step 22. Install Intake Adapter

Set the intake adapter into the fender with the round end through the inner fender. Slide the smaller of the two hose clamps over the end sticking through the hole with the tensioning screw facing up on the forward side of the adapter. Take the lower half of the intake box and set it into place, sliding the round end of the adapter over the intake on the box. Use a little dish soap on the inside of the rubber adapter as a lubricant if needed. Reinstall the lower airbox, along with the wiring harness clips you removed at the beginning. Wait to tighten the hose clamp until after the snorkel is installed.
Step 23. Install Hose Clamps on Adapter

Take the larger of the two hose clamps and install it on the oval end of the adapter in the fender. Snug it up just enough so it doesn’t rotate on the adapter. You’ll want the tensioning screw facing down on the rearward side of the adapter. Take a small amount of dish soap and spread it on the inside of the adapter as a lubricant.
Have one of the upper bracket bolts at the ready. Bring in the snorkel and line it up with the fender, setting it into place. Reach in from underneath to massage the adapter onto the snorkel making sure it seats evenly. Then, grab your bolt and lightly thread it into one of the upper bracket holes to keep the snorkel in place while you get ready to secure it from inside the fender.
Step 24. Install Nuts and Washers

With your six washers and nyloc nuts handy, thread one of each onto the six studs inside the fender. Tighten them evenly with a ratcheting wrench, eventually getting them all snug on the fender. Once the snorkel is secured from inside the fender, add the upper mount bolts on the A-pillar and tighten them until they’re snug.
Step 25. Tighten Hose Clamps

With the snorkel fully secured, tighten the hose clamps with a 7mm socket on both the snorkel and the intake side of the adapter.
Step 26. Install Airbox

Make sure your airbox is cleaned out using a vacuum and rag, then reinstall the filter and upper half of the air box. Tighten the hose clamp (10mm) and reinstall the harness clips/plug before securing the upper airbox.
Reinstall the inner fender liner after you have cleaned out any metal shavings from the drilling using a vacuum. Use the driver’s side if you can’t remember which clips/screws go where.
Step 27. Install Air Ram

Finally, attach the Air Ram head to the top of the snorkel using the provided black hose clamp with the tensioning bolt facing back. That’s it! You’re done!
Trail Impressions

With the snorkel installed, it isn’t really noticeable from the driver’s seat. You’ll only know it’s there from the grief you get from your significant other when you pick them up from work…ask me how I know.
Aesthetically, the Safari Snorkel will change the exterior appearance of your 4Runner and may look a little out of balance if you have a mostly stock 4Runner. That being said, this is a functional upgrade, first and foremost. If the Safari Snorkel gives you what you need when you need it, who cares what it looks like. On a mild to wild build, this snorkel looks right at home with its black textured finish.
Road Impressions

On the road, there is surprisingly no increase in sound from the snorkel either from wind or intake noise. You do get some increased intake noise if you rev the engine while parked, a benefit for overland parking lot meetups…joking.
Final Thoughts

Functionally, the snorkel has been working well on the 4Runner. I’ve taken it through a number of good water holes that have been covering the trails here in Central Oregon with no water to show in the airbox. I have also driven through heavy rain and snow with the snorkel with no accumulation in the intake, which is promising. The major factor I haven’t been able to test yet is dust, which was my main reason for installing the snorkel. With winter set in here and plenty of moisture in the dirt, I won’t get a good idea for dust until later this year.
I have high hopes for this Safari Snorkel to keep my airbox clean and dry through all of the conditions that I intend to put my 4Runner through in the years to come. It’s big, burly, and built to take a beating — much like the 4Runner itself.

Max Sheehan
Freshly rooted in Central Oregon, I have always had an eye for the outdoors and the vehicles that get you there. As a gateway to the wild, I have spent weekends exploring the best that the west coast has to offer in my expedition style 4Runner.

Thank you for the great write up! I just installed my snorkel following it.
One thing that I figured out that helped was to tape over the washers holes with painters tape (the ones that go on the inside of the fender). Then poke a little starter hole in the middle of the tape to use to press the washer onto the studs. This way the washers have a little bit of friction from the tape to hold them on when pushing them onto the studs giving you all the time you need to get the nut ready.
I only needed this trick for the upper 2 left studs that are very hard to reach with large hands.
I’d welcome thoughts for the nuts. I lost 2 in the process somewhere in the fender and had to buy more. I thought about hot gluing the nut to the washer so they go on as one unit, but that was after I already lost 2 so I never tried it.

Will this install be different for the 2020? There are SRS airbags in each of the A-pillars; what’s the possibility of activating/damaging the airbag system when drilling into the passenger side pillar?

No . Air bags are behind the a piller trim on inside. There is a Chanel in between on the outside. When you drill in its does not go through to inside of vehicle

Look at Snorkel Upgrade for a pre filter.
It’s almost like you know what article is dropping soon! 😉 I’ve been very happy with the one I installed on this ARB snorkel.
- Get Free Parts & Get Paid! Apply to Write
GET 20% OFF
Take up to 20% off at the trail 4runner store.
AFTERPAY total order limit is $1999. If you wish to purchase an item where the shipping added is over this amount please contact us.
Item added to your cart
Collection: safari snorkels & armax performance systems.
Safari 4×4 Engineering has designed and manufactured automotive snorkels and 4WD performance systems for decades. Safari engineers industry leading products through innovative design, where each product release is the result of a comprehensive research and development program. Every Safari product produces a totally engineered and thoroughly tested solution to be used by 4x4 enthusiasts all over the world! Can't find your vehicle listed below? Contact us with your Year, Make & Model to see what is available
36 products
- In stock (35)
- Out of stock (1)
The highest price is
Ford Ranger - PX I Safari V-Spec Snorkel SS980HF
Ford ranger 08/2011-2022 - safari v-spec snorkel, ford ranger next gen safari vspec snorkel 2022 on ss987hfd, ford ranger px i, px ii & px iii - safari armax snorkel ss982hp, holden rodeo 3.0l diesel ra- lx & lt v-spec snorkel ss165hf, holden rodeo r9 2.8 diesel v-spec snorkel ss150hf, isuzu rg d max & mux 3.0l diesel 2020 onwards (d-max) 06/2021 onwards (mu-x) ss177hp, isuzu rg dmax/mu-x 3.0l diesel safari vspec snorkel, jeep wrangler jk 2.8 diesel and 3.8 petrol (lhd) snorkel ss1066hf, jeep wrangler jk 3.8l eghv6 safari snorkel ss1060hf, land rover defender 200 series 2.5 diesel from 1990-1994 v-spec snorkel ss500hf, mercedes sprinter 2006 - 2013 all engines safari snorkel ss96hf, mitsubishi pajero na 2.5l diesel v-spec snorkel 84-91 ss20hf, mitsubishi triton mq 2.4l diesel safari v-spec snorkel ss662hf, mitsubishi triton mr 2.4l diesel safari v-spec snorkel, nissan gu patrol (y61) series 2 zd30ddt 3.0l diesel v-spec snorkel ss16hfb, nissan gu patrol (y61) series 4 td42-ti 4.2l diesel v-spec snorkel ss17hfd, nissan gu patrol cab chassis series 1, 2 & 3 td42-ti diesel v-spec snorkel ss15hfb, nissan patrol y62 02/2010 - 04/2019 safari v-spec snorkel ss62hf, suzuki vitara g16b 1991-1999 1.6l petrol safari snorkel ss850r, toyota landcruiser 100 series ss86hp armax snorkel ss86hp, toyota 40, 42, 45 & 47 series landcruiser 01/1980 - 12/1984 v-spec snorkel ss401hf, toyota fj cruiser 2008 with 'all terrain package' safari v-spec snorkel ss415hf, toyota hilux 03/2005 to 07/2011 safari v-spec snorkel ss120hf.
- Choosing a selection results in a full page refresh.
- Vehicle Builds
- Gear We Use
- Overlander Network
- Overlanding Blog Overlanding Blog
Snorkel 101: Function & Step-By-Step Installation
There are few build modifications that make a vehicle look as rugged and expedition-ready as a snorkel. Also known as a ‘raised air intake’ this aftermarket addition may look cool, but it also serves some important functions.
The main purpose of a snorkel is access to clean air. Most people associate the snorkel with water crossings, as it prevents water from flooding through the vehicle’s airbox and into the engine, potentially causing electrical and mechanical damage. But a properly installed snorkel can also protect your engine from the dust that would normally enter the air intake under the vehicle’s wheel well. It works just as a swimming snorkel does – by raising the air intake, your lungs have access to the water-free air above you.
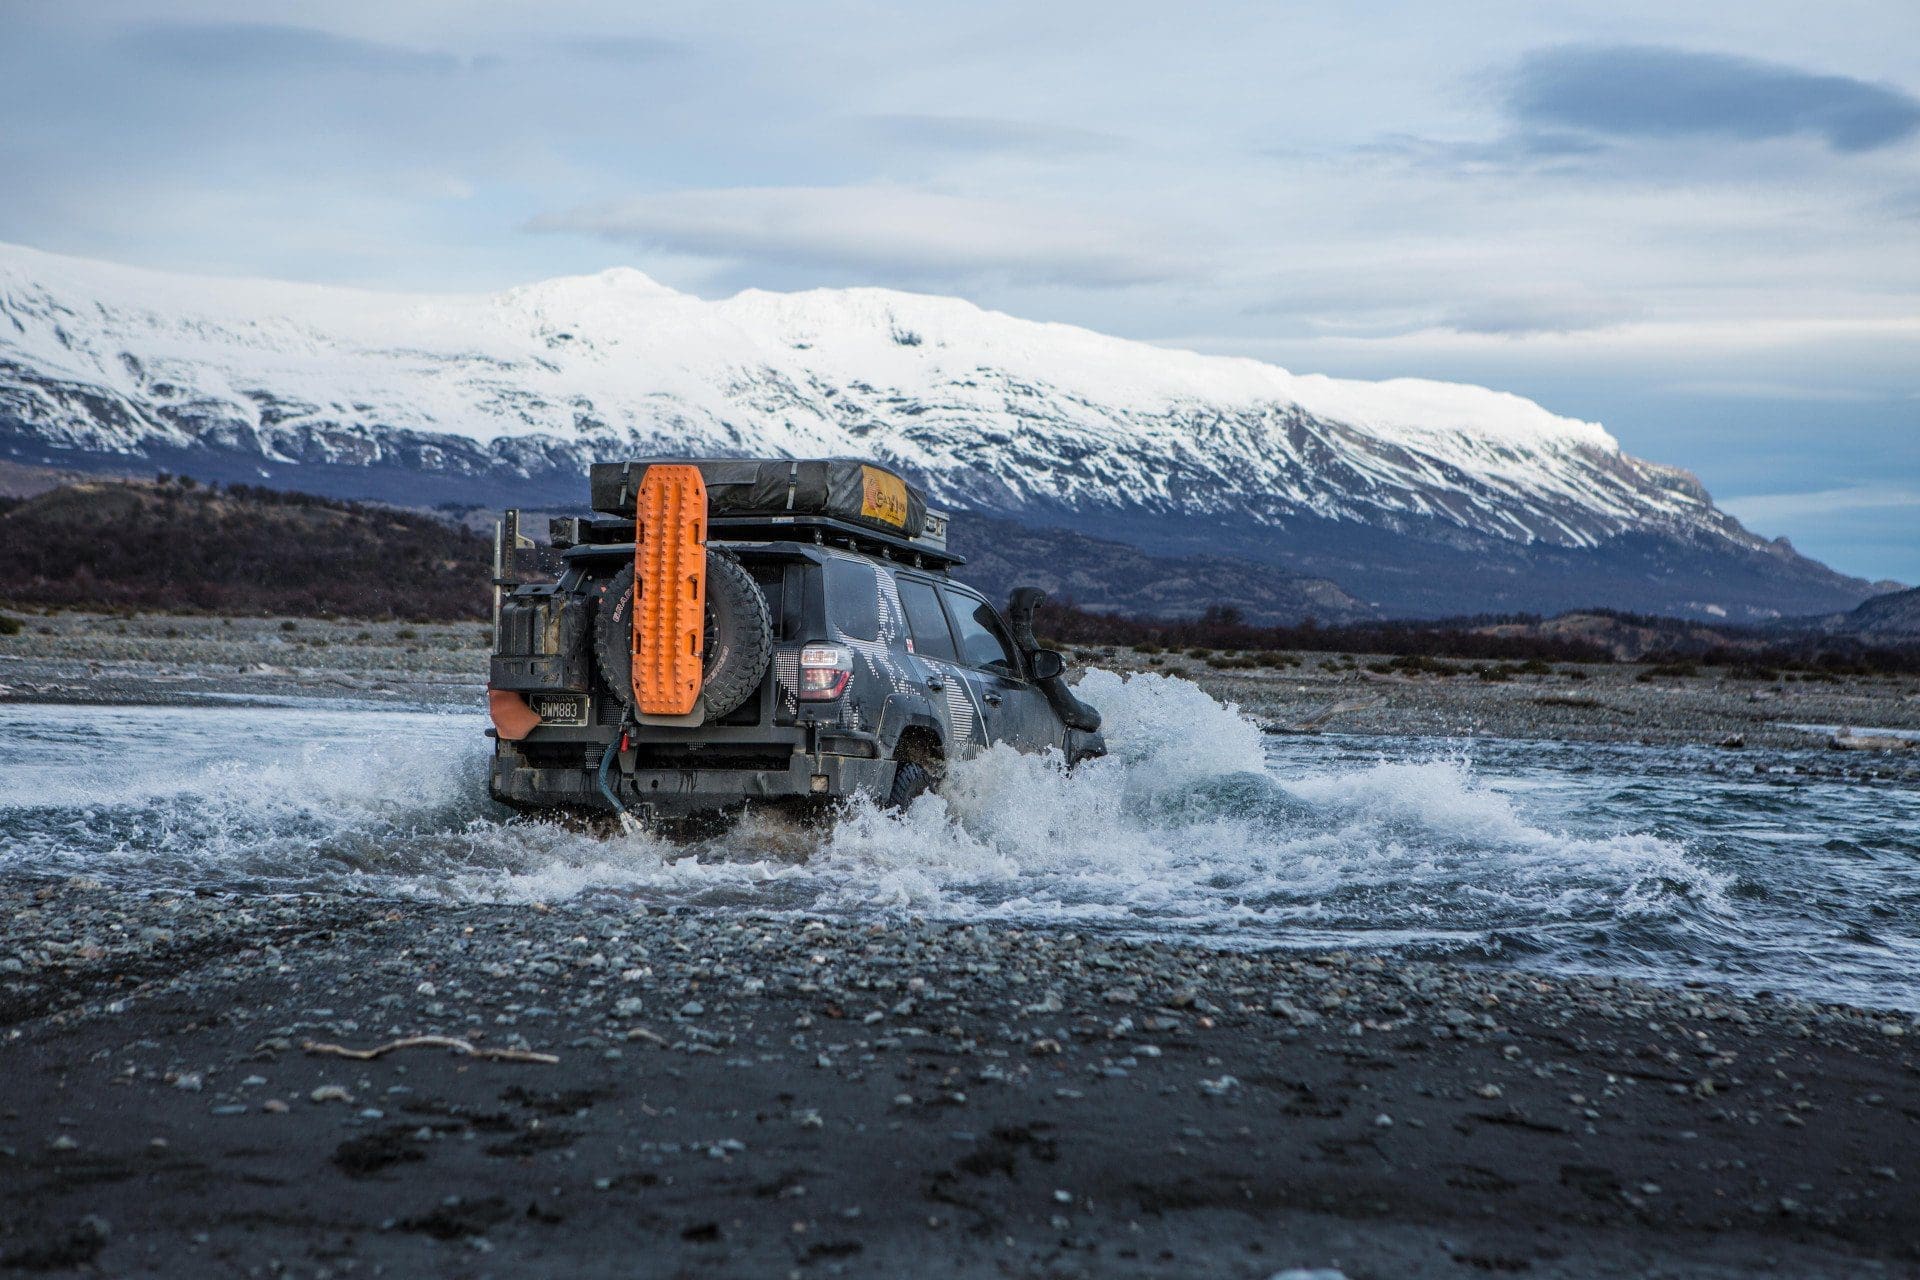
It is important to note that installing a snorkel does not give your off-road vehicle an Aquaman-like ability to breathe underwater for long periods of time. Manufacturers not only set wading and intake depths based on which components are most likely to be damaged in a water crossing, but also take into account how well sealed the cabin is from water intrusion. Have you installed a lift kit or swapped out stock tires for larger ones? These factors will also impact how you approach a water crossing.
Snorkel fitment is another important consideration. The best bet, in our experience, is to purchase a snorkel that is made specifically for your vehicle. A snug fit is important here – you don’t want any leaks! We’ve had great success with the , and have installed them on every one of our vehicles since 2010 (with the exception of the Prospector and Gladiator builds, for which AEV manufactures ). If you don’t have the tools and materials, head to your local 4×4 shop for help with installation.
A Step-By-Step Guide to Installing an ARB Safari Snorkel Intake Kit
If you do have the tools and would like to give a snorkel installation a go, we’ve set out the how-to below! Make sure to check out Episode 26 of “Oh Hey There!” with Jeff below, as the video is a great visual complement to these instructions.
1. Use the provided template to tape and mark your drilling locations .
2. Remove the template and drill the stud holes. We like to use the step-bit as it gives a nice clean cut and won’t mangle the metal as much as a normal bit would.
3. Next, cut the large hole for the airflow intake into the engine. Using a body saw is the easiest way to create the oval shape. Some kits are also designed so that you can use a four-inch hole saw to make the cut.
4. Go in and file the edges of your holes , ensuring any burrs are removed. Follow this up with a bit of paint to prevent any rust from forming.
5. Insert the studs into the snorkel. This is just for fitment at this point. We’ll use LOCTITE later in Step 9. We want to make sure everything lines up properly, because next is our most critical step.
6. Drilling holes into the A-pillar: Mark the area in tape where the bracket will be installed, lining the holes up correctly. Drill your holes, file and paint. Finally, insert the plastic tabs that will be screwed into later.
7. To install the air intake hose , first remove the airbox. Pinch together the end of the air intake hose that goes into the engine bay. Feed it up through the wheel well and into your air intake hole. Once that is in place, place your clamp around the air intake hose and reinstall the airbox.
8. Place the collar around the other end of the hose, which should be accessible through the large oval snorkel hole.
9. Put LOCTITE on the studs in the snorkel . Now you’re ready to mount the snorkel onto the vehicle.
10. Once that is complete, loosely screw the washers and nuts into the wheel well . We do this so that the bracket on the A-Pillar can be lined up first. Once lined up, make sure to tighten up the nuts in the wheel well and the bolts located on the A-pillar. Ensure your hose clamps are nice and tight as well, both inside the wheel well and inside the engine bay.
11. The last step is to install the ram head. Insert the clamp around the base of the ram head first – slide it on top and tighten it down. We like to face the screw clamp to the back so that we don’t snag anything on it when we’re on the trail.
Finally, for river crossings it is a good idea to extend your diff breathers and make sure your electrical components are also protected.
We hope this post has proved helpful! Does your vehicle have a snorkel? If so, have you noticed an improvement in the health of your engine and air filters? How about installation? Have you installed your own snorkel? Let us know if you have any questions below.
Share This Story, Choose Your Platform!
Related posts.

XOVERLAND Exclusive: We Put the 2024 Toyota Tacoma Trailhunter to the Test

Africa: A Look Back at How to Navigate the Unknown While Overlanding (as a Family)

2023 Overlander’s Holiday Gift Guide

XOverland’s Next Chapter

Tips for Overlanding Through Iceland and Scandinavia
Hello. Sign In
Lost password?
New to site? Create an Account
Already have an account login.
Your cart is currently empty!

Safari Snorkel SS450HP – Toyota 4Runner 5th Gen 2010-2024
- Suits Toyota 4Runner 5th Gen models from 2010 to 2024
- Raises air intake to prevent water ingestion, while also allowing vehicles to utilize clean air when driving in dusty conditions.
- Vehicle specific design and factory airbox adaption fitment.
- Manufactured using durable, UV stable cross linked polyethylene material.
- Supplied as a comprehensive kit, including the necessary fasteners and mounting brackets.
- Unique air ram design acts as a highly efficient water separator to remove rain water form incoming air stream.
- Designed and manufactured in Australia
- 10% higher CFM for this application over other brand snorkels, due to large body design
- Requires cutting and drilling of the fender and A-pillar. Full instructions and template provided.
$ 627.00
Description
SS450HP – ARB Safari Snorkel – (2010-2024 4Runner)
Protect your Toyota 4Runner against dust and water ingestion with the tough, stylish Safari Snorkel specifically designed to deliver a huge volume of cold, clean air.
Avoiding dust, water and snow ingestion is essential for keeping your 4×4 moving down the trail. Safari Snorkels relocate an engine’s air intake from a low, vulnerable position to a high, safe location where a constant supply of cold, clean air is available.
Featuring the new ARMAX design, the new Toyota 4Runner snorkel SS450HP for the 5th generation model is the start of a new generation of raised air intakes from Safari Snorkel. Tested and verified on an airflow bench, each ARMAX design ensures that the airflow through the snorkel meets or exceeds that of the factory inlet design. This ensures that if the owner wishes to increase their engine’s performance (ECU, exhaust, forced induction), the snorkel will meet those needs while providing the cold, clean air that is a standard benefit from any Safari Snorkel model. The SS450HP ARMAX outperforms the CFM flow of other brand 4Runner application snorkels by 10% due to its larger body size and air ram.
SS450HP FEATURES:
- 10% higher CFM for this application over other brand snorkels.
For a video about the Safari Snorkel product range, click here: https://youtu.be/Ow3Thzrm5oo
To see all Snorkels that Exit Offroad offers, click here: https://exitoffroad.com/product-category/accessories/snorkel/
Vehicle Fitment:
2010 Toyota 4Runner Snorkel Kit 2011 Toyota 4Runner Snorkel Kit 2012 Toyota 4Runner Snorkel Kit 2013 Toyota 4Runner Snorkel Kit 2014 Toyota 4Runner Snorkel Kit 2015 Toyota 4Runner Snorkel Kit 2016 Toyota 4Runner Snorkel Kit 2017 Toyota 4Runner Snorkel Kit 2018 Toyota 4Runner Snorkel Kit 2019 Toyota 4Runner Snorkel Kit 2020 Toyota 4Runner Snorkel Kit 2021 Toyota 4Runner Snorkel Kit 2022 Toyota 4Runner Snorkel Kit 2023 Toyota 4Runner Snorkel Kit
2024 Toyota 4Runner Snorkel Kit
Related products

Dobinsons MRA59-A575 3-Way Adjustable MRA Long Travel Rear Shocks Pair
- Suits 2003-2024 4Runner (4th and 5th Gen), All FJ Cruisers, Lexus GX470 & GX460 without KDSS, Toyota Prado 120 & 150, suitable for 2 – 3.5″ of lift
- CANNOT BE USED WITH KDSS
- 3-way adjustable valving – adjust high and low speed compression and rebound
- MRA59-A575 – Specifications. 730mm extended, 443mm compressed
- Massive 56mm (2.2″) Outer body with 50mm (1.97″) Bore and Piston
- 3-way Adjustable shocks provide maximum adjustability to provide the perfect ride quality for you.
- 10 Stage High Speed Compression – For aggressive, high speed off roading through ruts and holes.
- 20 Stage Low Speed Compression – For creepy crawling and cornering
- 15 Stage Rebound – Control your coils, prevent bucking
- 50mm CNC Machined High Flow Billet Aluminum Race Piston
- 3mm Thick Heavy Duty DOM Seamless 56mm O.D. shock Body Precision Honed to +/- 0.04mm
- Upgraded 3 Stage FKM‐HNBR Sealing System
- TSUGAMI™ CNC machined components for precise tolerances
- Parker™ Braided High Pressure Hoses
- 5140 HV900 Hard Chrome Plated, Heat treated 18mm Micro-Polished high strength Shock Shaft with a minimum tensile strength exceeding 700MPA
- T6 6061 Height Adjustable Spring Seat
- Carbon-Fibre/PTFE/Disulphide composite wear band for the ultimate in low-friction, low‐wear performance
- 60mm Full 6063 aluminum remote reservoir
- Lightweight CNC Machined Low Friction floating piston
- High Quality O.E.M. Grade Natural Rubber Bushings
- Single Piece Lower Leg
- EDP Surface Protection
- Direct Bolt-On Shock Design
- CNC TIG Precision Welded Body End Mounts
- Fully Rebuildable Design
- SOLD IN PAIRS
- Includes Universal Reservoir Bracket and Hardware, Sticker Pack, and Adjuster Wrench
- Can Use with Timbren Rear Bump Stop Kit
- Replacement Brake Lines are required: Extended Brake Lines
- Bump stops extensions or longer bump stops are required!!
- Full 2 year limited warranty, no set rebuild time period
- Now comes with a longer hose and different mounting instructions

Dobinsons C59-677V Rear Variable Rate Long Travel Coils | Toyota 4Runner FJ Cruiser GX470 GX460
- Fully Designed, Manufactured, and Finished In Australia
- Ultra modern design technology, Fully Scragged & Load Tested
- State of the Art Heat Treatment, High Intensity Shot Peened
- Formed on Precision Mandrels, Precise End Configurations
- Durable Powder Coat Finish
- Sold in Pairs
- 500mm free height, 16mm wire diameter, 157-230LBF/IN variable spring Rate

Extended Rear Brake Lines for 4Runner FJ GX470 GX460
- American made D.O.T. Certified extruded teflon core, stainless steel braided and coated with a PVC cover
- 20″ long, works with long travel rear suspension setups
- Suits up to 4″ of lift with long travel shocks or not
- Suits the following vehicles: Toyota 4Runner 4th Gen 2003-2009, Toyota 4Runner 5th Gen 2010-2024, Toyota FJ Cruiser all years, Lexus GX470 all years, Lexus GX460 all years
- Not recommended for stock or un-lifted vehicles, as the brake lines are much longer than necessary
- Sold as a pair with new retaining clips

Dobinsons Front IFS Diff Drop Kit | Tacoma 4Runner FJ Cruiser GX470 GX460
- Suits 2005-23 Toyota Tacoma, 2003-2024 4Runner, 2007-16 FJ Cruiser, Lexus GX470, GX460
- Keeps CV angles at a good working angle
- Suitable for lifts over 2.0″. There’s really no benefit to adding them if there’s less lift than 2.0″
- Includes all necessary hardware, including machined spacers and nuts/bolts
- Includes 2 different lengths of the long bolts as some vehicles need them longer than others
- Compliments Dobinsons 3″ lifts for IFS Toyota and Lexus vehicles
- Simply remove the front skid plate, remove the 2 long bolts at the front of the diff, install the spacers and long bolts supplied, install the skid plate spacers and longer bolts supplied while reinstalling the skid plate
- Note: Some aftermarket skid plates have spacers built-in so the small spacers aren’t necessary, and some skid plates may use larger bolts to install it to the vehicle, requiring modification to the supplied spacers
- Installation Instructions
Free Shipping for Baja Designs! Learn more
Baja Designs over $100 Ship free
Enjoy free shipping on all Baja Designs kit purchases over $100! Click the link below to explore our extensive collection – from vehicle-specific kits to universally compatible gear, we have something for everyone.
Our 25th Anniversary! Open House
25th Anniversary Open House!
We're so thankful for everyone who joined us to mark our 25th anniversary at SDHQ! Looking back on the event, we're overjoyed by the turnout and the shared enthusiasm. It was wonderful celebrating with you from 5pm-9pm at our Gilbert location.
A big shout-out to our vendors, raffle participants, and everyone who enjoyed the food and festivities. Your support is what makes our community great. Thank you for being part of our special day and for making it unforgettable. Here's to many more years of adventures together!
- Rear Shock Guards
- Rock Sliders
- Skid Plates
- A-Pillar Mounts
- Air Compressor Mounts
- Behind the Grille Mounts
- Switch Pros System Mounts
- Hidden Winch Mounts
- All Electrical Products
Battery Terminals
- Battery Accessories
- Dual Battery Kits
- Switch Pros Complete Kits
- All SDHQ Built
billet battery terminal kit
- A-Pillar Light Mounts
Switch pro panels
- Auxiliary Lights
- Light Mounts
- Lighting Accessories
- Wiring Harnesses
- Switch Panels
- Switch Pros Mounts
- All Lighting
A-Pillar mounts
- Alternators
- All Electrical

Switch pro kits
- All Systems
- Carli Suspension
- Icon Vehicle Dynamics
- King Shocks
- Bypass Shocks
- Smooth Body Shocks
- Coil Springs
- Leaf Springs
Control Arms
- Front End Components
- Rear Suspension Components
- Suspension Maintenance

Carli Systems

- Air Filters
- Cold Air Intake Systems
- Exhaust Systems
- Forced Induction Accessories
- Superchargers
- Catch Can Kits
- Fuel Injection
- Oils, Greases, Additives
- Power Steering
- Differential Covers
- Brake Line Kits
- Gear Packages
- Transmission Pans
- Engine Management & Wiring
- Engine Sensors
- Vehicle Tuning
Cold Air Intakes
superchargers
- All Air Systems
- Air Compressors
- Power Tanks
- Tire Inflators/Deflators
- All Bed Accessories
- Bed Organization
- Chase Racks
- All Communications
- Device Mounting
- GPS Systems
- Race Radios
- All Drivetrain
- Locking Differentials
- CV Boot Kits
- Drivetrain Maintenance
- Freespin Kits
- Air Supply & Support
- Rooftop tents
- Camping Gear
- Coolers, Fridges, Freezers
- Recovery Gear
- Storage Boxes
- Straps & Tie-Downs
- Tire Carriers
- Winches & Mounts
- All Exterior Accessories
- Roof Racks & Accessories
- All Fabrication Parts
- Body Mount Chop Plates
- Limit Straps
- Misalignment Spacers
- Custom Steering Parts
- Tube Clamps
- All Fuel Systems
- All Interior Accessories
- Steering Wheels
- All Safety Products
- Helmet Accessories
- Race Suits & Clothing
- Fire Extinguishers
- All Maintenance
- SDHQ CV Boots
- Land Cruiser
- JT Gladiator
- JL Wrangler
- JK Wrangler
- All Sport, Track & Luxury Builds

3rd gen tundra
6th gen bronco
RAM 1500 trx
- Complete Billet Battery Terminal Kit
- Switch Panel Power System
- Baja Designs XL 80 LED Light - Pair
Information
- Shock Rebuilds
- SDHQ Built meaning

New online store, new deals and new reasons to sign up for exclusive offers.
Cookie policy
I agree to the processing of my data in accordance with the conditions set out in the policy of Privacy.
Your cart is empty

'14-21 Toyota Tundra Safari Snorkel Intake Kit
190 South McQueen Road Suite 109 Gilbert AZ 85233 United States
STATE OF CALIFORNIA CONSUMER WARNING
Safari Snorkel to fit the Toyota Tundra 2014-2021 fitted with the 5.7L V8 engine (3URFE). The Safari Snorkel is the ultimate protection against water, dust, or snow and delivers cool, clean air to your vehicle’s engine. The part number for this new application is SS56HF.
Utilizing Safari‘s traditional design concepts and incorporating the latest in scanning and CAD design software, Safari‘s VSPEC Snorkels are ready to perform in the most extreme environments. Fully designed and manufactured in Australia, Safari Snorkels are tested and verified on a custom flow bench to ensure the airflow meets or exceeds the factory inlet design. The Safari Snorkel offers the best air intake protection and performance for today's 4x4 vehicles.
Shipping & Returns
SHIPPING POLICY There is a chance that your cart will display no shipping charges. Certain items populate a standard shipping rate, others are advertised as free shipping to the lower 48, and others (often multiple parts or larger orders) may not show a rate. There is nothing more to do on your end if it is free or flat-rate shipping. If your order does require a shipping cost/option, our shipping department will determine the shipping charges, and we will email you the cost/options for your order to ship out. Once you receive that email, there will be a link to pay for the charges, or you can cancel the order and be fully refunded.
OFFERS OF FREE SHIPPING: All free ground shipping offers only apply to shipping addresses in the continental United States. This notification will appear above the product information and on the cart page.
FLAT RATE GROUND SHIPPING: Some products have a standard ground shipping policy if you require the product faster, please notify us in the notes section during checkout.
If you have special shipping requirements, please contact our sales department. Email us [email protected]
PROCESSING YOUR ORDER: If shipping costs need to be calculated/added, you will be emailed with an updated link to your order. Your updated order will include your order's shipping costs and be your original order with the letter "A" at the end. While checking for updates on your order, please add an "A" to the end of your order number, as your order number without the "A" will show canceled since it has been superseded.
FIBERGLASS SHIPPING POLICY: Our shipping department takes the same time and effort in packaging your products as our engineers do in designing them. However, damage can still occur in shipping. Most of these damaged items can be easily repaired during install and or in paint prep. If this is not the case, the buyer must inspect the packaging and the products carefully upon receiving them, then accept the shipment and if need be, notate any damages and irregularities, such as crushed, torn, punctured, or broken parts on both the packaging and the product, on the freight bill or receipt at the driver’s presence. A signed receipt without any notation releases the carrier as well as SDHQ from any further damage claim. Discovery of damages after a clear delivery becomes the responsibility of the customer. The buyer must notify SDHQ of any damages within 24 hours. In cases of damage with proper notion on receipt, the carrier will determine whether to pay for the repair cost or replacement value of the damaged goods after damage inspection. Replacement value is the amount the buyer paid to SDHQ and is not negotiable. All disputes about the settlement amount shall be addressed with the carrier. SDHQ, under no circumstances, shall be liable for the damaged product or for subsequent settlement of the claim with the carrier.
POWDER COATED ROCK SLIDERS SHIPPING POLICY: While we pack with care, we advise against shipping powder-coated sliders due to the risk of scuffs/scratches during transit. Any shipping-related damage isn't covered by SDHQ.
GOOSE GEAR SHIPPING POLICY: All Goose Gear products are made-to-order. Once your order is placed, it cannot be cancelled or refunded. By checking this box, you acknowledge and agree to these terms. Thank you for understanding the unique nature of our custom manufacturing process.
RETURNS: Some items may be eligible to be returned if returned as new within 30 days of shipping, with a 20% re-stocking fee. If eligible for return, the return amount will be for store credit. There are NO returns after 30 days from the date of receipt. Freight is nonrefundable. Refunds will be given on parts only and exclude labor or installation charges, shipping, or any other charges. All parts must be returned in the original package, cannot be damaged or installed, and must be in original condition. For further info on our return policy, please visit the Online order returns page.
We pride ourselves on offering only top-tier products, handpicked through strategic partnerships with the industry's elite.
When you choose us, you're investing in unparalleled quality and craftsmanship.
Learn more about what 'SDHQ Built' means to us here.
Secure Payment
Your payment information is processed securely. We do not store credit card details nor have access to your credit card information.
We accept payments with : Visa, MasterCard, Shop Pay, PayPal, Apple Pay, Discover and more.
find everything you need?
Sdhq built products.
Discover the robust, American-made range of SDHQ products, where superior quality meets outstanding performance. Crafted at our headquarters, our gear is built to enhance your driving experience.
we may have just the thing you're looking for
A-Pillar Light mounts to fit any light for most models of 4x4 trucks.
Switch Pro Panels to control all onboard lights and accessories.
Inexpensive ABS Guards that can save you from expensive repairs.
American-made Excellence
Sdhq: built for adventure.
Experience American-made excellence from SDHQ, your fellow off-road enthusiasts. We take pride in crafting high-quality, custom products right at our headquarters for unparalleled performance and durability.
Check out what 'SDHQ Built' means for us as well as our customers:
family owned
We are a family-run small business committed to providing top-notch service and products.
worldwide shipping
We do our best to offer the most affordable and expedient shipping options available.
Secure payment
Your payment information is always processed securely.
Need to contact us? Just send us an e-mail - [email protected]
Subscribe to our newsletter
Promotions, new products and sales. Directly to your inbox.

- instagram Instagram
Snorkel/Air Intake
- Gen 1 | 1995-2004 Tacoma (1)
- Gen 2 | 2005-2015 Tacoma (3)
- Gen 3 | 2016-2023 Tacoma (4)
- Gen 4 | 2024+ Tacoma (1)
- Snorkel/Air Intake (6)
- Snorkel Accessories (1)
- Snorkel/Air Intake (5)
- ARB USA (2)
- Dobinsons (2)
- Snorkel Upgrade (1)
- upTOP Overland (1)
NEW Products

From Our Blog

‘My heart stopped’: Fossil Rim giraffe accidentally picks up toddler during drive-thru safari
GLEN ROSE, Texas ( KWTX ) - A Valley Mills, Texas family suffered quite the scare at Fossil Rim on June 1 when a giraffe accidentally picked their toddler up out of the bed of their truck.
At Fossil Rim, visitors get to drive themselves along a path where exotic and endangered animals all roam free. Visitors are allowed to feed the animals.
Paisley Toten, 2, was riding in the back of a pickup truck with her mom, feeding all the animals, when one giraffe accidentally grabbed her shirt and lifted Paisley into the air.
Paisley’s father, Jason Toten, recalled the moment the giraffe picked up his daughter, which was caught on video by a car behind them.
“We stopped to feed the giraffes and I turned around to look out the back window, and I saw the giraffe kind of digging around right there, and then it just grabbed her and I didn’t see her no more,” he said.
According to Toten, it was a complete accident and they never broke any rules.
“Paisley was holding the bag and the giraffe went to go get the bag, not get her, but ended up getting her shirt too and picking her up,” the father said.
Thankfully, she didn’t get too high up before the giraffe dropped her.
“Soon as she went up her mom just yelled hey - like ‘HEY!’ - and the giraffe just kind of let go.”
When she fell her mom was right there to catch her so no one was hurt, but it was still a scary moment for everyone.
“My heart stopped, my stomach dropped… it scared me.”
Afterwards, Toten said they even went to the gift shop and got Paisley a toy giraffe because “she deserved it.”

Other than that, the girl’s dad says it was a great trip to Fossil Rim and that they plan on going back to visit eventually.
According to the Fossil Rim road rules , you are allowed to ride in the bed of a truck as long as there is an adult riding in the bed as well and everyone can fit safely inside the vehicle in case of an emergency.
Copyright 2024 KWTX. All rights reserved.

Family identifies teens, child killed in Troy rollover

17-year-old drowns in creek near Crawford, authorities say

Authorities identify man killed in Copperas Cove house explosion

‘Her smile lit up every room’: 18-year-old girl shot, killed a day after graduating high school

Family killed in head-on crash with FedEx truck
Latest news.

‘Major vehicle wreck’ leads to closure of Highway 84 late Monday night in Coryell County

Historic Waco home built in the 1800s at risk of being demolished

Clean up from recent tornado in Temple causes some overflow at debris drop off sites

Owner of Helberg Barbecue steps up to help DiCampli’s Italian Ristorante after power outage hurt business, ruined food

Woodway man charged in assault of ex-girlfriend trying to move out: affidavit
IMAGES
COMMENTS
Safari VSPEC Snorkel SS56HF. $674.00. MSRP: Buy in monthly payments with Affirm on orders over $50. Learn more. Breathe easy and roll through rivers; Safari 4x4 off-road snorkels deliver cold, clean air to the engine of your Jeep, Truck, SUV or other offroad vehicle.
Safari 4x4 Engineering's purpose built 1200cfm in-house air-flow bench ensures that every snorkel model is designed to supply the optimum amount of air to your 4x4's engine. In the case of ARMAX snorkels, this is used to ensure that we provide the maximum possible amount of airflow to your engine to compliment other engine modifications.
Bryan McMeikan from Safari 4x4 Engineering covers the benefits of fitting a quality snorkel to your vehicle. Safari's signature lies in the quality and durab...
This snorkel comes with a 2-year limited warranty against defects on the materials and workmanship. For questions or clarifications about the terms and conditions, kindly contact the manufacturer. Application. This ARB Safari Air Snorkel System can be installed on 2016-2023 models of the Toyota Tacoma with 3.5L engines. Fitment: 2016 Toyota Tacoma
ARB Safari V-Spec Snorkel. (14-21 Tundra) Item TU1851. Save. Verify parts fit and get product recommendations. Tundra Sales Techs: Connect Now M-F 8:30A-11P, Sat-Sun 8:30A-9P. Call now 1-877-870-8556 Chat Now. Want $10? Write one of the first 5 reviews 5.0 ARB Intake product ratings.
Toyota. Ford. RAM. GMC/Chevy. Jeep. Lexus. Sport, Track & Luxury. Snorkels are for more than just deep water crossings where they ensure water does not make its way through your airbox and into your engine while crossing rivers.
That truck ran a snorkel for two, call it main reasons. 1. It sealed up my exposed air box (missing fender liners) and lifted the air intake to the roof line. 2. It looked super rad (in my opinion). However, that snorkel was a cheap Amazon find. It was for an 80 series (I think).
ARB. SKU: SS440HF. A safari snorkel system relocates your engine's air intake point from the relatively low and vulnerable position under the hood to a much higher and safer location where a constant source of cool, clean, dry air is available. Manufactured from premium quality polyethylene, safari snorkels are incredibly resilient and UV stable.
A safari snorkel system relocates your engines air intake point from the relatively low and vulnerable position under the hood to a much higher and safer location where a constant source of cool, clean, dry air is available. Manufactured from premium quality polyethylene, safari snorkels are incredibly resilient and UV stable.
This ARB Safari Snorkel comes with a 3-year limited warranty covering manufacturing defects. Please visit the manufacturer's website for more details. Application. The ARB Safari V-Spec Snorkel fits all 2019 to 2024 Ford Ranger models. Fitment: 2019 Ford Ranger; 2020 Ford Ranger; 2021 Ford Ranger; 2022 Ford Ranger; 2023 Ford Ranger; 2024 Ford ...
SIMILAR PRODUCTS to ARB Safari Snorkel Intake Kit - SS1055HF. Rugged Ridge AmFib Modular Snorkels. $179.99. ARB Safari Snorkel Air Ram Grills. $116.00. ARB Safari Snorkel Intake Pre-Cleaners. $113.99. Rugged Ridge XHD Snorkel Pre Filter. $89.99.
ARB Air Snorkels come with a 2-year limited warranty, which covers both craftsmanship and material defects. If you have any questions about the warranty policies, you may get in touch directly with the manufacturer.Application. This ARB Safari Air Snorkel System is compatible with all 2005-2015 models of the Toyota Tacoma with 4.0L engines.
Once the snorkel is secured from inside the fender, add the upper mount bolts on the A-pillar and tighten them until they're snug. Step 25. Tighten Hose Clamps. With the snorkel fully secured, tighten the hose clamps with a 7mm socket on both the snorkel and the intake side of the adapter. Step 26. Install Airbox.
Snorkel kits for trucks can raise the air intake level, which also allows the vehicle to move through higher water. Dielectric Grease vs. Diesel. Most engines need air, fuel and spark to run. A truck snorkel kit can keep water out of the engine and a sealed fuel system may prevent water from mixing with gasoline.
SCITOO Snorkel Head Pre Cleaner 3.5 Inch Snorkel Ram Sand Cup for Most Cars, Trucks, SUV, ATV, RV, Jeep, Off Road, 4X4 ... The Safari Snorkel Air Ram - 3.5 Inch snorkel head arrived quickly, and it was a perfect fit. I actually have an Airflow snorkel, but the Safari Air Ram fits perfectly.
These tough components keep you and your truck safe in the Outback or whichever treacherous path you find yourself on. All the necessary installation instructions and hardware are included to make installation easier. Upgrade your air-intake system with the Safari VSPEC Snorkel System to provide high-performance in any situation. Fitment: 2019 ...
Toyota Hilux 03/2005 to 07/2011 Safari V-SPEC Snorkel SS120HF. $611.00 NZD. 1. 2. Safari 4×4 Engineering has designed and manufactured automotive snorkels and 4WD performance systems for decades. Safari engineers industry leading products through innovative design, where each product release is the result of a comprehensive research and ...
Once that is in place, place your clamp around the air intake hose and reinstall the airbox. 8. Place the collar around the other end of the hose, which should be accessible through the large oval snorkel hole. 9. Put LOCTITE on the studs in the snorkel. Now you're ready to mount the snorkel onto the vehicle. 10.
Welcome to Safari 4x4 Engineering where we are passionate about the ultimate in 4x4 engine performance and 4x4 engine protection. Safari 4X4 have been an industry leader in 4x4 products since 1981! ... Safari Snorkel and Armax Performance Systems include Safari 4x4 Snorkels for Australia/New Zealand and International 4WD Vehicles, ECU Engine ...
Safari Snorkel SS450HP - Toyota 4Runner 5th Gen 2010-2024. Suits Toyota 4Runner 5th Gen models from 2010 to 2024. Raises air intake to prevent water ingestion, while also allowing vehicles to utilize clean air when driving in dusty conditions. Vehicle specific design and factory airbox adaption fitment. Manufactured using durable, UV stable ...
United States. +14806332929. STATE OF CALIFORNIA CONSUMER WARNING. Share. Safari Snorkel to fit the Toyota Tundra 2014-2021 fitted with the 5.7L V8 engine (3URFE). The Safari Snorkel is the ultimate protection against water, dust, or snow and delivers cool, clean air to your vehicle's engine. The part number for this new application is SS56HF.
Truck Bed Accessories Spacer Skid Plates ... 2016-2023 ARB Safari Air Snorkel System (3.5L Tacoma) ARB USA. $ 627.00 2005-2015 ARB Safari Air Snorkel System (4.0L Tacoma) ARB USA. $ 627.00 Sy-Klone Series 9001 Air Precleaner | For Gas Motors Under 4.8 Liters.
2-year-old Paisley Toten was riding in the back of a pickup truck with her mom, feeding all the animals, when one giraffe accidentally grabbed her shirt and lifted Paisley into the air.