

PatternPile is a resource for finding practical and fun-to-sew patterns for bags, hats and quilts.

Pattern Designer Gallery Spring 2024

Categories:
Links in BOLD type are affiliate links. Button links lead to both free AND for-a-fee projects.
Flat or Curling Iron Insulated Travel Case – Free PDF Sewing Tutorial
A free PDF sewing pattern from RebeccaMae Designs

A free PDF sewing pattern for a flat or curling iron travel case from by Sherri Noel of RebeccaMae Designs . Practice your binding, or pick up a new sewing skill in binding this quilted hot-iron pouch . Sew a matching cosmetic bag to create a coordinating travel set. This hot-iron case is a wonderful gift for any gift-giving occasion.
Go to the Hot Iron Case – Free PDF Sewing Pattern
See more from RebeccaMae Designs at Etsy

Advertisement
More travels bags to sew:

The latest from some of our partners:
Just Arrived - Today's Newest Fabric Collections!
Holiday Projects
The Elsie K. Baglet Pattern from StudioKat Designs ✁
DIYFluffies - Stuffed Animal Sewing & Crochet Patterns - Buy 5 patterns and get 20% off with code: PATTERNS5 🐯
Click to share on Pinterest (Opens in new window)
Click to share on Twitter (Opens in new window)
Click to share on Facebook (Opens in new window)
Click to share on Tumblr (Opens in new window)
Click to print (Opens in new window)
Click to email this to a friend (Opens in new window)
Click to share on Reddit (Opens in new window)
Click to share on Pocket (Opens in new window)
Click to share on LinkedIn (Opens in new window)
#RebeccaMaeDesigns #binding #sewing #bag #pattern #insulated #epattern #gift #travelpouch #PDF #pouch #tutorial #travel #giftidea #travelroll #travelcase #MothersDay #travelbag #flatiron #simple #utility #curlingiron #PDFSewingTutorials #MothersDaygift #quilted #travelaccessory #case #sewingpattern #giftset #SewingTutorial #giftgiving #free
- Friday Freebies
- Household Storage
Related Posts
Learn to Sew a Open-Top Trash Bag for the Car
Sotak Drawstring Bags Pattern - Multi-size
The Hannah Zippered Pouch Pattern and Tutorial - Open Wide Design
Popular Projects:

The Reporter Bag - Sew and Sell

How to Sew the Round Wing Zipper Pouch: Step-By-Step Guide

The Charlie Sling Bag

The Crosstown Crescent Bag

The Bolga Basket

Baseball Cap

Petal-Style Hot Soup Bowl Cozy

The Quilters Ultimate Carry-All Bag

The Chelsworth Cloche Hat
Thanks for subscribing!
- TRAVEL RETREATS
- SUBSCRIBE & CONTACT
- lectures * Workshops
Flat Iron Case ~ Tutorial
- April 21, 2015 January 21, 2021
- 10 Comments

Travel Case for Flat / Curling Iron ~
a Sewing Tutorial

I’m in love… with all this pink!
This case isn’t just pretty… It’s insulated with Insul-Bright and perfect for packing a hot iron!
I teamed up with The Warm Company to bring you a tutorial and Give-Away!
Here are the supplies you need to make this case:
Body ~ exterior fabric 12” x 18” Body ~ lining fabric 12” x 18” Insul-Bright for body ~ 12” x 18” Pocket fabric ~ 12″ x 11 1/2” Pocket lining fabric ~ 12″ x 11 1/2” Insul-Bright for pocket ~ 12″ x 11 1/2” Binding ~ aprox 2 yards Ribbon ~ 40” Velcro Dots ~ 2 sets
You can find the complete tutorial below but here are a couple tips on quilting the case and binding the pocket…
I started with Insul-Bright so the case would be insulated. If you’re not familiar with this product you can use it to insulate anything ~ hot or cold! I use it in my Lunch Bag Tutorial AND my Potholder / Towel tutorial )

I layered the bag parts (Insul-Bright / fabric) following the tutorial and marked them for quilting using this hera marker I found on amazon. I used my ruler and marker to make marks at 1″ intervals to keep my stitching lines straight..

You can see the marks here…

After all my lines were marked, I just stitched right on them!
After my quilting was done I got my binding strip aligned on the top edge. I lined up the raw edge of the binding with the raw edge of the pocket and stitched the binding on with 1/4″ seam.

Then I flipped the fold edge to the back of the pocket, top stitched along the binding catching the back (fold) of the binding on the lining side! Easy!

Find out more about Insul-Bright here .

Please pin this tutorial and share!
PRINTABLE PDF is below…

Here is the Flat Iron Case PDF.
If you are new to my site, find more free tutorials on my
TUTORIALS PAGE .
And don’t forget to visit my shop for patterns , fun sewing machine clocks , quilt-a-longs , mitten patterns and more!
The Warm Company is giving away
FIVE PACKAGES of Insul-Bright!!! (US residents)
Like The Warm Company on FB
Pin this post on Pinterest!
Comment that you did! Easy!
I’ll pick and post the winners on Sunday 4/26/15!
Sorry this Drawing is closed but Please Pin and Share this tutorial!

10 thoughts on “Flat Iron Case ~ Tutorial”
I pinned this to my Sewing, Quilting and Crocheting Board and I use the name Sylvia Anderson. Thanks for the giveaway option.
So pretty and practical. Thanks for the great tutorial and the give away. I like The Warm Company on FB.
I pinned it. Great idea for this insulated bag!
What a super great idea!! That fabric is perfect! Pinned this tutorial!
Oops…also liked the Warm Co. on FB!
Terrific idea! I love the pattern too! I liked the Warm Company on FB!
So glad I found this…i just bought a new flat iron and now it will have a new carrying case! Thanks.
Great idea for Christmas for the person who would like and use this! Thank you!
Hello! I’m a guest contributor on Sew Mama Sew, working on a Handmade Holidays roundup. I love this tutorial and would like to include it in my list. Sew Mama Sew only uses photos with permission, so is it ok with you if they publish one photo from this project? They will link back to the project and if it is used in social media to promote the series, they will provide attribution and tag you.
Yes, thanks for checking!!
Hello! Welcome and thanks for stopping by. Please join in the conversation... and share where you're visiting from! :) Cancel reply

Flat Iron Travel Case FREE Pattern
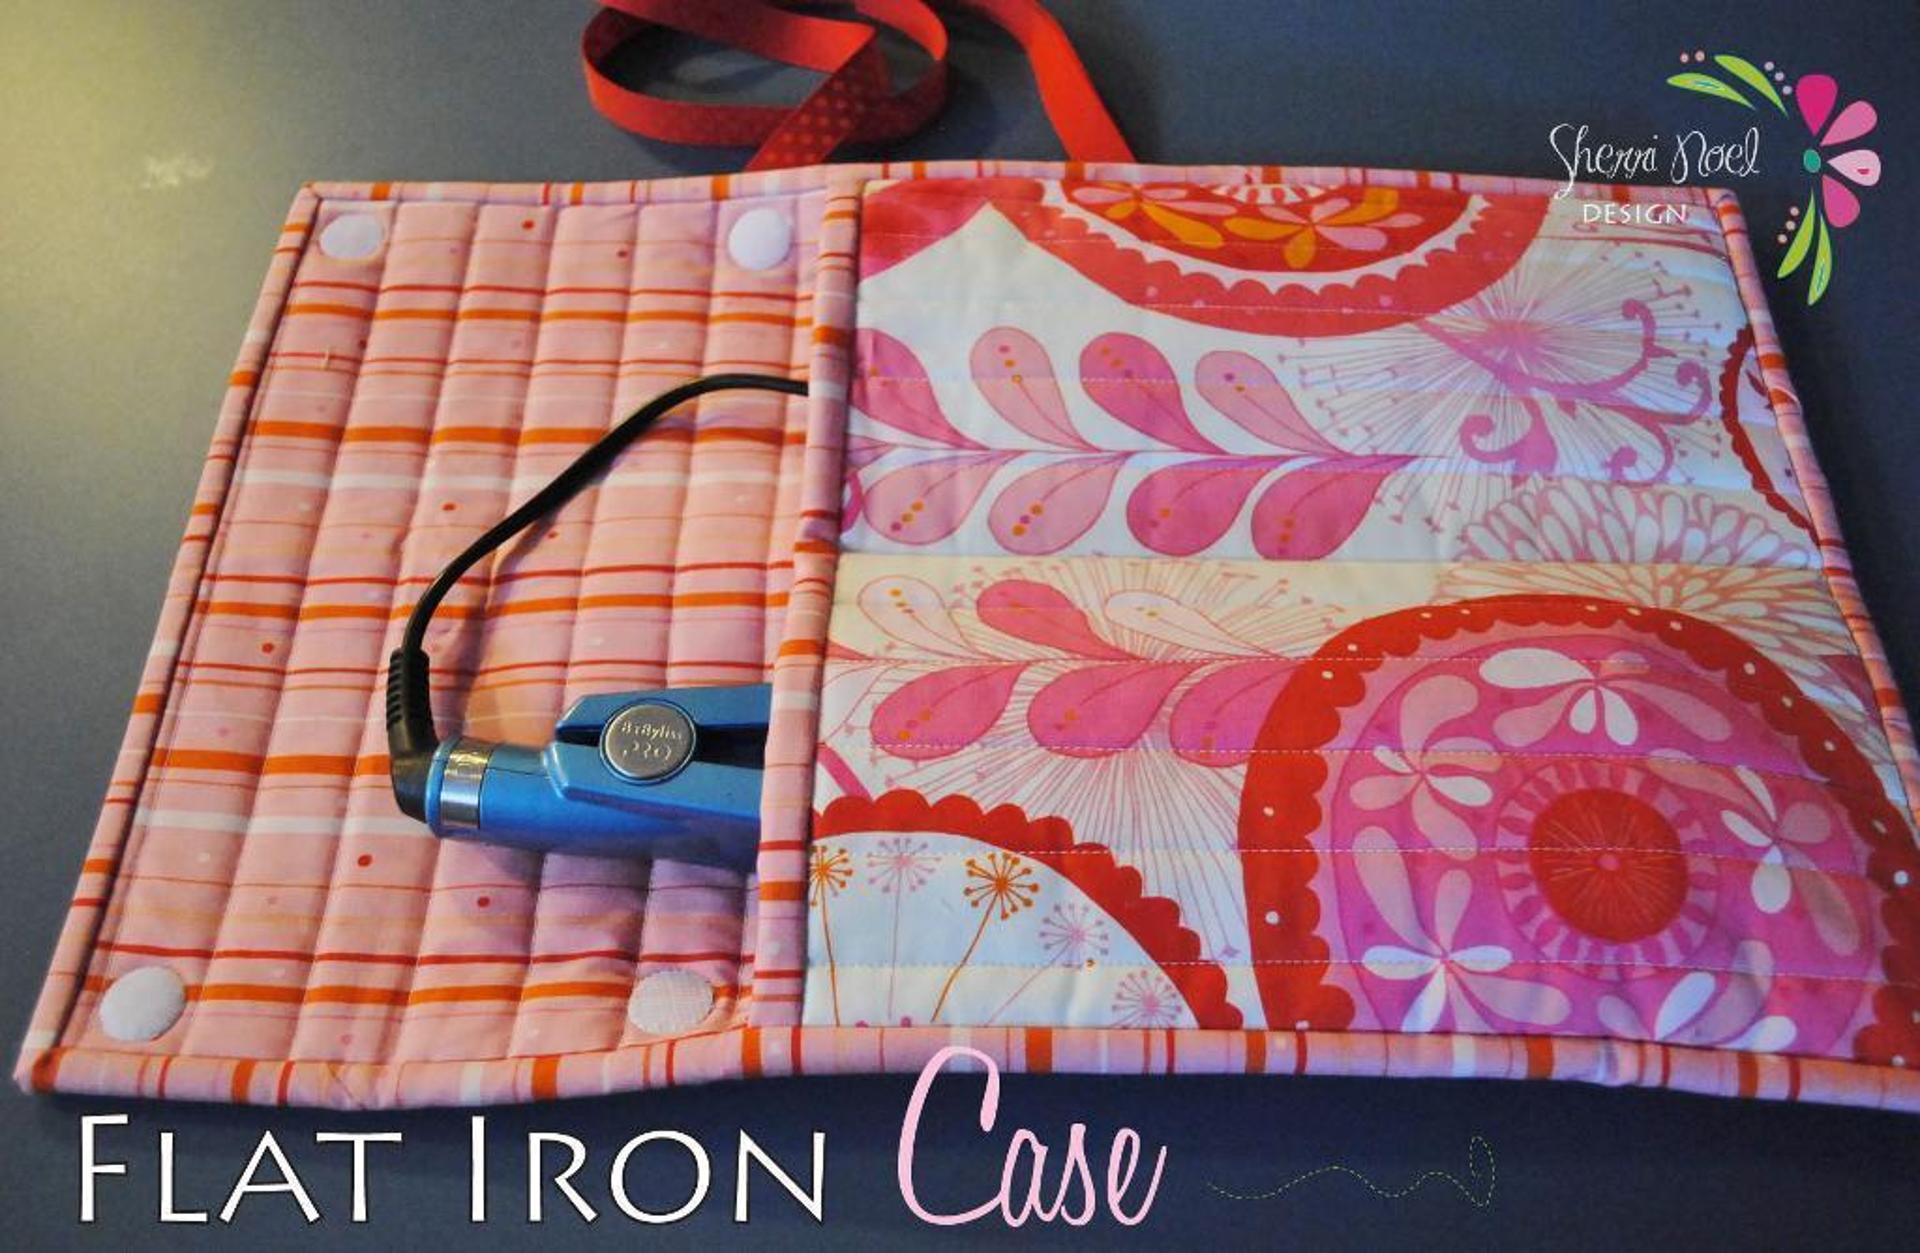
This Travel Case for your Curling or Flat Iron isn't just pretty… It's the perfect case to pack your hot iron when you're on the go!
RECOMMENDED WITH THIS PATTERN
- Velcro Dots
- Insul-Bright
- Basic Sewing Notions
Check the FREE Pattern HERE
Thinking for another project to sew for your next travel? Check this Jewelry Travel Case !
- 955 Share on Facebook
- 18056 Share on Pinterest
- 618 Share on Twitter
- 1396 Share on Instagram
This site uses Akismet to reduce spam. Learn how your comment data is processed .
Support Our Site
If you can donate a few dollars to help us keep running the site, we would be very grateful!
Search This Site
Never miss a free pattern: get our weekly newsletter, submit a link.
If you have a pattern that you would like us to consider publishing on Sewing4Free, please click the button and submit the link for review.

Subscribe to our weekly newsletter below and never miss a FREE pattern again!
Thanks, I’m not interested

Home > Uncategorized > Flat Iron – Curling Iron Travel Case
Flat iron – curling iron travel case.
Don’t know about you, but when I travel, not matter how organized I try to be, I’m always hurrying to finish packing my toiletries and make-up. I’m also usually trying to fix my hair at the last minute, which means there sits my flat iron… too hot to pack! This gave us the idea for today’s accessory: the hot tool case. It contains two hidden layers of metalized thermal batting . It looks pretty from the outside and is protective from the inside, so you can pack your curling or flat iron while warm… and still catch your plane on time! It’s also great for your gym bag.
Our hot tool case is cleverly created so you can pack it two different ways, depending on whether the tool is warm or cold. If the tool is warm when you need to pack it, put the tool itself in the inside tool pocket and loop the cord around to the outside cord pocket. This way you don’t store the cord next to the hot tool.

If you pack the tool when it is cool, the inside pocket is large enough to accommodate both the tool and its cord, and you can put other items, such as a comb and/or brush in the outside pocket.

The finished flat size of the case is approximately 6″ x 20″.
Sewing Tools You Need
- Any Sewing Machine (we recommend the Janome 3160 QDC )
- Walking Foot (optional)
- Ditch Quilting Foot (optional)
Fabric and Other Supplies
The Loulouthi fabric we used is an older collection, but you can still find cuts from online retailers as well as on Etsy. We found a remnant of our selection at Fashionable Fabrics . We also found some coordinating prints at Fabric.com .
- ½ yard of 44-45″ wide print fabric: we used Loulouthi Curated Bloom in AH39-June by Anna Maria Horner for Free Spirit Fabrics NOTE: You could probably squeeze by with a ⅓ yard cut, but having a little bit extra gives you the ability to nicely fussy cut the cord pocket.
- ¼ yard of 58-60″ wide heavy cotton twill in a coordinating solid color; we used 100% cotton twill in brown from Fabric.com
- Scrap or ¼ yard of lightweight fusible interfacing for cord pocket
- ½ yard of insulating batting ; we used Insul-Fleece by C&T Publishing NOTE: If you are new to this type of batting , take a look at our tutorial on thermal product options
- All purpose thread to match bias tape
- See-through ruler or yardstick
- Fabric marker, pen, or tailor’s chalk for marking fabric
- Iron and ironing board
- Scissors or rotary cutter and mat
- Straight pins
Getting Started
- Download and print the TWO 8½” x 11″ pattern sheets: Hot Tool Pouch 1 and Hot Tool Pouch 2 . IMPORTANT : You must print all these PDF files at 100%. DO NOT SCALE to fit the page.
- Cut out the patterns along the solid lines.
- Following the diagram on each sheet, tape the two pieces together. Butt together your cut pieces and tape; do NOT overlap.
- From the print fabric (Loulouthi Curated Bloom in June in our sample) , cut the following: Use the FULL pattern piece to cut ONE full 20″ piece Use the CROPPED pattern piece to cut ONE 14″ tool pocket piece – in other words, cut the top of this piece at the horizontal line marked “Top of Tool Pocket.” ONE 17″ x 6″ rectangle for the cord pocket NOTE: We fussy cut each rectangle so the pocket print matched the background piece. TWO 12″ x 1″ strips for the ties
- From the solid fabric (brown cotton twill in our sample) , cut the following: Use the FULL pattern piece to cut ONE full 20″ piece Use the CROPPED pattern piece to cut ONE 14″ tool pocket piece – in other words, cut the top of this piece at the horizontal line marked “Top of Tool Pocket.”
- From the insulting batting (Insul-Fleece in our sample) , cut the following: Use the FULL pattern piece to cut ONE full 20″ piece Use the CROPPED pattern piece to cut ONE 14″ tool pocket piece – in other words, cut the top of this piece at the horizontal line marked “Top of Tool Pocket.”
- Cut ONE 6″ x 8½” rectangle from the lightweight fusible interfacing.
At Your Sewing Machine & Ironing Board
Make and attach the narrow ties.

- Repeat to create the second tie.
- Place one tie at the center bottom of the print tool pocket piece, 5″ up from the bottom raw edge .

Layering and basting the two sections
- Make sure all your layers are pressed flat.

- Pin each set of layers together being very careful to make sure all the layers remain flat and all the raw edges, especially the rounded corners, are flush.

Make and place the cord pocket

- Fold the interfaced pocket piece right sides together, aligning all the raw edges. Pin along the 6″ side.
- Using a ½” seam allowance , stitch along the 6″ side only.
- Turn right side out and press well.

Attaching the binding
- Place the tool pocket layered piece onto the main case layered piece so the bottom curved edges match, the solid sides are facing in, and the print sides are facing out.
- We are attaching our bias tape binding using the traditional method. I’ve summarized my steps, but if you are new to this technique, check out our tutorial: Bias Tape: How To Make It & Attach It.

- You now have the tail you left at the beginning and the tail you left at the end. Unfold the binding strips and place the two binding tails right sides together.

- Pull the binding away from the fabric so you can place it under the foot of your sewing machine.
- Sew a seam where you pinned the binding . Trim the tails to a ¼” seam allowance .
- The binding should now be a perfect fit against the case. Fold this loose section of the binding back into its original shape and pin in place.

- Make sure your fold is even all around the edge. Again, you may need to futz with the rounded corners a little bit on the back to make sure they lay just right. Pin well!

- Press and steam so it is nice and flat.
- Carefully check both sides; if any of the original basting stitches show, simply pick them out with a seam ripper.
Hints and Tips
Clean finishing option.
I used the steps above to create our sample, and it turned out fine. However, if I were to do it again, I think I would choose to hand stitch the binding in place at the final step (step #17 above) for the cleanest finish .
This is the type of finish many quilters prefer for their quilt binding . All the steps are exactly the same as above, but instead of machine stitching all the way around, slip stitch or whip stitch the binding in place from the outside (the cord pocket side).
This technique was used on our Ruffled Table Runner project if you’d like to see step-by-step photos.
Contributors
Project Design: Alicia Thommas Sample Creation: Liz Johnson
Related Posts
Tips for sewing with faux leather, hand embroidery inspiration with amy barickman of indygo junction, brad’s test article.
*Sew4Home reserves the right to restrict comments that don’t relate to the article, contain profanity, personal attacks or promote personal or other business. When commenting, your name will display but your email will not.
Thanks for the great tutorial
Thanks for the great tutorial. I made my own binding, instead of using bias binding. I didn’t cut the binding strips on the bias and felt it worked out fine. I cut out 2 1/4 inch strips for the binding.
@judygold – Thanks for
@judygold – Thanks for letting us know you had success with our pattern! Good for you for making your own binding. This is a pretty gentle curve so you could certainly get away with straight cuts. Yay!
- Satchels + Briefs
- Crossbody + Shoulder
- Backpacks + Duffles
- Clutches + Pouches
- Small Goods
- Baskets & Catchalls
- Sewing Room
- Tech + Travel Accessories
- Gift Bags + Card Holders
- Hot pads + mitts
- Cozies + Covers
- Placemats + Runners
- Napkins + Coasters
- Tablecloths
- Bath Towels
- Pillowcases + Sheets
- Caddies + Toiletry Bags
- Floor Cushions + Ottomans
- Bench + Chair Cushions
- Full Panels
- Cafe curtains
- Outdoor Shades
- Bedding + Bath
- Diaper Bags + Changing Pads
- Play Mats + Rugs
- Outdoor + Party Fun
- Accessories
- Belts & Scarves
- Hand Sewing
- Basic Sewing
- Intermediate Sewing
- Advanced Sewing
- Specialty Sewing
- Tools + Notions
- Presser Feet + Accessories
- Machine Tips
- Products We Love
- Reviews + Interviews
- Advertising + Sponsorship
- Copyright + Usage
- Privacy Notice
You cannot copy content of this page
JOIN OUR NEWSLETTER
Enter your email address below to subscribe to the Sew4Home newsletter. Be the first to see new projects and patterns, helpful techniques, and new resources to enhance your sewing experience.
We will never sell, rent or trade your personal information to third parties.
- Sewing Projects
- _Sewing Tutorials
- _Bags & Purses
- _Holiday Sewing
- _Kitchen & Home
- _Quilts and Pillows
- _Sewing for Kids
- _Sewing for Women
- _Sewing eCourse
- _Sewing Patterns
- _Sew Simple SVGs
- Cricut & Crafts

DIY Curling Iron Holder and Flat Iron Case
.jpg)
Why might I need a DIY Flat Iron Case?
.jpg)
VIDEO: DIY Curling Iron Holder
How to Make a DIY Curling Iron Holder
- Free Curling Iron Holder Pattern - click peach button at the end of the post
- 1/2 yard Cotton material
- 1/2 yard Wrap n' Zap Batting
- 7" Bias Tape
- 2" Piece of Velcro
- Matching thread
.jpg)
DIY Curling Iron Holder and Flat Iron Case PATTERN
.jpg)
What width if bias tape do i need? Im new and havent used bias yet

You'll be safe using 2" bias tape. Hope that helps
I'd love to hear from you!

Site Disclaimer/Privacy Policy
© Sew Simple Home Designs - All Rights Reserve

Petite and Sewing
Sunday, march 29, 2015.
- Flat Iron - Curling Iron Travel Case

6 comments:
Great idea. Lovely fabric. Must check out this insulated fabric. I want to make an iron cover.
That's very nicely done. I think I'll make myself one! Thanks for the links.
What a lovely personal gift and such a pretty fabric.
I should have thought of this! I spent ages trying to find a cover that stored the cord separately from the iron. I gave up and bought something that was OK but not spot on. Your cover is beautiful!
What a clever gift!
Lovely gift Sharon - I need to check this pattern out!
Post a Comment

Vale Roscoe
Me Made May 2017
Me Made May 2016
Me Made May 2015
Me Made May 2014
Me Made May 2013
Me Made May 2012
Self Stitched September 2011
Me Made June 2011

Stashbusting 2014

Blog Archive
- ► July (1)
- ► May (2)
- ► April (1)
- ► February (3)
- ► January (1)
- ► December (1)
- ► October (1)
- ► September (2)
- ► August (1)
- ► June (2)
- ► May (1)
- ► March (4)
- ► February (1)
- ► August (3)
- ► June (3)
- ► April (2)
- ► March (1)
- ► January (4)
- ► November (3)
- ► September (3)
- ► May (4)
- ► April (4)
- ► March (3)
- ► January (2)
- ► December (5)
- ► November (2)
- ► September (1)
- ► June (1)
- ► May (8)
- ► April (3)
- Thank you for all your wonderful comments a...
- Goodies and a GIVEAWAY!
- ► January (3)
- ► October (2)
- ► September (6)
- ► August (4)
- ► July (6)
- ► June (6)
- ► May (10)
- ► January (7)
- ► December (7)
- ► October (4)
- ► September (4)
- ► July (3)
- ► June (4)
- ► May (31)
- ► February (5)
- ► December (4)
- ► October (5)
- ► May (30)
- ► April (5)
- ► March (6)
- ► December (6)
- ► September (22)
- ► July (2)
- ► June (28)
- ► March (2)
- ► January (5)
- ► May (3)
- ► February (2)
- ► December (3)
- ► August (10)
- Invisible Zip
- Lining Vogue 7937 Skirt
- Matching a Patterned Seam
Blog Labels
My sewing inspiration ........
- Privacy Policy
- Legal Disclaimers
- Terms and Conditions
- Pattern Corrections
Curling Iron Travel Case Sewing Pattern
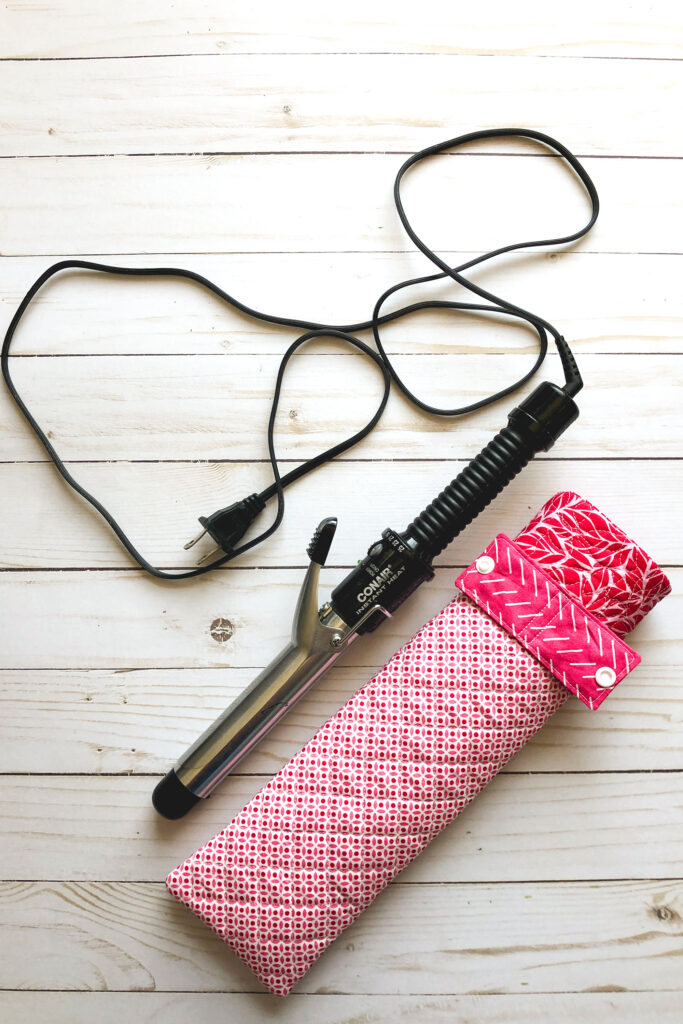
Want to curl your hair but you’re not sure it will cool enough to pack up in your suitcase? This Curling Iron Travel Case sewing pattern will help answer your problem! Layers of cotton batting and Insulbrite help protect your belongings from the residual heat from your cooling curling iron. *note: do not put a hot curling iron into the sleeve, allow it to cool as long as possible before putting the sleeve on.
And if you’re buying Insulbrite already, you may want to make yourself a beautiful new set of hot pads too !
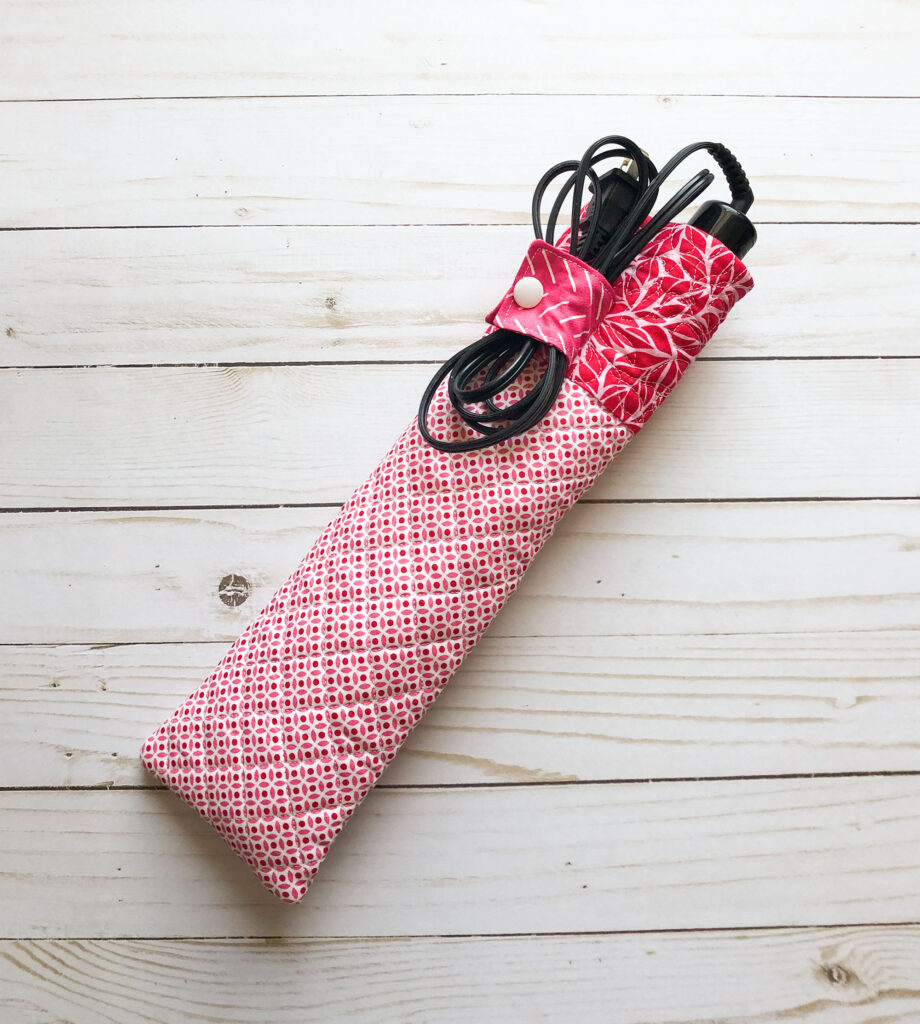
Curling Iron Travel Sleeve Sewing Pattern
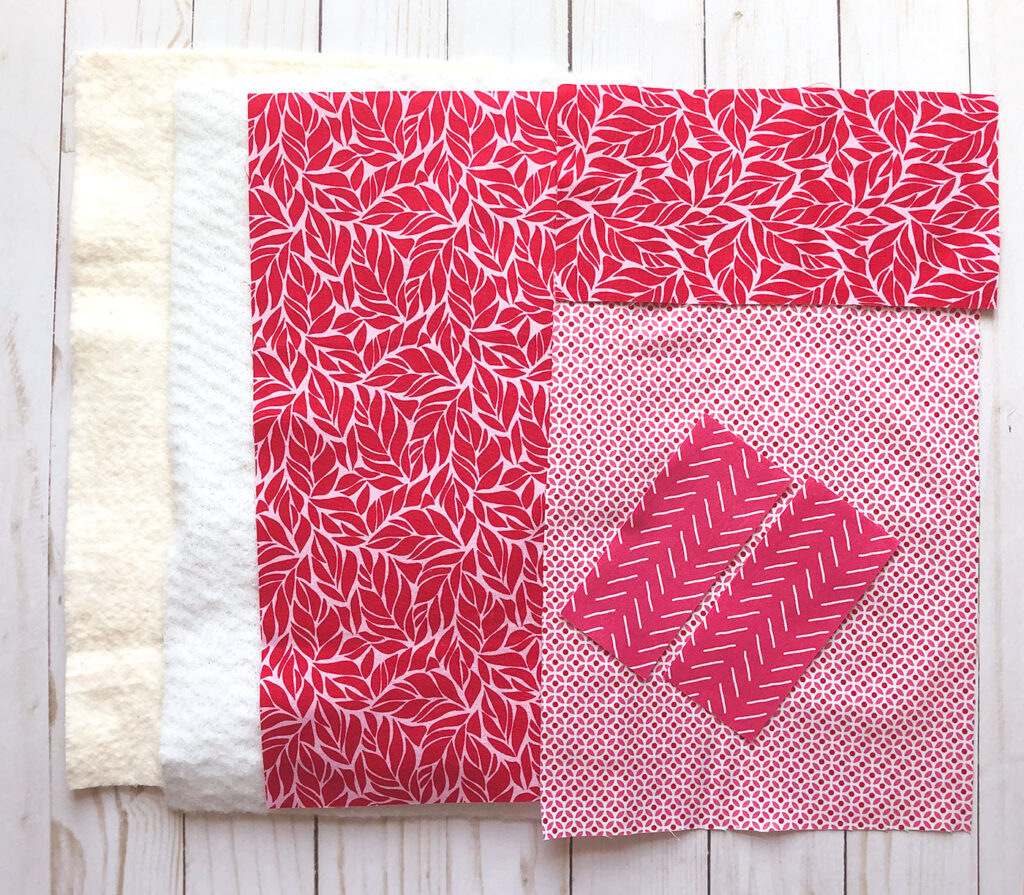
- Out of main exterior fabric cut a piece 8 1/2″ wide by 9 1/2″ tall (if you do not want an accent strip, cut your main exterior fabric to 8 1/2″ wide by 13 1/2″ tall)
- Cut exterior accent fabric to 8 1/2″ wide by 4 1/2″ tall
- From lining fabric, cut a piece 8″ wide by 13″ tall
- For your strap, cut 2 pieces 2″ X 4 1/2″
- Cotton Batting, cut to 8 1/2″ X 13 1/2″
- Insulbrite (or a second layer of cotton batting) cut to 8 1/2″ X 13 1/2″
- Snaps or Hook and Loop tape for closure on strap
Assemble Exterior of Case
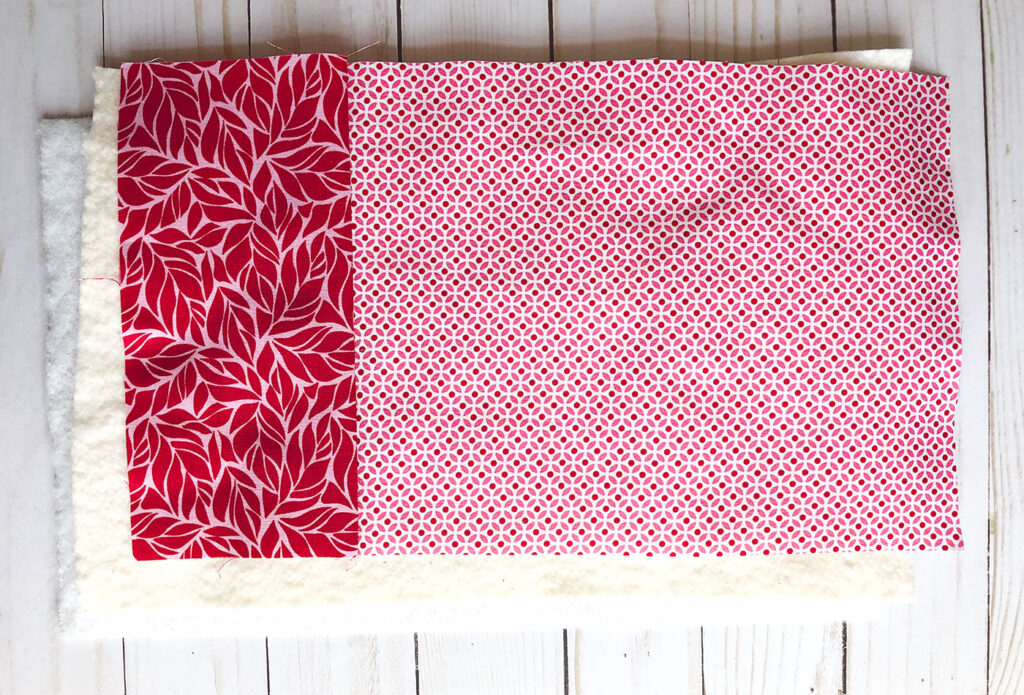
- First, sew your accent strip to the main exterior fabric on the 8 1/2″ side. Press the seam allowance toward the accent strip.
- Next, use basting spray to layer the insulbrite, batting and your pieced exterior fabric together as shown.
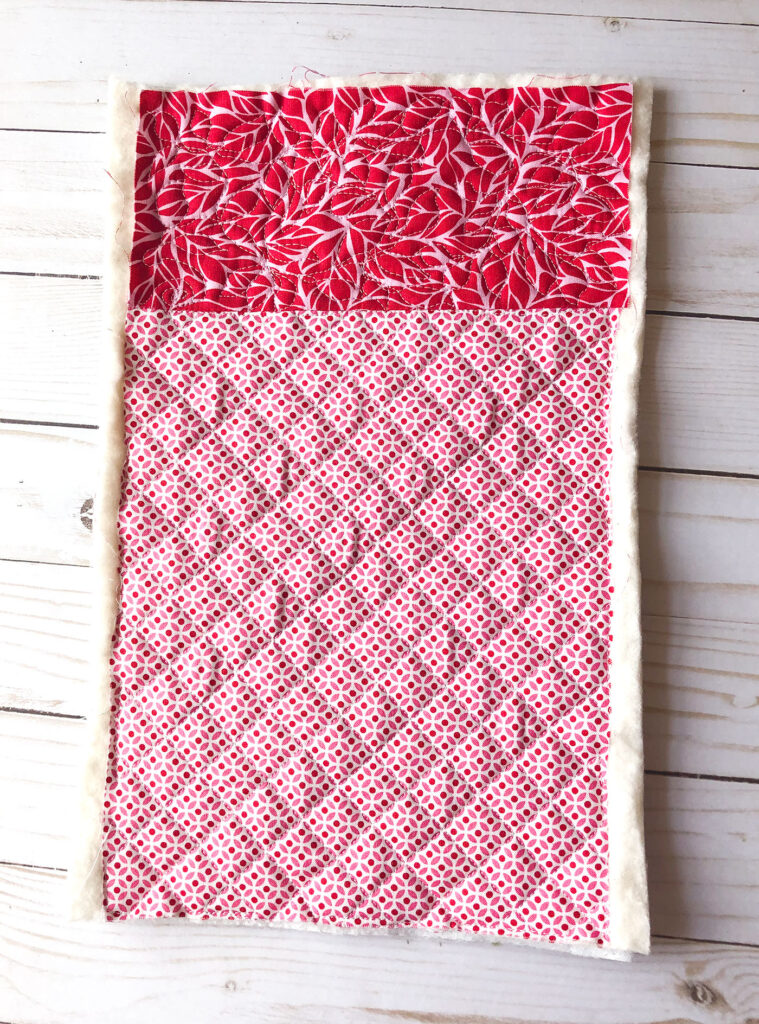
- Quilt the three layers together.
- Finally, trim your exterior piece to 8″ X 13″
Create strap for curling iron travel case
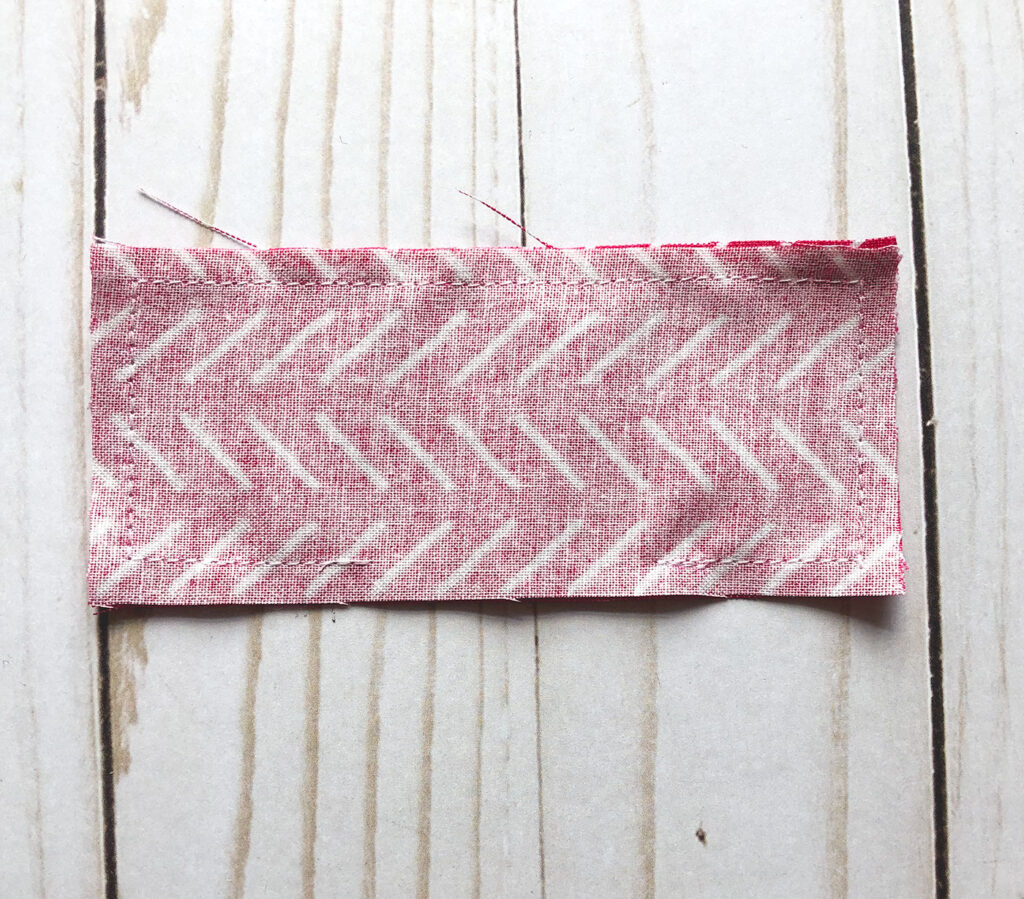
- Begin by placing the two strap fabric pieces right sides together.
- Now, sew around all four sides of the fabric pieces, leaving an opening for turning on one long side. Back stitch at the beginning and ending of your stitching.
- Next, clip the corners.
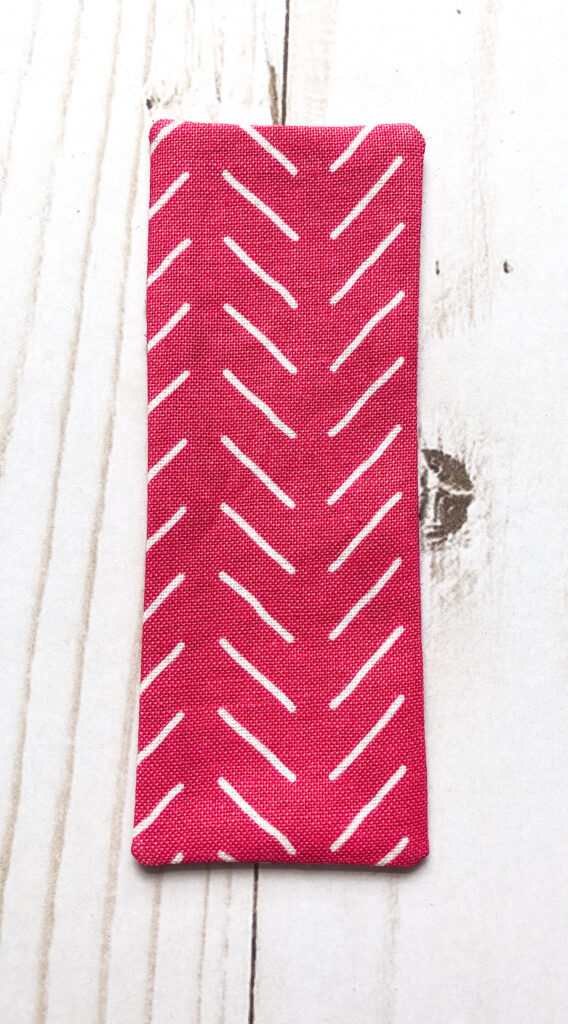
- Turn the strap right side out.
- Press well, turning the seam allowance of the opening under.
- Finish by sewing around the strap with a top stitch.
- If using snaps, center your snaps 1/4″ in from either side, the male and female sides of the snap should be on the same side.
- If using hook and loop tape, sew the loop side at one short end, then sew the hook side on the opposite side of the strap, at the opposite end.
Assemble the curling iron travel case
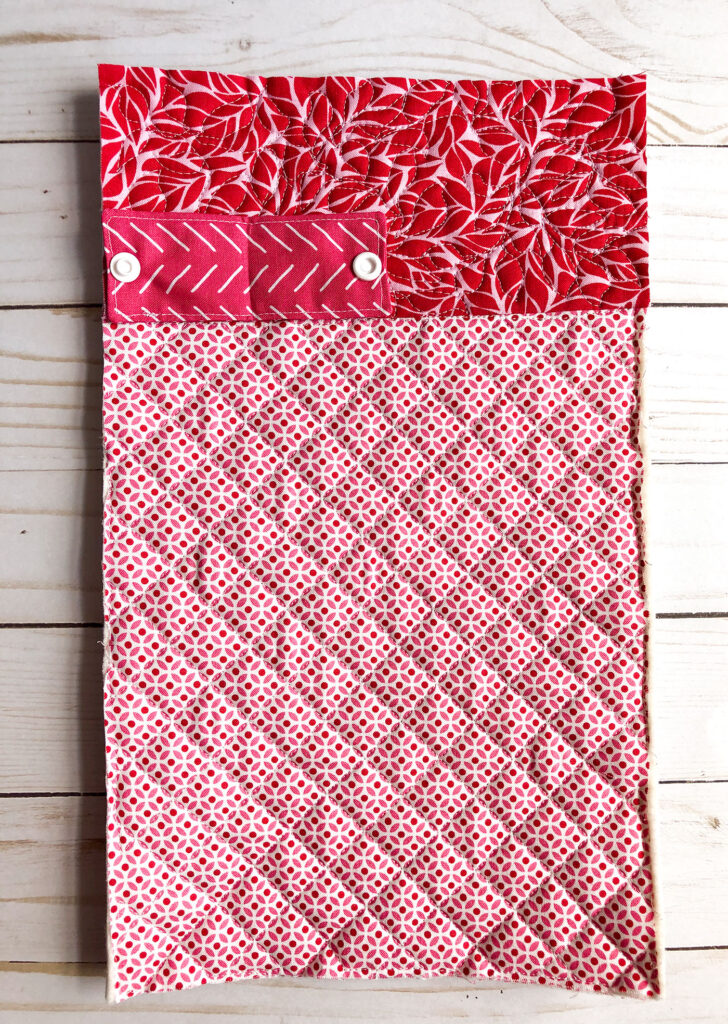
- Position the strap 2″ down from the top of the exterior piece. If using snaps, the male and female ends of the snaps should be facing up, if using hook and loop tape, the side with the hook tape should be facing up.
- Then, sew down the strap at the center of the strap. I like to sew a small rectangle on the side of the center mark of the strap, toward the center of the travel case.
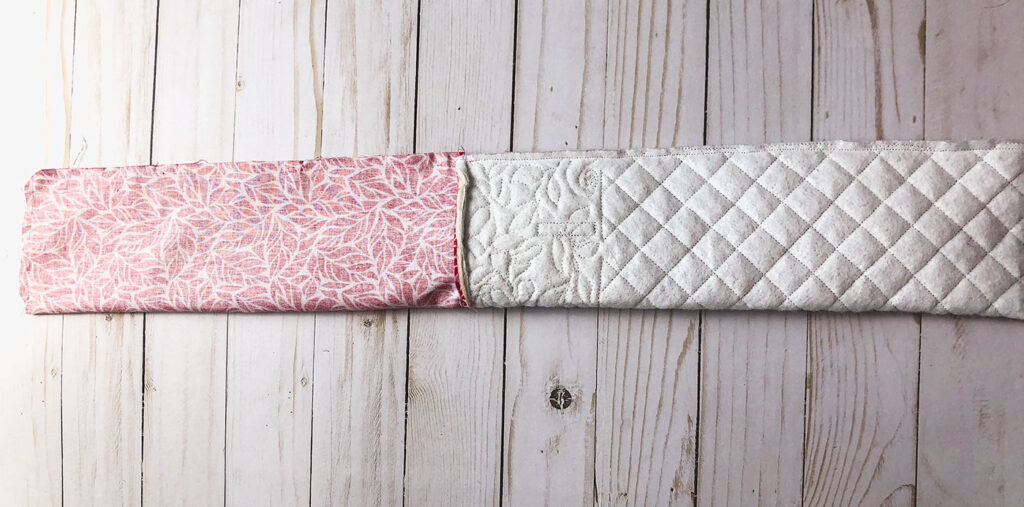
- Place the lining fabric right side down on top of the exterior fabric.
- Sew across the top edge using a 1/4″ seam allowance.
- Press the seam allowance toward the exterior.
- Next, fold the case in half along the length.
- Starting at one short end sew around the three raw sides of the travel case, leaving a 3-4″ opening in the lining fabric for turning.
- Now, turn the curling iron travel case right side out.
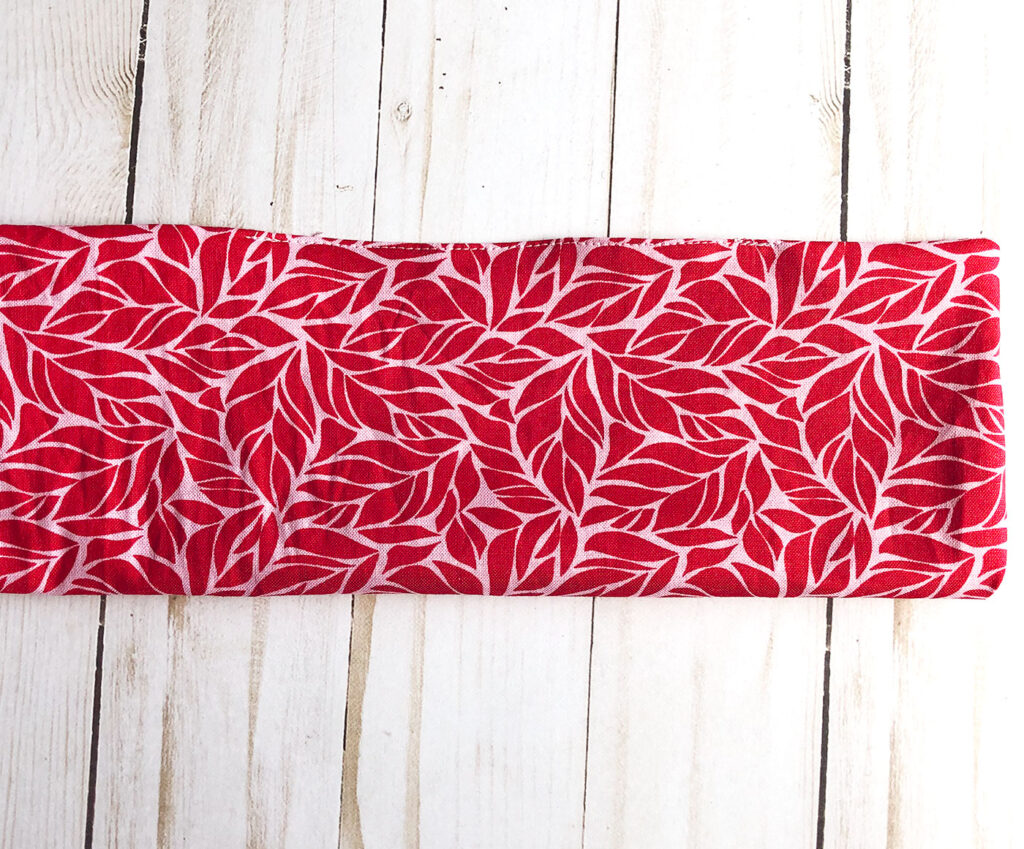
- Fold under the seam allowance of the opening in the lining and sew closed using a top stitch.
- Push the lining inside the exterior of the curling iron travel case. I find it helpful to use a long blunt tool to get the lining all the way into the bottom of the case, like a dowel or chopstick.
- Give your curling iron travel case one last press, and you are finished!
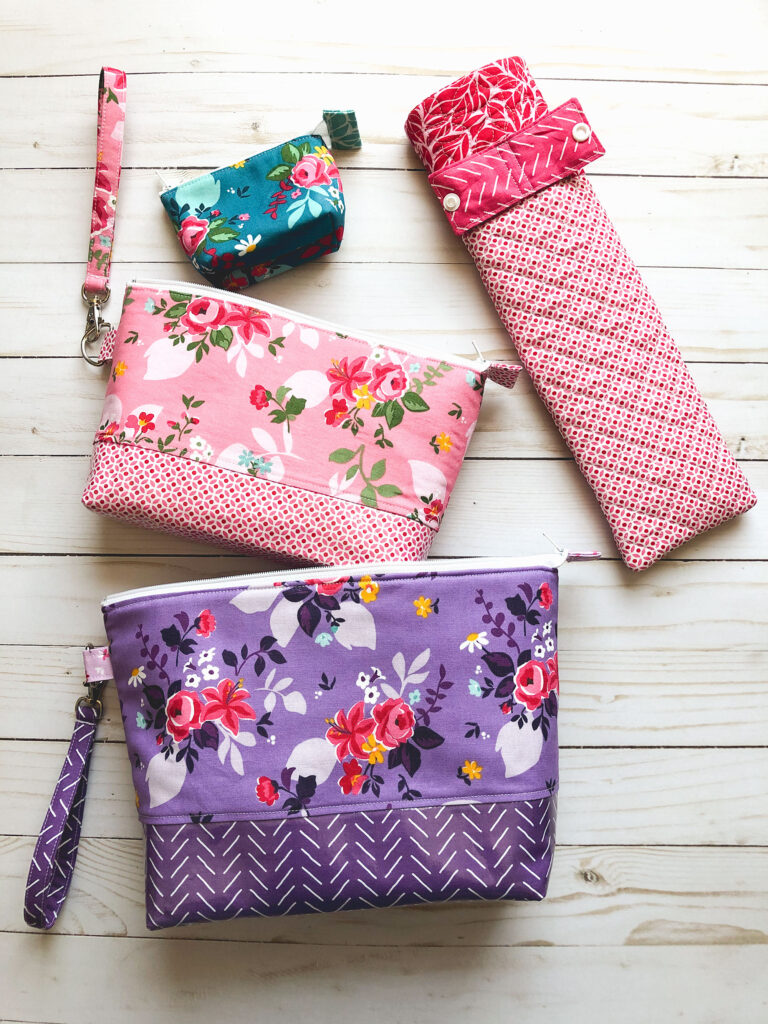
Sew it up with a set of Nesting Travel Pouches and you are set to go anywhere in style!
Amy Chappell
Creator, sewist and mom of 6. Making and sewing keeps me sane and happy. I'm here to share my love of creating with you. Free patterns, tips and tricks and videos to help you discover your own creative passions.
You Might Also Like
Rainbow sherbet.
Fabric Tree Tutorial
Bloom pencil bouquet tutorial, handmade travel accessories | ameroonie designs.
[…] Curling iron travel case is the perfect addition to your handmade travel accessories. It allows you to pack your still warm […]

For more Sewing fun follow me on IG!
Amerooniedesigns.

- Privacy Overview
- Strictly Necessary Cookies
This website uses cookies so that we can provide you with the best user experience possible. Cookie information is stored in your browser and performs functions such as recognising you when you return to our website and helping our team to understand which sections of the website you find most interesting and useful.
Strictly Necessary Cookie should be enabled at all times so that we can save your preferences for cookie settings.
If you disable this cookie, we will not be able to save your preferences. This means that every time you visit this website you will need to enable or disable cookies again.
Grab a copy of our FREE Handbag eBook!

F REE HANDBAG EBOOK! Get your copy! >
How to Make a Flat Iron Case
How to make a flat iron case.

How to make a flat iron case. Storing or traveling with hair appliances is always difficult. They are bulky and take up a lot of room. The cords are especially an issue so I thought I would create this flat iron case that you can use for storage and travel. This is a simple sewing project that can be made using basic sewing skills. I used two different quilting cottons and some ironing board fabric to create this project. I chose a fun orange floral but you can choose any fabric pattern you like for your flat iron case. Quilting cotton is probably the best fabric for this project. You could also use this to store a curling iron as well.
If you would like a video tutorial of this project head over to YouTube and check out my video. While you are there subscribe to my free youTube channel .

What you will Need: How to make a flat iron case
- 1/2 yd exterior fabric and lining fabric
- 1/4 yd ironing board fabric
- Kam Snap kit
Step 1: Cut Your Fabrics

Step 2: Cut Your Fabrics
Layer the smaller rectangles so that they are the ironing board fabric on the bottom then the lining wrong sides together and the outer fabric right sides together with the lining fabric. Using a 1/4″ seam allowance stitch along the top. Fold the main fabric back so that the ironing board fabric is in the center. Top stitch along the top edge using a 1/8″ seam allowance.
Step 3: Stack Your Fabrics
Place your long ironing board fabric right sides up on your work surface. Lay one long outer fabric wrong side down on the ironing board fabric. Place the shorter fabrics onto the outer fabric lining up the bottoms and sides. Place the second outer fabric right sides down onto the stack and clip. I used wonder clips due to the bulk of the fabrics. I really recommend them for this application. If you do not have wonder clips you can get them in my Amazon shop here. You can use pins but use them with care again because of the bulk.

Step 4: Sew Your flat iron case Fabrics
Sew all layers together leaving an opening on the side or turning. Turn the fabrics right sides out and sew the opening closed using ladder stitch. If you are unfamiliar with ladder stitch take a look at this video.

Step 5: Add the kam snaps
Add the Kam snaps. If you don’t have Kam Snaps you can purchase the kit through my Amazon shop here . Add one half of the snap on the flap and the other on the main part of the case. If you are unfamiliar with how to install Kam Snaps take a look at this video or follow the manufacturers instructions. You could also use Velcro for this but I like the Kam snaps.

I hope you enjoyed this project. If you would like to receive more sewing and crafting projects sign up for our newsletter and receive access to our free printables library.

SIGN UP TO RECEIVE THE LATEST FROM SEW VERY CRAFTY !
We don’t spam! Read our privacy policy for more info.
Check your inbox or spam folder to confirm your subscription.
Share this:
- Click to share on Facebook (Opens in new window)
- Click to share on Pinterest (Opens in new window)
- Click to share on Twitter (Opens in new window)
- Click to email a link to a friend (Opens in new window)
- Click to print (Opens in new window)
Hi, Welcome to Sew Very Crafty a place for beginner and intermediate sewists and crafters to learn and create. Here at SVC we create simple and fun projects that anyone with basic to intermediate skills can create and grow with. My name is Diana and I am a lifelong learner, sewing enthusiast, parent, spouse, lawyer, and die hard St. Louis Cardinals fan. I live in California with my husband. I love God and my country but am proud of my Irish heritage. I enjoy sharing my creativity and the things that I love with others.
Similar Posts

How to Make a Fan Pouch

DIY Three Ring Binder Pencil Case

Easy Sew Halloween Bee Costume for Kids

How to Make Reusable Makeup Remover Pads

How to Make a Simple Beach Coverup

How to Make a Simple Cross Body Bag
Am having difficulty with your directions, particularly #s 2 and 3. It’s unclear if we need to make an arc on BOTH pieces of the main fabric, also the layering is very hard to understand. A video might have worked better, as I am sitting here with my fabric all cut out now and no way to put it together!
I am sorry you are having trouble. I have sent you an email with further instructions. Let me know if you are still having difficulties.
Hi there! I am also having difficulty with steps 2 and 3. For the first bit of sewing- is it just the lining pieces with one ironing board fabric? Also, do you curve the two outers AND the ironing board fabric? Any clarification would be great! Thank you!
The best thing to do is to watch my video on how to make this project. You can find it here. https://youtu.be/ovipetaOUi4 . But yes, for the first bit you just need the two lining pieces and the ironing board fabric. You will also curve the outer and the long ironing board fabric.
Looking Forward to Reading your Thoughts on this Project Cancel reply
This site uses Akismet to reduce spam. Learn how your comment data is processed .
Privacy Overview
Crap I've Made
Speak Your Mind Cancel reply
Notify me of follow-up comments by email.
Notify me of new posts by email.
Connect with Me!
Sponsor love, search this blog, terms of use, blog archive.
- February 2019 (1)
- April 2016 (1)
- March 2013 (1)
- February 2013 (3)
- January 2013 (3)
- December 2012 (4)
- November 2012 (9)
- October 2012 (7)
- September 2012 (2)
- August 2012 (9)
- July 2012 (9)
- June 2012 (7)
- May 2012 (15)
- April 2012 (10)
- March 2012 (10)
- February 2012 (10)
- January 2012 (15)
- December 2011 (13)
- November 2011 (17)
- October 2011 (19)
- September 2011 (19)
- August 2011 (17)
- July 2011 (11)
- June 2011 (11)
- May 2011 (17)
- April 2011 (28)
- March 2011 (32)
- February 2011 (25)
- January 2011 (24)
- December 2010 (29)
- November 2010 (36)
- October 2010 (29)
- September 2010 (16)
- August 2010 (54)
- July 2010 (25)
- June 2010 (27)
- May 2010 (26)
- April 2010 (29)
- March 2010 (30)
- February 2010 (23)
- January 2010 (28)
- December 2009 (22)
- November 2009 (19)
- October 2009 (16)
- September 2009 (19)
- August 2009 (17)
- July 2009 (20)
- June 2009 (18)
- May 2009 (18)
- April 2009 (18)
- March 2009 (8)
- February 2009 (13)
- January 2009 (14)
- December 2008 (11)
- November 2008 (15)
- October 2008 (18)
- September 2008 (19)
- August 2008 (13)
- July 2008 (6)
- January 2007 (7)
Copyright Crap I've Made© 2024 | Web Hosting By RFE Hosting
Patterns, Techniques, Articles, Blogs, and other resources to learn how to sew
Sewing pattern: Travel curling iron case
October 25 , by Anne Weaver . Leave a Comment

It’s no fun waiting on a curling iron to cool before packing it in a bag! Melissa from Polka Dot Chair has a sewing tutorial showing how to make this travel curling iron sleeve. The quilted sleeve is lined with both batting and InsulBright to protect things around the sleeve from the heat of the iron. A fabric tab on the side will keep your cord all wrapped up and neat for packing.
Click below for her tutorial:
Travel Curling Iron Sleeve Sewing Pattern , by Polka Dot Chair
[photo from Polka Dot Chair]
Next Pattern:
- Mask Keeper Case Sewing Pattern - zipper case for face mask
- Padded Laptop Case or Tablet Case - DIY Sewing Tutorial
- Tutorial: Cleaning your iron with a Magic Eraser
Share this:
- Click to share on Facebook (Opens in new window)
- Click to share on Pinterest (Opens in new window)
Have you read?
Sewing your perfect capsule wardrobe.

The Re:Fashion Wardrobe by Portia Lawrie is a groundbreaking guide that not only introduces you to the art of sewing but also empowers you to make a positive impact on the environment. With a notable rating of 4.6 stars and recognition as one of Publishers Weekly’s Top 10 Lifestyle books in 2023, this book stands out in the world of sustainable fashion.
Portia Lawrie, known for leading the Refashioners – fashion reuse pioneers, takes readers on a transformative journey. The book addresses the critical issue of clothing waste due to fast fashion trends and provides a solution: creating a sustainable capsule wardrobe tailored to your style.
Amazing Ziggy Stardust capsule wardrobe
Book Review ; Illustrated Guide to Advanced Dressmaking And Alteration
Sewing Pattern Silk Camisole
The emphasis on practicality is evident in every project, making it accessible for both beginners and experienced sewers. The book encourages readers to adapt and cut away at various clothing items, from tops to trousers and dresses, empowering them to build a stylish, modern capsule wardrobe suitable for year-round wear.
Leave a Reply Cancel reply
Around the Bobbin

Hot Stuff Travel Case
No more waiting to pack your bags! Create a designer silicone travel case for a flat iron or curling iron. The silicone insert has an interior raised surface for added heat resistance. Your finished case will have a separate pocket for the cord. After completing your case, you can remove the silicone to protect the surface under your hot hair accessory.
This case is also an excellent way to transport a wand-style mini iron to class or a retreat.
Instructions, templates and 1 silicone insert included.
Silicone insert is 100% high quality food grade silicone and heat resistant up to 450 degrees. Refill silicone inserts available.
Finished case measures approx. 6 in x 13 in
$ 17.00
Description
This product is a kit with detailed diagrams and step-by-step instructions to create a designer silicone travel case for a flat iron or curling iron. Silicone is removable to use as a protective surface.
One silicone insert, sewing instructions and templates are included.
Sewing Level: – Intermediate
Skills you will learn or use: – Cutting with a rotary cutter – Cutting out with a template – Sewing with foam – Sewing with silicone – Finishing with binding
Materials: – A listing of materials needed for this project is on the back cover, shown above in the images.
Welcome to Around the Bobbin! Dismiss
Expedia Rewards is now One Key™
Elektrostal, visit elektrostal, check elektrostal hotel availability, popular places to visit.
- Electrostal History and Art Museum
You can spend time exploring the galleries in Electrostal History and Art Museum in Elektrostal. Take in the museums while you're in the area.
- Cities near Elektrostal

- Places of interest
- Yuri Gagarin Cosmonaut Training Center
- Central Museum of the Air Forces at Monino
- Peter the Great Military Academy
- History of Russian Scarfs and Shawls Museum
- Ramenskii History and Art Museum
- Bykovo Manor
- Pekhorka Park
- Balashikha Arena
- Malenky Puppet Theater
- Drama Theatre BOOM
- Balashikha Museum of History and Local Lore
- Pavlovsky Posad Museum of Art and History
- Saturn Stadium
- Church of Vladimir
- Likino Dulevo Museum of Local Lore
- Orekhovo Zuevsky City Exhibition Hall
- Noginsk Museum and Exhibition Center
- Fairy Tale Children's Model Puppet Theater
- Fifth House Gallery
- Malakhovka Museum of History and Culture

- Bahasa Indonesia
- Eastern Europe
- Moscow Oblast
Elektrostal
Elektrostal Localisation : Country Russia , Oblast Moscow Oblast . Available Information : Geographical coordinates , Population, Area, Altitude, Weather and Hotel . Nearby cities and villages : Noginsk , Pavlovsky Posad and Staraya Kupavna .
Information
Find all the information of Elektrostal or click on the section of your choice in the left menu.
- Update data
Elektrostal Demography
Information on the people and the population of Elektrostal.
Elektrostal Geography
Geographic Information regarding City of Elektrostal .
Elektrostal Distance
Distance (in kilometers) between Elektrostal and the biggest cities of Russia.
Elektrostal Map
Locate simply the city of Elektrostal through the card, map and satellite image of the city.
Elektrostal Nearby cities and villages
Elektrostal weather.
Weather forecast for the next coming days and current time of Elektrostal.
Elektrostal Sunrise and sunset
Find below the times of sunrise and sunset calculated 7 days to Elektrostal.
Elektrostal Hotel
Our team has selected for you a list of hotel in Elektrostal classified by value for money. Book your hotel room at the best price.
Elektrostal Nearby
Below is a list of activities and point of interest in Elektrostal and its surroundings.
Elektrostal Page

- Information /Russian-Federation--Moscow-Oblast--Elektrostal#info
- Demography /Russian-Federation--Moscow-Oblast--Elektrostal#demo
- Geography /Russian-Federation--Moscow-Oblast--Elektrostal#geo
- Distance /Russian-Federation--Moscow-Oblast--Elektrostal#dist1
- Map /Russian-Federation--Moscow-Oblast--Elektrostal#map
- Nearby cities and villages /Russian-Federation--Moscow-Oblast--Elektrostal#dist2
- Weather /Russian-Federation--Moscow-Oblast--Elektrostal#weather
- Sunrise and sunset /Russian-Federation--Moscow-Oblast--Elektrostal#sun
- Hotel /Russian-Federation--Moscow-Oblast--Elektrostal#hotel
- Nearby /Russian-Federation--Moscow-Oblast--Elektrostal#around
- Page /Russian-Federation--Moscow-Oblast--Elektrostal#page
- Terms of Use
- Copyright © 2024 DB-City - All rights reserved
- Change Ad Consent Do not sell my data
Analysis of real estate market in Moscow Oblast, Russia:
- Hand Embroidery
- Machine Embroidery
- Submit a Pattern

- Sewing Patterns
Free Sewing Pattern: Curling Iron / Flat Iron Travel Case

This Travel Case for your Curling or Flat Iron isn’t just pretty… It’s the perfect case to pack your hot iron when your on the go!

RELATED ARTICLES MORE FROM AUTHOR

Free Sewing Pattern: Sewing Caddy

Free Sewing Pattern: Car Organizer
Free Sewing Pattern: Lunch Bag

Free Sewing Pattern: Easy Skirt

Free Sewing Pattern: Baby Swaddle
Free Quilt Pattern: Gnomie Love
Current time by city
For example, New York
Current time by country
For example, Japan
Time difference
For example, London
For example, Dubai
Coordinates
For example, Hong Kong
For example, Delhi
For example, Sydney
Geographic coordinates of Elektrostal, Moscow Oblast, Russia
City coordinates
Coordinates of Elektrostal in decimal degrees
Coordinates of elektrostal in degrees and decimal minutes, utm coordinates of elektrostal, geographic coordinate systems.
WGS 84 coordinate reference system is the latest revision of the World Geodetic System, which is used in mapping and navigation, including GPS satellite navigation system (the Global Positioning System).
Geographic coordinates (latitude and longitude) define a position on the Earth’s surface. Coordinates are angular units. The canonical form of latitude and longitude representation uses degrees (°), minutes (′), and seconds (″). GPS systems widely use coordinates in degrees and decimal minutes, or in decimal degrees.
Latitude varies from −90° to 90°. The latitude of the Equator is 0°; the latitude of the South Pole is −90°; the latitude of the North Pole is 90°. Positive latitude values correspond to the geographic locations north of the Equator (abbrev. N). Negative latitude values correspond to the geographic locations south of the Equator (abbrev. S).
Longitude is counted from the prime meridian ( IERS Reference Meridian for WGS 84) and varies from −180° to 180°. Positive longitude values correspond to the geographic locations east of the prime meridian (abbrev. E). Negative longitude values correspond to the geographic locations west of the prime meridian (abbrev. W).
UTM or Universal Transverse Mercator coordinate system divides the Earth’s surface into 60 longitudinal zones. The coordinates of a location within each zone are defined as a planar coordinate pair related to the intersection of the equator and the zone’s central meridian, and measured in meters.
Elevation above sea level is a measure of a geographic location’s height. We are using the global digital elevation model GTOPO30 .
Elektrostal , Moscow Oblast, Russia

IMAGES
VIDEO
COMMENTS
A free PDF sewing pattern from RebeccaMae DesignsA free PDF sewing pattern for a flat or curling iron travel case from by Sherri Noel of RebeccaMae Designs. Practice your binding, or pick up a new sewing skill in binding this quilted hot-iron pouch. Sew a matching cosmetic bag to create a coordinating travel set. This hot-iron case is a wonderful gift for any gift-giving occasion.Go to the Hot ...
It's insulated with Insul-Bright and perfect for packing a hot iron! I teamed up with The Warm Company to bring you a tutorial and Give-Away! Here are the supplies you need to make this case: Body ~ exterior fabric 12" x 18". Body ~ lining fabric 12" x 18". Insul-Bright for body ~ 12" x 18". Pocket fabric ~ 12″ x 11 1/2".
Time needed: 2 hours. Curling Iron Travel Sleeve Sewing Instructions. Prepare Exterior Piece . Layer your Insulbright, cotton batting and exterior fabric (right side up) in that order. Use basting spray or pins to keep in place. Quilt all three layers together. Trim down the quilted exterior piece to 8"X 13". Prepare Cord Strap :
Tired of waiting for your flat iron or curling iron to cool down so you can put it in your suitcase? In this video, I'll show you how to make a heat resistan...
This Travel Case for your Curling or Flat Iron isn't just pretty… It's the perfect case to pack your hot iron when you're on the go! RECOMMENDED WITH THIS PATTERN. Fabric; Ribbon; Velcro Dots; Insul-Bright; Basic Sewing Notions; Check the FREE Pattern HERE. Thinking for another project to sew for your next travel? Check this Jewelry Travel Case!
No need to let your flat iron or curling iron cool after use; unplug and go! Approx. 13" Tall x 5½" Wide (33 cm tall x 14 cm wide). Please use caution: Do not leave the iron plugged in while it is inside the case. You will receive a PDF with 14 pages of detailed instructions and 26 step-by-step color photos to walk you through.
Following manufacturer's directions, fuse the interfacing to one half of the wrong side of the cord pocket piece. Fold the interfaced pocket piece right sides together, aligning all the raw edges. Pin along the 6″ side. Using a ½" seam allowance, stitch along the 6″ side only. Turn right side out and press well.
This flat iron case and curling iron holder is perfect for traveling. Not only will it help protect your favorite hair styling tool, but it will help prevent heat from melting or scorching your luggage. Plus, it is wide enough to fit the cord, which means less of a tangled mess for you.
1. Length: Measure the length of your flat or curling iron not including the cord then add an extra 1/2″. The CHI is 10 1/4″ so once I add the extra 1/2″ I'm using 10 3/4″. 2. Pocket width: Measure the diameter around the widest part of your flat or curling iron and add 2″. CHI diameter at the widest point is 5″. Add 2″ and my ...
This is the Travel Case closed with the cord in the back pocket. To get an idea of the finished size it is sitting on top of my carry on bag. The hot iron is encased within the Insul-Bright Insulated lining. and the cord is then folded into the pocket on the back. For those days that the iron is cold, you can put both the Iron and cord in the ...
Place the lining fabric right side down on top of the exterior fabric. Sew across the top edge using a 1/4″ seam allowance. Press the seam allowance toward the exterior. Next, fold the case in half along the length. Starting at one short end sew around the three raw sides of the travel case, leaving a 3-4″ opening in the lining fabric for ...
HOT STUFF Travel Case Pattern & Silicone Insert - Around The Bobbin - ATB196 - Designer Rubber Flat Curling Iron Mini Retreat Fat Quarter. (17k) $17.00.
Step 1: Cut Your Fabrics. Cut 2 18″x 6″ rectangles from exterior fabric and one 18″ x 6″ rectangle from the ironing board fabric. Then cut a 14 1/2″ x 6″ rectangle of exterior, interior, and ironing board fabric. Round the top of the main long outer pieces and ironing board fabric using a small plate or compass. What you will need.
Sew a piece of bias tape on the right hand side (short end) of your smaller piece. Hook your Velcro together. You're going to sew 1/4" from the left hand side of the top (smaller) piece. Undo the Velcro and fold the flap to the other side, lining up the edges. You may want to use a couple of pins to keep it in place.
The quilted sleeve is lined with both batting and InsulBright to protect things around the sleeve from the heat of the iron. A fabric tab on the side will keep your cord all wrapped up and neat for packing. Click below for her tutorial: Travel Curling Iron Sleeve Sewing Pattern, by Polka Dot Chair. [photo from Polka Dot Chair]
Finished case measures approx. 6 in x 13 in. $ 17.00. Add to cart. SKU: ATB-196 Categories: Patterns, Silicone Products Tags: around the bobbin patterns, hot stuff travel case, sewable silicone, sewing with silicone, silicone curling iron case, silicone flat iron case, silicone sewing pattern, silicone travel iron case. Description.
Flat Iron Bag - Black/Brown/Gray Diamond Pattern - Two Lengths Available. (1k) $33.95. Flat Iron or Curling Iron Sleeve. Hot Hair Tool Travel Protective tote. Quilted heat resistant tool sleeve with pocket and hanging loop. (414) $22.00.
This Travel Case for your Curling or Flat Iron isn't just pretty… It's the perfect case to pack your hot iron when your on the go! Download. Home; Embroidery. ... Free Sewing Pattern: Curling Iron / Flat Iron Travel Case. July 23, 2017. Share. Facebook. Twitter. Google+. Pinterest. WhatsApp.
Travel Guide. Check-in. Check-out. Guests. Search. Explore map. Visit Elektrostal. Things to do. Check Elektrostal hotel availability. Check prices in Elektrostal for tonight, Apr 20 - Apr 21. Tonight. Apr 20 - Apr 21. Check prices in Elektrostal for tomorrow night, Apr 21 - Apr 22. Tomorrow night.
Elektrostal Geography. Geographic Information regarding City of Elektrostal. Elektrostal Geographical coordinates. Latitude: 55.8, Longitude: 38.45. 55° 48′ 0″ North, 38° 27′ 0″ East. Elektrostal Area. 4,951 hectares. 49.51 km² (19.12 sq mi) Elektrostal Altitude.
* calculated weighted mean of apartment cost per 1 square foot/meter in Elektrostal secondary housing market. Among prices in range from 30 to 200 thousand Rub/m² for Elektrostal.Among apartments with area in range: from 20 to 350 m², from 215 to 3767 ft².
This Travel Case for your Curling or Flat Iron isn't just pretty… It's the perfect case to pack your hot iron when your on the go! Download. Home; Embroidery. ... Free Sewing Pattern: Curling Iron / Flat Iron Travel Case. May 27, 2017. Share. Facebook. Twitter. Google+. Pinterest. WhatsApp.
Geographic coordinates of Elektrostal, Moscow Oblast, Russia in WGS 84 coordinate system which is a standard in cartography, geodesy, and navigation, including Global Positioning System (GPS). Latitude of Elektrostal, longitude of Elektrostal, elevation above sea level of Elektrostal.