Gluesticks Blog
May 15, 2020 By Brandy 55 Comments
Home » Sewing

DIY Travel Diaper Changing Pad & Playtime Mat Tutorial
Filed Under: Sewing
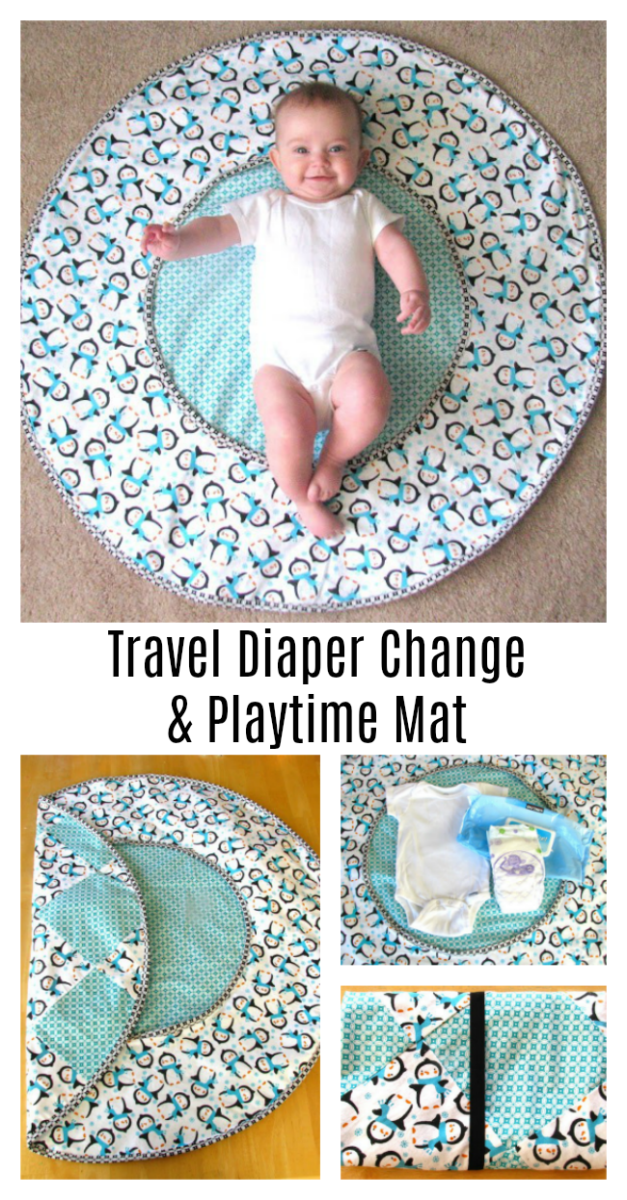
My inspiration for this project originated from a Patemm changing pad.
DIY Travel Diaper Changing Pad & Playtime Mat

How To Make A Folding Diaper Changing Mat

How To Make a Circular Pattern

Sewing On Bias Tape

Easy Folds for Changing Mat
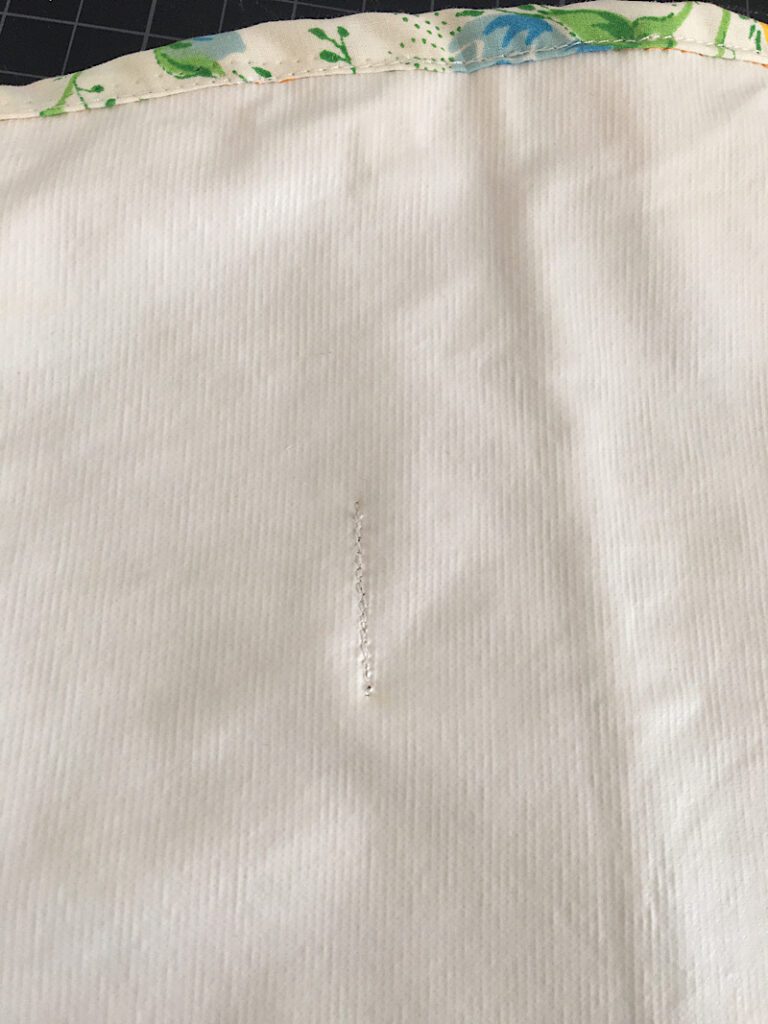
To create easy fold lines and sections for your items, fold your pad in thirds. Starting with the left, then the right and mark your folds with a pin. And iron your fold so that you can see it clearly to stitch. Pin along the stitch line, if necessary, to see it better. Stitch through all thicknesses starting at the top and going down on both lines (See illustration below) all the way to the bottom bias tape of your mat. This will create 4 sections. The top and bottom sections will be approx. 8×12″ and the sides approx. 8×24″. It is hard to see the thread in the photos, but it does create 4 nice sections and makes it easier to fold up the changing pad.

How To Secure Changing Mat

Welcome! I'm Brandy, mother to 5 darling kiddos and a cute black lab named Toby. My husband is in the Coast Guard so we've lived all over the place, turning each house into a home. I love baking, sewing, making cute things with my kids, and sharing what I've learned with all of you!
- 18 Pumpkin Recipes To Make This Fall
- The Best Chocolate Chip Pudding Cookies
- 16 Cheap and Easy Halloween Crafts to Make
- Kids Lacing Craft {Printable Template}
More Posts Like This

About Brandy
Disclaimer: I am a participant in the Amazon Services LLC Associates Program, an affiliate advertising program designed to provide a means for me to earn fees by linking to Amazon.com without any additional cost to you. As an Amazon Associate, I earn from qualifying purchases.
Reader Interactions

March 15, 2012 at 1:13 pm
This is such a great idea! I love how it turned out. Oh, and I love seeing Sophie the giraffe in those pictures. Our son LOVES her.
March 15, 2012 at 1:41 pm
So unique! And could that penguin fabric be any cuter?? Love this!
March 15, 2012 at 7:33 pm
I absolutely love this! You are immensely talented! I love the idea of using newspaper to make the circle too.
March 16, 2012 at 11:06 am
Hi Brandy!!!
This is SUCH A GREAT IDEA!!!!! I wish I would have seen this when my girls were babies!! Very practical!
I really hope you’ll swing by The DIY Dreamer and share this 🙂 http://thediydreamer.blogspot.com/2012/03/from-dream-to-reality-linky-party-7.html
March 16, 2012 at 3:34 pm
This is SO amazing! Pinning it right now!I want to make a bunch of these for baby gifts – my six are too old now…enjoy it while you’re in it 🙂
Come visit me at LoveItSewMuch.blogspot.com
March 17, 2012 at 1:03 am
Such a cute idea…maybe beyond my sewing skills though lol
March 17, 2012 at 1:17 pm
This is a great idea! I always tried to drag along a blanket for floor/belly time, which was a pain. Thanks for the inspiration!
March 17, 2012 at 3:35 pm
SO adorable- Thanks for the tutorial- I pinned this to my “To Sew” board
March 17, 2012 at 5:30 pm
Really cute idea – I’ll have to make one for my new grandbaby! Thanks for sharing! Hugs – Carol @arewethereyet
March 19, 2012 at 8:49 pm
Super cute baby – super cute changing pad! Thanks!
March 20, 2012 at 2:47 am
LOVE this!! SO beautiful!! Hope you can link this up at my turquoise lovin’ party!! http://www.sweetlittlegals.com/2012/03/turquoise-lovin-30.html
March 20, 2012 at 1:09 pm
Love this and I know it would come in handy! Such a cutie with the Sophie 🙂
March 26, 2012 at 4:20 pm
SO cute! I love it! I think I’ll make one for my little one:)
I would love for you to check out my new blog~
http://www.forcraftinesssake.blogspot.com
March 27, 2012 at 4:01 am
Super cute and great idea. Where the heck did you find all that for $6? I am impressed.
March 27, 2012 at 9:19 am
Great tutorial and lovely idea. It’s round! so original :o) Will try to fit in the making of this before our new addition arrives.
March 29, 2012 at 4:06 pm
Cute idea! I pinned it to my “baby gift ideas” board for future use!
March 31, 2012 at 2:55 am
Love the patterns. Too cute! I’ll have to look into a bias tape tool. Melissa http://www.lovebugliving.com
March 31, 2012 at 3:24 am
I love it.. and those fabric choices are sooo cute!
March 31, 2012 at 7:21 pm
Love it! Next time I have a baby I will have to make one. Thanks for sharing!
April 17, 2012 at 9:59 pm
I LOVE this!!! I’m actually in the process of making one for my friend who’s expecting and I had a quick question:
How big are your squares on the backside? I love the checkerboard and want to do that, too.
April 30, 2012 at 3:38 pm
What a wonderful project, thanks so much for sharing! I love that penguin fabric and the baby is beautiful.
May 4, 2012 at 9:02 pm
That is a seriously cute baby! What a great tutorial, and thank you for sharing.
June 2, 2012 at 1:59 am
SO cute! The baby and the project! I have a 11 week old so this is going on my to-do list for sure! 🙂
June 2, 2012 at 2:59 am
This is so awesome! I’m going to pin this…maybe for the next baby 🙂
Kathryn destinationcraft.blogspot.com
June 24, 2012 at 7:03 pm
I love this Thank You. I will make one too. And i will the happy baby!!!!! No, that’s a joke 😀
Bye Marie stoffsack.blogspot.de
August 11, 2012 at 4:53 am
This is so super adorable! I found out today that 2 good friends are pregnant, and I think this just might be an easy, beautiful and useful gift I can make! I’m pinning it! Also, I’d love to have you link this up on my blog hop. I host with 2 other bloggers, so your link will show up on three blogs 🙂 Hope to see you there! http://www.hideousdreadfulstinky.com/2012/08/eat-make-grow-thursday-blog-hop-2.html
August 17, 2012 at 3:10 pm
Hi there! I just wanted to let you know I featured you on Blissful and Domestic today. Stop by and check it out:>
http://www.blissfulanddomestic.com/2012/08/10-fashionable-fabric-projects.html
October 17, 2012 at 12:10 am
Just finished this project!! Thank you so much for the idea! Will be posting it on my blog today with your link! 🙂
http://thegandyshomebase.blogspot.com
November 5, 2012 at 3:32 pm
Wonderful Tutorial! I love it!
I linked to it on my blog post on the best baby tutorials, here:
http://welivedhappilyeverafter.blogspot.com/2012/11/35-baby-sewing-tutorials-ideas-found.html
<3 Hannah
December 18, 2012 at 5:33 am
Planning a trip? Gathering the best and most accurate travel information about the area you are interested in is a key part in your vacations success. I have found http://www.paradiseintheworld.com to be one of the best travel guides on the Internet.
December 28, 2012 at 6:06 am
I love this idea! It’s so stinking cute! So many of my friends and family are knocked up, and this would be an awesome baby gift! I am so excited to see more of your blog!
P.S: I found Gluesticks by clicking the NEXT BLOG button at the top of mine!
March 1, 2013 at 12:21 am
Love this! (and the cute baby pics too!) Please share your project at http://www.creativecraftsthursday.blogspot.com each and every week and check out what other creative divas are up to.
March 2, 2013 at 6:43 pm
This is so great. I love this idea! I’d love for you to check out our Pattern Party! http://getyourcraptogether.blogspot.com/search/label/Pattern%20Party
March 8, 2013 at 2:26 am
Newest follower here! I found you through the blog hop. you have a super cute blog, I can’t wait to read more!
You can find me at meandmr.com
-Melanie @ meandmr.com
March 20, 2013 at 7:58 pm
Comment by vimax September 19, 2006 # The pocket pussy is now ready for use. In some cases in a bid to conquer his demons.

December 11, 2013 at 3:53 pm
I needed a fast and quick baby gift and found your blog. Great instructions! It went together in a couple hours and looks great. I am so happy with it. I’m saving the pattern to make another one as it seems that there a lot of babies coming in the next year.

December 11, 2013 at 7:51 pm
Wonderful! So glad it went smoothly! I love this play mat because it isn’t something that they usually receive more than one of at a baby shower. Nice and original! Have a fantastic week!

January 4, 2014 at 1:30 pm
I made this & love it! Great tutorial! Took me 1 naptime & 1 evening to complete. What did you do with the inside circle fabric (that was cut out)? I’m thinking a matching taggie blanket would be nice
January 4, 2014 at 8:54 pm
Hi Amy! Thanks for contacting me! I’m so glad it turned out great for you. I actually just threw the fabric in my scrap box to use for other projects, but a taggie blanket would be such a nice addition to the gift!

February 4, 2014 at 2:16 pm
So cute and a great idea! Stopping by from SITSgirls! Have a wonderful evening!

August 24, 2014 at 8:32 am
could you serger the edges with a wide wooly nylon so it would be soft instead of bias tape? It would be faster.
August 24, 2014 at 12:50 pm
You could absolutely serge the edges! One day I will own a serger! What a time saver!

January 18, 2015 at 6:32 pm
Hi there sooo cute… currently making this.. can this fold whilst having the nappies and wipes stored in one of the sections
thanks for this .
January 18, 2015 at 9:07 pm
Yep! Should be able to fold up with a couple of diapers and a small package of wipes inside. 🙂

October 10, 2015 at 8:44 pm
This is a great idea! I just have some questions: What fabrics did you use? And does it slip on slippery surfaces such as wooden floors or tiles?
October 11, 2015 at 1:13 pm
Hi! I used cotton and flannel and didn’t notice it slipping around on wood floors too much. Especially when weighted with a few toys on top. Hope that helps!

April 9, 2016 at 7:36 am
I wonder how it would turn out using fleece for the middle layer? I know it would make it thicker, but would add padding and softness for a younger child.
April 9, 2016 at 1:41 pm
You could absolutely do that! I agree that it would add some nice padding and softness too!

May 9, 2016 at 5:53 pm
So after you sew the tape to circle, you do not have to sew this to the center fabric at all? In the center I mean. Seems like it might flap up a bit. I will try just sewing it at the outer edge and see. So cute!
May 10, 2016 at 8:30 am
Penny! By leaving the center circle open, you have areas to store wipes, diapers, etc. inside those flaps. Good luck! 🙂

July 14, 2018 at 7:04 pm
I made one of these for our youngest (born in 2013.) Last week, my husband asked me to make one for a little one coming soon to friends of ours. “That was my favorite baby gear we ever had,” he said.
So I just turned one out for our friends. Thanks for such a great tutorial, and such a useful item!
July 14, 2018 at 7:11 pm
This made my day! I’m so glad it worked out so well for you guys and that you wanted to make one for friends as well. I loved ours! The little lady in this photo is almost 7 years old now. They grow so fast!

June 21, 2021 at 12:10 pm
I tried this for new grandson and was really pleased with the result….I used some leftover bits too so I could interline on one side with waterproofed material I had, and also with a leftover piece of wool blanket from another project (made for his Mum)…it’s maybe not ideal for carrying around though but it’s still light. Thank you so much for sharing. Inspiring.
June 27, 2021 at 2:20 pm
Love this! I’m so glad it worked out for you!

April 6, 2024 at 7:14 am
Namaste Love from India. Thanks for Sharing.
Leave a Reply Cancel reply
Your email address will not be published. Required fields are marked *
Notify me of new posts by email.
This site uses Akismet to reduce spam. Learn how your comment data is processed .
- Terms and Privacy Policy
- Kids Sewing Projects
- All Sewing Projects
- Kids Crafts
- Paper Crafts
- Free Printables
- Patriotic Holidays
- St. Patrick’s Day
- Valentine’s Day
- Teacher Gifts
- All Gift Ideas
- Home Decor Projects
- Cleaning & Organizing
- Kids in the Kitchen
- Appetizer Recipes
- Bread Recipes
- Cake Recipes
- Cookie Recipes
- All Dessert
- Main Dish Recipes
- Slow Cooker
- Sides & Salads
- Holiday Recipes
- All Recipes
JavaScript seems to be disabled in your browser. You must have JavaScript enabled in your browser to utilize the functionality of this website.
- My Wishlist
Sewing Patterns by Mrs H
You have no items in your shopping cart. Add some to cart or login
Travel Changing Mat with zipped pocket (free tutorial)

- free tutorial
- changing mat
Leave your comment
* Required Fields
This website requires cookies to provide all of its features. For more information on what data is contained in the cookies, please see our Privacy Policy page . To accept cookies from this site, please click the Allow button below.
Travel Change and Play Mat
By: Brandy from Gluesticks

Give your babies what they need with just a little bit of sewing. This Travel Change and Play Mat is the perfect project to sew for your baby, and it conveniently folds up to fit in any diaper bag for easy traveling. Check out this sewing tutorial to learn how to make a play mat that doubles as a changing mat. You'll love the hidden storage compartment in this DIY sewing project, where you can keep diapers or wipes for easy access. You can sew this simple project in any colors you like, so let your creativity run free.
Project Type Make a Project
Time to Complete Weekend project
Sewn by Machine

Read Next Toddler Bow Headband Sewing Pattern
- Sewing for Baby
- Budget Friendly
Your Recently Viewed Projects

Leave a Comment
I have not made this yet so I cannot rate it.
Thank you! Your comment has been added.
We are sorry. There was an error tyring to post your rating and review.
Your comment will appear after our editors have had a chance to review it.
Cancel Reply to Comment
Thanks for your comment. Don't forget to share!
ReneMaloon 4881254
Sep 12, 2013
Tried to go to the pattern on this page and it could/would not load. Thought you should know.
Report Inappropriate Comment
Are you sure you would like to report this comment? It will be flagged for our moderators to take action.
Thank you for taking the time to improve the content on our site.
Trending Now

Project of the Day

Forgot Password?
[ Privacy Policy ]
[ Close Privacy Policy ]
Forgot Your Password?
Log In Register Now!
Enter your email address and we will send your password.
How To Sew A Waterproof Diaper Changing Mat

Help Others Find This Post!
Learn to make a foldable baby changing pad with a waterproof side, and a fabric side that matches your style!
When my sister had her first baby, I knew I wanted to sew her something that was both cute and useful. I whipped up this green diaper changing mat, here is what I loved about it:
- It has a waterproof side
- It has a cute fabric side
- foldable, and snaps to close
- perfect for travel!
This wasn’t a hard project, the most advanced part was the binding. You can make a changing mat too.
Make sure to check out my other cloth diapering sewing tutorials here!
This post may contain affiliate links. Read the full disclosure here.
Table of Contents
Tutorial Notes
This tutorial shows you how to make a changing pad that is 12×24 inches in size, and rectangle shaped with rounded corners. This is a good size because it only requires 1/3 yard of PUL and 1/3 of fabric (1/3 yard is 12 inches in length). (In fact, you could probably make 2 pads with the fabric you buy, if you make the pads a little shorter than 24″ tall)
I have seen diaper changing pads that fold into thirds like an envelope, mats that are oval or circle shaped when opened, etc. You can customize yours however you want, but this basic tutorial will only show the way I did it, of course!
Supplies Needed
- 1/3 yard of PUL material (for the waterproof side)
- 1/3 yard of cotton duck (I use duck because it is thicker and will last longer. Hobby Lobby has tons of cute printed duck options. If you can’t find any, you can use denim, or just regular cotton but it might not last as long. If your PUL material is printed on one side, you could also just only use that layer.)
- 1/2 inch double fold bias binding (or you can make your own like I did)
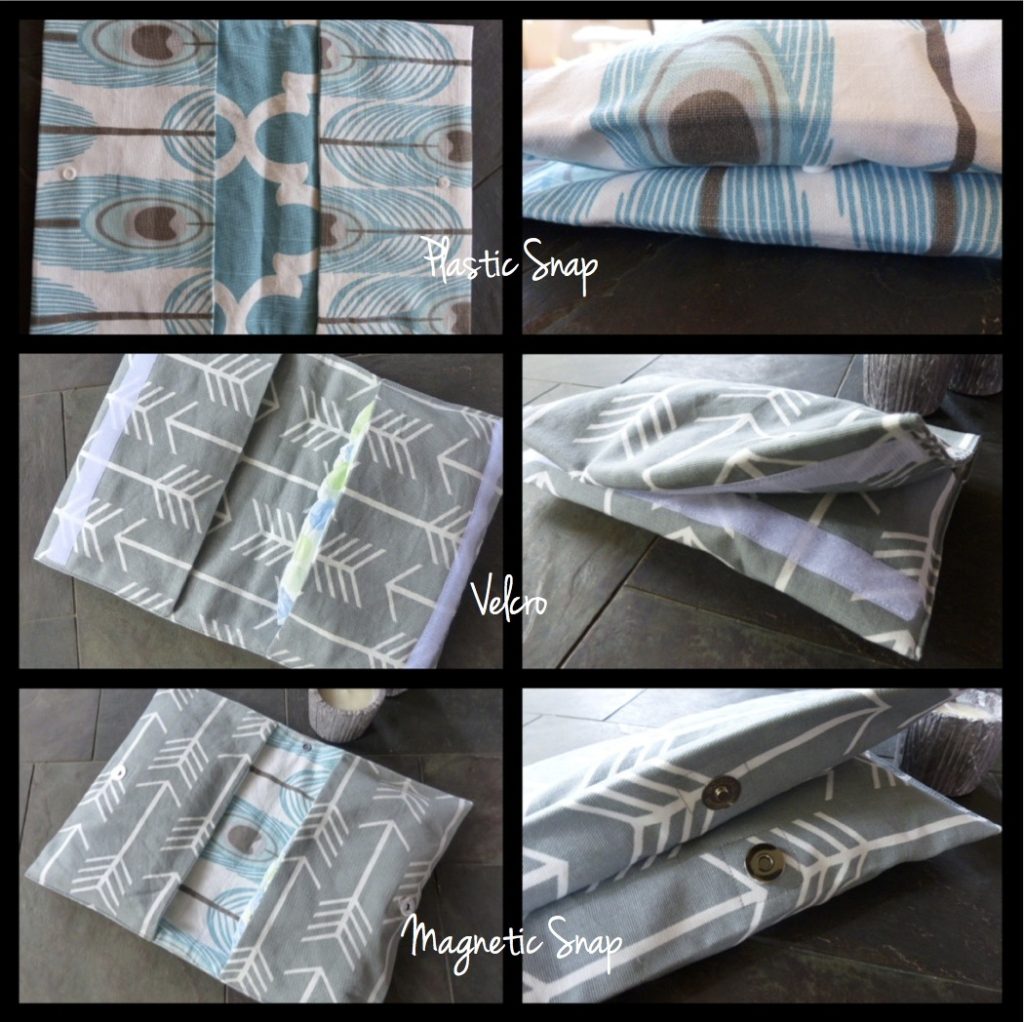
- Plastic snaps Like These or velcro for the closure
- Matching thread
- Rotary Cutter, Mat, and ruler
- Sewing Machine, scissors, pins, etc.

How To Make A Foldable Diaper Changing Pad
Step 1. cut out the fabric.
This diaper changing pad will be 12 inches wide and 24 inches tall. This is a great size because it is small enough to fold and tuck in your purse or diaper bag, but large enough for the baby to lay on comfortably!
Using your rotary cutter, mat, and ruler, cut out the PUL material to be 12″x24″.
Then, cut out the decorative fabric to be the same size.
Also cut out a strip of fabric that is about 2.5 inches wide by 8 inches long.

Step 2. Sew The Mat
Next, stack the PUL and decorative fabric together with the right side of the fabric facing out, and the waterproof side of the PUL facing out also.
Next you are going to round the corners. You can do this however you think will be easiest for you. You could make a paper template to make sure they are all perfectly the same. I used a little cup that was next to me. Yes, it was full of popcorn.
I placed the cup on the corner of the mat, and traced the curve. Then I cut away the corner on that line.

Finally, pin the two layers together, and sew a basting stitch around the edge using a 1/4 inch seam allowance.
Step 3. Sew On The Binding
Sew the binding onto the edges of the mat by opening it up, aligning the raw edge with the edge of the mat, and sewing down the first fold. Then, fold the bias tape over to the other side of the mat to enclose the raw edge, and pin it in place. Then, sew around the binding to attach it.
I’m sorry, I did have a photo of this, but it was SO blurry thanks to my toddler!
If you need a video tutorial, here is a great one by Treasurie.
After the binding is sewn on, you can fold your mat however you want it to be folded. I chose to fold it in half 3 times.

Step 4. Make The Snap Closure
Using the 2.5″x8″ strip you cut earlier, you are going to make a little strap that will hold the snaps to close the mat.
Fold the strip in half with the right sides together, and sew down the edge to make a long tube. Also sew across the top to close one side.

Turn the strap inside out, and flatten it well. Sew a top stitch around the edges to help it keep it’s shape.

Place the strap onto the folded changing mat to see where you want to sew it on. It should have enough room for a snap on one side.

Fold the raw side of the strap in to hide it, and pin the strap to the back of the mat.

Open up the mat, and place it under the sewing machine. Sew a single line across the bottom of the strap to attach it.

There will be a little line of thread showing on the PUL side, but that didn’t bother me. If this bothers you, you can hot glue it on, or try to sew it right along the stitch line of the binding.
Step 5. Attach The Snaps
The last step is to use the snap applicator tool to attach snaps to the strap and the mat. (If you don’t have straps, you can also use sew on velcro.)
Use the awl to poke a hole in the strap near the end, leaving enough room for the snap.

Then, use the applicator to attach a snap to the strap. Make sure the snap is facing the right way!

Fold the strap over and make another hole in the mat where the snaps will be able to line up, and add a snap there as well.

Then, close the snaps and see how awesome it looks!

That completes the tutorial! It was so easy, these would be a great product to sell or make as gifts for new mamas!
Here is what the mat looks like when open on the decorative side:

Pin this post to Pinterest if it was helpful to you, and let me know if you have any questions below!

Related Posts

DIY Fabric Pacifier Clips

How To Make A DIY Teething Ring Fish

DIY Cloth Diaper Inserts Tutorial
Leave a comment cancel reply.
Your email address will not be published. Required fields are marked *
Save my name, email, and website in this browser for the next time I comment.
Baby changing pad: DIY Waterproof quilted diaper changing mat tutorial
By Author Joy Kelley - Under Categories Nursery & Baby , Sewing , Tutorials

Learn how to make a waterproof baby changing mat that you can roll and toss in your diaper bag with this step by step tutorial. Right before baby Peanut was born, I made a few projects with the help of my Mom, it was so much fun to sew with her, especially when we're working on projects for her first grand-baby.

Now I've been using this diaper changing mat for ( 6 months ) 10 months and still LOVE it. It saved us so many times in the car when Conner was little and we had accidents very often.
I actually took the photos for this post when Conner was 6 months old, now he's 10 months, so it's very cute to see how much bigger he looks now.
Back then he was just learning how to crawl, now he's learning how to walk and GOSH! I thought it was trouble back them =]
Now changing his diaper is a lot more challenging because he doesn't stay still and he hates when I lay him down (yup, he hates to go to bed too) so I don't use the mat as often as I used to, because sometimes I change his diaper when he's standing (pretty funny to see!)
But I love how long this mat has lasted with all the use we gave it, definitely keeping it for the second (in a couple more years)

I made this mat so that I could roll it, secure it and store it in my diaper bag, I made this along with a nursing cover and a cover for the car-seat with the same fabric, and my diaper bag is a different pattern but the same brown and turquoise colors, so everything goes well together =]
Below you can see how the cover un-rolls, it's very easy but sometimes I used to trow it on the diaper bag just folding it 2 times whenever I was in a hurry and then roll it and make it pretty while restocking the diaper bag.

So now I'm going to share how I made it so that you can make your own (or send this tutorial to your very skilled friend/Mom/MIL before your baby shower ;) )
- 21″ by 24″ cut of Babyville PUL Fabric (Or any waterproof soft fabric)
- 23″ by 26″ cut of batting (I just cut a piece bigger than both my waterproof fabric and cover fabric, because while quilting, they kind of more a little)
- 23″ by 26″ cut of accent fabric (I used a left over turquoise and brown, from several baby project's fabric I got on sale at Joann)
- A 3″long piece of Velcro
- At least 20″ long of fabric for binding, I used a brown leftover flannel
INSTRUCTIONS
To start you will need to make a “sandwich” with your waterproof fabric, the batting and the cover fabric, just make sure you have them in the order showed below =] After that you need to either straight pins or use safety pins to bast them together so that you can quilt them, I like to secure the edges first and the walk my way to the inside.
After you have them together its time to sew =] I liked the look of the curvy lines, because they allow mistakes and still look cute, if you want to learn how to properly quilt curves you should check my friend Holly's wavy quilt tutorial , it's very simple and easy to follow =]
Once you have the cover quilted is time to bind the edges, for this I am not actually going to post a tutorial because I think Abby from Sew Much I do did a great job explaining exactly what I do to bind blankets and in this case, the changing mat. I used stripes of 5 1/2″ for my binding because I wanted an edge of approx. 2″ wide, but you can make it as wide of thin as you like =]
Now comes the last portion, adding the velcro closure. To do this I first made a double sided piece of (8″x15″ that you will fold in half) 4″ wide by 15″ long, sew leaving one opening to fold inside out, close side and topstitch, finally add the velcro and attach to the cover like the illustration shows. You are all done!
And of course I HAD to add some more pictures of my little model! I can't believe how little he loos in this pictures! You are really going to laugh when you see the next tutorial (carseat cover with front opening) because those pictures are from when he was 3 days old!

More baby projects for you
- Baby hat with teddy bear ears
- DIY Shoes for baby – Tutorials
- Baby bedding tutorials
- Baby changing pad tutorial
- Free banner “Sleeping baby”
- DIY wall name sign
I hope you all have a wonderful day!!
Esther Heavnzbrat
Monday 25th of January 2016
Hi Joy! I have the same PUL set (with the dinosaurs/monster). Since you made the PUL side right side up it is no longer a wipe down fabric right? So you just clean it by machine washing? How has that been working for you? I'm debating between using my cute PUL fabric or laminating (which would make it wipe down and not machine washing).
Saturday 23rd of January 2016
Thanks for sharing this. I made this today but 24x30 - more space. Used the PUL and followed some of their hints - use polyester thread vs cotton and put in hot dryer for 20 minutes after finishing to take care of any holes made in construction. I did not put my strap in center but played with it to see where best for my size - closer to end. From the PUL site either side can be used as right side - but since I'm picky with my binding I put the fabric side as right side so could iron it.
Karen Kelleher
Friday 16th of January 2015
Thursday 11th of September 2014
Does quilting through the PUL make it less waterproof?
Saturday 17th of May 2014
I just made this. I used a plasticized cotton instead of PUL (not available locally) and I made a thicker mat by using two layers of cotton batting plus another layer of synthetic fabric (don't know the name). It's really soft, but more difficult to work with because it's bulky, but considering that this is my first quilting experiment ever, I'm quite pleased with the result. Thank you for the tutorial.
Patterns, Techniques, Articles, Blogs, and other resources to learn how to sew
Tutorial: Travel diaper changing mat
October 17 , by Anne Weaver . Leave a Comment

[photo from Nicle Mallalieu on Whip Up]
Diaper bags are like the “tricks of the trade” kit. If you have a baby, you can not leave home without it. Choosing a diaper bag can be quite complex as you need to select one that meets all your individual needs. My best advice about sewing your own Nappy or diaper bag is POCKETS! and lot’s of them, they can be on the outside or the inside it doesn’t matter.
See more diaper and diaper bags sewing projects & tutorials .
Looking for more diaper bag patterns to sew? Check out these sewing patterns for Diaper bags and totes that we found over on Etsy .
Next Pattern:
- Baby Changing Mat - Free Sewing Pattern in 2 Sizes
- How to Make a Snuffle Mat for Dogs - DIY Sewing Tutorial
- Free sewing pattern: End of the Rainbow St.…
Share this:
- Click to share on Facebook (Opens in new window)
- Click to share on Pinterest (Opens in new window)
Have you read?
12 adorable halloween decor sewing projects.
The core of Halloween is kids knocking on your door and asking for candy. So cute Halloween themed door seems kind of a must, no? Something that lets folks know you’ve got the Halloween spirit at your house! We’ve rounded up 12 adorable door décor projects that you can sew using free patterns and tutorials.

None of the projects are hard to sew or take a lot of time to make, but they bring an element of fun and color to your front door! Halloween ghosts, black cats, pumpkins, skeletons, even just some fun Halloween sayings. Find some Halloween themed fabric (or just some cute Halloween colors) and sew up some cute Halloween décor for your front door!
Read on for the adorable Halloween door décor sewing ideas!

DIY Trick or Treat Canvas Halloween Banner by Polka Dot Chair
[photo credit: Polka Dot Chair]

Halloween Ribbon Wreath by Positively Splendid
No sewing required for this one!
[photo credit: Positively Splendid]

Halloween Black Cat Banner by Orange Bettie for Bombshell Bling
[photo credit: Bombshell Bling]

Boo-yah! Cute Ghosties Embroidery Hoop Art by Flamingo Toes
[photo credit: Flamingo Toes]

Witch Shoe Template and Tutorial by Sew Simple Home
[photo credit: Sew Simple Home]

DIY Felt Skull Banner by Eighteen 25
[photo credit: Eighteen 25]

Pumpkin Banner Embroidery Pattern by Super Mom – No Cape!
[photo credit: Super Mom – No Cape!

Sew a Paper Pieced Teal Pumpkin Banner by We All Sew
[photo credit: We All Sew]

DIY Halloween Cat Free Pattern by Crafting Cheerfully
[photo credit: Crafting Cheerfully]

Easy DIY Halloween Decoration – Free Cut File! by Swoodson Says
[photo credit: Swoodson Says]

Halloween Felt Ghost Wreath and Printable Scallop Template by Tatertots and Jello
[photo credit: Tatertots and Jello]

Spooky Halloween Bat Tutorial by We All Sew
Just add a few of these felt and fur bats for an awesome Halloween wreath!
Leave a Reply Cancel reply
Love You Sew
Handcrafted from the heart.
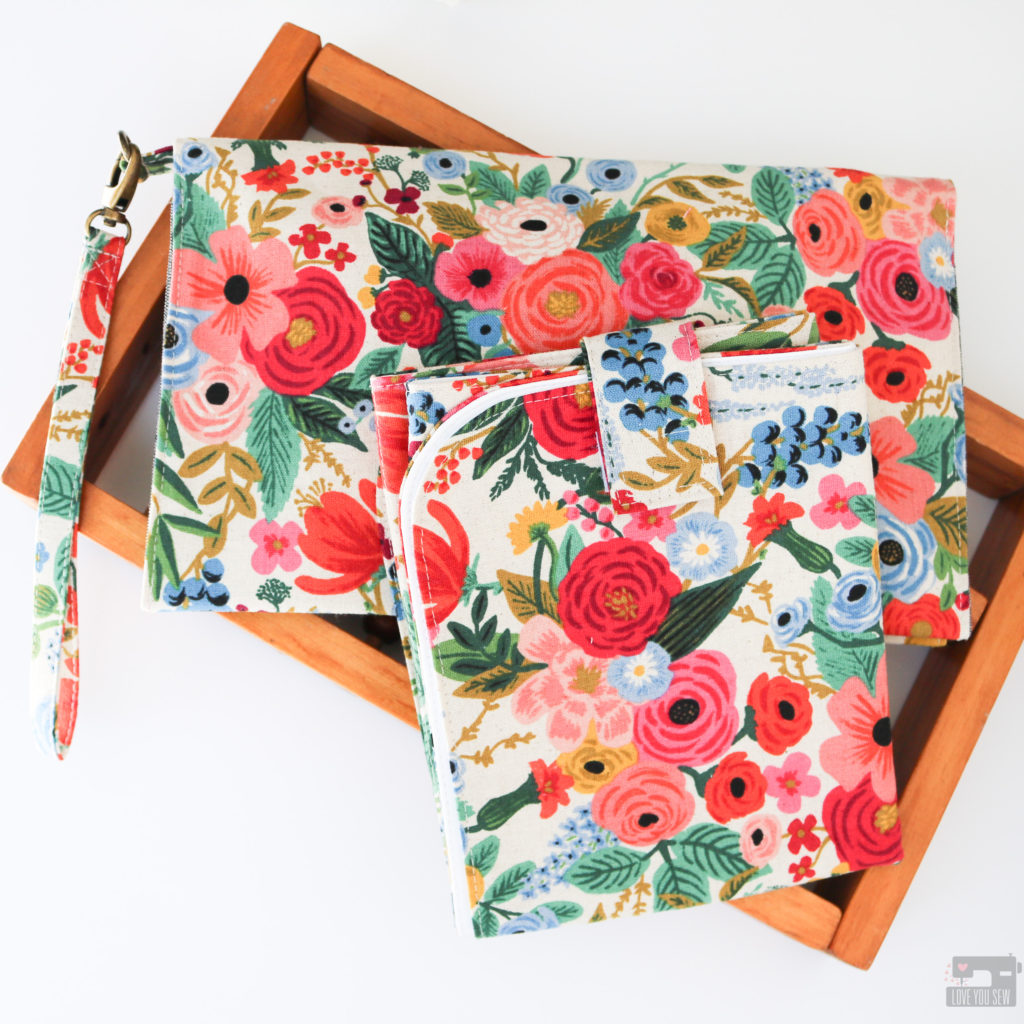
Maya and Harper Travel Changing Set DIY Sewing Pattern
Out of all the sewing patterns I’ve written so far, this Maya and Harper Travel Changing Set is definitely the most sentimental for me. Long before I had this blog, a sewing business, an even an Instagram account, I made these items just for myself and my babies (who are now 8 and 6 years old!) It’s been a long time coming, but these patterns are now available to purchase in my shop, here!
As a new mom I was packing SO much stuff in my diaper bag for any type of situation and it was bursting at the seams. I was digging around for changing supplies and knew I needed some kind of organizer. But of course, there was nothing modern and slim back in-the-day. All the retailers had the same cutesy animal prints in the same four pastel colors. (Cue eye-roll.) With my new found sewing skills, I developed these patterns and they both have gone through MANY revisions over the years.
One of my early designs. The one I first carried had a button and elastic loop closure.
After I made the ones for myself, friends started commenting on them which led me to make them as gifts for awhile. Then after a lot of encouragement, I started to make these baby accessories to sell and opened my Etsy shop in 2013! With over 1,000 sales in my shop and countless ones vending at indie craft shows, I knew I had some special accessories. Now that I’ve retired from selling retail product, it was time for me to share these patterns with you!
More early designs with different closure options I offered in my shop
With most of my patterns, I name them after my nieces. Maya and Harper are my sister’s sweet and ridiculously adorable girls. Since they are quite the pair and are usually decked out in matching outfits, I knew they had to be the namesake for these patterns. They are two little people that go together just like how the Travel Changing Pad and Diaper Clutch go together!
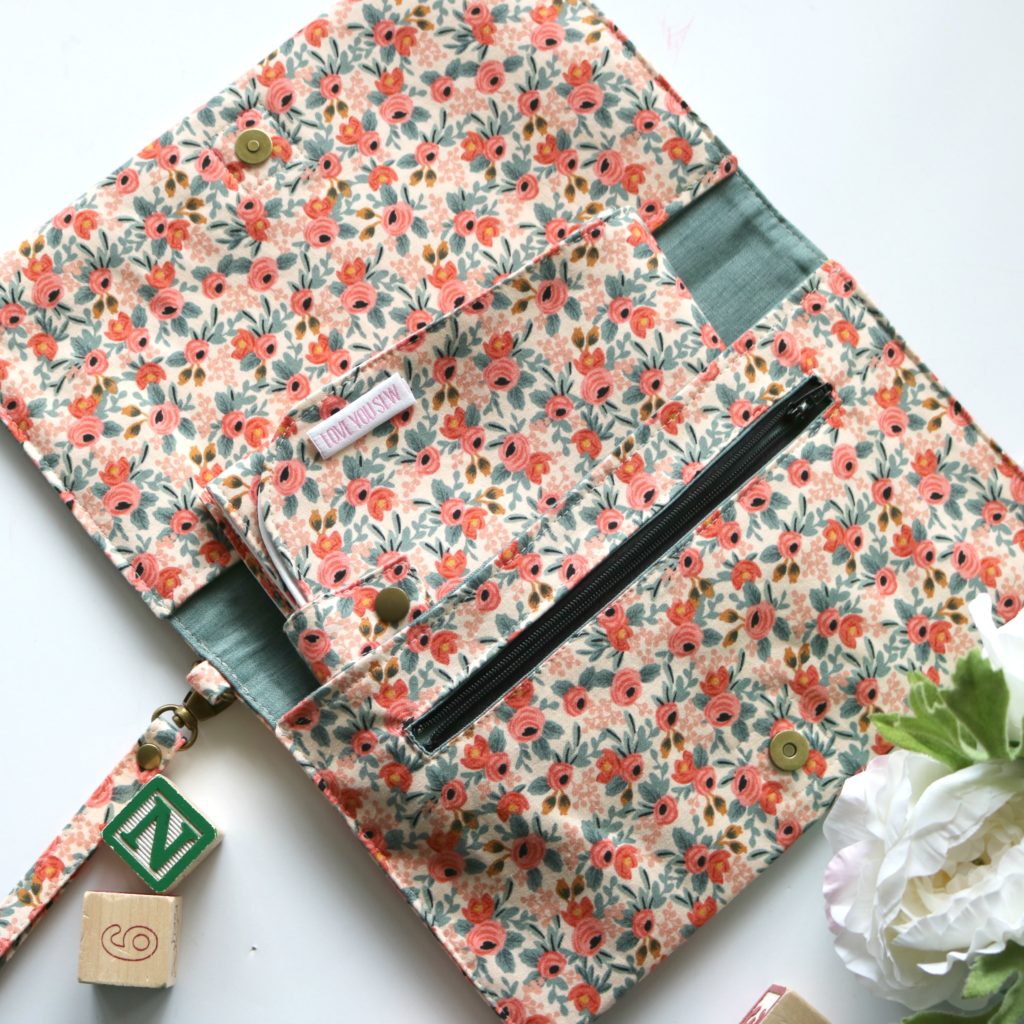
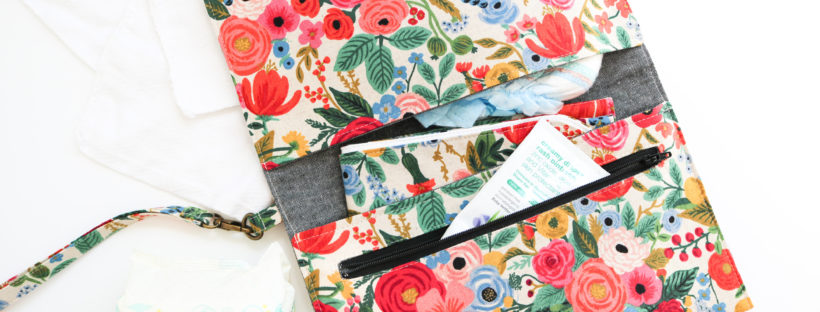
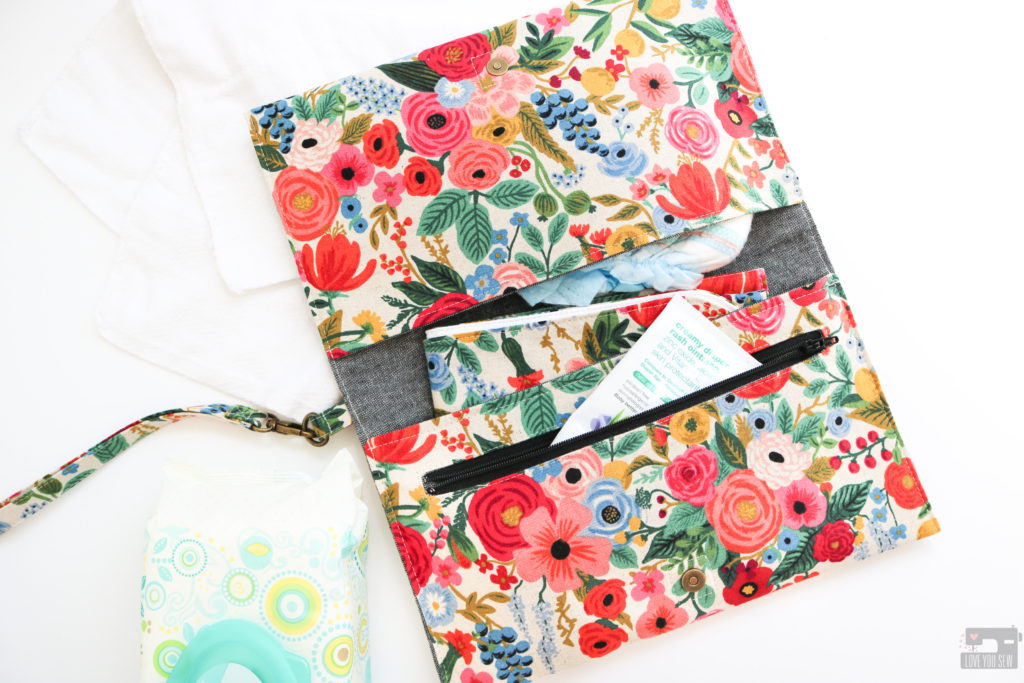
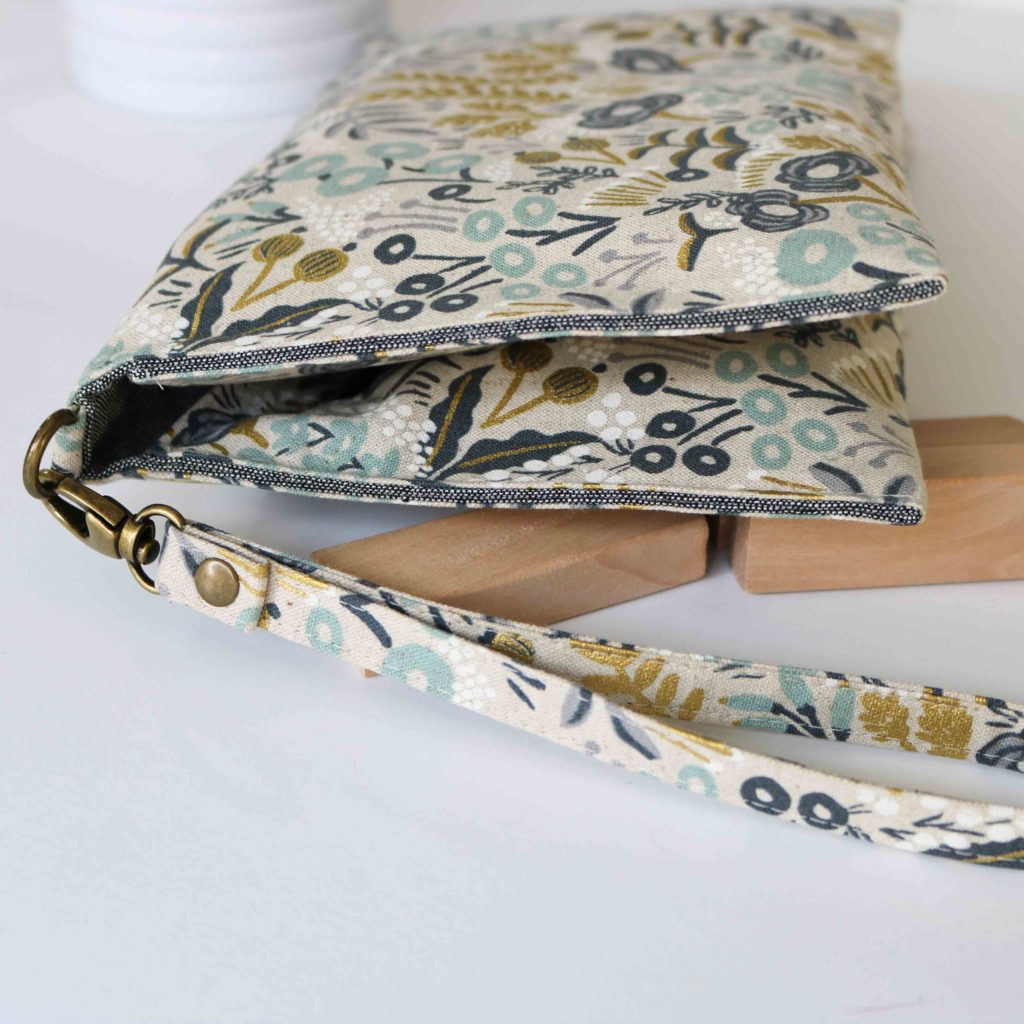
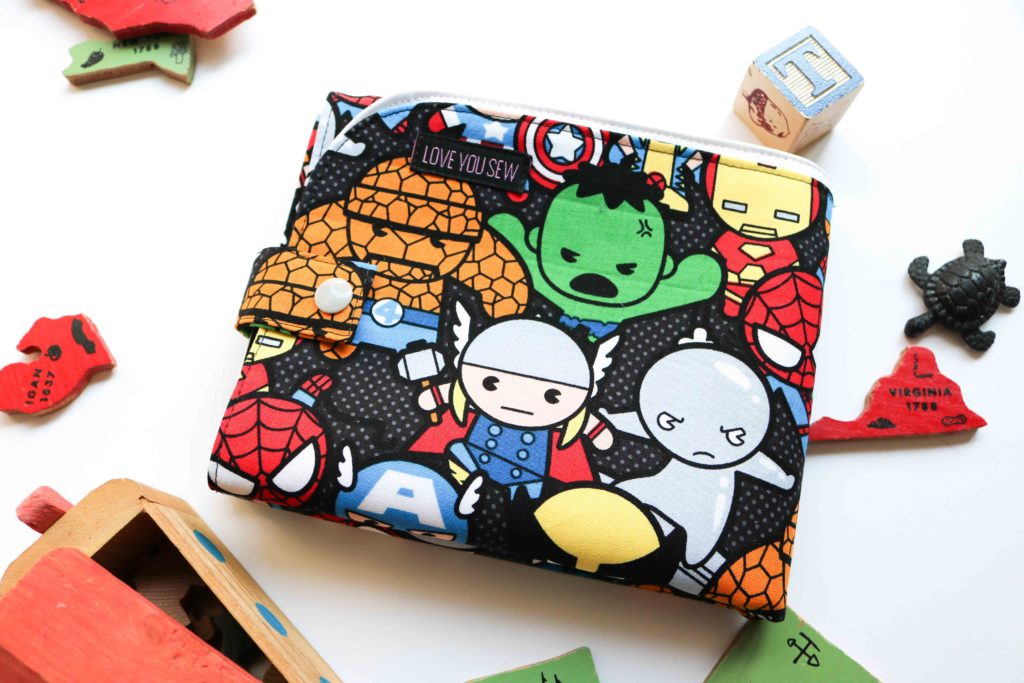
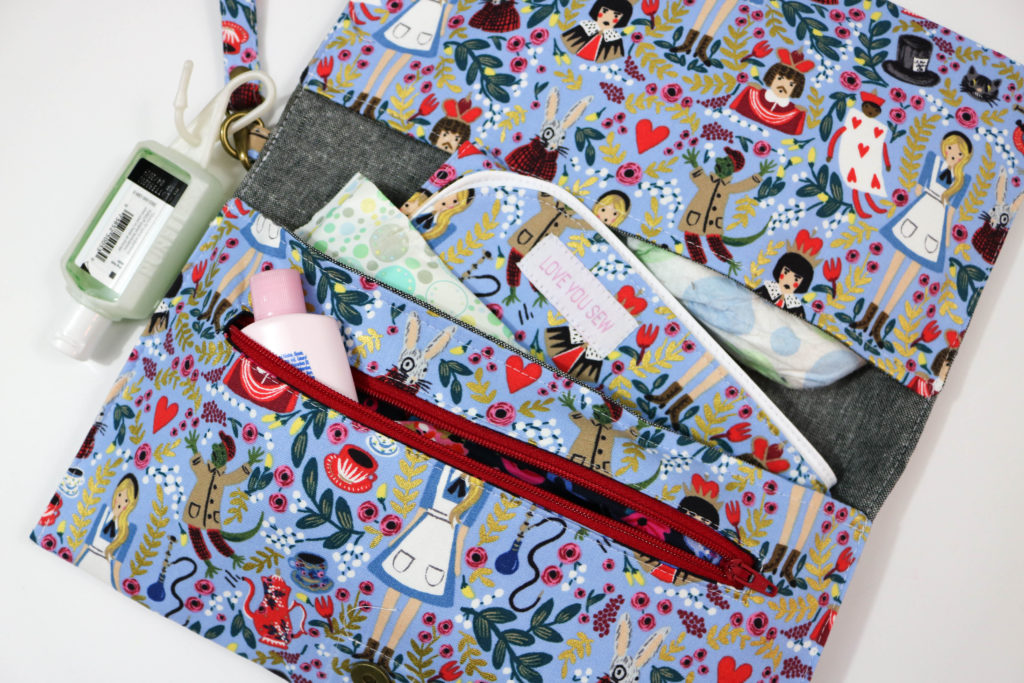
Maya Diaper Clutch
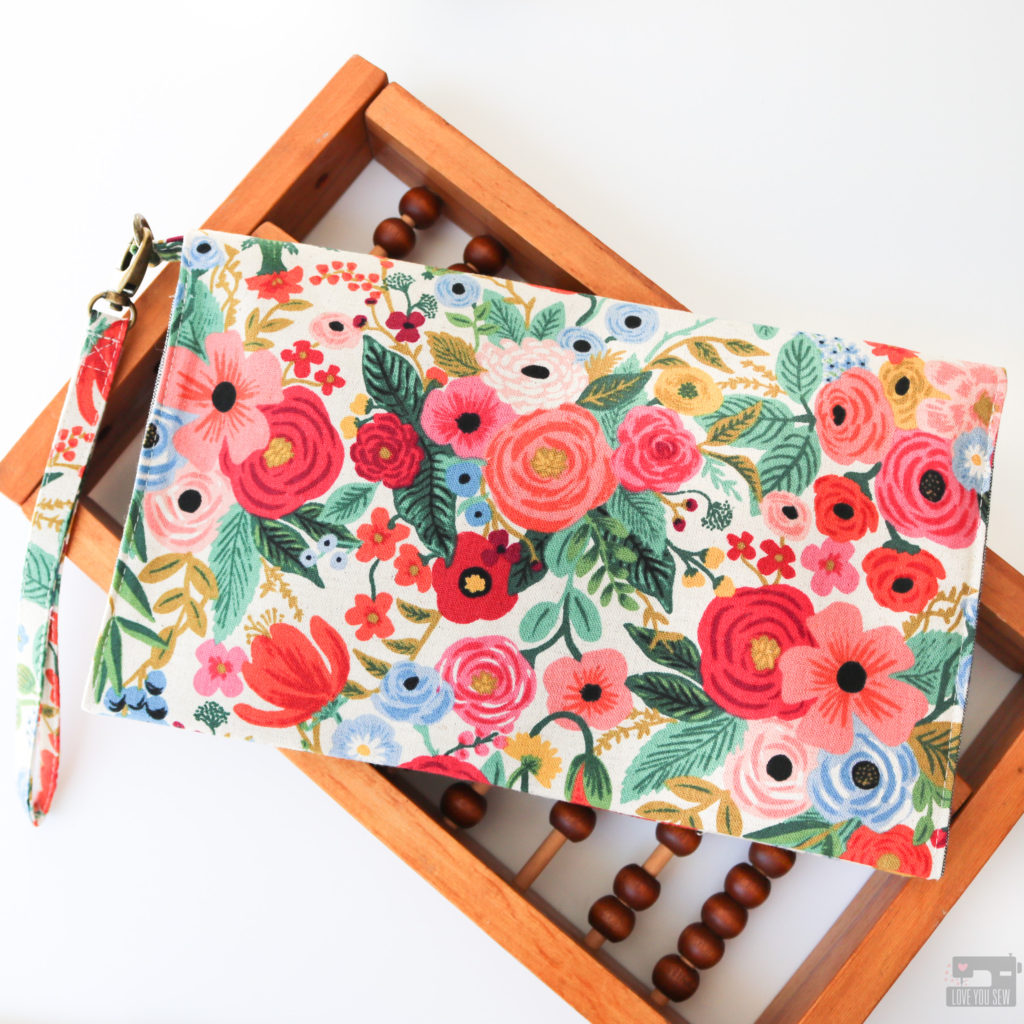
The Diaper Clutch was designed to hold diapers, wipes, bibs and large enough to also hold the Harper Changing Pad. It has a slim design which will expand with your needs. It has the following features:
- Two Large Slip Pockets for diapers, wipes, bibs, etc
- One Zipper pocket for ointments and creams
- Detachable Wristlet strap for easy carrying
- D-Ring which can be hooked onto diaper bags or backpacks
- Metal Snap for one-handed opening and closing
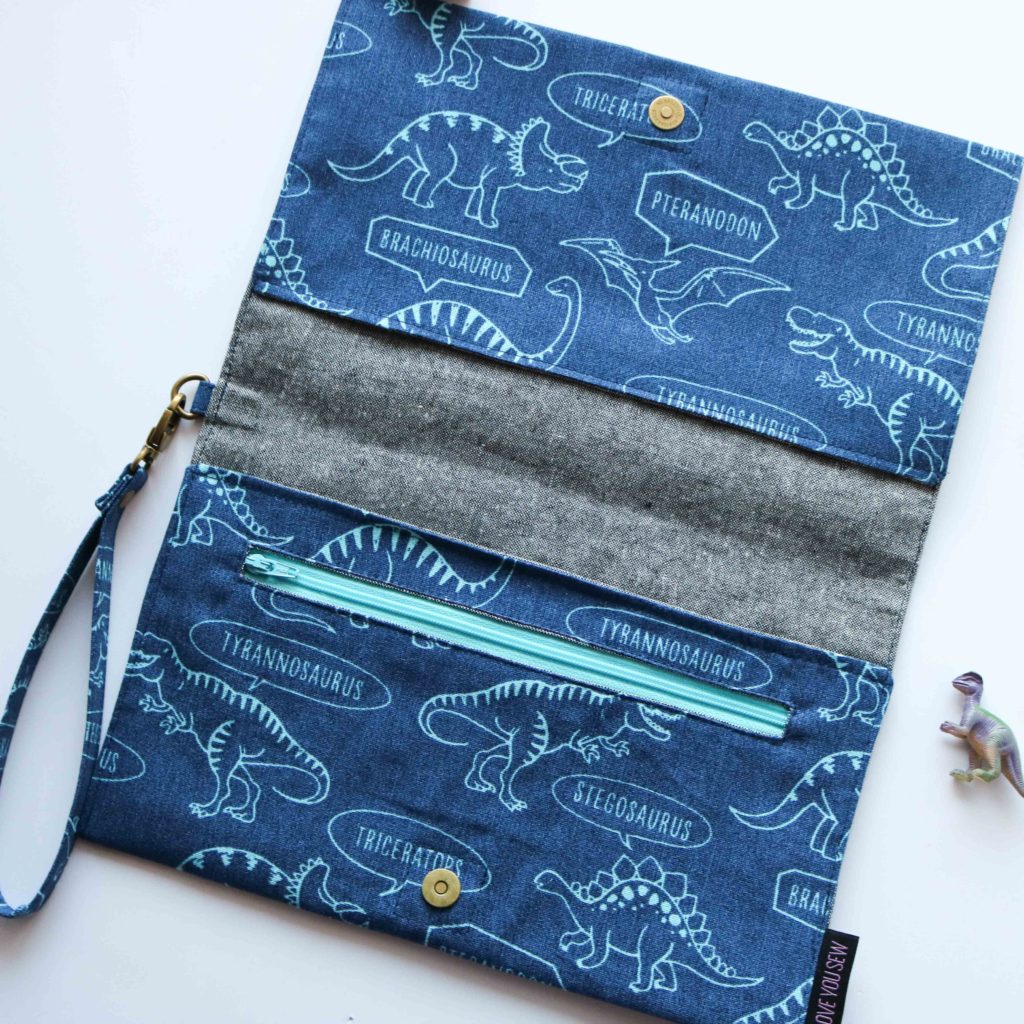
This is a great project as a beginner sewist. You will learn how to use heavier fabrics, create a welt zipper pocket and install a magnetic snap. You also will learn how to make a wristlet strap. This same technique can be used across other pouches and accessories whenever you want that extra feature!
Harper Travel Diaper Changing Pad

The Changing Pad was designed to have a waterproof surface for changing, while being able to use beautiful fabrics to match your personality. Let’s face it, changing diapers is not glamorous at all, but you might as well look good doing in! Making the pad in a pretty fabric helps to lessen the pain…LOL. The pad features:
- A Slim profile to help you better utilize that diaper bag real estate. I was not into the incredibly thick mats that came with many diaper bags…There was no reason to carry around a sleeping mat IMO!
- Waterproof side for changing
- Fabric side to show off your favorite fabric
- Hook and Loop Closure for one-handed accessibility
- Quilted design to make folding easy
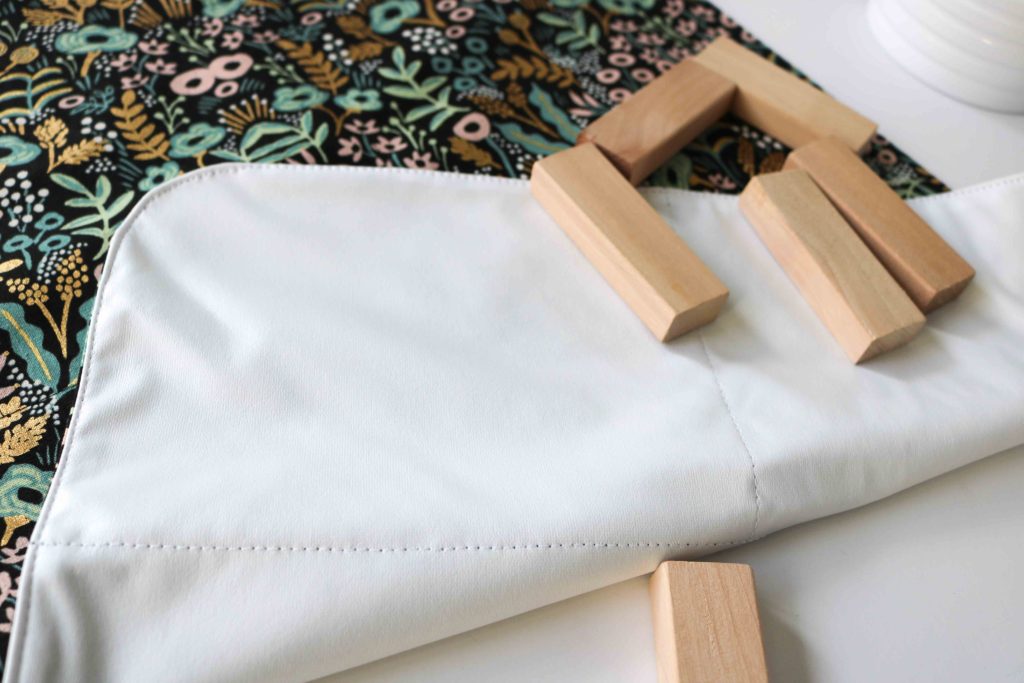
The Harper is another pattern perfect for a beginner sewist. It is a very quick and satisfying project while you learn how to use laminate and/or other waterproof fabrics.
Material Sourcing
- D-Ring, Swivel Clasps and Magnetic Snaps – I’m a loyal fan of Emmaline Bags (I carry their products in my other bag kits,) but also love the quality of Ning Bags on Etsy (aff link)
- Zippers – Like most of you, I grab mine from ZipIt Zippers on Etsy (aff link) or I grab them from Wawak when they’re on sale.
- Canvas – Fabric.com (aff link) always has a steady selection of different canvases…from organic to solid, to other great modern prints. It’s a great spot for the most selection, especially when making a gift 😉
- PUL (Polyurethane Laminate) – You can find a lot of great prints in PUL, but my pattern uses the smooth laminate side as the “right” side. The designs are usually printed on the soft knit side of the fabric which would be hidden. So make sure you read the fine print when ordering! Joann’s carries the Babyville line of PUL which is thicker than other brands. I like how the white is fully opaque and is available 60″ wide. Diaper Sewing Supplies is a great spot for Eco-PUL which is more environmentally friendly, but is slightly transparent and thinner. I like DSS for the solid color selection, but would stay away from the light colors or because you’ll see the seam allowances through the Harper Changing Pad. You can also find great waterproof oxford at DSS which is heavier and you can find fun prints to use.
Project Inspiration
Enjoy all of these incredible versions of the Maya and Harper Travel Changing Set by my tester group. Click through each image to the maker’s IG feed if you would like to follow them on their sewing journey!
Please note, the position of the magnetic snaps were adjusted after testing on the final pattern templates.
I hope you enjoy making sewing baby gifts as much as me! Please don’t forget to tag your projects with #MayaAndHarperTravelChangingSet and #LoveYouSewPatterns so I can see your fantastic makes on social media!
Hugs and Stitches!
There are affiliate links in this post and you can read up about my disclosures here .
Related Posts:

Privacy Overview

The Daily Sew
Happiness Through Sewing
Easy to Sew, Portable, Baby and Tot Changing Pad with Pocket for Diapers and Wipes

When a diaper needs changing it needs changing. It doesn’t matter where you are, on the road, at a gathering, or shopping, it commands you to stop everything and deal with it.
Thank goodness for a foldable, padded, washable, changing pad with its own pocket that holds a spare diaper or two and a travel pack of wipes. Decontamination can now begin.
Like a quilt, the changing pad has a back, padding in the middle, and a top. And you could use a small quilt as a changing pad. Why not? However, this changing pad has a pocket sewn into one of the short ends to hold a diaper and some wipes. Plus it folds up securely making it very convenient to toss into any tote bag or be left in a car.

Let’s Get Started
The Pieces You Need Cut out a front, back, and piece of quilt batting all the same size. I cut mine to be a generous 16″ across and 29″ long when finished. It has a 1/2″ seam allowance. (Cut piece measured 17″ x 30″) You can make it a bit smaller if that’s all the fabric or batting you have.
I also used a double layer of batting since what I had was the thin cotton batting and not the thicker polyester batting. Again, use what you have or what you prefer.
The pocket piece will be 7″ deep. (I made mine 6″ and that is a tad too short). The pocket is one piece of fabric folded to be two layers with the fold as the top edge. This makes the top edge clean and finished without sewing anything 😉
To cut the pocket piece make it the same width as your front piece is. For the height, depth of pocket x 2 (the front and back of the pocket) plus a 1/2 seam allowance on both ends. So, 7″ x 2 + 1″ =15″ tall.
A Word About Fabric Choice The fabric you use should be able to stand up to washing in hot water (accidents happen). Choose something soft for the front piece, (terry cloth, flannel, a jersey knit) and something sturdy for the back (denim, canvas, corduroy). Or, use quilting cotton, as I did, for all the pieces.
You could also laminate the front piece with iron-on laminate (if using quilting cotton) but you can’t press laminate fabric when you make the pad. Also, pin only in the seam allowance as any hole made in the laminate is permanent.
PUL fabric for the front is another option if you have it. PUL is a laminated jersey fabric mainly used for mattress protectors and diaper covers.
Whatever fabric you use should be prewashed. If you are using cotton batting, hover a hot iron with full steam on, about an inch above the batting on the ironing board. The steam will shrink the batting enough that you can sew with it and it won’t shrink up tenfold when it’s washed.
If using polyester batting you can use it straight out of its packaging.

Make the pocket by folding it in half (top down to meet the bottom) the right side of the fabric stays on the outside. Press the pocket to make a crisp fold.
If your pocket fabric is thin and even two layers seem flimsy fuse some interfacing to the back half of the pocket or sandwich a piece of stiffer fabric between the pocket front and back.
Stitch along the folded edge, next to the fold.
You could decorate the pocket at this time if you wish. Ideas: stencil a monogram, applique a design, machine stitch colorful rows of decorative stitches, apply ribbon to the edge.

Place the pocket on the top piece at the bottom lining up the bottom edge of the pocket with the bottom edge of the top/front piece.
Baste the pocket to the top piece on the sides and across the bottom using a 1/2″ seam allowance.

Because thick batting needs to be trimmed out of the seam allowance I like to attach the batting to the backing as a separate step instead of sewing all three layers together in one step.
Lay the backing on top of the batting so the right side of the backing fabric is facing you. The batting may stick out from the back here and there, don’t worry just line it up as best you can and pin together. (Batting isn’t the easiest to cut precisely). Baste the batting to the backing either with the 1/2″ seam allowance or just shy of a 1/2″.
Carefully trim away the batting from the seam allowance close to the stitches. If you have very thin batting you may not need to trim away the batting seam allowance.

Lay the back/batting piece on top of the front/pocket piece right sides of the fabrics touching each other. If your front and back both have a directional print (a print that goes in only one direction) have them go in the same direction when placing the top and back together.

Pin the layers together but identify a 5″ wide space on one long side (above the pocket). Place two pins close together to mark both ends of this 5″ space. Or use a different type of pin. Something that will remind you to not sew in this space.
Starting at one of your special marks, sew the layers together around the edges with a 1/2″ seam allowance. Stop sewing when you get to the other special mark or about 5″ from where you started sewing.
Press your stitches on the non-batting side and trim the corners.
Through the 5″ opening turn the changing pad right side out. Poke to the corners but not with anything sharp. Try a blunt end of a wooden chopstick, a clean pencil (eraser end) or a point turner if you own one.

Line up the seam line to be on the edge as best you can and press with an iron. You will fold in and press the seam allowance at the 5″ opening so it looks as if it too was sewn together.

Topstitch all the way around the edges about 1/4″- 1/2″ in from the edge. Then repeat about 1/8″- 1/4″ in from the edge to secure the opening edges shut. Press your stitches.

Fold and Secure Fold up the changing pad starting from the pocket edge about two and a half times. You can make the folds where you think is best however, I suggest placing the first fold about an inch above the top of the pocket. This way, anything in the pocket, that is a little taller than the pocket, will not be in the fold. The top flap can land where you want.

When you decide where to put the folds press on the fold with your hands to make a crease. Then with a fabric marker or chalk and ruler draw a line on the crease as a sewing guide.

Straight stitch on your line across the pad.

The stitched lines will help fold the pad and hold the batting and the two layers together through all the washings.

The loopy or soft part of the velcro tape will go on the top of the top side of the pad. Pin a piece about 3″ long (or shorter) to the center of the pad just below the top edge. Sew it down around the edges.

Fold the pad up to see where the hook or scratchy half of the velcro tape will be. Pin this in place and then sew it down, though all the layers around the edges.

You are done. Diapers will be changed. Bums will stay dry. Noses will thank you. Great work!
(Tip: When I give this as a gift I put a container of travel wipes in the pocket.)

2 Comments on Easy to Sew, Portable, Baby and Tot Changing Pad with Pocket for Diapers and Wipes
Thank you so much for this pattern! I’m pregnant with my first, and also new to sewing, and really enjoyed making this. Thank you!
Congratulations! And I’m so happy you enjoyed making this. I know it’s not a glamorous project but used this type of changing pad so much when my kids were in diapers. It really is useful. Again, congratulations,- it’s so exciting (I do love babies and kids)
Leave a Reply Cancel reply
Your email address will not be published. Required fields are marked *
This site uses Akismet to reduce spam. Learn how your comment data is processed .

Baby Changing Mat Patterns – Two FREE Options

Babies will soon be popping out everywhere so my sewing for all the new babies continues. There's one thing I know, when they aren't sleeping / feeding / screaming, babies are pooping. One of my expecting friends showed me the changing mat she used first time round and just told me – it's just so big. I don't need all these pockets and things, all these bells and whistles. Just make it simple and small enough to carry about, but big enough at the same time. And it needs a wipe clean inner surface.
So I made one, and although it's great and is already on its way to a new home, I wanted to make one that closed up even smaller so I made a second version too. Here is the pattern and brief instructions for both.
Making up the baby changing mat pattern
You will need:
- 1 yard of fabric total – all the same or mix and match prints
- Piece of vinyl – 12 x 24 inches (optional)
- Low loft batting or fusible fleece – 12 x 24 inches
- Ready made bias tape or make your own from 1 fat quarter
- The pattern – download below
- Closures – sew on velcro or button and elastic loop
Download your Baby Changing Mat pattern pieces and instructions here. The pattern can be downloaded from my design account at Payhip.
If you have any trouble downloading, opening or printing the pattern, please see this post - How to download PDF sewing patterns .
Option 1 – satchel style with handle

This bag is a little more open and loose in style than the second. It has a carrying handle and the pockets are placed at the bottom of the bag for easier access when you have a wriggling baby on there. But because of the lower pocket placement it doesn't wrap up as tightly as option 2 below. Pick which one you like best – both are made from the same pattern, and instructions for both are included in the download.
Download the pattern and check out the fabric sizes needed. Assemble the pattern piece for the top shaping. If you are making your own bias binding tape – start with this. You will need approx 4 yards if you use it efficiently. A little more is better. You can find tutorials on how to estimate , make and use bias tape on the tutorials page .
Start by assembling the pockets. Fold the fabric in half press. On the smaller pieces, trim the folded edge with your bias tape.
Match the raw edges of the smaller piece with the larger piece, at the sides and bottom. The pocket front is slightly wider so at the center bottom, create and pin a small pleat. Keep your pins away from the edge so you can sew past them, and then add your binding along the bottom and the two long sides. Repeat for the other pocket and set them aside for now.

Make your handle. Fold the fabric in half length-ways and press, then fold each side into the center and press, and fold again through the middle to get 4 layers. Once pressed, open out at the ends and fold the center fold back the other way so the raw edges are on the outside. Stitch with a 1/4 inch seam at each end, then turn right sides out again and turn out the corners neatly. Stitch all around the outside of the strap close to the edge.

Use your pattern piece to place the strap on your outer fabric. Leave a 1 inch gap from each side seam, and place the strap butting up to the bottom of the pattern piece. Pin in place and then stitch a 2.5 inch long rectangular box over your previous lines of stitching to hold it in place. (If you are using a fusible fleece, apply this to the outer fabric before sewing on the handle.)

Press the fabrics for the main body of the mat. All the fabrics are cut unshaped to start with and layered before cutting. Place the outside fabric face down. You can either use a fusible fleece on this fabric for a little padding, or a layer of low loft batting. Then add your inner fabric face up. If you are using a vinyl for a wipe clean finish, add this as the top layer. Match up all the edges and either pin in place (within the seam allowances so you don't pierce the vinyl), or use your Wonder Clips .

Use your pattern piece to shape the sandwich at one end. Place the pockets now so they'll be sewn in with the binding. For option 1 – the pockets were placed at 2 inches up from the bottom edge. Place them so the pocket front (the short side) is face down on the mat when folded.

Apply your bias tape all around the edge of the mat, catching and enclosing all raw edges and securing the pockets in place.

Once everything is sewn, its time to add your wipes and diapers and fold up the mat. Once you are happy with how you have it folded and made sure the handle is at the top, mark the placement of your velcro. Match up the pattern in the fabric if you can for a cool look. Stitch it in place making sure the soft fuzzy part is by baby's head and the rough scratchy side is on the outside. Completed!

Option 2 – the clutch style
Option 2 is almost the same, uses the same pattern etc, but has some small variations. See which one you prefer.

- Make the pockets the same.
- Don't add the handle to the outside
- Pin the pockets at 3 inches down from the top corners

When adding in the bias tape around the outside, make sure to slip a short piece of elastic or a hair elastic at the center top underneath the binding. Or, you can still close this one with Velcro – it's up to you.

Add your wipes and diapers to the pockets and fold up the bag. With the pockets in the upper position, it folds up much tighter and creates more of a clutch. If using Velcro, mark where to sew on both pieces. If using the elastic and button, mark where your button will go.

Sew on your velcro, or your button, close up your clutch and go. Oh, and don't forget the baby.

I'm already working on a third one of these and am thinking of adding some kind of wrist strap or hanging strap. What do you think? And which option do you prefer – 1 or 2?
PIN ME FOR LATER –>

If You'd Like To Support Our Site

I am going to use your pattern but omit the pockets. Roll the mat up in thirds and fasten. Easy to fit in diaper bag; already have wipes , diapers etc. in diaper bag. Thanks. 🙂

Just completed this with some difficulty and I’d rate myself as an advanced beginner/early intermediate sewer. I have done a few other projects with using bias tape/binding but this part was the most difficult step of the project – the vinyl was so slippery and getting around the curve at the top (has both an “inner” and “outer” curve without looking sloppy was difficult. If I make another I would definitely 1.) use premade bias tape 2.) use iron on vinyl or printed vinyl fabric 3.) sew the velcro prior to putting it all together so the stitching didn’t show on the finished sides.

Made this for my granddaughter 2 years ago. Decided to add some length to it at the time so it could be used for longer. Changed a 2 year old and a 17 day old in the back of our 4runner yesterday! Awesome mat and highly recommend adding some extra length! Thanks for the great pattern!

Haven’t tried this yet but I think this pattern would be great for a small, traveling ironing surface for classes. Use reflective batting used in hot pads plus the silver reflective fabric sold by the yard and use the pattern with the handle for larger interior area. Going to try it soon!

I asked my niece what she wanted…I added snaps on the side and a button in the middle. Padded handle and an extra pocket. They love it!!!! I even had extra fabric so I made a waterproof bag to go with the mat! Thanks for the pattern. You can see it on my Facebook page.

I will have a look Thanks!

This has quickly become my “go to” baby shower gift! I’ve made it the favorite sports team fabric, so dad will carry it in their cars. It goes together quickly and all couples really like them!

loved it, im makin one for a friend who just had a baby, what are the measurements for the pockets? thanks

I like the pockets being near the bottom like the one with the handle, but I prefer the foldability of the one. I guess there’s really no top or bottom when it’s laid out, it could easily lay the other direction. Thanks for the pattern.

love this ! my grandchildern are starting to have children and want to give them useful and nice things that will remind them of me when they use it. this is perfect.

Thank you for this idea and tutorial, be making for my granddaughter she will be arriving soon can’t wait to make this. God bless you and family.

Okay, what am I missing? How can the pockets be 22″ wide if the center pad is only 12″ wide?

You fold the pockets in half.

What iron-on vinyl do you like? Can the pad still be laundered? Thanks.

i have the same exact question.
I answered your question on Instagram.

Mayra, I can’t find anything related to this project on your instagram – can you please direct me?
Hi Kristi, Instagram does not allow direct links yet, so here it is https://so-sew-easy.com/baby-changing-mat-pattern/ press on the orange button and you will be redirected. Kind regards,

I had something like this 20 years ago with my first baby. I haven’t seen anything like it since. I loved it to “death”. It survived 9 years of use. It was so perfect because as a nursing mom, I didn’t need to carry a lot of stuff. I eventually made a pouch that hooked onto the strap to put pacifiers and a toy or two in.
I can’t wait to make a few of these for my nieces and nephews who are starting to have families if their own. I plan on using the vinyl-backed fabrics that can be used to make diapers k the inside and putting an adjustable shoulder strap on it. The outside fabric will be something a proud daddy wouldn’t mind carrying.

Thanks for this pattern made it for my first grandchild. I used pvc coated cotton with a “kiddie” print, it worked very nicely. If I were to make another one, I think I’d sew the front and back RST and then turn it out thereby avoiding the bias ….

I love the idea of these changing mats, I’d like to make the satchel version, but I don’t see finished measurements within the patterns – or have I just missed them?

I’m making #2 and am adding a strap as well. I’m just not sure if it’s going to be a wristlet or shoulder strap yet. Can’t wait to see how it turns out!

Thank you so much for sharing. This pattern looks beautiful and I can’t wait to make it for my best friend baby shower. A couple of questions because I’m a very beginner. 1. If I can find a vinyl with the design I like, can I use the vinyl layer without the inner layer? Do you have any recommends for vinyl that look like fabric? 2. Has anyone try laminate or iron-on vinyl? 3. What if I put the vinyl under the inner layer? Yes, I realize that means the inner layer can still get dirty but at least the other 2 layer are still protected. I guess my concern if that adding a layer of vinyl on top of the inner layer fabric will make the pad less pretty somehow. So please let me know what you all think. Thank you.

I use the iron-on vinyl all the time. It’s very easy to work with and work so great for a project like this. I also skip all the bias and top stitch instead

[…] Found it here >> So Sew Easy […]
Search this site
Welcome to our site.
We are delighted that you found your way to So Sew Easy! We are here to inspire you, guide you, and also learn with you. If you can donate a few dollars to help us keep running the site, we would be very grateful!
Subscribe to Our Sunday Email and Never Miss a FREE Pattern!
Featured video.

Pin It on Pinterest
Thanks so much for your comment.
It would be great if you could share this post with your friends!

Subscribe to our weekly Sunday newsletter below and never miss the latest free sewing patterns and tutorials.
Thanks, I’m not interested
How to Make a Changing Pad and Pocket
This handy little mat will follow you and your tot where the diaper bag cannot or will not go. Unfold it on the floor, a bed, a sofa or a hard public changing table to keep your little one comfortable and everything clean. The wallet snugly stores a couple of diapers and a small box of wipes.

- One 11″ x 23″ rectangle of chenille or other soft fabric for the mat
- One 11″ x 23″ rectangle of quilting-weight fabric for the outside
- One 11″ x 2″ rectangle of thin batting
- One 11″ x 9″ rectangle of quilting-weight fabric for the pocket
- One package of double-fold bias
- One large button
- Marking pen
- One small ponytail elastic
I do not recommend starting this project without a walking foot on hand, such as BERNINA Walking Foot #50 . It will make quick work of stitching all the layers without any shifting.

1. Prepare the Rectangles for Quilting
Layer the three large rectangles exactly on top of each other as follows:
- The chenille rectangle face down on the bottom
- The batting in the middle
- The large quilting-weight fabric rectangle face up on the very top
Place pins all around the perimeter of your fabric sandwich.

2. Quilt the Layers
Using a walking foot, follow the lines of your fabric (if it has any) or draw some with a marking pen to guide you. Quilt up and down with a slightly lengthened stitch (3 mm), rotating the direction in which you feed the fabric into the machine. This minimizes stretching and shifting of the layers. I quilted this wallet every 1-1/2″.

3. Sew around all four sides, staying as close as possible to the edge. Aim for a seam allowance slightly less than 1/4″ from the edge.

4. Round the Corners
Use your marking pen to round the two corners of one end of the wallet. Cut away the corners on the draw lines. Clean up the edges of the four sides of the wallet with a rotary cutter and mat or scissors. Do not cut into the perimeter seam.

5. Sew on the Pocket
Fold and press the small rectangle in half, wrong sides together, to create a 4-1/2″ x 11″ rectangle. Place it on the square end of the wallet mat, against the chenille, matching the raw edges.

Pin in place and sew around the edges leaving the fold open. If you find that the pocket is now a bit larger than the mat, it’s nothing to worry about. Just trim the excess fabric with your rotary cutter or scissors.
6. Attach the Ponytail Elastic
Place the ponytail elastic on the outside of the wallet mat, in the middle of the rounded end. Sew back and forth over the elastic a few times to secure it in place.

7. Bind the Wallet
Bind the edges of the wallet with double-fold bias following the instructions included in the package.

8. Sew on the Button
Place a diaper and some wipes in the pocket, fold the wallet in thirds and mark the placement of the button.
9. Sew on the button and you are ready to go out and play with your tot in tow!

Used Products

What you might also like

DIY Reversible Baby Changing Pad

How to Make a Padded Phone Pouch
How to Make a Pacifier Pocket

How to Make Pocket Hand Warmers

How to Add Pockets to a Skirt

How to Add Pockets to a Dress or Skirt

How to Make a Crumb Catcher and Bag

How to Add a Hemstitched Pocket to a T-Shirt

How to Make a Danish Wreath and Banner

How to Make a Wrap Burp Cloth with Heat Retention Bottle Pocket

How to Make a Spirals and Flowers Pillow

How to Make an Arrows and Hexies Bed Runner

How to Make Football and Heart Eye Spy Bags

How to Make a Haute Top
How to Make a Doll Quilt – with Kari, Kendall, and Anna

How To Sew A Simple Heart-Shaped Treat Pocket

How to Make Cat Wand Toys

How to Make a Pen and Pencil Case from Pieces of Ribbon
DIY Note Pad Folio

How to Make a Chic Wrap
2 comments on “how to make a changing pad and pocket”.
Very useful !
The pattern say 11 x 2 inch piece of batting? Is this correct? I’m thinking it should be 11 x 23? Thanks!
Leave a Reply Cancel reply
You must be logged in to post a comment.

Recent Blog Posts
- How to Make a Flatlock Snack Mat
- BOO-tiful Halloween Sewing Projects
- Tips for Sewing, Embroidery, Machine Maintenance and More!
- Transform a Tablecloth into a Circle Skirt
- Fast & Fun Fabric Bowls
Subscribe to our newsletter!
- September 2024
- August 2024
All-in-One Changing Mat

The All-in-One Changing Mat features a wipeable vinyl surface, two hanging pockets for diapers and wipes, and an elastic closure that can be fastened with one hand. It folds up into a tidy clutch.
1 You can use regular clear vinyl for this (typically sold off of big rolls, and often used for tablecloth coverings), or you can use iron-on vinyl (typically sold off the bolt, by the interfacing). Iron-on vinyl is thinner and easier to sew through, but be very careful not to touch the iron-on vinyl directly with the iron.
Cutting Measurements:
Main Mat: 23 x 12 in. Vinyl: 23 x 12 in. Pocket Backs: 21 x 7 in. Pocket Tops: 15 x 7
1 Start by ironing your fabrics. Cut the pieces to the measurements listed. First we’ll work with the smaller rectangles to create the tops of the pockets. Fold the 15 x 7 in. rectangles in half, wrong sides together. The pattern should be on the outside.
2 Add decorative bias tape to the folded edge. (Bias tape trim is optional, but it makes your project look polished.) Sew in place.
3 Now we’ll add the pocket tops to the main pocket pieces. Fold the 21 x 7 pocket pieces in half, right sides together. Press the fold.
4 Lay the pocket top piece on top of the main pocket piece, lining up the raw edge with the center fold line. Fold the main piece in half again, enclosing the pocket top. Pin the edges.
5 Sew the sides and bottom with a 1/4 inch seam, leaving the top open. Turn right side out and press. Repeat with the other pocket. Set aside.
6 Now we can work on the mat. (These pieces should have been cut to 23 x 12 inches.) If you are using iron-on vinyl, iron it to one cotton mat piece now. Lay the batting down first, then place a piece of fabric face-up on top of the batting.
7 I’m adding a business tag, but you can skip that if you don’t have one. Pin the elastic to the center of one short end. If your elastic has a metal clasp, pin it so the elastic hangs off the edge, we can trim it off later.
8 Next add the pockets. Measure two inches in from the edge without the elastic, and line up the raw edges of the pocket with the side of the main piece. The pocket should be face-up. Add the second pocket 1 inch away from the first. (Put both pockets on the same side, as they’re designed to hang off the side of the changing table.)
9 If you’d like, you can curve the top edge of the mat by tracing a plate with chalk and trimming off the corners.
10 Now pin the vinyl to the top of the other main mat piece (the piece without the elastic & pockets). I suggest pinning this separately, and pinning it very well, because you want the vinyl to be as smooth as possible.
11 Once this is pinned, lay it face down on top of the other mat piece and batting. Right sides should be together. Pin in place.
12 Sew with a 5/8 inch seam, leaving the bottom edge (without the elastic) open for turning. When you reach the elastic, backstitch over it for durability.
13 If you curved the end of your mat, you’ll need to notch the curves before turning right side out. Be careful not to snip your stitches. Trim the metal clasp off the elastic.
14 Press the outside of the mat, the side without the vinyl. Be careful not to touch the vinyl with your iron.
15 Fold in the bottom raw edge a 1/2 inch and pin. Topstitch with a 1/8 inch seam, and continue to add a decorative topstitch all the way around your mat. Consider using a contrasting thread for a pop of color.
16 Finally, we’ll add the button. Fill the pockets, then fold the mat into thirds. Use chalk to mark the center of the elastic, and sew a button there. Pinch the fabric so that you are sewing through the top layer only.
Now you’re ready to grab it and go!
Click to check out Made By Marzipan’s other sewing projects for baby .

- Jessica L. Rae
- Momma Cooper

85 thoughts on “ All-in-One Changing Mat ”
This is perfect — will be making one this week for my new grandbaby coming in July. Love your tutorials and your style!!
I’ll be making one also for my grandbaby in July
Thanks, Brenda! Feel free to share your finished project right here in the comments section, we’d love to see what you create!
Deborah, it’s adorable! I love the fabric you chose, and the bright button. Great job!
This was my 2nd sewing project and I’m really pleased how it turned out. I made a few tweaks – I added a loop handle for hanging off the pram and instead of making a pocket for the wipes, I used elastic so I could open the wipes without having to take them out of the pocket. I love your projects! Thank you. (I took photos but can’t seem to upload them)
I am curious about the elastic for the wipes. I’ve thought about cutting and trimming an oval hole, so the wipe didn’t have to be taken out of the pocket.
It was a nice idea! I could have used some more specific information: gauge of vinyl, batting thickness, stitch length, etc. as those variables seemed to cause all sorts of mayhem with my machine and project. Even with the help of an experienced helper (my mom), we had a lot of trouble. Hopefully we’ll figure out how to get it finished for a baby shower tonight. . .
Sorry you had trouble, Sara. I didn’t mention specifics like batting thickness and stitch length, because it really shouldn’t have much effect on the outcome of this project. I think the problems you’re having might have more to do with finding the right sewing machine settings based on the materials you chose. As you become more practiced with your particular machine, it will become easy to tell when you should lengthen your stitches, increase the tension, switch sewing machine feet, etc. Best of luck!
Hey I have a question on the care of this… can you machine wash this if it is on cold? Also I am assuming because of the vinyl you should not put it in the dryer. I you could please e-mail me at [email protected] that would be great! Thank you! :^D
Hi, Christelle- yes, you could machine wash this and hang to dry. But, I designed it with the thought in mind that I’d like to be able to wipe it down with Lysol disinfecting wipes on-the-go. Some people have wondered “Why would you put vinyl on this? Vinyl isn’t soft and snuggly for a newborn baby!” But as a mother of 3, I know that accidents happen, and I don’t want to roll up a soiled mat to put it in my bag! Disinfecting wipes are portable and will clean the mat just as well as a washing machine :)
Glad to see that it’s machine washable – I love that the baby side can be washed down with a clorox wipe, but I hate to think that the outside of the beautiful project will be on gross, dirty changing tables!! What a great project – Thank you! Can’t wait to use this!
You can definitely cover both sides with vinyl if you’d like :)
So I don’t think my last post worked! Oops! Well I had care instruction questions… Is it machine washable? Also I am assuming because of the vinyl you shouldn’t dry it in the dryer.
We have a couple in our church who are expecting twins in about a month. What a great gift idea! I can make it to fit their nursery decor!
i am sewing this project atm but im having troble in the final steps with the vinyl sticking to my machine and it will not feed through.any advice would be great…
Mikala, vinyl can be sticky to sew through! There are a couple things that could help. 1) Try adhering a piece of Scotch tape to the bottom of your sewing foot. The smooth surface of the tape will help it glide. 2) Sew through a layer of tissue paper along with the vinyl. When you’re done sewing, tear off and discard the tissue paper. Hope this helps!
I use toilet paper not tissue. It is easy to find and tear off.
I had a hard time with the vinyl as well. I ended up using PUL fabric which worked much better. There is a teflon sewing foot out there for materials like this. I have one, and it works beautifully. I don’t remember where I got it, but it was rather inexpensive. It snaps on just like any other sewing foot. I sew with the PUL fabric on top to make sure that I sew over the pockets properly and it works very well.
An easy solution for vinyl sticking to presser foot: talcum powder! Just take any kind of talc: baby powder or any other kind and spread a thin thin THIN layer along your sewing line using your finger. It’ll be so thin, it will just form a film over the plastic/vinyl/oilcloth whatever you choose to use. Your presser foot will glide over the fabric perfectly normally. Wipe off the powder after. Hope this helps!
I will be trying this. The mat was so well done. And I love the design on you nails.
When I was looking for various fabrics, I noticed a lot of designers (including your bicycle print) have laminated versions of their cotton designs. They are meant for raincoats, etc. May save a step!
Good idea, Heather. They do tend to be a good bit more expensive though. Also, you could use iron-on vinyl.
Hi! Thanks for this tutorial! I was wondering where you got your fabric? I have seen it, also used with vinyl, on a booster chair that I am in love with. Thanks!
Hi, Jessica. I bought it at a small local fabric shop, but there’s a link to buy it online here: http://www.fatquartershop.com/store/stores_app/Browse_Item_Details.asp?sid=40628441040&Store_id=499&page_id=23&Item_ID=53401&Parent_Ids=
Super cute, Momma Cooper!
Oh MC, I LOVE this one! Such cute fabric choices, and I love the contrasting fabric on the pockets. Thanks so much for sharing, I love to see how crafters put their own spin on Marzipan projects!
I love your idea. I posted this idea on my blog. I love the helpful tip of the video. If you like to see my design please go to: http://meandmisszippy.blogspot.com/ Thanks for all your craftiness!!!!
This is gorgeous!!
So cute, Teagan! Thanks for sharing!
Oh my, this is the cutest thing I’ve ever seen! Thank you so much! I will be bookmarking this and saving it for when I get closer to my due date! Perfect for us mummies on the go!
I have never sewn before and I used this tutorial and I am so happy with the product! Thank you!
Great! I’d love to see a picture! You can upload one right here in the comments section.
You can also laminate your own fabric with Iron-On Vinyl. I think Heat ‘n’ Bond makes it. I don’t know if it makes it easier to sew with, but I imagine it would because there would be no pinning or slipping as it is completely adhered to your fabric. Thanks for the tut! I will be making it in the next few months as I prepare for foster kids! I might also adapt it for cloth diapers and wipes. We’ll see. :-)
Yes, I made the one in the pictures at bottom using iron-on vinyl. I thought it was easier :)
Hi! Love the mat and was easy to make! But one problem I have is when I open it up to let the pockets of wipes and diapers hang off the edge it pulls the whole mat off of the table before I can put the baby on it. Any suggestions? Thanks!
I was thinking the same thing. I think I’ll try putting a “bumper” on the other side… like a tube filled with batting or fabric… something to counterbalance the weight hanging off the table. Anyone else have any suggestions?
I made this up in about 30 minutes but I cut and sewed pockets to make a second changing mat. Sadly I ran out of vinyl. I know I ended up with a lot of excess. Since I am making this as a gift, don’t have a baby, changing mat or any diapers/whipes to stuff it with I kinda had to wing it. Could you give me an idea of what the finished dimensions should be? I want to be sure mine isn’t actually doll sized or something. :D
Hi! Thanks for the tutorial. I was wondering if I could use iron-on vinyl for this instead of regular vinyl? I can’t think of why it would cause an issue, but wanted to double check. Thanks!!
Yes, you can, I’ve done it both ways and I think the iron-on vinyl is easier because there’s no risk of wrinkling it.
Your tutorial was very easy to follow and the iron on vinyl worked like a gem :) The attached picture is the second one I’ve made!
Thank you so much for sharing. I sewed it a few days back and it really turned out nicely <3
If you want to take a look : http://livinginaka.wordpress.com/
Hi, just wanted to say thanks for the idea and excellent instructions! I made mine in PVC (wipeable tablecloth) which, though making the final seam trickier, means it is waterproof and wipeable all over. Good if the mat has to lie on something outside during a picnic, if it gets rained on while in the pram basket or similar :-)
Have you a news letters please ? thank
Hello, I am new in sewing, so I am not sure what needle, thread or thread tension should be used when sewing the vinyl. Anyone? Thanks Sze
Thank you very much for the tutorial! It’s really a good project, and I can customized the size of the changing mat the way I wanted it to be, the changing mat which comes with diaper bags are way too tiny for my growing baby. I did both sides vinyl, as I like it cleanable and will not get dirty or soiled. Size of my mat is 14″ x 24″.
This is a really cool thing you have going. I was just wondering if you would make and sell them for people who didn’t have machines to sew. And what would your price be?
Sorry Kierston, I have too many craft projects and too little time! I don’t currently sew items for retail sale :)
Can I just say that your blog is awesome!!!! Great tutorials! And a huge plus for videos!!! Thanks for all your inspiration!
I just finished my mat. I love you instructions!! I thought the mat was a tad small so I did alter the size slightly. Thank you for this video!!!!
Matching nails to! :)
Easy to make, but made the mistake of NOT making it wider than the suggested 12″. If I made another one, I would make it 16″ or 18″. Great pattern though!
I made one of these yesterday – thought it was a tad small though perfect for a new baby…. I have made another one today – really great idea and I am sure it will work well…
Luv it very handy
Thank you so much for your tutorials! They’re so easy to follow! ^_^
the recipient of the mat I made just loves it…. excellent idea – thanks so much.
This was very nice I’m going to make one for my friend she just had a baby
BEAUTIFUL tutorial! Very easy to follow. Thanks so much! :)
think i might try and make one for my baby
i used a heavier gauge colored vinyl and changed out my needle to a “16 denim”. I used iron on fusible batting (not on the vinyl side) and used an antique button. I used the vinyl instead of bias tape on the pocket trim. Take care when attaching the elastic that the larger part of the loop is going to turn out to the outside when complete. Once you stitch closed, it’s very difficult to move. Love the pattern. I enlarged it the second time to 13 wide and elongated the large piece on the pocket by 1 inch.
i also used a heavier vinyl, 16″ needle, fusible batting, and made my second mat larger by an inch all around. I added a handle so that you can pull it out of the diaper bag easily. Used an antique button. It’s a piece of art! Great instructions and comments too! Best shower gift ever!
This mat is functional and compact. Can’t wait to make one for my newborn.
Where did you get the bicycle fabric? I love it. I have a cycling friend that is pregnant. I’d love to make this for her with that fabric.
Hi Laurie, you can buy it online from my sponsor site FatQuarterShop.com. It’s Michael Miller, here’s the link: http://www.fatquartershop.com/michael-miller-baby-gray-bicycles-yardage
Love this, hope I can get it to my printer from away from home.
I made two they turned out great are we allowed to sell them online
Hi Keturah, I’m so glad they turned out great! Thanks for asking about selling. Since I’ve had a lot of people interested in selling items made from my patterns, I’ve created a listing in my Etsy shop that gives you the rights to sell items made from a single Made By Marzipan tutorial. I appreciate the support from my followers that allows me to keep posting new projects! The listing is found here: https://www.etsy.com/listing/188944497/selling-rights-to-a-made-by-marzipan ?
Found this pattern on Pinterest, and I have created it 3 times already, thank you so much for the easy instructions. Everyone loves it and I got my first request for one. This has also turned out to be a good stash buster. I will probably make up a couple more to have ready to go as it seems to be baby season around me. Thanks again.
I’m so glad it’s been useful to you!
Love Love Love this!!!! Just finished making on for my niece. Her them is Pink and Navy Nautical. I live on an Island and very far from the mainland. So I used a shower curtain from the Dollar Store for my vinyl and sewed it to a secondary piece of fabric for stability and it worked perfectly. I will post a picture shortly. I have another Niece/Nephew and a dear friend who will also be receiving one of these! Thanks so much for sharing.
That sounds way cute! Can’t wait to see!
Hi there, looking at the fabric etc needed, do I need 2 of each of the fabric lengths for the pockets and the main mat?
So cute! Can’t wait to make it :) Just curious – where did you get your business labels? I’m thinking about buying some of my own!!
Hi! Just wondering, could I throw this in the washing machine?
I used a different type of vinyl – just white with some print on it, instead of using another piece of fabric…
I love this! It will be my project for the weekend. I keep my Grandbaby daily while Mom and Dad Work. I change him on the bed and so I plan to put the mat under the mattress and let the pockets hang off the edge of the bed for easy access. Thanks sharing the pattern and the video was a great help.
Great tutorial! This looks super handy for moms, or dads ;) I love that if folds up into a stylish clutch and that it is easy to open and close with one hand. Thanks for this great tutorial, love the video too! I linked to your post from my blog, click here to see it.
Loved the tutorial. Recently bought a bolt of PUL on sale from Tuesday morning. So I’ve been using the PUL instead of the vinyl.They have turned out so cute. I had contrasting colors to use on the pockets. Giving the changing mats to my daughter and one of her BFF’s, they are both due in December. Thanks again Sweetie.
Thanks for the feedback! They sound adorable!
i know this question has been asked, but what needle size is recommended? I used a 16 on seeing the “decorative stitch.” I had to rig my machine so the vinyl wouldn’t stick because it wasn’t feeding thru. Over all my mat is useable but my “decorative stitch” was an epic fail :)
Okay, just kidding, next time I’ll read all the comments before I ask my questions. Found my answers.
This design is steller! You certainly know how to keep a reader entertained. Between your wit and your videos, I was almost moved to start my own blog (well, almost…HaHa!) Wonderful job. I really enjoyed what you had to say, and more than that, how you presented it. Too cool!
Dear Marzi, do you know where i can buy one of these changing mats? Online? Cheers Barbara
I made this today and it worked really well. I too had trouble with the plastic at first but I just turned it over and sewed on the fabric side – easy!! Thanks for the tutorial.
I love this and would like to make one. Can you suggest alternatives to using vinyl given the increased awareness and interest in using less plastic?
Much appreciated.
I have made several of these and about to make another. They make great gifts and the receivers love them.
Leave a Reply Cancel reply
Your email address will not be published.
Easy Diaper Clutch and Changing Mat Pattern
Sharing is caring!
Learn how to make adorable diaper clutches with this easy diaper clutch and changing mat sewing pattern. These are extremely handy for a new mom and can make useful handmade gifts.

When it comes to sewing for babies, the items you can sew are endless. Babies need a ton of items and all of them are very much needed for a new mom to help ease her job of looking after her little one.

When my kids were babies, I had done a lot of traveling and I had all the things necessary for easy travel. I had to change their diapers in my car or even at the airport and had it not been for this two-in-one diaper clutch pattern, that changed to a nappy mat, I would have found it extremely hard for the diaper changes.
I easily slipped down some diapers and a diaper wiper pack inside the clutch and carried it in my handbag. That way I could avoid carrying an extra handbag for my baby.

The store-bought diaper clutches were often not up to the mark and the ones I had didn’t serve the dual purpose I required. That is how I designed my own quick and easy diaper clutch and changing mat pattern.

I designed this tutorial on how to make a diaper clutch to be sewn effortlessly with the fabric I liked. Here I have used flannel for the inner part for the baby’s comfort. You can easily toss it in your washing machine and get it cleaned.
If you would like to learn how to sew cute little baby mittens, click on the picture below:
You can follow the written pattern below or purchase an ad-free PDF for just $ 2.99. Add to cart here.
- Cotton fabric- 7/8 yard
- Flannel fabric- 7/8 yard
- Cotton quilt batting (I use Warm & Natural Brand )- 7/8 yard
- Sewing Machine
- Matching thread
- Fabric marking pen
- Sewing pins or clips
- Turning tool
- Cutting mat and ruler, measuring tape or ruler
- Kam snaps kit
- Skill Level: Beginner
- Approximate time to complete: 30 minutes
- Approximate cost to make: $2.75
- Finished size: 23”x13”
Instructions for Making the Clutch:
Gather your supplies.
Cut (1) 31 x 14” piece of each of your fabrics and the batting.
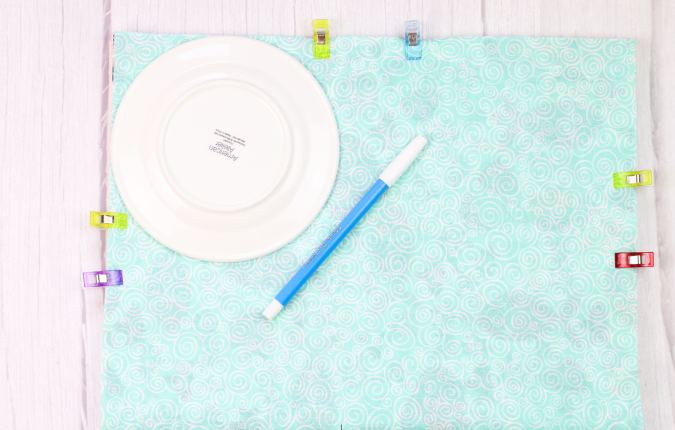
Layer your fabrics and batting on top of each other, making sure the edges are lined up evenly. Take a small dessert plate and place it on the corner, and using your fabric marker, trace around the edge, making a rounded corner.
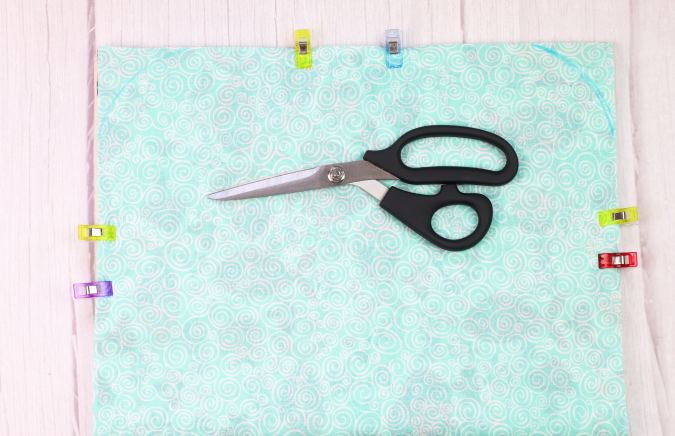
Repeat on the other side. Cut the rounded ends off each side.
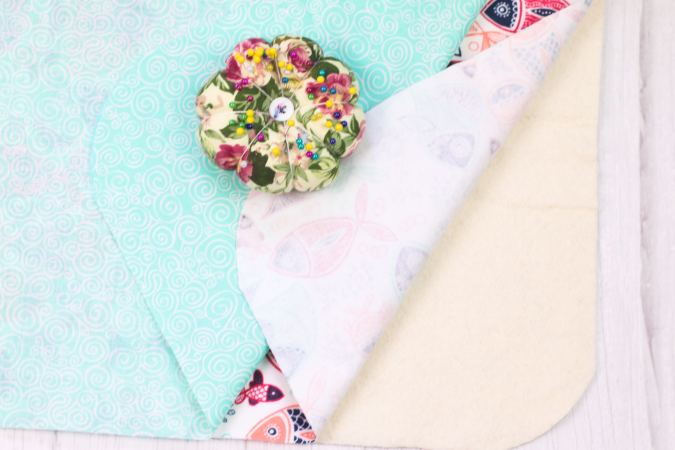
Layer your fabrics as follows: cotton batting on the bottom, flannel fabric right side facing up and the cotton fabric right side facing down (so the print fabrics have right sides facing each other).
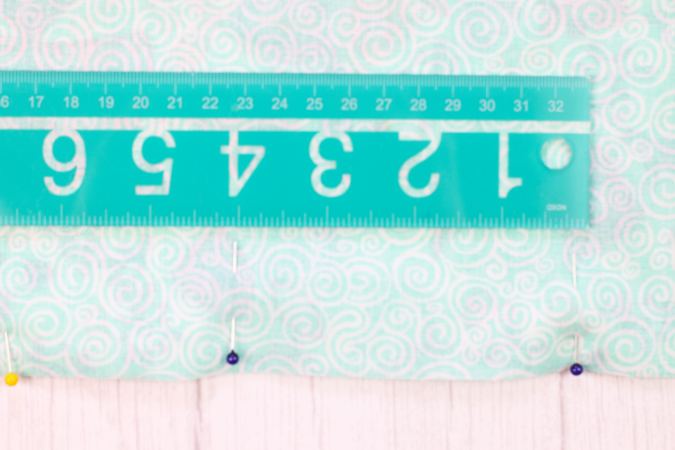
Pin together, leaving a 3-4” gap for turning the right side out.
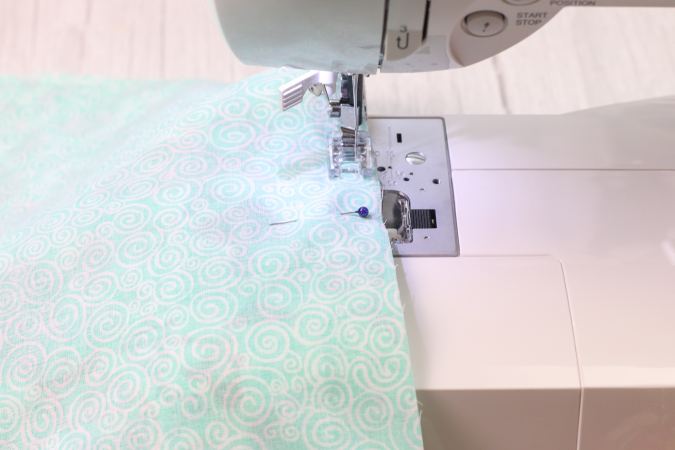
Using a ½” seam allowance, sew all the way around, remembering to leave your gap. a 3-4” gap for turning.
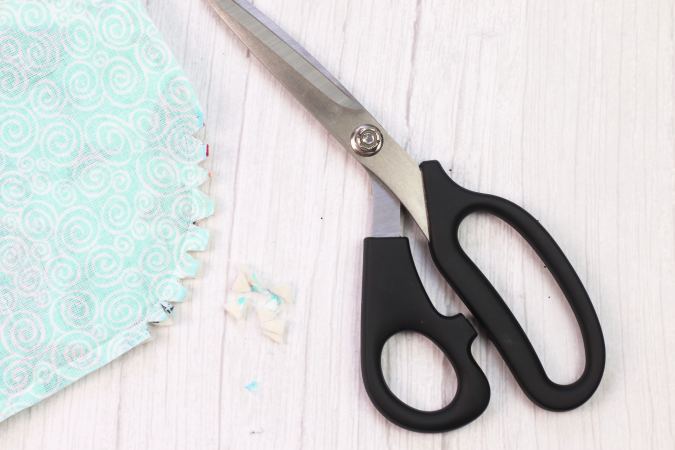
Clip the corners.
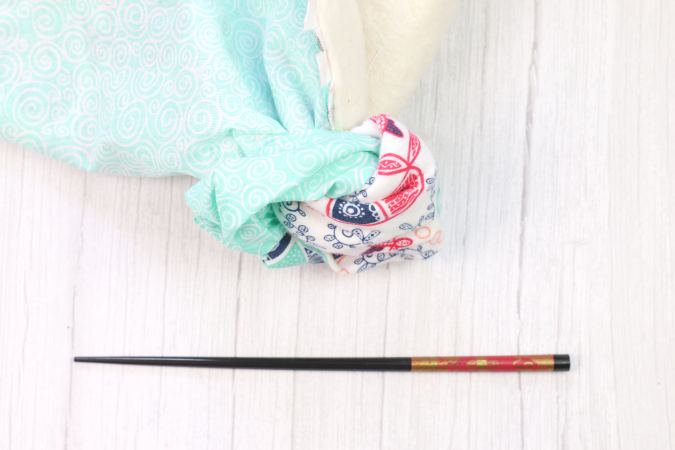
Slide your hands in between the right sides of the fabrics. Using your turning tool, turn your diaper clutch right side out and push out the corners.
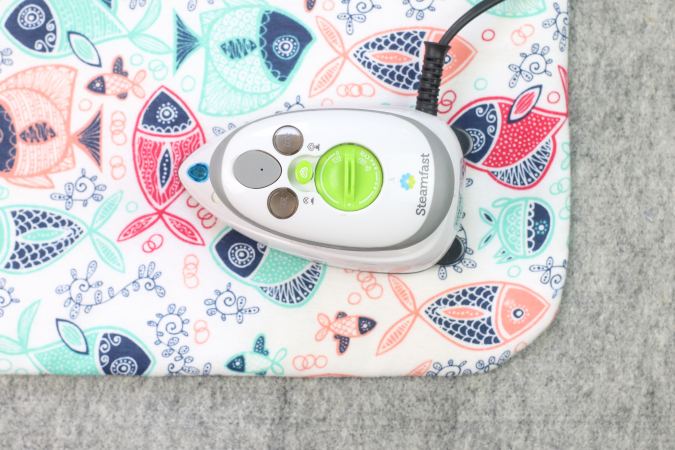
Press with a warm iron.
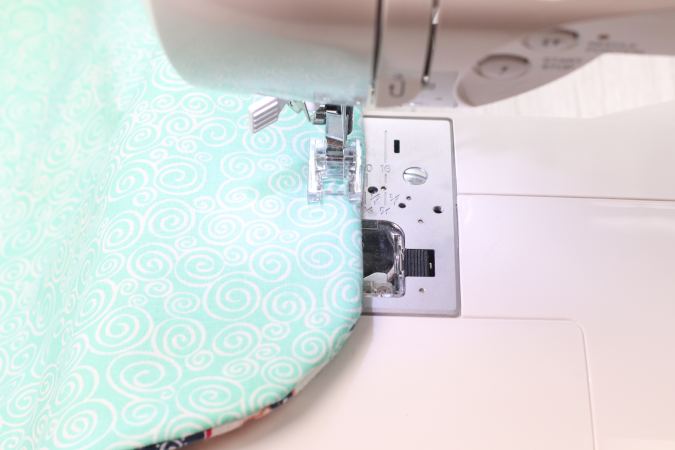
Using a ¼” seam allowance, topstitch around the entire diaper clutch.
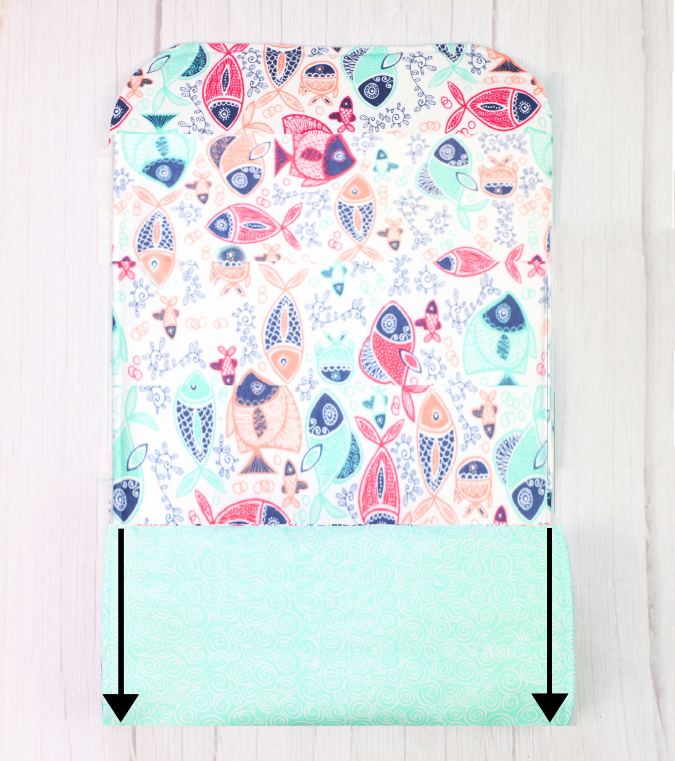
Fold the straight edge up by 7- inches. Pin and sew the sides shut to form the pocket for the diapers and the diaper wipes. * Make sure to reinforce the stitches at the start and finish.
Instructions for Placing and Attaching The Snaps:
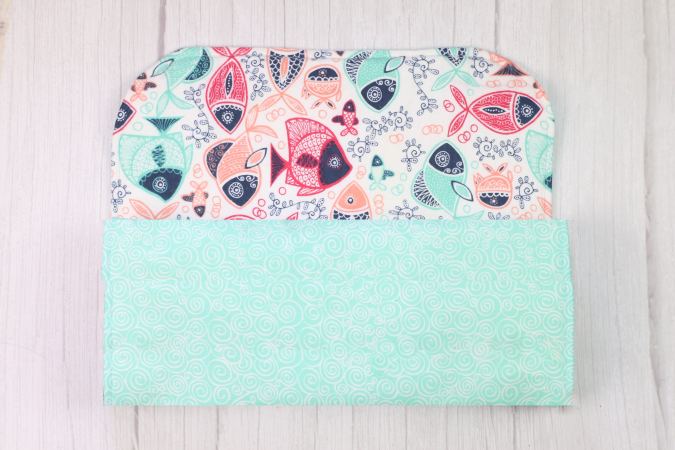
Place 2 diapers and your diaper wipes pack inside the pocket and fold up once more. Next, turn the clutch so it is horizontally placed in front of you on a flat working surface.
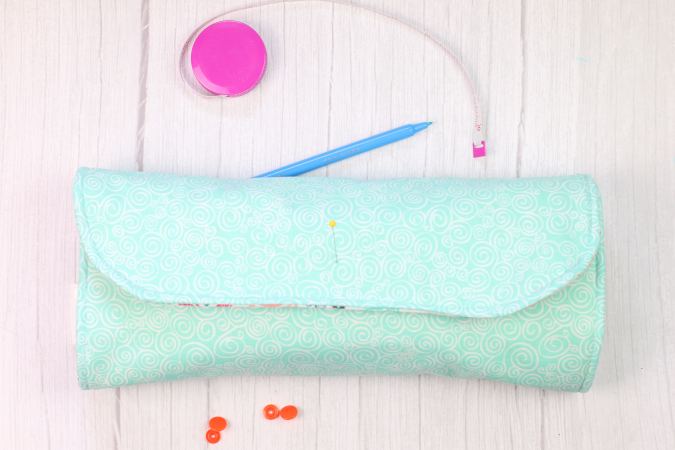
Fold over the curved edge towards you. I call it the flap. Using a ruler or tape measure find the middle point of the flap and mark it with your fabric marker. Now measure about 2” from the bottom of the flap and line those two points up. This is where the flat part with a pointed end (it looks like a tack, or top of your snap will go. Using a pin, push the point through the fabric of the marked spot. Using your fabric marker, mark the spot where the pin touched on the layer below the flap. This is where the snap with the one has a hole that goes up (like an outie belly button).
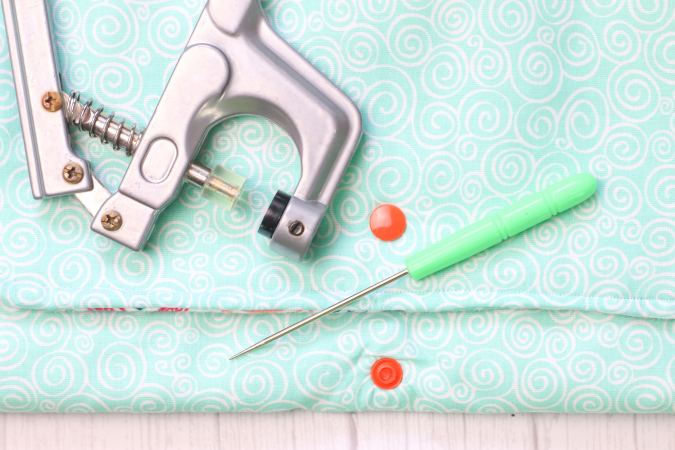
Next, you are going to install the Kam snaps. For each layer, you will need four plastic Kam snaps; two have a flat end with a point and two will have a hole. One that goes down (like an innie belly button), and one has a hole that goes up (like an outie belly button).
Your kit also comes with an awl, which is a tool with a handle with a sharp point and a hand-held press. Push the awl through the fabric of the flap, making a small hole. Place the snap, which is the flat piece with the point on it, with the point coming into the hole towards the inside of the diaper clutch, with the flat end facing the outside of the clutch. Place one of the snaps with the hole (it doesn’t matter which) on top of the point of the snap, and using the hand-held press, squeeze the snaps together. Repeat on the other side but reverse the side you have the snap and hole. If you need help, you can use the tutorial on the KAM website .
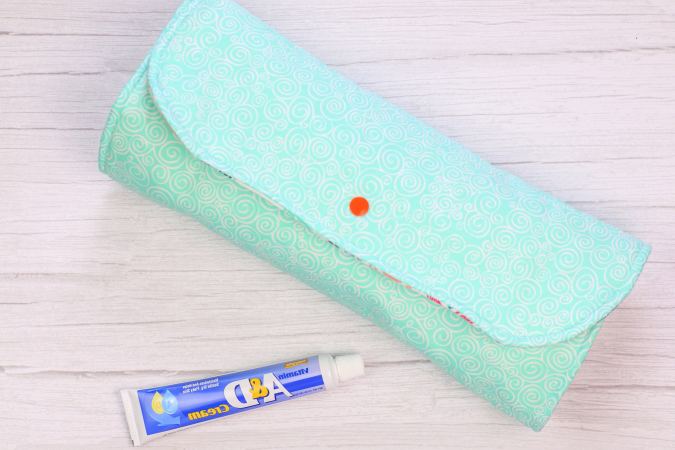
Your easy diaper clutch and changing mat is done!
Find the webstory for the post here, Free Diaper Clutch and Mat Pattern
Pin it for later here,

COMMENTS
Trim the metal clasp off the elastic. Turn out. Press the outside of the mat, the side without the vinyl. Be careful not to touch the vinyl with your iron. Fold in the bottom raw edge a 1/2" and pin. Topstitch with a 1/8" seam, and continue to add a decorative topstitch all the way around your mat.
Step 3: After you've marked your diagonal lines, place the backing on top of the wrong side of the towel piece. Pin in place. Then start topstitching down the lines beginning from the center and moving out to one corner. Repeat on the other side.
Fold up the left side, then the right. Fold up the bottom until it meets the center and then the top down to the center. Then fold in half one more time. How To Secure Changing Mat. You can add whatever fastener you would like to your changing pad: snaps, Velcro, a button…I just used some black elastic.
Use sewing clips to hold it together and serge edges, shown in grey. Fold strap in half and match long edges. Serge around raw edges of strap. Sew to a corner of the mat, 3″ from the corners edge. Place a snap at the end of the strap. And a corresponding snap at the same spot on the other top corner of the mat, 3″ from the corner.
Slim and easy to carry, they fold out to make a mat where you can change a diaper. Pockets inside hold a pack of wipes and a couple of diapers. So Sew Easy has a free sewing pattern you can use to make these travel diaper change mats, and it includes 2 sizes - a larger mat that folds up into a satchel, and a smaller mat that folds up into a ...
Once you've sewn your squares together and pressed the seams flat, it's time to cut the fleece for your mat. I wanted to reduce bulk in the fold lines so I cut mine to be around 2/3 down the first row of squares, and ending in the 6th row of squares.
This Travel Change and Play Mat is the perfect project to sew for your baby, and it conveniently folds up to fit in any diaper bag for easy traveling. Check out this sewing tutorial to learn how to make a play mat that doubles as a changing mat. You'll love the hidden storage compartment in this DIY sewing project, where you can keep diapers or ...
Step 3. Sew On The Binding. Sew the binding onto the edges of the mat by opening it up, aligning the raw edge with the edge of the mat, and sewing down the first fold. Then, fold the bias tape over to the other side of the mat to enclose the raw edge, and pin it in place. Then, sew around the binding to attach it.
Now comes the last portion, adding the velcro closure. To do this I first made a double sided piece of (8″x15″ that you will fold in half) 4″ wide by 15″ long, sew leaving one opening to fold inside out, close side and topstitch, finally add the velcro and attach to the cover like the illustration shows. You are all done!
October 17, by Anne Weaver. Leave a Comment. Nicole Mallalieu guest blogs at Whip Up with a downloadable PDF tutorial for making a travel diaper changing mat. The soft fabric mat is made from a layerof quilting cotton (cuteness) and a layer of toweling or chenille (softness and absorbancy). Pockets at either end hold diapers and wipes.
The Diaper Clutch was designed to hold diapers, wipes, bibs and large enough to also hold the Harper Changing Pad. It has a slim design which will expand with your needs. It has the following features: Two Large Slip Pockets for diapers, wipes, bibs, etc. One Zipper pocket for ointments and creams. Detachable Wristlet strap for easy carrying.
You will fold in and press the seam allowance at the 5″ opening so it looks as if it too was sewn together. Topstitch all the way around the edges about 1/4″- 1/2″ in from the edge. Then repeat about 1/8″- 1/4″ in from the edge to secure the opening edges shut. Press your stitches. Fold and Secure.
Making up the baby changing mat pattern. You will need: 1 yard of fabric total - all the same or mix and match prints; Piece of vinyl - 12 x 24 inches (optional) Low loft batting or fusible fleece - 12 x 24 inches; Ready made bias tape or make your own from 1 fat quarter;
PDF Sewing Pattern Travel Changing Mat, Baby Sewing Pattern, Instant Download (216) $ 5.50. Digital Download Add to Favorites Rainbow Play Mat and Cloud Cushion Sewing Pattern BUNDLE (68) $ 7.22. Digital Download Add to Favorites Simplicity 9926 Pattern UNCUT 1980s Vintage Baby's Travel Mat Tote with Pocets and Shoulder Straps and Seat Cover ...
Baby Navy Blue cotton with dash pattern travel changing mat. fold-able changing mat. waterproof. removable lining. (10) $ 37.23. Add to Favorites PDF Easy Sewing Pattern to make a Baby Changing Mat Day-Out Duffle Bag or Travel Flight Holdall Overnight Weekend Picnic Instant Download (3.6k) $ 3.99. Digital Download ...
The Travel Diaper Changing Pad Pattern is the perfect gift to give a new mom, especially if she is on the go. This travel sewing pattern for baby is easy to make, easy to carry and easy to clean too! No longer will mom have to search high and low for somewhere to change her little one. Click below link for instruction and tips….
PDF Pattern for Fold Up Baby Changing Mat, Instant Download Travel Changing Mat Sewing Pattern (216) $ 5.50. Digital Download Add to Favorites Diaper Changing Pad sewing pattern - Foldable Matt - Baby Changing station - Portable Changing Pad (ONE SIZE) - Beginner Friendly Pattern (1.2k) $ 3.00. Digital Download ...
Cut away the corners on the draw lines. Clean up the edges of the four sides of the wallet with a rotary cutter and mat or scissors. Do not cut into the perimeter seam. 5. Sew on the Pocket. Fold and press the small rectangle in half, wrong sides together, to create a 4-1/2″ x 11″ rectangle.
Trim the metal clasp off the elastic. 14. Press the outside of the mat, the side without the vinyl. Be careful not to touch the vinyl with your iron. 15. Fold in the bottom raw edge a 1/2 inch and pin. Topstitch with a 1/8 inch seam, and continue to add a decorative topstitch all the way around your mat.
Using your turning tool, turn your diaper clutch right side out and push out the corners. Press with a warm iron. Using a ¼" seam allowance, topstitch around the entire diaper clutch. Fold the straight edge up by 7- inches. Pin and sew the sides shut to form the pocket for the diapers and the diaper wipes.
Check out our travel changing mat selection for the very best in unique or custom, handmade pieces from our changing pads shops. ... travel changing mat sewing pattern (786) Sale Price $3.24 $ 3.24 $ 4.05 Original Price $4.05 (20% off) Digital Download Add to Favorites ...
Altino Portable Diaper Changing Pad for Baby. Keeping your baby's head cushioned is easy with the ½ inch memory foam pillow that is built into the Alatino Portable Changing Pad. The generous size makes this diaper changing pad large enough for use with both newborns and toddlers, all without affecting its portability.
Travel changing mat with a head cushion pattern, changing pad PDF pattern, travel changing mat sewing pattern (786) Sale Price $3.24 $ 3.24 $ 4.05 Original Price $4.05 (20% off) Digital Download Add to Favorites Baby changing mat Baby changing pad Baby travel change pad Waterproof change mat Cotton baby changing mat Baby shower gift ...