
- Register / Login
- Trucker's Forum
- Paid CDL Training
- Truck Driving Jobs
- CDL Practice Tests
- High Road Training

Pre-Trip Inspection Study Guide

Our Pre-Trip Inspection Study Guide has everything you need to prepare for the Class A CDL Pre-Trip Inspection Exam . Our study guide will cover the pre-trip inspection terminology as well as a thorough list of all of the parts you will be inspecting on the vehicle. For each part you will be inspecting there will also be a list of items you will be checking for. Our study guide is broken down into the following sections:
- What You Need to Know About Pre-Trip Inspection
Pre-Trip Inspection Practice Questions
- Pre-Trip Inspection Checklist
Pre-Trip Inspection Videos
Pre-trip inspection printable resources, what you need to know about the pre-trip inspection.
The Pre-Trip Inspection is a thorough inspection of the vehicle and all of its major systems. Inspecting the vehicle before driving each day is a Federal requirement and normally takes about 15 minutes. It must be logged in your logbook as "on duty not driving."
You will have to do thorough safety inspections of the coupling system, the vehicle lights, engine compartment, tires and brakes, the chassis, the fuel tanks, and an in-cab inspection.
The following information is a brief summary of Daniel's Complete Pre-Trip Inspection taken from our oustanding free PDF download:
Engine Compartment
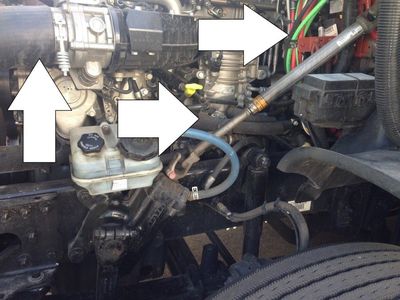
You will be checking the engine compartment for any sort of leaks. You will also be checking to see if all components are properly mounted and secured. None of the mounts must be cracked, bent, or broken.
You will be checking all hoses to make sure they aren't leaking, frayed, or sliced and the fluid levels including the oil level, the coolant, and the power steering fluid.
You must check the components like the water pump, the power steering pump, and the alternator to make sure nothing is leaking, the belts are not frayed, and that everything is properly mounted and secured.
From inside the engine compartment you will also find the steering system, the front suspension system, and the front brake system. All components of these systems must be properly mounted and secured without anything being cracked, bent, or broken. Finally you will be checking the tires, rims, and axle seals to make sure the tires are properly inflated, the rim isn't bent or cracked, and the axle seals are not leaking.
Fuel Tank And Battery Area
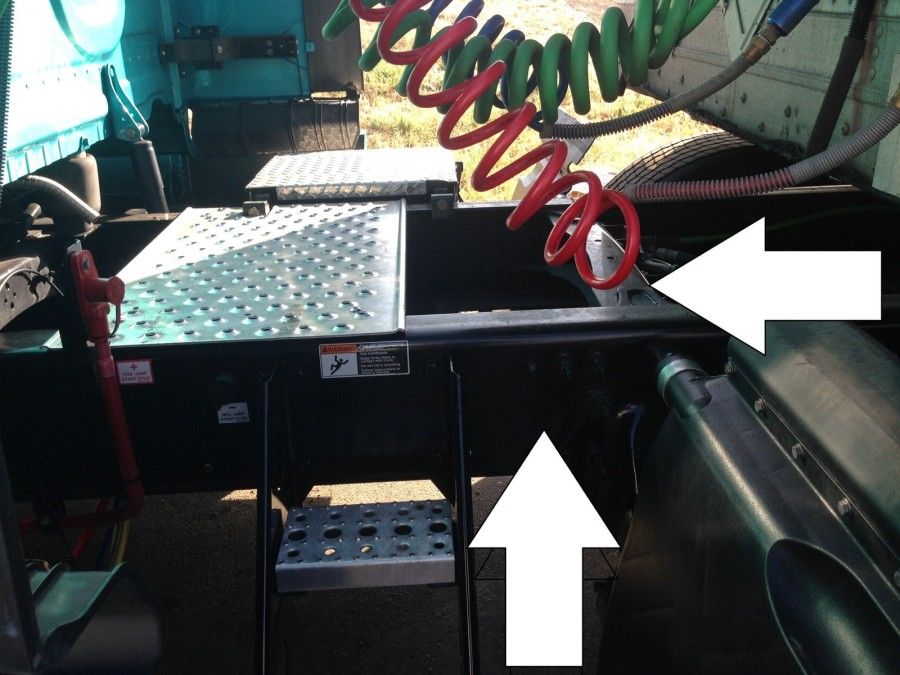
You will be standing along the side of the tractor doing a series of checks on the mirrors, fuel tanks, batteries, exhaust system, and more. You will check to make sure nothing is bent, cracked, broken, or leaking.
Check the mirrors, door hinges, door handle to make sure nothing is cracked, bent, or broken. Check to make sure there is no fuel leaking and that the fuel cap is secured and the gasket is not missing.
Check the exhaust system to make sure nothing is cracked, bent, or broken. Check the driveshaft, cat walk, and steps to make sure nothing is cracked, bent, or broken.
Check the frame and crossmembers for structural integrity. Check the air lines going to the trailer to make sure they're properly connected and that there are no abrasions, bulges, or cuts. Make sure the gaskets are present.
Check the suspension system and brakes on the drive axles, making sure nothing is cracked, bent, or broken. Make sure the brake linings are the proper thickness and that the air bags and properly inflated. Inspect the brake chambers, slack adjusters, and pushrods are properly mounted and secure. Not Cracked, Bent, or Broken. With the brakes released and pulled by hand, the Push Rod should not move more than 1 inch.
Check the rims, tires, and axle seals of the drive tires for proper inflation, no leaks around the seal, and the lugs are all present and secured.
Coupling System
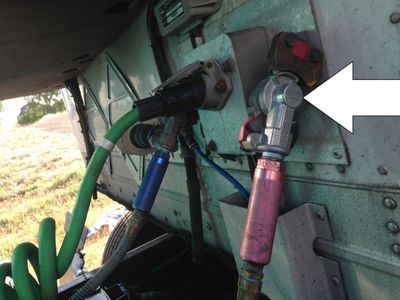
You will be standing where the tractor and trailer are connected and you'll start by checking the electrical line and air lines to make sure they're properly mounted and secure at both ends. No abrasions, bulges or cuts. Not leaking air. Make sure the electrical line has no wires exposed. Check the gladhands to make sure the seals are in good condition, no cracks or signs of dry rotting. Not leaking air.
Check the skid plate of the fifth wheel and the apron of the trailer to make sure there is no debris and nothing is cracked, bent, or broken. Make sure the fifth wheel is properly greased. Also make sure there is no gap in between the fifth wheel and the trailer apron once the tractor and trailer are coupled. Make sure the kingpin of the trailer is properly mounted and not cracked, bent, or broken and that the locking jaws of the fifth wheel are properly secured when the tractor and trailer are coupled.
Check the mounting bolts where the fifth wheel attaches to the tractor frame. Make sure there are no missing bolts and that everything is secured properly. Check the locking pin if you having a sliding fifth wheel to make sure it's properly locked into place.
Make sure that there is the proper clearance space between the tractor mudflap and the trailer landing gear so that they don’t hit each other when making a turn.
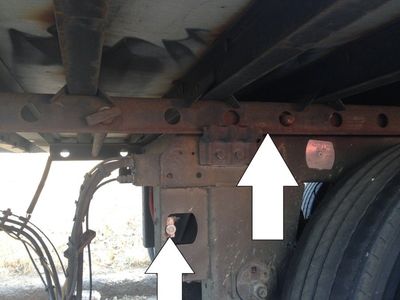
You will start inspecting the trailer at the head board, which is the front wall of the trailer. Make sure there are no holes or missing rivets. Check the landing gear to make sure it is properly mounted and secure. Not cracked, bent, or broken. Make sure the fully raised and the handle is secure in the cradle when the tractor and trailer are coupled.
Check the frame and crossmembers under the trailer to make sure they're not cracked, bent, or broken. Check the tandem frame and release pins to make sure the frame is in good condition and the release handle and locking pins are in the fully locked position.
You will check the entire suspension and brake system for the trailer tandems the same way you did for the drive axles of the tractor. You will also make sure the mudflaps are properly secured. For dual tires check to see that there is proper space between the tires and there is nothing stuck between the tires.
Check the rear door and hinges to make sure they are properly mounted and nothing is cracked, bent, or broken. Make sure the door seals are not worn, torn, or dry rotted.
Light Check
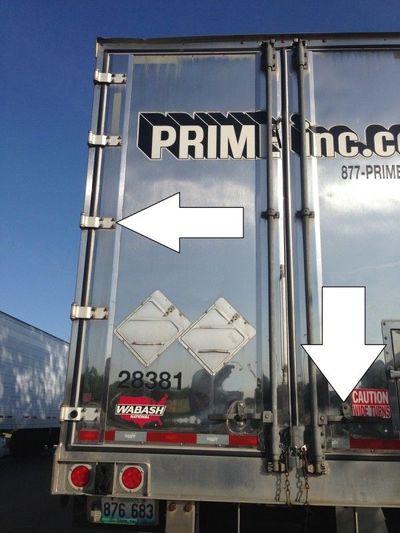
You will be checking all of the lights and reflectors on both the tractor and the trailer. Check the reflectors and reflective tape to make sure they are properly mounted and secure, not cracked, bent, or broken, and clean and illuminated. Check that you have the proper color of amber to the front and sides, and red to the rear.
Start by turning on your marker lights and headlights. Now walk around the entire truck and trailer and point out the lights. Give the function of the light and the location. You should then ask your examiner to help you check your five functions.
While you're sitting in the drivers seat, the examiner will stand to the front of the truck, then behind the trailer. He will then check your Turn Signals, Four Way Flashers and Brake Lights. You must do each function at every location.
The five locations that you must check your lights:
- Front of the Truck
- Both sides of the Truck
- Rear of the Truck
- Both sides of the Trailer
- Rear of the Trailer
The Five Functions you are checking for:
- Left Turn Signal
- Right Turn Signal
- Four Way Flashers
- High Beams/Low Beams
- Brake Lights
In-Cab Inspection
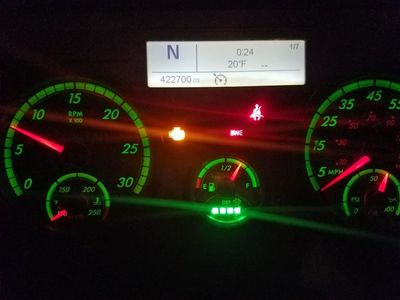
The in-cab inspection and air brake check will cover the various gauges and systems inside the cab along with several tests to make sure you air brake system is working properly.
You will start by checking the following:
- Seat Belt- Properly Mounted and Secure. Not ripped or frayed Adjusts and latches properly.
- Fire Extinguisher- Properly Mounted and Secure. Fully charged
- Three Red Reflective Triangles- My three red reflective triangles are GIVE LOCATION
- Spare Electrical Fuses- My spare electrical fuses are GIVE LOCATION
- Volmeter, Oil Pressure Gauge, Water Temperature Gauge, and Air Pressure Gauge all show proper operation
- City horn and air horn functioning properly
- The windshield and mirrors are clean, no cracks or breaks, no obstructions. The mirrors are in proper adjustment.
- Windshield Wipers and Washers - Demonstrate that the washers work by spraying the windshield. The Wipers are: Properly Mounted and Secure and operate smoothly. The blades aren't cracked or dry rotten.
- Heater and Defroster - Demonstrate that both the Heater and Defroster are working properly.
- Lighting Indicators - Left Turn, Right Turn, Four Way Flashers, and High Beams.
Trailer Parking Brakes - Set the Trailer Brake, release the tractor brake, and then tug lightly on the trailer.
Tractor Parking Brakes- Then set the Tractor Brake, release the trailer brake, and then tug lightly on the tractor.
Service Brake Check - Release both Tractor and Trailer Brakes. Now drive at idle speed. Apply the Service Brake to make sure you come to a complete stop, and that it doesn't pull to the left or right when applying the brakes.
Air Brake Test
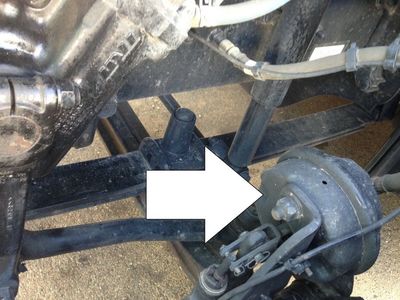
The air brake test will consist of a leakdown test to make sure your air brakes aren't leaking air and losing pressure. It will also test the warning lights and buzzer to make sure the driver gets the proper warning if the air pressure drops too low.
There are three stages to an Air Brake Test
#1: Applied Pressure Test
#2: Warning Light and Buzzer
#3 Tractor/Trailer Protection Valve Pop Out
Applied Pressure Test: Build the air pressure to governor cut out. Put the truck in the lowest gear. Then turn off the engine Immediately turn the engine back on. Push in both the tractor and trailer valves. (This will release the parking brakes.) Push and hold the Brake pedal fully. Allow the gauges to stabilize. Announce the gauges have stabilized and the Primary and Secondary PSI. With the Brakes fully pressed, you should not lose more than 4 PSI in one minute. Announce that you are listening for air leaks during that minute.
Warning Light and Buzzer Test: Pump down on the Brake pedal until the warning light and buzzer comes on, at or before 60 PSI.
Tractor/Trailer Protection Valve Pop Out Test: Pump down on the brake pedal until both the tractor and trailer protection valves pop out. They should both pop out between 40 and 20 PSI.
We have a ton of Pre-Trip Inspection Practice Questions along with the answers and a complete scoring system in our Free Online CDL Practice Tests :
The Engine Compartment Section will include questions about checking the oil level and coolant levels, inspecting belt-driven engine components (like the water pump, alternator, and air compressor), and the safety devices required in the cab. There will also be questions regarding the windshield wipers and free play in the steering wheel.
The Lights And Brakes Section will include questions about dashboard indicator lights, inspecting the parking brakes, and doing a leakdown test on the air brakes. It will also include questions about the low air pressure warning signal and testing your air horn and city horn.
The Suspension And Steering Section will include questions about the tractor protection valve, inspecting the steering box, and inspecting many suspension system parts. It will also include questions about welds being present on tire rims and the minimum tread depth required on steering axle tires.
The Tires And Coupling Devices Section will include questions about shiny trails or rusty threads on lug nuts, inspecting the battery box and cover, and inspecting electrical lines. It will also contain questions about inspecting the coupling devices and the fifth wheel skid plate.
The Emergency Equipment And Fifth Wheel Section will include questions about additional emergeny equipment required by school buses, inspecting the gap between the kingpin apron and the fifth wheel skid plate, and the landing gear securement. It will also contain questions about inspecting driver mirrors and the trailer frame.
Pre-Trip Inspection Checklist - Class A
Our pre-trip inspection checklist covers every part of the truck from front to back, both inside and outside of the truck. It covers the air brakes, suspension parts, steering components, wheels and rims, fuel tanks, batteries, lights, and more. It also covers the air brake tug test and checks for everything under the hood including alternator, water pump, fuel pump, fluids, and more.
This is a super handy checklist to study anytime you have a few minutes to spare:
Pre-Trip Inspection Checklist - Free Word Document Download (Editable Version)
Pre-Trip Inspection Checklist - Free PDF Download (Print Version)
Pre-Trip Inspection Video By Apex CDL Institute
Jeff from Apex Institute does an in-depth explanation of the entire pre-trip inspection process. This video is loaded with tips that go beyond the CDL test to help drivers really understand how to identify problems.
Pretrip Inspection Self-Test By CDL College
The Pretrip Inspection Self-Test By CDL College is really unique. It's a silent video which will show you the part you're inspecting and then gives you a few seconds to figure out what you should be checking for before giving you the answer. Definitely check this one out. Great for practicing before the CDL exam.
Pre-Trip Inspection Video By Averitt Express
This is a complete back to front pre-trip inspection of a truck and trailer by Averitt mainentance associate Kevin Breeding. This thorough pre-trip inspection covers all inportant points of inside the cab, lights, engine, the tractor itself and the trailer.
We have included two print versions of the pre-trip inspection process from Daniel. The first is the entire pre-trip inspection and the second is an abbreviated checklist for the inspection.
- PDF: Daniel's Pre-trip Inspection (Print Version)
- PDF: Daniel's Pre-trip Inspection Checklist (Print Version)

Why Join Trucking Truth?
- The High Road Training Program
- The High Road Article Series
- The Friendliest Trucker's Forum Ever!
- Email Updates When New Articles Are Posted
Apply For Paid CDL Training Through TruckingTruth
Did you know you can fill out one quick form here on TruckingTruth and apply to several companies at once for paid CDL training? Seriously! The application only takes one minute. You will speak with recruiters today. There is no obligation whatsoever. Learn more and apply here:
- Privacy Policy

Class A Pre-Trip Inspection Study App
The CDL Pre-Trip Inspection can be the most daunting portion of the driving test. But, it's easy if you study.
Use this FREE study guide to prepare for your CDL Skills test.
Would you like a video version of the Pre-Trip Inspection? Scroll to the bottom of this page for a free video.
Courtesy of CDL College .
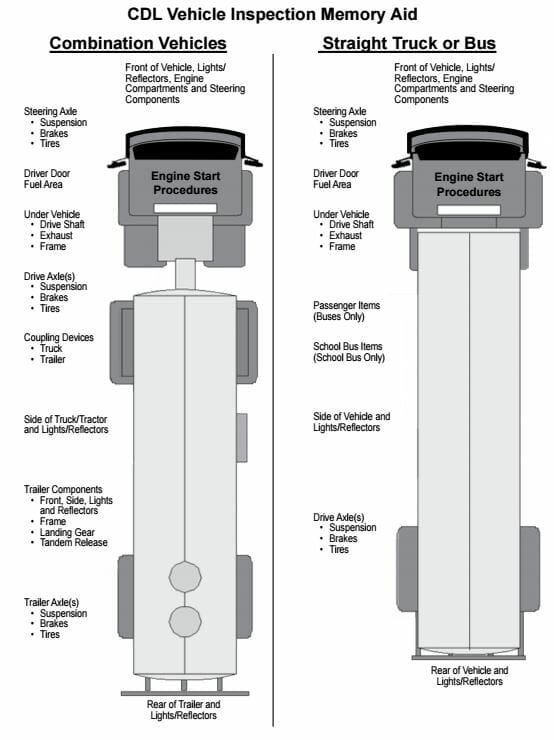
Metal Parts: cannot be broken or cracked and must be securely mounted. Rubber Parts: no abrasions, bulges, or cuts. Parts that hold a Fluid or Air: cannot be leaking. Example: the engine air compressor (a metal part) is securely mounted, not cracked, gear-driven, and has no audible leaks.
• The Pre-Trip Inspection is a verbal test. • Say at least 2 things about every item you inspect. • Point to, or touch, every item that you inspect. • Mention all damaged items to the tester.
01: Engine Compartment + 1 Axle
Stand in front of the truck.
(3 L’s) Lights, Leans, Leaks
Verify that the LIGHTS on the front of the truck are the proper color, securely mounted, not cracked or broken, and clean.
Next, make sure the truck isn’t LEANing to one side, which could indicate a suspension problem or low tire pressure.
Ensure there are no LEAKS underneath the engine compartment.
Check the front of truck for damage. When you find damage on the vehicle, tell the tester that you’ll note it on your Vehicle Inspection Report.
3 Components
Alternator: securely mounted, not cracked; wires are properly fastened and not frayed. Belt or gear driven: If belt-driven, belt has no more than 1/2" to 3/4" of play, and no cuts or splits.
Water Pump: (see box on right) properly mounted and not broken; no visible leaks; belt or gear driven: belt has no more than 1/2" to 3/4" inch of play and no splits or cuts.
Air Compressor: securely mounted to engine, not broken or cracked; no audible leaks; belt or gear driven: belt has no more than 1/2" to 3/4" inch of play and no splits or cuts.
Coolant: verify proper level through sight glass or dipstick; reservoir is properly mounted not cracked; check the hoses for splits or cuts and ensure they are securely mounted at both ends.
Oil: indicate where the dipstick is located and that the oil is at the proper level.

Power Steering: verify proper level through sight glass or dipstick; reservoir is securely mounted and not cracked; check the hoses for splits or cuts and ensure they are securely mounted at both ends.
Belts and Hoses
After properly inspecting the power steering hose and the coolant hose , tell the tester that you would inspect all remaining hoses the same way. After properly inspecting the alternator belt , tell the tester that you will inspect all remaining belts the same way.
Steering Shaft: not bent or broken and securely mounted; no excessive play. Steering Gear Box: properly mounted to frame and not cracked or broken; no visible leaks; HOSE has no visible leaks and is properly mounted at both ends.
Pitman Arm: not cracked and securely mounted, all hardware is present. Castle nuts and cotter pins are present and tight. Drag Link: not broken and properly mounted at both ends. Rubber bushings: not split or cut and properly greased. Upper/Lower Control Arms and Tie Rod: not broken and securely mounted, all hardware present.
Spring Mounts: spring mounts and hardware are not cracked or broken and properly mounted to frame. Leaf Springs: not cracked or broken, not shifted or scissored; properly mounted to spring hangers. U-bolts: not cracked or broken and securely mounted.
Shock Absorber: not bent or broken and mounted securely; no visible leaks; rubber bushings have no dry-rot.
Brake Hose: hose to brake chamber not split or cut, no audible leaks, and securely mounted at both ends. Brake Chamber: not cracked or broken and securely mounted; no audible leaks. Slack Adjuster: no missing hardware and properly mounted; push rod has no more than 1" of play and is at a 90° angle to brake chamber. Brake Drum: securely mounted and not broken, no bluing from excessive heat. Brake Pads: securely mounted and not broken; minimum brake pad thickness is 1/4".
Wheel inside: not broken and securely mounted; no welding repairs. Tire: sidewalls have no cuts or bulges; steer tire tread depth is 4/32" min.; tread is evenly worn; check inflation w/ air gauge (do not kick tires) ; no re-treads on steers. Wheel outside: securely mounted and not cracked, no illegal welds. Valve Stem: properly secured and not broken; no audible leaks, has a metal cap. Lug Nuts: not cracked or broken; all lug nuts are present and tight. Hub Seal: not cracked, broken, or loose; no visible leaks. End this portion of the inspection at the Hub Seal.
02: Side and Back of Truck + 1 Axle
Side and back of truck.
Mirror bracket: properly attached to truck and not broken, all hardware in place. Door: securely mounted and opens and closes; hinges not broken and securely mounted; rubber seal not split or cut and is properly mounted. Steps: hold my weight, not loose, no debris. Fuel tank: not leaking and no loose hardware; cap is tight, seal intact and chain present. Exhaust: not loose, all hardware present, no evidence of leaks (exterior soot). Cat Walk and Steps: properly mounted and not excessively dirty. Frame: not twisted or broken and no illegal welds. Drive Shaft: not cracked or broken, U-joints not broken and have no foreign objects. Rear truck lights: proper color, all lights are present, not cracked or dirty, no moisture inside the lens. Mud Flap: bracket is securely mounted and not cracked, all hardware in place; mud flap not split or cut. DOT tape is securely mounted, not dirty, covers 100% of rear. Space: enough space between rear of truck and landing gear for turns.
Note: axle suspension components can be different from truck to truck. You should determine which suspension components are present and inspect those components. Axles consist of suspension, brakes, wheels, and tires. Spring mounts: spring mounts and hardware are not cracked or broken and properly mounted to frame. Leaf Springs: not cracked or broken, not shifted or scissored; properly mounted to spring hangers. U-bolts: not cracked or broken and securely mounted. Shock Absorber: not bent or broken and mounted securely; no visible leaks; rubber bushings have no dry-rot. Air Bags: not split or cut, no audible leaks; mounts are properly secured and not cracked. Brake Hose: hose to brake chamber not split or cut, no audible leaks, securely mounted at both ends. Brake Chamber: not cracked or broken and securely mounted; no audible leaks. Slack Adjuster: no missing hardware and properly mounted; push rod has no more than 1" of play and is at a 90° angle to brake chamber. Brake Drum: securely mounted and not broken, no bluing from excessive heat. Brake Pads: securely mounted and not broken; minimum brake pad thickness is 1/4". Wheel inside: not broken and securely mounted; no welding repairs. Tires: sidewalls have no cuts or bulges; tread depth on drive tires is 2/32" min.; evenly worn; check inflation w/ air gauge (do not kick tires) ; can be re-treads; Dual Tires: no foreign objects between tires, no gap between wheels. Wheel Outside: not cracked, securely mounted, no welding repairs. Valve Stem: properly secured and not broken; no audible leaks, has a metal cap. Lug Nuts: not cracked or broken; all lug nuts are present and tight. Hub Seal: not cracked, broken, or loose; no visible leaks. End this inspection at the Hub Seal.
03: Connections
Locate the air lines and the electrical line at the rear of the cab.
Air Lines should be securely mounted at BOTH ends. All hardware is present, nothing broken. Lines have no cuts or splits and no audible leaks. Glad hands are locked in place, not broken, and seals are not split or cut.
Electrical line is securely mounted at BOTH ends. All hardware is present and tight. Lines have no cuts or splits. Safety latches are in place. Lines are not tangled or dragging on catwalk.
Fifth Wheel Assembly: Apron: securely mounted, not cracked or broken. No gap between apron and skid plate. Skid Plate: properly greased, securely mounted, not cracked. Pivot pin is securely mounted, not cracked or broken. Platform: is securely mounted to frame and not cracked or broken. Release Handle: securely mounted, not broken and in locked position. Sliding Fifth Wheel? The actuator is not cracked or broken; air line is securely mounted, no audible leaks, no cuts or splits).
Kingpin and Locking Jaws: securely mounted and not worn. Locking jaws are secure around kingpin, both are properly greased.
04: Trailer + 1 Axle
Start at the front of the trailer, then inspect the side and the back. Finish with a trailer axle. Front of Trailer: clearance lights are the proper color, not loose, cracked, or dirty, and clean. Front of trailer has no holes, all rivets present. Side of Trailer: no holes in side of trailer, all rivets in place. DOT tape: properly secured, not dirty, covers at least 50% of the side. Frame: not twisted or broken, all hardware present and tight. Cross members: securely mounted, not loose or broken, none missing. Floor: securely mounted and no holes. Landing gear: is raised, not broken, securely mounted; Handle not broken, securely mounted, and operational. Clearance light: proper color, not loose, cracked or dirty; rubber gasket not split or cut. Air lines: are securely mounted under trailer, no audible leaks, not dragging on the ground. Tandem slide: not bent, properly mounted, pins locked in place. Release arm: securely mounted, not broken, and in locked position. Mud flap: securely mounted, no cuts, and proper distance from tire and ground. ABS light: not cracked or dirty, proper color, no moisture inside
Back of Trailer: clearance lights are the proper color, not cracked or dirty, and clean. Hinges: are securely mounted, bot cracked or broken. Doors: not broken, no holes; door seal intact, no cuts, securely mounted. Door handles and rods: are not bent, are securely mounted, and operational. Lights: proper color, securely mounted, not loose, cracked or dirty. DOT tape: is securely mounted, clean, and covers 100% of rear. Bumper: is properly secured, not cracked or broken.
Trailer Axle
Note: axle suspension components can be different from truck to truck. You should determine which suspension components are present and inspect those components. Axles consist of suspension, brakes, wheels, and tires.
Trailing Arm Mount: securely mounted to frame, not broken or cracked. Spring mounts: spring mounts and hardware are not cracked or broken and properly mounted to frame. Leaf Springs: not cracked or broken, not shifted or scissored; properly mounted to spring hangers. U-bolts: not cracked or broken and securely mounted. Shock Absorber: not bent or broken and mounted securely; no visible leaks; rubber bushings have no dry-rot. Air Bags: not split or cut, no audible leaks; mounts are properly securedand not cracked. Brake Hose: hose to brake chamber not split or cut, no audible leaks, securely mounted at both ends. Brake Chamber: not cracked or broken and securely mounted; no audible leaks. Slack Adjuster: no missing hardware and properly mounted; push rod has no more than 1" of play and is at a 90° angle to brake chamber. Brake Drum: securely mounted and not broken, no bluing from excessive heat. Brake Pads: securely mounted and not broken; minimum brake pad thickness is 1/4". Wheel inside: not broken and securely mounted; no welding repairs. Tires: sidewalls have no cuts or bulges; tread depth on drive tires is 2/32" min.; evenly worn; check inflation w/ air gauge (do not kick tires) ; can be re-treads; Dual Tires: no foreign objects between tires, no gap between wheels. Wheel Outside: not cracked, securely mounted, no welding repairs. Valve Stem: properly secured and not broken; no audible leaks, has a metal cap. Lug Nuts: not cracked or broken; all lug nuts are present and tight. Hub Seal: not cracked, broken, or loose; no visible leaks. End this inspection at the Hub Seal.
05: External Light Check
Follow the flow to avoid missing any lights: 4 sides for the truck, 4 sides for the trailer.
Group similar lights together (headlights and high beams; turn signals and 4-way flashers; brake lights and tail lights).
TRUCK LIGHTS
Front: clearance lights, headlights, high beams, left turn, right turn, 4-way flashers
Left side: clearance light, left turn, 4-way flasher
Rear: tail lights, brake lights, left turn, right turn, 4-way flashers
Right side: clearance light, right turn,4-way flasher
TRAILER LIGHTS
Front: clearance lights
Rear: clearance lights, tail lights, brake lights, left turn, right turn, 4-way flashers
Right side: clearance light, right turn, 4-way flasher
06: In Cab and Brake Test
Memorize this formula: 5, 5, Safe Start, 5, 5 5 safety items 5 in cab items Safe Start 5 gauges 5 -step brake check
5 Safety Items
5 in cab items.
Follow the blue spiral shape below to remember the 5 in cab items. Mirrors: glass not dirty or cracked, no illegal stickers, mirrors properly adjusted. Windshield: securely mounted, not dirty or cracked, no illegal stickers. Windshield wipers: arms properly mounted and not broken; blades have no splits or cuts, wipers and wiper fluid are operational. Heater/defroster: demonstrate both are operational by setting fan to max, and the mix valve to heat/defrost. Dashboard light indicators: turn the lights on and check the indicators for the high beams, right and left turn signals, and 4-way flashers.
Tell the examiner these 3 steps before you perform them: parking brake is set, transmission in neutral, and the clutch is depressed. Start the engine and look for the ABS light on the dash to come on and then go off. With the vehicle started, check the gauges.
Oil gauge: operational, rising to proper operating range, no warning light. Temperature gauge: operational, rising to proper operating range, no warning light. Voltmeter: operational, at the proper operating range, 12-14 volts. Air gauges (2): building air to proper operating range, no warning lights.
5-step Brake Test
Explain each step before performing it. With the first 2 steps, you’re either trying to move the vehicle, or you are moving the vehicle. The engine must be ON for the first 2 steps. 1) Parking Brake: release trailer brake (push RED valve IN); slowly release the clutch, tugging lightly against the parking brake. Push clutch in. (Leave everything in the truck as it is). 2) Service Brake: (brake pedal) release parking brake (BOTH valves should be IN), pull forward to 5 mph, depress clutch and brake while lightly gripping the steering wheel; check if vehicle pulls to the left or right. (Leave everything in the truck as it is).
**Turn the engine OFF, and turn the key ON for the next 2 steps. You’ll need power for your gauges.**
Air Compressor check: perform a Safe Start. Idle up the engine (1200RPM) until the secondary air tank reads 85psi. At 85psi begin counting. The air pressure must rise from 85 to 100psi in 45 seconds or less. Next, fast idle the truck up to 120-140psi, at which point the governor cut-out should occur. Psshhh!
Class A CDL Pre-Trip Inspection Video
Want the youtube version of the Class A Pre-Trip Inspection video? Watch the youtube version.
Would you like our help finding a CDL driving job?
Try our version of a job board- Gary's Job Board. CDL Job Board Receive daily job offers in your email for FREE. Sign up takes 2 minutes. Review Gary’s jobs. Reply to the jobs you like, trash the crappy ones. Gary puts drivers in control.
Visit CDL College for all of your truck driving school needs .
Class A Pre-Trip Inspection Study App Copyright© 2018 CDL College
CDL Pre-Trip Inspection Practice Test
- Connecticut
- District of Columbia
- Massachusetts
- Mississippi
- New Hampshire
- North Carolina
- North Dakota
- Pennsylvania
- Rhode Island
- South Carolina
- South Dakota
- West Virginia
The pre-trip inspection test is neither an endorsement test nor a written test … but it is an essential part of the commercial driver’s license testing process.
The pre-trip vehicle inspection test is basically a skills test that is designed to determine if a driver can identify which features and equipment on a test vehicle should be inspected before operating the vehicle.
The test can cover a wide variety of equipment located both inside and outside of a truck. For example, the test could cover hoses and belts, specific parts of the engine, oil level, mirrors and windshield and much more. We’ll discuss in more detail what is covered on the test later in this guide.
Right now, let’s proceed on and take a close look at the test itself and the testing process.
Test Overview
The purpose of the vehicle inspection test is to both determine if a vehicle is safe to operate and to determine if a driver knows how to ensure his or her vehicle is safe to operate.
During the vehicle inspection test, the driver is expected to explain or show their knowledge of the vehicle inspection process. That means the driver will have to walk around the vehicle and point to or touch each item and explain to the examiner what they are checking and why.
If you do not pass this test, any other endorsement tests that you have scheduled will be canceled.
Before you go to the DMV to this and other endorsement exams, you should visit your state’s DMV website and find the following:
Age requirement for taking the test – most states require applicants to be 18 years of age with a valid driver’s license. If the driver is going to be driving from state to state, most states require that they be 21 years of age with a valid driver’s license.
Identification documents that most be produced to prove your identity. Sample documents that acceptable often include a birth certificate and a valid driver’s license.
Fees that will be due before taking the test. Also, as part of this step, be sure to check what payment methods are accepted at the DMV office you will be visiting.
What’s on the Test?
You will be required to conduct both an internal and external inspection of the test vehicle.
That means on the internal inspection you will have to identify and check such things as: engine hoses, engine belts, oil pressure, coolant level, power steering fluid, mirrors and windshield, safety equipment, temperature gauge, air gauge and more.
On the external inspection you will need to identify and check such things as: steering box, hoses and linkage, air brakes, suspension, wheels, tires, doors, splash guards and more.
During the test, the driver will NOT have to crawl under the hood or under the vehicle. The brake lights, emergency flashers, turn signals, and horn must be checked and if any of these items do not work, the skills and road portions of the test process will immediately be postponed.
One more thing, when taking the inspection test you may be able to use the guides shown in your commercial driver’s license handbook but you cannot have any instructions or notes written on them.
Here are some sample questions that you will need to be able to answer when conducting the pre-trip inspection:
- How much play is allowed in engine compartment belts?
- What might puddles on the ground or dripping fluids on the underside of the engine and transmission indicate?
- How should you go about checking the engine coolant level?
- When checking the wheels, what might rust around a nut indicate?
- How do you check the power steering fluid?
How to Prepare for the Test
We recommend a three step approach to preparing for this test.
Step One – study your commercial driver’s license handbook, paying particular attention to the pre-trip inspection section. Read this section multiple times and try to commit everything to memory.
Step Two – Take pre-trip inspection practice tests to asses and further increase your understanding of this topic. We offer pre-trip inspection practice tests right here .
Step Three – Take what you’ve learned and apply it to a real world truck. It’s one thing to see something in print but you should also look at a physical truck so that you know where essential components are and you can identify them.
Test Taking Tips – Improve Your Chances to Pass
Things you can do to improve your chances of passing this test include getting a good night’s rest the night before the exam.
You should also eat well before the test. This will ensure your mind and body have fuel needed to successfully execute the inspection.
Still more things that you can do include taking some deep breaths to relax yourself before beginning the test. You should also be very familiar with where the DMV is located and how to get there. Then you should plan on leaving early so that you will have to compose yourself before the test and you won’t feel rushed and stressed when you begin.
We also recommend scheduling an appointment at the DMV to avoid any long wait that can make you feel tired and stressed and negatively impact your test performance.
The pre-trip inspection test is a very important test because failing to pass this test will prevent you from being able to move an take scheduled endorsement exams.
This is done for a reason – because being able to identify that a truck is safe to operate is something that is critical for drivers to know how to do. Failure to master this skill can put lives at risk on the roadways.
So don’t take this test for granted. Study the handbook, take practice tests and be sure to practice inspections on real trucks to further expand your knowledge. Do these things and you’ll pass this test with flying colors and be able to move on to receiving the endorsements you covet.

- All Companies
- Driver Training
- All Freight Types
- Lease/Purchase
- Message Board
- Truck Driver Salary
- How to Become A Truck Driver
- Will I Be Successful?
- Truck Driving Schools
- CDL Practice Tests
- Get Your CDL
- Get Your First Truck Driving Job
- Your First 100,000 Miles
- Advanced Tips
- Sign Up Here
Select Location x
Please tell us your location.
Location not set
The Complete Pre-Trip Inspection Checklist
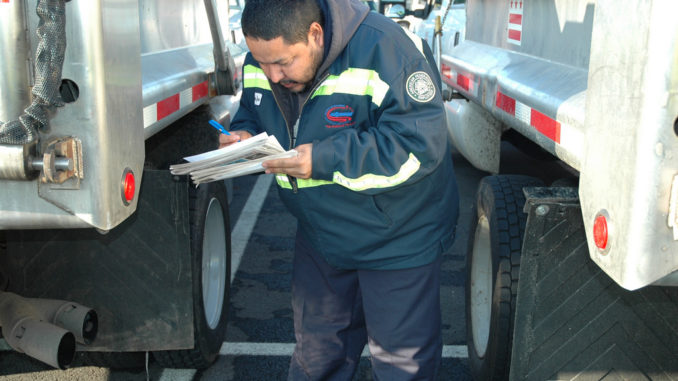
Due to heavy memorization, the pre-trip inspection is one of the hardest aspects of the CDL test. Also called the “Vehicle Inspection Test,” the pre-trip is one of the tests that trucking students fail the most.
With this pre-trip inspection checklist, we tell you everything you need to know and what you need to check for.
Engine Compartment – What to Check For:
When checking the engine compartment, you always want to make sure the following components are properly mounted and secured. You should also make sure they are not cracked, bent, or broken. The items you need to check for include:
Belt-Driven Alternator
All of the wires are connected. The belt is not cracked or frayed, and the free play on the belt is between ½ to ¾ of an inch.
Belt-Driven Water Pump
The free play on the belt is between ½ to ¾ of an inch, and all the hoses running to and from the water pump are tightly clamped. Ensure nothing is leaking.
Brake Chamber
The brake chamber is not leaking air.
The brake drum is properly mounted and secure.
The brake hose is rubber; it is not cracked and is not leaking air.
Brake Lining
Check for oil or debris on the lining. There should be at least ¼ of an inch of friction material.
Caste Nuts and Cotter Pins
All three caste nuts and cotter pins are present.
Coolant Reservoir
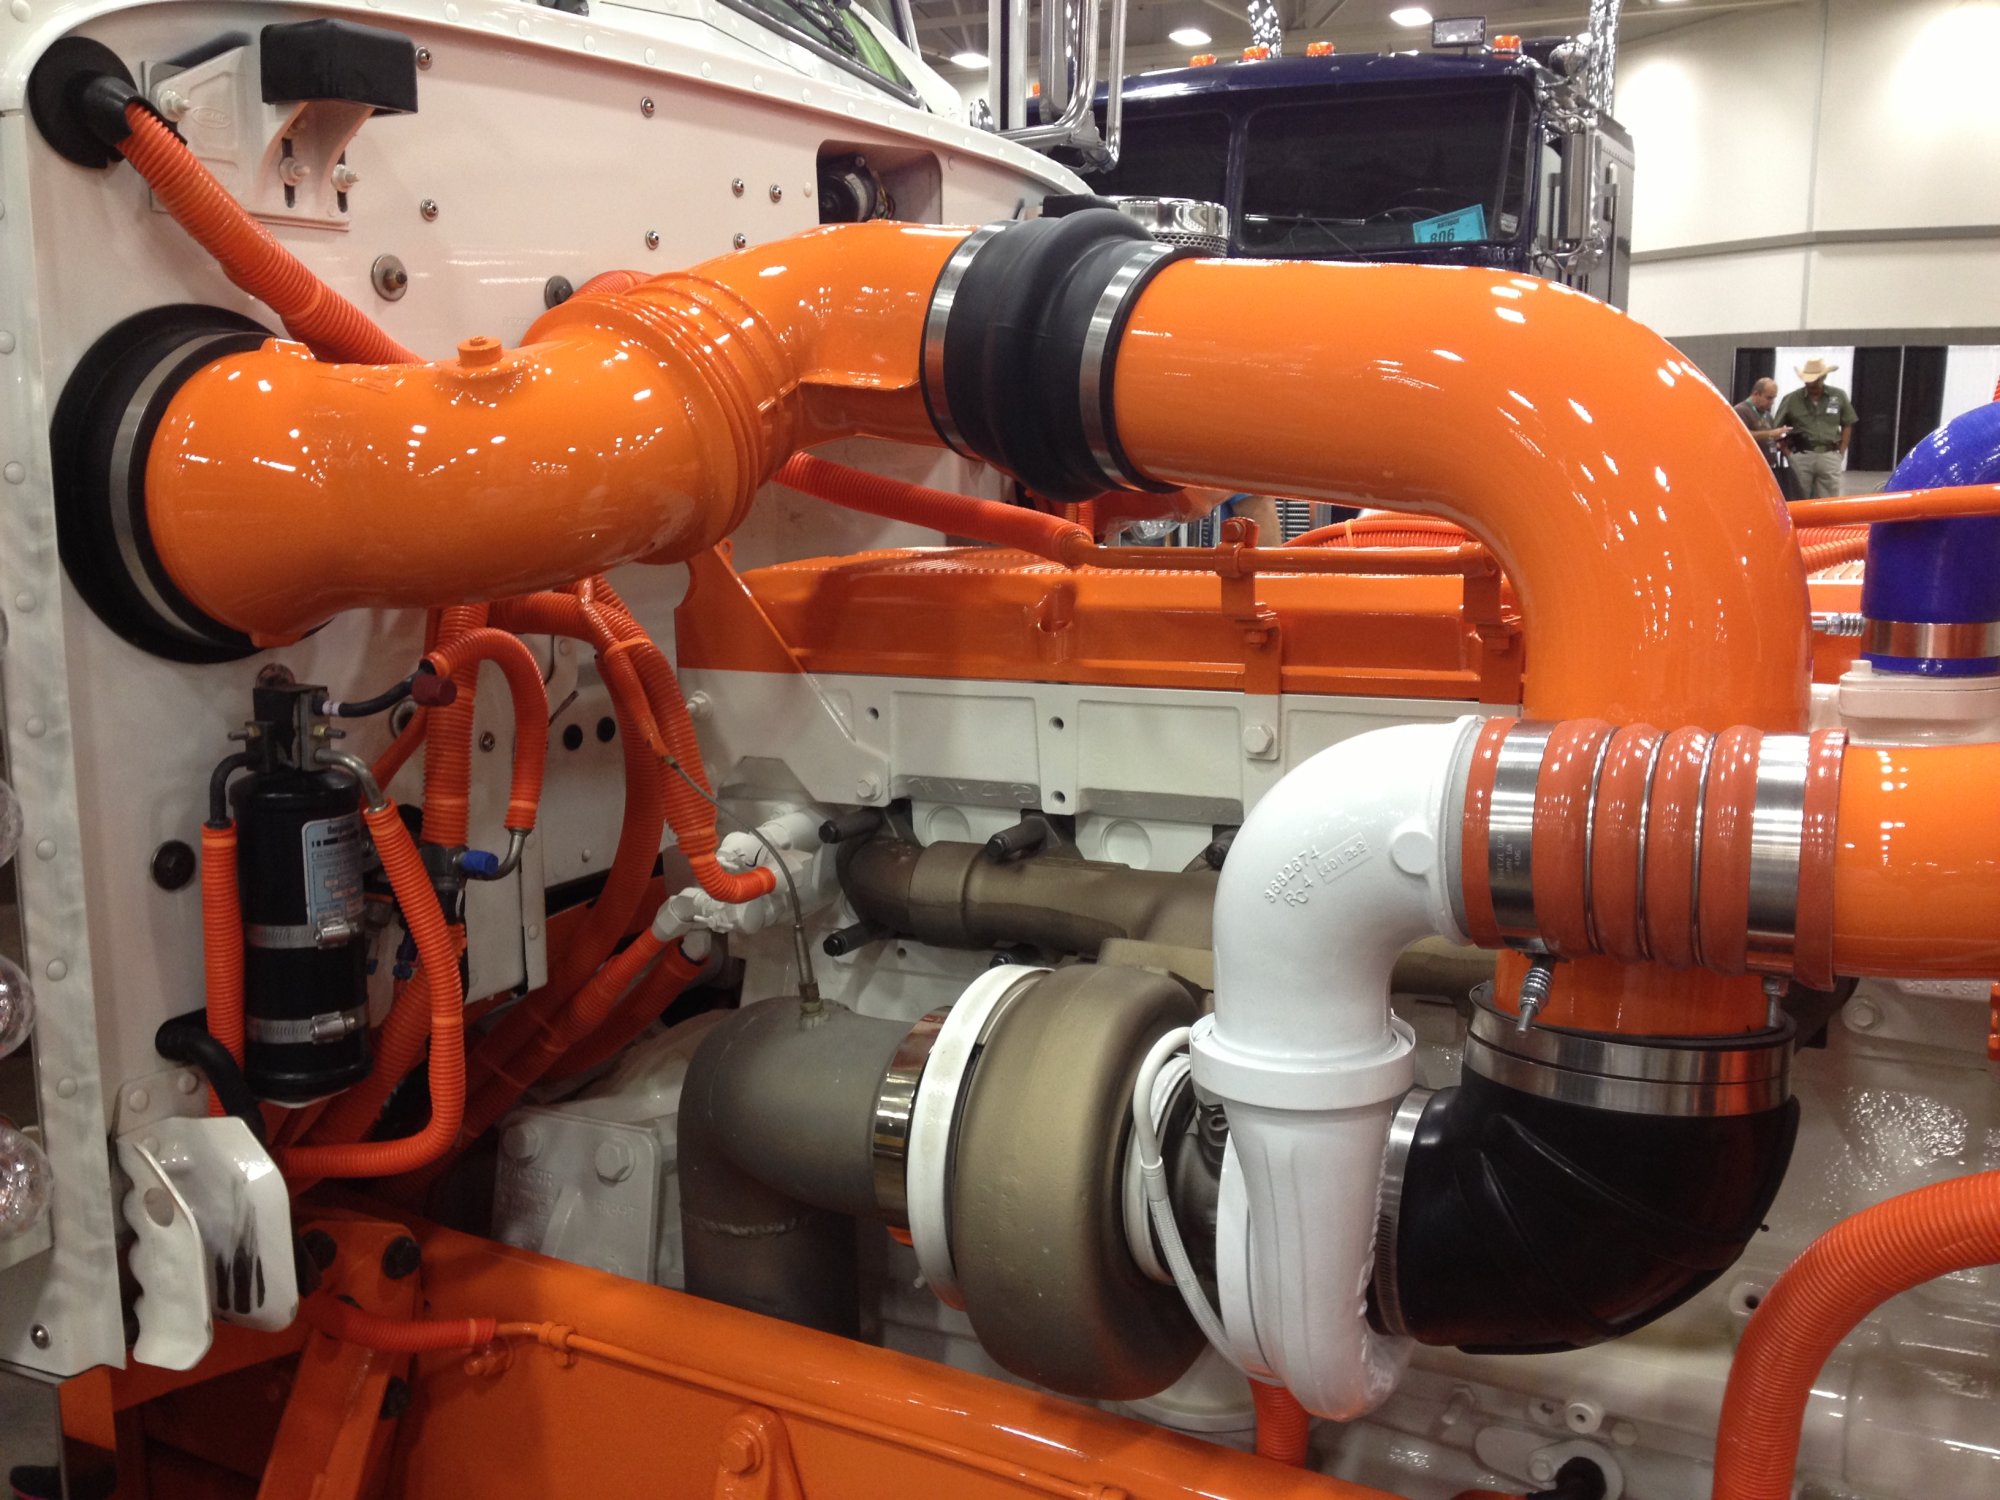
The reservoir is not leaking and is filled to the manufacturer’s specifications.
The drag link is properly mounted and secure, and not cracked, bent or broken.
Gear Box and Hoses
The gear box and hoses have no abrasions, bulges or cuts, and are not leaking.
Gear-Driven Air Compressor
The air compressor is properly mounted and does not leak.
Gear-Driven Power Steering Pump
The steering pump is properly mounted and not leaking.
General Hoses (Passenger and Driver’s Side)
The hoses are secure at both ends and are not leaking. There are no abrasions, bulges, or cuts.
The hub seal (or axle seal) is leaking and is filled to the manufacturer’s specifications.
Leaf Springs
None of the leaf springs have shifted or are bent or broken.
There are no signs of leaks under the truck.
There are no lug nuts missing. There are no rust trails, powder residue, or cracks around the bolt holes.
The oil level is filled to the manufacturer’s specifications.
The pitman arm is properly mounted and secure. It is not cracked, bent, or broken.
Power Steering Fluid Reservoir
The power steering reservoir is not leaking and is filled to the manufacturer’s specifications.
The rim does not have any unauthorized welds.
Shock Absorber
The shock absorber is not leaking. If it is leaking, the leak will be at the point where the top and bottom portion of the shock meet.
Slack Adjuster and Push Rod
With the brakes released and pulled by hand, the push rod does not move more than one inch.
Spring Hanger
The spring hanger is properly mounted and secure.
Steering Column
The steering column is properly mounted and secure. It is not cracked, bent, or broken.
There are no abrasions, bulges, or cuts on the tread or sidewalls. Tread depth should have a depth no less than 4/32 of an inch. Tires are properly filled to the manufacturer’s specifications. This can be checked with an air gauge.
The tie rod is properly mounted and secure, not cracked, bent, or broken.
Make sure all are accounted for.
Driver Door Fuel Area-What to Check For:
Remember – during the pre-trip inspection, you want to make sure these items are properly mounted and secure. Look for cracks, bends, and breaks.
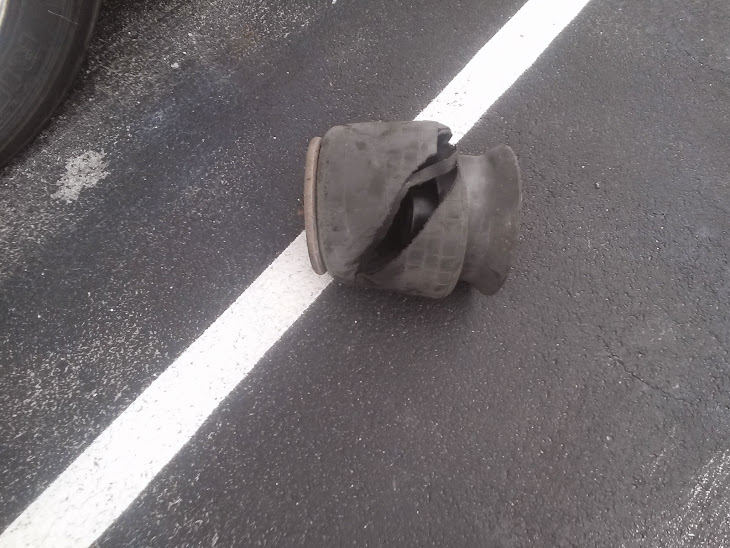
The actual airbag has no abrasions, bulges, cuts, or leaks. The airbag is not missing mounting bolts.
The axle seal is not leaking and is filled to the manufacturer’s specifications.
The brake drum is secured properly and has no cracks, bends or breaks.
Check the brake hose at both ends to make sure it is not leaking air.
There is no oil or debris on the brake lining. There is at least ¼ of an inch of friction material.
Catwalk and Steps
The cat walk and steps are clear of any loose objects.
Door and Hinges
The doors open, close, and latch properly. Door seals should not be worn, torn, or rotten.
Drive Shaft
The drive shaft is not twisted, and the u-joints are free of any debris.
The tread and sidewalls have no abrasions, bulges, or cuts. The tread depth is no less than 2/32 of an inch. Tires are properly filled to the manufacturer’s specifications. This can be checked with an air gauge.
Exhaust System
The exhaust system shows no signs of leaks.
Frame and Cross Members
There are no unauthorized holes or welds. Bundle up the cross members to ensure none are missing.
Fuel is not leaking from the tank, and the cap is on tight.
There are no rust trails, loose bolts, powder residue, or cracks around the bolts.
Mirrors are clean, with no cracks or chips.
The mud flap is secured properly, with no cracks, bends and breaks.
There are no unauthorized welds.
The shock absorber is secure at both ends and not leaking. If it does leak, it is preferable to leak in the middle.
There is proper spacing between the tires and there is nothing stuck.
The spring arm is secure at both ends.
Spring Mount
The spring mount is secure at both ends.
The torque arm is secured properly, with no cracks, bends or breaks.
No u-bolts are missing.
Coupling Area-What to Check For:
Air lines should be secure at both ends with no abrasions, bulges, or cuts. They should not be leaking, dragging, or tangled.
Make sure the apron is properly mounted and secure. Look for cracks, bends, and breaks.
Make sure there is enough space between the tractor mud flap and the trailer landing gear, so that they don’t hit each other when making a turn.
Electric Line
The electric lines are secure at both ends. There are no abrasions, bulges, cuts, or exposed wires.
There is no space between the apron and the skid plate.
The seals are in good condition with no cracks, signs of rotting, or leaking air.
The king pin is properly mounted and secure, without cracks, bends and breaks.
Locking Jaws
Physically check that the locking jaws are fully locked around the king pin.
Mounting Bolts
No mounting bolts are missing.
The platform is properly mounted and secure, without cracks, bends and breaks.
Release Arm
The release arm is in the fully locked position.
The skid plate is properly lubed.
Sliding Fifth Wheel Locking Pin
The pin is in the fully locked position.

Trailer- What to Check For :
The airbag has no abrasions, bulges, cuts or leaks, not missing any mounting bolts.
The brake chamber is properly mounted and does not leak air.
The brake hose is secure at both ends with no abrasions, bulges, cuts, or leaks.
No oil or debris on the brake lining and at least ¼ of an inch of friction material.
No missing cross members.
Header Board
The header board does not have any holes or missing rivets.
Landing Gear
The landing gear is fully raised and the cradle handle secure.
No rust trails, powder residue, or cracks around the bolt holes.
The rims do not have any unauthorized welds.
Rear Door and Hinges
The rear door opens, closes, and latches properly. Door seals are not worn, torn, or dry rotten.
The shock absorber is secure at both ends with no leaks.
When the brakes are released and pulled by hand, the push rod does not move more than one inch.
Tandem Frame and Release
Release handle and locking pins are in the fully locked position.
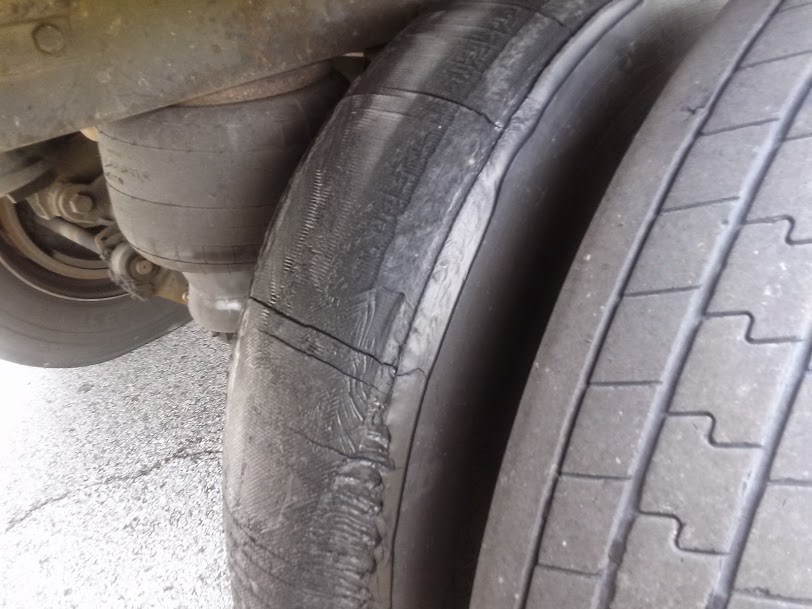
Trailer Tire
There are no abrasions, bulges, or cuts to the tread or sidewalls. Tread depth is no less than 2/32 of an inch. The tire is properly filled to manufacturer’s specifications and checked with an air gauge.
Light Check
There are five locations where you must check your lights. These include:
- Front of the truck
- Both sides of the truck
- Rear of the truck
- Both sides of the trailer
- Rear of the trailer
The five functions are:
- Left turn signal
- Right turn signal
- Four way flashers
- High/low beams
- Brake lights
Inspection and Brake Tests-What to Check For: In-Cab
The last section is In-Cab Inspection and Brake Tests. For the In-Cab Inspection you once again want to make sure all of the following components are properly mounted and secure. As well as the following:
Air Brake Test
There are three stages to an air brake test:
- Applied Pressure Test – When doing the Applied Pressure Test, you want to build the air pressure to governor cut out. Put the truck in the lowest gear, turn the engine off and immediately turn it back on. Push in the tractor and trailer valves which then release the parking brakes. Push and hold the brake pedal, allowing the gauges to stabilize. When the gauges have stabilized, announce the Primary and Secondary PSI. Listen for air leaks while doing this.
- Warning Light and Buzzer – Pump down on the brake pedal until the warning light and buzzer comes on. This is typically at or before 60 PSI.
- Tractor/Trailer Protection Valve Pop Out – Pump down on the brake pedal until the tractor and trailer protection valves pop out, this will be between 20 and 40 PSI.
Air Pressure Gauges
The air pressure gauges build to governor cut out.
Emergency Equipment
Truck has a fire extinguisher, three red reflective triangles, and spare electrical fuses.
Heater and Defroster
Demonstrate both the heater and defroster are working properly.
Horns (Air Horn and City Horn)
Blow both horns to make sure they are working.
Lighting Indicators
Check the left turn, right turn, four way flashers and high beams; also point these out on the dashboard.
With the transmission in neutral, fully depress the clutch. Turn the key on, check the ABS light, announce when it comes on and off, and start the engine.
The seat belt is not ripped or frayed and adjusts and latches properly.
Oil Pressure Gauge
The engine oil pressure gauge should rise to normal operating range.
Parking Brake
- Trailer Parking Brakes – Set the trailer brake, release the tractor brake, and tug lightly on the trailer.
- Tractor Parking Brakes – Set the tractor brake, release the trailer brake, and tug lightly on the trailer.
Service Brake Check
Release both the tractor and trailer brakes. Drive at idle speed. Apply the service brake to make sure you come to a complete stop and that it doesn’t pull to the left or right when applying the brakes.
The voltmeter is charging between 13 and 14 volts.
Water Temperature Gauge
The water temperature gauge rises to normal operating range.
Windshield and Mirrors
The windshield and mirrors are clean, with no obstructions and in proper adjustment.
Windshield Wipers and Washers
Demonstrate the wipers and washers are working properly by spraying the windshield.
This is a really nice complete list, very useful.
Comments are closed.
Contact ClassADrivers.com
Please use the form below to contact our customer service or sales team.
You can also reach us at (888) 830-2326. Our normal business hours are Monday-Friday 8 a.m. to 5 p.m. (Pacific Time).
Our business address is: Attn: Class A Drivers MH Sub I, LLC dba Internet Brands 909 N Pacific Coast Highway, 11th Floor El Segundo, CA 90245
By clicking the ["Send"] button, you agree to our Terms of Use and Privacy Policy , and to the use of cookies described therein, and you also consent to the collection, storage, and processing of your data in the United States where the level of data protection may be different from that in your country.
CDL Pre Trip Inspection Practice Test
After you read the CDL pre trip inspection study guide take this Class A pre trip inspection practice test. In it you’ll find questions and answers about checking components in the engine compartment, driver door fuel area, trailer, and in the cab.
Any answers not found in the pre trip inspection study guide will be found in section 11 of this online CDL manual .
You got at least 80% correct, nice job. If you didn’t get 100% correct study some more and try again.
You didn’t get 80% correct, study more and try again.

#1. Check the following belts for snugness (up to 3/4 inch play at center of belt), cracks, or frays:
#2. true or false: u bolts and tie rod are found in the engine compartment., #3. the five functions of the lights are: left turn signal; right turn signal; four way flashers; ___________; ___________, #4. true or false: when checking the steer tire tread depth should have a depth no less than 4/32 of an inch., #5. true or false: with the brakes released and pulled by hand, the push rod should never move more than 2 inches., #6. when checking the __________________ make sure it’s not leaking and it’s filled to the manufacturer’s specifications., #7. when checking the ____________ there should be none missing. look for rust trails powder residue and cracks around the bolt holes., #8. when checking the belt driven alternator it should not be cracked or frayed and the free play on the belt should be between _____________, #9. true or false: the brake chamber, brake drum and brake hose should be checked in the engine compartment, driver door fuel area and trailer., #10. true or false: when checking the drive shaft, it should not be twisted and the u-joints should be free of any debris., #11. the airbag is made out of _________., #12. on the brake lining, there should be at least _____ of an inch of friction material., #13. when checking the drive tire the tread and sidewalls should have no abrasions, bulges or cuts and the tread depth should be no less than _______ of an inch., #14. true or false: when checking trailer tire, there should be no abrasions, bulges or cuts to the tread or sidewalls. tread depth should be no less than 2/32 of an inch. the tire should be properly filled to manufacturer’s specifications and checked with an air gauge., #15. there are how many stages in an air brake test, #16. in cab emergency equipment should include a fire extinguisher, 3 red reflective triangles and ____________., #17. true or false: it is sufficient to visually check that the locking jaws is fully locked around the king pin., #18. true or false: any space between the apron and the skid plate is called a “gap”. and there should be no space between the apron and the skid plate., #19. the light check includes: ____________ both sides of the truck; rear of the truck; both sides of the trailer; rear of the trailer., #20. true or false: when inspecting the coolant level of a hot engine you will inspect the reservoir sight glass. if the engine is not hot, remove the radiator cap and check for a visible coolant level., #21. check that the landing gear is __________, has no missing parts, the crank handle is secure, and the support frame is not damaged., #22. true or false: you will not get credit if you simply kick the tires or strike the tire with a mallet or other similar device to check for proper inflation. you must use a tire gauge..
The vehicle inspection test is a skills test to see if the student can identify which features and equipment on the truck should be inspected before operating the class A vehicle, and in what condition these features or equipment should be in.
Find a local CDL training school .
Find a truck driving job .
CDL Pre-Trip Inspection Test and How To Memorize It
The pre-trip is one of the things that students fear the most and fail the most. Let’s face it, the pre-trip is intimidating because there is so much stuff to memorize. The key to learning the pre-trip inspection is preparation, memorization, and repetition. Don’t go away, in this article I have exactly what you need to make sure you pass it the first time.
It is going to take time for you to memorize everything and the only way to do this is by repeating it over and over.
Hopefully, the school where you are being trained is giving you enough time to practice it everyday you are there.
I can’t stress that enough, regardless of which method you use below you need to repeat it daily and practice on your own.
Don’t expect that your run through once a day with your instructor is enough, it isn’t.
In this article I’m going to give you 8 tips that will help you memorize the pre-trip so you are able to pass it your first time and move on with your driving career.
1. REPETITION!
The only way to memorize the pre-trip is to repeat it over and over. Start with the engine area and work your way around the truck and finally inside the cab.
There is no way around consistent repetition. The more you do it the more you will memorize it. It’s just that simple.
Now that we have established how important repetition is I want you go through the rest of this list and figure out which method (or methods) works best for you and then repeat it over and over.
2. Record Someone Else
You can use YouTube to find a video of someone doing a pretrip and for the most part they work pretty well (more about YouTube later).
Take it a step further though. Ask someone (like and instructor or friend) to do a pre-trip and video record them.
While they are doing it try to use the zoom function on your camera so that you know what the parts look like and what is being checked.
Students that I come across have said that this method works really well because you have quality video and audio. Just watch your recording over and over and this stuff will be engraved in your brain.
Just make sure you are absolutely sure that the person you record knows what they are doing and are showing you everything. You don’t want to watch a video that skips anything that will be on the test.
3. Smaller Chunks
Break down the pre-trip into smaller chunks so that it is not overwhelming. If you think about memorizing everything at once it will be a daunting task.
My suggestion is you learn your air brakes first, then the inside of the cab, the engine compartment, and then the rest of the truck. You can chose any order that you want to as long as it helps you out.
Memorize each part and then tie it all together. You will find that learning the pre-trip is much easier if you do it this way.
4. Use Your Imagination
Do this while in bed before you fall asleep. Warning: the pre-trip is going to consume a lot of your attention during training, even while you sleep!
When you wake up go through a video you found on YouTube or the one you recorded (see #2) and correct any errors you made.
5. Find A Truck
It really helps if you have access to a truck. Pictures alone are not enough. Most of you are probably getting your training through a private school, company sponsored training , or community college.
All of these will give you access to an actual truck and should be taking time each day to practice the pre-trip.
Take advantage of this time with the truck to practice your pre-trip as much as possible. When class ends try to stick around to get in some extra practice, this could be the difference between passing and failing.
6. Watch A Pre-Trip Video On YouTube (not straight through)
There are a lot of videos on YouTube that you can choose from. Let me save you some time, these two (below) is the best because it has good audio and video quality, is accurate, and is easy to follow.
Don’t watch the video straight through over and over. Like I mentioned earlier you should chunk it into smaller sections.
Watch a section, pause it, and list off the names of the parts and things to look for. Play it again to see if you are getting them correct. When you finish one section go on to another section until you finish it.
Don’t move on to a new section until you have memorized the section you started. When you complete all the sections you should be able to watch the whole pre-trip and repeat everything on it from start to finish.
If you want to challenge yourself a little try mixing up the sections so that the sections that was last is now first. This will let you know if you are really memorizing everything.
7. Use A Checklist
Probably the most popular ways to memorize the pre-trip is to use a checklist. No doubt that wherever you are getting your training at is already giving you a checklist to use.
Use it. A lot.
Not all checklists are done in the same order but they should all cover the same stuff. I like this one here (printable PDF document) by the people at Trucking Truth , it’s easy to follow and is accurate.
Every possible thing that you will need to identify during the pre-trip is on this checklist.
8. Use Pictures/Diagrams
There are a ton of picture resources out there that will help you memorize the test. Just do a search for “cdl pre-trip inspection pictures” and you will find a ton of stuff.
The picture I like most are these (link to PDF) by Driver Solutions. The pictures are easy to see and distinct arrows are used to point to each part. Along with pictures is an explanation of what to look for and what to say for each individual part.
What Is The Pre-Trip Inspection?
The pre-trip inspection is an inspection of the commercial vehicle including the cab, engine compartment, and exterior.
A driver of a commercial vehicle is required, by federal law, to complete one every day before driving the vehicle and at least once in a 24 hour period. Every single time you begin driving your truck you will have to complete a pre-trip.
The purpose of it is to make sure that the vehicle is safe to drive.
This gives you a chance to get whatever is wrong fixed. If you miss something and are inspected it could result in citations by the DOT.
A lot of drivers find it to be a pain in the rear but you really need to do it every single time you drive your truck. Don’t listen to the irresponsible driver at the truck stop that tells you it’s okay to skip it. It’s not okay.
How Long Does An Inspection Take?
A pre-trip usually takes about 15-45 minutes to complete. It really depends on the type of truck you are inspecting and your experience.
After several years of driving it’s inevitable that your pre-trip is going to be quicker because you are better at doing it and you know what to look for.
As a new driver you should take your time and make sure you do it right. Make it a habit to always conduct a thorough inspection so that you run into less problems while on the road.
What To Say During The Pre-Trip Test
Knowing what to say is important during the test. There are some specific language the person testing you is going to be listening for. More than likely you already heard these phrases but here is an easy way to remember what to say:
PMS— Properly Mounted, Secure ABC— Abrasions, Bulges, Cuts CBB— Cracked, Bent, Broken
There are some tricks that you can use to make sure you say the right thing, here they are: 1 . If its mounted (almost everything is) use the words, “Properly Mounted, Secure” (PMS) 2. If its rubber use the words, “Abrasions, Bulges, Cuts” (ABC) 3. If it’s metal or another hard surface use the words, “Cracked, Bent, Broken” (CBB) 4. If it has fluid or air going through it or in it remember to say, “Not Leaking”
This language shouldn’t be new to you, hopefully the school that is training you has already taught you this stuff.
What Should You Cover During The Pre-Trip?
The areas that you should cover include the coupling system, light check, in-cab inspection, engine compartment, trailer, and drivers door fuel area. Make sure that you are prepared for all of these.
Also, keep in mind that CDL schools/classes may cover the pre-trip in different orders. It’s okay though, they all cover the same stuff. The order that you practice is probably going to be different from someones in a different school/class.
There is no correct order as long as you memorize everything.
What Will Be Tested On The Actual State Pre-trip Inspection Test?
You will be required to perform a pre-trip for the light check, the in-cab inspection, and the coupling system. These 3 areas you have to complete.
After completing those 3 areas your examiner will have you perform one of the following: the engine compartment, trailer, drivers door fuel door, or the entire vehicle.
You will not know ahead of time which one the examiner will choose. This is why it is crucial that you know all the areas.
What Else You Can Do To Prepare?
Aside from the ways listed above to help you memorize the pre-trip there are some other things you can do.
One thing you can do is try answering some practice tests like these here from Trucking Truth. There are 5 free practice tests you can take.
I really find that these practice tests reinforce what you need to know for the real test. It’s worth your time try them out just to see how you do.
What If You Fail The Pre-Trip?
If you do fail the pre-trip you are able to retake it. Make sure you know why you failed the test, ask the inspector if he/she can specifically tell you what you did wrong.
This is usually never a problem because the inspectors want you to know what you missed so that you can pass the test the next time.
One more thing, don’t be embarrassed because you didn’t pass it on your first try! This happens to a lot of people! You are not the only person that will fail the pre-trip and you won’t be the last.
Study what it is that you missed/did wrong and pass it on your second attempt.
Extra Tips For Passing The Pre-Trip Test
Probably the most common reason people fail the pre-trip is because they are nervous.
The two things that will help you out the most is to always remember that the pre-trip is a verbal contact test.
As you start walking towards the vehicle you should already be looking for any leaks under it, broken marker lights, loose mirror brakes and anything else that seems out of place.
BE VERBAL! Your number one priority is to make sure the examiner knows that you know what you are talking about. The more you talk the greater your chances are to pass the test.
Even if it might seem you are going overboard just keep going. Examiners tend to like when testers are verbal.
http://www.truthabouttrucking.com/fls/Pre_Trip_Inspection.pd
CONTACT! The second most important thing you can do is make contact with the item you are describing. For example, as you are explaining the radiator brace you need to make sure you point to or put your hand on the brace as well.
Your examiner wants to make sure that you actually know what the item is that you are explaining.
Make sure you are pointing the the correct item though! Don’t describe the radiator brace while pointing to the turbo!
Again, make sure you are VERBAL and CONTACT every single item (correctly) that you are describing.
Now go pass that test! Good luck driver!
Privacy Policy
COPYRIGHT © 2019 CDL TRAINING SPOT

Pre-Trip Inspection CDL Practice Tests

Our Free Online Pre-Trip Inspection Practice Test questions and answers will prepare you online to Prepare for the Pre-Trip portion of the CDL skills test. Each test has 3 testing modes to help you prepare and easily remember the information.
- Download your state CDL manual and open up it up in another tab of your browser. Read it over, but you don’t need to try to memorize it!
- On this page, begin the first of our CDL practice tests in Classic Mode . See how well you do, but try not to stress out about any mistakes at this point.
- Next, switch to Practice Mode for intense preparation, complete with instant correct answers after every question and a CDL reference.
- When you think you’re ready, take the exam! Each Exam Mode practice test is timed and you get your grade and results only after you’ve finished each test. This is very similar to the official state CDL written exams!
Note: For more information, see our guide on How to Pass the Official State CDL Exams .
Choose Pre-Trip Inspection Tests Here

- Get Started Now On Pre-Trip Inspection Test 1 (Classic Mode)

- Visit Our Blog about Russia to know more about Russian sights, history
- Check out our Russian cities and regions guides
- Follow us on Twitter and Facebook to better understand Russia
- Info about getting Russian visa , the main airports , how to rent an apartment
- Our Expert answers your questions about Russia, some tips about sending flowers

Russian regions
- Altay republic
- Irkutsk oblast
- Kemerovo oblast
- Khakassia republic
- Krasnoyarsk krai
- Novosibirsk oblast
- Omsk oblast
- Tomsk oblast
- Tuva republic
- Map of Russia
- All cities and regions
- Blog about Russia
- News from Russia
- How to get a visa
- Flights to Russia
- Russian hotels
- Renting apartments
- Russian currency
- FIFA World Cup 2018
- Submit an article
- Flowers to Russia
- Ask our Expert
Irkutsk Oblast, Russia
The capital city of Irkutsk oblast: Irkutsk .
Irkutsk Oblast - Overview
Irkutsk Oblast is a federal subject of Russia located in Eastern Siberia, in the south-eastern part of the Siberian Federal District. Irkutsk is the capital city of the region.
The population of Irkutsk Oblast is about 2,357,000 (2022), the area - 774,846 sq. km.
Irkutsk oblast flag
Irkutsk oblast coat of arms.

Irkutsk oblast map, Russia
Irkutsk oblast latest news and posts from our blog:.
19 April, 2023 / Steam Locomotive of the Circum-Baikal Railway .
8 June, 2021 / Irkutsk - the view from above .
4 April, 2019 / Cities of Russia at Night - the Views from Space .
16 November, 2017 / The Lost World of Tofalaria .
22 September, 2016 / The train ride along the shore of Lake Baikal .
More posts..
News, notes and thoughts:
5 October, 2013 / Typical news from Russia. In Irkutsk region, the bear made his way in one of the cottages located near Ust-Ilimsk. By night, the bear climbed onto the veranda through the window and ate the whole pot of borsch while owners were in the banya. Arrived on the scene the police shot into the air and the bear ran into the woods.
Irkutsk Oblast - Economy
Irkutsk Oblast is rich in such natural resources as oil, natural gas, gold, iron, coal. It is an important transport hub of Siberia - the Trans-Siberian Railway and the Baikal-Amur Railway pass through its territory. The main rivers are the Angara, Belaya, Iya, Kitoy, Irkut, Oka, Lena, Kirenga, and Nizhnaya Tunguska.
This region plays a significant role in the Russian industry. In the all-Russian production it makes about 6,5% of power production, 15% of timber export, 6% of coal mining, almost 20% of pulp production, over 10% of carton, about 9% of oil.
The following industries are the most developed: timber and wood-processing, pulp and paper, mining, fuel, non-ferrous metallurgy, power engineering, machine-building, chemical and oil, food and ferrous metallurgy. Hydro-power industry is also well developed (the main dams: Irkutsk Dam, Bratsk Dam, Ust-Ilimsk Dam). Industrial enterprises are mainly located in Irkutsk and several district centers.
The railway is the main means of transport. The main transport line is the Trans-Siberian Railway. The western part of the Baikal-Amur Railway stretches from the town of Taishet to the east through the territory of the region. The total length of railways is about 2,500 km.
There are two airports in the cities of Irkutsk and Bratsk, they are international airports and offer flights to China, Mongolia, Tajikistan, Thailand, Uzbekistan, South Korea.
Several large navigable rivers flow through the region - the Angara, Lena, Nizhnyaya Tunguska. The largest ports are located on the Lena - Kirensk and Osetrovo. They provide cargo transportation to the Republic of Sakha (Yakutia) and the northern seaport of Tixi.
Nature of Irkutsk Oblast

Beautiful nature of the Irkutsk region
Author: Kovalev Maksim

River in Irkutsk Oblast
Author: Roman Romanov

Lake in Irkutsk Oblast
Author: V.Chokan
Irkutsk Oblast - Features
Irkutsk Oblast is a large subject of the Russian Federation that is almost equal to the territory of Turkey. It is the largest region of Russia that has no outlet to the sea. From north to south the region stretches for about 1,450 km, from west to east - for 1,318 km.
The distance from Irkutsk to Moscow by rail - 5,192 km, to Vladivostok - 4,106 km. Time difference between Irkutsk and Moscow - 5 hours. The largest cities and towns of Irkutsk Oblast are Irkutsk (617,200), Bratsk (222,500), Angarsk (220,000), Ust-Ilimsk (78,700), Usolie-Sibirskoye (73,800).
The climate in the Irkutsk region is sharply continental, with long cold winters and short hot and dry summers.
Irkutsk Oblast has a rich history: ancient sites, the Russians settling in eastern Siberia, Decembrists, the Soviet construction sites - there are historical monuments in almost every settlement. Over 60 museums are open in the region, they attract historians and tourists from Europe and Asia.
Attractions of Irkutsk Oblast
Baikal , the largest freshwater lake in the world, occupies a special place among the riches of Siberia. This lake is a wonderful natural monument known for its extremely clean, very clear water. Baikal is a unique sea-lake sung in legends and tales of antiquity, one the centers of Asian culture. It is a great place for eco-tourism.
The Circum-Baikal Railway , offering stunning views of the lake and its surroundings, is one of the most visited places of the region. It is an amazing piece of engineering, a historical monument of the 19th century. There are 38 tunnels with total length of 9,063 m, 15 stone galleries, 3 concrete galleries, 248 bridges and viaducts, 172 architectural monuments.
Olkhon , the largest on Lake Baikal, is also popular among tourists. In Buryat folk legends, Olkhon Island is a mysterious place; to this day it is known as the center of shamanism.
Khamar-Daban, Primorsky, North Baikal ridges, Sayan spurs, Olkhinskoye plateau are unique place not only for mountaineering but also for downhill skiing. Tourists are also attracted by mountain skiing in Baikalsk city.
About 60 km from Irkutsk there is an architectural and ethnographical museum “Taltsy”.
Irkutsk oblast of Russia photos
Pictures of irkutsk oblast.

Early autumn in the Irkutsk region
Author: Taranovsky

Sunset in Irkutsk Oblast
Author: Konstantin Vavilov

Church in Irkutsk Oblast

Orthodox church in the Irkutsk region
Author: Gennady Taraskov
- Currently 3.06/5
Rating: 3.1 /5 (170 votes cast)
View prices for your travel dates
- Excellent 1
- Very Good 4
- All languages ( 38 )
- Russian ( 37 )
- English ( 1 )
Own or manage this property? Claim your listing for free to respond to reviews, update your profile and much more.
Navigation menu
Vostochnaya

Property Policies
Property description, frequently asked questions, how much does it cost to stay at vostochnaya, what is the closest airport to vostochnaya, what are the check-in and check-out times at vostochnaya, does vostochnaya provide airport transfer services, what amenities and services does vostochnaya have, does vostochnaya have a swimming pool, does vostochnaya have fitness amenities, does vostochnaya provide wi-fi, does vostochnaya have non-smoking rooms, does vostochnaya have a restaurant, about this property, popular hotels, popular attractions, explore more.

COMMENTS
Pre-Trip Inspection Study Guide. Our Pre-Trip Inspection Study Guide has everything you need to prepare for the Class A CDL Pre-Trip Inspection Exam. Our study guide will cover the pre-trip inspection terminology as well as a thorough list of all of the parts you will be inspecting on the vehicle. For each part you will be inspecting there will ...
This includes checking the engine compartment, brake system, fuel system, and more. The CDL Pre-Trip Inspection Exam is an integral part of obtaining your commercial driver's license. This guide covers Class A and Class B pre-trip inspections, provides a checklist, and offers tips for memorizing the inspection process.
This video will explain the full pre-trip inspection on your Class A truck for the new CDL road test. Watch the whole thing to learn the new pre-trip.Our Web...
Class A Pre-Trip Inspection Point to, or touch, every item that you are inspecting. Tell the tester how you know that the part you are inspecting is in good, safe working condition. Identify all defects or you may not receive credit. 1 Engine Compartment + 1 Axle 3 L's. Leaks, Leans, and Lights.
Jeff from Apex CDL Institute explains how to do a Pre-Trip examination for the new modernized Class A CDL Exam.Before using this method, make sure your state...
CDL Pre-Trip Inspection Checklist. Studying this Class-A CDL pre-trip inspection checklist is an important part of truck driver training. Before getting your Class-A CDL and finding an entry level truck driving job, most states will require students to pass a DOT (department of transportation) pre-trip inspection test and a general knowledge test. ...
In this in-depth video, we will walk you through every crucial element of the inspection process, ensuring you are prepared and confident for your upcoming C...
Rubber Parts: no abrasions, bulges, or cuts. Parts that hold a Fluid or Air: cannot be leaking. Example: the engine air compressor (a metal part) is securely mounted, not cracked, gear-driven, and has no audible leaks. • The Pre-Trip Inspection is a verbal test. • Say at least 2 things about every item you inspect.
We recommend a three step approach to preparing for this test. Step One - study your commercial driver's license handbook, paying particular attention to the pre-trip inspection section. Read this section multiple times and try to commit everything to memory. Step Two - Take pre-trip inspection practice tests to asses and further increase ...
Due to heavy memorization, the pre-trip inspection is one of the hardest aspects of the CDL test. Also called the "Vehicle Inspection Test," the pre-trip is one of the tests that trucking students fail the most. With this pre-trip inspection checklist, we tell you everything you need to know and what you need to check for.
After you read the CDL pre trip inspection study guide take this Class A pre trip inspection practice test. In it you'll find questions and answers about checking components in the engine compartment, driver door fuel area, trailer, and in the cab. Any answers not found in the pre trip inspection study guide will be found in section 11 of ...
1. REPETITION! The only way to memorize the pre-trip is to repeat it over and over. Start with the engine area and work your way around the truck and finally inside the cab. There is no way around consistent repetition. The more you do it the more you will memorize it. It's just that simple.
Master the Class A Pre-Trip Inspection in 32 minutes. Atom is your instructor and he's always this friendly. Have a look.If you'd like to test your knowledge...
Pre-Trip Inspection CDL Practice Tests. Our Free Online Pre-Trip Inspection Practice Test questions and answers will prepare you online to Prepare for the Pre-Trip portion of the CDL skills test. Each test has 3 testing modes to help you prepare and easily remember the information. Test Instructions.
PRE TRIP INSPECTION CLASS A TEST - 02. The pre trip inspection class a test will examine your knowledge of internal inspection and external inspection. In order to receive your Commercial driver's license, it is required that you pass the state's official CDL written Knowledge exam. ADVERTISEMENT. ADVERTISEMENT.
The FEV150 EV Charging Station Analyzer is compliant with J1772 standards. Applications: Safety testing of charging stations. Performance testing of charging stations. Troubleshooting/repair of charging stations. Available measurements: PE (protective) earth pre-test to ensure no dangerous voltage is present. Visual inspection.
Irkutsk Oblast is a large subject of the Russian Federation that is almost equal to the territory of Turkey. It is the largest region of Russia that has no outlet to the sea. From north to south the region stretches for about 1,450 km, from west to east - for 1,318 km. The distance from Irkutsk to Moscow by rail - 5,192 km, to Vladivostok ...
Here's a demonstration of how to perform a proper pre-trip inspection on a Class A tractor-trailer with one trailer. For the CDL Class A road test, the CDL C...
Bratsk Hotel, Bratsk: See 38 traveler reviews, 14 candid photos, and great deals for Bratsk Hotel, ranked #12 of 14 specialty lodging in Bratsk and rated 3 of 5 at Tripadvisor.
Eat. Drink. Sleep. Go next. Bratsk ( Russian: Братск brahtsk) is a large city in Irkutsk Oblast on the Baikal-Amur Mainline . Angara River at Bratsk.
Jeff from Apex CDL Institute is a licensed 3rd party CDL examiner in the state of Kansas. Here he demonstrates how to perform a proper pre-trip inspection on...
Vostochnaya. The Oriental hotel is located in the Eastern part of the town, residential area Osinovka. 50 m from the hotel is the railway station "hydro", which is convenient for guests arriving by train from any point of Russia. From the railway station, Shuttle buses to reach any district of the city of Bratsk, as well as to the city of Irkutsk.
Driving Academywww.cdldrivingacademy.com908-525-3609If you like this video please visit our site for more Info & TrainingFor the CDL Class A Road test, the C...