5 Ways to Switch Between Windows of Same App in Mac
If you like using multiple windows of the same app like Safari, Chrome, etc., you definitely would want to switch between them. Unfortunately, it’s not quite intuitive on MacBook to do so. But on the good side, you get different ways to toggle between windows on Mac. You can do it using a mouse, keyboard shortcut, or even the trackpad. Let’s learn how to switch between windows of the same app on Mac.
Table of Contents

1. Switch Between Windows on Mac Using Keyboard Shortcuts
There are three Mac keyboard shortcuts that you can use to toggle between windows of the same app like Chrome, Safari, etc., on your MacBook.
Using Command + ` Shortcut
The Command + ` shortcut is one of the most widely used keyboard shortcuts to switch between different windows of the same app on Mac.
1. Open any one of the windows of the app on your MacBook.
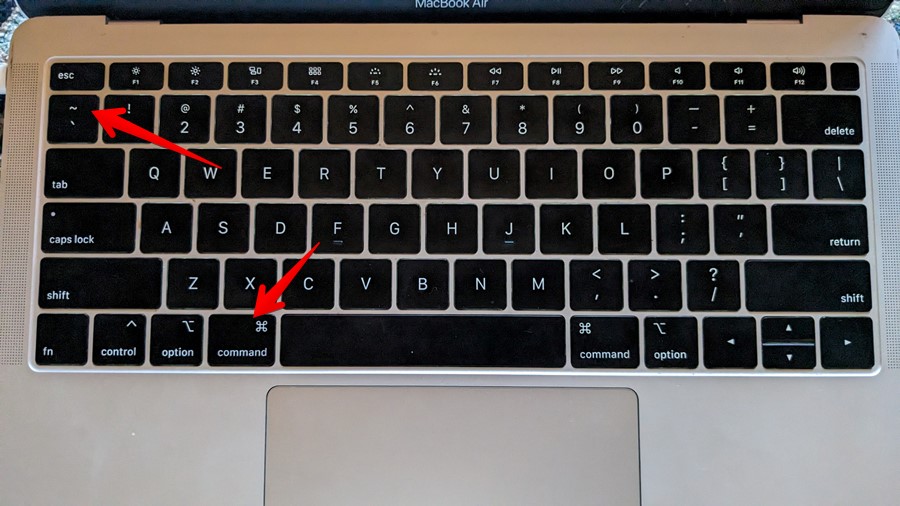
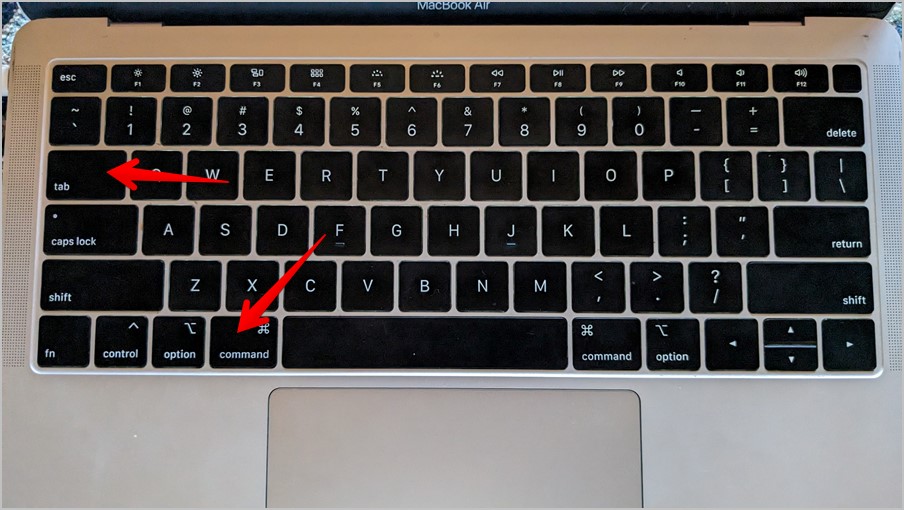
2 . Then, hold the Command button and press the ` (tilde) key repeatedly to cycle between the windows of the same app. Press Command + Shift + ` to cycle between the windows in the reverse direction.
3. Release the Command key after you have landed on the window that you want to switch to.
- The method lets you switch between non-maximized windows of the same app only. It will not work for app windows in full-screen.
- It will not work for minimized windows either.
- It works for windows in the same space and not over multiple spaces.
- There’s no visible user interface in this method.
How to Fix or Change Keyboard Shortcut to Switch Between Windows of the Same App
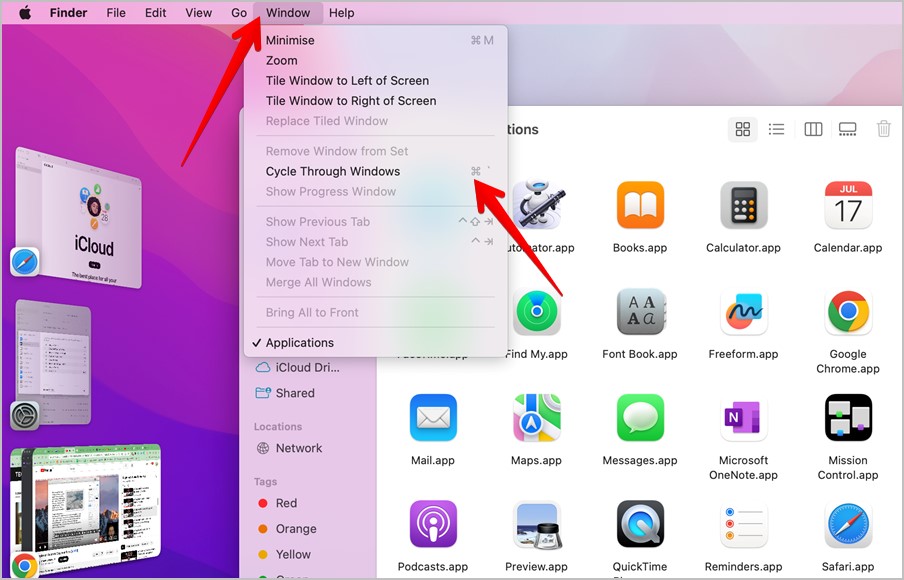
In case the shortcut doesn’t work or you feel that you may have accidentally changed the shortcut, you can easily check and confirm it. For that, open Finder and click on Window in the menu bar. Look for the shortcut mentioned next to Cycle Through Windows.
If you would like to change this shortcut, follow these steps:
1 . Click on the Apple icon in the Menu bar and select System Settings.

2. Go to Keyboard followed by Keyboard shortcuts.
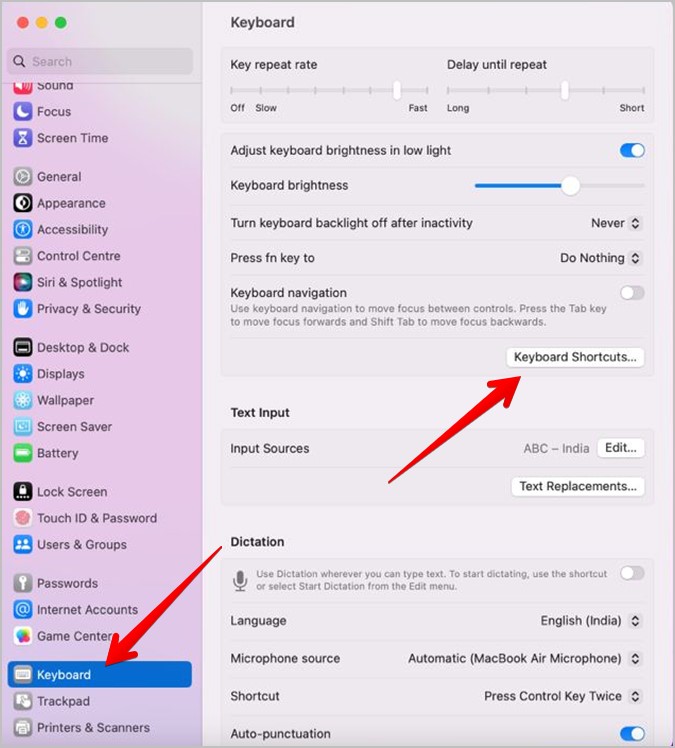
3. Select the Keyboard from the left sidebar.
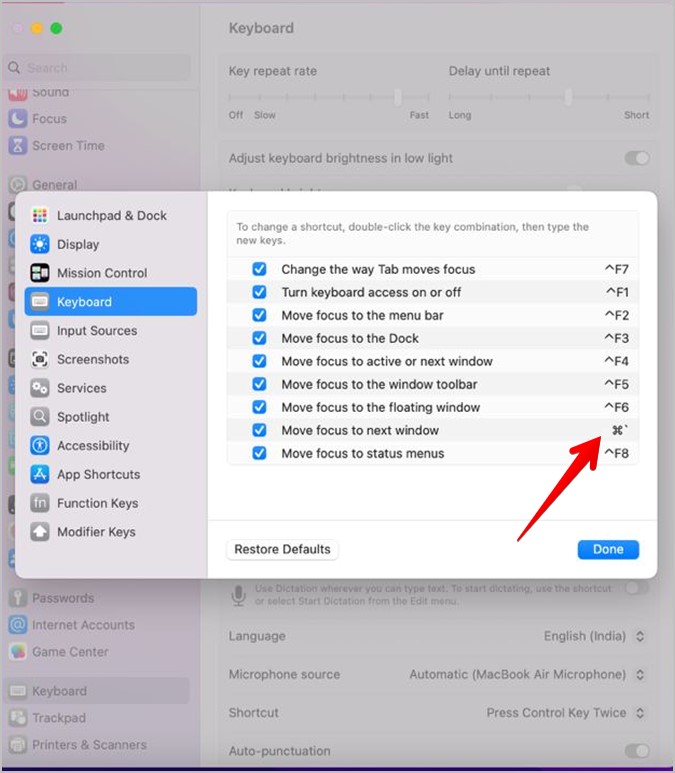
4. Next, make sure the checkbox next to Move focus to next window is selected. Then, double-click on the keyboard shortcut next to it i.e., Command icon ⌘ + ` and enter your own shortcut to change it. Click on Done to save the changes.
Using Command + F4 Shortcut
You can also use Ctrl + F4 or Ctrl + fn +F4 to switch between active or next windows of the same app on a MacBook. Again, this will not work for maximized or minimized windows.
Using Command + Tab Shortcut
Do you use Command + Tab keyboard shortcut to switch between different apps on your Mac? The same shortcut can be used to toggle between windows of the same app as shown below.
1. Hold the Command button and press the Tab button to open the app switcher screen.
2 . Without leaving the Command button, press the Tab button (or the right/left arrow keys) repeatedly to go to the app icon whose windows you want to switch to. Let’s say Chrome. So go to Chrome.
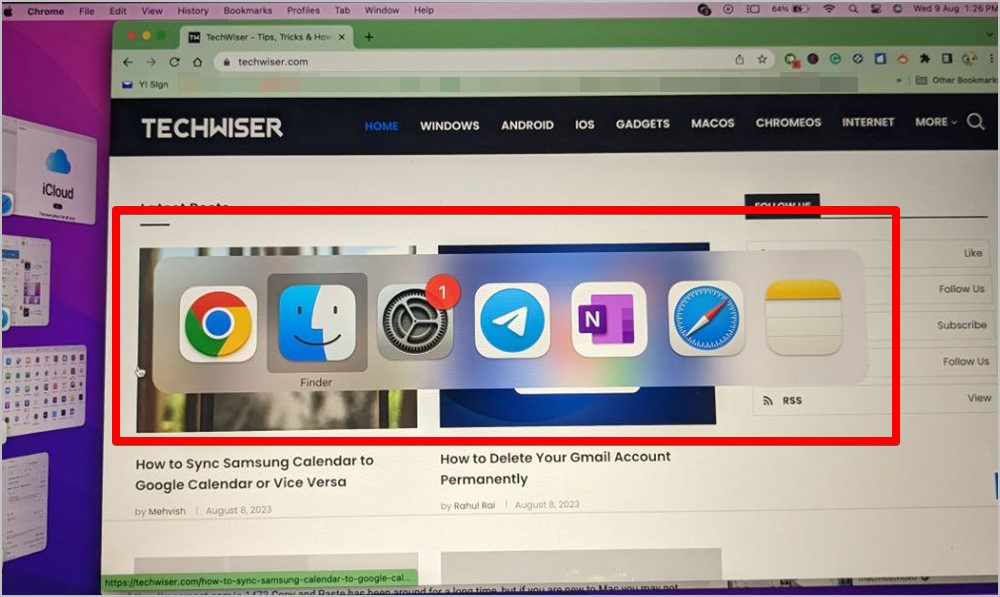
3. Once you are on the desired app icon i.e., Chrome in our example, press the Down arrow key while holding the Command button to see all the open windows of the same app.
4. Use the right/left arrow keys to navigate between the open windows. Then, press the Return key to switch to the selected window. Alternatively, you can even click on the window to switch to it.
- This method works for minimized windows.
- Can switch between apps too.
- This method won’t work for maximized windows.
- It doesn’t work between Spaces.
Tip: Check out different ways to open Launchpad on Mac .
2. Switch Between Windows on Mac Using Trackpad
You can also use your Mac’s trackpad to switch between windows of the same app in two different ways.
Using Mission Control (Control + Up Arrow or Swipe Up)
Mission Control shows all the windows and apps that are open on your MacBook on a single screen. That includes both minimized and full-screen apps, apps in Split View, or desktop spaces. You will find desktops/spaces as thumbnails at the top.
Follow these steps to toggle between windows on Mac using Mission Control:
1. First, you need to launch the Mission Control screen which can be done from any app in the following two ways:
- Swipe up using three fingers on your trackpad.
- Press Control + UP arrow keys. If it doesn’t work, try holding the keys a bit harder and for a second or two.
2. On the Mission Control screen, click on the window that you want to switch to from the same space.
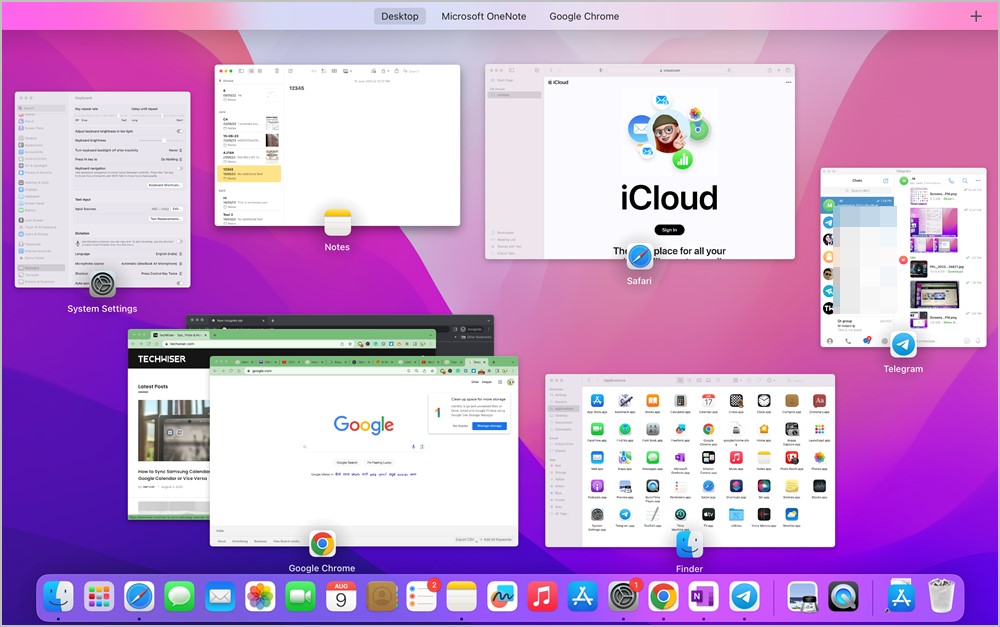
3 . To switch between spaces or full-screen windows, swipe left or right with three fingers on the trackpad on the Mission Control screen.
Tip: By default, the open windows of the same app are ungrouped and will appear scattered. To group them, go to System Settings from the Apple icon > Desktop and Dock. Scroll down and enable the toggle next to Group windows by application under the Mission Control section.
- Can see all apps and windows.
- Works for minimized and maximized windows.
- Works for windows on different desktops.
- Will not work for hidden apps.
Tip : Know how to change scroll direction in Macbook .
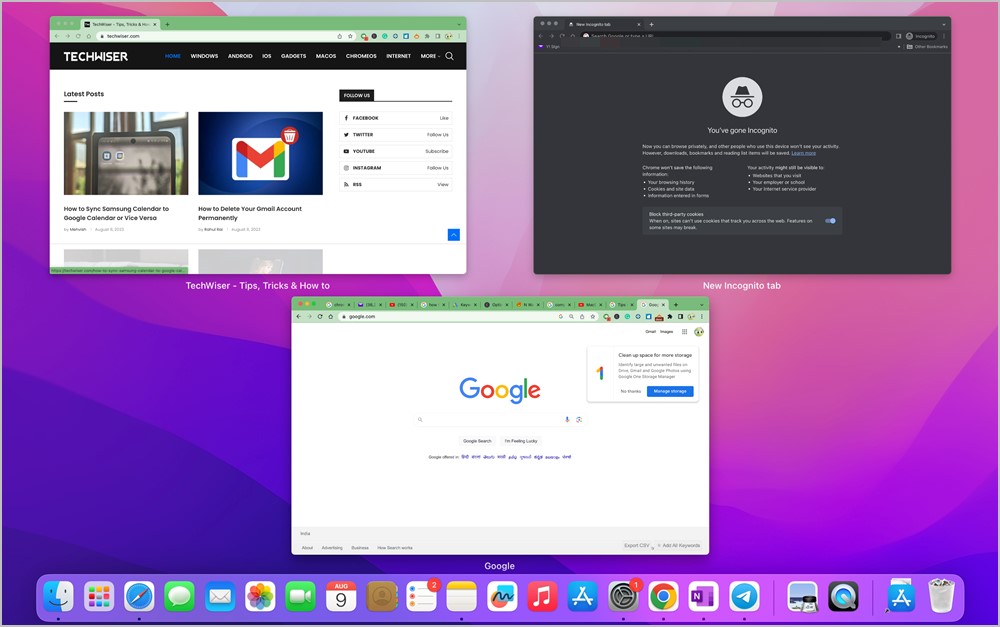
Using App Expose (Control+ Down Arrow or Swipe Down)
Unlike Mission Control which shows all apps, this method shows all open windows of the same app on the same desktop.
1. Open any window of the app.
2. Swipe down using three fingers on the trackpad. Or, hold the Control button and press the Down arrow key once to see all open windows from the same app. Then, use the arrow keys to switch between windows of the same app on your Mac.
- Show all open windows of the same app on one desktop.
- Works for minimized windows.
- Doesn’t work in full-screen windows or between desktops.
3. Switch Between Windows on Mac Using Mouse
Another easy way to toggle between windows on Mac is from the Dock. Right-click on the app icon in the Dock using your mouse and you will see the list of open windows of the same app. Click on the window that you want to switch to.
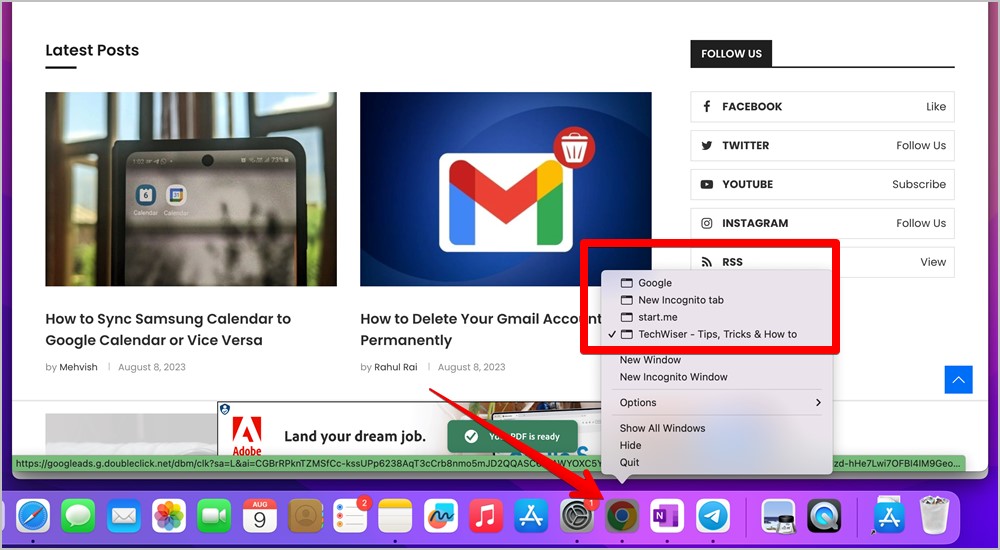
If you aren’t used to right-click, you can access the app menu in the Dock in the following ways:
- Press and hold down the trackpad using one finger on the app icon.
- Click the app icon in the Dock using two fingers on the trackpad.
- Move the mouse pointer over the app icon and then Ctrl + click on the app icon.
- Works for both full-screen and minimized windows.
Tip: Check out cool apps to customize Mac’s Dock .
Using Window in Menu Bar
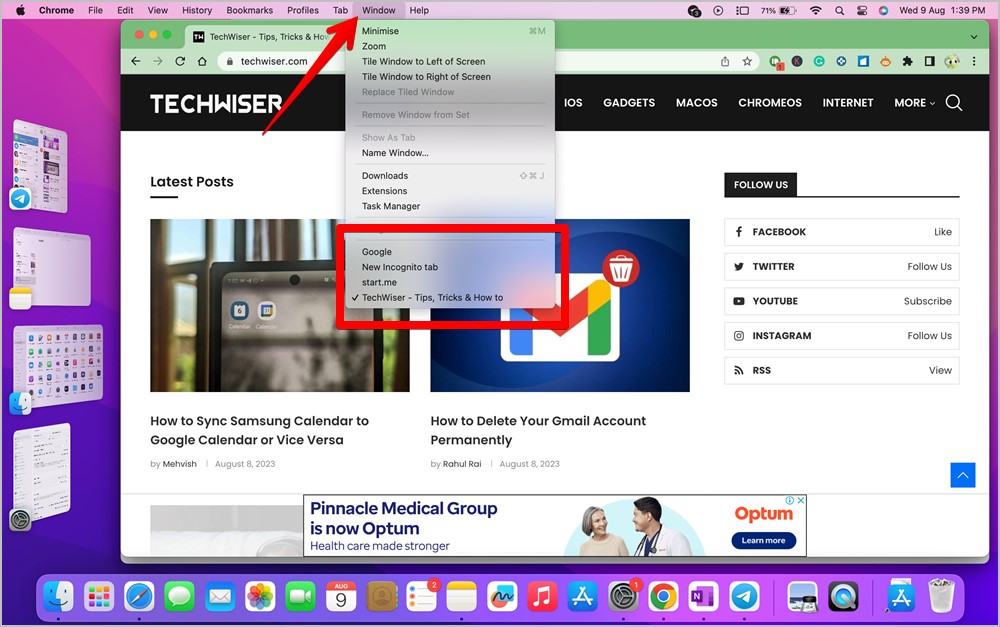
Just like the Dock, you can see and switch between windows of the same app on your MacBook using the Window tab in the Menu bar.
1. Open any one window of the app.
2 . Click on Window in the Menu bar. You will see the list of open windows at the bottom. Click on the window that you want to switch to.
- Works for minimized and full-screen apps.
- Need to open at least one window of the concerned app.
4. Switch Between Maximized Windows
When any of your app windows is full screen, it will act as an individual Space. To switch between app windows when at least one of them is maximized, use Ctrl + right or Ctrl + left arrow to switch between spaces. You can also swipe left or right on the trackpad to switch between full-screen app windows.
Alternatively, you can switch between maximized windows from Dock, Window menu, or Mission Control.
5. Using Hot Corners
Hot Corner is a special feature available on MacBooks that lets you assign different actions to four corners of the screen. You can assign the ability to switch between windows of the same application to one of the hot corners.
1. Open System Settings on your MacBook.
2. Go to Desktop & Dock and click on Hot Corners at the bottom.

3. Click on the drop-down box for the corner using which you want to switch between application windows.
4 . Select Application Windows from the menu and click on Done.

5. Now, whenever you want to see or switch between windows of the same app, move your mouse pointer to that particular corner when the app is open. You can also open any other app and it will show its open windows.
Frequently Asked Questions
1. How to merge app windows into one window?
You can merge different windows of the same into one tabbed window where each window will act as a tab. Open the app and click on Window in the Menu bar. Select Merge all Windows. Please note that this feature works for some apps only.
2. How to switch between different apps on Mac?
Use the Command + Tab keyboard shortcut or Mission Control to switch between apps on MacBook. You can also use Stage Manager or Dock to switch between apps.
3. How to change trackpad gestures on Mac?
Go to Apple icon > System Settings > Trackpad > More Gestures. Here you can customize gestures for Mission Control, App Expose, etc.
4. How to change keyboard shortcuts on Mac?
Go to System Settings > Keyboard > Keyboard Shortcuts. Select the preferred category to change its keyboard shortcut.
Multitask on MacBook
Hope you have understood how to switch between windows of the same app on Mac. If you like to multitask, know how to snap windows on MacBook . Also, check out the best MacBook apps to improve productivity.

Mehvish Mushtaq is a tech lover from Kashmir. With a degree in computer engineering, she's always been happy to help anyone who finds technology challenging. She's been writing about technology for over six years, and her favorite topics include how-to guides, explainers, tips and tricks for Android, iOS/iPadOS, Windows, social media, and web apps. You can also find her work on Make Tech Easier , Guiding Tech , and Nerds Chalk
You may also like
How to use two different search engines in..., 8 fixes for microsoft excel file not opening..., 3 ways to set a video as screen..., 11 fixes for sd card not showing up..., how to connect two bluetooth headphones with mac, how to extract text from images on mobile..., how to connect your mac to apple vision..., 9 fixes for calendar search not working on..., 12 fixes for continuity camera not working with..., how to scan qr codes on windows or....
How to quickly switch between windows on your Mac computer using 4 different shortcuts
- You can switch between windows on your Mac with a few quick keyboard shortcuts. These shortcuts can save you time and keep your workflow orderly.
- Hitting the F3 button at the top of your Mac's keyboard, for example, will display all the windows you have open, and let you quickly click on the one you want front and center.
- You can also use the Mac's Command key to switch between windows in two different ways, or you can swipe up on your trackpad on a MacBook to open Mission Control.
- Visit Business Insider's homepage for more stories .
If you're like pretty much everyone, you probably have many windows open every time you use your Mac .
It might be a group of Word documents, a host of browser windows, or collection of pictures — whatever the case, having too many windows open means frustration when it comes time to switch between them.
If you have too many windows open, finding the file, webpage, or document you want at any given moment can take a surprisingly long time. That is, unless you know a few Mac keyboard shortcuts that make navigating between windows quick and easy.
Check out the products mentioned in this article:
Macbook pro (from $699.99 at best buy), how to quickly switch between windows on a mac.
There are several ways to switch windows on your Mac.
First of all, if you hit the F3 key (in the very top row on your keyboard), your windows will shrink so you can see them all. If you have multiple monitors, each monitor will show all the windows currently on that screen.
Once you're in this view, you can click any window to switch to it, or press F3 again to return to your current window.
You can also switch windows using your Command key. Try hitting Command + Tab — a pop-up will appear showing every app that currently has windows open on your computer. Press Tab to cycle through them, and release Command when you've highlighted the one you want to switch to.
You can also hold down the Command key and tap the tilde key, which is immediately to the left of the number "1" on the top line of numbers, and just below the Escape key.
While you're holding the Command key, tapping the tilde key will bring you to the next window of the same type. This is great if you're working with lots of windows in the same program, like Word documents.
Finally, if you're using a MacBook, swiping up on the trackpad with three or four fingers (depending on your settings) will open Mission Control, which shows all the windows that you have open. If this isn't working, make sure it's enabled in the "Trackpad" section of System Preferences.
Related coverage from How To Do Everything: Tech :
How to stop notifications on your mac computer, or adjust your notification preferences, how to set an alarm or event reminder on a mac using the calendar app, how to manually update your mac computer (when you've been putting off automatic updates), how to reset a mac computer to its factory default settings, how to turn off notifications on your iphone for individual apps, or adjust the types of notifications you receive.
Insider Inc. receives a commission when you buy through our links.
Watch: A diehard Mac user switches to PC
- Main content
Home » Tech Tips » Mac » Shortcuts to Switch Between Same App Windows in Mac
Shortcuts to Switch Between Same App Windows in Mac
It is common to work with multiple apps in Mac and switch across them using “Command + Tab” or “Command + Shift + Tab” keyboard shortcuts. However, did you any time wonder how to toggle through multiple windows of the same application? This is super easy on Windows as you can see all instances of an app as an individual thumbnail when using “ Alt + Tab ”. Unfortunately, it does not work like that in Mac, and here are different methods to efficiently switch between same app windows on your Mac.
1. Keyboard Shortcuts for Switching Same App Windows
Press Command + ` keys in Mac to switch between windows of the same app. Backlit ` symbol is shown along with Tilde key which is located below the “Esc” key (or above Tab) on most Mac English keyboard models.

This shortcut allows you to cycle through all open instances within the active application. You can use Command + Shift + ` keys to cycle through app windows in reverse manner. However, you will not visually see any thumbnails or app icons on the screen.
2. Change Cmd + ` Shortcut Keys
The problem with the backlit or tilde key is that it will not be available in most European and other language keyboards. In that case, you may need to use different key combination with Command instead of tilde. To avoid confusion, you can find the actually assigned shortcut keys on your Mac and change it as per your convenient.
- Click the Apple menu and select “System Settings…”.
- Go to “Keyboard” section and click on the “Keyboard Shortcuts…” button.
- Navigate to “Keyboard” section and find “Move focus to next window” option.
- The shortcut assigned here (⌘`) is what your default shortcut to switch windows of same app.
- Double-click on the shortcut and press any key combination as per your wish to set a new shortcut.
- Click “Done” button and start using the newly assigned shortcut henceforth.

3. Use Down Arrow with Command + Tab
As mentioned, most Mac users know you can switch across app windows using the “Command + Tab” App Switcher (or Application Switcher) shortcut. However, you can also use the same shortcut with arrow keys to toggle between open windows of same app.
- Press “Command + Tab” on your keyboard to open App Switcher.
- While holding down the “Command” key, use “Tab” or “Right or Left Arrow” keys to highlight the desired app.

- Now, press “Down Arrow” key to view all open windows of the highlighted app.
- Select the instance you want to open with mouse. Alternatively, use arrow keys to navigate through open windows and press enter key to open the highlighted instance.
4. Using Mission Control
Mission Control is another feature that simplifies window management on your Mac. To activate it, press “F3” on your keyboard or use a four-finger upward swipe on the trackpad. On some keyboards, you may need to use “Fn + F3” keys to launch Mission Control. This will show you all your open app windows including apps with multiple instances. Click on a thumbnail to open that app window.

The advantage with Mission Control is that you can easily switch between virtual desktops and select the app windows on different screen. You can also group the app windows in Mission Control view from “Apple Menu > System Settings… > Desktop & Dock > Mission Control” settings.

This will group same app windows along with the app icon so that you can easily pick up the needed window.

5. Using Trackpad Swipe Gestures for Full Screen Windows
If you’re using a MacBook with a trackpad, you can make use of swipe gestures to toggle between full screen app windows. Let’s say, you have two Word documents opened in a full screen mode. Swipe left or right with three or four fingers to move between them. This is a quick way to navigate through app’s full screen windows if you are comfortable with finger movements.
You can change the trackpad gesture to use three or four fingers swipe. For that, go to “Apple Menu > System Preferences… > Trackpad > More Gestures” (or System Settings in new macOS). Make sure to check “Swipe between full-screen apps” item and select three or four fingers option from the dropdown.

6. Control Click on Dock Icon
If you prefer a visual approach by seeing the document name, then simply control-click (or right-click) on the app icon on your Dock . This will show the titles or document names of all open app windows. You can either use mouse to select an item or use the arrow key to highlight an item and press enter to open it.
7. Keeping Minimized Windows as Separate Icons on Dock
Mac also allows you to show each instance of same app window on Dock when you minimize them.
- Go to “Apple menu > System Preferences… > Dock & Menu Bar” section on old macOS. Otherwise, go to “Apple menu > System Settings… > Desktop & Dock” section in new macOS.

- Disable “Minimize windows into application icon” option.
- This will show all your minimized windows of the same app as separate icons on the Dock.

We hope the above tips help to switch between same app windows in Mac with ease. Whether you prefer keyboard shortcuts, trackpad gestures, or mouse, you can easily manage multiple windows. Unfortunately, there are no options to view individual browser tabs and switch across them in Mac. All you can do is to keep separate browser windows and select from Dock or use App Switcher with down arrow key. Within a browser window, you can use number 1 to 9 keys along with Command to quickly navigate through the tabs.
About Editorial Staff
Editorial Staff at WebNots are team of experts who love to build websites, find tech hacks and share the learning with community.
You also might be interested in

10 Tips to Use Mouse More Productively in Windows PC
Though all latest laptop models have a touchpad, many of[...]

Insert Emoji, Symbols and Stickers in Microsoft OneNote
There are many applications available to take quick notes in[...]

Alt Code Shortcuts for Mahjong Tiles Symbols
Mahjong is a tile-based game widely played in China. This[...]
DOWNLOAD EBOOKS
- SEO Guide for Beginners
- WordPress SEO PDF Guide
- Weebly SEO PDF Guide
- Alt Code Emoji Shortcuts PDF
- Free ALT Code Shortcuts PDF
- View All eBooks
TRENDING TECH ARTICLES
- 600+ Windows Alt Codes for Symbols
- Fix Chrome Resolving Host Problem
- Fix Slow Page Loading Issue in Google Chrome
- View Webpage Source CSS and HTML in Google Chrome
- Fix Safari Slow Loading Pages in macOS
- Fix Windows WiFi Connection Issue
- ROYGBIV or VIBGYOR Rainbow Color Codes
- Fix I’m Not A Robot reCAPTCHA Issue in Google Search
- Structure of HTTP Request and Response
POPULAR WEB TUTORIALS
- Move WordPress Localhost Site to Live Server
- Move Live WordPress Site to Localhost
- Move WordPress Media Folder to Subdomain
- Fix WooCommerce Ajax Loading Issue
- Create a Free Weebly Blog
- Edit Weebly Source Code HTML and CSS
- Add Scroll To Top Button in Weebly
- Add Table in Weebly Site
- How to Add Advanced Data Table Widget in Weebly?
- Up to $500 Free Google Ads Coupon Codes
FREE SEO TOOLS
- Webpage Source Code Viewer
- HTTP Header Checker
- What is My IP Address?
- Google Cache Checker
- Domain Age Checker Tool
- View All Free Web and SEO Tools
© 2024 · WebNots · All Rights Reserved.
Type and press Enter to search
Tips & Tricks
Troubleshooting, switch between different windows in same app on mac with a handy shortcut.

Do you ever have a bunch of different windows open in the same Mac app, and you’re wanting to quickly toggle between them with a keyboard shortcut? That’s exactly what this trick is for, and it can really boost your productivity in multi-windowed Mac apps.
Maybe you’ve got a bunch of different Safari or Chrome windows open, each with sets of tabs for work, productivity, leisure, personal, etc, or maybe you have a bunch of Terminal windows open, or documents open in Pages, or you want to switch between multiple images open in Photoshop, Pixelmator, or Preview, whatever the use case, this keyboard shortcut is for you.
Switch between different windows in the same Mac app with Command+`
The keyboard shortcut to remember for switching between windows of the same application is Command+`

` is also the ~ tilde key, and you can find it on US keyboards under ESC or above Tab.
Each time you press Command+` you will switch to the next window available in the active application.
You can also go toggle between different windows of the same app, but backwards, by using Shift+Command+`
If you’re familiar with the fantastically useful Command+T application switcher keyboard shortcut , this should be a nice addition to your productivity repertoire, since it’s a similar keyboard shortcut, but rather than switching between active apps, you switch between windows in the active app.
If you like keyboard shortcuts for productivity, you may also appreciate allowing the Tab key to switch between dialog boxes on the Mac too, which can further boost your navigation.
The Command+` window switching shortcut works in every version of MacOS and Mac OS X, so whether you’re using Ventura, Monterey, or keeping it classic with Snow Leopard still, you’ll find the keystroke works the same.
Enjoy this tip? Subscribe to our newsletter!
Get more of our great Apple tips, tricks, and important news delivered to your inbox with the OSXDaily newsletter.
You have successfully joined our subscriber list.
Related articles:
- How to Create Custom Keyboard Shortcuts in Mac OS
- Set a Keyboard Shortcut for “Save as PDF” in Mac OS
- How to Set & Use the Accessibility Shortcut on iPhone and iPad
- How to Show Hidden Files on MacOS with a Keyboard Shortcut
10 Comments
» Comments RSS Feed
Just got a new MBP with Sonoma and I’ve noticed that the CMD+` cycles through 2 or 3 windows super rapidly to the point where it’s no longer useful. It’s cycling way to quickly and not one at a time.
Anybody else?
I have noticed that Cmd+` used to work, but now (perhaps since new OS) it only works once you have moved the window for that application slightly…. i.e. mouse over title bar and move the window then the key combo works.
However, I do seem to be able to switch between windows of same app without moving the window by using Cmd+ Shift + `
Frustratingly, window cycling no longer loops in Ventura once you reach the last window, regardless of which direction you are cycling. From Reddit, it seems that this was introduced in the Ventura betas and was never changed back.
(Meanwhile, Cmd-Tab still loops fine switching between different applications.)
If that key combination isn’t convenient or isn’t working for you, you can always change the hotkey combination to something else using Keyboard Preferences.
You can easily remap another Hot-Key to move focus to the next and previous windows. (The above article really should have mentioned that, as different locales, and older keyboards will behave differently)
On my Norwegian keyboard, the ` is beside the backspace key, and I additionally have to use shift to reach it. So with the default shortcuts this is hard to use.
You can always change the hot-key to something different using Keyboard Preferences.
On my iMac Magic Keyboard, Command+` does nothing.
With a US keyboard layout, Command+` switches windows. I have used this feature for a long time.
I assume those having trouble have different keyboard layouts or different regions.
On my keyboard, I have to press Alt+` to get `and Alt+Shift+` to get ~ So, Command+`doesn’t do anything.
The shortcut can be changed in System Settings – Keyboard – Keyboard Shortcuts – Keyboard – Move focus to next window (before Ventura in System Preferences – Keyboard – Shortcuts – Keyboard – Move focus to next window)
Leave a Reply
Name (required)
Mail (will not be published) (required)
Subscribe to OSXDaily
- - How to Search Google Without AI Rubbish & Clutter
- - How to Install & Run Windows 11 in VMware Fusion Pro on Mac
- - How to AirPlay from Chrome & Edge Browsers on Mac to Sonos or HomePod
- - How to Disable Microsoft Defender SmartScreen in Edge
- - How to Check Battery Life of Apple Watch
- - iOS 17.5.1 & iPadOS 17.5.1 Update Released to Fix Reappearing Deleted Photos Bug
- - MacOS Ventura 13.6.7 & macOS Monterey 12.7.5 Updates Available
- - iOS 16.7.8 & iPadOS 16.7.8 Updates for Older iPhones & iPads Available
- - iOS 17.5 & iPadOS 17.5 Updates Released with Bug Fixes
- - MacOS Sonoma 14.5 Update Released with Security Fixes
iPhone / iPad
- - 3 Great Photo App Tips for iPhone, iPad, & Mac That You May Have Overlooked
- - How to Find Your Phone Number on iPhone
- - Play Apple Music in Retro Mac OS X Fashion with QuickTune
- - How to Factory Reset Mac (MacOS Sonoma & Ventura)
- - How to Download & Install VMware Fusion Pro for Mac for Free
- - How to Fix the Apple Watch Squiggly Line Screen
- - What Does the Number Badge Mean on Microsoft Edge Icon?
- - How to Hide iPhone Keyboard When It’s Covering Buttons & Won’t Go Away
- - What’s a PXM File & How Do You Open It?

About OSXDaily | Contact Us | Privacy Policy | Sitemap
This website is unrelated to Apple Inc
All trademarks and copyrights on this website are property of their respective owners.
© 2024 OS X Daily. All Rights Reserved. Reproduction without explicit permission is prohibited.
How-To Geek
How to "alt+tab" to switch windows on a mac.
If you're a Mac user familiar with Windows' Alt+Tab task switching shortcut, you'll feel right at home with macOS's built-in equivalent. Here's how to use it.
Quick Links
Switching open apps with ease, exposing open window thumbnails with command+tab, quitting and hiding apps with command+tab, quickly switching between open app windows.
If you're a Mac user familiar with quickly switching between apps on Windows using Alt+Tab, you might be delighted to learn that there is a built-in way to do something very similar on a Mac. Here's how.
In the world of Windows, many users are familiar with a feature often called "Task Switcher" that allows you to quickly switch between open applications by pressing Alt+Tab . This feature has been in Windows since Windows 2.0 in 1987, and macOS has a similar shortcut.
If you'd like to quickly switch between open apps on a Mac, press Command+Tab. A row of app icons will appear in the center of your screen. If you hold the Cmd key down while tapping the Tab key, the cursor will move between the icons from left to right.
You can also hold down Command+Shift and tap "Tab" to move the selection cursor in the opposite direction---from right to left. Or you can press Command+Tab and use the left- and right-arrow keys to select an app.
Once you've highlighted the app you want to switch to, release Command+Tab and the app will be brought into the foreground.
There are other things you can do with the Command+Tab switcher. If you press Command+Tab, highlight an app's icon, then push the up or down arrow, you will launch a mode that shows thumbnails of all that app's open windows on the screen. This is similar to a long-time macOS feature called Exposé or Mission Control .
From there, you can select any window you'd like by clicking on it with your mouse pointer or by highlighting the window with the left- and right-arrow keys and pressing Return.
You can also manage open applications with the Command+Tab shortcut. With the Command+Tab app list open, highlight an app and press the "Q" key to quit the application. Or you can press the "H" key to hide or unhide the application.
Here's a related window management tip that doesn't involve Command+Tab. If you have two or more windows from the same app open and would like to cycle through them with a keyboard shortcut, press Command+` (that's Command and the backtick /tilde key).
You can also press Command+Shift+` to cycle through them in the opposite direction. When you find the window you'd like in the foreground, just release the keys. Happy app switching!
Stack Exchange Network
Stack Exchange network consists of 183 Q&A communities including Stack Overflow , the largest, most trusted online community for developers to learn, share their knowledge, and build their careers.
Q&A for work
Connect and share knowledge within a single location that is structured and easy to search.
Hotkey for switching between tabs / window panes on a Mac
For example, in the Keyboard preferences window in System Preferences -> Keyboard, there's two tabs (or at least the equivalent for Windows) called Keyboard and Keyboard Shortcuts. Is there a hotkey to switch between these two ?
- keyboard-shortcuts
- You can tab to the bar and use the arrow keys to select the tab you want (hit space or wait a second and it will swap to it). Other than that, I have found OSX terribly lacking in keyboard shortcut possibilities. – Kevin Jun 20, 2013 at 3:05
- Better example, I'm in the Get Info window of a media file in iTunes, and I want to switch between 'Summary', 'Info', 'Video', 'Sorting', 'Options', 'Lyrics' and 'Artwork' with a keystroke. What do you call those things ? Because apparently there's a lot of ambiguity out there with the word 'Tabs' (I'm looking at you Lenwood) – Alex Marshall Jun 26, 2013 at 22:32
5 Answers 5
Here are a couple of shortcuts that may be helpful.
- Command + Tab = switch between applications
- Command + ~ = switch between windows of an application
- CTRL + Tab = move forward through tabs (in same window)
- CTRL + Shift + Tab = move backward through tabs (in same window)
- See my example above in the comments under the original question. None of the keys mentioned in this answer work for switching between tabs in an OS window (Ctrl+(Shift+)Tab will work in Chrome tabs, but not OS window tabs) – Alex Marshall Jun 26, 2013 at 22:33
- Wow, that's a really good question. I'm not sure there's a keyboard shortcut to navigate between those tabs/windows/panes. Here's a list of all OS X keyboard shortcuts , I tried all of the ones that I could think of & came up with nothing. I tried a few other searches as well. If you find the answer please post back, I'm kinda curious about this now, too. – Lenwood Jun 27, 2013 at 16:04
- God, I should have checked this before. – Sjors van Heuveln May 7, 2022 at 15:30
My personal favorite is to hold Command + Shift and then use [ to flip left through tabs and ] to flip right.
- 3 This is so much easier than CTRL + Tab and CTRL + Shift + Tab. Thanks! – Josh McKearin Nov 25, 2018 at 16:51
- 1 Unfortunately this only works if the cursor is not in a text area. – v3nt Feb 3, 2019 at 13:32
- 1 sure wish windows had this one – taxilian Nov 23, 2019 at 23:02
I finally found the answer. You have to hit Command + [number of desired tab]. e.g. Command+1 takes you to the first 'tab', Command+2 the second, etc etc.
- This is not always the case for every mac apps. Some apps support this behavior (e.g., Google Chrome and major browsers) but many other apps do not and they instead use these shortcut keys for UI layout options. – elquimista Nov 6, 2020 at 2:30
In Firefox on macOS:
- Ctrl + PageUp and Ctrl + PageDown to switch tabs, and PageUp can be simulated with Fn + Up ;
- Command + 1 for first tab, etc; and
- Command + 9 for last tab.
Option (or Alt) ⌥ + Command (or Cmd) ⌘ + (left or right) arrow key
for changing tabs in chrome in MacOS.
- Welcome to SuperUser! This is not what the author of the question wanted to do, please read the question and existing answers carefully before answering a question. You find help on how to write good answers here superuser.com/help/how-to-answer – DarkDiamond Jan 18, 2022 at 20:57
You must log in to answer this question.
Not the answer you're looking for browse other questions tagged macos mac keyboard-shortcuts ..
- The Overflow Blog
- How to train your dream machine
- You should keep a developer’s journal
- Featured on Meta
- Our Partnership with OpenAI
- What deliverables would you like to see out of a working group?
Hot Network Questions
- locale-aware trim functions for std::string
- Is it an error to read "Ozymandias" as performance art by Shelley?
- Conveying a mathematical joke
- Does Egypt have an obligation under international law to reopen the Rafah crossing, even if they don't like who's controlling the Gaza side of it?
- Set a limit on value change of a binary variable
- Easiest way to draw celestial sphere diagrams
- Chopin Nocturne in F minor Op. 55 No. 1 m.71 accidental and fingering
- Two balls bouncing up and down, unevenly help
- How do floating plants get their trace nutrients?
- How close will Pluto come to Earth this year (2024)?
- I want to know the tricks to search for and find old academic journals for free
- Unable to Signup omnistudio enabled developer org
- Is it an offence to photograph a seahorse?
- How do I complete Use Daily Adventure Incense to help catch 10 Pokemon quest in An Intruiging Incense Part 2?
- What should I do if I messed up my pre-thesis project and I just want to end it as soon as possible and switch a group for master thesis?
- How can I record pain during a ritual sacrifice in my fantasy world?
- Why have Norway, Ireland and Spain only now recognised the Palestinian state?
- Warning: this puzzle contains made-up words
- Why are ND filters used in moon photography
- Snap polyline to another polyline's vertices
- Dual British-Italian citizen, what passport should I use travelling to Italy on holiday?
- Why is time, when viewed objectively, in reverse from when it's viewed subjectively?
- RAW can a vorpal sword instakill Vecna on a 20
- Is it correct to put a section separator (double thin lines) in the middle of a measure?
The Safari Shortcuts Cheat Sheet for Mac
Mac users, make your browsing sessions a lot less work with these keyboard and link-based shortcuts for Safari.
Safari is one of the best browsers for Mac users and beats Chrome on many counts .
Have you decided to stick with this native macOS app for browsing? Then it's time to take your Safari experience a notch or two higher by adding a few choice shortcuts to your workflow. Take your pick from the shortcuts we've compiled in the cheat sheet below. (Using them all is even better!)
The cheat sheet contains several keyboard shortcuts as well as link-based shortcuts for handling tabs, bookmarks, webpage content, and more. These shortcuts can save you loads of time as you surf the web.
FREE DOWNLOAD: This cheat sheet is available as a downloadable PDF from our distribution partner, TradePub. You will have to complete a short form to access it for the first time only. Download The Safari Shortcuts Cheat Sheet for Mac .
Personalize Safari for a Better Workflow
Despite being less versatile than popular browsers like Chrome, Firefox, and Opera, Safari remains the top choice for Mac users thanks to its seamless integration with macOS.
To make the best of Safari, personalize it with our Safari customization guide , keep it in top shape with our tips for boosting browser speed and performance and of course, use the shortcuts we've listed above.
12 Safari keyboard shortcuts you should know
If you use Safari as your full-time browser on Mac, then you should learn some of the more important keyboard shortcuts to supercharge your workflow. In this post, we tell you about a dozen must-have Safari shortcuts to power up your browsing experience.

But first, a quick video walkthrough of the best keyboard shortcuts in Safari for Mac.
Without further ado, here are the best keyboard shortcuts for macOS Safari.
1. Quickly switch between open tabs
To quickly switch between Safari tabs using your keyboard, use Control + Tab or Control + Shift + Tab to navigate your open tabs forward and backward. You can also press Command + 1 to Command + 8 to quickly switch to a specific tab. If your open tabs don’t fit Safari’s tab bar , simply swipe left or right on any tab using your trackpad to reveal the ones outside window boundaries.
2. Instantly jump to the rightmost tab
To instantly jump to the rightmost open tab , press Command + 9 . This handy shortcut only works on Mac computers running macOS High Sierra 10.13.4 or newer. On older macOS editions, this shortcut takes you to the ninth Safari tab.
3. Close a tab
You can quickly close a Safari tab by pressing Command + W . To close all tabs except the currently active one , right-click or Control-click the one you’d like to keep and choose Close Other Tabs from a popup menu.
Alternatively, press the Option key and click the tab’s close symbol ( x ). This will keep this tab open and close all other open tabs!
4. Reopen recently closed tabs or windows
Have you ever closed a tab and instantly regretted doing so? No big deal! There are several shortcuts for bringing recently closed tabs . If your last action in Safari was closing a tab, use the standard undo shortcut Command + Z .
Otherwise, press Shift + Command + T or choose Reopen Last Closed Tab from Safari’s History menu.
You can use this shortcut (or the Undo action) repeatedly to reopen multiple closed tabs. To reopen a particular closed tab, select it from Safari’s History → Recently Closed sub-menu
Tip: To reopen any accidentally closed windows or tabs from your last browsing session, click Safari’s History menu and choose the option Reopen All Windows From Last Session .
5. Switch between windows
We know how to switch between tabs, but how do you quickly switch between windows in Safari? Just press Command + ` or Command + Shift + ` to switch windows in reverse.
6. Go back or forward
Let the trackpad and mouse rest. Use the Command + ] shortcut to advance to the next webpage and Command + [ to go back to the previous webpage in Safari on Mac.
7. Scroll a full-page
To scroll a full page at a time in Mac’s Safari, hold the Option key and press the Up or Down arrow key. You can also press the Space bar or the Shift + Space bar combination to scroll down or up a full page.
8. Jump to the top or bottom of the webpage
To instantly reach the very top or bottom of a webpage in Safari, hold the Command key on the keyboard while pressing the Up or Down arrow key.
9. Show or hide the favorites bar
Every little bit of real estate counts. To show or hide your Favorites bar in Mac’s Safari, press Command + Shift + B .
10. Open a private-browsing window
To quickly open a new private-browsing session in Safari on Mac, press Command + Shift + N .
Related: 4 quick ways to open Safari Private Tab on iPhone
11. Show or hide the sidebar
Want fast access to Safari’s Bookmarks, Reading List, and Shared links? Try pressing Command + Shift + L .
12. Jump straight to the URL bar
If you want to quickly access the Safari address bar to type in a URL or enter a search query, use Command + L .
Your favorite Safari shortcuts?
Of course, there are many more productivity-boosting keyboard shortcuts for Safari that you should familiarize yourself with, but these twelve basic ones should be incorporated into everyone’s repertoire from the get-go. Plus, with Safari open, when you click the menus in the menu bar, you’ll get to know about more keyboard shortcuts.
What’s your favorite Safari shortcut from our list?
You’ll also like:
- The ultimate list of Mac keyboard shortcuts
- 19 useful Mac startup keyboard shortcuts you should know
- How to view available keyboard shortcuts in every Mac app
Looks like no one’s replied in a while. To start the conversation again, simply ask a new question.
How to quickly switch between windows in Safari
MBP, Mac OS X (10.4.6), 15.4" 1GB
Posted on Jun 19, 2006 7:51 PM

Posted on Jun 19, 2006 8:24 PM
Loading page content
Page content loaded
Jun 19, 2006 8:24 PM in response to tglass6105
Jun 19, 2006 7:57 PM in response to tglass6105
Jun 19, 2006 8:03 PM in response to Tg20
Jun 19, 2006 8:06 PM in response to tglass6105
Jun 20, 2006 8:41 AM in response to tglass6105
Safari Extensions Worth Downloading - 1Blocker, Browser Note, Keyword Search iOS Today (Audio)
Listen on Apple Podcasts Requires subscription and macOS 11.4 or higher
In this episode of iOS Today, Mikah Sargent and Rosemary Orchard dive into the world of Safari extensions, discussing a variety of handy tools that can enhance your browsing experience on iPhone, iPad, and Mac. From content blockers to custom search engines, the duo explores the benefits and potential drawbacks of these powerful add-ons. Additionally, Rosemary tackles a Shortcuts Corner question about switching Apple Watch faces using Siri. Safari Extensions: Browser Note: A simple extension that allows you to stick virtual post-it notes on websites, reminding you of important information when you revisit the page. Keyword Search: An extension that enables custom search engines for various websites, allowing you to quickly search Amazon, DuckDuckGo, and even TWiT.tv right from Safari's address bar. 1Blocker: A powerful content blocker that prevents ads and trackers from loading on web pages, potentially speeding up your browsing experience and protecting your privacy. Redirect Web for Safari: An extension that lets you create custom redirect rules for websites, ensuring you always end up on the correct version of a site (e.g., old.reddit.com instead of www.reddit.com). PayPal Honey: A controversial but money-saving extension that automatically finds and applies coupons and deals as you shop online. Vinegar and Baking Soda: Two extensions that work together to improve your video watching experience by replacing the native video player controls on YouTube and other video sites with iOS's native controls. Opener: While not technically a Safari extension, this app allows you to choose which app opens when you click on a link, giving you more control over your browsing experience. Shortcuts Corner: Doug asks how to switch Apple Watch faces using Siri without having to confirm the action on his watch when his iPhone is locked. Rosemary walks through the process of ensuring the shortcut has the necessary permissions to run when the device is locked and troubleshoots potential issues Doug may be facing. If the "Allow Running When Locked" option is missing, Rosemary suggests resetting the shortcut's privacy settings or recreating the shortcut from scratch. Hosts: Mikah Sargent and Rosemary Orchard Want access to the video version and exclusive features? Become a member of Club TWiT today! https://twit.tv/clubtwit Club TWiT members can discuss this episode and leave feedback in the Club TWiT Discord. You can also contribute to iOS Today by sending an email to [email protected].
- Episode Website
- More Episodes
- This work is licensed under a Creative Commons License - Attribution-NonCommercial-NoDerivatives 4.0 International - http://creativecommons.org/licenses/by-nc-nd/4.0/
Top Podcasts In Technology
More by twit tv.
How to Use Inspect Element in Chrome, Safari, & Firefox
Published: May 20, 2024
When I started my coding journey, I couldn’t always pinpoint what made a web page great — all of the code underneath that craft a well-designed experience. So, I would use the inspect element on my browser to peel back the curtain. Here, I could see how pages were coded so I could understand how to recreate elements for my own projects.

The inspect element feature lets us view and even modify any website’s front end. This simple trick can help you understand how websites work and even help you build your own.
In this post, I’ll discuss what it means to “inspect” page elements and how to do so on three common web browsers. If you’re in a pinch, jump ahead to what you’re looking for.
Table of Contents
How to Inspect Elements in Chrome
How to inspect elements in safari, how to inspect elements in firefox, get a closer look with inspect, what does “inspect element” mean.
Inspect element is a feature of modern web browsers that enables anyone to view and edit a website’s source code, including its HTML, CSS, JavaScript, and media files. When the source code is modified with the inspect tool, the changes are shown live inside the browser window.
Inspect is a web professional’s scout team. Developers, designers, and marketers frequently use it to peek inside any website (including their own) to preview content and style changes, fix bugs, or learn how a particular website is built. For instance, if I find an intriguing interface on a competing website, the inspect element lets me see the HTML and CSS that make it up.
I also think of my browser’s inspect feature as a “sandbox” of sorts. I can play around with a web page as much as I want by changing content, colors, fonts, layouts, etc. When finished, I just refresh the page to revert everything to normal.
Inspect doesn’t change the website itself — only how it appears in your browser. You can then experiment without worry!
Inspect is also an incredibly valuable tool for those learning web development. Instead of viewing plain source code, I can use the inspect element to interact with the page and see how each line of code maps to an element or style.
By better understanding what constitutes the typical web page, I can communicate effectively with developers in the case of an error or if I want to make a change.
Inspect may be a “developer tool,” but you don’t need to write any code or install any additional software to use it. You can do everything I’ve described right inside your browser. Let’s learn how.
How to Inspect Elements
To inspect elements, you have to right-click any part of a web page and click Inspect > Inspect Element. Alternatively, you can press Command+Option+i on your Mac or F12 on your PC to do the same.
Every modern web browser has a native tool for inspecting elements. It can be accessed in any browser, but some browsers like Chrome and Safari have slight differences. Let’s discuss how to use the inspect tool in three desktop web browsers: Google Chrome, Apple’s Safari, and Mozilla Firefox.
Chrome comes with a handy developer tool that allows you to inspect individual elements. This allows you to see the code behind a web page and even edit it on your own browser. (Note that the changes are only visible to you, not to anyone else across the web.)
Here's how to get started.

Free Guide: 25 HTML & CSS Coding Hacks
Tangible tips and coding templates from experts to help you code better and faster.
- Coding to Convention
- Being Browser-Friendly
- Minimizing Bugs
- Optimizing Performance
You're all set!
Click this link to access this resource at any time.
1. Launch Chrome and navigate to the page you want to inspect.
To use the element inspector in Google Chrome, I first navigate to any web page. In these examples, I’ll be using HubSpot.com .
2. Open up the Inspect panel.
Once I arrive at my desired page, I have several ways to open Chrome's Inspect tool.
- Option 1 : I can right-click any part of the page and choose Inspect . Right-clicking a specific page element will open that element in the inspector view.
- Option 2 : In the top menu bar, I can select View > Developer > Developer Tools .
- Option 3: I can click the three-dot icon in the top right corner of the browser window. From there, I can choose More Tools > Developer Tools . Then, I can click the Inspect tab in the popup.
- Option 4 : I can use the shortcut control-shift-C on Windows or command-option-C on macOS.
3. Change the location of the inspect panel.
To better view the code, I can change the position of the inspector window.
The Chrome Developer Tools panel will open at the bottom of the browser window, but sometimes it opens in a separate window altogether.
If I want to change the location of the panel, I can click the three-dots icon in the top right corner of the panel (next to the X icon), and then choose my preferred dock position.
Pro tip: Choosing Dock to right makes it easier to view the rendered page and its source:

Along the top of the inspect panel, I see tabs for Elements , Console , Sources , etc. These are all tools I can use to assess a page’s contents and performance. However, everything I need to inspect is under the Elements tab.
4. Look at the source HTML code of the page.
The biggest area of the panel will contain the source HTML of the current page. I always spend some time exploring this region. Hovering the cursor over the piece of code highlights the corresponding element on the page.
Blue indicates the contents of an element, green corresponds to padding, and areas in orange are margins.
Pro tip: If you’re a beginner and want to learn more about the different elements you’re inspecting, check out this HTML guide for beginners.
5. Select a specific element to inspect.
Rather than trying to read through the code to find an element, I can also do the opposite. I can locate a piece of code by hovering over the page element itself. To do this, I click the Element select icon in the top left corner of the panel.

8. Edit the page's CSS code.
Moving down the Chrome inspect panel, I see the Styles tab. This shows me what CSS styling has been applied to the selected element. I can click on lines of code to rewrite them, or I can activate/deactivate certain declarations by checking/unchecking the boxes next to them. I’ll do this for my <h1> element’s font-weight property:
9. View the page's mobile version.
Finally, let’s cover one more feature of Chrome’s inspect feature: mobile view. When building a site, designers need to consider how its pages appear on desktop, mobile, and tablet screens alike.
Fortunately, Chrome lets me preview the same web page in multiple screen resolutions. Start by clicking the Toggle device icon in the top left corner of the panel:

Now, when I click a page element, the Web Inspector reveals the corresponding source code.
7. Edit, add, or delete page elements.
Like Chrome’s inspector, Safari lets me modify, add, and remove page elements. To edit the page, I can right-click an HTML element in the inspect panel. I can then choose an option from the Edit menu.
Web Inspector will prompt me for a new text input and then display my changes in real time:

If I want to delete a page element, I just select some code and delete it. Or, I can right-click and choose Toggle Visibility to hide an element without deleting it.
8. Activate or deactivate the page's CSS code.
To the right, I have the Styles column, where I can change or activate/deactivate CSS declarations for any element, like so:
When testing content and style changes, I want to see the effect on mobile screens as well as desktops. I’ll cover that next.
Pro tip: When seeking inspiration from other web pages, I always take advantage of the Styles tab in my browser’s developer tools to tailor the CSS according to how I envision it on my own page. Try it out. This allows you to refine and adapt design elements to suit your specific preference before moving forward with coding it in your own workspace.
Safari’s Responsive Design Mode allows me to preview a website across common devices.
To view the page in a mobile viewport, I choose Develop → Enter Responsive Design Mode . In this mode, I can use the same inspector tools on pages formatted for Apple devices or set the dimensions myself:

What I like: Safari’s responsive design tab not only lets you test your web page’s responsiveness on devices, but you can also test its behavior across different browsers. Serving as a one-stop-shop for testing responsiveness, the Safari dev tools are a huge time saver.
Firefox is another great option for inspecting a web page in either macOS, Windows, or Linux. Here’s how to get started.
1. Open Firefox's inspect element tool.
To open the Firefox Inspector, I have several options:
- Option 1: I can right-click any part of the page and choose Inspect Element . Right-clicking a specific page element will open that element in the inspector view.
- Option 2: I can select Tools → Browser Tools → Web Developer Tools from the top menu bar.
- Option 3: I can use the shortcut control-shift-I or press f12 in Windows or command-option-I in macOS.
Next, I go to the web page I’d like to inspect. I’ll be using HubSpot.com again.
3. Change the location of the inspector panel.
The Firefox inspector appears along the bottom of the window by default. To change its position, I can select the three-dots icon in the top right corner of the inspector, then choose an alternative display option.

4. Look at the HTML code of the page.
Firefox’s inspector panel is comparable in features to Chrome’s and Safari’s. The HTML source code indicates the corresponding page element with color codes — content is blue, padding is purple, and margins are yellow:
I can also find code by selecting elements on the page. To enter selection mode, I click the cursor icon in the top left corner:

I can then click any page element to reveal its source code in the inspect panel.
6. Modify or delete page elements.
To modify or delete a page element, I select its code in the inspector. Then, I can either double-click to change the text, right-click and choose Edit as HTML, or click Plus Button next to the “Search HTML” bar to add code. Or I can simply delete the code and see the resulting changes on the page.

7. Toggle the page's CSS styles.
To toggle the CSS styling of an element, I use the Filter Styles region at the bottom of the inspect panel. There, I can uncheck the box next to a CSS declaration to deactivate it (or write in new code myself):
8. View the page's mobile version.
Finally, Firefox’s tools also come with a mobile preview option. To use it, I can click the Responsive Design Mode icon in the top right corner of the panel:

Responsive Design Mode lets me choose from several preset screen resolutions or set my own. I can also toggle connection speed and device pixel ratio:

What I like: As a software developer, it is very important that I make web pages that can be easily used by anyone. Firefox’s accessibility tab in its inspector tool allows me to check if my nodes accessibility tree is missing any important properties. I can verify color contrasts too.
The quickest way to access this feature is by right clicking on the page → choose Inspect → select the two arrows next to debugger → select Accessibility .
Once you learn the basics of your browser’s inspect tool, you might realize just how much information about your favorite websites is publicly available. With a few clicks, you can explore how exactly web pages are built, what styles they use, how they optimize for search engines, how they format on mobile screens, and a lot more.
Editor's note: This article was originally published in December 2020 and has been updated for comprehensiveness.

Don't forget to share this post!
Related articles.

The Beginner's Guide to Website Development

Are .io Domains Good? Why Tech Startups Love .io Domains

15 Backend Project Ideas for Your Developer Portfolio

37 Backend Interview Questions and Answers: The Ultimate Guide 2022
![How to Build & Run an Effective Website With a Small Team or Budget [Startup Tips]](https://blog.hubspot.com/hubfs/website-on-a-budget.jpg "switch safari windows mac shortcut")
How to Build & Run an Effective Website With a Small Team or Budget [Startup Tips]

How to Code a Website for Free in 6 Easy Steps

How Long Does it Take to Build a Website?

Flush DNS: What It Is & How to Easily Clear DNS Cache
![How to Make a Website With User Accounts and Profiles [With WordPress, Wix, and More]](https://blog.hubspot.com/hubfs/how-to-create-user-accounts-and-profiles.jpeg "switch safari windows mac shortcut")
How to Make a Website With User Accounts and Profiles [With WordPress, Wix, and More]

Wildcard SSL Certificates: What They Are & How They Work
CMS Hub is flexible for marketers, powerful for developers, and gives customers a personalized, secure experience
- Services & Software
Make Google Look Like 1998 Again: How to Get Just Links in Search Results
A new Google Search filter makes it simple.

The Google search engine first launched in 1998.
Google Search's new AI Overviews are a landmark change for the leading search engine. The top result for many Google searches now will be a summary of what you're searching for, composed by Gemini AI .

Not all users are thrilled by the new AI Overviews though, especially those who are searching for links, not answers to questions. Luckily, a new "Web" search filter gives you exactly that -- nothing but text-based links. No ads, no AI, no images, no videos.
Even better, you can get those link-based results on Google just by searching with your browser address bar. We'll show you how to do it on Google Chrome, Mozilla Firefox, Apple Safari or Microsoft Edge.
What is the Google Search Web filter?
Google's new Web filter is similar to its filters for results like News, Images, Videos or Shopping. When the Web filter is selected, your search results will return only text-based links, with no advertisements, AI summaries or knowledge panels like "Top Stories" or "People Always Ask."
The new filter should appear below the search box on the Google Search results page, among other filters like News, Images and Videos. You'll usually have to click the three-dot "More" menu to see it as an option.

The Web filter for Google Search will usually be placed in the menu for More filters underneath the search box.
Clicking the Web filter link will give you Google Search results composed entirely of text-based links, with no answers, ads, AI or anything else. "Web" will now be underlined and highlighted in blue under the search query box.
As with AI Overviews, we're currently only seeing the Web filter on the Chrome browser when logged into our Google accounts, but it seems to show up on other browsers regardless of logged-in status.

Google's Web filter removes snippets and other knowledge panels from your results.
How do I get Google Search Web filter results for my address-bar searches?
Depending on your browser, it's fairly easy to customize your browser settings so that your address-bar searches go straight to the Google Web filter results. You'll need to create a custom site search shortcut in your browser and then trigger that search option with a keyword or make it your default for all searches.
The critical URL that you need to remember is https://www.google.com/search?q=%s&udm=14 . The "%s" represents your search query, and the "udm=14" tag limits your results to the new Web filter.
Here's how to add the necessary custom site search for Google's Web filter in the four most popular web desktop browsers -- Google Chrome, Microsoft Edge, Mozilla Firefox and Apple Safari.
Google Chrome
Open up a Google Chrome browser window, then click on the three-dot menu in the upper-right corner, next to your Google account profile. Click Settings near the bottom of that menu. You can also get to your Chrome settings by entering chrome://settings in the browser address bar.
Select Search engine from the left-hand column, then click "Manage search engines and site search" in the middle of the browser window. Next, scroll down to "Site search" and click the blue Add button.
In the resultant pop-up window, create a name for the new search shortcut and a keyword for triggering it. We chose "Old Google" and "og." For the last field -- "URL with %s in place of query" -- enter that URL we mentioned above: https://www.google.com/search?q=%s&udm=14 . Then click the blue Add button.
Now when you search your address bar using "og" + your search term, you'll get results using Google's Web filter.
If you'd like to make it your default search option, click the three-dot menu next to your new site search and select "Make default." After you make the new search shortcut your default search, all of your address-bar searches will use the Web filter -- no keyword needed.

After you create the site search shortcut for Google's Web filter, you can make it your default search engine.
Microsoft Edge
The Windows browser is based on the Chromium codebase, so the steps for adding a Google Search Web filter shortcut are similar to Google Chrome. Navigate into Settings by clicking the three-dot menu in the upper-right corner, then select Privacy, search, and services .
Near the bottom of the following screen, select Address bar and search , then Manage search engines . Alternatively, you can navigate directly to that screen by entering edge://settings/searchEngines in your Edge address bar.
Click the Add button to create your new site search shortcut. The Search engine is your name for the shortcut (I used "Old Google"), the Shortcut is the term that triggers that specific site search (I used "og"), and the URL template is the string that triggers the Google Search Web filter: https://www.google.com/search?q=%s&udm=14 .

Search engines in Microsoft Edge work very similarly to Google Chrome.
To make that new Google URL your default search, go back to the Address bar and search settings page and click on the drop-down menu next to Search engine used in the address bar . Select your new custom site search, and your address-bar searches will default to the Google Search Web filter.
Mozilla Firefox
Firefox works a little bit differently for setting up search shortcuts. Instead of using the search settings, you'll create a new bookmark with a keyword shortcut, then use that keyword in the address bar to trigger the Web filter results for Google Search. Unfortunately, Firefox doesn't let you add new search engines in its desktop version.
From the Bookmarks drop-down in Firefox, select Manage Bookmarks . On the following screen, right-click on the folder in your Bookmarks where you'd like to place the shortcut, then select "Add Bookmark." (Since you'll be triggering it from the address bar, it doesn't matter where the bookmark lives.)
In the following pop-up window, enter a Name (for example, "Old Google"), the URL https://www.google.com/search?q=%s&udm=14 and a Keyword (such as "og") to save the search filter as a bookmark. Hit the "Save" button, and the Google Web filter results will be available by entering your keyword before any address-bar searches.

To search Google's Web filter with Mozilla Firefox, you'll need to use a bookmark with a keyword shortcut.
Apple Safari
Safari doesn't enable custom site shortcuts by default. In fact, the only way we were able to add the Google Web filter search was by installing the free Safari extension Smart Keyword Search , which enables site search shortcuts.
After installing Smart Keyword Search, the first thing you'll need to do is enable it to adjust your Google search results. Go into Settings , click Extensions at the top of the window, select Smart Keyword Search , then click on the "Edit Websites" button. On the following page, click the drop-down menu next to google.com and select "Allow."

You'll need to allow the Smart Keyword Search extension the permission to adjust Google searches.
Now close the Settings window, and click the icon for Smart Keyword Search that appears next to the Safari address bar. You'll see a pop-up window with the various "rules" the extension uses to modify searches. Click the "compose" button to start a new rule, then enter a name (such as. "Old Google"), prefix (for example, "og") and a familiar URL for the Web filter search shortcut.

The Smart Keyword Search extension for Safari uses slightly different syntax.
Smart Keyword Search uses the variable "{search}" instead of "%s" to indicate a search query, so you'll need to enter a slightly different URL: https://google.com/search?q={search}&utm=14 . Hit the "submit" button. Now entering "og" (or your selected prefix) before any searches in your address bar will return results restricted by Google's Web filter.
How to restrict your Google Web searches to 'verbatim' results
You can further customize your searches on Google so that the search engine only returns results based on the exact terms that you use -- not synonyms or related terms. The "verbatim" option was introduced back in 2011 and is usually accessed via the "Tools" link under most Google searches.
To add a "verbatim" restriction to your Web filter shortcut, append the attribute "&tbs=li:1" to the end of your custom search URL: https://www.google.com/search?q=%s&udm=14&tbs=li:1
Any searches that you make using that new URL will now only return text-based web links for your exact search queries.
For more, discover how to use Google's circle-to-search feature on the iPhone and five Google Assistant settings you need to change right now .
Editors' note: CNET used an AI engine to help create several dozen stories, which are labeled accordingly. The note you're reading is attached to articles that deal substantively with the topic of AI but are created entirely by our expert editors and writers. For more, see our AI policy .

Make Google Look Like 1998 Again: How to Get Just Links in Search Results
Google Search's new AI Overviews are a landmark change for the leading search engine. The top result for many Google searches now will be a summary of what you're searching for, composed by Gemini AI .
Not all users are thrilled by the new AI Overviews , especially those who are searching for links, not answers to questions. Luckily, a new "Web" search filter gives you exactly that: nothing but text-based links; no ads, no AI, no images and no videos.
Even better, you can get those link-based results on Google just by searching with your browser address bar. We'll show you how to do it on Google Chrome, Mozilla Firefox, Apple Safari or Microsoft Edge.
What is the Google Search Web filter?
Google's new Web filter is similar to its filters for results like News, Images, Videos or Shopping. When the Web filter is selected, your search results will return only text-based links, with no advertisements, AI summaries or knowledge panels like "Top Stories" or "People Always Ask."
The new filter should appear below the search box on the Google Search results page, among other filters like News, Images and Videos. You'll usually have to click the three-dot "More" menu to see it as an option.
Clicking the Web filter link will give you Google Search results composed entirely of text-based links, with no answers, ads, AI or anything else. "Web" will now be underlined and highlighted in blue under the search query box.
As with AI Overviews, we're currently only seeing the Web filter on the Chrome browser when logged into our Google accounts, but it seems to show up on other browsers regardless of logged-in status.
How do I get Google Search Web filter results for my address bar searches?
Depending on your browser, it's fairly easy to customize your browser settings so that your address bar searches go straight to the Google Web filter results. You'll need to create a custom site search shortcut in your browser and then trigger that search option with a keyword or make it your default for all searches.
The critical URL that you need to remember is https://www.google.com/search?q=%s&udm=14 . The "%s" represents your search query, and the "udm=14" tag limits your results to the new Web filter.
Here's how to add the necessary custom site search for Google's Web filter in the four most popular web desktop browsers -- Google Chrome, Microsoft Edge, Mozilla Firefox and Apple Safari.
Google Chrome
Open up a Google Chrome browser window, then click on the three-dot menu in the upper-right corner, next to your Google account profile. Click Settings near the bottom of that menu. You can also get to your Chrome settings by entering chrome://settings in the browser address bar.
Select Search engine from the left-hand column, then click "Manage search engines and site search" in the middle of the browser window. Next, scroll down to "Site search" and click the blue Add button.
In the resultant pop-up window, create a name for the new search shortcut and a keyword for triggering it. We chose "Old Google" and "og." For the last field -- "URL with %s in place of query" -- enter that URL we mentioned above: https://www.google.com/search?q=%s&udm=14 . Then click the blue Add button.
Now when you search your address bar using "og" + your search term, you'll get results using Google's Web filter.
If you'd like to make it your default search option, click the three-dot menu next to your new site search and select "Make default." After you make the new search shortcut your default search, all of your address-bar searches will use the Web filter -- no keyword needed.
Microsoft Edge
The Windows browser is based on the Chromium codebase, so the steps for adding a Google Search Web filter shortcut are similar to Google Chrome. Navigate into Settings by clicking the three-dot menu in the upper-right corner, then select Privacy, search, and services .
Near the bottom of the following screen, select Address bar and search , then Manage search engines . Alternatively, you can navigate directly to that screen by entering edge://settings/searchEngines in your Edge address bar.
Click the Add button to create your new site search shortcut. The Search engine is your name for the shortcut (I used "Old Google"), the Shortcut is the term that triggers that specific site search (I used "og"), and the URL template is the string that triggers the Google Search Web filter: https://www.google.com/search?q=%s&udm=14 .
To make that new Google URL your default search, go back to the Address bar and search settings page and click on the drop-down menu next to Search engine used in the address bar . Select your new custom site search, and your address bar searches will default to the Google Search Web filter.
Mozilla Firefox
Firefox works a little bit differently for setting up search shortcuts. Instead of using the search settings, you'll create a new bookmark with a keyword shortcut, then use that keyword in the address bar to trigger the Web filter results for Google Search. Unfortunately, Firefox doesn't let you add new search engines in its desktop version.
From the Bookmarks drop-down in Firefox, select Manage Bookmarks . On the following screen, right-click on the folder in your Bookmarks where you'd like to place the shortcut, then select "Add Bookmark." (Since you'll be triggering it from the address bar, it doesn't matter where the bookmark lives.)
In the following pop-up window, enter a Name (for example, "Old Google"), the URL https://www.google.com/search?q=%s&udm=14 and a Keyword (such as "og") to save the search filter as a bookmark. Hit the "Save" button, and the Google Web filter results will be available by entering your keyword before any address-bar searches.
Apple Safari
Safari doesn't enable custom site shortcuts by default. The only way we were able to add the Google Web filter search was by installing the free Safari extension Smart Keyword Search , which enables site search shortcuts.
After installing Smart Keyword Search, the first thing you'll need to do is enable it to adjust your Google search results. Go into Settings , click Extensions at the top of the window, select Smart Keyword Search , then click on the "Edit Websites" button. On the following page, click the drop-down menu next to google.com and select "Allow."
Now close the Settings window, and click the icon for Smart Keyword Search that appears next to the Safari address bar. You'll see a pop-up window with the various "rules" the extension uses to modify searches. Click the "compose" button to start a new rule, then enter a name (such as. "Old Google"), prefix (for example, "og") and a familiar URL for the Web filter search shortcut.
Smart Keyword Search uses the variable "{search}" instead of "%s" to indicate a search query, so you'll need to enter a slightly different URL: https://google.com/search?q={search}&utm=14 . Hit the "submit" button. Now entering "og" (or your selected prefix) before any searches in your address bar will return results restricted by Google's Web filter.
How to restrict your Google Web searches to 'verbatim' results
You can further customize your searches on Google so that the search engine only returns results based on the exact terms that you use -- not synonyms or related terms. The "verbatim" option was introduced back in 2011 and is usually accessed via the "Tools" link under most Google searches.
To add a "verbatim" restriction to your Web filter shortcut, append the attribute "&tbs=li:1" to the end of your custom search URL: https://www.google.com/search?q=%s&udm=14&tbs=li:1
Any searches that you make using that new URL will now only return text-based web links for your exact search queries.
For more, discover how to use Google's circle-to-search feature on the iPhone and five Google Assistant settings you need to change right now .
Editors' note: CNET used an AI engine to help create several dozen stories, which are labeled accordingly. The note you're reading is attached to articles that deal substantively with the topic of AI but are created entirely by our expert editors and writers. For more, see our AI policy .

- Helldivers 2
- Dragon’s Dogma 2
- Genshin Impact
- Counter Strike 2
- Honkai Star Rail
- Lego Fortnite
- Stardew Valley
- NYT Strands
- NYT Connections
- Apple Watch
- Crunchyroll
- Prime Video
- Jujutsu Kaisen
- Demon Slayer
- Chainsaw Man
- Solo Leveling
- Beebom Gadgets
All macOS Versions in Order Until 2024
- With the launch of Mac OS X Public Beta, Apple launched the first member of the macOS family in 2000.
- In 2024, macOS 14 Sonoma is the latest macOS version available.
- Launched in October 2021, macOS 12 Monterey is the oldest macOS still supported.
All macOS Versions List
Complete macos version history, 1. mac os x 10.0 (cheetah).
That said, there were some challenges too. One of the major issues was slow performance. As a result, Apple shifted its focus to performance with the next release.

2. Mac OS X 10.1 (Puma)

3. Mac OS X 10.2 (Jaguar)

4. Mac OS X 10.3 (Panther)
- Xcode developer tools
- Updated Finder interface
- Fax support
- Faster user switching
- Built-in X11 support
- iChat AV video-conferencing software

5. Mac OS X 10.4 (Tiger)
Rolled out on April 29, 2005, Mac OS X Tiger was a pretty big update that delivered more than 200 features and improvements. During this time, Apple also switched to Intel processors. So, Tiger was the first operating system on Intel-based Macs. Apple described Mac OS X 10.4 as the “world’s most advanced operating system”.
- Dictionary and thesaurus
- Enhanced Japanese fonts
- Improved syncing features

6. Mac OS X 10.5 (Leopard)
- Spotlight enhancements
- Support for 64-bit apps
- Time Machine
- Improved Automator
- Improved 3D dock
- Objective-C 2.0 runtime

7. Mac OS X 10.6 (Snow Leopard)

8. Mac OS X 10.7 (Lion)
Released on July 20, 2011, Mac OS X Lion brought several useful enhancements from iOS to Mac, including launchpad, multi-touch gestures, and more. Introduced at $19.99, Apple sold $1 million in sales on the first day of the Mac OS X Lion release. Back then, many users criticized Mac OS X 10.7 for “natural scrolling,” which moved the content up when you scroll down. At that time, the users wanted the content to move down when they scroll down. That’s what Windows did.

9. OS X 10.8 (Mountain Lion)

10. OS X 10.9 (Mavericks)

11. OS X 10.10 (Yosemite)
- Ability to take iPhone calls from desktop
- Darker night theme
- Instant hotspot
- “Today view” in Notifications centre

12. OS X 10.11 (El Capitan)

13. macOS 10.12 (Sierra)
Arrived on September 20, 2016, macOS Sierra brought some other iOS perks like unlocking Mac with an Apple Watch. The thirteenth major software release of Apple’s desktop also brought the following notable features on Macs:
- Picture-in-Picture support for Safari and iTunes
- Safari-inspired tags
- Optimized storage feature
- Rich media support in Messages

14. macOS 10.13 (High Sierra)

15. macOS 10.14 (Mojave)

16. macOS 10.15 (Catalina)

17. macOS 11 (Big Sur)

18. macOS 12 (Monterey)
On October 25, 2021, macOS Monterey replaced Big Sur and brought several significant features like SharePlay, Live Text, redesigned Safari with tab groups, Shortcuts app, Quick note feature, and Focus modes. In addition to this, Monterey added Universal Control that allows a seamless transition between macOS and iOS devices. For instance, you can move the pointer between your Mac and iPad.

19. macOS 13 (Ventura)

20. macOS 14 (Sonoma)

Upcoming macOS Version
How to check macos version on your mac.
You can always check the current macOS version is installed on your Mac. Here’s what you need to do:
- On your Mac, click on the Apple menu icon from the top left corner of the screen,
- Select “About This Mac” .

- This should bring up a small window displaying your Mac’s model, Serial number, current macOS version, and other information.

Kanika Gogia
Kanika has been a loyal iPhone user since 2014 and loves everything Apple. With a Master’s in Computer Applications, passion for technology, and over five years of experience in writing, she landed at Beebom as an Apple Ecosystem Writer. She specializes in writing How To’s, troubleshooting guides, App features, and roundups for Apple users to help them make the best use of their gadgets. When not writing, she loves to try out new recipes and enjoy some family time.
Add new comment

Mac : raccourcis clavier
Les raccourcis clavier vous permettent d’effectuer des actions spécifiques, en recourant à des combinaisons de touches plutôt qu’à votre souris, trackpad ou autre périphérique d’entrée.
Utilisation des raccourcis clavier
Couper, copier, coller et autres raccourcis courants, mise en veille, fermeture de session et arrêt de l’ordinateur, raccourcis système et du finder, raccourcis utilisables au sein de documents, raccourcis d’accessibilité, autres raccourcis.
En savoir plus
Pour utiliser un raccourci clavier, appuyez longuement sur une ou plusieurs touches de modification, puis sur la dernière touche du raccourci. Par exemple, pour utiliser Commande + C (copier), maintenez la touche Commande enfoncée, appuyez ensuite sur la touche C, puis relâchez les deux touches. Dans les menus et sur le clavier des ordinateurs Mac, les touches, notamment les touches de modification, sont souvent représentées par des symboles :
Commande (ou Cmd) ⌘
Option (ou Alt) ⌥
Contrôle (ou Ctrl) ⌃
Verrouillage majuscule ⇪
Sur un clavier conçu pour un PC Windows, la touche Alt remplit le même rôle que la touche Option, et la touche Ctrl ou le logo Windows fonctionnent comme la touche Commande.
Commande + X : couper l’élément sélectionné et en enregistrer une copie dans le presse-papiers.
Commande + C : copier l’élément sélectionné dans le presse-papiers. Ce raccourci peut également être utilisé avec les fichiers du Finder.
Commande + V : coller le contenu du presse-papiers dans le document ou l’app en cours. Ce raccourci peut également être utilisé avec les fichiers du Finder.
Commande + Z : annuler la commande précédente. Vous pouvez ensuite appuyer sur Maj + Commande + Z pour rétablir la commande venant d’être annulée. Certaines apps permettent de réaliser plusieurs opérations de ce type (Annuler/Rétablir) à la suite.
Commande + A : sélectionner tous les éléments.
Commande + F : rechercher des éléments dans un document ou ouvrir une fenêtre Rechercher.
Commande + G : trouver à nouveau, autrement dit trouver la prochaine occurrence de l’élément précédemment trouvé. Pour trouver l’occurrence précédente, appuyez sur Maj + Commande + G.
Commande + H : masquer les fenêtres de l’app ouverte au premier plan. Pour masquer les fenêtres de toutes les apps ouvertes, hormis celles de l’app au premier plan, appuyez sur Commande + Option + H.
Commande + M : minimiser, autrement dit placer la fenêtre active dans le Dock. Pour minimiser toutes les fenêtres de l’app ouverte au premier plan, appuyez sur Commande + Option + M.
Commande + O : ouvrir l’élément sélectionné ou afficher une boîte de dialogue permettant de choisir un fichier à ouvrir.
Commande + P : imprimer le document actif.
Commande + S : enregistrer le document actif.
Commande + T : ouvrir un nouvel onglet.
Commande + W : fermer la fenêtre ouverte au premier plan. Pour fermer toutes les fenêtres de l’app, appuyez sur Option + Commande + W.
Option + Commande + Échap : forcer la fermeture d’une app.
Commande + Barre d’espace : afficher ou masquer le champ de recherche Spotlight . Pour lancer une recherche Spotlight depuis une fenêtre du Finder, appuyez sur Commande + Option + Barre d’espace. (Si vous écrivez dans différentes langues à l’aide de plusieurs sources de saisie , ces raccourcis vous permettent de basculer d’une source à une autre au lieu d’afficher Spotlight. Découvrez comment modifier un raccourci clavier présentant un conflit .)
Contrôle + Commande + Barre d’espace : afficher le visualiseur de caractères, à partir duquel vous pouvez choisir des Emoji et d’autres symboles .
Contrôle + Commande + F : utiliser l’app en plein écran, si cette dernière le permet.
Barre d’espace : utiliser la fonctionnalité Coup d’œil pour obtenir un aperçu de l’élément sélectionné.
Commande + Tab : passer à l’app ouverte suivante la plus récemment utilisée.
Commande + Accent grave (`) : basculer entre les fenêtres de l’app en cours d’utilisation. (Le caractère sur la deuxième touche varie selon le clavier. Il s’agit en général de la touche située au-dessus de la touche de tabulation et à gauche du chiffre 1.)
Maj + Commande + 5 : effectuer une capture d’écran ou procéder à l’enregistrement de l’écran sous macOS Mojave ou version ultérieure . Vous pouvez également appuyer sur les touches Maj + Commande + 3 ou Maj + Commande + 4 pour prendre des captures d’écran. Obtenez des informations supplémentaires sur les captures d’écran .
Maj + Commande + N : créer un nouveau dossier dans le Finder.
Commande + Virgule (,) : ouvrir les préférences de l’app active.
Vous pouvez avoir besoin d’appuyer et de garder les touches de certains de ces raccourcis enfoncées un peu plus longtemps que pour les autres. Cela vous évite de les utiliser involontairement.
Bouton d’alimentation : mettre votre Mac sous tension ou le sortir du mode veille. Maintenez la touche enfoncée pendant 1,5 seconde pour mettre votre Mac en mode veille*. Maintenez la pression pour forcer votre Mac à s’éteindre.
Contrôle + Commande + Bouton d’alimentation * : forcer le redémarrage de votre Mac, sans être invité à enregistrer les documents ouverts et non enregistrés.
Contrôle + Commande + Q : verrouiller immédiatement l’écran.
Maj + Commande + Q : se déconnecter de votre compte utilisateur macOS. Vous serez invité à confirmer. Pour vous déconnecter immédiatement sans confirmer, appuyez sur Option + Maj + Commande + Q.
* Ne s’applique pas au capteur Touch ID .
Commande + D : dupliquer les fichiers sélectionnés.
Commande + E : éjecter le disque ou le volume sélectionné.
Commande + F : lancer une recherche Spotlight dans la fenêtre du Finder.
Commande + I : afficher la fenêtre Lire les informations pour un fichier sélectionné.
Commande + R : (1) afficher le fichier d’origine d’un alias sélectionné dans le Finder. (2) actualiser ou recharger la page dans certaines apps telles que Calendrier ou Safari ; (3) Dans Mise à jour de logiciels, recherchez à nouveau d’éventuelles mises à jour de logiciels.
Maj + Commande + C : ouvrir la fenêtre Ordinateur.
Maj + Commande + D : ouvrir le dossier Bureau.
Maj + Commande + F : ouvrir la fenêtre Récents, qui affiche tous les fichiers que vous avez consultés ou modifiés récemment.
Maj + Commande + G : ouvrir une fenêtre Aller au dossier.
Maj + Commande + H : ouvrir le dossier de départ du compte utilisateur macOS actuellement connecté.
Maj + Commande + I : ouvrir iCloud Drive.
Maj + Commande + K : ouvrir la fenêtre Réseau.
Option + Commande + L : ouvrir le dossier Téléchargements.
Maj + Commande + N : créer un dossier.
Maj + Commande + O : ouvrir le dossier Documents.
Ma + Commande + P : afficher ou masquer la sous-fenêtre d’aperçu dans les fenêtres du Finder.
Maj + Commande + R : ouvrir la fenêtre AirDrop.
Maj + Commande + T : afficher ou masquer la barre d’onglets dans les fenêtres du Finder.
Contrôle + Maj + Commande + T : ajouter au Dock un élément sélectionné dans le Finder (OS X Mavericks ou version ultérieure).
Maj + Commande + U : ouvrir le dossier Utilitaires.
Option + Commande + D : afficher ou masquer le Dock.
Contrôle + Commande + T : ajouter l’élément sélectionné à la barre latérale (OS X Mavericks ou version ultérieure).
Option + Commande + P : afficher ou masquer la barre de chemin d’accès des fenêtres du Finder.
Option + Commande + S : afficher ou masquer la barre latérale des fenêtres du Finder.
Commande + Slash (/) : afficher ou masquer la barre d’état des fenêtres du Finder.
Commande + J : afficher les options d’affichage.
Commande + K : ouvrir la fenêtre Se connecter au serveur.
Contrôle + Commande + A : créer un alias de l’élément sélectionné.
Commande + N : ouvrir une nouvelle fenêtre dans le Finder.
Option + Commande + N : créer un nouveau dossier intelligent.
Commande + T : afficher ou masquer la barre d’onglets lorsqu’un seul onglet est ouvert dans la fenêtre de Finder active.
Option + Commande + T : afficher ou masquer la barre d’outils lorsqu’un seul onglet est ouvert dans la fenêtre de Finder active.
Option + Commande + V : déplacer les fichiers enregistrés dans le presse-papiers de leur emplacement d’origine vers l’emplacement actuel.
Commande + Y : utiliser Coup d’œil pour avoir un aperçu des fichiers sélectionnés.
Option + Commande + Y : afficher sous forme de diaporama Coup d’œil un aperçu des fichiers sélectionnés.
Commande + 1 : afficher les éléments de la fenêtre du Finder sous forme d’icônes.
Commande + 2 : afficher les éléments d’une fenêtre du Finder sous forme de liste.
Commande + 3 : afficher les éléments d’une fenêtre du Finder sous forme de colonnes.
Commande + 4 : afficher les éléments d’une fenêtre du Finder sous forme de galerie.
Commande + Crochet gauche ([) : aller dans le dossier précédent.
Commande + Crochet droit (]) : aller dans le dossier suivant.
Commande + Flèche vers le haut : ouvrir le dossier dans lequel se trouve le dossier actuel.
Commande + Contrôle + Flèche vers le haut : ouvrir, dans une nouvelle fenêtre, le dossier dans lequel se trouve le dossier actuel.
Commande + Flèche vers le bas : ouvrir l’élément sélectionné.
Flèche vers la droite : ouvrir le dossier sélectionné (uniquement dans la présentation par liste).
Flèche vers la gauche : fermer le dossier sélectionné (uniquement dans la présentation par liste).
Commande + Supprimer : placer l’élément sélectionné dans la corbeille.
Maj + Commande + Supprimer : vider la corbeille.
Option + Maj + Commande + Supprimer : vider la corbeille sans afficher de boîte de dialogue de confirmation.
Commande + Diminuer la luminosité : activer ou désactiver la recopie vidéo lorsque le Mac est connecté à plusieurs écrans.
Option + Augmenter la luminosité : ouvrir les préférences Moniteurs (vous pouvez également utiliser le raccourci Option + Diminuer la luminosité).
Contrôle + Augmenter la luminosité ou Contrôle + Diminuer la luminosité : modifier la luminosité de votre écran externe, si votre écran le permet.
Option + Maj + Augmenter la luminosité ou Option + Maj + Diminuer la luminosité : ajuster la luminosité de l’écran au par palier. Ajoutez la touche Contrôle à ce raccourci pour effectuer le réglage sur votre écran externe, si pris en charge par votre écran.
Option + Mission Control : ouvrir les préférences de Mission Control.
Commande + Mission Control : afficher le Bureau.
Contrôle + Flèche vers le bas : afficher toutes les fenêtres de l’app au premier plan.
Option + Augmenter le volume : ouvrir les préférences Son (vous pouvez également utiliser le raccourci Option + Diminuer le volume).
Option + Maj + Augmenter le volume ou Option + Maj + Diminuer le volume : ajuster le volume sonore par palier.
Option + Augmenter la luminosité (Touche du clavier) : ouvrir les préférences Clavier. Vous pouvez également utiliser le raccourci Option + Diminuer la luminosité (Touche du clavier).
Option + Maj + Augmenter la luminosité (Touche du clavier) ou Option + Maj + Diminuer la luminosité (Touche du clavier) : ajuster la luminosité du clavier par palier.
Option + Double-clic : ouvrir l’élément dans une nouvelle fenêtre, puis fermer la fenêtre d’origine.
Commande + Double-clic : ouvrir un dossier dans un onglet ou une fenêtre distincte.
Touche Commande lorsque vous faites glisser un élément vers un autre volume : déplacer l’élément déplacé sur l’autre volume au lieu de le copier.
Touche Option lorsque vous faites glisser un élément : copier l’élément déplacé (l’icône du curseur change lors de ce processus).
Option + Commande lorsque vous faites glisser un élément : créer un alias de l’élément déplacé (l’icône du curseur change lors de ce processus).
Cliquer sur un triangle d’expansion tout en appuyant sur la touche Option : ouvrir tous les dossiers du dossier sélectionné (uniquement dans la présentation par liste).
Cliquer sur le titre d’une fenêtre tout en appuyant sur la touche Commande : voir les dossiers qui contiennent le dossier actuel.
Découvrez comment utiliser Commande ou Maj pour sélectionner plusieurs éléments dans le Finder .
Cliquez sur le menu Aller dans la barre de menus du Finder pour afficher les raccourcis permettant d’ouvrir de nombreux dossiers couramment utilisés, tels qu’Applications, Documents, Téléchargements, Utilitaires et iCloud Drive.
Le comportement de ces raccourcis peut varier selon l’app que vous utilisez.
Commande + B : mettre en gras le texte sélectionné ou activer/désactiver l’écriture en gras.
Commande + I : mettre en italique le texte sélectionné ou activer/désactiver l’écriture en italique.
Commande + K : ajouter un lien web.
Commande + U : souligner le texte sélectionné ou activer/désactiver le soulignement.
Commande + T : afficher ou masquer la fenêtre Polices.
Commande + D : sélectionner le dossier Bureau dans la boîte de dialogue Ouvrir ou Enregistrer.
Contrôle + Commande + D : afficher ou masquer la définition du mot sélectionné.
Maj + Commande + Deux-points (:) : afficher la fenêtre Orthographe et grammaire.
Commande + Point-virgule (;) : rechercher les mots mal orthographiés dans le document.
Option + Supprimer : supprimer le mot situé à gauche du point d’insertion.
Contrôle + H : supprimer le caractère situé à gauche du point d’insertion (vous pouvez également utiliser la touche Suppr).
Contrôle + D : supprimer le caractère situé à droite du point d’insertion (vous pouvez également utiliser les touches Fn + Suppr).
Fn + Suppr : supprimer le caractère situé à droite du curseur, sur les claviers ne disposant pas de la touche Suppression vers l’avant (vous pouvez également utiliser les touches Contrôle + D).
Contrôle + K : supprimer le texte qui se trouve entre le point d’insertion et la fin de la ligne ou du paragraphe.
Fn + Flèche vers le haut : page précédente, autrement dit faire défiler d’une page vers le haut.
Fn + Flèche vers le bas : page suivante, autrement dit faire défiler d’une page vers le bas.
Fn + Flèche vers la gauche : départ, autrement dit accéder au début d’un document.
Fn + Flèche vers la droite : fin, autrement dit accéder à la fin d’un document.
Commande + Flèche vers le haut : déplacer le point d’insertion vers le début du document.
Commande + Flèche vers le bas : déplacer le point d’insertion à la fin du document.
Commande + Flèche vers la gauche : déplacer le point d’insertion vers le début de la ligne actuelle.
Commande + Flèche vers la droite : déplacer le point d’insertion vers la fin de la ligne actuelle.
Option + Flèche vers la gauche : déplacer le point d’insertion vers le début du mot précédent.
Option + Flèche vers la droite : déplacer le point d’insertion vers la fin du mot suivant.
Maj + Commande + Flèche vers le haut : sélectionner le texte entre le point d’insertion et le début du document.
Maj + Commande + Flèche vers le bas : sélectionner le texte entre le point d’insertion et la fin du document.
Maj + Commande + Flèche vers la gauche : sélectionner le texte entre le point d’insertion et le début de la ligne actuelle.
Maj + Commande + Flèche vers la droite : sélectionner le texte entre le point d’insertion et la fin de la ligne actuelle.
Maj + Flèche vers le haut : étendre la sélection de texte à la ligne au-dessus, jusqu’au caractère le plus proche au niveau du même emplacement horizontal.
Maj + Flèche vers le bas : étendre la sélection de texte à la ligne en dessous, jusqu’au caractère le plus proche au niveau du même emplacement horizontal.
Maj + Flèche vers la gauche : étendre la sélection de texte d’un caractère vers la gauche.
Maj + Flèche vers la droite : étendre la sélection de texte d’un caractère vers la droite.
Option + Maj + Flèche vers le haut : étendre la sélection du texte au début du paragraphe actuel, puis au début du paragraphe suivant si vous utilisez une nouvelle fois cette combinaison de touches.
Option + Maj + Flèche vers le bas : étendre la sélection du texte à la fin du paragraphe actuel, puis à la fin du paragraphe suivant si vous utilisez une nouvelle fois cette combinaison de touches.
Option + Maj + Flèche vers la gauche : étendre la sélection du texte au début du mot sélectionné, puis au début du mot suivant si vous utilisez une nouvelle fois cette combinaison de touches.
Option + Maj + Flèche vers la droite : étendre la sélection du texte à la fin du mot actuel, puis à la fin du mot suivant si vous utilisez une nouvelle fois cette combinaison de touches.
Contrôle + A : se placer au début de la ligne ou du paragraphe.
Contrôle + E : se placer à la fin de la ligne ou du paragraphe.
Contrôle + F : avancer d’un caractère.
Contrôle + B : reculer d’un caractère.
Contrôle + L : centrer le curseur ou la sélection dans la zone visible.
Contrôle + P : monter d’une ligne.
Contrôle + N : descendre d’une ligne.
Contrôle + O : insérer une nouvelle ligne après le point d’insertion.
Contrôle + T : intervertir le caractère situé derrière le point d’insertion et celui situé devant.
Commande + Accolade gauche ({) : aligner à gauche.
Commande + Accolade droite (}) : aligner à droite.
Maj + Commande + Barre verticale (|) : aligner au centre.
Option + Commande + F : accéder au champ de recherche.
Option + Commande + T : afficher ou masquer une barre d’outils dans l’app.
Option + Commande + C : copier le style, autrement dit enregistrer les réglages de formatage de l’élément sélectionné dans le presse-papiers.
Option + Commande + V : coller le style, autrement dit appliquer le style copié à l’élément sélectionné.
Option + Maj + Commande + V : coller et appliquer le style, autrement dit insérer un objet en appliquant à celui-ci le style du contenu environnant.
Option + Commande + I : afficher ou masquer la fenêtre de l’inspecteur.
Maj + Commande + P : format d’impression ; afficher la fenêtre permettant de définir les réglages applicables au document.
Maj + Commande + S : afficher la boîte de dialogue Enregistrer sous ou dupliquer le document actuel.
Maj + Commande + Signe moins (-) : réduire la taille de l’élément sélectionné.
Maj + Commande + Signe plus (+) : augmenter la taille de l’élément sélectionné. Le raccourci Commande + Égal (=) remplit la même fonction.
Maj + Commande + Point d’interrogation (?) : ouvrir le menu Aide.
Pour utiliser ces raccourcis liés à la vision, choisissez tout d’abord le menu Pomme > Réglages Système (ou Préférences Système), puis cliquez sur Clavier. Cliquez sur Raccourcis clavier, sélectionnez Accessibilité à gauche, puis sélectionnez « Inverser les couleurs » et « Contraste » à droite.
Contrôle + Option + Commande + 8 : inverser les couleurs.
Contrôle + Option + Commande + virgule (,) et Contrôle + Option + Commande + point (.) : réduire et augmenter le contraste.
Utilisez ces raccourcis pour changer le focus du clavier. Pour utiliser certains de ces raccourcis, choisissez d’abord le menu Pomme > Réglages Système (ou Préférences Système), puis cliquez sur Clavier. Cliquez sur Raccourcis clavier, sélectionnez Clavier à gauche, puis sélectionnez le réglage de raccourci à droite.
Contrôle + F2 ou Fn + Contrôle + F2 : déplacer le focus vers la barre de menus. Vous pouvez ensuite utiliser les touches fléchées pour parcourir le menu, appuyer sur Retour pour ouvrir un menu sélectionné ou choisir un élément de menu sélectionné, ou taper le nom de l’élément de menu pour y accéder dans le menu sélectionné.
Contrôle + F3 ou Fn + Contrôle + F3 : déplacer le focus vers le Dock.
Contrôle + F4 ou Fn + Contrôle + F4 : déplacer le focus vers la fenêtre active ou la fenêtre suivante.
Contrôle + F5 ou Fn + Contrôle + F5 : déplacer le focus vers la barre d’outils de la fenêtre.
Contrôle + F6 ou Fn + Contrôle + F6 : déplacer le focus vers la fenêtre flottante.
Contrôle + Maj + F6 : déplacer le focus vers la sous-fenêtre précédente.
Contrôle + F7 ou Fn + Contrôle + F7 : changer le déplacement du focus de la touche Tab, entre la navigation entre toutes les commandes à l’écran et uniquement les zones de texte et les listes.
Contrôle + F8 ou Fn + Contrôle + F8 : déplacer le focus vers le menu d’état dans la barre de menus.
Commande + accent grave (`) : activer la fenêtre ouverte suivante dans l’app au premier plan.
Maj + Commande + accent grave (`) : activer la fenêtre ouverte précédente dans l’app au premier plan.
Option + Commande + accent grave (`) : déplacer le focus sur le volet de la fenêtre.
Tab et Maj + Tab : passer à la commande suivante ou précédente.
Contrôle + Tab : passer à la commande suivante lorsqu’un champ de texte est sélectionné.
Contrôle + Maj + Tab : passer au groupe de commandes précédent.
Touches fléchées : passer à l’élément adjacent dans une liste, un groupe d’onglets ou un menu, ou déplacer les curseurs et outils de réglage (flèche vers le haut pour augmenter les valeurs, flèche vers le bas pour diminuer les valeurs).
Contrôle + touches fléchées : passer à une commande adjacente au champ de texte.
Autres raccourcis d’accessibilité :
Option + Commande + F5 ou triple appui sur Touch ID : affiche la sous-fenêtre Raccourcis d’accessibilité .
Commandes de VoiceOver
Effectuer un zoom avant et arrière
Contrôler le pointeur à l’aide de Touches de souris sur Mac
Si vous utilisez VoiceOver, vous devrez peut-être faire en sorte que VoiceOver ignore la prochaine combinaison de touches sur Mac pour pouvoir utiliser certains raccourcis de cet article.
Raccourcis Safari
Raccourcis Spotlight
Raccourcis Mail
Raccourcis dans Photos
Raccourcis dans Utilitaire de disque
Raccourcis dans Aperçu
Raccourcis dans Musique
Raccourcis lors du démarrage
Pour plus de raccourcis, consultez les abréviations de raccourcis affichées dans les menus de vos apps. Certains raccourcis clavier peuvent être propres à une app. Les raccourcis qui fonctionnent dans une app donnée peuvent ne pas fonctionner dans une autre.
Informations supplémentaires
Utiliser des Emoji et symboles
Créer vos propres raccourcis et résoudre les conflits entre les raccourcis
Modifier le comportement des touches de fonction ou des touches de modification
Utiliser des commandes de dictée vocale pour donner des instructions à votre Mac
Découvrez la communauté d’assistance Apple
Trouvez les questions des clients Apple et consultez les réponses apportées.
IMAGES
VIDEO
COMMENTS
1. Switch Between Windows on Mac Using Keyboard Shortcuts. There are three Mac keyboard shortcuts that you can use to toggle between windows of the same app like Chrome, Safari, etc., on your MacBook.. Using Command + ` Shortcut. The Command + ` shortcut is one of the most widely used keyboard shortcuts to switch between different windows of the same app on Mac.
On US keyboard: Next window: Command ⌘ ` Previous window: Command ⌘ Shift ` ` is the key on top of Tab key, so it's similar to Command ⌘ Tab shortcut. On other language: Go to System Preferences-> Keyboard-> Shortcuts-> on the left menu, select Keyboard-> on the right menu, select Move focus to next window.You can now change the shortcut to which ever key is on top of Tab in your ...
Please see the following for Safari keyboard shortcuts: "Go to the next tab: Control-Tab or Shift-Command-]" Keyboard shortcuts and gestures in Safari on Mac. Cheers. Hi iMaJiNair, That command does not work when you have Safari in full screen. If you wish to switch between Safari windows, we suggest exiting full screen and then resizing the ...
I'm on Mavericks and I was looking for a keyboard shortcut to quickly switch between tabs in Chrome. Cmd +` didn't work for me, although I made sure it was correctly setup in System Preferences → Keyboard → Keyboard Shortcuts. What I found is that Ctrl + Tab works! So for me it's Cmd + Tab to switch between applications, and Ctrl + Tab to switch between the same application's windows, try ...
Quickly switch between app windows. On your Mac, do any of the following: Switch to the previous app: Press Command-Tab. Scroll through all open apps: Press and hold the Command key, press the Tab key, then press the Left or Right arrow key until you get to the app you want. Release the Command key. If you change your mind while scrolling ...
Press the Command+Tab keys and then hold the Command key to bring up the floating app switcher. Here, you'll see all of the apps that you have open. Now, while holding the Command key, press the Tab key to move forward through the list of open apps, one at a time. If you want to move back (left-side) in the list, press the Tilde (`) key while ...
Once you're in this view, you can click any window to switch to it, or press F3 again to return to your current window. You can also switch windows using your Command key. Try hitting Command ...
Press. Command + `. keys in Mac to switch between windows of the same app. Backlit ` symbol is shown along with. Tilde key. which is located below the "Esc" key (or above Tab) on most Mac English keyboard models. This shortcut allows you to cycle through all open instances within the active application.
Shortcut or gesture. Search the current webpage. Command-F. Highlight the next field or pop-up menu on a webpage. Tab. Tab also highlights buttons and other controls if "Use keyboard navigation to move focus between controls" is selected in the Shortcuts pane of the Keyboard pane of System Preferences. Highlight the next field, pop-up menu ...
Switch between different windows in the same Mac app with Command+`. The keyboard shortcut to remember for switching between windows of the same application is Command+`. ` is also the ~ tilde key, and you can find it on US keyboards under ESC or above Tab. Each time you press Command+` you will switch to the next window available in the active ...
Hold Command + ` (tilde key, to the left of 1 on your keyboard) to switch between windows of the same app. If you hold Command and continue to click the ` key, it will move you through each open window. Just release your keys when you land on the one you want. You can also use the trackpad gesture described above; just note that you will see ...
This feature has been in Windows since Windows 2.0 in 1987, and macOS has a similar shortcut. If you'd like to quickly switch between open apps on a Mac, press Command+Tab. A row of app icons will appear in the center of your screen. If you hold the Cmd key down while tapping the Tab key, the cursor will move between the icons from left to ...
If I have several windows of Safari open, CMD+TAB will show only ONE instance of Safari. ... some applications have also different keys shortcuts. I usually set up my key shortcut in preferences as "Move focus to next windows" and sometimes work, but for example, Terminal doesn't accept it. ... or even if you change it to a custom one [even ...
24. Here are a couple of shortcuts that may be helpful. Command + Tab = switch between applications. Command + ~ = switch between windows of an application. CTRL + Tab = move forward through tabs (in same window) CTRL + Shift + Tab = move backward through tabs (in same window) Share. Improve this answer.
Cmd + I. Email link to current page. ¹Use Cmd + L and Cmd + Return in that order to duplicate current tab quickly. ²Shortcut works with bookmarks in Favorites bar also. ³Shortcut works in other macOS apps also. ⁴The Undo shortcut Cmd + Z also works as long as the Close Tab action was the most recent one.
6. Go back or forward. Let the trackpad and mouse rest. Use the Command + ] shortcut to advance to the next webpage and Command + [ to go back to the previous webpage in Safari on Mac. 7. Scroll a full-page. To scroll a full page at a time in Mac's Safari, hold the Option key and press the Up or Down arrow key.
The Command + ` shortcut that still works to cycle through windows in the Finder doesn't work in Safari. I've tried assigning the shortcut in the Keyboard Shortcuts -> Applications section of the Systems Pref, but that doesn't work either. The Cmd + Tilde + L also doesn't work (and requires two hands!). What else can I try? T.
Posted on Jun 19, 2006 8:24 PM. Command ~ switches between windows in the same program. (That's Command - aka the Apple key - and the tilde key, at the top left under the escape key.) That's a very useful keyboard shortcut in any program where you use multiple windows. Command Shift [arrow right/arrow left] switches between tabs in Safari.
I was having the same issue where Cmd + ` wouldn't switch Safari windows. My workaround was Cmd + Shft + `. After a bit more research the root cause tuned out to be using the US International keyboard layout. Switching to the US layout 'solved' it for me. Share.
Or right click on the Safari icon in the Dock (or long press on it) to see a list of Safari windows. Also command-tilde switches between windows of an app, and command 1,2,3,etc can be used to switch between tabs. If you prefer Microsoft Edge, it's available for Mac as well. IMO macOS is easier to use than Windows.
Opener: While not technically a Safari extension, this app allows you to choose which app opens when you click on a link, giving you more control over your browsing experience. Shortcuts Corner: Doug asks how to switch Apple Watch faces using Siri without having to confirm the action on his watch when his iPhone is locked.
Better yet, you can add shortcuts to the Quick Actions menu. Open the Shortcuts app and simply drag a shortcut into the Quick Actions section in the left-hand sidebar. This puts even the most ...
Option 4: I can use the shortcut control-shift-C on Windows or command-option-C on macOS. 3. Change the location of the inspect panel. To better view the code, I can change the position of the inspector window. The Chrome Developer Tools panel will open at the bottom of the browser window, but sometimes it opens in a separate window altogether.
Command-D: Duplicate the selected files.; Command-E: Eject the selected disk or volume.; Command-F: Start a Spotlight search in the Finder window.; Command-I: Show the Get Info window for a selected file.; Command-R: (1) When an alias is selected in the Finder: show the original file for the selected alias.(2) In some apps, such as Calendar or Safari, refresh or reload the page.
Select Search engine from the left-hand column, then click "Manage search engines and site search" in the middle of the browser window. Next, scroll down to "Site search" and click the blue Add ...
Safari doesn't enable custom site shortcuts by default. In fact, the only way we were able to add the Google Web filter search was by installing the free Safari extension Smart Keyword Search ...
On your Mac, choose Apple menu > System Settings, click Keyboard in the sidebar (you may need to scroll down), then click Keyboard Shortcuts on the right. In the list on the left, select a category, such as Mission Control or Spotlight. You can also customize keyboard shortcuts for specific apps by clicking the App Shortcuts category on the left.
Let's check out the complete rundown of all macOS versions released until 2024. 1. Mac OS X 10.0 (Cheetah) Released on March 24, 2001, Mac OS X Cheetah was the first major software update for Mac users. Cheetah featured an Aqua interface, a water-based theme with a beautiful, all-new visual experience and 2D & 3D graphics support.
Shortcut or gesture. Show tab overview. Shift-Command-\. Open a page in a new tab. Command-click a link. Command-click a bookmark. Command-Return after typing in the Smart Search field. Open a page in a new tab, and make that tab the active tab. Shift-Command-click a link.
Commande + A : sélectionner tous les éléments. Commande + F : rechercher des éléments dans un document ou ouvrir une fenêtre Rechercher. Commande + G : trouver à nouveau, autrement dit trouver la prochaine occurrence de l'élément précédemment trouvé. Pour trouver l'occurrence précédente, appuyez sur Maj + Commande + G.