Ski Touring | The Ultimate Guide to Getting Started
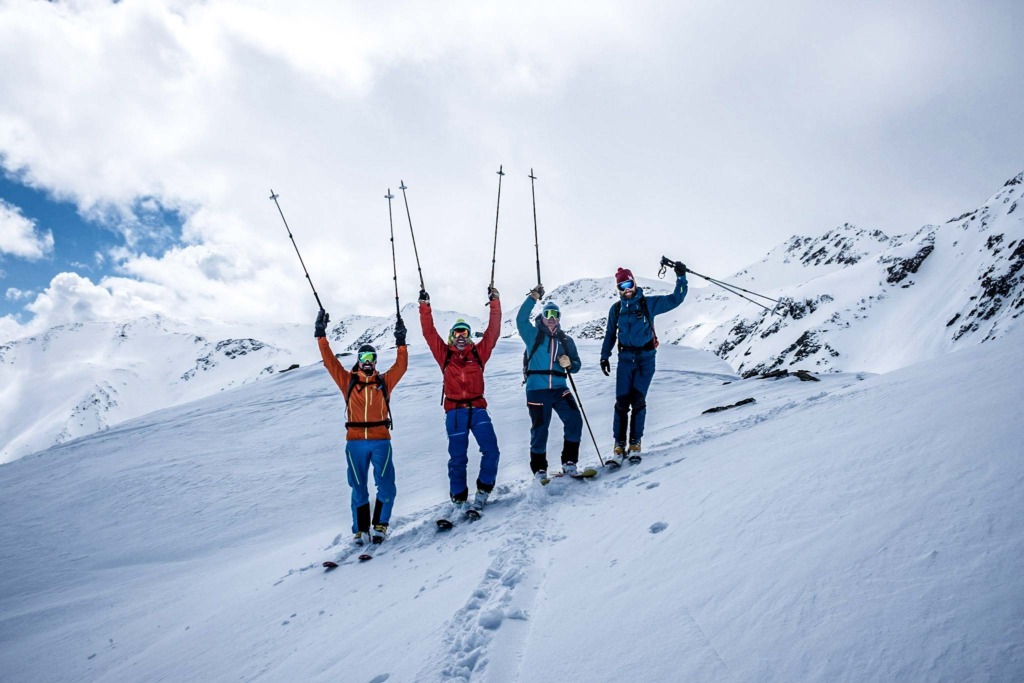
Ski touring often sounds daunting, but it needn't be—and one of the best places to learn is right here in the UK. We've teamed up with Glenmore Lodge, Scotland's National Outdoor Training Centre to create this complete guide to getting started.

Sponsored content
Ski touring, a discipline which involves using specialised climbing skins that let you ski uphill, has exploded in popularity in recent years, and with good reason. Unlike alpine skiers (who rely on lifts) or cross country skiers (who need largely flat tracks) ski tourers can pretty much travel wherever they want.
Because of the element of physical exercise involved, ski touring appeals to all kinds of outdoorsy people, from hardcore endurance athletes to those who just like getting out into nature. The mental health benefits of outdoor exercise are well documented, and ski touring is a great way to keep up your cardiovascular fitness through the cold winter months.
Of course, for skiers who love powder (and what experienced skier doesn't?) the advantages are obvious: ski touring lets you access fresh snow that others can't reach. Whereas most off-piste skiers are limited by what they can traverse to from the lift (or how far they're willing to hike in deep snow) ski tourers can head off into vast, trackless areas of backcountry beyond ski area boundaries. Learn a few more technical ski mountaineering skills and entire mountain ranges open up, with limitless possibilities.
The discipline had a huge boost during the pandemic as many European countries closed their ski lifts. But even before Covid struck, ski touring equipment was the fastest selling category of ski gear according to the industry research body SIA.
While the UK can't realistically compete with the Alps when it comes to ski resorts, Scotland is a great place to try ski touring. Scotland's lift systems are small, meaning that much of the best skiing in places like the Cairngorms National Park can only be accessed using touring gear.
At the same time, the mountains are a manageable size, so you won't be faced with Eiger-style north faces right from the off (although there's plenty of gnarly skiing in Scotland if you know where to look). Taking a train to Scotland is also way better for the planet than flying to the Alps, and one of the main benefits of ski touring is its reduced environmental impact, especially when compared to other ways of accessing the backcountry like heliskiing or cat skiing.
We've teamed up with Andy Townsend, Head of Snowsports at the Scottish National Outdoor Training Centre at Glenmore Lodge , to talk you through the basics of this fast-growing discipline—and share our top tips to help you start ski touring yourself.


Don't be intimidated
Getting started with ski touring can feel like a scary prospect, even for those with plenty of off piste skiing experience. Heading deeper into the backcountry requires careful preparation and planning, as well as a well-honed skill set. But none of it is rocket science.
The good news is that if you're a proficient skier already, you've done the hardest part. As Andy Townsend says, "the trickiest and most time-consuming part of ski touring to master is the actual skiing bit!" We wouldn't recommend trying ski touring until you're an accomplished piste and off piste skier. But from a technical point of view, the uphill bit of ski touring is very easy. It just requires a reasonable level of fitness.

Do be careful
Ski touring might be technically easy, but venturing into the backcountry, far from groomed slopes, and the watchful eye of ski patrol, will always carry inherent risks. Avalanche safety is an essential part of ski touring. But there are also more basic precautions you'll need to take, like you would if you were going hiking in Scotland in summer.
Packing adequate food, water and a first aid kit. Making sure your group's navigation skills are on up to scratch, and making sure everyone has enough clothing to stay warm if the weather changes—these aren't things that alpine skiers normally have to think about. They can usually nip into a mountain restaurant to eat or warm up, and consult a piste map if they get lost. As a ski tourer, you're on your own.
These days, some resorts have dedicated ski touring parks—areas that are controlled for avalanches, patrolled by pisteurs, and usually close to the pistes, to help those on their first ski tour get to grips with the basics. But there are still risks involved that far outweigh those you'd encounter with regular alpine skiing. As Andy Townsend says, "with ski touring, there is both a lot to learn and a lot to practice."

Go with a guide
Unsurprisingly, the best way to learn ski touring skills is from an expert like Andy. Which is why we suggest one unbreakable golden rule for first time ski tourers: always go with a guide. "Having someone hold your hand and share their knowledge while you head into the backcountry for the first time is invaluable," says Townsend. Glenmore Lodge offers a whole range of backcountry skiing courses , which include ski touring for beginners.
Taking a course brings countless advantages. For starters, it will make your first ski tour infinitely safer. Guides will have know the terrain, local snow conditions and so on, and will be able to make the all important judgement calls about where it's OK to go. Guides also remove the stress of route and tour planning, and can help you avoid basic mistakes, like carrying too much heavy kit for the conditions. They will help you with technique while skinning uphill, and give you tips your downhill performance. But most of all, a guide will make your first ski tour way more fun.
A guide with local knowledge will almost certainly be able to choose more manageable routes for the climbs, and find you better snow on the descents. In a mountain range like the Cairngorms, knowing where to find pockets of powder can really make the difference to your first ski tours. Even highly experienced ski tourers usually hire guides, so if you're in a group of ski touring beginners, it's a must.
- READ NEXT: The Aye of the Storm: Taking on Scotland's Backcountry

Learn your essential avalanche safety skills
It's a guide's job to take decisions about safety, line choice, which climbs are doable given group fitness levels and so on. But a guide can't be solely responsible for the safety of a group. Anyone who's venturing into the backcountry needs to take responsibility for themselves, and know how to use their avalanche safety equipment.
The key here, Andy Townsend says, is not to view your avalanche transceiver, shovel, and probe as a form of protection. "These items are essential and everyone in your party should have them and know how to use them," he says. "But it is important that you remember they are rescue equipment not safety. You are only going to use them to rescue a companion, once you or a member of the party has been avalanched, after making a poor decision."
The difference is more than just semantic—it's making good decisions that will keep your group safe on the mountain, not your beeper, avalanche probe, shovel, or airbag. Learning how to make good decisions comes, of course, with experience—which is one reason why hiring a guide is essential—but the basics of good, safe, decision making can also be taught. "Attending an avalanche course with your regular ski partners is a really good way to ensure no one in your group is working to a different and potentially dangerous agenda," says Andy.
At Glenmore Lodge, he and his colleagues teach a range of avalanche courses , and because of the variable weather, the Cairngorms are a great place to practise safety skills too.
Mountaineers sometimes joke that "the Himalayas are good training for Scotland". But there's an element of truth in the idea that learning in Scottish conditions will prepare you well for other mountain ranges around the world.

Make sure you have the right ski touring skillset
"A ski tourer needs a very broad ski skill base before considering venturing into the backcountry," according to Andy Townsend. And as with safety skills, Scotland's often variable conditions make it a great place to learn these.
There are two basic elements to a ski touring adventure — the way up, and the way down. Depending on your background, you may need to spend more time thinking about one or the other. As Andy Townsend says: "A proficient downhill skier with some experience of off piste snow will find the uphill part of the journey the most challenging and the descent the most enjoyable, while the mountaineer/hill walker venturing out on skis will find the uphill straightforward, but will find the downhill to be challenging, exhausting and potentially very dangerous until they master their skis."
As we mentioned earlier climbing uphill, the skill that a proficient skier will need to spend time working on, is technically relatively easy. The basic movement involves shuffling your skis forward one at a time, and zig zagging your way up the slope. The tricky part is the kick turn — the movement you need to execute when you reach the end of a zig zag and have to turn around. But if you start off practising on a gentle route with an easy slope incline, under the watchful eye of a good guide, you'll nail it pretty quickly.
After that, it's just a question of cardiovascular fitness. Ski touring is a little like going for a slow jog, and while efficient technique can help you expend less effort, there's no getting away from the fact that if you struggle to run 5km, you'll probably struggle climbing a powdery slope.
As Andy suggests, those who come from a hill-walking background might be able to breeze through the climb uphill, but they face a trickier challenge in mastering the discipline of ski touring overall. You don't have to be a pro to try it, by any means. On gentle slopes in good conditions, even a strong intermediate skier can have fun ski touring. But as Andy Townsend explains: "Snow can vary from turn to turn, and it is vital that the skier can cope autonomously with anything the mountain throws at you.
"The energy wasted through poor technique and endless crashes is not the only concern. Being able to control your speed and turn exactly where you want to will allow you to avoid obstacles and hazards, which is especially important when you are far from immediate medical help." Townsend recommends spending lots of time perfecting your backcountry skiing technique in the 'sidecountry' (the terrain between groomed slopes, and around lifts) before trying ski touring proper.

Make sure you have the right gear
We've put gear at the end of this list because we believe that ski touring beginners should take everything else into consideration before they think about what ski touring equipment they need. The phrase "all the gear, no idea," (or its more earthy equivalent, "all the clobber, still a nobber") is common parlance in ski resorts. But while having kit that you don't know how to use might make you look silly within the resort boundaries, in the backcountry, it can be deadly.
So, before you buy any of this specialist equipment, make sure you've done your homework, perfected your skiing skills and (ideally) signed up to a ski touring course. Many places that offer ski touring for beginners will be able to rent you ski touring gear for your first tour. but you may find that you want to invest in things like ski touring boots at an early stage. Here are the ski touring gear essentials. Touring skis
Dedicated ski touring skis are quite specialist compared to regular alpine skis. They are almost always lighter, with manufacturers often compromising things like torsional stiffness to save weight. This usually means they perform less well on piste or hard-pack, but you'll appreciate the reduced weight when you're climbing uphill on the skin track.
Today's touring skis range from massive, fat beasts with waist widths of 120mm plus, to skinny whippet-like planks with less than 80mm underfoot. Wide skis float more in powder, and so tend to be better for the descents, especially in deep powder. But that extra width makes them heavier, which is why some ski tourers—often Italians with a penchant for lycra one-pieces, road cycling shades, and climbing helmets—prefer short, skinny skis. They might not be great on the downs but if you're racing uphill, you can absolutely motor.
Ski touring bindings
The crucial difference between ski touring bindings and regular ski bindings is that you have to be able to lift your heel up as you climb, to shunt the ski forward, as you would in cross country skiing. Unlike cross country skiing, you then have to be able to lock it down again for the descents.
Companies have experimented with different types of touring bindings over the years, but these days most people prefer pin bindings, which are far lighter. There are some frame bindings (ie. classic alpine downhill style bindings) with heel lift settings that work. If you're a part time tourer these can be a good option, not least because they'll save you from having to buy a pair of pin compatible ski boots just for touring.
Ski touring boots
Dedicated ski touring boots differ from traditional alpine boots in three main ways. Firstly, like all ski touring kit, they tend to be lightweight. This can mean they're more expensive, as materials like carbon fibre are substituted for plastic to keep the weight down.
Second, touring boots usually have a flexible cuff, with a walk mode that makes it easier to slide your skis forward when touring uphill. (They also have a locked in downhill mode for descending, of course).
And third, touring ski boots usually have holes in the sides of the toes to make them compatible with pin style touring bindings. Holes aside, the toes look a lot like those on any other ski boot, and they're usually compatible with normal frame bindings too.
Ski touring poles
Ski touring poles aren't all that different from regular ski poles, except that they tend to be lighter, and they're usually telescopic, with a clasp mechanism of some sort that can lock them at different lengths.
As a ski tourer, you often find that you'll want your poles shorter on steep climbs and longer when you're using them to push yourself along flats. If you're on a ski tour which involves traversing a particularly steep slope, it can sometimes be useful to set one pole shorter than the other for balance.
Ski touring skins
Climbing skins, or ski touring skins, as they're also known, are an essential part of ski touring equipment. The early versions used by the sports' pioneers were literally made of animal skin, which was laid along the ski with the fur facing the rear. This meant you could shuffle the ski one way, but the fur would grip on the snow, stopping it sliding backwards—the essential innovation that made ski touring possible.
The original skins were permanently nailed on, but that made sliding downhill trickier. Today's skins are made of synthetic fur, with sticky glue on the other side, so you can peel them off when you need to descend. They usually have tail clips, to ensure they're stretched tight over the whole body length of the ski.
Avalanche transceiver, shovel and probe
These are the three essential bits of rescue kit you should buy as soon as you start venturing into the backcountry—whether that's to ski tour, or simply ride powder off the side of the lifts.
The avalanche transceiver, or beeper, sends out a signal so that if you get buried beneath the snow, others in your group with avalanche transceivers set to "search" mode can find you. The probe, a collapsible pole usually made of carbon or aluminium, allows them to fine tune their search once they've picked up your signal. The shovel—which should be light enough and pack down small enough to fit in your pack—lets them dig you out.
Places like Glenmore Lodge which teach ski touring for beginners will usually rent out beepers, shovels and probes. But as you ski tour more, This is kit you need to know like the back of your hand, so you can use it quickly in case of emergency.
Ski touring backpack
A ski touring backpack needs to be lightweight and waterproof enough to handle heavy snow, as well as large enough to carry skins, shovel, probe, extra layers, and all the other bits of kit you need for ski touring.
Crucially, it also has to be comfortable when fully laden, as you'll be spending long days on the skin track wearing it, and it shouldn't move around too much when you're coming down the mountain at speed. A decent padded waistband is a must, as is a chest strap.
These days, many ski touring backpacks have avalanche airbag systems in them. The way these work is best explained by filling a cup with a mixture of sand, stones and gravel, and giving it a good shake. You'll notice the larger objects rise to the top. If you're being carried down the hill by an avalanche, inflating the airbag makes you a larger object, which means you're more likely to end up at the top of the slide when the snow sets.
An avalanche airbag system isn't as essential as the other rescue kit, which you should never go into the backcountry without. But while it's not part of the basic gear you need on all your ski tours, it can definitely help improve your chances of survival in the event of an emergency.
To find out even more about ski touring in Scotland, go to glenmorelodge.org.uk .

- READ NEXT: Best Touring Skis
// Read Next //
How to: Practice an Avalanche Beacon Search

5 Expert Tips for Better Smartphone Ski Pictures

Quick fix: How to get fit for your ski holiday

Beginners guide to avalanche safety

What ski poles are for and how to use them properly
// trending //.

The Best Ski Resorts In The Pyrenees

Swiss Ski Resorts | The Best Places to go Skiing in Switzerland

The Best Short Transfer Ski Resorts in Europe

The Best Ski Holiday Deals

The Best Ski Resorts for Spring Ski Holidays

7 Outstanding Places to Stay in the Isère French Alps

Six of the Best Winter Experiences in the Isère French Alps

Our Guide to Skiing in the Valais, Switzerland

Ski Turns: 7 Types & How To Master Them
Turning is something we all do when we ski. You may take it for granted or even do it unconsciously. Whether you’re a beginner or an advanced skier, it’s useful to understand the different types of ski turns and how to master them.
The 7 types of ski turns are:
- Stem Christie
- Pivot/Braquage
It’s extremely important to pick the right turn for the right situation. That’s why learning all 7 of them could kick your skiing skills up a level and majorly improve your confidence. Let’s learn when it is and isn’t appropriate to use these ski turns.
Table of Contents
Why Is Turning So Important In Skiing?
Turning is so important in skiing because it controls your speed, allows you to safely navigate the environment, and completes your chosen path down the mountain. Learning to properly turn is arguably the most critical part of learning to ski, and it doesn’t have to be hard to learn.
Turns allow us to feel in control while getting down the slope, but it’s up to us to decide which type to use. It’s not surprising that many people only use one or two types of turns , but it severely limits their skiing progression.
Depending on the situation, you may need to perform short sharp turns when darting through large blockades of skiers and trees, or long and wide carving turns on an empty piste . The decision to pick which is most suited at the time can only be learned through many years of practice.
Let’s discuss each one of the 7 turns in more detail so that next time you’re on the mountain, you’ll have a better idea of which turns work best for specific situations. You may learn a thing or two even if you’re an intermediate or advanced skier , as many people simply bypass a lot of these turns as they think they don’t need them .
7 Types Of Ski Turns
1. snowplow.
Pizza, wedge, or snowplow . Whatever you call them, we’ve all used them at one time or another during our skiing journey. And no, not just while you’re a beginner!
The basics of a snowplow turn will have you center your weight in the middle of the skis and turn both skis slightly inward to form a triangle . By pushing out your heels and forming this triangle, you allow your skis to “plow” the snow away and form a build-up on the outside.
That buildup is what stops you in your tracks. If you want to turn, lean your weight onto your left or right leg depending on the direction of travel . Weight on the right leg to turn right, and on the left leg to turn left.
While this is an easy turn to understand, it can be very tough on your knees and quads if you aren’t used to it. Especially as a beginner if you aren’t used to skiing in the first place, snowplow turns are a quick way to tire you out . That’s why people quickly aim to graduate to a more advanced style of turning.
When Is A Snowplow Turn Used?
Contrary to popular belief, the snowplow turn is not only used by beginner skiers . In fact, depending on the terrain, even professional skiers may use it to transfer into a particularly difficult area when off-piste.
It’s also a turn that intermediate skiers will sometimes fall back on when the terrain they’re skiing is above their comfort zone or ability. It doesn’t help them get down any easier, but there’s a feeling of safety because it’s something they’re used to.
However, the most common place you’ll see the snowplow turn being used is of course on the beginner slopes. It’s the first turn everyone starts off with , and is a signature identifier of the amateur skier.
2. Stem Christie
Next up we have the stem christie turn, though it’s not often referred to as a ‘stem christie’ nowadays and is likely referred to as just a ‘stem turn.’ It’s frequently used as a stepping stone into full-on parallel turns .
The way to initiate a stem christie turn is by continuing the snowplow we talked about above, but learning to traverse across the mountain with straight skis rather than a wedge-shaped stance. The key here is to roll your ankles towards the face of the mountain while you traverse and remember to keep your body stacked on top of your skis.
They’re somewhat similar to snowplow turns, but with the stem christie, you’re skiing parallel (traversing) across the slope. That makes things much easier for your muscles and joints , and so should be moved onto as quickly as possible.
When Is A Stem Christie Turn Used?
Stem christie turns are, more often than not, a completely natural progression for most people . However, they’re slightly more advanced than snowplow turns because of the traverse.
It’s a bit of an odd one out on this list because, unlike the others, it’s very rarely referred to nowadays. When beginner skiers are taught to snowplow, it can often take only a couple of hours to progress from snowplow to parallel turns. That means the actual time spent on the “stem christie” turn is very low .
3. Parallel
This is the most widely used turn on the mountain, and the hallmark of an intermediate skier. This is the ski turn that could get you through any situation if it had to .Once you’ve learned how to do it, you’ll wonder why you didn’t figure it out quicker. All you have to do is spend a single run skiing in a snowplow stance to understand how fantastic the parallel turn really is.
The idea behind skiing a parallel turn is to ski the entire traverse and turn while keeping your skis perpendicular to each other . This dramatically reduces the strain, speeds you up because you’re on your edges, and allows you to be far more maneuverable than a snowplow.
To initiate a parallel turn, keep the majority of your weight on the downhill ski while traversing, and visualize a place to make your turn. Once you get to that place, release the pressure from your downhill ski and transfer the pressure over. The pressure should go from your downhill skill, to neutral (facing downhill), and downhill ski again (after the turn has been made).
Your uphill ski should skid around (if you’ve got your weight on the downhill ski), but it will take practice to get a feel for the right balance . It’s much easier to get a feel for it than to try and explain it.
The easiest way to get your head around parallel turns is to imagine the movement as a shift of weight. Center, left foot, center, right foot . When you are able to transfer your weight rapidly and read the mountain correctly, parallel turning will be easy. Of course, turning isn’t that robotic, but that’s the general idea your body will learn to adapt to after a lot of practice.
The most common mistake when first learning parallel turns is feeling as though you’ve lost control and need to fall over (or gracefully sit down on your traverse, depending on how fast you were going). This is completely understandable, but you’re urged to keep your posture centered . It’s going to take some time to get used to and realize that you’re in control.
When Is A Parallel Turn Used?
As previously mentioned, the parallel turn is the most common ski turn you’re going to see on the mountain. As such, it can be seen on the beginner runs, all the way up to blacks .
If you’ve ever tried skiing before, you know the first few runs (or holidays) can be an extremely tough experience. In part, that’s due to the limitations of the snowplow . When you couple the mental stress of feeling like you can’t stop, with the physical burden the wedge turn takes on you, it’s not a pleasant experience.
Most people consider the parallel turn to be the time when they can properly ski. I t’s a turn that allows you to explore all parts of the mountain , both on and off-piste depending on your level. If nothing else, you should always learn how to do the parallel turn before you make a decision on whether skiing is something you enjoy doing.
A lot of casual skiers stop at parallel turns because they can take you anywhere on the mountain if you learn them well enough. Think of them as a 4X4 car. However, carve turns are by far the best choice when it comes to skiing on a steep, icy, or open piste. If you love skiing as fast as you can, these are the turns you need to learn next. The great thing is, they’re extremely easy to learn.
The first thing you need to learn about carve turns is that the main idea is to always keep the inside edges of your skis on the snow . Not only does this dramatically increase your speed, but it also makes it far easier to stop. Therefore, in certain situations, it’s actually the safest way to ski.
To initiate a carving turn, start by traversing across the mountain (the closer to the fall line the better), and then roll your ankles, and then your knees in the direction you’re headed. Keep your body stacked above your skis at all times and keep your hands out in front of you. Do not pole plant.
It’s similar to parallel turns but it does have some differences. The downhill ski still needs a lot of pressure, but this time, the inside ski also needs to work its edge into the snow .The best way to achieve this is to proactively role the inside ankles to initiate contact with the edge. Most of us are lazy skiers, especially during parallel, so you should feel it when your inside edge works.
If you’ve done it right, your skis shouldn’t skid or slide around each turn , but instead, you should feel as though you’re being catapulted into the next turn. It’s more physically intensive if you’re trying to push yourself as hard as possible, but it can be quite relaxing if you’re just skiing casually.
When Is A Carve Turn Used?
Carve turns are used exclusively on piste. They’re most useful if it’s icy, hard-packed, steep, or freshly groomed . That’s because, as we’ve just discussed, both edges are hard at work for the entirety of the turn, not just the turn itself.
Ski racing is another place where carve turning is the only option. At those kinds of speeds, the skis they use have to be extremely rigid and heavy to deal with the forces. Luckily for you, it’s possible to carve on just about any ski , though the thinner they are, the easier it is to switch from edge to edge.
There are some places where using carve turns is pointless. For instance, powder, slush, and the majority of off-piste terrain will all require a different technique to conquer. Wide-open pistes are where carving is in a league of its own .
Now we are getting into the extremely niche areas of ski turns . The next three turns we’ll be looking at are only used in a handful of situations, all of which beginners would not find particularly useful.
Jump turns are a type of turn where the skier “pops” out of one turn, straight into another . This is often without any traversing but can be adapted to fit any situation. For instance, you may only have to jump into a right-hand turn once to navigate a tricky section.
To initiate a jump turn, you first need to practice jumping on your skis. You can do this while moving slowly or staying still, the choice is up to you. Remember, when jumping with your skis on, all of the energy comes from your legs . Don’t be tempted to bend at the waist.
Once you’re confident with that, head out onto a piste within your comfort zone. A blue run should do nicely for a lot of people. Stand with your hips facing downhill, and your skis pointed across the mountain. Plant your pole below your skis, jump, and swing your skis around to face the opposite direction . You should be no more than a meter below where you started.
You’re going to find this whole process far easier if you learn to build up the basics on a relatively gentle slope before heading out onto something steep. With a turn as “aggressive” as this, getting the basics right is more important than ever . That means stacking your body over the center of your skis and learning to adapt your posture and stance when the incline shifts on a steep slope .
If your boot flex is too stiff and you aren’t able to stay in control of it, this will affect your ability to make these turns . If that’s the case, your other options are to ski more aggressively, or perhaps a better idea, go to a boot fitting shop and ask them if your boots are suitable.
When Is A Jump Turn Used?
This isn’t the kind of turn you’ll find being widely used on your yearly ski holiday, unless you all charge off-piste every day – if that’s the case then go you! The jump turn is used to navigate tricky sections, mainly narrow or off-piste . For instance, couloirs, awkward terrain, and chutes. Sometimes there are situations where you cannot traverse, and so your only option is to use a jump turn.
Corbett’s couloir is probably the most famous place where it’s almost impossible not to make a jump turn unless you jump straight into it. But if you’re skiing that, you probably aren’t reading this article!
Popping in and out of a turn, to a lesser degree than this jump turn, is something you’ll also find useful in powder skiing . It’s less pronounced than it is while navigating extremely narrow areas, but the movement of your legs is worth keeping in mind.
There are quite a few different ways to initiate a kick turn , and a lot of that depends on your flexibility. For the purposes of simplicity, we are going to learn the most common way to perform a kick turn and why you would need it in the first place.
As you get to the position you want to turn on (let’s pretend you’re turning left) while using your poles to keep steady, lift your left ski up until its tail touches the snow and its tip is pointing to the sky . With your left leg straight in front of you, allow the ski to rotate from the tail, and the tip (and your foot) should fall to the left-hand side to meet your other foot.
You should now have one ski facing left, and the other directly below it facing right. It’s not the most comfortable of positions, but it’s exactly where you should be at the moment. Now put all of your weight on the left ski and lift your right ski around to meet it .
That last part will take a bit of strength and flexibility , so make sure you’ve trained hard in the gyms before the season starts. If everything has gone well, you should now be facing to the left, ready to continue your tour.
When Is A Kick Turn Used?
Kick turns are perhaps the most specialist of all the ski turns on this list. You’ll only be using them in one situation, and that’s ski touring . There’s very little need to learn these if you aren’t thinking about touring in the future. Especially as your boots will normally only be attached from the toe end with touring skis (when climbing) which makes it easier to accomplish.
However, if you aren’t constantly starving to move forward with your skiing, you’re never going to improve. Attempting this with normal skis and on a normal piste won’t help you navigate it in any way (unless you need to turn around quickly), but it may help you improve your balance and ski posture while transferring the weight from ski to ski during the turn.
7. Pivot/Braquage
To learn the Pivot or Braquage turn, you first need to understand what the fall line is. The fall line is the quickest, most direct route down the slope . Draw a line from where you are, straight down the slope, and that’s your fall line.
First, position your skis perpendicular to the fall line, and make sure you have very strong edge control. Place your downhill pole below you and rest a little bit of weight on it. Next, rotate your legs, lean over your feet, and begin to achieve neutral pressure on both skis as they face downhill. Quickly pivot your skis to face perpendicularly across the mountain in the opposite direction .
Do not rotate your hips or upper body during the beginning half of the turn . They should stay in posture, centered over your skis at all times. Take your time learning this ski turn as it can be extremely useful in certain situations.
When Is A Pivot Turn Used?
Pivot turns are used in a similar way to jump turns, only in a less technical environment. So, while you will see them being used off-piste, you’ll also see them being used on-piste, especially in narrow or crowded areas where a skier wants to control their speed .
It may help to think of the pivot turn as a glorified side slip. Many advanced intermediate skiers will use this turn to navigate sections of the mountain they believe are out of their skill level , but not so advanced that they have to side slip. Though it has specific uses all across the mountain, it’s a fallback that lots of skiers use when they struggle.
How To Practice Ski Turns
Watch a video.
While this technically isn’t a way to practice ski turns, it’s a very good way to visualize it in your mind . Plus, skiing is sadly not an activity you can do year-round, which means making the most of the off-season.
It’s also a great idea to download any videos that give you a good example of the turn you’re practicing. It’s not uncommon for someone to watch a video in the morning and have forgotten it by the time they’re up the mountain, so download it and bring it with you! It may sound a bit silly, but downloading a ski video that gives examples of turns is a great way to make the most of your practice .
Practice Your Form
The building blocks for all of these ski turns are exactly the same: good form. By running ski drills designed to concentrate on and improve your form , you’ll notice benefits in every part of your skiing. You might feel silly if you consider yourself an advanced skier who is now skiing a blue run with your hands on your knees, but those are the most crucial runs you can do.
Some of these turns seriously test your ability to stack (position your bones and body structure over the center of your skis). You have to be able to quickly re-adjust your form to accommodate for the terrain or else you’ll quickly become off-balance and feel out of control.
Practice Each Turn On The Right Slope
Though it’s important to get the basics down on a gentle slope, you should also practice each turn on the terrain it’s meant for . That might mean stepping out of your comfort zone. If you’re doing that safely, then it’s a great thing to do!
If you’re unsure, take someone who has experience skiing that kind of terrain and watch them ski it . Follow their tracks and learn from someone who is better than you. Or even better, get an instructor to teach you.
Get A Ski Lesson
If you really want to learn these 7 ski turns in the best possible way, there is absolutely no substitute for a ski instructor. They will be able to watch you ski, correct your mistakes, and show you a (hopefully) near-perfect example of the turn you’re trying to learn .
Final Thoughts
So many people ski for decades without realizing there are more turns in skiing than the parallel and the wedge. While there’s nothing wrong with sticking to what you know, you can access so much more of the mountain with confidence if you spend some time learning these other ski turns .
Get Your Skiing Groove On: Mastering the Art of the Kick Turn
Are you looking to take your skiing to the next level? The kick turn is an essential skiing technique that every avid skier should master. This advanced maneuver involves turning your skis 180 degrees while standing still or moving uphill, allowing you to navigate difficult terrain with ease. While it may seem daunting at first, with practice and the right techniques, you can quickly get the hang of it and start skiing like a pro.
But where do you start? In this article, we’ll cover the basics of the kick turn, from proper weight distribution to essential gear. We’ll also provide tips and tricks for avoiding common mistakes and taking your skiing to the next level. Whether you’re a beginner or an expert, mastering the art of the kick turn is sure to take your skiing game to new heights. So strap on your boots, grab your skis, and let’s hit the slopes!
Table of Contents
Turn Like a Pro: The Basics of Skiing Techniques
Whether you’re a beginner or an experienced skier, mastering the basics of skiing technique is essential to having a successful and enjoyable time on the slopes. Here are a few tips to help you turn like a pro:
Proper Weight Distribution
One of the most important aspects of skiing technique is proper weight distribution . As you turn, make sure to keep your weight centered over your skis. This will give you greater control and stability, allowing you to make more precise turns. Shift your weight forward when you want to turn more sharply and back when you want to slow down or stop.
Edge Control
- Use the inside edge of your outside ski to start and finish turns.
- When you need to turn more sharply, use the inside edge of your inside ski as well.
- Keep your edges sharp and well-maintained to ensure the best control and stability.
Body Position
Your body position can greatly affect your ability to turn effectively. Keep your upper body facing downhill and your knees and ankles flexed. This will help you maintain your balance and control, as well as allow for more precise turns. Also, keep your arms out in front of you for added stability and balance.
With these basic tips, you’ll be on your way to mastering the art of skiing. Remember, practice makes perfect, so get out there and hit the slopes!
Mastering Your Balance: Tips for Achieving Stability on Skis
If you’re looking to improve your skiing technique, mastering your balance is key. Proper balance ensures you can stay upright on your skis, carve turns with precision, and navigate difficult terrain with ease. Here are some tips for achieving stability on skis:
Keep Your Feet Shoulder-Width Apart: One of the most common mistakes beginner skiers make is keeping their feet too close together. This makes it harder to balance and turn. Keeping your feet shoulder-width apart will give you a solid base to work with.
Bend Your Knees: Another common mistake is skiing with stiff legs. This makes it difficult to absorb bumps and changes in terrain. By bending your knees, you can absorb shocks and maintain better balance.
Additional Tips for Achieving Balance on Skis
- Keep Your Arms Forward: Your arms should be in front of you, not to the side or behind you. This helps maintain your center of gravity and provides more stability.
- Look Ahead: Don’t look down at your skis, look ahead at where you’re going. This will help you anticipate changes in terrain and adjust your balance accordingly.
- Shift Your Weight: When turning, shift your weight onto the outside ski. This will help you maintain balance and carve through turns with precision.
Advanced Techniques for Improving Balance on Skis
Practice on One Ski: Practicing skiing on one ski can help improve your balance and control. Start by taking short runs on one ski and gradually increase the distance.
Use a Balance Board: Balance boards can help you develop the muscles and reflexes needed for skiing. Stand on the board and try to maintain your balance while shifting your weight from side to side.
By following these tips and techniques, you can improve your balance on skis and take your skiing to the next level.
The Secret to Effortless Turning: Understanding Weight Distribution
Effortless turning is something every skier dreams of. It’s the feeling of gliding effortlessly over the snow, carving through turns with ease. The secret to achieving this lies in understanding weight distribution.
When turning on skis, weight distribution is crucial. The majority of your weight should be on the downhill ski, while the uphill ski should be light. This allows you to control the turn and maintain balance. But weight distribution is not the only factor to consider.
Body Positioning
Body positioning is also important in achieving effortless turns. You want to keep your upper body facing downhill and your shoulders level. This will help you maintain your balance and keep your weight centered over your skis. Keep your knees slightly bent and your hips facing forward to maintain a stable and strong base.
Practice Makes Perfect
Effortless turning is not something that can be achieved overnight. It takes practice and patience. One way to improve your weight distribution and body positioning is to practice on groomed runs with a gradual slope. This will help you develop the muscle memory and balance necessary for effortless turns. Start with smaller turns and work your way up to larger ones.
- Focus on keeping your weight centered over your skis
- Gradually increase your speed as you become more comfortable
- Practice on different terrain, such as moguls or powder, to challenge yourself
Equipment Matters
Finally, your equipment can also play a role in achieving effortless turns. Make sure your bindings are properly adjusted for your weight and skill level. The right skis can also make a difference. Skis with a shorter turn radius and a wider waist can make it easier to initiate turns and maintain balance.
Mastering weight distribution, body positioning, and practice will help you achieve effortless turns on the slopes. With patience and dedication, you’ll soon be carving your way down the mountain with ease.
Breaking Bad Habits: Common Skiing Mistakes to Avoid
Skiing is a fun and exhilarating winter sport that requires a combination of skill, technique, and practice to master. However, even experienced skiers can fall into bad habits that hinder their performance on the slopes. To help you improve your skiing technique and avoid common mistakes, we have compiled a list of the most prevalent skiing habits that you should break.
Leaning back on your skis – This is a common mistake that many beginner and intermediate skiers make. Leaning back on your skis puts you in an unstable position, making it harder to control your speed and turn. Instead, you should keep your weight forward and centered over your skis to maintain better balance and control.
Not looking ahead
One of the most important aspects of skiing is vision . Focusing on your feet, skis, or the snow immediately in front of you can result in slower reaction times and a lack of spatial awareness. Always look ahead and scan the slope to anticipate upcoming terrain changes and obstacles, allowing you to plan your movements and adjust your speed accordingly.
Crossing your skis
- Keep your skis parallel – Skiers often cross their skis when they turn, leading to loss of balance and control. Instead, focus on keeping your skis parallel and turning by shifting your weight and edging your skis.
- Finish your turns – Many skiers make the mistake of not finishing their turns, which can lead to skidding and a loss of speed. To finish your turn, keep your skis on edge and gradually bring them back to a parallel position to set up for the next turn.
- Keep your hands and arms in front of you – Your hands and arms play an important role in balance and control. Keep them in front of you, and avoid swinging them around, as this can cause a loss of balance and stability.
By breaking these bad skiing habits, you can improve your technique and performance on the slopes, making your skiing experience more enjoyable and fulfilling.
Take Your Skiing to the Next Level: Advanced Techniques for Expert Skiers
Expert skiers are always looking for ways to improve their technique and take their skills to the next level. By incorporating advanced techniques into your skiing, you can increase your speed, control, and overall performance on the slopes. Here are some techniques to help you take your skiing to the next level:
Carving is an essential technique for expert skiers looking to make clean, precise turns at high speeds. To carve, begin by angling your skis into the turn and leaning your body weight into the downhill ski. Use your edges to grip the snow and create a curved turn. As you come out of the turn, release your edges and move into the next turn. With practice, you can develop a fluid carving motion that allows you to carve up the mountain with ease.
Mogul Skiing
- Keep your weight forward
- Use quick, short turns
- Keep your skis parallel
Powder Skiing
Tip #1: Stay forward and keep your weight centered over your skis. This will help you maintain control in deep snow.
Tip #2: Use a wider stance and keep your skis parallel. This will help you stay on top of the snow and prevent your skis from getting bogged down.
By incorporating these advanced techniques into your skiing, you can take your skills to the next level and tackle even the most challenging terrain with confidence and control. Remember, practice makes perfect, so be sure to keep honing your skills both on and off the slopes.
The Right Gear for the Job: Essential Equipment for the Perfect Ski Trip
Skiing can be an exhilarating and fulfilling experience, but having the right gear is essential to ensure a safe and enjoyable trip. Investing in quality equipment can make all the difference, and here are some essential items to consider:
Ski Boots : Having comfortable and properly fitting ski boots is crucial to enjoying a successful day on the slopes. Make sure to get measured by a professional and choose boots that are appropriate for your level of skiing.
- All-Mountain Skis : These versatile skis can handle a variety of conditions and are suitable for intermediate to advanced skiers.
- Powder Skis : Designed for deep snow, these wider skis are perfect for advanced skiers who love to hit the backcountry.
- Carving Skis : These skis are designed for precise turns and are perfect for advanced skiers who want to tackle the groomed runs.
Accessories
Goggles: A good pair of goggles can protect your eyes from the sun and snow and improve visibility on the slopes. Look for goggles with interchangeable lenses for varying light conditions.
Helmet: Wearing a helmet is a must for safety on the slopes. Look for helmets with adjustable vents and comfortable padding.
Gloves: Keep your hands warm and dry with a good pair of gloves or mittens. Look for gloves with good insulation and waterproofing .
Having the right gear can make all the difference in having a safe and enjoyable skiing experience. Invest in quality equipment that fits properly and suits your level of skiing to make the most of your next ski trip.
Frequently Asked Questions
What is a kick turn in skiing.
A kick turn is a technique used in skiing to reverse direction when the terrain becomes too steep to turn around. It involves lifting one ski and placing it perpendicular to the other ski while pivoting on the ball of the foot. The skier then rotates the body and the other ski around the stationary ski to face the opposite direction.
When should I use a kick turn?
A kick turn is most commonly used when skiing on steep terrain where turning around in the conventional manner is not possible. It is also useful in narrow chutes or couloirs where there is not enough room to perform a wide turn.
What are the common mistakes made when doing a kick turn?
One of the most common mistakes when performing a kick turn is not keeping the weight over the downhill ski during the turn, which can cause the uphill ski to slide or the skier to lose balance. Another mistake is not using the poles to help balance and pivot around the stationary ski.
Can kick turns be done on both alpine and backcountry skis?
Yes, kick turns can be done on both alpine and backcountry skis. However, it may be easier to perform a kick turn on backcountry skis because they are generally lighter and more maneuverable than alpine skis .
Is it necessary to learn a kick turn as a beginner skier?
A kick turn is an advanced skiing technique and is not typically taught to beginner skiers. It is important to first master basic skiing skills such as turning and stopping before attempting more advanced techniques like the kick turn.
Craving More Content?
Read our latest blog posts
How to ski steep powder [ultimate guide].
Summer is coming, and this means one thing: It’s time to hit the slopes! While some of us may be stoked on the prospect of going…
How To Store Xc Skis? [Fact Checked!]
There is no question that backcountry skiing is one of the most fascinating sports to watch. The combination of ski touring and xc skiing is such…
How To Store Water Skis? [Fact Checked!]
Water skiing is a popular winter sport that is both exciting and challenging. There is a lot of gear involved with taking part in a water…
Your first day of cross-country skiing, whether a distant memory, or a soon reality, will bring a wide array of sensations. Fear knocks first with thoughts of high speed downhills and black and blue butt cheeks, but soon forgotten once the flat trails open before you. Then comes the sensation of glide, like a sweet voice beckoning you farther down the trail. Then you stop and look behind, only to see the two-story touring center is now a dot amidst the naked aspen trees. You decide to turn your skis around to head back but find these floppy diet sticks have a mind of their own, and you haven't a clue how.
Finally, the maneuver of changing direction is accomplished but not without its challenges. You might have experienced the tangled mess of ski tip and tail, or the echo of your accelerating heart as your mind and body try to untangle the floppy ski tails out of the powdery snow. You seemed to manage but not with bests choice for the situation or the pizzazz you deserve.
Choices for turning around, otherwise called a stationary turn, are many. If we omit the mid air 180-jump turn and the collapse and slither to redirect the skis then we end up with four distinct moves.
The Tip , Tail , Foot and Kick turn are the four of choice, the latter requiring dexterous angularities, but fun and fast to perform once you know the right moves. The main point of all these is that they take very little space on the trail with one for the exact situation you find yourself in.
The easiest part of the first three moves is the name given to them — they are exactly what the name is.
THE TIP TURN A tip turn has the skier turning around the tips of the skis. Start with lifting up the tail of a ski, leaving the tips on the snow — think of raising the heel higher than your toe. Now take a small step to the right, moving the tail only, and then bring the left tail over to match. Remember to leave the tips on the snow and move the tails over, in a series of short steps, until you reach the desired direction.
The Tip Turn is good because you can see what you are doing and enforces the same movement pattern for an “A” position used in a gliding wedge for slowing on a downhill.
Notice that we are making multiple “V” steps in the snow. This is the same “V” position skier’s use in the uphill herringbone and the same position for skating. It's also the same movement pattern for step turns.
Many people feel the tail turn offers the best turning stability because they can feel the tail pressure on the snow. They can also easy to see how high to lift up the ski tip to clear powdery snow.
FOOT TURN The next turn is one we perform naturally, without much thought: the Foot Turn. Just move around the feet performing small tip and tail turns, lifting the tips and tails equally high.
Start by drawing a small circle in the snow then step in and center your feet in the middle. Now start taking small steps to turn around. Notice that your tips come together but with the next step it's your tails — like a tip and tail combo turn.
KICK TURN Our last stationary turn is the Kick Turn. I will admit that it takes some practice. The way some students react to it makes one think that it should have a surgeon generals warning with it, "The kick turn may be hazardous to your health." You do need limber knees and hips but the majority of problems comes from skis that are too long or just a lack of knowledge and practice.
Stability for the entire move comes from the pole plant. Begin by planting your right pole near the tails of your skis then plant the left pole near the tip of your skis. Don't lock at your elbows but keep them relaxed while planting the poles vertically, pole tips underneath the hands. With your arms out spread, your body is now open to the direction of your first step.
Your leg on this open side is the right leg—the leg you’ll use for the first move. Another quick check on the pole plants to make sure they're firm in the snow and providing stability, then it's no turning back.
To begin this first "kick around" with the right ski, use the knee to start lifting up the ski tip. Then kick your foot forward and up to help set the ski tail in the snow out in front of you. Now pivot the tail away from you and let the ski swing the 180 degrees into the new direction.
As the ski swings over and touches the snow, your body weight should follow so that you can quickly swing the other ski around to match. Now both skis should be facing the new direction. Bring your left pole around and your ready to ski off into the sunset. The kick turn is also useful for changing direction while traversing up a hillside. When you come to the point where you want to change direction, level your skis across the hill, and begin to pack out a stable platform in the snow. Plant the poles above your uphill ski and kick your downhill ski around first. Bring the poles around; then you're ready to continue your traverse in the new direction. (Note: experienced skiers will change direction with the uphill ski first)
With practice, you'll find a favorite turn that works best for you in each situation. As they become second nature your thoughts will begin turning to the pure enjoyment of cross-country skiing and never having to look back.
Written by Mark Pearson ; Photos courtesy Tom Lippert Photography
CLASSIC TECHNIQUE: Diagonal Stride ; Adjusting Pole Straps ; Arm Swing ; Double Pole ; Kick-Double Pole . CLASSIC UPHILL TECHNIQUE: Classic Uphill Diagonal ; Edging ; Side Step ; Herringbone . DOWNHILLS AND TURNING: Getting up from a fall ; Kick Turn ; Track Snowplow ; Five Tips for the Diagonal Stride ; Kick Double Pole . SKATE SKIING: Ten Tips for the V-1 ; V-2 skate technique ; Marathon Skate . ALL AROUND: Stationary Turns ; Step Turns . RESOURCES: Nordic Glossary ; 20 Q and A ; History of Cross Country Skiing
©2010-2022 SkiXC.com All Rights Reserved in All Media
BEST WEEK EVER
Try out unlimited access with 7 days of Outside+ for free.
Start Your Free Trial
Powered by Outside
The Skinny on Skinning: Ski Touring for Beginners
Heading out the door? Read this article on the new Outside+ app available now on iOS devices for members! >","name":"in-content-cta","type":"link"}}'>Download the app .
Editor’s note: Before venturing into the backcountry, or leaving the boundary gates of any ski area, make sure you are well-versed in avalanche safety and search and rescue techniques. Check your local avalanche report and make sure you have the necessary safety gear—a beacon, shovel, and probe—and you know how to use it. If you don’t know, don’t go.
Don’t be afraid. Skinning isn’t as painful as it sounds. In fact, it’s the most efficient way to propel yourself uphill. It’s a crucial skill for ski touring in the backcountry, where you don’t have the aid of a chairlift to get you to the top of a peak. Pete Swenson, Director of the U.S. Ski Mountaineering Association , says that almost anyone can do it. “If you’re capable of a slow jog, you can skin up the side of the hill,” he says. But before you venture out on your first backcountry adventure, you’ll need the right gear and some sound advice.
Ski Touring and Backcountry Skiing Gear

Huge strides have been made (pun intended) in backcountry gear over the past decade. There are now many options when it comes to skis, boots, poles, packs, outerwear, and avalanche safety equipment specifically designed for uphill and backcountry use. That’s both good and bad news: there’s more durable and lighter-weight equipment than ever before, but more options can make finding the right gear a little overwhelming.
For this reason, beginners just getting into alpine touring can do themselves a favor by researching and learning about alpine touring basics, then taking that knowledge into a ski shop and speaking with someone who can help pinpoint the right setup. In the meantime, here are some basics about alpine touring equipment that will help get the ball rolling.
Alpine Touring Boots

Skinning requires alpine touring (AT) equipment designed to give you mobility when you’re moving uphill but stability when you’re skiing down. AT boots look and feel a lot like traditional alpine boots, but they have adjustable cuffs that allow for more forward movement while you’re hiking. They’re also generally lighter and more flexible than alpine boots. Click here for more on the latest technology in AT boots .
Check out SKI’s Gear of the Year AT Boot on Amazon: Atomic Backland Carbon AT Boot
Touring Bindings

There are a variety of AT bindings on the market these days, ranging from alpine-touring specific to resort/backcountry hybrid bindings . Technology varies depending on the type of touring binding, but here’s the gist: AT bindings have pivoting devices that let you raise your heels off the skis with each step, while keeping the toe of your boot firmly locked in place. When you reach the top of your climb, you can clamp the heel piece back onto the ski for your descent and ski downhill as you would on a pair of traditional downhill bindings. AT bindings can be affixed to any alpine skis though, generally, the lighter the ski, the better. Click here for a look at the latest backcountry bindings .
It’s available on Amazon: Marker Kingpin 13 Alpine Touring Binding

Finally, you’ll need the skins themselves. These long strips of heavy-duty nylon have mohair or synthetic fur on one side and a strong, reusable adhesive on the other, which you affix to your skis’ bases. The fur flattens as you move uphill, allowing your skis to glide over the snow, but it grips to keep you from sliding back after each step. In general, skins come in a variety of lengths and widths that you can trim to fit the specific dimensions of your existing alpine skis. Or, if you’re in the market to buy your own AT setup, look for skis that come with pre-cut skins. Skins cost anywhere from $160–$220 a pair. The wider your skis, the more expensive the skins . Trusted skin brands include Black Diamond, G3, Dynafit, and Pomoca.
Available on Amazon: G3 Alpinist Plus Glide Skin Black Diamond Ultralight Mix STS Climbing Skin Dynafit Speed 90 Speedskin Unico Pomoca Climb 2.0 Climbing Skins
Alpine Touring Outerwear and Layers

Dressing for alpine touring adventures can be tricky; layering is key. While you’re skinning, you’ll definitely get your heart pumping, so even in cold temperatures, you’re liable to break a sweat. But as soon as you stop to rest or get ready to ski downhill, winter weather can cool you down quickly. Carry a lightweight jacket, and throw it on anytime you stop and when you’re ready for your descent. Nearly all ski shops at major resorts will rent or demo backcountry packages that include skis, skins, AT boots and bindings, and poles for around $40 a day.
Backcountry Skiing Backpack
Because you’ll always want to carry layers, water, and some snacks when ski touring, you’ll need a pack to haul all your stuff. If you’re just doing a quick lap in-bounds at your local resort, a smaller pack—20 to 28L—should do. If you’re headed into the backcountry, you’ll be carrying avalanche safety equipment (shovel, probe, first aid kit, etc.), so you may need a larger backcountry-specific backpack that’s equipped with avalanche safety technology as well as features like a ski-carry stystem.
Round-up: 2019 Backcountry Gear of the Year
Training and Technique

Applying Skins to Skis
The rubbery glue on the bottom of skins is strong to ensure they stay put on your skis’ bases. It’s a good idea to practice taking them on and off your skis before you actually get out on the hill. It’s surprisingly easy,” says Swenson. “People put their skins on and say ‘that’s all there is to it?’ It’s pretty amazing…now you can go wherever you want.”
First, wipe off your ski base with your glove to remove excess snow and debris. Most skins will have a metal clip or a fabric loop that attaches to the tip of your ski. After you attach your skin to the tip, you’ll want to press down the skin from tip to tail. Some skins will also have a tail clip. Keep in mind that not all skins are created equal. Dynafit skins, for example, are pressed on from tail to tip, so make sure you get clear instructions from the retailer or rental shop on how to apply them.
Uphill Technique
Swenson recommends practicing skinning on a groomed resort slope before heading out to the sidecountry. Many resorts, such as Colorado’s Breckenridge , will allow you to skin up their slopes before the lifts open each morning. You’ll also want to walk around in your boots before your first big outing to ensure they’re comfortable.
Do not lift your skis off the snow when skinning. Instead, glide them forward as if you were cross-country skiing, not snowshoeing. Take comfortable strides, depending on the length of your legs, and don’t push yourself too hard too soon. Bring water and a snack, and rest whenever you feel tired.
Many resorts offer backcountry skiing clinics where you can easily master skinning basics in a single afternoon.
Read more: All About Angles
Removing Skins from Skis
To remove your skins, simply pull them from the skis’ tips and gently separate them from the skis’ bases. To store them, fold each skin in half on top of itself, sticky side in. Now, you can roll each skin up and place it in your jacket or backpack. When the skins start losing their stickiness, or after about 50 uses, you’ll need to take them to a ski shop to be re-glued.
Available on Amazon: Black Diamond Gold Label Adhesive Glue
Snow Safety
When you’re skiing “outside the gate,” you are no longer in a controlled environment. Swenson recommends taking an avalanche class so that you are aware of the risks. Talk to someone who has skied the area where you are going or hire a guide . Whether skiing backcountry or sidecountry, you should always carry a shovel, a beacon, and an avalanche probe, and be sure to check for avalanche warnings in the area. Visit the American Institute for Avalanche Research and Education for more information and snow safety.
Popular on SKI

Join Outside+ to get access to exclusive content, thousands of training plans, and more.
Healthy Living
- Clean Eating
- Vegetarian Times
- Yoga Journal
- Fly Fishing Film Tour
- National Park Trips
- Warren Miller
- Fastest Known Time
- Trail Runner
- Women's Running
- Bicycle Retailer & Industry News
- FinisherPix
- Outside Events Cycling Series
- Outside Shop
© 2024 Outside Interactive, Inc
- Touring ski
- Ski touring binding
- Ski touring boots
- Touring poles
- Touring skins
- Safety Equipment and Backpack
- Protective Equipment and Clothing
- Route planning
- Tips for beginners
Information portal for ski touring
Ski touring is great fun! Pure nature, fresh air, exhausting and unique moments alone or with friends. In order to enjoy all this to the fullest, you need not only to have good preparation, but also the right ski touring equipment.
presented by
With the help of the experienced mountain guide brothers Michi and Julian Bückers we have collected the most important information as well as helpful tips & tricks. Have fun and enjoy every tour!
Ski touring Gear Guide
Ski touring gear guide - essential ski touring equipment
Ski touring the most important tips for beginners.
Touring skis, touring ski boots, touring bindings…is there anything missing? Our Ski Touring Gear Guide clearly shows you what a complete ski touring equipment includes and what you should consider when buying.
HOW TO'S - Video Hacks
How to do a kick turn? And how do I step into a pin binding correctly? Here come helpful ski touring “how to’s & hacks” that make every ski tour easier.
Ski touring
Correct hiking techniques, how to master kick turns, skitouring - route planning.
Planning is much more than just choosing the most beautiful summit. To enjoy the tour you need the right touring equipment, good weather and the necessary knowledge about alpine dangers and risks.
Tour tips 5 tips for ski tours at night

„Wir von MDV Sports lieben den Wintersport und sind fasziniert vom Tourengehen im freien Gelände. Uns ist dabei aber auch stets bewusst, dass wir als Skitourengeher nicht nur die Verantwortung für uns und unsere Mitmenschen tragen, sondern besonders auch für die Natur, in der wir uns bewegen, und ihre Bewohner. Aktuell entdecken immer mehr Wintersportfans die Leidenschaft für das Tourengehen. Uns liegt es besonders am Herzen, durch ein respektvolles, umweltbewusstes Verhalten weder Fauna noch Flora zu schaden und diese einzigartige Artenvielfalt zu schützen.“
Jonathan Wiant, Präsident Marker Dalbello Voelkl Brands
Die 10 Regeln lauten
1. Bleiben Sie auf den empfohlenen Routen 2. Respektieren Sie Schutzgebiete und Wildzonen; vermeiden Sie Lärm. 3. Vermeiden Sie, wann immer möglich, jeden Kontakt mit Wildtieren, beobachten Sie sie nur aus der Ferne. Umgehen Sie Futterstellen. Führen Sie Hunde an der Leine. 4. Meiden Sie im Hochwinter vor 10 Uhr morgens und nach 16 Uhr nachmittags Gipfel und Kämme. 5. Bleiben Sie in bewaldeten Gebieten und an der Baumgrenze auf Forststraßen und markierten Wegen; halten Sie Abstand zu einzelnen Baum- und Strauchgruppen. 6. Schützen Sie Aufforstungsflächen und junge Wälder. 7. Benutzen Sie umweltfreundliche Verkehrsmittel: öffentliche Verkehrsmittel oder Fahrgemeinschaften; benutzen Sie gekennzeichnete Parkplätze; blockieren Sie keine Einfahrten. 8. Planen Sie mehrtägige Reisen, anstatt mehrere Tagesausflüge zu unternehmen; essen Sie bei den örtlichen Wirten. 9. Planen Sie Ihre Touren anhand von Reiseführern und Karten. 10. Bewegen Sie sich innerhalb der Grenzen des Skigebiets
Quelle: www.alpenverein.de

“We at MDV Sports love winter sports and are fascinated by touring offpiste and in the backcountry. However, we are always aware that we are not only responsible for ourselves and other persons, but especially for nature and its inhabitants. Currently, more and more winter sports fans are discovering the passion for ski touring. We are particularly concerned about not harming fauna or flora and protecting this unique biodiversity through respectful, environmentally conscious behavior.”
Jonathan Wiant, President Marker Dalbello Voelkl Brands
The 10 Rules
1. Stay on the recommended routes 2. Respect protected areas and wildlife zones; avoid making noise. 3. Whenever possible , avoid all contact with wild animals, do only observe them from a distance. Avoid feeding sites. Keep dogs on a leash. 4. In midwinter, avoid peaks and ridges before 10 a.m. and after 4 p.m. 5. Stay on forest roads and marked paths in forested areas and at the tree line; keep a distance from isolated groups of trees and shrubs. 6. Preserve reforestation areas and young forests. 7. Use environmentally-friendly transportation: public transport or car sharing; use marked parking areas; do not block driveways. 8. Plan multi-day trips rather than taking multiple day trips; eat locally . 9. Plan tours with guide books and maps 10. Ski touring within ski resort boundaries
- Bahasa Indonesia
- Eastern Europe
- Moscow Oblast
Elektrostal
Elektrostal Localisation : Country Russia , Oblast Moscow Oblast . Available Information : Geographical coordinates , Population, Altitude, Area, Weather and Hotel . Nearby cities and villages : Noginsk , Pavlovsky Posad and Staraya Kupavna .
Information
Find all the information of Elektrostal or click on the section of your choice in the left menu.
- Update data
Elektrostal Demography
Information on the people and the population of Elektrostal.
Elektrostal Geography
Geographic Information regarding City of Elektrostal .
Elektrostal Distance
Distance (in kilometers) between Elektrostal and the biggest cities of Russia.
Elektrostal Map
Locate simply the city of Elektrostal through the card, map and satellite image of the city.
Elektrostal Nearby cities and villages
Elektrostal weather.
Weather forecast for the next coming days and current time of Elektrostal.
Elektrostal Sunrise and sunset
Find below the times of sunrise and sunset calculated 7 days to Elektrostal.
Elektrostal Hotel
Our team has selected for you a list of hotel in Elektrostal classified by value for money. Book your hotel room at the best price.
Elektrostal Nearby
Below is a list of activities and point of interest in Elektrostal and its surroundings.
Elektrostal Page

- Information /Russian-Federation--Moscow-Oblast--Elektrostal#info
- Demography /Russian-Federation--Moscow-Oblast--Elektrostal#demo
- Geography /Russian-Federation--Moscow-Oblast--Elektrostal#geo
- Distance /Russian-Federation--Moscow-Oblast--Elektrostal#dist1
- Map /Russian-Federation--Moscow-Oblast--Elektrostal#map
- Nearby cities and villages /Russian-Federation--Moscow-Oblast--Elektrostal#dist2
- Weather /Russian-Federation--Moscow-Oblast--Elektrostal#weather
- Sunrise and sunset /Russian-Federation--Moscow-Oblast--Elektrostal#sun
- Hotel /Russian-Federation--Moscow-Oblast--Elektrostal#hotel
- Nearby /Russian-Federation--Moscow-Oblast--Elektrostal#around
- Page /Russian-Federation--Moscow-Oblast--Elektrostal#page
- Terms of Use
- Copyright © 2024 DB-City - All rights reserved
- Change Ad Consent Do not sell my data
- Share full article
For more audio journalism and storytelling, download New York Times Audio , a new iOS app available for news subscribers.

- June 14, 2024 • 34:50 How to Retire as Early as Humanly Possible
- June 13, 2024 • 31:20 Inside Trump’s Search for a Vice President
- June 12, 2024 • 27:55 The Criminal Conviction of Hunter Biden
- June 11, 2024 • 24:11 Biden’s Hard-Line Effort to Close the Border
- June 10, 2024 • 33:44 The Rise and Fall of Congestion Pricing in New York
- June 7, 2024 • 30:00 Real Teenagers, Fake Nudes: The Rise of Deepfakes in American Schools
- June 6, 2024 • 23:38 The Fight Over the Next Pandemic
- June 5, 2024 • 30:42 Biden’s Push to End the War in Gaza
- June 4, 2024 • 29:17 A Conversation With President Zelensky
- June 3, 2024 • 32:07 How Trump’s Conviction Could Reshape the Election
- May 31, 2024 • 31:29 Guilty
- May 30, 2024 • 25:21 The Government Takes On Ticketmaster
Real Teenagers, Fake Nudes: The Rise of Deepfakes in American Schools
Students are using artificial intelligence to create sexually explicit images of their classmates..
Hosted by Sabrina Tavernise
Featuring Natasha Singer
Produced by Sydney Harper and Shannon M. Lin
Edited by Marc Georges
Original music by Marion Lozano , Elisheba Ittoop and Dan Powell
Engineered by Chris Wood
Listen and follow The Daily Apple Podcasts | Spotify | Amazon Music | YouTube
Warning: this episode contains strong language, descriptions of explicit content and sexual harassment
A disturbing new problem is sweeping American schools: Students are using artificial intelligence to create sexually explicit images of their classmates and then share them without the person depicted even knowing.
Natasha Singer, who covers technology, business and society for The Times, discusses the rise of deepfake nudes and one girl’s fight to stop them.
On today’s episode
Natasha Singer , a reporter covering technology, business and society for The New York Times.

Background reading
Using artificial intelligence, middle and high school students have fabricated explicit images of female classmates and shared the doctored pictures.
Spurred by teenage girls, states have moved to ban deepfake nudes .
There are a lot of ways to listen to The Daily. Here’s how.
We aim to make transcripts available the next workday after an episode’s publication. You can find them at the top of the page.
The Daily is made by Rachel Quester, Lynsea Garrison, Clare Toeniskoetter, Paige Cowett, Michael Simon Johnson, Brad Fisher, Chris Wood, Jessica Cheung, Stella Tan, Alexandra Leigh Young, Lisa Chow, Eric Krupke, Marc Georges, Luke Vander Ploeg, M.J. Davis Lin, Dan Powell, Sydney Harper, Mike Benoist, Liz O. Baylen, Asthaa Chaturvedi, Rachelle Bonja, Diana Nguyen, Marion Lozano, Corey Schreppel, Rob Szypko, Elisheba Ittoop, Mooj Zadie, Patricia Willens, Rowan Niemisto, Jody Becker, Rikki Novetsky, John Ketchum, Nina Feldman, Will Reid, Carlos Prieto, Ben Calhoun, Susan Lee, Lexie Diao, Mary Wilson, Alex Stern, Sophia Lanman, Shannon Lin, Diane Wong, Devon Taylor, Alyssa Moxley, Summer Thomad, Olivia Natt, Daniel Ramirez and Brendan Klinkenberg.
Our theme music is by Jim Brunberg and Ben Landsverk of Wonderly. Special thanks to Sam Dolnick, Paula Szuchman, Lisa Tobin, Larissa Anderson, Julia Simon, Sofia Milan, Mahima Chablani, Elizabeth Davis-Moorer, Jeffrey Miranda, Maddy Masiello, Isabella Anderson, Nina Lassam and Nick Pitman.
Natasha Singer writes about technology, business and society. She is currently reporting on the far-reaching ways that tech companies and their tools are reshaping public schools, higher education and job opportunities. More about Natasha Singer
Advertisement
COMMENTS
How to kick turn. Stomp out a rough platform, if possible. (After doing so, resist the instinct to take your skis off, swing them around by hand and put them back on again because that would be far too sensible). Shift all your weight onto your downhill ski. Plant both poles uphill in a position that will not interfere with the forthcoming ...
Start with the upper ski on the mountain side followed by the ski in the lower position and move them in the new walking direction. As a preliminary exercise, simply stand on one leg in flatter terrain, keep your balance and then slowly try the individual steps of the kick turn. In the beginning it can help to put the ski on the upper edge of ...
Watch on. The Basics: Plant your outside foot so it's facing up the hill. Walk right around it and move on. When it gets steeper, you can throw your tail in the snow underneath your outside ski to make yourself a little more balanced. Turn around and keep on rolling to the top. Shop men's ski gear shop women's ski gear.
Learn how to make a good kick turn to make your ski touring more enjoyable! This is the easy way. The 2 common flaws to avoid when doing a kick turn while sk...
Kick turns are an effective way to change directions on skis and learning to do them is a key skill for exploring off-piste terrain. In this REI Expert Advic...
The tricky part is the kick turn — the movement you need to execute when you reach the end of a zig zag and have to turn around. But if you start off practising on a gentle route with an easy slope incline, under the watchful eye of a good guide, you'll nail it pretty quickly. ... But as you ski tour more, This is kit you need to know like ...
An instructional video by Action Outdoors especially for ski tourers or splitboarders learning to do up hill kick turns. Demonstrating how to do a kick turn ...
How to ski tour 6 min read. Ski touring is a fantastic way to expand your skiing horizons beyond the boundaries of the ski resort and into an amazing world of high mountains, backcountry wilderness and rarely-travelled alpine terrain. ... Kick turns - when the terrain gets too steep for backcountry skiers to efficiently skin straight up, they ...
Stem Christie. Parallel. Carve. Jump. Kick. Pivot/Braquage. It's extremely important to pick the right turn for the right situation. That's why learning all 7 of them could kick your skiing skills up a level and majorly improve your confidence. Let's learn when it is and isn't appropriate to use these ski turns.
The kick turn is an essential skiing technique that every avid skier should master. This advanced maneuver involves turning your skis 180 degrees while standing still or moving uphill, allowing you to navigate difficult terrain with ease.
Kick Back. Photo credit: Keri Bascetta. With your weight on the downhill ski, lift your uphill foot behind the heel of your downhill foot. The tail of your uphill ski will fall so the shovel can clear your uphill pole. Pro Tip: "Kick your leg back to clear the tip of that ski to step it parallel to your other ski," says MacArthur.
The kick turn is also useful for changing direction while traversing up a hillside. When you come to the point where you want to change direction, level your skis across the hill, and begin to pack out a stable platform in the snow. Plant the poles above your uphill ski and kick your downhill ski around first.
Check out SKI's comprehensive online course, Uphill Skiing 101, to get the skinny on what gear you'll need and get tips and tactics for moving uphill safely and efficiently. More Backcountry Tips and Gear. The Skinny on Skinning: Backcountry Tips for Beginners Master the Skin-Track Kick Turn Best Jackets and Pants for Backcountry Skiing
In this ski touring tutorial we squeezed 10 tutorials into one so it will contain a lot of information but we could obviously not cover everything and we apo...
Nearly all ski shops at major resorts will rent or demo backcountry packages that include skis, skins, AT boots and bindings, and poles for around $40 a day. Backcountry Skiing Backpack. Because you'll always want to carry layers, water, and some snacks when ski touring, you'll need a pack to haul all your stuff.
How to do a kick turn? And how do I step into a pin binding correctly? ... Ski tour. how to master kick turns. To the article. Skitouring - Route planning. Planning is much more than just choosing the most beautiful summit. To enjoy the tour you need the right touring equipment, good weather and the necessary knowledge about alpine dangers and ...
Elektrostal is a city in Moscow Oblast, Russia, located 58 kilometers east of Moscow. Elektrostal has about 158,000 residents. Mapcarta, the open map.
Elektrostal Geography. Geographic Information regarding City of Elektrostal. Elektrostal Geographical coordinates. Latitude: 55.8, Longitude: 38.45. 55° 48′ 0″ North, 38° 27′ 0″ East. Elektrostal Area. 4,951 hectares. 49.51 km² (19.12 sq mi) Elektrostal Altitude.
Learn how to master the art of the kick turn with instruction from the American Mountain Guides Association.
Find the Best Ski Resorts and Ski Chalets in or near Elektrostal. We Feature Premium Hotels, Resorts, and Slopeside Apartments as well as Ski-in/Ski-out Chalets, Condos, and Cabins. Compare 41 Luxury and Discount Accommodation Options Available. Get Hot Deals in Hottest Destinations on Hotala™.
Elektrostal , lit: Electric and Сталь , lit: Steel) is a city in Moscow Oblast, Russia, located 58 kilometers east of Moscow. Population: 155,196 ; 146,294 ...
Step-by-step 'how to' video on how to do kick turns in skiing, by Mountain Adventure Guides, based in Chamonix, France.
A disturbing new problem is sweeping American schools: Students are using artificial intelligence to create sexually explicit images of their classmates and then share them without the person ...