- Compare Providers
- Review Providers

How to Get Home Internet on Your Wi-Fi Devices
Our simple step-by-step guide to getting connected
Getting connected and setting up your Wi-Fi network is easier than you may think. If you’re lucky, the internet provider you choose installs a gateway or a standalone modem and router (or mesh system) for you, so all you do is connect your wired and wireless devices. Bam. Boom. Class dismissed.
But if you don’t have internet or a home network, read on to find out how to get service, install the equipment, and connect your wired and wireless devices.
Jump to: Get internet | Install the modem | Install the router | Connect your devices
- Get internet
- Install the modem
- Install the router
- Connect your devices
Step 1: Get internet
Since you’re here, we’ll assume you don’t have home internet (or you want to switch). Use our tool below to see what’s available in your zip code.
Once you sign up for service, you will have two installation options, depending on what your home needs: Professional or self-install.
Normally, homes not currently wired for internet require a professional install. Some providers actually insist on a professional install even if your home is ready for the internet for several reasons, including:
- The entry point must be relocated
- The cabling outside needs repairing
- Mesh satellites require placement and signal testing
Self-installation is an option if your home is already wired for internet and there are no immediate issues that demand a technician. It’s also your cheaper option, although you may get lucky with free professional installation (meaning less work for you, so take it).
Ready to get internet? Let’s go!
Enter your zip code below to see what’s available. When you decide on a plan, you can order service online or call a customer service representative. Be sure to check out our guide to choosing an internet provider for the best speeds you can afford.
Step 2: Install the modem
When we say “ modem ,” we’re referring to the standalone device that connects to a coax cable or telephone line.
Internet providers also use the term “modem” when talking about their equipment for fiber internet (for simplicity’s sake). There’s still some “modeming” involved, but the technology is vastly different. They’re actually called optical network terminals (ONTs), and what you get may be a standalone unit installed by a technician or embedded in a gateway you can install yourself.
Regardless, you can’t access your new internet service pouring out of the incoming line without a modem, gateway, or fiber ONT. Think of it as the translator that bridges your provider’s network with your home network.
Need a modem for gigabit internet? Check out our guide to the best gigabit modems .
That said, after you sign up for internet service, your provider will install or give you one of two setups, depending on your internet type, home requirements, and your provider’s current hardware package:
- You receive a separate modem and router (or mesh system) or
- You receive a single gateway (with possible satellites)
To connect your modem or gateway to your home internet connection, find your main internet line. Here’s what to look for:
Once your internet connection is plugged in, check the status lights on your modem or gateway. It can take a while for things to come fully online. If it doesn’t, call your internet provider to activate the device (basically to make sure the provider’s network recognizes it) or use a mobile device to sign in to your account and activate the modem from there.
Okay, the modem or gateway is good to go. Now what? You have two options:
- If you installed a standalone modem, move on to the next section to install your router or mesh system.
- If you installed a gateway, skip the next section and learn how to connect your devices .
You can connect a computer directly to your modem with an Ethernet cable to ensure that your internet is working properly. However, we don’t recommend using a direct modem connection for regular internet use because your other devices can’t access the internet. You also bypass the router’s firewall(s) when you connect directly to a modem.
Here are some additional modem resources:
- Modem and Router Light Meaning Explained
- Are Ethernet Cables Slowing Your Connection?
- DOCSIS 3.0 vs. DOCSIS 3.1: Which Modem Is Right for You?
Step 3: Install the router
We assume you’re here because you installed a standalone modem, and now you have this other thing called a router or mesh system . You can access the internet without either one, but you’ll be limiting yourself to just one wired device. Plus, it’s not a good idea to connect directly to the modem for long periods because routers and mesh systems have at least one firewall to keep the creeps out of your devices.
In short, the router or mesh system creates your home network. Think of it as your digital post office: It routes digital “mail” to and from the modem to all your devices (P.O. boxes).
Modern routers and mesh systems support Wi-Fi 6, Wi-Fi 6E, and the newer Wi-Fi 7, so you want wireless devices that support these standards. Depending on the model, they also provide wired speeds up to 10Gbps.
However, there are many factors to consider when choosing a router or mesh system. If you need some help making a decision, see our articles on the best routers and the best mesh systems .
That all said, here’s how to install your router or mesh system:
Step 1: Plug one end of the provided Ethernet cable into the modem’s WAN port and the other end into the WAN port on a standalone router or into an Ethernet port on the first unit in your mesh system kit.
Step 2: Plug your router or mesh unit’s power supply into the wall outlet and press the power button or simply wait for it to turn on—some models don’t have a power button (go figure).
Step 3: Wait for the status lights to show that it’s connected to the internet successfully and Wi-Fi is active and ready.
Step 4: Locate the login information affixed to the bottom of the router or mesh system unit. This tag normally includes (1) the default IP address and a custom URL for setting up the router using a browser and (2) a unique network name and passcode for accessing the router over Wi-Fi for the first time. You’ll also see a QR code for installing the manufacturer’s mobile app (which is required for nearly every mesh system).
Step 5: Log in to the web interface or mobile app and follow the instructions for setting up your router or mesh system.
If you want separate networks for each radio (band), be sure to disable Smart Connect/Band Steering/Whatever (no one is on the same page with the terminology) during the setup process or afterward. You’ll need to use separate names, but you can use the same password. However, for simplicity, most mesh systems do not allow you to create separate networks.
Here are some additional router resources:
- Where Is the Best Place to Set Up Your Router?
- How to Connect Your Computer to Your Router with a Wired Connection
- How to Log In to Your Router
- How to Set Up a Router
- How to Find the Best Channels for Your Router
- How to Set Up Parental Controls on Your Router
- How to Update Your Router’s Firmware
- How to Factory Reset Your Router
- How to Set Up a Mesh Network
Step 4: Connect your devices
With your gateway, router, or mesh system ready to roll, let’s get your devices connected!
But wait! If you set up your router or mesh system using a wireless device, then you don’t need to find the network and enter the password on that device—it should be connected already (or be able to). Plus, if you have multiple devices accessing the same cloud account, like Apple iCloud, your new Wi-Fi settings are already applied to the devices you use.
That said, if you don’t need to set up wireless devices, then skip to the next section to connect your wired devices. Otherwise, continue on.
How to connect to Wi-Fi
Use these instructions for devices not already connected to your new Wi-Fi network (and don’t have the connection stored in the cloud).
iPhone and iPad
Step 1: Tap Settings .
Step 2: Tap Wi-Fi .
Step 3: Tap on the network’s name.
Step 4: Enter the network’s password.
Android (stock)
Step 1: Swipe down from the top to expand the Notification Shade and tap on the “cog” icon. This opens the Settings panel.
Android (Samsung)
Step 1: Swipe down from the top to expand the Notification Shade and tap on the “cog” icon, This opens the Settings panel.
Step 2: Tap Connections .
Step 3: Tap Wi-Fi .
Step 4: Tap on the network’s name.
Step 5: Enter the network’s password.
Step 6: Tap Connect .
Microsoft Windows
Step 1: Click on the Wi-Fi icon displayed on the taskbar.
Step 2: Click on the network’s name listed on the pop-up menu.
Step 3: Click on the Connect button.
Step 5: Click on the box next to Connect Automatically if you want to autoconnect.
Apple macOS
Step 1: Click the Wi-Fi icon displayed on the menu bar.
Step 2: Click on the network’s name listed on the drop-down menu.
Step 3: Enter the network’s password.
Step 4: Click Join .
How to connect via Ethernet
Your wired devices should be easy to connect. Simply plug one end of an Ethernet cable into one of the router’s “LAN” Ethernet ports on the back and the other end into the Ethernet port on your computer, laptop, game console, or other wired device. Some mesh systems only have one or two Ethernet ports, so your wired options are limited. If your device doesn’t have an Ethernet port, you can use an adapter. Here are a few suggestions:
- USB-C to Ethernet
- USB-A to Ethernet
If there aren’t enough Ethernet ports on your router, add an Ethernet switch to expand your network.
Other home networking resources
- How to Troubleshoot Internet Issues
- Why Can I Only Get a Few Internet Providers?
- How to Change Your Wi-Fi Network Name and Password
- What Cables Do I Need to Connect My Router to My Computer?
Author - Kevin Parrish
Kevin Parrish has more than a decade of experience working as a writer, editor, and product tester. He began writing about computer hardware and soon branched out to other devices and services such as networking equipment, phones and tablets, game consoles, and other internet-connected devices. His work has appeared in Tom’s Hardware, Tom's Guide, Maximum PC, Digital Trends, Android Authority, How-To Geek, Lifewire, and others. At HighSpeedInternet.com, he focuses on network equipment testing and review.
Editor - Aaron Gates
Related Posts

- PRO Courses Guides New Tech Help Pro Expert Videos About wikiHow Pro Upgrade Sign In
- EDIT Edit this Article
- EXPLORE Tech Help Pro About Us Random Article Quizzes Request a New Article Community Dashboard This Or That Game Popular Categories Arts and Entertainment Artwork Books Movies Computers and Electronics Computers Phone Skills Technology Hacks Health Men's Health Mental Health Women's Health Relationships Dating Love Relationship Issues Hobbies and Crafts Crafts Drawing Games Education & Communication Communication Skills Personal Development Studying Personal Care and Style Fashion Hair Care Personal Hygiene Youth Personal Care School Stuff Dating All Categories Arts and Entertainment Finance and Business Home and Garden Relationship Quizzes Cars & Other Vehicles Food and Entertaining Personal Care and Style Sports and Fitness Computers and Electronics Health Pets and Animals Travel Education & Communication Hobbies and Crafts Philosophy and Religion Work World Family Life Holidays and Traditions Relationships Youth
- Browse Articles
- Learn Something New
- Quizzes Hot
- This Or That Game
- Train Your Brain
- Explore More
- Support wikiHow
- About wikiHow
- Log in / Sign up
- Computers and Electronics
- Computer Networking
- Wireless Networking
How to Set Up and Connect to a Wi-Fi Network: Easy Guide
Last Updated: May 9, 2024 Fact Checked
Installation
Configuration, expert q&a.
This article was co-authored by Luigi Oppido and by wikiHow staff writer, Darlene Antonelli, MA . Luigi Oppido is the Owner and Operator of Pleasure Point Computers in Santa Cruz, California. Luigi has over 25 years of experience in general computer repair, data recovery, virus removal, and upgrades. He is also the host of the Computer Man Show! broadcasted on KSQD covering central California for over two years. This article has been fact-checked, ensuring the accuracy of any cited facts and confirming the authority of its sources. This article has been viewed 1,110,756 times.
Do you want to create a solid home network for all of your wireless devices? If you want to use a network or access the internet wirelessly, you'll need to set up a Wi-Fi network. Installing a router is the first step, but how do you choose the right one? And what do you do after that? This wikiHow article teaches you how to set up a wireless network connection at home, and walks you through the simple steps of connecting your PC, Mac, Android, iPhone, and iPad to Wi-Fi.
Things You Should Know
- If your ISP doesn't offer a modem and router with their internet packages that you like, you can buy one from almost any electronics retailer.
- Connect the router to your computer via an ethernet cable so you can set up Wi-Fi settings.
- Log into your router from your computer's web browser and create a network name and password.

- One of the most important factors to consider when purchasing a router is the distance between the router and the devices that you are wirelessly connecting. More expensive routers generally have more antennae, which can lead to a more stable connection at further distances.
- Another factor to consider is the amount of signal interference. If you have multiple devices that operate on the 2.4 GHz band, such as microwaves and cordless phones, these can interfere with the Wi-Fi signal. Newer routers can operate on the 5 GHz band, which is much less crowded and thus less prone to interference. The drawback is that 5 GHz signals do not travel as far as 2.4 GHz signals.
- . If you're purchasing a separate router and modem, transfer speed is a feature to consider. Newer routers claim to be able to transfer data up to 450 Mbps. While this may be helpful when moving data between two computers over a network, it will not increase your general Internet speed, as this is set by your ISP. There are three main router speeds available: 802.11g (54 Mbps) 802.11n (300 Mbps), and 802.11ac (450 Mbps). It is important to note that these speeds are virtually impossible to attain in any environment other than a clean room free of signal interference.
- Finally, make sure that the router you are purchasing has the latest form of wireless encryption, WPA2. This is pretty much standard in all new routers but is something to consider if purchasing an older, second-hand router. Older encryption algorithms are much less secure; a WEP key can be cracked in just a few minutes.

- Make sure that the router is properly powered and turned on.

- For optimum efficiency while setting up the router, plug it in next to your computer while you adjust the settings. After you are finished configuring the router, you can move it to where it will normally stay. [1] X Trustworthy Source Microsoft Support Technical support and product information from Microsoft. Go to source
Kevin Burnett
Wireless security still relies on physical wired networking. You need fundamentals like internet service, hardware routers and Ethernet cables making connections. Wireless grows out of this hardline backbone.

- You will be asked for a username and password to continue into the router configuration. These are also provided in the documentation that came with your router. Typical defaults are username: admin and Password: password or admin.

- To set the name of the network, select the SSID field. This is the name that will be displayed on any device that detects your network. If you are living in an area with a lot of public traffic, avoid putting any identifiable information in the SSID, as anyone with a wireless device can see it.
- Make sure to set the encryption to the latest version allowed by your router. In most cases, this will be WPA2. WPA2 operates with a single password. You can enter whatever you'd like, but a strong password is recommended. Stronger passwords contain upper and lowercase letters, numbers, and symbols.

- Remember that it must be physically connected to your modem, so this may limit your options when placing the router.

- On an Android, swipe down from the top of your screen and tap and hold the Wi-Fi icon, which will open your Wi-Fi settings. Slide the "Wi-Fi" switch to "ON" (or tap the option to Use Wi-Fi ) and tap a network's name.
- On an iPhone or iPad, open Settings and tap Wi-Fi , tap the switch ON , and tap your network's name.
- On macOS, click the Wi-Fi icon in the menu bar at the top of the screen, and click your network's name. If the network doesn't require a password, your Mac will connect automatically. If a password is required, you'll be prompted to enter it now.
- On Windows 10/11, click the network icon in the taskbar, then click your network's name. Click Connect next to the network you want to join. If the network has no password, you'll connect automatically after clicking Connect .

- If your internet connection feels slower than it should, [ are a few troubleshooting steps ] you can take to fix that issue. Thanks Helpful 0 Not Helpful 0
- Improve your Wi-Fi signal by buying an extender or upgrading your older router/modem to a more modern version. Thanks Helpful 0 Not Helpful 0

You Might Also Like

- ↑ https://support.microsoft.com/en-us/windows/setting-up-a-wireless-network-in-windows-97914e31-3aa4-406d-cef6-f1629e2c3721
About This Article

- Send fan mail to authors
Reader Success Stories
Olaniyi Adigun
Feb 1, 2017
Is this article up to date?
Nov 15, 2017
Narendra Parihar
Jul 27, 2016

Featured Articles

Trending Articles

Watch Articles

- Terms of Use
- Privacy Policy
- Do Not Sell or Share My Info
- Not Selling Info
Keep up with the latest tech with wikiHow's free Tech Help Newsletter
- How to Set Up a Home Wi-Fi Network
Setting up your Wi-Fi network is easier than you may think.
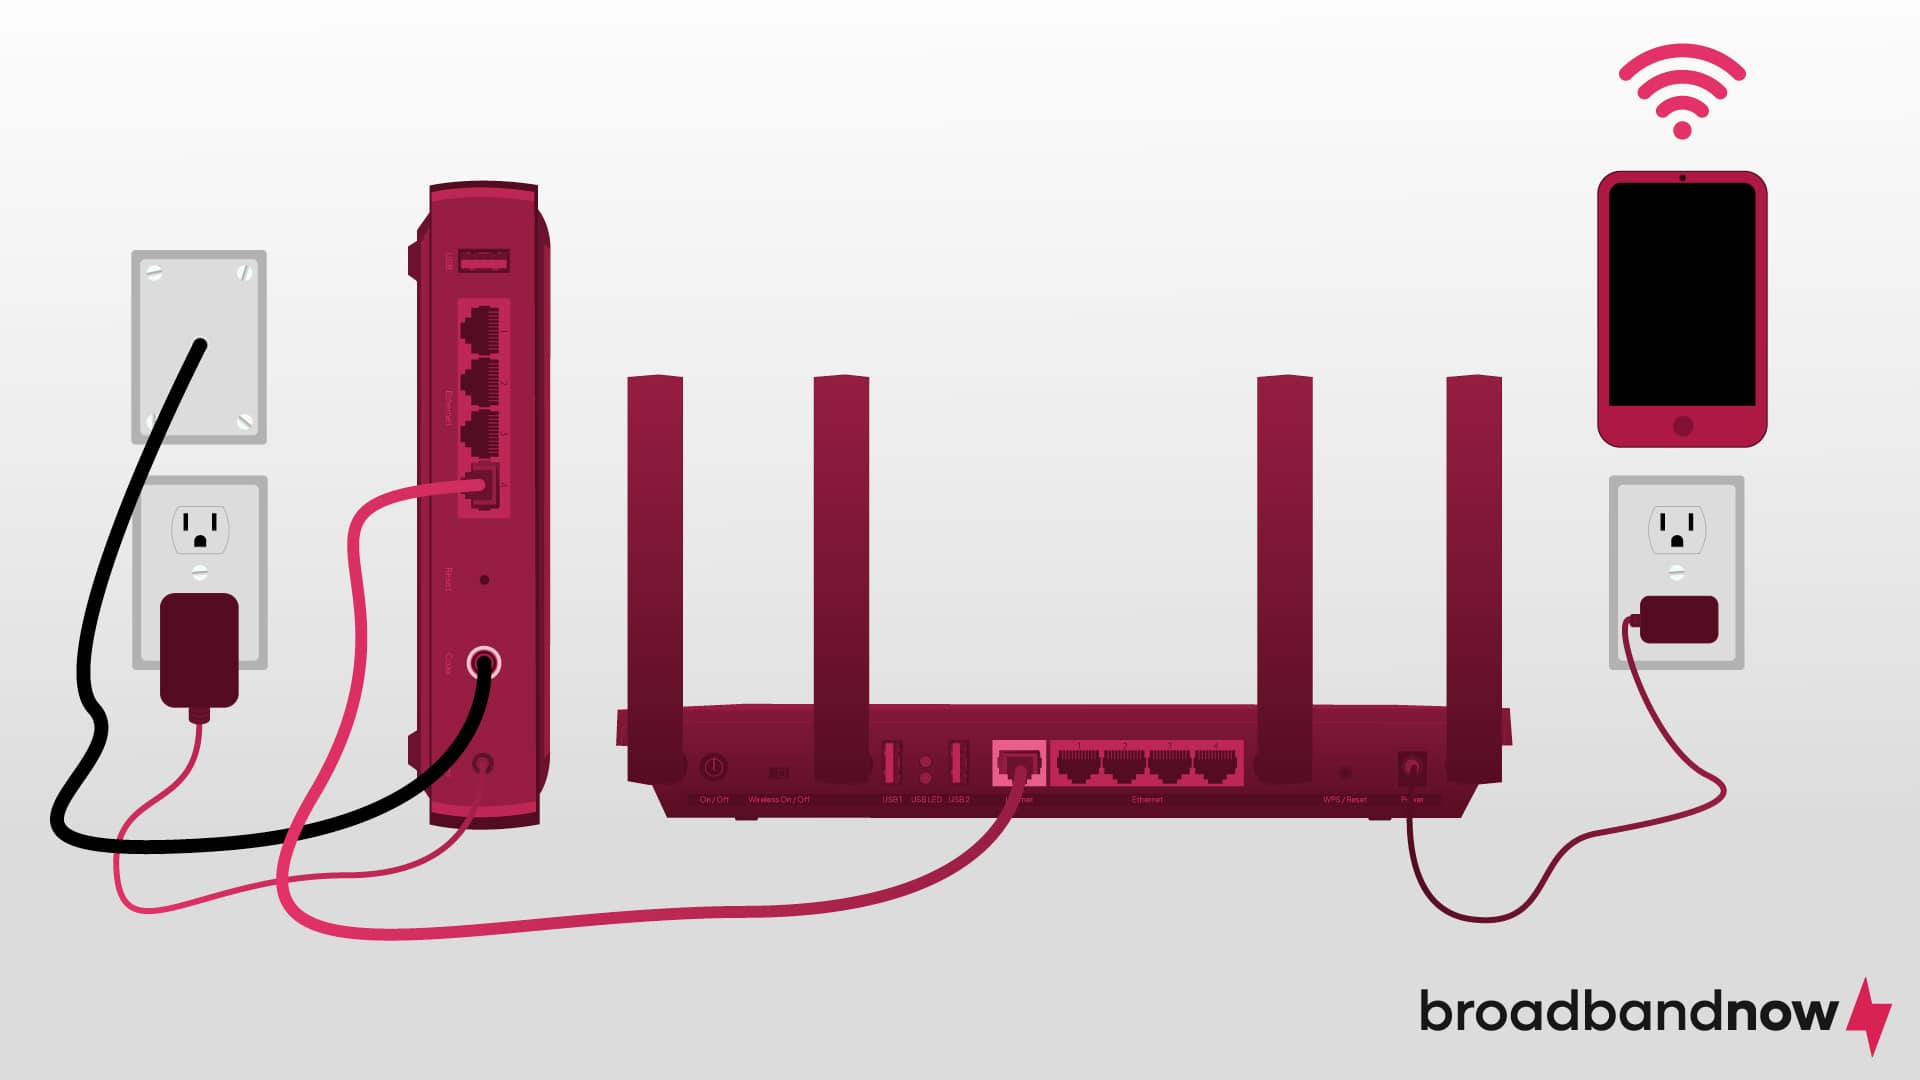
- Setting up a home Wi-Fi network is generally straightforward and can be cost-saving compared to professional installation, requiring basic technical skills and careful consideration of internet needs.
- Optimal placement of modem and router, away from electronic interference, is crucial for maximizing Wi-Fi signal strength throughout the home.
- Ensuring Wi-Fi network security through unique SSID and password, along with educating household members on safe internet practices, is essential for safeguarding against unauthorized access and cyberthreats.
While setting up your own home Wi-Fi network can seem stressful at first, the savings compared to professional installation make it worth the learning process. Anyone can set up a home Wi-Fi network with some technical skill and patience. In this guide, we’ll walk you through the straightforward steps to establishing a home Wi-Fi network and provide you with the essential tips you need to keep your new network secure.
Preparing to Set Up a Home Wi-Fi Network
Before setting up your Wi-Fi network, you must make certain preparations to ensure a smooth setup. Here are four steps to take prior to plugging in anything:
- Choose an internet service provider (ISP). The available providers in your area will vary based on your location, and you may only have access to a few options. Use your ZIP code to find ISPs in your area. Then determine which internet provider offers plans matching your budget and speed necessities.
- Evaluate your Wi-Fi requirements. Start evaluating your household Wi-Fi requirements by determining the number of devices that will connect to the network, the size of your home, and the typical online activities. This assessment will help you decide on the appropriate Wi-Fi technology, such as Wi-Fi 6 for faster speeds and better performance in crowded networks.
- Select your internet speed. Consider the available plans and pricing to find the one that aligns with your household’s internet needs for speed and reliability. Don’t forget to research customer reviews to understand the type of service you can expect.
- Gather all the necessary equipment. Put together your modem, a router, an Ethernet cable, and any additional accessories that came with your self-installation kit into one space. Be sure you have the required login credentials from your ISP, and consider choosing a strong and secure Wi-Fi network name (SSID) and password during the setup process.
Once you’ve made all of the preparation steps, you’re now ready to set up your very own home Wi-Fi network. Follow these steps to establish a strong Wi-Fi network in your household:
Determine the Location of Your Devices
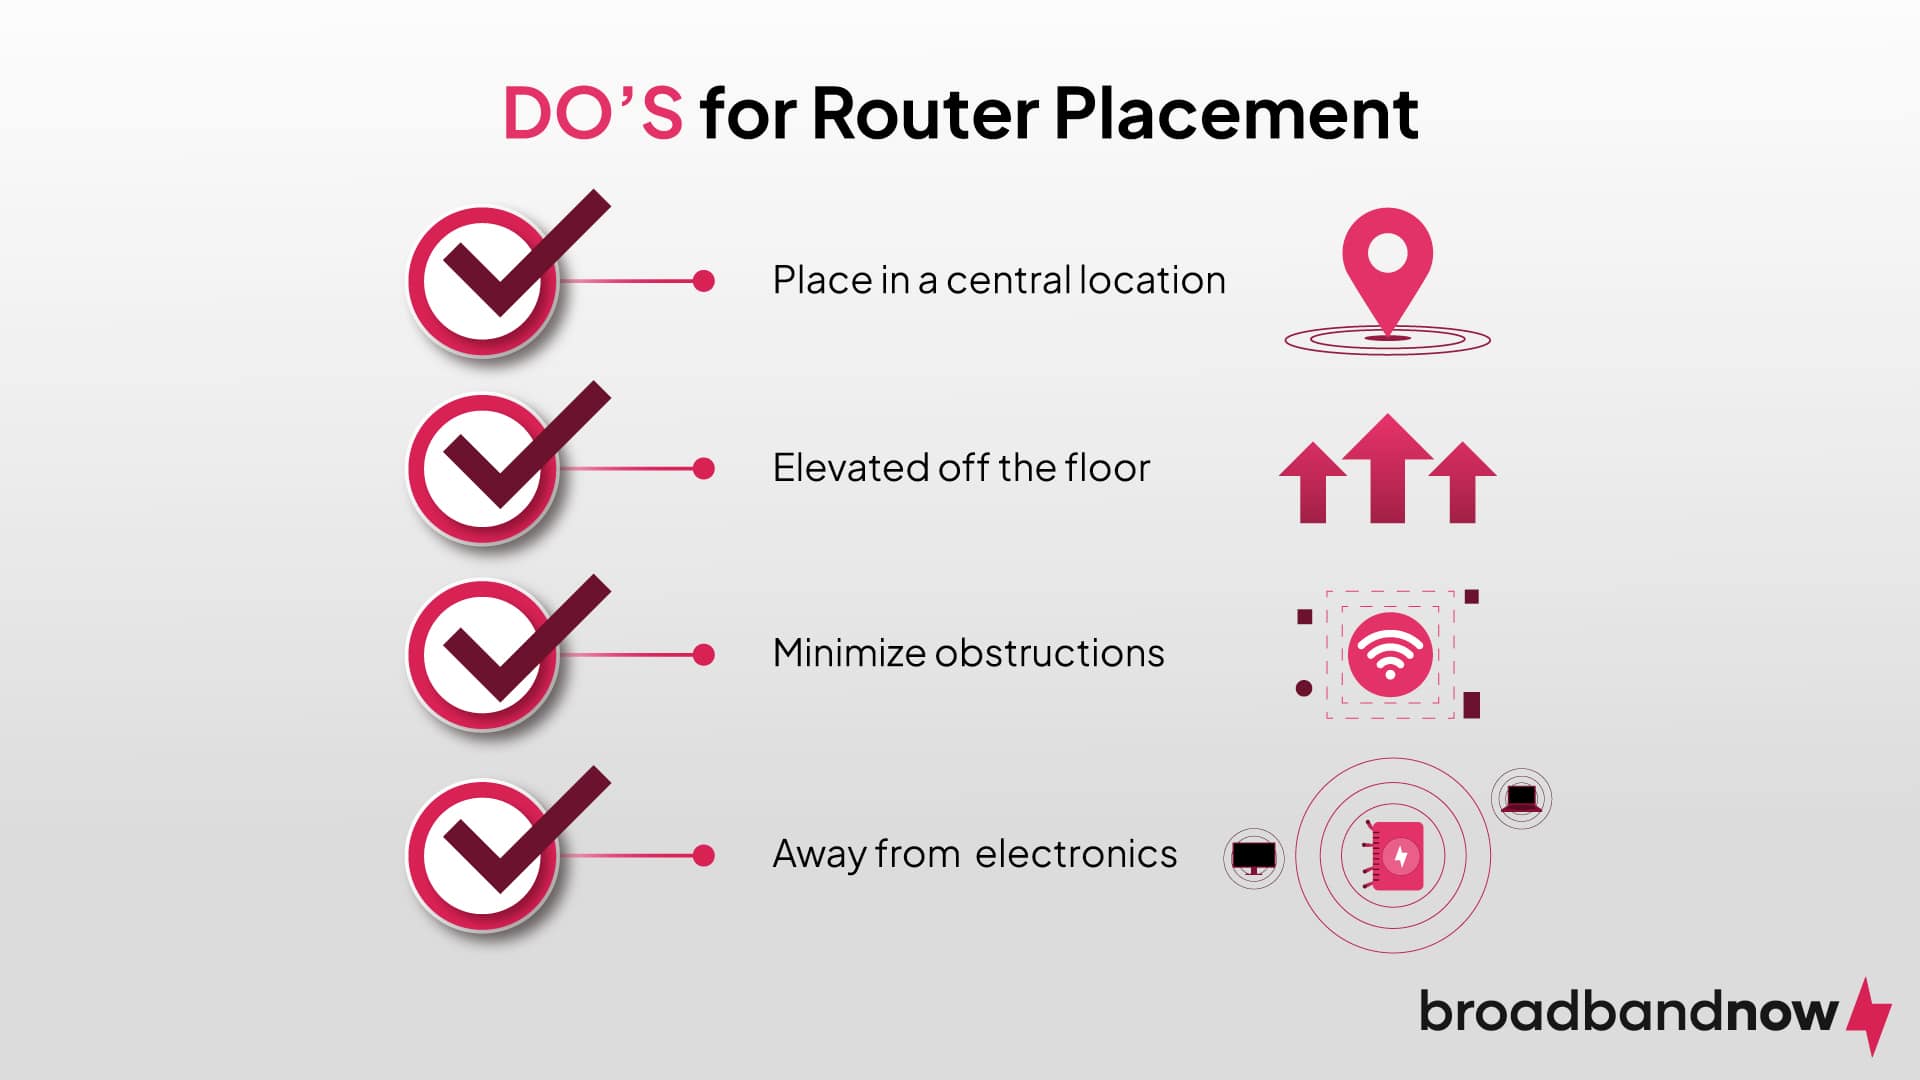
Choosing a location for your modem and router is essential to boost the Wi-Fi signal throughout your home. Typically, the best location is in the center of the home. In my home, the living room is the area that makes the most sense. You also want the location to be away from too many electronic devices or appliances, which is why the kitchen is generally not the best choice.
The modem poses only a few challenges with placement, but the router location significantly affects signal strength. Choose a router placement that’s elevated off the ground with minimal obstructions. Keeping a router on top of an end table without any other objects is usually your best choice. But work with what you have, and feel free to test out different locations to find the spot that works best.
You may be limited on where you can place your modem and router, depending on where you have to plug in your modem. Do your best to find a spot within reach of that area and adhere to optimal location practices.
Set Up Your Modem
Using the provided cord for your modem, plug it into your main internet line. This process will look different depending on the type of internet service you have. The following list explains how to connect a modem for each of the major connection types:
- Cable: Connect one end of the coaxial cable to the cable outlet on the wall. Then, attach the other end of the coaxial cable to the modem. Plug the modem into a power outlet.
- DSL: Plug one end of the phone cable into the phone jack on the wall. Then, connect the other end of the phone cable to the designated “DSL” or “Phone Line” port on the modem. Connect the modem to a power outlet.
- Satellite: Connect the satellite dish cable to the designated “Satellite In” or “Antenna In” port on the modem. Plug the modem into a power outlet. Note: The satellite setup process may involve a professional technician.
- Fiber: Connect the fiber optic cable either from the wall or the ONT (Optical Network Terminal) to the designated “Fiber” or “ONT” port on the modem. Connect the modem to a power outlet.
Once all connections are in place, check the modem for a status light to ensure everything is working. It may take a few minutes for the status light to appear.
Set Up Your Router
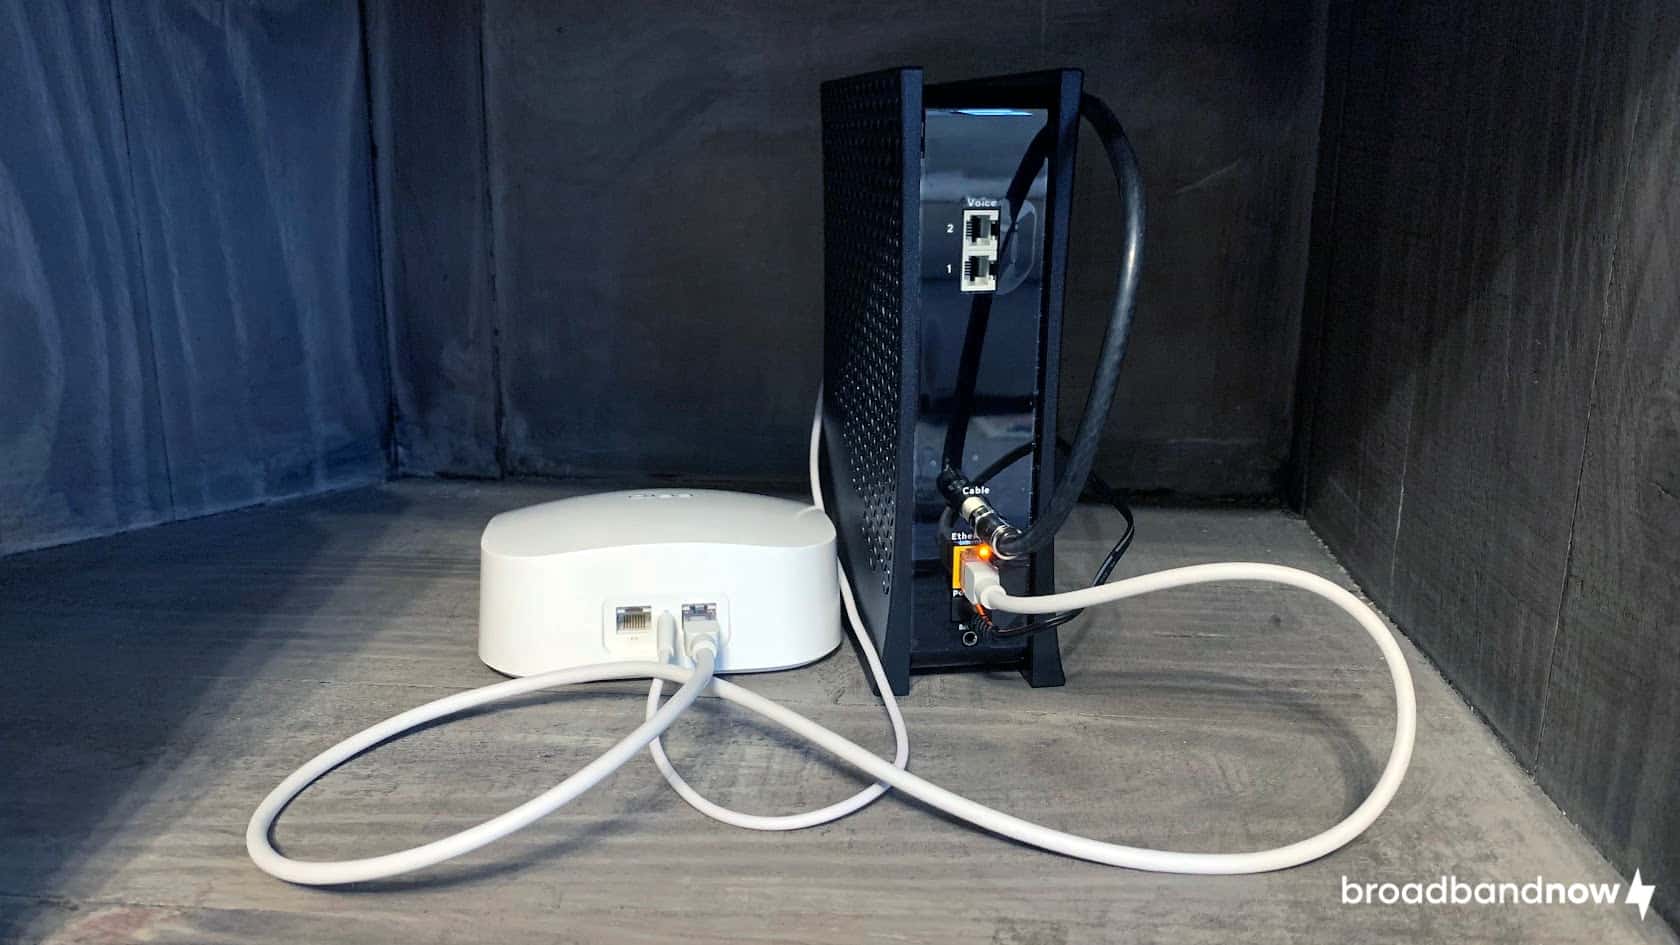
For this step, you’ll want to connect your wireless router directly to your modem using an Ethernet cable . While the modem will typically only have one Ethernet port, sometimes you may have to find the “WAN” port for this step. Many times, companies highlight this port by using a blue color rather than yellow.
Once you connect the Ethernet cord to the modem, you’ll put the other end into the router. If the router has more than one port, utilize the first port, usually denoted by a small “1” on the router itself. Once that’s done, connect the other end to an electrical outlet. Wait for the router status lights to indicate that the modem has established a connection between the router and the internet.
Activate Your Internet
Activating your internet will depend on your internet service provider’s protocols. In most cases, you can use the ISP’s app or their website to activate your service, with step-by-step instructions along the way. This step will require the use of a mobile device. If either is not the case for activation, the information for activating your internet will be provided with your self-installation kit. If your internet is already activated, you don’t have to worry about this step.
Set Up Mesh System
Using a mesh Wi-Fi system may be beneficial if your home requires a more robust Wi-Fi setup. If you are setting up a system for your home network, your system will likely provide step-by-step instructions on how to continue activating other devices.
In my home, I have an eero Pro 6 mesh Wi-Fi network . Once I set up my base router, setting up additional routers is relatively simple. To do so, find another location in your home for your router, ensuring the same best practices are followed for optimal signal strength. The location of this device is typically on another floor of the home. For homes with large square footage on a single floor, in an area on the other side of the house.
Connect these devices by simply plugging them into electrical outlets. An Ethernet cord is not required as it can be connected wirelessly to the base router. Completing setup for these devices will typically be done through the brand’s mobile app.
How to Keep Your Wi-Fi Network Secure
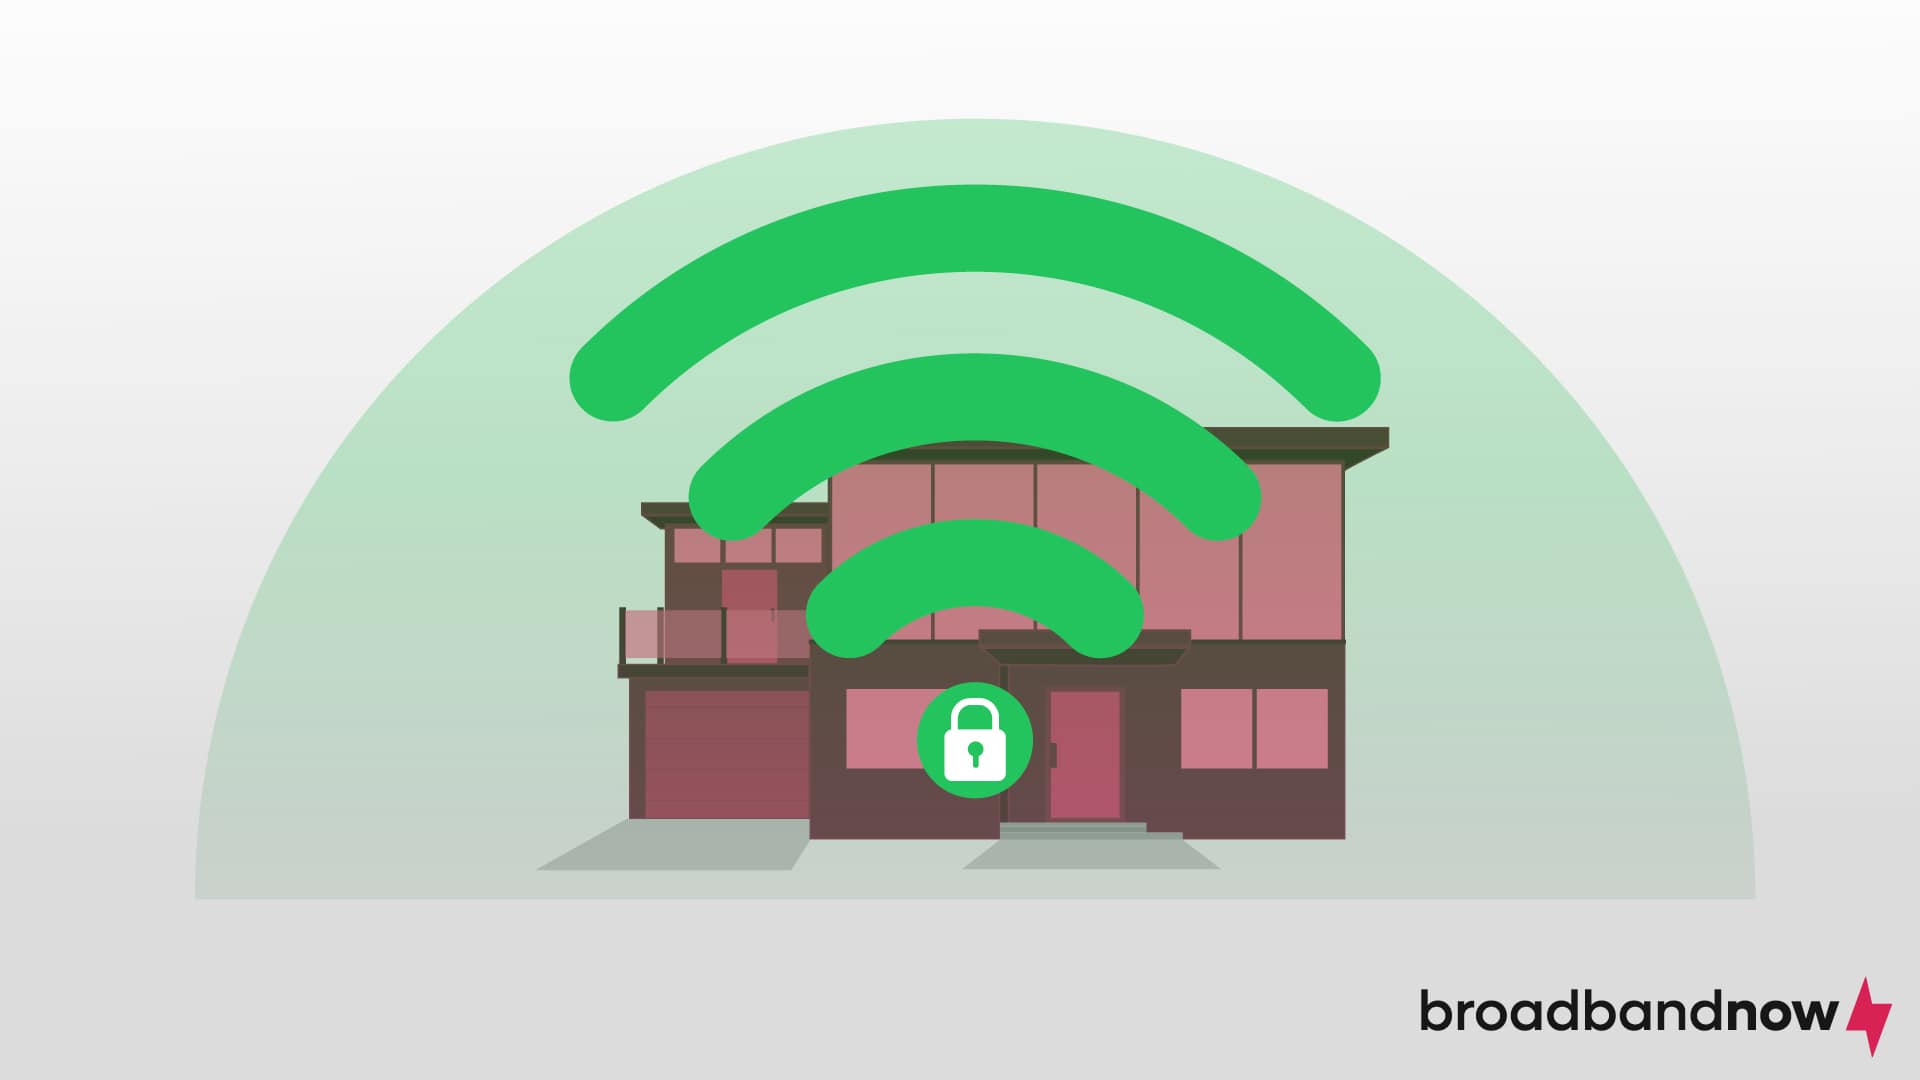
Securing your home Wi-Fi network is paramount to safeguarding against unauthorized access and preventing hackers from exploiting your internet connection for malicious purposes or gaining access to sensitive information. A secure network deters against data theft, protecting personal and confidential data transmitted over the network, including login credentials and financial details. It’s best to work through security practices following the Wi-Fi setup to prevent any potential cyberattacks.
Your router will come with login credentials. We highly recommend changing your Wi-Fi name and password to keep your home network secure. As you change these credentials, avoid incorporating personal details, such as your name, surname, or street address. Using information that’s relatively easy for cybercriminals to find increases the risk of potential hacking attempts. Opt for a distinctive yet easily memorable network name for you and your family. When changing your Wi-Fi password, use a mix of uppercase letters, lowercase letters, numbers, and symbols.
Securing Your Home Network: Keep everyone in your household informed about the importance of security practices and share guidelines for safe internet usage. Explain how to access the internet safely and why keeping this information secure matters. You should also provide useful tips on navigating the internet safely. Empower everyone to do their part to keep your home network secure.
Frequently Asked Questions About Home Wi-Fi Networks
Do i need an ethernet cable to set up a wireless router.
An Ethernet cable is required when setting up a wireless router because it establishes the initial connection between the router, the modem, and the internet. During the initial setup, connecting the router to the modem via an Ethernet cable allows you to access the router’s interface and configure settings, such as network name and password.
Do I need both a modem and a router?
A modem and a router are both required to set up Wi-Fi because they each serve different functions. A modem establishes the connection between your home network and the internet service provider to create the gateway to the internet. A router manages the local network by assigning local IP addresses to devices and directing data traffic within the network. The router ensures efficient and secure communication within your home network, allowing multiple devices to connect to the internet wirelessly.
How much does it cost to set up a home network?
The cost to set up your Wi-Fi home network will vary based on your internet service provider. On average, the cost can range between $50 and $200. This is generally a one-time upfront expense. The price may vary depending on service type, complexity, speed, cable length, and the need for additional hardware like modems and routers. Requesting a self-installation kit is less expensive than having a professional installation and is a great hack to avoid hidden internet fees .
Is it hard to set up Wi-Fi by yourself?
Setting up Wi-Fi by yourself is generally relatively easy, especially given the user-friendly interfaces of modern modems and routers. Most Wi-Fi equipment comes with detailed instructions, and the setup process often comes with guided instructions from the internet service provider. Unless there is a major roadblock in the connections of your household, setting up your Wi-Fi may require assistance from a technician. These types of roadblocks are usually found in older homes.
In most cases, setting up Wi-Fi is designed to be a straightforward process. Many people do it successfully without extensive technical knowledge. However, the difficulty level can vary based on your familiarity with the technology and the specific router model. If you’re uncomfortable with technology, you might find the process challenging. If you decide to do self-installation, there are resources like online guides or customer support to assist you.
ENTER A ZIP CODE TO FIND PROVIDERS IN YOUR AREA
Broadband shopping guide.
- Determine what Internet speed you need
- Internet Bandwidth Calculator
- Compare Urban Internet Options: DSL vs Cable vs Fiber
- Compare Rural Internet Options: Satellite Internet vs DSL
- Decide Between a Bundle or Internet-Only
- Decide Whether to Buy or Rent Your Modem
- Internet Contracts and Fees 101
- Order and Install Internet Service
INTERNET TROUBLESHOOTING AND GUIDES
- How to Set Up A Home WiFi Network
- How to Extend Home WiFi
- WiFi Security Basics
- How to Optimize a Home Network for Gaming
- How to Fix Home WiFi and Router Issues
- How to Tell if You're Being Throttled
BROADBAND CONSUMER RESOURCES
- How to Switch or Cancel Internet Service
- Low and Fixed Income Internet Options
- FCC and FTC Internet Service Complaints
- How to Negotiate With Your Internet Provider
SATELLITE INTERNET RESOURCES
- What is Satellite Internet?
- Satellite Internet Pros & Cons
- Best Satellite Internet Providers of 2024
- Satellite Internet Data Caps Explained
- The Best Satellite Internet for Gaming
- Satellite Internet for Vans and RVs
- Satellite Internet for Boats
BUSINESS BROADBAND GUIDES
- Service Level Agreements
- How to Choose A Business Internet Service Provider
Offer Detail
Advertisement
How to Set up WiFi on Your PC or Laptop
- Share Content on Facebook
- Share Content on LinkedIn
- Share Content on Flipboard
- Share Content on Reddit
- Share Content via Email

Wondering how to set up WiFi in your home or office? You can connect your PC or laptop to the internet through a Wi-Fi connection if you have a wireless router connected to broadband internet and an operating system that fully supports wireless networking.
How to Set a Home Wi-Fi Network
Troubleshooting connectivity issues, happy surfing.
If your wireless router was professionally installed by an internet service provider, chances are it's already been set up with an SSID and password encryption . In such a case, you can most likely skip straight to the final step. If you're installing it yourself, you can proceed with the guide as normal. Here's what to do:
- Power up the wireless router and use an ethernet cable to connect to one of the network ports on your internet service provider's modem.
- Open the network setup wizard [source: Microsoft ]. (Your router's manufacturer may have their own software or web client to assist the setup process. Consult your owner's manual for more details.) Depending on the version of your OS , this process varies:
- In Windows 7 or Windows 8.1, select Start, start typing Network and Sharing Center, and then choose it in the list.
- In Windows 10, select Start, then select Settings/Network & Internet/Status/Network and Sharing Center.
- In Windows 11, select Start, type Control Panel, then select Control Panel/Network and Internet/ Network and Sharing Center.
- In MacOS: Click the Wi Fi icon on the top right of the screen [source: Apple ]. A dropdown menu will appear with the list of available networks. Select your network and click "Join."
Once the wizard is accessed:
- Select: Set up a new connection or network/Set up a network/Next.
- Enter your username and password when prompted. Many routers use the term admin as a default for both. Again, check your router's manual if you don't know the default username and password.
- Pick a network name, also called an SSID, for your network, once you access your router's configuration page. Try to think of an original name that will distinguish your Wi Fi from your neighbor's Wi-Fi.
- Choose the type of security you want. WPA2 and WPA3 are more secure than WEP, but not all devices support WPA3 [source: Ghimiray ]. Create a unique password for your network. There will be hints on your router configuration page to tell you how to set up a password. Make sure to keep a hard copy of your password hidden somewhere in case you forget it.
- Locate and click on the network icon for Windows 8, 10 or 11 in the notification area to the right of the taskbar. The icon will resemble a signal meter, like you would see on a cell phone. Choose the wireless network you just set up and enter your password.
If you've followed all of the steps above and still can't establish a connection on your wireless enabled devices, try the following:
- Ensure you're within range of the Wi Fi router.
- Ensure that the router is placed in a central location.
- Restart your router and computer.
- Forget the network from your Wi Fi settings and reconnect as if it were a new Wi FI network.
- Check for hardware issues if the problem persists, especially if you're using an external adapter.
Once connected, you can browse the internet, stream videos, download files, and more. Remember, the strength and speed of your Wi Fi connection depend on the distance from the router, obstacles in between, and the bandwidth provided by local internet service providers.
Setting up wireless networks, and connecting your PC, laptop, or Mac is usually a simple task. By following tese steps, you should be able to connect to the internet via WiFi in just a few minutes. If you encounter any problems, consult troubleshooting tips or contact your ISP for further assistance.
Wi-Fi is often assumed to be short for Wireless-Fidelity. However, no such thing exists. The user-friendly term was created by a marketing firm to refer to the user-unfriendly technology known as IEEE 802.11.
Laptop WiFi FAQ
Can i buy internet for my laptop, why is my laptop is not connecting to wifi, can i get mobile internet on my laptop, which vpn is best for a laptop, are laptop wifi cards universal.
Please copy/paste the following text to properly cite this HowStuffWorks.com article:
- I Tried Both: Apple Watch 9 vs Fitbit Charge 6
- Best Places to Print Photos Online
How to Set up a Home Wi-Fi Network
Get your devices connected
- Queens College
- Harvard University Extension School
:max_bytes(150000):strip_icc():format(webp)/image-5e6611aebe974bb7886a24b5070c834f.jpg)
In This Article
Jump to a Section
How to Set Up Your Home Wi-Fi Network
- Frequently Asked Questions
What to Know
- Using Ethernet cables, connect the router to the modem, then connect your computer to your router.
- Open a web browser and enter your router's IP address to configure your Wi-Fi network's security settings.
- Unplug your computer from the router, then wirelessly connect all of your devices to the new network.
This article explains how to set up a Wi-Fi network using any wireless router and modem.
If the wireless router and other devices are capable of Wi-Fi Protected Setup (WPS), you can connect and configure these devices with the push of a button. However, having WPS set up on a router is a security risk, so we recommend disabling WPS .
Here's how to set up a Wi-Fi router.
Find the best location for the wireless router . The optimal placement is in a central location, free from obstructions that could cause wireless interference.
Don't place the router close to windows, walls, or the microwave.
Turn off the modem . Power off the cable, fiber, or DSL modem from your internet service provider before connecting your equipment.
Connect the router to the modem . Plug an Ethernet cable (typically provided with the router) into the router WAN port . Then, connect the other end of the Ethernet cable to the modem.
Connect a laptop or computer to the router . Plug one end of another Ethernet cable into the router LAN port (any port will work) and the other end of the Ethernet cable into the Ethernet port of a laptop.
This wiring is temporary; you will remove the cable after setting up the network.
Power up the modem, router, and computer . It's best if you turn on these devices in the proper order. Turn on the modem first. When the modem lights are all on, turn on the router. When the router is on, turn on the computer.
Go to the management web page for the router . Open a browser and enter the IP address of the router administration page. This information is in the router documentation (it's usually something like 192.168.1.1). The login information is also in the manual.
Change the default administrator password (and username) for the router . This setting is usually on the router administration page in a tab or section called Administration. Use a strong password that you won't forget.
Add WPA2 security . This step is essential. Find this setting in the wireless security section of the router administration page. Select which type of encryption to use and enter a passphrase of at least eight characters. The more characters and the more complex the password, the better.
WPA2 is significantly more secure than WEP. Use WPA or mixed mode WPA/WPA2 with older wireless adapters. WPA3 is another option for more recent hardware, but its compatibility is limited.
Change the wireless network name (SSID) . To make it easy for you to identify your network, choose a descriptive name for your SSID ( Service Set Identifier ) in the router administration page's wireless network information section.
Optional: change the wireless channel . If you're in an area with other wireless networks, minimize interference by changing the router's wireless channel to one that other networks aren't using.
Use a Wi-Fi analyzer app on your smartphone to find an uncrowded channel or use trial and error (try channels 1, 6, or 11, since these channels don't overlap).
Set up the wireless adapter on the computer . After saving the router's configuration settings, unplug the cable that connects the computer to the router. Then, plug a USB or PC card wireless adapter into the laptop if it doesn't have a wireless adapter installed or built-in.
Your computer may automatically install the drivers, or you may have to use the setup CD that came with the adapter.
Connect to the new wireless network . On your computer and other wireless-enabled devices, find the new network you set up and connect to the network .
If your phone can't connect to Wi-Fi , make sure Wi-Fi is turned on, turn off Airplane Mode, check the Wi-Fi password, and try disconnecting and reconnecting from the network. If you still can't connect, check for operating system updates, restart your device, and reset your network settings.
To get Wi-Fi without cable or a phone line , look for an internet service provider (ISP). Compare plans, contact multiple providers, and ask around online.
To install a Wi-Fi extender , connect it to your existing router and use it to broadcast a new Wi-Fi network. Place the extender in an area that needs a stronger connection. Larger homes may benefit more from a long-range or mesh router.
To connect your Alexa device to Wi-Fi , open the Alexa mobile app, go to Menu > Add device , then follow the steps to set up your device and connect it to your wireless network. If your Alexa device is already set up, go to Menu > Settings > Device Settings , choose the device, then tap Change next to Wi-Fi Network.
Get the Latest Tech News Delivered Every Day
- How to Connect Two Routers on a Home Network
- The Best Wi-Fi Range Extenders of 2024
- How to Set Up a Router
- How to Get Wireless Internet Access in a Hotel
- What to Do When Windows 11 Can't Connect to a Network
- How to Fix It When There's No Internet Connection
- 5 Things to Consider Before Buying a Wireless Router
- How to Fix a Vizio TV That Won't Connect to Wi-Fi
- How to Use a Router as a Wi-Fi Extender
- How to Share Wi-Fi Network Passwords in Windows 11
- How to Connect a Router to a Modem
- How to Set Up a Modem
- What Is a Wi-Fi Adapter?
- How to Connect a Router to the Internet
- How to Make Your Wi-Fi Faster
- Best Mac Apps
- Unknown Caller
How to set up a wireless router
When you open that router box for the first time, all the different cables and ports can feel intimidating. Even the instruction manual might read like a foreign language. Fortunately, you’re not the only one who struggles to set up a wireless router.
Connect your router to your modem
Download the app and connect, create a username and password, or find the existing one, continue setting up your router, optional: setting up mesh routers, and you’re off.
We can help guide you through the process of setting up your router and connecting it to your favorite devices so that you’ll be on the internet in no time.
What You Need
A new router
A modem provided by your ISP
A iPhone or Android with access to the App Store
A Windows PC or a Mac
Don’t plug your router into the power outlet just yet. Instead, the first thing you’re going to do is connect your modem to the WAN port with an Ethernet cable .
Step 1: Not sure what the WAN port is? Most consumer routers feature a group of Ethernet ports, several of which are called the LAN ports (local area network) and another called the WAN (wide area network) port.
The WAN port looks the same as the LAN ports, but it’s often a different color and spaced apart from them. In the above photo, for instance, the WAN port is yellow and labeled Internet. Sometimes it will be labeled WAN. This port is intended to connect your router to the modem and the outside world from there. The LAN ports are designed for connecting to local devices.
Step 2: Plug one Ethernet cable into your modem and the other end into your router’s WAN port. Then, plug your router’s power adapter into the wall.
If you don’t have a cable, check out our guide on how to choose the right Ethernet cable.
- How to connect an iPhone to a Mac with or without a cable
- How to change your Google background in Chrome
- How to transfer photos from an iPhone to a computer
Give your router a minute to start up and create a network. In the meantime (if another connection option is available), download the app associated with your modem’s manufacturer. Today’s modems can typically be set up by a mobile app that will automatically walk you through the setup process. It’s the most effective method, but you have to make sure you choose the right app.
Step 1: Linksys has its proprietary setup and management app, Netgear uses the Nighthawk app, and Google has a setup app of its own. Instructions for what app to use should be in your manual.
Step 2: Now connect to your latent Wi-Fi network. Doing so is usually a simple process: Head to the settings on your phone or computer and choose the Wi-Fi/Network option. Look for your router’s name here. Your router should have a default SSID name that’s printed on the back out of the router, along with the default network key. Use the key to log into the network. Some routers simply have you scan a QR code to complete this process, but if that isn’t an option, these steps should be sufficient.
Step 3: Once connected, launch the router management app to begin the setup!
Alternative method: If your router doesn’t have an app, connect a computer manually to the router using an Ethernet cable. Once you’re connected, head to your router’s configuration page. This page is a website hosted on your router, and it’s a traditional way to configure your router’s settings. How to find it can vary, but it almost always means typing 192.168.1.1 into the address bar of your preferred browser, then hitting Enter.
Step 4: If you find a page, go ahead and jump ahead to the next step. If that address doesn’t work, however, your router may use another address entirely. This address can vary depending on your router, so consult your router’s official documentation if the 192.168.1.1 address doesn’t work.
Alternatively, you could just check our list of default router IP addresses and passwords.
Your router app should automatically walk you through setup procedures, so answer its questions and fill out forms as necessary. For most new routers, you’ll be asked to create an app name (again, this is called an SSID) and password. Make sure this password is unique and secure because anyone who has it can do all kinds of nasty things to your network.
Step 1: WPA2 encryption is currently the standard for security, and you should always choose it if given an option for your security protocol. Make sure you select a long password, too, one that is distinct from the admin password you set earlier. Ideally, it should not include words from the dictionary or an easily-guessed name (like the name of your pet). Store the password somewhere secure afterward.
Step 2: A used router, however, may already have a password and need to be reset. Most routers have a recessed reset button on the back. Holding down the Reset button with a paperclip for at least 30 seconds will do the trick. Leave the power on, and wait for the router to rest. It should utilize the default settings when it restarts, meaning the default username and password will now grant you access to settings.
The router app should also allow you to set up other settings such as parental controls, automatic updates, and more. You can tweak these settings and more later from the app, but pay attention to the walkthrough and everything it teaches you. You should learn about guest access, monitoring activity, and more. When finished, the app will configure network settings and finish setting up your network. You can now explore the app at your leisure to learn more.
Some apps, like the Nighthawk app, will also sign you up for free trials of extra security filters. These should not automatically sign you up for payments and will expire naturally after 30 days without any additional costs.
A growing number of routers are “mesh routers” these days, such as the Google Wi-Fi router . Mesh routers use a group of Wi-Fi devices that all work together — typically two or three of them. One device plugs into your modem and acts just like a traditional router.
The other devices act more like automatic repeaters that link to the first device and provide a secondary source for the signal. This functionality can significantly expand the router’s range, enable users to get rid of dead zones, and ensure that large houses or property have full coverage.
However, this means you will need to take one more step and position the secondary devices in your home. Here are a few tips to help you position mesh routers the right way:
- Try to set up additional router devices in open spaces where they can broadcast the network as freely as possible. Remember, you don’t have to be latched to a modem with these access points! The routers will need access to an outlet, however.
- Set the additional router points farther away but not too far apart. All routers need to work together. Aim for about two rooms away from the original router on average.
- You can also choose to place your router points at important zones in your home. For example, if you have a gaming space where you use Wi-Fi, you may want to make sure one of the satellite models is placed there for maximum effect.
- Many routers offer a mobile app that makes it easy to connect additional routers and access points to your network from your phone or tablet. For example, Google Nest uses QR codes to connect a router or access point. Failing to connect these additional pieces of hardware to your network means you’ll miss out on the special features they offer. Make sure to complete this step for any devices you add.
Now that you’ve already connected and configured your wireless router plus any additional routers and access points, you can start to connect devices, so they can access the internet – without any ugly cords or cables.
It might be worth exploring additional options that your new network offers since you have the hardware now. Take advantage of enhanced features like setting up port forwarding and upgrading your router’s firmware with DD-WRT. Then you can access advanced settings that increase your Wi-Fi network’s reliability and security.
Editors' Recommendations
- How an iPad just set a Geekbench record
- How to clear cookies
- Best router deals: Save on mesh networks and Wi-Fi 6 routers
- How to allow pop-ups on a Mac
- How to change your MAC address on Windows and Mac
- How-To Guides

One of the best ways to keep your many email inboxes safe and secure is by frequently changing your password. While this may sound inconsequential, periodic login updates end up being one of the biggest deterrents against hackers and other malcontents. If Yahoo is your email platform of choice, we’ve put together this guide to teach you how to update your account password in just a few simple steps.
We review dozens of gaming PCs each year. In 2024, there are a ton of great options, but we've narrowed them down to a list of the 10 best gaming desktops that deserve your hard-earned money.
In 2024, we still recommend the Alienware Aurora R16 because of its fantastic design, solid performance, and decent value. However, there are several other options depending on your needs and budget. If you want a deeper look into how we evaluate gaming PCs, make sure to read about how we review desktops.
If you want every corner of your home to have access to a stable internet connection, you're going to want to buy a mesh Wi-Fi system. There are lots of options out there among all the router deals online, but here's one that we recommend -- the Netgear Orbi AX6000 tri-band Wi-Fi system, which Crutchfield is selling at $100 off. Instead of $900, you'll just have to pay $800 for this mesh Wi-Fi system, but only if you hurry. The discount is expected to last for a few more days, but we're not sure if stocks will still be available by the end of the sale.
Why you should buy the Netgear Orbi AX6000 tri-band Wi-Fi system The Netgear Orbi AX6000 tri-band Wi-Fi system includes a router module and two satellites to create a mesh network that supports Wi-Fi 6 and will provide coverage across 7,500 square feet. The router and the satellites will use a single network name for a seamless connection as you move around -- horizontally or vertically -- and MU-MIMO technology will allow for simultaneous streaming across multiple devices, so even if everyone in the family is connected to the mesh Wi-Fi system at the same time, nobody will experience any lag or buffering while watching streaming shows.

- Get started with computers
- Learn Microsoft Office
- Apply for a job
- Improve my work skills
- Design nice-looking docs
- Getting Started
- Smartphones & Tablets
- Typing Tutorial
- Online Learning
- Basic Internet Skills
- Online Safety
- Social Media
- Zoom Basics
- Google Docs
- Google Sheets
- Career Planning
- Resume Writing
- Cover Letters
- Job Search and Networking
- Business Communication
- Entrepreneurship 101
- Careers without College
- Job Hunt for Today
- 3D Printing
- Freelancing 101
- Personal Finance
- Sharing Economy
- Decision-Making
- Graphic Design
- Photography
- Image Editing
- Learning WordPress
- Language Learning
- Critical Thinking
- For Educators
- Translations
- Staff Picks
- English expand_more expand_less
Basic Computer Skills - How to Set Up a Wi-Fi Network
Basic computer skills -, how to set up a wi-fi network, basic computer skills how to set up a wi-fi network.

Basic Computer Skills: How to Set Up a Wi-Fi Network
Lesson 9: how to set up a wi-fi network.
/en/basic-computer-skills/what-is-a-pdf-file/content/
How to set up a Wi-Fi network
The Internet is a really powerful tool. It gives us access to all kinds of information at a moment's notice—think email, Google search, and Wikipedia. So there's something a little counterintuitive about only being able to use the Internet when you sit down at a desktop computer. What if you could use the Internet from anywhere in your home or office?
If you already have high-speed (broadband) Internet service at your house, it's pretty easy to create your own home wireless network . Commonly known as Wi-Fi , a wireless network allows you to connect laptops, smartphones, and other mobile devices to your home Internet service without an Ethernet cable.
Purchase a wireless router
To create your own Wi-Fi network, you'll need a wireless router . This is the device that will broadcast the Wi-Fi signal from your Internet modem throughout your house. Your Internet service provider (ISP) may offer you a wireless router for a small monthly fee. If you've never set up a Wi-Fi network before, this may be the easiest option.
If you want to buy your own router, we'd recommend spending a little more time researching different options. CNET offers a comprehensive guide on How to Buy a Router .
Some Internet modems may already have a built-in wireless router, which means you won't need to purchase a separate one.
Connect the cables
Once you've acquired a wireless router, you'll need to connect it to your existing Internet modem.
Connect an Ethernet cable from your modem to the wireless router (there is usually a short Ethernet cable included with your wireless router for this purpose).
Plug in the power cable for the wireless router.
Wait at least 30 to 60 seconds, and make sure the lights on your router are working correctly.
Configure your router
Next, you'll need to use your computer to configure your router's default settings. This includes setting a unique name and password for your wireless network.
Using your web browser, enter the router's default IP address into the address bar, then press Enter . Your router's instructions should include this information, but some of the most common addresses include 192.168.0.1 , 192.168.1.1 , and 192.168.2.1 .
The router's sign-in page will appear. Again, the exact sign-in details should be included with your router's instructions, but most routers use a standard user name and password combination, such as admin and password .
Your router's settings page will appear. Locate and select the Network Name setting, then enter a unique network name.
Locate and select the Network Password setting, and choose an Encryption option. There are several types of encryption you can use, but we recommend WPA2 , which is generally considered to be the most secure.
Enter your desired password. Make sure to use a strong password to help ensure no one else can access your network.
Locate and select the Save button to save your settings.
That's it! Now you're ready to connect to your Wi-Fi network and make sure it's working. The process for connecting to a Wi-Fi network will vary slightly depending on what type of computer or device you're using, but any system will require these basic steps.
Locate your computer's network settings, and search for nearby Wi-Fi networks.
Select your network, and enter your password.
If the connection is successful, open your web browser and try navigating to a webpage like www.google.com . If the page loads, it means your Wi-Fi connection is working correctly.
Congratulations!
You've just set up your own home wireless network. Way to go!
/en/basic-computer-skills/how-to-update-your-software/content/

- Mobile WiFi
- WiFi Routers
- WiFi Extenders
- Home Network
NETGEAR WiFi Range Extender Quick Setup Guide

NETGEAR Orbi Team
Is your WiFi Router coverage spotty or simply out of range? Do you need a to connect a few devices on the other side of the house? Setting up a WiFi extender in-between can boost your WiFi enough to make up the difference. This article is a simplified guide for setting up your NETGEAR WiFi range Extender.
IN THIS ARTICLE
Expanding Your Existing Home WiFi Network
Wifi extender setup steps, additional extender resources, can you setup a wifi range extender with a mesh wifi system, considering mesh wifi as an alternative to an extender.
NETGEAR WiFi range extenders are designed to enhance your home WiFi network’s coverage by connecting to your existing network router or gateway. They can be good in a pinch if you have spotty WiFi in some areas of your home. Go here – if you need help setting up a whole Mesh WiFi System instead. Below is a simplified guide to setting it up your WiFi range extender:

- Power Up: Plug in your NETGEAR extender. The Power LED should light up. If it doesn’t, press the Power or On/Off button.
- Connect: Use your computer or mobile device to connect to the extender’s WiFi network, named NETGEAR_EXT by default. The network may be open or use ‘password’ as the default password.
- Setup Page: Launch a web browser and enter mywifiext.net or 192.168.1.250. This will take you to the New Extender Setup page. This is similar to how the Router Login system works.
- Admin Credentials: Click on NEW EXTENDER SETUP. Choose and set your extender’s admin credentials, which are different from your WiFi network password.
- Network Selection: The extender will search for local WiFi networks. Select your network’s 2.4GHz and 5GHz bands.
- Network Extension: Enter your existing network’s password. You can choose to keep the default SSIDs or customize them for your extender.
- Finalize Setup: Follow the prompts to complete the setup. The extender will apply your settings, which might take a few minutes.
- Connect Devices: Connect your devices to the extender’s new network using the WiFi settings.
- Confirmation: Return to your browser and confirm the setup to start using your extended network.

Yes, a WiFi range Extender can be used with a Mesh WiFi system such as Orbi. They can work in a pinch, especially for low-bandwidth stationary IOT devices such as a WiFi Garage Door opener. However, the best option to extend an Orbi WiFi system is to add an additional Orbi Satellites matched to your existing Orbi System to allow for seamless roaming and full whole home WiFi performance for all your connected devices.

- Seamless Coverage: Unlike extenders, Mesh WiFi provides uniform coverage without the need for separate network names (SSIDs).
- Easy Management: Manage your entire network through a single interface, making it easier to control and monitor.
- Better Performance: With dedicated WiFi radios – Mesh systems provide better speed and WiFi stability, especially in larger homes or spaces with many devices.
- Upgradable Coverage: Orbi Mesh WiFi systems can be upgraded with additional WiFi Satellites to extend full speed WiFi to any corner of your home.
In summary, while a NETGEAR WiFi range extender is an excellent choice for extending your WiFi coverage, especially if you are trying to extend the range of your existing router, a Mesh WiFi system might be a better fit for more demanding or larger homes and offices. Consider your specific needs to choose the best solution for your home network. Shop Mesh WiFi Shop WiFi Range Extenders
Related Stories


How to Choose the Right Orbi System

What is Mesh WiFi?

WiFi Extender vs Mesh WiFi – Which is Better?
How to connect to Wi-Fi network on Windows 11
You can connect your Windows 11 device to a Wi-Fi network in various ways, and in this guide, you will learn how.
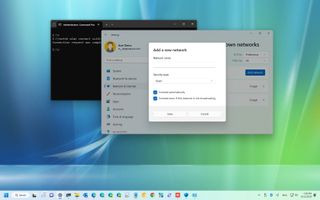
- Control Panel
- Command Prompt
Windows 11 makes it easy to connect laptops, tablets, and desktop computers to a wireless network to access the internet and other local network resources. However, it's only easy if you know the tools and process to connect.
If you are setting up a connection in a new network or want to learn a more efficient way to connect multiple computers, Windows 11 has different tools to connect without cables, using the Taskbar, Settings, Control Panel and Command Prompt.
In this how-to guide , I'll walk you through how to connect your computer to a Wi-Fi network on Windows 11.
How to connect to Wi-Fi network from Taskbar
To connect to a Wi-Fi network through the Windows 11 Taskbar, use these steps:
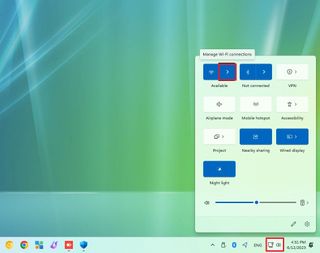
- Click the Network icon in the bottom-right corner to open Quick Settings .
- Quick tip: You can also use the "Windows key + A" keyboard shortcut to open the settings flyout. On Windows 11, there are several other shortcuts, you can learn more in this guide .
- Click the button next to the wireless icon.
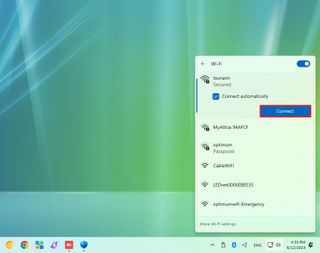
- Select the wireless connection.
- (Optional) Check the Connect automatically option.
- Click the Connect button.
- Confirm the network security key (password).
- Click the Next button.
- Confirm whether the device should be discoverable in the network.
Once you complete the steps, the laptop will connect to the network using the wireless connection.
Reconnect automatically
In addition, Windows 11 also offers an option to reconnect the device automatically after disconnecting the adapter manually.
Get the Windows Central Newsletter
All the latest news, reviews, and guides for Windows and Xbox diehards.
To set the Wi-Fi adapter to reconnect automatically on Windows 11, use these steps:
- Click the wireless icon in the system tray.
- Turn off the Wi-Fi toggle switch in the top-right corner.
- Use the drop-down menu and select when to reconnect automatically:
- In one hour.
- In four hours.
- In one day.
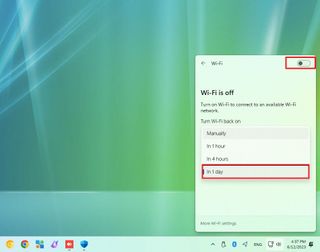
After you complete the steps, Windows 11 won't reconnect until the time you selected. When using this functionality, the computer will only connect automatically to the networks you have connected to in the past.
How to connect to Wi-Fi network from Settings
You can also set up wireless connections manually using the Settings app. This way, when the network is in range or hiding its SSID (Service Set Identifier), the laptop or desktop computer can connect automatically.
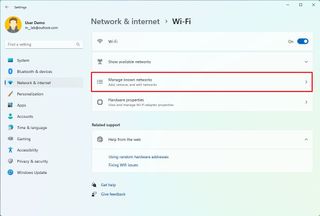
To add a wireless connection manually, use these steps:
- Open Settings .
- Click on Network & internet .
- Click on Wi-Fi .
- Click the "Manage known networks" page on the right side.
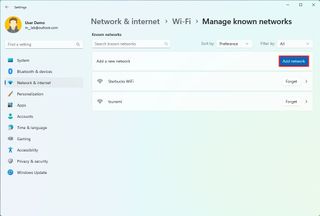
- Click the Add network button.
- Confirm the name of the network.
- Use the drop-down menu to select the Security type – For example, WPA2-Personal AES .
- Check the Connect automatically option.
- Check the "Connect even if this network is not broadcasting" option (if applicable).
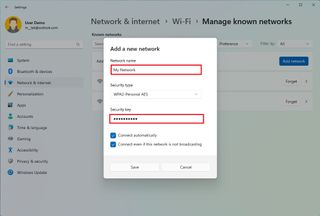
- Click the Save button.
Once you complete the steps, the device will connect automatically when the wireless network is in range and whether it's hidden or visible.
How to connect to Wi-Fi network from Control Panel
To connect to a wireless network with Control Panel on Windows 11, use these steps:
- Open Control Panel .
- Click on Network and Internet .
- Click on Network and Sharing Center .
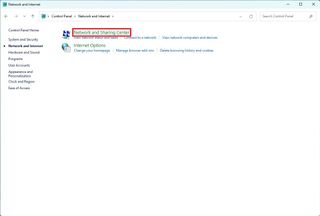
- Under the "Change your networking settings" section, click the "Set up a new connection or network" option.
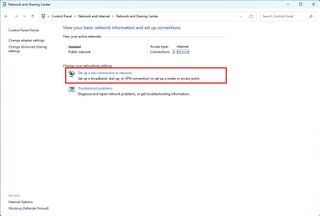
- Select the "Manually connect to a wireless network" option.
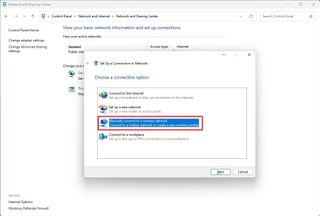
- Confirm the network name.
- Use the drop-down menu to select the Security type — for example, WPA2-Personal .
- Check the "Start this connection automatically" option.
- (Optional) Check the "Connect even if the network is not broadcasting" option.
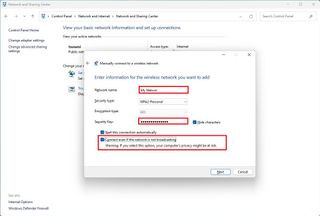
- Click the Close button.
Once you complete the steps, the computer will automatically connect to the Wi-Fi network.
How to connect to Wi-Fi network from Command Prompt
You can also use the netsh command-line tool in Command Prompt to connect to a Wi-Fi network on Windows 11.
To connect to a Wi-Fi network with commands, use these steps:
- Open Start .
- Search for Command Prompt , right-click the top result, and select the Run as administrator option.
- Type the following command to view the available network profiles and press Enter : netsh wlan show profile
- Confirm the wireless profile.
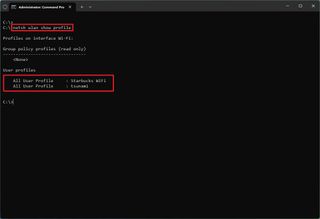
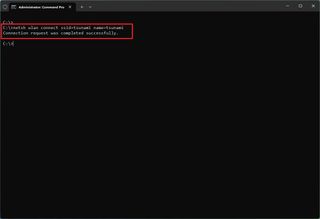
- Type the following command to connect to the wireless network on Windows 11 and press Enter : netsh wlan connect ssid=YOUR-WIFI-SSID name=PROFILE-NAME
In the command, update the name (SSID) of the network and profile name with your network information. For example, this command connects to the "tsunami" network using the "tsunami" profile: netsh wlan connect ssid=tsunami name=tsunami .
- Quick tip: On a computer with multiple adapters, you also have to specify the adapter name in the command. For example: netsh wlan connect ssid=YOUR-WIFI-SSID name=PROFILE-NAME interface=Wi-Fi .
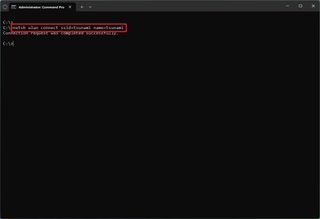
After you complete the steps, the laptop will connect to the Wi-Fi network.
Create network connection
The netsh command tool also allows you to manage Wi-Fi adapters and networks . The only issue is that you can only manage existing profiles. You cannot create new network profiles with this tool.
If you have to use Command Prompt to connect one or multiple computers to the same wireless network, you can export the profile created automatically during the first connection. Then you can import it using netsh to connect using commands.
Export Wi-Fi profile
To export a Wi-Fi profile with commands on Windows 11, use these steps:
- Type the following command to export a profile and press Enter : netsh wlan export profile PROFILE-NAME key=clear folder=PATH\TO\EXPORT\FOLDER
For example, this command exports the tsunami profile to the "Documents" folder: netsh wlan export profile tsunami key=clear folder=C:\Users\m\Documents
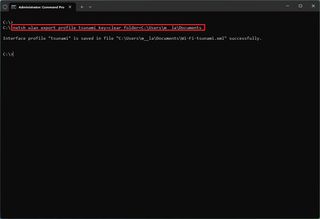
Once you complete the steps, you can import the same XML file to connect other computers to the wireless network.
Import Wi-Fi profile
To import a Wi-Fi profile on Windows 11, use these steps:
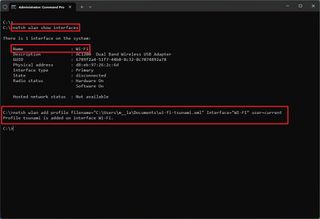
- Type the following command to determine the name of the network adapter and press Enter : netsh wlan show interfaces
- Confirm the name of the adapter that will connect to the network.
- Type the following command to import the wireless profile and press Enter : netsh wlan add profile filename="PATH\TO\PROFILE.XML" Interface="YOUR-WIFI-ADAPTER-NAME" user=current
In the command, you must specify the location of the XML file and network interface name. For example, this command imports the XML profile located in the "Documents" folder to the Wi-Fi adapter: netsh wlan add profile filename="C:\Users\m\Documents\wi-fi-tsunami.xml" Interface="WI-FI" user=current .
- Type the following command to connect to the wireless network and press Enter : netsh wlan connect ssid=YOUR-WIFI-SSID name=PROFILE-NAME
In the command, you must specify the SSID and profile name that corresponds to your network. For example, this command connects to an access point using the "tsunami" SSID and "tsunami" profile name: netsh wlan connect ssid=tsunami name=tsunami .
- Quick tip: If you have multiple wireless interfaces, you must also specify which adapter you want to use in the command. For example, netsh wlan connect ssid=YOUR-WIFI-SSID name=PROFILE-NAME interface=Wi-Fi .
After you complete the steps, the computer should connect to the wireless network automatically.
More resources
For more helpful articles, coverage, and answers to common questions about Windows 10 and Windows 11, visit the following resources:
- Windows 10 on Windows Central — All you need to know
- Windows 11 on Windows Central — All you need to know

Mauro Huculak is technical writer for WindowsCentral.com. His primary focus is to write comprehensive how-tos to help users get the most out of Windows 10 and its many related technologies. He has an IT background with professional certifications from Microsoft, Cisco, and CompTIA, and he's a recognized member of the Microsoft MVP community.
- 2 Microsoft will put the next Call of Duty on Xbox Game Pass, reveal planned for Games Showcase
- 3 This may well be the cheapest I've EVER seen the Xbox Elite Series 2 controller
- 4 Ubisoft's XDefiant has one huge advantage over Call of Duty
- 5 Microsoft VP describes the new iPad Pro as having a "3 legged OS" and it sums up my own past experience better than I ever could
Setting up Smart WiFi
Set up smart wifi wirelessly using the ee app.
Identify your hub from these options and then follow the instructions in this article or on the app.
- EE Smart WiFi (2023)
- EE Smart WiFi Plus
- EE Smart WiFi Disc
Set up your EE Smart WiFi (2023) by following the instructions in the EE app.
- download from the App Store if you're an Apple user
- download from Google Play if you're on Android
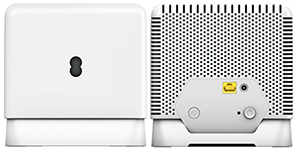
Set up your EE Smart WiFi Plus by following the instructions in the EE app.
Your hub might need to update its software. It usually takes around 20 minutes, but it can sometimes take up to 1 hour. Don’t restart your hub until the update is complete.
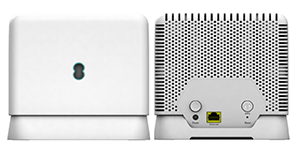
Set up EE Smart WiFi Disc using the EE Home app. If you don't have it already you can download it here:
- download from Google Play if you're on Android
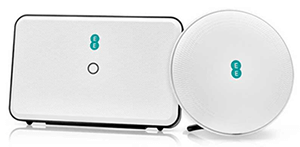
Set up Smart WiFi wirelessly without the EE app
- Plug your Smart WiFi device into a socket near your hub.
- Switch it on and wait for a red light to appear.
- To pair your Smart WiFi device and hub, press the WPS button on your router and then the WPS button on the back of your Smart WiFi device right away (within 2 minutes).
- Pairing can take up to 5 minutes.
- When your devices are paired, the light on your Smart WiFi device will turn solid blue or aqua.
- Unplug your Smart WiFi device.
- Move it to a place halfway between your router and the part of your home where you want the WiFi to be stronger.
Set up Smart WiFi using Ethernet
You can connect your devices using an Ethernet cable. You'll find one in your router box and another in your Smart WiFi box.
- Plug one end of the Ethernet cable into a yellow port on the back of the router.
- Plug the other end into your Smart WiFi device.
- The light on the Smart WiFi will start flashing and after a couple of minutes it will turn solid blue or solid aqua.
- Unplug the cable. The light will change to flashing red and will go back to solid blue or solid aqua in a few seconds.
- Unplug the Smart WiFi device from the mains.
- Move it to a place halfway between your router and the part of your home where you want your WiFi to be stronger.
Where to put your Smart WiFi device
You'll find a location checker in the EE Home app and EE app. It will help find the best home for your Smart WiFi device.
Or, just put your Smart WiFi halfway between the hub and the location in your home that has poor WiFi. You may want to move it after set-up if your speeds are slow.
What the lights mean on your Smart WiFi device
The lights on your Smart WiFi device will tell you if it is set up correctly and if there are any problems later on. Find out what the lights mean .
Find your admin password
You'll need your admin password to access the settings for your router and Smart WiFi. Often you'll also need it to set up Smart WiFi using the apps. You'll find it on the router's wireless card settings, which is on the back of your router.
Change your wireless network's name and password
If you have a Smart Hub or Smart Hub Plus:
- Open the EE app.
- Select WiFi Controls from the Home screen.
- On the dashboard tap the Smart Hub tile.
- Select the three dots in the right-hand corner.
- Tap Change WiFi Settings.
- Enter your new password and tap Save.
If you have our Smart Router:
- Open the EE Home app.
- Go to Smart WiFi then Manage your WiFi settings.
- Tap Change your WiFi name and password.
- Enter the new network name and/or password and tap Save.
Important information
When you change your old password, remember to pop the new one into your phone and other devices.
Was this article helpful?
Related articles.

Our expert, award-winning staff selects the products we cover and rigorously researches and tests our top picks. If you buy through our links, we may get a commission. How we test ISPs
- Home Internet
Moving? Do Not Wait to Set Up Your Internet Service. Here's How to Do It
Settling into your new home includes setting up your internet service. Here's how to go about it, whether transferring or switching internet providers.

With just a few steps, you'll be ready to use the internet at your new home.
There's more to moving than hauling furniture and packing/unpacking box after box. You'll also have to set up home services and utilities in your new place, including your internet connection. While some moving tasks are more stressful and difficult than others, setting up internet in your new home should be fairly simple.
Most internet providers make it easy to transfer service when you move, but if your current provider does not serve your new address, you'll have to take a few extra steps to switch internet providers . Even if your current provider is available at your new address, it may be worth checking whether any new ISPs are available in the area .
Here's how to go about a seamless transition of internet services when moving from your current address to your new home, whether transferring service or signing up with a new provider. For more moving tips, check out our picks for the best moving companies , how much you should tip movers and how to figure out which size moving truck you need .
Locating local internet providers
Internet service moving checklist
- Check to see what providers and plans are available at your new address.
- Decide whether to sign up for a new ISP or transfer your current service (if applicable).
- Contact your current provider regarding transferring or canceling your service .
- Set up service with your new provider (if applicable).
- Carefully pack equipment and take it to your new home if transferring service, or follow the provider's instructions for returning it.
- Set up your existing or new equipment in a good spot in your new home.
Which internet providers are available at my new address?
Before you can decide to transfer your internet service or sign up for a new one, you'll need to know your options. Many websites enable you to check for local internet providers, including CNET -- just click "Edit Location" on the tool above and enter your address to view available providers and plans.
When using these sites or tools, or checking availability on a provider's official site, you'll get the best results when using an address opposed to something general like " internet providers in Charlotte, North Carolina ." Most providers operate in specific service areas , so availability can vary by ZIP code or even neighborhood. During a cross-town move, it's not always safe to assume that your current provider will be available at your new address or that your new home won't have more internet options than your current address.
We can help you figure out which internet service providers are available in your new area.
What about internet for the apartment I'm moving into?
When moving into a new apartment, check with the leasing office to see if the complex has a primary internet provider. While the Federal Communications Commission seeks to increase broadband competition in apartments , your apartment may be wired for a specific internet service type , such as cable , fiber or even fixed wireless . In such cases, your best option will likely be to go with whatever provider serves the complex, but you may be able to seek out other options. Again, speak with your leasing office about what's available before moving in.
How to switch or transfer internet service when moving
Once you've decided on the internet provider you want, whether that's your current provider or a new one, and the plan that best fits your needs , it's time to connect with the providers.
Obviously, you'll only have to contact one provider and give them your move-out and move-in dates if you're transferring service. Some providers, such as Verizon Fios and Xfinity , let you schedule your service transfer online, whereas others, like Spectrum , require you to call customer service.
Your provider may charge a transfer fee. My advice would be to negotiate with your provider and see if they'll waive the fee. This may require a call to customer service, even if you can transfer your service online, which may not be worth your time when you're trying to pack. Service transfer fees are often low, in the $10 to $20 range, but every dollar counts when moving.
Moving on to a new internet service provider
In the case of switching providers, I'd recommend contacting your current provider first. That way, you can schedule the disconnect date and get the details on any remaining payments and what you need to do with your equipment, all of which are good things to know before moving day.
Additionally, suppose your current provider is also available at your new address and you express interest in switching to a new provider. In that case, they may offer you a lower rate or other incentives to keep your business -- perks that you may not get when simply transferring your service.
When switching to a new provider, either because your current provider isn't available or your new address presents options for a faster ISP with cheaper plans , try to set up your new service well before your move. That way, you'll have the best chance of scheduling your installation as close to your move-in date and time as possible. Most providers allow you to sign up for service online and schedule your installation date right from your computer or phone. In some cases, you can also pick a preferred window of time for the installation.
If self-installation is available, and you're comfortable with it, that may be the best way to ensure service is set up when you want it. Just keep in mind that self-installation may require picking up the gear or waiting for it to arrive in the mail.
Here's what to do with your internet equipment when you move
Your provider will handle things on the service side of your internet connection, but you'll be responsible for the equipment.
When transferring service, or if you use your own network devices , you'll probably be expected to pack it up and take it with you. If you still have the box the hardware came in, that'll be your best option for storing and moving it. Otherwise, feel free to throw it in a box with other stuff, though you may want to wrap it in a towel or thin blanket to prevent damage during the move. Also, and this is important, make sure your equipment doesn't get wet.
Switching providers will involve returning your old equipment and getting your new devices. Many providers have brick-and-mortar locations where you can return your gear, but if yours does not, or if the trip and waiting in line is out of your way, mailing it back may be an option as well.
Getting your new equipment comes down to self versus professional installation. For self install, you may have to pick your devices up at a brick-and-mortar location or receive it by mail. If it's not out of your way, I'd recommend picking it up in person so you have it on the day of your move. Again, try to transfer the hardware in the box it came in and, above all, keep it from getting wet.
If you opt for professional installation, you can count on the tech to bring the necessary accessories and cords -- one less thing to worry about when moving.
As you're setting up your network, try to find a central, open spot for your router that's clear from walls and other obstructions, as well as interference from nearby electronics.
Setting up your new Wi-Fi network
With a professional installation, your tech will know the best place to install your devices and should test your connection before leaving. However, there are times when you may want to move your equipment after installation to get the best Wi-Fi connection throughout your home.
During self-installation or when moving your equipment after a professional installation, try to place your router in a central location in your home, as high as possible and away from large obstructions like walls or other electronics. An extra-long ethernet cable can be handy to have on hand, making it easier to move the router to a good location that isn't necessarily right next to the modem.
After installation, be sure to test your internet connection . If you aren't getting the speeds you expect, try resetting or repositioning your router. Once you've got your equipment set up and are satisfied with your speeds, moving your internet service is complete. Now, onto those boxes labeled "kitchen."
Internet service FAQs when moving
How should i pack my router for moving.
As far as electronics go, routers are less fragile than a television, tablet or other device with a screen that can be easily damaged. Still, you'll want to pack and transport it somewhat carefully to avoid damaging the internal components or the external casing (including any buttons and lights).
Wrapping your router in newspaper or cloth such as a pillowcase will help protect your router during your move, but bubble wrap is probably the best protective barrier. If placing your router in a box with other items, ensure the items, router included, are packed tightly to avoid shifting during your move.
How long does it take to set up internet in a new place?
If you already have an internet provider and service to your home, you can set up a Wi-Fi network in a matter of minutes. Just plug in your router and follow the instructions to create a Wi-Fi network and password, then start connecting your devices.
Professional installation can take a bit longer, maybe as much as three or four hours if the installer needs to run wires or troubleshoot connection issues.
Will my ISP set up the internet in my new home when I move?
Unless you have an internet connection that requires professional installation, such as satellite internet, don't count on it. If your new home is already wired for service, setup is little more than plugging in your router and creating your new Wi-Fi network. You won't need a technician for that, and your ISP likely won't send one out, though they should provide technical support online or over the phone if you need assistance.
Will my old Wi-Fi equipment work for internet in my new home?
If you're canceling service with your current provider and going with a new one, it's possible that any equipment you own, such as Wi-Fi routers and extenders, will be compatible with your new service.
This won't always be the case, however. When switching to a new connection type, say cable internet to fiber, you'll need a different type of modem.
If you were planning on taking rented equipment from your old provider to your new one, keep in mind that doing so will likely result in a hefty fee from your previous ISP. Not only that, but the devices are almost sure to not be compatible with your new service.
Where should I place my router in my new home?
Try to place your router in a central location in your home so that your router's Wi-Fi range can reach all corners of your home. It's also recommended to place your router somewhere high, like the top of a bookshelf, and free of obstructions. Avoid "hiding" it as doing so can limit range and possibly cause your router to overheat.
If your router is in the ideal spot but you're still experiencing dead spots, consider adding a Wi-Fi extender to your network or upgrading to a mesh Wi-Fi system for better coverage.
Home Internet Guides
- Best Internet Providers in Los Angeles
- Best Internet Providers in New York City
- Best Internet Providers in Chicago
- Best Internet Providers in San Francisco
- Best Internet Providers in Seattle
- Best Internet Providers in Houston
- Best Internet Providers in San Diego
- Best Internet Providers in Denver
- Best Internet Providers in Charlotte NC
- Google Fiber Internet Review
- Xfinity vs Verizon Fios
- Verizon 5G vs. T-Mobile Home Internet
- Verizon Internet Review
- Xfinity Internet Review
- Best Rural Internet
- Best Cheap Internet and TV Bundles
- Best Speed Tests
- AT&T Home Internet Review
- Best Satellite Internet
- Verizon 5G Home Internet Review
- T-Mobile Home Internet Review
- Best Internet Providers
- Frontier Internet Review
- Best Mesh Wi-Fi Routers
- Eero 6 Plus Review
- TP-Link Review
- Nest Wi-Fi vs. Google Wi-Fi
- Best Wi-Fi Extender
- Best Wi-Fi 6 Routers
- Best Wi-Fi Routers
- What is 5G Home Internet?
- Home Internet Cheat Sheet
- Your ISP May Be Throttling Your Internet Speed
- How to Switch ISPs
- Internet Connection Types
- Internet for Apartments
- Top 10 Tips for Wi-Fi Security
- How to Save Money on Your Monthly Internet Bill
- How Much Internet Speed Do You Need?
How-To Geek
What is wps (wi-fi protected setup), and how do you use it.
Connect devices to your Wi-Fi with the push of a button.
Key Takeaways
- WPS lets you connect to Wi-Fi effortlessly without knowing the SSID or password.
- WPS has security risks due to potential PIN vulnerabilities, which is why some newer devices don't support it at all.
- You can keep WPS enabled for easy device connections, but security-conscious users should disable it and use standard Wi-Fi passwords, or opt for the newer Wi-Fi Easy Connect method.
The double-edged sword of living in the modern world is that everything can connect wirelessly, which often leaves us open to easier attacks. WPS can help mitigate that risk for you without requiring you to be tech-savvy with a simple push of a button on your router .
What Is Wi-Fi Protected Setup (WPS)?
The WPS button on your router is a simple method for connecting your wireless devices when you don't want to connect manually. It uses an automated protocol to get you on the local Wi-Fi network without requiring the password while your network remains secure.
That's key because, as everything has become more interconnected, network security has become more and more important in the day-to-day, doubly so as work-from-home environments have become commonplace. Whether it's protecting your email and social media passwords or your company data, there's a real and present need for cybersecurity.
The problem, though, is that not everybody is necessarily tech-savvy, and the complex security protocols and tech standards can sometimes get in the way of securing ourselves. So, for example, if somebody is having a hard time connecting to their printer wirelessly using security standards, they might get so frustrated they connect without any security standards at all, such as using the same password for everything.
WPS is an attempt to fix that issue regarding Wi-Fi signals. More specifically, it allows people to create a secure connection between two devices using Wi-Fi without the need for a lot of tech knowledge. The only caveat is that both devices need to be using the WPA or WPA2 security standard.
Initially introduced in 2006 by Cisco, WPS over the years became a pretty standard feature for many devices that use Wi-Fi. It's still common on devices you buy nowadays, but some have removed it because of security concerns.
Why Use WPS?
Ultimately, a lot of it is about convenience, especially as we become more and more inundated with needing to remember dozens of passwords. Even with password managers , it can become a pretty frustrating task to find the SSID and re-enter a password for every device you connect with.
This problem is made worse because some device interfaces are simply horrendous or incredibly hard to access without a good set of tools. For example, most Wi-Fi range extenders require you to log in to their admin page, which itself can sometimes require you to use an Ethernet cable. Then there's the issue of actually finding their log-in page, the log-in details, and setting them to something new.
All of that can lead to a ton of frustration for those who aren't tech-savvy and may end up having the device sitting in the corner unused. That's where the quick setup of WPS can help since it can connect two devices with, basically, a push of a button.
Is WPS Safe?
That being said, there are some pretty serious concerns when it comes to WPS because brute-force attacks on a WPS device's PIN are possible. That means you should switch off WPS in your device if you aren't using it, assuming your router allows disabling it. Alternatively, check the vendor's website to see if it's patched the PIN vulnerability.
You should be aware that because of those vulnerabilities, fewer wireless devices work with WPS these days. Android 9 and newer, for example, have no support at all for WPS . Assuming your router supports it, you can instead use the newer Wi-Fi Easy Connect , where you scan a QR code physically stuck to your router which hands the credentials directly to your wireless device.
It's also worth noting that WPA3 has made WPS somewhat more secure. (However, even if you have WPA3 security, it's likely that your router also has WPA2 enabled for backward-compatibility purposes.)
How to Use WPS
Generally speaking, there are two primary ways to connect to the WPS devices: using a button and/or using the PIN, as mentioned earlier.
The button is generally the easier of the two options, especially since it doesn't require you to find or use any sort of admin page. Instead, all you need to do is press two WPS buttons: the one on your router and the one on the device you want to connect with, in that order. It functions similarly to Bluetooth or Wi-Fi pairing on your phone works, except the router has to come first so it can be discoverable.
If you're not sure what to look for on your router, we have a couple of examples. Below is the WPS button on the back of a TP-Link mesh router.
WPS buttons can look different, though. The button on the Linksys Hydra Pro 6E router is located on the side and looks like this.
Not all devices have a WPS button, even though it's arguably much safer than a PIN. If your router has a WPS PIN, you'll simply have to enter the authentication PIN, usually on the page of your router or stuck to the device, when prompted for it on the admin page. It's a little bit more of a hassle than the button, but it's the only alternative if there isn't one.
Should You Keep Using WPS?
Whether you should use WPS depends on how much convenience you want. If you're concerned about your network's security, it's best to leave it turned off and connect using your Wi-Fi network's password. If you don't mind the security concerns with WPS, go ahead and use it to connect devices like printers and TVs to your network much more easily. At least WPA3 has boosted WPS's security, so if you have a newer router you have less reason for concern. If your router is more than a few years old, though, it might be time to upgrade to one of our recommended Wi-Fi routers .
Connect Sonos to a new router or WiFi network
Your Sonos system needs updated network information after you’ve changed your WiFi network name, password, or replaced your router. This article will help you connect your Sonos system to a new router or to a new WiFi network.
Sonos app for iOS or Android
Sonos app version 80.0
The Sonos app’s ability to update your Sonos system’s WiFi credentials is temporarily unavailable. It will be added again in a future update.
Use one of the workaround methods below to connect your Sonos products to a new WiFi network or provide a new WiFi password.
Switch to a wired setup
When wired to a router, some Sonos products can broadcast their own dedicated wireless network that other Sonos products can use.
If you have Sonos products that support this, you can temporarily use your Sonos system in a wired setup as a workaround. You can find instructions on how to switch to a wired setup, as well as a list of products that don’t support this type of setup, in this article .
Reset your Sonos products and set them up again
In order to connect to a new network or use a new WiFi password, your Sonos products must be factory reset and set up again. During the setup process, you’ll provide each of your Sonos products with your updated WiFi network name and password.
If you would like assistance with this process, please contact Sonos Support .
- Factory reset each Sonos product in your system. This will erase all existing system data, including settings, Sonos Playlists, and Sonos Favorites.
- Close and re-open the Sonos app. If all of your products have been reset, the Sonos app will display “No products found.”
- Select one of your reset products and follow the steps in the app to set it up again. You’ll select a WiFi network and provide a WiFi password during this step.
- Repeat step 4 for any remaining products that were reset.
- Add any content services or voice services that were previously on your system.
Once completed, all of your Sonos products will be set up again and connected to your network with the newest WiFi credentials.
Sonos S1 Controller app for iOS or Android
If sonos connects through your wifi network.
If your Sonos system is in a wireless setup , follow the steps below. If you have more than one Sonos product in your system, this process will require you to temporarily connect a Sonos product to your router with an Ethernet cable.

- Open the Sonos S1 Controller app and wait while it searches for your Sonos system.
- When you see the message "Unable to connect to Sonos," select Learn More .
- Select Changed router or Wi-Fi settings?
- Follow the instructions to connect Sonos to your new router or WiFi network.
If a Sonos product is wired to your network with an Ethernet cable
Still need help.
Our technicians can help over the phone or with a live chat. You can also ask questions and find answers with other Sonos owners in our Sonos Community.
Ask the Community
Beat the heat and save this season on a smart home thermostat.
YOUR CART IS EMPTY
Your shopping cart, how do i change or reset the wifi connection on my rth6500wf smart series programmable thermostat.
Last updated
A basic WiFi Reset can be performed by removing the thermostat face plate from the wall plate and reattaching it after 30 seconds. The thermostat will attempt to connect to the WiFi signal is was previously paired with. To connect to a new WiFi signal, follow step 1 outlined below to disconnect or “forget” the old WiFi network and connect to the new network.
Step 1 – Connecting your mobile device to the thermostat’s WiFi network (NewThermostatxxxxxx)
Once installed and configured, the thermostat will display “WiFi Setup”. Open the Settings – WiFi on your mobile device and connect to the WiFi network named “NewThermostatxxxxxx”.
*If your thermostat does not display WiFi Setup, remove the thermostat faceplate from the wall plate for 30 seconds and then reattach it. If WiFi setup does not display, enter the Installer Setup (press and hold the fan and up arrow simultaneously for 5-10 seconds until the screen changes) and use the RTH6580WF1 User Guide here (or TH6320WF1 Install Guide here ) to navigate the settings to function 38. Make sure function 38 is set to 1, then proceed to function 39. Use the up or down arrow to change function 39 function to 0 then press done. WiFi setup will then be displayed on the screen.*
Step 2 – Connect the thermostat to your home WiFi (via an internet browser on your mobile device)
After connecting to the thermostat WiFi (NewThermostatxxxxxx), open a web browser (Safari, Chrome, etc.) You should be automatically guided to a page titled “Thermostat WiFi Setup. If you are not automatically guided there, enter the IP address: 192.168.1.1 into the address bar on your browser to navigate there manually.
You should see your Home WiFi network listed. Select it and enter your WiFi password. After a brief connection period, your thermostat will display a “Connection Success” message. Reconnect your phone to your home WiFi network if your device does not reconnect automatically.
*If you do not see your home WiFi network, refresh the list. If your WiFi network is still not displayed, check the Trouble Connecting? / WiFi network recommendations*
Thanks for your feedback!
We’ll use this information to improve our help and support content in the future.
Message us on Twitter for help with our products.
Monday through Friday: 9am to 6pm CDT Saturday and Sunday: 9am to 5pm CDT
Connect with an agent for quick assistance.
Monday through Friday: 9am to 8pm CDT Saturday and Sunday 9am to 5pm CDT
Speak directly with an agent for help with our products.
Homeowner Support 1-800-633-3991 Open Hours: Monday through Friday: 9am - 8pm CDT Saturday and Sunday: 9am - 5:30pm CDT
Online Order Support and Customer Service 1-800-664-2751 Open Hours: All day (24 hours), Monday through Sunday
Professional Contractor Support
Call the Homeowner number above and select the 'Contractor' option.

Roku: How to connect your TV or streamer to Wi-Fi without a remote
R oku is a popular and versatile streaming device for watching your favorite TV shows, movies, and series. With one of the best Roku streaming devices , you can enjoy your favorite content whenever you want. But what happens when you lose the remote that came with your Roku? This guide explains how to connect your Roku streaming device to your Wi-Fi network without a remote using the Roku app, which you can download on any smartphone or tablet.
What happens if you lose the Roku remote after a factory reset?
If you recently performed a factory reset on your Roku , you need a new remote to connect it to your Wi-Fi network. You can also use the dedicated app to reconnect your Roku to your existing network. The app's remote control feature allows you to manage your Roku wirelessly without the physical remote that comes with it. This feature is only available if your Roku was previously connected to your current Wi-Fi network. The following sections explain two ways to reconnect your Roku to your home Wi-Fi network.
The most common Roku problems and how to fix them
Use an ethernet connection to change your roku wi-fi settings.
If your Roku stops connecting to your Wi-Fi network and you can't find the remote, an Ethernet cable can help. Not all Roku devices have an Ethernet port. If yours does, go this route to keep things simple. After the cable is connected to your access point, you may need to unplug and replug your Roku before it recognizes the network. Then, you can use the Roku app's remote control feature to manage it without a remote or update the Wi-Fi settings. After that, you can go back to using it over Wi-Fi.
Use a temporary Wi-Fi mobile hotspot as a workaround
If your Roku doesn't have an Ethernet port and the remote is missing, you can potentially get it back up and running on your Wi-Fi network. This process is a little out of the way and requires multiple devices and a mobile Wi-Fi hotspot. It is your only option other than buying a new remote. The idea is to trick your Roku into connecting to your mobile hotspot using the same Wi-Fi credentials it had when it was working. You can then use the remote feature in the Roku app to wirelessly control your device.
You can also use a mobile hotspot to connect your Roku to another Wi-Fi network outside your home. This can be useful if you lose the remote while traveling. It allows you to use the device from the Roku app. It can also be beneficial if you recently found an old Roku device and know the Wi-Fi name and password. Rather than doing a factory reset, you can bring it online as long as your mobile hotspot matches the original Wi-Fi credentials.
You must meet the following requirements for the mobile hotspot method:
- A Roku device that was previously set up on your Wi-Fi network.
- A Roku device with support for 2.4 GHz Wi-Fi bands.
- A wireless smartphone plan that supports mobile Wi-Fi hotspots.
- Two separate mobile devices (Android or iOS).
- The Roku app must be installed on the non-hotspot mobile device.
Set up your mobile hotspot and install the Roku app
After meeting the requirements, connect your Roku to your home Wi-Fi network without a remote. You must have one device using a mobile hotspot and the other with the Roku app installed separately.
To connect your Roku to Wi-Fi without a remote, do the following:
- Turn on the mobile hotspot feature on your first device. For Android devices, go to Settings > Network & internet > Hotspot & tethering . On an iPhone, go to Settings > Cellular > Personal Hotspot or Settings > Personal Hotspot on the newer version of iOS.
- Set your mobile hotspot's network name and password to match the Wi-Fi network that was last used on your Roku.
- Download the Roku app on the second non-hotspot device. You can download the app on an Android device from the Google Play Store or an iOS device from the App Store .
- Open the Roku app on your second device.
- Tap the Continue button to get started.
- Tap Next or Skip to move to the next screen. Close
- Choose Nex t or Skip to get the account sign-in option.
- Tap the Sign in button to log in with your Roku account or Continue as guest . Close
- Reset your Roku by unplugging it for a few minutes and plugging it back in.
- Your Roku automatically reconnects to your mobile hotspot.
- Use the Remote tab in the Roku app to update your network settings from the mobile hotspot to your home Wi-Fi network. Close
You can still use your Roku even if you lose the remote
Using the dedicated remote with your Roku is the easiest way to connect it to your home Wi-Fi network , but it isn't the only option. If you misplace the remote, a temporary mobile Wi-Fi network is the next best bet aside from a direct hardwired connection. When your mobile hotspot is active, you can remotely control your Roku from the app on another device and update your Wi-Fi settings. If you meet all the requirements, you can bring your Roku back to life in a pinch without a remote.

Taylor Swift is about to go back on tour: Here's what to expect on the Eras Tour in Paris

After a two-month break, Taylor Swift is revitalizing her titanic Eras Tour in Paris, and fans believe there are changes coming to the show.
If you are wondering where she's playing, if there will be changes and how to score tickets, here's everything we know.
And if you're new to the Eras Tour party, you can get caught up on the first 83 shows here .
When does the Eras Tour start again?
Swift kicks off the European leg of her tour on Thursday, May 9, in Paris. She will perform Friday, Saturday and Sunday nights, as well, in the City of Light.
Need a break? Play the USA TODAY Daily Crossword Puzzle.
What are Taylor Swift's tour dates in Europe?
There are 69 shows left in the Eras Tour: 51 in Europe, nine in America and nine in Canada.
The European leg stretches from May all the way through a five-night stand at Wembley Stadium in London in mid-August.
See a complete list of international dates here .
After she wraps up in Europe, Swift will stop in Miami, New Orleans and Indianapolis before wrapping up in Canada.
See the remaining U.S. dates here .
What is the Eras Tour set list?
The Eras Tour has featured a massive 45-song set list you can check out here . But speculation is swirling it won't look the same when Swift takes the stage in Paris.
Will Taylor Swift add 'The Tortured Poets Department' to her set list?
The tortured poet has been on hiatus keeping her stamina up by releasing a double album of 31 tracks. The 2-hours-and-2-minutes project broke a number of Billboard records as the superstar did zero press to promote it. Fans flocked to stores and streaming services to listen to all the songs from "Fortnight" to "The Manuscript."
Although the singer has not confirmed whether her 11th era album will be added to her Eras Tour set list, she did post a YouTube shorts video with two scenes that sent Easter egg decoders into a frenzy. In one of the shots, the singer is next to a railing where a "TTPD" logo appears to be (at 0:11). In the succeeding shot, her back-up dancers perform holding canes and wearing top hats, something they have not worn previously.
Swift's dancers and bandmates posted to their Instagram stories as they left for France last week. The singer did not appear at two media events with her boyfriend Travis Kelce: the Kentucky Derby and a Formula 1 race in Miami , Florida. Patrick Mahomes, Kelce's friend and Kansas City's quarterback, attended the car racing spectacular with his wife, Brittany.
Can I still get Eras Tour tickets?
Swift's show is completely sold out in Europe and North America. There are resale sites with tickets, but be wary of scams. The best way to avoid getting swindled is continuously checking links on Swift's website . There are some for resale on the sites verified by her camp.
Singapore was a hotbed for fans who traveled thousands of miles only to get turned away at the venue. In Tokyo and Australia, last-minute ticket drops happened a few days — without announcement — ahead of the shows.
Miami, New Orleans and Indianapolis — the three U.S. cities Swift is visiting in the fall — have some of the heftiest price tags with Canada closely behind. In may be cheaper to travel to Warsaw, Poland, or Gelsenkirchen, Germany. Here's a list of cities with the cheapest resale tickets, according to travel website Islands.com .
10. Vienna, Austria — total average cost: $1,089, safety score: 69.72
9. Cardiff, U.K. — total average cost: $1,061, safety score: 61.83
8. Lyon, France — total average cost: $1,047, safety score: 44.3
7. Lisbon, Portugal — total average cost: $1,028, safety score: 70.15
6. Munich, Germany — total average cost: $1,000, safety score: 78.88
5. Paris, France — total average cost: $971, safety score: 41.83
4. Stockholm, Sweden — total average cost: $935, safety score: 53.86
3. Hamburg, Germany — total average cost: $903, safety score: 57.51
2. Gelsenkirchen, Germany — total average cost: $749, safety score: 51.33
1. Warsaw, Poland — total average cost: $712, safety score: 72.98
Catch Taylor Swift live with tickets at Vivid Seats , shop merchandise , and stream her latest on Disney+ . Purchases you make through our links may earn us and our publishing partners a commission.
Who are the opening acts?
Paramore launched the Eras Tour in Glendale, Arizona, in March 2023, so it's fitting the American rock band is opening the tour's second year. The act will open for Swift for 51 shows across Europe . The band was dubbed the 2024 Record Store Day global ambassador and surprised fans in Nashville the weekend following the release of "The Tortured Poets Department."
When the tour comes back to North America in October , Swift's opening act will be Gracie Abrams.
Where can I watch if I don't have tickets?
The Eras Tour is one of the first tours that has been followed, globally, by thousands of fans on digital platforms. Fans dedicate part of their concert experience to livestreaming as Swift performs. A few Swifties have learned how to host their own shows over social media including Tess Bohne , known as the livestream queen. Bohne goes live for (almost) every show pulling streams from Instagram and TikTok. When a livestream goes down, she fills the time with banter.
On YouTube, user @TaylorSwiftHockeyBro also livestreams the three-hour show, and on Twitch, @folkleric , is a host fans follow.
There is also an app, Swift Alert , that notifies fans who only want to watch certain eras like the acoustic, surprise set. The app sends out push alerts if there are any major announcements.
What secret songs are left?
For the past 83 shows, Swift has played an acoustic set she customizes at each stop with a guitar and piano performance. In 2024, the Eras Tour star added mashups of her songs for each stop. Here are the songs she has yet to perform:
- "Taylor Swift" (debut album): "Mary's Song" and "A Perfectly Good Heart"
- "Fearless": "The Way I Loved You," "Change," "Superstar," "We Were Happy," "That's When," "Don't You" and "Bye Bye Baby"
- "Red": "Girl At Home," "Ronan," "Forever Winter" and "Run"
- "1989": "Sweeter Than Fiction"
- "Reputation": "I Did Something Bad"
- "Lover": "London Boy," "Soon You'll Get Better" and "It's Nice to Have a Friend"
- "Folklore": "Hoax"
- "Evermore": "Happiness" and "Closure"
- "Midnights": "Paris" and "Glitch"
- "The Tortured Poets Department": all 31 tracks
Will Taylor Swift perform in 2025?
There have been many rumors that Swift will continue her show in 2025, but they are only rumors. Nothing has been announced for next year, and as of now, the tour will end in Vancouver, British Columbia, on Dec. 8.
Don't miss any Taylor Swift news; sign up for the free, weekly newsletter "This Swift Beat."
Follow Taylor Swift reporter Bryan West on Instagram , TikTok and X as @BryanWestTV .

COMMENTS
Microsoft Windows. Step 1: Click on the Wi-Fi icon displayed on the taskbar. Step 2: Click on the network's name listed on the pop-up menu. Step 3: Click on the Connect button. Step 4: Enter the network's password. Step 5: Click on the box next to Connect Automatically if you want to autoconnect.
The "Wireless" section will allow you to set up your wireless network, so navigate there. 7. Enter a name for your wireless network. In the "Wireless" section, you should see a field labeled "SSID" or "Name." Enter a unique name for your wireless network. This is what other devices will see when scanning for networks.
To set one up, go to your router's app/configuration page and navigate to the wireless settings. Most routers have guest networks disabled by default, so there will usually be a page to set one up ...
Slide the "Wi-Fi" switch to "ON" (or tap the option to Use Wi-Fi) and tap a network's name. On an iPhone or iPad, open Settings and tap Wi-Fi, tap the switch ON, and tap your network's name. On macOS, click the Wi-Fi icon in the menu bar at the top of the screen, and click your network's name.
Then, attach the other end of the coaxial cable to the modem. Plug the modem into a power outlet. DSL: Plug one end of the phone cable into the phone jack on the wall. Then, connect the other end of the phone cable to the designated "DSL" or "Phone Line" port on the modem. Connect the modem to a power outlet.
In Windows 11, select Start, type Control Panel, then select Control Panel/Network and Internet/ Network and Sharing Center. In MacOS: Click the Wi Fi icon on the top right of the screen [source: Apple ]. A dropdown menu will appear with the list of available networks. Select your network and click "Join."
Follow these steps to set a schedule for your wireless router using this method. Step 1. Unplug your wireless router and set it aside, we won't need it for the next couple of steps. Step 2. In the outlet you typically use for your wireless router, go ahead and plug in the digital outlet timer. Step 3.
To connect your Alexa device to Wi-Fi, open the Alexa mobile app, go to Menu > Add device, then follow the steps to set up your device and connect it to your wireless network. If your Alexa device is already set up, go to Menu > Settings > Device Settings, choose the device, then tap Change next to Wi-Fi Network.
Step 2: Plug one Ethernet cable into your modem and the other end into your router's WAN port. Then, plug your router's power adapter into the wall. If you don't have a cable, check out our ...
Locate your computer's network settings, and search for nearby Wi-Fi networks. Select your network, and enter your password. If the connection is successful, open your web browser and try navigating to a webpage like www.google.com. If the page loads, it means your Wi-Fi connection is working correctly.
Connect to Wi-Fi from an iPhone: Go to Settings>Wi-Fi. Select your network name, enter the password and hit "Join.". Connect to Wi-Fi from a laptop: Go to Settings>Network & internet>Wi-Fi ...
Paul shows you how to connect the SiriusXM TOUR to Wi-Fi in order to be able to utilize all of the streaming options SiriusXM has to offer.
To connect to a Wi-Fi network with Control Panel, use these steps: Open Control Panel. Click on Network and Internet. Click on Network and Sharing Center. Under the "Change your networking ...
If it doesn't, press the Power or On/Off button. Connect: Use your computer or mobile device to connect to the extender's WiFi network, named NETGEAR_EXT by default. The network may be open or use 'password' as the default password. Setup Page: Launch a web browser and enter mywifiext.net or 192.168.1.250. This will take you to the New ...
If you'd prefer to connect to Wi-Fi using the Settings app in Windows 11, first open Settings by pressing Windows+i on your keyboard. Or you can right-click the Start button and select "Settings." When the Settings app opens, click "Network & Internet" in the sidebar, then select "Wi-Fi." Under Wi-Fi, flip the switch beside "Wi-Fi" to "On."
To set the Wi-Fi adapter to reconnect automatically on Windows 11, use these steps: Click the wireless icon in the system tray. Click the button next to the wireless icon. (Image credit: Future)
Open the EE app. Select WiFi Controls from the Home screen. On the dashboard tap the Smart Hub tile. Select the three dots in the right-hand corner. Tap Change WiFi Settings. Enter your new password and tap Save. If you have our Smart Router: Open the EE Home app. Go to Smart WiFi then Manage your WiFi settings.
After installation, be sure to test your internet connection. If you aren't getting the speeds you expect, try resetting or repositioning your router. Once you've got your equipment set up and are ...
If you are logging in for the first time, search for your router's default credentials on the internet using the manufacturer's name. Now, look for the WLAN settings; under it, expand the WLAN On ...
WPS is an attempt to fix that issue regarding Wi-Fi signals. More specifically, it allows people to create a secure connection between two devices using Wi-Fi without the need for a lot of tech knowledge. The only caveat is that both devices need to be using the WPA or WPA2 security standard. Initially introduced in 2006 by Cisco, WPS over the ...
In Windows 10, go to Settings > Network & Internet > Status > View hardware and connection properties. In Windows 11, go to Settings > Network & internet > Advanced network settings > Hardware and ...
Follow the instructions to connect Sonos to your new router or WiFi network. If some of your Sonos products are missing from your Rooms list after you've wired a Sonos product, reboot all missing Sonos products in your household, then go to Settings > System > Network > Wireless Setup to connect them to the WiFi network.
Make sure function 38 is set to 1, then proceed to function 39. Use the up or down arrow to change function 39 function to 0 then press done. WiFi setup will then be displayed on the screen.*. Step 2 - Connect the thermostat to your home WiFi (via an internet browser on your mobile device) After connecting to the thermostat WiFi ...
Taylor Swift paused her acoustic set of The Eras Tour in Stockholm to make sure a fan was okay. Inside courtroom College protests Start the day smarter ☀️ Bird colors explained U.S. Elections ...
PARIS, France — The Chairman jump-started her tour after a two-month hiatus, and anticipation was high over whether Taylor Swift would incorporate her 11th era album into the Eras Tour set at La ...
A Roku device that was previously set up on your Wi-Fi network. A Roku device with support for 2.4 GHz Wi-Fi bands. A wireless smartphone plan that supports mobile Wi-Fi hotspots.
Taylor Swift's smash-hit "Eras Tour" is set to boost spending in the United Kingdom by nearly $1 billion, according to estimates by Barclays. The British bank said in a report Wednesday that ...
The Eras Tour has featured a massive 45-song set list you can check out here. But speculation is swirling it won't look the same when Swift takes the stage in Paris.
Open the Wi-Fi menu on the device you need to connect to the internet. Look for your iOS device (ex: PCMag's iPhone), select it, then enter the hotspot password to connect. Once your secondary ...
Taylor Swift 's legion of Swifties are not letting up on their unwavering support for the pop star, and because of it, her Eras Tour has just set a new record. On The Eras Tour's X (formerly ...