Five ways Google Trips can help you enjoy your next vacation
Apr 26, 2017
[[read-time]] min read

Everyone loves vacation, but the work that goes into planning one—well, can be a lot of work.
The exciting (and often challenging) part of traveling is that things can sometimes change last minute. You need to be able to easily track updates to your travel plans and share them with your travel buddies. That’s where Google Trips comes in. We’ve added three new features to make your summer travel easier to plan and enjoy—even as things change. Learn more, plus some travel tips:
1. Share and keep track of your reservations in one place. No need to dig up every individual hotel, flight and travel reservation and forward them from your inbox. Save yourself the headache and share all the reservations for your trip with just a tap of the arrow button in Google Trips. Anyone you share with will receive an email with all the reservation details, and see them in the app too.

2. Stay on top of last-minute changes. Trips already helps automatically organize your travel reservations from Gmail. For those last-minute or spontaneous changes, we built in a feature that lets you quickly update and add new details for flight, hotel, car, and restaurant reservations, even when you don’t have an email confirmation. Simply press the “+” button in the bottom right corner within the Reservations section. Enter your airline and flight number, or the name of your hotel, car rental or restaurant, and we’ll fill out the rest. There’s space for free-form notes, too, if you’d rather.

3. Catch a train or bus to your next adventure. Part of the fun of traveling to a new country is visiting the top sights in different cities, and often travel by train or bus is the most convenient way to get around (Rome to Florence by train in 1:30? Sign us up!). In fact, more than 3 million rail and bus reservations are booked weekly by travelers around the world. So starting now, all your past and upcoming train and bus reservations will automatically be organized in one place for you in Trips—along with your flight, hotel, car and restaurant reservations.

4. Follow the wisdom of the crowd for some travel inspiration. There are so many places in the world to visit, sometimes you need a little help to figure out where to go next. Here are eight destinations we saw rise in popularity for travelers over the past year:
5. Download your trip before you go . No matter where you end up, you can find nearby spots to see, check hours and locations for attractions, and review your saved places. On average, nearly a quarter of Trips users are offline for more than seven hours at a time while traveling, and nearly 70 percent use the offline feature and download trips in advance. Even with Wi-Fi available at hotels or local cafes, you can’t always count on a steady connection to get the information you need when you’re out and about, but Google Trips has you covered.

Going on vacation should be fun. While you kick back, we’ll keep working on Google Trips to make traveling easier for you!

Related stories

3 ways to find a great deal with Google Flights

A new advisory committee to improve flight emission estimates

Three tools for stress-free travel around Asia Pacific

New ways to browse hotels and save money on flights — plus other tools for summer travel
New ways to drive hotel bookings and reach travelers.

5 sustainability updates from 2022 that are good for you — and the Earth
Let’s stay in touch. Get the latest news from Google in your inbox.

How to Use Google My Maps to Plan a Trip (Ultimate Guide)
Note: Some of the links in this post may be affiliate links. This means if you click on the link and purchase the item, I will receive a commission at no additional cost to you. More details are here .
I love a good map. I’ve got maps hanging on my walls. I go to the bookstore to read maps. Whenever I navigate my way home using only a map, I feel like I must have some innate bushcraft skills. And if you’ve read my posts about traveling in Maine , you’re probably sick of me talking about the DeLorme Atlas by now.
But while reading paper maps will always inspire a sense of get-up-and-go adventure for me, I’m not totally opposed to using tech for planning my trips and navigating on the ground.
And one of my favorite techy solutions? A secret little trip planner called Google My Maps, buried inside of everyone’s favorite map tool.
Google My Maps lets you create shareable custom maps with multiple layers, plus location pins with icons and notes. It’s a great way to brainstorm travel plans or create a trip itinerary from a desktop. And since the map can be viewed in the Google Maps app, you can use it to navigate on the go.
To give you an example of what this post will show you how to do, here’s one of the custom Google Maps I’ve created for a trip.
Keep reading for an overview of how to use Google My Maps to plan a trip, plus a video tutorial of how to set it up—all updated in 2023. I’ll also share answers to commonly asked questions and some lesser known tips to help you get the most out of this tool.
A quick note: Creating a custom map in Google My Maps is distinct from Google Lists of saved places. Check out our Google My Maps vs Lists comparison to see all the differences and our full guide to using Google Maps Lists .
8 Top Google My Maps Features
(AKA Why It’s Awesome)
Google My Maps allows you to see your trip itinerary.
This is so helpful, especially if you’re a visual person or enjoy using maps. But even if you’re not, it’s still really useful to see where everything is in relation to each other as you plan your trip, vacation, or holiday because it helps you be realistic about your plans.
It connects with other Google apps.
Setting aside my (ahem, very rational) fear that they may take over the world soon, I love all things Google. My Maps stores a copy of the map in whatever Google Drive account you’re using. (Am I the only one who has six of these?) So if you like to create Google Docs or folders to store trip planning information, documents, photos, or itineraries, it’s nice to have your map easily accessible in the same folder.
You get additional location information since it’s part of Google Maps.
If a location is on Google, you can see their website, phone number, address, reviews, and website when you add it to your custom map. (Note that you can’t see this information when clicking on your saved pin from the Google Maps app, but you can from desktop.)
You can add your own extra notes and photos.
Customize your map even more by adding notes, photos, or videos. Use the notes during planning to add website, hours, or tips. If I hear about the location from a particular website, I usually add that link and what was noted in the article about the location (e.g., it’s a great sunset spot, which dish on the menu is recommended) so I can reference it later.
You can view your route by creating a layer with directions.
When I traveled to Burlington, Vermont, I wanted to see the length of the bike trail on the map, so I used the directions feature to show the whole route. (Check out the Burlington travel guide for an example of the travel map I created that includes the bike path route.) And while I haven’t done this yet, you could also use Google My Maps to plan a road trip itinerary for a longer adventure.
Caveat: As I’ll discuss later, you can’t use directions layers to get turn-by-turn directions (but I mention an alternative below). For this reason, I only use these layers to visualize my route.
It’s highly customizable.
Don’t mind me while I swoon over the color coding and organization options over here. Use custom icons, layers, and colors so it’s easy to see what things are at a glance. For example, you can give different locations individual styles: a coffee cup icon for cafes, a bed icon for hotels, and a swimming icon for beaches. You can also use layers in many different ways, such as one layer for each day of your trip or one layer for each category (like dining, lodging, and things to do).
In-depth planning on your computer. Easy, on-the-go access from your phone.
While you can’t edit the maps from the Google Maps app on iPhone or Android, you (and anyone you’ve shared them with) can view them. You can click on icons and see your notes, as well as navigate to those locations.
Note that there used to be a dedicated My Maps app on Android, but this has been deprecated.
It’s easy to share it with a friend or with the world.
If you’re planning a trip with other people, it’s easy to share the map with others . And if it’s something you want to make available to everyone (like I do on my travel guide posts), just change the privacy setting and share the link or embed it on a website.
3 Ways to Use Google My Maps
Brainstorm and store ideas for future “maybe” trips.
I often come across a really interesting hotel, restaurant, or fun thing to do in destinations I want to travel to in the future, and I want to make sure I don’t forget about them. I have so many bookmarks in so many places (Pinterest, Facebook, Instagram), but Google My Maps is the place I’ve started storing ideas for future trips.
Plan your trip itinerary.
Want to use Google Maps for route planning? When you’re ready to plan an upcoming trip, plot it out visually by using Google My Maps to create your itinerary. If you like structured itineraries, you can easily create a detailed day-to-day plan.
Or, you can use a looser itinerary structure like we usually do by adding all the places you might like to go.
For example, on a day trip to NYC, we added tons of places to eat on the map (thank you, Tiktok). As we were walking around doing other activities and started to get hungry, we were able to easily see which saved restaurants were closest to us.
Navigate on the go.
Whether you’re using your map loosely for ideas or for a structured itinerary, you can pull it up on your phone anytime and get directions to your next location.
Not sure what you want to do today, or want to see what the closest restaurant from your list is for dinner? Pop into your custom map to jog your memory from the notes you made or to get directions to your next location.
Recommended: Need an organized backpack to take on the road? Check out my favorite luggage for camping, road trips, and flying: the Cotopaxi Nazca 24L and Allpa 35L !
How to Use Google My Maps to Plan a Trip
How to create a new custom map.
Go to Google My Maps from your desktop browser . Check the Google icon in the top right corner to make sure you’re using the Google account you want to. Click “Create A New Map” and a window will open with a blank map. To give your map a name and description , click the map name (“Untitled Map”).

You can also change the color and style of the base map if desired. At the bottom of the layer panel on the left, click the arrow next to “Base Map.” You’ll get a window with nine options, including terrain, light political (a very light version of the standard Google Maps), satellite, and some different colored versions. Note that changing the base map style on desktop won’t change anything when viewing on mobile in Google Maps.
How to Add and Edit Layers
When you create a new map, the first layer will already be created, so you’ll probably want to rename it. To give your first layer a title , click directly on the title name like you did with the map name, or click the 3 dots next to “Untitled Layer” and then click “Rename Layer.” Clicking these 3 dots next to a layer title is also how you can delete a layer if you add one accidentally or change your mind. In this example, I’m changing my first layer to “dining” and will add all restaurants to this layer.
You can use layers any way you want to, or simply stick to one layer if you don’t need multiple. To add new layers , simply click “Add Layer” in the gray section below the map title and description.
To move a pin between layers , click the pin on the layer and hold down the mouse, and then drag it to the desired layer.

How to Add Location Pins
There are various ways to add location pins to a layer. First, make sure the correct layer is chosen by clicking anywhere in the white area on the layer. You’ll see which layer is selected by looking for the blue bar on the left of the layer.
- In the map search bar, type either a place name or an address. Click “Add to Map” to add a pin for this location . This is how I add most pins.
- If you don’t need an exact location or don’t have an address , you can click the pin marker button below the map search bar (“Add Marker”). It will turn your mouse into a T and you can click anywhere on the map to add a blank pin. You’ll immediately be prompted to add the pin title and description.
- If you’re dealing with very remote locations (or you just like geeky map stuff), you can also use latitude and longitude coordinates in the search bar.
To delete a pin , simply click on it and click the trash icon.

A few tips and best practices for adding pins:
- If the place you’re searching for does not have a listing on Google, you’ll have to use an address. One thing to note is that sometimes Google Maps listings aren’t correct or don’t take you to the right place, so you may want to double check the location if you’re not using a street address to add the pin (especially if it’s a small business without a website).
- I have also found that hiking trail heads are frequently on Google Maps, but they’re not always correct in terms of navigating there by car. I usually add them to my map to get a basic idea of where they are while planning, but I use a paper map or atlas to find them while traveling.
How to Customize Location Pins
To change the title and add notes to your listing, click on the pin on the map, and then click the pencil icon (“Edit”).
To change the color and icon of the pin , click the paint bucket icon (from the pin itself or directly in the layer). Click “More Icons” to view all the icon options. You can color code by type of activity, by layer, or any way that makes sense to you.
To add photos or videos to a pin , click on the pin on the map, and then click the camera icon (“Add Image or Video”). This is another way to make your map interactive, especially after you’ve visited a location and want to share it with others.

How to Add A Directions Layer
I find that directions layers are helpful for showing the route of a walking tour, bike path, or road trip you want to take, but I don’t find them useful for directions while traveling since I can simply use the maps app to navigate.
I use directions layers whenever I want to show an entire route on a map , rather than a specific location. Think of this as the 2024 version of mapping out a trip with AAA paper maps and a highlighter (if you’re old enough to remember).
Click the arrow icon underneath the search bar, which will create a new directions layer. On the legend, click “Driving” if you want to change this to walking or biking directions. Add a location name or address to Points A and B in the legend. If you find that the pins are not exactly where they should be, you can drag the points on the map.
Continue adding points by clicking “Add Destination” on the map. You can either type the information into the legend or hover your mouse to a spot on the map and double click it. (This is especially useful if you’re tracing a route on something like a bike path or hiking trail that won’t have an address.)
Rearrange the order by dragging the items around in the legend. Just like altering directions on Google Maps navigation, you can click on part of the route and drag it to a different road if you want to change part of the route after it is complete.
If you need to access the directions so you can see the distance of your route or the time it will take, click the three dots on the layer and click “Step-by-Step Directions.” Note that you can’t actually use this to get turn-by-turn directions in Google Maps.

How to Share A Google My Map
There are several options for sharing your Google Maps trip plan.
Open up your map, then click the share button in the gray bar above your layers. To allow others to view your map (which includes embedding on your website), click “change” under the section “Who has access.” For embedding, you will need to make this setting public.
Otherwise, if you want to allow others to edit your map, add their email address in the “invite people” section.

How to View Your Custom Map in Google Maps (iPhone or Android)
Open Google Maps and go to the Saved icon at the bottom. Scroll to the bottom of this screen and click “Maps.” Choose the My Map you want to view. The layers with your custom icons will now be visible on your Google Map. You can click on any pin to view your details (such as description or photos), as well as to navigate there.
To close a map, click on a pin and then click “View Map Legend.” There, you can click the Close icon.
From the Map Legend, you can also toggle layers on and off, and then backing out to the main map (don’t click Close—just the back arrow or back button).
How to Navigate with a Custom My Map (iPhone or Android)
To navigate to one of your pins, open your map, find the pin for where you want to go, click it, and then click “directions.” When you do this, you won’t see your custom map anymore but will be looking at the regular navigation of Google Maps.
You can’t use a My Maps “directions layer” for navigation. If you’re looking for that functionality, I recommend just creating a route in Google Maps and sending it to your phone (or sharing with others). See here for more details.
How to Import Locations from Google Sheets, CSV, or Excel
Importing locations to a My Maps layer can be helpful in a few scenarios:
- You have a significant amount of locations to add to your layer
- Your data is already in the form of a spreadsheet
- You want additional fields included besides the default Name and Description
- You want to create groupings of pins (for example, a list of 50 restaurants could have a column for “Cuisine,” which will give you the option to group and style the pins by cuisine)
The process is simple, and you can import a variety of file types, including CSV, Excel (XLSX), or directly from Google Sheets. There are also special file formats that import map data from other programs, but this section is focused on spreadsheet-type files that you create and format.
Create a spreadsheet with the desired column headers. At a minimum, you need place names and either addresses or latitude-longitude information .
If you want to group your pins by some type of categorization, you should include that as a column. Other columns you could include: website, phone number, description, or notes. While Google Sheets allows you to include photos in a cell, Google My Maps will not import photos in this way (it will include the column as a field, but will be blank).
Once your spreadsheet file is ready, click “Import” on a blank layer (if your map already has layers, you will need to add a new layer to see this option). If uploading a CSV or XLSX, do this from the Upload tab. If using a Google Sheet, click the Google Drive tab and choose your file.
Choose which column has location data (address or latitude-longitude) and click “Continue.” Choose the location name column next and click “Finish.”
To change the icons individually, click “Uniform Style” next to the paintbrush on your layer. Under “Group Places By,” choose “Individual Styles.”
To change styles by a category column (such as Cuisine), click the link next to the paintbrush and choose to group places by the desired column. You can then give each category its own color or icon.
You can manually add new pins to this layer, and they will include all the fields you imported from the spreadsheet columns.
You can also add more items to your spreadsheet, and import this new data. Click the three dots on your layer. Under “Reimport and Merge,” click “Add More Items” and choose your file. It will add the new rows to your layer.
How to Import a Route from Google Maps Timeline History (KML) or GPS Data From a Fitness App (GPX)
Google My Maps can import routes and locations you’ve already traveled to via special file types that are very easy to download from certain apps. This could be useful if you want to share a walking, biking, or driving route that you’ve taken without having to recreate it on a directions layer.
Note that this only works as well as the GPS satellites were able to track your location while you were traveling.
If there are a lot of clouds, dense forest, buildings, or anything else blocking the GPS signal, your tracked route will be much less precise. I’ve noticed that Google Maps sometimes has my route showing somewhere I couldn’t have walked or driven.
If you have your location history turned on in Google Maps, you can download a KML file from a trip, which will include the route traveled and location pins for any stops. Sometimes it misses a location name or adds a pin in the wrong place, but overall it’s pretty good.
Go to your Google Maps Timeline and locate the day you want to export. Click on it, and you should now see your route highlighted along with any stops you made. Now click the gear icon on the bottom of your map, and click “Export this day to KML.” Go to your My Map and on a new layer, click “Import.” Choose the KML file you just downloaded. You can now edit each portion as needed—changing the color and thickness of the route line, changing the location icons, as well as adjusting the route where desired.
If you have other apps that track your location, such as fitness apps, you may be able to download a GPX file that shows the route you took. The instructions for doing this will vary from app to app, but I was able to easily find it in Samsung Health by looking at the detail of a particular workout/walk and clicking the three dots to download a GPX. The import process to Google My Maps is the same as above.
With both methods, you can make adjustments to points/stops along the way or even add more pins. With the Google Maps KML file, you can also adjust your route by moving the small white dots.
Google My Maps Tutorial
Here’s a walk through video to show you how to use Google Maps to plan a trip, along with several of my own Google My Maps itinerary examples. Coming soon: a 2024 update!
Google My Maps Examples
Here are a few more examples of My Maps I’ve created for sharing recommendations, trip ideas, and actual vacation planning.

Google My Maps FAQs and Tips
As great as Google My Maps is for planning a trip, there are some limitations to using it. Lots of questions have also come up about more specific uses and ways to use its features. Thanks to all the readers who have asked or shared tips in the comments as I’m always looking to make this a more robust guide. I’ve organized the questions and tips here since it makes it easier than scrolling through the comments.
How many layers can you add to a map?
Google My Maps limits you to 10 layers. If you are planning a longer road trip and want to create a layer for each day, this limitation may prove frustrating.
Here are a couple of workaround ideas: You can create 2 maps, and have the entire master route as 1 layer on each (showing the very basic route for all 12 days—say from city to city) as a reference. Then build individual layers for each day. As a second option, you could add multiple days to 1 layer and change the titles to start with the day they correspond to (so it would be “1 – Name of Place” instead of just “Name of Place.”) However, this option may not be ideal since you can’t see the titles until you click when you’re on the phone.
How many location pins can you add to each layer?
You can add up to 2,000 pins per layer, and the entire map cannot exceed 10,000 lines, shapes, or places total. I haven’t tested the limits, and it’s possible adding this amount of items could slow things down. My guess is that most travelers wouldn’t need anything so large, but it is possible according to Google .
Are custom Google My Maps available offline?
No, but keep reading for a workaround and alternative.
One of the biggest complaints about Google My Maps is that you can’t download your custom map and pins to use offline, unlike the rest of Google Maps.
However, I have been able to use it in areas with spotty reception. I pulled the map up when I did have reception, and I left it running in the background. It would stay loaded in the app and I was able to pull it up to look at it later when I was out of reception. I’m not sure I would rely on this as a surefire workaround, but it can work in a pinch.
Another alternative, especially if you’ll be traveling in another country where you’ll be completely offline, is to use Google Maps Lists, which can be edited from desktop or your phone but don’t offer the option for separate layers, unique icons, or adding photos.
Is there an app for Google My Maps?
There is no separate Google My Maps app, but you can view your maps within Google Maps. Just make sure you’re signed into the same account, and all your maps will sync.
(There used to be a dedicated My Maps app on Android, but this was deprecated in 2021.)
Can you create or edit maps from your phone?
No, the maps cannot be edited from the Google Maps app. Google My Maps can only be created or edited from the desktop version of the site. This is another huge advantage Google Lists has over Google My Maps because Lists allow you to add new places or entire lists from any device—iPhone, Android, tablet, laptop, or desktop.
Is there a bridge height filter?
No. For RVers and others who need to plan ahead for height limitations, there is no bridge height filter available in Google Maps. Since I haven’t had to use this feature myself, I am not confident in an alternative to recommend. However, from a bit of digging around, there are some apps and GPS units for truckers that may be a good place to start looking if you have an oversize vehicle.
What is the difference between Google Maps Lists and Google My Maps?
They both allow you to create custom maps with pins, but there are some key differences, such as offline access, layer capabilities, customizable pins, and creating/editing within the app. Check out the details on how Google My Maps compares to Lists (including a features comparison table).
How many stops can you add on a directions layer?
You can only add 10 stops per directions layer. This is also the maximum number of stops you can add for navigation in Google Maps. As some readers have pointed out, this can be limiting when you want to use this feature for a long road trip.
Can you use the directions layers on your phone for navigation purposes?
No, you cannot create a directions layer and then access those turn-by-turn directions for navigation in the Google Maps app.
So…are directions layers totally useless? What’s the point of having a Driving Directions layer in My Maps?
Personally, I still like to use these layers, but only to show a route for my very visual brain, rather than to actually create custom directions.
Can you send a custom created route (layer) to someone else so that the other person will take that specific driving route on google maps?
No, you can’t do this from My Maps, but there’s a workaround I can suggest.
Forget My Maps, and use Google Maps from desktop or mobile to plot a route. You can add up to 10 stops, and then you will be able to share your custom directions.
From desktop, there’s an extra step in first sending the directions to your phone. If you’ve created the directions in the mobile app or once you have them pulled up there, you can share them with anyone by clicking the 3 dots next to your list of locations (sharing must be done before clicking “Start”—if you’re already in the navigation, you need to back out of it to share). When you share, it will list all the steps as well as send a link for the other person to open the directions in Google Maps directly.
An important caveat to sharing custom routes: Google Maps will reroute the directions as it normally does according to current traffic at the time of driving, so this method cannot be relied upon if you’ve mapped a specific route for bridge clearances. As a workaround, you can add “stops” on the desired interstate (zoom in and add this literally on the road itself so navigation doesn’t try to take you off an exit), which will force Google Maps to take the driver that way. This is what I do when driving south from Connecticut to PA because Google Maps always wants me to take its beloved George Washington Bridge and I always don’t want to. I add a stop to force my route across the Tappan Zee Bridge. However, I’m not sure I would rely on this workaround as a sole method for RVs or truckers.
Can you see how much time the directions will take?
Yes, on desktop you can view the details if you want to know the distance or how long a route will take. To view distance and time for a directions layer, click the 3 dots on the laye, then click Step-by-Step Directions.
Of course, this doesn’t really help when you want to get this information on your phone or use the directions for navigation. As mentioned elsewhere, the “directions” layer functions best as a way to visualize a route. If you need turn-by-turn directions, see the steps mentioned above to save and send directions in Google Maps.
This post was originally published on July 27, 2017 and has been updated in May 2023.
Travel Photographer | FAA Certified Drone Pilot
Naomi is the coffee-loving, crazy-about-Latin-America writer and photographer behind everything here. She's guided by curiosity and a belief that every place has a story to tell–whether it’s through the intricate details of nature, history that has shaped a culture, or the people who call a place home. Learn More

How to Plan a Trip with Google My Maps
Google My Maps is one of my favorite tools for planning a trip. You’ve probably seen the maps around the site for you to use as well. Those are Google My Maps (which we’ll get into the difference below), but overall both are great tools for planning. It can be a little confusing to use, which is why I wanted to put together this guide on how to plan a trip with Google My Maps, including photos, so you can feel comfortable with this valuable tool!
I love using Google My Maps to plan a trip even as an idea. I have so many maps of different places that I would like to visit eventually. It’s really a great way to see places and save information for travel.
Most people just use it for a road trip itinerary or a driving route, but it’s a great way to assess the length of a day trip or public transportation. Not to mention the ability to download offline maps in case you don’t have service.
This post contains affiliate links. This means if you purchase something from a link, I may make a small commission, at no cost to you. This helps me keep the site running and free.
If you like this post, be sure to sign up for my e-mail list for travel inspiration (and get your FREE budget printable), or connect with me on Facebook , Instagram , Twitter , or Pinterest .
Why Use Google My Maps for Trip Planning?
Google My Maps is a powerful tool for trip planning, offering a wide range of features and benefits that make it an essential resource for travelers. Whether you’re exploring a new city, embarking on a road trip, or simply trying to navigate your way around town, Google My Maps provides detailed and accurate information to help you make the most of your journey. From real-time traffic updates and GPS navigation to local business reviews and recommendations, there are countless reasons why using Google My Maps can enhance your travel experience.
Google Maps vs. Google My Maps
There is an important distinction to be made between Google MY Maps and Google Maps. This post is going over Google My Maps. I prefer it for being on the move. Google My Maps is good for showing an itinerary – it is what I use on this site to show you where locations are. It’s a link to a map, but you can’t get directions on it.
Google Maps is similar, but with directions, and the ability to download the map offline – perfect for when you’re traveling without data! You have limited stops in Google Maps, but you can put in over 2000 things on My Maps. (Not that the names are confusing or anything, thanks Google.)
How to Create a Trip Plan On Google My Maps [Step-by-step Guide]
I’m going to walk you through the process of how to plan a trip plan on Google My Maps , from setting your starting point to adding multiple destinations, and even sharing the plan with your fellow travelers. Whether you’re planning a road trip, a vacation, or a simple weekend getaway, this guide will help you make the most out of Google Maps to ensure a smooth and well-organized trip. So grab your laptop or phone, and let’s get started on creating your perfect travel itinerary!
1. Create a Map
To create a new map in Google My Maps, start by accessing the Google My Maps website or app. Once on the Google My Maps interface, look for the “Create a new map” option, usually located on the side menu or in the top left corner. Click on this option to begin creating a new map.
Next, a new page will appear where you can enter a name for your map in the given field. Simply type in the name you want to give to your map and then click “Save” or “Create” to confirm the name.
After naming the map, you can also add a description by clicking on the “Untitled Map” text at the top of the page. This will allow you to provide a brief description of what the map is for or what it represents.
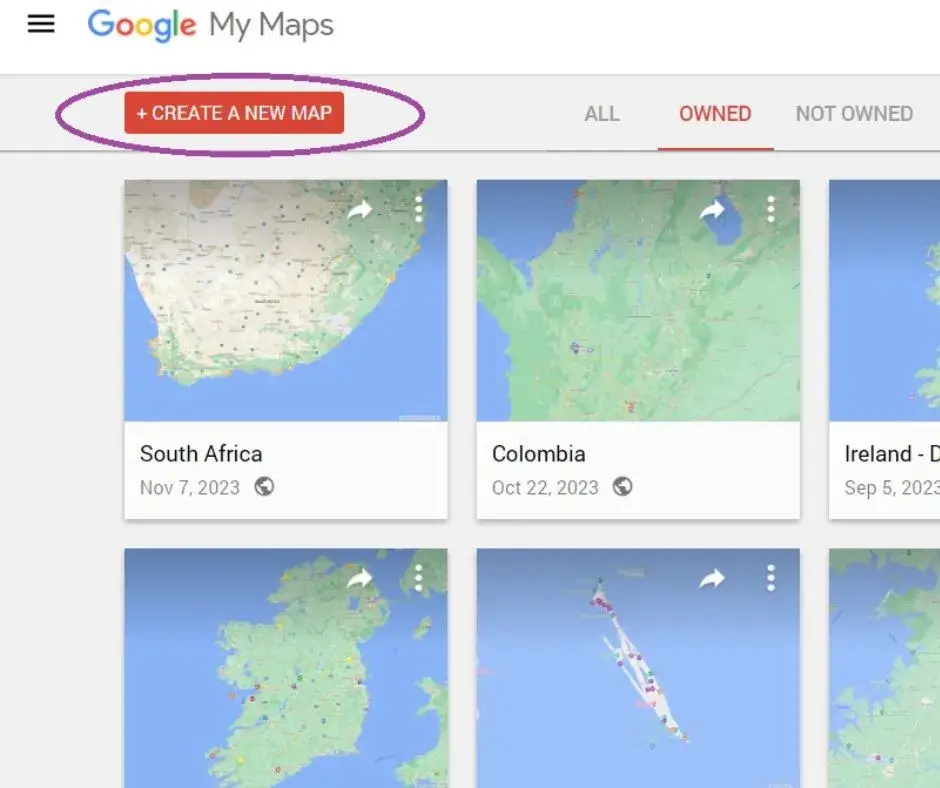
2. Add Locations
To add locations to your Google My Maps, you can simply type the location into the search bar and click on “Add to map” when the location appears. Alternatively, you can use the “Add Marker” tool to manually place a marker on the map.
To include the starting point and destination, click on the search bar and enter the details of both locations. Then, click on the blue button for “Directions” to generate the route between the two points.
If needed, you can click and drag the location pins to adjust their placement on the map.
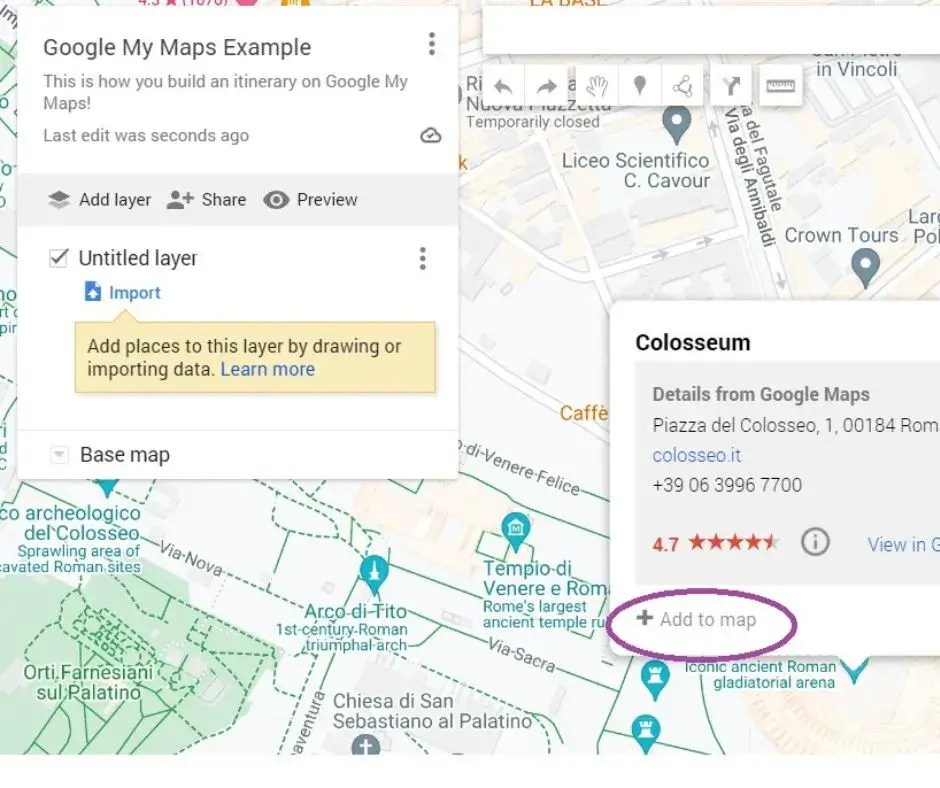
3. Customise Your Categories (Icons and Colours)
To customize your categories on Google My Maps, start by clicking on the “Style” option on the left-hand side of the menu. Select the category you want to customize, such as things to do, photography spots, restaurants, cafes, hotels, and shops, and then click on “More options” to change the color and add an icon for each category. Utilize different colors and icons to easily differentiate between different types of places on the map. For example, you can choose a green color and a camera icon for photography spots, a red color and a fork and knife icon for restaurants, a blue color and a bed icon for hotels, and so on. This will make it easier for you to navigate and identify different types of places on the map. By customizing the icons and colors for your categories, you can personalize your Google Maps experience and make it more intuitive and visually appealing.

4. Create Layers
To create layers for your map, start by clicking on the “Add layer” option in the sidebar. This will create a new layer that you can use to organize your locations. You can then rename the layer to better categorize the locations it contains and delete any layers you no longer need. Making layers invisible can help declutter your map and focus on specific categories. I also love to use color codes to help me easily find something.
To move points of interest between layers, simply click and drag the location pin to the desired layer.
Layers can help categorize and organize locations for your trip. For example, you can create layers for different attractions, restaurants, or hotels. This will make it easier to view and manage the different aspects of your trip. You can add up to 10 location pins per layer and create up to 10 layers per map, giving you plenty of freedom to organize your trip effectively.
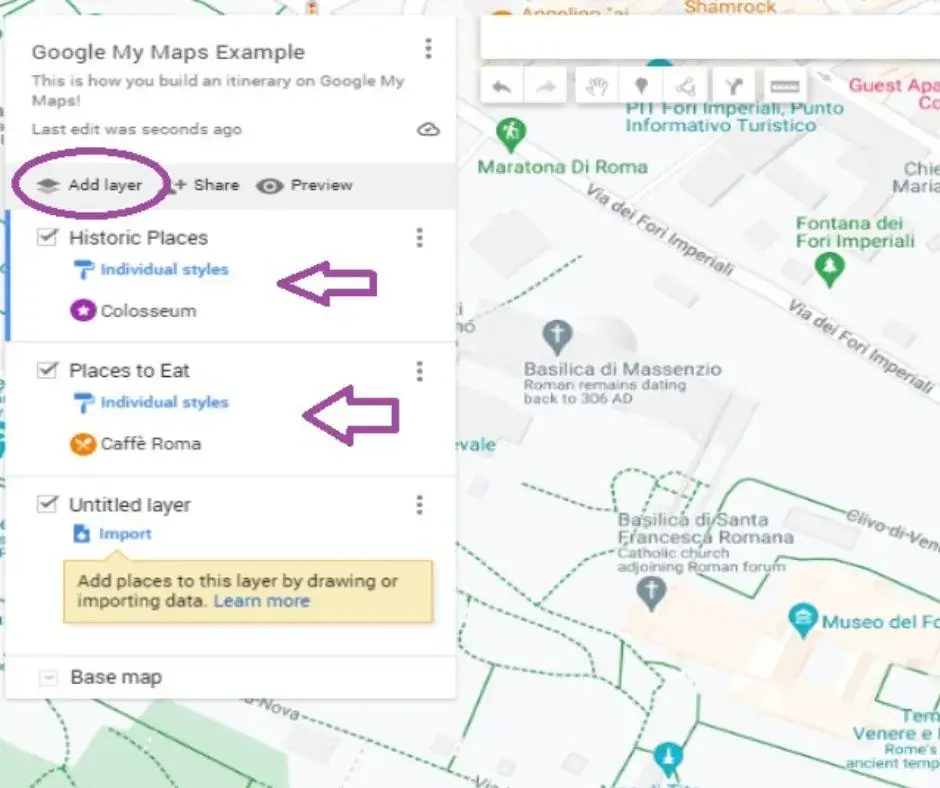
5. Plan Your Itinerary (with Directions)
Enter your starting point and destination (or end point), then add the stops along your route. Create a layer for each stop and add pins for points of interest such as attractions, restaurants, and activities. This will help you efficiently organize and visualize your itinerary. This is a key step of how to plan a trip with Google My Maps – saving all those top places to see and eat!
Utilize Google My Maps to research and save points of interest along your route. You can also include accommodations, gas stations, and rest areas to ensure a smooth trip. Once your stops and points of interest are added, you can easily drag and drop to rearrange them in the most efficient order.
For each stop on your trip, use the directions feature on Google Maps to get a turn-by-turn navigation. This will help you plan your route and estimate travel time between each stop.
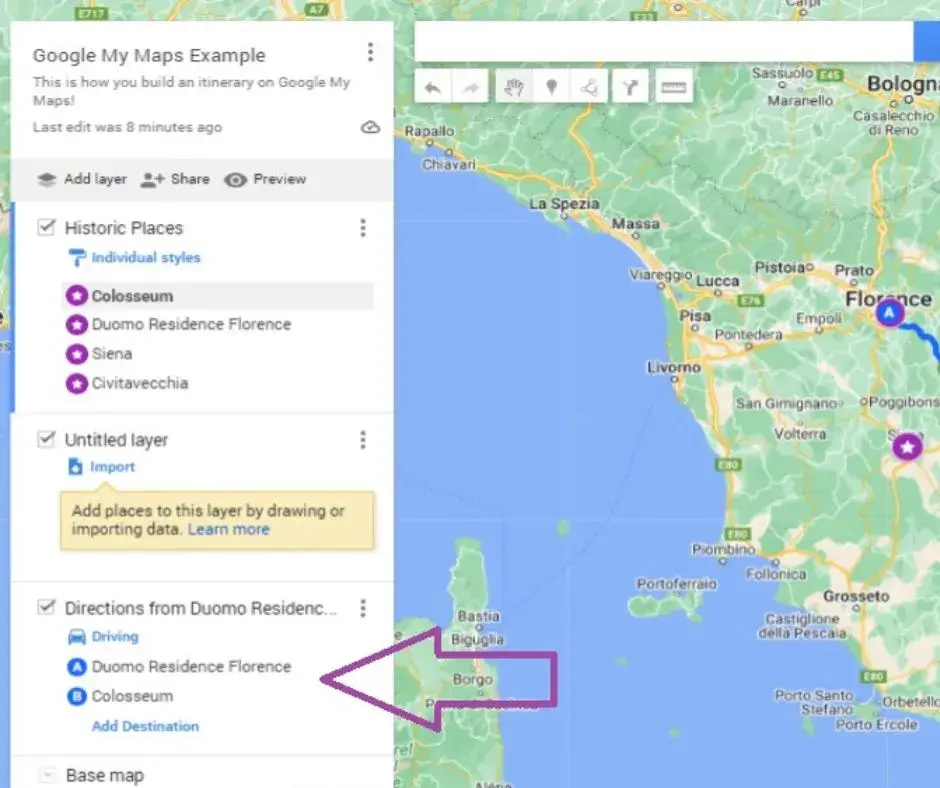
Add Directions
To add directions to a map, first click on the arrow icon underneath the search bar to create a new directions layer. Then, in the legend, add locations or addresses to Points A and B. You can continue adding more points by clicking on “Add Destination” on the map. If you need to rearrange the order of the points, simply drag the items around in the legend to modify the route as needed. This allows you to easily customize the route to include all necessary stops and optimize your travel plans.
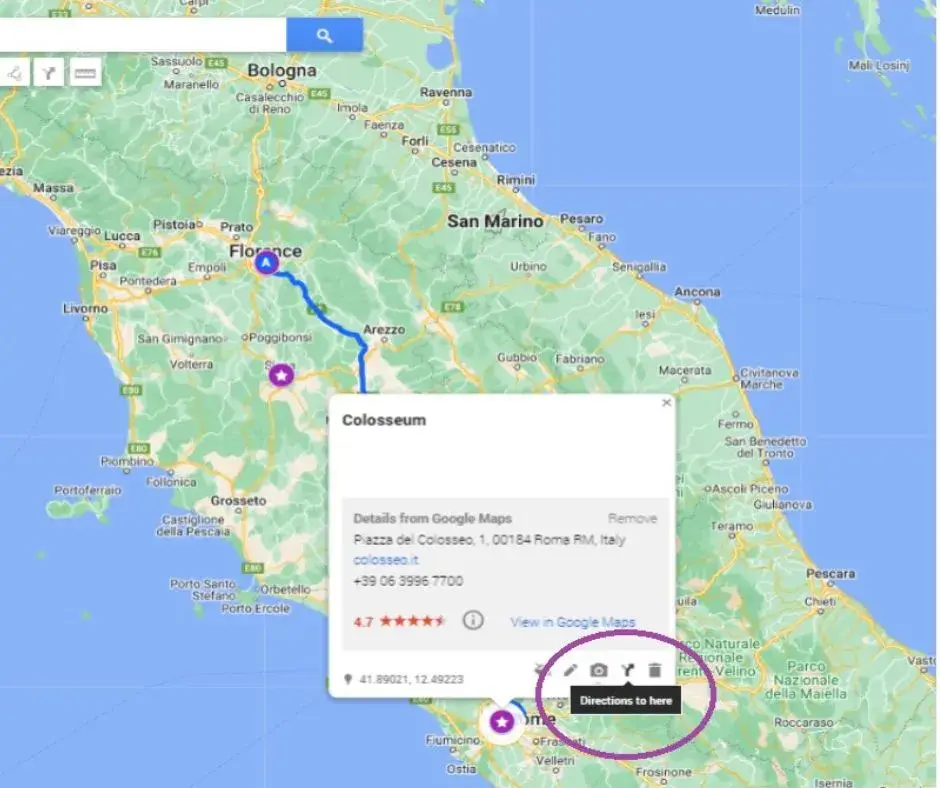
Step 4: Review your customized route map
After customizing your route map with multiple stops, it is essential to thoroughly review the trip itineraries to ensure the best possible routes are included within your desired time window. Double-check the route plan to confirm that the most efficient and convenient paths are selected for each leg of the journey. Consider factors such as traffic conditions, road closures, and potential delays to optimize your route.
Once you are satisfied with the customized route plan, access the route directions from the left-hand corner of the map to proceed. This will provide you with a detailed overview of the chosen routes, including important landmarks, turn-by-turn directions, and estimated travel times between stops.
6. Book Your Hotels
To find the perfect accommodation based on my daily itinerary, I start by using Google Maps to plot out the locations I’ll be visiting each day. Then, I use Booking.com’s map feature to search for hotels near those locations. I select a spot near each of my planned stops and add them to my map on Booking.com. After I have marked all the potential hotel locations, I compare the map from Booking.com with my map on Google Maps to find the best hotel spot closest to most of my destinations. I take into consideration factors such as distance, transportation options, and nearby amenities. I can find accommodation that is conveniently located for my daily activities, making the most of my trip. (I also make sure it answers my top 10 questions for choosing a hotel !)

7. Share Your Trip & Access it on Your Phone
Sharing your travel map with your buddies and accessing it on your phone is easy with Google My Maps. To begin, open the Google My Maps app on your device and find the map that you want to share.
On IOS devices, tap the “share” button and select the friends you want to share the map with. They will receive a link to access the map.
On Android devices, tap the menu button and select “share trip.” Choose the friends you want to share the map with, and they will receive a link to access the map.
To access the shared map on your phone, simply download the Google My Maps app from the App Store for IOS devices or the Google Play Store for Android devices. Log in to your Google account, and navigate to the “shared trips” section to view the map that has been shared with you.

FAQs About Planning a Trip with Google Maps
What is the difference between google my maps and google maps.
Google My Maps and Google Maps both offer users ways to create personalized maps, but they have key differences in terms of features and capabilities.
Google My Maps allows for extensive customization, including the ability to add custom markers, lines, and shapes, along with the option to import and export data. Users can also create layers to organize their data and share their maps with others. On the other hand, Google Maps is more simplistic, offering a basic way to save and organize places of interest with the ability to add notes and labels.
In terms of organizational capabilities, Google My Maps provides a more robust platform for managing and categorizing map data through the use of layers, making it easier to keep track of different types of information. Google Maps, however, is more straightforward and user-friendly for those who simply want to create and manage a list of locations without the need for complex customization.
I prefer Google My Maps for planning a trip, then using Google Maps for navigation (and downloading a map offline for when I don’t have service or wifi).
Can you use the directions layers to navigate on Google My Maps?
Technically yes, but I wouldn’t recommend it. When you’re ready to go, open the regular Google Maps and use that for navigation. Google Maps has real-time estimates for traffic, speed traps, and more.
Simply open the Google Maps app or website and enter your desired destination. Then, select the “Directions” option and choose the mode of transport (car, public transit, walking, or biking) for your trip. After entering your destination and mode of transport, you can then view the different routes and estimated travel times on the map.
The directions layers will show you the various route options available, taking into account factors such as traffic and road closures. You can compare the routes and select the one that best fits your trip itinerary. Once you’ve chosen your route, you can follow the turn-by-turn directions provided by Google Maps to navigate to your destination.
If you don’t have service, be sure to download maps offline so you can still navigate to your destination! Pull up the location area and scroll out until the second destination is in the map. Then click on the “…More button” The option for download an offline map will pop up. Then you’ll be able to use the map for that area without needing wifi or service!
Can you use your phone to create or edit Google My Maps?
Yes, you can use your mobile browser to create or edit Google My Maps. First, log in to your Google account on your mobile browser and navigate to the “Saved” tab to access your saved maps and lists. From there, you can create a new map or edit existing ones. To create a new map, click on the “Create Map” button and start adding locations, routes, and custom markers.
If you want to access your map on your phone while traveling, download the Google Maps app and sign in with the same Google account. This will allow you to access the map on your phone and make any necessary edits or additions while on the go.
What is the limit for adding layers and location pins in the Google Maps trip planner?
In the Google My Maps trip planner, users are limited to adding a maximum of 10 layers and 2,000 location pins. This limit can impact trip planning by restricting the amount of detailed information and destinations that can be included in the trip itinerary.
To optimize trip organization within these limits, users can consolidate multiple locations into a single pin by creating custom labels or categories within a layer. For example, instead of adding individual pins for restaurants, hotels, and attractions, users can create a “Dining” or “Accommodations” layer to group relevant locations together.
Additionally, users can prioritize and carefully select the most essential locations to include in the trip planner to avoid exceeding the 2,000-pin limit. By focusing on key destinations and points of interest, users can effectively plan their trips within the given constraints.
How can I integrate other Google products with Google Maps for trip planning?
Google Maps can be integrated with various Google products for efficient trip planning. Users can integrate Google Drive to access and save relevant documents, Google My Maps to create personalized maps with specific locations and routes, Google Calendar to manage travel itineraries and schedules, Google Photos to view and share trip photos, and Google Sheets to organize and track trip expenses and budgets.
By integrating Google Drive, users can access important documents such as travel itineraries, hotel reservations, and flight details directly from Google Maps. Google My Maps allows users to create custom maps with specific destinations and points of interest, which can then be integrated with Google Maps for easy navigation. Google Calendar can be integrated to keep track of planned activities and appointments during the trip. Google Photos integration allows users to view and share trip photos directly from the Google Maps app. Additionally, Google Sheets can be used to track and manage trip expenses and budgets, which can be accessed and updated alongside Google Maps. (This may be a whole other post in the future. Let me know if you would like that in the comments.)
How do I save a Google My Maps itinerary?
To save a Google itinerary, first, open the itinerary in Google My Maps. Then, look for the bookmark icon or “Save” button in the map editor. Click on this icon or button to save the itinerary to your Google account.
To access the saved itinerary later on, navigate to the “Saved” section of Google Maps. Log into your Google account on Google Maps, and select the “Menu” icon. Then, choose “Saved” and “Maps” to view the list of saved maps and itineraries.
How do I send a Google itinerary?
To send a Google itinerary, open Google Maps, and select the itinerary you want to share. Then, click on the “Share” button from the menu. Choose a sharing option, such as email, messaging, or social media. Enter the recipient’s email addresses in the designated field. Customize the message as needed by adding a personalized note or additional information. Once the message is ready, click “Send” to share the Google itinerary with the selected recipients. Alternatively, you can also copy the link provided and manually share it with the intended recipients.
Make sure to select the appropriate sharing option and enter the correct email addresses of the recipients to ensure they receive the itinerary. Customizing the message allows you to provide any additional details or context about the itinerary.
How do I find my Google itinerary?
To find your Google itinerary, first, open Google Maps on your computer or mobile device and log in to your Google account. Once logged in, select the “Menu” icon in the upper left corner of the screen. From the menu, choose “Saved,” and then select “Maps.” Here, you will see a list of your saved maps and itineraries. Look for the itinerary you want to view and click on it to open and view the details.
Why should I use Google Maps to design my own vacation?
Google Maps trip planner offers a multitude of features for designing a vacation. It provides access to detailed destination information, such as reviews, photos, and popular attractions, allowing users to make informed decisions about their itinerary. The customization options enable users to tailor their trip according to their preferences, including selecting specific modes of transportation, adding multiple stops, and choosing different routes. Real-time updates ensure that users receive the most current information on traffic, transit schedules, and potential delays. Additionally, the seamless integration with other Google products, like Google Calendar and Gmail, enables easy organization and sharing of travel plans with friends and family. The collaboration capabilities allow for multiple users to contribute to and edit a shared trip plan in real-time.
Using Google Maps for trip planning offers numerous benefits. The platform is intuitive and easy to use, making it accessible to all levels of travelers. Users can save their favorite locations, creating a personalized travel database for future trips. Moreover, the ability to organize itineraries with detailed information, including addresses, hours of operation, and contact information, streamlines the vacation planning process. Overall, Google Maps trip planner is an essential tool for designing a vacation, offering a wealth of features and benefits to enhance the travel experience.
Final Thoughts
Google My Maps is my favorite way to plan a trip (and save future trip ideas for later). I hope this will inspire you to make your own, or a few, custom maps!
Read More Travel Planning Tips
Important Tips for Finding Cheap Flights
16 Tips for Saving Money on Accommodation
How to Avoid Travel Stress
How to Get Family Travel Insurance
Save “How to Plan a Trip with Google My Maps” for Later!

About The Author
7 thoughts on “How to Plan a Trip with Google My Maps”
I do use Google Maps extensively on my travels. I have found them to often be the most informative and extensive and generally fulfil my needs for a well put together map. I occasionally, however find that locations are misplaced, even if only by a few streets, and that can confuse the heck out of me. Your extensive guide has definitely shown me more than I knew about these maps and I learned a few tricks from your explanations to make my use of these maps more efficient for me.
If you are someone about to embark on a trip or a first-time traveler, Google Maps is a savior. This is one way of saving a lot of time and can really help in organizing the experience like seeing one landmark to the next or where to stop to grab a good drink on the way. While I occasionaly use it for very specific reason when traveling, I am the type who prefers to get lost and wander around and let my nose, eyes and instincts point me to where I need to go next 😉 #flyingbaguette
Jan – https://flyingbaguette.com/
I agree with you… My Maps is crucial for my planning. I am very visual and seeing the places I want to visit on a map helps me to organize in a coherent pattern. I do hit the limits fairly frequently on my long road trips, which can be frustrating. I do use it much as you’ve described.. planning on My Maps but navigation on Maps.
I also like Google Travel which consolidates a lot of the planning.
This is a valuable post for those who haven’t tried out My Maps. Your directions are very clear and precise.
Lyn | http://www.ramblynjazz.com
We use Google Maps a lot during our trips, and particularly like the downloadable feature for offline navigation, but have not yet explored My Maps, something we should remedy immediately! What a useful app. Your guide is excellent – it contains very clear instructions on how to make use of its features. We are currently planning a road trip so have bookmarked this guide – you may just have revolutionised our itinerary planning! Thank you for such a helpful post.
I’ve used Google My Maps once or twice but realize now that I haven’t been using it to its full potential. On top of this being practical and helpful for planning, it also just looks a lot of fun to create different maps. good to know about the directions, and the limitations, although I think it’s highly doubtful I’ll need 2000 pins. Thanks for the introduction and the detailed review of how to create these maps
I use Google Maps mostly for pinning places of interest and have found a few gems whilst scrolling and scanning a destination before my visit. It is one of my favourite tools to use when I plan my trips. Unfortunately, Google have changed the layout of the maps and they are now a bit sketchy whenever I try to use them offline.
Carolin | Solo Travel Story
Is there someone who understands me and who talks about an authentic philosophy of life: creating travel itineraries with the help of Google Maps 🙂 I have a whole set of maps that I created as an aid to my travels. Today they serve as a reminder of the places I visited and also as a basis for others to benefit from the information. Your guide explains everything very well and has very good tips for those who want to be part of the “team that makes maps for everything” 🙂
Leave a Comment Cancel Reply
Your email address will not be published. Required fields are marked *
How to use Google My Maps to plan your trip
How to set up, share and use Google’s customized map view
- Quick steps
Tools and requirements
- How to use Google My Maps
Whether you’re planning a holiday or a day trip, having the ability to plan your trip with more granularity is a real boon, so it’s worth learning how to use Google My Maps to help you get organized.
Google Maps is undoubtedly one of the best wayfinding software available, but there are some features Google likes to split off into separate services.
One such example is the ability to customize your maps, which is currently housed under Google My Maps , allowing you to plan custom routes, set multiple markers, and add details like notes, colored labels, and more.
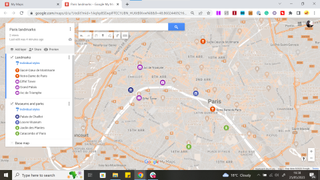
For example, the map above shows a map of some of the most popular destinations in Paris, with added detail in the form of summaries and different layers for different types of locations.
Below, we’ve included instructions on how to do a basic set-up, as well as some optional steps to really make your map sing.
Steps for how to use Google My Maps
- Head to Google My Maps and log in to your Google account
- Create and name a new map
- Input or import your destinations
- Customize tags, labels, and imagery
- Google account
- Desktop browser
Step by step guide for how to use Google My Maps
1. head to google my maps and create a map.
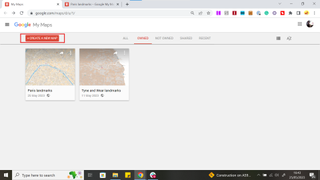
First, open Google My Maps and sign in to your Google account. In the top left hand corner of the screen, you’ll see a button titled “Create a new pin". Click this , then name your map by clicking the map title field in the index on the left side of the screen.
2. Add pins for your destinations
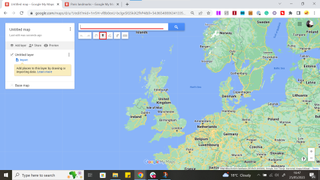
Next, you'll want to add pins for the destinations on your map. You can do this either by using the search bar as you would on the standard Google Maps, or by pressing the pin logo, which will change your mouse into a crosshair and allow you to manually place your destination.
3. Label and describe the destinations
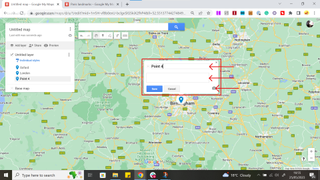
A box will appear, in which you can type your own label for the location (or use whatever comes up in the text box search, if you used that method), add a short description or any notes, and even add media to the location.
This media can either be uploaded from your device, from a URL, from your Google Drive, from Google Image search results, or from YouTube.
4. (Optional) Add lines or directions
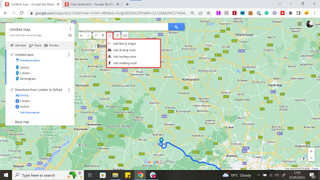
If you're traveling by foot, car or by bike, you can press the three circles connected by dots below the search bar (pictured above) to draw lines or directions between your destinations . You can choose to type the destinations directly into the index on the left side of the page or simply click on existing pins to connect them .
5. (Optional) Customize your map
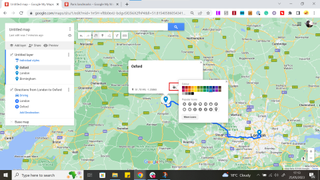
There are lots of ways to make your map bright, colorful, and detailed.
By clicking the paint can icon on a pin or in the index bar next to the pin's name in the index, you can change the pin color or icon.
By clicking the dropdown menu titled 'Base map' at the bottom of the index, you can change the topography of your map.
You can also separate your pins out into layers by clicking 'add layer', allowing you to check or uncheck the visibility of given layers and separate destinations by any filter you might need; what day of the trip you'll be visiting, what kind of location they are, etc.
6. (Optional) Share and/or publish your map
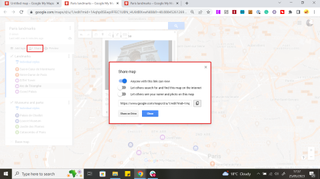
When your map is ready, you can either share it with your families or travel buddies, or you can publish it online for your blog, social media, or project.
Clicking share will bring up a window with the sharing options, allowing you to toggle your map's visibility, searchability, and if your details are attached to the map, as well as its share link and an option to share on drive.
To see what it will look like to non-collaborators, click the preview button.
Get daily insight, inspiration and deals in your inbox
Sign up for breaking news, reviews, opinion, top tech deals, and more.
Josephine Watson ( @JosieWatson ) is TechRadar's Managing Editor - Lifestyle. Josephine has previously written on a variety of topics, from pop culture to gaming and even the energy industry, joining TechRadar to support general site management. She is a smart home nerd, as well as an advocate for internet safety and education, and has also made a point of using her position to fight for progression in the treatment of diversity and inclusion, mental health, and neurodiversity in corporate settings. Generally, you'll find her watching Disney movies, playing on her Switch, or showing people pictures of her cats, Mr. Smith and Heady.
Microsoft has gone too far: including a Game Pass ad in the Settings app ushers in a whole new age of ridiculous over-advertising
YouTube may be planning to give us new AI song generators this year – and this time the music labels could let it happen
Anthropic wants its AI assistant Claude to be your favorite coworker
Most Popular
- 2 Report: Samsung's next Galaxy Buds might be the most useful model yet
- 3 YouTube on Google TV and Android TV is about to get a great free update we’ve been hoping for
- 4 ChatGPT wrote a movie and yes, it freaked people out and forced a big change to its launch plans
- 5 I’m obsessed with bird-watching and the Bird Buddy smart bird feeder is my new, favorite gadget
- 2 Leaked iPhone 16 case video may show off the new design for 2024
- 3 LockBit hackers claim to have cracked the US Federal Reserve
- 4 Discover the ultimate power-up for your iPhone
- 5 New Superman movie leak gives us a better look at the Man of Steel's costume and first images of fellow hero Mr. Terrific
Popular destinations
Create and share custom maps with Google My Maps.
Get started
Easily create custom maps with the places that matter to you.
Add points or draw shapes anywhere.
Find places and save them to your map.
Instantly make maps from spreadsheets.
Show your style with icons and colors. Add photos and videos to any place.
Share & collaborate
Allow friends to see and edit your maps, or publish them to the whole world.
Embed maps in your website or blog.
Work together on building your map, just like Google Docs.
Easily organize all your maps alongside your other documents in Google Drive.
Take anywhere
View custom maps in the Google Maps mobile app so you can find places on-the-go.
Find all your maps in the Your Places menu on Google Maps.
Chart your favorite places or explore a new city.
Save maps you find on the web and use them on-the-go.
Get started now
How to use Google Maps as a trip planner and make a full itinerary
- You can use Google Maps as a trip planner through the "Places" and "My Maps" features.
- Both the Google Maps website and app let you save locations to lists, which you can then get immediate directions to.
- When getting directions, you can look up reviews and add multiple stops to your route.
Google Maps has become an essential part of any road trip. After all, it's a GPS, business directory, and reviews platform all-in-one.
But if you spend some time with it, you can integrate Google Maps even more seamlessly into your next vacation. Google Maps has a variety of features you can use to plan your trip and save any interesting spots you find on the way.
Here's how to make Google Maps your trip planner, using the Places feature, My Maps, and more.
How to use Google Maps as a trip planner
Use the 'places' feature to save points of interest.
Let's say you're traveling, and happen to stumble upon the cutest coffee shop you've ever seen. You want to visit, but don't have time right now — what's the best way to remember it?
Google Maps' Places feature can help you out. Both the Google Maps website and app let you save any location on the map to a list, which you can then easily find later.
1. Open Google Maps and click, tap, or search for the location that you want to save.
2. Find the Save icon , which has the icon of a bookmark. You'll find it right under the location's name, but you might need to swipe to find it in the mobile app.
3. Pick where you want to save the location to. You've got three lists to start with — Favorites , Starred places , and Want to go — but you can make a new one by tapping New list .
4. Once you've saved the location, you can find it again by opening the list. In the mobile app, tap Saved at the bottom of the screen; on the website, click the three stacked lines in the top-left and then Your places .
Tap on a location in your list to have the map jump straight to it.
Look at Google Reviews to find the best shops
Nearly every point of interest on Google Maps has a section for user reviews. Similar to sites like Yelp, these reviews can be a great way to see which stops are must-sees and which you can pass.
To check out reviews:
1. Open Google Maps and find the location that you're interested in.
2. At the top of its information page should be a star rating and a number, showing how many people have left reviews.
3. Scroll down until you hit the Reviews section, and you'll find reviews from other users who've visited the location. They'll include a star rating, a date, and occasionally a picture.
If you're interested in leaving a review of your own, check out our article on how to write Google reviews .

Make a custom My Maps page to share your road trip plan
Only available on a computer as of this month , Google's My Maps program lets you make a custom map or plot out a route with as many waypoints as you like, and then save and share it with others.
1. Head to the My Maps homepage and click Create a New Map .
2. You'll be given a world map. In the menu in the top-left, click the Untitled map name to give your map a name.
3. Use the search bar at the top of the page to find any location, then click Add to map to save it. You can add as many points of interest as you like.
4. You can also save multiple separate lists of locations to the same map; just click Add layer in the top-left menu.
5. To save directions between multiple locations, click the Add directions icon that looks like a curved arrow. It'll add a new layer that you can use to plot a path.
6. When you're done, click Share or Preview in the top-left window.
Add multiple stops to one trip
Driving from one city to another is simple. But if you want to make stops along the way — lunch, the beach, a mall — things get complicated.
Luckily, you don't need to start a new Google Maps route for every stop. You can create one navigation route that includes every stop from the start, giving you a clear way to see how long it'll all take.
1. Open the Google Maps app and start navigating to another location.
2. On the screen that lets you pick your starting and ending location, tap the three dot icon .
3. Select Add stop .
4. A third waypoint — labeled "B" — will appear. Tap it to choose your second destination, or drag it to reorder the waypoints.
On a computer
1. On the Google Maps app website, find a location and start getting directions to it.
2. Underneath the menu that lets you pick your starting and ending location, click Add destination .
3. A new field will appear. Enter your third waypoint.
4. Once you pick a new waypoint, you'll be able to click Add destination again and pick another one, as well as reorder them.
You can add up to nine destinations on both the website and mobile app.
- Main content

How To Plan A Trip Using Google Maps (+ BONUS Tips)
Regardless of where we’re going, our travel planning process looks the same pretty much every single time. And it all starts with a custom map using Google My Maps.
Read on to discover a complete video and written tutorial to show you how to plan your trips using Google Maps. Along the way, we’ll also share some bonus travel planning tips with you based on our 10+ years of travelling together as a couple.
Video Tutorial
Learn how to plan a trip using Google Maps by joining me as I start planning our next trip to Madeira in this walkthrough video. You’ll also find some written instructions below the video:
Psst! Do you like the trip planner we showed you at the end of the video? You can grab a copy of it right now via this link ! Don’t worry! We’ve also created some training videos and tutorials to show you how to use it, which you’ll get access to if you decide to buy our trip planner.
Written Instructions & Screenshots
If you learn better through reading, please find some written instructions and step-by-step screenshots below to help you plan your trip .
Step 1. Open Google My Maps and create a new map.
Google My Maps is slightly different from the standard Google Maps feature that we’re used to using for, say, driving directions. Instead, the Google My Maps feature allows you to create your very own tailored map that’s just for you. Navigate to Google My Maps and click “Create new map”.
Step 2. Search for your first place and add it to your map.
First things first, you’ll want to give your map a title like 7 day Madeira itinerary or 4 days in San Francisco .
I like to add my top must-sees to the map first. Then, as you plan your itinerary, you can drag and drop them into your chosen days.
Start by searching for your first place. Once that pops up, click “Add to map”.

You can also change the symbol and colour of it to help it stand out. I usually change the colour of it because the default is a dark blue colour that’s far too similar to other markers already on the map, such as bus stops and grocery stores.
Bright yellow or purple are often a good shout. I also give it a star symbol at this point so that it stands out on the map better.

Step 3. Create your first layer and add some more of your must-sees.
When you first add something to the map, you might notice it goes into an “Untitled layer”. Let’s rename that to “Must-Sees” or something similar by clicking on the title of the layer and renaming it.
Now, all your must-sees will appear as a list within this layer. Continue adding your other must-sees to the map.
Step 4. Add new layers to start creating your itinerary.
Once you have all your must-sees in a handy list, it’s time to start building your itinerary. Click “Add layer” and call this “Day 1”. Add another layer and call that “Day 2”.
Continue until you’ve added all your days.

TOP TIP: You can’t add more than ten layers to a Google Map. If your trip is for two weeks or longer, you’ll need to set up the layers to cover several days each. For example, “Days 1-2”, “Days 3-4”, “Days 5-6” and so on.
Now it’s a case of dragging and dropping your must-sees into their relevant days. You’ll need to be patient with it because this step is sometimes a bit slow and clunky.
You might also want to change the colours to correspond to different days so it’s easier to see things at a glance. Especially how close things are to each other and whether it’s physically possible for you to do everything you’ve selected in one day. You might have to play around with things a little until you’re happy with your itinerary.
Step 5. Print your custom map or share it around.
Once you’re happy with your itinerary and map, you can share it with the person you’re travelling with. You can even print it out if you want to.
IMPORTANT: To access your map during your trip, you’ll need to go to the link you’ve created for the map. Unfortunately, the data doesn’t transfer to the default Google Maps view. But you can easily navigate between the two by selecting the “Menu” button in Google Maps followed by “Saved”. Click the “Maps” tab underneath this and you’ll see the custom maps you’ve created.
Bonus Tips For Planning Your Itinerary
1. aim for a maximum of 2-3 main activities per day..
When it comes to planning itineraries , focus on a maximum of 2-3 main activities per day. The reason for this is that you don’t necessarily know how long things are going to take you to do. By planning a small number of things for each day, you’ll have more flexibility to add other things later if you have the time.
2. Take particular note of where places are in relation to each other.
The reason we like to use Google Maps when planning itineraries is because of the visual side of it. You can quickly and easily see where things are in relation to each other and whether it’s feasibly possible for you to do the activities in the order you’ve planned them. You can double-check walking and driving distances by using the next feature mentioned below.
3. Don’t forget to add walking and driving directions to your map.
If you click the “Directions” button, another layer will be added to your map. You can then select whether you need walking, driving or cycling directions either between different places you’ve added to your map or between other places you’ve not yet added.
If you click the three dots next to this layer, you can double-check the journey times and distances between those points. With this, your custom map becomes your own personal road trip planner or walking tour guide! You can also toggle the directions on and off to show or hide them from view.

4. Make use of the colour coding and symbols features.
We’ve talked about colour-coding the different points on your map according to what day of your itinerary they belong to. But you might want to instead colour code things based on what type of place they are. Green for parks or purple for museums, for example. You can also use various symbols to quickly see things at a glance, such as a plane symbol for an airport or a knife and fork symbol for restaurants.
5. Add notes to the points on your map to serve as helpful reminders.
If you click the “Edit” pencil icon on any place you’ve added to your map, you can rename them or add notes. One good use case for this would be to add flight departure and arrival times to any airports you’ve added to the map.

6. Use your map to find restaurants and cafes near where you’ll be.
Zoom in on the map wherever you’ve added some points of interest and you’ll probably find nearby amenities like restaurants and cafes. Why not add a few of these to your map so you can quickly find them when you’re actually sightseeing?
Discover more travel planning tips in our complete guide >>
Once you’ve finished building your own custom map and itinerary in Google Maps, you have a couple of options.
You could use this map on the go or print it out to serve as a reminder of your itinerary. The downside to this is you’d still need a separate place to keep all your booking confirmations, important documents, expense sheets, packing lists and other essential travel info.
This might mean having to flip between different tabs in your Internet browser to find the various information you need. Thankfully, there is another way!
Introducing The Wanderer’s Trip Planner

We’ve recently created our very own trip planner , which serves as a central system for your itinerary, expenses, packing list, trip checklist, booking confirmations and more. It even comes with a free mobile app, so you can easily see all this info while on the go!
While it doesn’t have a map feature, you could include a link to your custom map within the “Useful Links” tab of our trip planner. Pretty cool, eh?
Learn more about our custom trip planner >>
We’ve also designed a Madeira travel planner >> (with more destination-specific ones on the way soon!)
Read More About Travel Planning
If you enjoyed our tips on how to use Google Maps for planning your trips, then you might also enjoy some of our other blog posts, such as:
- The Complete Travel Planning Guide for Couples
- 24 of the Best Travel Planning Apps
- How To Plan A Trip To Europe For The First Time
- How To Plan The Perfect Destination Proposal
Alternatively, why not “steal” one of our tried and tested itineraries ? We have lots of them on the blog for all kinds of different destinations we’ve enjoyed travelling to.
We can also create a custom itinerary just for you. Check out our travel planning services to find out more >>
I hope our tutorial video and tips on how to plan a trip using Google Maps come in handy. We’ve saved so much time over the years planning our trips this way.
Did you enjoy this tutorial? Why not pin or bookmark it now so that you can refer back to it later?

Justine Jenkins
Justine is one half of the married couple behind the Wanderers of the World travel blog. She lives in Bristol, UK and has travelled extensively within Europe and beyond since 2013. After her trips, she shares detailed travel itineraries, helpful travel guides and inspiring blog posts about the places she's been to. When she's not travelling overseas, you'll find her joining her husband, Scott on various day trips, weekend getaways and walks within the UK, which she also writes about on Wanderers of the World. Aside from travelling and writing, she also loves reading, crafting and learning about nature.
Leave a reply Cancel reply
Your email address will not be published. Required fields are marked *

5 Google Maps Tips You Need To Know When Planning Your Next Trip
W hether a brief weekend escape or an extensive expedition across continents, planning a trip can be a daunting task. The challenge of selecting the ideal destinations, navigating through unfamiliar territories, and ensuring that you experience all the essential sights without overlooking anything, can quickly become overwhelming for any traveler. This is where online maps come into play, and one prominent tool that almost everyone has used at some point is Google Maps.
Google Maps goes beyond basic directions . It offers a suite of features designed to make trip planning not just easier, but also more enjoyable. You can map out itineraries, discover new attractions, get insights into local restaurants and services, and even find electric vehicle charging stations . The platform's real-time updates, user reviews, and detailed information on points of interest can help you make informed decisions while exploring new destinations. Moreover, its customization features allow you to create personalized maps that cater specifically to your travel plans, which are also shareable. Here are five essential Google Maps tips that every traveler should know. These tips will not only help you streamline your trip-planning process but also ensure that your travels are as smooth and enjoyable as possible.
Read more: 12 Smart Gadgets You Didn't Know Existed
Utilizing Offline Maps
When you're heading out on a trip, one thing you definitely don't want to worry about is losing access to your maps when your signal drops. That's where offline maps come in handy. Google Maps allows you to download maps for offline use, ensuring you never get lost even when you're off the grid.
Downloading maps for offline use is a straightforward process. Follow these steps:
- Open the Google Maps app on your smartphone or tablet.
- Tap on your profile icon in the top-right corner.
- Choose Offline maps.
- Tap Select your own map in the following window.
- Drag the map window to your desired area.
- Select Download.
Depending on the size of the area you're downloading and your internet connection speed, this process may take a few moments.
Once the download is complete, you'll be able to access the map even without an internet connection. Offline maps are not only convenient, but they can also save you time and frustration. Imagine hiking in a remote area and losing your cell signal — having the offline map ensures you can still navigate your way back to your starting point without any hassle. This is also one of the many secret Google Maps features that can come in handy.
Customizing Your Route With Multiple Stops
We all have days packed with errands or sightseeing, where we just wish we could plan the routes efficiently. Google Maps allows you to do that by customizing your route with multiple stops. It's a nifty feature that can save you time and make your trips more organized.
Follow these steps:
- Open Google Maps on your device and enter your final destination.
- Click on the three buttons next to your starting point and select Add stop.
- You can add multiple stops by repeating this step.
- Rearrange stops by dragging the three lines next to each destination.
Now, Google Maps will calculate the most efficient route for you, taking into account all your stops along the way. This is perfect for those days when you have several places to visit or errands to run, but you want to make sure you're not zigzagging all over town. It can also save you time and fuel. Plus, it's a great way to ensure you don't forget any important stops along the way.
When customizing your route with multiple stops on Google Maps, keep in mind to arrange your stops in a logical order to minimize backtracking and optimize efficiency. Additionally, consider traffic conditions and estimated travel times between each stop to plan your schedule accordingly. Lastly, ensure that all stops are accurately inputted to avoid any confusion or missed destinations along the way.
Taking Advantage Of Live Traffic Updates
This feature provides real-time information about traffic conditions, allowing you to avoid packed routes and save valuable time.
As you navigate with Google Maps, the app constantly monitors traffic conditions along your route. If there is heavy traffic, accidents, or road closures ahead, Google Maps will highlight the problematic area on the map using yellow or red markers.
To enable live traffic updates, open the Google Maps app and enter your destination. Once your route is set, Google Maps will display real-time traffic information along the way, including any incidents or slowdowns. You can then choose to follow the suggested route or explore alternative options based on the traffic conditions.
When using live traffic updates on Google Maps, keep in mind to regularly check for updates throughout your journey to stay informed about changing road conditions. You can also report problems on the road yourself on Google Maps . Lastly, be flexible with your travel plans and prepared to follow alternative routes suggested by Google Maps to avoid congestion and minimize travel time.
By taking advantage of live traffic updates, you can make informed decisions about your route and avoid getting stuck in gridlock. Whether you're commuting to work or heading out on a road trip, this feature can help you reach your destination more efficiently.
Exploring Nearby Attractions And Restaurants
When you're in a new area, or even just exploring your own neighborhood, Google Maps can be a great tool for discovering nearby attractions and restaurants.
To start exploring:
- Open Google Maps and zoom in on the area of your interest. You should see several options below the search bar, including Restaurants, Gas, Coffee, Shopping, ATMs, and more.
- Click on the option you want to explore. For instance, if you are looking for places to eat nearby, select Restaurants to see a list of dining options in the area. Each restaurant will be marked with its location on the map, along with details such as the establishment's name, its rating, and sometimes photos or reviews.
- Refine your search further by applying filters for rating and distance.
- After selecting a restaurant that catches your interest, click on it to view more detailed information, including its address, hours of operation, contact details, and directions on how to get there.
Google Maps also allows you to call the restaurant directly from the app if you wish to make a reservation or inquire about menu items.
You can explore all these categories by swiping right on the options pane below the search bar. To view the full list, click on the More button (three dots) at the very end.
Create A Custom Map To Share With Friends And Family
You can also easily create a custom map and share it with whoever you want on Google Maps. It's a great way to collaborate on travel plans, recommend must-visit places, or simply share your favorite local hangouts.
- Open Google Maps on your computer and sign into your Google account.
- Click on the menu icon and choose Saved > Maps > Open My Maps.
- Start a new map by clicking the Create A New Map button.
- Give your map a title and a description that encapsulates the essence of your adventure or theme. This could be anything from "Family Road Trip to Yellowstone" to "Best Coffee Shops in New York City."
- Populate your map with markers. Click on the marker icon, then click on the location on the map you wish to mark. For each marker, you can add a detailed description, upload photos, and even include links for more information.
- Additionally, Google My Maps allows you to draw paths and shapes, perfect for outlining routes or highlighting areas of interest.
- Once your map is ready, click on the Share button. Here, you'll be prompted to set the map's privacy settings. You can choose to make it public, share it with specific people, or keep it private with a link.
- Finally, invite your friends via email or simply send them the link.
Read the original article on SlashGear .
- Help Center
- Google Maps
- Privacy Policy
- Terms of Service
- Submit feedback
Pin & manage your trips in Google Maps
Important : This feature is only available on mobile.
Pin your frequent trips
If you want to save a frequent trip, you can pin it. By default, the Go tab suggests several addresses to pin. These addresses come from your search history or your Location History. Learn about directions and places from your history .
If you pin a favorite trip, it shows up at the bottom of your screen when you tap the Go tab. You can pin a trip from a directions search or from the suggestions in the Go tab.
To pin a trip from a directions search:
- Search for a destination and tap Directions .
- Select a transportation mode. If you select Transit, choose your preferred route.
To pin a trip from the Go tab:
- To get a list of suggested trips, in the bottom bar, swipe up.
Remove a pinned trip
- Tap the pinned route you want to edit.
Clear pinned trips
- Under "Go tab," tap Delete pinned trips .
- Tap Delete .
Edit a trip you pinned
Edit a trip from driving to transit.
- Tap the trip you want.
Edit a trip from transit to driving
- At the top, tap Other trip options .
Was this helpful?
Need more help, try these next steps:.

Key Products
- Route Optimization API
Optimize routing, task allocation and dispatch
- Directions and Distance Matrix API
Calculate accurate ETAs, distances and directions
- Navigation API & SDKs
Provide turn-by-turn navigation instructions
- Live Tracking API & SDKs
Track and manage assets in real time
- All Products
Product Demos
See NextBillion.ai APIs & SDKs In action
- Integrations
Easily integrate our products with your tools
Platform Overview
Learn about how Nextbillion.ai's platform is designed
Routing Customizations
Learn about NextBillion.ai's routing & map customizations capabilities
Supply Chain & Logistics
Get regulation-compliant truck routes
- Fleet Management
Solve fleet tracking, routing and navigation
- Last-Mile Delivery
Maximize fleet utilization with optimal routes
- On-Demand Delivery
Real-time ETA calculation
- Middle Mile Delivery
Real-time ETA Calculation
- Ride Hailing
Optimized routes for cab services
- Non-Emergency Medical Transport
Optimize routing and dispatch
Field Workforce
- Field Services
Automate field service scheduling
- Waste Collection
Efficient route planning with road restrictions
BY BUSINESS TYPE
Logistics technology providers
Fleet owners
BY LOGISTICS TYPE
Long haul trucking
Middle-mile logistics
Last-mile delivery
Urban mobility
Field services
Non-emergency transportation
See NextBillion.ai APIs & SDKs in Action
- Case Studies
Discover what customers are building in real time with NextBillion.ai
Get in-depth and detailed insights
- Product Updates
Latest product releases and enhancements
Navigate the spatial world with engaging and informative content

NextBillion.ai vs. Google Cloud Fleet Routing
Experience a more powerful optimization and scheduling platform, better optimized routes, advanced integration capabilities and flexible pricing with NextBillion.ai.
- API Documentation
Comprehensive API guides and references
Interactive API examples
Integrate tools you use to run your business
- Technical Blogs
Deep-dive into the technical details
Get quick answers to common queries
FEATURED TECHNICAL BLOG

How to Implement Route Optimization API using Python
Learn how to implement route optimization for vehicle fleet management using python in this comprehensive tutorial.
ROUTE OPTIMIZATION API
API Reference
DISTANCE MATRIX API
Navigation api & sdk.
Android SDK
Flutter SDK
Documentation
Integration
NEXTBILLION.AI
Partner with us
Our story, vision and mission
Meet our tribe
Latest scoop on product updates, partnerships and more
Come join us - see open positions
Reach out to us for any product- or media-related queries
For support queries, write to us at
To partner with us, contact us at
For all media-related queries, reach out to us at
For all career-related queries, reach out to us at
- Request a Demo
Table of Contents
Google Maps Trip Planner: How to use it in 2024?
Rishabh singh.
- June 20, 2024
Arranging a dream vacation is exciting, but it can also be very stressful. You can follow travel guides, borrow other people’s itineraries, or—my personal favorite—use Google Maps Trip Planner to create the vacation of your dreams to give yourself peace of mind.
The Google app and web interface can be utilized to:
- Add destinations.
- Pin locations with color coding
- Obtain directions to several locations.
- Organize the ideal vacation.
By reading this article, you’ll learn how to use the Google Maps Trip Planner in a way that will change the way you plan your trips. From basic setup to advanced tips and tricks, I’ll make sure you know how to find the best routes, avoid potential problems, and make the most of your time.
How to Plan a Road Trip on Google Maps?
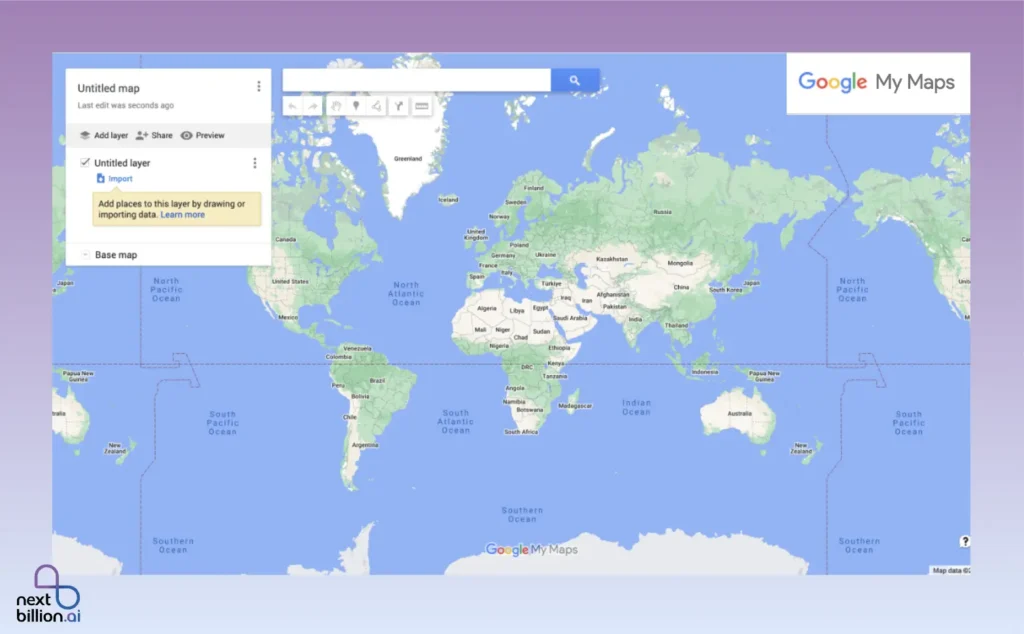
Planning a road trip can be fun, and Google Maps has many useful tools to help you do it quickly. By taking things one step at a time, you can ensure that your road trip is well-planned and fun.
Now for the exciting part: making travel plans. This is how I go about it:
Step 1: Generate a new custom map

You’ll have a ton of options when maps open up. Give your map a name first. When you select “ Untitled Map ,” a dialog box containing the map’s name and description will appear.
I’m organizing a three-day trip to Gangotri in India for this example. We’ll refer to this map as “ Road Trip to Gangotri .”
You can add your locations to your map once you’ve given it a name.
Step 2: Include and personalize your places
The exciting part is about to begin: adding every location you want to see while traveling. I’m going to assume that you already have a list of locations, but if you don’t, use this opportunity to learn about the city and compile a list of attractions.
Making a list will greatly facilitate and expedite the planning process.
Google Maps uses “pins” to represent your locations. Use the search bar to find the location of interest before you begin adding pins.
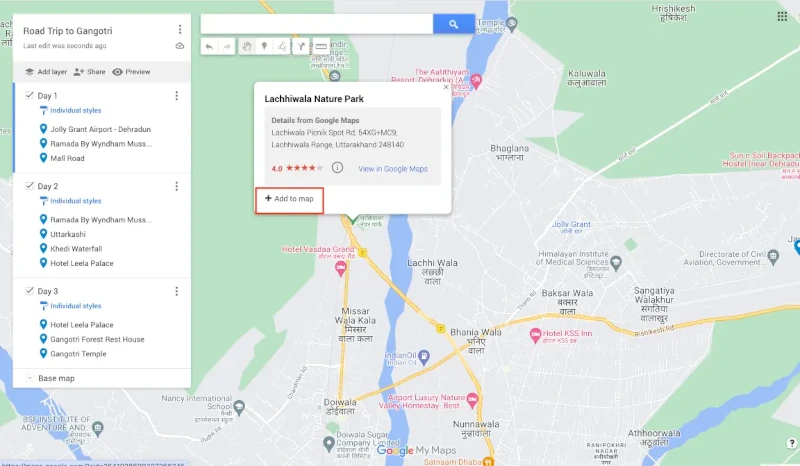
Let’s begin with one of Mussories’s most well-known landmarks: Lachhiwala Nature Park.
When you search for a location, maps will enlarge it and give you the option to “ Add to Map .” You can add the point of interest to your map layer by clicking or tapping this button.
You can alter each point of interest’s color and icon to help you keep your pins more arranged.
A paint can icon will appear when you hover over the address. To access your customization choices, click it. You can select from a variety of icons on Google Maps, such as those for monuments, museums, gardens, and more.
Thanks to these icons, understanding each destination is a bit simpler. Additionally, that may facilitate the following step.
Step 3: Divide your journey into several layers or categories
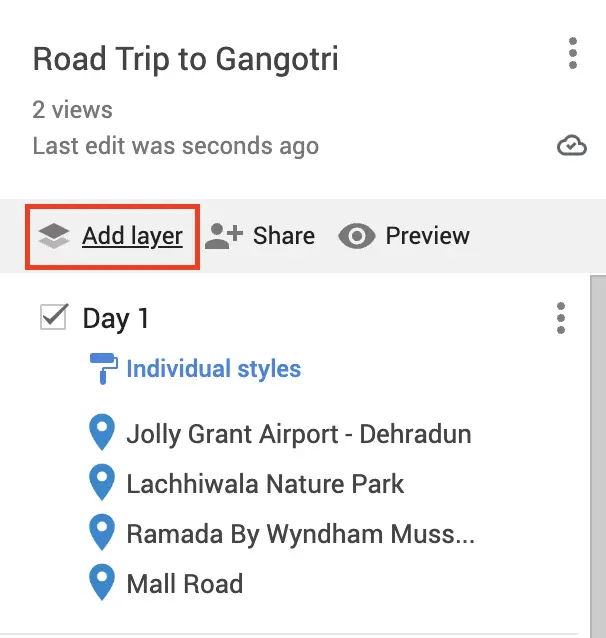
After setting that up, I can begin arranging my daily points of interest.
You are free to include any categories (or layers) in your trip plan as long as they are relevant.
If you’re organizing a road trip itinerary, for instance, you might decide to divide your journey into cities and include attractions in each one. Perhaps you would like to create categories for foods or particular interests. You can tailor Google Maps to your own travel preferences and style, which is a great feature.
How many levels is a map capable of having?
Although layers can help keep your map organized, don’t use them excessively. The maximum number of layers you can add is ten.
It might be necessary to carefully organize your layers or categories if you’re organizing a large, intricate trip.
For every layer, how many location pins can you add?
You can customize each map you make in My Maps with up to 2,000 different pins.
Step 4: Make travel arrangements
Now that you have established all of your categories, you can begin creating your schedule. Organizing points of interest into distinct layers or categories is simple. To move the pin, simply click and drag it to the desired location. In our example, I made three layers, one for each day, so I dragged each point of interest into the appropriate layer to plan my itinerary.
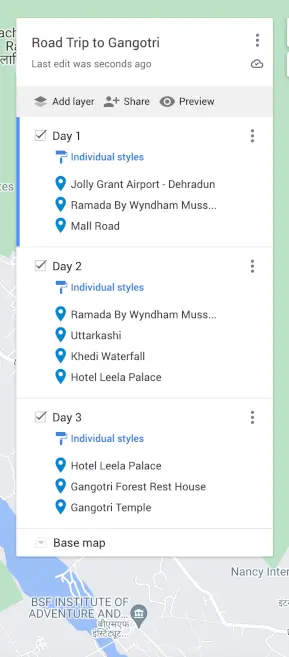
What happens, though, if you don’t divide your trip into days? What happens if you group your points of interest by city or category (restaurants, museums, etc.)? Not a problem! You are free to arrange your layers however you see fit. The key is that Google My Maps facilitates easy trip visualization. You can quickly determine which points of interest are adjacent to one another. This makes making your itinerary in a digital planner or on paper simple.
Step 5: Make reservations
Now that you have arranged your travel, you can begin:
- Make hotel reservations
- Making reservations for car rentals
- Making reservations for any tickets that may be required.
Plan your reservation as far in advance as you can. There’s a chance that rooms and tickets will sell out if you wait too long.
Step 6: Cite off your map
You can give your itinerary and map to friends and family if you’re traveling with them.
Here’s how to do it:
- Return to the Google My Maps dashboard’s main screen.
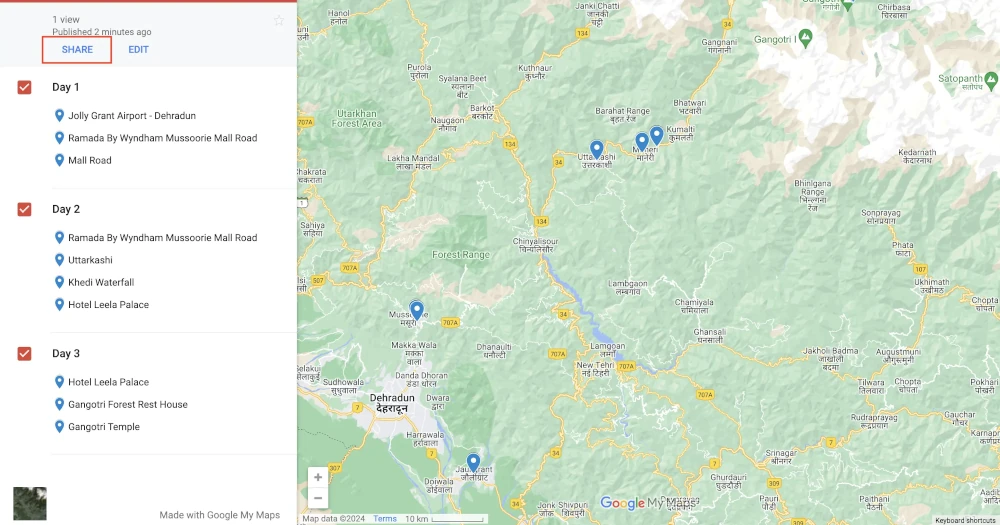
You can use Twitter, Facebook, or email to share your map. If you have a website, you can also integrate your map into it.
Step 7: Use your phone to access your map
You’ve made your map and distributed it among your pals. However, you must have the Google Maps app installed on your phone in order to use it.
To view your maps on a mobile device, follow these steps:
- Launch the Google Maps application.
- Select Saved.
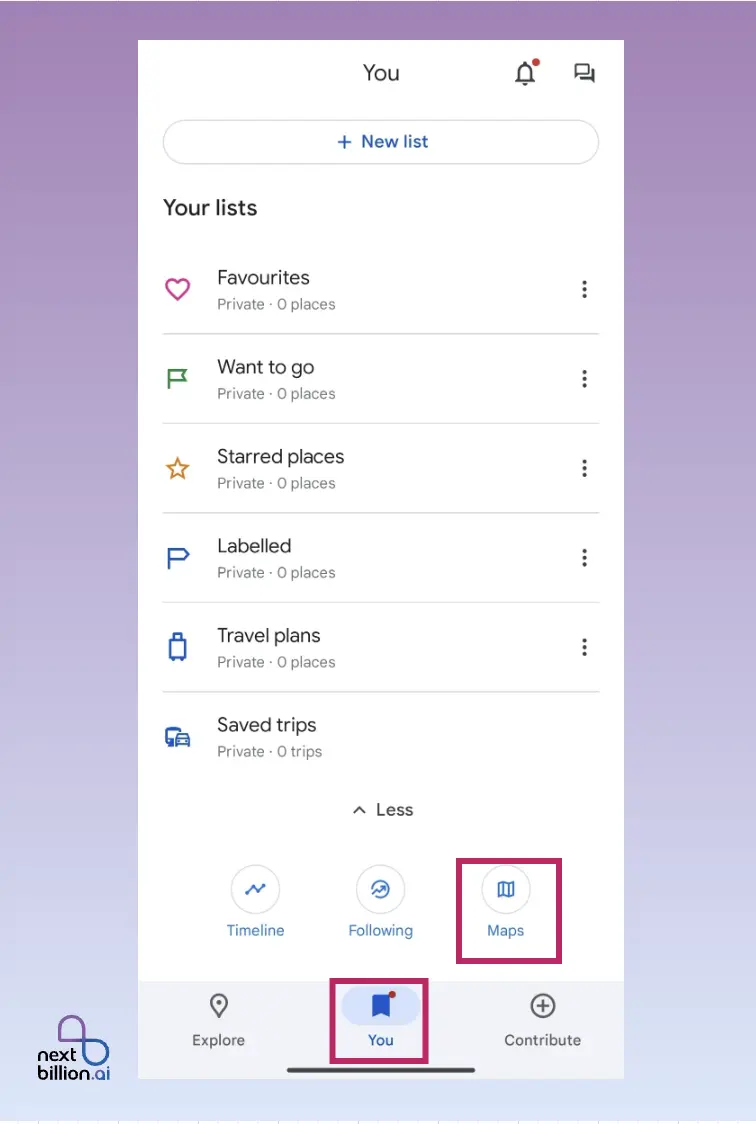
- Click Maps at the bottom.
- Select the map of your trip from the list.
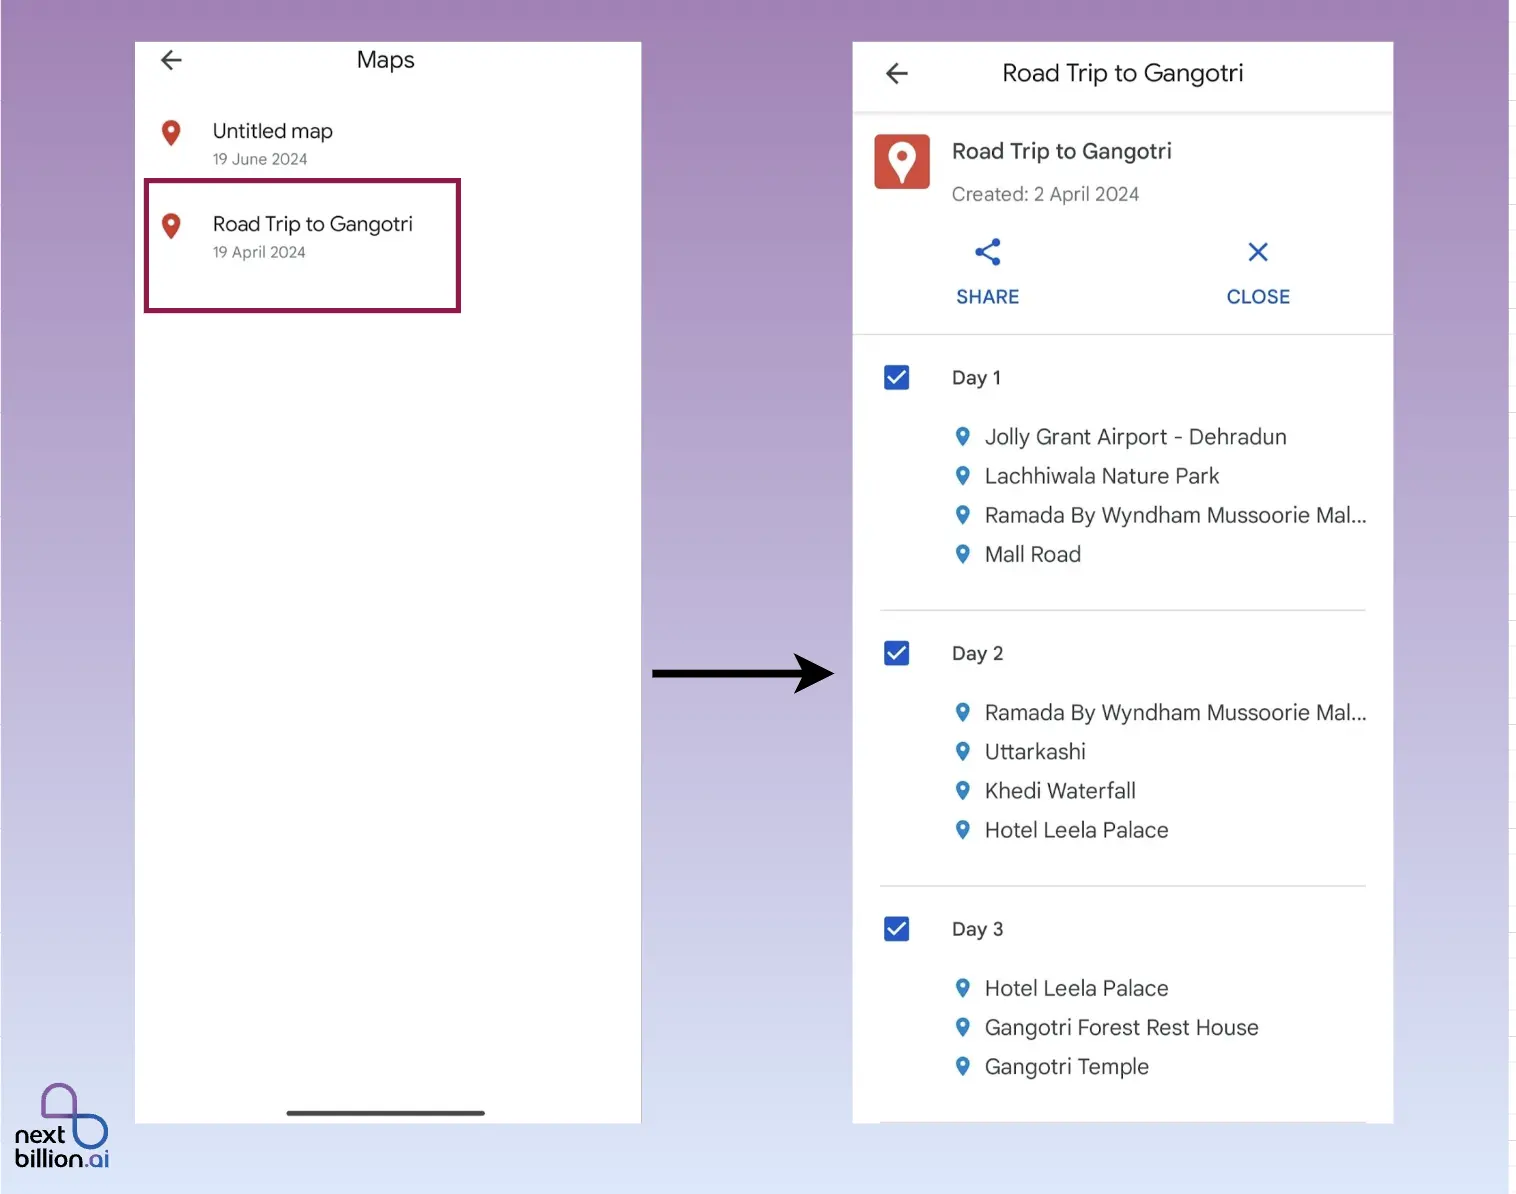
Stay ahead in mapping and location technology!
What are the drawbacks of using google maps as an itinerary planner.
When used as a full itinerary planner, Google Maps isn’t as useful as it could be for finding your way and planning your routes. Here are three major problems that could make planning your trip harder, especially if you want more detailed and personalized help.
1. Lack of Detailed Itinerary Management
Google Maps does a great job of giving directions and showing routes, but it doesn’t do a great job of managing schedules. When travelers need to make a detailed itinerary with activities, accommodations, and scheduled events, Google Maps isn’t the best tool for organizing and managing all of these parts.
- Limited Activity Planning : Google Maps lets you add more than one stop, but it doesn’t let you schedule activities or events in detail at each one. You can’t give each stop a time limit or make a schedule for your trip.
- No Integration with Other Tools : Unlike specialized itinerary planners, Google Maps does not work with other travel planning services and tools, like booking systems for hotels, restaurants, or tours. This makes it harder to keep track of all the details of your trip.
2. Poor Collaboration and Sharing Options
Google Maps doesn’t have as many features for planning trips with a group as dedicated trip-planning apps. You can share routes and locations, but it doesn’t have the advanced tools for working together that many travelers need.
- Simple Sharing Options: You can email or post on social media to share routes and locations, but Google Maps doesn’t offer a central location for groups to work together. You can’t edit an itinerary together with other people or see what changes other users have made.
- Lack of Interactive Features: Unlike trip planning apps that provide interactive features such as voting on activities, commenting, and assigning tasks, Google Maps lacks these capabilities, making it less effective for collaborative planning.
3. Limited Flexibility and Customization
Google Maps API has powerful mapping and routing features, but it’s not very flexible or easy to customize:
- Predefined Functions: The API is made to provide certain functions, like geocoding, routing, and mapping. It can be hard to change these features to fit the needs of a specific business, and you often have to find ways to get around problems.
- Limited Access to Data: The API might not fully allow access to or customization of some data, like real-time traffic and historical traffic patterns. This could make it harder to create highly customized routing solutions.
Travelers who want a more powerful and adaptable way to plan their trips. Travel planning apps might be a better choice for people who need more advanced features for making itineraries.
Is There A Better Option For Route Planning?
A lot of people use Google Maps to plan simple routes, but it might not always work for businesses and advanced users who want more powerful and flexible tools. Nextbillion.ai is a better alternative that can handle the needs of complex logistics and delivery operations with its advanced route optimization features.
Why Should You Use Nextbillion.ai to Plan Your Route?
NextBillion.ai offers a complete and adaptable Route Optimization API that is meant to boost productivity, reduce time and money wasted, and raise efficiency.
NextBillion.ai’s API is better than Google Maps because it can handle both Single and Multi-Vehicle Routing Problems (VRP). This makes it perfect for companies that need to handle complicated logistics.
Customization and Flexibility: NextBillion.ai lets you change the routing algorithm to fit your needs, taking into account things like delivery priorities, time windows , and vehicle capacity. This customization ensures that you get the best routes for your business.
Real-Time Adaptability: The API uses real-time traffic data to change routes on the fly, which is very important for keeping things running smoothly when traffic conditions change. This feature cuts down on wait times and makes the best use of resources.
Scalability: NextBillion.ai’s API can be used to manage either a small fleet of vehicles or a large cluster of vehicles with a lot of moving parts. It can handle up to 4000 tasks in a single route optimization problem , which makes it good for large-scale operations.
How to Use NextBillion.ai to Plan Your Routes?
Here are the steps you need to take to start planning your route with NextBillion.ai:
Step 1: Sign up and get your API key
Step 2: Compile your input data to use

Find out about your jobs (like where to deliver), your vehicles (like fleet information), and your shipments (like pick-up and delivery tasks).

Put this information in the JSON format. This information will be sent to the API in the form of a POST request.
Step 3: Set up the parameters for optimization

You can also improve your routes even more with advanced features like re-optimization , order grouping , or task sequencing .
Step 4: Get optimized routes and use them
You will be given a unique task ID once your optimization request is sent.

To get the optimized routes based on the task ID, use the Optimization GET method.

When you use these routes in your logistics, you’ll start getting better planning results.
Refer to the tutorials page for a more detailed understanding of Route Optimization API.
Getting Started with Route Optimization
While Google Maps is an excellent tool for personal trip planning and basic navigation, it might not be the best fit for complex route planning scenarios, especially for businesses.
Its limitations in handling multiple stops, dynamic route adjustments, and custom constraints can pose significant challenges for logistics and delivery operations.
For businesses looking to optimize routes with advanced features and greater flexibility, NextBillion.ai offers a robust alternative.
With capabilities to handle Single and Multi-Vehicle Routing Problems, real-time traffic data integration, and customizable constraints, NextBillion.ai’s Route Optimization API is designed to meet the complex needs of modern logistics.
To get started with route optimization contact us by clicking the button below and get your API key.

Route Optimization: What is it and How to do it?

Best 5 Route Planning Software to Try in 2024 [In-Depth Guide]
Best 7 Google Maps Alternatives & Competitors in 2024
- IPad accessories
Upgrade your M4 iPad Pro travel carry with these accessories
As someone who uses their iPad Pro as their main computer, I tend to bring it with me wherever I go. One of my favorite aspects about the iPad is that it is basically a modular device without actually saying it’s modular. Between the pin connectors, Thunderbolt port, the magnets, and its lightweight chassis, this makes it the perfect computer to pair with many accessories. So here are some of my favorite accessories I have been using with my new M4 iPad Pro, specifically centered around travel.
If you want to see a hands-on video of all of these accessories and more, be sure to check out our video below!
Native Apple accessories
I want to mention briefly that I use Apple’s native accessories for the M4 iPad Pro. If you use your iPad as your main computer, like I do, then getting the new Magic Keyboard is a must. It completely changes how you use the iPad by turning it into a laptop-like experience. It is pretty pricey, but it’s the only true way to make the iPad compete with something like a Macbook Air. Secondly, I am using the new Apple Pencil Pro. I am no designer or artist, but I tend to take a lot of notes and work with Affinity Photo. The new updates to the Apple Pencil Pro , like haptics, the squeeze gesture, and Find My support, have been welcome upgrades. But now that we have those out of the way, lets get into the fun part!
Shinjuku Messenger Bag
I am always looking for new backpacks and messenger bags to carry all of my tech goodies. This new Shinjuku Messenger by Waterfield checks off many boxes for people looking for a high-quality leather bag that’s lightweight and has the perfect amount of storage for a work commute or a quick work weekend. The combination of full-grain leather on the outer flap and their new X-Pac canvas material makes for a nice, well-rounded package.
- The compact is made for the 11in iPad Pro and smaller devices
- Full is made for the 13in iPad Pro and also fits the 13in Macbook air and other similar-sized devices
- It comes in three colors: Brown Waxed Canvas, Storm Grey and Black
- Dedicated compartment for iPad Pro with Magic Keyboard
- Larger, more open area for larger items
- Internal water bottle holder
- Exterior zipper on flap for quick access to items

Overall, I think this is a great option for someone who isn’t looking for a large backpack but more of a slick and minimal messenger bag look. You can also fit much more than I thought you could fit in the bag itself. The compact size is $229 and the full size is $239, which is very competitive pricing when considering the build quality and materials.
Woolnut Leather Folio Case
The M4 iPad Pro is not a cheap package, especially when considering the additional Apple accessories. I spent around $1800 on my 1TB iPad Pro with Magic Keyboard and Apple Pencil Pro. So, the first thing I did was to make sure I had a safe way to store my iPad while still being able to bring it with me. The new Leather folio by Woolnut was perfect. This is essentially a perfectly sized leather sleeve that fits your M4 iPad Pro with the Magic Keyboard and Apple Pencil Pro. The outside is made of full-grain leather, which smells fantastic, and the inside is made of this extremely soft and satisfying wool felt. So, it will still be protected even if you place your iPad in the sleeve without the keyboard.
- It comes in 3 leather colors: Black, Cognac & Green
- It comes in 3 Matte PU material colors: Black, Blue & Green
- Room for Magic Keyboard & Apple Pencil
- Zipper protection avoids scratches
- Dedicated Apple Pencil holder
Woolnut does offer these in two different material finishes, in leather and in this matte PU material as well. Both are functionally identical, so if you want to save some money, the matte PU version is on sale for under $60, while the full-grain leather version is $160.
ProtoArc USB- C Hub Mouse
I love it when a product can serve multiple functions. This mouse by ProtoArc does just that. On the surface, it looks like a normal lightweight and portable mouse. It has all your normal functions, like connecting to 3 different devices, a scroll wheel, an extra shortcut button, and charging via USB-C. But the mouse actually houses a mini USB-C hub! If you look at the rear of the mouse, you can actually pull out a 3 in 1 USB-C hub, which is perfect for those on-the-go situations. It has:
- HDMI 2.0 port
- USB-A 3.0 port (up to 5GBps)
- USB-C power passthrough port with 60W support
Of course there are USB-C hubs out there with many more ports and with faster data and power speeds, but for something small compact that is just part of another product, I love this thing. Not only that but it’s only $50 (sometimes on sale for $40). This has been one of my favorite recommendations for anyone looking for a portable mouse.
5 in 1 Magic Power Bank
In the same light as the ProtoArc mouse, I wanted to find a charger that did more than just plug into a wall and charge my iPad. Raycon, yes, the headphone company recently released a slew of power-related products, and they are actually great! I recommend checking them out but we are going to focus on their 5 in 1 charger.
So, how is this a 5 in 1 charger? Firstly, it looks and acts as a typical wall charger. It connects to any AC outlet and has a USB-C and USB-A port that outputs 20W. Charges of this size typically can charge at higher wattage, but since this is only for an iPad, the 20W is more than enough, especially considering everything else. Not only does it charge your plugged-in devices, but it also houses a 10,000mAh battery that is constantly charging itself when it’s plugged into the wall. It doesn’t stop there; then it has two short built-in cables, a USB-C cable, and a lightning cable to charge your devices on the go. It also has a Magsafe puck on its side that supports up to 15W of charging. Then the last two things to mention are that it has a small kickstand for your phone and an LED screen that gives you the battery percentage of the power bank.
This is the perfect travel charger for iPads and iPhones. My only gripe is the output. It only charges at 20W, so I wouldn’t consider this a solution for a MacBook.
Other accessories
As I mentioned above, be sure to check out our video here to see the rest of the accessories in my pack. I bring up products like the Sonos Ace, a Magsafe battery bank a cleaning kit and more! Let me know what you think of these accessories. What type of accessories do you use with your iPad? Let’s discuss in the comments below!
FTC: We use income earning auto affiliate links. More.

Check out 9to5Mac on YouTube for more Apple news:

Apple's tablet debuted in 2010. Since the origin…

The new iPad Pro is powered by the A12Z processo…
Fernando Silva started off his professional career in the enterprise technology space with his primary focus being moving large organizations from onsite legacy technologies to a more modern cloud infrastructure. All the technologies he dealt with were mostly in the Microsoft arena but he was always a lover of Apple at heart.

IMAGES
VIDEO
COMMENTS
Plan your trip with Google. Find flights, hotels, vacation rentals, things to do, and more.
Learn how to access your travel history with Google Account and explore more features of Google Travel, Flights and Maps.
Google Maps Timeline is a personal map that helps you remember routes and trips you've taken and places you've been based on your Location History. You can edit your Timeline at any time and delete your Location History in Timeline. If you have settings like Web & App Activity turned on and you turn off Location History or delete location data from Location History, you may still have location ...
We're also adding a few new features to make planning and organizing your trips easier. One place for all of your trip details. Last year, we started adding your trip reservations for things like hotels and flights to a trip timeline for your upcoming trips, when you're signed into your Google account and you've received a confirmation in ...
On your mobile device, open the Google Maps app . Search for a destination and tap Directions. Select a transportation mode. If you select Transit, choose your preferred route. At the bottom, tap Pin . To pin a trip from the Go tab: On your mobile device, open the Google Maps app . At the bottom, tap Go. To get a list of suggested trips, in the ...
Google Trips is a personalized tour guide in your pocket. Each trip contains key categories of information, including day plans, reservations, things to do, food & drink, and more, so you have everything you need at your fingertips. The entire app is available offline — simply tap the "Download" button under each trip to save it to your ...
Stitching your trip plans together across Google. There are so many travel resources out there it can feel like you spend hours researching flights, hotels and sites before you feel prepared to book your trip. In fact, 46 percent of leisure travelers globally think travel planning takes too long, according to our recent research with Phocuswright.
Next time you're on your way or running late, you can share your real-time location and trip progress from navigation as well. During your next trip, tap the "More" button on the bottom on the navigation screen, and then tap "Share trip.". When you share your trip with people, they'll see your expected arrival time and can follow ...
Google Trips is a free app that not only helps you manage your air, hotel, ground transportation, and reservations, but combines it with suggestions of place...
Save yourself the headache and share all the reservations for your trip with just a tap of the arrow button in Google Trips. Anyone you share with will receive an email with all the reservation details, and see them in the app too. 2. Stay on top of last-minute changes. Trips already helps automatically organize your travel reservations from Gmail.
Check the Google icon in the top right corner to make sure you're using the Google account you want to. Click "Create A New Map" and a window will open with a blank map. To give your map a name and description, click the map name ("Untitled Map"). You can also change the color and style of the base map if desired.
To begin, open the Google My Maps app on your device and find the map that you want to share. On IOS devices, tap the "share" button and select the friends you want to share the map with. They will receive a link to access the map. On Android devices, tap the menu button and select "share trip.".
1. Head to Google My Maps and create a map. First, open Google My Maps and sign in to your Google account. In the top left hand corner of the screen, you'll see a button titled "Create a new ...
Plan your trip with Google. Find flights, hotels, vacation rentals, things to do, and more.
To find your trip reservations, simply search "my trips" and Google will quickly pull up all of your upcoming travel plans. Of course, you must be logged into the Google account you used to make your travel reservations. From here, you can click into any of the individual trips and find all of the reservation info that once lived within ...
Sign in. Use your Google Account. Email or phone. Forgot email? Type the text you hear or see. Not your computer? Use a private browsing window to sign in. Learn more about using Guest mode. Next. Create account.
Find all your maps in the Your Places menu on Google Maps. Your world, your maps. Chart your favorite places or explore a new city. Discover new destinations. Save maps you find on the web and use ...
1. Head to the My Maps homepage and click Create a New Map. Any map you create will appear on this page. Google; William Antonelli/Insider. 2. You'll be given a world map. In the menu in the top ...
Find local businesses, view maps and get driving directions in Google Maps.
Long back, if u typed just my flights, ur entire future and past flights used to come, Now nothing, google travel looks empty as hell Reply reply omegastuff
On your mobile device, open the Google Maps app . Search for a destination and tap Directions. Select a transportation mode. If you select Public transport, choose your preferred route. At the bottom, tap Pin . To pin a trip from the Go tab: On your mobile device, open the Google Maps app . At the bottom, tap Go.
Click "Add layer" and call this "Day 1". Add another layer and call that "Day 2". Continue until you've added all your days. TOP TIP: You can't add more than ten layers to a Google Map. If your trip is for two weeks or longer, you'll need to set up the layers to cover several days each. For example, "Days 1-2", "Days 3-4 ...
Open Google Maps on your computer and sign into your Google account. Click on the menu icon and choose Saved > Maps > Open My Maps. Start a new map by clicking the Create A New Map button.
On your mobile device, open the Google Maps app . Search for a destination and tap Directions. Select a transportation mode. If you select Transit, choose your preferred route. At the bottom, tap Pin . To pin a trip from the Go tab: On your mobile device, open the Google Maps app . At the bottom, tap Go. To get a list of suggested trips, in the ...
The key is that Google My Maps facilitates easy trip visualization. You can quickly determine which points of interest are adjacent to one another. This makes making your itinerary in a digital planner or on paper simple. Step 5: Make reservations. Now that you have arranged your travel, you can begin: Make hotel reservations
It has all your normal functions, like connecting to 3 different devices, a scroll wheel, an extra shortcut button, and charging via USB-C. But the mouse actually houses a mini USB-C hub!