- Skip to primary navigation
- Skip to main content
- Skip to primary sidebar
- SEWING TUTORIALS
- FREE SEWING PATTERNS
- CROCHET TUTORIALS
- FREE CROCHET PATTERNS
- OTHER CRAFTS

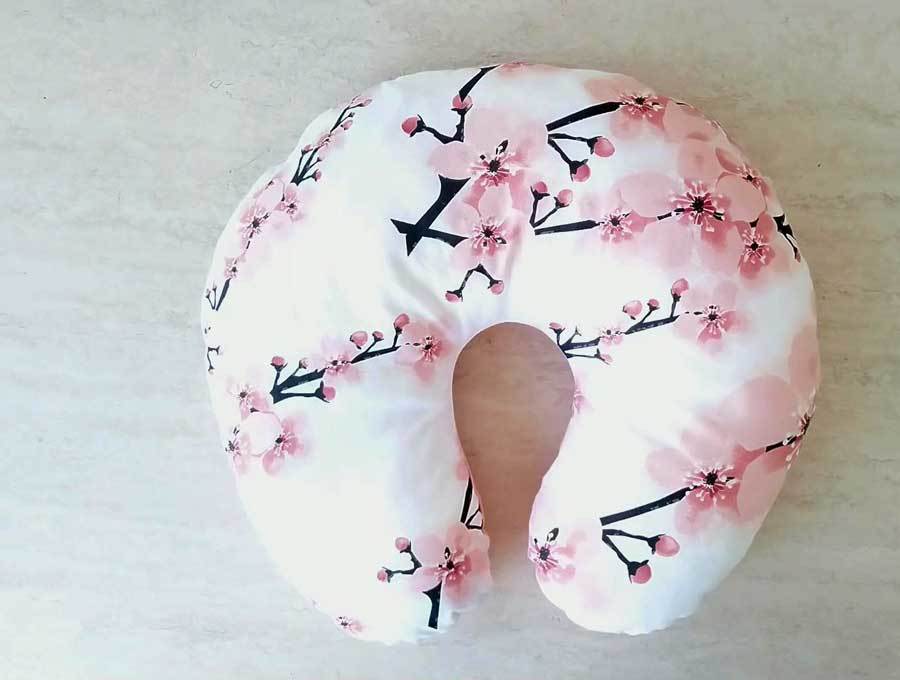
DIY Travel Pillow {Neck Pillow} - Free Pattern
Modified: Mar 1, 2023 by Treasurie
Are you planning a plane trip or long car ride? Make yourself a soft, comfortable DIY travel pillow to make your journey enjoyable and memorable. These neck pillows can be made in under 30 minutes and are a great beginner sewing project. DIY travel pillows are great to give for gifts and can be made in colorful fabrics that coordinate with luggage.

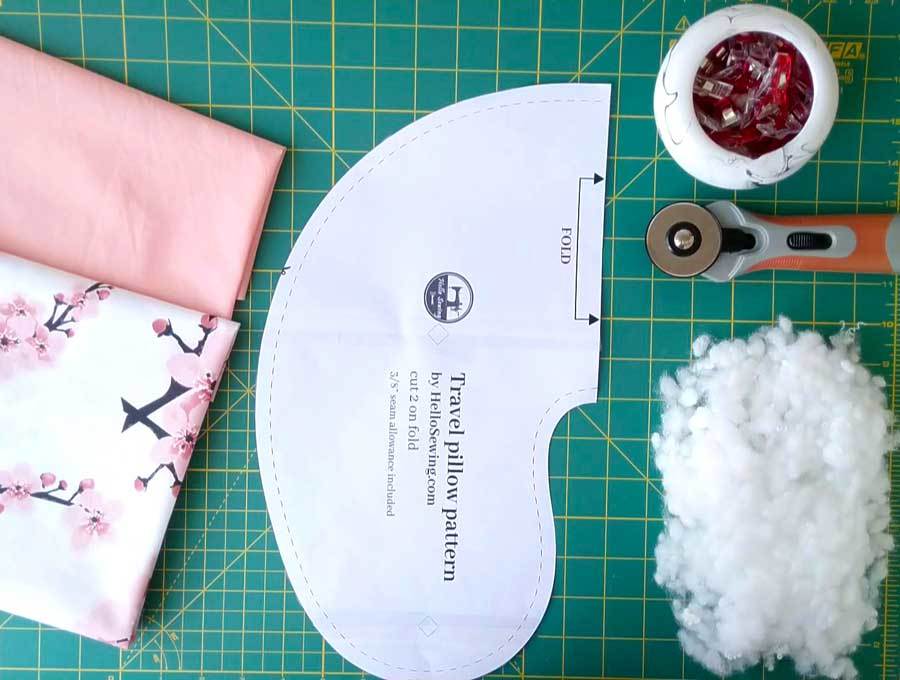
DIY Travel Pillow - Supplies
- FABRIC - ½ yard (0.45m) of cotton fabric - Choose a soft fabric that will breathe and not make you sweat. I used a soft quilting cotton. Since this will be next to your face, make sure you prewash the fabric before you start sewing. This will eliminate shrinkage and remove any chemicals the manufacturer may have added.
- STUFFING - Polyester stuffing is best. This is the kind you use for stuffed toys.
- SEWING MACHINE
- NEEDLE - Hand needle and thread
- PATTERN - Your DIY travel pillow pattern. Download the free pattern . (Link will open in a new window). Just trim the boxes and stick the 2 pages together.
>> Download the free pattern
Table of Contents

DIY Travel Pillow - The Video
Hooray! There is a video to go with this tutorial. Like all my videos, it is just a few minutes long, so grab a piece of chocolate and relax for a short while. Don't forget to subscribe to my YouTube channel for more weekly videos.
>> PRESS PLAY BELOW
DIY Travel Pillow - Instructions
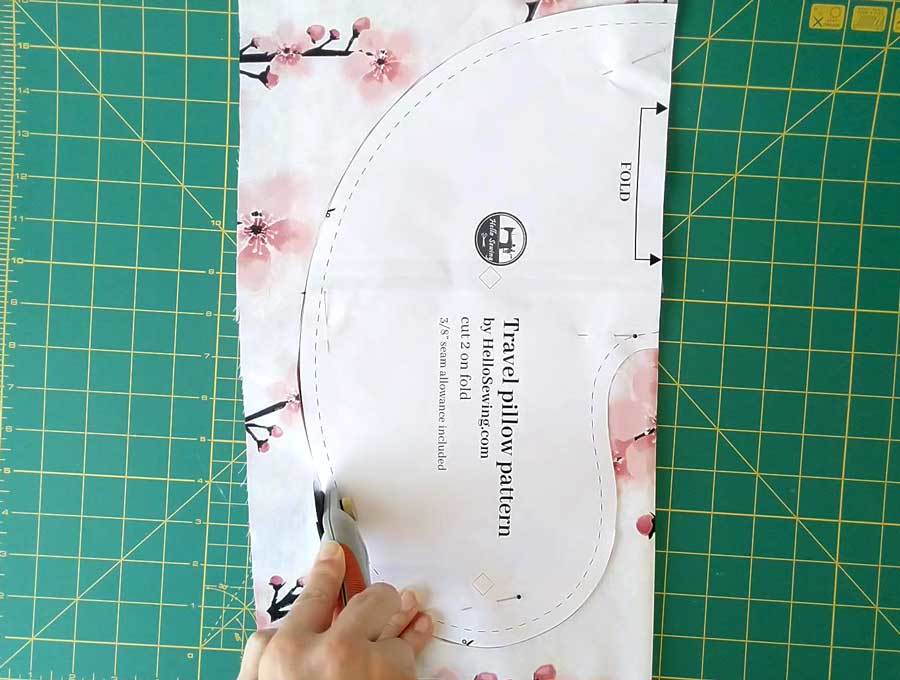
Step 1 - cut fabric.
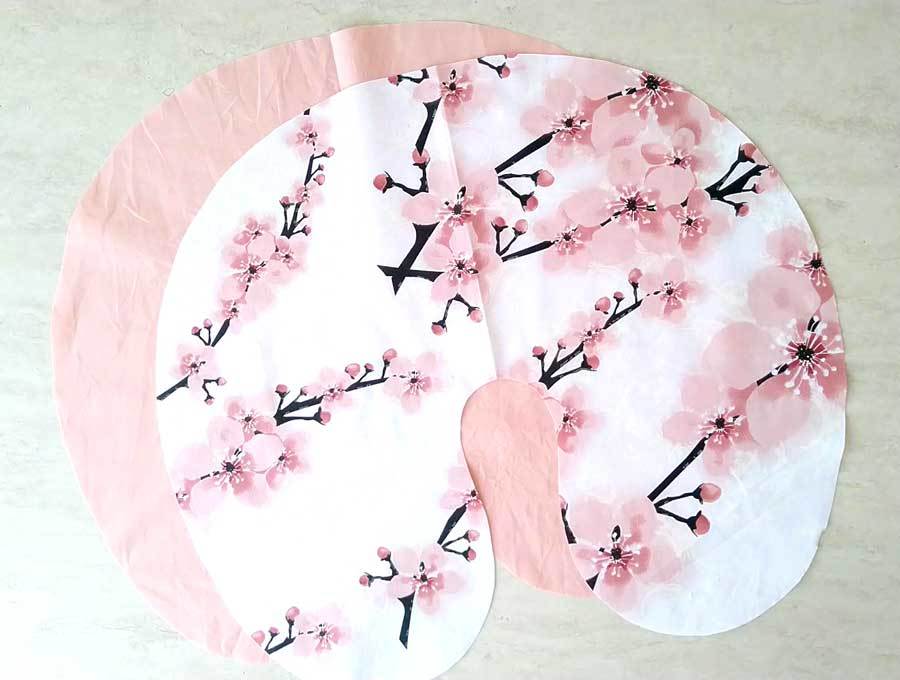
Place your pattern on the fold of your fabric and cut 2 pieces. One will be for the front and the other for the back. If you have larger scrap pieces use one color for the front and another for the back
Step 2 - Stitch
Put the fabric pieces with right sides together and stitch all the way around, leaving a 1 ½ inch (4cm) gap on the outside as shown. Use smaller straight stitches. I recommend using a 2.0 length. If you are new to sewing curves then read my article >> Sewing Curves

Step 3 - Clip and Turn
Clip the curves, leaving the gap unclipped. Turn your DIY travel pillow to the right side through the gap.
Further Reading: Sewing Clipping

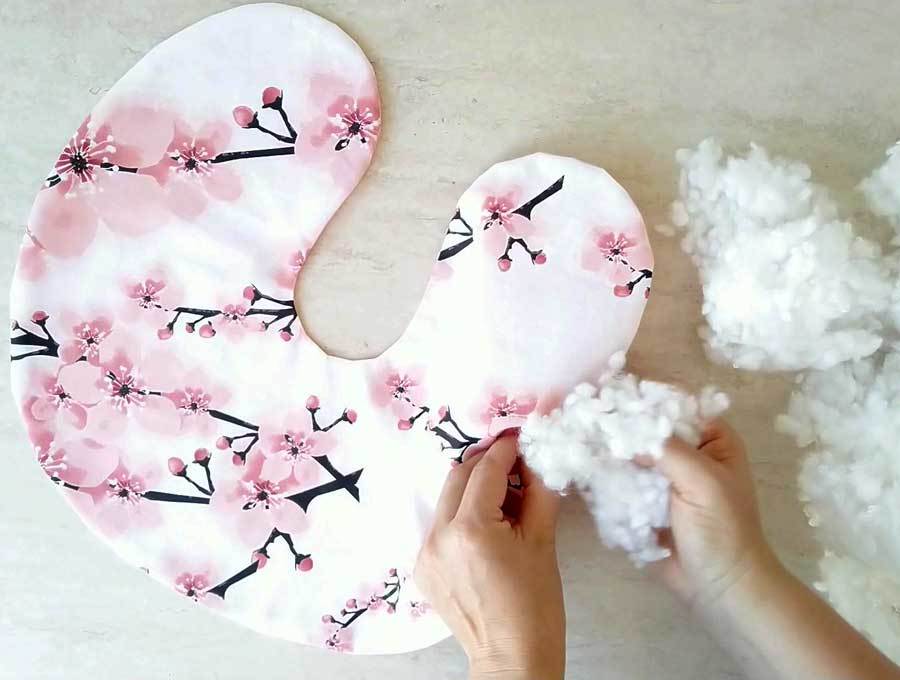
Step 4 - Stuffing
Give your pillow a good press and start stuffing. I made mine fairly hard but you can stuff it as much or little as you find comfortable. Keep in mind, the stuffing will squash down once you put your head on it.
Step 5 - Stitch Gap
Close the gap with an invisible ladder stitch . This stitch goes through the fold and if you use a matching color thread, it will almost be unnoticeable.
Further Reading: How to Sew an Invisible Stitch

DIY Travel Pillow - In Conclusion
Your DIY travel pillow is all ready for a trip! I hope you are going somewhere exciting and have an amazing time.

More Pillow Tutorials
If you enjoyed this DIY travel pillow tutorial, you might like to sew some more pillows and cushions. Transform your house with some bright fabrics.
- Pillowcase Pattern
- How to Make A Pillowcase (with border)
- How to Make a Cushion Cover – Envelope Style
- Make a Cushion Cover with Piping
- Zippered Cushion Cover
- DIY Neck Pillow
- DIY Star Pillow
- Pom Pom Pillows
- Patchwork Cushion
- Reading Pillow Pattern
- Pillow Patterns
- DIY Christmas Pillows

DIY Travel Pillow
- Sewing Basics Sewing machine, needle, thread, scissors
- Fabric ½ yard (0.45m)
- Polyester Stuffing
Instructions

More Free Sewing Patterns & Tutorials

Reader Interactions
April 05, 2024 at 6:42 pm
Thank you for this pattern. I use a pillow this shape as my bed pillow. It fits my short neck and small person shoulders best. My ear is not crushed nor does my face get pillow wrinkles. It just cradles my head. It is filled with polyester fiberfil that doesn't clump, ever. It was purchased, and having a pattern without having to create my own is so nice. I'll be filling the new one with polyester fiberfil that doesn't clump as well. Perhaps I'll pack it slightly firmer than current to see if the slight tweak will be even better.
November 20, 2023 at 2:04 am
Thank you for this pattern! I used a zipper so I can stuff it with a few clothing items to 'carry on' the plane so I could have them easily accessible.
March 12, 2023 at 11:27 pm
Hi Beth, the gap works anywhere. I did it on the side as the seam is a little straighter so easier to close up at the end. Thanks for reading.
March 07, 2023 at 5:02 pm
I'm in the process of making a neck pillow using your pattern. Thanks for the excellent instructions. I have a question. Is there any reason not to make the closure spot at the back of the pattern instead of on the side? I'm thinking that it might be easier to stuff from the back as well as easier sewing it closed since it seems like the curve is a bit flatter at the back. Your thoughts? Again thanks for making the pattern available and for the detailed instructions.
February 03, 2023 at 6:43 pm
I just made this pillow - ultra easy! The stuffing was the biggest portion of the half hour duration! Lol! Thank-you for the pattern! Ooh! And I put a fabric loop on the back part so I can hook it on the tv tray latch on the plane 😉 or on a carabiner for on my carry on.
Violet Raven
December 29, 2022 at 7:35 pm
I made this for my grandma for Christmas, and she absolutely loved it!!
March 01, 2021 at 3:16 am
You can print the pattern and scale it down on your printer. Try 80% reduction.
February 12, 2021 at 8:32 am
Thank you for this pattern and tutorial! Do you think you'll have a pattern for child size anytime soon?
December 20, 2020 at 3:41 am
Hi Beverly, there is a link in the article above for the printable pdf. Thanks for reading.
Beverly Comley
December 18, 2020 at 9:41 pm
how do i get your pattern
September 14, 2020 at 9:44 pm
It is 3/8 inch (1cm) or the dotted line on the pattern
Stacey jeansonne
September 14, 2020 at 9:41 pm
Could you please tell me the seam allowance? Thank you
August 16, 2020 at 10:19 pm
I used fabric of dogs in sweaters, very cute!
August 16, 2020 at 10:17 pm
This is very cute! I am planning to make them for my family as Christmas presents. However, thick thread will work much better than thin.
November 14, 2019 at 7:59 pm
I'm sure they will love that you made it for them.
November 14, 2019 at 3:02 pm
My grandchildren often travel to visit us. I wanted to give them a personalized DIY gift to welcome them. I hope they will enjoy the pillows on the trip back. Thank you for the pattern and the video..
November 04, 2019 at 7:26 pm
Hi Diana, I appreciate the suggestion. I'll look into that.
November 03, 2019 at 11:00 pm
I’m not able to print this from my phone. If you could add a print button it would greatly appreciated.
nanawhatsnanamakingcom
June 13, 2019 at 2:06 pm
Thank you so much for sharing this. It is awesome which is why I featured it in my 10 awesome travel accessories post which you can check out here https://whatsnanamaking.com/travel-accessories-to-sew/ Beautiful fabric BTW
Leave a Reply
Your email address will not be published. Required fields are marked *

30+ FREE Travel Pillow Sewing Patterns

Don't ever pay top dollar for a travel pillow again!
I was taking a flight recently and during a short stopover before boarding the long overnight flight across the Atlantic, I realized that I had forgotten my trusty travel pillow on the plane. That old pillow definitely helps me get some rest when sitting upright for hours and hours in economy.
Well, I decided I just couldn't deal with an overnight flight without a travel pillow so I went to the gift shop to purchase one. And holy smokes, it was almost $30 for a simple pillow!
I resolved to figure out how much these pillows actually cost to make and to find some good patterns so I could make my own when I got home.
Well, it turns out that these travel pillows are quite easy to make and cheap too. It will only cost a couple of dollars of materials if you don't already have what you need in your stash –which you probably do.
In any case, I wanted to share the long list of free travel pillow sewing patterns that I was able to put together so you can save money too and travel more comfortably on your next trip.
Want something a bit different from a standard travel pillow?
Here's one of our designs for a comfortable road trip car pillow .
Comfortable road trip car pillow
Travel Pillow Sewing Patterns Roundup
Here's a huge list of some of the best free travel pillow sewing patterns I could find on the internet. I'm sure you'll love them. Hover over the picture to show the title, click to open, or right-click and open in a new tab to keep this page open too. And don’t forget to pin it .

If You'd Like To Support Our Site

hi, these are really great ideas, and awesome alternative to regular travel pillows from the shop

What can I use for stuffing to make it a “squishy” pillow that gives a lot when you squeeze it, but quickly resumes its shape when you let go?

I would use upholstery foam – High-Density Polyurethane Foam. It has different densities and firmness.

Thank you. This is great!

I saw one at the airport recently that had a hood attached- like a hoodie sweatshirt. Any patterns for that? Thanks!

Your neck pillows are unique and adorable.

Great job putting these all in one space. Pegeth

I find that none of the above type of pillows work. Not enough support for my neck. Last trip I bough a more expensive one with more support in it and it was much better. Still woke on and off with sore neck but not as bad.
Search this site
Welcome to our site.
We are delighted that you found your way to So Sew Easy! We are here to inspire you, guide you, and also learn with you. If you can donate a few dollars to help us keep running the site, we would be very grateful!
Subscribe to Our Sunday Email and Never Miss a FREE Pattern!
Featured video.

Pin It on Pinterest
Thanks so much for your comment.
It would be great if you could share this post with your friends!

Subscribe to our weekly Sunday newsletter below and never miss the latest free sewing patterns and tutorials.
Thanks, I’m not interested
- Home →
- Projects & Tutorials
- → DIY Travel Pillow | Neck Pillow Pattern + VIDEO Tutorial

DIY Travel Pillow | Neck Pillow Pattern + VIDEO Tutorial
Traveling can get very uncomfortable at times, especially if you’re traveling by car or worse, bus. But if you have the right equipment for the trip, you can make it as comfortable as possible. What kind of equipment am I talking about? Neck pillows.
A well-made neck pillow can make a big difference during long trips during which you have no other options but so sit put.
Since I don’t really like those you can get in the stores, I came up with a cute and very comfortable DIY travel pillow design. It’s easy to make and it requires very little time. And I’m about to show you precisely how to make a travel pillow yourself. It makes a great gift and can be made in colorful fabrics to coordinate with your luggage or your fabric luggage tags !
Below you will find my step by step written tutorial with VIDEO instructions for all the visual learners.
We occasionally link to goods offered by vendors to help the reader find relevant products. Some of the links may be affiliate meaning we earn a small commission if an item is purchased.
Table of Contents
- 1 How to Make a Travel Pillow
- 2 Supplies and tools
- 3.1 DIY Neck Pillow VIDEO TUTORIAL
- 3.2 INSTRUCTIONS:
- 3.3 STEP 1: Prepare the pattern
- 3.4 STEP 2: Cut the fabric
- 3.5 STEP 3: Pin
- 3.6 STEP 4: Sew
- 3.7 STEP 5: Turn inside out and press
- 3.8 STEP 6: Fill the pillow with the stuffing
- 3.9 STEP 7: Finish the DIY travel pillow
- 4 NECK PILLOW STUFFING OPTIONS:
How to Make a Travel Pillow
You don’t need all that much for this project, it’s likely that you even already have all of the essentials in your sewing supplies. First up you will need to download the free neck pillow pattern below – it’s a U-shaped design that is very comfortable.
Supplies and tools
- fabric – 1/2 yard cotton fabric (or 2 x 1/4 yard if you are using two fabrics)
- stuffing – polyester stuffing works best
- matching thread thread
- scissors (or rotary cutter and a cutting mat )
- pins or clips
- sewing machine ( these machines are great for pillows and home decor, or you can even hand sew this)
- iron and ironing board
- sewing clips or pins
DOWNLOAD : FREE Travel pillow pattern (PDF file)
Notes : You can use a variety of materials for the stuffing – I’ll cover the options at the bottom of this tutorial if you’re not sure what to use. use what you consider to be the most comfortable option.
Once you prepare all that, you can start making the travel pillow.
How To Sew a Travel pillow
Watch the diy travel pillow video first and then follow the written step by step instructions below. Please enjoy and don’t forget to Like and SUBSCRIBE over on YouTube to be kept up to date with new videos as they come out.
DIY Neck Pillow VIDEO TUTORIAL
INSTRUCTIONS:
Step 1: prepare the pattern.
Print out the travel neck pillow pattern you downloaded and cut it out. Make sure you print it as 100% (no scaling) on either a US letter or A4 paper. Cut it out and tape it together
If you don’t have a printer or you can’t use the downloadable pattern for some other reason, you can draw it yourself on a piece of paper.
Just draw one half of the usual travel pillow shape. Similar to a bean. Then cut it out.
STEP 2: Cut the fabric
Fold the fabric in half and align the edges. Then put the travel pillow sewing pattern on the fold, pin it and cut through both layers according to the pattern. The seam allowance is already included.
Do this two times, as you need two identical pieces of fabric – one for the front and one for the back. If you have larger scrap pieces – this is a great project to use couple of them!
STEP 3: Pin
Unfold both pieces of fabric and set them on top of each other, right sides facing each other. Align the edges and pin everything in place. Leave an opening for turning.
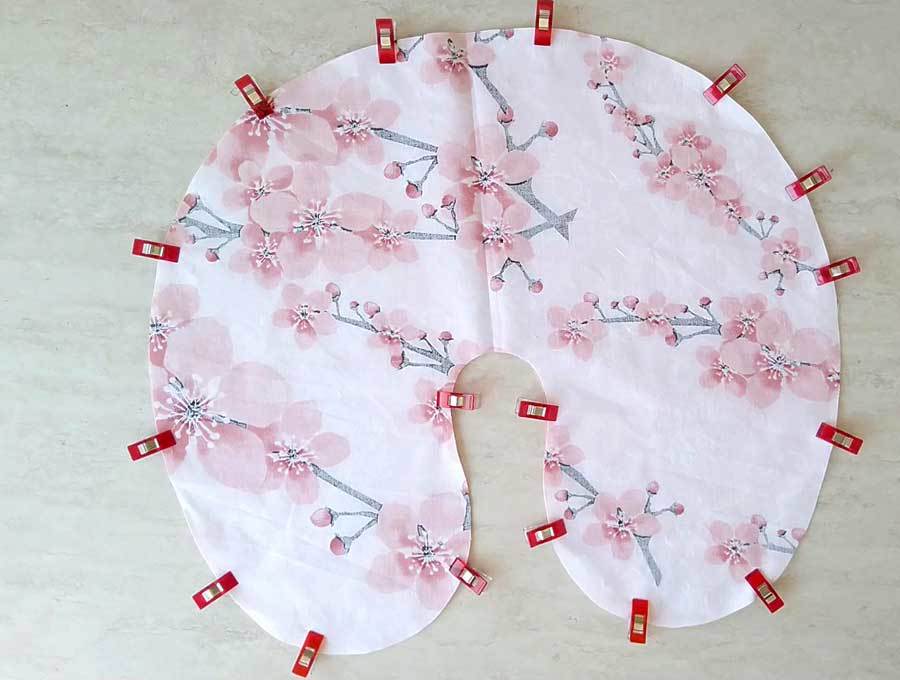
STEP 4: Sew
Stitch all around the edges using a 3/8 inch seam allowance. Leave a gap of about two inches unstitched so that you can turn the DIY neck pillow inside out.
Use your scissors to notch all around the pillow, snipping small triangles out of the seam allowance about one inch apart from each other. This will allow the pillow to form properly along the curves. Don’t notch the gap.
STEP 5: Turn inside out and press
Turn the whole pillow inside out through the opening you left unstitched earlier. Tuck the seam allowance of the opening inside and press it. Press the entire thing flat with an iron using a lot of steam.

STEP 6: Fill the pillow with the stuffing
Take the polyester stuffing you have prepared and fill the neck pillow with it. You can put as much stuffing as you wish, it’s your choice. If you like your pillows to be fluffier then put a bit more, just don’t overdo it so that it doesn’t become too hard.
STEP 7: Finish the DIY travel pillow
Once you have finished stuffing the neck pillow, all that’s left to do is to close up the opening on it. Take your needle and a thread and close the opening shut with a ladder stitch.
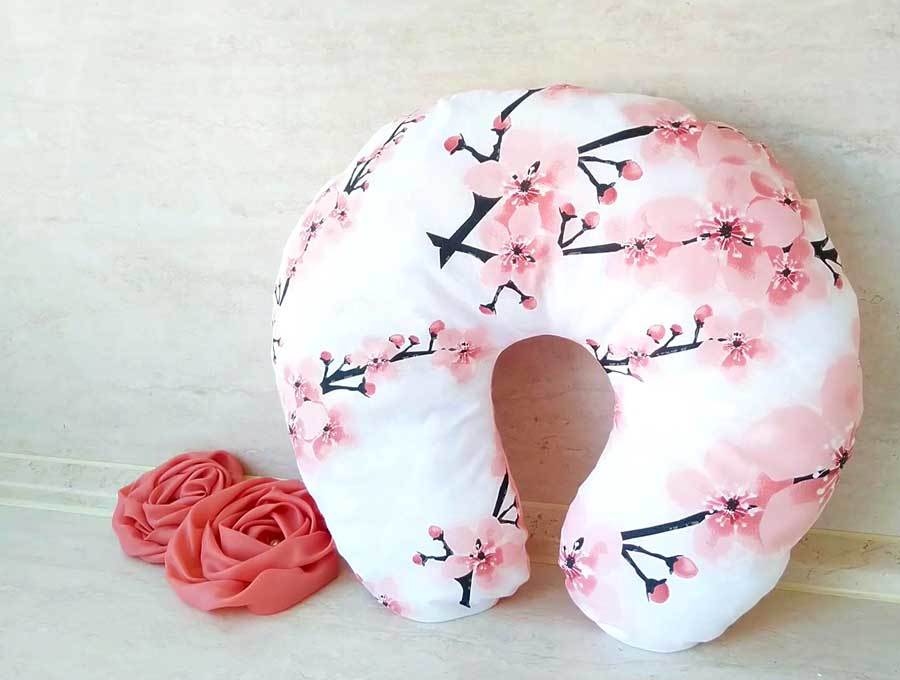
Psst… do you like the gorgeous roses in the image above. Here’s how to make them
NECK PILLOW STUFFING OPTIONS:
As I mentioned earlier, you can use whichever stuffing you prefer, but if you’re not sure, here are a few suggestions and their characteristics.

No products found.
- Option 5: Feathers
Light and soft, very comfortable, and it can be shaped easily. It tends to flatten often and it can get pretty hot during use.

I hope you liked this neck pillow tutorial and that you found it useful and interesting. Let us know what you think about it by sharing your thoughts with everyone in the comment section below. If you have some suggestions for improvement, do tell, your feedback is very appreciated!
Now go ahead and make a few of these DIY travel pillows for yourself and your loved ones, they’ll be grateful for sure!
Do you like this? Pin for later:
Wanna be friends? Click HERE and follow me on Pinterest
- DIY Luggage Tags
- DIY Sleep Mask
- Breathable face mask tutorial
- DIY Kimono from a scarf
OTHER PILLOWS THAT MAKE GREAT GIFTS:
- How to make a pillowcase
- Book pillow tutorial
- DIY phone pillow
- dog bone neck pillow pattern
Related Posts
Modern Men’s Sewing Patterns – Easy DIY Outfits for Beginners
17+ DIY Denim Quilt Ideas [Great for Upcycling Old Jeans]
15+ Fox Plush Patterns – Fox Stuffed Animal Patterns
11+ Lap Quilt Patterns
such a great idea! thank you for tutorial – it makes me think I can try to sew my own travel pillow 🙂
Leave a reply:
Save my name, email, and website in this browser for the next time I comment.
Sure you can. It’s such an easy so, and the travel pillow is so comfortable
It turned out awesome, and thanks so much for sharing the great tutorial.
Thank you for your kind comment, Chas. I love it!
What a great tutorial, thanks for sharing with us at Handmade Monday
Thank you, Julie. It’s a pleasure to share my projects with you!
Thank you for sharing your post at this week’s #TrafficJamWeekend Linky Party.
Have a wonderful weekend!
Thank you for dropping by!
Thank you for the instructions. We need to get neck pillows for our next trip and this will let us personalize them.
Looking forward to travel is such a great treat…and then the memories are so sweet. Share photos of your creations with us! I love seeing items made with my patterns
This is fantastic! Absolutely cannot wait to be able to travel again! Maybe the time at home will give me time to make some of these as Christmas gifts! Thank you for linky up at Oh My Heartsie Girl’s Wonderful Wednesdays, I’m co-hosting at My Crafty Zoo!
Oh, how I miss traveling! These make wonderful gifts everyone would love to receive
Such a great tutorial and pattern, thank you for sharing on OMHGWW it will be featured this week. Please stop by and share again!
Have a great week!
I will. Thank you so much for the feature and hosting this wonderful party
I like your choice of fabric. It turned out so pretty. The tutorial is very detailed and easy to follow. Thanks for sharing. #HomeMattersParty
Thank you so much for the kind words, Donna. I love it!
So many times I have wanted one of these! I can quilt, but making 3D items is always more of s struggle. I think I can manage this though. Look for your neck pillow to be featured in this week’s Creative Compulsions.
Michelle https://mybijoulifeonline.com
It’s actually very easy, I’m sure you can manage it! Thanks for the feature, I’ll stop by this week
My daughter and I recently traveled on airplane and I was wishing I had a travel pillow. This will be on my to-do list for our next cross-country excursion!
It’s a must have travel item for me! So comfy
I love the pattern. I use the micro-beads and use them in a separate pillow then the decorative outer shell I put a 1/2 inch loop in the seam. I attach a carabiner to that. When I am not using it after a flight I can attach it to a loop or strap before I leave the plane and don’t loose me favorite pillow. Just a thought worth mentioning.
Great idea, Judi, thanks for sharing. This sounds like a handy feature
this is amazing but here are the some best travel pillows for tall person that support your neck and head than that any other pillow
These are custom made pillows so that can be made to fit any person tall or short
That’s really very nice. Thanks.
Great project. I will be making one of these soon. Could I use scraps of fabric with the Polyester fill?
If you do yarn crafts, put a zipper on the back and leave a small gap at the bottom of each “arm”. Put 1 skein in each arm, threading the end through the gaps. Put an extra skin or 2 to fill it for comfort and now you can knit or crochet easily.
That is clever! Thanks for the tip, Susan!
Lately I have seen notices that say we use this type of pillow wrong. The opening goes in the back. This is so the pillow supports our head when we fall asleep and the head nods forward. Always something new to learn.
Yes, isn’t it funny how we are taught to do something and we are doing it this way for years when suddenly you realize you are doing it all wrong
Leave a Reply:
DIY Adult Travel Neck Pillow (with washable cover)

Adult-sized neck pillows
Recently, I’ve been making neck pillows. Several of us like pillows if we want to sleep during long drives (not the driver, of course), but usually we just use a rolled up jacket or whatever else we happen to be able to get our hands on at that moment (I’ve been known to use everything from window curtains to piling my hair under my head!). It occurred to me one day that if I made a real neck pillow, I’d be able to always have the right amount of “stuff” under my head (without using two jackets) and that would be a really nice thing! So since I was making one for myself, I started making them as gifts…for mother’s day…for father’s day… and if a recent trip was any indication, I’d say they went over pretty well! Since the van is a dirty place (and so are we after a week or more on the road), I decided to make a washable cover for the pillow. It may not look quite as pretty (it can turn out a little floppy), but, hey, at least I can wash it easily!
What You’ll Need to Make Your Own Neck Pillow

Some of the materials
Neck Pillow Pattern . (Many thanks to Dani for this – so as not to infringe on her copyright, I’ll just link to her pattern here . Click the image, the scroll to find the pattern . Or, click here to be taken directly to the pattern image .) Sadly, the pattern is no longer online. You can find the pattern on Pinterest here . You can also download the pattern and print it (below) – it should work with 8.5″x11″ or A4 paper. I don’t promise it’s perfect, but you should be able to figure it out…
About 1 yd. fabric; I like quilting cotton, but almost anything would work (I even used a piece of an old bed sheet at one point when I was pressed for time and materials – and it worked great!).
About 1 ¼ yd. soft fabric. I’ve used fleece and flannel with equally good results. Make sure it’s washable, though, or your washable cover won’t be very washable 🙂
Stuffing. I used Polyester Fiberfill, available at most craft shops. Since I was using partial bags, I don’t know exactly how much I used, but it was a lot. Plan on having at least a 12oz. bag on hand.
Closures. I used hook-and-eye fasteners, but you could use almost anything washable that will hold the two sides closed. I try to stay away from Velcro, though; let’s just say I’ve had my hair caught in the stuff way too many times! On my own pillow, I didn’t use closures at all…but that makes it look even less professional.
Matching thread
Sewing Machine
Sewing supplies (scissors, pins, hand needle, ruler or measuring tape)
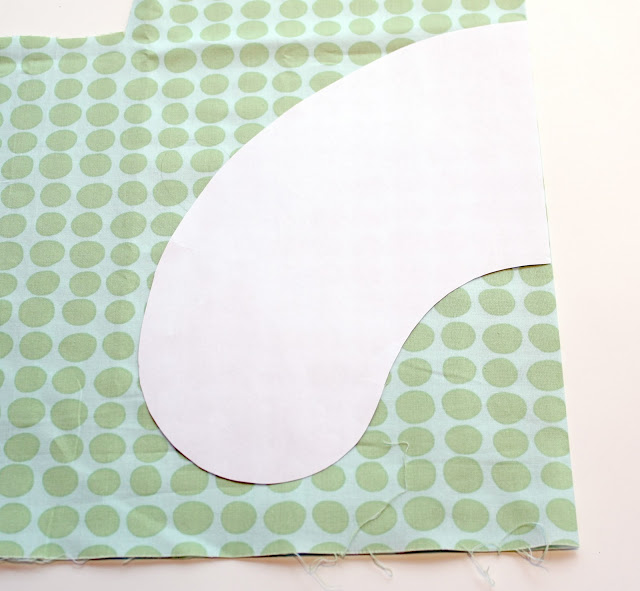
Step 1: Laying out and Cutting Out the Pillow

The cut neck pillow pieces, pinned
Start by laying out the pattern on the cloth. The easiest way to do this is to fold the cloth in half (like in the store), right sides together; then pin the pattern on the fold. Cut a second pattern on the fold, as well.
***Note*** I found the pillow to be a little lacking in height, so I added about a half inch around the pattern on all sides except the side on the fold. This seemed to work great for a fatter neck pillow! ***Update*** After using the pillows, I’d say the original pattern is the best size for most situations. So, think twice before making it bigger 🙂
Step 2: Pinning and Sewing the Pillow

Sewing the pieces together
Pin the pieces you cut out, right sides together. They should be exact replicas of each other; if not, do your best to line them up as closely as possible and it should be ok.
Use the sewing machine to sew around all sides of the neck pillow, leaving about 4” open for stuffing the pillow. I used a ¼” to ½” seam allowance, depending on how strong I felt the fabric was.
Step 3: Turning the Pillow

The sewn and clipped neck pillow. The pins (purple and white) mark the area I left unsewn for stuffing and turning. I wouldn’t have wanted it any smaller!
Take the stitched pillow and clip the curves. “Clipping” is just snipping little triangles out of the seam allowances (don’t go through the seam!) in the curving areas (the tighter the curve, the more “clips” you’ll want to make). This will ensure that the seams lie flat and neat after you stuff it.
Then turn the pillow right side out. I found the easiest way to do this was to stick my hand right up inside the pillow and pull it right side out.
Step 4: Stuffing the Pillow

The neck pillow, stuffed and ready for the opening to be stitched shut
After the pillow has been turned right side you, stuff the neck pillow by taking small handfuls of the polyester fiberfill and sticking your entire hand through the opening, then pushing the fiberfill down to the very bottom of the pillow. Repeat until the entire pillow is very firmly stuffed (unless you like a less-firmly stuffed pillow).
Turn in the seam allowance of the stuffing opening and pin. This may be tricky if the pillow is well-stuffed! Hand-stitch the opening closed.

The opening, stitched closed. I’m almost embarrassed to admit I stitched it, but since I did, there it is. The good thing is that it will be hidden under the washable cover!
Congratulations! The pillow is finished! Now for the washable cover…
Step 5: Cut the Cover Pieces

The neck pillow cover, traced onto the flannel fabric (if you can see the pencil marks!)

The cut neck pillow cover
Cut the cover pieces exactly as for the neck pillow, EXCEPT make the pieces a generous ½-3/4” larger on all sides (except where the piece meets the fold – the straight edge) than the original pillow (the smaller the excess, the less floppy the cover will be, but it will also be much harder to stuff the pillow inside the cover!) I used the same pattern piece, and marked the extra with a pencil on the cloth…I know, not professional, but it does work if you’re too lazy to make another pattern piece 🙂
Step 6: Pin & Sew the Cover Pieces

The pieces, ready to be stitched
Pin the cover pieces, right sides together, matching all edges (especially the curves). Use the sewing machine to stitch around the entire outside (at ½” seam allowance) except for about 6-8”, which you’ll want to leave open for inserting / removing the pillow.
Step 7: Turn the Cover Right Side Out
Clip the curves (less so than for the pillow – keep the clips well away from the stitching) and turn the cover right side out. Take a thin object, such as a short ruler or pencil with broken lead, and run this along the inside of the pillow along seam lines. This should help the cover with the final “turning out”, so the seams are flat and finished-looking. Iron if the seams simply will not turn right side out and look good.
Step 8: Finishing the Cover

Hemming the opening
Turn the open edges under ¼” and then under ¼” again. Press. Essentially, you’re going to hem the opening so it doesn’t fray. Pin, then sew by hand or on the sewing machine (I used the sewing machine).

Stuffing the pillow into the cover. I made this particular cover a little big, so it’s extra floppy. I fixed that in the directions, though.
Stuff the pillow into the cover via the opening with the now-hemmed edges. Then position your closures to best close the opening while not being in the way for the sleeper / get caught in your hair / etc. Attach the closures – if you’re sewing, either use extra caution not to catch the pillow, or remove the pillow before sewing.

Almost done!
To wash, simply unhook the closures, pull the pillow out of the cover, and toss the cover in the laundry (laundering via the cloth’s specifications, of course!)

The stitched closures
Congratulations! Your neck pillow with its washable cover are finished!!!
This Week’s Featured Product!
If you’d rather buy a neck pillow, this one has multiple colors to choose from!
More Related Posts:

- ← Willowwood Arboretum: One of the Nice Kind of Arboretums!
- Holzwarth Historic Site – Worth a Summer Stop! →
4 thoughts on “ DIY Adult Travel Neck Pillow (with washable cover) ”
These are great! I’d love to make one for myself, since I have a hard time finding a neck pillow that is tall and narrow enough for my neck. How tall would you say your pillow are (original and/or altered pattern)? I need to figure out how much to adjust it. Thanks!
Hi froghazel, the normal pattern turns out to be about 4.5 in. tall when all was said and done if I stuffed it very firmly. I gave the larger pattern away as a gift – but it was a little taller, maybe closer to 5 or 5.5 in. If I didn’t stuff as firmly, it’s more like 3 in. Hope that helps!
Pingback: The Best of Anne's Travels in 2015 - Anne's Travels
Pingback: Top 10 Pages on Anne’s Travels in 2014 - Anne's Travels
Get Hiking Guides & Other Outdoor Fun!
Subscribe to View Junkie Adventure Report and get exclusive outdoor and hiking-related content.
I agree to receive newsletters & updates from Anne's Travels and accept the data privacy statement.
We use Sendinblue as our marketing platform. By Clicking below to submit this form, you acknowledge that the information you provided will be transferred to Sendinblue for processing in accordance with their terms of use

DIY Travel Neck Pillow Free Pattern
Learn how to diy travel neck pillow that also makes the child’s body comfortable during long car rides get my free neck pillow pattern and follow a detailed tutorial on how to sew a travel seat belt pillow, my diy travel neck pillow was inspired by the way my kids sleep during car rides. since my daughter graduated to a booster seat her sleeping position got even worse. as parents or guardians, you know that chauffeuring kids around comes with wobbly sleepy heads. it hurts my neck from just looking at them sleep. this post contains some affiliate links for your convenience (which means if you make a purchase after clicking a link i will earn a small commission, but it won’t cost you a penny more), as i was thinking about how to design the travel neck and body pillow for my daughter, i remembered how much the body pillow that i used during pregnancy benefited me. let’s take a look at the pattern and tutorial for the diy travel neck pillow with a combination of seat belt pillow, are you wondering how to sew that cute beanie hat my daughter is wearing then, check my post on sewing a beanie hat and a tube scarf to get the free pattern and tutorial., what you need for diy travel neck pillow, basic sewing tools, 1.25 yard 44” wide fabric – regular cotton or flannel will work perfectly, free pdf pattern for both travel neck pillows is ready to download at my resource library – to get the password, fill out the form at the bottom of this post, remember, always wash and dry fabric ahead of time to pre-shrink it., if you are looking for a great online store to buy fabric, i highly recommend fabric.com . they have a wide array of fabric colors and textures. in addition to fabric.com, i also shop at joann, either at my local store or joann.com for convenience., step 1. fold the fabric crosswise, right side together, and cut out the pillow piece, adding 3/8” for the seam..
Step 2 . Stitch the two pieces right side together, leaving about six-inch opening. Also, snip notches on all the curves.
Step 3. Turn the sewn travel neck pillow piece right side out through the opening.
Step 4. stuff fiberfill inside the cover and hand stitch the opening close..
Tip: Don’t be shy with the fiberfill. Make sure the travel neck pillow is stuffed firmly. Over time the stuffing may get squished and flat. In that case, you can rip the hand seam and stuff more fiber filling inside. Of course, hand stitch the opening close again. If you are very ambitious, you can sew in a short zipper in place of the opening.
So, here it is, you made a travel neck and body pillow. wasn’t that easy.

My daughter always thinks about her big brother and she makes sure he is not left behind. She said that Daniel needs a travel pillow too, to sleep enjoyably while during long car rides. Isn’t she cute or what? 😊
So, here it is, another travel neck pillow, but this time just for the neck., you will need the same materials as for the travel neck and body pillow listed above. also, the same steps will apply to make this travel neck pillow, as well., i have attached this image in order to help you remember to make the notches. it is important to do so, to make the seam on the outer side of the curved project look nice and smooth..
Done! You made another travel neck pillow.

As you see on the pictures the travel neck pillows are very useful.
(adsbygoogle = window.adsbygoogle || []).push({});, i hope you enjoyed sewing the travel neck pillows and your kids are loving them. if you are looking for an idea to keep kids occupied during car rides, check out my post on the travel activity table . also, check out the diy car seat organizer post to store travel activity supplies and make your car look nice and tidy., happy sewing, free pdf printable pattern for the diy travel neck pillows, get the password for the library with the free pattern here by filling out this form:, want to remember this save the diy travel neck pillow to your favorite pinterest board.

Leave a Comment Cancel reply
Save my name, email, and website in this browser for the next time I comment.
Sewing Skills for Fun & Business
- Pattern Making
- Sewing Tutorials
- Free Patterns
DIY travel neck pillow for adults and kids
In this post, I am going to show you how to make a travel neck pillow by yourself. This DIY tutorial comes with a pattern in toddler/kids and adult sizes that you can get for free as a “Thank you!” gift if you choose to become a subscriber to my email list.
The kid’s size pattern fits nicely up to a 10-year-old. For older kids, use the adult version of the pattern.
To download the travel neck pillow pattern, scroll down to the end of this post.
Travel neck pillow video tutorial
DIY Travel Neck Pillow
I had two reasons to make this pillow myself. First, I didn’t like the support our store-bought pillow provided. Of course, I could search for a more supportive one, but I also really wanted it to match the car seat cover I made a while ago.

Here is how to make it yourself:
What you are going to need to make a travel pillow (image 1)
- the pattern ;
- 12 inches/30 cm of non-stretch fabric for the kids’ version and 20 inches/50 cm for the adult one ;
- pins, scissors, a sewing machine ;
- polyfill or other stuffing material;
- hand needle and a matching thread .
Steps to follow when making the travel neck pillow
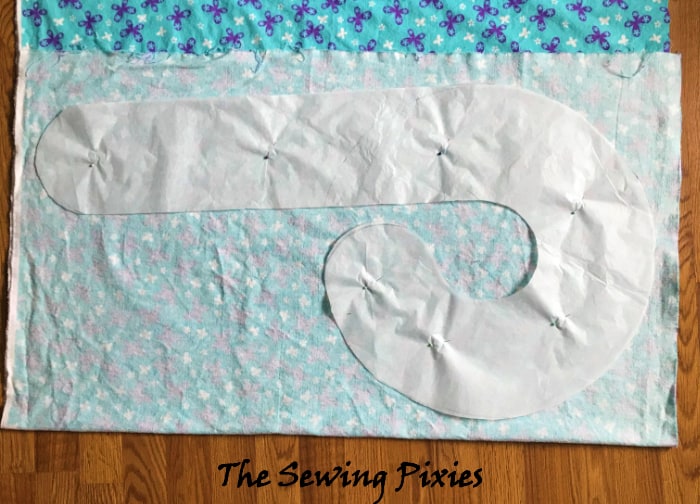
Use the pattern to cut two details of the travel pillow.
The idea to make a travel neck pillow came later, so I didn’t have enough fabric left to use.
That’s why I’ve joined some scrap pieces together to get the shape of the pillow. If you are using the pattern and enough fabric, you are going to end up with two whole and even details that look much prettier than mine (image 2).
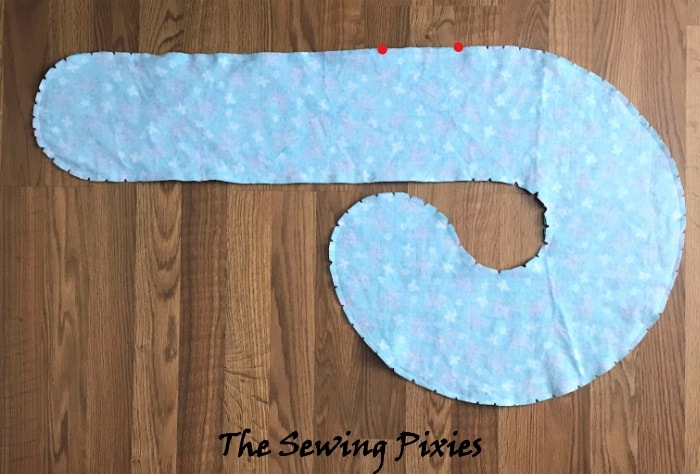
Put them face sides together and pin them if you like. Sew all around the pillow except the narrow part on the inside. We are going to use it as a hole through which to turn the pillow inside out later.
Leaving the hole at this place, it would be a bit harder to hand stitch later, but it’s the least visible place so that’s where I am going to make it. If you prefer, you can leave the opening elsewhere to make it easier for you to hand stitch later.
Sew it with ⅜ of an inch or 1 cm seam allowance (image 3).
Use a straight stitch and anchor the seam at the beginning and the end.
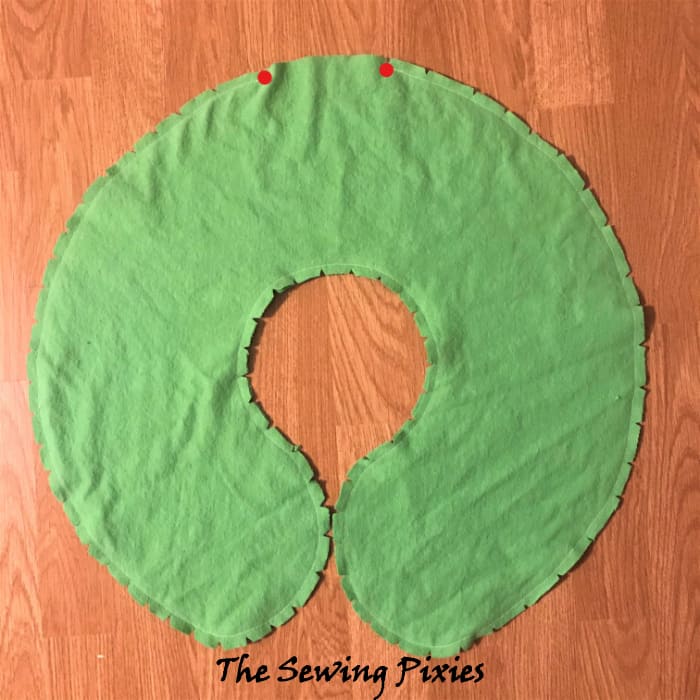
Turn the pillow inside out by pushing it through the hole we left (image 4).
You might want to iron at this point, but the filling is going to pull the seams anyway so I am going to skip this step.

Stuff the pillow with poly-fil or other stuffing material
Here is how the travel pillow looks now (image 5). Now I am going to start stuffing the fill-in (image 6). How much you are going to stuff the pillow depends on your preferences.
I am using my thumbs to push the stuffing all the way in and I am careful to use the same amount of fill in all parts of the pillow (image 7).

Close the opening we left in the middle of the pillow
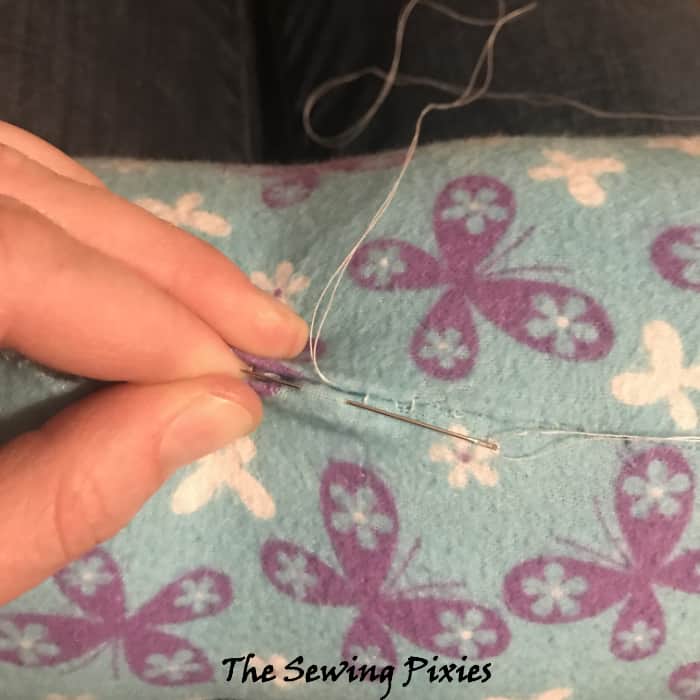
Once I am done, I need to close the hole in the middle (image 8). I am going to do that with the invisible hand stitch or the so-called ladder stitch. Here is how to do it.
Start at one side and insert the needle a bit in on one side and then on the other side so the seam allowance gets pushed inside and both sides get joined together (image 9).
This pillow is nicely stuffed, so I don’t pull the sides together right from the first stitches. I make a couple of them and then pull them together so that the thread doesn’t break under the pressure. I am going to go all the way up until I close the hole.
Then, I am going to go backward. Going back is not strictly necessary, but in my case, the fabric tends to unravel, so I am going to secure it.
To finish the stitch, instead of making a knot I am going to stick the needle inside the pillow. Then, take it out on the other side, cut the remaining thread and the end of it would disappear into the inside of the pillow (image 10).

To download the pattern, click on the button below. The adult and toddler/kids versions of the travel neck pillow pattern are provided in separate PDF files.
Like what you read here? Support my site
If you want to help me continue delivering similar content, please consider buying me a coffee to keep it going. It helps me focus and have more time to prepare these tutorials and develop my lessons.
I can devote more time and do everything involved to make this happen and share what I’ve learned about sewing and pattern-making with you.
I would appreciate it.
More sewing tutorials:
- How to make a car seat cover for a baby/toddler
- DIY Cape Tutorials – Make Your Own Halloween Costume
- DIY Organza String Bags
- Embellish Your Wardrobe: Create a Classic Box-Pleated Skirt
- Sewing with elastic thread – make a shirred dress
SIGN UP FOR SEWING FOR A LIVING NEWSLETTER
If you like what you read here, join our mailing list so we can send you our new sewing tutorials, pattern-making lessons, patterns, and some occasional offers that we think might interest you!
We will protect and use your data following our Privacy policy .
You may unsubscribe at any time by clicking the link in the emails we send.
Leave a comment Cancel reply
Your email address will not be published. Required fields are marked *
Save my name, email, and website in this browser for the next time I comment.

30+ FREE Travel Pillow Sewing Patterns

FREE Travel Pillow Sewing Patterns
Travel pillows can get you some rest when sitting upright for hours and hours while traveling.
These travel pillows are quite easy to make and cheap too. It will only cost a couple of dollars of materials if you don't already have what you need in your stash –which you probably do.
I wanted to share the long list of free travel pillow sewing patterns that I was able to put together so you can save money too and travel more comfortably on your next trip.
You'll love this Comfortable Road Trip Car Pillow , too
- 963 Share on Facebook
- 18132 Share on Pinterest
- 630 Share on Twitter
- 1403 Share on Instagram

This site uses Akismet to reduce spam. Learn how your comment data is processed .
Support Our Site
If you can donate a few dollars to help us keep running the site, we would be very grateful!
Search This Site
Never miss a free pattern: get our weekly newsletter, submit a link.
If you have a pattern that you would like us to consider publishing on Sewing4Free, please click the button and submit the link for review.

Subscribe to our weekly newsletter below and never miss a FREE pattern again!
Thanks, I’m not interested
Travel Pillow Case FREE Pattern
Here are the materials you will need to make a Travel Pillow Case:
DIY Travel Pillow Case – Materials List
- Qty (1) 12” x 16” Pillow Form
- Check out my selection of “sporty fabric” from My SHOP
- ¼ Yard of Fabric for your Pillowcase Band ( French Blue )
- 1/8 Yard of Fabric for your Pillowcase Trim ( White )
DIY Travel Pillow Case – Basic Supplies
- Sewing Machine
- A thread that coordinates your project (I use Aurifil 50 wt )
- Sharp Fabric Scissors ( I love these scissors )
- Straight pins or wonder clips
This post contains affiliate links for your convenience. ? Read my full disclosure policy here .
Here is the Travel Pillow Pattern:
Travel Pillow Cutting and Sewing Instructions:
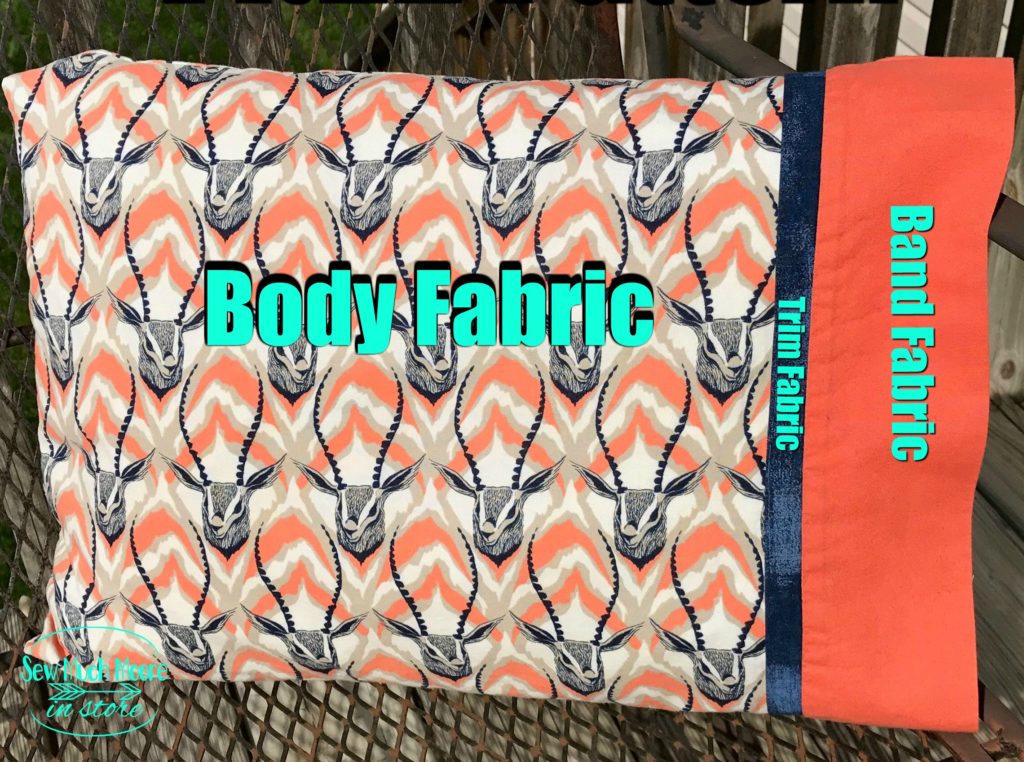
Based upon the direction of the body fabric print, you will cut the fabric accordingly:
- Body Fabric 17”x29”
- Cut Band Fabric 7” x 29”
- Cut Trim Fabric 2”x29”
Fold the Trim Fabric in half lengthwise with the wrong sides together. Press.
Layout the band fabric (right side up), place the body fabric (right side up) on top of the band fabric, and along the top edge with raw edges matching. Pin along the raw edge.
Place the trim on top of the other 2 fabrics and along the top raw edge, with raw edges matching. Repin all 3 fabrics along the top raw edge.
Take the bottom raw edge of the body fabric and roll the pillowcase Body Fabric up into a narrow tube until it meets the center of the Band Fabric. Pull the Band Fabric up and over the fabric tube and matching the raw edges and pin in place.
Stitch along the top raw edge, using 1/4″ seam allowance. Be careful not to catch the fabric tube in the seam.
Pull the body fabric out one end of the band tube and press flat.
Fold the pillowcase in half with right side’s together, stitch down the side and bottom raw edge of the pillowcase at 1/4″ seam. Leave the folded band edge open. Follow the last straight stitch down each seam with either a zigzag stitch or serger. Leave the Band folded edge open.
Turn right side out and press.
If you would like to see the video on how to do this as well, head back over to my Tutorial post right HERE .
Click HERE for a PDF Copy
Happy Sewing!


Free travel pillow pattern
Prepare for comfortable travels with this free travel neck pillow template available for both kids and adults! You can sew this versatile pattern by hand or mostly by machine. The template comes in two sizes: child size, suitable for 4-6 years, and adult size, recommended for age 6 and up. But here’s the cutest feature – an optional carry strap! These straps (can be secured with snaps or velcro) serve as a convenient way to hang your pillow from a suitcase or backpack while traveling. To make a super comfy travel pillow, choose a soft and fuzzy fabric. You’ll love your cozy neck support during car rides, plane trips, or even relaxation at home!
Denim crossbody bag tutorial
January 22, 2024
Free cozy kitty heat pack pattern
January 24, 2024
Related posts
Leave a comment cancel reply.
Submission guidelines
Cookie banner
Cookie policy
Terms & conditions
Privacy policy
COPYRIGHT © 2024 | Crafts on display
To provide the best experiences, we and our partners use technologies like cookies to store and/or access device information. Consenting to these technologies will allow us and our partners to process personal data such as browsing behavior or unique IDs on this site and show (non-) personalized ads. Not consenting or withdrawing consent, may adversely affect certain features and functions.
Click below to consent to the above or make granular choices. Your choices will be applied to this site only. You can change your settings at any time, including withdrawing your consent, by using the toggles on the Cookie Policy, or by clicking on the manage consent button at the bottom of the screen.
- Capes & Cloaks
- Coat&Jacket
- Romper & Jumpsuit
- Baby & Kids
- Saint Patrick’s Day
- Mother’s Day
- Father’s Day
- Baby & Kids
Travel Neck Pillow Free Sewing Pattern
In-flight snoozing on those red-eye flights just got easier and much more fashionable.This neck pillow can better wrap your neck and free your chin, prevents the head from falling forward, relieves neck pain during travel. When sleeping upright is your only option, this soft and comfortable DIY neck pillow will help you get the Zzz’s you need. I have shared some pillow free sewing patterns which you won’t miss, especially if you have little ones at home or around. Make one to match your luggage or make one to match your traveling clothes. Whatever colors you choose to make this pillow, it most certainly will ensure sweet dreams during your next trip.
You may love: Baby Carseat Head Support Pillow Free Sewing Pattern

Click the link below for the FREE sewing pattern:
How to Make a Travel Neck Pillow by The Renegade Seamstress
Related articles more from author, best fabric square basket free sewing pattern, fabric little mouse stuffed toy free sewing pattern, baby snakes catnip cat toys free sewing pattern, fabric russian matroyshika doll free sewing pattern, stuffed fabric turtle free sewing pattern , fabric handbag strap key fob free sewing tutorial + video.
The Cottage Mama
sewing • cooking • crafting • all things domestic
Subscribe to my Newsletter
Subscribers receive FREE exclusive patterns & discounts
- Lessons with Lindsay Videos
- Sewing Basics
- The Cottage Mama’s Creations
- ALL CRAFTING
- Main Course
- Slow Cooker
- ALL RECIPES
Patchwork Travel Neck Pillow ~ Pattern & Tutorial
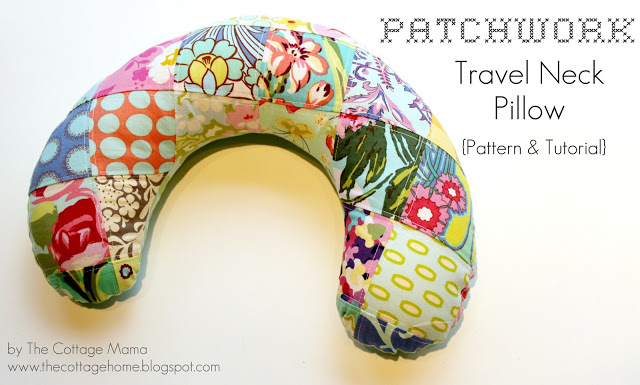
I know a lot of people travel around this time of year. As a matter of fact, my mom and her husband will be flying in to celebrate an early Christmas with us in less than two weeks! Many people are unable to sleep in airplanes and cars because of their uncomfortable neck position . I’ve seen lots of travel pillows in the airports, but I wanted to make one that was a little bit more exciting………a little more “me”, shall we say.
Happy Holiday Travels!

You may also like these:

Like this post? Want even more? Sign up below and receive all my tutorials, recipes and updates directly in your email inbox.
Popular Posts

Mary Jane Baby Shoes Pattern

Before and After Kitchen Makeover

15-Minute Pillowcase {with French Seams} ~ Tutorial

Purple Potluck Bowl Covers

Tile Coaster Tutorial

Embellished Hooded Towel Tutorial

Change Up Bag Lunches with Tortilla Roll-ups

Ruffle Bonnet Tutorial

Purchase My Book

Stay Connected
All Content Copyright © The Cottage Mama 2024 · Privacy Policy · Disclosure · Site design by Emily White Designs
Patterns, Techniques, Articles, Blogs, and other resources to learn how to sew
Free pattern: Travel neck pillow
August 24 , by Anne Weaver . Leave a Comment

Sahana from Vikalpah shares a free pattern and tutorial for making a travel neck pillow. It’ll help support your neck so hopefully you can catch a few Z’s to make the travel time pass a little more quickly. You can make one from just 1/2 yard of fabric and some stuffing.
Click below for her free pattern:
DIY Travel Pillow (DIY Pattern Included) , by Vikalpah
[photo from Vikalpah]
Next Pattern:
- Easy DIY Travel Pillow Free Sewing Pattern
- Free pattern: Cat shaped neck pillow
- Sewing pattern: Vintage travel art pillow
Share this:
- Click to share on Facebook (Opens in new window)
- Click to share on Pinterest (Opens in new window)
Have you read?
8 great halter tops to sew for summer.
If there’s any top that’s made for summer, it’s a halter top. Sleeveless, shoulders bare, usually open at the back it’s perfect for hot summer days. Those same features – no sleeves, open back – make halter tops relatively easy to sew. Plus they don’t take much fabric which is always a plus! We’ve rounded up 8 halter top sewing patterns for the ultimate summertime top. You’ll find casual and dressy styles, and classic or modern fits.

Here are 8 great halter tops you can sew for summertime!

Sewing Halter Top + Pattern: A Beginner-Friendly Tutorial by Sparrow Refashion
A classic halter top easy enough for a beginner to make!
[photo credit: Sparrow Refashion]

Simple Halter Top Sewing Pattern, from Clueless Patterns on Etsy
A simple fitted halter from knit fabric.
[photo credit: Clueless Patterns]

No Sew, DIY Tee-Shirt Halter #2, by Wobi Sobi
Repurpose an old tee into a loose fit halter, no sewing required.
[photo credit: Wobi Sobi]

Nova Halter Top Digital SEWING Pattern from SewiStudio on Etsy
Beautiful open back halter with gathers at the neck!
[photo credit: SewiStudio]

[Video] Men’s Shirt Refashioned Into Halter Top Dupe, by Paper Michey
Refashion a button down men’s shirt into a new halter top for yourself!
[photo credit: Paper Michey]

Arwen Halter Twist Neck Top Digital PDF Sewing Pattern, from The Blankk on Etsy
The twist neck on this top is such a fun detail!
[photo credit: The Blankk]

DIY Bandana Halter Top by Opal Crown
Create a classic halter top out of a bandana! It takes just a couple of easy seams.
[photo credit: Opal Crown]

Twist Front Top – FREE T-Shirt Pattern, by So Sew Easy
Sew a halter top with a cool twist front using this free pattern.
[photo credit: So Sew Easy]

Halter Neck Crop Top, from Kenzpatron on Etsy
This loose fit halter neck crop top has an easy modern style!
[photo credit: Kenzpatron]
Leave a Reply Cancel reply
Expedia Rewards is now One Key™
Elektrostal, visit elektrostal, check elektrostal hotel availability, popular places to visit.
- Electrostal History and Art Museum
You can spend time exploring the galleries in Electrostal History and Art Museum in Elektrostal. Take in the museums while you're in the area.
- Cities near Elektrostal

- Places of interest
- Yuri Gagarin Cosmonaut Training Center
- Central Museum of the Air Forces at Monino
- Peter the Great Military Academy
- Bykovo Manor
- Balashikha Arena
- Ramenskii History and Art Museum
- Malenky Puppet Theater
- Balashikha Museum of History and Local Lore
- Pekhorka Park
- Saturn Stadium
- Orekhovo Zuevsky City Exhibition Hall
- Noginsk Museum and Exhibition Center
- Bahasa Indonesia
- Slovenščina
- Science & Tech
- Russian Kitchen
Where to watch movies for free in Moscow this summer

People watching a movie in a Pioner 24-hour open-air cinema in Gorky Park.
Temporary cinemas will be popping up across Moscow very soon, starting from July 16. All of the spots are brilliant examples of either constructivist or avant-garde architecture, so expect striking settings. A selection of classic Soviet films will be aired using cinematic equipment from the last century. All the screenings are free although online registration is required beforehand, while there will also be guided tours of the spaces, organized by the “Moscow through the Engineer's Eyes” company.
Registration will be open soon at mos-kino.ru
Bread factory

Following the success of former factories transformed into art spaces (VinZavod, Arma, Trekhgornaya manufacture), Khlebzavod (“bread factory”) No 9 is one newly opened joint that is attracting creative types from all over the city. The movie Time! Forward! will be screened in the building’s boiler room on July 16. It follows workers from the Magnitogorsk Iron and Steel Works, one of the largest steel companies in Russia, and is based on a novel by Soviet writer Valentin Kataev.
What’s more, Khlebzavod is a monument to constructivist architecture. Where better to watch such a film?
Novodmitrovskaya St. 1
Roof of the Narkomfin Building

The Narkomfin Building was originally designed to house high ranking employees at the Commissariat of Finance. It was built by architects Moisei Ginsburg and Ignaty Milinis. Also a fine example of constructivism, it’s currently in a state of disrepair, locked down, and fairly difficult to get into - which is like a red flag to a bull for more adventurous types.
However, on July 30 the place will be opened up and people will be welcomed onto the roof to watch the film Faith and Truth.
Novinsky Blvrd . 25b1
Khrushchyovka courtyard

A courtyard located in the 9th experimental block of the Novye Cheremushki district will turn into an outdoor cinema this summer. Cheremushki is the first district where Soviet leader Nikita Khrushchyov decided to build the iconic Khrushchyovka apartment blocks in the 1950s. As a result, thousands of Russians were given their own pads after decades living huddled together in communal apartments known as kommunalka .
Cheremushki is the adapted film-version of Dmitry Shostakovich’s operetta and will be shown here on Aug. 6. The organizers of the multiple screenings - the Moskino cinema chain - say they will revive the Soviet tradition of neighbors meeting in courtyards for a good old tongue wag. There will also be a guided tour of the block.
Address to be confirmed at mos-kino.ru
Pioneers Palace

If you want a slice of the postwar Soviet avant-garde style, head to the Pioneers Palace at Vorobyevy Gory. Pioneers Palaces were youth centers for sport, creativity, and hobbies for Young Pioneers (a communist organization for children) during the Soviet Union. There were dance classes, martial arts, drawing, and many other activities.
To Love a Man , a movie about two young architects building a new town in Siberia, will be shown here on Aug. 22. There will also be a lecture about building experiments in the 20th century.
Kosygina St. 17b2
A secret place

The last cinema venue remains a secret. On Aug. 27 there will be a screening, but at the moment no one knows where. Information will appear on mos-kino.ru but those who attend all four screenings above will be able to guess the last location.
A talk about architecture and Soviet history also will be hosted here.
Read more: Relics of Constructivist Architecture in post-Soviet countries
If using any of Russia Beyond's content, partly or in full, always provide an active hyperlink to the original material.
to our newsletter!
Get the week's best stories straight to your inbox
This website uses cookies. Click here to find out more.
IMAGES
VIDEO
COMMENTS
Download the free travel pillow pattern. Cut the fabric. Put the fabric pieces with right sides together and stitch all the way around, leaving a 1 ½ inch (4cm) gap on the outside as shown. Clip the curves, leaving the gap unclipped. Turn your DIY travel pillow to the right side through the gap. Give your pillow a good press and start stuffing.
Travel Pillow Sewing Patterns Roundup. Here's a huge list of some of the best free travel pillow sewing patterns I could find on the internet. I'm sure you'll love them. Hover over the picture to show the title, click to open, or right-click and open in a new tab to keep this page open too. And don't forget to pin it.
3 How To Sew a Travel pillow. 3.1 DIY Neck Pillow VIDEO TUTORIAL. 3.2 INSTRUCTIONS: 3.3 STEP 1: Prepare the pattern. 3.4 STEP 2: Cut the fabric. 3.5 STEP 3: Pin. 3.6 STEP 4: Sew. 3.7 STEP 5: Turn inside out and press. 3.8 STEP 6: Fill the pillow with the stuffing.
Step 1: Laying out and Cutting Out the Pillow. The cut neck pillow pieces, pinned. Start by laying out the pattern on the cloth. The easiest way to do this is to fold the cloth in half (like in the store), right sides together; then pin the pattern on the fold. Cut a second pattern on the fold, as well.
Pin or clip your pillow pieces together. Using a ½" seam allowance, sew around the pillow, leaving a 4" opening on one side to stuff the pillow. Clip notches around the curved middle "smile" and the curved bottoms. Turn the pillow right side out. Using a warm iron, press the pillow. Stuff the pillow with your fiberfill.
Step 1. Fold the fabric crosswise, right side together, and cut out the pillow piece, adding 3/8" for the seam. Step 2. Stitch the two pieces right side together, leaving about six-inch opening. Also, snip notches on all the curves. Step 3. Turn the sewn travel neck pillow piece right side out through the opening.
These DIY Seat Belt Travel Pillows are one of the most practical travel sized pillow projects to make road trips easier! There are many different pillows and cushions I have surfed for those who are keen on sewing. The seat belt pillow makes it easy to tuck behind your neck when you're in a car so you won't wake up with a sore neck.
This neck pillow is soo easy to make and it's beginner-friendly, which makes it a great project for both inexperienced sewing enthusiasts and experts alike. Go to Hello Sewing for a free pattern and a video tutorial. The video tutorial will show you how to make a travel pillow in a very short amount of time. Just download the free neck pillow ...
This DIY tutorial comes with a pattern in toddler/kids and adult sizes that you can get for free as a "Thank you!" gift if you choose to become a subscriber to my email list. The kid's size pattern fits nicely up to a 10-year-old. For older kids, use the adult version of the pattern. To download the travel neck pillow pattern, scroll down ...
I wanted to share the long list of free travel pillow sewing patterns that I was able to put together so you can save money too and travel more comfortably on your next trip. Check FREE Roundup HERE. You'll love this Comfortable Road Trip Car Pillow, too. 951. 18019.
Here is the Travel Pillow Pattern: Travel Pillow Cutting and Sewing Instructions: Based upon the direction of the body fabric print, you will cut the fabric accordingly: Body Fabric 17"x29" Cut Band Fabric 7" x 29" Cut Trim Fabric 2"x29" Fold the Trim Fabric in half lengthwise with the wrong sides together. Press.
Pin the two cut fabric pieces together with the right sides of the fabrics facing each other. Next, sew around the perimeter of the pillow with a 1/2" seam allowance. Leave a 5" hole in the top edge for stuffing the fiberfill. To help the curves of your pillow lay flat, clip the seam allowance.
This easy-to-follow and well-explained guide is a worthwhile addition to all your travel sewing needs! Project Type Make a Project. Time to Complete Under an hour. Sewn by Either Hand or Machine. This Quick and Easy DIY Travel Pillow is a great beginner sewing project if you're lacking a comfortable rest for your travels!
Prepare for comfortable travels with this free travel neck pillow template available for both kids and adults! You can sew this versatile pattern by hand or mostly by machine. The template comes in two sizes: child size, suitable for 4-6 years, and adult size, recommended for age 6 and up. But here's the cutest feature - an optional carry ...
Travel Neck Pillow Free Sewing Pattern. In-flight snoozing on those red-eye flights just got easier and much more fashionable.This neck pillow can better wrap your neck and free your chin, prevents the head from falling forward, relieves neck pain during travel. When sleeping upright is your only option, this soft and comfortable DIY neck ...
Basic sewing supplies (including hand-sewing) Travel neck pillow pattern piece (click HERE) Instructions: Print and cut out the pattern piece. Use this pattern to cut the backing for your pillow. Place pattern piece on fold of fabric and cut. Gather a bunch of fabric scraps that you have lying around.
Sahana from Vikalpah shares a free pattern and tutorial for making a travel neck pillow. It'll help support your neck so hopefully you can catch a few Z's to make the travel time pass a little more quickly. You can make one from just 1/2 yard of fabric and some stuffing. Click below for her free pattern:
Make the perfect travel and use your sewing skills at the same time when you learn how to make a pillow that is as compact as it is comfy. This kidney bean-shaped sewing project is perfect for long car rides or plane adventures. Let your kids curl up and nap while on the road with this Travel DIY Pillow Tutorial. Big enough to keep kids comfy, but small enough to stop backseat "you're ...
Cutting Instructions: Cuff: Contrast Band:Cut (1) 9 1/2" x 30"Cut (1) 2 1/2" x 30" These instructions are for either travel-size pillow case and th. allow for working with Cuddle or Minkee fabric. This is called the "hot dog" style of making a pillow case and it only requires two seams. 1/2" seam al.
Elektrostal is a city in Moscow Oblast, Russia, located 58 kilometers east of Moscow. Elektrostal has about 158,000 residents. Mapcarta, the open map.
Cities near Elektrostal. Places of interest. Pavlovskiy Posad Noginsk. Travel guide resource for your visit to Elektrostal. Discover the best of Elektrostal so you can plan your trip right.
map to travel: Medvedkovo. Wikipedia. Photo: Antares 610, CC BY 3.0. Notable Places in the Area. Babushkinskaya. Metro station Photo: Aborisov, Public domain. Babushkinskaya is a Moscow Metro station in the Babushkinsky District, North-Eastern Administrative Okrug, Moscow. Sviblovo.
5 temporary screenings guaranteed to blow your mind. People watching a movie in a Pioner 24-hour open-air cinema in Gorky Park.