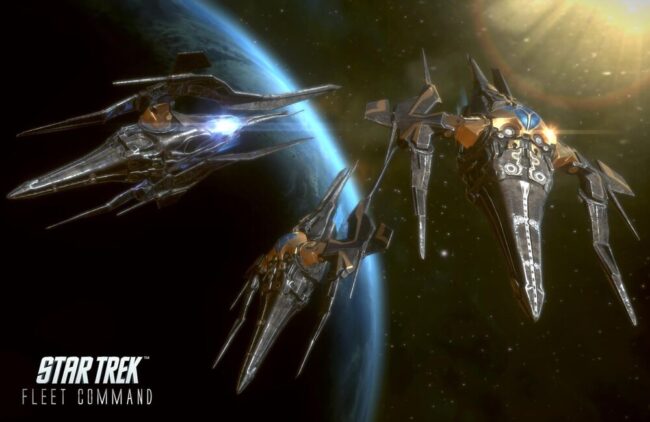
Swarm Armadas
Once you acquire the Franklin-A , you’ll unlock the ability to command swarm armadas. They won’t be a walk in the park, and assembling a formidable team will be essential.
Launching these swarm armadas will require 100 Rare Armada Directives.

Crews for Swarm Armadas
- William T. Riker (captain), Six of Eleven , and Khan Below desk focus on attack
Location of Swarm Armadas
Swarm armada stats by level, swarm horde (40).
- Swarm Advanced Biotics 0 – 40
- Kiju (39) > Warp 80
- Miset (43) > Warp 90
- Araxian (37) > Warp 75
- Estar (37) > Warp 75
- Uyik (39) > Warp 80
- Siieqa (41) > Warp 85
- Vahok (39) > Warp 80
- Nobeau (43) > Warp 90
- Huik (41) > Warp 85
- Iusum (37) > Warp 75
Power: 254,905,719
Attack (3,200,099)
DPR: 3,075,746 Armor Piercing: 35,529 Accuracy: 7,106 Shield Piercing: 7,106 Critical Chance: 10% Critical Damage: 150%
Defense (1,705,620)
Armor: 113,708 Shield Deflection: 113,708 Dodge: 113,708
Health (250,000,000)
Shield Health: 0 Hull Health: 500,000,000
Type: Kinetic Shot: 3 Warmup: 1 Cooldown: 2 Accuracy: 7,106 Penetration: 35,529 Modulation: 7,106 Min Dmg: 267,424 Max Dmg: 320,912 Crit Chance: 10% Crit Dmg: 150%
Type: Kinetic Shot: 1 Warmup: 15 Cooldown: 15 Accuracy: 7,106 Penetration: 35,529 Modulation: 7,106 Min Dmg: 12,402,726 Max Dmg: 14,883,269 Crit Chance: 10% Crit Dmg: 150%
Type: Energy Shot: 3 Warmup: 1 Cooldown: 1 Accuracy: 7,106 Penetration: 35,529 Modulation: 7,106 Min Dmg: 133,714 Max Dmg: 160,461 Crit Chance: 10% Crit Dmg: 150%
Swarm Horde (44)
- Swarm Advanced Biotics 0 – 60
- Vugef (45) > Warp 100
- Begekou (44) > Warp 100
- Hobu (46) > Warp 100
- Hedex (47) > Warp 100
Power: 510,082,816
Attack (4,965,956)
DPR: 4,717,251 Armor Piercing: 71,058 Accuracy: 14,212 Shield Piercing: 14,212 Critical Chance: 10% Critical Damage: 150%
Defense (5,116,860)
Armor: 341,124 Shield Deflection: 341,124 Dodge: 341,124
Health (500,000,000)
Shield Health: 0 Hull Health: 1,000,000,000
Type: Kinetic Shot: 3 Warmup: 1 Cooldown: 2 Accuracy: 14,212 Penetration: 71,058 Modulation: 14,212 Min Dmg: 483,699 Max Dmg: 580,444 Crit Chance: 10% Crit Dmg: 150%
Type: Kinetic Shot: 1 Warmup: 15 Cooldown: 15 Accuracy: 14,212 Penetration: 71,058 Modulation: 14,212 Min Dmg: 12,402,726 Max Dmg: 14,883,269 Crit Chance: 10% Crit Dmg: 150%
Type: Energy Shot: 3 Warmup: 1 Cooldown: 1 Accuracy: 14,212 Penetration: 71,058 Modulation: 14,212 Min Dmg: 241,847 Max Dmg: 290,223 Crit Chance: 10% Crit Dmg: 150%
Swarm Armadas Rewards
When leading the armada, there’s a 40% probability of obtaining a Jaylah shard; otherwise, you’ll receive rare credits. Additionally, there’s another chest that yields 100 rare credits, making the rewards relatively modest for such a challenging armada. The enemy’s cargo, consisting of 40-60 Advanced Biotics divided among 5-6 participants, is also unremarkable. In general, these armadas might be worth considering if you’re just a shard or two away from obtaining Jaylah, but otherwise, they can probably be skipped.
Swarm Armada Video
#ezw_tco-2 .ez-toc-title{ font-size: 120%; font-weight: 500; color: #000; } #ezw_tco-2 .ez-toc-widget-container ul.ez-toc-list li.active{ background-color: #c1d3ff; } In This Article

Previous Post Borg Solo Armadas
Next post solo armadas, recommended for you.

Star Trek: Fleet Command: All Swarm Locations
In Star Trek: Fleet Command you encounter various enemies, join alliances, build strong spaceships, conquer territories, and explore space with the ultimate goal to prevail in the galaxy. However, there is an enemy that doesn’t follow that pattern, doesn’t align with anyone, and only wishes to see the universe burn – The Swarm.
Swarm won’t care if you’re Federation, Klingon, or Romulian, they will attack anyone. And since that is the case, that means everyone suffers from their aggressiveness.
In this guide, we’ll give you the necessary information to locate and defeat Swarm across the galaxy.
Fighting the Swarm
Since the Swarm has become such a pest and an annoyance for the Federation, they have decided to hire independent commanders to get rid of them. USS Franklin is the best weapon for this job with its Sabotage ability which can inflict serious damage to swarm ships.
However, don’t be hasty to go out and challenge the Swarm. Before you do, you would need to have a ship of the right tier to fight off this fierce enemy. The rough picture of which tier you should be to tackle a certain level of the Swarm is shown below:
- Tier 1 Ship: Level 17
- Tier 2 Ship: Level 18
- Tier 3 Ship: Level 20
- Tier 5 Ship: Level 22
- Tier 6 Ship: Level 26
- Tier 7 Ship: Level 28
- Tier 8 Ship: Level 30
- Tier 9 Ship: Level 32
Defeating the Swarm allows you to get awards called “Swarm Biominerals” that you can exchange for precious Parsteel, Tritanium, and Dilithium in your refinery. Also, you will be getting Frequency Modulators that are key for tiering up your ship.
Locations of the Swarm
There are 18 locations of the Swarm throughout the galaxy:

Full resolution picture would help you recognize Swarm better and you would easily recognize them as they are marked like this:

To defeat each Swarm you would need to upgrade crew, do research, and come to a certain level. Below is the list of all Swarms and levels required to kill them.
- Andvaris [15]
- Caldik [16]
- Altamid [17]
- Herias [18]
- Beta Vordunn [20]
- Er’Yozun [24]
- Alpha Horunia [26]
- Fyrsta [32]
- Dalogn [35]
- Lahrel [24]
- Redmond [28]
- Fontaine [30]
- Adelphi [32]

Details [ ]
More New Pages Planned & will be listed here Armada Control Center & Armada Resources

Armadas [ ]
via STFC Official Reddit At last, “Armadas Coming Soon” can be replaced with Armadas Are Here! We hope you’re as excited as we are because it’s going to be an epic adventure!
Players use an Armada to band together with members of their Alliance to form a greater force that is capable of taking on tougher enemies.
Armada Control Center Building
Build an Armadas control center in order to unlock the Armadas feature and lead your own Armada. Available at Ops level 23.
New Armada Targets Armada Targets are powerful new opponents that can be found in Level 20+ star systems across Federation, Klingon, Romulan and neutral space. (see Neutral Zone & Faction Zones for locations)
Do Armada Targets belong to their respective Factions? Yes, Armada Targets that belong to a faction count as being of that faction for abilities, dailies & so on.
- Armada Targets can only be attacked by Armadas - they are too strong to be defeated with normal attacks
- Due to their size and power, Armada Targets are not affected by the following research bonuses and abilities :
New Resources
- Armada Credits are earned by defeating Armada Hostiles and can be used to purchase rewards in the Alliance Store.
- Armada Directives are used to start Armadas. Players can get more from the Alliance Store, by completing Daily Goal milestones, and by upgrading the Armada Control Center.
- Armada Tactical Cores are specialized command, control and communication systems used to upgrade the Armada Control Center
Everything you need to know about Armadas!
To start an Armada attack, you need the Armada Control Center building in your station. Starting at level 23 , this building can be unlocked through a new research node called ‘Unlock Armada Control Center’ in the Station research tree. This research uses a new resource, Armada Tactical Cores.
Starting an Armada attack requires Armada Directives, a new resource. These can be acquired from the Alliance Store, and by upgrading the Armada Control Center (each new level grants some Directives). They can also be acquired, from completing Daily Goals (one of the milestone rewards will award some Directives dependent on your level) or purchased via the store.
Once you start an Armada attack on a target, it creates an 'Armada Pin' on the system map close to the target, with a zone around it.
In order to take part in the Armada attack, you and each member of your Alliance who wants to participate need to:
1: Join the Armada and 2: Have a ship idle within the zone when the attack takes place and the countdown expires. (15 minutes after you start the Armada attack).
The maximum number of ships that can take part in the Armada attack ranges from 2-5 and is determined by the building level of the leader’s Armada Control Center (the Armada leader’s ship also counts toward the max). You can join multiple Armadas with your ships, but only your strongest ship in each Armada will take part. (You can consider any extra ships as a backup in case your main ship gets taken out by another player). The ships that will be taking part in the battle will have a purple glow around them in the system. When the timer runs out, the Armada leader’s ship, as well as the most powerful ships that have joined the Armada and are within the Armada zone will all fight together against the target. If you take part in an Armada attack that defeats the target, you'll earn Armada Credits, which can be used to buy new reward packs in the Alliance store. One of the participants of the Armada will have the chance at receiving a loot chest with additional credits!
The launch of Armadas will feature challenging cooperative PvE targets that grant significant rewards. You will be able to play together and help your friends progress by leading or contributing your ships to Armadas.
Not only that - but Armadas will also provide players opportunities to compete. Armada tournament events reward Alliances for their performance . Be on the lookout for players attempting to intercept your Armada as it forms. Or find theirs and strike back! When you find an Armada target, get your Alliance ready to defend against any incoming competing players.
Revisit Mission Dialogue
Developer Comments: Star Trek Fleet Command has a rich storyline and narrative so with this feature we are giving you the chance to revisit missed dialogues from missions.
- Allows you to read through the history of a quest and its logs
- Highlights choices and actions that you performed in the quest chain
Empty State in all Stores Developer comments: When a store doesn’t have any bundles, it currently looks empty. With this change, you’ll be able to correctly identify when this is the case.
View Resources in refinery Instead of Refinery Level, you now see relevant resources.
Other Notes [ ]
Armadas bonus exceptions
Due to their size and power, Armada Targets are not affected by the following research bonuses and abilities:
• Research: Combat - Defensive Tactics • B’Rel Class - Cloaking System • Gladius Class - Secret Weapon • Grace Chen - Energy Absorber • T’Laan - Objective Defense • Tal - Resistance • Mara - Wife of a Dahar • Qa’ug - Excel under Pressure • Severus - Spreading Fire • Yuki Sulu - Disrupting Field • John Harrison - Sabotage • Marlena Moreau - No Fear • Cadet Nyota Uhura - Scan the Enemy • Vixis - Fake Communiques • D’joaki - Shatter Defenses • Chang - Dogs of War
- 1 The Swarm
- 3 Faction Reputation
Armada Systems
Compare logs, start a crew test, one-time password, scrapping options.
- Need support? Have a suggestion? Join Our Discord
ARMADA FINDER
Level (min -> max), warp range (min -> max).

For Armadas
- Any Officer who provides a debuff (like Hull Breach, Burning, Critical Hit Chance Reduction, etc) can be crewed by only one player, and the debuff is applied to all the players participating in the Armada. For example, one player uses a Hull Breach Officer and all Armada participants get an increased chance for a critical hit.
- Hull Breach: When an Armadahas a hull breach, it will increase the critical hit damage of player ships within the Armada.
- Burning: When burning is applied, it reduces Armada hull health by 1%. Eg. If burning is applied for 100 maxed rounds, then the armada will be defeated.
- Any Officer which provides a Buff to yourself (like Morale, Shield Regen, Increased Self Crit Chance) applies only to the player using them.
- Using multiple Debuff Officers will not stack results. Coordination is key, discuss the crew you'll use and align with your Alliance!
- What about the spoils? Armada Loot is divided based on Ship Power. For example, if five players participate in the Armada and they have relatively similar power, the loot is divided equally. If four people are equal, and one player is stronger, the highest ship power will get a larger portion, and the rest will be divided equally.
- Any abilities that multiply loot gained (Officers/Ship Abilities) are applied after the loot division by ship power is completed.
Related articles
STFC: Borg Solo Armada Locations
The borg solo armada hostiles in stfc can only be found in specific systems, each of which has a warp requirement that you have to meet., borg spheres, collective thinking, which crews should you use.
As you progress in Star Trek Fleet Command (STFC) you will get the opportunity to defeat Armada hostiles.
You can either participate in a Group Armanda, which requires that Alliance members collaborate to destroy the enemy, or in a Solo Armada.
Similar to the Group Armada, you need a specific directive to begin a Solo Armada. However, a Solo Armada can only be completed by 1 Commander which controls 3 different ships with unique crews.
Players should note that a Borg Solo Armada cannot be started in just any system. You have to travel to specific systems to use the directive in order to summon the Borg Solo Armada.
The following table lists the systems in which you can summon a Borg Solo Armada:
As the table indicates, low-level players will not be able to travel to a Borg Solo Armada system to vanquish the hostile from the galaxy as their warp ranges are too low.
Several Commanders meet the warp range requirement to travel to some of the mentioned systems, but before traveling, we recommend that you ensure that your crews and vessels are fully upgraded.
Once you have traveled to a Borg Solo Armada system, you can use the directive to summon the hostile. You have to use all 3 of your vessels to take down your opponent and earn rewards.

Before you travel to one of the Borg Solo Armada Systems, we recommend that you decide what enemy level you want to attack.
There are different levels of Borg Spheres that you can attack, and we advise Commanders to attack the enemy that corresponds with their levels at the time.
The enemy’s level determines the system in which it spawns. The following table lists the systems in which you can find certain levels:
Similar to other hostiles in STFC, the Borg Solo Armada has abilities that can be used during the battle. Although their levels differ, their abilities remain the same for all Borg Solo Armadas.
According to the ability description, the Borg’s strength lies in their single mindedness.
Commanders have to research the Translink Disruptor in the Combat Research Tree to disable Borg Communications. If you complete this research node, you will also increase your combat power against the Borg Solo Armadas.
Keep in mind that if you do not defeat the Borg Solo Armadas, they will regenerate their hull health to maximum capacity. If this happens, your chances of defeating the hostile decrease significantly.
Before traveling to one of the Borg Solo Armad systems, you have to obtain Directives to summon the hostile.
Commanders can purchase 100 Regular Directives on a daily basis if they have a tier 9 Vi’dar. But if your vessel is below tier 9, you will only receive 9 directives.
Players whose Vi’dars are below tier 9 should not purchase the Directives as they will be wasting resources.
After destroying the Armadas, you can exchange your loot from a chest, which contains 100 Rare Directives. If you successfully vanquish a Rare Armada, you can obtain 200 Epic Directives.
Commanders therefore have to begin by defeating Regular Borg Solo Armadas to gain the Directives which are required to summon an Epic Armada.
Although you can use any crew against the Borg Solo Armadas, this is not recommended as some crew combinations are considered better than others.
The following table lists some of the crew combinations that you can use:
Leave a Comment Cancel reply
Save my name, email, and website in this browser for the next time I comment.
All Swarm Locations in Star Trek: Fleet Command

Star Trek: Fleet Command is a mobile strategy game from Digit Game Studios, taking you on a mission to explore the galaxy. Boldly go where no one has gone before, battling, exploring, and building ships with all your favourite Star Trek crew: Kirk, Spock, Uhura, Scotty, and more. These characters can be unlocked and upgraded, ready to take on missions for some exciting RPG gameplay. Missions include battling The Swarm , a fierce and deadly enemy to everyone in the galaxy. Find out more below!
Locations of The Swarm in Star Trek: Fleet Command
These enemies from Beyond will attack any allegiance, Federation, Romulan, or Klingon, and commanders have been tasked by the Federation to help defeat them. Using the most decorated ship in the Fleet– The USS Franklin– you can battle the hostiles and obtain much-needed Swarm Biominerals. These biominerals can then be refined into resources Parsteel, Tritanium, and Dilithium.
You will need to be level 15 and above to begin these missions to battle The Swarm. The higher your ship’s tier, the more upgrades you can add and the more fearsome foes you can fight. To find every Swarm available to battle, check out our list of locations and the map below ( a full resolution is available via Imgur ). On the map in-game The Swarm can be identified by swirly imagery. Each location in the galaxy listed below shows what level you should be to easily defeat The Swarm found there.

- Andvaris (15)
- Caldik (16)
- Altamid (17)
- Herias (18)
- Beta Vordunn (20)
- Er’Yozun (24)
- Alpha Horunia (26)
- Fyrsta (32)
- Dalogn (35)
- Lahrel (24)
- Redmond (28)
- Fontaine (30)
- Adelphi (32)
Star Trek: Fleet Command is available to play on IOS and Android.
We are hiring game guide writers!
Touch, Tap, Play is looking for experienced writers to produce guides for popular mobile and Nintendo Switch titles. If mobile gaming is your passion and you want to get paid to create guides, you’re in the right place. Check out our job ad today!
Write A Comment
Leave a reply cancel reply.
Save my name, email, and website in this browser for the next time I comment.
This site uses Akismet to reduce spam. Learn how your comment data is processed .
- More to Explore
- Series & Movies
Published May 31, 2024
RECAP | Star Trek: Discovery 510 - 'Life, Itself'
The Discovery's last dance.
SPOILER WARNING: This article contains story details and plot points for Star Trek: Discovery.

StarTrek.com
After chasing clues across the galaxy, taking on a Red Directive mission, it all comes down to the final challenge. Unfortunately for Captain Burnham and the Discovery crew because Breen forces are on their tail.
In the series finale episode of Star Trek: Discovery , " Life Itself ," trapped inside a mysterious alien portal that defies familiar rules of time, space, and gravity, Captain Burnham must fight Moll – and the environment itself – in order to locate the Progenitors' technology and secure it for the Federation. Meanwhile, Book puts himself in harm's way to help Burnham survive and Rayner leads the U.S.S. Discovery in an epic winner-takes-all battle against Breen forces.

- Michael Burnham
- Moll (Malinne Ravel)
- Sylvia Tilly
- Lorna Jemison
- William Christopher
- Charles Vance
- Cleveland "Book" Booker
- Paul Stamets
- Dr. Hugh Culber
- Keyla Detmer
- Joann Owosekun

- Infinity Tunnel
- U.S.S. Discovery -A
- Federation HQ
- Pathway-Drive Shuttle
- Discovery Shuttle
- Inner Sanctum
- Sanctuary Four

As the Progenitors ' portal hovers between two black holes, echoing voices stir Captain Michael Burnham back to consciousness within its interior. Burnham stands, taking in the marvelous sight that surrounds her. An open corridor extends as far as the eye can see, and the illuminated path is outlined by views into other worlds. The captain calls out to the U.S.S. Discovery -A, but her appeals go unanswered. Burnham begins to describe the experience in the event that anyone can hear her. Her tricorder picks up an energy signature, and she heads off toward a bright light which she assumes contains the Progenitors' technology.

"Life, Itself"
Although the captain notes she has yet to encounter Moll or any of the Breen who preceded her into the portal, she draws her phaser just to be safe. A scan for lifesigns yields inconclusive readings, and Burnham kneels to pluck a lush green leaf from a plant. She describes the gateways to other vistas as windows, theorizing that this location was a lab where the Progenitors tested lifeforms in different environments or a hub for them to seed the humanoid form throughout the galaxy. Burnham takes in a mountainous view through a window below her before turning to a stormy setting displayed beside the path. Stowing her weapon, she watches as a leaf is slowly pulled toward a clear, fluid-like barrier. The leaf floats through, so the captain reaches her hand out to test the permeable wall… and is immediately pulled into a rain-soaked maelstrom.
Captain Burnham crashes to the ground, bracing herself against the wind and spotting a dead Breen soldier with a green body fluid leaking from its helmet. She shelters behind a large boulder and spies the window she fell through resting far above her. Burnham marches on, an air of surprise about her as another Breen soldier rushes at her from the darkness. Her offer to help the Breen goes ignored, and she is tackled to the ground. As the two engage in a desperate hand-to-hand battle, hurricane wind speeds nearly sweep them both away. Burnham and the Breen clutch to the nearest boulder, their bodies flailing in the gusts. The Breen continues to fight, and the captain's phaser is knocked away. However, she manages to dislodge her opponent from the rock, sending the Breen tumbling into the distance.
The wind subsides, but Burnham prepares herself to harness the next burst. As speeds increase once again, the captain launches herself into the air and is carried back up to the window she fell from. Pulling herself back onto the path, she has only a moment to rest before a third Breen readies themself to charge at her. An energy blast radiates out and strikes the Breen down, and Burnham turns to find Moll floating down from another window. Blood streams from a gash on Moll's leg, and the captain observes that someone nicked her femoral vein. Moll considers it a fair trade, as she had bashed that Breen's helmet in. Moll trains her Breen weapon on Burnham, but the captain materializes a dermal regenerator from her kit. She tosses it to Moll, who uses it to close up her wound.

Since Captain Burnham followed the entire clue trail, Moll reasons that her adversary knows how to navigate the portal. Burnham admits she may have learned something, but offers a condition — she won't help Moll as her prisoner and asks her to drop her weapon. The captain reminds Moll that working together is the only way she'll get L'ak back, a reality which prompts the courier to lower her weapon. Pleased with the compromise, the two set out to locate the Progenitors' technology and begin walking down the portal's path.
Meanwhile, the U.S.S. Discovery -A is rocked by debris from the black holes as it approaches the portal. On the Bridge, Lieutenant Sylvia Tilly tells Commander Rayner that there's still no sign of Captain Burnham from within the artificial gateway. Seated in the captain's chair and surrounded by the Bridge crew — Commander Lorna Jemison; Lieutenant Commanders Gen Rhys and Asha; and Lieutenants Gallo, Naya, Christopher, and Linus — the first officer listens to status reports. Gravitational fields are causing too much interference for a transporter lock on the portal, so Discovery must get within tractor beam range. The Breen Dreadnaught is still dealing with the damage the Starfleet vessel inflicted on it, but Primarch Tahal's fleet will arrive in 60 minutes. Rhys relays that the Dreadnaught has sent out at least 40 fighters, and the incoming vessels come in with their weapons hot.
At Federation Headquarters, Admiral Charles Vance updates Ambassador Saru and Commander Nhan on Discovery 's condition. Hoping to prevent Tahal from learning about the Progenitors' power, Saru believes his strategy will convince the primarch to turn her fleet around. Vance questions Saru's decision to disable his shuttle's photon torpedoes, but the ambassador is certain that diplomacy can not succeed if both parties threaten violence. Nhan remarks that the admiral doesn't need to order her to accompany Saru, as she volunteers for the mission. The crew of Discovery is family to both Saru and Nhan, and the shuttle's pathway drive has been calibrated. They are ready to go, and Vance emphasizes that the Federation is counting on them.
Within the Progenitors' portal, Moll complains that — regardless of how far they walk — they don't seem to be getting any closer to the end of the tunnel. Burnham states that nothing in nature is truly infinite, then turns the conversation toward the Progenitors' tech. She assures Moll that the Federation will help her bring L'ak back, but only after it learns how to safely use it. Moll responds that she doesn't trust the Federation or the Breen, though at least the Imperium has a vested interest in her getting what she wants. Burnham counters by conveying the devastation she witnessed in an alternate future where the Breen obtained the power — the captain defiantly proclaims that there’s no way she's letting the Breen anywhere near it.

Moll is doubtful, and Burnham strikes out at the courier during the unguarded moment. As Moll struggles to regain her composure, the captain propels herself up to a window on the tunnel "wall." Moll pursues her, and the variable gravity between environments allows them to grapple for the Breen weapon while being suspended in midair. The weapon discharges and falls away, leaving Moll to kick Burnham through a gateway and into a vibrant, purple-hued forest. Their intense fight continues until they both return through a window and land back on the path. The courier knees Burnham, sending the captain rolling into an ash-strewn environment with flames leaping about. Their unrelenting battle rages on.
In the space outside the portal, the Breen fighters swarm around Discovery as the Dreadnaught closes in on the Starfleet ship. On the Bridge, Cleveland "Book" Booker joins Rayner and the senior staff as they brace themselves for a torpedo impact. The deck shakes and shields drop to 60 percent. Naya registers a region of high-energy plasma orbiting one of the black holes, meaning one spark too many will cause the whole thing to blow. Asha alters the vessel's course, but the situation is dire. The first officer reflects back to the avalanche on Q'Mau, where Captain Burnham was quick to notice that the mission had changed. If they keep up with this strategy, the Breen will get the captain and the Progenitors' tech. Rayner announces a change of plans — they'll take out the fighters first and come back for the portal. The crew exchanges skeptical looks, and Book asks for a shuttle so that he can handle the portal. The Kwejian is adamant that he can succeed, so Rayner grants the request and orders Engineering to find a way for Book to not get irradiated to death.
Book beams down to Engineering, where Commander Paul Stamets and Ensign Adira Tal present him with a device to attach to his shuttle's deflector array. It will boost the craft's built-in radiation protection, but at a certain point, Book just won't survive. Adira attempts to reassure him by divulging that it will increase the absorption capacity of the shields against high-velocity subatomic particles for at least an hour. Dr. Hugh Culber hurries in with a hypospray, injecting Book with a treatment to counteract radiation sickness. The doctor also shocks those around him when he pronounces that he's going to accompany Book on the perilous endeavor. Dread fills Stamets' face, but Culber insists that he somehow knows Book is going to need him on this mission. Ever since his zhian’tara with Jinaal, Culber has been trying to figure out what the change inside of him means. This may not give him the answers, but it might . Stamets reluctantly relents, kissing his partner farewell. Culber attests to Adira that he'll be okay.
Still clashing within the portal, fatigue grabs hold of Burnham and Moll. Out of breath, they pause for a moment. The captain insists that this brawl will only result in them becoming trapped and dying in the tunnel. Burnham resolves to get them out, gazing at Moll before admitting that she also knows what it’s like to lose somebody who means everything to her. Pain crosses Moll's expression, and Burnham confides that she was lucky to get that person back. Because of this, the captain promises that she will do everything within her power to help Moll and L'ak. Moll is hesitant to trust the Federation, but Burnham insists she just needs to trust her . The captain gives the courier her word. Moll considers the offer, ultimately opting to accept it.
Before Burnham will disclose how they can get through this situation, she has Moll relinquish the blade she has stashed in her right boot. Moll tosses it away, but she declines to remove the pattern buffer that's affixed to her wrist. If she had any weapons in there, she insists she would have used them already. The self-conscious manner in which Moll eyes the buffer allows a sudden realization to dawn upon Burnham — L'ak's body is being stored within it. The captain understands Moll's stance on the issue, permitting her former foe to keep the buffer as she starts to lead the way along the tunnel’s path.
As displays flicker on Discovery ’s Bridge, Book's shuttle successfully exits the ship and gets clear of the Breen fighters. Rayner is determined to switch from defense to offense. When Tilly puts forth a crazy idea, he states that she doesn't need to qualify it — just spit it out. Since there are too many fighters to pick off one by one, Tilly thinks there's a way to utilize the plasma region against the Breen. Naya chimes in excitedly, noting that they could ignite the plasma and take out all the fighters at once. The timing would need to be perfect, but in this "us or them” scenario, the plan seems viable.
While walking along the tunnel within the Progenitors' portal, Captain Burnham explains that every step of the trail required her to think like the individual who hid each clue. They must do the same here and think like the Progenitors. Moll points out that they went extinct four billion years ago, but the captain observes that gravity and space function differently inside the portal. This suggests that the Progenitors existed beyond the dimensions that humans do, so they have to look past three dimensions and find what’s beyond what they can see. Burnham's inquisitive nature permits her to spot negative space along the edge of each light illuminating their path. There's a shadow, but nothing to create it. The captain initially believed it to be an optical illusion, but she presses her hand through and pulls the barrier to the side. An astounding sight emerges, as they are greeted by a large field of yellow flowers extending to a distant horizon. They glance at each other and step through.

As Primarch Tahal's fleet of three Breen Dreadnaughts warps through deep space, Saru and Nhan's shuttle employs its groundbreaking pathway drive to swiftly catch up to the starships. They take a position within the fleet's formation, prompting the Dreadnaughts to arm their weapons. Saru opens a channel to Tahal, introducing himself as an Ambassador from the United Federation of Planets and highlighting the fact that his shuttle's weapons are not armed. After a long pause, Tahal grants his request for a conversation. The Breen primarch's helmeted visage appears as a hologram above the shuttle's controls, and she greets him by asking him if he's insane. Saru responds that, to the best of his knowledge, he is not. Since Tahal refused President Laira Rillak's invitations to communicate, Saru's actions were necessary. The ambassador agrees that the Federation doesn't typically have a role to play in a confrontation between Breen primarchs, but the engagement between a Starfleet vessel and another Breen Dreadnaught has changed the circumstances. Tahal's arrival would risk escalating that conflict into a war with the Federation, so Saru suggests it would be prudent for her to return her attention to the Imperium's throne.
Incredulous, Tahal wonders why Saru and Discovery would each engage with vastly superior Dreadnaughts. Something of great interest must be located near the black holes. Saru claims that, while Tahal speaks of "maybes and mights," he offers certainty — if she reverses course, the Federation will establish a formal trade route from Tahal's border to the L'Tar Nebula. Sole access to this route would bolster her claim to the throne, but the primarch declines and ends the transmission. Saru eases Nhan’s visible concern by cryptically asserting that Tahal supplied them with all the information they need. Now he must determine how to use it.

Captain Burnham and Moll wade through the field of flowers they uncovered within the Progenitors' portal toward a place where three paths converge in a circular platform. Burnham realizes they are standing on the technology — it's the entire place. Moll questions the strange placement of a nearby pile of rocks, but the captain believes it is a monument to the 24th Century scientist who was killed here. They step up to the center disc, and a translucent interface coalesces in its center. As nine triangular pieces appear on its surface, Burnham must stop the courier from immediately shifting them around. Taking a breath, Burnham relays that she was given a phrase when she found the last clue — "Build the shape of the one between the many." Assuming the triangles are "the many," Moll suggests they use them to build one large triangle with the many. Doubtful, the captain stresses that the message said between the many, not with. Given the precise manner in which the scientists offered cultural context, honored differences, and stoked self-reflection with every clue, Burnham does not believe this is a translation error.
The captain proposes that they need to get this power back to the Federation before they try to use it, but her train of thought is interrupted by a static-filled communication from Book. She can make out that the Kwejian is coming to retrieve them, but as she opens her tricorder and tries to amplify his signal, Moll moves in from behind and knocks her unconscious. Burnham's body collapses into the flowers below, leaving Moll to activate her wrist-mounted pattern buffer and materialize L’ak’s body on the platform. She kneels beside him, vowing to figure out this technology and bring him back from the dead. Moll walks to the interface and rearranges the nine pieces into a single large triangle. Brilliant light radiates around her, but she grimaces as energy cascades over her hands and locks them to the surface. Moll screams, and three powerful pulses strike the edges of the field.

With sparks erupting around Discovery 's Bridge, Rayner receives a report from Book's shuttle — something is happening to the portal. Using the black hole as some sort of power source, the portal draws in matter and energy around itself. If one black hole loses mass, it would throw the entire area into gravitational chaos. Citing Book's "gravity problem," Rayner asks the Kwejian to try to secure the gateway. At that moment, Asha detects that the last of the Breen fighters have followed them into the plasma region. Rhys launches a spread of photon torpedoes which lash out and set the plasma ablaze. Several tense seconds pass, but the tactical officer joyously states that every enemy ship was destroyed. His exuberance fades when he sees that the Breen Dreadnaught is back in commission and will beat Discovery to Book and the portal. Interstellar debris prevents them from jumping ahead of them, so Rayner orders the helm to set an intercept course with the Dreadnaught.
Aboard the shuttle, Book and Culber hear about Discovery 's "Dreadnaught problem." With the cockpit bathed in light from the spectacle before it, the doctor notes that whatever process the portal just initiated is pulling it toward the black hole — if it crosses the event horizon, it'll be gone for good. Book engages a tractor beam, but it fails to lock on. The portal repels the beam, mystifying Book. A smile slowly spreads across Culber's face, and he tells the Kwejian to synchronize to the aperture's subspace resonance frequency — 5.1732. Although there are tens of thousands of frequencies and Culber admits his experience on such matters is limited — "I'm a doctor, not a physicist" — he implores Book to trust him. Believing in his friend, Book follows Culber's direction and lets out a jubilant cry as the tractor beam successfully grabs hold of the portal. Needing all available power to keep the portal steady, the shuttle is unable to pull away from the black holes. Aware that Michael is inside the gateway, Book declares that he's not letting go.
Saru and Nhan confer aboard their own shuttle, where Primarch Tahal has provided a grim ultimatum — leave within 30 seconds or be destroyed. Saru takes a belligerent posture and opens a channel to Tahal. The ambassador chastises the primarch for being as cowardly as the Federation's admirals believed her to be. The insult provokes an angry response from Tahal, but Saru threatens that his death would merely ensure that she would never take the Imperium's throne. Adopting a menacing tone, Saru emphasizes his Kelpien heritage — he's a predator who has studied Tahal like prey. Federation Intelligence had suspected that the primarch maintained bases in the L'Tar Nebula, and her refusal to accept a trade route in that area served to confirm their existence.
The ambassador professes that he has the ear of numerous planets in that region who are preparing to attack Tahal's bases without mercy. Although they would lose thousands of lives, Tahal's forces would be weakened enough so that the other primarchs could strike. Turning her fleet around would prevent such an outcome, but she suspects that Saru is bluffing. His resolve soars, and he commands that she look into his eyes and let him know if she sees even the slightest glimmer of doubt. Concluding that Saru is insane, Tahal closes the channel and has her vessels change their course. Impressed by Saru's clever performance, Nhan intends to avoid playing him in Ferengi rummy. The Kelpien shakes his head and exhales, sensing that Tahal won't leave this matter alone. The shuttle drops out of warp and cloaks so that it can monitor the situation — Discovery may yet need their assistance.

As Moll remains affixed to the portal's interface, a transmission from Book rouses Captain Burnham from her unconscious state. Composing herself, Burnham is alerted by the contents of Book’s message — something the portal is doing is causing gravitational chaos. The captain moves toward Moll, risking her own life to grasp the courier's shoulders and free her hands from the surface. An injured Moll crumbles to the floor, and Burnham hurries back to the interface in an effort to help Moll and her friends outside of the aperture. Hoping to stop whatever the portal is doing, she reflects on the phrase she learned from the mindscape. Every clue has prepared her for this last test, so the captain pauses to center herself and meditate on the phrase. Repeating "the one between the many" to herself, her eyes spring open as she recalls the negative space shadow behind the light.
Inspired by this revelation, she shifts the small triangles around to form an outline of an empty triangle on the interface's surface. The negative space between them glows with a magnificent light, but Burnham quickly finds herself surrounded by a tranquil night sky peppered with falling star-like streaks. The captain turns to see a figure approaching, astounded to observe a Progenitor greeting her with a warm smile. The Progenitor has been waiting for her. While the Progenitor's species went extinct billions of years ago, her mind occupies this liminal spacetime adjacent to her own. It is her duty to share instructions on how to operate this technology, and it will take Burnham some time to learn. The captain interjects, asking if what the portal is doing to her spacetime can be stopped. By activating the interface without engaging the safety protocol, Moll endangered Burnham's friends.
The Progenitor assures Burnham that Moll will likely survive and her crew will have time, as time functions differently in this space — in the captain's present moment, the technology is merely gathering the power it requires to perform its function of designing and creating life. Burnham inquires as to whether the tech can be used to restore life. The Progenitor replies that, while a new being can replace a lost one and be genetically identical to the original, it would lack its memories and fundamental essence. The Progenitor comments that the speed and scale of creation are adjustable, causing the captain to realize that someone could use the technology to engineer an army. The Progenitor points out that a brick is just a brick — it can create a home or destroy a body. This is why the Progenitors chose only to seed life, as demonstrated by the vistas in the tunnel that brought Burnham here.
Captain Burnham is taken aback by the Progenitor's next confession — her species did not create those worlds, they found them here. The Progenitors did not build the portal, but they theorized that whoever constructed it could have been the ones who created them. Or perhaps it goes even further back, a cycle of creators and creations countless times over. The portal predates them all. As Burnham lets this startling disclosure set in, the Progenitor guides her toward something she’d like to show her....
In the cockpit of Book's shuttle, warnings and alerts blare to inform him that shields are at five percent. Book presses a control to silence the computer, resolving to hold on until Discovery gets there or the shuttle falls apart. He urges Culber to beam to safety, citing the doctor's family. While Culber will go if he has to, he will stay as long as he can. The two consider the doctor's insight into grabbing the portal, and Culber credits his actions to a memory belonging to Jinaal . The scientists ran into the same problem when they sought to build a structure around it. Even though Culber doesn't have access to Jinaal’s memories, he was nevertheless aware of that piece of information and knew that he had to accompany Book. Culber laughs at his failed attempt to find an answer that doesn't exist, but that truth no longer drives him crazy. Despite his progress still being a process, the doctor wonders if there is something that is kind of beautiful about the mystery. Book ponders Culber's words, and the two share a friendly fist bump of solidarity.
As the shuttle desperately continues to cling to the portal, the Breen Dreadnaught closes in on its position. The Discovery -A swoops in on a course that will take them between the shuttle and the Dreadnaught in approximately five minutes. On Discovery 's Bridge, Rayner takes a call from Ambassador Saru. While Primarch Tahal and her fleet had reversed course, she left behind a cloaked scout vessel to investigate the conflict at the black holes. They must prevent that ship from learning about the Progenitors' power. Unable to destroy the Dreadnaught or let the scout report to Tahal, Rayner elects to take both pieces off the field of battle. The first officer directs his attention to Tilly, asking her if disabling all of the spore drive's safeguards would permit them to jump something that's not Discovery . The lieutenant replies, "Absolutely not… maybe."
Stamets and Adira react in a similar manner from Engineering, declaring it to be impossible… unless, in theory, they quantum entangled the spores and separated them by distance. If Discovery jumped, the spores would behave as they always do and jump whatever was between them. In need of two poles to extend the entanglement field between, Tilly submits that they separate the saucer from the secondary hull and place them on either side of the Dreadnaught. On the Bridge, Rayner approves and orders them to do it within three minutes — well, two and a half, but who’s counting?
Stamets questions where they should jump the Breen to. Sweat covering his brow, Rayner closes his eyes to concentrate on the inquiry — they'll send the Breen to the Galactic Barrier. It'll take them a couple of decades to get back, but they'll live. That's more than the Breen gave to Rayner's family on Kellerun. The first officer opens a shipwide channel, announcing the risky plan and proclaiming that he appreciates the trust the crew had placed in him. Rayner takes his place in the captain’s chair, and the bridge officers ready themselves at their stations. Rayner contacts Saru, requesting that the ambassador lure Tahal's scout into the vicinity of the Dreadnaught. As Discovery goes to Black Alert, Nhan decloaks Saru's shuttle and opens fire on the scout to draw its attention.
Captain Burnham takes in the majestic view within the portal, and the Progenitor informs her that she is only the second being to make it to her. Dr. Derex was the other, though she did not believe that civilization was ready for the technology at the time of her visit. The Progenitor agreed to wait, so long as the Betazoid scientist built a path to better prepare the next visitor for the responsibility. Now that Burnham is here, she will become the technology's steward. In awe of the scope of such a task, the captain remarks that no single being should control such power. Having discussed the path with Dr. Derex, the Progenitor believes that Burnham's ability to travel it has demonstrated that she has learned its lessons and faced her darkest sides. Speaking in a whisper, the captain affirms that she is far from perfect — she is afraid and lost at times. The Progenitor acknowledges that every sentient being, herself included, is all of those things, yet some strive to be the best of themselves. She sees that effort in Burnham.
The captain presses on with her argument, conveying that this isn't just about her. Right now, a battle is waging in space — the Discovery is seen separating its saucer from its secondary hull as the scout ship fires upon Saru's shuttle on its approach to the Dreadnaught. Burnham's crew is risking their lives to protect the portal and this technology, yet how can she or any other individual know how to use this power to bring peace and not more conflict? The Progenitor considers it a question that only a steward can answer. Captain Burnham must ask herself what is most meaningful to her.
The Progenitor presents several options: the advancement of science — Stamets and Adira prepare Discovery 's spore drive; a devotion to duty — Saru and Nhan weather the scout's relentless weapons fire; through connection and love — Book holds his shuttle's course; in the beauty of the unknowable — Culber stares in wonder at the sight before him; in family and community — Discovery 's bridge officers crew their stations; or in the capacity for change — Rayner delivers the command to jump. Outside the portal, Discovery 's saucer and secondary hull rotate on either side of the Breen Dreadnaught, the spore drive's signature blue energy spinning the enemy ship until it vanishes toward the Galactic Barrier. Triumph rings out across Discovery and the two Starfleet shuttles.
Back within the starry portal, the Progenitor observes that there is strength in the face of great challenges. She found her meaning in embracing difference. The Progenitors were alone in the cosmos — a single sentient culture whose wish was to create a diversity of beings in the galaxy with richness and variation. Captain Burnham struggles to decide what is most meaningful to her, requiring time to think it over and needing to know that her friends are safe. The Progenitor agrees to return the captain to her present moment, advising her that all she needs to do in order to stop the technology is remove her hands from the interface. It's that simple, as the important things always are. The Progenitor divulges that they will finish Burnham's training when — or if — she rejoins her in the portal. Having faith that Burnham will choose wisely, the Progenitor places her hands on the captain's temples. Visions flash before Burnham's eyes, bestowing a view of planets being born, life forming, and civilizations rising.
A tear streams down Captain Burnham's cheek as the overwhelming experience concludes. She finds herself back at the interface, now among the field of flowers once more. She moves to help Moll up, and the courier asks her a heartbreaking question — can she save L'ak? The captain answers with the harsh truth, explaining that nothing here can bring him back. Burnham returns L'ak's body to Moll’s pattern buffer and helps Moll to her feet. They walk away from the interface, which disappears upon their exit.
As Book's shuttle maintains its grip on the portal, the Kwejian realizes that the gravitational disruptions have stopped. He's now picking up two lifesigns within the aperture, excitedly beaming Burnham and Moll aboard. Keeping Moll upright, the captain hands the courier over into Dr. Culber's care. Discovery is beaten up but okay, so Burnham breathes a sigh of relief and takes a seat next to Book at the helm. Having heard Book's messages in the portal, she thanks him for holding on. He replies with a grin and says, "Always." Rayner opens a channel, letting the shuttle know that Discovery is on its way and will secure the portal in its Shuttlebay.
Captain Burnham transports to her Ready Room, where she finds Rayner and Saru already waiting for her. Burnham and Saru share a friendly hug, and the captain suspects that "Action Saru" came out today. Saru sheepishly notes that he may have, inspiring a laugh as Stamets and Adira enter the room. Having reviewed the data from Burnham's tricorder, the enthusiastic astromycologist comments that it is not hyperbole to say that this is the greatest scientific discovery of their lifetime. Burnham's somber reaction perplexes those gathered, and she relays that she met one of the Progenitors in the portal and saw the last four billion years. Witnessing all the incredibly complex events that had to happen for each one of them to be alive was powerful. She realized that the galaxy already has infinite diversity in infinite combinations — there’s no need for this technology anymore.
However, Burnham is not implying they should leave the portal here. Believing it to be too powerful for one person or one culture to have access, or control, the captain thinks they must let it go. Always attuned to his duties, Rayner opines that they have orders. Stamets desperately clings to his wish to study and understand the portal, but Saru interjects — this is not about the astromycologist's legacy. Captain Burnham silences the discussion, citing the Progenitor's trust in her to make this decision. She will talk to Admiral Vance and President Rillak, but she knows they'll agree that this is the right thing to do. Saru and Rayner, as well as a reluctant Stamets, opt to place their faith in their captain. As Burnham exits with Saru and Rayner, Stamets stares silently out the Ready Room's viewports. Adira approaches him carefully, claiming that Stamets has learned a lot from the amazing mission. Maybe that's enough. Moved by the ensign's efforts to comfort him, Paul reaches up to Adira's cheek and asks them when they got so wise.
Some time after the Ready Room meeting, Captain Burnham takes to the ship's comm system and commends the crew on a job well done. The portal is released from the Shuttlebay, Discovery 's tractor beams guiding it toward one of the black holes. Burnham is proud of her team for safeguarding this technology by placing it beyond the event horizon. They trust that what the Progenitors created for them is enough… and those that came before and developed this power must have the ability to recreate it should they still exist. A flash signals the portal's final journey through the black hole, and the Federation starship maneuvers away from the coordinates.
Discovery jumps back to Federation HQ, where a small fleet of vessels are assembled around the space station. Book heads down to the ship's Sickbay, finding Nhan watching over Moll in a biobed. The courier seems more open to his friendliness, joking that she found out her room in the brig has a window. Book shifts the conversation to a more serious matter, recalling that losing everything left him wondering how he'd find his way again. But he did, and he hopes that Moll will too. He promises that he'll always be here if she needs him, offering that she might even stop hating the name Cleveland Booker one day. She laughs, telling him not to count on it. Book moves to the door to join Nhan, who says that her orders are to bring Moll to Dr. Kovich after she completes her sentence.

"The Examples"
Captain Burnham beams over to Kovich's ornate office in Federation HQ, finding him scribbling a note at his desk. As she takes a seat, Kovich advises her that the Red Directive has officially been closed. All records will be classified, and no one will know the technology existed — a protocol which Burnham is very familiar with. The captain mentions Moll, and Kovich acknowledges that the courier is a capable individual who could prove to be useful. He states that Moll will be given a choice, prompting Burnham to produce the small device Kovich used to call her to the Infinity Room. While Kovich has lived many years and many lives, he's met few people who’ve impressed and aggravated him as much as Captain Burnham. She smirks at his analysis, and he urges her to keep the Infinity device — just in case.
Burnham's eyes turn to the collection of items adorning the wall behind Kovich's desk — a bottle of Chateau Picard, a VISOR worn by Geordi La Forge, and a baseball favored by Benjamin Sisko. The captain guesses that Kovich is actually a codename, but the doctor professes that his real name is a bit of a Red Directive in and of itself. Burnham stands and extends her hand in greeting, introducing herself as Captain Michael Burnham, U.S.S. Discovery . Kovich reciprocates, identifying himself as Agent Daniels, U.S.S. Enterprise … and other places.* Their cordial handshake radiates with respect.

Several weeks later, Discovery 's crew joins Admiral Vance, President Rillak, Lieutenant Jax, and other officials to Ambassador Saru and President T'Rina's elegant beachside wedding. At the event's reception, Duvin announces the newlyweds' arrival to the cheerful crowd. As applause engulfs the room, Saru and T'Rina thank their loved ones for attending. Wearing her dress uniform, Captain Burnham congratulates them on a beautiful ceremony. The celebration makes Saru think of the Progenitors and their shared ancestor — they are all connected in the most fundamental ways.
Vance makes his way up to convey his own felicitations, and Burnham retreats to find Rayner chatting with Tilly. The lieutenant sees that Rayner has grown so much since he became Discovery 's first officer, and his relationship with Burnham reminds her of her relationship with Adira — but with ages reversed and more crabbiness. The dynamics between Burnham and Rayner, as well as their one-on-one connection, inspired Tilly to realize that those traits are what Starfleet Academy has been missing. Her plan to start a mentorship program at the Academy earns her a high five from Burnham and approval from Rayner, although the Kellerun teases her for calling him crabby.

Captain Burnham maneuvers through the crowd, welcoming other members of her crew before noticing that Book has just made a late entrance to the party. The Kwejian claims he had a run-in with some Talaxian pirates on his way back, and the captain voices how impressed she is by Book's dapper clothing. Book states that he planted the world root clipping he obtained from the Eternal Gallery and Archive in Sanctuary Four, the same place they took Molly the trance worm years ago.
Rather than participate in the wedding festivities right away, Book requests time alone with the captain. They take their conversation to the water's edge, where the distant sun hovers just above the horizon. Book expresses his thanks, as the mission helped him find his way and gave him renewed hope. As of yesterday, his sentence had been commuted. He and Grudge are figuring out what’s next for them, and the future is still a bit of a scary word. Burnham gazes out over the ocean, eventually confessing that the future is also a scary word for her. She considers herself to be lucky and grateful that Book is here and alive. They stand before one another, and Michael takes the bold step of proclaiming that she "never stopped." Book smiles in understanding, declaring, "You love me." The captain nods, and the two look into each other's eyes as they exchange "I love yous."
Book adds that his love for Michael possibly extends all the way to the moment they met, leading the captain to comment that he was "annoying as hell" back then. Book playfully notes that she still loved him, and they kiss passionately under the sunlight. The Kwejian asks whether they can just do this? Just the two of them, no matter what. Michael responds with a jovial sneer and adds, "And Grudge." Book agrees with her reasoning, aware that Grudge might claw the captain's leg to bits in her sleep. "You, me, and Grudge it is," whispers Michael, and they share another kiss until a sound from the captain's Infinity device interrupts them. Kovich has impeccable timing and another mission. Burnham looks at Book with hope, inviting him to join her on the adventure. Book believes it could be fun and that Saru would understand, then draws attention to their fancy attire by commenting that it never hurts to look good wherever you go. They join hands and resolve to see what the future holds, taking several steps down the beach before beaming away.

Some years later, a rustic room overlooking Sanctuary Four's red-leaved forests is serenaded by birdsong. A quiet fire crackles in the fireplace, and both Book's Tuli wood box and Burnham's Infinity device rest on a bedside table. Michael Burnham arises from her slumber and puts on her slippers, her slightly graying hair indicating that a significant amount of time has passed since Saru and T'Rina's wedding. As she enjoys the view of nature, an elder Book walks up with a mug of foamy coffee. He presents her with their first honeycomb from their very own Gexara bees. He places it in her drink but is disappointed when it sinks to the bottom. Michael is not bothered by the wax in her beverage, suggesting that the honey flavor could make it tasty. She takes a sip, quickly realizing that the blend is not as appealing as she had anticipated. Book wraps his arm around Michael's shoulder, offering to come with her on her "big day." She politely declines, feeling as if she should go alone. Book jokes that the rejection stemmed from the fact that he put wax in her coffee, and she agrees in the same jocular tone.
Now fully dressed, Michael carries lumber through the courtyard outside of her home. A Starfleet insignia is emblazoned on the ground, and she secures the post to a section of the fence. An incoming transmission calls out to her, and a voice tells Admiral Burnham that her shuttle is arriving momentarily. A four-legged hoofed creature meanders up to the barrier, and Michael apprises "Alice" that the area is fenced for a reason. As Burnham turns back toward the house and waits by the Starfleet logo, the arrival of a shuttle sends Alice running back into the forest. The Federation craft hovers over the yard, and a uniformed officer transports down. Michael is pleasantly surprised to see the face of her son Leto, who she believed would be on his way to Crepuscula by now. Book exits the house to join the reunion, pronouncing that there will be no hugging without him.

Freshly promoted to the rank of captain, Michael and Book's son brushes his shoulder off and insists that he's trying to "up his swagger a bit." Michael describes Leto as his father's son, and Book advises him to "Go get our swagger on in outer space, young man." Michael says that she will see Book in a couple of days, responding to his acknowledgment of "Aye, aye, Admiral" by reminding him that there's only one "aye." Michael taps her chest, causing her admiral's uniform to replace her casual clothing. As Book smiles upon Michael and their son, the two officers beam up to the shuttle. The craft flies low over the foliage, passing over a family of trance worms before jumping into deep space.
En route to their destination, Captain Burnham tells his mother that Tilly — now the longest tenured Starfleet Academy instructor ever — says hi. He ran into her while he was meeting with Admiral Vance at Federation Headquarters. As the shuttle continues on its journey, Michael senses her son is a bit nervous about getting his own command. He concedes that he's been thinking about what to say in his first speech to his crew. Vaguely referencing the still-classified incident with the Progenitor, Michael says that someone once asked what was most meaningful to her. She had always sought it in her missions, counseling her son that the captain's pips can bring pressure — they're supposed to. At the end of the day, every member of his crew will have to find their own sense of meaning. Leto is interested in how his mother would answer that question now, and Michael answers that sometimes life itself is meaning enough. How they choose to spend the time that they have and who they spend it with — her son, Book, and the family she found in Starfleet — are what is most important. Michael promises her son that his crew will become a family one day, and he interprets this as a way of saying he's got this. Michael confirms that Leto can handle this, and they bump fists over the shuttle's controls.
The shuttle drops to sublight speed, allowing Captain Leto and Admiral Michael Burnham to take in a miraculous view of Starfleet Headquarters. There are now three stations resembling the old Federation HQ, numerous starships surround the facilities, and the U.S.S. Discovery -A sits in drydock. As the shuttle closes in on the vessel, DOT-23s can be seen removing the “A” from the ship's hull registry. Remarking that this is the "last dance," Michael is glad that she is the person leading Discovery on its final mission and will have a chance to say goodbye.

Now alone aboard the ship, Admiral Burnham steps onto its shadowy Bridge. The lights and displays spring to life, and Zora welcomes her back. Michael notes that it's been too long as the words, "Resetting For Mission Protocols," flash across the screens. Discovery 's interior has been reconfigured to its original 23rd Century form, and the admiral relays that she'll be taking the ship to a set of coordinates in deep space. Michael and the crew will then leave, and Zora's assignment will be to wait.** This is a Red Directive, so the admiral doesn't know much about the mission. However, she did hear a word in passing — "Craft." Unsure if that is a person or a vessel, Michael opines that she's going to miss Zora, as her wait will likely be longer than the admiral's lifetime.
Zora has mixed feelings about that truth, but Michael points out that everything ends some day. There will be a new beginning when Zora returns, and she can look up the crew's descendents and meet the next generation of her extended family. The admiral refers to their time together as a "hell of a journey," allowing Zora to respond that the Federation has so many wonderful possibilities ahead because of Burnham and her crew. The admiral corrects her, stating that it is because of all of them. With the ship nearly ready for departure, Burnham gleefully takes a seat in the captain's chair. The station feels like home, and the distant echoes of her crew’s voices spring to her mind. She has a vision of herself turning to find Saru and taking the Kelpien's hand, suddenly rejuvenated to the age when she served as Discovery 's captain. Awash in affection and embraces, an otherworldly glow casts light upon a gathering of her closest friends — Tilly, Rayner, Stamets, Culber, Adira, Rhys, Linus, Commander Jett Reno, and Lieutenant Commanders Joann Owosekun, Keyla Detmer, and R.A. Bryce

"Life, Itself'
Admiral Burnham's focus returns to the present day, the fond memories flooding her senses. She settles in for the mission, and Zora assures the admiral that she is also ready. For the last time, Michael Burnham delivers her signature command from the center seat — "Let's fly." Its exterior now reset to its previous 23rd Century condition, the U.S.S. Discovery departs drydock amidst an honor guard consisting of a massive formation of shuttles and an armada of Starfleet vessels. Upon reaching open space, its spore drive activates. Blue energy envelops Discovery , and it spins at an increasingly rapid rate until it jumps away to its final destination. Headquarters and the assembled fleet remain in its wake as a monument to the Federation's rebirth and a testament to the contributions of Michael Burnham, the U.S.S. Discovery , and its crew.

* " Cold Front " — The temporal agent, Daniels, was first introduced in Star Trek: Enterprise 's first season. From the 31st Century, he would frequent the 22nd Century to assist Captain Archer and his crew whenever forces attempted to rewrite history.
** " Calypso " — In this Star Trek: Short Treks short, after waking up in an unfamiliar sickbay, Craft finds himself to be on board a deserted ship, the U.S.S. Discovery , his only companion and hope for survival, an A.I. computer interface, Zora.

- Written by Kyle Jarrow & Michelle Paradise
- Directed by Olatunde Osunsanmi
Get Updates By Email
Jay Stobie (he/him) is a freelance writer, author, and consultant who has contributed articles to StarTrek.com, Star Trek Explorer, and Star Trek Magazine, as well as to Star Wars Insider and StarWars.com. Learn more about Jay by visiting JayStobie.com or finding him on Twitter, Instagram, and other social media platforms at @StobiesGalaxy.
Star Trek: Discovery Seasons 1-4 are streaming exclusively on Paramount+ in the U.S., the UK, Canada, Switzerland, South Korea, Latin America, Germany, France, Italy, Australia and Austria. Seasons 2 and 3 also are available on the Pluto TV “Star Trek” channel in Switzerland, Germany and Austria. The series streams on Super Drama in Japan, TVNZ in New Zealand, and SkyShowtime in Spain, Portugal, Poland, The Nordics, The Netherlands, and Central and Eastern Europe and also airs on Cosmote TV in Greece. The series is distributed by Paramount Global Content Distribution.
Stay tuned to StarTrek.com for more details! And be sure to follow @StarTrek on TikTok , Instagram , Facebook , YouTube , and Twitter .

- Bahasa Indonesia
- Eastern Europe
- Moscow Oblast
Elektrostal
Elektrostal Localisation : Country Russia , Oblast Moscow Oblast . Available Information : Geographical coordinates , Population, Altitude, Area, Weather and Hotel . Nearby cities and villages : Noginsk , Pavlovsky Posad and Staraya Kupavna .
Information
Find all the information of Elektrostal or click on the section of your choice in the left menu.
- Update data
Elektrostal Demography
Information on the people and the population of Elektrostal.
Elektrostal Geography
Geographic Information regarding City of Elektrostal .
Elektrostal Distance
Distance (in kilometers) between Elektrostal and the biggest cities of Russia.
Elektrostal Map
Locate simply the city of Elektrostal through the card, map and satellite image of the city.
Elektrostal Nearby cities and villages
Elektrostal weather.
Weather forecast for the next coming days and current time of Elektrostal.
Elektrostal Sunrise and sunset
Find below the times of sunrise and sunset calculated 7 days to Elektrostal.
Elektrostal Hotel
Our team has selected for you a list of hotel in Elektrostal classified by value for money. Book your hotel room at the best price.
Elektrostal Nearby
Below is a list of activities and point of interest in Elektrostal and its surroundings.
Elektrostal Page

- Information /Russian-Federation--Moscow-Oblast--Elektrostal#info
- Demography /Russian-Federation--Moscow-Oblast--Elektrostal#demo
- Geography /Russian-Federation--Moscow-Oblast--Elektrostal#geo
- Distance /Russian-Federation--Moscow-Oblast--Elektrostal#dist1
- Map /Russian-Federation--Moscow-Oblast--Elektrostal#map
- Nearby cities and villages /Russian-Federation--Moscow-Oblast--Elektrostal#dist2
- Weather /Russian-Federation--Moscow-Oblast--Elektrostal#weather
- Sunrise and sunset /Russian-Federation--Moscow-Oblast--Elektrostal#sun
- Hotel /Russian-Federation--Moscow-Oblast--Elektrostal#hotel
- Nearby /Russian-Federation--Moscow-Oblast--Elektrostal#around
- Page /Russian-Federation--Moscow-Oblast--Elektrostal#page
- Terms of Use
- Copyright © 2024 DB-City - All rights reserved
- Change Ad Consent Do not sell my data
IMAGES
VIDEO
COMMENTS
Locations of The Swarm in Star Trek: Fleet Command. These enemies from beyond will attack any allegiance, Federation, Romulan, or Klingon, and commanders have been tasked by the Federation to help defeat them. They can be some of the most pesky opponents. Using the most decorated ship in the Fleet- The USS Franklin — you can battle the ...
Armada Targets are powerful opponents that can be found in Level 20+ star systems across Federation, Klingon, Romulan and neutral space. There are currently 9 different types of Armadas in STFC. Click on an armada type to learn more about them and what systems they are located in. Borg Armadas.
Swarm Armadas. Once you acquire the Franklin-A, you'll unlock the ability to command swarm armadas. They won't be a walk in the park, and assembling a formidable team will be essential. Launching these swarm armadas will require 100 Rare Armada Directives.
Rewards. The leader of the armada has a 40% chance of getting a Jaylah shard, otherwise they get rare credits. One other chest will drop with 100 rare credits, making the rewards from these relatively low for such a high armada. The enemy cargo of 40 Advanced Biotics split 5-6 ways is also not very exciting.
System Level Type Hub Planet Available Faction; Azha: 20: Uncommon: Yes: Neutral: Kepler-018: 20: Uncommon: Yes: Neutral: Opla: 20: Uncommon: Yes: Neutral: Voss: 20 ...
Araxian, Estar and Iusum are the system names. You're gonna need a bigger boat. (Franklin-A and a really high warp rating around 75 for systems like Araxian far off to the lower right edge of Romulan space, etc. The Icarus swarm events today mention swarm Armadas, but I can't find them in any of the systems I have access to.
Scopely introduced a lot of interesting stuff. In this Video I introduce you to the Swarm Armadas.Outside Views STFC:On this channel you find videos about th...
There are 18 locations of the Swarm throughout the galaxy: Full resolution picture would help you recognize Swarm better and you would easily recognize them as they are marked like this: To defeat each Swarm you would need to upgrade crew, do research, and come to a certain level. Below is the list of all Swarms and levels required to kill them ...
It's a nice list. Is it not the case on your server that you can also find the 39e in the same zones as the 38r? This includes the 'secondary' systems where you list the 38r (Denobula Triaxia / Terix / Gorath for feds/roms/klingon respectively; and also in Ain'tok for independent). If you'd like, I can send you screenshots of 39e armadas in ...
Star Trek Fleet Command Interactive Map. A map made for Star Trek Fleet Command by Scopely.
Armada Credits are earned by defeating Armada Hostiles and can be used to purchase rewards in the Alliance Store. Armada Directives are used to start Armadas. Players can get more from the Alliance Store, by completing Daily Goal milestones, and by upgrading the Armada Control Center. Armada Tactical Cores are specialized command, control and ...
17. 23. Rare. Klingon. Klingon Arsenal. 16. Showing 1 to 10 of 331 entries. This tool lets you easily locate armadas and copy and paste them into Star Trek Fleet Command (STFC)
Star Trek Fleet Command Galaxy Map v2.4.1 By: Originator: JoeCrash; New: TaggedZi - Server: [71] SoongOriginator: JoeCrash; New: TaggedZi - Server: [71] Soong
Most armadas need approx 50% of the power they ask for. ACC 23 gives a 46% bonus to power and it goes up as you level the building. So a L30 player hosting with ACC 30 get 60% bonus and can get by with 40% from the attendees. Rule of thumb until ops 35 or so is just easier to say 50%, and around 30% for over ops 40 hosts.
Armadas can be a solo or a joined effort for up to 7 members (depending on the Armada control Center level of the Commander who started the armada). If you're teaming up with your Alliance, it's best for most players to run one of the Generic crews above. One player in each Armada (usually the lower level) can swap out Khan for.
The Borg Solo Armada hostiles in STFC can only be found in specific systems, each of which has a warp requirement that you have to meet. As you progress in Star Trek Fleet Command (STFC) you will get the opportunity to defeat Armada hostiles. You can either participate in a Group Armanda, which requires that Alliance members collaborate to ...
Locations of The Swarm in Star Trek: Fleet Command. These enemies from Beyond will attack any allegiance, Federation, Romulan, or Klingon, and commanders have been tasked by the Federation to help defeat them. Using the most decorated ship in the Fleet- The USS Franklin- you can battle the hostiles and obtain much-needed Swarm Biominerals.
After chasing clues across the galaxy, taking on a Red Directive mission, it all comes down to the final challenge. Unfortunately for Captain Burnham and the Discovery crew because Breen forces are on their tail.. In the series finale episode ofStar Trek: Discovery, "Life Itself," trapped inside a mysterious alien portal that defies familiar rules of time, space, and gravity, Captain Burnham ...
The official subreddit for the exciting mobile game "Empires & Puzzles". Discuss tips and strategies, ask questions and make friends with other players around the globe.
State Housing Inspectorate of the Moscow Region Elektrostal postal code 144009. See Google profile, Hours, Phone, Website and more for this business. 2.0 Cybo Score. Review on Cybo.
Elektrostal Geography. Geographic Information regarding City of Elektrostal. Elektrostal Geographical coordinates. Latitude: 55.8, Longitude: 38.45. 55° 48′ 0″ North, 38° 27′ 0″ East. Elektrostal Area. 4,951 hectares. 49.51 km² (19.12 sq mi) Elektrostal Altitude.
Related Star Trek Fleet Command MMO Gaming forward back r/triathlon A subreddit dedicated to the sport of triathlon, and all of its constituent components, quirks, and joys.
Algfail (SVG-fail, algsuurus 631 × 595 pikslit, faili suurus: 1,14 MB). See fail ja sellest kastist allapoole jääv kirjeldus pärinevad kesksest failivaramust Wikimedia Commons.: Faili lehekülg Commonsis
596K subscribers in the vexillology community. A subreddit for those who enjoy learning about flags, their place in society past and present, and…