How to Enable JavaScript on Apple Safari (iPad, iPhone iOS)
Are you having a hard time in trying to turn on JavaScript on your iPad or Apple iPhone device?
JavaScript has evolved into an essential tool that makes the web what it is today. It controls the dynamic elements of web pages, and most websites will fail to run correctly if your Apple Safari browser does not have its JavaScript enabled. Although disabling JavaScript offers browsers faster loading of a website, you should know that it reduces the overall browsing experience on your iPad or iPhone device.
Be it an iPhone 11, iPhone 10 or MacOS device, the steps in this guide will help you learn the simple process and benefits of enabling the JavaScript feature on your Safari browser.

Instructions for Web Developers
You may want to consider linking to this site, to educate any script-disabled users on how to enable JavaScript in six most commonly used browsers. You are free to use the code below and modify it according to your needs.
On enablejavascript.io we optimize the script-disabled user experience as much as we can:
- The instructions for your browser are put at the top of the page
- All the images are inlined, full-size, for easy perusing
We want your visitors to have JavaScript enabled just as much as you do!
What Is JavaScript and Why Do I Need It?
JavaScript is a type of code used by web developers to install and establish interactive content on websites – in essence, it allows web pages to dynamically load and send content in the background without page loads on your Apple Safari browser. Generally, JavaScript is used by modern websites to provide various features such as display advertisements – the reason why a small subset of internet users want it disabled.
However, disabling the JavaScript feature on your Safari web browser is much more of a hassle than it seems. If you turn off JavaScript on your browser, many websites won’t function properly. In most cases, you will also be unable to enjoy certain functions or view content that you are accustomed to accessing on JavaScript-based websites.
How to Enable JavaScript on Safari
Here’s how to turn on JavaScript on Safari:
1. Select the “Safari” icon on your home screen.
2. Scroll down the Settings page to find the menu item labelled “Safari”, and then select it.
3. Scroll to the bottom of the Safari menu and choose “Advanced” – choosing this will reveal the advanced settings for your Safari browser.
4. On the Advanced menu, find the option for enabling or disabling “JavaScript” for your Safari browser. On finding the JavaScript option, you’ll see a button next to it.
5. Now slide this button to the right to turn on JavaScript on your Safari browser.
6. That’s it! You’ve just enabled JavaScript.
How to Disable JavaScript on Safari
Here’s how to turn off JavaScript on Safari:
1. Tap on the “Settings” icon on your home screen.
5. Now slide this button to the left to turn off JavaScript on your Safari browser.
6. That’s it! You’ve just disabled JavaScript.
How to Enable JavaScript on Mac
Follow the steps below to activate JavaScript in Safari on Mac:
1. Open the Safari application by clicking on an icon that appears like a compass in your bottom toolbar.
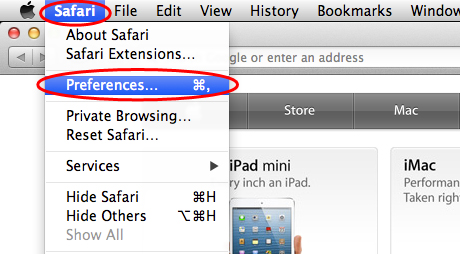
2. Click on the “Safari” menu at the top left corner of the browser.
3. Under the Safari menu, find and click on “Preferences”. This will open a pop-up menu.
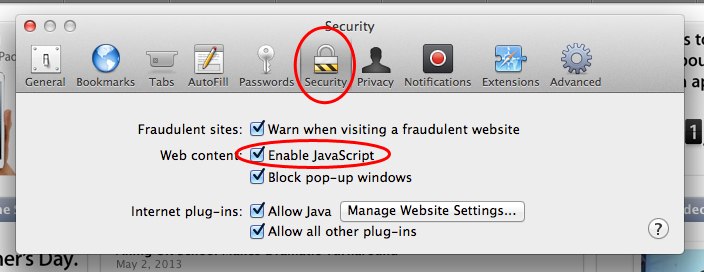
4. Move your cursor over to the “Security” tab and select it.
5. Now check the box beside “Enable JavaScript” to turn on JavaScript. Make sure the box is checked.
6. You can now close the “Preferences” window to apply your settings.
7. That’s it! You’ve enabled JavaScript.
8. Restart your browser.
How to Disable JavaScript in Safari on Mac
Follow the steps below to disable JavaScript in Safari on Mac:
2. Click on “Safari” menu at the top left corner of the browser.
3. Under the Safari menu, find and click on “Preferences”. This will open a dropdown menu.
4. Move your cursor over to the “Security” tab and then click on it.
5. Now uncheck the box beside “Enable JavaScript” to disable JavaScript.
7. That’s it! You’ve disabled JavaScript.
8. Restart your browser.
Apple Safari comes built-in with a JavaScript engine that makes website elements interactive. And while it isn't actually necessary that you enable it to use your Safari browser, it's something that you'll perhaps want to do to enjoy a seamless browsing experience. Otherwise, many websites you visit will appear broken or won't even work.
JavaScript is enabled by default in Apple Safari, but you can verify if yours is active through the Safari tab. To do this, simply click on "Safari" at the top left of your screen to expand the Menu. Next, click on Preferences to reveal the Safari Preferences section. Now that you're in the Preferences section, find and click the "Security" tab to access the "Enable JavaScript" checkbox. If the checkbox has a tick symbol, it means JavaScript is active and working.
Millions of websites use JavaScript to display interactive elements, such as animations, special effects and more. If you browse them with JavaScript disabled in your Apple Safari, then you probably won't have the full experience that you normally would. Some JavaScript-based websites may appear dull or static, while others may not even work at all.
Olumide is a longtime writer who started his career as a digital marketer before transitioning into a copywriter almost eight years ago.
- – Google Chrome
- – Internet Explorer
- – Microsoft Edge
- – Mozilla Firefox
- – Apple Safari
How to enable JavaScript in your browser and why http://www.enablejavascript.io/
iOS 17: How to Enable JavaScript on Your iPhone
Turning on JavaScript on your iPhone with iOS 17 is a breeze. Just dive into your settings, tap Safari, and toggle the JavaScript switch to on. It’s that simple!
Related Video: How to Enable JavaScript on Your iPhone
Step by Step Tutorial: Turning on JavaScript on iPhone with iOS 17
Before we start, keep in mind that enabling JavaScript will allow your Safari browser to display interactive content from web pages, which includes animations, videos, and web applications.
Step 1: Open Settings
Open the Settings app on your iPhone.
The Settings app is where you can tweak your iPhone to work exactly how you want it. It’s the place with all those gears on it, you can’t miss it.
Step 2: Scroll and Tap Safari
Scroll down until you find Safari and tap it.
Safari is Apple’s web browser, and it’s where you’ll find the JavaScript settings. It’s usually located towards the middle of the Settings menu.
Step 3: Toggle JavaScript to On
Find the JavaScript option and toggle the switch to the on position.
The JavaScript toggle is usually near the bottom of the Safari settings. If the toggle is green, that means JavaScript is enabled.
After you complete these steps, JavaScript will be enabled on your iPhone. This means websites that use JavaScript for interactive features will now work properly.
Tips for Turning on JavaScript on iPhone with iOS 17
- Make sure your iPhone is updated to the latest version of iOS to have the most recent features and security updates.
- If you’re concerned about security, keep in mind that while JavaScript is generally safe, it can be used in harmful ways. Be cautious about which websites you allow to run JavaScript.
- Remember that some websites won’t work correctly without JavaScript enabled.
- If you’re experiencing issues with Safari after enabling JavaScript, try restarting your iPhone.
- Keep in mind that other web browsers on your iPhone might have different steps for enabling JavaScript.
Frequently Asked Questions
Is it safe to enable javascript on my iphone.
Yes, JavaScript is generally safe to enable, but you should always be cautious about the websites you visit and the content you interact with.
Will enabling JavaScript slow down my iPhone?
No, enabling JavaScript should not slow down your iPhone. However, some complex web pages using JavaScript may load more slowly.
Can I enable JavaScript on other browsers besides Safari on my iPhone?
Yes, most web browsers have a similar option to enable JavaScript, but the steps may vary depending on the browser.
What if a website asks me to enable JavaScript and it’s already on?
Try refreshing the page or restarting your browser. If that doesn’t work, the website might have other issues.
Can I turn off JavaScript later if I want to?
Absolutely, you can follow the same steps and toggle JavaScript off if you decide you don’t want it enabled anymore.
- Open Settings.
- Scroll and tap Safari.
- Toggle JavaScript to on.
There you have it—enabling JavaScript on your iPhone with iOS 17 is as easy as pie. It’s just a matter of a few taps in your settings, and you’ll be all set to enjoy the full range of features the web has to offer. Whether you’re watching videos, playing games, or just surfing the web, having JavaScript turned on will make your browsing experience much more rich and interactive.
Remember, while JavaScript can significantly enhance your web experience, it’s always good to proceed with caution. Not all websites have your best interests at heart. Keep your wits about you, stick to secure sites, and you’ll be golden.
If you’re ever in doubt about whether to enable JavaScript, just remember that you can easily toggle it off again. The control is right at your fingertips. So go ahead, give it a try and see how it transforms your web browsing on your iPhone. Enjoy the magic of the internet with iOS 17, and don’t let those outdated, JavaScript-less websites hold you back any longer!

Matt Jacobs has been working as an IT consultant for small businesses since receiving his Master’s degree in 2003. While he still does some consulting work, his primary focus now is on creating technology support content for SupportYourTech.com.
His work can be found on many websites and focuses on topics such as Microsoft Office, Apple devices, Android devices, Photoshop, and more.
Share this:
- Click to share on Twitter (Opens in new window)
- Click to share on Facebook (Opens in new window)
Related Posts
- iOS 17: How to Enable JavaScript on iPhone – A Step-by-Step Guide
- How to Enable Javascript on an iPhone 7: Step-by-Step Guide
- How to Disable JavaScript on iPhone 15: A Step-by-Step Guide
- How to Turn Off Javascript on the iPhone 12: A Step-by-Step Guide
- How to Enable Javascript on an iPhone 11
- How to Enable iPhone 14 Javascript in Safari
- How to Favorite a Web Page in Safari on iPhone 13
- How to Turn Off Javascript in Safari on an iPhone
- How to View Safari History on iPhone
- How to Change the Default iPhone 13 Web Browser
- How to Get Safari Back on iPhone 13: A Step-by-Step Guide
- iPhone 15: How to Clear Safari History in Just a Few Steps
- How to Remove Safari Frequently Visited on iPhone 13
- How to Allow Pop Ups in Safari on an iPhone 7: A Step-by-Step Guide
- How to Allow Pop Ups on iPhone 15: A Step-by-Step Guide
- How to Clear Browsing History on iPhone 14
- How to Turn Off Pop Up Blocker on iPhone Safari: A Guide
- How to Create Safari Bookmarks on iPhone 14
- How to Stop Safari Websites from Using Your Location on iPhone 14
- Disabling Safari Extensions on iOS 17: A Step-by-Step Guide
Get Our Free Newsletter
How-to guides and tech deals
You may opt out at any time. Read our Privacy Policy
Follow these instructions to activate and enable JavaScript in iOS on the iPhone and iPad.
- Select the Settings application/icon on the iPhone home screen.
- Select Safari on the following screen.
- Select Advanced , located near the bottom of the following screen.
- Move the JavaScript toggle to the right so that it highlights green .
How to enable JavaScript on your iPad to make websites and videos work properly in Safari
- You should enable JavaScript on your iPad so that websites you access function properly.
- If JavaScript is not enabled in your browsers, some websites won't function or will function poorly, and features like animations and videos won't work, so it is important that you know how to turn it on.
- Visit Business Insider's homepage for more stories .
Most websites are programmed using JavaScript , which is essential for more advanced or complex operations and functions.
JavaScript can also be used to program, and there are a lot of resources for learning to use JavaScript for amateur programmers up to high-end web developers.
If JavaScript is not enabled in a browser, your iPad will inhibit functionality on some sites and prevent you from even accessing others.
That can also limit your ability to access certain features of websites. Some programs and applications from the web, which use JavaScript as well, will also have trouble working.
Check out the products mentioned in this article:
Ipad (64gb), available at best buy, from $799.99, how to enable javascript on your ipad.
1. Tap the "Settings" app.
2. Scroll down until you see "Safari," or any other web browser that you'd like to enable JavaScript in.
3. Tap on the "Safari" icon.
4. Scroll down and tap "Advanced," at the very bottom.
5. JavaScript should be one of the few items you see. Tap on the "JavaScript" toggle so that it turns green.
6. JavaScript is now enabled in Safari.
7. If you have other browsers you use, you will have to go back, select those in "Settings" and repeat the process for them as well.
Related coverage from How To Do Everything: Tech :
How to enable javascript in safari on a mac computer to prevent website errors, how to enable javascript on your iphone if it's disabled, to access most websites in a safari browser, how to delete an email account on your ipad in 4 simple steps, how to turn off autocorrect on your ipad in 4 simple steps.
Insider Inc. receives a commission when you buy through our links.
Watch: A professional race car driver turned the luxurious Porsche 911 into a rugged off-road sports car
- Main content
Currently Reading :
Currently reading:
How To Enable JavaScript On Safari In iPad & iPhone
Enable javascript iphone & ipad (safari).

Mayank Jain
Software Developer
Published on Wed May 08 2024
JavaScript is a programming language that allows developers to create dynamic and interactive effects within web browsers. Websites use JavaScript to enhance user experience by enabling functions such as animation , form validation, and asynchronous content updates without needing to reload the page. Enabling JavaScript in Safari on iPhone and iPad ensures that web pages function as intended by their developers. Users experience the full capabilities of websites, including interactive features and faster responsiveness, when JavaScript is active. Disabling JavaScript might lead to a static and less interactive web experience. Web developers often design websites assuming that JavaScript is enabled, optimizing their sites for functionality and interactivity. Enable JavaScript in Safari to ensure that all elements of the web page display correctly and interactive features operate smoothly.
To enable JavaScript on Safari in an iPad or iPhone, follow these simple steps:
- Open the "Settings" app on the iPad or iPhone. This app contains all configuration settings for the device.
- Scroll through the menu and select "Safari" to access browser-specific settings. Safari is the default web browser on all Apple iOS devices.
- In the Safari settings menu, scroll down to the "Advanced" option. This section allows users to manage more technical settings of the Safari browser.
- Toggle the "JavaScript" switch to the on position. JavaScript is now enabled in Safari, allowing web pages that rely on JavaScript for interactive elements to function correctly.
- Close the "Settings" app. Changes take effect immediately, no restart of Safari or the iPad or iPhone is required.
- Open Safari and navigate to a website to test if JavaScript is running. A website that uses interactive features or animations often relies on JavaScript.
- If JavaScript was properly enabled, users will notice that interactive elements on websites function seamlessly. This confirms that the settings adjustment was successful.
How To Enable JavaScript On Safari In Mac
To enable JavaScript on Safari in Mac, follow these steps:
- Open Safari from the Dock or the Applications folder on the Mac.
- Navigate to the Safari menu at the top of the screen and click on it.
- Select "Preferences" from the dropdown menu to access the settings.
- In the Preferences window, click on the "Security" tab.
- Locate the "Web content" section within the Security tab.
- Check the box next to "Enable JavaScript" to activate JavaScript in Safari.
- Close the Preferences window to save the settings.
- Refresh any open web pages where JavaScript content needs to run, if necessary.
Enabling JavaScript in Safari on iPad & iPhone is a straightforward process that can significantly enhance your browsing experience by allowing interactive and dynamic content to display properly. By following the simple steps outlined above, you can ensure that all web applications and sites function as intended. Regularly updating Safari and maintaining JavaScript enabled will provide the best user experience, as many websites rely heavily on JavaScript for full functionality. Always be aware of the security implications and trust the sources of JavaScript-enabled content for a safe browsing environment.

About the author
Mayank Jain is a skilled Software Developer passionate about crafting efficient and innovative solutions. Experienced in various programming languages and technologies, dedicated to continuous learning and problem-solving.
Related Blogs
How to disable or enable buttons using javascript and jquery
Vinayaka Tadepalli
Removing Elements from a JavaScript Array

Harsh Pandey
JavaScript appendchild(): What it is and when to use it

Varun Omprakash
JavaScript Window prompt() Method
The Double Question Mark (??) in JavaScript
Link JavaScript to HTML
Browse Flexiple's talent pool
Explore our network of top tech talent. Find the perfect match for your project.
- Programmers
- React Native
- Ruby on Rails

About JavaScript - How to enable JavaScript in your web browser
On desktop and mac.
- Google Chrome
- Internet Explorer (IE)
On Smartphones
- Safari iOS (iphone, ipod, ipad)
Enable JavaScript in Safari
Enable javascript in safari for ios (iphone, ipod, ipad).
With Safari on MacOS. Click on Safari Menu and select " Preferences… " (or press Command+, )
If you are using Safari on Windows. Click the Gear icon and select " Preferences ".
In the " Preferences " window select the " Security " tab.
In the " Security " tab section " Web content " mark the " Enable JavaScript " checkbox.
Close Preferences popup window and reload your webpage.
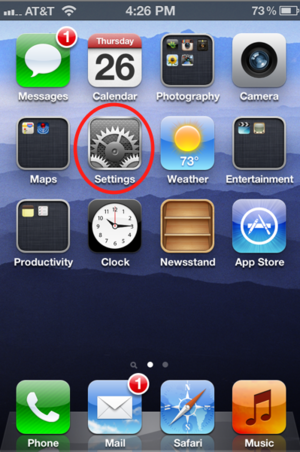
Hit on Settings icon.
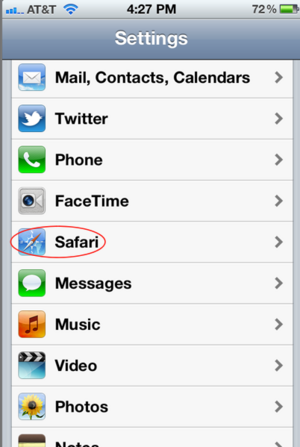
Scroll down until you see " Safari " Click on it to bring up the option page.
Turn on " JavaScript " option and you have done enable JavaScript in Safari on iOS.
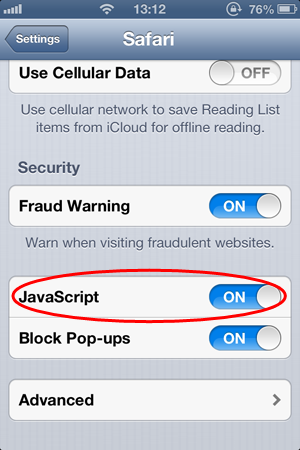
- PC & Mobile
How to Enable JavaScript in Google Chrome, Firefox, Microsoft Edge, and Safari
Lee Stanton Lee Stanton is a versatile writer with a concentration on the software landscape, covering both mobile and desktop applications as well as online technologies. Read more February 23, 2024
JavaScript is one of the most powerful dynamos behind the interactive web. This programming language lets web pages respond to your actions in real time. It’s why you can play videos, fill out forms, and engage in the myriad activities that make the World Wide Web so versatile and interactive.

If JavaScript is turned off in your browser, you’re not just missing out on flashy animations or convenient auto-fill forms; you’re opting out of the full, rich functionality modern web developers work so hard to create.
How to Enable JavaScript
Each web browser will be slightly different regarding how to enable JavaScript. However, there are many common threads that will be similar no matter which browser you use.
Google Chrome
If Google Chrome is your default browser , its important that you enable JavaScript on it for the best browsing experience.

Mozilla Firefox
Enabling JavaScript support in Firefox is also easy.

- The search for javascript.enabled .

Remember that incognito tabs in Firefox have JavaScript enabled by default.
Microsoft Edge
JavaScript is enabled by default in Microsoft Edge. You can still verify this by following the below steps.

While JavaScript can enhance a webpage, it can also be the cause of its unresponsiveness.
Safari (macOS)
Enabling JavaScript in Safari on macOS requires jumping into its Preferences menu.

Safari (iOS/iPadOS)
- Go to Settings on your iPhone or iPad and scroll down to Safari .

Opera’s JavaScript settings are tucked under Privacy & security section.

Enable the True Internet
Enabling JavaScript is easy on every web browser and unlocks the web’s real potential. It’s a tiny change with a significant impact: enjoying the web’s full interactive features. So don’t keep it off, even if there are some security concerns. Just stay vigilant and use it in places you trust.
You might also want to learn how to block a website on Chrome for additional security.
Related Posts

Disclaimer: Some pages on this site may include an affiliate link. This does not effect our editorial in any way.

Parth Shah February 29, 2024

Lee Stanton February 19, 2024
Send To Someone
Missing device.
Please enable JavaScript to submit this form.
- I Tried Both: Apple Watch 9 vs Fitbit Charge 6
- Best Places to Print Photos Online
How to Activate the iPhone Debug Console or Web Inspector
Use Safari's web developer tools to study problematic websites
:max_bytes(150000):strip_icc():format(webp)/ScottOrgera-f7aca23cc84a4ea9a3f9e2ebd93bd690.jpg)
- Saint Mary-of-the-Woods College
- Switching from Android
What to Know
- Activate Web Inspector on iOS: Go to Settings > Safari > Advanced and move the Web Inspector toggle switch to the On position.
- Use Web Inspector on macOS: Connect your iOS device to a Mac and choose the URL to inspect from the Develop menu.
If you run into a bug or another issue with a website on Safari mobile, use the Web Inspector tool to investigate. This article explains how to use the Safari console for iPhone to debug errors with the help of your Mac computer. Instructions apply to iPhones with iOS 14, iOS 12, or iOS 11, and well as Macs with macOS Big Sur (11.0), macOS Catalina (10.15), or macOS Mojave (10.14).
Activate Web Inspector on Your iPhone or Other iOS Device
The Web Inspector is disabled by default since most iPhone users have no use for it. However, if you're a developer or you're curious, you can activate it in a few short steps. Here's how:
Open the iPhone Settings menu.
On an iPhone with an early version of iOS, access the Debug Console through Settings > Safari > Developer > Debug Console . When Safari on the iPhone detects CSS, HTML, and JavaScript errors, details of each display in the debugger.
Scroll down and tap Safari to open the screen that contains everything related to the Safari web browser on your iPhone, iPad, or iPod touch.
Scroll to the bottom of the page and select Advanced .
Move the Web Inspector toggle switch to the On position.
Connect Your iOS Device to Safari on a Mac
To use the Web Inspector, connect your iPhone or another iOS device to a Mac that has the Safari web browser and enable the Develop menu .
With Safari open, select Safari from the menu bar and choose Preferences .
Select the Advanced tab.
Select the Show Develop menu in menu bar check box and close the settings window.
From the Safari menu bar, select Develop and choose the name of your attached iOS device, then select the URL that appears under Safari to open the debug console for that site.
After you connect your device, use your Mac to inspect the website you want to debug and have it open in the Safari mobile browser.
What Is Web Inspector?
Web developers use Web Inspector to modify, debug, and optimize websites on Macs and iOS devices. With Web Inspector open, developers can inspect the resources on a web page. The Web Inspector window contains editable HTML and notes regarding the styles and layers of the web page in a separate panel.
Before iOS 6, the iPhone Safari web browser had a built-in Debug Console that developers used to find web page defects. Recent versions of iOS use Web Inspector instead.
With Safari 9 and OS X Mavericks (10.9), Apple introduced Responsive Design Mode in Web Inspector. Developers use this built-in simulator to preview how web pages scale to different screen sizes, resolutions, and orientations.
To set up Web Inspector on your iPad, open your iPad's Settings and select Safari > Advanced , then turn Web Inspector On . Connect the iPad to a Mac computer, then open Safari on the Mac and select Safari > Preferences > Advanced , then turn on Show Develop menu in menu bar .
You cannot just connect your iPhone to a Windows PC and start using Web Inspector through Chrome like you can with a Mac. Installing package manager software can provide you a sort of workaround, but it's not recommended unless you're familiar with the package management app you intend to use.
Get the Latest Tech News Delivered Every Day
- Add More Features by Turning on Safari's Develop Menu
- 4 Ways to Play Fortnite on iPhone
- How to Activate and Use Responsive Design Mode in Safari
- How to Change the Default Search Engine in Chrome for iOS
- What Is Safari?
- How to Inspect an Element on a Mac
- How to Use Web Browser Developer Tools
- How to Disable JavaScript in Safari for iPhone
- How to Clear Search History on iPhone
- 10 Hidden Features in macOS Sonoma
- How to View HTML Source in Safari
- How to Manage History and Browsing Data on iPhone
- How to Change Your Homepage in Safari
- How to Manage Cookies in the Safari Browser
- How to Reset Safari to Default Settings
- How to Clear Private Data, Caches, and Cookies on Mac
This iPhone Setting Will Make It Easy To Switch Between Pages On Safari

Even though Safari is Apple's official browser app for its devices, you can actually change your iPhone's default web browser to a third-party option. If you do, though, you may miss out on some of the features and upgrades Apple's made to Safari over the last few years. For instance, in 2022 with iOS 16, Apple added passkeys, a more secure way of logging in to apps and service while browsing the web than standard passwords. Meanwhile, those who've recently upgraded to last year's iOS 17 can enjoy an overall faster search that provides more relevant related suggestions. The company also added a feature to lock private browsing tabs between uses.
With the imminent release of iOS 18 this fall, it can be easy to overlook iPhone features that came out long ago. For Safari, there are little known features like the ability to create tab groups. Apple's also added features to change the location of the Safari address bar, a setting that initially irked iPhone users . This setting though actually unlocks a pretty useful and seemingly underutilized feature that makes it easy to page-hop on the browser app.

How to change the tab bar location
Since Apple released iOS 15 in 2021, iPhone users have had the option to pick between two address bar placements for the mobile browser's interface: the original that places the search field at the top of the screen, or a newer "tab bar" layout that places it at the bottom of the screen instead. Here's how you can make modifications to how Safari looks like on your iPhone:
- Launch the Settings app.
- Scroll down and go to Safari.
- Under the Tabs section, select Single Tab to place the address bar up top. Otherwise, pick Tab Bar to have the address bar placed at the bottom.
The top tab bar option is likely what a lot of mobile browser users are accustomed to as top-of-page is often the default placement of address bars across a variety of browser apps, including those used on computers. If you want more flexibility in your use of the browser app on your iPhone though, there is merit to picking the lesser known page layout instead. Not only is it more thumb-friendly, but it adds certain browsing features that are only accessible when you do so.
Surfing Safari's tab bar layout
If you opt for the bottom Tab Bar view in the Settings app, you can easily switch from one web page to another by swiping left or right on the address bar at the bottom of the screen. If you have several browser tabs open at once, you can essentially flip through them, as if you're reading a book. Meanwhile, if you choose to stick with Safari's Single Tab layout, you can only view one page at a time. You'll also need to click on the Tabs switcher icon to see all your open pages or any tab groups that you may have.
Based on testing, embracing the unconventional bottom-of-the-screen address bar placement has a few perks. It makes it more convenient to use Safari and operate your iPhone one-handed . You can quickly type in new searches or websites into the search field since it's closer to the thumb of the hand holding your device. It's also easier to scroll through your tab group carousel — that's also located at the bottom of the iPhone screen — when you hit the Tab switcher icon to view all your open tabs.

6 Tips to Improve Your Safari Experience on iPhone
A ccessing the internet on an iPhone is made simple by Safari, Apple's native web browser; it does a great job of getting you started, but there are several other features that you can leverage to enhance your user experience.
Below, we'll list some valuable tips you can use to get the most out of Safari on your iPhone. So, let's get started.
1. Modify the Start Page
The start page is the first element you usually run into when launching Safari—it's the default screen if you've not used the browser before or didn't leave any tabs open after your last session. And the first step you can take in improving your Safari experience is to customize it.
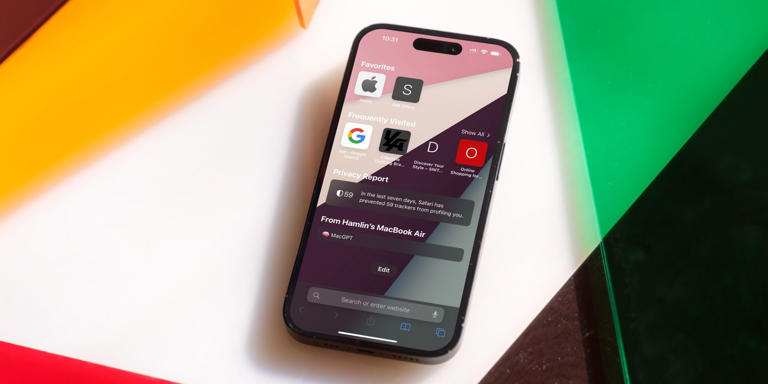
Customizing the start page involves changing the background image and choosing the sections (listed below) you want the app to show. We've added descriptions to help you understand a little more about each section.
- Favorites : This section will show all your favorite websites and bookmarks which have been added to the Favorites section on your iPhone.
- Frequently Visited : This is a collection of searches and websites you've frequented in recent months. The information is said to be a mix from all your Apple devices if you've enabled iCloud.
- Shared with You : It works by finding links, images, music, and more, sent within the Messages app, and brings them up in relevant applications. For example, if someone texted you a link via iMessage, you'll find it in this section of the start page.
- Privacy Report : This section surfaces information on the trackers used by websites you've visited in the last 30 days and showcases when your iPhone—and other Apple devices—prevented them from profiling you.
- Siri Suggestions : You can find website suggestions based on your recent browsing history, bookmarks, and open tabs within this section if you choose to use them.
- Reading List : You can find the three latest additions to your Reading List in this section, with a Show All button available in case you want to view the other articles you've added to your read later list.
- iCloud Tabs : This feature showcases up to four most recent tabs open on each Apple device you own with iCloud enabled for Safari.
To begin customizing your Safari's start page, follow the steps listed below:
- Scroll down to the bottom of the Safari start page and tap Edit.
- Now, enable the desired sections using the toggles or reorder them by pressing (and dragging) the three horizontal lines.
If you want to experience Apple's Continuity feature , toggle on Use Start Page on All Devices at the top of the edit menu. This will ensure your start page is in sync across all devices connected to your iCloud account.
2. Create Tab Groups in Safari
The next step in improving Safari on iPhone is to create and use Tab Groups . The feature lets you bring order and control to tabs by allowing you to group similar ones—or those you often use together—into folders. Ideally, you can use the feature to separate search results and websites related to work from those you open during casual browsing.
To create a Tab Group, follow the steps listed below:
- View all your tabs by tapping the Tab button in the bottom-right corner.
- Now, tap the text box at the bottom of the screen—it mentions the number of tabs open.
- In the menu that appears, tap New Empty Tab Group or the second option, New Tab Group with X Tabs .
- Name the Tab Group according to your liking and hit Save .
The X in the second option will vary based on the number of tabs open when creating a Tab Group.
3. Use Safari Extensions
Like Chrome, you can install Safari extensions to improve your browsing experience. For those unaware, these are applications built for web browsers that bring additional functionality and make your life easier.
For example, you can install applications that scour the web for coupon codes and bring them up when you're making a purchase or add ones that help edit written content to ensure you aren't making silly errors.
Adding extensions to Safari on an iPhone is a bit different compared to installing and removing extensions in Safari on a Mac . To do this, follow the steps listed below:
- Go to Settings > Safari on your iOS device.
- On the next screen, find Extensions under the General subsection and tap on it.
- You'll now see a list of extensions available. In case you see no options, tap More Extensions to visit the Safari Extensions store.
You may sometimes see options without having installed an extension before; these are present due to an application—that offers Safari extensions—installed on your iPhone from before.
Once you've installed an extension, activate it in Settings using the same steps above and then do the following:
- Open Safari and tap the AA button in the address bar.
- Now, tap Manage Extensions and select the extension you want to activate.
4. Choose Websites to Automatically Use Reader
Reader in Safari is a nifty add-on that lets you read content from a website with minimal distractions and no ads. It makes the experience quite simple and offers options like changing the page color, font, and font size.
Activating Reader is quite simple; tap the AA button in the address bar when you're on a supported webpage and choose Show Reader . However, if you frequently visit a specific website, you can configure Safari to load all its webpages in Reader. Here's what you need to do:
- Open the desired website and tap the AA button.
- In the context menu that appears, tap Website Settings .
- Now, toggle on Use Reader Automatically . Each supported webpage will now open in Reader, making it easier to read the content.
5. Set Tabs to Open in Background
Despite it being easy to access AI tools like ChatGPT on mobile for learning about things, if you prefer getting deep into the weeds when doing research, you may want to view many of the following webpages in new tabs.
By default, opening a new tab via a hyperlink will leave the old tab behind and move you to the new tab. While this behavior is fine, it can feel like a chore if you'd like to open multiple results from a search page.
Fortunately, you can change this behavior. Here's what you need to do:
- Open the Settings app, and scroll down to the Safari option.
- On this page, under the Tabs subsection, tap on Open Links .
- Now, choose In Background .
6. Configure Safari to Automatically Close Tabs
Lastly, while the ability to open many tabs in Safari is a boon, knowing ways to organize your browser and keeping it clutter-free can help you focus better and increase productivity. And keeping only a few tabs open can be a part of this regime.
Safari on iPhone also helps with this, with the ability to automatically close tabs after a set period of time; we've detailed the steps to activate the feature below:
- On this page, under the Tabs subsection, tap on Close Tabs .
- Now, choose from the available options: After One Day , After One Week , or After One Month .
Become a Safari Power User With These Changes
Each customization method listed above will help improve your Safari experience, be it with a new background image that makes the app feel more personal or a setting that keeps it clutter-free.
Overall, Safari is an excellent browser that can be made even better for power users with a few changes. And some of Apple's exclusive features make a strong case for the app, especially if you're a Mac user.
iOS 17 – How to Turn Off the iPhone Javascript Setting
Turning off JavaScript in iOS 17 on an iPhone involves navigating to the Settings app, selecting Safari, and toggling the JavaScript option off. This process is quick and simple, ensuring you can adjust your browsing experience in just a few taps.
After you complete this action, your iPhone’s Safari browser will no longer run JavaScript. This means some web pages might not load correctly or at all, as many websites rely on JavaScript for interactive features and dynamic content.
You can also view this video about how to disable Javascript on iPhone for more information.
Introduction
Ever found yourself scratching your head, trying to figure out how to make your iPhone do something? You’re not alone. With each iOS update, Apple introduces a flurry of features and settings, some of which seem to be hidden within the labyrinth of your phone’s menu. And here we are with iOS 17, navigating the twists and turns of the Settings app to find one tiny, but mighty, toggle: JavaScript settings.
For the uninitiated, JavaScript is the language of the web. It’s what makes websites interactive and dynamic. But why would anyone want to turn it off? Well, that’s a great question! Maybe you’re concerned about security, or you’re trying to save data, or perhaps you’re troubleshooting a browser issue. No matter the reason, knowing how to disable JavaScript can be essential for iPhone users who want more control over their web browsing experience. This skill is especially pertinent for parents managing their children’s web access, professionals needing to test web pages, or just the curious cats among us who love to tinker with settings.
Related: How to Enable Javascript on iPhone 14
Step by Step Tutorial
This section will guide you through the steps to turn off JavaScript on your iPhone, which will alter how web pages are displayed in Safari.
Access Settings
Open the Settings app on your iPhone.
When you tap on the Settings icon, you’ll be met with a list of options. Think of it as the gateway to your iPhone’s many capabilities.
Scroll to Safari
Scroll down and select the Safari option.
This is where you dive into the world of web settings. Safari’s settings allow you to control how your browser functions, much like the captain of a ship steering through the seas of the internet.
Advanced Settings
Find and tap on ‘Advanced’ at the bottom of the Safari settings.
Under the Advanced section, you’ll find the nuts and bolts of your Safari experience. It’s where you can fine-tune the technical aspects of your browsing.
Toggle JavaScript Off
Switch the JavaScript toggle to the off position.
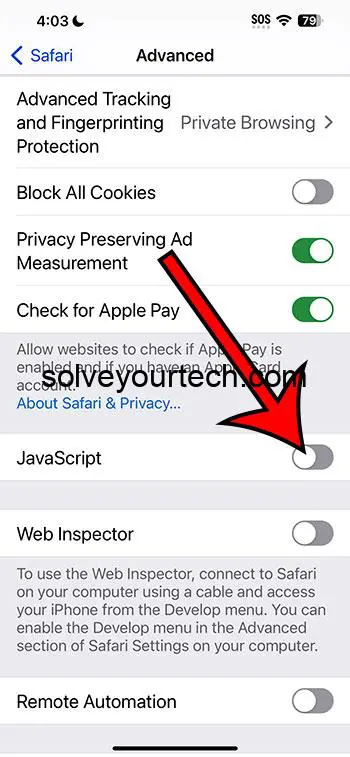
By flipping this switch, you’re telling your iPhone, “Hey, let’s take a break from all that fancy interactive stuff on the web.”
Turning off JavaScript can provide various benefits depending on your needs and preferences.
Improved Security
Disabling JavaScript can enhance the security of your device.
Since JavaScript can be used for harmful activities like executing malicious scripts, turning it off can serve as an additional layer of defense against such threats.
Increased Speed and Reduced Data Usage
Websites may load faster and use less data without JavaScript.
Without the burden of running complex scripts, web pages are stripped down to their basics. This not only speeds up the browsing experience but also saves on data consumption—a boon for those with limited data plans.
Fewer Distractions
Less dynamic content means fewer distractions.
For those who prefer reading articles or research without pop-ups and other dynamic nuisances, turning off JavaScript ensures a more focused and cleaner browsing experience.
However, there are drawbacks to consider before disabling JavaScript.
Limited Functionality
Many websites will not function properly without JavaScript.
In the modern web, JavaScript is the backbone of functionality. Without it, expect to see a lot of broken pages or features that just won’t work.
Potential Compatibility Issues
Some web services and applications may become unusable.
If you’re relying on web apps for work or personal use, turning off JavaScript might be a deal-breaker, as many of these services rely entirely on JavaScript to operate.
Manual Management
You may need to toggle JavaScript on and off frequently.
For sites that you trust and need JavaScript to function, you’ll find yourself frequently switching the setting on and off, which can be quite a hassle.
Video About Disabling Javascript
Additional Information
As we delve deeper into the nooks and crannies of our iPhones, it’s important to remember that settings like JavaScript aren’t just switches to be flipped without consideration. They alter the very way we interact with the vast world of the internet. For every site that runs a little faster, there may be another that refuses to load.
One tip for those who wish to disable JavaScript is to keep a mental or physical note of which sites you absolutely need it for. That way, you can temporarily re-enable it to ensure full functionality. Additionally, some might not know that you can also manage content blockers, which can further refine your browsing experience, sometimes making the need to disable JavaScript less necessary.
Remember, every update to iOS might shuffle settings around or add new features, so it’s always a good idea to stay current with what each new version brings to the table. Staying informed means staying in control.
- Open Settings.
- Select Safari.
- Tap on Advanced.
- Toggle JavaScript to off.
Frequently Asked Questions
Why would i want to disable javascript.
Disabling JavaScript can help with security concerns, reduce data usage, increase website loading speeds, and minimize distractions from dynamic content.
Will disabling JavaScript affect all websites?
Yes, all websites accessed through Safari will be affected by this setting change.
Can I enable JavaScript for specific websites?
Unfortunately, iOS does not currently offer the option to enable JavaScript for specific websites; it’s an all-or-nothing setting.
What should I do if I need JavaScript for a site to work?
You’ll need to re-enable JavaScript temporarily by following the same steps and toggling the switch back on.
Is it possible to disable JavaScript on other browsers on my iPhone?
Yes, most browsers have similar settings, but the process may differ slightly. You’ll need to check the settings or preferences of the browser you’re using.
Navigating the digital seas with your trusty iPhone in hand, you’re now equipped with the knowledge to turn JavaScript on or off. This seemingly minor setting can significantly impact your online experience, so wield it wisely. Whether for security, speed, or simplicity, the power is now at your fingertips. And like any seasoned captain, you know that with great power comes great responsibility—so keep exploring, learning, and staying informed about your device. The world of iOS is ever-changing, and staying adept is the key to making the most of it.

Matthew Burleigh has been writing tech tutorials since 2008. His writing has appeared on dozens of different websites and been read over 50 million times.
After receiving his Bachelor’s and Master’s degrees in Computer Science he spent several years working in IT management for small businesses. However, he now works full time writing content online and creating websites.
His main writing topics include iPhones, Microsoft Office, Google Apps, Android, and Photoshop, but he has also written about many other tech topics as well.
Read his full bio here.
Share this:
Join our free newsletter.
Featured guides and deals
You may opt out at any time. Read our Privacy Policy
Related posts:
- How to Enable Javascript on iPhone 14
- How to Enable Javascript on an iPhone
- How to Disable JavaScript on iPhone 15: A Step-by-Step Guide
- 15 Ways to Fix Safari Not Working on iPhone in 2023
- 15 iPhone Settings You Might Want to Change
- Safari History iPhone: How to See It [2023 Guide]
- How to Turn Off Javascript on the iPhone 6
- Why Can’t I Create a Private Browsing Tab in Safari on My iPhone?
- 3 iPhone Safari Tips You Might Not Know
- How to Turn off Javascript on the iPad 2
- How Do I Change Pop Up Blocker iPhone Settings in Chrome?
- How to Disable a Safari Extension on an iPhone in iOS 17
- How to Get Safari Back on iPhone 13
- Can I Get Rid of Frequently Visited in Safari on iPhone?
- How to Do Private Browsing on iPhone 15: A Step-by-Step Guide
- How to Clear Cookies on iPhone
- iOS 17: How to Turn Off Pop-Up Blocker on iPhone – A Step-by-Step Guide
- Can I Disable the Pop-Up Blocker in Safari On My iPhone?
- How to Block Websites on iPhone 12: A Step-by-Step Guide
- How to Allow Pop Ups on iPhone 15: A Step-by-Step Guide
Fix: iPhone Lagging and Freezing After iOS 17.5 Update
iOS updates bring in new features, enhance the security of the iPhone, and also optimize it to perform better. Sadly, multiple users have reported that ever since they updated to iOS 17.5, their iPhones have been lagging. Moreover, there are constant frame drops while scrolling, keyboard freezing when typing and even the browsing experience on Safari has deteriorated. If you’re facing similar problems, here are ten fixes to try.
How To Fix iPhone Lagging and Freezing After iOS 17.5 Update
1. change keyboard settings.
With iOS 17, Apple updated the Auto-Correction feature with a transformer language model which also improves the Predictive Text feature. The keyboard has inline predictive text recommendations too. While this is a step in the right direction, it consumes a huge chunk of resources, especially if you have an older iPhone.
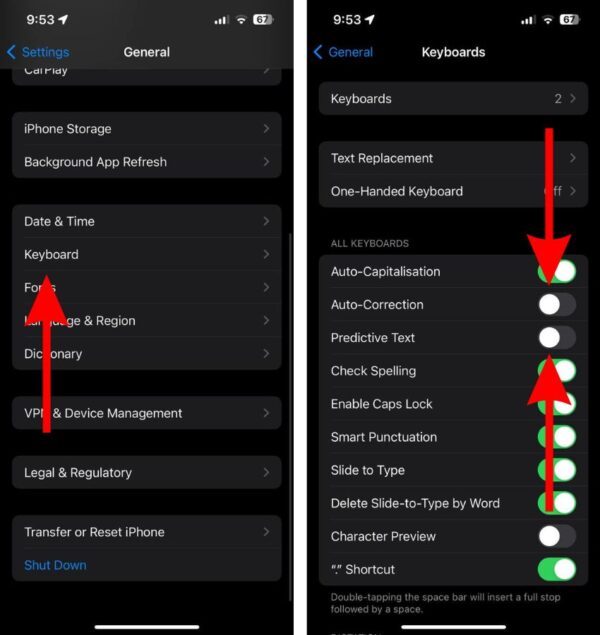
Therefore, we suggest disabling the Auto-Correction and Predictive Text feature on your iPhone as it might help fix your iPhone lagging. Especially because other users have reported that doing so helps resolve the issue.
Time needed: 2 minutes
Steps to disable Auto-Correction and Predictive Text in Keyboard settings.
2. Remove Dictionary and Add It Back
The Dictionary feature helps you “Look Up” the meaning of words on your iPhone. You can add dictionaries of several different languages. But for some reason, these dictionaries might be the reason your iPhone is lagging.
Yes, it does not make a lot of sense, but a user on the Apple Discussion Community has reported that removing all the dictionaries and then adding back only the ones you use helps fix iPhone lagging issues. Therefore, we suggest you do the same.
- Open Settings on your iPhone and head to General .
- Tap the Dictionary option.
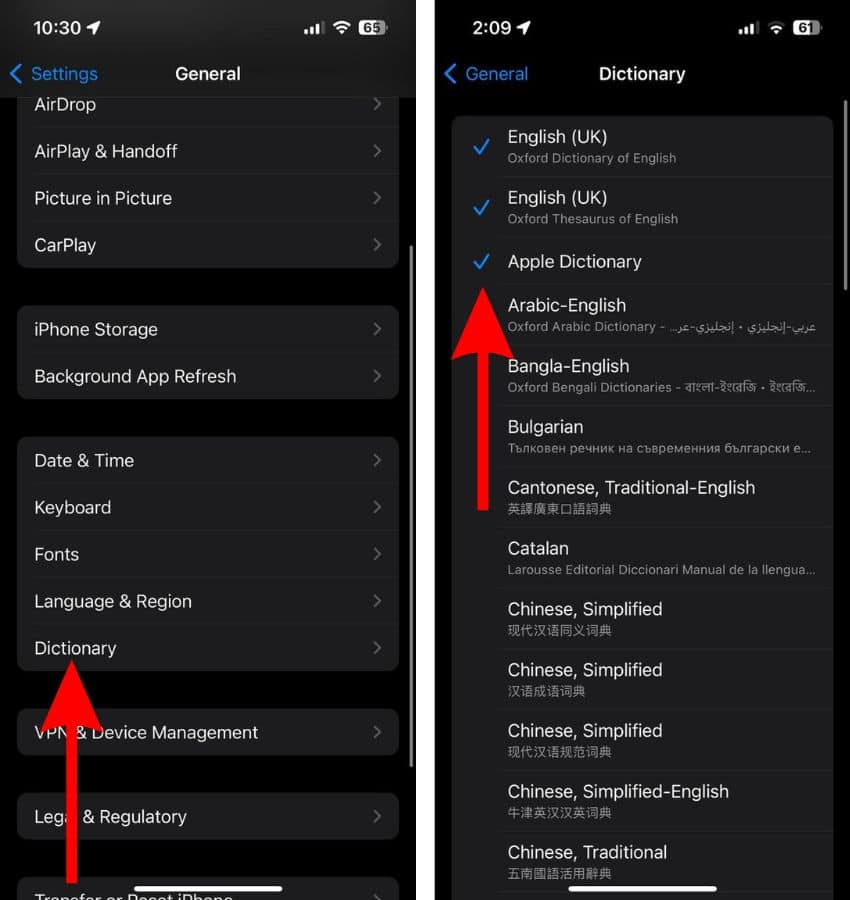
- Restart your iPhone. If you’re unaware of the steps to do so, ask Siri to restart your iPhone .
- After your iPhone restarts, head back to Settings > General > Dictionary .
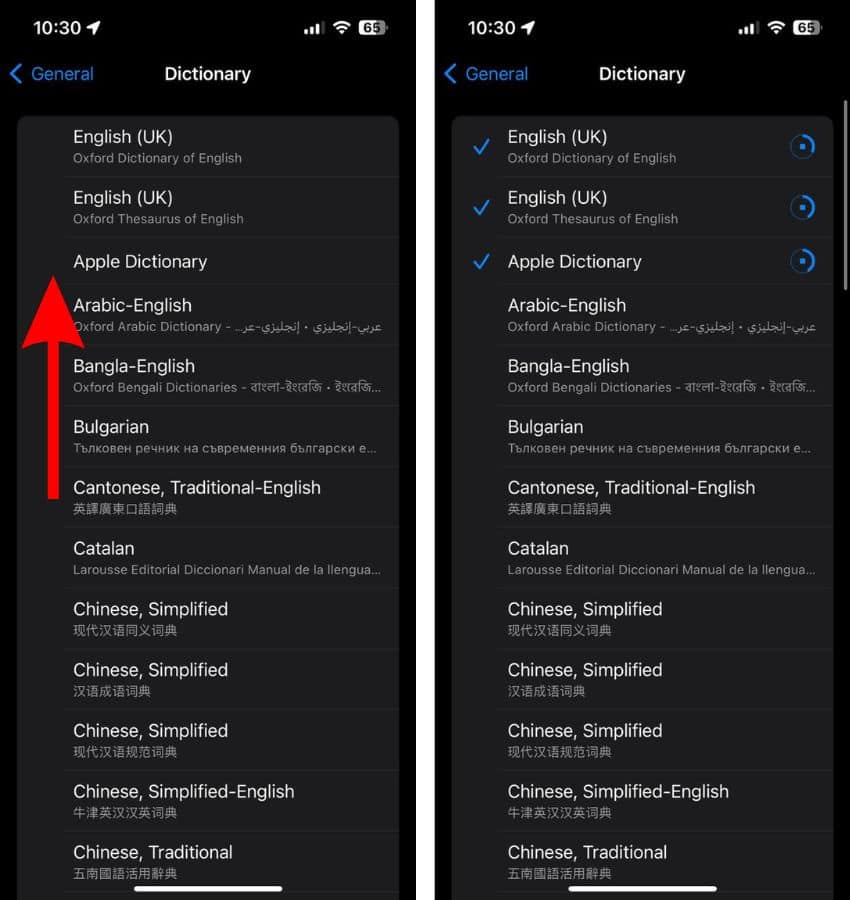
3. Disable Siri Contact Suggestions
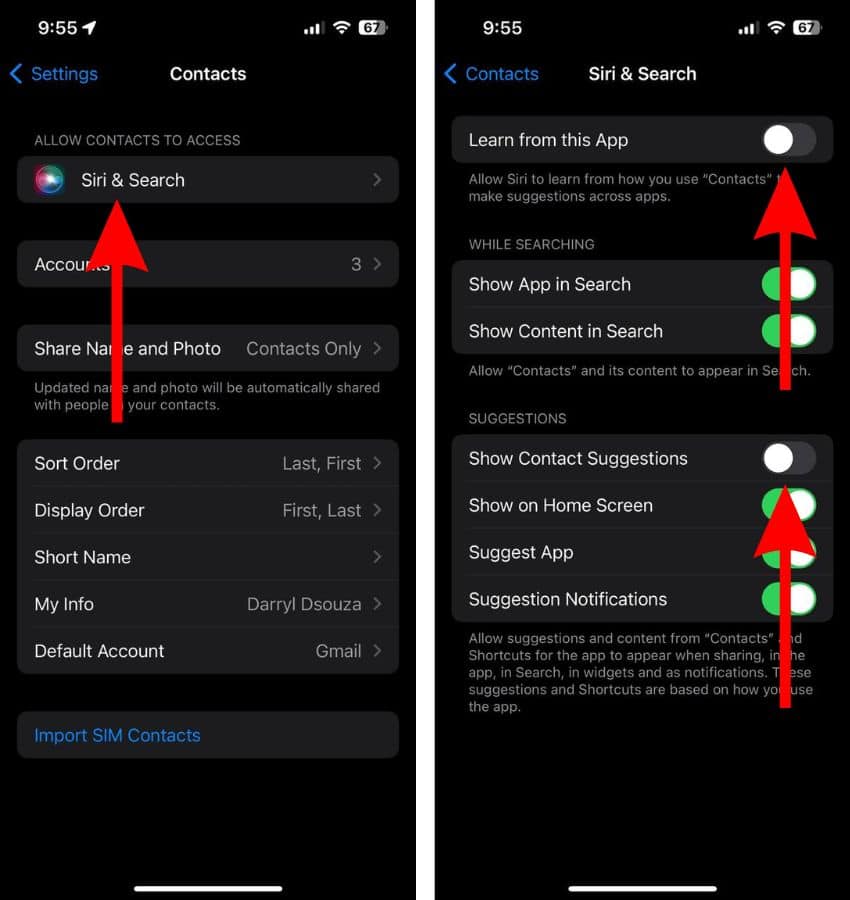
- Open Settings on your iPhone and head to the Contacts option.
- Tap the Siri & Search option.
- On the next screen, disable the Learn from this App toggle.
- Disable the Show Contact Suggestions toggle too.
4. Clear Safari History and Data
If Safari is lagging, freezing, or crashing on your iPhone running on iOS 17.5, the first thing you must do is to clear Safari’s History and Website Data.
- Open Settings on your iPhone and navigate to Safari .
- Scroll down and tap the Clear History and Website Data button.
- Select the All History option from the Clear Timeframe menu.
- You can also enable the Close All Tabs toggle. It won’t delete any tabs that are in a Tab Group.
- Finally, tap the Clear History button.
- Scroll to the bottom of the page and tap the Advanced button.
- Tap the Website Data button.
- On the Website Data page, tap the Remove All Website Data button.
- Tap the Remove Now button to confirm your selection.
If the aforementioned steps don’t fix the freezing issues on your iPhone, please refer to our detailed guide on how to fix Safari Freezing on your iPhone .
5. Clear Background Apps
Apps running in the background can also be the reason why your iPhone is lagging. Please clear all the background apps and it might free up the RAM and fix lagging issues.
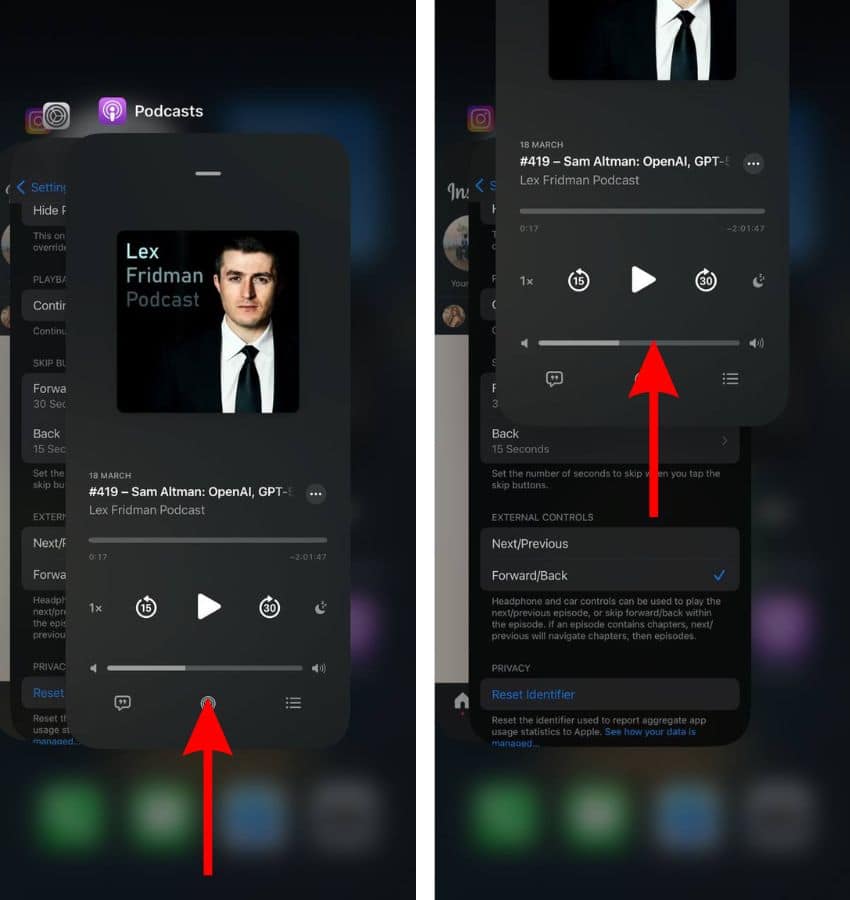
- For iPhone with Face ID: Swipe up and hold on to the Home Screen . For iPhone with Touch ID: Double tap the Home Button .
- Swipe up on all the app s in the Recent Apps tray.
6. Force Restart iPhone
Temporary bugs and glitches in the software, apps, or services can also cause the iPhone to lag. Force restarting your iPhone can help get rid of these bugs and fix the lagging issues.
Steps to Force Restart iPhone (iPhone 8, iPhone SE 2nd Gen and above)
- Press and release the volume up button .
- Press and release the volume down button .
- Next, press and hold the Side button until the Apple logo appears.
- As soon as you see the Apple logo, release the Side button . Please do not release the Side button before the Apple logo appears on the screen.
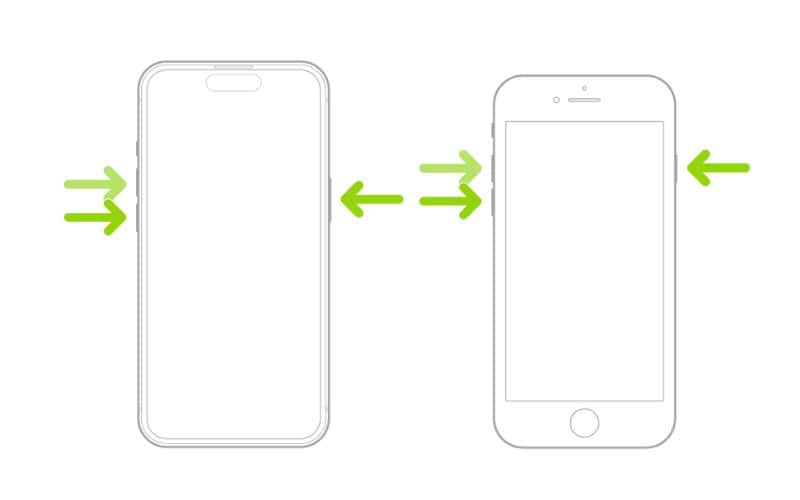
Steps to Force Restart iPhone 7 or iPhone 7 Plus
Press and hold the Volume down and Side buttons simultaneously. Release the buttons once the Apple logo appears.
Steps to Force Restart iPhone 6s or below
Press and hold the Side and Home buttons simultaneously. Release the buttons once the Apple logo appears.
7. Update All Apps
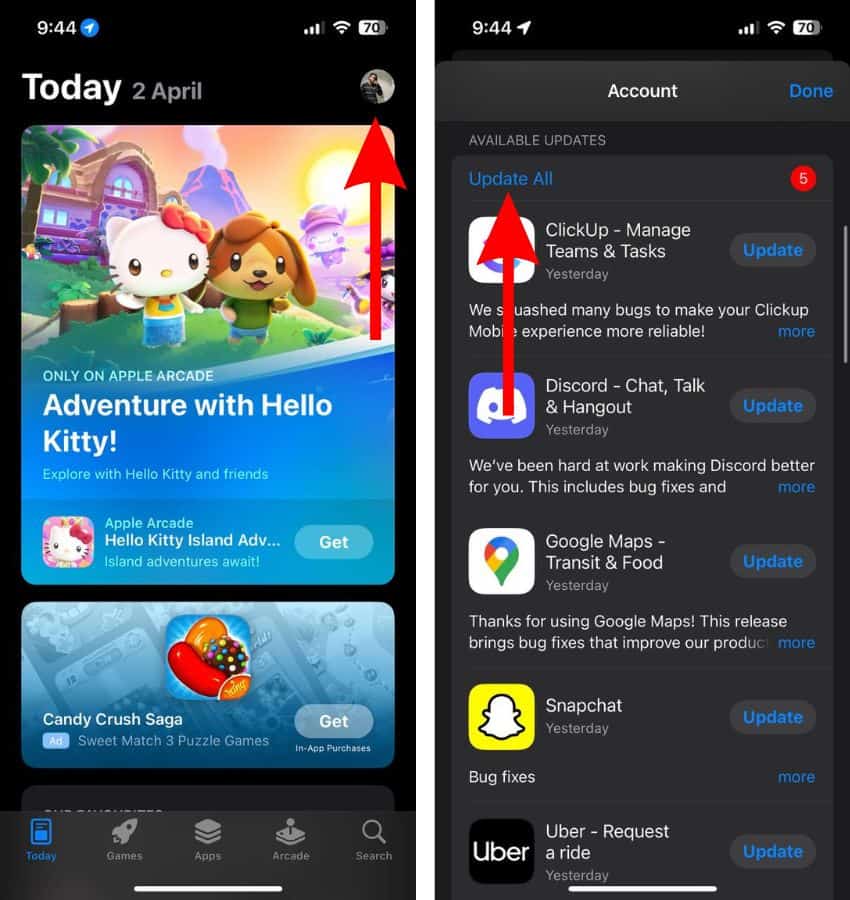
- Open the App Store on your iPhone.
- Tap on your Profile at the top right corner.
- Scroll down to the Available Updates section and tap the Update All button.
8. Check Storage Space
Most of us are aware that iPhones tend to lag when running extremely low on storage space. If you haven’t already, please check the free storage space on your iPhone. If it is low, we suggest uninstalling apps or unused media files to free up storage space as it might help fix the lag or stutters on your iPhone.
- Open Settings on your iPhone and head to the General option.
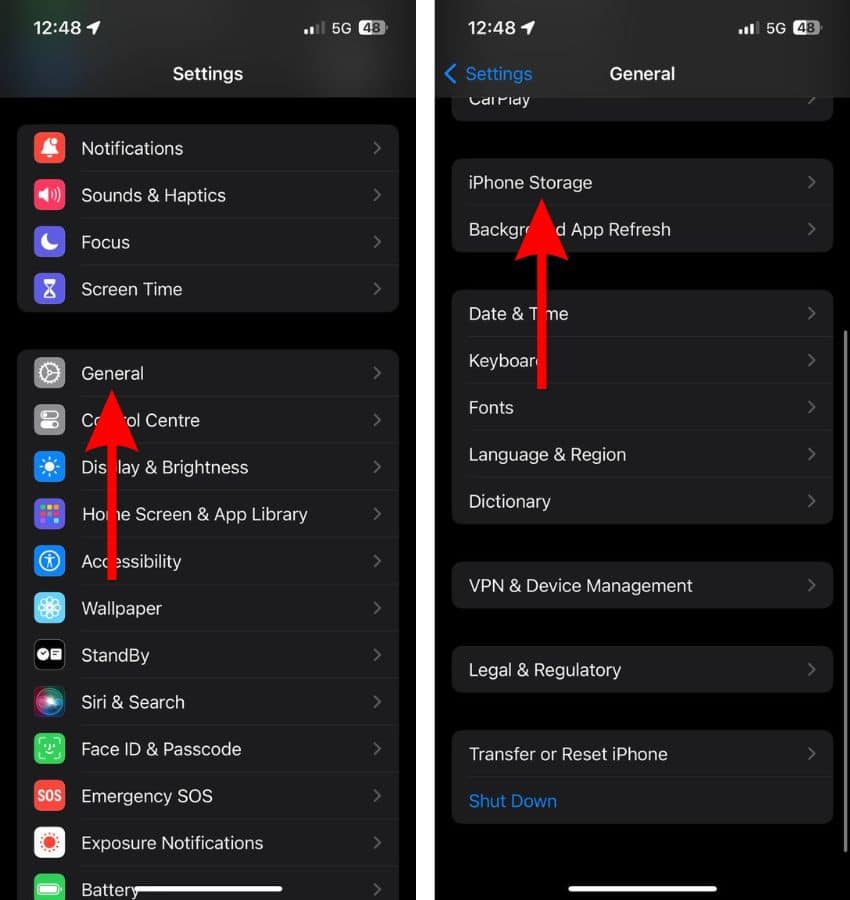
- The next screen will display the amount of occupied and total storage space on your iPhone. You can delete apps that you don’t use often to free up storage space on your iPhone.
- Tap on any app you want to delete.
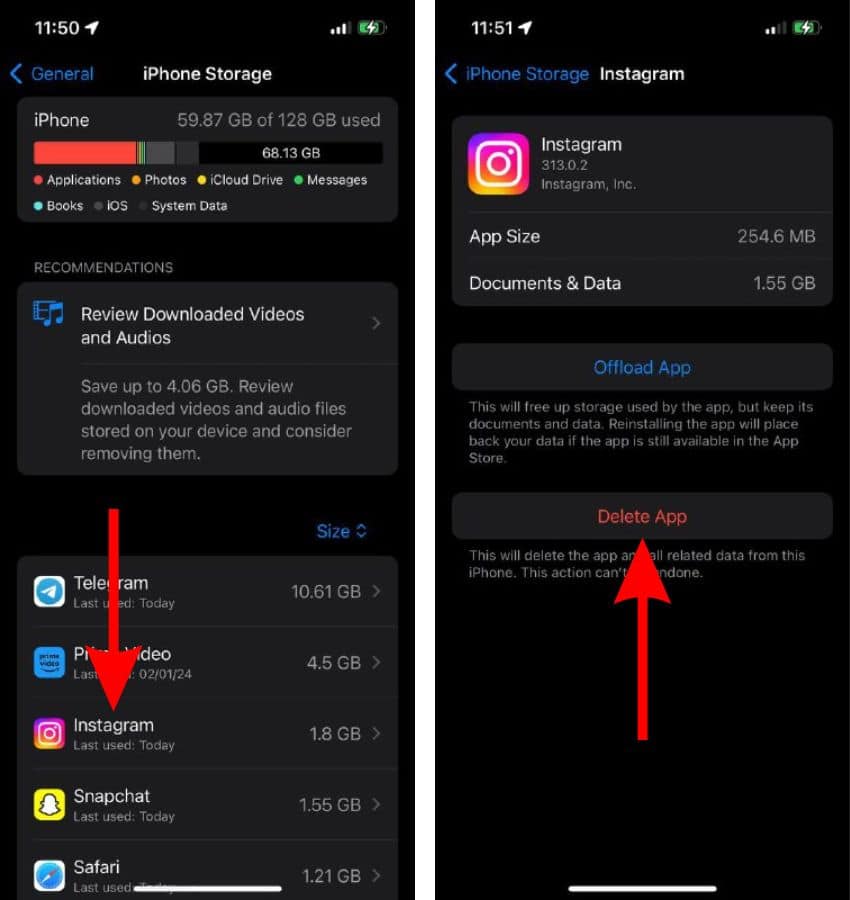
Also, in case your iPhone displays a “Recommendations” option, tap on it and follow the recommended actions to free up storage space. The quickest way to empty storage space is to use a maintenance tool. One of the most popular apps is the Intego Washing Machine because it fully declutters your iPhone and increases its health significantly.
9. Factory Reset iPhone
If none of the aforementioned methods help resolve the issue, the last option you’re left with is to factory reset your iPhone. Please refer to our guide on How to Factory Reset Your iPhone for detailed instructions.
We hope this guide helps fix your iPhone lagging after the iOS 17.5 update. If you have any doubts, please let us know in the comments below.
Leave a Reply Cancel reply
You must be logged in to post a comment.
This site uses Akismet to reduce spam. Learn how your comment data is processed .
- Darryl Dsouza
Mac keyboard shortcuts
By pressing certain key combinations, you can do things that normally need a mouse, trackpad, or other input device.
Using keyboard shortcuts
Common shorcuts like cut, copy, paste
Sleep, log out, and shut down shortcuts
Finder and system shortcuts, document shortcuts, accessibility shortcuts, other shortcuts.
To use a keyboard shortcut, press and hold one or more modifier keys and then press the last key of the shortcut. For example, to use Command-C (copy), press and hold the Command key, then the C key, then release both keys. Mac menus and keyboards often use symbols for certain keys , including modifier keys:
Command (or Cmd) ⌘
Option (or Alt) ⌥
Control (or Ctrl) ⌃
Caps Lock ⇪
On keyboards made for Windows PCs, use the Alt key instead of Option, and the Ctrl key or Windows logo key instead of Command.
Cut, copy, paste, and other common shortcuts
Command-X : Cut the selected item and copy it to the Clipboard.
Command-C : Copy the selected item to the Clipboard. This also works for files in the Finder.
Command-V : Paste the contents of the Clipboard into the current document or app. This also works for files in the Finder.
Command-Z : Undo the previous command. You can then press Shift-Command-Z to Redo, reversing the undo command. In some apps, you can undo and redo multiple commands.
Command-A : Select All items.
Command-F : Find items in a document or open a Find window.
Command-G : Find Again: Find the next occurrence of the item previously found. To find the previous occurrence, press Shift-Command-G.
Command-H : Hide the windows of the front app. To view the front app but hide all other apps, press Option-Command-H.
Command-M : Minimize the front window to the Dock. To minimize all windows of the front app, press Option-Command-M.
Command-O: Open the selected item, or open a dialog to select a file to open.
Command-P : Print the current document.
Command-S : Save the current document.
Command-T : Open a new tab.
Command-W : Close the front window. To close all windows of the app, press Option-Command-W.
Option-Command-Esc : Force quit an app.
Command–Space bar : Show or hide the Spotlight search field. To perform a Spotlight search from a Finder window, press Command–Option–Space bar. (If you use multiple input sources to type in different languages, these shortcuts change input sources instead of showing Spotlight. Learn how to change a conflicting keyboard shortcut .)
Control–Command–Space bar : Show the Character Viewer, from which you can choose emoji and other symbols .
Control-Command-F : Use the app in full screen, if supported by the app.
Space bar : Use Quick Look to preview the selected item.
Command-Tab : Switch to the next most recently used app among your open apps.
Command–Grave accent (`): Switch between the windows of the app you're using. (The character on the second key varies by keyboard. It's generally the key above the Tab key and to the left of the number 1.)
Shift-Command-5 : In macOS Mojave or later , take a screenshot or make a screen recording. Or use Shift-Command-3 or Shift-Command-4 for screenshots. Learn more about screenshots .
Shift-Command-N: Create a new folder in the Finder.
Command-Comma (,) : Open preferences for the front app.
You might need to press and hold some of these shortcuts for slightly longer than other shortcuts. This helps you to avoid using them unintentionally.
Power button : Press to turn on your Mac or wake it from sleep. Press and hold for 1.5 seconds to put your Mac to sleep.* Continue holding to force your Mac to turn off.
Control–Command–Power button :* Force your Mac to restart, without prompting to save any open and unsaved documents.
Control-Command-Q : Immediately lock your screen.
Shift-Command-Q : Log out of your macOS user account. You will be asked to confirm. To log out immediately without confirming, press Option-Shift-Command-Q.
* Does not apply to the Touch ID sensor .
Command-D : Duplicate the selected files.
Command-E : Eject the selected disk or volume.
Command-F : Start a Spotlight search in the Finder window.
Command-I : Show the Get Info window for a selected file.
Command-R : (1) When an alias is selected in the Finder: show the original file for the selected alias. (2) In some apps, such as Calendar or Safari, refresh or reload the page. (3) In Software Update, check for software updates again.
Shift-Command-C : Open the Computer window.
Shift-Command-D : Open the desktop folder.
Shift-Command-F : Open the Recents window, showing all of the files you viewed or changed recently.
Shift-Command-G : Open a Go to Folder window.
Shift-Command-H : Open the Home folder of the current macOS user account.
Shift-Command-I : Open iCloud Drive.
Shift-Command-K : Open the Network window.
Option-Command-L : Open the Downloads folder.
Shift-Command-N: Create a new folder.
Shift-Command-O : Open the Documents folder.
Shift-Command-P : Show or hide the Preview pane in Finder windows.
Shift-Command-R : Open the AirDrop window.
Shift-Command-T : Show or hide the tab bar in Finder windows.
Control-Shift-Command-T : Add selected Finder item to the Dock (OS X Mavericks or later)
Shift-Command-U : Open the Utilities folder.
Option-Command-D : Show or hide the Dock.
Control-Command-T : Add the selected item to the sidebar (OS X Mavericks or later).
Option-Command-P : Hide or show the path bar in Finder windows.
Option-Command-S : Hide or show the Sidebar in Finder windows.
Command–Slash (/) : Hide or show the status bar in Finder windows.
Command-J : Show View Options.
Command-K : Open the Connect to Server window.
Control-Command-A : Make an alias of the selected item.
Command-N : Open a new Finder window.
Option-Command-N : Create a new Smart Folder.
Command-T : Show or hide the tab bar when a single tab is open in the current Finder window.
Option-Command-T : Show or hide the toolbar when a single tab is open in the current Finder window.
Option-Command-V : Move the files in the Clipboard from their original location to the current location.
Command-Y : Use Quick Look to preview the selected files.
Option-Command-Y : View a Quick Look slideshow of the selected files.
Command-1 : View the items in the Finder window as icons.
Command-2 : View the items in a Finder window as a list.
Command-3 : View the items in a Finder window in columns.
Command-4 : View the items in a Finder window in a gallery.
Command–Left Bracket ([) : Go to the previous folder.
Command–Right Bracket (]) : Go to the next folder.
Command–Up Arrow : Open the folder that contains the current folder.
Command–Control–Up Arrow : Open the folder that contains the current folder in a new window.
Command–Down Arrow : Open the selected item.
Right Arrow : Open the selected folder. This works only when in list view.
Left Arrow : Close the selected folder. This works only when in list view.
Command-Delete : Move the selected item to the Trash.
Shift-Command-Delete : Empty the Trash.
Option-Shift-Command-Delete : Empty the Trash without confirmation dialog.
Command–Brightness Down : Turn video mirroring on or off when your Mac is connected to more than one display.
Option–Brightness Up : Open Displays preferences. This works with either Brightness key.
Control–Brightness Up or Control–Brightness Down : Change the brightness of your external display, if supported by your display.
Option–Shift–Brightness Up or Option–Shift–Brightness Down : Adjust the display brightness in smaller steps. Add the Control key to this shortcut to make the adjustment on your external display, if supported by your display.
Option–Mission Control : Open Mission Control preferences.
Command–Mission Control : Show the desktop.
Control–Down Arrow : Show all windows of the front app.
Option–Volume Up : Open Sound preferences. This works with any of the volume keys.
Option–Shift–Volume Up or Option–Shift–Volume Down : Adjust the sound volume in smaller steps.
Option–Keyboard Brightness Up : Open Keyboard preferences. This works with either Keyboard Brightness key.
Option–Shift–Keyboard Brightness Up or Option–Shift–Keyboard Brightness Down : Adjust the keyboard brightness in smaller steps.
Option key while double-clicking : Open the item in a separate window, then close the original window.
Command key while double-clicking : Open a folder in a separate tab or window.
Command key while dragging to another volume : Move the dragged item to the other volume, instead of copying it.
Option key while dragging : Copy the dragged item. The pointer changes while you drag the item.
Option-Command while dragging : Make an alias of the dragged item. The pointer changes while you drag the item.
Option-click a disclosure triangle : Open all folders within the selected folder. This works only when in list view.
Command-click a window title : See the folders that contain the current folder.
Learn how to use Command or Shift to select multiple items in the Finder .
Click the Go menu in the Finder menu bar to see shortcuts for opening many commonly used folders, such as Applications, Documents, Downloads, Utilities, and iCloud Drive.
The behavior of these shortcuts may vary with the app you're using.
Command-B : Boldface the selected text, or turn boldfacing on or off.
Command-I : Italicize the selected text, or turn italics on or off.
Command-K : Add a web link.
Command-U : Underline the selected text, or turn underlining on or off.
Command-T : Show or hide the Fonts window.
Command-D : Select the Desktop folder from within an Open dialog or Save dialog.
Control-Command-D : Show or hide the definition of the selected word.
Shift-Command-Colon (:) : Display the Spelling and Grammar window.
Command-Semicolon (;) : Find misspelled words in the document.
Option-Delete : Delete the word to the left of the insertion point.
Control-H : Delete the character to the left of the insertion point. Or use Delete.
Control-D : Delete the character to the right of the insertion point. Or use Fn-Delete.
Fn-Delete : Forward delete on keyboards that don't have a Forward Delete key. Or use Control-D.
Control-K : Delete the text between the insertion point and the end of the line or paragraph.
Fn–Up Arrow : Page Up: Scroll up one page.
Fn–Down Arrow : Page Down: Scroll down one page.
Fn–Left Arrow: Home: Scroll to the beginning of a document.
Fn–Right Arrow : End: Scroll to the end of a document.
Command–Up Arrow : Move the insertion point to the beginning of the document.
Command–Down Arrow : Move the insertion point to the end of the document.
Command–Left Arrow : Move the insertion point to the beginning of the current line.
Command–Right Arrow : Move the insertion point to the end of the current line.
Option–Left Arrow : Move the insertion point to the beginning of the previous word.
Option–Right Arrow : Move the insertion point to the end of the next word.
Shift–Command–Up Arrow : Select the text between the insertion point and the beginning of the document.
Shift–Command–Down Arrow : Select the text between the insertion point and the end of the document.
Shift–Command–Left Arrow : Select the text between the insertion point and the beginning of the current line.
Shift–Command–Right Arrow : Select the text between the insertion point and the end of the current line.
Shift–Up Arrow : Extend text selection to the nearest character at the same horizontal location on the line above.
Shift–Down Arrow : Extend text selection to the nearest character at the same horizontal location on the line below.
Shift–Left Arrow : Extend text selection one character to the left.
Shift–Right Arrow : Extend text selection one character to the right.
Option–Shift–Up Arrow : Extend text selection to the beginning of the current paragraph, then to the beginning of the following paragraph if pressed again.
Option–Shift–Down Arrow : Extend text selection to the end of the current paragraph, then to the end of the following paragraph if pressed again.
Option–Shift–Left Arrow : Extend text selection to the beginning of the current word, then to the beginning of the following word if pressed again.
Option–Shift–Right Arrow : Extend text selection to the end of the current word, then to the end of the following word if pressed again.
Control-A : Move to the beginning of the line or paragraph.
Control-E : Move to the end of a line or paragraph.
Control-F : Move one character forward.
Control-B : Move one character backward.
Control-L : Center the cursor or selection in the visible area.
Control-P : Move up one line.
Control-N : Move down one line.
Control-O : Insert a new line after the insertion point.
Control-T : Swap the character behind the insertion point with the character in front of the insertion point.
Command–Left Curly Bracket ({) : Left align.
Command–Right Curly Bracket (}) : Right align.
Shift–Command–Vertical bar (|) : Center align.
Option-Command-F : Go to the search field.
Option-Command-T : Show or hide a toolbar in the app.
Option-Command-C : Copy Style: Copy the formatting settings of the selected item to the Clipboard.
Option-Command-V : Paste Style: Apply the copied style to the selected item.
Option-Shift-Command-V : Paste and Match Style: Apply the style of the surrounding content to the item pasted within that content.
Option-Command-I : Show or hide the inspector window.
Shift-Command-P : Page setup: Display a window for selecting document settings.
Shift-Command-S : Display the Save As dialog, or duplicate the current document.
Shift–Command–Minus sign (-) : Decrease the size of the selected item.
Shift–Command–Plus sign (+) : Increase the size of the selected item. Command–Equal sign (=) performs the same function.
Shift–Command–Question mark (?) : Open the Help menu.
To use these vision shortcuts, first choose Apple menu > System Settings (or System Preferences), then click Keyboard. Click Keyboard Shortcuts, select Accessibility on the left, then select “Invert colors” and "Contrast" on the right.
Control-Option-Command-8 : Invert colors.
Control-Option-Command-Comma (,) and Control-Option-Command-Period (.) : Reduce contrast and increase contrast.
Use these shortcuts to change keyboard focus. To use some of these shortcuts, first choose Apple menu > System Settings (or System Preferences), then click Keyboard. Click Keyboard Shortcuts, select Keyboard on the left, then select the shortcut's setting on the right.
Control-F2 or Fn-Control-F2: Move focus to the menu bar. You can then use the arrow keys to navigate the menu, press Return to open a selected menu or choose a selected menu item, or type the menu item's name to jump to that item in the selected menu.
Control-F3 or Fn-Control-F3 : Move focus to the Dock.
Control-F4 or Fn-Control-F4 : Move focus to the active window or next window.
Control-F5 or Fn-Control-F5 : Move focus to the window toolbar.
Control-F6 or Fn-Control-F6: Move focus to the floating window.
Control-Shift-F6 : Move focus to the previous panel.
Control-F7 or Fn-Control-F7 : Change the way Tab moves focus—between navigation of all controls on the screen, or only text boxes and lists.
Control-F8 or Fn-Control-F8 : Move focus to the status menu in the menu bar
Command–Grave accent (`) : Activate the next open window in the front app.
Shift–Command–Grave accent (`) : Activate the previous open window in the front app
Option–Command–Grave accent (`) : Move the focus to the window drawer.
Tab and Shift-Tab : Move to next control, move to previous control.
Control-Tab : Move to the next control when a text field is selected.
Control-Shift-Tab : Move to the previous grouping of controls.
Arrow keys : Move to the adjacent item in a list, tab group, or menu, or move sliders and adjusters (Up Arrow to increase values, Down Arrow to decrease values)
Control–Arrow keys : Move to a control adjacent to the text field.
Other accessibility shortcuts:
Option-Command-F5 or triple-press Touch ID : Show the Accessibility Shortcuts panel .
VoiceOver commands
Zoom in or out
Use Mouse Keys to control the pointer with your keyboard
If you're using VoiceOver, you might need to make VoiceOver ignore the next key press before you can use some of the shortcuts in this article.
Safari shortcuts
Spotlight shortcuts
Mail shortcuts
Photos shortcuts
Disk Utility shortcuts
Preview shortcuts
Apple Music shortcuts
Startup shortcuts
For more shortcuts, check the shortcut abbreviations shown in the menus of your apps. Every app can have its own shortcuts, and shortcuts that work in one app might not work in another.
Use emoji and symbols
Create your own shortcuts and resolve conflicts between shortcuts
Change the behavior of the function keys or modifier keys
Use a spoken command for a keyboard shortcut
Explore Apple Support Community
Find what’s been asked and answered by Apple customers.

IMAGES
VIDEO
COMMENTS
Click on the "Safari" menu at the top left corner of the browser. 3. Under the Safari menu, find and click on "Preferences". This will open a pop-up menu. 4. Move your cursor over to the "Security" tab and select it. 5. Now check the box beside "Enable JavaScript" to turn on JavaScript.
Open the Settings app on your iPhone. Scroll down until you see "Safari," and tap it. To enable JavaScript, start the Settings app and go to Safari. Dave Johnson/Insider. At the bottom of the page ...
Enabling JavaScript on your iPhone running iOS 17 is a breeze. Tap on the Settings app, scroll down to Safari, and then to Advanced. There you'll find the JavaScript toggle - switch it on, and you're all set! Once you've enabled JavaScript on your iPhone, you'll experience a smoother and more interactive web browsing.
Step 3: Toggle JavaScript to On. Find the JavaScript option and toggle the switch to the on position. The JavaScript toggle is usually near the bottom of the Safari settings. If the toggle is green, that means JavaScript is enabled. After you complete these steps, JavaScript will be enabled on your iPhone.
When you tap on the Settings icon, you'll see a list of options for adjusting your iPhone's various features and preferences. Step 2: Scroll and tap Safari. Scroll down until you find Safari and tap on it. Safari is the default web browser for iOS devices, and this is where you'll find the option to enable JavaScript. Step 3: Tap on Advanced
Enabling JavaScript on your iPhone running iOS 17 is a straightforward process. Head to the "Settings" app, tap "Safari," and select "Advanced.". There you will find the JavaScript setting. Just switch it on, and voilà, JavaScript is now enabled on your iPhone. After you complete this action, your mobile browser will be able to run ...
Safari; Opera; iOS. Follow these instructions to activate and enable JavaScript in iOS on the iPhone and iPad. Safari iOS. Select the Settings application/icon on the iPhone home screen. Select Safari on the following screen. Select Advanced, located near the bottom of the following screen. Move the JavaScript toggle to the right so that it ...
The Advanced section is typically at the very bottom of the Safari settings page. Step 4: Toggle JavaScript On. In the Advanced section, you'll see an option for JavaScript. Toggle the switch to the right to enable it. The switch will turn green once JavaScript is enabled. This means that your browser can now process JavaScript code on websites.
In the Shortcuts app, the Run JavaScript on Webpage action helps you spot errors by doing a basic syntax check before you run the shortcut from the Safari extension. As you enter your script in the text field, syntax highlighting helps ensure that your JavaScript is valid. For example, if you forget to include quotation marks at the end of a ...
Tap the "Settings" app. 2. Scroll down until you see "Safari," or any other web browser that you'd like to enable JavaScript in. 3. Tap on the "Safari" icon. 4. Scroll down and tap "Advanced," at ...
Scroll through the menu and select "Safari" to access browser-specific settings. Safari is the default web browser on all Apple iOS devices. In the Safari settings menu, scroll down to the "Advanced" option. This section allows users to manage more technical settings of the Safari browser. Toggle the "JavaScript" switch to the on position.
To ensure that the shortcut appears only in Safari, deselect all input types except "Safari webpages." For more information, see Understanding input types in Shortcuts on iPhone or iPad . Tap Done to return to the shortcut editor, then tap Done again to save the shortcut to your shortcuts collection.
Select " Safari ". Scroll down to the bottom and select " Advanced ". Set the " JavaScript " setting to " On " (green) to enable it. Set it to " Off " (white) to disable it. iOS 6 & Lower. Tap the " Settings" icon. Select " Safari ". Slide the JavaScript setting to " On " to enable the setting. Slide it to ...
Enable JavaScript in Safari. With Safari on MacOS. Click on Safari Menu and select " Preferences… " (or press Command+,) If you are using Safari on Windows. Click the Gear icon and select " Preferences ". In the " Security " tab section " Web content " mark the " Enable JavaScript " checkbox. Close Preferences popup window and reload your ...
Microsoft Edge. JavaScript is enabled by default in Microsoft Edge. You can still verify this by following the below steps. Click on the Menu icon in Edge and go to Settings. Select Cookies and ...
on the iPhone create and use a shortcut for Safari advanced options: open Shortcuts on iOS and select the + to create a new one; give it a name (eg "toggle-js"); choose add action then from the "Web" options select Open URL; use the URL in quotes here: "prefs:root=SAFARI&path=ADVANCED";
Go to Settings > Safari > Advanced. Turn on JavaScript. Get more help. If the issue continues and only affects a certain website or webpage, check if you have Private Relay turned on. You can temporarily turn off Private Relay in iCloud Settings. If Safari still doesn't load websites and you tried all of these steps, contact the website ...
Enabling inspecting your device from a connected Mac. Before you can connect your device to a Mac to inspect it, you must allow the device to be inspected. Open the Settings app. Go to Safari. Scroll down to Advanced. Enable the Web Inspector toggle. Now, connect the device to your Mac using a cable. In Safari, the device will appear in the ...
Activate Web Inspector on iOS: Go to Settings > Safari > Advanced and move the Web Inspector toggle switch to the On position. Use Web Inspector on macOS: Connect your iOS device to a Mac and choose the URL to inspect from the Develop menu. If you run into a bug or another issue with a website on Safari mobile, use the Web Inspector tool to ...
How can I go to apple settings in safari IOS 17? javascript; html; ios; url; safari; Share. Follow asked Sep 20, 2023 at 10:11. Andy Brown Andy Brown. 11 1 1 ... javascript; html; ios; url; safari; or ask your own question. Mobile Development Collective Join the discussion. This question is ...
Here I find solution how to open Settings in iOS: How to redirect to ios settings in Safari use javascript in ios9. var redirect = function() {. window.location.href = "prefs:root=Settings"; But there is some problems with this solution on my iPhone 6s plus 9.3.2 (13F69): - this solution doesn't work on my particelar iPhone, but work on iPhone ...
Here's how you can make modifications to how Safari looks like on your iPhone: Launch the Settings app. Scroll down and go to Safari. Under the Tabs section, select Single Tab to place the address ...
Customize your start page. When you open a new tab, you begin on your start page. You can customize your start page with new background images and options. Open the Safari app on your iPhone. Tap , then tap . Scroll to the bottom of the page, then tap Edit. Favorites: Display shortcuts to your favorite bookmarked websites.
2 Images. Close. If you want to experience Apple's Continuity feature, toggle on Use Start Page on All Devices at the top of the edit menu. This will ensure your start page is in sync across all ...
4. I believe the following is still the current picture for iOS: elements will be allowed to autoplay without a user gesture if their source media contains no audio tracks. elements will also be allowed to autoplay without a user gesture. If a element gains an audio track or becomes un-muted without a user gesture, playback will pause.
Turning off JavaScript in iOS 17 on an iPhone involves navigating to the Settings app, selecting Safari, and toggling the JavaScript option off. This process is quick and simple, ensuring you can adjust your browsing experience in just a few taps. After you complete this action, your iPhone's Safari browser will no longer run JavaScript.
Clear Safari History and Data. If Safari is lagging, freezing, or crashing on your iPhone running on iOS 17.5, the first thing you must do is to clear Safari's History and Website Data. Open ...
Open the Safari app on your iPhone. Tap , tap , then tap Clear. Below Clear Timeframe, choose how much of your browsing history to clear. Note: If you have Safari profiles set up, select a profile to clear only the history of that profile, or select All Profiles. Tap Clear History. Learn how to erase your browsing history to clear the cache in ...
FaceTime (In iOS 17.4 or later, if you remove the FaceTime app from your iPhone, or if you removed it in an earlier version of iOS before updating to iOS 17.4, you won't be able to make or receive FaceTime calls or join SharePlay sessions on your iPhone unless you redownload the app. See Make FaceTime calls on iPhone.) Files
Finder and system shortcuts. Command-D: Duplicate the selected files.. Command-E: Eject the selected disk or volume.. Command-F: Start a Spotlight search in the Finder window.. Command-I: Show the Get Info window for a selected file.. Command-R: (1) When an alias is selected in the Finder: show the original file for the selected alias.(2) In some apps, such as Calendar or Safari, refresh or ...