- Press Releases
- Industry News
- Product Spotlight
- Fresh from Apple
- Video Production
- Installation Videos
- Explainer Videos
- Testing Lab
- Networking & Security
- Special OWC Deals
- The Other World
- Powered by OWC
- Space & Beyond
- Random Thoughts & Topics
- OWC Unplugged
- Article Archives
- Make a Suggestion

Send us a Topic or Tip
Have a suggestion for the blog? Perhaps a topic you'd like us to write about? If so, we'd love to hear from you! Fancy yourself a writer and have a tech tip, handy computer trick, or "how to" to share? Let us know what you'd like to contribute!
How to Take a Screenshot of an Entire Webpage in Safari on a Mac

Taking screenshots of a webpage is a normal operation for many. Perhaps it’s to capture an image for a meme, graphs for a presentation, or to send that annoying error message to a disbelieving customer service rep. Whatever the reason, some of the standard Mac screenshot options may not do the trick.
Most of us are familiar with Shift-Command-3 to capture the entire screen, or Shift-Command-4 to capture a selected portion of a screen. You may even be familiar with Shift-Command-5 to capture a single window. But what if you want to take a scrolling screen capture of an entire webpage? The aforementioned tools can’t do that – they can only capture visible areas of your screen. So, is it even possible to take a screenshot that includes a portion of a webpage you would normally need to scroll to see?
Yes, there is! But it does take a few extra steps than just executing a single keystroke combination.
Screenshot a Webpage
- Open Safari and go to “ Safari > Preferences… “
- Click the Advanced tab and toggle on “ Show Develop menu in menu bar .”

- Navigate to the webpage you want to capture and from the Develop menu, choose “ Show Web Inspector .” Alternatively, you can hit alt-command-I (⌥⌘I).

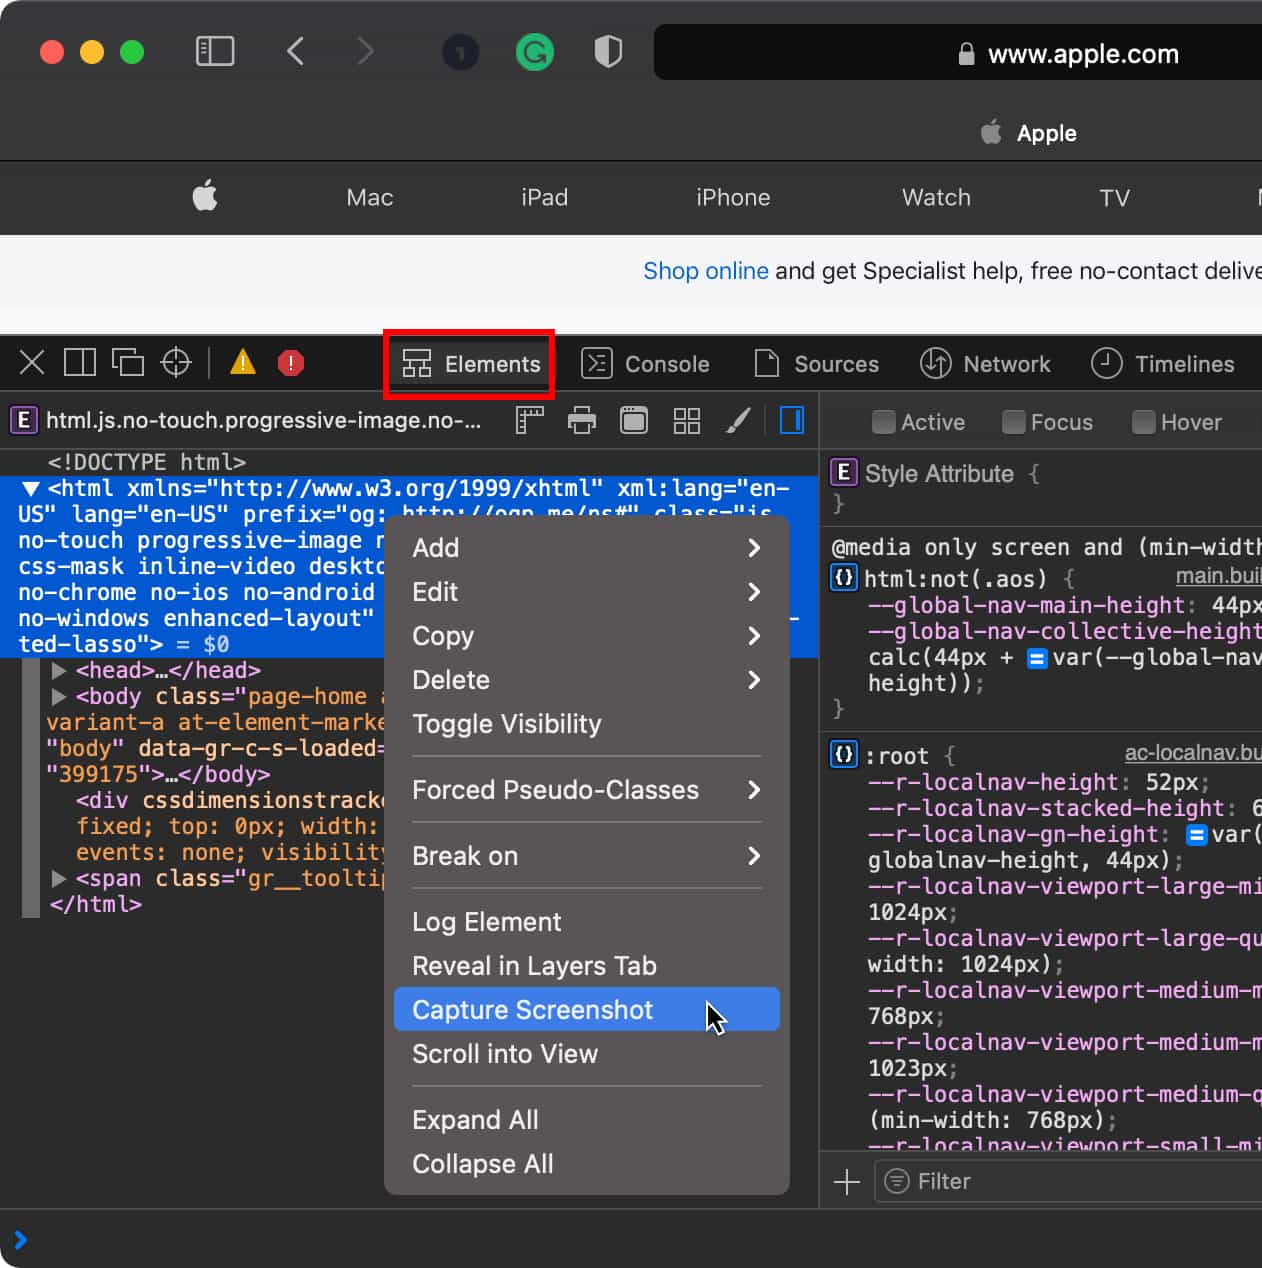
- Select the Elements tab and right-click on the line that begins with “<html…”
- Choose Capture Screenshot
- Give it a moment to do it’s magic, and then select a name and location to save the file.

All done! Well, almost…
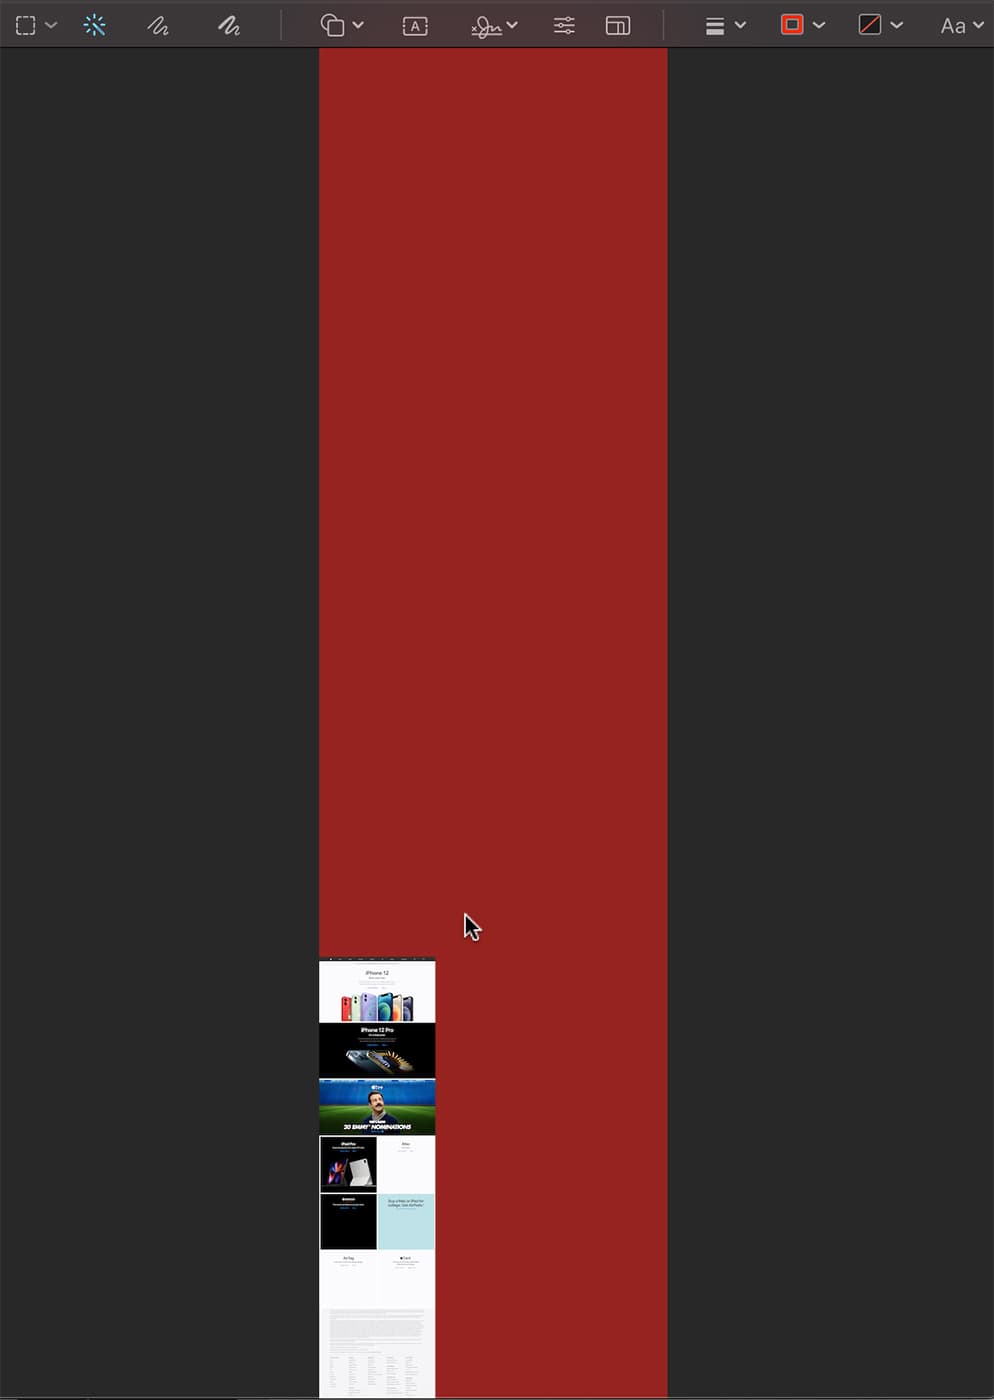
This could just be an issue I run into, but when capturing entire pages in this manner, there is a lot of empty container buffer around the image in the PNG file. You can see this in the Quick Preview of the file:

Let’s fix that.
- Open the file in Preview . If Preview is already your default application to open PNG files, you can simply double-click its icon.

- Drag the crosshairs in the empty area around the image. You’ll see the empty space selected and highlighted in red. Drag too far, and you’ll pick up the image itself. Don’t do that, we only want to select the empty area.
- When you let go of the mouse button, the highlighted color will disappear and be replaced with a dotted line indicating the selected area.

- Hit Shift-Command-I (⇧⌘I) to invert the selection.

- Hit Control-K (⌘K) to crop the image to the selection.
- Now you can hit Save (⌘S) and you truly are done. One cleaned up screenshot of an entire webpage.

Related Links
- macOS 101: What’s in the Utility Folder, Part 2
- Friday Five: Apple Webpages You Should Bookmark Right Now
- Using Activity Monitor Part 1: CPU and Memory
- Your Mac Doesn’t Want to Empty the Trash? Make It!
- How to Print a Webpage Without Ads and Backgrounds on a Mac
Other Topics You Might Like:

Leave a Reply Cancel reply
Save my name, email, and website in this browser for the next time I comment.
Notify me of follow-up comments by email.
Notify me of new posts by email.
13 Comments
OH man, Thank you so much for this post. it really helped me and saved a lot of my time.
Thanks for the helpful screen capture. I cannot get the clean up to work. The Shift+Command+I doesn’t work and I cannot get the Control+K to work. Can select the red area but that’s it.
Hoping you can help.
You show us how to capture OTHER web pages but NOT your own? That’s not cool dudes! If its not NOT for you, its not OK for anyone, right?
on Catalina, the part involving Preview to crop the image was a bit different, but I figured it out. Click on the show Markup Toolbar icon, then click on Rectangular Selection, then draw a box around the bit of interest, then click on “crop” in the toolbar. Repeat if needed. Zoom as needed.
Thanks for the insight!
Tried it on the article and when I try to pen saved .png I get message that either file is corrupted or can’t open the file format.
I ran into this also, then I quickly realized the file does not have the .png extension. Recaptured the screen and ensured when renaming the file, I added .png. Opened as a webpage though not as a preview. Still to figure out how to set preview as the default file opener for png files.
I’ve often wanted to do this. However, on this very page, while the initial steps seem to work, the resulting .png is un-openable by Preview or Pixelmator Pro or Quicklook. (“It may be damaged or use a file format that Preview doesn’t recognize.”)
File->Print->Save as PDF, and File->Export as PDF work as expected in Safari (full HTML-rendered page) with the added features of selectable text and extractable images in the PDFs (for those memes y’all). ~Tim~ macOS Big Sur, 11.4 Safari 14.1.1
Awesome tip! These are the articles that make it worthwhile to keep visiting Rocket Yard of OWC. Thanks. BTW an application to do it is Paparazzi! (but it does not work in all cases) https://derailer.org/paparazzi
I just tried that same Apple webpage with Safari 14.1.1 in OS 11.4. Went to File > Export as PDF… and bingo! Got a nice high-res 8.2MB PDF on my desktop instantly. Image is clean, no unexpected margins.
That works! Thank you!
Huh. I just tried that in Mojave with the latest Safari (14.1.2), using this webpage for the test.
I end up with a 20.6mb file ending in .PNG format, but which will not open. It’s either “damaged” or in a format that Preview can’t open.
In most other applications, this function would be easily performed using the Print button, and then Save as PDF. It is truly unfortunate that web developers have blocked the normal Print functionality on the web.
You Might Also Like

Apple Unveils New iPad Pro, Its Thinnest Product Ever with “World’s Most Advanced” OLED Display
M4 is Here: Apple’s Latest Chip Adds Dedicated Display Engine
Apple Adds External Drive Editing, Multicam Production in Final Cut Pro for iPad 2
How To Share Passwords With Others in macOS Sonoma Using iCloud Keychain
Email Address
- Brand Assets
8 Galaxy Way Woodstock, IL 60098 1-800-275-4576 +1-815-338-8685 (Int)
All Rights Reserved, Copyright 2020, OWC – Since 1988 | Terms of Use | Privacy Policy
We use cookies to provide you with a full shopping experience, including personalized content, and to help us improve your experience. To learn more, click here .
By continuing to use our site, you accept our use of Cookies, Privacy Policy and Terms of Use .
- PRO Courses Guides New Tech Help Pro Expert Videos About wikiHow Pro Upgrade Sign In
- EDIT Edit this Article
- EXPLORE Tech Help Pro About Us Random Article Quizzes Request a New Article Community Dashboard This Or That Game Popular Categories Arts and Entertainment Artwork Books Movies Computers and Electronics Computers Phone Skills Technology Hacks Health Men's Health Mental Health Women's Health Relationships Dating Love Relationship Issues Hobbies and Crafts Crafts Drawing Games Education & Communication Communication Skills Personal Development Studying Personal Care and Style Fashion Hair Care Personal Hygiene Youth Personal Care School Stuff Dating All Categories Arts and Entertainment Finance and Business Home and Garden Relationship Quizzes Cars & Other Vehicles Food and Entertaining Personal Care and Style Sports and Fitness Computers and Electronics Health Pets and Animals Travel Education & Communication Hobbies and Crafts Philosophy and Religion Work World Family Life Holidays and Traditions Relationships Youth
- Browse Articles
- Learn Something New
- Quizzes Hot
- This Or That Game
- Train Your Brain
- Explore More
- Support wikiHow
- About wikiHow
- Log in / Sign up
- Computers and Electronics
- Screenshots
How to Take a Screenshot on a Mac: Complete Guide
Last Updated: May 24, 2024 Fact Checked
Capture the Entire Screen
Screenshot a portion of your screen, capture an open window, save a screenshot to the clipboard, use the screenshot app (mojave and later), use the grab utility tool (high sierra and earlier).
This article was co-authored by Chiara Corsaro and by wikiHow staff writer, Kyle Smith . Chiara Corsaro is the General Manager and Apple Certified Mac & iOS Technician for macVolks, Inc., an Apple Authorized Service Provider located in the San Francisco Bay Area. macVolks, Inc. was founded in 1990, is accredited by the Better Business Bureau (BBB) with an A+ rating, and is part of the Apple Consultants Network (ACN). This article has been fact-checked, ensuring the accuracy of any cited facts and confirming the authority of its sources. This article has been viewed 12,031,810 times.
This wikiHow guide will show you how to take a screenshot on a Mac. There are several easy methods for taking screenshots! You can capture the entire screen, a portion of the screen, or an individual window or menu. On macOS Mojave and later, you can use the Screenshot app for these functions. On macOS High Sierra and earlier, you can use the Grab utility tool.
How to Screenshot on Mac
Press Command-Shift-3 to immediately take a screenshot of your entire screen. To capture a portion of the screen, press Command-Shift-4 and drag your mouse over the area you want to capture. Alternatively, use Command-Shift-4 and press the spacebar to capture a window.

- Earlier versions of OS X will save it as "Picture #"—for example, if it's the 5th screenshot on your desktop it will be labeled "Picture 5".

- Earlier versions of OS X will save it as "Picture #"—for example, if it's the 5th screenshot on your desktop it will be labeled as "Picture 5".

- After you’re done taking screenshots, check out how to delete cookies on your Mac .

- You can also take a portion screenshot with this method using ⌘ Command + Control + ⇧ Shift + 4 and dragging your reticle over the appropriate part of your screen, exactly as the portion screenshot method.

- You can also use Edit > Paste in the menu bar.
- Next, check out how to view your web browser history on your Mac .

- Capture the entire screen
- Capture a window
- Capture a portion of the screen
- Record the entire screen
- Record a portion of the screen

- To capture a window, click the window on the screen while using the window tool.

- This tool has been replaced by the Screenshot app in later versions of macOS.

- To take a picture of your entire screen, click Screen . A window will pop up telling you where to click and letting you know that the window will not appear in the shot.
- To take a picture of a portion of your screen, click Selection . A window will pop up instructing you to drag your mouse over the portion of your screen you'd like to capture.
- To take a picture of a specific window, select Window . Then, click on the window you'd like to take a picture of.

Community Q&A

- It is possible to change the shortcut used for taking screenshots by going into System Preferences, then to the Keyboard area, and clicking on the Screenshot section of Shortcuts. By clicking on the type of screenshot you want to change the shortcut for, you can press a combination of keys to create a new shortcut. Thanks Helpful 0 Not Helpful 0
- Files from the screen-capture tool are saved to the desktop as PNG files by default. You can change the default location in MacOS Mojave or later using the Screenshot app. Click the Options menu in the app to change where screenshots are saved. Thanks Helpful 0 Not Helpful 0
- Advanced users with knowledge of the Mac OS X Lion Terminal application can also use the "screen-capture" command to take a screenshot from the command line . Thanks Helpful 0 Not Helpful 0

- Posting screenshots that include copyrighted information could have legal implications, so be careful that you have the right to capture any of the information visible on your screen. Thanks Helpful 9 Not Helpful 2
- When taking screenshots to pass on to other people, or to publish on the Internet, ensure no personal or confidential information is captured within the image. Thanks Helpful 7 Not Helpful 6
You Might Also Like

- ↑ Chiara Corsaro. Certified Apple Technician. Expert Interview. 18 October 2019.
- ↑ https://support.apple.com/guide/mac-help/take-a-screenshot-mh26782/mac
About This Article

1. Ensure that the screen is exactly how you want it. More ↓ 2. Press Command + Shift + 3. ↓ 3. Find your screenshot on your desktop. ↓ Did this summary help you? Yes No
- Send fan mail to authors
Reader Success Stories
Janette Van Gruisen
Aug 3, 2016
Is this article up to date?

Jul 21, 2016
Apr 25, 2016
Jun 21, 2017
Jun 19, 2016

Featured Articles

Trending Articles

Watch Articles

- Terms of Use
- Privacy Policy
- Do Not Sell or Share My Info
- Not Selling Info
wikiHow Tech Help Pro:
Level up your tech skills and stay ahead of the curve
You are using an outdated browser. Please upgrade your browser to improve your experience.
How to take a screenshot on a MacBook Pro

Insert: close up on one method of taking screenshots on a MacBook Pro

Whether it's just for speed as you want to capture a website page, or you need to show someone what's being shown on your display, taking a screenshot or grab of your MacBook Pro screen is handy. Apple doesn't exactly make it clear how you do it, but the company does give you an almost ridiculous number of options once you start.
Two crucial things before you take a screenshot, though.
The most important caveat is that you must remember that you are not taking a shot of the screen, you are taking a shot of what the Mac is displaying. So if your display has gone, say, monochrome for some reason, and you take a screenshot, that shot will be in perfect color.
You also can't take a screenshot of a Blu-ray or DVD player because of rights issues. It's the same thing with streaming services such as Netflix — you can take a shot, but it will be blank where the movie was
Other than that, you can take a grab of anything on your Mac's screen and choose between either doing it very quickly or with some customization.
How to take a screenshot on a MacBook pro, the quick way
- Hold down the Command key
- Hold down the Shift key
- Tap the number 3 key
A capture of your entire MacBook Pro screen is briefly displayed at the bottom right of your monitor, and then it is saved to your desktop.

In a giant majority of cases, this is probably all you want. And on the odd occasion that you only wanted to grab a particular portion of the screen, you can open that screenshot in an image editor and delete what you don't need.
That image editor could be your Mac's built-in one, too. When the screenshot is briefly displayed at the bottom right, or at any time when you select it and tap the Spacebar , you can edit the image.
Click on the icon of a marker pen and you get a reasonable set of editing tools that include markup ones and cropping.
How to take a screenshot of part of a MacBook Pro screen
You can, though, decide in advance that you are only going to take a screenshot of, say, one particular window, or one section of your screen.
- Tap the number 4 key
Notice the difference here, you're using the number 4 key. When you do that, the Mac's cursor turns into a crosshair and you can drag over the area you want to grab.
When you let go of the mouse, or the trackpad, the shot is taken.

How to take a screenshot of a single window on a MacBook Pro screen
- Move the cursor over a window
- Tap the spacebar
- Click when you're ready
How to take a screenshot of a single window on a MacBook Pro screen on a timer
In that example, the shot only takes place when you click, and in all the others, it happens immediately. To give yourself a few seconds to, say, arrange a window or select a menu, you can use a timer.
Having seen the use of the number 3 and 4 keys, you may not be surprised to know that this one involves 5.
- Tap the number 5 key
This time, all that happens is that you get a control strip on screen. It actually contains buttons to start off everything you've done so far with keystrokes, such as grabbing the whole screen or a portion.
However, it also has an Options control.

Click on that and you get the choice of taking a shot immediately, in 5 seconds or in 10 seconds.
There are also options for where you save the screenshot, whether it gets displayed on screen, and so on. The same control strip even includes options to take video of the screen instead of a still image.
However, for speed and convenience, the keystrokes of Command , Shift and the number 3 , 4 or 5 , can't be beaten.
Keep up with AppleInsider by downloading the AppleInsider app for iOS, and follow us on YouTube , Twitter @appleinsider and Facebook for live, late-breaking coverage. You can also check out our official Instagram account for exclusive photos.
Top Stories

Killer deals: Apple TV 4K drops to $89.99, HomePod 2nd Gen dips to $175

13-inch iPad Pro review: hardware of the future running software of the past

AirPods Max versus Sonos Ace: premium personal audio, compared

Apple's iPhone 16 Pro could have world's thinnest bezels

How to buy the best mechanical keyboard for your needs

Bigger and brighter: iPhone 16 & iPhone 16 Pro rumored screen changes
Featured deals.

Apple's latest MacBook Air with M3 chip, 16GB RAM drops to $1,149
Latest news.

How to watch WWDC 2024 on iPhone, iPad, Mac & Apple TV
Apple's Worldwide Developers Conference is one of the most anticipated events in the tech world. Here's how you can watch the WWDC keynote and developer sessions.

Apple Books now offers Reese's Book Club audiobook recommendations
Apple Books users can now discover the top audiobook picks from Reese Witherspoon, with the service now the preferred home for her eponymous Book Club.

Apple TV+ tries to become the first US streamer in China
Apple has reportedly been in talks with China Mobile about bringing both Apple TV+ and Apple Arcade to the country.
You can already buy iPhone 16 cases, but you probably shouldn't
Social media banter between leakers confirms that it's possible to buy cases for the iPhone 16 now. It's a really bad idea, though.

Save up to $350 on every M3 MacBook Pro, plus get up to $80 off AppleCare
Steep price drops are in effect on every MacBook Pro, with exclusive discounts on the M3 14-inch and 16-inch laptops in addition to promo code savings on three years of AppleCare.

Apple is still considering screens for AirPods charging cases
It's the idea that just won't go away — Apple is again looking at adding screens to AirPods charging cases.

AirPods Max vs. Sonos Ace: premium personal audio, compared
The Sonos Ace is the company's new push into premium personal audio. Here's how it fares when compared to Apple's AirPods Max.

Apple's 13-inch iPad Pro is a testament to the power and efficiency of Apple Silicon, but WWDC has to address at least some of the shortcomings of iPadOS for those hardware upgrades to mean anything.

How to use Reader Mode in Safari on iPad
Whether it be ads or shoddy formatting, some web pages might not be that easy to decipher. Thankfully, there is a solution built right into Safari on your iPad.

How to set up and manage a guest user to your Mac
On occasion, you may want to allow other people in your home to access your Mac, but not your personal account. We'll show you how to set up and manage temporary guest users.

How to connect just about any vintage Mac to a modern monitor
HDMI is the de facto standard for connecting a monitor to a Mac and has been for many years, but there are many older Macs out there that can't be easily connected to that modern connector. Here's how to connect your vintage Mac to your new monitor.
Latest Videos

Retro gold rush: which emulators are on the App Store, and what's coming

More Metal: Apple's iPad Pro Magic Keyboards, compared
Latest reviews.

TerraMaster D8 Hybrid drive enclosure review: Lots of data, not enough bandwidth

Xencelabs Pen Display 16 review: A compact digital art masterpiece

{{ title }}
{{ summary }}
- Irresistible Tech Gifts for That Special Dad
- Killer Smartphone Deals We Love
Screenshot on Mac Not Working? 5 Ways to Fix It
Fix the screenshot feature and get back to capturing images
:max_bytes(150000):strip_icc():format(webp)/SimonChandler-f142d22d063d46c18cdacc6077ecc4ea.jpg "screenshot safari mac 12.6")
- University of Reading
- King's College London
The screenshot feature built into macOS requires no additional software; it should just work. If it stops working, there are a few places to look for answers—starting with the keyboard. If this accessory is functioning properly, look elsewhere.
Whether you use the tried-and-true keyboard shortcuts for taking screenshots or prefer to go through the Preview app or the Screenshot app (in Mojave or later) for that purpose, one of these fixes should get your Mac's screenshot feature up and running.
Stephanie Keith / Getty Images
Information in this article applies to macOS Catalina (10.15) through macOS Sierra (10.12), except as noted.
Possible Causes for Mac Screenshot Issues
When you can't take a screenshot on a Mac, you're missing a valuable tool for troubleshooting and communicating ideas through email and text messages. Since it's rare that screenshots don't work on a Mac, it may be easy to discover why your Mac isn't performing as expected.
It's wise to start by confirming that the keyboard is responsive. If you notice issues with specific keys or momentary unresponsiveness, try these Mac keyboard troubleshooting tips .
Other places to look include the Mac's keyboard shortcut settings for screenshots and the built-in Screenshot app.
How to Fix it When You Can't Take a Mac Screenshot
If everything else works correctly on the Mac, the keyboard is working correctly and isn't the problem. There are several other things you can do to pinpoint the reason why your Mac's screenshot function won't work.
Turn off the Mac and turn it back on . Running a Mac for long periods without shutting it down can cause it to perform inefficiently or prevent certain apps from working properly.
If the screenshot feature on your Mac isn't working, shut down the Mac and turn it on again. Then take a screenshot according to your preferred method, whether that's keyboard shortcuts or the Screenshot app.
Check the screenshots keyboard shortcuts. These settings are on by default. They may have been switched off at some point or set to keyboard combinations other than the defaults.
To check this, go to System Preferences > Keyboard > Shortcuts . There you can see whether keyboard shortcuts have been turned off or reassigned to other actions.
Reset the NVRAM . Like a simple restart, resetting the non-volatile random-access memory (NVRAM) can sometimes resolve issues with core Mac apps and functionality. This memory is responsible for controlling many of the internal settings of the computer.
Confirm the location for saving screenshots in the Screenshot app. The default is to save screenshots to the Desktop. If you changed that setting, your screenshots may be hiding somewhere you haven't looked. Check the location on the Screenshot app's floating menu bar.
If you prefer a manual approach, use Terminal to set the destination for screenshots and other files.
Check Your Dropbox settings . If you have Dropbox on your Mac , you may have set it so that screenshots save to your Dropbox rather than your Mac's desktop.
Get the Latest Tech News Delivered Every Day
- How to Take a Screenshot on Any Device
- How to Fix It When a Mac Is Not Detecting an External Display
- How to Fix It When a MacBook Pro Keyboard Isn't Working
- How to Screenshot on a Surface Laptop
- How to Fix a Chromebook Touchscreen That's Not Working
- The Best Mac Shortcuts in 2024
- How to Fix a Black Screen on FaceTime
- 11 Ways to Fix It When Apple CarPlay is Not Working
- How to Unfreeze a Mac
- How to Fix It When the Snipping Tool Isn't Working in Windows 11
- iPhone Screenshots Are Not Working? 6 Ways to Fix That
- 4 Ways to Take Screenshots in Windows 10
- How to Fix the Microphone on an HP Laptop
- How to Screenshot on a Logitech Keyboard
- Android Screenshot Not Working? Try These Fixes
- How to Take a Screenshot on a Surface Pro
How to Take a Screenshot on Mac (Ventura, Monterey)
How to take a screenshot on mac, capture the whole screen, capture a window, capture a selected area of the screen, capture the touch bar, capture a menu, how to change the default save location of screenshots on a mac, using the built-in app on a mac, using the third-party app.
Taking a screenshot on a Mac is nothing new, in fact, there are so many people are wondering how to get this job done because there is no “Print Screen” key on your Mac keyboard. Taking a screenshot on your Mac is a great way to make a tutorial, showing a great moment of videos, high scores from Games, some problems you need help and the conversations on Facebook, Snapchat, Twitter, etc.
Taking screenshots on a Mac is super simpler than Windows 10/11 because you can use the built-in keyboard shortcuts or the third-party software for taking a screenshot on Mac.
Preview App
Grab utility.
Apple has added the new tool in new macOS to help simplify this process. Taking pictures and recording videos is no longer that hard. Let’s jump right in to find out!
There are several new ways to take screenshots on your MacBook, especially with the new macOS Ventura, Monterey, Big Sur, Catalina and Mojave version . Previous keyboard shortcuts like Shift + Command + 4 or Shift + Command + 3 still remain working.
Step 1: Press Shift + Command + 5 to see the toolbar.
Step 2: Choose the Capture Entire Screen icon.

Step 3: Click anywhere on the screen you want to capture to take a screenshot, or you can click on Capture to take screenshots.
Step 4: At this point, you will see a small thumbnail appear at the corner of your laptop screen. Click on this thumbnail to edit the screenshot(s) you have just taken. This process is only available on macOS Mojave or later.
You also can follow the traditional way of taking a screenshot, which is available for all macOS. All you need to do is press Shift + Command + 3 to capture the whole screen, and you can find the screenshot on your desktop.
Step 2: Choose the Capture Selected Windows icon.

Step 3: Click on the window you want to take a screenshot of.
Step 4: At this point, you will see a small thumbnail appear at the corner of your laptop screen. Click on this thumbnail to edit the screenshot(s) you have just taken. This process is only available on macOS Mojave or later. You also can follow the traditional way of taking a screenshot, which is available for all macOS.
All you need to do is press Shift + Command + 4 . Then, press Space and you will see the pointer change to a camera. Click on the window you want to capture, and you will find your screenshot(s) on your desktop.
Step 1: Press Shift + Command + 5 to see the toolbar. Step 2: Choose the Capture Selected Portion icon .

Step 3: Drag your mouse the select the area you want to capture.
Step 4: Click on Capture.
Step 5: At this point, you will see a small thumbnail appear at the corner of your laptop screen. Click on this thumbnail to edit the screenshot(s) you have just taken.
This process is only available on macOS Mojave or later. You also can follow the traditional way of taking a screenshot, which is available for all macOS.
All you need to do is press Shift + Command + 4 , then drag your mouse to the area you want to capture. After you release the mouse, the screenshot has now taken, and you can find it on your desktop.
You can press Shift + Command + 6 to take a screenshot of what currently being displayed on the Touch Bar. Your macOS has to be Sierra 10.12.2 or later.
Step 1: Click on the menu to see its content. Step 2: After pressing Shift + Command + 5 , choose one of the two options to take a screenshot: Capture Selected Window or Capture Selected Portion .

Step 3: At this point, you will see a small thumbnail appear at the corner of your laptop screen. Click on this thumbnail to edit the screenshot(s) you have just taken. This process is only available on macOS Mojave or later. You also can follow the traditional way of taking a screenshot, which is available for all macOS.
First, you need to click on the menu to see its content. Then, press Shift + Command + 4 and drag your mouse to the menu where you want to take a screenshot. After releasing your mouse or the trackpad button, press Space to change the pointer into the camera icon and click on the menu to capture.
This is all the different ways to take a screenshot on macOS Big Sur or later with a special tool, I hope you find this article helpful.
Step 1: Create a new folder on Desktop or wherever you want.
Step 2: To change the name of the created folder, just click on that folder and press the Enter button. Then, type the new name you want, such as “TakeaScreen”
Step 3: Open a Terminal app by typing “terminal” on Spotlight Search or click on Launchpad >> Other >> Terminal.
Step 4: At Terminal window, let copy and paste the command line below.
Note: Make sure to have a “space” after “defaults write com.apple.screencapture location”.
Then, let drag and drop the folder into the Terminal.

Drag and drop the folder Step 6: Once you’ve pressed Return button, continue to Enter the command below.
Now, you can take a screenshot by using the above guide to check the result.
Preview is also the built-in tool which lets you open anything from photos to PDF files on Mac. However, it has some hidden features. With Preview, you can completely take a screenshot and here is the step-by-step to do that.
Step 1: Go to LaunchPad >> open Preview app. Then, click File >> Take a screenshot at the menu of the screen.

Step 2: Select the option you want. To save your screenshot, click File >> Export.

Apple’s operating system, Mojave, has been released to the public. This update includes a plethora of new features including better security for browsing and screensavers that play behind your login screen as you’re working on projects.
The most notable change in this version is with Grab which was replaced by Screenshot ! It means you can not use Grab on Mojave, Big Sur and later.
Step 1: Open the Grab app on your Mac by going to Applications >> Utilities >> Grab. You can only use the Grab’s menu at the top left of your Mac’s screen because there are no app’s window which show up on the screen.
Step 2: Go to the Capture menu and select one of 4 options, including:
- Taking a screenshot of your entire screen, select Screen and click on the screen which you want.
- Taking a screenshot a part of your screen, click Selection. A window will appear and you need to drag your mouse over the part of your screen you want to capture.
- Taking a screenshot of a particular app window, click Window. Then, select the window you want to take a screenshot of.
- Click Timed Screen option, you’ll have 10 seconds to stage the screen before this app capture the entire screen.
Skitch is a great screen capture and editing app from Evernote. Skitch can assist as your primary screen capture app, surely replacing the built-in Grab utility in your Mac. It provides some features which allow you to annotate a screenshot with adding arrows, text, shapes, and lines.
- It costs free.
- User-friend ly interface
- Supports for JPG, PNG, JPEG, TIFF, GIF, BMP, and PDF formats.
- It only allows editing one image at a time.
- Must use export option to save the image.
LightShot is also an amazing screenshot tool available for Mac. You can capture screenshots in many ways and easily edit, upload or even share them on the Internet. Here’s the guide on how to use the LightShot app.
Tags: apple desktop macos

- 4 Simple Ways to Take a Screenshot on iPhone 14/14 Pro

How To Screenshot Samsung A12: The Easiest Way

How to Taking a Screenshot on Samsung S21/S22 Ultra

How to Take a Screenshot on iPhone 7 and 7 Plus
Leave a reply cancel reply.
Save my name, email, and website in this browser for the next time I comment.
Screen capture is an essential part of our lives. Whether we’re capturing a funny moment with friends or recording a tutorial for work, screenshots are always there to help us out.
At Screenshots.today , we’re dedicated to ensuring you have the best tools and information for all your screen capture needs. Our user-friendly tutorials cover everything… ( read more )
- The Button Combo For Taking A Screenshot On Any iPhone
- 3 Keyboard Shortcuts To Take a Screenshot in Windows 11
- 7 Keyboard Shortcuts To Take a Screenshot on a Mac
- How to Restart iPhone Using Buttons & AssistiveTouch
- Privacy Policy

- a. Send us an email
- b. Anonymous form
- Buyer's Guide
- Upcoming Products
- Tips / Contact Us
- Podcast Instagram Facebook Twitter Mastodon YouTube Notifications RSS Newsletter
Apple Releases macOS Monterey 12.6 With Security Updates
While we have to wait a bit longer for the macOS Ventura launch, Apple today released macOS Monterey 12.6. macOS Monterey 12.6 is the sixth major update to macOS Monterey and it comes a couple months after the launch of macOS Monterey 12.5 .

macOS Monterey 12.6 addresses a number of kernel vulnerabilities as well as issues with maps, iMovie, ATS, MediaLibrary, and PackageKit.
Apple says that it is aware that one kernel vulnerability was actively exploited, which means that it is important for all macOS Monterey users to update to the new version of the operating system as soon as possible.
Apple has also released a macOS Big Sur 11.7 update with security fixes.
Get weekly top MacRumors stories in your inbox.
Popular Stories

Gurman: No Hardware at WWDC, Next Apple TV No Longer Coming Soon

Sonos Ace Headphones vs. AirPods Max

Exclusive: iOS 18 to Add Text Effects to iMessage

Best Buy and Amazon Introduce Steep Discounts on M2 and M3 MacBook Air [Updated]

iPhone 16 Pro Could Break Record for Thinnest Bezels on a Smartphone
Top rated comments.

I do wonder why I always have to download these big updates separately for all of my Macs. Why can't the first download be shared with other Macs on the same network? We don't all have superfast (or even fast) internet. Would be a nice showcase of Apple's magic at work.
Upon updating, I noticed that my battery health went up from 85 to 97...
Next Article
Our comprehensive guide highlighting every major new addition in iOS 17, plus how-tos that walk you through using the new features.

Apple News+ improvements, cross-platform tracker alerts, website app downloads for the EU, and more.

Get the most out your iPhone 15 with our complete guide to all the new features.
A deep dive into new features in macOS Sonoma, big and small.

Apple's annual Worldwide Developers Conference will kick off with a keynote on June 10.

Expected to see new AI-focused features and more. Preview coming at WWDC in June with public release in September.

AI-focused improvements, new features for Calculator and Notes, and more.

Action button expands to all models, new Capture button, camera improvements, and more.
Other Stories

5 hours ago by Tim Hardwick

5 days ago by MacRumors Staff

2 weeks ago by Tim Hardwick

2 weeks ago by Juli Clover
Safari 12 is now available for macOS Sierra and High Sierra
Comes with macOS Mojave by default

Safari 12, the latest version of Apple ’s web browser, is now available to download for people running macOS Sierra (10.12.6) and macOS High Sierra (10.13.6).
This new version of the browser, which is the default browser in the upcoming macOS Mojave (10.14) update, comes with a range of new features, and if you can’t wait until Mojave launches on September 24 you can get the updated browser for the older versions of macOS.
In fact, if you use Safari as your daily web browser then it’s a good idea to update to Safari 12 as soon as possible, as it includes security updates. To download and install Safari 12 right now, open up the Mac App Store, click on ‘Updates’ and you’ll see the Safari 12 update waiting for you there.
Safari 12 features
So, what’s new in Safari 12? Apple has included support for website icons in tabs, which makes it easier to organize and find open websites when you’re browsing with multiple tabs open, as well as password suggestions and an alert if you're using a password for a service that Safari has saved for another site.
This should encourage people to use different passwords for different websites, rather than using one password for many.
Users also have better control over how pop-up windows are handled on websites, and ad retargeting suppression has been bolstered so that it reduces advertisers' ability to identify unique Mac devices. The web browser also disables any extensions that cause it to perform more slowly by default.
So, even if you're planning on upgrading to macOS Mojave next week with Safari 12, we’d recommend installing it on your Mac as soon as possible, so that you can access these new features and benefit from the added security.
Get daily insight, inspiration and deals in your inbox
Sign up for breaking news, reviews, opinion, top tech deals, and more.
- What’s the best web browser in 2018?
Via OSXDaily
Matt is TechRadar's Managing Editor for Core Tech, looking after computing and mobile technology. Having written for a number of publications such as PC Plus, PC Format, T3 and Linux Format, there's no aspect of technology that Matt isn't passionate about, especially computing and PC gaming. Ever since he got an Amiga A500+ for Christmas in 1991, he's loved using (and playing on) computers, and will talk endlessly about how The Secret of Monkey Island is the best game ever made.
Good news for Mac users wanting to run Windows apps: VMware Fusion Pro 13 is now free for personal use
Here are three excellent Windows features we really want to see in macOS
NYT Strands today — hints, answers and spangram for Sunday, June 2 (game #91)
Most Popular
- 2 Ticketmaster breached — data of over 500 million users allegedly put up for sale online
- 3 Hardly any of us are using AI tools like ChatGPT, study says – here’s why
- 4 Nvidia RTX 5090 rumors continue to suggest this graphics card will not just be powerful, but also somehow miraculously slim
- 5 I tried Hugh Jackman’s 7-minute workout which 'uses every single muscle' and it’s one of the hardest things I’ve ever done
- 4 iPhones just got a powerful new video-editing app that lets you add cool cinematic looks with ease
- 5 Great news — Microsoft is killing off non-editable PDFs for good
- Best Video Converters
- The Best Video Downloaders for Windows

“Downloading Do Not Turn OFF The Target!” Error In Samsung
- The Best Network Monitoring Tools
- The Best TVs for Xbox Series X

‘IP address conflict’ – How To Manage & Fix
- Best Laptops Under $300
- Best Laptops Under $500

10 Alternatives to Trapcall
- Social Media
- Cut the Cord
TechJunkie is a BOX20 Media Company
Home Mobile Android Mac OS Sierra: How To Screen Screenshot (Print Screen)
Mac OS Sierra: How To Screen Screenshot (Print Screen)

Previous versions of Mac OS Sierra will display your print screen or screenshot as Picture # , so if it’s your fourth screenshot on your computer then it will be labeled as Picture 4 once you have taken a Mac print screen and you need to make the Mac print screen selection for the fourth image. You can use the screenshots in emails or word documents, or even edit your screenshots and upload your screenshots to the web.
Print Screen (full screen):
- Make sure that everything on your screen is what you want captured in the screenshot. If it’s not you can just delete the image, rearrange the screen, and take another picture and it won’t cause any problems, but it will be annoying nonetheless.
- Press Command + Shift + 3 and then release all keys. You’ll hear a noise like a camera going off.
- Now check your desktop and you should see a new .png file that contains the screenshot you just took.
Screenshot (localized):
- Open the item or area you’d like to take a screenshot of.
- Press Command + Shift + 4 and then release all keys.
- You will now see that your mouse cursor has turned into crosshairs that you can move around.
- Drag the cursor to the area want to start as one corner of the screenshot. Then press down and drag the mouse over the area you want to take a screenshot of.
- When you have selected the area you want to capture, just release your mouse button. You’ll hear a sound like a camera going off, and the screenshot will be taken.
- Check your desktop, and you’ll find a new .png file of your screenshot.
These steps will work for the MacBook Pro, MacBook Air, as well as Mac OS Sierra. Once you learn how to take screenshots and use the print screen feature on your Mac, it becomes very easy and useful, and you’ll be doing it all the time. Hopefully the step-by-step instructions above will help you as a guide to Mac print screen selection.
How To Repair Samsung Galaxy S6 IMEI Number Issue
David Williams
Feb 16, 2019
I am a true junkie for everything tech. My current arsenal includes an Apple TV, Amazon Fire TV Stick, iPhone Xs, Samsung Galaxy S9, Samsung Chromebook, iMac, and Dell XPS 13.
3076 Articles Published
You May Like

How To Text Someone from a Different Phone Number (Not Your Own)

Ronil Thakkar
Mar 13, 2024
How to Unsubscribe From all YouTube Channels
Mar 11, 2024

How to Fix the Waiting for This Message Error on WhatsApp

Ashish Mohta
Mar 10, 2024

Signal: How To Create a Username to Hide Your Number
Mar 4, 2024

How To Fake Your Location on Life360

Robert Hayes
Feb 29, 2024

How to Change Emoji Set in Telegram
May 29, 2024

How to Share Collaborative Collection on Instagram With Multiple People
May 27, 2024

How to Save WhatsApp Video Notes or Video Messages
May 23, 2024

How to Change Your Name in Zoom

May 31, 2021

How To Filter By Color in Google Sheets
Jan 15, 2020
Copyright @2024 TechJunkie
Apple’s Worldwide Developers Conference to kick off June 10 at 10 a.m. PDT with Keynote address
The Keynote will be available to stream on apple.com , the Apple Developer app, the Apple TV app, and the Apple YouTube channel. On-demand playback will be available after the conclusion of the stream.
Looks like no one’s replied in a while. To start the conversation again, simply ask a new question.
Safari for Sierra 10.12.6
I keep running into issues with websites that say my version of Safari is out of date. I am running Sierra 10.12.6 and would like to find out if there are any more modern versions of Safari that will work with Sierra. The App store shows no further updates for Safari on Sierra. My Safari version is 10.1.2.
iMac 27″, macOS 10.12
Posted on Mar 8, 2022 9:16 AM

Posted on Mar 8, 2022 9:25 AM
You cannot update Safari without upgrading from Sierra.
If you cannot or don't want to do that, you should consider a 3rd party browser such as Chrome
The model year of an iMac is available at Apple menu > About This Mac.
An early 2009 iMac can be upgraded to El Capitan 10.11.6 but no later version. See: How to get old versions of macOS - Apple Support
A late 2009 through mid 2011 iMac can be upgraded to High Sierra 10.13.6 but no later version. See: How to get old versions of macOS - Apple Support
A late 2012 through late 2013 iMac can be upgraded to Catalina 10.15.7 but no later. See: How to get old versions of macOS - Apple Support
A mid 2014 and late 2014 can be upgraded to the latest version of Big Sur macOS 11 but no later. See: How to get old versions of macOS - Apple Support
A late 2015 or later can be upgraded to the current version of Monterey macOS 12. See: How to upgrade to macOS Monterey - Apple Support
Similar questions
- Safari newest version I can use with High Sierra ? What is the newest version of Safari that I can use with Mac OS 10.13.6 High Sierra ? My bank says I need to update my Safari 459 2
- What is the current version of Safari for Mac laptops? What is the current version of Safari for Mac laptops? 110 1
- Is there a newer browser version of Safari I can update to from El Capitan? I am looking for a newer Safari browser version that will work with my current operating system 10.11.6. 247 1
Loading page content
Page content loaded
Mar 8, 2022 9:25 AM in response to Tom Kirkman
Mar 8, 2022 10:01 AM in response to FoxFifth
Thank you. It's odd - the Safari version that I had with El Capitan worked fine and now that I moved to Sierra the later version of Safari hardly works with anything. I have Chrome and will move to that. Thanks.
Screen Rant
Make mac safari go full screen & more ways to expand your viewport.

Your changes have been saved
Email Is sent
Please verify your email address.
You’ve reached your account maximum for followed topics.
Blockbuster Inc. Review: A Glorious Return To 2000s Tycoon Renaissance
Stranger things season 5 set photos reveal vecna's return in human form, thor reveals how he'd kill the hulk, & it's incredibly dark (but smart).
Apple 's Safari browser for the Mac is more customizable than ever and there are several ways to expand the viewport to show more of a website at once, including full screen mode. When looking at a photo or a video, more is usually better and the same is true of data-heavy websites that may have several large tables filled with relevant information. Fitting that all in on a MacBook screen might be a tight squeeze.
It feels like Safari has been around forever, but Apple first launched its browser in 2003. Before that, Mac users primarily relied upon Microsoft's Internet Explorer , although, Opera, Netscape, and Mozilla were well known and good solutions as well. Google's Chrome followed soon after and, over the years, the browser wars have settled into a fairly consistent rendering and performance level, making the differentiating factor more about user-friendliness as well as the overall look and feel of the browser. Apple usually opts for minimizing the appearance and letting the website shine, but there are ways to show even more of a website's content with Safari.
Related: How To Clear Cookies On A MacBook & Why You Should
Switching to full screen mode is the quickest way to hide all of Safari's chrome, the developer terminology for the user interface, including the address bar, tab bar, and any other controls that are open. Basically, the entire screen becomes a window to the current website. To enter full screen on a MacBook , simply hold the globe key, also known as the function key, and tap the letter 'F.' Tapping the escape key will exit full screen mode. On a Mac that doesn't have such a key on its keyboard, a combination of control and the command key, which looks a bit like a four-leaf clover, plus the letter 'F' switches to full-screen. This is as much screen space as possible, but there is a way to see even more of a web page. Also, Apple gives Safari users ways to minimize the chrome without hiding it all.
See More Website, Less Safari
With Safari on the Mac, some controls can be hidden to allow more room for content while keeping the tab bar visible. Under the View menu, there are options to show or hide the favorites bar and sidebar. Full screen can be accessed from this menu as well. Reader mode, also found there, offers a different type of content viewing that hides ads and removes the website's styling, instead formatting the page in a narrow column with a large font. For anyone looking for a distraction-free view of an article, going to Reader and full screen displays the words and photos in a minimalist fashion. For those running macOS Monterey , opening preferences from the Safari menu and choosing compact tabs will merge the search field and the tab bar together, an easy way to gain vertical space, which is tight on a MacBook, but might be less of an issue on a desktop Mac.
Another way to view more of a website on a Mac computer is to zoom out, which is easily accomplished by holding the command key and tapping the minus key. Zooming back in is done with a combination of command and equals key, which is the same key used for the plus sign but there is no need to hold the shift key. Command plus the zero key restores the zoom level to normal. Zooming affects both text, images and other graphics on a page and Safari remembers the zoom level set for each website, so upon returning it will default to the magnification used at the last visit, which is a nice touch by Apple . If there is a need to reduce images and graphics on a website, but keep text readable, under the advanced preferences pane, there is an option to set a minimum font size. Apple's Safari offers several ways to customize the view of a website to help the user see more of the content and less of the browser.
Next: A Safari Feature That Apple Killed In macOS Monterey Is Finally Coming Back
Source: Apple
How-To Geek
How to screen record on your mac.
Recording your screen on Mac is easier than ever.
Quick Links
Open the screenshot utility on mac, set your screen recording options, record your screen.
Screen recording on Mac was vastly improved with macOS Mojave (first introduced in 2018). With nothing but a built-in application, you can capture sound, mouse clicks, portions of your screen, and more. Here's how to screen record on your Mac.
You can use the same tool to screen record that you do to take screenshots . Open up the Screenshot app using one of these methods:
- Press Command+Shift+5.
- Use Spotlight (Command+Space), search for "Screenshot," and choose the app from the results.
- Open the Applications folder using Finder and then click Go > Utilities from the menu bar at the top of your screen and select "Screenshot."
When you open Screenshot, you'll see a toolbar at the bottom of your screen. The three options on the left of the toolbar are for screenshots, so you'll start with the middle two for recordings.
One option is for recording your whole screen. Click "Record Entire Screen" to do this.
The other option is for selecting just a portion of it. If you only want to capture part of your screen, click "Record Selected Portion." Then, drag the dotted shape where you want it to go and resize it by dragging an edge or a corner.
Before you start recording, click "Options." At the top of the list, you can pick a spot to save your recording. Then, you can get into some handy recording features.
When you need a few moments to prepare what's on your screen for the recording, use the Timer. You can pick 5 or 10 seconds from the time you hit Record until the recording begins.
If you want to include audio with your recording, select "Built-in Microphone." This is ideal for explaining what you're recording.
The "Show Floating Thumbnail" option is useful if you'll be demonstrating how to take a screenshot. As you know, a thumbnail appears in the corner of your screen by default.
Need to show the steps that you're taking on the screen? Use the "Show Mouse Clicks" option. When you enable this, each click of your mouse displays as a circle. That way, your audience can see the steps in a sequence, or even in a single, helpful click.
If you change your mind about recording your screen, you can simply close the Screenshot app. Either click the "X" on the left of the toolbar or press your Escape key.
Once you have your options set, it's time to record. Hit the "Record" button in the Screenshot toolbar. If you turned on the timer, you'll see how much time you have left to get ready on the Record button.
A small Stop button will appear in your menu bar as you capture your screen. Click that button to stop recording.
Then head to the location that you chose to save the recording in to view the video. You can then open the recording using the built-in Preview program your favorite video editing application.
If you've got an iPhone, it's a cinch to record your iPhone screen too.
Related: How to Open Finder with a Keyboard Shortcut on Mac

Use Split View With Two Safari Windows

Check out Use Split View With Two Safari Windows at YouTube for closed captioning and more options.
Comments: 4 Responses to “Use Split View With Two Safari Windows”
Thanks for this Split View instructional video. It's one feature that I'll be now using more often. However you didn't mention how to escape from the screen because the red, yellow and green buttons have disappeared. Thank goodness I discovered that by moving the cursor to the top of the screen they did reappear.
I can't make split view work in ANY scenario; two Safari windows or any unrelated two apps. Pressing, holding, cursing, head scratching; nothing. Hovering changes the green dot to an 'expand' icon and produces full-screen; option-hover changes it to a 'plus' producing a full desktop but nothing I do allows for a split screen. Curious. 15" MBP Late 2016, IOS 10.12.2.
John: Not sure. Hard to say without seeing exactly what you are doing and how it is different.
Found it on Apple's support site: If holding down the full-screen button doesn't enter Split View, go to Apple menu > System Preferences, click Mission Control, and make sure that “Displays have separate Spaces” is selected. [Log out required.]
Welcome to MacMost
Free weekly newsletter.
- MacMost Online Courses

- macOS Sonoma
- Mac Shortcuts
- Mac Numbers
- Mac Keynote
- Final Cut Pro
Keyboard Shortcuts PDF

Connect with MacMost
- Free Email Newsletter
- YouTube Channel
- Follow Gary on Threads
- Follow Gary on Mastodon
- Follow Gary On Bluesky
- MacMost @ Apple News
- iPhone/iPad App
MacMost Sections
- The Practical Guide To Mac Security
- Videos by Category
- Video Archive
- Virus and Malware Information Center
- Protect Yourself From Online Scams
- A Graphical Guide To iCloud
- Free iPhone Ringtones
- Recommended Products
- Printable Mac Keyboard Shortcuts PDF
- macOS System Requirements List
Popular Tutorials
- Learn How To Edit Your Pictures In Mac Photos In 5 Minutes
- How To Use Your iPhone As a Scanner For Your Mac
- How To Combine Parts Of Images Using Mac Photos
- How Many Mac Third-Party App Installs Work
- How To Free Up Space On iCloud Drive
- 6 Ways To Convert Video Files On a Mac
- How To Get File Listings As Text
- 5 Ways To Trim Audio On a Mac
Information
- About MacMost
- Support MacMost
- Contact MacMost
- MacMost Video List
- MacMost Site Map
- MacMost Site Policies
Copyright © 2006-2024 CleverMedia, Inc. All Rights Reserved.
Safari User Guide
- Get started
- Go to a website
- Bookmark webpages to revisit
- See your favorite websites
- Use tabs for webpages
- Import bookmarks and passwords
- Pay with Apple Pay
- Autofill credit card info
- View links from friends
- Keep a Reading List
- Hide ads when reading
- Translate a webpage
- Download items from the web
- Add passes to Wallet
- Save part or all of a webpage
- Print or create a PDF of a webpage
- Interact with text in a picture
- Change your homepage
- Customize a start page
- Create a profile
- Block pop-ups
- Make Safari your default web browser
- Hide your email address
- Manage cookies
- Clear your browsing history
- Browse privately
- Prevent cross-site tracking
- See who tried to track you
- Change Safari settings
- Keyboard and other shortcuts
Use the developer tools in the Develop menu in Safari on Mac
If you’re a web developer, the Safari Develop menu provides tools you can use to make sure your website works well with all standards-based web browsers.
If you don’t see the Develop menu in the menu bar , choose Safari > Settings, click Advanced, then select “Show features for web developers.”
Open Safari for me
COMMENTS
Open Safari and go to " Safari > Preferences…. Click the Advanced tab and toggle on " Show Develop menu in menu bar .". Navigate to the webpage you want to capture and from the Develop menu, choose " Show Web Inspector .". Alternatively, you can hit alt-command-I (⌥⌘I). Select the Elements tab and right-click on the line that ...
On your Mac, choose Apple menu > System Settings, click Keyboard in the sidebar, click Keyboard Shortcuts on the right, then click Screenshots. (You may need to scroll down.) Screenshots are saved as .png files and screen recordings are saved as .mov files. Filenames begin with "Screenshot" or "Screen Recording" and include the date and ...
To take a picture of the whole screen, press Shift-Command-3. To capture just part of the screen, press Shift-Command-4.
1. Make sure your screen displays exactly what you want to show in your screenshot image. Ensure all the relevant windows are visible. 2. Press ⌘ Command +⇧ Shift + 3. This keyboard shortcut takes a screenshot of everything on your screen. If your sound is on, your computer should make a brief camera shutter noise.
Shift+Command+4 then Space: Capture a window or menu. Shift+Command+5: Open the Screenshot app interface. Shift+Command+6: Take a screenshot of the Touch Bar on a Macbook Pro. To capture a screenshot directly to the clipboard instead of an image file, add Ctrl to any of the shortcuts listed above.
Hold down the Command key. Hold down the Shift key. Tap the number 3 key. A capture of your entire MacBook Pro screen is briefly displayed at the bottom right of your monitor, and then it is saved ...
Take a screenshot on your Mac. You can capture the entire screen, a window or just a portion of the screen. How to take a screenshot on your Mac . To take a screenshot, press and hold these three keys together: Shift, Command and 3. If you see a thumbnail in the corner of your screen, click it to edit the screenshot.
Turn off the Mac and turn it back on. Running a Mac for long periods without shutting it down can cause it to perform inefficiently or prevent certain apps from working properly. If the screenshot feature on your Mac isn't working, shut down the Mac and turn it on again. Then take a screenshot according to your preferred method, whether that's ...
Taking a screenshot of your entire screen, select Screen and click on the screen which you want. Taking a screenshot a part of your screen, click Selection. A window will appear and you need to drag your mouse over the part of your screen you want to capture. Taking a screenshot of a particular app window, click Window.
Screenshots Are Usually Saved to the Desktop. By default, when you take a screenshot using Shift+Command+3, Shift+Command+4, or Shift+Command+5, your Mac saves any screenshots you take to your Desktop as PNG files. Each one will have the name "Screen Shot" with a date and time at the end (such as "Screen Shot 2022-06-03 at 10.58.12 AM").
All of a sudden the shift + command + 3 stopped working to screenshot my screen on my Mac. What other shortcut could I use for screenshot or how can I fix this? -------. Accessing then Screenshot App Manually: Click: the Desktop. Go to: Go menu. Select: Utilities. Select: Screenshot.app. .
The cursor will now turn into a crosshair. Hover over the window that you want to capture and press the Spacebar. The window will be selected. Now, hold the Option key when you press the Left Mouse button to take the screenshot. When you go to your Desktop (or wherever you save screenshots ), you'll see that the screenshot doesn't have a shadow!
Monday September 12, 2022 10:40 am PDT by Juli Clover. While we have to wait a bit longer for the macOS Ventura launch, Apple today released macOS Monterey 12.6. macOS Monterey 12.6 is the sixth ...
How to take a screenshot of a window Press Shift-Command-4. The pointer changes to a crosshair. Press the Space bar. The pointer changes to a camera. Move the camera over a window to highlight it. Click your mouse or trackpad. To cancel, press the Esc (Escape) key before you click. Find the screenshot as a .png file on your desktop.
Comes with macOS Mojave by default. Safari 12, the latest version of Apple 's web browser, is now available to download for people running macOS Sierra (10.12.6) and macOS High Sierra (10.13.6 ...
Screenshot (localized): Open the item or area you'd like to take a screenshot of. Press Command + Shift + 4 and then release all keys. You will now see that your mouse cursor has turned into crosshairs that you can move around. Drag the cursor to the area want to start as one corner of the screenshot. Then press down and drag the mouse over ...
Safari 12.1.2. Released July 22, 2019. Safari. Available for: macOS Sierra 10.12.6, macOS High Sierra 10.13.6, and included in macOS Mojave 10.14.6. Impact: Visiting a malicious website may lead to address bar spoofing. Description: An inconsistent user interface issue was addressed with improved state management.
The model year of an iMac is available at Apple menu > About This Mac. An early 2009 iMac can be upgraded to El Capitan 10.11.6 but no later version. See: How to get old versions of macOS - Apple Support. A late 2009 through mid 2011 iMac can be upgraded to High Sierra 10.13.6 but no later version. See: How to get old versions of macOS - Apple ...
Use Apple devices together. Work across devices using Continuity; Use iPhone as a webcam; Use iPhone with Desk View; Stream audio and video with AirPlay; Use one keyboard and mouse to control Mac and iPad; Hand off between devices; Unlock your Mac with Apple Watch; Make and receive phone calls on your Mac; Sync music, books, and more between ...
To enter full screen on a MacBook, simply hold the globe key, also known as the function key, and tap the letter 'F.' Tapping the escape key will exit full screen mode. On a Mac that doesn't have such a key on its keyboard, a combination of control and the command key, which looks a bit like a four-leaf clover, plus the letter 'F' switches to ...
Open the Screenshot Utility on Mac. You can use the same tool to screen record that you do to take screenshots. Open up the Screenshot app using one of these methods: Press Command+Shift+5. Use Spotlight (Command+Space), search for "Screenshot," and choose the app from the results. Open the Applications folder using Finder and then click Go ...
Safari. While many Mac users know about using Split View for sharing the screen with two apps, you can also use it to split the screen between two windows of the same app. You can put two safari windows on either side of your screen and still have access to tabs and the toolbar of each.
If you're a web developer, the Safari Develop menu provides tools you can use to make sure your website works well with all standards-based web browsers. If you don't see the Develop menu in the menu bar, choose Safari > Settings, click Advanced, then select "Show features for web developers.". Open Safari for me.