

25 Mobile Office Set-Ups to Inspire You to RV Full-Time
This post may contain affiliate links. See our affiliate disclaimer here .
I’m a sucker for a good mobile office setup. After traveling full-time for nearly a decade and running a business remotely the whole time, I think I’ve worked from any possible surface. Mostly because 99% of RVs don’t come equipped with a desk or any space resembling a good workstation.
Shout out to all of you entrepreneurs who are taking conference calls at the RV park picnic table!
If you want a mobile office in your RV, you have to get creative, learn how to do a little renovating , and maximize your square footage.
If you’re not a DIY person, a great resource for finding a camper with a desk built-in is RenovatedRVsforSale.com . You’ll find already renovated RVs, many of which already have desks added (like the one below)!

As we all make do with creating an office space in our home on wheels, we’ve found a few essential items that make the situation’s ergonomics a whole lot better.
Tools & Gear for Creating Your Own RV Mobile Office
Laptop stand.
Save your neck the literal headache.
This is Heath’s favorite laptop stand (we’ve also used this cheaper but bulkier one that is slightly harder to travel with), and he has used it for years. If you are slouching over your laptop, complaining about neck and shoulder pain, and need an fast solution, this is it.
This stand has traveled to multiple countries by plane and RV. Highly recommend. You will need even more gear if you go with a stand, though.
Wireless Mouse
Some people hate trackpads. Or they hate Bluetooth mouses, which can be a pain to connect. Or they hate using a mouse with a cord like it’s 2003.
This USB mouse checks all the boxes (and is available in many colors). We’ve used this mouse for years after our Apple mouse kept giving us trouble. It’s under $20 and super reliable. If you use a stand, you’ll need a mouse unless you want to awkwardly navigate on your trackpad while it’s in the air.
Wireless Keyboard
We use the Magic Keyboard that came with our iMac. It’s small, it’s rechargeable, it’s light and easy to toss into a backpack.
But it’s nearly $100.
You can find much cheaper keyboards on Amazon , and I recommend any small, light keyboard that works via Bluetooth so you can easily travel with it.
External Monitor
This is the piece of equipment you’ll see most people below adding to their RVs.
We’ve traveled with our iMac in both of our Winnebagos—laying the heavy monitor on the bed during travel for safety. But for most, a lightweight and mountable external monitor is a better option.
Plus, you can simply unhook your laptop and head to a coffee shop if you want to get out of the rig. That is not so easy with a desktop computer! External monitors are great for running multiple screens simultaneously and keeping your workspace a little more comfortable for your body.
Other recommendations:
Standing Desk : We used a piano stand and a large cutting board as a makeshift standing desk for a while. It worked great, though it was a bit wobbly. If you ask me, standing desks are crazily overpriced, but you can find collapsible laptop stands for musicians on Amazon for a quarter of the price.
Airpods : Heath has raved about Airpods for years, and I’m now on board. Mine aren’t noise-canceling, but the fact that whatever I’m listening to pauses as soon as I remove an Airpod is SO BRILLIANT. And handy.
Portable Table : If the couch if your best workspace, we loved this little table! It scoots under the couch easily and is big enough to host your laptop and lunch (clearly speaking from experience here.) The height is adjustable, but it doesn’t get tall enough to be used as a standing desk.
Those are the biggest ways we’ve seen RVers adapt their workspace to be a little friendly to the body and the small space. It’s a challenge that all RV entrepreneurs love to tackle, so we asked our Facebook group to share their mobile office set-ups to inspire you.
Below are our top 25 picks, ranging from stand-up desks to custom build-outs to folding tables and couches. There’s no one way to set up a desk in an RV, and these pioneers prove it!
Dapper Drive

The Rig: 2007 28-foot travel trailer
Outside Found

The Rig: 2001 GMC Bluebird bus
Phyllis Swenson

Most intense set-up I have seen!
The Rig: Class A motorhome

What is it really like to RV full-time and work on the road?
In our latest book, we share what it’s like RVing across America—breakdowns, bear encounters, stunning hikes, beachfront camping and even starting our first business (also known as the time that our bank account hit zero).
Order your copy on Amazon Today
Roamin ryans.

The Rig: Grand Design Momentum fifth wheel toy hauler. Sit/stand up desk set up in the garage.
Sonya Schweitzer

Desk set up in the bedroom for the husband. The wife uses the dinette.
No Address Required

The Rig: 2007 Damon Daybreak 3276
Nathan Kaemingk

They took out the chair by the door and added a small Ikea desk!

The Rig: Airstream
Migratory Life

The Rig: Rockwood Windjammer
Steffanie and Michael have done a lot of little renovations on their travel trailer, including adding in this desk space!
Mark Roberts

The Rig: 40 ft Itasca Horizon (Class A motorhome)
This is actually the existing dinette!
Rachel Brewer

Always on Liberty

Lisa in her outdoor office!
The Rig: Landmark fifth wheel
Mountain Modern Life

Can I choose a favorite mobile office set-up? It’s this one! 😍😍😍 You can learn more about this awesome desk setup here .
A Team Life

Oh wait, this one might be my favorite. I love the curtains!
The Rig: Fifth wheel
Follow Your Detour

The Rig: Winnebago Travato (Class B motorhome)
The Simple Venture

Northern Nomads

The Rig: Travel Trailer
Technomadia

The Rig: 1961 vintage bus
[For more mobile office set-ups, check out Technomadia’s article.]
Always the Road

The Rig: Class A Motorhome

The Rig: Keystone fifth wheel
The pup: Foxey, a miniature Golden doodle that Heath tries to kidnap every time we see Kevin and Mandy 😂
Heath, the king of many offices
Heath cracks me up because he has made so many different mobile office setups in our Winnebago! There’s the removal round table in the front of the rig.

Photo cred: Kyle Kesterson
Then there’s the standing desk we made, the fold-out desk built into the Winnebago in front of the passenger seat, the dinette, and, of course, a picnic table!

Back in our Winnebago Brave, Heath would use all five of these desk setups on any given day because he can’t sit still. He likes to bounce around.

This year we moved into a 2020 Winnebago Forza 38D, which has a dual desk setup that has been a game-changer. As I said, 99% of RVs don’t have desk space. We chose this RV because it falls in that one percent. I love having that separation between a workspace and the rest of the house. Plus, having any space at all that is dedicated solely to being an office is pure luxury.
Now that you’ve got the desk, you only need a job you can work from anywhere !
- About Author
- Latest Posts

Alyssa Padgett
Travel blogger
The second half of Team Padgett and the chief navigator in our travels. I blog about our latest adventures, how I run our business from the road, and the ridiculous things Heath does on a daily basis. Fortunately, my husband thinks I'm funny.
Latest posts from Alyssa Padgett
- What does it cost to motorhome in France? - April 4, 2024
- A Brief Guide to Renting an RV in Europe - February 20, 2024
- All the Countries Where You Can RV: A Complete List - February 10, 2024
Similar Posts

2015 Year in Review

3 Things You Need to Know before Buying Your RV

10 Things I Learned When RVing

One Year As Biz Owners: Key Takeaways and Surprising Numbers

The Reason Why I Can’t Sit Still
How to cross off items on your bucket list: time, effort, and money.

The Difference Between Class A and Class C Motorhomes

We’re traveling again (not what you think)
36 responses.
Aren’t they amazing?? I’ve got serious office envy over here.
Those are some great setups. Almost makes you want to work – almost.
Great post. I love “looking” inside peoples campers. We’re finally taking our camper out next week. I’ll post a picture of our office setup while we’re out.
Haha yes sometimes the best part of RV parks is getting to peek inside everyone else’s rigs!
Keepin’ it real… Awesome Post!
These pics are great!! I really love a whole bunch of them. I adore about everything from Mountain Modern Life. Such fantastic style. You are a cute mess at least. Thanks for a great posts.
Hahaha, well thank you 😂 but yes Mountain Modern Life looks gorgeous!
Very nice pictures! The beauty of RVing is that it takes you into the nature. So just having a laptop and a folding chair is usually all what needed for a true mobile office.
The complicated set ups are usually counter productive, as one mentioned below ” it almost makes you want to work” and inside.
Keep it simple – that’s why we are RVing…
Very true! But I think most of us want to and enjoy working in our RVs because it allows us to go more places and get out into nature more often!
Awesome pics! We pulled out the recliner and installed a big deal made out of a scrap piece of butcher block. It’s right in front of a big window. Awesome-sauce!
Thanks for the inspiration! I was afraid I’d have to give up my beloved DXRacer chair when we get our 5th wheel, but I see others on wheels. I’d be curious how they secure their rolling chairs…
Bungee cords! Or tossing them on the bed 🙂
Thanks for the tip!
Love the inspiration and it’s fun to see some of my favorite mobile office spaces in this post, including ours, woo-hoo! The only downside to our living room office is that we have to spend two minutes putting it away or setting it up, which means on my super lazy days I just work at the pop-up desk in the bedroom, haha.
Haha it’s funny how big of a difference those two minutes make! I have definitely spent many mornings with my laptop in bed because that’s just SO much easier!
I’m surprised there weren’t any bunk removals. That’s the direction we are leaning. But have till spring to figure it out.
Well there’s a couple school buses in there, so there were a few that started out with empty buses and built out their whole layout!
Great office ideas, thanks for compiling and sharing!
Thanks Shane! 🙂
[…] See Jordan & Brittany’s custom workspace here! Absolutely love their RV remodel! […]
https://uploads.disquscdn.com/images/66aad73f77b4793761d407ed6446b97762f7ed84a59715e5be07907702982e5e.jpg
We used a $20 black desk and $20 black 2-shelf bookcase from Walmart and made a great corner desk behind our passenger seat. We have a 37ft Class A Motorhome.
[…] for how to create a workable space in your RV for you to run your business (check out this blog: https://heathandalyssa.com/mobile-office/). Some keys to remember […]
Just stumbled on this blog because I Googled “why don’t RVs have office space?” As a video editor I need to set up and LEAVE IT…until I move again 🙂 I wish I just used a laptop…but my office setup will be a little more complicated. Thank you SO MUCH for this post and the inspiration. I’m just beginning my journey of research to see if this is indeed something I could do. I hope RV designers take this trend seriously and actually start designing workspaces! RVs aren’t just for the retired anymore. Thanks again for your blog! Great information! Happy travels!
Hey Wendi! I do video editing on the road as well and just takeover our dinette table with a desktop computer. When we’re driving, we lay it down on the bed so it’s protected. 🙂 So glad you enjoyed the post! We actually had Winnebago come out to our conference last month and they interviewed entrepreneurs on how to integrate workspace into future RVs. It will be cool to see what they come up with!
That’s amazing and such great news!! Thanks so much for the tip! I will remember that. I’m so happy I found your blog! Thanks again!
[…] 25 Mobile Office Set-Ups to Inspire You to RV Full-Time […]
[…] RV workspaces are all over the internet! RVers have gotten super creative when it comes to developing unique spaces that maximize efficiency. Heath & Alyssa wrote a great article about these Unique RV Work Spaces. […]
[…] 25 Mobile Office Set-Ups to Inspire You to RV Full-Time. – If you want a mobile office in your RV, you have to get creative, learn how to do a little renovation, and maximize your square footage. It’s a challenge that all RV entrepreneurs love to tackle, so we asked our Facebook group to share their mobile office set-ups to inspire you. […]
[…] More @ heathandalyssa.com […]
[…] Download Plan More @ heathandalyssa.com […]
Comments are closed.
Username or Email Address
Remember Me
- START HERE!
- Work From Anywhere
- How to Start a Blog
- Heath’s Reading List
Privacy Overview
How to Build a Portable Office for Travel & Remote Work
Posted on Published: September 8, 2020 - Last updated: March 7, 2023

Many new digital nomads set off on long term working travel with a carefully curated packing list and a thoughtfully selected bag , but not much thought on how to set up a productive workspace on the road.
I wrote this article after my third long term digital nomad trip to share thoughts on my own portable office essentials and some questions to help you think through how to set up a portable travel office specific to your work. With care and thought, you can create a portable office setup that is ultra-light, compact, and easy to pack- ensuring you have everything you need and aren’t stuck traveling with things you don’t.
Starting out as a digital nomad, it can be tempting to just pack a laptop and wing it, but after over a year, total, of working while traveling as a blogger, illustrator, and digital nomad , I’ve learned that there is a big difference between what I need for an afternoon working in a cozy local coffee shop near my apartment back home in Seattle vs the equipment I need to be comfortable, productive, and high-performing in a makeshift workspace set up in a remote hotel, Airbnb, or coworking space.

Start by Evaluating your Portable Office Equipment Needs
It might go without saying, but before copying my list of portable office essentials, consider your work style and industry. Full-time software developers, audio engineers, digital illustrators, virtual assistants, and copywriters all have different equipment needs.
Evaluate the tech and equipment you use regularly in your current office, and research whether ultra-compact, portable, or dual-use versions are available that can still produce the quality needed to impress your bosses and clients. One strange side effect of the COVID-19 pandemic is that we all got a little more comfortable with working remotely and the ways to maximize quality output without a professional office, so you may already have a pretty good idea of what you need- in that case, your task will be figuring out what to cull or replace with a lighter-weight version for less hassle traveling.
Test Everything Before Travel
If you are planning a big trip or long season of travel while working remotely, set up your portable office well in advance and give it a few trial runs. While you are still close to home and easily able to return or replace equipment that doesn’t work well for you, try setting up your portable office in a local cafe or in a good work spot found during a regional day trip.
Evaluate: What works and what doesn’t? What can be adjusted to work and what needs to be replaced? What’s missing? Answering these questions before you are overseas and working against a deadline with faulty equipment can be the difference between success as a digital nomad and a total breakdown of productivity.
Consider your Travel Style
As you build your portable office set up for remote work, think about whether you are someone who travels slowly- setting up an office for weeks or even months at a time in a single location- or if you will be moving and changing destinations every few days. Are you also attempting to one bag travel , or are you okay with moving multiple bags on transfer days? The answer to these questions can help you decide whether to pack extensive, full-size equipment or pare down your portable office packing list to a few basic, ultra-light essentials.

About WanderBig’s Tested and Researched Reviews:
Look, we all know buying tech online in 2020 is a gamble- products appear overnight with 80 five-star reviews and disappear just as quickly- often leaving buyers who thought they were purchasing a quality product left holding the bag.
These are products I have tested in the field or researched extensively and screened with a number of counterfeit-flagging Chrome extensions (in the case of most items, both) Save the time and hassle of trying to read between the lines of product reviews with the Digital Nomad Supplies Shopping list I have created- full of products that I personally have vetted and/or tested in the field.
The following section may contain affiliate links. As an Amazon Associate, we earn from qualifying purchases.
Review my list below for details, tips, and specs, or just jump to my Portable Office Shopping list at Amazon .
Essential Supplies for my Portable Office for Remote Work while Traveling
Your needs will vary according to your professional field and travel style, but here’s what I pack in my portable office for the multi-media work that I do to earn an income while traveling .
Power Adaptor and Multi-Outlet with USB Ports
A compact multi-outlet USB surge protector isn’t very exciting, but it is the foundation to keeping all tech working on the road. My dream is to find this unit combined with a power converter, but to date none of the international outlet converters with multi-plugs or USB ports have lived up to the performance of the Belkin mini surge protector plugged into a dedicated power converter.
You may also wish to bring or purchase in the country a short extension cord. There’s no point in having a portable office for digital nomading if you can’t reach an outlet, work comfortably, or get your equipment charged!
Folding keyboard
When working in a remote space it’s not always feasible to bring a laptop. Sometimes, I know I’d like to find a cafe and write for an hour or two for a break in the midst of a full day of exploring a city. Due to both weight and theft risk, bringing my entire laptop for the day doesn’t make sense. Instead, I found a folding keyboard that skips into a daypack or handbag and allows me to type full speed on my phone or tablet via a Bluetooth connection.
My Sounwill Foldable Keyboard takes up about as much space as a makeup compact, works with iOS, Android and Windows systems, and has a satisfying feel to the keys while typing. When I decided to order a folding keyboard I ordered 4 keyboards to try, and this was my favorite to type on.
I especially like the folding keyboard because it makes me makes it possible to be productive absolutely anywhere. Weighing in at just 5.5 ounces, and taking up virtually no space in my bag, it’s easy to carry in my purse or backpack so I can pull out my keyboard, connect it to my phone via Bluetooth, and type up a storm from any cafe, park bench, or table. It also comes with a tiny plastic stand to hold any phone at an angle to make typing easy

The image above shows a sample of how I use this incredibly compact writing set up on the road. In this photo, I’m at a coffee shop in Punta Natales, Chile in Southern Patagonia, looking out the window at the Magellan Straight while hammering out an article on time management for another job.
Compact Keyboard
Depending on whether I’m staying in a location for a few weeks at a time or taking a one bag trip where I’ll be switching lodging often, I either take a folding keyboard or a slightly larger, compact keyboard. My compact stainless steel keyboard is significantly smaller and lighter than a standard size keyboard, without compromising on key placement or key resistance. The spacing, click of the keys, and resistance means I can type at my full speed without modifications, and I find it to be a significant productivity upgrade from my Surface Pro Keyboard Cover or most laptop keyboards.
My iPad Pro ( shop the latest mode here on Amazon ) is a must for me when I travel – forming the backbone of on-the-road entertainment (like movies and ebooks) and the foundation of my work as an artist. (P.S. Downloading the $10 Procreate app and purchasing an Apple Pen is also a fun and unique way to create a digital format travel journal ) without having to pack a full travel Journal Supply kit .
Not necessarily a portable office must, I LOVE the composition book-themed iPad case pictured below for throwing off would-be thieves, and it made my list of my top 10 tips to protect your valuables from theft while traveling.
12 pack of canvas bags

While manufactured as party favors, I love these small canvas drawstring bags for travel. Measuring just 7 x 4 inches each, they are perfect for organizing small tech items in your bag. While cables and devices can easily get tangled, mixed up, and damaged in your luggage, organizing with these brightly colored bags helps keep everything separated, easily identified, and slightly cushioned. It’s so much easier to find what I’m looking for when I’ve color-coded and know that I’m looking for the “yellow bag ” rather than just another black cable or compact portable office device swimming in a dark backpack.
Apple Pencil 2nd Gen

Even if you aren’t an artist and don’t do digital illustration or graphic management while you are a digital nomad, if you travel with an iPad you should go ahead and get the Apple pen for the flexibility and usefulness that it offers.
One of my favorite travel stories is sketching in the tiny dining room of a guest house set on a floating island in the middle of Lake Titicaca in Peru . My host in that location was a husband and wife, and when the wife noticed me drawing on a screen she was intrigued and drew near. Even she did not speak English and I knew only a few words of the language spoken by their Uros community, my digital drawing tablet became a connection where we could communicate.
She soon filled the screen with traditional folk drawings of the indigenous people group that I was visiting and taught me how to create these amazing patterns. Without the iPad and pen, I would have missed this really memorable and precious cultural exchange.
Slash-Proof Lockable Tote Bag
All the lightweight and portable office tech in the world is useless if it’s stolen mid-trip. The only thing worse than having valuables stolen while you are traveling is losing the equipment you use to produce an income are traveling. In addition to observing general travel safety , consider security just for your tech.
While you can go for dedicated theft-proof luggage, I believe one of the safest ways to travel is to obscure valuables- and carrying a banged up, used bag is one way I deliberately don’t stand out while traveling. Inside the beat-up bag, you can place a lockable, slash proof drawstring tote . I’m a fan of this bag for my tech and valuables. For day-to-day travel it can be locked and placed inside of the bag I wear on my body, and when I’m not able to wear it I can lock the entire bag (via straps that require bolt cutters to remove!) to a fixed object in my hotel, Airbnb, or even a hostel.
Dictation Software – Dragon Naturally Speaking
If your work requires writing, it likely requires an irritating amount of typing. I break up my workday, give my hands a break, and speed up my writing by using Nuance’s Dragon Speech Recognition software . Most people type around 50 words a minute, but we speak over 250 words a minute! Dictation software can help harness that speed and catch your writing speed up to your speaking speed, to increase productivity- and comfort! As I write this article I, am on the balcony of an Airbnb with a simple lapel microphone clipped to my sweater dictating via my Pixel into WordPress, for editing and publishing later.
An Interval App
A few years ago I read about how maximum productivity is achieved when we do tasks for 23 minutes at a time. I’m still skeptical of that exact timing, but I do know that when I tried it, I found myself starting and completing tasks more quickly. Instead of thinking “I’m going to spend the afternoon on this,” I think instead “I’m only going to spend 23 minutes on this, and I better get started right away.” More often than not, I find myself engrossed in my task and continuing well past the 23-minute mark.
Hardshell Case
A Hardshell Tech Case is essential for protecting delicate tablets and laptops. To save room and weight in your bag you may be tempted to forgo an extra shell for your laptop or tablet. As someone who has done significant damage to a tablet screen, mid-work trip, by trying to skip a case and pack light, let me shout from the rooftop: DON’T SKIP PROTECTIVE CASES.
Now, I always travel with a hardshell case- even for devices that already have a flip cover. Placing them inside of a rigid case prevents damage from pressure points as I stuff my bag with other travel essentials, snacks, and treasured souvenirs on transfer days.
Collapsible computer mouse
I’m never quite as productive when I’m using a touchpad as I am when I have a mouse in my hand. This is particularly true when I am working with image editing. I found my solution in the Surface Pro’s collapsible Bluetooth mouse.
The Microsoft Arc Mouse is the industry-leading collapsible mouse and it’s a trustworthy piece of equipment to travel with. The Microsoft Arc Mouse connects via Bluetooth and can be used with both Apple, Windows, and other operating systems.
Noise Canceling Earphones
The ability to cancel out ambient noise can increase productivity and help you rest better overnight while traveling , relax on transfer days, and focus on your work when you don’t have a quiet environment. For years, I’ve been a fan of Audio-Technica noise canceling in-ear headphones, but their wireless version hasn’t lived up to my hopes. After reviewing a massive number of noise-canceling wireless earbuds, my new travel earbuds are these Sony Bluetooth earbuds with a mic and noise-canceling tech built-in.
Wired headphones
While bringing headphones on any trip is an automatic entry on any good packing list, travelers who hope to work in a portable office during their trip should consider a set of wired backup headphones as an absolute must (Get a basic set or my favorite wired earphones Audio-Technica’s QuietPoint earbuds ).
Not only will the second set of headphones take up virtually no room in your bag and be a lifesaver if you misplace your noise-canceling headphones, the primary reason for bringing your own wired headphones is for in-flight entertainment on airplanes. Airplanes still require an audio jack to enjoy in-flight entertainment, so to avoid uncomfortable airline-provided headphones, plan ahead and bring your own wired headphones with an audio jack both for your portable digital nomad office and for your transportation-entertainment comfort.
The Portable Office Low Tech Workhorse: a Turkish Towel
One thing in short supply even in luxurious accommodations: comfortable task chairs. Perhaps one of the most low-tech things that I now consider essential for working from a mobile office is a soft cotton towel. Not the terry cloth kind, but a woven cloth turkish towel .
It also makes my list of absolute packing list essentials for the purpose of using as a beach towel, blanket, and neck pillow, but in this case, my Turkish towel has made a lot of uncomfortable work seats tolerable. Folded in on itself three or four times, it provides a little extra cushion for use on hardwood or plastic chairs- making it easier to sit comfortably and work productively in a chair that perhaps wouldn’t be your first choice for productivity.

Surface Pro 7 Tablet / Laptop
Depending on the focus of my work during any given trip, I may or may not pack my Surface Pro 7 in my portable office for working while abroad. If I know that I’ll need to edit databases, work with spreadsheets, or write extensively while I’m away, I know I need more power than the iPad can offer, and the Surface Pro 7 is my pick. weighing in at just 1.7 pounds and offering all the essentials of a bigger laptop, it’s a great addition to a portable office that offers all of the functions of a full desktop computer in a fraction of the space and weight taken up in your luggage.

Moment Camera-Phone Lenses
If your work involves photography- and even if it doesn’t- moment lenses are an investment worth making for travel. Even though I travel with a Google pixel that takes amazing photographs, upgrading to a moment wide-angle lens and a moment telephoto lens dramatically improved my ability to take photographs worthy of professional media. For example, the flat lay photo of my portable office supplies featured in this post was taken with a wide-angle lens.
A traditional built-in lens would require me to climb a ladder to get everything in my shot, but the moment wide-angle lens captures a much wider frame in one photo- perfect for product photos like these and for squeezing lots of drama into a landscape photo.
Google Pixel
A Google Pixel with Google Fi’s no-extra-charge International Service will always be my favorite portable office supply, personal safety device, and camera for when I’m working and traveling abroad. It’s a core part of my portable office- often working as a monitor when I’m using a folding keyboard to write copy in a cafe or creating interactive media online.
Anker Portable Charger:
A portable charger is a must-have for any digital nomad’s travel office. I recommend travelers to carry as large and as powerful of a portable battery charger as your travel style allows. For ultralight travelers, this may mean just a very small lipstick-sized charger , for slow travelers that are okay with carrying more luggage, a more powerful battery backup may be more appropriate. In any case, it’s good to have a very small and lightweight charger for personal– and not just professional– purposes. Carrying a tiny battery backup in your day bag or handbag can be the difference between having it just enough charge to navigate with GPS on the way home or having a dead phone with no clear way to get back to your lodging (which is a set up for a high-risk situation).
Name Brand (+verified not counterfeit) Charging Cable for your tech:
You wouldn’t dream of leaving on your digital nomad work trip without cables and phone chargers, what you might neglect to think about, however, is the charging capacity of those cables and their durability as they are folded, stretched, bent, and refolded as you pack and repack.
Start out with really good cables
Good cables can be hard to find, although tech brands like Anker and Belkin do make really good cables , that carry enough amps to charge phones and other tech rapidly. However, it can be hard to trust the quality of cables purchased from sales platforms with many sellers.
If you don’t have the tech-savvy to test the amps on the cables you receive, you may wish to skip marketplace websites and order directly from the manufacturer’s website or from a private vendor.
A hack to making your USB cables last while traveling
Broken, frayed, or malfunctioning USB and charging cables can typically be replaced while traveling, but there’s no promise of that being an easy or cheap process. To give a little extra support to my charging cables before setting out, I like to use heat shrink tubing to protect delicate connections. Just slipping a heat shrink tube over the joint where the cable meets the plug and carefully shrinking it with a little bit of heat from a candle or heat gun protects the delicate connection and makes the joint more resistant to the sharp bends that tend to damage the delicate wiring inside of charging cables

Lynli Roman’s unique approach to travel is informed by decades of experience on the road with a traveling family and, later, years spent as a solo international traveler. When she’s not writing about Seattle from her Pike Place Market apartment, Lynli writes on-location while conducting hands-on research in each destination she covers. Lynli’s writing has been featured by MSN, ABC Money, Buzzfeed, and Huffington Post. She is passionate about sharing information that makes travel more accessible for all bodies.
Monday 10th of June 2024
Just a point people should be aware of - not all airlines allow you to pack a power bank. I carry region- and brand-specific plugs, which are small and don't take up much room.
Ultimate RV Setup Checklist (Printable PDF)
Read this page without ads! Go Ad-Free
Our comprehensive RV setup checklist will guide you step-by-step, ensuring a seamless arrival and setup at your campground.
Tip : Download our Printable RV Arrival & Departure checklists and check off each of these steps as you complete them for a stress-free setup and teardown – no WIFI needed!
Arrival at Your Chosen Campground
Upon reaching your destination, follow these steps:
- Check-In and Get Your Campsite Number : Register at the campground office and get your assigned campsite number.
- Use Discount if Possible : If you have memberships with RV clubs like Good Sam, take advantage of these offered discounts.
- Confirm Campsite Has All Requested Amenities : Double-check that your site is equipped with the amenities you need for your stay, such as electricity, water, and sewage connections.
- Get a Map and Rules List for the Campground : Familiarize yourself with the campground layout and its regulations to ensure a smooth and respectful stay.
- Inquire About Points of Interest in the Area : Ask about local attractions, hikes, or events to make the most of your trip.
Arrival at Your Designated Campsite
Once at your site, run down this campsite setup checklist:
- Visually Confirm Site Has Needed Amenities : Do a quick visual survey of your campsite to ensure it’s equipped with all the necessary facilities, like power or sewage hookups.
- Plan Your Entry Path : Plan how you’ll maneuver your RV into position, be it pull-through or back-in.
- Inspect Campsite for Hazards or Obstructions : Check for potential obstacles like tree branches or rocks that could interfere with parking or setup.
- Park Your RV : Position your RV on the site, allowing enough room for slideouts and the awning. Be sure to keep kids and pets in your vehicle when you park, use a spotter to help guide you safely, and take it slow!
- Turn on Your Emergency Brakes if Driving a Motorhome : Secure your vehicle by engaging the emergency brakes.
- Check to Make Sure You Can Reach Hookups : Verify that your RV’s cords and hoses can comfortably reach the site’s water, electrical, and, if applicable, sewer hookups.
- Level RV : Use leveling blocks or your RV’s built-in leveling system to ensure a stable and even living area.
- Connect to Shore Power : Plug in your electrical cord to the site’s power supply to run your RV’s electrical systems.
- Connect Water Lines : Hook up your water lines to access fresh water.
- Connect Sewer Hose : Attach your sewer hose to properly manage waste.
- Turn on the Propane : Turn on your propane supply to power your gas-powered appliances.
- Roll Out Awning : Unroll your awning, taking care to secure it safely.
- Lower Handrails and Entry Steps : Ensure safe entry and exit by lowering the handrails and steps.
- Campsite Setup : Arrange your outdoor furniture and accessories to create your perfect outdoor living space.
Unhitching (If Applicable)
- Chock Tires : Secure your RV from moving unintentionally by placing chocks around the tires.
- Put Support Blocks Down & Lower Jacks : Establish further stability by using support blocks and lowering the RV’s jacks.
- Disconnect the Electrical Cord from the Tow Vehicle : Detach the electrical connection from the tow vehicle to the RV.
- Disconnect the Breakaway Cable from the Tow Vehicle : Unhook the safety breakaway cable from your tow vehicle.
- Unhitch RV : Detach the RV from the tow vehicle.
Now, let’s prepare the inside of your RV:
- Extend Slideouts : Extend any slideouts your RV has to increase living space.
- Turn on the RV Refrigerator : Start cooling your refrigerator to store food safely.
- Turn on A/C or Heater : Based on weather conditions, turn on either the A/C or heater to maintain a comfortable temperature.
- Open Roof Vents : Promote good air circulation by opening your roof vents.
- Light Pilot on the Oven : If your stove has a pilot light, make sure it’s lit and ready for cooking.
- Turn on the Water Heater : Activate your water heater for warm showers and dishwashing.
- Extend Antenna : Raise your antenna for better TV or radio reception.
- Test Water Lines : Turn on faucets to ensure all water lines function properly.
- Set up Furniture : Arrange interior furniture as desired for your comfort and convenience.
- Unpack Items : Remove items from storage and place them in their designated spots for easy access.
Using these steps as your guide, you can ensure that your arrival and setup at any campground go smoothly and efficiently. Combine this with our RV Departure Checklist , and you’ll have your entire camp setup and teardown process completely covered!
Better yet, we have put all of these steps into a simple-to-follow printable RV setup checklist that you can download, print, and reuse over and over as many times as you want!
These PDF checklists are easy to use and come with blank copies, so you can make them work for you and your RV. Get your RV Arrival & Departure Checklists today and take the hassle out of the setup and teardown process!
Common Setup Issues and Troubleshooting
No matter how well-prepared you are, unexpected issues can arise while setting up your RV.
Wrong Electrical Connection
In some instances, your RV’s electrical system might not match the site’s power source, which could lead to power issues. Always carry adapters for different types of electrical connections. Be aware of your RV’s power requirements to prevent damage to your RV’s electrical appliances and systems.
High-Pressure Water
An unexpectedly high water pressure can lead to damaged plumbing within your RV. To avoid this, always use a water pressure regulator when connecting your RV to a water source. This will ensure that the water pressure stays within a safe range.
Power Cord Doesn’t Reach the Pedestal
In certain situations, you might find that your power cord isn’t long enough to reach the campground’s power pedestal. Always carry an extension cord suitable for your RV’s power requirements to avoid such issues. Be aware that using extension cords can lead to power loss, so use them sparingly and only when necessary.
Uneven Leveling
An uneven RV can lead to unstable walking conditions inside and can even affect the functioning of some appliances. Always carry leveling blocks or consider investing in automatic leveling systems to deal with uneven terrain. Should your RV not appear level even after your initial setup, re-adjust and use your leveling system to correct this.
Water Leakage
Water leaks can cause significant damage to your RV. Always check your water system during the setup process to prevent leakage issues. Ensure all connections are tight and the seals are in good condition. If you detect a leak, turn off the water supply immediately, identify the source, and repair it. For securing the connections, consider using plumber’s tape for a more secure fit.
Slide-out Issues
Slide-out rooms in your RV can occasionally encounter problems. Whether they refuse to extend or retract, such issues can be caused by several factors, like low battery voltage, blown fuses, motor failure, etc. Understanding your slide-out mechanism and maintaining it properly can prevent such problems.
Leave a Comment Cancel reply
We highly encourage discussion on our posts and in our RV Community Forums . The most helpful comments are those that you can learn from or that help others out. Please refrain from insults, complaints, or promotional material. See our community guidelines for more information.
Save my name and email for the next time I comment.
Notify me of follow-up comments via e-mail.
- Find a Location
A Comprehensive RV Setup Checklist for Your Campsite

This checklist begins once you’ve checked into your campground and located your site. Here’s everything you need to think about to get your RV ready for daily living:
- Scout your site. Assess the space to determine whether you can pull through or have to back in. Determine how you want to position your RV to make it easier to level and ensure clearance on all sides (above as well) for your entry steps, slide-outs, and awnings.
- Disconnect your toad or dinghy (Only motorhomes towing a second vehicle).
- Use a spotter to pull in. Even if your RV has a backup camera , your travel companion should know how to guide an RV , be willing to help, and be easily seen by the driver.
- Position your RV within reach of hookups. The lengths of your sewer hose, electrical cord, and potable water hose determine this distance.
- Install leveling blocks as needed. Use leveling blocks under your wheels to raise your RV and level it from side-to-side (for towable RVs) or side-to-side and front-to-back (for motorhomes).
- Chock the wheels. Set these in place to ensure your RV doesn’t shift.
- Disconnect your tow vehicle ( Towable RVs only) . Remove the electrical connection, breakaway cable, safety chains, and any weight distribution hitch components before using the tongue jack to lift your trailer off your vehicle’s hitch ball.
- Pull your tow vehicle away ( Towable RVs only). Allow yourself space to easily unload items from your tow vehicle’s trunk.
- Raise or lower the tongue jack or landing legs to level the unit (Towable RVs only). Use a bubble level to check your work from front to back and side to side.
- Extend stabilizing jacks. Place jack pads or 2”x4” wooden blocks beneath and extend jacks until they make contact. DO NOT OVEREXTEND! Stabilizing jacks are meant for stabilizing your RV, not for lifting it. View our full tutorial on leveling and stabilizing your RV.
- Connect a surge protector and your electrical cord to shore power. Use the appropriate surge protector , electrical cord, and/or adapter for your RV’s electrical system . Check that the breaker on the power pedestal is turned on for your 30 or 50-amp outlet.
- Attach a potable drinking water hose, water pressure regulator, and water filter. Attach the pressure regulator to the water source. Attach the inline water filter to the regulator. Attach one end of your potable water hose to the filter and the other to your RV’s city water inlet. Skip the filter step if your RV has an onboard filtration system. You may consider using a 90° elbow to reduce strain on the hose’s connection to your city water inlet.
- Connect the sewer hose to the sewer drain outlet. Place the downstream end in the sewer drain outlet before attaching the bayonet fitting on the other end to your RV’s sewer outlet. Place a sewer hose support below your hose to create a slope from the RV to the drain outlet.
- Lower your entry steps. Adjust them to ensure safe entry and exit (if applicable). You may need wooden blocks to support your steps if they don’t come with adjustable legs.
- Turn on your refrigerator and switch it to AC power. Ensure your refrigerator is powered on and set to run on 120-volt AC power.
- Turn on your propane supply. Open the container valve(s) and set the position of your LP regulator .
- Unlock and extend slide-outs. Remove any slide-out locks or brace bars before fully extending your slide-outs .
- Turn on your water heater to fill the tank. Turn it off after 2-3 minutes until hot water is needed. Verify tank is full again before operating.
- Return all stowed items to their proper positions.
- Set up kitchen and interior.
- Set up the exterior.
Setting up the Inside of Your RV

Every floorplan is unique , meaning your exact process will differ depending on your RV’s make and model. Here’s a list of all the considerations you might account for when setting up your RV’s interior:
- Open the blinds.
- Plug in the electric kettle and/or coffee maker.
- Set out dish soap and sponge(s).
- Place shower essentials back in the shower from their stored locations.
- Raise the TV antenna. (Only applicable to RVs with a manual antenna).
- Turn on the TV and run a channel scan. Check that your signal booster is turned on if applicable.
- Place bedding/linens on any convertible sleeping areas you’ll use.
Setting up the Outside of Your RV

Some may not apply to your setup, but here’s a comprehensive list of everything you might set up for your RV’s outdoor living area:
- Secure your patio mat .
- Set up camping chairs .
- String up patio lights .
- Unfold your camp table .
- Extend RV awning(s) as desired.
- Find a spot for your portable firepit (if applicable).
- Set up your outdoor grill or griddle .
- Return stowed items in your outdoor kitchen to their proper position (if applicable).
- Turn on your exterior TV and run a channel scan (if applicable).
RV Teardown Checklist

Use this checklist to ensure you’re ready to head home or explore your next destination:
- Stow items in your outdoor kitchen.
- Stow all outdoor camp gear (chairs, patio mats, griddles, outdoor games, patio lights, etc.)
- Retract RV awnings.
- Lower TV antenna (if applicable).
- Stow all interior appliances that can shift during travel.
- Turn off all interior and exterior electronics and lights.
- Close the blinds/curtains.
- Turn off your water heater.
- Retract and secure slide-outs.
- Drain holding tanks and stow sewer hose and hose support.
- Turn off the propane supply.
- Turn off the refrigerator.
- Turn off city water and store the water hose, regulator, and filter. Take the time to blow any remaining water out of the hose and filter before stowing.
- Disconnect the surge protector, electrical cord, and any electrical adapters and stow away.
- Check to ensure all rooftop accessories are in the stowed position.
- Retract stabilizing jacks and entry step(s).
- Raise the tongue jack to prep for connecting your tow vehicle (Towable RVs only).
- Connect tow vehicle and weight distribution hitch (Towable RVs only).
- Remove wheel chocks and stow.
- Check tire pressures and condition.
- Pull forward off leveling blocks.
- Collect and store leveling blocks.
- Lock all compartment doors.
- Use a spotter to guide you out of your campsite.
- Connect your toad or dinghy (Motorhomes only).
- Conduct a final walkaround .
- Verify you have all camping partners. Don’t leave your furry companions either!
- Stop and re-check all hitch connections after moving a short distance.
Are there items on your RV setup or teardown checklist that we didn’t include? Share them in the comments below.
- Comment (17)

Always check for slide room clearance before unhooking tow vehicle.
Great addition!

Pretty good checklist, however, I would like to add one very important step to your departure list. At least it is an important step for us! “Ensure all doors and windows are closed and secured, and toilet seat is down.” We have a motorhome we like to take on extended trips. Even though we have our own checklist to use, we are constantly overlooking at least one drawer or door that has not been fully secured before we pull out. Fortunately, we generally notice/hear the oversite either as we are pulling out of our driveway or within a couple miles of our home.

Especially the shower door. A friend of ours forgot to secure the shower door and it shattered.
This is a great point! And a great addition to the list. Thanks for your insight!

One of us always goes behind the RV while the other turns on turn signals, flashers, taps brakes, turns on all lights—to make sure everything is working before we pull out on the road. If one has a towable, trailer/fifth wheel it’s wise to test the breakaway switch periodically.
Great recommendations Vicki!

One thing I’ve been told is to turn off the circuit breaker before plugging in and before unplugging the power. You don’t want to be doing this in case the A/C or furnace is on and drawing lots of power or you forgot to turn off the refrigerator.
When I turn off the propane I turn on the stove to purge the lines so no gas stays in the unit, then turn off the stove.
I apologize for the delayed reply, as I wanted to get insight from our technical service team on your comment. Here’s their reply:
It is very good advice to ensure that all 120VAC loads are off when changing power sources (none, generator, inverter, or shore power) so that they are not damaged by surges. However, circuit breakers are safety devices, not switches. Every time they are flipped it wears them out a little bit. The appliance switches/controls should be used for turning loads on and off. The furnace runs on 12VDC power, not 120VAC power and is unaffected by this issue.
Purging the LP gas from all lines when not in use will allow air into the system. The oxygen and humidity can cause brass, copper, and rubber to oxidize and fail prematurely. There will be little pressure or volume left behind in the lines when the LP containers are turned off and should not be dangerous. In addition, the chore of purging the air from the system later is inconvenient and may even result in a flame out with an open valve if the system were improperly purged.
Side note: many people turn off the battery disconnect for travel in the interest of safety, but the house battery is required for emergency braking!

This is great! So needed and we can customize it but it gives us a great start. Thank you!
Glad you found it Karen!

ALWAYS turn the electric breaker on the power pedestal OFF before plugging in or unplugging your RV’s electrical service. This prevents arching which damages both the contacts on your power cable and the pedestal outlet. Damaged contacts will cause overheating and eventually an electrical fire.
I was curious to get our technical service team’s thoughts on your comment, which is why my reply is delayed. Here’s their response:
If you’ve shut off all 120VAC loads in the RV when connecting and disconnecting, there will be little or no arcing, making this recommendation unnecessary. Most shore cord damage is actually done when users exceed the capacity of their system, of during a drop in voltage in the park at peak usage hours. A very effective practice to ensure that no damage is done to a shore cord is the use a QUALITY surge protector. The best of these eliminate arcing, prevent operating the RV on poor quality pedestal power, and will not let the user exceed the rated capacity.
Here’s our guide to choosing the proper surge protector for your RV: https://blog.campingworld.com/learn-to-rv/how-to-choose-an-rv-surge-protector/

Tucker You have done a very good job with these check list. I have been raving for 40 years and this is the best I have seen. Thanks for all the newbies who will need this.
Thanks so much Dan!

My Arctic Fox camper model 1150 has a kill switch. I have no idea when I should put the switch in the on or off position. I could sure use some help with this problem.
Sorry for the delayed response, but I wanted to get our technical service team’s thoughts. Here’s their reply:
Although most will refer to this as a Battery Disconnect Switch, Arctic Fox actually does refer to it as a Battery Kill Switch. It is usually located under the bunk step. This company has used 2 different switches, a fixed round rotary switch and a smaller black switch with a removable red plastic key. The switch must be on at all times when the camper is in use or the battery will not be in the system. When plugged in to 120VAC shore power, the converter will be on to provide 12VDC power and charge the battery. The converter does not have adequate output power to satisfy high demand loads, and the battery is there to back it up. The user can know if the switch is on or off by looking at it: the large, round, fixed red knob points an arrow towards the on or off labels. The key style is only removable in the off position, and cannot be removed while in the on position.
I hope this helps, but please let us know if you have any follow up questions!
Leave Your Comment Cancel Reply
Save my name, email, and website in this browser for the next time I comment.
Shop By RV Type

Your Adventure Awaits
Copyright © 2023 cwi, llc all rights reserved.
- RV Glossary |
- Privacy Policy |
- California Privacy Rights |
- Do Not Sell or Share My Personal Information |
- Targeted Advertising Opt Out |
- Terms of Use

No products in the cart.

How To Set Up an RV For Permanent Location Use
NOTE*** The content on this page may contain affiliate links, we may make a commission. And, as an Amazon Associate, we earn from qualifying purchases. More information: disclosure page .
For many RV owners, the idea of setting up on a prime piece of land sounds like a dream. Maybe you’ve envisioned living by a lake, in the mountains, or the desert for an indefinite amount of time. Or perhaps you are looking to save some money on housing. Do any of these sound familiar? I can help you.
I spent time living in our travel trailer with 5 kids and a dog in a seasonal RV campsite in Massachusetts. I learned so much and I’m happy to share everything with you.
Whatever your reason, the minimalist lifestyle can be closer than you can imagine by planning accordingly and learning the correct steps to set up an RV for permanent location use.
Turning an RV into a Permanent Home in Five Basic Steps:
If you’re asking yourself, “Can I use my RV as a permanent home to live in?” the answer is yes. You can use your camper as a permanent home. However, you need to know what you’re getting into before packing up and searching for your own homestead.
Keep reading to learn exactly how to turn this dream into a reality.

- Pick your location
- Place Blocks Next to Wheels
- Drive Your Trailer Onto the Blocks
Place Wheel Chocks Around Tires
- Lower the Tongue Jack
Install Stabilizing Jacks
Connect the hookups, organize inside the camper for living.
- Set Up Your Outdoor Space
Before we proceed, here are some resources to read more about setting up your RV.
- Choosing the Perfect Campsite Every time
- RV Rental Delivery and Setup at Your Campsite (Cost, FAQs, Examples)
- Rent an RV for a Month (10 Examples Plus Cost)
If you’re an RV owner and have been playing with the idea of renting a seasonal or year-round campsite, we’ve got you covered. In this article, we’ll take you through the steps to set up a permanent RV for living in.
How to Set Up a Permanent RV
Now that we’ve briefly discussed the five main steps of how to set up a travel trailer permanently, I will dive into each step to provide you with specific details and information.

Choose an Ideal RV Location
Choosing the right location for your permanent RV setup is essential . After all, if you want to make an RV into a permanent home, you’ll want to put some thought into it.
Ask yourself whether having amenities are essential to you or if you’re more interested in living entirely off the grid or “boondocking.” Many RV campgrounds and campsites offer long-term residency for RV campers.
Many people in the Northeast states rent seasonal or permanent RV sites and return year after year.
I can say from experience, living off-grid with no hookups, no Wi-Fi, and no cell service may be fine for a weekend away – but it gets old quickly.
We lived in a seasonal RV spot with water and electricity. Dump service came weekly for the blackwater and we had the option to connect to graywater disposal for a leach field. The Wi-Fi did not reach and the cell service was spotty.
However, we did enjoy the pool, mini-golf, and small arcade that were onsite.
If you prefer more amenities, it might make sense to you to look into privately-owned RV parks, luxury parks, or KOA campgrounds. One thing to note is that some of these campgrounds charge extra for additional people, so a family with kids may be more expensive.
If RV parks aren’t your thing and if you’re not looking to be remote, another option is to consider buying or leasing RV-deeded land to set up. Several online resources feature land for sale or lease.
Deliver Your RV to the Site
Once you have picked the location that your motorhome will be permanently set up on, you will need to deliver your RV to the site. If you have a motorhome or tow your own trailer this will be easy. Otherwise, you will need to hire a contractor to move and deliver your RV.
In some areas – such as New England – this is quite common, and you can find a contractor by an internet search.
The benefit of hiring a contractor is that they will help you level the camper and may even be able to connect the hookups.
When we moved our RV from Colorado to Massachusetts, we found a contractor on Facebook who came highly recommended.
Level Your RV
Even if you’re staying in an RV park with paved slots, you will need to level out your RV. To start, you should pick a spot that is already reasonably level and clear any debris out of the way. If the space is too uneven, it may be a headache to get it level by yourself.
There are several reasons why leveling your RV is essential.
First, some of your systems may not work correctly. The sink and toilets may have trouble draining, which can lead to clogging. The refrigerator could malfunction due to coolant lines clogging up. Even your food could cook unevenly.
Also, an unleveled camper can affect your sleep. Sleeping at a tilt will make you feel like you’re constantly falling out of the bed and can be very uncomfortable.
You should have an RV level with you whenever you go out on the road. RVs are generally made with level indicators on the rig. However, if yours is missing or broken, you can place a level like this in the doorway of the RV. Additionally, you can find many types of affordable stick-on levels on Amazon which work just as well.
Once you’ve parked your RV at a fixed location, a device like the LevelMate Pro is another great option to aid in leveling your travel trailer. This system mounts directly to the vehicle and measures the amount it’s off-level. It will tell you how much height should be added or subtracted from each side to make the rig level.
Place Leveling Blocks Next to Wheels
Proper leveling blocks are worth the investment if you plan to park your RV in a location long-term. Another alternative is pressure-treated lumber, but make sure the wood is in good condition and there isn’t any rot. Ensure the blocks are wide enough for your wheels since this can cause damage if they aren’t the correct size.
Carefully place the blocks at the front of the tires on the side to be raised.
Drive Your Trailer RV Tires Onto the Blocks
With the help of someone else, carefully drive the RV up onto the blocks. Make sure the person guiding you has experience with the correct hand motions.
Try not to overcorrect and go easy on the gas. If you don’t get it right the first time, readjust, and try again. If the tire is hanging off by just a little bit, it can cause significant damage, resulting in a flat at a later – likely inconvenient -time.
Again, since we’re thinking long-term for our location, wheel chocks will be necessary once you are in the correct spot. It’s a good idea to invest in a quality pair from a hardware or camping store.
Place the wheel chocks behind the tires that will be bearing the weight of the slope. If this is unclear, you can place wheel chocks on either side of the tires.
Lower the Tongue Jack on a Trailer

You can find the tongue jack at the front of the RV travel trailer. This is used to raise the trailer off the hitch of the tow vehicle. In preparation, you may want to lay down a couple of pieces of wood or a metal plate to provide sound footing, and so it won’t sink into the soft ground quickly.
Carefully lower the jack and make sure the wood planks are well centered. When the tongue is above the ball of the hitch, drive the vehicle away from the trailer. Now, raise or lower the jack to make sure the trailer is level front to back.
Have someone place a lever inside the center or threshold of your RV, and have them keep an eye on it to ensure you’re staying level as the jack is lowered.
If you are in a fifth wheel, you will simply disconnect the fifth wheel hitch. You will not have a tongue jack but can use a tripod stabilizer on the front.

If you plan to park your RV in a permanent location for an indefinite amount of time, it’s a good idea to secure the four corners of your rig with stabilizing jacks. The stabilizing jacks prevent the RV from rocking side-to-side or from tilting onto the tongue jack.
Pro tip: Stabilizing jacks are not meant to bear the weight of the camper or be used for leveling. So make sure to get it level with the blocks and tongue jack.
Most RV’s will come with either electric or manual stabilizing jacks . If yours doesn’t, you can purchase these online or in any camping store.
When planning on turning an RV into a permanent home, correctly hooking up to power and water is important for your safety and long-term comfort. If your site has power, ensure you are connected to the correct plug-in. Since this is your new home, protect the camper’s wiring with a surge protector between the shore power and your plug.
For more information about the electrical systems in your RV, read “ RV Electric Setup Basics ” and “ Do You Need the Battery if the RV is Plugged In? “
Next, you will need to set up your permanent RV water hookup. Use a drinking water-rated hose and pressure regulator to hook up your RV to the water supply. If you are living in a cold area, you’ll also need to check with the campground about their procedure for preventing the lines from freezing. Many year-round hookups have heat tracing and insulation.
Don’t forget to hook up the gray and blackwater sewer connections. A good quality hose and hose level will be important here.
If you do not have a sewer hookup you will want to have the blackwater tank pumped weekly. This was part of the deal when I lived in a seasonal spot at a campground. In other places or on private land you can contact the local portable sewer service and ask for dump service.
Since you will be living in your RV or travel trailer, you will need to have your belongings organized and available for everyday use. The main challenge is going to be the limited space inside. Plus you will want to be careful to save the propane for necessary tasks.
Many people love Ikea and the dollar store for organizing an RV. There are so many unique ways to use the different boxes, tubs, and shelves available.
When first moving in to your RV, only bring what you need. You may soon realize that you need to pare down a couple more times. Once you are in your permanent spot, you will need to clear out unnecessary items regularly so you don’t collect too much stuff.
Your kitchen is a good area to focus on staying organized and learning to use the space and power efficiency. You will have to bring in propane bottles, so many full-timers use electric appliances that run on shore power. I love my Insta-pot , electric skillet , and water kettle .
Your cleaning regimen will also change when you are living permanently in an RV. The small space will get dirty quickly – but it will clean up quickly as well. Our cleaning checklist will help you pack just the right amount of cleaning supplies.
Set Up Your Outside Space

Permanent living in an RV is not like camping for the weekend. Your campsite will be your patio, driveway, and your front and back yards. Many people take advantage of this space by setting up structures for their comfort.
Some of the easiest steps are to place a weatherproof outdoor mat out in front and set up nice camping or patio chairs . A good folding table and some storage bins will help too.
Storage will be one of your biggest challenges. You will likely have extra gear, toys, and tools that need to be organized and stored. You can get plastic bins and take advantage of the room under your camper to keep everything tidy.
Some people build semi-permanent (or even permanent structures) like a storage shed or deck at their campsite. Check the rules at the location that you have picked and plan for adding amenities that will make the space feel like home.
4 Tips You Need To Know Setting Up A Permanent RV
Now that you know the steps to set up and stabilize your RV, below are a few expert tips on how to set up a travel trailer to live in.
Check on and Care for Your Tires
You already know to check your tires on the road, but it’s also essential to check them when you set up your RV for the long term. Tires can lose air pressure quickly if they are older.
It’s also a good idea to cover your tires when you’re parked. Covering your tires will protect them from the elements and sun, and extend their life span ( source ).
Check Your Fuel and Engine Oil
It’s critical to check your fuel levels, engine oil, and filters – even if you’re stationary. Your water heater will probably need propane to keep running, and you should run your generator and engine frequently if you are living in a motorhome. Run the engine weekly to check for issues. Starting the engine will help maintain your battery life and circulate the fluids. If your engine oil is dirty, it could corrode your engine.
Many people add an extra-large propane tank and even have propane delivered to their campsite.
Check Your Batteries
Even if you’re on the electric grid, it’s vital to check the health of your RV batteries frequently. Know what kind of batteries your RV needs and how they work. You don’t want to be unprepared if a power outage occurs.
If you have questions about the batteries and what will work without being plugged in, we have an article all about it: “ Do You Need the RV Battery When Plugged In? ”
Make Your RV Feel Like Home
Here is the fun part! Since you’ll be making your RV home for a while, you should make it feel that way too.
Make the inside of your motorhome cozy with soft mattresses, bedding, cozy rugs, throw pillows, and soft towels for the bathroom. Many people choose to lose the brown RV colors in favor of painting the inside fun or brighter colors. Hang up some family pictures or your favorite artwork using wall putty or Command strips .
Stay organized by hanging hooks for keys and pet leashes and using storage bins to store personal items. I love these large foldable cloth bins from Amazon .
Make the outside welcoming by rolling out mats and a fun doormat , and set up a table and chairs for seating and dining. Add some lighting with light strands and solar yard lights . Get a nice propane outdoor firepit , or line a dug-out firepit with nice rocks and surround it with comfortable chairs.
What To Use To Act As Your RV Foundation
We briefly touched on the RV foundation at the beginning of this article, but it’s worth mentioning again. Many experts have weighed in on the best foundation ideas.
If you’re not going to be setting up on the pavement, there are some other options. However, depending on the soil, you will need more than just the jack stands on bare ground.
Some experienced RVers have recommended a reinforced concrete pad over a base rock as the most permanent solution for your RV location. The downside to this is that it’s expensive to install and remove if you change your mind later. Depending on the soil, it may not be the best choice.
Should I Put My RV on Blocks?
Good quality leveling blocks are your best option for affordable, long-term stabilization at your permanent RV location.
Many newer, Lego-shaped blocks have a design that allows them to snap together to bring your camper up to the desired height. You can also use them to create a ramp for your RV’s tires and ensure that they are the correct width for your tires.
Depending on the soil you may need to lay down a better foundation under the plastic leveling blocks such as rocks, pavers, boards, or metal plates.
Frequently Asked Questions (FAQs)
How do i get mail as a permanent rv resident.
Mail is something we may take for granted, but when you set up your RV as your permanent home, it’s something you need to consider.
One popular way to receive mail when living in an RV is to set up a PO box in a nearby town. However, you may not be able to ship all packages to a PO box (like new camp chairs from Amazon) so you might need an alternate location for large packages.
Some people use a friend or family member’s address. It is a good choice if you’re not staying in a campground or if the campground doesn’t accept mail.
There are also several professional RV mail forwarding services that are good options for permanent RVers. These services will scan your mail and send you photos of the documents so you can be remote if you need to be.
How Can I Ensure I Have Good Wi-Fi?
If you plan on working from your RV or if you need to pay bills online, you must have a strong Wi-Fi connection. Trust me, not having Wi-Fi can be one of the biggest challenges to modern daily life. (I had to walk two blocks to the front of our campground and sit outside the office for a long time before we got this solved.)
Since campground Wi-Fi can often be spotty, you’ll want to ensure that you have a reliable cell phone with a good data plan and set up a mobile hotspot . The most reliable, but most expensive option, is to use satellite Wi-Fi. I have used this in very remote locations and the only thing that had a lag was FaceTime (Zoom worked if we were patient).
Final Thoughts About Setting Up an RV for Permanent Use
Setting up camp for a season or even for a year is a delight on its own. You get to experience a new landscape and community that you can bond and grow with.
For some, it can be overwhelming, but if you know the basic steps then you should be good to go. After all, experiencing it will teach you the ways of living in an RV.
Additionally, if you are going to rent an RV, I always suggest starting with Outdoorsy or RVezy . You can ask the owners for personal tips before your trip.
I also have a ton of other helpful blog posts that cover every aspect of RVing, from troubleshooting your RV air conditioner to preventing mice. Take a minute to browse through my posts , or check out these quick reads:
- Is RVezy Legit and Safe?
- Outdoorsy vs RVshare for Renting an RV (Who You Should Rent From)
Regardless of how long you’ll be staying in your camper, you can find a lot of useful planners and checklists in my Etsy Store to keep you organized and relaxed in your RV.

Get this 19-page Travel Planner that I personally use for our family trips
We respect your privacy. Unsubscribe at anytime.

Hi, I’m Shauna – Welcome to Family Travel Fever. We are a large family, that was bitten by the travel bug! I take the kids by myself because I don’t mind flying or driving solo with my crew to discover the coolest places.
Sign up for our email list for my best travel tips plus get the family travel planner free.
Similar Posts

Which is the Easiest RV to Drive? (Beginners Guide)
For beginners, driving an RV can be scary. Obviously, you want to know what is the easiest RV to drive. This guide shows the pros and cons of different RV types.

RV Water Fill Stations in Moab
The first question when arriving is likely – where can we fill our RV water tank? This list is all your options for RV water fill stations in Moab.

Can I Tow A Car With A Rental RV? (and your alternative option)
Renting an RV is a great way to experience what RVers are experiencing when they’re traveling. However, there are times that you will also need a regular car as most rigs are too large to be driven around especially on small roads. Perhaps you’re now thinking of towing your car behind the rental RV. But,…

How to Hire a Professional RV Driver for a Road Trip (+ Cost)
Imagine having someone to drive your RV while you relax and enjoy your time on the road trip. You won’t have to miss out on the fun. Finding a safe and reputable driver can be difficult. Here’s how.

How Far Can an RV Go on a Tank of Gas?
Doing guesswork when your RV will run out of gas can be a dangerous game. Know the exact estimate and the distance that you can travel depending on the…

RV Camping Rules In Maine: Here’s What You Need To Know
If you’re planning your first RV trip to Maine, you should know that the state has specific rules pertaining to campers. In general, camping in a tent, recreational vehicle, or any camping unit is allowed in Maine’s public lands and state parks.
good job of handling a complicated topic.
I’m interested in renting out my RV 5th wheel, but I don’t know where to go to rent land with hook up. What are some ideas I can implement?
I want to know if it is legal for me to live in my rv on my daughters property. Since she is my care giver.
When you’re parked at a fixed location, a device like LevelMate Pro is a great option for leveling your travel trailer. The system measures how much off level your car is by mounting directly to it. The vehicle’s alignment is then determined by precisely how much height needs to be added or subtracted from each side of the vehicle.
Leave a Reply Cancel reply
Your email address will not be published. Required fields are marked *
This site uses Akismet to reduce spam. Learn how your comment data is processed .
- Skip to primary navigation
- Skip to main content
- Skip to primary sidebar
- Skip to footer
- KYD Insiders
- Tricia’s Cookbook
- Summer To Remember
- KYD Magazine
Keep Your Daydream
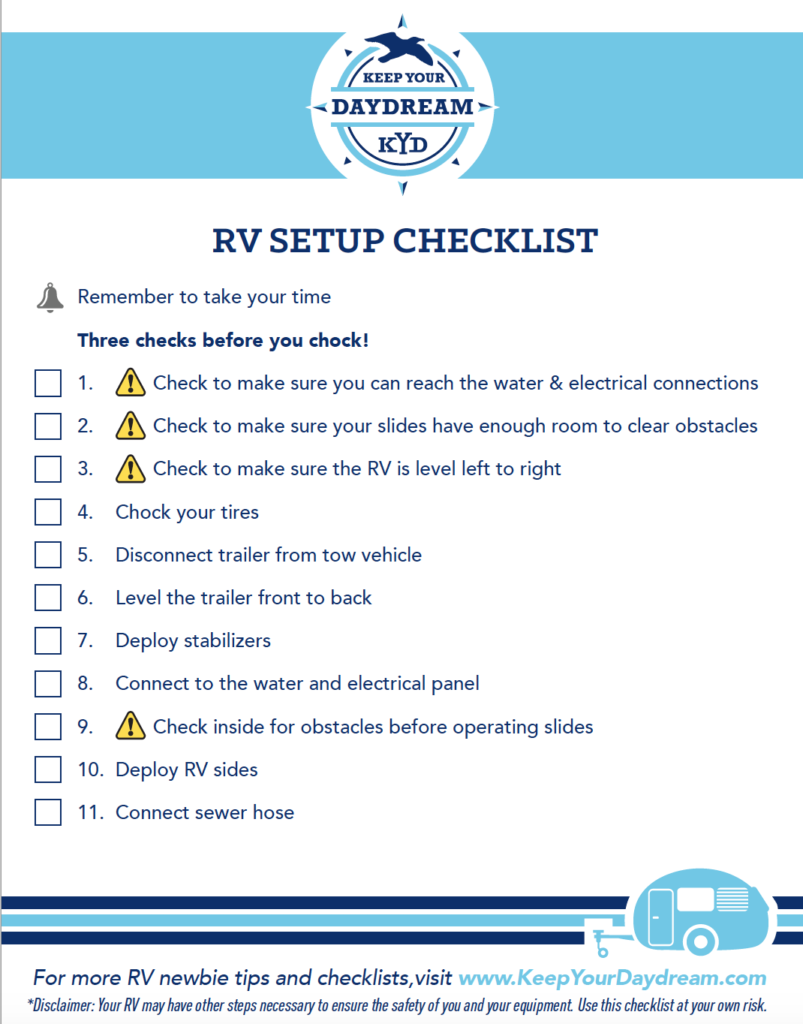
Rv newbie: setup checklist.
When we’re between seasons, it’s the perfect time to focus on creating highly requested videos. Now that we have over 100,000 miles of RVing experience, it was time to update our RV Setup checklist. This video covers the RV basics of setting up in an RV site, but it’s not designed to cover every detail. Rather, we wanted to draw attention to the required steps that must be done in order to set up safely.
What I learned from the comments ????
We create these videos to be helpful and teach but as always, we learn so much from the community. Below are some recommendations that should have been mentioned. We’ll add more as we learn more!
- Check to make sure the electrical and water are working before disconnecting. That will save you from having to reconnect and move sites (good tip!)
- The chocks are the last things to take off and the first things to put on, so keep them at the door to make it harder to forget.
- After connecting the surge protector to the panel to ensure the proper lights, turn the panel off and connect the power cord to your RV. Then turn the panel back on.
- Putting the filter on the RV side may filter any bacteria in the hose from sitting in the sun.
- I used to have a 90 degree elbow to connect the water and put less strain on the RV connection, but I haven’t replaced it yet. It’s a good thing to have.
**This checklist is designed for a travel trailer and may not be complete for your rig. Your RV may have other steps necessary to ensure the safety of you and your equipment.
Click the checklist to download !
RV Newbie Essential Gear List
If you’re an RV Newbie, the amount of gear needed to get started can feel overwhelming. We’ve added all the essential gear to help you get started and a few non-essential items that will help make RV Life a little easier.
It’s best to first get everything you need for water, electrical and sewer hook-ups (those are truly the essentials) and then take a look at some of the items such as chairs and wagons that are “nice to have”.
Visit the KYD Amazon page and then look for our Essential Gear Catagory.
*We are a participant in the Amazon Services LLC Associates Program, an affiliate advertising program designed to provide a means for us to earn fees by linking to Amazon.com and affiliated sites.
Reader Interactions
December 3, 2018 at 4:19 am
Guys, We just brought home our first travel trailer and first thing we said was we need a checklist for things. I have been watching you guys and love your videos and now I love you guys for doing these checklists.
May 16, 2019 at 12:52 pm
1st time with used camper dont know much abt it. Need check list I’m overwhelmed
September 6, 2019 at 6:53 pm
I have a through detailed one for my Airstream but you can use it! Opening List- Stationery
Turn Water on Air Conditioner ( weather permitting) otherwise refer to step 3 if cool, then open Couch side window and Kitchen window then open the roof vent leave screen door open Set up chairs rinse them all off including the chairs on fire pit Weather permitting ( no rain or heavy wind) Open the awning. Undo the latch(es) get the rod hook the strap pull outwards drop rod when fully extended, hold onto the valence go to end flip the grey latch, make sure it won’t go back up. Take the rafter arm and put on wheel lock it into place repeat on other side. Raise Awning 4 holes on the front side and 3 on the backside. Roll up if rain or wind will be present. Set up the umbrella Set up a table ( it is in the bumper of Airstream.) Clean off some things Set the radio up Get anything needed out of yellow/black storage chest in back ( at night turn on blue led lights outside
PACK UP LIST (STATIONARY) Stack Chairs one by one against the “ Excella Part” of the Airstream ** DO NOT PUT AGAINST THE METAL LEAVE 1 inch of space in between. Clean Up anything Put the front leaning down on fire pit Empty the Ice Chest Put Radio away Put anything that was in yellow/black chest back in it, put back where it was. Put umbrella down put the cover on it ( in the passenger-side storage unit.) Put the awning down. Refer to the setup list do the opposite of that. Do a quick walk around In the Morning make sure to turn the water off. Run the lines clean
Winter Pack Up ( Stationary)
Winterize (refer to the manual for how to do it) Chairs stacked in the very back The umbrella under the trailer The table flipped upside down and put in the back Radio take back home and yellow bucket back home Take all things out of trailer that can be frozen Bring out Woodburner Fill Propane up
Pack Up ( Mobile)
Empty Tanks Empty Water Latch all cabinets TVs on floor ( front) blanket over it Tv backroom put in the very far corner with a blanket over it Antenna down All shampoo, soaps, etc put in sinks or showers Disconnect electric Disconnect water Wheel chocks Outside latch awning Stairs Lube ball and hitch Tire pressure and lugnuts Make sure all compartments are latched shut Disconnect brake secured The main door locked + all curtains shut. Tug Test 15 feet pull ahead
Set Up Mobile
DO THE REVERSE OF EVERYTHING LISTED ABOVE
June 24, 2020 at 1:48 pm
Thank you for the list.
December 3, 2018 at 7:48 am
Thank You for Guidance. My wife and I are just now shopping for a trailer i have 2016 Ford Expedition, factory ready for towing. How can we learn about quality trailer manufacturers. There Are so many, some with major brand names, others we are not familiar with. We would like to have a quality unit. We prefer a unit within a interior the dimention of 25 to 30′ for the 2 of us with one to to slide outs. Your followers from Mesa, AZ
April 20, 2019 at 5:30 am
In our search (mainly my wife) we found that many manufactures have forums. We also went to independent travel trailer repair / supply stores and would inquire about different manufactures. We were fortunate to find an individual that refurbishes trailers and assisted us with our quest. We did purchase a used trailer similar to your requirements; 27RKSS which is 33.5′ total length. One warning! Although extremely pleased and blessed with our first trailer; we discovered that it is a little bit too much for our 1/2 ton (GMC Sierrra w/ heavy duty tow package). Although we were about 3500 shy of the GMC’s towing capacity; in the hills of the Ozarks we really felt the truck struggle. We are planning longer trips so out west so we upgraded to a 3/4 ton truck.
December 3, 2018 at 1:15 pm
Thank you for the newbie setup video. I really like the no kink 50′ hose. I don’t see that hose referenced on your Amazon list. Please share the brand of the hose Thanks Tom
November 15, 2019 at 4:13 am
Same! Could you share a link to the no kink hose?
November 17, 2019 at 6:19 pm
Here you go. It’s in our essential list. https://www.amazon.com/shop/keepyourdaydream
June 19, 2020 at 11:48 pm
I found one at Bed Bath & Beyond
December 3, 2018 at 3:32 pm
What order Does the surge protector, dog bone, and electrical cord go in?
December 5, 2018 at 6:25 am
Thanks, Loved your Set-Up CHECKLIST & Newbie Essential Gear List and video! I really enjoy your positive attitude and the way your lovely family makes the RV lifestyle look like So Much Fun. B-T-W, you may want to check the spelling on Checklist #10 (slides vs. sides, maybe?).
April 6, 2019 at 3:38 pm
how do I find you on Amanon
April 23, 2020 at 7:55 am
This is the link to their RV Essentials list… https://www.amazon.com/shop/keepyourdaydream
April 15, 2019 at 3:01 pm
Have been following and learning with you from the beginning of your adventures. Such great information and experiences! We are on our way now too! Just bought our 1st Home, it is a 2019 Grand Design Reflections 337RLS and LOVE it! Safe travels to you and thank you for the check list. Hope we meet you on the road! Tom and Brittany
April 19, 2019 at 12:17 pm
We pick up our new (and first-ever) Winnebago Micro Minnie 2108ds this weekend. Finding info from experienced travelers like you is so helpful! Thanks much for creating and posting the checklists for gear, setting up, etc.
April 20, 2019 at 5:31 am
May 30, 2019 at 3:37 pm
We are first time RVers and your RV Newbie Set Up Video and Checklist are the best!
Question: can the regulator be attached to water source before the the y-splitter?
June 6, 2019 at 11:43 pm
My wife and I just bought our first RV a week ago. I stumbled across your videos on YouTube and I just wanted to say “Thank You” for all the great videos for newbies !!! You two Rock !!!
June 13, 2019 at 2:09 pm
Question! Is that hose good for drinking water?
September 18, 2019 at 5:23 pm
Hi there: This setup checklist is simple and perfect! Do you have one written for when it’s time to head out?
September 18, 2019 at 5:35 pm
Nevermind: I found it! Fantastic! I figured out to search using “tear down”. Thanks!
September 30, 2019 at 2:21 pm
I’m pretty sure you can download it on the blog. Link in the video description.
October 8, 2019 at 1:24 pm
Thank you for Newbie lists. Much appreciated.
February 23, 2020 at 5:36 am
My husband and I just found you all about two weeks ago and have become addicted as we watch you while shopping for a used rig on-line. Hope to gut an older model (we like that kind of thing…) and hit the road in 2021.
July 9, 2020 at 7:10 pm
what TPMS system do you recommend?
July 12, 2020 at 5:38 pm
we are waiting to get our Trailer. We have been scouring the Interwebs watching all sorts of Travel Trailer videos. We really enjoy and appreciate what you put out. Thank you
August 12, 2020 at 6:15 pm
I didn’t see any reference to the hot water heater on the setup checklist. Is that not an essential item?
January 6, 2021 at 12:18 am
shouldn’t you level the trailer side to side before disconnecting it? Thanks for the helpful videos.
January 6, 2021 at 12:24 am
Just a thought: 3A should be level the trailer side to side before un hooking. Thanks for the fantastic videos.
February 4, 2021 at 11:24 pm
We are renting our first trailer in 3 weeks. I saw you You Tube video for Newbies and have watched it twice; downloaded the checklist and made notes from the gear list. We are going from the Houston area to Big Bend State Park. Will let y’all know how we made out. we will rent for a year or so to be sure we want to buy our own, then if no catastrophes, we will probably buy. Thanks for your help.
February 14, 2021 at 5:41 pm
I really like your FB page, and find it very useful. Although I had a toyhauler TT a while back, I still consider myself a newby, especially since I will start full-timing in the near future.
I found this site because I was looking for a campground setup checklist. I really like the list you have, it helped immensely in building one for my use. I just so happen to have a gooseneck toyhauler, so modified it to meet what I hope are my specific needs. There are some things on here many will not need but Some may. I added checking the power pedestal as one of the first items. Wouldn’t want to backtrack too much it it’s jacked up. Feel free!
Upon Arrival Check to make sure you can reach the water & electrical connections Check to make sure slide(s) have enough room to clear obstacles Check for good, clean power at pedestal. Make sure circuit breaker is off, connect surge protector, and turn breaker on. If surge protector shows good, turn breaker off. If power is unacceptable, contact management Level RV side to side Chock tires Use landing gear to raise trailer from hitch. Watch for side to side shifting Disconnect 7-way connector from tow vehicle Disconnect camera cable from tow vehicle Disconnect safety chains Pull tow vehicle from under trailer Outside Setup Level trailer front to back Connect power cable to surge protector. Turn pedestal circuit breaker on Connect all filters and water hoses. Turn on spigot Connect sewer hose Inside Setup Check for obstacles before deploying slide(s) Deploy slide(s) Check for any loose items that may have been jostled during transit. CLEAN IT UP!
February 23, 2021 at 8:41 pm
We LOVE your videos! We are SUPER RV Newbies and your videos have been such a huge help to us! Thank you so much for your videos. Please keep them coming!
April 24, 2021 at 9:58 pm
we have our first RV Trailer after tent-camping for YEARS. IT is so overwhelming Still sitting in our driveway We hope to get over the first time jitters and actually take it out. Have to figure out how to de-winterize it first. ugh
May 18, 2021 at 12:35 am
Surfing the net looking for a simple set up checklist. And of course the one I immediately liked best was from you guys!!! Thanks for the list and for videos that make learning fun and inspirational. Safe travels and happy camping.
May 19, 2021 at 9:28 pm
We love your checklists and have used them faithfully for 2 years. However, we’ve found we need to add/change some things here & there. Is there any way your checklists can be edited?
August 21, 2022 at 11:29 pm
Export KYD List as a pdf and save to your computer. Open it in a pdf editor.. I like Adobe if you don’t have one (they allow you to modify almost any document, and fill and sign forms digitally!). Edit the list at will, save and print. Update it as often as you need.
July 9, 2023 at 2:54 pm
This is a great checklist for RV newbies!
July 11, 2023 at 10:28 am
April 18, 2024 at 10:54 am
Your updated RV Setup checklist video offers essential guidance for newcomers, emphasizing crucial steps for safe setup. Community feedback enriches the learning experience with practical tips and reminders, making your channel a valuable resource for RV enthusiasts. Keep up the fantastic work!
Leave a Reply Cancel reply
Your email address will not be published. Required fields are marked *
Where Are We Now?
Keepyourdaydream.

- KYD Partners
Popular Posts
- Season 4 Route & Plan
- Ep 100: How We Turned “Someday” Into Today!
- RV Newbie? Top 10 things a new RVer should know!
Looking for something?
Keep in touch, join the kyd community.
You’ll receive the once-per-month “KYD Drop” loaded with inspiration, ideas and stuff to make you smile 😀
- First Name *
- Email Address *
- Name This field is for validation purposes and should be left unchanged.
The ULTIMATE Traveling Office & Digital Nomad Setup (2024)
By: Author Mitch Glass
Posted on Last updated: December 31, 2023
If you purchase through links on this page, I may earn a commission (at NO additional cost to you). I only recommend bomb-dot-com products I’m in love with. (See full disclosure )
I’ve searched far and wide for the perfect digital nomad work setup.
A traveling office that:
(1) is lightweight and compact (2) has a second monitor (3) is affordable (4) improves my posture so I won’t grow up to be a hunchback

After some trial and error, I finally landed on a lightweight digital nomad setup that barely takes up any extra space in my backpack.
In this guide, I’ll show you why this portable home office is the bee’s knees — plus alternative gear options for Mac/Windows users, or anyone on a budget.
Whether you’re looking for an entire digital nomad desk setup or you just need ideas and recommendations for how to mount multiple screens, this will help.
But if you’re in a hurry, here’s the TL;DR version…
Just starting (or struggling) with digital nomad life? Check out this ginormously detailed guide on how to become a digital nomad and this mega list of best travel jobs . You will come away with new ideas, guaranteed. And if you still need a place to store your traveling office, here are the absolute best digital nomad carry-on bags .
Table of Contents
TL;DR — The Ultimate Traveling Office for Digital Nomads
The keyboard and mouse (or trackpad), the second screen, the second screen stand, the second screen mount, the dual-screen connection, the internet, the headphones, the posture, what does your portable home office look like.

Shopping online for your portable office setup can be a pain. Without being able to test components out together, you could end up with a janky setup.
To save you the hassle of ordering things that suck, here’s every piece of my remote work setup (plus alternative options I’ve vetted):
The Basics ▶ Laptop stand ▶ Magic keyboard ▶ Magic trackpad 2 ▶ Magic mouse 2 ▶ Alternative budget-option keyboard (PC/Mac) ▶ Alternative budget-option mouse (PC/Mac) ▶ Case for keyboard and mouse ▶ Tripod for tablet or iPad ▶ Mount for tablet ▶ Budget iPad (I use the generation prior to this. Refurbished is a great way to save.) Extras ▶ International eSIM for data worldwide ▶ Sony noise-canceling headphones (I use the version prior to this, which is cheaper.) ▶ Jabra sweatproof earbuds ▶ Cell signal booster for van/RV
Best Digital Nomad Setup, Explained
Your travel desk setup should not be an afterthought.
Whether you’ve been working digital nomad jobs for years or are brand spanking new, these portable office ideas will make work more comfortable on the road.

We’ll start with the obvious. Your laptop is the most important tool in your digital nomad toolkit. It’s the only piece of equipment you actually need . Everything else is a bonus.
Choose your laptop based on your unique needs and preferences (versus just getting what everyone else has).
I personally use a Macbook Air with the M1 chip , but there are a handful of other awesome options as well, both PCs and Macs.
For help determining which is right for your needs, check out these detailed guides: ▶ Best laptops for digital nomads ▶ Best laptops for teaching online

A laptop stand lifts your laptop to eye level and helps you maintain a healthy posture while working.
The most popular digital nomad laptop stand is called “The Roost”.
If you’re an I-only-use-name-brand-stuff kind of person, grab a Roost.
They’re compact, super sturdy, and have easy height adjustments.

This is where your digital nomad accessories may vary. Since your laptop sits up higher on a stand, you need to add a Bluetooth keyboard and mouse (or trackpad) to your toolkit.
For Mac users, the best digital nomad keyboard and mouse combo is the Magic Keyboard and Magic Mouse 2 (or Magic Trackpad 2).

The 2nd generation models allow you to recharge via USB-C cable. This is convenient compared to the 1st generation trackpad , mouse , and keyboard — which require AA batteries.
If you’re on a budget, you may be able to pick up any of these second-hand on Facebook Marketplace or in “renewed” condition on Amazon.
The decision between mouse and trackpad comes down to personal preference. I have both, but I mostly use the trackpad. The mouse is nicer if your job requires a lot of precise click-and-dragging.
If you use Windows, I recommend this combo:

Both of these also work with Mac and are great budget alternatives.
The Protection
Don’t just cram your accessories in your traveling office bag — they will break. This is especially true for the Magic accessories. I learned this the hard way when my $100 trackpad shattered inside my backpack…
To protect your accessories, grab one of these affordable cases:

This particular case is the perfect size for the keyboards and trackpads mentioned above (apart from the Logitech mouse, which is pretty sturdy on its own). If you have a different keyboard, measure it to make sure it fits.

Constantly changing and resizing windows on a small laptop screen is annoying and inefficient. To fix this, you can add a second screen and instantly boost your productivity.
There are two main screen options:
- A designated portable external monitor
I simply use my handy-dandy digital nomad iPad . It’s something I travel with anyway, so I’m not adding any extra bulk to my setup.
While a portable external monitor might be a little cheaper, it only has one function. A tablet has many functions. And when you live out of a backpack, multi-functionality is key.

Work is more comfortable when your two screens are at the same level.
Most portable external monitors and tablet cases have some sort of built-in stand. When you’re not using your laptop stand, this works perfectly.

But if you put your laptop on your laptop stand, now there is a huge difference in level — your eyes have to make a big jump every time you move screens.
If you’re ok with this, you can simply lean your digital nomad monitor against the front of your laptop stand, like so:

But if you want both screens at the same level (which I recommend), you need another stand. This can get tricky because not just any old stand will work.
It has to be sturdy enough to hold your screen, with enough adjustable height to match your laptop screen.
The best solution I’ve found is this GorillaPod .

The best part is, it’s multifunctional. We also use this as a tripod for our phones to take pics and videos while sightseeing. Since it’s something we use anyway, it’s not adding any extra bulk to our pack.
Note : To attach your phone, you also need a phone mount. We use this Ulanzi mount because it allows you to attach a light and/or microphone to the top (handy for Youtube). But if you don’t care about that, any old mount will do.

To attach your second monitor to the Gorillapod, you need a mount.
Now, the mount you use really depends on the type of screen you have. If you use an iPad (or any tablet with similar thickness), you can use this cheap-yet-sturdy mount .
The best part is, depending on your tablet’s thickness and case, you may even be able to mount your tablet with the case on. My iPad (basic 7th generation) and case fits perfectly. If you had to remove the case all the time, it’d get old fast.
Now all you need to do to finish your digital nomad office setup is connect the two screens.
There are several ways to do this, and some work better than others.

If you have a new-ish Macbook and iPad (see exact requirements here ), you can use Sidecar for free. This is what I’m currently using, and it’s super slick.
If you use Windows or have older Apple equipment, you can install the Duet app on your tablet and laptop. I used this method before upgrading my laptop, and it works pretty well. It’s a one-time purchase (~$20) for the wired connection or $20/year for wireless.
Even if you do have Sidecar-compatible equipment, Duet still comes in handy if you ever have a spotty wifi connection.
Lastly, if you buy an external portable monitor, it’ll come with instructions on how to connect to your laptop. Some monitors connect via cables, while others have wireless capabilities.

Unless you like stress, I would not recommend depending on cafes or your accommodation’s wifi to get work done.
Always have a Plan B.
Whether that be tethering to a data plan on your phone or one of these other fancy digital nomad wifi hotspot options , you need to bring the internet with you.
Think of these hotspot devices as your very own portable “digital nomad router”.
If you have a van life job and need internet in your vehicle while traveling, a WeBoost cell booster helps you get usable cell service in places you normally wouldn’t.
You can then use your phone’s data plan and tether to your laptop. We used the Unlimited Everything phone plan from Visible in the U.S., which can be as cheap as $25/month.
While traveling, I use international eSIMs. I’ve tested out Holafly (see my Holafly review here), which offers unlimited data plans in many countries. Unfortunately, their unlimited plans don’t allow tethering.
If you want to be able to tether to your phone (which you probably do as a digital nomad), I recommend other eSIM companies like Nomad eSIMs . I tested Nomad out in Thailand, and it worked like a charm. To see how easy it is to set up, check out my full Nomad eSIM review .
If you work from public wifi or unsecured networks (which you will), you also need a VPN.
I’ll spare you the details of how they work (mostly because I have no idea), but they basically serve two purposes:
- Protect your sensitive info from hackers (e.g., when logging into your digital nomad banking )
- Allow you to make it look like you’re accessing the internet from a different location
This second perk is handy for accessing websites only available in certain countries; when you get locked out of accounts for being abroad; or to stream movies on Netflix, Hulu, etc.
If you don’t care about streaming or bouncing to specific locations, TunnelBear is a great free VPN I’ve used for years. This would be if you just want something to protect you when logging into your bank account periodically.
For something a little faster and more flexible, Surfshark is probably the best bang for your buck. To test it out, use their free 30-day trial .

A good pair of noise-canceling headphones is a digital nomad’s best friend.
Sitting at the airport in a crowd of people? Put on your headphones and block ‘em out.
People jabbering and trying to be friendly at a hostel? Put on your headphones and block ‘em out. (jk, be friendly.)
Living in Colombia next door to an inconsiderate b-hole who has never heard of earbuds and blasts salsa music for the whole barrio to hear? Put on your headphones and block ‘em out. (Literally what I’m doing right now).
My go-to pair are the Sony WH1000XM3s . They’ve since released the newer WH1000XM4s , but the 3s work fine for me (and are cheaper).
I also carry around these Jabra sweatproof earbuds . These are my exercise headphones, but they also come in handy when I don’t want to lug around the bulky, over-the-ear headphones.
If you’re on a budget, you don’t have to buy fancy headphones to be a digital nomad. They certainly make work more comfortable, but you can always upgrade later.
A basic pair of earplugs works just fine.
Everyone has different tastes, but I’ll just throw my favorites into the ring.
I’m a big fan of Lofi Girl on Youtube. You can also find her playlists on Spotify.
If you can’t concentrate well with music, I also like the free White Noise Lite app. If you don’t have noise-canceling headphones, just choose the Airplane white noise, crank it up, and it’ll block everything out.
Lastly, if you need something more upbeat to give you energy, try listening to music in different languages. Since you can’t understand what they’re saying, it’s not as distracting.
It doesn’t matter how fancy your traveling office is if you continue to use poor posture.
And even with all the gear, sometimes it’s still difficult. Unfortunately, there’s no such thing as a digital nomad office chair that you can carry around with you (that’d be cool though). And if you’re not sitting at the correct height, it throws everything else out of whack.
In an ideal world, you want to have:
- Top of screen at eye level
- Shoulders relaxed
- Arms and back supported
- Elbows, knees, and hips at 90 degree angles
- Straight, supported wrists
- Feet flat on the floor
This rarely happens when working on the road. But for your body’s sake, try your best.
Every digital nomad’s needs are unique. While this guide covers several options, it’s impossible to cover them all.
So, have you discovered anything I’m missing?
Leave a comment below – I’d love to hear what you use at your setup!

Mitch is your typical nomadic backpacker. Or at least, he was . But after stopping in Colombia to take “one week” of salsa lessons, his life took a sharp left turn. He met a cute Colombian girl in dance class, fell in love, and got married. Over half a decade has passed since he left his career to travel the world as a digital nomad, and he’s never looked back.
Nowadays, he’s the blogger behind Project Untethered — where he runs an awesome email newsletter and Youtube channel teaching adventure-craved wanderlusters how to escape the rat race, earn money from anywhere, and build an “untethered life”.
His advice has been featured in Forbes, USA Today, Yahoo, MSN, Reader’s Digest, Condé Nast Traveler, and more.
Mitch's Travel Recommendations: Travel Planning Resources - Everything you need to plan your trip on one convenient page. Going Cheap Flights Newsletter - Get flight deals from your airport up to 90% off sent straight to your inbox. Safetywing Insurance - This cheap travel insurance has saved me over $15,000 in medical bills. Booking.com - Book accommodation without adding your credit card (in case you need to cancel). Trusted House Sitters - Take care of pets in exchange for free (sometimes luxury) accommodation. Flexjobs - Find remote jobs without having to sift through crappy ones. Skillshare - Free trial to take unlimited classes that teach digital nomad skills. Wise - Send and receive money abroad cheaply (great for freelancers).
By signing up, you'll also be added to my legendary email list and receive exclusive travel lifesyle tips I don't share anywhere else.
Discover how to travel FOREVER
Grab this "Cheat Sheet" to discover the tricks full-time travelers use to slash their costs to practically nothing.
You're Seconds Away...
What to expect:
- Bonus guides, ebooks, and other freebies
By signing up, you'll be added to my legendary email list.
- Realistic advice on setting up life on the road (no hype)
- Cool travel hacks that'll save you money
- Direct access to me for questions
From learning exactly how to travel the world full-time, earn money from anywhere, and live a completely "untethered" life.
Where should I send your itinerary PDF?
By signing up, you'll also be added to my legendary email list and receive handy travel lifestyle tips and inspiration I don't share anywhere else.
Where should I send your packing checklist?
By signing up, you'll also be added to my legendary travel lifestyle email list.
RV Setup Checklist: How To Easily Set Up Your RV
Sharing is caring!
Looking for an easy to follow RV setup checklist? Then keep on reading.
After almost 3 years of living in an RV full-time , our family has adjusted enough to commit fewer mistakes in our travels — be it staying in campsites or going on road trips.
We’ve moved past the beginner phase and we’re excited to give more tips to you guys.
Honestly, it took a while to adjust to the RV lifestyle, and recently we began RVing part-time as we found a home in Idaho. Yet we still love to get out and do some RV camping.
The important tip for RV beginners is mastering the basics. Basics are often overlooked but they are SO essential that you should need to prioritize them.
One of the basics that every RVer should master is setting up the RV campsite.
For this, we recommend that you make an RV camping checklist to guide you and make setting up an easier task. I’m going to share with you our top tips.
Read on to learn how to get a copy of our free RV camping checklist.
THIS ARTICLE MAY CONTAIN COMPENSATED LINKS. PLEASE READ OUR DISCLAIMER FOR MORE INFO. THIS POST WAS WRITTEN BY JILL GREISING-MURSCHEL , A FAMILY TRAVEL AND RV LIVING EXPERT .
Don’t have time to read a bunch of RV travel posts and reviews? Here are some of our top picks for RV living:
Our Favorite RV Resources:
- Ultimate RV Living eBook
- Harvest Hosts : (save 15% off your first year and stay overnight at one of the many farms, breweries, and wineries across the country)
- Romely Insurance – (sign up for full timer’s RV insurance and save big)
- Rent An RV With Outdoorsy – (the Airbnb of RVs)
- CampScanner – (Snag reservations at sold-out campgrounds!)
- RV Sheets – (Camping World Queen Short sheets made just for RV mattresses)
- Best Sewer Hose – (popular sewer hose for RVs)
- Best RV Vacuum – (small but mighty vacuum)
- Berkey Water Filters – (the travel Berkey is used by so many RV owners to get clean drinking water)

RV Setup Checklist FAQ
Setting up your new camper is an exciting adventure! You’ll want to start with the basics like leveling blocks, wheel chocks, and a water hose for hooking up to campground utilities. Consider investing in a surge protector to safeguard your water and electrical connections from unexpected power surges.
Regular maintenance is key to keeping your RV in tip-top shape for all your adventures. This includes routine checks on your tires, brakes, and seals to ensure everything is in working order. Don’t overlook the importance of keeping your RV’s interior and exterior items such as the trailer lights, checking tire pressure, and safety chains.
Preparing your RV for use is all about ensuring it’s safe, comfortable, and ready for the road. Start by thoroughly inspecting your RV for any signs of wear and tear, and address any issues before hitting the highway. Creating a RV teardown checklist is definitely the most effective way to plan your RV.
Packing your RV kitchen is all about convenience and efficiency. Essentials include pots and pans, utensils, plates, and cups, as well as cooking appliances like a stovetop or microwave. Don’t forget to stock up on non-perishable pantry items like spices, oils, and canned goods, and consider investing in space-saving storage solutions to make the most of your kitchen space on the road.
RV Setup Checklist: Tips on setting up your RV
Sometimes we feel like we already have everything we need and we have the routine down. Then we realize that we’re missing something once we’re already setting up, or we missed a step in the process.
Setting up your RV is much more technical can finding a great camper name for your RV. So don’t miss these simple steps.
1. Disconnect towed cars
Campgrounds can be full when you arrive. It is much easier to enter and drive around the campground without a tow vehicle connected to the back of your motorhome (if you have one). Besides, there’s no need to tow one once at the campground.
2. Survey your camp’s surroundings

Check the tree branches and potholes in the campground to avoid damaging your vehicles. Consider the space for your awnings (if you have one and want to use it) and slideouts.
Also, remember where the electric, water, and sewer hook-ups are if you have them available to you at your campsite.
We really recommend that you arrive at your campsite during daylight so that it’s easier to do this.
3. Position the RV depending on hookup placement

When you arrived to your assigned campsite, you’ll have to determine whether you’ll drive through or back up. Some campsites are pull-throughs and others you are required to back up.
To do this, check the placement of the hookups. Your RV setup will depend on the placement of the hookups – water, sewer, and electric.
4. Emergency brakes: ON
Before you step out of the Motorhome or your truck, remember to turn on the emergency brakes. Don’t forget this step. It’s not only essential for everyone’s safety at the campsite, if you’re driving a motorhome it may not even allow you to put the jacks down if you don’t have the emergency break on.
5. Leveling

Not every campsite is flat and level. You will most likely have to make adjustments like leveling to make the RV stable.
There are different types of levels for RVs depending on if you have a travel trailer, fifth wheel, or motorhome. Be sure to at least have leveling blocks to place under your jacks or stabilizers. Then, if you have towable RV (a trailer that needs a tow vehicle) you’ll need chocks to hold the tires and RV in place.
If you want to know more about which leveling block is the best for your RV, check out our Best RV Leveling Blocks blog post !
6. Electric Hookups

When you are finished leveling your RV, now you’ll need to take out your surge protector and hook it up before ‘plugging in’ your RV. Please don’t go without a surge protector, it will save your RV’s entire electrical system in so many cases. Click here to learn which surge protector to buy for your RV .
It’s one of the most important, in my opinion, RV necessities.
Grab Your FREE RV Setup Checklist.
Click below to receive the checklist that will make RV travel days so much easier.
7. Water Hookups
Hook up to the fresh water supply with the freshwater hose that you use ONLY for potable/fresh water. If you want to connect to a water filter or a water heater, this is the time to do so. Check for leaks right after.
Check out our list of RV essentials including the basics such as the fresh water hose and leveling blocks.
8. Sewer Hookups
Now, if you have a campsite with ‘full hook-ups’ that means you can connect your sewer hose at this point. I’d recommend hooking up the sewer hose and opening up your grey tank valve (shower and sink waste water), but keep your black tank closed. Only open the black tank valve when it’s at least half way full, so that gravity can do the job.
9. Let Out your awnings (or not)

There are times when you don’t want to let out your awnings, or can’t. Bad weather with high winds or lack of space may prevent you from doing so.
In the case that you can let it out, do it after setting up and leveling. Remember to take the awnings back IN before you leave again. This is one of the most common RV safety mistakes that you have to avoid .
10. Mat, Tables, and Chairs

Once you’re done with the technicalities, you can set out the outside mat, tables, and chairs for a great camping experience!
Set up your favorite camping table and get ready to grill for dinner!
Take it slow
Be calm. Your mindset is very important in setting up your RV checklist, especially if it’s your first time.
We know that it can be stressful to have several campers watching your back during this process but it’s okay. You’re doing fine and if you ever need help, ask an experienced camper near you.
Remember that things go better with practice!
Leave a Comment Cancel reply
This site uses Akismet to reduce spam. Learn how your comment data is processed .

You are here: Home // How To Create The Perfect Traveling Office
This post may contain affiliate links or mention our own products, please check out our disclosure policy .
How To Create The Perfect Traveling Office
Published on July 9th, 2019 by Chelsea Gonzales
Living on the road is an amazing dream. That said, for those who cannot yet retire, the only way to make this dream a reality is by working while traveling. While for some, this might mean traveling from one gig to the next, but for most non-retired full-time RVers, this means working remotely from a computer.
In this day and age, the possibilities are endless when it comes to the types of work that might be done over the internet. However, one thing remains the same no matter what kind of online job you may have: the need for a workspace.
Sure, you could just work from the dining room table or even a picnic table outside. These spots are less than ideal, though. After all, think of all the distractions that might pull you away from what you’re doing. Additionally, you may want to consider the hassle of moving your work set-up every day and the pain it might be to clear a suitable workspace on the dining table each morning.
DON’T MISS OUT ON DO IT YOURSELF UPDATES
Sign up for the newsletter today.
Please enter a valid email address.
An error occurred. Please try again later.
Thank you for subscribing to the Do It Yourself RV newsletter, keep your eye on your inbox for updates.
A dedicated office space is the way to go, and while it might take some creativity, in most cases, creating this traveling office space is 100% possible. Here are some of the best options we’ve seen in our travels.

Bunkroom conversion
We’ve seen countless couples and single people convert their RV bunkroom into an office space. This is a wonderful idea if you don’t have kids, and can be used even if you do have kids if you find that they only use one side of the bunkroom.
We love that the bunkroom conversion sets your workspace apart from the rest of the RV, and in most cases, gives you the option of shutting the door to drown out the noise from the living area.
Living room nook
Don’t have an extra bunkroom sitting around? That’s understandable. After all, most people don’t purchase an RV with a bunkroom if they don’t have kids to put in it. Lucky for you, there are plenty of other options. One popular option is to create an office nook in the main living area of the RV.

This option provides less privacy, something you may want to consider before jumping in. That said, if you don’t use your dining table or your couch much, pulling one or the other out and replacing it with a desk should be simple enough.
Bedroom office
Obviously, you can’t convert your entire master bedroom into an office. However, we have seen many people put small workspaces into their bedrooms with much success. This option is great because it still allows you to close a door, separating yourself from whatever else might be happening in the rig.
In order to get around the fact that there is limited space, we’ve seen people create fold-down desks that mount to the wall, as well as desks that live in the closet. Some people have dedicated office chairs, and many others use folding chairs that can be put away, but other people simply use the edge of the bed as their seat.

Bathroom workspace
That’s right, a bathroom office. This one is hilarious and pretty clever. The lady that used this set-up happened to have a second bathroom off of her master bedroom. She rigged up a small folding desk that was the correct height and used her toilet (with the lid down, of course) as her office chair. Here, she was able to work in peace without interruption from her husband and baby.
Tent office setup
On more than one occasion, we’ve seen someone set up outside in a Clam or something similar, typing away. A tent workspace is a great option if you prefer to leave the RV in order to work. It also ensures you still get to spend time in nature despite your need to bring in an income.
Unfortunately, this option does have downsides:
- For one thing, you cannot leave important work documents and equipment in a tent for fear of weather and thieves messing things up.
- For another, very warm or cold temperatures will render your office useless.
Vehicle desk
Lastly, we must mention the vehicle office. For some, this is a lap desk put to use in the passenger seat of their motorhome. For others, it’s a full-fledged office set-up in the back of their tow van. Both options are something to consider when figuring out your on-the-road work groove.
Tips for setting up a mobile office
Once you’ve picked out your favorite office idea, use these tips to get everything just right:
Chances are, you’re going to need an internet connection. While it is sometimes possible to use in-park WiFi, and satellite internet is available, we’ve found that a cellular hotspot is by far the best option. Use this in conjunction with a WiFiRanger SkyPro and you should be able to connect wherever you roam.
- Monitor safety
If you’ll be using a traditional computer monitor, make sure it is securely mounted to a wall. Otherwise, you may want to consider using a laptop that can be put away on travel days.
- Secure your chair
Honestly, rolling chairs aren’t the best ideas in an RV. However, if you insist on having one, make sure to secure it with a bungee cord before driving anywhere.
- Wall organization
You likely won’t have space for a filing cabinet. A hanging wall organizer can be a lifesaver for keeping papers organized and within reach.
See also: How To Stay Productive As A Working Full-Time RVer
Share this post:, related posts:.

What Most People Don’t Tell You About Moving Into an RV

Converting a Bus Into a Camper: Getting A Jump-Start on the Process

Beyond the Vacation: The Realities of Extended Stay RV Parks
- Books & Merch
- Gear We Use
- National & State Parks
- Best RV Campgrounds in New Hampshire
- Best RV Campgrounds in NC Mountains
- Best Florida Beach RV Campgrounds
- South Dakota
- The Great Lakes
- Campers Swear By This Portable Device That Keeps Dogs Safe -The Best Portable Dog Fence for Camping (2024)
- Mosquitos and bugs
- Camping Clothes
- Camping Gifts
- Camping Internet
- 5 Best RV Backup Cameras for RV & Trailer
- 7 Best Screen Tents for Camping (2024)
- Best RV Campgrounds in California
- 5 Best Key West RV Parks
- 9 Best RV Campgrounds in New Jersey
- Camping Reservations
- Campground Comparisons
- Cheap or FREE RV Camping Sites
- Best RV Campground Memberships & Clubs
- Boondocking 101
- Boondocking Adventures
- RV Internet
- What Do Flamingos and Upside Down Pineapples Mean?
- Where to Find FREE or Cheap RV Sites Camping
- RV Winter Camping
- RV Show List for 2024
- 17 Best Camper Vans 2024 (New Class B RVs Available!)
RV Hookups for Beginners (5 Steps for Your First Trip)
Here's an rv hookups for beginners guide to better prepare you for your first rv trip….
- 1 Here's an RV hookups for beginners guide to better prepare you for your first RV trip…
- 2.1 Step 1: Set Your Parking Brake
- 2.2.1 PRO TIP: Always Use a Surge Protector
- 2.2.2 Electrical Hookup Adapters
- 2.3 Step 3: Water Hookup
- 2.4 Step 4: Cable Hookups
- 2.5.1 Do NOT Leave Your Black Tank Valve Open When Hooked Up
- 3 Are You an RV Newbie? Or Thinking of Joining the RV Lifestyle?
Jennifer and I have been doing this for a long time. So, sometimes I take for granted some of the beginner's tasks that are now second nature to me. RV hookups being one of those things.
I realized I should take a step back and cover some basics that RV beginners need to know. And what better way to start than how to connect full hookups on your first stay at a campground?
As a first time RVer, you're probably wondering what steps you need to take and in what order to do them. So, I'm going to share the “general rules” and my best tips the new RVers need to know.
If you buy something through our links, we may get a small commission at no extra cost to you. It helps keep our lights on so we can continue to provide helpful resources for RVers. Read our full affiliate disclosure here.
RV Hookups for Beginners (How to Set Up Your RV)
Like what you see in these videos? We'd appreciate it if you would Subscribe to our YouTube Channel ( easy to do right here ) and consider “ringing the bell icon” to be notified of any new video from us. 🙂 Thanks!
Not too long ago, Jennifer and I made the above video on how to set up your RV at a campground . It covers everything from choosing a site to what to hook up and in what order. It's a great visual guide on what you need to do from start to finish.
For the purpose of this article, however, I'm going to focus only on RV hookups for beginners. These steps and tips are the same whether you drive a motorhome, travel trailer, fifth wheel, or any camper. Hookups are essentially the same wherever you camp, whether it's an RV park, state parks, national parks, or any other place that offers hookups.
 1")
Step 1: Set Your Parking Brake
The most important thing to do before you even start hooking up is set your parking brake! Experienced RVers can share plenty of stories where either they or someone else forgot to do this with disastrous (& sometimes funny) results.
The last thing you want is for your RV to “settle” and shift back or forth, putting tension on your cables. Or, worse, roll off and pull out the cables and do costly damage to the campground's panels and connection points.
So, don't repeat the dumbest RV camping mistakes , and set your parking brake!
Step 2: Electric Hookup
The first thing I recommend connecting is your electric hookup. The main reason is so you can start running your air conditioning, heater, fridge, etc. on the power source from your RV campsite instead of from your RV's power supply.
There are usually 3 different plugs on a campsite's electric panel: 20 amp, 30 amp, and 50 amp. Bigger RVs usually use 50 amp and smaller RVs usually use 30 amp. You should know which kind of amp service your RV runs off of. But, if you don't, the plugs have differently shaped prongs, so you should only be able to plug into the correct one.
Once you're plugged in, you flip the breaker switch corresponding to the amp service you need. For instance, you flip the 30 amp breaker after you plug in your 30 amp plug. Then you plug in the other end to your RV, giving it a twist and rotating the collar until it's snug.
BUT BEFORE YOU PLUG IN , here is one of the best RV tips I can give you…
PRO TIP: Always Use a Surge Protector
 2")
Always use a surge protector when connecting your RV to power! A lot of people have learned the hard way that campground electrical panels are not always well-maintained or wired properly. They can cause a power surge that can badly damage your electrical system.
Some RVs have built-in surge protectors, but if yours doesn't, I can recommend 30 Amp Surge Guard or 50 Amp Surge Guard . You can get 5% off either of those surge protectors (or any TechnoRV products) with the coupon code RVLIFESTYLE5 .
Plug this portable surge protector into the campground's electric power supply, and then plug your power cable into the surge protector.
Electrical Hookup Adapters
Not every campground provides multiple amp services. Some may only have electrical hookups for 30 amps or 50 amps. That's why it's a good idea to keep an RV plug adaptor in your RV, like this Dogbone adapter for 50 amp male to 30 amp female .
Step 3: Water Hookup
The next hookup on the list is connecting your water hose to the campground's water source. Just like we recommend a surge protector with electrical hookups, we recommend you always use a water filter connected to your fresh water tank.
We use a relatively new system called Clear20 that consists of an inline water filter and the Dirtguard pre-filter that takes out the sediment and particulates before they go through the inline filter. Or, there is a cheaper Clear2o RV water filter system that uses solid charcoal to filter.
To easily connect your water hose, I recommend getting a Fresh water quick disconnect . It's much easier than threading hoses by hand and helps minimize water waste from annoying little leaks. The quick connect snaps right on and off. Couldn't be easier.
Connect the filter to the campsite's water spigot, then connect your fresh water hose to the water filter. Then, using the quick connect, connect the other end of the water hose to your RV.
 4")
Step 4: Cable Hookups
If your campground offers cable TV, you can now connect it to your RV. There's nothing special to know here. Simply plug in the cable cord to your RV. If you don't know where your cable port is, consult your owner's manual.
Step 4: Sewer Hookups
Lastly, it's time to do your sewer connection. Not all campsites have sewer connections, so this might not be something you do until you dump your black tank at RV dump stations .
Whether you're connecting at a campsite or the dump station, the process is basically the same. The only difference is how long you leave it connected.
Now, let me warn you, dealing with your black water tank is one of the biggest downsides of RVing. It's just gross. But it needs to be done and is well worth the stinky effort in the end.
That said, I suggest you put on rubber gloves before you connect your sewer line, or what the RV world likes to call the “stinky slinky.” Make sure your gray tank and black tank are closed , then grab your sewer hose.
Connect the end of the hose with the twist-on connector to your RV drain spout. Then run the hose the sewer drain. It's usually easiest to run your sewer hose support as you go. This support helps direct the hose (and its contents) toward the drain.
Now, attach the end of the hose with the elbow connection to the sewer drain. Screw it into position if the sewer drain also has threads (not all do.)
You might also want to review this post from the RV Proctologist !
 5")
Do NOT Leave Your Black Tank Valve Open When Hooked Up
This is a mistake that a lot of new RVers make. They understandably think that if they're connected, they might as well leave their blank tank valve open so it can continuously drain. Less poo stored in your RV, the better, right? Wrong!
If you leave your black tank valve open while you're hooked up, it will cause gross and sometimes expensive problems. The most common of which has its own inelegant RV terminology : the poop pyramid.
This happens when liquid waste easily drains out when your valve is left open but solid waste builds up in your tank. Like I said, it's gross. And stinky. And can be expensive to clean out.
So, don't leave your black tank valve open!
Get the Home Study Course today and worry about the road, not the repairs! Every time you move your RV it's like driving through a hurricane during an earthquake. Parts break and many items need to be maintained, this program will show you how you can save time and money by gaining the confidence to take on the majority of the issues you’ll come across. Don’t get caught with your RV in the shop! Learn how you can maintain and repair your RV at your own pace and at the most convenient time for you! This course is produced by the National RV Training Academy.
Are You an RV Newbie? Or Thinking of Joining the RV Lifestyle?
 7")
THIS is the ebook to get first – before you purchase anything- to make sure you are heading in the right direction with the right RV and plans.
So, buckle up and get ready for the ride of your life. Consider this not just a guide—but an invitation to discover the joy of RV travel and the freedom of the open road.
You’ll find it all in this 64-page ebook (digital PDF – NOT a print book) The Newbies Guide to the RV Lifestyle
Published on 2022-11-25
Mike Wendland is a multiple Emmy-award-winning Journalist, Podcaster, YouTuber, and Blogger, who has traveled with his wife, Jennifer, all over North America in an RV, sharing adventures and reviewing RV, Camping, Outdoor, Travel and Tech Gear for the past 12 years. They are leading industry experts in RV living and have written 18 travel books.
8 Responses to “RV Hookups for Beginners (5 Steps for Your First Trip)”
June 09, 2023at8:48 pm , Tamarah UHLMANN said:
2005 Fleetwood Wilderness What is the apprx 2in black pipe pointing straight down underneath RV between rear axles?? Unable to determine where or if it needs to be connected
June 10, 2023at8:10 am , Team RV Lifestyle said:
This would be a great question for our RVLifestyle Facebook group. Hard to get specific for every model out there here but the FB group is a very large group of RVers and people ask questions like this all the time, and there is always someone with the same model to help – Here is a link: https://www.facebook.com/groups/roadtreking – Team RV Lifestyle
November 26, 2022at12:11 am , Chris Nintzel said:
At least two chocks in addition to the parking brake.
November 25, 2022at9:18 pm , Bryant Payne said:
For the sewer hookup, I always connect the hose to the campground outlet, then to the RV. This way, when you take off the cap on the RV end, if there is any water, or heaven forbid, a valve wasn’t closed, you only get a mess at the RV end instead of both ends if you catch part of the spill in the hose.
IMHO, surge protecters are basically a waste of money. I have a tester (about $30 on Amazon) that I use to check for proper wiring at the pedestal, and if that’s OK, the power is as good as it is to your house. The electronics in new RVs run off 12 volts, and the surge protector does nothing for them. I’ve been camping for 40 years without a surge protector and no fried RV power systems.
November 26, 2022at3:39 pm , Team RV Lifestyle said:
Thanks for sharing the sewer hookup tip and your feedback – it is appreciated! Team RV Lifestyle
November 25, 2022at10:50 am , michael smallets said:
I would suggest shutting off campsite water (or water pump) when leaving your RV/TT so that if a leak develops during your absence you won’t have water damage
November 25, 2022at11:18 am , Rick Beal said:
I always make the power connection to my coach first, and then connect to the pedestal last (after ensuring the breaker is off). This prevents arcing which can damage your power cord connectors.
November 25, 2022at7:59 pm , Team RV Lifestyle said:
Thanks for adding this tip to the discussion, Michael — Happy Trails! Team RV Lifestyle
Leave a Reply Cancel reply
Your email address will not be published. Required fields are marked *
Related Posts

RV Upgrade That’s Worth It: A/C Soft Start Up
 9")
How to Keep Your RV Clean with Dogs (5 Tips)

20 Camping Flags to Add Personality to Your Campsite
Forget all the nastiness of Facebook.
We built the forums in our RV Lifestyle Community completely off Facebook.
No rude comments. No Nastiness.
Just friendly RVers who love to help.
CLICK here to see for yourself!
RV Set Up Guide Step by Step (And Everything You Need)

This article may contain affiliate links . We earn a small commission (at no additional cost to you) if you make a purchase through these links. As an Amazon Associate I earn from qualifying purchases.
When I think back to the first time we set up our RV at a campground, I remember how overwhelming it all seemed. Did we bring everything we would need? And more importantly would we remember how it was all supposed to work. Now that we have been full-time traveling RVers for 9 years we have our RV set up process down to a science.
Here is a step by step guide to everything you need to know to set up your RV at a campsite for the first time . From making your reservation and choosing the best campsite, to parking your RV and setting up all of your hookups. Each section includes a list of all of the gear used so you’ll be ready to set up your RV when you arrive. Feel free to print the guide or checklist and adjust it to your own RV setup process. Enjoy!
TLDR – For the Cliff Notes version, jump to the RV Set Up Checklist .
Reservations (and how to get the best site!)
Whether or not you need a reservation really depends on your travel style and when or where you are traveling. Often we don’t make reservations at all. On the other hand, sometimes you absolutely need a reservation. If you are visiting during the high season, during an event or have your heart set on a particular campground you’ll want to make a reservation.
Reservation tips:
- Check for discounts and specials. These can be via membership clubs like Good Sam, Passport America, Escapees or even campground specific specials, for example stay 6 nights and get 1 night free. It is always worth asking. For more about RV club discounts check out our article about the 6 best membership clubs for full-time RVers.
- Find out the cancellation policy just in case you need it.
How to get the best site.
Take a look at the campground map and determine which area of the campground you would like to be in. You’ll have to decide what is important to you. What you want in a site for a quick overnight stop will probably be different than what you want for a longer stay. And everyone has a different rig and different preferences so my best site is probably not the same as your best site.
Here are a few things to consider:
- Do you need a 30 amp or 50 amp site?
- A shady site or full sun?
- Would you like to be close to the pool or playground or as far away from them as possible?
- Full hook ups, partial hookups or none?
- Back in site or pull through?
- A site that faces your neighbor so that you can share common space with your camping buddies?
- What size site?
- How long are you staying?
- On a corner where you can watch the world go by and say hi to all of your neighbors? Or more tucked in for privacy?
Do a little research.
Next, check out Google and Bing maps satellite views of the campground. You’ll be able to see if there are areas with lots of trees or that are adjacent to railroad tracks or a busy road. You should also be able to see if some sites are more spread out than others. Streetview can be helpful too.
For even more information take a look at the reviews and photos of the campground at Campground Reviews and Campendium . They are both great resources. You can gather a lot of information from the photos and you may even find tips about specific sites.
Need network? Check the coverage map for your provider, sometimes coverage is better in certain sections.
Now that you have an idea of the campground, when you make your reservation ask for the site or area that you think is best for you. If the site is available, most campgrounds are perfectly happy to accommodate your request. If there are sites that you do not want make sure to let them know that too!
Pre Check In
Confirm your reservation: It is a good idea to call and confirm your reservation prior to arriving. If you requested a specific site, confirm that too.
Late arrival: If you know that you will be arriving late in the day or are delayed on the road, call the campground and find out the procedure for an after hours check in. Many campgrounds are happy to leave you a check in packet with directions to your site to pick up when you arrive. Others have someone on call to help you and still others simply do not allow check in after dark.
Early arrival: If you plan to be early, ask about early check in or a parking area to wait in. Again, policies will vary, some parks let you check in early if your site is available. Others charge a small fee for early check in. An early check in fee can be worth it depending on the situation.
Tip : If you are very new to RVing, plan your route to the campground ahead of time. Include good places to stop, stretch your legs and take a break. Google and Bing satellite maps are great for this! We still do this whenever possible. Having the route planned out, including stops, just makes everything easier on travel day.

When you arrive at your campground you’ll need to check in. If you have any questions now is a good time to ask them. For example, if you travel with dogs you may want to ask about the dog walk area.
You will need some or all of the following to check in.
- Payment . Be aware of any campground specific restrictions on cash or credit.
- Membership discount card. Such as Good Sam, Passport America, Escapees, or Thousand Trails. Some campgrounds will be fine with just the membership number or a soft copy of the information but once in a while you’ll come across one that requires the actual physical card.
- Registration information & license plate numbers.
- Proof of insurance.
- Proof of pet vaccinations.
Make sure you get a campground map and the best route to your campsite. This is usually standard operating procedure but sometimes they forget. Campground maps usually list local attractions and services.
Note about Thousand Trails: Most Thousand Trails campgrounds let you choose you own sites! We absolutely love this option because we can choose a site that works best for us. You’ll check in with the ranger then drive around the campground and choose a site. Once your RV is set up you go back to check in and let them know which site you are in. Tip: If there is a place to park our rig we like to scope campsites on our bikes. When we find the site we want, one of us stays there while the other brings our RV back. If you drive a rig with a toad, that works too. If you have a portable EMS, bring it with you so that you can check the power post in the sites you scope.
For more about Thousand Trails check out how we traveled the country, camped with hookups for $5.01 per night and saved $28,992.19 in 6 years with our Thousand Trails membership.
Campsite Walk Through
Before you pull into the campsite do a quick walk through..
- Nails, screws, dog doo or other debris.
- Branches or other obstacles.
- Location of services. Do a quick visual inspection- water, electric sewer.
- Size – verify that you fit in the site. For an easy way to do this check out Neat Tricks to Measure Your RV & Slides – Without Tools!
Tip : Wear gloves and be aware the spiders love to hide inside RV power posts. No big deal if you are paying attention but you may need to provide umm… spider relocation services.
If you are parked in a location that is not blocking the road now is a great time to take a closer look at your campsite. If you are blocking the road, pull into the site first.
Next, check out the campsite a little more closely.
- Turn on the water for a second.
- Find the sewer hookup. (If it is a FHU site)
- Make sure the power breakers are off.
- Plug in your EMS.
- Turn on the breaker.
- Let your EMS check the power. If the power is good carry on with your RV set up. If not head back to the office and have them check and fix the power or switch you to another site.
Note the boundaries of the site and the surroundings and decide exactly where you want to park.
Make sure that:
- RV will be close enough to the utilities.
- Slides (if you have them) have room to extend.
- You will have room to navigate around your rig once your RV is set up.
- Leave room for your tow vehicle or toad.
- Awning has room to extend.
- Stairs have room to open properly.
- Fire pit, if there is one and you plan on using it, is appropriately distanced from your RV.
- Ants – Be aware of anthills do not park where your tires or stabilizers will be on an anthill. (And….yup… we did that once and it resulted in what we still refer to as the great ant attack!)
If you encounter an issue you can call or return to the office and have them resolve the issue or move you to another site.
Park Your RV in the Site

If you have a spotter – and if at all possible you should – make sure to use them and have a communication plan. Cell phone, walkie talkies, hand signals, whatever works for you. As a spotter, stay clear of the rig until the vehicle is in park and you have an all clear signal from the driver.
Back In Tips:
- Backing up a trailer can be confusing if you are not used to it. Try holding the steering wheel at the bottom, the trailer will move in the same direction as your hands.
- Whether you are an old pro or a newbie, it can be very helpful to put an orange cone in the site to give you a target to aim for while parking.
Once the rig is parked where you want it, you’ll need to make sure that you are level.
Level and Stabilize
This will vary between RVs. Some RVs, like our travel trailer need to be manually leveled. Some rigs have an automatic leveling system that will do all of the work for you! *This section details manually leveling a travel trailer but the general idea is applicable to all RVs – you’ll want to level and stabilize.
What you need to level and stabilize your travel trailer.
- Leveling pads . To raise one side of your RV so that it is level. Also handy to put under stabilizers.
- Coupler lock. To lock your travel trailer once it is unhooked.
- Long bike security cable with looped ends and lock. Optional. To run through your tires for an added layer of security.
- Tire Covers. Optional. To protect your tires from the sun.
Before you unhook level from left to right.
- Check the level on the front of your RV. If the bubble is not in the middle of the level it is time to pull out your leveling pads.
- The leveling pads need to go under the tires on the side of the RV that you want to raise. This is also the direction that you want the bubble to go. In other words, remember that the bubble will move towards the side with the leveling pads .
- Place the leveling pads on the ground next to each of the tires. Have the driver pull forward slowly until there is room to slide the leveling pads in to the space where the tires were.
- Once the vehicle is in park, slide the leveling pads into place.
- Have the driver back up slowly onto the leveling pads. Check the level again.
- If the site is a little larger you can just put the leveling pads in front of or behind the tires and pull onto them.
- Adjust if necessary. You may need to add or remove leveling pads to get your rig level.
- If you need to add leveling pads it will be easier to drive onto them if you build a ramp or pyramid.
Tip: Stay away from the tires until you are sure the vehicle is in park.
Here is a quick video from Lynx Levelers showing how to place and pull on to your leveling pads.
Next, unhook and level front to back.
- Chock your tires.
- Unhook – this will vary between rigs. Follow the procedure for your particular equipment.
- Check the level on the side of your RV. Then raise or lower the front of your RV using your tongue jack until the level bubble is in the middle. Again, remember that the bubble will move towards the side that you raise.
- We use stacks of leveling pads under each of our stabilizer jacks. It makes it easier to extend them because they don’t have to go down as far. It also helps keep our RV more stable.
- Remember the stabilizer jacks are meant to stabilize, not lift your RV . They should be lowered until they are snug.
- Go back to your chocks and make sure that they are snug.
- Lock travel trailer with coupler lock.
- Run bike security lock through both tires on one side of travel trailer and lock looped ends together.
- Put on tire covers.
- Insert wheel stop chocks if you are using them.

Congrats! Your RV is parked, level and locked! Time to set up the rest of your RV campsite.
Power Connection
The next step in your RV set up is to connect your rig to the campsite power.
What you need to set up your RV power connection.
- Electrical Management System (EMS). An EMS protects your RV and appliances if you encounter poor power from the campground. Your EMS needs to match your RV power, 30 amp or 50 amp.
- Lock. Only if you have a portable EMS – if you have an onboard EMS you won’t need the lock. We use this lock for our EMS – the length is easily adjustable so it locks to just about any power post.
An important note about campground power. You will want to use an Electrical Management System (EMS). This is a device that protects your RV from a variety of possible power problems. For example, a mis-wired electrical post, low voltage, power surges and so on. Basically an EMS scans the power source for issue before it allows any power through to your RV. Once you have power, it scans continuously. If the EMS encounters a power problem, it cuts the power before your RV or appliances can be damaged. Think of it as insurance, you can protect your (expensive) RV and appliances from damage due to poor campground power with an EMS. For more information about how an EMS works in general and a review of ours, check out EMS-PT30X – Can You Afford Not to Have One?
How to connect your RV power.
- By now you have already checked the power post with your EMS and removed any resident spiders.
- Make sure all power breakers are all set to the OFF position.
- Plug your EMS into the 30 or 50 amp socket.
- Plug your RV power cord into the EMS.
- Flip the breaker on.
- Once the EMS has finished checking the power, it will allow it through to your RV.
If it’s very hot out now is a great time to turn on your AC to start cooling down your RV. Turn on your refrigerator and anything else you want to run while you are inside. Open up your stairs on the way in.
RV Water Hookup

What you need to set up your RV water connection.
- Fresh water hose. Not just any garden hose. Fresh water hoses are made to be drinking water safe. We had this basic fresh water hose for years and recently upgraded to the light and easier to handle Zero G RV/Marine Fresh Water Hose . (It is one of my favorite upgrades!)
- Inline water filter. Even if you do not drink your water directly from the tap. Campground water varies widely and the filter helps to keep your water system clean. We do drink our water but we use a Travel Berkey to filter it first. This Camco inline water filter has worked well for us over the years. The first time you buy one, you’ll want to get the version with the flexible hose connector. When it is time to replace the filter, keep the flexible hose connector.
- Water splitter. Optional. The splitter has one outlet that attaches to the city water connection and splits it into two water outlets. It is very convenient to have an extra water connection at your campsite for your black tank flush.
- Extra fresh water hose. Optional. Just in case the water connection is very far away from your RV and for a back up. Two 25 foot water hoses is what we have found works best.
- Ball bungee or carry strap. Optional. To hang your water hose once it is connected so that it is neat and off the ground.
If you have never hooked your RV to a water connection before – set up your RV “fresh water kit”.
This is how to do it with the Camco Inline water filter, if you are using another water filter follow the instructions for your water filter. I find it is easier to connect all the pieces together on a picnic table and then bring them all to the water spigot together.
- Start with the pressure regulator.
- Connect the flexible hose connector to the Pressure Regulator.
- Next, connect the water filter to the flexible hose connector. It has an arrow on it to tell you which way the water should flow.
- Finally, connect your fresh water hose to the other end of the water filter.
- The first time that you use your water filter and every time you replace it, it will need to be flushed before use. We’ll get to that in a minute.
Now you have a “fresh water kit”. All of these pieces will stay connected together and you will use them to connect to city water every time you set up your RV at a campground.
How to hook up your RV to city water.
Clean the water spigot. Trust me, you want to clean it before you connect to it. I have seen people put their sewer hose over the water spigot to rinse it out. Gross!
- Connect a splitter to the water spigot. You only need to do this if you want to have an outdoor water connection available.
- Connect the pressure regulator on your “fresh water kit” to the splitter.
- If this is the first time you are using your water filter it needs to be flushed. Turn on the city water and run water through the filter and your entire “fresh water kit” until the water runs clear. It will start out black, don’t worry, it is just the charcoal being flush out of the filter.
- Turn the water off again.
- Connect your hose to the fresh water inlet on the side of your RV.
- Turn the water on and check for any leaks or drips.
- Now go inside and run the cold water. It will probably spit and spurt a few times. Run until it stops spitting. Do the same for the hot water.
- That’s it! Your water is connected.
When you disconnect your water, leave your “fresh water kit” connected together and store it that way. It will save you a few steps the next time you connect to city water.
RV Sewer Hose Hookup
The last thing you’ll need to connect in your RV set up process is the sewer hookup. You’ll already have running water inside so you can wash your hands when you are done.
A quick overview of how RV sewer systems work.
RVs have two separate tanks for waste water, a grey tank and a black tank. The sinks and shower drain into the grey tank. The toilet drains into the black tank. Both tanks have separate outlets that run to a single sewer connection on the outside of your RV.
When the tanks are full they need to be emptied. This is done by connecting one end of a sewer hose to your RV sewer connection and the other end to a dump station or campground sewer connection. Once the sewer hose is connected each tank is emptied separately.
The black tank is always emptied first. Pulling the lever that opens the tank allows the contents to flow through the sewer hose and into the dump station or campground sewer. Once the black tank is empty, the lever is used to close the tank again. Next, the grey tank is emptied in the same manner. The contents of the grey tank wash away any bits from the black tank that may be left in the sewer hose as the tank empties.
It actually works pretty well and is not nearly as gross as you might think. Now, on to how exactly to hook up your RV sewer connection at a campground.
Tip: Please use RV toilet paper in your RV. Yes, it is more expensive but It is made to dissolve very quickly and prevent clogs in your black tank.
What you’ll need to set up your RV sewer connection.
- Sewer hose and adapter. We have used a version of this Rhino sewer hose since we started full-time RVing and it works well.
- Hose to flush your tanks. Not your fresh water hose. It is nice if the hose is lightweight and easy to store.
- Sewer hose supports. To hold the sewer hose at an angle so that the tank contents flow downhill. And to keep it off the ground.
- Disposable gloves. You can buy them online but stopping by Harbor Freight is the cheapest option we have found. Look for the 100 packs of nitrile gloves. Make sure to download a 20% off coupon & check for freebies.
- Clear sewer extender for the RV end of the sewer hose. Optional. Helpful for emptying and flushing your tanks. A short one is fine, you just want to be able to see what is going on as you empty your tanks.
- Sewer hose caps. Optional. To put on the ends of your sewer hose for transport or storage. Caps make it easier to handle and put away because you don’t need to worry about drips.
- Extra length of sewer hose. Optional. In case the sewer connection is far away from your RV.
- Bin or storage container. Optional. It is a good idea to have a bin that closes so that you can store all of your RV sewer accessories together. Personally, I don’t want this stuff in contact with anything else in my RV.
How to set up your RV sewer hose.
- Put on disposable gloves.
- Remove your sewer hose from it’s storage location. Most RVs have a designated place built-in for sewer hose storage.
- Verify the black and grey tank release valves are closed. Then remove the RV sewer outlet safety cap.
- If you use caps on your sewer hose remove them now. If you don’t, your sewer hose won’t expand easily due to the suction created by the caps.
- Connect your sewer hose to the RV sewer outlet. The outlet will have small raised knobs on it. Slip the sewer hose on, then turn to lock in to the knobs. Make sure it is securely connected.
- Remove the sewer cover from the campground sewer hookup.
- If the campground sewer hookup is not threaded use your (no longer optional) flexible sewer adapter. Push it into the sewer connection so that it is secure.
- Screw your sewer adapter into the Flexible Adapter so that it is secure.
- Insert the elbow end of your sewer hose into the sewer adapter.
- Your sewer hose should now be securely connected to your RV and to the campground sewer hookup.
- Next, set out your sewer hose supports and run your sewer hose so that it slopes downhill towards the campground sewer hookup. (Because we all know what flows downhill.)
- P-trap. You can build a P-trap into your sewer hose by creating a U in the hose so that it fills completely with liquid.
Tip : If you are concerned about your sewer run, test it with grey water before dumping your black tank. Note, you will need more grey water to flush the hose after you empty the black tank.
A note on P-traps.

We build a P-trap into our sewer hose when we are connected to a campground sewer for two reasons. First, it mimics a traditional P-trap, like the ones under your sink, and helps keep sewer odors out of our RV. Second, it stops sewer flies from getting into your RV tanks through the sewer hose. It does not affect the emptying of our tanks as the pressure of the liquid coming out of the tanks pushes everything through the hose. You do need to empty it when you disconnect the sewer. If you plan to leave your grey tank open at all during your stay I would suggest creating a P-trap in your sewer hose.
Dump Your RV Black and Grey Tanks
OK, dumping your tanks is not really part of RV set up, but you are going to need to do it while you are there. Here are step by step instructions: How to Dump RV Waste Tanks: Easy (No Mess) Guide
Now back to your RV campsite set up!
Slides and Inside
Now that you are connected to all of the utilities, it’s time to put out your slides if you have them. It is a good idea to have someone outside watching for obstacles just in case. Hopefully you have already measured them to make sure they fit as outlined above.
Also turn on your refrigerator and set up anything else you need inside your RV.
Campsite SAFETY
In our 9 years of full-time RV we have always felt safe. We read reviews of every campground we stay at before we arrive and if we see anything in the comments that makes us nervous we just choose another place to stay. Generally, we are more concerned about tripping or twisting an ankle than any kind of crime. That said, because we are traveling, we are always in new and unfamiliar locations so it is always good to be aware of your surroundings.
A few safety considerations around the campsite.
Note your location..
Campground or RV Resort Name Address County Your SITE number Office and Emergency Phone Number Local Sheriff phone number (Remember 911 may not work very well with cell phones.)
We write our site number on the campground map next to the address and tack it up on a cork-board. Any other information that we may need is also tacked to the cork-board so that we always know exactly where to find it quickly in the case of an emergency.
Important documents.
Keep any important documents in a specific location so you will always know where to find them. Things like emergency contact information, medical insurance card, prescriptions, copy of driver’s license and so on. It may be easier to keep these things in a secure cloud location so that they are always accessible from anywhere that you have a secure network connection.
Weather radio.
These days weather forecasts and warnings are readily accessible on your cell phone. A weather radio is still a good idea for RVers because they are not dependent on cell phone data or the campground wireless network. Data service and campground wireless networks can be unreliable. Also, if there is a storm and the power is out, the campground wireless is probably also off.
A weather radio works on radio waves and service is available in a wider range of locations. In 9 years of full-time RVing we have always been able to receive a signal to our weather radio.
In areas of the country where weather events can happen suddenly, like tornadoes and tsunamis, being notified of a weather event before it happens is critical.
Tip: Make sure to get a weather radio with S.A.M.E technology. This will allow you to set the specific types of events you want to be alerted to. For example, we turn off the Tornado Watch category and turn on the Tornado Warning category. I am happy to be woken up for a warning, not so much for a watch. We have been using this weather radio by Midland , for 9 years and counting. It is a basic model with S.A.M.E. technology and battery backup.
It is not a bad idea to have a go bag ready just in case. You’ll need to decide what to put in yours. Check out the suggestions at the American Red Cross for ideas.
Google maps offline.
You can download a self selected area of Google Maps for offline use. This is a great idea if you do not think you will have data service or if you will be in an area for a length of time. Also useful when traveling through an area without data service. Check out Google’s instructions for iPhone and Android if you are not sure how to download maps.
Some slides seem to be magnets for hitting your head or clipping your arm while walking around the outside of your RV. There are two things you can do about this.
- Put a piece of pipe insulation or a pool noodle over the corners of your slides.
- Place a small orange cone on the ground just below the corner of the slide.
Tree roots or other tripping hazards.
- Place a small orange cone next to the root or tripping hazard.
Flashlights.
Keep a few flashlights around just in case you need them. We recently got a few of these rechargeable flashlights . They are incredibly bright, recharge via USB and even have a strong magnet built in so they can be attached to a metal surface.
- First Aid Kit.
It is a good idea to have a first aid kit in your RV. You can purchase a pre-made First Aid Kit or put on together yourself.
Drinking water.
Campground water sources are all different and you really have no way of knowing how safe the water is. We filter all of our drinking water with a Travel Berkey and it is one of the most used RV accessories we have.
If you decide not to drink the campground water you can:
- Bring bottled water.
- Use refillable water containers. Drinking water fill stations are common at grocery stores and Walmart. Some campgrounds have drinking water fill stations on site.
- Use a filtration system like a Berkey or a Lifesaver Jerrycan.
Lock up bikes and other toys.
I don’t want to give you the impression that theft is rampant at campgrounds, it is not. But it does happen sometimes so it is just a good idea to lock up items like bikes, generators etc.
Patio or Yard

Outdoor living spaces vary widely from person to person so we’ll just share some of our favorite basics.
Door mat . These actually make a huge difference, they stop you from tracking most of the outdoors into your RV.
Wrap around step rugs . These help keep dirt and dust out of your RV. We have one on every step. They are nice because they stay on your steps during travel so you don’t even need a place to store them. Tip: The front edge of the step rugs wear the fastest so if you flip your step rug around when the front edge is close to wearing out they will last almost twice as long.
RV patio area mat. Yet another way to keep from tracking dirt into your RV. Are you sensing a theme here? They also add a little ambiance to your outdoor area and make it feel like you have another room outdoors. On the other hand, they are large and need to be put out and stowed away every time you move. A mat with a bag is handy.
Folding table. Most campsites will have a picnic table but some do not. Convenient for extra food prep space, working outside or any projects.
Bug repellent. No one likes mosquito bites.
Solar lanterns. A peaceful soft light for evenings at the campsite. Our friends have a few of these inflatable solar lanterns . They are on my wish-list.
Chairs. A camping chair is a must. Our Kijaro Dual Lock chairs are sturdy and comfortable. On average they seem to last us about two years of almost daily use.
Screen room. These really are another room and a great way to make the most of your outdoor space.
Solar lights. Great for lighting your stairs and the entryway to your site at night. We use these solar garden/pathway lights and they work well for us but I can not entirely recommend them. They do have an on/off switch which is nice but they do not always last through the night. Sadly, we haven’t found anything better yet.
Small propane tank. These are great for gas grills and propane fire pits. They are small enough to be easy to handle around the campsite and a much cheaper way to buy propane than the disposable green canisters. Plus, you can help the environment by not using disposable canisters. If you want more detail read our review of the Worthington 1 gallon propane tank.
RV Set Up Checklist
- Confirm reservation and site type prior to arrival.
- Early or late arrival. Let the campground know and find out the check in procedure.
- Payment. Be aware of what payment types are accepted.
- Membership discount card.
- Registration info and license plate number.
- Get a campground map with the route to your site.
- Check the site for nails, dog doo or other debris before you pull in.
- Check for branches or other obstacles.
- Test power post with EMS.
- Run water for a second.
- Visually inspect sewer hookup.
Parking your RV in your campsite.
- RV is parked close enough to connect the utilities.
- Slides have clearance to open.
- Leave room to walk around the outside of your RV once you are set up.
- You have a spot in the site to park your tow vehicle or toad.
- Awning has space to extend.
- Stairs have room to open properly.
- Fire pit is appropriately distanced from RV.
- Ants. If there are anthills do not place your tires or stabilizers on them.
This section is tailored to a travel trailer. The idea is the same for all RVs, you’ll need to level and stabilize.
- Level RV Left to Right – Before you unhook.
- Place leveling pads next to your tires.
- Pull RV forward or back so that you can slide in leveling pads.
- Slide leveling pads into the spot where your tires will go.
- Pull RV on to leveling pads.
- Check levels and adjust until level.
- Chock tires.
- Unhook tow vehicle.
- Level Front to Back – Use tongue jack to do this.
- Lower stabilizer jacks and stabilize RV.
- Tap in wheel chocks again.
- Run long bike lock cable through both tires on one side and lock loops together.
- Insert wheel stop chocks or X-chocks.
RV Power Connection Set Up
- Verify breaker is in the OFF position.
- Plug EMS into the power post.
- Plug RV power cord into EMS.
- Flip breaker to ON position.
RV Fresh Water Connection
- Sanitize water spigot.
- Screw on splitter. (If using.)
- Attach pressure regulator.
- Connect inline water filter.
- Attach fresh water hose.
- Run a little water through the hose. (To fill and flush the hose.)
- Connect the other end of the freshwater hose to your RV fresh water inlet.
- Turn on water.
- Hang your water hose off the ground if possible.
- Run a little water inside to clear any air from water lines.
- Put on your disposable gloves.
- Verify that black and grey tanks are closed.
- Remove safety caps from RV sewer outlet and sewer hose.
- Attach sewer hose to RV sewer outlet. Make sure it is secure.
- Use the flexible sewer adapter.
- Push it into the campground sewer connection until secure.
- Thread the normal sewer adapter into the flexible sewer adapter.
- Insert elbow end of sewer hose into sewer adapter. Make sure it is secure.
- Set out sewer hose supports.
- Run sewer hose along supports so that it runs downhill.
- Add P-trap to sewer hose. (If desired.)
- Test sewer run with a little grey water.
Slides & Inside
- Extend slides.
- Set up anything you need inside your RV.
Campsite Safety
- Campground name, address, county, site number and after hours contact number.
- Add any other info you want to have on hand. For example, local sheriffs number and so on.
- Set weather radio to current county.
- Lock bikes and toys.
- Make sure flashlights are charged and accessible.
- Set out small orange cones by any tripping hazards.
- Download offline google maps. If desired.
- Put pool noodle or pipe insulation over any slide corners. If desired.
- Access to important documents. eg prescription info, medical insurance card etc.
- Go bag. If desired.
- Drinking water or filtration system.
Set Up RV Patio/Yard Area
The outside area will vary widely from person to person so here are a few of our favorite basics. Thinking about how you plan to use your outdoor area will help you decide what to include at your campsite.
- Wrap around step rugs.
- RV patio area mat.
- Camping chairs
- Bug repellent.
- Propane fire pit.
- Folding table.
- Solar lanterns.
- Solar walkway lights.
- Screen room.
- Small refillable propane tank. For your grill and fire pit.
Enjoy your campsite!
That’s it. Your RV is all set up. It may seem overwhelming at first but you will get used to it. After you have done it a few times it will become second nature. Until then, slow down and take it step by step.

Enjoy This Article? Share It!

6 Best RV Drinking Water Hoses (2024 Buying Guide)

RV Sewer System Guide

Thousand Trails Membership Review – Year 6

THANKS FOR READING!
We’ve been full-time RVers since 2012. Over 127,000 miles and 47 states later, we are still towing our home around the United States.
On TowingHome we share what we have learned along the way; what we love (and what we don’t) about the RV lifestyle, tips and tricks, our favorite campgrounds, places and gear.
We hope that it makes your journey a little bit easier.
Travel Trailer Setup Checklist: Setting Up an RV Campsite for Beginners

As an Amazon Associate, we earn from qualifying purchases. We also earn from other affiliate websites. See our full disclaimer .

When setting up your RV travel trailer as a beginner, it’s essential to take your time and do it correctly. You don’t want to rush through the setup procedure and wind up with an RV that isn’t set up safely or prepared for an enjoyable camping experience.
We’ll cover everything you need to know – from unhitching the trailer to RV hookups, and give some helpful tips that took us a while to learn!
Below we’ll take you through a step-by-step travel trailer setup, so you are fully prepared to take your RV to a campsite. You can also download our travel trailer setup checklist below.
Arriving at Your Campsite
The first thing you want to do before pulling into a site is to inspect it. If you can choose your spot, drive around until you find one that suits you and ask yourself these three questions.

- Is it level?
- Does it have any obstructions for backing in, putting out the awning or slide outs, or using the solar panels?
- Where are the hookups?
You can usually inspect the site from the driver’s seat on a flat, pull-through, concrete pad campsite. However, getting out and surveying the area on foot is best for anything more complicated. We still follow this process at almost every site. It doesn’t pay to be in a rush.
Let’s break down what to look for when answering the above questions.
Is the Campsite Level?
Picture where your RV camper will be in your mind. Take note of sloping and where you might need leveling blocks. Look for bumps and dips to avoid. If a campsite is too crooked, it may be best to drive on or ask the campground if you can be reassigned to a different spot.
Obstructions
Trees, large rocks, camping tables, hookup pedestals, or any other obstructions make it hard to get into a site and can damage slide-outs and awnings. Trees cast shade that can help keep an RV cool but also significantly reduce the output of solar panels and dirty the RV’s roof.
Hookup Locations
Ideally, a campsite will have water, electrical, and sewer hookups on the driver’s side of the RV centrally located where you will park. The passenger’s side is left with room to set up camping gear.
In reality, there isn’t consistency with hookup layouts between campgrounds or even campsites within some campgrounds. Sometimes the hookups can be spread out so far that extra hoses or electrical extensions are needed. We have experienced campgrounds with water and electricity on the driver’s side and the sewer right in the living space on the passenger side.
Try to line up the RV’s sewer connection with the campsite’s. Sewer hoses tend to be the shortest hookups and the most cumbersome to set up. Bends in sewer hoses accumulate particulates and make them harder to keep clean.
RV Leveling and Unhitching
Once you’ve pulled or backed into your campsite, it is time to continue the RV checklist by leveling.
A device like the Levelmate Pro can speed up the leveling process by telling you exactly how many inches one side needs to be raised in real-time, but an RV level or a level from your toolkit can do the job with some patience.
Leveling Side to Side
If you have a towable RV such as a fifth wheel or travel trailer, it is crucial to level the rig side to side across the wheelbase before unhitching.

Looking at your leveling device, determine which side needs to be lifted, and place a lifting device such as Lynx Levelers or an Anderson Leveler under the downhill wheels.
Pulling the RV onto Levelers in 3 Steps
- Ensure your vehicle has its parking brake on before getting under the tires.
- Pull forward or reverse onto the leveler slowly. (This is where a spotter comes in handy to let you know when you are on the blocks.)
- Check your level and add or remove blocks until level.
Chock Wheels
Before unhitching, it is imperative to place wheel chocks under the RV wheels. The potential of an accident from a moving RV is not worth skipping this step that only takes a few seconds.

The heavy-duty rubber chocks are more sturdy and grip well. Two sets are recommended on extreme slopes or wet/soft ground conditions.
Unhitch RV and Level Front to Back
Now that your RV is level side to side, it is OK to unhitch the RV from the tow vehicle. Follow these five steps to unhitch and finish leveling your travel trailer.

- Extend the tongue jack until pressure begins to be taken off the hitch ball. (Use a tongue jack stand or support block to protect the pad of your jack and reduce the amount of extension required.)
- Unplug the 7-pin electrical connector.
- Remove all equipped weight distribution or sway stopping devices, emergency breakaway brakes, and safety chains.
- Release the hitch ball lever and extend the tongue jack until the tow vehicle can be safely pulled forward.
- Using your leveler again, extend or retract the tongue jack until the RV is level front to back.
Put Down Stabilizers
When level, the stabilizer jacks (sometimes called scissor jacks) are extended to reduce the rocking that occurs in RVs from walking, wind, and other shaking. Stabilizers minimize strain on the frame of an RV when a slide out is moved in or out. Always put the stabilizers down before putting the slide out.

It is important to note that these are not the same as the automatic leveling systems in some motorhomes. If the stabilizer jacks are lifting the RV, you risk damaging the jacks and the RV. Stabilizing jacks support the RV by being pressed firmly to the ground, and no more.
Many RVs come with electric stabilizers that can be raised or extended with a switch. Manual jacks use a turn handle, but this drill adapter makes it less strenuous and speeds up the process. Jack pads are recommended to keep jacks from sinking and reduce exposure to dirt and moisture.
Connect Power
The electrical power cord is usually the first on the list to get attached. Often the slide needs to go out, or the air conditioning needs to come on. Plugging into electrical keeps those bigger loads from hitting the batteries.

Your RV will require 30 or 50 amp service, but the campground may not have a site with your particular circuit. The good news is that an adapter easily connects a 30 amp plug to a 50 amp outlet or a 50 amp to a 30 amp , allowing you to stay in any available electrical spots.
Using a Surge Protector
You also will want to protect your RV from electrical disturbances with an RV surge protector. There are several types of surge protectors. A basic model surge protector plugs into the power pedestal and is the most affordable. Other versions of surge protectors are installed permanently in the RV , so you don’t need to set up anything at camp.
The pedestal’s breaker should be off until the RV is plugged in securely. Once the breaker is on, the surge protector will take a few seconds to examine the incoming power for problems like bad wiring before allowing electricity to flow. If there is a problem, the surge protector will display an error code and block the electricity.
Connect Water
If your site has a water spicket, a hose can plug directly into the RVs city water inlet or fill up the water tank. Use a hose rated for drinking water . Green water hoses have dangerous chemicals like lead, so skip those.
High water pressure can burst an RVs plumbing. Protect your RV with a water pressure regulator . A basic one does the job but can leave you with poor water flow. An adjustable water regulator set around 45 PSI protects most RVs and keeps the shower flowing nicely.
PRO TIP: Adding a Y-adapter at the spicket is a good tip for several reasons. One, it gives you a place to quickly wash your hands or hook up a black tank flush hose. Second, the lever is much more convenient to turn off and on when filling the water tank.
Water filtration.
Water filtration is a big topic and can be approached in many different ways. At a minimum, protect yourself with an inline one-micron water filter to reduce harmful contaminants, reduce odor and improve the taste. Add a pre-filter for two-stage filtration to reduce sediment, rust, and other particulates.
Advanced Water Filtering
It is debated if water passed through only inline filters is suitable for drinking. There are more advanced and expensive water purification systems if you plan to regularly drink from the RV water tap.

- If you have the countertop space, many people swear by the Berkey system .
- Advanced water filtration systems that can be installed in storage areas are available from companies like Clearsource .
- Acuva systems use UV light to kill bacteria and viruses and are more compact and mount under the sink.
Connect Sewer Hose
Connecting the sewer at arrival can be a convenient way to dump as needed. If your sewer connection significantly intrudes on another camping spot, try to be courteous and wait until you’re not disturbing your neighbor. A pair of waterproof gloves is recommended to use while setting up your sewer connection.

Setting Up the Sewer Hose Support
Use a sewer hose support to slope away from the RV to keep things moving and prevent build-up in the sewer hose. Lay out the support evenly, avoiding low spots and turns in the hose to make things clean when it comes time to disconnect.
Connecting the Hose
Attach the hose to the RV first, then lay the hose across the support. Remove the cap from the ground drain, quickly screw a clear elbow adapter into the threads that held the cap, and connect your hose to the adapter.
You’re ready to dump your tanks!
READ NEXT: For a complete list of travel trailer equipment to outfit your RV for travel, check out this list of travel trailer must-haves .
Finish setting up your camper trailer.
There may be items specific to your RV to complete your setup. You may have a slide that needs to come out, a satellite TV to set up, or an internet antenna.
Make your RV campsite setup feel like home with tables, chairs, lights, etc.
If you use your RV’s stove, you’ll also need to open the exhaust vent cover outside the RV.
We hope this guide and checklist will help you feel confident setting up your site. Now, sit back, relax, and enjoy your campsite, knowing it is ready to go!
Want more beginner tips on RVing and how to get started?
Check out our guide to preparing for full-time RV living, including info on choosing an RV, pros and cons of the lifestyle, RV gear lists, downsizing for RV life, and more.
Like this post? Save it on Pinterest for later.

Morgan, the founder of The Home That Roams, has been living nomadically for over five years. She began her journey traveling across the U.S. in a motorhome and cruising on a liveaboard sailing catamaran. Currently, she lives full-time in a travel trailer, sharing resources on RV living and boat life to help others downsize their lives and thrive in an alternative lifestyle.
Leave a Reply Cancel reply
Your email address will not be published. Required fields are marked *
Sign Me Up!
Learn how to live in an rv.
Get weekly tips on how to start traveling full-time in an RV.
View our privacy policy .
Privacy Overview
- You are here:
- Home »
- Blog »
- » Permanent RV Setup: Setting Up a Travel Trailer Permanently

Permanent RV Setup: Setting Up a Travel Trailer Permanently
- May 17, 2021 /
- RV Parking /
- By James V. /
RVs can be like homes. Just take the wheels off and it is not going anywhere, just like a home doesn't go anywhere. The good thing about ‘permanently’ setting up a travel trailer is that after a few years you can reverse the foundation and move to a new location. A home takes more work to move.
Setting up a travel trailer permanently is also like choosing a home. You have to decide on which location will be the right spot for you and your spouse. The next key would be to make sure the ground is perfectly level. If it isn’t, you won’t be comfortable.
To learn more about setting up an RV or travel trailer permanently, just keep reading our article. It has the information you need to know about in order to get the job done correctly. RVs and travel trailers need the same basic key elements to work properly.
Setting Up a Permanent RV Site

Some people enjoy the RV or travel trailer life. The main reason that they do is that they can pick up and move to a new location when they have exhausted all the fun things to do in their current place.
Then some have found the perfect spot and do not want to move from it. That is the time to think about setting up the travel trailer permanently. There are very good reasons why you should consider finding a perfect spot to live in.
One reason is that you only have to do this task once. With the constant moving around, you are setting up, leveling, and taking down every time you want to explore a new region of the country.
Another reason to set up a permanent travel trailer spot is that you have explored the country and now found the right spot where you want to spend your retirement. Whatever the reasons you have, setting up a permanent travel trailer site is a good idea.
You get a bit more stability, you can become part of the local community and it doesn’t take that much more work than setting up a site temporarily. There is something you should be wary of though, and you should check into this before you start all the work.
There are some counties, cities, or states that will level property taxes on your travel trailer if you remove the wheels. They will do it to RV owners who do the same thing. Keeping the wheel son and the travel trailer licensed avoids paying those taxes.
Check with the local authorities of the area or the campground owners you are setting up in to make sure. You never know what different regions will do when it comes to taxes.
How to Set Up a Travel Trailer Permanently

There are a few steps involved in this process and you should follow each step to make sure you get it right. Nothing is worse than a bad set-up as it makes permanent travel trailer life a lot more awkward than it should be.
Step 1. The decision
This is the most important part of the process as you have to decide where you want the travel trailer to remain permanently. If you are not happy with the area, you won’t stay that long so make sure you get the perfect spot for you and your spouse.
Step 2: Leveling
This is the next most important act you will do in this process. If the TT is not level you will have a hard time sleeping, cooking, and even relaxing. Also, toilets and other appliances may not work that well when the TT is not level to perfection.
That can lead to some uncomfortable situations including your food not staying fresh or cooking properly. Plus, you may get false indicator readings which will affect how you empty your tanks or refill them.
If you are going to be in an RV park, most concrete slabs have been installed by professionals who know how to get the pad level. You won’t have much to worry about on those pads.
However, if you go to a campground or apiece of raw land, leveling your TT will take a bit more work to get it right.
Step 3: The foundation
If you are going to a regular RV campground that allows permanent set-ups, then you do not have to worry about this step. The foundation is ready for you. You just have to supply the necessary equipment like cement blocks, 2 x6 or 2 x8, or whatever size wood you want along with stabilizers, leveling blocks, and wheel chocks.
If you are building your own permanent site, then you have to consider drainage issues, and making sure the ground is level while still being able to drain. Your foundation should include drainage rock, then some concrete patio stones some wood blocks.
What you eventually use will be up to you but it should protect the ground underneath your trailer. You can remove the tires if you want, which may alleviate leveling issues, and you can either store those tires or sell them if you plan on staying in one spot for more than 7 years.
Some people suggest removing the axles and selling them as well, but that seems to be an extreme measure unless you are never going to more the travel trailer again. How you do this stage of the process is again up to you just make sure to take into account the height the tires add to your positioning.
The battle is basically over once you have leveled the travel trailer. Everything else after that is minor in comparison to this one task.
How to Level Your Trailer

As we have said, this is the main priority when you want to have a permanent setup for your travel trailer. If the trailer is not level, nothing else matters as you will be encountering a lot of difficulties every day you live in the rig.
Some people say that using pressure-treated wood piers is a good leveling tool, but use them at your own risk as these pieces of lumber can still absorb water, rot, and split on you. When they do, it can be very difficult to replace them.
- Step 1: Once you have selected your permanent site, put a level on your TT to see how level it is and where you need to add some leveling equipment.
- Step 2: Use leveling blocks to help you get the tires in the right position. These leveling blocks are similar to the Lego toy. That means you can add to or subtract from them in order to get the right height for the tires.
When you move your trailer onto these leveling blocks, make sure to center the tires exactly. A little bit off-center may affect your level or it may help the tire deteriorate faster, making it unsafe to drive on if you decide to move.
- Step 3: Add the wheel chocks as these can prevent your tires from moving. If you want extra safety, then locking wheel chocks will be the better option. Also, go with the set that is on sale in your local RV or department stores. Professionally made wheel chocks are usually safer than DIY options.
- Step 4: O nce those steps are done, lower your tongue jack till it is in the right position. A couple of pieces of wood measuring 2 x 10 inches in size should provide a stable surface to lower the tongue onto. Make sure to hit the pieces of wood dead center.
Or you can go with a plastic wheel dock or concrete patio stone if you are worried about rotting, splitting, and other issues that come with wood.
- Step 5: Use stabilizing jacks to help keep your travel trailer from moving during wind and other storms. These may already be installed in your trailer but if not, they are widely available. Just make sure to get the stabilizing jack that is strong enough to hold the weight of the travel trailer.
Some people confuse stabilizers with levelers and the latter term is what you are actually looking for. They will hold the weight of the corners with ease and help keep the travel trailer level.
5th Wheel Permanent Setup

A lot of the previous instructions will work for the permanent set-up of a 5th wheel. However, you do not need to take the tires off or any weight off the tires. Most 5th wheels are set up to handle the weight.
Once you lower the jacks, you can block up the trailer and put some skirting on it to make it look nice. This will protect the wheels from the weather, which tends to age the rubber even as it sits still.
If you are blocking, then you may have to do a lot of shimmying to make sure everything fits into place. Some people raise the 5th wheel to take pressure off the tires and then lower the frame onto cinder blocks to reduce or eliminate any shaking.
Make sure to level the trailer using the onboard system first, then do any fine-tuning manually. Everyone has their own way of fine-tuning that meets their situation and makes sure the frame of the trailer does not get damaged.
RV Sewer Hookup Permanent
This is a necessary step when permanently setting up your travel trailer. The system pipes that come with your rig are often reinforced flexible plastic not meant for long-term use. They can wear out on you and you will end up replacing them more often when you are in a permanent situation.
- Step 1: Put a sewer adapter on the RV ’s holding tank drains.
- Step 2: Measure the distance from the bottom of the adapter to the ground and subtract 2 inches. Cut that piece out and clear any burrs on the end using fine-grit sandpaper.
- Step 3: Add a 4-inch long section of 3-inch diameter rubber hose to the end of the sewer hose adapter. Use a hose clamp to attach this piece. Next, put a 3-inch diameter PVC elbow to the bottom of the vertical piece you cut out. There is no need to glue it together.
- Step 4: Cut a 6-inch piece of 3-inch diameter PVC pipe. Using the two-step PVC glue, place the 6-inch piece on the elbow and let it dry.
- Step 5: Cut a horizontal piece of PC pipe to the actual size you need.
- Step 6: Connect the pipe to the sewer drain and glue it into place. Make sure all connections are tight and fit together snugly as you do not want any leaks.
Permanent Camper Setup Tips
- 1. Check the air pressure in your tires to make sure they are at the right levels. Tires can lose air pressure fairly quickly.
- 2. Cover your wheels to protect them from the weather and help them last longer
- 3. Consider going solar when you are sitting permanently on a site. This will help reduce dependency on the grid
- 4. Have the best driver back your rig up onto the wheel levelers. That way you know the wheels will be centered on the levelers correctly
- 5. Check your hoses to make sure they can endure changes in temperatures. Insulate them to help protect them.
Some Final Words
Setting up a permanent location is not a bad idea. You get to enjoy the area you like the most and have a lot of stability. Plus, a permanent site can act as a nice getaway location when you need a break from the rat race.
Your travel trailer is always ready for you when you visit and you do not have to set it up every time you use it. Just make sure to protect the tires and other vital equipment.
Related Posts
List of Campgrounds Along I-40 (New Mexico, Arizona, TN, AR)
Halo Resorts Fisherman’s Retreat Membership Cost
How To Level a Camper Without Moving It (Leveling a Parked RV)
Leave a Comment:
How to Install RV Hookups at Home

Sharing is caring!
Thanks for your support! If you make a purchase using our links in this article, we may make a commission. And, as an Amazon Associate, I earn from qualifying purchases. See the full disclosure here .
We’ve been considering installing RV hookups at home for water, sewer, and electrical. We would like to do this so we have a place to store the RV but also so we can live in or service our RV right at home. But, there are steps we must take to ensure we do things the right way.
So how do you smoothly connect water, electric, and sewer hookups to your RV at home?
1. Build a Gravel or Concrete Parking Pad 2. Run a Water Hookup to the RV 3. Run an Electrical Hookup to the RV 4. Install or Use Your Existing Permanent Sewer Hookup

In this article, we will run through some home RV parking hookup ideas so you can install your own RV hookups right at home. Please be aware that depending on where you live, you may need permits to install permanent RV hookups at home. So, check with your local officials before you begin any work.
Build a Gravel or Concrete Parking Pad
If you want your RV hookups to go as seamlessly as possible, you will want to build a gravel or concrete pad. This setup allows your RV to rest on a flat surface outside of your home. Ultimately, it will keep the weight of your RV from settling into the ground. If you were to park your RV on grass sooner or later, the ground will settle, and your RV will no longer be level.
To build a gravel or concrete parking pad, you should first measure the length and width of your RV. You want to make the pad about 4 feet wider and 4 feet longer than your RV, so you have room to walk around the RV. You should also consider the height of your RV to make sure you don’t hit any overhead power, phone, or cable TV lines.
To build a gravel pad, you will need to start by leveling the area where you want to install the pad. You should plan to make the gravel pad 4-6 inches deep. The heavier the RV, the deeper the gravel.
Once you dig out and level the area, install a layer of filter cloth over the dirt BEFORE filling in with gravel. Most people don’t know to install the filter cloth first. The filter cloth keeps the dirt under the gravel from eroding, so you don’t end up with spots that sink.

I recommend using #57, or #2 washed gravel for your gravel pad. Do not use pea gravel because your rig will sink right into it. I also do not recommend using crush and run, which is gravel mixed with gravel dust. Crush and run is very dirty and you will track the stone dust into your RV, and maybe your house too.
And lastly, I absolutely do not recommend using recycled concrete. Recycled concrete typically has wire mesh or rebar in it, which is metal used inside of concrete to add to its overall strength. Use recycled concrete, and I guarantee you will get a flat tire at some point.
To build a concrete pad, you will need to dig and deep enough to install 4 inches of gravel below the 4-6 inches of concrete you will then pour on top. You should still use filter cloth under the gravel, and I recommend using crush and run gravel and tamping it down under the concrete.
When pouring the concrete, you will want to use 2 x 6s to build a form, so your concrete pad has a clean edge all the way around. Also, you should install wire mesh in your concrete pad or buy concrete that has fiber mesh mixed into it for added strength.
Also, I do not recommend trenching under your parking pad for your water or electric lines. I realize that if you take a shorter path, the cost of materials will be less expensive.
But, if there is ever a problem with either of those lines, you may have to dig up your parking pad to make a repair. And, the trench lines are likely to settle at some point which will cause the pad to sink in those spots.
If time, tools, or know-how aren’t on your side, you can always hire a contractor to do the dirty work for you.
Install Sturdy Posts for Your Water and Electrical Hookups
When the pad is complete, it’s time to install 4 x 4 posts for the RV hookups. You can use the leftover concrete if you installed a concrete pad to do this. Or, you can just buy a few bags of concrete and dry pack the posts if you installed a gravel pad.
Dig a hole for each post about 8 inches in diameter and about 30 inches deep. Install the posts as level and plumb as possible and then pack with leftover concrete or just pour the dry concrete right from the bag around the post.
This is called dry packing and the moisture from the ground will seep into the dry concrete mix and it will harden up. If you live in very dry climates, this method will not work and you will have to mix it with water before packing it around the post.
Obviously, you will want the water and electrical posts to be on the correct side of the RV to make hooking up the electric line and water hose as easy as possible.
Install the Water Line Hookup First
First, dig a trench from the water source to the post for the water hookup. Why dig a trench? Well, you’ll need something that you can run the waterline through so it doesn’t get damaged or freeze. You’ll want to strategically position your post and trench. (Knowing this may affect where you choose to install your post in the first place)
Before you dig your trench, you should call Miss Utility. or whatever service is in your area, to come out and mark all of the existing utility lines on your property. In fact, in Maryland, where we live, it’s the law.
Calling a utility marking company can help prevent you from hitting an existing water, power, or gas line! And it is expensive to pay the repair bill if you hit one of these lines.
Digging the trench for the waterline is the hardest part of setting up the waterline. It’s labor intensive because you have to dig down below the frost line.
Or you can rent a trenching machine at Home Depot so you can get the waterline installed below the frost line for your area of the country. A frost line is how deep the ground freezes during winter. Once you know the frost line depth, be sure to dig below it or the water line could freeze.
CPVC pipe is easy to install and it is rated for installation both above and below ground. Just make sure you do not use purple primer on the CPVC pipe and that you use the proper glue rated for CPVC.
After running your water line through the trench, you’ll run the water line up the post. Before securing the water line to the post, wrap the water line with heat tape. This will keep the water line above the frost line from freezing.
Then secure the line with pipe clamps and fill in the trench. So long as your line is secure, you shouldn’t run into any problems hooking up your RV at home. Add the faucet, and you are almost done.
While you still have to set up the electricity and sewer lines, you’ve got the first part under your belt! It’s a rewarding feeling, especially when you’ve done it all yourself. So go ahead and celebrate, but not for too long—there’s more work to be done.
Installing the RV Electrical Hookup at Home
Hooking up electric service to your RV means figuring out some details about your rig. In this case, you’ll want to figure out what number of amps your RV pulls.
This will determine which breaker box and outlet you purchase for your electrical line. You should also decide if you want phone and cable TV service for the RV because the electrician can take care of those items too.
RVs typically pull two different amperage levels. So, figure out whether yours is 30 amp or 50 amp. Refer to the owner’s manual for this information. Another option is to look at your RV’s male electric plug since the two amp options look different. In our case, our RV can run on a 110-volt line so all we need to do is plug into an existing outside receptacle.
If you need 30 or 50 amps of electricity, it’s probably best left to an electrician to do the work. I highly recommend hiring an electrician because the electrical line will need to be run from your breaker box, or a sub-panel to the RV. A licensed electrician will be able to determine what size electric line you need run from your house to your RV.
By having a dedicated 30 or 50 amp circuit installed for your RV, you will be able to run all of the appliances in your RV. I also recommend having a 110 outlet mounted on the electrical post so you have somewhere to plug in your heat tape for the water line during the winter.
To save yourself some money, you can install the trench for the electric line from the house to the RV. And since you will possibly have rented a trenching machine, why not just get it done so, you aren’t paying an electrician top dollar to dig it for you.
You’ll want to dig a trench from your house to the post. But first, have the electrician show you where and how deep to dig the trench. You can ask him to show you when he visits to give you an estimate for the work. This way, the trench will be ready when he arrives to do the job.
Do note that you’ll want the electric line to be a separate trench. Don’t share the trench with the water line. Just like the water line, secure the electrical wire to the post with u-shaped clamps.
Turn off all appliances and breakers before plugging in and install a good 30 amp surge protector or 50 amp surge protector before plugging the RV into the new electrical receptacle. A surge protector can help to ensure that the appliances in the RV don’t short out in case of an electrical surge.
It’s incredibly expensive to replace the electrical appliances in your RV. So, whether at home or at a campground, you should always use a 30 amp or 50 amp surge protector.
How to Install an RV Sewer Hookup at Home
There are a few ways to accomplish setting up an RV sewer hookup at home. They are hooking up to the existing public sewer system, hooking up to your private septic system, or installing a sewer tank.
Hooking up to your existing public sewer system is the easiest way to drain your black and gray water tanks, but it also may be illegal where you live. So, you will need to check with your local jurisdiction before attempting to hook up this way.
But if it’s legal, it’s as simple as hooking up your sewer at a campground. Just look for the sewer cap in your yard, remove it, and hook up your sewer line.
The process is similar if you have a septic system on your property, but you may need to install a 4-inch pipe from the septic holding tank, so you have something to connect to.
Adding an RV in-ground septic tank to your yard is the last solution to the sewer hookup problem because it can be very expensive to bury a holding tank. And then, after it’s installed, you will have to pay to have it pumped out when needed. You will also probably need to have a contractor install the septic tank for you, and then you just hookup like at a campground.
Consider Using a Compost Toilet
There’s an alternative to a septic tank setup. Compost toilets are eco-friendly and help you avoid having to install a tank on your property. In a self-composting toilet, the liquid and solid wastes are kept separate, but how?
Liquid waste goes in the front compartment and is tossed outside in a safe location when full. Meanwhile, solid waste finds its way into the back section. Natural ingredients like mulch or moss help it break down, and compost and a fan help avoid any smells before they begin.
You can then deliver compost build-up to your outdoor composting pile. Composting toilets aren’t cheap but they are certainly less expensive than installing a septic holding tank.
RV Hookup Installation Costs
The costs for water, sewer and electrical hookups can vary quite a bit depending on how much work you can do yourself, what type of sewer system you need, and if you need to pay for permits in your area.
Below are some cost ranges for RV hookups at home:
- RV Water Hookups – From $20 if you do it yourself to $750 if you hire a plumber
- RV Electrical Hookups – From $100 if you do it yourself to $1200 if you hire an electrician
- RV Sewer Hookups – From $0 if you can hook up to your existing sewer or septic system to $3500 or more if you have a sewer tank installed.
It can be really easy or pretty complicated and expensive to install RV hookups at Home. But it can be done! Just be sure to do your homework up front to know if this option will work for you. For some very good related information about parking an RV at home, check out these other articles we wrote.
RELATED READING :
– can i park an rv in my driveway, – can i live in an rv on my own property, – 21 must have rv accessories for a new camper or travel trailer, – rv hookups explained (water, sewer, electric).
Do you have any thoughts or ideas to share about installing RV hookups at home? Please share in the comments section below!

31 thoughts on “How to Install RV Hookups at Home”
Hi, Ive searched all over the internet for the answer to this question and have not found it. I have 7 acres in the country, when purchased this land it already had a septic tank, electric pole and water well on it. I had electrician install a pole to put electric for my rv, a plumber to run septic to graveled area where I will park my travel trailer so those areas are taken care of. Now I have a water well thats about 40 ft. from where the trailer will be parked. I called the well service people and was told that if I just planned on using trailer as an occasional vacation spot that instead of running a water line to trailer, I could just run a water hose from the well spout to the trailer. The well house in enclosed in a 5×5 by 4 ft tall square enclosure made up of cinder blocks with a corrigated tin lid. When looking at the plumbing there is a metal spigot attached to the pvc piping next to the pressure switch, oh and my well does not have a pressure regulator guage on it that I can find. Then at the end of the pvc piping there is narrow piece of pvc pipe with a plastic valve on top, when you turn the valve water shoots out of it. Not sure what that is for, is it to put on another connection? So my question is, would i attach the water hose to the metal spigot or have to install a fixture onto that end pvc piece with the plastic valve to attach water hose to to run to trailer? Also, would I need to attach a pressure guage at that spigot to control the water pressure and would I install a water filter onto the well spigot or would the pressure guage and water filter go on the other end of the water hose that attaches directly to the trailer?
Regarding dumping a black RV tank into a residental septic tank I am wondering if the typical odor eliminating and break up chemicals that are used in a RV black tank would cause havoc with the bacterial world in the septic tank. Any opinion on this question?
Already have full hookups on our property but looking to make them better. Trying to find the sewer hookups like you find at Disney or higher end RV parks that put the connection below the surface and allow you to cover it when not in use. Any idea of where to find them?
Thanks for the article.
I believe I will hire professionals and appreciate all the insights.
Hi Laura, I wish you the best of luck! Keep us posted on the project. Mike
Hello, I am planning on living in my trailer on an isolated corner of my parents property. Their septic tank is about an acre away from where I am parking the trailer. What would be the best (cheapest) option for hook up?
Do you have any information on Maryland restrictions? My mother wants to park one on our property and live out of it. Thank you!
We are selling our house and buying an trailer to live in for a period of time (1-2 years). The property we are going to does not have a septic system so I will have to install one. What size would you recommend I install and about how frequent would that have to be pumped? Can the gray and black water go into the same tank. Family of 4 2 adults with 2 toddlers. Totally new to camper/RV world so sorry if this is a dumb question. Can’t seem to find much on the Google machine.
Thanks, Joe
No one has a 115 amp receptacle outside their house. I think you meant 115 volts. Most homes only have 100 amp service total.
Thanks Bob – sometimes I do misspeak for sure. Mike
Happy new year 2021 to all! Thank you so much for this site & wealth of info! My husband & I have an RV and enjoyed several years traveling locally, in a tri-state area bc of his medical issues. Hope to get back to it again this year. My question, however, is about my (step)daughter. College student who will graduate in 6 months but due to fast roommate loss, had to move in with her mom. Sorry, to make this long story shorter…she’s convinced, with her mom’s encouragement that she can just buy a camper, travel trailer, for couple thousand dollars and set it up on her grandmother’s home area, less than acre, in a subdivision. I’m trying to not scream how crazy this is but can you tell me (without all my emotions added) Why this is or isn’t even plausible much less a good idea?? She thinks she can buy a used one & remodel the interior like she sees online…however we don’t have a plumber, electrician or contractor in our family anywhere!?!? Sorry for length of this but I’m trying to get a response together, with facts not my emotions
Mike thank you for this informative and straightforward session!
looking at your picture, I would never put the water and electric on the same pole, actually i would separate them by at least 6 feet. when you have a backflow preventer on the end of the faucet, they tend to leak often, having it right next to a power outlet is asking for trouble. other than this I think you have shared some good info. thanks.
Thanks Gregg, Water and electric are on the same pole in just about every campground in the US… Is this dangerous? Thanks Mike
What would be approximate cost of gravel pad 20×14. As in someone else but me doing it myself?
Have you ever seen a stainless steel RV dump “sink” which has an RV sewer hose connection for dumping and also a smaller drain? Ft. Wilderness had these at Disney years ago and I’d like to install one in the barn we are building for our RV. The purpose is should there be some leakage at the dump hose connection it stays contained in the sink and then goes down the separate smaller drain in the corner of the sink. Great for rinsing everything out afterwards. Looked everywhere but can’t find a small sink like that with the larger and smaller drain holes in it.
As another alternative for sewer hookup is a macerator pump. Connect it to your sewer connection on the RV and its discharge is pumped through a 3/4″ to 1″ garden hose. These pumps typically run on 12 volt DC from the RV. The hose can be discharged directly into a toilet or piped into the sanitary piping inside a building.
Hi Doug, That is a great option too! Thanks for sharing that info with the group! We started a new Facebook group that we are launching today called RV Camping for Newbies! It’s a great place to ask questions and get great answers from your fellow RVers in the group! We hope you’ll check it out! Mike and Susan https://www.facebook.com/groups/RVCampingforNewbies/
We recently bought a cabin that has what we were told were hookups for gray water and black water. How do I know that they will work if we have a friend with an RV come and visit? I’m coming in the dark having never RV or even camped much.
thanks! Jean
That’s a tough one Jean. If you have zero experience I would ask a plumber come and take a look for you. They will be able to make sure everything works properly. Also – when you bought the cabin was there a home inspection? Maybe the home inspector tested the hookups and if he did it will be in the home inspection report. Thanks and best of luck! Mike
I have looked all over our yard for a sewer cap and can’t find one. I know where the septic tank lives. I am wondering how do you install a cap that goes into the septic tank?
hopefully by now you found it. you can “T” in off the clean out cap.
A Flowjet Portable Waste Water Macerator pump or Valtera SewerSolution is also a great way to pump waste water into a sewer clean-out or even household toilet. My Flojet can empty my 30 gallon tank in less than 5 minutes through a high quality hose over 50′ to my toilet. Would not be without it.
There are two sewer pipes coming out of the ground at my house one in front of the other and I don’t want to play any many mighty mo, so do you the one close to the house or the farther, thanks, Randall
Hi Randall,
That’s very unusual but I would remove one cap and flush the toilet in your house and see if you hear the water rushing through the pipe. Then I would put the cap back on and remove the second cap and flush the toilet or run a lot of water and see if you can hear it. Whichever pipe you hear the water running through is the sewer pipe you can connect to. Hope this helps! Let me know how you make out! Mike
Two sewer cleanouts in line can indicate either 1) a backflow/backcheck valve & cleanout combination or 2) two one-way cleanouts installed back to back (one guides the sewer snake upstream the other guides it downstream).
That is not unusual. They are sewer clean outs and they “sweep” in different directions. The one closest to the house actually sweeps toward the street so you can clean out clogs between the street and the house. The one farthest from the house (closest to the street) actually “sweeps” toward the house so you can clean out clogs under house. Imagine a system where the clean out closest to the street swept toward the street and the clean out closest to the house swept toward the house. There would be an 18 inch (24-36 inche?) space in the sewer line where no camera and no roto rooter would have access.
Why do you not use purple primer on the cpvc water line?
There is a primer for PVC, for CPVC and for both PVC and CPVC. The same is true for the glue. I’ve seen more people use the wrong primer and the wrong glue than you can shake a stick at. So, I recommend no purple primer on CPVC and use the correct glue. Just makes it simpler.
Hey Mike, thanks for the clarity! However, “why” or “what” is the end result if the “purple” primer is used, pls!?
Respectfully, Joe
Hi Joe, Great question. There are several types of purple primer on the market. One is for use on PVC, one is for use on CPVC and finally, there is a purple primer that can be used on both PVC and CPVC. However, if you use the wrong primer on your CPVC pipe the seal can leak over time. And I have seen countless times where people have used the wrong primer on the wrong pipe! So, I recommend not using it and just going with good CPVC glue. Or if you do choose to use the purple primer just make sure you are using the right one. PVC and CPVC are not the same. Hope this helps! Mike
Leave a Comment Cancel reply
Save my name, email, and website in this browser for the next time I comment.
Travel Coffee Kits: My Two Favorites, Tested Around The World
Pour-over brewing is a fun and easy way to enjoy great coffee at home.
But if you’re on the road much, then you know the difficulty of packing all that paraphernalia.
Having spent several months on the road in recent years, I’ve tried almost everything under the sun.
What follows are my two favorite ways to brew great coffee while traveling.
This article might contain affiliate links. As a member of programs including Amazon Associates, I earn from qualifying purchases.
Option 1: A minimalist pour-over coffee travel kit
Choose a dripper that collapses to pack flat. Bring a quality hand grinder, since grinding fresh is critical for flavor. Replace your usual kettle with a microwave-safe glass or silicone measuring cup. Keep beans in their valved bag to minimize air volume. Finally, pack your filters against something flat, like a laptop or book.
While you can also just bring a standard, plastic pour-over cone, it’s easy to find more compact options.
My favorite option is a collapsible silicone dripper like this one from Amazon.
(There are a few on the market, all basically identical.)
It uses Melitta-style filters, which cost next to nothing and are available at practically any grocery store.
Equally importantly, it has just a couple of small holes in the bottom. That’s a good way to keep water from passing too quickly when you don’t have a luxury of a gooseneck kettle.
Another option is this style of cone-less dripper with a reusable nylon filter.
In my experience, its filter allowed about as much sediment as you’d find in a French press. I dislike that; others don’t mind. It’s also harder to control the flow of water, since it’s just a suspended filter, not a cone with small openings.
That said, it’s the lightest and most compact option out there.
Finally, metal filter holders are a nice middle ground between the first two options. MiiR makes this particularly stylish one.
The price is a bit steep, frankly, but its fit and finish seem a notch up from cheaper knock-offs. It uses standard V60-style conical filters. However, the wide-open bottom means it could be a little finicky without a gooseneck kettle.
Option 2: The simplest AeroPress travel set-up
The AeroPress is ideal for travel because it’s easy to use without a kettle or scale. For easier packing, bring a hand grinder that fits inside the AeroPress plunger. Store some filters inside the filter cap, or switch to a reusable metal filter. Skip the funnel, but bring the scoop to help you estimate coffee amounts.
The AeroPress has a cult following in the specialty coffee world, and for good reason: it’s ingenious.
It’s also the single most travel-friendly brewer on the market.
My review goes into more detail, but in brief, the AeroPress is a tough and compact brewer that yields great coffee even when you can’t measure and pour precisely.
The plunger also lets you control extraction time when water temperature may be hard to manage. That matters more than you might think, as explained in my guide to coffee extraction .
Although the AeroPress takes more space than a collapsible pour-over cone, you can make up for that by buying a grinder that fits inside its plunger. Any of the models shared here would work well.
Finally, the AeroPress eliminates the need for a specialized kettle. It’s an immersion brewer, meaning the water stays in the coffee for some time, rather than passing straight down through it (as in percolation). There’s no further benefit to the slow, precise pouring of a gooseneck kettle.
What travel coffee gear do you really need?
Both of the suggestions above will make you excellent coffee. Still, it takes some compromises to fit everything into a bag while leaving room for (non-coffee) essentials.
These trade-offs will be clearer as we go through each item in a travel pour-over set-up.
Hand grinders are great for travel (as well as home)
No matter where or how you brew, it’s essential to grind fresh before brewing.
It’s equally essential to use a high-quality burr grinder. Otherwise, you’ll end up with a mix of powdery grounds and large bean chunks, both of which will throw off the taste.
The answer is a quality hand grinder. I’m fond of the Timemore Chestnut (reviewed here ), and actually use it at home as well as on the road. Like all other hand grinders of similar quality, it grinds as nicely as a much more expensive electric grinder, but in a small and affordable package.
If you go with an AeroPress, then check out this guide for three models that fit inside the plunger.
Manual grinders aren’t convenient for brewing large batches, but that’s seldom necessary when you’re traveling.
If a hand grinder breaks your budget (or weight/space limit), then pre-ground coffee may be the best remaining option. It loses flavor extremely quickly, so it’s best purchased at your destination.
Skip the scale
The water-to-coffee ratio plays a huge role in flavor. It’s impossible to get consistent results without measuring coffee and water alike.
However, inconsistent results aren’t bad ones, necessarily. Just a bit different each time. If that’s acceptable, then forget about packing something as delicate as a scale.
How, then, do you even get close to the right amount of coffee?
Personally, I practiced with a scale at home until I could reliably get within 1 gram based on the level of beans in a scoop or even in the palm of my hand.
(Yes, it’s a weird coffee-geek thing to do. But it works!)
This convenience does bring a couple disadvantages:
- It’s less useful if you need to make different batch size. If my palm or scoop hold 11 grams, there’s no obvious way to get (say) 17, besides eyeballing a palmful-and-a-half. Your mileage may vary.
- This work best with beans of similar density, which means similar size and roast level. For example, X grams of a light-roasted peaberry fill much less volume than X grams of a dark-roasted Pacamara. After all, we use a scale in the first place because mass, not volume, is what matters.
This isn’t an exact science, but that’s all right. We’re not looking for absolute consistency, just for a minimalist way to have good coffee.
Get creative with kettle alternatives
Gooseneck kettles make it easy to control the flow of water through a pour-over dripper. That helps the coffee extract more evenly.
Unfortunately, they’re the least travel-friendly item imaginable. Bulky, heavy, and equipped with a spout that might pierce whatever it’s packed alongside.
Use the numbers on the side of the AeroPress
If you use an AeroPress, then you can simply use the numbers on the side. Each one represents 60 mL, e.g., from the top of the “1” to the top of the “2”.
Pro tip: make your usual AeroPress recipe at home with a scale, and note what water level it reaches. That’s helpful because it may actually be more or less than 60 mL to reach the “1”, depending on how much coffee is resting on the bottom.
Use a measuring cup for pour-overs
The best reasonable alternative is a microwaveable measuring cup. Its microwave-friendliness lets you boil the water directly in it. (That’s better than the alternative of boiling elsewhere, then decanting. It loses heat too quickly.)
Silicone ones obviously win for durability and weight. Glass ones have handles, though, which makes a huge difference when full of scalding water.
Hotels in many parts of the world stock their rooms with one of those cheap, plastic tea kettles. They don’t pour as neatly as a gooseneck, but are perfectly adequate.
However, those kettle have too few volume markings—often none below a few hundred mL—so your measuring cup will still come in handy for filling it.
Wrapping up: great coffee wherever you are
Pour-over and AeroPress brewing are two of the best ways to make coffee at home. They’re also two of the best options to take on the road.
After traveling extensively with variations of both set-ups, I still can’t pick a favorite. The AeroPress gets a slight edge for its simplicity and extra control over extraction time, but the clarity and lightness of pour-over brews is also appealing.
In other words, it’s hard to go wrong.
Some simplifications and trade-offs are necessary. That’s especially true where measurement and pouring are concerned.
But as long as you buy a great grinder and don’t mind a little more variation between brews, it’s surprisingly easy to enjoy an excellent cup on the go.
Similar Posts

These 3 AeroPress Tips Will Take Your Coffee to the Next Level
The AeroPress is like nothing else on the market. It’s part immersion brewer, part French press, and–kinda sorta almost–part espresso-maker. It’s also the only device that’s so appealing to fellow coffee geeks and totally casual users at the same time. The AeroPress’s quirky design opens up all sorts of brewing possibilities, some of which are…

How To Roast Better Coffee At Home (9 Must-Try Tips For Beginners)
Who doesn’t love having plenty of fresh-roasted coffee on hand? Even better is when it’s your own handiwork. Home coffee roasting is a fun and approachable hobby. It’s free or cheap to start, and can be extremely cost-effective in the long run. Think of it as a craft. You can make something right away, then…

Here’s The Deal With Single-Origin Coffee (Why & How To Enjoy It)
The specialty coffee world is all about single-origin beans. Well, perhaps not all, but suffice to say that specific and far-flung origins are core to “third-wave” coffee culture. Some folks even make full-on careers of finding and promoting interesting coffee origins to their connoisseur clientele. It’s like wine or cigars, just less pretentious. Well, usually……

Why Use A Pour-Over Coffee Maker? (Simple Explanation)
Coffee drinkers have a lot of options when it comes to coffee makers. Some want the convenience of an automatic drip machine while others enjoy the ritualistic process of brewing with a pour-over brewer. If you’re looking for more flavor from your morning brew, then using a pour-over coffee maker is perfect for you! Read…

Why Roast Your Own Coffee (Fresh, Tasty…And A $10,000 Skill?)
For the longest time, I figured coffee roasting was some bizarre, complicated process that required thousands in equipment. Something only serious experts could even think about. But I discovered that’s not the case. Not only is it accessible to anybody, but it’s even easier than you’d think. Here’s why you ought to give it a…

Is Pour-Over Coffee Really So Hard To Make?
Pour-over coffee is a popular brewing method, but it often looks complex. We’ll take a look at what makes it seem complex, then see how to tweak your pour-over routine to suit you. Here’s whether pour-over coffee is hard to make Pour-over coffee is easy to make, but hard to make consistently great. The learning…
- Search Please fill out this field.
- Manage Your Subscription
- Give a Gift Subscription
- Newsletters
- Sweepstakes
If you click on links we provide, we may receive compensation.
- Travel Products
- Trends + Deals We Love
10 Best-selling Matching Lounge Sets at Amazon That Are Comfy, Cozy, and All Under $50
Score popular travel outfits with thousands of five-star ratings for as little as $26.
:max_bytes(150000):strip_icc():format(webp)/gabriellabioheadshot-97681b9e5bdd4bf19deb50877dadc037-2ed6c99ee5734c82ab458bdef6aef537.jpeg "travel set ups")
Travel + Leisure
There’s finally a chill in the air, which means it's time to cozy up in your comfiest clothing . If your fall wardrobe is due for a restock, look no further. Amazon has tons of best-selling matching lounge sets up for grabs, and they’re all under $50.
Inside Amazon’s Best-sellers hub is an entire section dedicated to the most frequently-purchased two-piece sets. No matter what travel plans are on your agenda, these sets are versatile enough to be worn to a variety of fall occasions, from road trips to pumpkin patches and bonfires. The fashion pieces have also secured tons of five-star ratings from reviewers and several pieces are on sale for up to 62 percent off.
Best-Selling Matching Lounge Sets at Amazon Under $50
- Merokeety Two-piece Oversized Lounge Set , $27 with coupon (originally $40)
- Anrabess Two-piece Lounge Set , $45
- Automet Two-piece Sweatsuit Set , $26 with coupon (originally $53)
- Bofell Two-piece Lounge Set , $20 with coupon (originally $34)
- PrettyGarden Two-piece Lounge Set , $32 (originally $43)
- Anrabess Two-piece Sweatsuit Set , $25 with coupon (originally $67)
- Aloodor Two-piece Lounge Set , $22 with coupon (originally $36)
- Xieerduo Two-piece Sweatsuit Set , $35 with coupon (originally $56)
- Wiholl Two-piece Lounge Set , $33 (originally $41)
- Anrabess Two-piece Matching Set , $48 (originally $56)
Merokeety Two-piece Oversized Lounge Set
The period between summer and fall can be tricky to navigate when it comes to your wardrobe, but this popular two-piece set has you covered. It includes a long-sleeve sweatshirt and a pair of matching shorts that work for both chilly mornings and warmer afternoons. It’s made with a blend of rayon and polyester that reviewers say is soft and warm to the touch.
Anrabess Two-piece Lounge Set
Cooler weather calls for extra layers to stay toasty warm, and this lounge set is a great base to start with. The top is designed with a crewneck, sleeveless cut, and loose fit so you can easily throw a sweater or jacket over it. The matching pants include details like a high waist and wide legs so you can stay comfortable for hours on end.
Automet Two-piece Sweatsuit Set
Get ready to kick back and relax in this two-piece sweat set that’s on sale not once, but twice , thanks to a coupon you can use on top of the already-discounted price. The set comes with a half-zip long-sleeve sweatshirt and matching high-waisted sweatpants that cuff at the ankle. Reviewers say it feels oh-so-cozy thanks to its blend of polyester and cotton materials. Choose from 15 colors, including apricot, coffee, and light pink.
Bofell Two-piece Lounge Set
This set comes with a pullover sweatshirt and matching jogger pants that reviewers say feels lightweight yet cozy. One shopper wore the set on their flight from the United States to Asia and said that it’s cute, comfy, and “just the right amount of warmth for chilly planes.”
PrettyGarden Two-piece Lounge Set
Simplicity never goes out of style — especially when it looks as effortlessly chic as this two-piece lounge set . It includes an oversized short-sleeve T-shirt and coordinating wide-leg pants for you to wear to a variety of occasions. One shopper wrote that it’s the perfect travel outfit, later adding that it’s versatile enough to wear from the plane straight to town. Take your pick from 22 solid colors, like army green, beige, and brick red.
Anrabess Two-Piece Sweatsuit Set
If you can’t already tell, sweatsuits are still very in this season, so we’re adding another option of the classic style to the list. The baggy hoodie and matching sweatpants have “casually cool” written all over them. There’s a big pocket in the sweatshirt to hold your phone, keys, and lip gloss, as well as two pants pockets.
Aloodor Two-Piece Lounge Set
This stylish lounge set takes the timeless design of a sporty tracksuit and, well, elevates it. The sweatshirt features a white lining on the crew neckline with stripes on the sleeves, and the jogger pants have matching stripes down the side of each leg. Just add your favorite pair of sneakers, and you’re good to go. Hurry and snag the set while it has an additional 40 percent off coupon available. More than 1,000 shoppers have already claimed theirs in the past month.
Xieerduo Two-Piece Sweatsuit Set
My favorite thing about a matching set is that it automatically makes you look and feel put together, even though it requires very minimal planning. This two-piece lounge set will definitely step up your vibe, thanks to its preppy aesthetic that lands somewhere between coastal grandmother and tennis star. The long-sleeved sweatshirt includes elegant details like a half-zip closure which meets a wide collar, and the matching wide-leg pants are the cherry on top.
Wiholl Two-Piece Lounge Set
Whether you’re heading to a cozy cottage in the woods or the beach, this lounge set is a great addition to your wardrobe. The set is made with a blend of polyester and spandex that reviewers say is soft and stretchy enough for you to comfortably move around in it. You can easily mix and match the henley top with jeans or leggings, and the set’s pants with a t-shirt or sweater. The set comes in 22 colors, including fall shades like beige, camel, and caramel.
Anrabess Two-Piece Matching Set
It’s no secret why this popular lounge set has climbed to the top of the best-sellers list. It’s cute, comfy, and can instantly be dressed up or down. The slouchy knit top screams fall fashion, and you can easily throw a cardigan over its sleeveless design. The pants are made with a different fabric and texture, which really adds a unique flare to the overall look. Wear it casually with slides or sneakers, or dress it up with a pair of loafers.
Love a great deal? Sign up for our T+L Recommends newsletter and we’ll send you our favorite travel products each week.
Shop More T+L-Approved Picks
:max_bytes(150000):strip_icc():format(webp)/tal-hiking-tout-05ff9329c45347e1aa4775317effb632.jpg "travel set ups")
Related Articles
- Canon Community
- Desktop Inkjet Printers
- Printer Software & Networking
- Office Printers
- Professional Photo Printers
- Mobile & Compact Printers
- Production Printing
- EOS DSLR & Mirrorless Cameras
- Point & Shoot Digital Cameras
- EF & RF Lenses
- Camera Software
- Speedlite Flashes
- Camera Accessories
- EOS Webcam Utility Pro - Discussions
- Professional Video
- Video Accessories
- General Discussion
- Community Events
- Featured Photo Galleries
- Share Your Photos
- Learn With Canon
- Welcome To The Community
- Getting Started & Guidelines
- Discussions & Help
- EF & RF Lenses
- Re: Best lens for travel baseball photography? Ple...
- Subscribe to RSS Feed
- Mark Topic as New
- Mark Topic as Read
- Float this Topic for Current User
- Printer Friendly Page
Best lens for travel baseball photography? Please help I am lost on settings and lens. A year later.

- Mark as New
- Report Inappropriate Content
- All forum topics
- Previous Topic

09-06-2024 08:52 PM

09-06-2024 09:35 PM - edited 09-07-2024 10:13 PM

09-07-2024 03:40 PM

09-07-2024 04:17 PM - edited 09-07-2024 04:18 PM

09-07-2024 06:42 PM
09-07-2024 07:10 PM
09-07-2024 07:08 PM
09-08-2024 11:41 AM
09-08-2024 11:55 AM
- « Previous
- Next »
07/01/2024: New firmware updates are available.
CR-N700 - Version 1.4.0
CR-N500 - Version 1.5.0
CR-N300 - Version 1.5.0
CR-N100 - Version 1.1.0
CR-X300 - Version 1.3.0
RC-IP1000 - Version 1.1.0
06/06/2024: New firmware updates are available.
EOS R6 Mark II - Version 1.4.0
EOS R7 - Version 1.5.0
EOS R8 - Version 1.3.0
EOS R10 - Version 1.5.0
EOS R50 - Version 1.2.0
Speedlite EL-5 - Version 1.1.0
Speedlite Transmitter ST-E10 - Version 1.1.0
04/16/2024: New firmware updates are available.
RF100-300mm F2.8 L IS USM - Version 1.0.6
RF400mm F2.8 L IS USM - Version 1.0.6
RF600mm F4 L IS USM - Version 1.0.6
RF800mm F5.6 L IS USM - Version 1.0.4
RF1200mm F8 L IS USM - Version 1.0.4
03/26/2024: New firmware updates are available.
EOS R3 - Version 1.7.1
EOS R5 - Version 2.0.0
EOS R6 - Version 1.8.4
EOS 1DX Mark III - Version 1.9.0
WFT-R10 - Version 1.3.1
- Best lens for travel baseball photography? Please help I am lost on settings and lens. A year later. in EF & RF Lenses 09-06-2024
- EOS R7: Shapes forming in equalize mode -- HELP PLEASE!! in EOS DSLR & Mirrorless Cameras 09-04-2024
- EOS R5 How to lock AF point in the center in EOS DSLR & Mirrorless Cameras 08-23-2024
- Which to purchase? EOS R3 vs R6 Mark II vs 1D Mark III in EOS DSLR & Mirrorless Cameras 08-18-2024
- EOS Rebel T7 Nighttime Fair Lights Aesthetic in EOS DSLR & Mirrorless Cameras 08-15-2024

- Terms of Use
- Privacy Statement
Canon U.S.A Inc. All Rights Reserved. Reproduction in whole or part without permission is prohibited.
IMAGES
VIDEO
COMMENTS
Below are our top 25 picks, ranging from stand-up desks to custom build-outs to folding tables and couches. There's no one way to set up a desk in an RV, and these pioneers prove it! Dapper Drive. The Rig: 2007 28-foot travel trailer. Outside Found. The Rig: 2001 GMC Bluebird bus. Phyllis Swenson. Most intense set-up I have seen! The Rig ...
Many new digital nomads set off on long term working travel with a carefully curated packing list and a thoughtfully selected bag, but not much thought on how to set up a productive workspace on the road.. I wrote this article after my third long term digital nomad trip to share thoughts on my own portable office essentials and some questions to help you think through how to set up a portable ...
Level RV: Use leveling blocks or your RV's built-in leveling system to ensure a stable and even living area. Connect to Shore Power: Plug in your electrical cord to the site's power supply to run your RV's electrical systems. Connect Water Lines: Hook up your water lines to access fresh water. Connect Sewer Hose: Attach your sewer hose to ...
Connect a surge protector and your electrical cord to shore power. Use the appropriate surge protector, electrical cord, and/or adapter for your RV's electrical system. Check that the breaker on the power pedestal is turned on for your 30 or 50-amp outlet. Attach a potable drinking water hose, water pressure regulator, and water filter.
Drive Your Trailer RV Tires Onto the Blocks. With the help of someone else, carefully drive the RV up onto the blocks. Make sure the person guiding you has experience with the correct hand motions. Try not to overcorrect and go easy on the gas. If you don't get it right the first time, readjust, and try again.
RV Newbie: Setup Checklist
Since your laptop sits up higher on a stand, you need to add a Bluetooth keyboard and mouse (or trackpad) to your toolkit. For Mac users, the best digital nomad keyboard and mouse combo is the Magic Keyboard and Magic Mouse 2 (or Magic Trackpad 2). Apple Magic Mouse 2 (Wireless, Rechargable) - Silver. Buy on Amazon.
I also have 14 RV Pro Tips for Backing Up a Travel Trailer. Jennifer using a 2 way radio to direct Mike as he backs into a camping space 3. Set the Emergency Break. Always set the emergency brake as soon as you park! If your RV or travel trailer doesn't have an emergency brake, use wheel chocks on both sides of the wheels. 4. Secure Your Pet
To do this, check the placement of the hookups. Your RV setup will depend on the placement of the hookups - water, sewer, and electric. 4. Emergency brakes: ON. Before you step out of the Motorhome or your truck, remember to turn on the emergency brakes. Don't forget this step.
Office set-ups - Photo via iRV2 Forums Bunkroom conversion. ... Otherwise, you may want to consider using a laptop that can be put away on travel days. Secure your chair; Honestly, rolling chairs aren't the best ideas in an RV. However, if you insist on having one, make sure to secure it with a bungee cord before driving anywhere.
6) RV setup - Hook up Electricity. Our RV runs on 30 amp shore power. Plug the electrical cord into the 30 amp receptacle. If there is only a 50 amp plug and you have an adapter, you can use it. Check the breakers above the plug. Flip the breaker on for the plug you are using. Our RV has a surge protector built-in.
Fast Set Up: Spacious 5-sided gazebo with quick pop-up design with bugproof mesh windows; $239.99 −$63.20 $176.79. ... Amazon Basics - Ladder Toss Indoor/Outdoor Game Set with Travel Carrying Case, Full Size, Blue, Red . Easy-to-learn game offers interactive family fun; Includes 2 upright ladder-shaped targets, 3 blue bolas, and 3 red bolas;
After initial research, it might be a good idea to confirm your choice with a call to the campground. Be prepared with your rig's length! Printable RV Setup Checklist. Get our FREE downloadable and printable RV Setup Checklist by signing joining our email list. We use this RV setup checklist for every trip we take!
Refrigerators. With so many things to remember upon arrival or departure from your campsite, it can be easy to miss crucial steps during setup or tear down. That's why we created this printable RV setup checklist.
Step 2: Electric Hookup. The first thing I recommend connecting is your electric hookup. The main reason is so you can start running your air conditioning, heater, fridge, etc. on the power source from your RV campsite instead of from your RV's power supply.
The next step in your RV set up is to connect your rig to the campsite power. What you need to set up your RV power connection. Electrical Management System (EMS). An EMS protects your RV and appliances if you encounter poor power from the campground. Your EMS needs to match your RV power, 30 amp or 50 amp. Lock.
Follow these five steps to unhitch and finish leveling your travel trailer. Extend the tongue jack until pressure begins to be taken off the hitch ball. (Use a tongue jack stand or support block to protect the pad of your jack and reduce the amount of extension required.) Unplug the 7-pin electrical connector.
Nothing is worse than a bad set-up as it makes permanent travel trailer life a lot more awkward than it should be. Step 1. The decision. This is the most important part of the process as you have to decide where you want the travel trailer to remain permanently. If you are not happy with the area, you won't stay that long so make sure you get ...
How To Start a Profitable Travel Agency in 8 Steps
There are a few ways to accomplish setting up an RV sewer hookup at home. They are hooking up to the existing public sewer system, hooking up to your private septic system, or installing a sewer tank. Hooking up to your existing public sewer system is the easiest way to drain your black and gray water tanks, but it also may be illegal where you ...
Dig a trench from the beginning of the line to the post, at least 18" deep. Run this in a separate trench from the water line! Use conduit to protect the line where it is exposed above ground. You can use this conduit under the ground as well, or ensure you get underground cable.
Photo: Coachmenrv.com. Weight: 1,200-2,800. Features: Depends on the model. Here is a sampling: high-density cushions, kitchen with 2-burner range, 12-volt on-demand water pump, built-in shower, porta potty, fridge, furnace, water heater. Coachman makes four different styles of Clipper pop up campers: the Express, the LS, the Sport/Classic and ...
Option 2: The simplest AeroPress travel set-up. The AeroPress is ideal for travel because it's easy to use without a kettle or scale. For easier packing, bring a hand grinder that fits inside the AeroPress plunger. Store some filters inside the filter cap, or switch to a reusable metal filter. Skip the funnel, but bring the scoop to help you ...
In Amazon's Fashion hub, the best-selling matching lounge sets are all under $50. Score comfortable, cozy, and versatile sets you can wear for travel. Several of the pieces are on sale for up to ...
Something in the 1/500 up and 1/1000 up is even better.But using Av mode will let the R7 do its best at SS. You can use auto ISO and set a low and a upper limit of your choice probably like 200 to 6400 is good. Set the WB to daylight but the reset should have done that so leave it there.