
How to Zoom In and Out in Safari on Your Mac
On your Mac, you may want to zoom in or out to make things on your screen easier to see while browsing the web in Safari. If you zoom in, this will enlarge the text, images, videos, and other objects on a website. You can also zoom out to see more content. By default, Safari sets the zoom level to 100%, but you can change this. This article will help you adjust the size of website content to make a webpage easier to read. More specifically, this article will teach you these:
- How you can zoom in to magnify any web content that you have on your Mac.
- How you can zoom out if you think the website text and images are too small.
- How you can set a default zoom level for all websites.
- How you can customize zoom settings for individual websites.
This article is especially important as users with low vision may prefer to have Safari (and other browsers) zoom into page content.
To quickly zoom in and out
You can zoom the active website you are currently viewing. If you want to quickly zoom in, out, and reset the zooming setting, you can use these keyboard shortcuts. This will temporarily set the zoom level:
- Zoom in: Command and +
- Zoom out: Command and –
- Actual size: Command and 0 (this will restore the zoom to 100%).
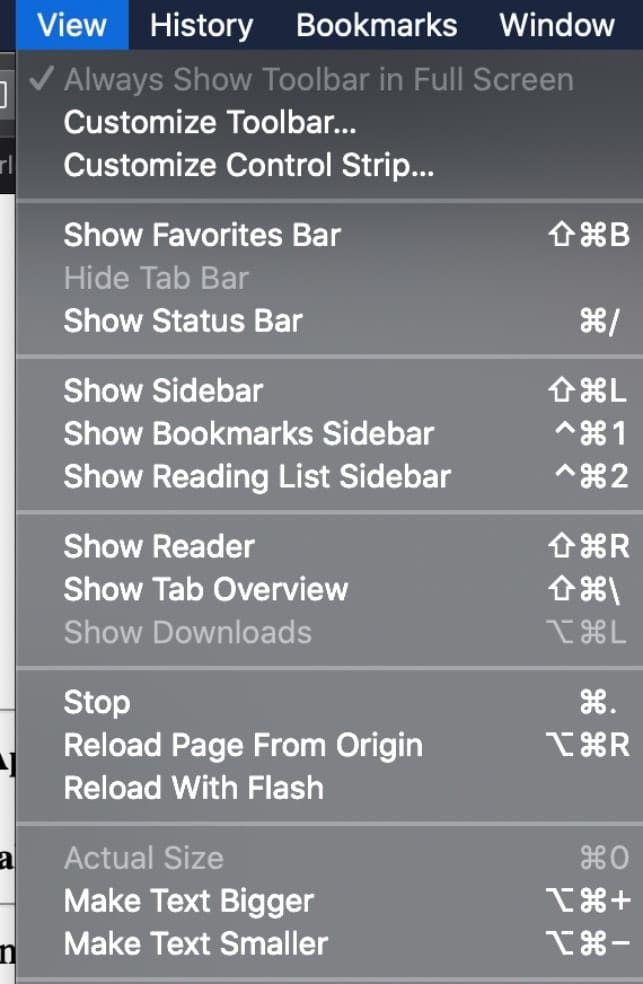
Alternatively, in the Safari app, you can click the View menu and select a different zoom level: Actual Size, Zoom In, or Zoom Out.

Increasing or decreasing the Text Size
You can zoom website text. This will only change the text size. The website’s other elements (e.g., images, etc) will not be changed. Here is how:
- While you are viewing the website, press and hold down the Option key and from the View menu, select Make Text Bigger or Make Text Smaller.

Or, alternatively, you can use these shortcuts:
- Make text bigger: Option, Command and +
- Make text smaller: Option, Command and –
- Reset to the default text size: Command and 0
Permanently set the zoom level for all pages opened with Safari
As stated above, Safari’s default zoom setting is 100%. Here is how you can change this setting:
- Open Safari and in Safari, go to Safari > Preferences > Websites > Page Zoom (sidebar).
- Select all websites (you can press the Command key and click the websites).
- Then click the “When visiting other websites” menu and choose a larger or smaller percentage.

Set the zoom level for a specific website
If a particular website content looks too small or too big for you, then you may want to customize its zoom setting. Here is how:
- If you are currently viewing the website, then you can click the Safari menu and Settings for This Website. Choose the Page Zoom option and change the level. You can increase or decrease. The 100% option will return the website to the default magnification level.

- If you are not currently viewing the site, then you can choose Safari > Preferences > Websites. Select Page Zoom (sidebar) and then change the zoom level.

Set a minimum font size
This is another zoom setting. You may want to use it. So, if you are thinking that the font sizes on the web appear too small (for example, you may have vision impairment), you can set a minimum text size. In Safari, click Safari > Preferences > Advanced. Check the “Never use font sizes smaller than” box and choose a font size.

- How To Turn Off Zoom (Magnifier) On Your iPhone
- How to Change the Text Size in macOS
- How To Change macOS Cursor Size
Dr. Serhat Kurt worked as a Senior Technology Director specializing in Apple solutions for small and medium-sized educational institutions. He holds a doctoral degree (or doctorate) from the University of Illinois at Urbana / Champaign and a master’s degree from Purdue University. He is a former faculty member. Here is his LinkedIn profile and Google Scholar profile . Email Serhat Kurt .
Similar Posts

How to Turn Down or Change WhatsApp Message Sound on iPhone
I recently found that my WhatsApp message notifications were too loud on my iPhone. The sound was getting pretty irritating, especially when someone would send me multiple messages in a row. When I…
How to Block YouTube Access on iPhone and iPad
You may not want your kids to spend time watching videos on YouTube while using the iPhone or iPad. Kids usually love to watch YouTube, but you may want to block their YouTube…
How To See The Full Web Site Address In Safari URL Bar
By default, macOS Safari only shows the domain name of the web site you are viewing. It does not show the full, complete url. For instance, when you visit https://macreports.com/disable-auto-play-videos-safari-macos/, Safari’s address bar will…
How to Turn Off the Email Ding on Mac
Tired of hearing a ding with every new email that comes in? Instead of just turning down the sound on your Mac, you can change the setting in the Mail app to turn…
How to Record your Screen or Take a Screen Shot on Apple TV
In this article, I explain how you can use your Mac to take screenshots or record video from your Apple TV. This will let you create a screen recording of your Apple TV…
How to Fix When your iPhone Won’t Charge or Charges Slowly
Yesterday, I plugged in my phone to charge but nothing happened. Fortunately, I was able to resolve my issue. Are you having issues with charging? Sometimes you, too, may experience issues when you…
Leave a Reply Cancel reply
Your email address will not be published. Required fields are marked *
Categories:
How to always zoom in Safari on iPhone, iPad and Mac
Do you have trouble reading small text while browsing the web? Learn how to set up automatic web page zoom for all or specific websites in Safari on your iPhone, iPad, and Mac.

Sometimes, you may have trouble reading text on specific websites because those sites use tiny font sizes. And if you have a weak eyesight, you may have this trouble on all websites. To address this, you can adjust the font size in Safari. But this isn’t always enough. Maybe the webpage you’re visiting has images that you want to view bigger. Or perhaps the site size overall is just too small.
There’s a wonderful accessibility feature for Safari on both Mac and iOS that lets you zoom to a particular percentage on all sites you visit or only those where you need it. We’ll show you how to enable zoom in Safari in this tutorial.
On iPhone and iPad
For a specific website.
- Open Safari and visit the website whose text size you want to increase.
- Tap the AA button from the address bar.
- Tap the bigger A to increase the text size. 100% is the default .

For all websites
- Open Settings and tap Safari .
- Scroll down and tap Page Zoom.
- Here, you’ll see the specific websites whose text size you have changed following the earlier set of steps. To change one, tap it and choose a new zoom percentage. You can also edit the list of sites on this screen. Tap Edit at the top and then Delete or Clear All Settings .
- After specific sites, there is a heading for Other Websites . Here, you can choose a default percentage for all other pages you visit in Safari that isn’t already on your list. Pick a percentage from 50% to 300%.

- Visit the site in Safari.
- Press the Command + Plus (+) keys to increase the page size.
- Or, click Safari next to the top Apple icon and choose Settings for the website name . Now, use the Page Zoom option to set it to an appropriate percentage.

- Open Safari and click Safari > Settings from the top menu bar.
- Go to the Websites tab.
- Select Page Zoom from the left sidebar.
- Here, you will see your configured websites and currently open websites where you’re using page zoom. You can change their zoom level or remove them.
- To set zoom for all other websites you visit that are not already on your list, click the drop-down menu next to “ When visiting other websites ” and pick a level from as low as 50 percent or as high as 300 percent.

Using zoom in Safari is a super simple way to see websites and pages larger and more clearly. And because the setting is so easy to access on all your devices, you can change it back at any time. Just follow the above steps and set the zoom level to 100%, which is the default.
Is the zoom feature in Safari something you’ve tried and would recommend, or are you going to give it a shot for the first time?
Check out next:
- How to increase text size on iPhone and iPad
- How to increase the font size on Mac
How to Zoom in Safari: A Comprehensive Guide
Zooming in on webpages can greatly enhance your browsing experience, especially when dealing with small text or images. Safari, the popular web browser developed by Apple, offers a convenient Zoom feature that allows users to magnify content effortlessly. In this article, we will delve into the ins and outs of zooming in Safari, providing you with easy-to-follow instructions and expert tips to make the most out of this functionality.
Accessing the Zoom Feature in Safari
To begin zooming in Safari, you first need to access the Zoom feature. Fortunately, Safari makes it a breeze to find and activate this option. Follow these simple steps:
- Launch Safari on your device.
- Navigate to the top menu and click on the “Safari” tab.
- From the dropdown menu, select “Preferences.”
- In the preferences window, click on the “Advanced” tab.
- Check the box next to “Accessibility.”
- Now, Safari's Zoom feature is enabled, and you can proceed to adjust the settings according to your preference.
Zooming In on Safari Webpages
Once you have enabled the Zoom feature, it's time to look at the process of zooming in on Safari webpages. Here's how you can do it:
- Press “Command” and “+” simultaneously to zoom in.
- Press “Command” and “-” together to zoom out.
- Press “Command” and “0” (zero) to reset the zoom level to the default.
- Look at the top-right corner of the Safari window to find the toolbar.
- Click on the “Zoom In” icon (magnifying glass with a plus sign) to zoom in.
- Click on the “Zoom Out” icon (magnifying glass with a minus sign) to zoom out.
- You can also click on the “Zoom Text Only” icon to zoom in on text exclusively.
- Simply place two fingers on the trackpad.
- Spread them apart to zoom in.
- Pinch them together to zoom out.
By following these methods, you can easily adjust the zoom level to your liking, making web content more accessible and readable.
Adjusting Zoom Settings in Safari
Safari provides several options to customize the Zoom feature according to your specific needs. Let's explore how you can adjust Zoom settings:
- Return to the “Preferences” window by following the steps mentioned earlier.
- Under the “Accessibility” tab, locate the “Zoom” section.
- Use the slider to set your desired default zoom level.
- Safari will remember this setting for future browsing sessions.
- Smart Zoom is a convenient feature that allows you to double-tap on a webpage to automatically zoom in and out.
- To enable Smart Zoom, go to the “Preferences” window and click on the “Trackpad” tab.
- Check the box next to “Smart zoom” to activate this functionality.
- Safari offers different styles for the Zoom feature, allowing you to choose the one that suits your preferences.
- In the “Accessibility” tab of the “Preferences” window, click on the “Display” dropdown menu.
- Select your preferred style from the available options.
By customizing these settings, you can optimize the Zoom feature to enhance your browsing experience.
Troubleshooting Zoom Issues in Safari
While Safari's Zoom feature is generally reliable, you may encounter some issues along the way. Here are a few common problems and their corresponding solutions:
- Sometimes, zooming in Safari can cause webpages to appear distorted or misaligned.
- To rectify this issue, hold down the “Option” key while zooming to maintain the webpage's original layout.
- If zoomed-in content appears blurry or pixelated, try using the “Zoom Text Only” option from the toolbar.
- This will optimize the readability of text while keeping other elements at their default size.
- In some cases, Safari may not remember your preferred zoom level after closing the browser.
- To resolve this issue, ensure that “Never use font sizes smaller than” is unchecked in the “Preferences” window under the “Advanced” tab.
By applying these troubleshooting tips, you can overcome common issues and enjoy a seamless zooming experience in Safar
In conclusion, knowing how to zoom in Safari is a valuable skill that can greatly enhance your browsing experience. With Safari's easy-to-access Zoom feature and customizable settings, you can effortlessly magnify web content to suit your needs. Whether you're reading small text or examining intricate details in images, Safari's Zoom feature ensures you never miss a thing.
So, why strain your eyes when you can zoom in Safari with just a few clicks? Take advantage of this powerful functionality and enjoy a more comfortable browsing experience today!

Jim's passion for Apple products ignited in 2007 when Steve Jobs introduced the first iPhone. This was a canon event in his life. Noticing a lack of iPad-focused content that is easy to understand even for “tech-noob”, he decided to create Tabletmonkeys in 2011.
Jim continues to share his expertise and passion for tablets, helping his audience as much as he can with his motto “One Swipe at a Time!”
Download Free
How to Zoom In on Safari
It's free and super easy to set up
Safari is a popular web browser that is widely used across various devices. However, sometimes it can be difficult to read text or view a webpage without zooming in. Fortunately, Safari provides multiple ways to zoom in on a page. In this article, we'll explore the different options available for zooming in on Safari and guide you through how to use them.
Understanding Zoom Options in Safari
Before diving into ways to zoom in on Safari, it's essential to understand the various zoom options available. Safari offers two types of zoom options: Page Zoom and Text Zoom.
Page Zoom vs. Text Zoom
Page Zoom enlarges the entire webpage, including text, images, and other elements. This option is beneficial for users who want to view the webpage in its entirety without having to scroll excessively. However, it can also make the page appear cluttered and difficult to read.
Text Zoom, on the other hand, only enlarges the text, not other elements on a page. This option is useful for users who want to focus on the text and make it easier to read without affecting the layout of the page. However, it can also make images and other elements appear small in comparison.
Both options have their benefits and drawbacks, depending on the user's preference and the specific webpage. Some users may prefer to use Page Zoom for websites with lots of images, while others may prefer Text Zoom for websites with a lot of text.
Setting Default Zoom Levels
If you prefer to always view webpages at a specific zoom level, you can set a default zoom level in Safari Preferences. To do this, open Safari Preferences, go to the "Advanced" tab, and choose "Page Zoom" or "Text Zoom" from the dropdown menu. Set the zoom level you prefer, and every subsequent page you visit in Safari will automatically zoom to that level.
It's important to note that setting a default zoom level may not work for every webpage, as some websites have their own zoom settings that override the browser's default settings. Additionally, changing the zoom level on a webpage may affect the webpage's layout, making it appear distorted or difficult to navigate.
Overall, understanding the different zoom options available in Safari can help improve your browsing experience and make it easier to read and navigate webpages. Whether you prefer Page Zoom or Text Zoom, or like to change the zoom level on a per-page basis, Safari offers a variety of options to suit your needs.
Zooming In Using Keyboard Shortcuts
Safari offers several keyboard shortcuts that allow you to zoom in and out of a page. Zooming in on a page can be particularly useful when reading small text or viewing images in detail. Here are the most commonly used keyboard commands:
Zooming In and Out with Keyboard Commands
To zoom in on a page, press the "Command" and "+" keys simultaneously. This will increase the size of the text and images on the page, allowing you to view them more clearly. If you want to zoom out, press "Command" and "-" keys simultaneously. This will decrease the size of the text and images on the page, allowing you to see more of the page at once.
Using keyboard shortcuts to zoom in and out can be a great time saver, as it allows you to quickly adjust the size of the content on the page without having to navigate through menus or use your mouse.
Resetting Zoom to Default with Keyboard Shortcuts
If you accidentally zoom too far in or out while browsing a webpage, you can easily reset the zoom level to default with the "Command" and "0" keys. This will return the page to its original size and make it easier to navigate and read.
Overall, keyboard shortcuts are a great way to improve your browsing experience and make it more efficient. By using these shortcuts, you can quickly and easily adjust the size of the content on the page and navigate through websites with ease.
Zooming In Using Safari Menu Options
Another way to zoom in on a page is through the Safari menu options. While using the zoom feature can be helpful for those with visual impairments or for those who want to get a closer look at a particular part of a web page, it can also be useful for those who want to read small text or view images more clearly.
Accessing Zoom Options in the View Menu
To access the Zoom options in the View menu, go to "View" in the Safari menu bar and select "Zoom In" or "Zoom Out." This will allow you to increase or decrease the size of the text and images on the page. Alternatively, you can use the keyboard shortcuts "Command" and "+" or "-" keys simultaneously. This is a quick and easy way to adjust the zoom level without having to navigate through the menu options.
Customizing Zoom Levels in Safari Preferences
You can also customize the default zoom levels by going to 'Preferences' in the Safari menu. From there, choose 'Page Zoom' or 'Text Zoom' from the dropdown menu, and set the percentage that you prefer. This is a great option for those who frequently use the zoom feature and want to have a more personalized experience while browsing the web.
Additionally, it's worth noting that some websites may have their own zoom features that override the default settings in Safari. For example, some websites may have a "Zoom" button that allows you to quickly adjust the zoom level without having to navigate through the Safari menu options.
In conclusion, the zoom feature in Safari can be a useful tool for a variety of purposes, from making small text easier to read to getting a closer look at images on a webpage. Whether you prefer to use the menu options or customize the default settings, Safari makes it easy to adjust the zoom level to fit your needs.
Zooming In Using Safari's Touch Gestures
If you are using a touchpad or magic mouse, Safari also supports various touch gestures to zoom in on a page.
Pinch-to-Zoom on Trackpad and Magic Mouse
To zoom in with a trackpad or magic mouse, you can use the pinch-to-zoom gesture by placing two fingers on the trackpad or holding down the control key and scrolling up or down with the mouse wheel.
Double-Tap Zoom on Trackpad and Magic Mouse
You can double-tap with two fingers on the trackpad or double-click using a magic mouse to zoom in on the area you're focusing on.
Using Safari Extensions for Enhanced Zoom Control
If you are looking for additional control over your zoom experience, you can explore a variety of Safari extensions that can cater to your specific needs.
Popular Safari Zoom Extensions
Some of the popular Safari Zoom extensions include ZoomPage, Zoom Hub, and PerfectZoom. These extensions provide advanced options for zooming in and out of webpages in Safari.
Installing and Managing Safari Extensions
You can install extensions using the Safari Extension Gallery or third-party websites. To manage and remove extensions, open the "Safari" menu and select "Preferences." Choose the Extensions tab, and you can disable, remove, or customize the extension's settings.
Zooming in on a Safari browser couldn't be easier with the many options provided by the browser. Use the tips and tricks shared in this article to enhance your browsing experience and enjoy zooming in on webpages without hassle.
Let's set you up !
Working on the web!
Student Tips
Startup Tools
Browser Glossary
Browser Tips
Newsletters
- Our sponsors
- Watch Store
- Hot topics:
- Apple deals
- Apple rumors
- Editor’s picks
Enable automatic Page Zoom for easier reading in Safari [Pro tip]
By Killian Bell • 1:00 pm, January 13, 2021

iOS, iPadOS, and macOS allow you to increase font sizes system-wide so that everything you do is easier to see. You can do a similar thing to make your favorite websites easier to read inside Safari.
We’ll show you how to use Page Zoom in this Safari pro tip.
If your vision isn’t too spectacular, increasing font sizes on your Apple devices can make a huge difference to usability. And when you choose a larger font in your settings, that change extends to many of your apps.
However, a larger system font won’t automatically make webpages easier to read in Safari. There’s another setting for that, and we’ll show you how to take advantage of it.
Enable automatic Page Zoom in Safari
Simply follow these steps on iPhone and iPad:
- Open the Settings app.
- Tap Safari .
- Tap Page Zoom .
- Select the Page Zoom preference you would like to use. This will become the default and will apply to all websites.
And follow these steps on Mac:
- Open Safari .
- Click Safari in the menu bar, then click Preferences…
- Under the Websites tab, click Page Zoom .
- You’ll see a list of the sites you currently have open, and you can specify a zoom preference for each if you wish. To set a zoom setting for all sites, look for the drop-down box alongside When visiting other websites .
There are a long list of Page Zoom options, from 50% to 300%, with 100% selected by default. We recommend selecting 115% initially, then visiting a site you find difficult to read, and increasing the zoom again if necessary.
Page Zoom can have inadvertent affects on some websites, and the higher your zoom setting, the more likely you are to run into issues. That’s why it’s best to increase zoom incrementally to find what works best for you.
Change Page Zoom on the fly
You might find a Page Zoom setting that works for you but still run into some websites that are too difficult to read. When this happens, you can change Page Zoom for this particular site on the fly.
On iPhone and iPad, simply tap the Aa button in Safari’s address bar, then use the buttons at the top of the menu to adjust zoom. On macOS, tap View in the menu bar when Safari is open, then click Zoom In .
Daily round-ups or a weekly refresher, straight from Cult of Mac to your inbox.

Cult of Mac Today
Our daily roundup of Apple news, reviews and how-tos. Plus the best Apple tweets, fun polls and inspiring Steve Jobs bons mots. Our readers say: "Love what you do" -- Christi Cardenas. "Absolutely love the content!" -- Harshita Arora. "Genuinely one of the highlights of my inbox" -- Lee Barnett.

The Weekender
The week's best Apple news, reviews and how-tos from Cult of Mac, every Saturday morning. Our readers say: "Thank you guys for always posting cool stuff" -- Vaughn Nevins. "Very informative" -- Kenly Xavier.
Popular This Week
What we did not get at apple’s september event, today in apple history: first airpods revealed to the world, this tiny 3-way charger is the star of anker’s new maggo lineup, jony ive designs a jacket that uses magical magnets for buttons, apple ‘it’s glowtime’ event rumors: iphone 16 and more, this is when you can get ios 18, ipados 18 and watchos 11, plug this carplay streaming box into your car’s infotainment system [deals], apple watch series 10 gets major upgrade, catches up with ultra, expect to see iphone 16 and 16 plus in these 4 colors, iphone 16 brings refined design, snazzy new colors and a18 chip.
- Press Releases
- Industry News
- Product Spotlight
- Fresh from Apple
- Video Production
- Installation Videos
- Explainer Videos
- Testing Lab
- Networking & Security
- Special OWC Deals
- The Other World
- Powered by OWC
- Space & Beyond
- Random Thoughts & Topics
- OWC Unplugged
- Article Archives
- Make a Suggestion
Send us a Topic or Tip
Have a suggestion for the blog? Perhaps a topic you'd like us to write about? If so, we'd love to hear from you! Fancy yourself a writer and have a tech tip, handy computer trick, or "how to" to share? Let us know what you'd like to contribute!
How to Increase or Decrease the Zoom Level in macOS Safari

Sometimes when I’m viewing an article (usually involving patent images) in Safari, it’s hard to view an entire image. However, you can increase or decrease the zoom level of images (and text) when viewing web pages in the macOS web browser.
When viewing a picture or text, press Command and the + (plus) or – (minus) keys. Alternately, you can click on View in Safari’s menu bar and select Zoom In or Zoom Out.
You can even add zoom buttons to Safari’s toolbar. To do so, right-click (or Control-click) on a space in the Safari toolbar and click Customize Toolbar. Click and drag the Zoom buttons in the dropdown to the are you clicked on the toolbar. Click Done to finish.
Also cool: if you wish to keep images at the same size and only adjust web page font size on the fly, press Option-Command and the + or – keys. You can also hold down the Option key and click on View in the Safari menu bar. This changes the Zoom options to “Make Text Bigger” and “Make Text Smaller.”
The web browser will “remember” your zoom wishes and preferred font size settings until you clear your History. If you want to do that, open Safari, select Clear History, and click the Clear History button.
But, wait!, we’re not done. You can also set the zoom level for a website of your choosing. Once you’ve set up the zoom level for a specific webpage, Safari applies it automatically whenever you view it. Here’s how to set this up:
Go to the site.
Under the Safari menu, click Settings for This Website. You’ll be presented with a variety of options from which to choose, including setting the page zoom percentage.
Other Topics You Might Like:

Leave a Reply Cancel reply
Save my name, email, and website in this browser for the next time I comment.
Notify me of follow-up comments by email.
Notify me of new posts by email.
You Might Also Like

Getting the Most Performance out of Spinning Hard Drives, Part 5: Validating Hard Drive Performance, Especially for RAID

How to Use the Awesome New Features in macOS Sonoma’s Reminders App

Future-proof Your Setup With the OWC Express 1M2: All the SSD You Need—and Then Some

Getting the Most Performance out of Spinning Hard Drives, Part 4: the Many Ways to Configure 4/8 Hard Drive Enclosures
Email Address
- Brand Assets
8 Galaxy Way Woodstock, IL 60098 1-800-275-4576 +1-815-338-8685 (Int)
All Rights Reserved, Copyright 2020, OWC – Since 1988 | Terms of Use | Privacy Policy
We use cookies to provide you with a full shopping experience, including personalized content, and to help us improve your experience. To learn more, click here .
By continuing to use our site, you accept our use of Cookies, Privacy Policy and Terms of Use .
How-To Geek
How to zoom in or out on a mac.

Your changes have been saved
Email is sent
Email has already been sent
Please verify your email address.
You’ve reached your account maximum for followed topics.
Quick Links
How to zoom in on a mac, how to zoom out on a mac, how to enable accessibility zoom on a mac, how to zoom with hover text, key takeaways.
In many apps, pressing Command and + (plus sign) at the same time will let you zoom in, and Command with - (minus) will let you zoom out on a Mac. You can also zoom system-wide or zoom in on specific text by enabling those features in Accessibility settings.
When you have trouble seeing something on your computer screen, do you lean in closer or put on your reading glasses? You can make it easier to see anything on your Mac screen using the Zoom feature.
We'll show you various ways to zoom in and out on a MacBook or desktop Mac . You can use a keyboard shortcut, gesture, or both. You can even enlarge text when you hover your cursor over it and customize its view.
Related: How to Set a Default Zoom Level in Safari for Mac
To zoom in on a window or specific app such as Safari, hold Command and press the Plus (+) key. Different apps may use other shortcuts, toolbar buttons, or menu actions, so refer to your specific apps' documentation.
Additionally, once you enable zoom options in the Accessibility settings, you can use a shortcut, your trackpad, or a scroll gesture to zoom in on any window or part of the screen:
- Keyboard Shortcut : Press Option+Command+= (equal sign) to zoom in. You can also use Option+Command+8 to switch between no zoom and your last zoom level.
- Trackpad : Double-tap your trackpad with three fingers to zoom in. You can also double-tap and drag on your trackpad to change the zoom level.
- Scroll Gesture : Press the modifier key you chose and then use your mouse or trackpad to scroll up.
To zoom out of a window or a specific app like Safari, you can hold Command and press the Minus (-) key. Again, other apps may use different shortcuts, toolbar buttons, or menu actions to zoom out.
With accessibility zoom option(s) enabled , you have more options for zooming out on your Mac, no matter which app you're using. Depending on which options you've enabled, you can use one or more of the following:
- Keyboard Shortcut : Press Option+Command+- (minus sign).
- Trackpad : Double-tap your trackpad with three fingers to zoom out after you zoom in.
- Scroll Gesture : Press the modifier key you chose and then use your mouse or trackpad to scroll down.
To start zooming anywhere on your Mac, you'll need to enable the Zoom feature in the Accessibility settings . From there, you'll choose the methods you want to use.
Open System Preferences with the Dock icon or from the Apple icon in the menu bar. Then, select "Accessibility" on the left and "Zoom" on the right.
You'll see each of the following options you can use to zoom in on your Mac.
Keyboard Shortcuts and Trackpad Gestures
Enable the toggles for using keyboard shortcuts and/or trackpad gestures to zoom in and out. With these settings, you'll see the shortcuts and gestures to use directly below the settings.
Scroll Gestures
Next, you can turn on the toggle for using a scroll gesture with a modifier key. If you enable this option, choose the modifier key you want to use in the drop-down box. You can pick the Control, Option, or Command key .
Related: How the Command and Option Keys Work on a Mac
Then, pick the zoom style you want to use on your Mac. You can pick from Full Screen, Split Screen, or Picture-in-Picture. Depending on the option you select, you can adjust its options.
- Full Screen : Select "Choose Display" to pick the monitor you want to zoom if you use more than one display .
- Split Screen or Picture-in-Picture : Select "Size and Location" to choose the window placement and size.
Related: How to Use Multiple Monitors on Your Mac
Another zoom option you can enable on your Mac is Hover Text. As you can see from the description, you hold the Command key as you hover your cursor over text to zoom (more detail below ).
Optional: Touch Bar Zoom
If you have a Mac with a Touch Bar , you can enable this option as well. You then touch and hold your Touch Bar to see a larger version of it on your screen.
Related: Five Useful Things You Can Do With The MacBook Pro's Touch Bar
If you enable the Hover Text option in the Zoom settings on your Mac, you can make adjustments to how the zoom looks for complete flexibility.
In System Preferences > Accessibility > Zoom, press the Info icon (small letter "i") to the right of Hover Text.
You can then adjust the text size, style, and entry location along with the activation modifier and an option to triple-press the modifier for activation lock.
Next, you can change the colors for the text, insertion point, background, border, and element-highlight.
Select "Done" when you finish and then check out the Hover Text zoom.
Hold Command, or the modifier key you selected if you changed it, and use your cursor to hover over text. You'll see the text pop making it easy to read. Release the modifier key to remove the zoom.
Using one or more of these zoom methods can help you see just about anything on your Mac screen bigger and better. For more, look at how to magnify your iPhone screen using Display Zoom .
How To Zoom Out In Safari

- How-To Guides
- Software Tutorials

Introduction
Welcome to our guide on how to zoom out in Safari! Safari is a popular web browser with a sleek interface and advanced features. However, sometimes webpages may appear too large, making it difficult to view or navigate through the content. In such cases, zooming out can be a useful solution to adjust the size of the page and improve readability.
In this article, we will explore various methods to zoom out in Safari , catering to different preferences and situations. Whether you prefer using keyboard shortcuts, accessing the zoom option through the view menu, utilizing the pinch-to-zoom gesture on a trackpad or magic mouse, or customizing the zoom settings in the Safari preferences , we’ve got you covered.
By the end of this guide, you’ll have a clear understanding of how to zoom out in Safari and be able to easily adjust the zoom level to suit your needs. So, let’s dive into the methods and start zooming out in Safari !
Method 1: Using Keyboard Shortcuts
One of the quickest and most convenient ways to zoom out in Safari is by using keyboard shortcuts. These shortcuts allow you to adjust the zoom level without having to navigate through menus or settings. Here are the steps to zoom out using keyboard shortcuts:
- To zoom out in Safari, press and hold the “Command” key (⌘) on your keyboard.
- While holding the “Command” key, press the “-” (minus) key.
- Each time you press the “-” key, Safari will zoom out by a preset amount.
- Continue pressing the “-” key until the page is zoomed out to your desired level.
The keyboard shortcut “Command” + “-” is a handy way to quickly decrease the zoom level in Safari. It is especially useful when you want to shrink the page to view more content at once or if the webpage appears too large for your screen.
Keep in mind that using keyboard shortcuts to zoom out in Safari will decrease the overall size of the webpage, including text, images, and other elements. If you find that the page becomes too small to read comfortably, you can use the keyboard shortcut “Command” + “+” (plus) to zoom back in and increase the size.
Now that you know how to use keyboard shortcuts to zoom out in Safari, you can easily adjust the zoom level with a few simple key combinations. Let’s move on to the next method and explore another option for zooming out in Safari.
Method 2: Using the Zoom Option in the View Menu
If you prefer a more visual approach to zooming out in Safari, you can utilize the built-in zoom option available in the view menu. This method provides a user-friendly way to adjust the zoom level and is particularly useful if you’re not familiar with keyboard shortcuts. Here’s how you can zoom out using the view menu:
- Open Safari and navigate to the webpage you want to zoom out.
- Click on the “View” option in the Safari menu bar at the top of the screen.
- In the drop-down menu, hover your cursor over the “Zoom Out” option.
- Click on “Zoom Out” to reduce the zoom level of the webpage.
- You can click on “Zoom Out” multiple times to further decrease the zoom level.
The zoom out option in the view menu allows you to easily adjust the size of the webpage with just a few clicks. By reducing the zoom level, you can fit more content on the screen and improve readability.
In addition to the zoom out option, you’ll also find other useful zoom-related options in the view menu, such as “Zoom In,” “Actual Size,” and “Zoom Text Only.” These options provide additional flexibility to customize your browsing experience according to your preferences and needs.
Using the zoom option in the view menu is a straightforward method to zoom out in Safari. Whether you’re new to Safari or simply prefer a visual approach, this method allows you to easily adjust the zoom level and optimize your browsing experience.
Now that you’ve learned about using the zoom option in the view menu, let’s explore another method that utilizes the pinch-to-zoom gesture on a trackpad or magic mouse.
Method 3: Using the Pinch-to-Zoom Gesture on Trackpad or Magic Mouse
If you’re using a trackpad or a Magic Mouse with your Mac, you can take advantage of the pinch-to-zoom gesture to easily zoom out in Safari. This method provides a seamless and intuitive way to adjust the zoom level with just a simple gesture. Here’s how you can use the pinch-to-zoom gesture:
- Place two fingers on the trackpad or Magic Mouse.
- Pinch your fingers together, moving them closer towards each other.
- As you pinch, Safari will zoom out, reducing the zoom level of the webpage.
- You can continue pinching your fingers together to further decrease the zoom level.
The pinch-to-zoom gesture offers a natural and intuitive way to control the zoom level in Safari. By using your fingers to pinch or expand, you can easily adjust the size of the webpage to your liking. This method is especially convenient for those who prefer tactile interactions and want a more hands-on approach to zooming out.
It’s worth noting that the availability of the pinch-to-zoom gesture depends on your device’s compatibility. Most Mac laptops and trackpads , as well as Magic Mouse, support this gesture. If you’re using a different type of mouse or trackpad, this gesture may not be available. In such cases, you can try using the keyboard shortcuts or other zooming methods mentioned in this guide.
The pinch-to-zoom gesture not only allows you to adjust the zoom level in Safari but also gives you precise control over the size of the webpage. Whether you want to shrink the page to fit more content or make it smaller for comfortable reading, this gesture provides a convenient and efficient solution.
Now that you’ve learned about using the pinch-to-zoom gesture on a trackpad or Magic Mouse, let’s explore another method by customizing the zoom settings in the Safari preferences.
Method 4: Using the Zoom Options in the Safari Preferences
If you prefer a more permanent solution for adjusting the zoom level in Safari, you can customize the zoom options in the Safari preferences. This method allows you to set a default zoom level or enable text-only zoom for a consistent browsing experience. Here’s how you can use the zoom options in the Safari preferences:
- Open Safari and click on “Safari” in the menu bar.
- In the drop-down menu, select “Preferences” to open the Safari preferences.
- Click on the “Advanced” tab in the preferences window.
- Check the box next to “Never use font sizes smaller than” to enable text-only zoom.
- Use the slider or input a specific percentage in the “Page Zoom” section to set the default zoom level.
By customizing the zoom options in the Safari preferences, you can have more control over how webpages are displayed. Enabling text-only zoom ensures that only the text size adjusts when zooming in or out, preserving the layout and preventing images from becoming distorted.
The ability to set a default zoom level allows you to always have your preferred view when loading webpages. Whether you prefer a larger zoom for easier reading or a slightly smaller zoom for a compact layout, you can tailor the default zoom level to your preferences.
Keep in mind that customizing the zoom options in the Safari preferences will apply to all webpages you visit using Safari. This can be particularly useful if you frequently visit websites with similar designs or if you prefer a consistent browsing experience across various sites.
Now that you know how to customize the zoom options in the Safari preferences, you have a more permanent solution for adjusting the zoom level to your liking. Let’s wrap up this guide with a quick summary of what we’ve covered.
Zooming out in Safari is a useful feature that allows you to adjust the size of webpages for improved readability and convenience. In this guide, we explored four different methods to zoom out in Safari:
- Using keyboard shortcuts: By pressing “Command” + “-” (minus), you can quickly decrease the zoom level.
- Using the zoom option in the view menu: Navigating through the “View” menu, you can easily access the zoom options and adjust the zoom level.
- Using the pinch-to-zoom gesture on trackpad or Magic Mouse: By pinching your fingers together on the trackpad or Magic Mouse, you can intuitively decrease the zoom level.
- Customizing the zoom options in the Safari preferences: By adjusting the settings in the Safari preferences, you can set a default zoom level or enable text-only zoom.
Each method offers a unique approach to zooming out in Safari, catering to different preferences and situations. Whether you prefer keyboard shortcuts for quick adjustments, visual options in the view menu, tactile interactions with pinch-to-zoom gestures, or customized settings in the preferences, you can find a method that suits your needs.
Remember that zooming out in Safari can be helpful when webpages appear too large or when you want to fit more content on the screen. It’s important to find a balance between zooming out for better visibility and ensuring that the page remains legible and easy to navigate.
We hope this guide has been informative and helpful in assisting you with zooming out in Safari. Now, you can confidently adjust the zoom level and enhance your browsing experience. Happy zooming!
Leave a Reply Cancel reply
Your email address will not be published. Required fields are marked *
Save my name, email, and website in this browser for the next time I comment.
- Crowdfunding
- Cryptocurrency
- Digital Banking
- Digital Payments
- Investments
- Console Gaming
- Mobile Gaming
- VR/AR Gaming
- Gadget Usage
- Gaming Tips
- Online Safety
- Tech Setup & Troubleshooting
- Buyer’s Guides
- Comparative Analysis
- Gadget Reviews
- Service Reviews
- Software Reviews
- Mobile Devices
- PCs & Laptops
- Smart Home Gadgets
- Content Creation Tools
- Digital Photography
- Video & Music Streaming
- Online Security
- Online Services
- Web Hosting
- WiFi & Ethernet
- Browsers & Extensions
- Communication Platforms
- Operating Systems
- Productivity Tools
- AI & Machine Learning
- Cybersecurity
- Emerging Tech
- IoT & Smart Devices
- Virtual & Augmented Reality
- Latest News
- AI Developments
- Fintech Updates
- Gaming News
- New Product Launches
- 12 Best Free AI Image Sharpeners in 2024 WebPCMobile
Sanjuksha Nirgude Soaring High with Robotics
Related post, unveiling the secrets of sls printing and its role in robotics, unleashing efficiency: the role of robotic process automation in industry 4.0, advancing cybersecurity: the integration of robotics with emerging sms phishing alert tools – innovations, challenges, and future perspectives, robotics redefining long-term investment horizons, bridging software development and robotics for enhanced automation, the role of robotics in cnc machining for large part production, related posts.

Why Is My Safari So Zoomed Out On IPhone

How To Zoom Out Of Safari On IPhone

Why Is My Safari Zoomed In

How To Zoom In On Safari On Mac

How Do I Zoom Out On Safari

How To Make Safari Bigger On IPhone

How To Make Safari Screen Smaller On Mac

How To Zoom Out On Safari IPhone
Recent stories.

12 Best Free AI Image Sharpeners in 2024 (Web/PC/Mobile)

OpenStack Backup and Recovery Software

Apple Wallet Availability in the PocketGuard App: Sync your Apple Card, Apple Cash, and Savings from Apple Card Accounts

5 Ways to Improve IT Automation

What is Building Information Modelling?

How to Use Email Blasts Marketing To Take Control of Your Market

Learn To Convert Scanned Documents Into Editable Text With OCR
- Privacy Overview
- Strictly Necessary Cookies
This website uses cookies so that we can provide you with the best user experience possible. Cookie information is stored in your browser and performs functions such as recognising you when you return to our website and helping our team to understand which sections of the website you find most interesting and useful.
Strictly Necessary Cookie should be enabled at all times so that we can save your preferences for cookie settings.
If you disable this cookie, we will not be able to save your preferences. This means that every time you visit this website you will need to enable or disable cookies again.
How to Zoom Out on iPhone Web Pages
There are still some instances where you might need to zoom in or out to comfortably read the text on a Web page, even though many of the Web pages you visit on your iPhone will be optimized to display on the smaller device screen.
One of the benefits of knowing how to zoom in or out on Safari iPhone Web pages is that you can keep reading the websites and receive the information you require.
Our tutorial will walk you through the process of adjusting this setting so that you can find the zoom level that is ideal for your browsing habits.
Summary – How to Unzoom in Safari on an iPhone
- Open Settings .
- Select Safari .
- Choose Page Zoom .
- Select the desired zoom percentage.
Our guide continues below with additional information on how to zoom out on iPhone Web pages, including pictures of these steps.
When you visit Web pages in the Safari browser on your iPhone , you might find them difficult to read.
Whether the information on the pages appears too large or too small, it might have an impact on your ability to navigate the Internet.
Fortunately, there is a feature in the Safari iPhone browser that allows you to change the zoom level for each page you view.
If you wish Web page information to be larger or smaller when seen on your iPhone, our tutorial below will show you how to identify and modify that setting.
Related: This what does delivered mean on iPhone article can explain some of the messages you might see under your text messages.
How to Change the Page Zoom in the Safari iPhone Browser
The steps in this article were performed on an iPhone 13 in iOS 16.
Step 1: Find and open the Settings app on your iPhone Home screen.

Step 2: Scroll down and select the Safari option.

Step 3: Scroll down and select the Page Zoom option from the menu.

Step 4: Touch the zoom level that you wish to use for the pages that you view in the browser.

Now that you know how to zoom out on iPhone Web pages, you can use this technique whenever you want to adjust the zoom level for the websites that you visit.
More Information About Zooming Out on an iPhone
Zooming on an iPhone is a basic yet helpful feature that allows you to magnify the material on the screen of your device. This can be useful in a variety of scenarios, such as when trying to read small print, inspecting an image more closely, or navigating a website.
Depending on what you want to magnify, there are numerous ways to zoom in on an iPhone. The following are the most prevalent methods:
Pinch to zoom – This is the most natural way to zoom on an iPhone. Simply spread your thumb and index finger apart on the screen to zoom in, or bring them together to zoom out. This strategy works in practically every app, including the camera app, maps, and the Safari web browser.
Double-tap to zoom – This method comes in handy while reading text or seeing a picture. Simply double-tap the content you wish to enlarge, and it will zoom in automatically. To zoom out, double-tap once more. This strategy works with the majority of applications, including Photos and iBooks.
Accessibility zoom – This feature is intended for persons with visual impairments, but anyone who wants to magnify the screen can benefit from it. Go to Settings > General > Accessibility > Zoom and toggle the switch to the on position to enable Accessibility Zoom. Simply double-tap with three fingers to zoom in and out, and then use the same gesture to alter the zoom level.
Magnifying glass – You can use this function to temporarily magnify a specified region of the screen. Go to Settings > General > Accessibility > Magnifier and toggle the switch to the on position to enable Magnifying Glass. To utilize the magnifying glass, triple-click the side button (or, on older models, the home button) and swipe left or right to change the magnification level.
You could want to zoom in on an iPhone for a variety of reasons, including:
Reading small text – If you’re having difficulty reading small writing on your iPhone, zooming in can assist.
Examining photos or images more closely: Zooming in on a picture you just took or an image in an article allows you to see the details more clearly.
Zooming in on a website might help you view the content more clearly, particularly if the writing or graphics are small.
Checking photo quality – When examining photos you’ve taken, zooming in might help you examine the image’s quality and check for any blurriness or other flaws.
Zooming in on the iPhone can make it easier for persons with visual impairments to see the content on the screen, whether it’s text or images.
Accessing hidden details – When viewing maps, photos, or other content, zooming in can help expose details that may not be immediately evident.
Zooming in can help you get a closer look at the information and improve your overall viewing experience, whether you’re watching a movie, playing a game, or reading an e-book.

Matt Jacobs has been working as an IT consultant for small businesses since receiving his Master’s degree in 2003. While he still does some consulting work, his primary focus now is on creating technology support content for SupportYourTech.com.
His work can be found on many websites and focuses on topics such as Microsoft Office, Apple devices, Android devices, Photoshop, and more.
Share this:
- Click to share on Twitter (Opens in new window)
- Click to share on Facebook (Opens in new window)
Related Posts
- How to Unzoom an Apple Watch Screen
- How to Turn Off Zoom on Apple Watch
- How to View Safari History on iPhone
- How to Change the Default iPhone 13 Web Browser
- How to Make Text Vertical in Google Docs
- How to Favorite a Web Page in Safari on iPhone 13
- How to Remove Safari Frequently Visited on iPhone 13
- How to Remove Background Color in Google Docs
- How to Change the Pop Up Blocker iPhone 13 Setting
- How to Use the Screen Recorder on iPhone 13
- How to Add Someone to a Group Text with iPhone and Android
- How to Rearrange Pages in Word
- iPhone 15: How to Clear Safari History in Just a Few Steps
- How to Make Text Bigger on iPhone 14
- How to Adjust Brightness on iPhone 13
- How to Change Screen Timeout on iPhone 13
- How to Enlarge iPhone 13 Screen
- How to Change Margins in Google Docs (A Quick 4 Step Guide)
- How to Clear History on iPhone 14
- How to Bookmark on iPhone 15: A Step-by-Step Guide
Get Our Free Newsletter
How-to guides and tech deals
You may opt out at any time. Read our Privacy Policy
How to Change Page Zoom in Safari on iPhone 14
If you want to adjust the zoom level in the iPhone 14 Safari browser, then you need to go to Settings > Safari > Page Zoom > and then choose the desired option.
Our guide continues below with additional information about zooming in Safari, including pictures of these steps.
You can also check out our video about how to change page zoom in Safari on iPhone 14 for more on this topic.
How to Adjust the iPhone Safari Zoom Level (Guide with Pictures)
The steps in this article were performed on an iPhone 14 Plus in the IOS 16.6 operating system.
These steps also work on many other iOS versions, as well as many other iPhone models, including the following:
- iPhone 14 Pro
- iPhone 14 Pro Max
Step 1: Locate the Settings icon on your Home screen and tap it to open the menu.

Step 2: Scroll down and choose the Safari option.

Step 3: Scroll down again and select the Page Zoom option.

Step 4: Tap the desired zoom level you wish to use for the Web pages you view on your iPhone.

Now that you know how to change page zoom for Safari on iPhone 14, you will be able to adjust this setting as needed until you find the level that makes Web browsing most comfortable.
Note that this won’t affect the zoom level in other Web browsers like Google Chrome or Mozilla Firefox. You will need to change the zoom level for those browsers as well.
Additionally, this won’t affect the appearance of any other apps or menus on the device. You can, however, change the zoom level for the entire phone by going to Settings > Display & Brightness > choosing Display Zoom and then selecting the Larger Text or Default option there.
Video About Safari Zoom
Summary – Zooming in Or Out in Safari on an iPhone 14
- Open Settings .
- Select Safari .
- Choose Page Zoom .
- Select an option.
Related: How to Pin a Safari Tab on an iPhone 14
The iPhone 14 screen has a high resolution, and depending on the phone model that you own, it can also be a pretty large screen.
This allows you to see a lot of information on the screen at one time, such as when you are looking at a Web page.
But you might feel that the information on the screen is either too large or too small and that you would like to change that.
One way that you can accomplish this is by adjusting an option called “Page Zoom” for Safari.
Hopefully, our article above about how to change page zoom in Safari on iPhone 14 has provided you with the information that you need in order to switch the Safari display to something that is more comfortable for you.
All Content is the sole property of Matthew Burleigh and Solve Your Tech. If you are reading this blog on another site, it has been reposted without the author’s permission and is in violation of the DMCA. © Solve Your Tech.

Matthew Burleigh has been writing tech tutorials since 2008. His writing has appeared on dozens of different websites and been read over 50 million times.
After receiving his Bachelor’s and Master’s degrees in Computer Science he spent several years working in IT management for small businesses. However, he now works full time writing content online and creating websites.
His main writing topics include iPhones, Microsoft Office, Google Apps, Android, and Photoshop, but he has also written about many other tech topics as well.
Read his full bio here.
Share this:
Join our free newsletter.
Featured guides and deals
You may opt out at any time. Read our Privacy Policy
Related posts:
- How to Unzoom Apple Watch
- Safari History iPhone: How to See It [2023 Guide]
- 15 Ways to Fix Safari Not Working on iPhone in 2023
- How to Make All Columns the Same Width in Excel 2013
- How to Get Safari Back on iPhone 13
- How to Zoom Out on Safari iPhone Web Browsers
- How to Change the Maximum Zoom Level iPhone Setting
- iOS 17: How to Turn Off Zoom on iPhone – Step by Step Guide
- 3 iPhone Safari Tips You Might Not Know
- iOS 17: How to Zoom on iPhone – A Step-by-Step Guide
- 15 iPhone Settings You Might Want to Change
- How to Bookmark on iPhone (2023 Guide)
- How to Make Google Your Homepage in Safari on a Mac
- How to Connect AirPods Max to iPad: A Step-by-Step Guide
- How to Disable a Safari Extension on an iPhone 13
- How to Remove Frequently Visited on iPhone
- How to Zoom Out Safari iPad: Easy Steps to Adjust Your Browser View
- How to Rotate Screen on iPhone 7
- How to Connect AirPods Max to iPad: A Step-by-Step Guide for Users
- How Long is iPhone 14 Pro Max? The Ultimate Guide to Its Dimensions
You can make a difference in the Apple Support Community!
When you sign up with your Apple ID , you can provide valuable feedback to other community members by upvoting helpful replies and User Tips .
Looks like no one’s replied in a while. To start the conversation again, simply ask a new question.
How to zoom out in Safari iPad browser
We are using Safari on iPad for core business functionality and need to zoom out to 80%. I do not see the Menu Bar and wonder how this can be achieved. The Zoom function under Settings > General > Accessibility is not doing the job. I've also looked under Settings > Safari and do not see this option. How do I change Safari's Zoom to 80%?
iPad 2 Wi-Fi + Cellular, iOS 11.2.1
Posted on Jul 24, 2018 12:34 PM

Posted on Jul 25, 2018 2:41 AM
There are several varying ideas and functional adaptations in the area of control of iPad display.
In fact, some I've never tried with my iPad Mini1.1 (wi-fi) iOS9.3.4 because mine is used in the
association of a Mac and an iPhone. And some of these things are best done with better tools.
Problem with iPad Zoom - Full Screen Changes to Window | iPad ...
If full screen zoom isn't working the way you want on the iPad , here's a fix for the problem.
https://ipadacademy.com/presenting-with-the-ipad-problem-with-zoom-full-screen-c hanges-to-window/
How to use Safari on the Apple iPad - Know Your Mobile
We show you how to use Safari on the Apple iPad . Safari is the default web
browser on the Apple iPad . ... Double tap to zoom into a page;
Change screen resolution on your iPad (increase or decrease ...
Change screen resolution on your iPad ... But your iPad also comes in with an accessibility
feature that allows you to zoom in and zoom out from the image currently ...
Due to the changes during evolution and span of different iOS versions, these ideas also change
so what may work for iOS10. may not be what you wanted for an upgrade to iOS9.3. And later
hardware wouldn't know how the earlier iOS option worked; as that missed out on it entirely.
Several subtle and not so subtle ideas that may help your specific situation, that I've read about
but have not tried on iPad in iOS10.x. ~ Of those in search result some more likely appear here:
https://duckduckgo.com/?q= iPad+Safari+Zoom+Out &t=ffsb&ia=qa
While some newer ideas incorporated in later iOS version instructions may not retro to old
models, some do. The Apple iOS manual for iOS 11.4 updates older 11.3, free in iBooks.
..Sorry to not be of much help at nearly 2AM local..
Have been reading while writing; & not finding much.
Similar questions
- Issue to 'zoom out' on iPad Pro Hello, I have a 'zoom' problem with my 2018 iPad Pro running iPadOs 13.4. For example if I open the Amazon app and compare what I see on the screen on my ipad as opposed to what I would see if I open the same Amazon page on a computer, the page on the iPad Pro is way too much zoomed in and I do not know how to fix since the zoom feature is already turned off in the Accessibility menu. It's the same thing for the web pages that I browse using Safari: there are too much 'zoomed in'! I would like to be able to achieve the same result as when I press the 'Apple + Minus key' on a computer and to be able to save this setting as my default zoom setting but I do not know how to do it. Does anyone know a workaround for this issue? Thank you so much for your help! Best regards! 3102 3
- Always open zoom using safari How do I let zoom.us automatically open zoom whenever I click a zoom link. Currently the only option I have is to always click 'allow' every single time. 4911 3
- Force Safari Zoom to 90 per cent The pre-set Zoom numbers are quite restrictive. Do you know of any way I can force Safari Zoom to 90% (or any number of my choice)? 893 1
Loading page content
Page content loaded
Jul 25, 2018 2:41 AM in response to ade@coc
Change Websites settings in Safari on Mac
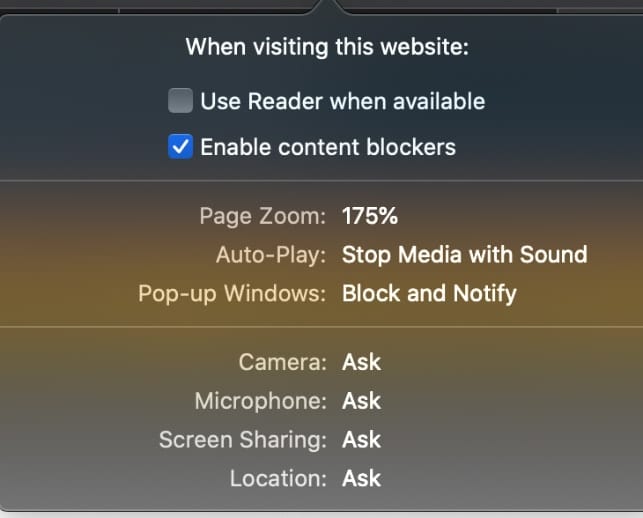
To change these settings, choose Safari > Settings, then click Websites.
The settings you can customize (such as Reader and Content Blockers) are listed on the left.
To apply a setting to a website on the right, first select the setting, then choose the option you want from the pop-menu next to the website.
Open Safari for me
Get work done more efficiently with Zoom AI Companion. The AI Companion Onboarding Center is now live!
Empowering you to increase productivity, improve team effectiveness, and enhance skills.
Communication
Productivity, apps & integration, employee engagement, business services, customer care, developer tools.
- Financial Services
- Manufacturing
- Small and Midsize businesses
- IT Professionals
- Customer Experience
- Sales and Revenue
- Marketing and Events
- Meeting SDK
- App Marketplace
- Developer Solutions
- Partner Solutions
- Find a Partner
- Become a Partner
- Partner Portal
- Partner Learning Center
- Resource Library
- Webinars & Events
- Customer Stories
- Zoom Trust Center
- Zoom Community
- Learning Center
- How-to Videos
- Customer Success Hub
- Global services
- Hardware options
- Customer Managed Key
- Customer Support
- Premier Support
- Developer Support
- Premier Developer Support
Download the Zoom app
Keep your Zoom app up to date to access the latest features.
Zoom Virtual Backgrounds
Download hi-res images and animations to elevate your next Zoom meeting.
- Plans & Pricing
- Join by Meeting ID
- Public Event List
- Screen Share Only
- With Video On
- With Video Off
- Phone System
- Mail & Calendar
- Marketplace
- Rooms and Workspaces
- Workspace Reservation
- Contact Center
- Virtual Agent
- Revenue Accelerator
- Events and Webinars
- Work Transformation Summit
- Customer Success Events
- Customer Success Forum
- OnDemand Learning
- Zoom Status
- Submit Feedback
- Community Terms and Guidelines
- Getting Started
- Community Center
- Happy Rewards
- Social Corner
- Community Champion Program
- Billing & Account Management
- Zoom Meetings
Can alternate host change zoom settings?
- Subscribe to RSS Feed
- Mark Topic as New
- Mark Topic as Read
- Float this Topic for Current User
- Printer Friendly Page
- Zoom meeting invite sent out through personal gmail account not work email account in Zoom Meetings 2024-09-11
- Way to customize IVR forwarding for different hours? in Zoom Phone System 2024-09-10
- How do I set someone as the alternative host of a webinar? in Zoom Meetings 2024-09-06
- Changing the ' Only authenticated users can join meetings' setting in Zoom Meetings 2024-09-05
- Mark as New
- Report Inappropriate Content
2024-09-11 06:48 AM
- All forum topics
- Previous Topic

2024-09-11 07:27 AM
How to Legally Change Your Name and Gender at the Same Time
Changing your name and your gender all at once may seem overwhelming, but it's probably going to be easier to do both at the same time.
Find out more about legal name change

by Geoff Williams
Geoff specializes in personal finance and business articles. He is a regular contributor to U.S. News & World Rep...
Read more...
Updated on: September 11, 2024 · 9 min read
How to change your legal name by petition
How to change your gender marker, how long does it take to change your name and gender marker, how much does it cost to change your name and gender marker, do i need a lawyer to get my name and gender marker changed.
Changing your name and gender at the same time starts with filing a written request to the court for a name change. After getting it approved you can update your records. To change your gender marker is a simpler process, which typically means updating your preferred gender on documents such as a passport. Both a name change and a gender marker change may require paying fees, and requirement will depend on your state's laws.
Generally, if you’re going to change your legal name , you’ll need to file a petition with your local court. A petition is simply a formal written request to the court. Here’s what you’ll need to do:

Step 1: Research your state’s laws
As with many legal decisions, the laws governing how people change their names vary from state to state. You may want to consider working with a lawyer. Working with somebody who knows the territory well can be a cost-effective way to simplify the process of changing your legal name and steer you away from making any expensive or time-consuming mistakes.
Step 2: Complete the required forms
Changing your legal name may require filling out many forms. This depends on your state's laws. For instance, you might need to fill out a name change application and also an affidavit, which is a written statement signed under oath and offered up to a judge.
A minor would likely have more forms, including one to be signed by a parent or guardian.
Step 3: File your petition
Most petitions for changing your legal name can be filed at the local courthouse or clerk’s office. Depending on your state, you may need to bring paperwork, such as your birth certificate.
Step 4: Publish notice of your name change
This can feel invasive, and it’s arguably an outdated practice that anyone needs to publish their new identity, but it’s a practice with historical roots. Traditionally, publishing somebody's name change gave townspeople a heads up, in case the person was changing their name for an unethical reason such as avoiding paying a debt.
If you’re uncomfortable sharing with the world that you're changing your legal name, a lawyer can help. If you make a convincing case to a judge that publishing your name would cause you harm, you may be able to get this requirement waived.
Step 5: Attend a court hearing
A hearing for a petitioned name change is typically a straightforward process, and it’s unlikely you have anything to worry about. (If you are nervous, though, that’s where an attorney can guide you through the process.)
You will be asked to share your current name. Afterwards, you’ll typically be asked what you want to change your name to—and you’ll offer a simple explanation of why.
Unless there’s some persuasive reason why your chosen name shouldn’t be approved, the judge should approve it. Your family and friends, if they haven’t been doing so already, can start calling you by your new legal name.
Step 6: Receive your court order
The petitioner—you, in this case—will receive copies of the court-ordered name change from the clerk’s office. You’ll want to make copies and store the decree in a safe place. You may, down the road, need proof of your name information, such as when you update your federal and state records.
Step 7: Update your records
This is going to be a process, possibly a long one. There are many different types of documents you may need to alter your name. Because of that, you may want to consult a lawyer or start brainstorming a name change checklist .
For instance, assuming you drive, you'll have to get your driver's license changed. But you may have financial accounts, estate planning documents, or deeds and titles that need to be changed.
The term gender marker refers to what you select on documents when you’re asked what your gender is. Generally, you will select M if you identify as a male, F if you identify as a female, or X if you would rather not specify.
Changing your gender marker on federal documents
You’ll want to change your gender on federal documents to keep them current, and a good place to start is with your Social Security card. Simply contact the Social Security Administration (SSA) and fill out the application for a new Social Security card (Form SS-5). Bring identification with you, but you don’t need medical or legal evidence of your gender designation. You simply update your new designation on the form.
Once you’ve made the change, the SSA will update their records and mail your free replacement card.
After that, you'll likely want to change your name and legal gender on your birth certificate.
Changing your gender marker on state documents
Once you've changed some of your federal records, such as your Social Security card and birth certificate, you'll likely want to change your legal gender with your state documents.
The steps you'll need to take will vary from state to state. In some states, like California, you may find it fairly easy; in other states, you may find more red tape.
In any case, you’ll likely want to start with updating your driver's license. You may need to submit your court name change order certifying how you now identify, and you may need to complete paperwork such as a “declaration of gender change” form.
On the other hand, depending on your state, you may not need to worry about showing a court order showing that you have made a legal transition to a new gender.
Keep in mind that in most states, you’ll need to be 18 years old, or at least an emancipated minor, to make a gender marker change on state documents.
Plan for at least a couple of months, although it may take longer, depending on your state. Scheduling a hearing to legally change your name and gender will probably take the longest time. After that, it may take a few weeks to get everything changed on your federal and state identification documents.
Don’t be surprised if it takes several months, or longer, if you have many documents that need updating. You'll be changing your Social Security card, birth certificate, and likely a driver's license, and possibly many other legal documents.
The cost to legally change your name and gender varies from state to state, but you should plan on budgeting for at least $500. While changing your Social Security card is free, some of the costs you may encounter with other legal documents and various expenses include:
- A filing fee. This is likely to be the costliest fee and might run several hundred dollars. In California, the filing fee in courts is in the neighborhood of $435 and $450 . In some parts of Louisiana, the filing fee can reach $500. Other states will have lower fees. Provided you’re able to change both your name and gender at the same time, you should only have to pay this once.
- Cost of publishing your name in the newspaper. Some states require people with name changes to publish their new identity in the local newspaper, part of a longstanding tradition. Generally, you can expect to pay between $80 and $120.
- Fee to update birth certificates. This also varies by state. Just to give you an idea of what you might pay to change your birth certificate: Michigan’s fee is $50, and Wyoming charges $55.
- Fee to update your driver’s license. This may be pretty minimal. For instance, to change information other than your address in Nevada, you would pay $8.25.
- Passport fee. If you have a passport and need to update your information, and if it’s been over a year since your passport was issued, it’s $130 to renew your passport.
You may get some fees, such as the filing fee, waived if it’s a financial hardship to pay it. If you have an attorney, they can help you with this.
Nobody is required to hire anyone to help change what they're called or what gender they identify as. That said, it's not a bad idea to have some help. The new name and gender mark journey can be complicated and frustrating, especially in states with stricter laws and red tape.
While it can be time-consuming to change one’s name and gender, the nice part of all of this is almost anyone can do it, if they want to. Nobody goes through a gender transition lightly, of course, but in most cases, with changing your name , if you wanted to change it for any reason, you can.
A capable lawyer can help you make these changes more efficiently.
Can I change my name if I have a criminal record?
If you have a criminal record, you may find it difficult or impossible to change your name. Where people run into trouble is if they have a felony on their record, especially if they are on a sex offender registry or if they’ve been convicted of stealing somebody's identity. If you are worried about your background, a good lawyer can advise you on whether you can change your name.
Do I need to publish my name change in a newspaper?
Depending on the state, if you change your legal name, you may need to publish your name change in your local newspaper. (Sometimes you can get that requirement waived, especially if you have a good lawyer to help make your case.) It can seem invasive to be forced to publish your updated name in the paper, but it’s part of a long-standing tradition that came about for a good reason—to make it harder for people to commit fraud.
What is a gender marker?
A gender marker is a term used to describe an individual’s gender identity. Most often, you’ll find that somebody identifies as F (female) or M (male). But some people prefer to use X, if they consider themselves non-binary (an identity that doesn’t fit as male or female), intersex (a person born with a combination of male and female biological traits), or gender non-conforming (your behavior or appearance doesn’t conform to social expectations of how your gender should act).
You may also like

Can I Make My Ex Change Their Last Name After Divorce?
Legally, you can't force your ex-spouse to change their last name when you get divorced. Here are some tips for navigating the situation.
August 21, 2024 · 2min read

How Much Does It Cost to Change Your Name?
Actually changing your legal name may be more complicated than you might think. Still, despite a name change taking some time and money, it can be worth the effort.
July 24, 2024 · 12min read

Estate planning for the modern family
Today's families come in many forms. Stepping back to consider who you want protected should tragedy occur can be tough. Whether you have a life partner, lifelong friend, or you're part of a husband-and-wife team with or without kids, a parent or grandparent to biological kids, adopted children, or stepkids, the family tree can have many branches. It's important to act now to help everyone you care about—including your pets.
March 26, 2024 · 2min read
iPhone 16 Pro Technical Specifications
Black Titanium, White Titanium, Natural Titanium, Desert Titanium
Titanium design Latest-generation Ceramic Shield front Textured matte glass back

2.81 inches (71.5 mm)
5.89 inches (149.6 mm)
0.32 inch (8.25 mm)
7.03 ounces (199 grams)

3.06 inches (77.6 mm)
6.42 inches (163 mm)
7.99 ounces (227 grams)
- Super Retina XDR display
- 6.3‑inch (diagonal) all‑screen OLED display
- 2622‑by‑1206-pixel resolution at 460 ppi
The iPhone 16 Pro display has rounded corners that follow a beautiful curved design, and these corners are within a standard rectangle. When measured as a standard rectangular shape, the screen is 6.27 inches diagonally (actual viewable area is less).
- 6.9‑inch (diagonal) all‑screen OLED display
- 2868‑by‑1320-pixel resolution at 460 ppi
The iPhone 16 Pro Max display has rounded corners that follow a beautiful curved design, and these corners are within a standard rectangle. When measured as a standard rectangular shape, the screen is 6.86 inches diagonally (actual viewable area is less).
- Dynamic Island
- ProMotion technology with adaptive refresh rates up to 120Hz
- HDR display
- True Tone
- Wide color (P3)
- Haptic Touch
- 2,000,000:1 contrast ratio (typical)
- 1000 nits max brightness (typical); 1600 nits peak brightness (HDR); 2000 nits peak brightness (outdoor); 1 nit minimum brightness
- Fingerprint-resistant oleophobic coating
- Support for display of multiple languages and characters simultaneously
Rated IP68 (maximum depth of 6 meters up to 30 minutes) under IEC standard 60529
- A18 Pro chip
- New 6‑core CPU with 2 performance and 4 efficiency cores
- New 6‑core GPU
- New 16‑core Neural Engine
Built into your iPhone, Apple Intelligence is the personal intelligence system that helps you write, express yourself, and get things done effortlessly. With groundbreaking privacy protections, it gives you peace of mind that no one else can access your data — not even Apple. 4
Learn more about Apple Intelligence
- Pro camera system
- 48MP Fusion: 24 mm, ƒ/1.78 aperture, second‑generation sensor‑shift optical image stabilization, 100% Focus Pixels, support for super‑high‑resolution photos (24MP and 48MP)
- Also enables 12MP 2x Telephoto: 52 mm, ƒ/1.6 aperture, sensor-shift optical image stabilization, 100% Focus Pixels
- 48MP Ultra Wide: 13 mm, ƒ/2.2 aperture and 120° field of view, Hybrid Focus Pixels, super-high-resolution photos (48MP)
- 12MP 5x Telephoto: 120 mm, ƒ/2.8 aperture and 20° field of view, 100% Focus Pixels, seven-element lens, 3D sensor-shift optical image stabilization and autofocus, tetraprism design
- 5x optical zoom in, 2x optical zoom out; 10x optical zoom range
- Digital zoom up to 25x
Camera Control
- Customizable default lens (Fusion)
- Sapphire crystal lens cover
- Adaptive True Tone flash
- Photonic Engine
- Deep Fusion
- Smart HDR 5
- Next-generation portraits with Focus and Depth Control
- Portrait Lighting with six effects
- Night mode portraits enabled by LiDAR Scanner
- Panorama (up to 63MP)
- Latest-generation Photographic Styles
- Spatial photos
- 48MP macro photography
- Apple ProRAW
- Wide color capture for photos and Live Photos
- Lens correction (Ultra Wide)
- Advanced red-eye correction
- Auto image stabilization
- Photo geotagging
- Image formats captured: HEIF, JPEG, and DNG
- 4K Dolby Vision video recording at 24 fps, 25 fps, 30 fps, 60 fps, 100 fps (Fusion), or 120 fps (Fusion)
- 1080p Dolby Vision video recording at 25 fps, 30 fps, 60 fps, or 120 fps (Fusion)
- 720p Dolby Vision video recording at 30 fps
- Cinematic mode up to 4K HDR at 30 fps
- Action mode up to 2.8K at 60 fps
- Spatial video recording at 1080p at 30 fps
- ProRes video recording up to 4K at 120 fps with external recording
- Log video recording
- Academy Color Encoding System
- Macro video recording, including slo‑mo and time‑lapse
- Time‑lapse video with stabilization
- Night mode Time‑lapse
- QuickTake video up to 4K at 60 fps in Dolby Vision
- Second‑generation sensor‑shift optical image stabilization for video (Fusion)
- 3D sensor‑shift optical image stabilization and autofocus for video (Telephoto)
- True Tone flash
- Cinematic video stabilization (4K, 1080p, and 720p)
- Continuous autofocus video
- Take 8MP still photos while recording 4K video
- Playback zoom
- Video formats recorded: HEVC, H.264, and ProRes
- Spatial Audio and stereo recording
- Four studio‑quality mics
- Wind noise reduction
- 12MP camera
- ƒ/1.9 aperture
- Autofocus with Focus Pixels
- Retina Flash
- Portrait Lighting with six effects
- Animoji and Memoji
- Lens correction
- 4K Dolby Vision video recording at 24 fps, 25 fps, 30 fps, or 60 fps
- 1080p Dolby Vision video recording at 25 fps, 30 fps, or 60 fps
- Cinematic mode up to 4K Dolby Vision at 30 fps
- ProRes video recording up to 4K at 60 fps with external recording
- Academy Color Encoding System
- Slo-mo video support for 1080p at 120 fps
- Time‑lapse video with stabilization
- Night mode Time-lapse
- Spatial Audio and stereo recording
- Enabled by TrueDepth camera for facial recognition
- Emergency SOS
- Crash Detection 5
Model A3293 * Model A3296 *
- FDD-5G NR (Bands n1, n2, n3, n5, n7, n8, n12, n20, n25, n26, n28, n29, n66, n70, n75, n76)
- TDD-5G NR (Bands n38, n40, n41, n48, n53, n77, n78, n79)
- FDD-LTE (Bands 1, 2, 3, 4, 5, 7, 8, 12, 13, 14, 17, 18, 19, 20, 25, 26, 28, 29, 30, 32, 66, 71)
- TDD-LTE (Bands 34, 38, 39, 40, 41, 42, 48, 53)
- UMTS/HSPA+/DC-HSDPA (850, 900, 1700/2100, 1900, 2100 MHz)
- GSM/EDGE (850, 900, 1800, 1900 MHz)
- 5G (sub‑6 GHz) with 4x4 MIMO 6
- Gigabit LTE with 4x4 MIMO and LAA 6
- Wi‑Fi 7 (802.11be) with 2x2 MIMO 7
- Bluetooth 5.3
- Second-generation Ultra Wideband chip 8
- Thread networking technology
- NFC with reader mode
- Express Cards with power reserve
- Precision dual-frequency GPS (GPS, GLONASS, Galileo, QZSS, BeiDou, and NavIC)
- Digital compass
- iBeacon microlocation
- FaceTime video calling over cellular or Wi‑Fi
- FaceTime HD (1080p) video calling over 5G or Wi‑Fi
- Share experiences like movies, TV, music, and other apps in a FaceTime call with SharePlay
- Screen sharing
- Portrait mode in FaceTime video
- Spatial Audio
- Voice Isolation and Wide Spectrum microphone modes
- Optical zoom with rear‑facing camera
- FaceTime audio
- Voice over LTE (VoLTE) 6
- Wi‑Fi calling 6
- Supported formats include AAC, APAC, MP3, Apple Lossless, FLAC, Dolby Digital, Dolby Digital Plus, and Dolby Atmos
- Spatial Audio playback
- User‑configurable maximum volume limit
- Supported formats include HEVC, H.264, AV1, and ProRes
- HDR with Dolby Vision, HDR10+/HDR10, and HLG
- Up to 4K HDR AirPlay for mirroring, photos, and video out to Apple TV (2nd generation or later) or AirPlay‑enabled smart TV
- Video mirroring and video out support: Up to 4K HDR through native DisplayPort output over USB-C or USB-C Digital AV Adapter (model A2119; adapter sold separately) 10

Volume up/down
Action button
Side button
Built‑in stereo speaker Built‑in microphone
USB-C connector
Built‑in microphones
Built‑in stereo speaker
Silent mode, Focus, Camera, Flashlight, Voice Memo, Recognize Music, Translate, Magnifier, Controls, Shortcut, or Accessibility
Exposure, Depth, Zoom, Cameras, Styles, Tone
- USB-C connector with support for:
- DisplayPort
- USB 3 (up to 10Gb/s) 11
Video playback Up to 27 hours
Video playback (streamed) Up to 22 hours
Audio playback Up to 85 hours
Video playback Up to 33 hours
Video playback (streamed) Up to 29 hours
Audio playback Up to 105 hours
- Built‑in rechargeable lithium‑ion battery
- MagSafe wireless charging up to 25W with 30W adapter or higher 13
- Qi2 wireless charging up to 15W 13
- Qi wireless charging up to 7.5W 13
- Fast-charge capable: Up to 50% charge in around 30 minutes 14 with 20W adapter or higher paired with USB-C charging cable, or 30W adapter or higher paired with MagSafe Charger (all available separately)
- Wireless charging up to 25W with 30W adapter or higher 13
- Magnet array
- Alignment magnet
- Accessory Identification NFC
- Magnetometer
- Face ID
- LiDAR Scanner
- High dynamic range gyro
- High-g accelerometer
- Proximity sensor
- Dual ambient light sensors
- iOS 18 iOS is the world’s most personal and secure mobile operating system, packed with powerful features and designed to protect your privacy.
See what’s new in iOS 18
Built-in accessibility features supporting vision, mobility, hearing, speech, and cognitive needs help you get the most out of your iPhone — in the ways that work best for you.
Learn more
- Switch Control
- AssistiveTouch
- Eye Tracking
- Closed Captions
- Live Captions
- Personal Voice
- Live Speech
- Vocal Shortcuts
- Spoken Content
- Dual SIM (nano‑SIM and eSIM) 15
- Dual eSIM support 15
Learn more about eSIM
Learn more about traveling with eSIM
Hearing Aid Compatible
.jpg, .tiff, .gif (images); .doc and .docx (Microsoft Word); .htm and .html (web pages); .key (Keynote); .numbers (Numbers); .pages (Pages); .pdf (Preview and Adobe Acrobat); .ppt and .pptx (Microsoft PowerPoint); .txt (text); .rtf (rich text format); .vcf (contact information); .xls and .xlsx (Microsoft Excel); .zip; .ics; .usdz (USDZ Universal)
- Apple ID (required for some features)
- Internet access 16
- macOS Catalina 10.15 or later using the Finder
- macOS High Sierra 10.13 through macOS Mojave 10.14.6 using iTunes 12.8 or later
- Windows 10 or later using iTunes 12.12.10 or later (free download from apple.com/lae/itunes/download )
32° to 95° F (0° to 35° C)
−4° to 113° F (−20° to 45° C)
5% to 95% noncondensing
tested up to 10,000 feet (3000 m)
English (Australia, UK, U.S.), Chinese (Simplified, Traditional, Traditional – Hong Kong), French (Canada, France), German, Italian, Japanese, Korean, Spanish (Latin America, Spain), Arabic, Bulgarian, Catalan, Croatian, Czech, Danish, Dutch, Finnish, Greek, Hebrew, Hindi, Hungarian, Indonesian, Kazakh, Malay, Norwegian, Polish, Portuguese (Brazil, Portugal), Romanian, Russian, Slovak, Swedish, Thai, Turkish, Ukrainian, Vietnamese
English (Australia, Canada, India, Japan, New Zealand, Singapore, South Africa, UK, U.S.), Chinese – Simplified (Handwriting, Pinyin QWERTY, Pinyin 10-Key, Shuangpin, Stroke), Chinese – Traditional (Cangjie, Handwriting, Pinyin QWERTY, Pinyin 10-Key, Shuangpin, Stroke, Sucheng, Zhuyin), French (Belgium, Canada, France, Switzerland), German (Austria, Germany, Switzerland), Italian, Japanese (Kana, Romaji), Korean (2-Set, 10-Key), Spanish (Latin America, Mexico, Spain), Ainu, Albanian, Amharic, Apache (Western), Arabic, Arabic (Najdi), Armenian, Assamese, Assyrian, Azerbaijani, Bangla, Belarusian, Bodo, Bulgarian, Burmese, Cantonese – Traditional (Cangjie, Handwriting, Phonetic, Stroke, Sucheng), Catalan, Cherokee, Croatian, Czech, Danish, Dhivehi, Dogri, Dutch, Dzongkha, Emoji, Estonian, Faroese, Filipino, Finnish, Flemish, Fula (Adlam), Georgian, Greek, Gujarati, Hawaiian, Hebrew, Hindi (Devanagari, Latin, Transliteration), Hungarian, Icelandic, Igbo, Indonesian, Irish Gaelic, Kannada, Kashmiri (Arabic, Devanagari), Kazakh, Khmer, Konkani (Devanagari), Kurdish (Arabic, Latin), Kyrgyz, Lao, Latvian, Lithuanian, Macedonian, Maithili, Malay (Arabic, Latin), Malayalam, Maltese, Manipuri (Bengali, Meetei Mayek), Māori, Marathi, Mongolian, Navajo, Nepali, Norwegian (Bokmål, Nynorsk), Odia, Pashto, Persian, Persian (Afghanistan), Polish, Portuguese (Brazil, Portugal), Punjabi, Rohingya, Romanian, Russian, Samoan, Sanskrit, Santali (Devanagari, Ol Chiki), Serbian (Cyrillic, Latin), Sindhi (Arabic, Devanagari), Sinhala, Slovak, Slovenian, Swahili, Swedish, Tajik, Tamil (Anjal, Tamil 99), Telugu, Thai, Tibetan, Tongan, Turkish, Turkmen, Ukrainian, Urdu, Uyghur, Uzbek (Arabic, Cyrillic, Latin), Vietnamese (Telex, VIQR, VNI), Welsh, Yiddish, Akan, Bangla (Transliteration), Chickasaw, Choctaw, Chuvash, Gujarati (Transliteration), Hausa, Hmong (Pahawh), Ingush, Japanese (Handwriting), Kabyle, Kannada (Transliteration), Liangshan Yi, Malayalam (Transliteration), Mandaic, Marathi (Transliteration), Mi’kmaw, N’Ko, Osage, Punjabi (Transliteration), Rejang, Tamazight (Standard Moroccan), Tamil (Transliteration), Telugu (Transliteration), Urdu (Transliteration), Wancho, Wolastoqey, Yoruba
Arabic, Arabic (Najdi), Bangla, Bulgarian, Catalan, Cherokee, Chinese – Simplified (Pinyin QWERTY), Chinese – Traditional (Pinyin QWERTY), Chinese – Traditional (Zhuyin), Croatian, Czech, Danish, Dutch, English (Australia, Canada, India, Japan, New Zealand, Singapore, South Africa, UK, U.S.), Estonian, Filipino, Finnish, Dutch (Belgium), French (Belgium), French (Canada), French (France), French (Switzerland), German (Austria), German (Germany), German (Switzerland), Greek, Gujarati, Hawaiian, Hebrew, Hindi (Devanagari, Latin, Transliteration), Hungarian, Icelandic, Indonesian, Irish Gaelic, Italian, Japanese (Kana), Japanese (Romaji), Korean (2-Set, 10-Key), Latvian, Lithuanian, Macedonian, Malay, Marathi, Norwegian (Bokmål), Norwegian (Nynorsk), Persian, Persian (Afghanistan), Polish, Portuguese (Brazil), Portuguese (Portugal), Punjabi, Romanian, Russian, Serbian (Cyrillic), Serbian (Latin), Slovak, Slovenian, Spanish (Latin America), Spanish (Mexico), Spanish (Spain), Swedish, Tamil (Anjal), Tamil (Tamil 99), Telugu, Thai, Turkish, Ukrainian, Urdu, Vietnamese (Telex)
English (Australia, Canada, India, Japan, Singapore, South Africa, UK, U.S.), Chinese (Simplified, Traditional), French (Belgium, Canada, France, Switzerland), German (Austria, Germany, Switzerland), Italian, Japanese, Korean, Spanish (Latin America, Mexico, Spain), Arabic, Arabic (Najdi), Cantonese (Traditional), Dutch, Hindi (Devanagari, Latin), Portuguese (Brazil, Portugal), Russian, Swedish, Thai, Turkish, Vietnamese, Hebrew, Polish, Romanian
English (Australia, Canada, India, Japan, New Zealand, Singapore, South Africa, UK, U.S.), Chinese – Simplified (Pinyin), Chinese – Traditional (Pinyin), French (France), French (Belgium), French (Canada), French (Switzerland), German (Germany), German (Austria), German (Switzerland), Italian, Japanese (Romaji), Portuguese (Brazil), Portuguese (Portugal), Spanish (Spain), Spanish (Latin America), Spanish (Mexico), Dutch (Belgium), Dutch (Netherlands), Hindi (Latin), Vietnamese, Polish, Romanian, Turkish
English (Australia, Canada, India, Japan, New Zealand, Singapore, South Africa, UK, U.S.), Chinese (Simplified), French (Belgium), French (Canada), French (France), French (Switzerland), German (Austria), German (Germany), German (Switzerland), Italian, Spanish (Latin America), Spanish (Mexico), Spanish (Spain), Arabic, Arabic (Najdi), Dutch (Belgium), Dutch (Netherlands), Hindi (Devanagari), Hindi (Latin), Russian, Swedish, Portuguese (Brazil), Turkish, Vietnamese
English (Australia, Canada, India, Japan, New Zealand, Singapore, South Africa, UK, U.S.), Chinese (Simplified Pinyin QWERTY), Chinese (Traditional Pinyin QWERTY), French (Canada), French (France), French (Switzerland), German (Austria), German (Germany), German (Switzerland), Italian, Spanish (Latin America), Spanish (Mexico), Spanish (Spain), Portuguese (Brazil), Portuguese (Portugal), Dutch (Belgium), Dutch (Netherlands), Swedish, Vietnamese, Arabic, Hebrew, Korean, Polish, Romanian
English (Australia, Canada, India, Ireland, New Zealand, Singapore, South Africa, UK, U.S.), Spanish (Chile, Mexico, Spain, U.S.), French (Belgium, Canada, France, Switzerland), German (Austria, Germany, Switzerland), Italian (Italy, Switzerland), Japanese (Japan), Korean (Republic of Korea), Mandarin Chinese (China mainland, Taiwan), Cantonese (China mainland, Hong Kong), Arabic (Saudi Arabia, United Arab Emirates), Danish (Denmark), Dutch (Belgium, Netherlands), Finnish (Finland), Hebrew (Israel), Malay (Malaysia), Norwegian (Norway), Portuguese (Brazil), Russian (Russia), Swedish (Sweden), Thai (Thailand), Turkish (Türkiye)
English (Australia, Canada, India, Ireland, Malaysia, New Zealand, Philippines, Saudi Arabia, Singapore, South Africa, United Arab Emirates, UK, U.S.), Cantonese (China mainland, Hong Kong), Mandarin Chinese (China mainland, Taiwan), French (Belgium, Canada, France, Luxembourg, Switzerland), German (Austria, Germany, Switzerland), Italian (Italy, Switzerland), Japanese, Korean, Spanish (Chile, Colombia, Mexico, Spain, U.S.), Portuguese (Brazil, Portugal), Arabic (Kuwait, Qatar, Saudi Arabia, United Arab Emirates), Catalan, Croatian, Czech, Danish, Dutch (Belgium, Netherlands), Finnish, Greek, Hebrew, Hindi, Hungarian, Indonesian, Malay, Norwegian (Bokmål), Polish, Romanian, Russian, Shanghainese (China mainland), Slovak, Swedish, Thai, Turkish, Ukrainian, Vietnamese
English (UK, U.S.), Chinese (Simplified, Traditional, Traditional – Hong Kong), Danish, Dutch, French, German, Hebrew, Hindi, Italian, Japanese, Korean, Norwegian, Portuguese, Russian, Spanish, Swedish, Thai, Turkish, Bulgarian, Catalan, Greek, Malay, Polish, Punjabi, Romanian
Simplified Chinese, Traditional Chinese – English, Cantonese – English
Arabic – English, Bangla – English, Chinese (Simplified) – English, Chinese (Traditional) – English, Czech – English, Dutch – English, Finnish – English, French – English, French – German, German – English, Gujarati – English, Hindi – English, Hungarian – English, Indonesian – English, Italian – English, Japanese – English, Japanese – Chinese (Simplified), Korean – English, Polish – English, Portuguese – English, Russian – English, Spanish – English, Tamil – English, Telugu – English, Thai – English, Urdu – English, Vietnamese – English, English – Greek, English – Malay, English – Swedish
English (UK, U.S.), Chinese (Simplified)
English (Australia, Canada, India, Japan, New Zealand, Singapore, South Africa, UK, U.S.), French (Belgium, Canada, France, Switzerland), German (Austria, Germany, Switzerland), Italian, Spanish (Latin America, Mexico, Spain), Arabic, Arabic (Najdi), Bulgarian, Czech, Danish, Dutch (Netherlands, Belgium), Finnish, Greek, Hindi (Devanagari), Hungarian, Irish Gaelic, Norwegian (Bokmål, Nynorsk), Polish, Portuguese (Brazil, Portugal), Punjabi, Romanian, Russian, Swedish, Telugu, Turkish, Vietnamese
Argentina, Armenia, Australia, Austria, Azerbaijan, Bahrain, Belarus, Belgium, Brazil, Bulgaria, Canada, Chile, China mainland, 17 Colombia, Costa Rica, Croatia, Cyprus, Czech Republic, Denmark, El Salvador, Estonia, Faroe Islands, Finland, France, Georgia, Germany, Greece, Greenland, Guatemala, Guernsey, Honduras, Hong Kong, Hungary, Iceland, Ireland, Isle of Man, Israel, Italy, Japan, Jersey, Jordan, Kazakhstan, Kuwait, Latvia, Liechtenstein, Lithuania, Luxembourg, Macao, Malaysia, Malta, Mexico, Moldova, Monaco, Montenegro, Morocco, Netherlands, New Zealand, Norway, Palestine, Panama, Peru, Poland, Portugal, Qatar, Romania, San Marino, Saudi Arabia, Serbia, Singapore, Slovakia, Slovenia, South Africa, South Korea, Spain, Sweden, Switzerland, Taiwan, UK, Ukraine, United Arab Emirates, U.S., Vatican City, Vietnam
- iPhone with iOS 18
- USB‑C Charge Cable (1 m)
- Documentation
IMAGES
VIDEO
COMMENTS
In the Safari app on your Mac, do one of the following: Make all content larger: Choose Safari > Settings for [website] and choose an option from the Page Zoom pop-up menu, or choose View > Zoom In. You can also pinch open on a trackpad that supports gestures. Safari remembers the zoom level when you return to the website (unless you pinch open ...
Setting the individual page zoom level for specific websites takes just four clicks. In the top menu bar, click Safari > Settings for This Website. Select the current zoom setting next to "Page Zoom" and click your desired setting. To reset the zoom level to 100 percent on any website, press Command + 0. Hold Command and press the Minus (-) or ...
You can increase or decrease just the font size of pages that you view in Safari on macOS Sierra. Safari will remember your settings until you clear your History. To increase the font size, press Option-Command-Plus sign (+) To decrease the font size, press Option-Command-Minus sign (-) Or you can go to the View menu and hold down the Option ...
Make all content larger: Choose Safari > Settings for This Website and choose an option from the Page Zoom pop-up menu, or choose View > Zoom In. You can also pinch open on a trackpad that supports gestures. Safari remembers the zoom level when you return to the website (unless you pinch open to zoom). Make only the text larger: Press Option ...
Permanently set the zoom level for all pages opened with Safari. As stated above, Safari's default zoom setting is 100%. Here is how you can change this setting: Open Safari and in Safari, go to Safari > Preferences > Websites > Page Zoom (sidebar). Select all websites (you can press the Command key and click the websites).
Open Settings and tap Safari. Scroll down and tap Page Zoom. Here, you'll see the specific websites whose text size you have changed following the earlier set of steps. To change one, tap it and choose a new zoom percentage. You can also edit the list of sites on this screen. Tap Edit at the top and then Delete or Clear All Settings.
Press "Command" and "+" simultaneously to zoom in. Press "Command" and "-" together to zoom out. Press "Command" and "0" (zero) to reset the zoom level to the default. Utilize the toolbar options: Look at the top-right corner of the Safari window to find the toolbar. Click on the "Zoom In" icon (magnifying glass with ...
Accessing Zoom Options in the View Menu. To access the Zoom options in the View menu, go to "View" in the Safari menu bar and select "Zoom In" or "Zoom Out." This will allow you to increase or decrease the size of the text and images on the page. Alternatively, you can use the keyboard shortcuts "Command" and "+" or "-" keys simultaneously.
Simply follow these steps on iPhone and iPad: Open the Settings app. Tap Safari. Tap Page Zoom. Select the Page Zoom preference you would like to use. This will become the default and will apply ...
To do so, right-click (or Control-click) on a space in the Safari toolbar and click Customize Toolbar. Click and drag the Zoom buttons in the dropdown to the are you clicked on the toolbar. Click Done to finish. Also cool: if you wish to keep images at the same size and only adjust web page font size on the fly, press Option-Command and the ...
Keyboard Shortcut: Press Option+Command+= (equal sign) to zoom in. You can also use Option+Command+8 to switch between no zoom and your last zoom level. Trackpad: Double-tap your trackpad with three fingers to zoom in. You can also double-tap and drag on your trackpad to change the zoom level. Scroll Gesture: Press the modifier key you chose ...
Step 2: Pinch with two fingers. Step 2: Place two fingers on the screen and pinch them together. This is similar to the zoom-out gesture on most touch devices. Placing two fingers apart on the screen and bringing them together should reduce the zoom level. It's akin to squeezing a spring - it compresses the view back to normal.
Open Safari and navigate to the webpage you want to zoom out. Click on the "View" option in the Safari menu bar at the top of the screen. In the drop-down menu, hover your cursor over the "Zoom Out" option. Click on "Zoom Out" to reduce the zoom level of the webpage. You can click on "Zoom Out" multiple times to further decrease ...
Pinch to zoom - This is the most natural way to zoom on an iPhone. Simply spread your thumb and index finger apart on the screen to zoom in, or bring them together to zoom out. This strategy works in practically every app, including the camera app, maps, and the Safari web browser. Double-tap to zoom - This method comes in handy while ...
Summary - Zooming in Or Out in Safari on an iPhone 14. Open Settings.; Select Safari.; Choose Page Zoom.; Select an option. Related: How to Pin a Safari Tab on an iPhone 14 Conclusion. The iPhone 14 screen has a high resolution, and depending on the phone model that you own, it can also be a pretty large screen.
Want to know how to change Safari zoom on iPhone or iPad in iOS? This video will show you how to change zoom on Safari on iPhone. You might want to know how ...
How to zoom out in Safari iPad browser. We are using Safari on iPad for core business functionality and need to zoom out to 80%. I do not see the Menu Bar and wonder how this can be achieved. The Zoom function under Settings > General > Accessibility is not doing the job. I've also looked under Settings > Safari and do not see this option.
Step 3 - Go all the way down and open the "Display Zoom" settings. Step 4 - Now, there are two different modes present here. Either choose the "Larger Text" or "Default" mode to adjust the zoom size on the Safari. Keep this in mind that this display zoom will be effective in all the apps, including Safari. So, if you face any problem with the zoom effect, change it.
Apologies for the bump, but I found this post trying to find a solution myself. I haven't found a way to change it per-site, but one can change the default using the terminal command defaults write com.apple.Safari DefaultPageZoom "1.10" The change doesn't seem to be reflected in the Preferences GUI, but it does change the page zoom.
In the Safari app on your Mac, do one of the following: Make all content larger: Choose Safari > Settings for [ website] and choose an option from the Page Zoom pop-up menu, or choose View > Zoom In. You can also pinch open on a trackpad that supports gestures. Safari remembers the zoom level when you return to the website (unless you pinch ...
When it deems an orientation change imminent, the script disables user zooming, allowing the orientation change to occur properly, with zooming disabled. The script restores zoom again once the device is either oriented close to upright, or after its orientation has changed. This way, user zooming is never disabled while the page is in use.
To change these settings, choose Safari > Settings, then click Websites. The settings you can customize (such as Reader and Content Blockers) are listed on the left. To apply a setting to a website on the right, first select the setting, then choose the option you want from the pop-menu next to the website. Option. Description.
Can alternate hosts for a meeting (that is scheduled and used for a series of meetings) - go into Zoom settings and change the "Auto Record to. Get work done more efficiently with Zoom AI Companion. The AI Companion Onboarding Center is now live! Learn more. Products. ...
Oklahoma City Council approves final plans for first phase of MAPS 4 Innovation District connectivity projects
This also varies by state. Just to give you an idea of what you might pay to change your birth certificate: Michigan's fee is $50, and Wyoming charges $55. Fee to update your driver's license. This may be pretty minimal. For instance, to change information other than your address in Nevada, you would pay $8.25. Passport fee.
Storage capacity subject to change based on software version, settings, and iPhone model. Size and weight vary by configuration and manufacturing process. iPhone 16 Pro and iPhone 16 Pro Max are splash, water, and dust resistant and were tested under controlled laboratory conditions with a rating of IP68 under IEC standard 60529 (maximum depth ...