Join 100,000+ Drivers
- Sponsorship
- Thinking of Becoming a Truck Driver?
- Getting a CDL License
- Trucking Driving Jobs Guide
- Trucking Company Guide
- Trucker Life
- Paid CDL Training
- CDL Schools
- Professional Driving Skills + Knowledge
- Owner Operator
- Latest Articles
- Truck Driver Skills

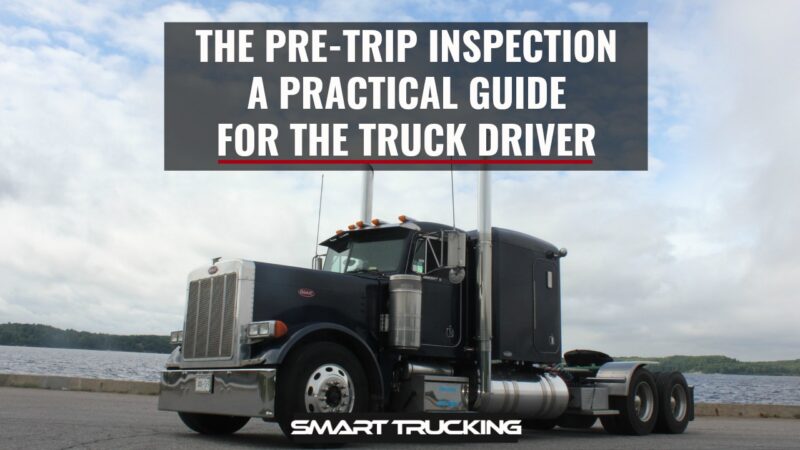
The Pre-Trip Inspection: A Practical Guide For the Truck Driver
Updated February 24th, 2022

- Facebook 426
- Pinterest 1
The pre-trip inspection is an integral part of every road trip for a trucker.
It’s probably the most disliked and most often overlooked part of the job of the professional truck driver in the trucking industry.
This inspection is meant to be a thorough check of the truck, trailer and load.
The check is to ensure that everything is in correct working order, prior to the truck and driver, departing on a trip.
Any damage or issues found during the pre-trip inspection which needs attention, must be addressed before departure.
CDL Test Pre-Trip Inspection
If you just came through the process of getting your CDL, you can breathe a sigh of relief.
You don’t have to check all 500 or so items that you had to memorize for the test every single day.
Out on the road, a thorough pre trip shouldn’t take more than 10 to 15 minutes.
DVIRs – Daily Vehicle Inspection Report
According to federal law ( FMCSR Section 396.11 ), every day, a driver must submit a Daily Vehicle Inspection Report (DVIR) for each power unit he operates. Multiple trailers can go in one report.
DVIRs are either paper or electronic.
Not every trucking company (ahem) enforces this policy, so some truck drivers can go months or years without submitting a DVIR.
Minimum DOT Pre-Trip Inspection Requirements
- Service brakes including trailer brake connections
- Parking brake
- Steering mechanism
- Lighting devices and reflectors
- Windshield wipers
- Rear vision mirrors
- Coupling devices
- Wheels and rims
- Emergency equipment
Your trucking company’s DVIR might be more thorough.
This is a thorough Q&A on DVIRs which you can refer to.

Inspecting a New Truck
When you are assigned a new truck (either daily or just once), there are a few additional things you need to check for on the pre-trip inspection.
Truck Compliance
- Cab card and book – This is a book containing the registration, inspection, permits, cab cards, IFTA paperwork, and any other important papers for the truck. Make sure it is in the truck and all the paperwork is up to date.
- Inspection sticker – This is outside the truck. Find it and make sure the truck is not overdue.
- IFTA stickers – These are the fuel tax compliance stickers. They are on both sides of the truck. Make sure the current year is displayed.
- Elog device – Most trucks are required to have a working elog device.
- Required permits – These are in the cab card book. The most common permits are Heavy Motor Vehicle Trip Permit (Oregon) and the Weight Distance Tax Permit (New Mexico).
- New York HUT sticker – This is usually on the front of your truck. It’s a type of permit.
- License plate – Make sure the license plates on the front and back of the truck match.
- FMCSA Safety Regulations and Hazardous Materials book – These will be given to you by your company. They must stay in your truck within arms reach from the driver’s seat.
- Paper logbook – If your e-log stops working, you must log your hours in a paper logbook, which must be kept in your truck.
- Medical card – You must keep your current medical card in your truck. Always have your CDL on you as well.
- Orange triangles – You must have 3 triangles for when you break down.
- Fire extinguisher – Must be charged and secured to the truck. No rolling around on the floor.
- Extra fuses – If your truck doesn’t use circuit breakers, you must have spare fuses.
- Load bars and/or straps
- Extra oil, coolant, and windshield washer fluid
- Line antifreeze and diesel anti-gel
- Chains and bungees
- Gladhand seals
- Hammer, wrench, wire cutters, cable cutters, knife with glass-breaker
The Class A Pre-Trip Inspection Process
Unless I have to bobtail to pick up my trailer, I inspect my truck and trailer together.
The best way to memorize a thorough pre trip is to do it the same way each time.
Your process will look different from mine, but as long as you are consistent, you will be less likely to miss anything.
I do the inspection first thing each morning as well as every time I swap trailers.
Paperwork and Trailer
- Check the paperwork. It should be the first thing checked when you get to your truck.
- Match the trailer number to your paperwork. If your trailer has a seal, make sure it matches too.
- Unsealed trailer. If your trailer does not have a seal, open it and confirm the product matches the bills. If you are picking up an empty trailer, open it and make sure it’s actually empty.
- Confirm your destination. Ensure the destination is the same as on your trip sheet or load assignment. If there is a discrepancy, call your dispatcher.

I personally like to start with checking under the hood of the rig. Not everyone does, but I do.
Under the Hood of the Truck
I walk around the front of the truck, making sure all the lights work. Then I open the hood.

- Fluid levels – Check all fluids: coolant, oil, power steering fluid, and windshield washer fluid. Make sure caps are tight for the rad, oil filler, power steering fluid and the dip-stick is seated properly.
- Alternator, water pump, power steering pump –Make sure these are in good working order, and the belts are not worn or have too much slack.
- Observe at the engine block. Check for leaks, fluid running down the side of the engine. Check for wear, cracking or fraying. Inspect fan belts for proper tension and signs of wear.
- Hoses – Check all hoses for leaks, cracks, and tears.
- Wiring – Check wiring for wear.
- Steering linkage – Check linkage for worn or missing parts.
- Tires – Tires should be properly inflated and have decent tread. If there are flat spots on the tire, it needs to be replaced.
- Hub seal – Make sure it’s not leaking and wiped with oil if transparent.
- Brakes – Brake chambers should not be out of round and should be free of grease. Shoes should not be worn down too much.
- Slack adjusters – Pull slack adjuster. If it travels more than an inch, it needs to be adjusted.
- Suspension – Shocks should be in good condition, and not covered in grease or oil.
Back of the Truck
Next, I check the back of my truck because it’s easier to check this before hooking to a trailer.
- Tires – Tires should be properly inflated and have decent tread. If the tires have flat spots, the tire needs to be replaced.
- Suspension – Shocks and airbags should be in good condition, and not covered in grease or oil.
- Drive shaft – Driveshaft should be undamaged and free of grease. Make sure there is no debris in the u-joints.
- Frame – The frame should not have any welds and not cracked or significantly rusted.
- Fifth wheel – The fifth wheel should be properly greased and not broken.
- Fuel tanks – Fuel tanks should not be leaking.
- Stairs and catwalk – Stairs and catwalk should be free of debris and not broken.

Tires should be checked with a tire gauge.
Tip . This is especially if you are slip seating. Tire thumpers aren’t very accurate. If you use a tire thumper, still check with a tire gauge from time to time.
Drives and tandems should be inflated to 100-110 psi and have a minimum tread or 2/32in. Steer tires should be inflated to 110-120 psi and have a minimum tread of 4/32in.
Tires under 50 psi should be replaced, as they can’t retain enough air pressure.
Flat spots can occur from dragging tandems in the winter or when trying to slide the tandems. Tires with flat spots should be replaced.
Check tires for damage, nails, and punctures.

Next, I jump in my cab and start my truck.
- Gauges – Make sure air, oil, and water temperature gauges rise to normal levels.
- Mirrors – Adjust mirrors before moving your truck.
- Windshield wipers – Make sure they work and sit flat against the windshield.
- Horn – Make sure the city and air horns both work.
- Heat and A/C – Check to see if heat and/or air conditioning is working.
- Seat belt – Seat belt should not be frayed and should move freely.
Coupling and Air Lines
This is what could happen if you don’t do the tug test.
The pre-trip inspection is a pretty important thing to do.
Learn your pre-trip procedure and do it when required.
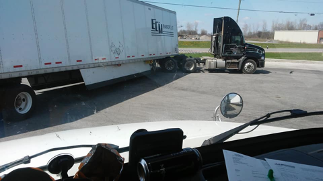
This is why you should always do a tug test when picking up a trailer. The passenger side of the front of the trailer is resting on the frame of the truck and NOT hooked up to the 5th wheel.

The front left corner of the trailer is supported by retracted landing gear only. (Not good!)
The truck driver in this photo (hopefully) learned how critical a pre-trip is. Don’t end up in a pickle like this guy.
Next, I hook up to my trailer.
- Tug test – I back under my trailer until I hear a click, and then immediately do a tug test.
A tug test tests both your coupling and your brakes. If you pull away from your trailer, you aren’t hooked properly.
If you pull your trailer with you, your trailer brakes are out of adjustment. Be absolutely sure to write it up and have it corrected before departure.
- 4 Ways + Headlights. I also turn on my four-way flashers and headlights.
- Airlines and pigtails – Next, hook up airlines and pigtails (electrical connection). Inspect to make sure they aren’t leaking or ripped.
- Visual check of Fifth wheel – Look at the fifth wheel arm under the trailer to make sure it is coupled. The arm should be in.
- Landing gear – Raise the landing gear and check for damage.

Next, I check the bulkhead (front of the trailer).
- Wall – Make sure the wall is not damaged.
- Inspection sticker – Check the DOT inspection sticker to make sure it’s not out of date.
- Registration paperwork – Check the front trailer box to make sure the registration is good.
- Reefer unit – If you are pulling a reefer, select the pre trip function on the unit and run it. It should be completed by the time you are finished your pre trip inspection.
Next step for the pre-trip inspection is to check the side of the trailer and the tandems.
- Lights – Lights should be on and flashing.
- Suspension – springs or airbags should be in good condition, and not covered in oil or grease.
- Tandem pins – Tandem pins should be locked in position, and slider arm should be in its cradle.
- Cables – Make sure the tandem cables aren’t dragging on the ground.
- Underbelly – Make sure there are no damaged beams under the trailer. Check the entire length.
- Mudflaps – Mud flaps should not be torn and hanging.
Back of Trailer
Next, I check the back of the trailer.
- Doors – Doors and hinges should not be damaged.
- Door latches – Doors should be closed and secured.
- Seal – Seal should be intact and match paperwork.
- DOT bumper – DOT bumper should not be damaged
- License plate – Check for the license plate. They tend to wear out and fall off.
Passenger Side
Next, I check the passenger side.
- Brakes – Brake chambers should not be out of round and should be free of grease.
- Suspension – Springs or airbags should be in good condition, and not covered in grease or oil.
- Mudflaps – Mud flaps should not be torn.
Ready to Roll

Finally, I jump in my truck and double check my paperwork and destination.
I release my air brakes, roll forward, and push the service brake.
If everything is good, I’m ready to roll.
Post-Trip Inspection
When I’m done for the day, and every time I swap trailers, I do a post-trip inspection. If I am swapping trailers, I do a pre-trip on the new trailer as well.
A post-trip includes:
- lowering the landing gear
- removing the airlines
- uncoupling, and walking around the trailer checking tires, lights, seal, and mudflaps
Then I finish my paperwork and go home.
Slip Seating
If you slip seat (meaning you are in a different truck each shift), your pre- trip check should be more thorough than if you are permanently assigned a truck.
This also applies to the first inspection after being assigned a truck.
Please be courteous and write up any problems or issues found, so the next driver of the vehicle doesn’t have to deal with it.
Side Note: Clean out your truck and throw away any trash. Common courtesy goes a long way in trucking, between drivers.
Pre-Trip Inspection F.A.Q.
Most breakdowns can be avoided with proper preventative measures, such as daily inspections.
Thorough inspections should be done at the start of each shift. Inspections of trailers should be done every time you swap trailers.
Each driver should do a thorough pre-trip every time they swap drivers.
It should take about 10-15 minutes to perform a pre trip inspection.
The DOT. Make sure you stay in compliance so you don’t end up with hefty fines and an out of service.
The best way to memorize your pre trip inspection routine, is to do it the same way every time. That way you’re less likely to miss something. If you have questions, ask your safety team at your company.
Fluids in the engine, engine hoses and wires, brakes and suspension, mudflaps, trailer registration and inspection paperwork, and license plates.
A Few Trip Planning Tips

- Buy and learn to read a trucker’s atlas. It’s useful to plan routes and avoid restricted roads. I find this road atlas a necessity as a professional truck driver.
- Buy a decent trucking GPS , but don’t rely on it 100%. Use common sense.
- Don’t use the GPS in your elog device. It will put you in a lake.
Please note that minimum requirements for the inspection are established by the FMCSA.
But these may vary by state, trucking company, truck type, and trailer type.
It is your duty as a professional truck driver to perform a thorough pre-trip inspection before each trip and before you drive.
You’ll save yourself from headaches, fines and unnecessary accidents.

More Articles You May Like
- Trucking Terms – A Guide to Our Industry’s Lingo
- The 18 Wheeler – A Comprehensive Guide to Big Rigs
CDL Truck Driver Skills – Tips, Tricks + Knowledge to Kick Your CDL Skills Up a Notch!
- The D.O.T. Physical- A Guide For the Truck Driver

Everything You’ll Want To Know About Paid CDL Training
Learn how to talk cb lingo like a trucker, c’mon.

Best Truck Engines + The Worst Truck Engines: A Trucker’s Guide
What you need to know about owner operator vs company driver jobs, twice a month we email you the best tips and new articles to help you better navigate the trucking industry..

10 Truck Driving Safety Tips Every Professional Driver Should Follow
A veteran 40+ years truck driver shares 10 of the all time, tried and true truck driving safety tips ALL professional truckers should know AND follow! If every driver of EVERY vehicle on the road followed these safety tips, our roads would be SO much safer.

Trucker Tips Master Guide: Expert Advice From Experienced Truck Drivers
A collection of trucker tips from million milers and experienced drivers. These are gold nuggets for the new truck drivers!

Instruction, clear advice, videos and photos for truck driver skills, maneuvers and information for all professional truck drivers.
A practical guide to paid CDL training programs. Recommended Company Sponsored Schools, Requirements, pros + cons, what to expect from company-sponsored cdl training programs.

How Witnessing a Fatal Accident Can Affect You: Forever
Truck driving can be a great career. But like any career, there are downsides and sometimes even a dark side. […]

10 Reasons Why Truck Drivers Quit Their Jobs
In the trucking industry, retaining drivers is a constant challenge for trucking companies. Understanding why truck drivers quit is essential […]

The Big Rush For More Truck Drivers To Put Behind the Wheel
It never ceases to amaze me how many regulations govern and control nearly every move we make as truck drivers. […]

Big Rigs, Bigger Dreams: The Best Heavy Haul Trucking Companies, U.S.
Heavy haul trucking is a specialized sector of the trucking industry. It’s a much more challenging driving job than hauling […]
The Fight Against Criminal Record Bias in the Trucking Industry
Truck driving is more than just a job. It’s a lifeline for our communities, delivering goods and keeping the wheels […]
Follow Smart Trucking
- Fleet Training
- CDL Training
- Insurance Discount
- Court Diversion
- Our Courses
- What is the SPIDER Method?
Pre-Trip Inspection: An Essential Guide for Commercial Drivers
Why are pre trip inspections essential, and how can they make a difference in the daily lives of truck drivers? With safety, regulatory compliance, and preventative maintenance on the line, pre trip inspections are a crucial aspect of ensuring smooth and efficient operations on the road. In this blog post, we dive into the critical components of pre trip inspection and provide valuable tips and resources to help drivers stay ahead of potential hazards and costly repairs.
- Pre-trip inspections are essential for promoting safety, compliance, and cost savings while on the road.
- The pre-trip inspection process should take approximately 10–15 minutes and include items such as braking systems, steering & suspension systems, emergency equipment & engine compartment.
- Establishing a routine for pre-trip inspections with sufficient time to check all components is key to ensuring vehicle safety and regulatory compliance. Accurate records must also be kept.
The Importance of Pre-Trip Inspections

- Lessen accident risks
- Comply with regulations
- Maintain the vehicle’s condition
- Avert expensive repairs and downtime
Frequent inspections, such as periodic inspection, are important for maintaining safety and preventing costly issues.
The benefits of conducting pre-trip inspections include:
- Ensuring safety and compliance with regulations like DOT inspections
- Preventing fines, penalties, and potential harm to the driver’s or company’s reputation
- Acting as preventative maintenance, catching minor issues before they escalate
- Saving time, reducing repair costs, and minimizing downtime
Safety Concerns
Ensuring the vehicle’s safety is of paramount importance when conducting pre-trip inspections. A thorough examination of various components is necessary, including:
- Fire extinguishers
- Brake lights
This enables drivers to spot potential hazards and affirm the vehicle’s operational readiness, ultimately reducing the risk of accidents, in line with the goals of the Commercial Vehicle Safety Alliance.
However, the consequences of neglecting a thorough pre-trip inspection can be severe. Overlooking potential hazards may render the vehicle unfit for operation, increasing the risk of collisions. An inspection focused solely on the vehicle can spot these hazards and confirm the vehicle’s safety, underlining the significance of a thorough pre-trip inspection.
Regulatory Compliance
The Federal Motor Carrier Safety Administration mandates pre-trip inspections as part of DOT inspections for commercial motor vehicles, requiring drivers to acknowledge and certify that appropriate repairs have been made before commencing a trip. Non-compliance with pre-trip inspection regulations can result in fines, penalties, and harm to a driver’s or company’s reputation. Conducting periodic inspections can help maintain compliance and ensure the vehicle’s safety.
A Driver Vehicle Inspection Report (DVIR) is an essential tool to guarantee regulatory adherence. Watching a pre-trip inspection video can help drivers understand the process and ensure they follow the correct procedures, further emphasizing the need for thorough pre-trip inspections.
Preventative Maintenance
Preventative maintenance is an essential aspect of vehicle upkeep, aiming to prolong the lifespan of corporate assets, equipment, and infrastructure. By inspecting, cleaning, lubricating, adjusting, and replacing parts as necessary, drivers can detect minor issues before they escalate into major problems, saving time and money on repairs and reducing downtime.
The advantages of preventative maintenance include enhanced safety, increased efficiency, and minimized downtime. By incorporating pre-trip inspections into a regular maintenance routine, drivers can ensure their vehicles remain in optimal condition and avoid unexpected breakdowns or costly repairs.
Pre-Trip Inspection Process

Conducting pre-trip inspections at the start of each shift and each time a trailer swap occurs is integral. Such regularity aids in upholding the vehicle’s safety, roadworthiness, and regulatory compliance while also acting as preventative maintenance. The average inspection should last between 10-15 minutes, allowing enough time for a thorough examination of all components.
Engine Compartment
Inspecting the engine compartment is a critical part of the pre-trip inspection process. Drivers should examine the engine for leaks, fluid levels, belts, hoses, and other critical components to ensure optimal performance and prevent breakdowns. This includes checking the water pump, power steering pump, and alternator for any signs of leakage, fraying of belts, and ensuring that all components are securely mounted.
Additionally, drivers should verify the location of the dipstick and the appropriate oil level, as well as inspect the coolant system for proper levels, hose conditions, and secure mounting at both ends. By carefully examining each part of the engine compartment, drivers can maintain their vehicle’s performance and avoid unexpected issues on the road.
Exterior and Tires
A thorough inspection of the vehicle’s exterior and tires is crucial for ensuring its safety and roadworthiness. This includes checking the lights, reflectors, fuel tank, battery, and tires for any damage or wear that could impact safety or performance. Tires should be inspected for adequate tread, cuts, bubbles, or gouges, and to make sure there are no foreign objects, such as stones or large debris, between the wheels and no space between tires and rims.
Moreover, it is vital to check and maintain the appropriate air pressure in the tires to ensure optimal performance and prevent tire-related accidents. By carefully inspecting the exterior and tires, drivers can guarantee a safer and more efficient driving experience.
cabin and Controls
The cabin and controls of a commercial vehicle play a crucial role in the driver’s safety and comfort on the road. During a pre-trip inspection, drivers should examine the cabin for proper functioning of:
- other essential equipment
They should also ensure the availability of emergency equipment.
In addition to checking seatbelts, mirrors, seat position, steering wheel, pedals, windshield, lights, turn signals, ABS lights, gauges, windshield wipers, and horns, it’s essential to verify that all required emergency equipment, such as fire extinguishers, warning devices, and first aid kits, are present and in good working condition.
By thoroughly inspecting the cabin and controls, drivers can ensure a safe and comfortable driving experience.
Essential Items on a Pre-Trip Inspection Checklist

In addition to the aforementioned items, a pre-trip inspection checklist should also include the engine compartment, exterior and tires, and cabin and controls, as previously discussed. Combining all these components in a well-structured checklist ensures a thorough and effective pre-trip inspection that promotes safety and compliance.
Braking System
The braking system is a vital component of any vehicle, and a thorough inspection is necessary to ensure proper functionality and safety. During a pre-trip inspection, drivers should examine all components of the braking system, including air brakes, parking brakes, and hydraulic systems.
Specifically, drivers should inspect the following parts of the service brake system for any signs of wear or damage:
- Brake chamber
- Slack adjuster
By carefully examining each part, drivers can guarantee the vehicle’s safe operation and prevent potential accidents due to brake failure.
Steering and Suspension
A vehicle’s steering and suspension systems play a significant role in ensuring proper handling and a smooth ride. During a pre-trip inspection, drivers should inspect the steering components, suspension system, and wheel alignment to guarantee the vehicle’s optimal performance.
Specifically, drivers should examine the following components of the steering and suspension systems:
- Ball joints
- Tie rod ends
- Strut mounts or shock towers
- Steering effort for both manual and power systems
By thoroughly inspecting these components, drivers can maintain the vehicle’s handling capabilities and provide a comfortable driving experience.
Emergency Equipment
Ensuring the presence and proper functioning of emergency equipment is a crucial part of a pre-trip inspection. Drivers should verify that all required emergency equipment, such as fire extinguishers, warning devices, and first aid kits, are present and in good working condition.
In addition to these items, drivers should also be familiar with the location and operation of any other emergency equipment required by law or their specific company. By confirming the availability and functionality of emergency equipment, drivers can be prepared for unforeseen situations and enhance the overall safety of their vehicle.
Digital Tools and Resources for Pre-Trip Inspections

- Mobile apps that provide checklists and guides for conducting pre-trip inspections
- Online videos and tutorials that demonstrate best practices for inspecting different parts of the truck
- Websites and forums where drivers can stay updated with the latest regulations and requirements for pre-trip inspections
By leveraging these digital tools, truck drivers can enhance their knowledge and efficiency when it comes to pre-trip inspections.
These digital resources not only simplify the pre-trip inspection process but also help drivers maintain compliance with regulations and support preventative maintenance efforts. By leveraging technology, drivers can enhance their pre-trip inspections and promote safety and efficiency on the road.
Mobile Apps
Mobile apps designed for pre-trip inspections can greatly benefit truck drivers by creating checklists, tracking progress, and storing records digitally for easy access and compliance. Some popular mobile apps for pre-trip inspections include iAuditor, Whip Around DVIR software, Teletrac Navman Pre-trip Checklist tool, and Titan GPS Digital Pre-trip Inspection.
By utilizing these apps, drivers can:
- Generate checklists tailored to their specific vehicle and requirements
- Monitor their progress throughout the inspection
- Maintain digital records for future reference and compliance purposes
This not only simplifies the driver only inspection process but also ensures that drivers are following a thorough and effective routine.
Online Videos and Tutorials
Online videos and tutorials serve as valuable resources for truck drivers looking to enhance their pre-trip inspection skills and knowledge. By accessing these resources, drivers can learn best practices for conducting pre-trip inspections and stay updated on regulations and requirements.
Drivers can find online resources on websites, YouTube channels, and other digital platforms that provide informative and instructional content on pre-trip inspections. By staying informed and utilizing these resources, drivers can ensure they are conducting thorough and effective pre-trip inspections that promote safety and compliance.
Tips for a Successful Pre-Trip Inspection
To ensure a thorough and effective pre-trip inspection, truck drivers should establish a routine, take their time, and keep accurate records. Following these tips allows drivers to boost safety, comply with regulations, and bolster preventative maintenance efforts.
Adopting a consistent routine for pre-trip inspections helps ensure that all components are checked and nothing is overlooked. Here are some tips to follow:
- Allow sufficient time for a thorough inspection, typically between 15-30 minutes, to prevent missed issues and potential safety hazards.
- Check all essential components, including tires, brakes, lights, mirrors, and fluid levels.
- Keep detailed records of the inspections, including any issues identified and actions taken.
Regularly review and update your inspection checklist to ensure it covers all necessary items. By following these tips and maintaining a consistent pre-trip inspection routine, you can demonstrate compliance and support preventative maintenance efforts.
Establish a Routine
Developing a consistent routine for conducting pre-trip inspections is crucial for ensuring all components are checked and nothing is overlooked. Adhering to a systematic process lets drivers ensure the vehicle’s safety, roadworthiness, and regulatory compliance.
Some recommended components to include in a pre-trip inspection routine are:
- The engine compartment
- Exterior and tires
- Cabin and controls
- Braking system
- Steering and suspension
- Emergency equipment
By incorporating all of these components into a well-structured routine, drivers can guarantee a thorough and effective pre-trip inspection.
Take Your Time
Allowing sufficient time for a thorough pre-trip inspection is essential to prevent missed issues and potential safety hazards. An average inspection should last between 15-30 minutes, giving drivers enough time to examine all components in detail and ensure the vehicle’s safety and roadworthiness.
Allocating time for pre-trip inspections helps drivers reduce the risk of missing critical issues and affirm the vehicle’s operational readiness. Remember, a thorough vehicle only inspection is not only essential for safety but also for compliance with regulations and preventing costly repairs down the line.
Keep Accurate Records
Maintaining detailed records of pre-trip inspections is essential for demonstrating compliance with regulations and supporting preventative maintenance efforts. Drivers should document any issues identified during the inspection, along with the actions taken to address them.
Maintaining accurate records enables drivers to easily refer back to past inspections and monitor the vehicle’s maintenance history. This not only helps ensure compliance with regulations but also supports proactive maintenance initiatives that can prevent major issues and costly repairs.
In Conclusion
Pre-trip inspections are an essential aspect of ensuring safety, compliance, and preventative maintenance for truck drivers. By following a systematic process, utilizing digital tools and resources, and implementing practical tips, drivers can guarantee thorough and effective inspections that promote safety and efficiency on the road. Remember, a well-executed pre-trip inspection not only minimizes risks but also contributes to a smoother and more enjoyable driving experience.
Frequently Asked Questions
Which of these items should be checked in a pre-trip inspection.
A pre-trip inspection should include thorough safety inspections of the coupling system, vehicle lights, engine compartment, tires and brakes, chassis, fuel tanks, and an in-cab inspection, and must be logged in your logbook as “on duty not driving.” This inspection should be done before every trip to ensure the safety of the driver and other motorists. It is important to check the coupling system for any signs of wear or damage, as well as the vehicle lights, engine compartment, tires and brakes, chassis, and fuel tanks. Additionally, an in-cab inspection should be conducted to ensure that all safety requirements are met.
What is the first step in the pre-trip inspection?
The first step of the pre-trip inspection is to check under the hood, starting at the front of the vehicle and inspecting the various components of the truck’s engine compartment. Begin by checking the oil level, coolant level, and power steering fluid level. Make sure all hoses and belts are in good condition and that all fluid levels are at the proper levels. Check the battery terminals and cables for corrosion and make sure the battery is connected and functioning.
What are the ABSC in a pre-trip inspection?
Pre-trip inspections involve inspecting all parts of a truck and trailer for abrasion, bruises, cuts, bent, broken or cracked parts, and ensuring all air and liquid-holding parts are not leaking. It’s recommended to do the inspection in order, starting with the truck and then the trailer, touching each part and working from the top down and from the center out while wearing gloves.
Which is not checked during an exterior pre-trip inspection?
The reservoir sight glass of the coolant level is not checked during an exterior pre-trip inspection, whereas the oil pressure gauge, wiper arms and blades, horn and heater/defroster should all be checked.
What does DOT mean in inspection?
DOT stands for U.S. Department of Transportation and a DOT inspection is conducted to ensure that commercial motor vehicles are up to standards and safe for public use.

Everything You Need to Know About CDL Medical Requirements

CDL Hours of Service Regulations – Everything You Need to Know
Complete pre-trip inspection checklist for truck drivers

By The Schneider Guy
Estimated reading time: 4 minutes
As a truck driver, performing a CDL pre-trip inspection is one of the most common and repeated tasks you will complete. Pre-trip inspections help truck drivers ensure their tractor and trailer are safe to operat e before hitting the road.
Keep reading to learn what a p re -trip inspection is and what should be on a p re -trip inspection checklist .
What is a pre-trip inspection?
A pre-trip inspection includes checking over the tractor and trailer a truck driver will be operating . A pre-trip should be completed before the operation of a vehicle :
- At the beginning of a driver’s shift.
- Any time a new trailer is picked up.
- After a 10-hour break.
A thorough inspection usually takes anywhere from 30 minutes to one hour and should be logged as on-duty, not driving (line 4) .
How to complete a CDL pre-trip inspection
CDL pre-trip inspection checklist
1. passenger-side engine: .
- Air filter housing: Secure mounting, cover in place.
- Windshield washer fluid reservoir: No leaks, proper fluid level.
- Turbocharger: No oil or exhaust leaks.
- Engine air ductwork: No cuts, clamps secured.
- Alternator: Mounting secured, no broken or loose wire.
- Accessory drive belt: Not cracked or frayed.
- Air conditioner compressor: Secure m ounting .
2. Front brakes (covers all five brake components):
- Brake drum: No cracks.
- Brake lining: No cracks or damage.
- Slack adjuster: Proper angle to the brake chamber, clevis and cotter pin intact.
- Brake air line: No bulges or cuts, fitting tight .
- Brake chamber: Mounting bolts secured, band clamp secured.
3. Front wheel:
- Tire: ABCs (abrasions, bulges, cuts), pressure = 120 PSI, tread depth = 4/32 min ( DOT ) .
- Wheel: Not cracked or bent.
- Hub oil: Not leaking, at proper level – if it’s a sealed unit, can’t check level.
- Oil seal (outer): Not leaking.
- Valve cap: Not missing.
- Lug nuts: None missing, no streaks or shiny areas, none loose.
4. Driver side of engine:
- Radiator brace: No cracks or missing bolts.
- Radiator: Not leaking, secure mounting.
- Water pump: No cracks, not loose or leaking.
- Fuel water separator/filter: Not leaking, secure mounting.
- Pitman arm/drag link: Not cracked, castle nut secured with cotter pin.
- Steering gear box: Secure to frame, not leaking.
- Power steering reservoir: Secure mounting , no leaks, proper level.
- Dipstick: Right level, secured after check.
- Steering shaft: Secure, not loose or damaged.
- Fuel pump: No cracks, not loose or damaged.
- Oil filler cap: Secure, no cracks.
- Engine coolant reservoir: No leaks, proper fluid level.
5. Steer axle suspension:
- U-bolts: No cracks, no loose or missing nuts.
- Leak spring: No cracks, not loose or shifting.
- Tie rod: Secured with castle nuts and cotter pins.
- Shock absorber: Secure mounting, not leaking oil.
- Axle: Not cracked.
6. Rear suspension:
- Spring mount: No cracks, secure mounting.
- Tire: ABCs (abrasions, bulges, cuts), pressure = 110 PSI, tread depth = 2/32 min ( DOT ) .
- Airbag (bellows): Fully inflated, secure mounting, not ruptured.
7. Side of cab:
- Mirrors: Secure m ounting , no broken glass.
- Doors: No damage, glass not broken, hinges secured, opens and closes well.
- Lights and turn signals: Working, not cracked.
- Steps: Mounted, secured to skirting.
- Battery box: Secure m ounting , cover latched.
- DEF cap: Cap secured.
- Fuel cap/tank: Gasket in place, vent in place, chain secures the cap to the tank.
- Side skirting: No damage, panels secure.
- Side box: Secured, safety triangles present.
- Side of sleeper berth: No body damage.
- Sleeper berth window: No cracks.
8. Rear of cab:
- Electrical cord: No bare wire, no corrosion, check the plug at the end of the cord.
- Air line: Not tangled or worn, rubber grommets not worn, fittings tight.
- Cab shock absorber: Secure mounting, not leaking oil.
- Cab airbag (bellows): Not ruptured, securely mounted.
9. Driveshaft/rear frame:
- Driveshaft: Not cracked.
- Universal joint: Not cracked, not missing bolts, no shiny areas.
- Differential: Not leaking oil.
- Frame: Straight, no non-factory welds.
10. Fifth wheel area:
- Pivot pin: Keeper pin and cotter key intact.
- Slider lock pins: Fully engaged.
- Release arm: Not bent.
- Slider rail: No broken welds or missing bolts.
- Slider stop blocks: Welds not broken, not missing bolts.
- 5th wheel platform: Well-greased, tilted down.
11. Front of trailer:
- Top rail: No cracks or collision damage.
- Clearance lights: Not broken, working properly.
- Registration: Not missing, readable.
- Document box: Not missing or loose.
- Air line /glad hands: No bulges or cuts in air lines, rubber grommets not damaged on glad hands.
- Electric hook up: No broken pins, cover intact.
- PM sticker: Current, legible.
- Height sticker: Legible, legal for route.
- Placard holder: Not broken or missing rivets.
- Tracking device: No cracks or collision damage.
12. Side of trailer:
- Top rail: Not cracked, no collision damage.
- Clearance light: Not broken, operational.
- Bottom light: Not cracked, no collision damage, no missing bolts.
- Landing gear: Legs straight, no broken welds in bracing, sand pads secured and clean handle in cradle.
- Reflector tape: Clean.
- Side panels: No holes or cuts, no missing rivets.
13. Rear of trailer:
- Latches: Secured, not damaged.
- Lights: Not broken or missing, operational.
- Splash guard: Brackets and guard secured.
- License plate: Secure and clean, light is working.
- Bumper: Not damaged, no broken welds.
- Door hooks: Not loose, no missing bolts.
- Hinges: Not cracked, no missing bolts on both sides.
- Door seals: No separation, no rubber tubing sticking out.
14. Trailer suspension:
- Air line: No bulges or cuts, fittings are tight and not rubbing.
- Axle: Not bent or broken.
- Clevis pin/cotter key: Not missing.
- Slack adjuster: Proper angle, clevis pin and cotter pin intact.
- Brake linings: Minimum of ¼ inch thick, not cracked.
- Brake drum: Not cracked.
- Tire: (ABCs), tread depth = 2/32 , air pressure = 110 PSI.
- Spring: Not broken, not shifted.
- Spring mount: No broken welds.
- U bolts: Not loose, not cracked.
- Torque rod: Secure mounting, bushings intact.
- Spring brake chamber: Secure m ounting , band clamp secure.
15. Gauges/inside the truck:
- Fuel: Matches visual when looking in the tank.
- Def level: Maintain a minimum of one light bar.
- Oil pressure: 25-50 PSI.
- Speedometer: 0-60 MPH.
- Air pressure: 90-120 PSI.
Please note that the list above is just an example. It is important to remember the type of driver you are, the company you work for and the type of truck you drive can impact your CDL pre-trip inspection . Be sure to consult your company guidelines or speak with your leader for more information on your post-trip inspection requirements.
Get more great driving tips and guides.
Schneider Guy loves the "Big Orange." He's passionate about the trucking industry and connecting people to rewarding careers within it. He's been the eyes and ears of our company since our founding in 1935, and he's excited to interact with prospective and current Schneider associates through "A Slice of Orange."
Related posts

8 CDL Road Test tips to help you pass

How hard is it to get a CDL?

How to get your CDL – 7 simple steps for new truck drivers

Pre-Trip Inspection Checklist for Truckers
July 28, 2023.

Table of Contents
The most important element of a truck driver’s daily routine is the pre-trip inspection. Pairing a comprehensive pre-trip inspection with a regular preventative truck maintenance schedule is key to ensuring your safety and the safety of others on the road . To give you an idea of how essential the pre-trip inspection is, consider that drivers are required by law to record at least one inspection per day.
Finding and fixing mechanical defects early is essential to functioning as a safe operator.
What is a Pre-trip Inspection?
The pre-trip inspection is the process of thoroughly examining the truck before starting a new journey. It ensures the safety of the driver and the others sharing the road with them by identifying and addressing mechanical issues early on, so truckers can prevent unexpected breakdowns, delays, and potential accidents.
Drivers must record at least one pre-trip inspection per day. Learning the process is crucial for obtaining a commercial driver's license (CDL) and continuing a successful career in the industry.
Benefits of a Truck Pre-Trip Inspection
Aside from being a requirement, here are some benefits of conducting a thorough pre-trip inspection:
- Safety is prioritized by the early identification of potential mechanical issues, ensuring a secure journey for truck drivers and others on the road.
- Early detection and resolution of mechanical problems during this essential routine lead to reduced delays and costly repairs.
- Regulatory compliance is showcased as pre-trip inspections are a legal requirement, reflecting professionalism and commitment to safety.
- Smooth schedules are maintained as pre-trip inspections help prevent unexpected breakdowns and disruptions.
- Early issue identification and timely repairs achieve cost savings and prolonged vehicle lifespan.
- Improved fuel efficiency results from ensuring components like tires and engines are in top condition.
- Trust and professionalism are earned by conducting regular inspections, leaving a positive impression on clients, employers, and regulators.
- Reduced on-road accidents are promoted by verifying lights and brakes are in optimal condition.
- Boosted driver confidence is achieved by confirming the truck's peak condition, enabling worry-free journeys.
This powerful routine keeps us safe, compliant, and efficient on our trucking journey.
15-minute Pre-trip Inspection Checklist

A properly conducted pre-trip inspection is a core proficiency evaluated during the CDL exam. The most efficient way to prepare for the pre-trip inspection exam is to use a checklist. Practice using the checklist several times a day until you have the process memorized and have mastered this important truck driver skill . It will serve you well in helping you obtain your CDL and will continue to benefit you throughout your career.
It may seem overwhelming and difficult at first , but with practice, the pre-trip inspection will become a habit. To help you, we’ve prepared this pre-trip inspection guide.
A good starting point is the FMCSA and its regulations concerning the pre-trip inspection. Different companies have produced their pre-trip inspection checklists, so it’s a good idea to consult your company’s guidance and compare it with the FMCSA regulations to ensure you are conducting a compliant inspection.
Some common elements you will encounter on most checklists include:
1. Tire Inspection
Every 10 ° F change in air temperature can make vehicle, truck, and light truck tires lose one psi pressure. A tire with low pressure has a negative effect on the distance needed to stop and miles per gallon of gas.
Ensure no foreign objects are between the wheels and no space between tires and rims. Evaluate the tires for sufficient tread depth and look for cuts, bubbles, or gouges.
Insufficient treads increase the likelihood of losing control from hydroplaning or sliding on standing water, snow, or ice. This is an especially important detail when preparing to drive your truck in winter weather conditions.
2. Lights and Reflectors Check
Verify the proper functioning of exterior lights, turn signals, warning lights, and clean lenses for maximum visibility. Ensure reflectors are free of dirt or debris and intact without cracks or missing pieces.
3. Brake Examination
Assess the brake system both inside the cab and externally. Verify proper brake adjustment with the slack adjuster, inspect brake linings for the appropriate thickness, and ensure air lines are free from damage, leaks, and properly sealed. This includes checking air brakes, parking brakes, and hydraulic braking systems.
4. Engine Inspection
Check the engine compartment for various components, such as the radiator, air compressor, steering gearbox, water pump, belts, hoses, and wiring.
5. Fuel Tank and Battery Check
Visually examine the fuel tank and battery area to ensure no cracks or leaks. Verify the battery levels for sufficient power and proper charging.
6. Fluid Inspection
Inspect fluids under the truck for signs of leaks, including fuel, oil, coolant, power steering fluid, brake fluid, and windshield washer fluid. Check fluid levels and assess the condition of hoses, belts, and wires for safe operation. Pay special attention to the oil pressure gauge for proper functionality.
7. Windshield
Chipped, cracked, or deteriorated glass weakens the final barrier that prevents the driver from being thrown during an accident and can inhibit clear road visibility. Also worn-out wipers will reduce visibility when driving in the rain or snow.
8. Emergency Kit
Road flares, triangles, and a fire extinguisher are the emergency equipment necessary to safeguard the vehicle and the driver should an accident or breakdown occur and must not be missing or broken. The fire extinguisher must be easily accessible, with a current inspection, and maintain the appropriate PSI.
9. Mirrors with Swivel Mounts
Frozen or loose mirrors prevent the driver from properly adjusting them to cover blind spots. It can create a greater risk of hitting the side or colliding when turning.
10. Coupling System Assessment
Examine the coupling system, paying close attention to the kingpin and sliding fifth wheel locking pin. Check the condition of air lines, apron, electrical connections, gap, glad hands, locking jaws, mounting bolt, platform, release arm, and a skid plate that connects the trailer to the cab.
11. Cabin InspectionTemperature
Inside the cabin, check the seat belts for wear or fray and ensure a snug fit. Assess the operation and functionality of inside and outside mirrors, seat position, steering wheel, pedals, windshield, wipers, horns, lights, and gauges. Make sure all alerting systems, including ABS lights, are working correctly.
Verify the temperature, controls that are not working properly can produce physical stress, fatigue, and distraction while driving.
12. Trailer Examination
Conduct a thorough inspection of the trailer for mechanical defects that might hinder secure mounting to the tractor. Look for holes, cracks, breaks, bends, or missing rivets in the headboard, frame, release pins, cross members, release handles, locking pins, doors, and hinges.
13. Back of the Truck Inspection
Before hooking up to a trailer, check the back of the truck for properly inflated tires with decent tread, undamaged brake chambers, intact shocks and airbags, a clean driveshaft without debris in the u-joints, a sturdy and unbroken frame, well-greased fifth wheel, and leak-free fuel tanks. Also, inspect stairs and catwalks for cleanliness and integrity.
A thorough pre-trip inspection should take approximately 15 to 30 minutes to complete.
How to Properly Report a Pre-trip Inspection?

According to current guidelines by the FMCSA , at least one inspection must be logged in your hours of service each day. Previously, drivers were also required to fill out a pre-trip inspection report each day. However, recent changes in the guidelines now only require you to fill out an inspection report for the purpose of recording a defect found during your inspection. If you have uncovered no defects, you are no longer required to fill out the inspection report.
Companies such as JJ Keller produce market inspection reports that you can keep on board your truck in the event you need to fill one out. Additionally, you can, in a pinch, use these reports as a checklist if you are still unfamiliar with the pre-trip inspection process.
Regardless of how long you’ve been working as a truck driver or how many other trucker safety tips you follow, the pre-trip inspection will serve you well to keep you safe as you go about your day. Discovering critical defects early can be the difference between making it to your next stop and ending up broken down on the side of the road , or even worse, involved in a preventable accident.
Download Your Free Pre-Trip Inspection Checklist for Trucks

Frequently Asked Questions
How often should i perform a pre-trip inspection.
It should be conducted before every journey, ensuring the vehicle's safety and readiness for the road.
How long does a pre-trip inspection typically take to complete?
It usually takes 15 to 30 minutes to complete, depending on the complexity of the vehicle and the driver's familiarity with the checklist.
Can I skip a pre-trip inspection if I'm in a rush?
Never skip a pre-trip inspection. Not only is the inspection a legal requirement, but also it is essential for your safety and the safety of others on the road.
Can I keep a pre-filled inspection report for daily use?
While it might seem convenient, it is not recommended. The pre-trip inspection report is meant to reflect the vehicle's actual condition. Using a pre-filled report without physical inspection may lead to inaccuracies and compromise safety.
Can I delegate the pre-trip inspection?
The pre-trip inspection is the driver's responsibility to operate the vehicle. While others can assist, the driver remains accountable for ensuring it is conducted correctly.

Preparing and Planning Loads Has Never Been Easier
Better Paying Loads Without Calling a Broker. Instant Payments After Delivery. Competitive Rates so you keep 82% of your load.
Related Articles

13 Safety Tips for Truck Drivers

12 Essential Tips for Truck Driving in Winter Weather

Essential Truck Driver Skills to Master
Start driving with cloudtrucks.
Have questions? Give us a call at (469) 250-1214
- Free Practice Tests
Commercial Driving
- Introduction
Getting a CDL
- Fees and costs
CDL Types & Permits
Endorsements & Restrictions
CDL Exam Preparation
Written exams
Practical exams
- Skills test
- Pre-trip inspection
- TSA background check
- Retake policy
CDL Maintenance
ELDT Training & Certification
CDL how-to guides
Mastering the CDL Pre-Trip Inspection Exam: A Complete Guide
Learn how to conduct thorough pre-trip inspections with our guide, a critical component for commercial vehicle safety.

Written by Andrei Zakhareuski. With over 16 years of expertise, Andrei leads Driving-Tests.org, a top online resource for driver education. His leadership has established vital partnerships with over 2,600 libraries, educational bodies, and state agencies.
The CDL Pre-Trip Inspection Exam is an integral part of obtaining your commercial driver’s license. This guide covers Class A and Class B pre-trip inspections, provides a checklist, and offers tips for memorizing the inspection process.
Start a free Pre-Trip Inspection practice test:
- Alabama - AL - Alabama Pre-Trip Inspection Practice Test
- Alaska - AK - Alaska Pre-Trip Inspection Practice Test
- Arizona - AZ - Arizona Pre-Trip Inspection Practice Test
- Arkansas - AR - Arkansas Pre-Trip Inspection Practice Test
- California - CA - California Pre-Trip Inspection Practice Test
- Colorado - CO - Colorado Pre-Trip Inspection Practice Test
- Connecticut - CT - Connecticut Pre-Trip Inspection Practice Test
- Delaware - DE - Delaware Pre-Trip Inspection Practice Test
- District of Columbia - DC - District of Columbia Pre-Trip Inspection Practice Test
- Florida - FL - Florida Pre-Trip Inspection Practice Test
- Georgia - GA - Georgia Pre-Trip Inspection Practice Test
- Hawaii - HI - Hawaii Pre-Trip Inspection Practice Test
- Idaho - ID - Idaho Pre-Trip Inspection Practice Test
- Illinois - IL - Illinois Pre-Trip Inspection Practice Test
- Indiana - IN - Indiana Pre-Trip Inspection Practice Test
- Iowa - IA - Iowa Pre-Trip Inspection Practice Test
- Kansas - KS - Kansas Pre-Trip Inspection Practice Test
- Kentucky - KY - Kentucky Pre-Trip Inspection Practice Test
- Louisiana - LA - Louisiana Pre-Trip Inspection Practice Test
- Maine - ME - Maine Pre-Trip Inspection Practice Test
- Maryland - MD - Maryland Pre-Trip Inspection Practice Test
- Massachusetts - MA - Massachusetts Pre-Trip Inspection Practice Test
- Michigan - MI - Michigan Pre-Trip Inspection Practice Test
- Minnesota - MN - Minnesota Pre-Trip Inspection Practice Test
- Mississippi - MS - Mississippi Pre-Trip Inspection Practice Test
- Missouri - MO - Missouri Pre-Trip Inspection Practice Test
- Montana - MT - Montana Pre-Trip Inspection Practice Test
- Nebraska - NE - Nebraska Pre-Trip Inspection Practice Test
- Nevada - NV - Nevada Pre-Trip Inspection Practice Test
- New Hampshire - NH - New Hampshire Pre-Trip Inspection Practice Test
- New Jersey - NJ - New Jersey Pre-Trip Inspection Practice Test
- New Mexico - NM - New Mexico Pre-Trip Inspection Practice Test
- New York - NY - New York Pre-Trip Inspection Practice Test
- North Carolina - NC - North Carolina Pre-Trip Inspection Practice Test
- North Dakota - ND - North Dakota Pre-Trip Inspection Practice Test
- Ohio - OH - Ohio Pre-Trip Inspection Practice Test
- Oklahoma - OK - Oklahoma Pre-Trip Inspection Practice Test
- Oregon - OR - Oregon Pre-Trip Inspection Practice Test
- Pennsylvania - PA - Pennsylvania Pre-Trip Inspection Practice Test
- Rhode Island - RI - Rhode Island Pre-Trip Inspection Practice Test
- South Carolina - SC - South Carolina Pre-Trip Inspection Practice Test
- South Dakota - SD - South Dakota Pre-Trip Inspection Practice Test
- Tennessee - TN - Tennessee Pre-Trip Inspection Practice Test
- Texas - TX - Texas Pre-Trip Inspection Practice Test
- Utah - UT - Utah Pre-Trip Inspection Practice Test
- Vermont - VT - Vermont Pre-Trip Inspection Practice Test
- Virginia - VA - Virginia Pre-Trip Inspection Practice Test
- Washington - WA - Washington Pre-Trip Inspection Practice Test
- West Virginia - WV - West Virginia Pre-Trip Inspection Practice Test
- Wisconsin - WI - Wisconsin Pre-Trip Inspection Practice Test
- Wyoming - WY - Wyoming Pre-Trip Inspection Practice Test
CDL Class A Pre-Trip Inspection
Engine Compartment Inspection
Includes checking for leaks, belt tension, and the condition of hoses, among other components.
Cab Check/Engine Start
Involves inspecting the cab’s interior, gauges, and starting the engine to check for abnormalities.
Brake Check
Focuses on air brake systems, including air brake checks and the parking brake test.
CDL Class B Pre-Trip Inspection
Vehicle Overview
Begin with a general overview of the vehicle, checking for obvious signs of damage or issues.
External Inspection
Inspect all external components, including tires, lights, and mirrors.
Internal Inspection
Check all internal controls, ensuring everything is functional and within reach.
Pre-Trip Inspection Checklist
- Lights and reflector s: Ensure all are clean and functional.
- Engine oil and coolant levels : Check for adequate levels.
- Steering mechanism : Ensure it’s secure and functioning.
- Horn : Test for functionality.
- Windshield wipers : Check for operability and condition.
- Mirror s: Adjust for optimal visibility.
- Emergency equipment : Ensure presence and accessibility.
- Air brake system : Test for leaks and proper pressure.
Tips for Memorizing the Pre-Trip Inspection for CDL
- Create a Routine : Develop a consistent order in which to conduct your inspection.
- Use Mnemonics : Create acronyms or phrases to help remember the steps.
- Practice Regularly : Hands-on practice is the most effective way to memorize the inspection process.
- Visual Aids : Use diagrams or checklists as visual reminders.
Pro Tip : Practice the pre-trip inspection in a real-world setting. The more you perform the inspection in a practical environment, the more natural it will become.
Remember, the pre-trip inspection is not just a test requirement – it’s a fundamental safety practice every commercial driver should master. For more resources and detailed guides, visit Driving-Tests.org .
Secure your CDL with confidence!
Our exclusive CDL Premium program offers comprehensive online training with an ELDT certificate, authentic exam questions, and a solid Pass Guarantee, starting at only $49. Ideal for first-time applicants, seasoned drivers, and those new to the U.S. road rules.
Explore CDL Premium
Was this page helpful?
- Start a free Pre-Trip Inspection practice test:
- CDL Class A Pre-Trip Inspection
- CDL Class B Pre-Trip Inspection
- Pre-Trip Inspection Checklist
- Tips for Memorizing the Pre-Trip Inspection for CDL
- Skip to main content
- Skip to primary sidebar
- Skip to footer
Truckers Training
Everything you need to know to become a truck driver
Pre-trip Truck Inspection 101

by Geoff Craig, MBA
With the many millions of miles driven by trucks every year, pre-trip inspections are as important as ever. Even though on average trucks are safer than they ever have been, this is because of the success of regular checking.

Drivers and fleet managers should know their requirements. A pre-trip inspection of about 15 minutes should take place every day before any journey. This will flag up any potential or current problems with the cab, trailer, or coupling. This will then enable any remedial work to be done to keep the truck up to standard, keeping the driver and other road users safe. Prioritizing safety before and after each road trip is key.
The list here is not in any particular order of importance, but each journey should include each of these in its inspection .
Getting Ready
The ideal way to prepare for a pre-trip inspection is to do two things. First of all, have a checklist that contains all the things that need to be checked in and around the vehicle. A good checklist will ensure that everything that needs to be checked will be covered. The headings within this article can provide the basis for a checklist, but your business may have its own that it uses for pre-trip inspections.
If your business does not have a checklist, you could use this article as a basis for creating one, although templates are available on the Internet that can be personalized to your needs.
Checking the Paperwork

If the pre-trip inspection is being done at the beginning of a journey, check the paperwork. This could be checking that the correct goods are in the trailer. It could also involve checking if any import/export documentation is available should you be traveling across borders.
Any documentation relating to the vehicle, e.g., safety certificates, insurance, a driving license should also be checked and made available for easy access if required during the journey. If you are carrying hazardous materials, it is vital to check that all the paperwork is in place for transporting those materials.
Inside the Cab

There are a number of inspections that can take place inside the cab. The most obvious is with regards to the driver’s seat and passenger seat if appropriate, and checking if all seatbelts are working.
The dials and controls that the truck has should be checked that they are all operating, including the horn. Then you should check that there is no damage or obstructions to the windscreen or side windows. You should also check any defrosting or heating equipment in the cab.
Emergency Kit
Trucks should have an emergency kit in case of breakdown. The equipment should be checked on a regular basis, and certainly before embarking on a journey. This is an easy check to forget, but important at any time of year, as an accident can happen at any time.
This emergency kit may include fire extinguishers or fire blankets, which may also be checked separately within the business. This may also include red triangles for breakdowns and spare light fuses.
Checking the Engine

The checking of the engine is perhaps the most important check, as problems here could be catastrophic. A pre-trip inspection of the engine compartment will involve checking for any leaks or damage. This could include oil leaking from where it shouldn’t, or loose hoses or other piping.
Any apparent damage to the engine should be taken very seriously and looked at straight away. A driver who knows his truck will know the sound that it makes, so a pre-trip check could include starting the engine and listening for unusual sounds. This check is particularly important if the truck has not been driven for some time. It would be useful to chock the wheels when running the engine for safety reasons.
Cleanliness
Checking for cleanliness may not seem as important as other checks, but it is a very important part of the pre-trip inspection. A clean, well-looked after vehicle can give confidence to customers that their goods are also looked after.
Mud and dirt on a truck can also sometimes hide major or minor problems underneath that would otherwise be missed. Any areas where air needs to circulate should be checked for ingress of dirt or mud that would make operation difficult.
If mud and dirt are left on the truck, it can eventually cause damage to bodywork. Damage to bodywork can affect the safety and integrity of the truck, so should be cleaned off regularly.
Internal dirt in the cab or junk left around can affect the workings of the defrosting or heating system.
Checking Fuel
Does the truck have sufficient fuel to get going on the journey? Will fuel need to be added soon, in which case where from? Do the fuel gauges on the vehicle work effectively and accurately? Are the fuel lines clean, allowing fuel to easily get to the engine? Many of these can be checked either before the interior cab inspection or whilst inspecting the engine.
Battery Check
The battery should be checked for effective operation. The terminals connecting the battery to the vehicle can be checked for damage or corrosion. Many trucks allow the connection of a battery voltage tester via the in-cab cigarette lighter. This can confirm whether the battery is charging correctly. The check should also test that the battery is seated correctly and does not move during transit.
The Coupling System

The coupling system is a vital system for any truck, connecting the truck to the trailer. This check should involve checking that the electrical and air lines are properly connected. There should be no obstructions or any sign of wear and tear on the lines that could indicate a potential failure. Check that the electrical line has no exposed wires. Check that the air lines have no leaks, rotting, or cracks.
The Trailer
The trailer should be checked from the front to the back to check that all connections are secure. There should not be any missing rivets or holes in the headboard or nearby. The landing gear should be checked for sturdiness and solidity. There should be no signs of cracks, broken or bent areas, as these could cause catastrophic failure.
The suspension and the brake system should be checked on the trailer as well as on the cab. This is because they are independent in operation from the trailer and therefore could have their own problems.

The tires on both the cab and the trailer should be checked thoroughly. All tires, including spare tires, should have sufficient depth of tread. Mud flaps should also be secured in place so that they can operate properly. Wheel nuts can also be checked for tightness and to ensure that none are missing.
The lights are a huge part of other drivers on the road knowing your intentions as well as keeping you safe. The lights on the front of the cab should be checked – headlights, sidelights, and indicators. Then the lights on the trailer should also be checked – rear lights, indicators, and brake lights. Do not presume that as the lights work on the cab that they work on the trailer.
When checking the lights, do not forget to check the reflectors. These become particularly important for driving in the dark but are vital at any time.
The air brakes can be checked by means of a leak down test, to ensure that there is no loss of pressure nor leaks in the system. This will also test the warning system that warns the driver of problems.
With the safety of vehicles being paramount, and roadside inspections common, the pre-trip inspection is vital. It gives the driver, the business, and the customer confidence that both the truck and the goods transported are as safe as possible.

Geoff Craig, MBA
Geoff is a freelance writer at TruckersTraining.com with 20+ years of experience driving trucks and buses, dispatching, supervising, and training commercial driving teams. His expertise is writing topics on the transportation and trucking industry, and information technology trends.
- How to Become a Walmart Truck Driver
- Best Semi Trucks of the Future Revealed
- Can You Get a CDL License Without Going to School?
- Top 10 Highest Paid CDL Jobs
- How to become Truck Driver
- CDL Training
- Best CDL Schools by State
- Truck Driver Salary Guide
- CDL Scholarships Guide
- Paid CDL Training
- Veterans Grant
- Trade Adjustment Assistance (TAA) Grant
- Privacy Overview
- Strictly Necessary Cookies

This website uses cookies so that we can provide you with the best user experience possible. Cookie information is stored in your browser and performs functions such as recognising you when you return to our website and helping our team to understand which sections of the website you find most interesting and useful.
Strictly Necessary Cookie should be enabled at all times so that we can save your preferences for cookie settings.
If you disable this cookie, we will not be able to save your preferences. This means that every time you visit this website you will need to enable or disable cookies again.
Prime’s Guide to Pre-Trip Inspections
Tractor-trailers can weigh up to 80,000 lb . if you count the semi, trailer and cargo. Operating a heavy tractor-trailer can be dangerous, so drivers undergo extensive training to earn their CDLs and start their careers.
Whether studying for your CDL test or heading to your next customer, pre-trip inspections help you catch problems with your vehicle or trailer. Unchecked issues can lead to accidents or extensive repairs.
Do you know how to perform a pre-trip inspection? Need a quick refresher? Follow our guide to pre-trip inspections to learn the basics. Reach out to our Safety Department for more in-depth information.
Use these quick links to jump to sections of the article:
- The Engine Inspection
- Driver Door Area & Tires
- Trailer Pre-Trip Inspection
Lights & Reflectors
In-cab pre-trip inspection , large truck crash statistics .
Knowing how to operate a semi-truck safely in various conditions is imperative for drivers. In 2019, there were 510,000 large truck crashes, according to FMCSA’s 2021 Pocket Guide to Large Truck and Bus Statistics .
Of these crashes, 4,479 were fatal, and 114,000 were injury crashes involving large trucks. Most fatal large truck crashes involved those weighing more than 33,000 lb.
Accidents happen. Drivers can mitigate their risk of an accident by being responsible behind the wheel , following federal regulations and performing pre- and post-trip inspections.
Your Pre-Trip Inspection Checklist
Drivers must provide a vehicle inspection report at the end of each day. Vehicle inspection reports list any issues that could affect the vehicle’s operation and safety. Inspecting vehicles before and after each trip helps catch problems and keep drivers safe.
At a minimum, each report covers the following parts of a vehicle :
- Coupling devices
- Emergency equipment
- Lights and reflectors
- Parking brakes
- Service brakes
- Steering mechanism
- Tires and rims
- Windshield wipers
Pre-trip inspections take around 15 to 20 minutes. You’ll examine your truck and trailer to ensure it’s ready for the trip.
Before every haul, you should check that you have your license, registration, medical card, updated inspection sticker and FMCSA Safety Regulation manual. If you’re picking up a trailer, always make sure the trailer number matches the number listed on your assignment.
Follow these steps to inspect your tractor-trailer, and watch our video on Prime’s pre-trip inspections . Chock your tires before you begin, so the vehicle doesn’t roll or slip.
Under the Hood: Examining the Engine
Start your pre-trip inspection by looking at the engine. Lower the gear guard so you can open the hood. Remove pins and unlatch the hood to do so. Once the hood is open, step back and look underneath the truck to see if there are any leaks.
Passenger Side
On the passenger side, make sure that your general hoses and alternator are free of cuts, abrasions or cracks. Hoses should be sufficiently secured, exhibiting no signs of leaks.
Driver’s Side
Walk around to the driver’s side and conduct a similar examination. Look at the parts listed below for signs of wear, abrasions and leaks. Your coolant and oil levels should be filled to the manufacturer’s specifications. Keep an eye out for fraying belts, improperly secured parts, and missing castle nuts and bolts.
- Air compressor
- Belt-driven water pump
- Coolant reservoir
- Gearbox and hoses
- General hoses
- Power steering fluid
- Power steering pump
- Shock absorber
- Spring hangers and arm
- Steering linkage
Check Your Brake System
Drivers must check the brake hose, brake chamber and slack adjuster. When pulled by hand, the push rod should not move more than 1” with the brakes released.
Your brake line should be free of debris and oil, and the hose material shouldn’t be worn too thin.
Outside Driver Door Area & Tires
If the engine looks good, inspect the outside of the truck.
- Check your mirror on the driver’s side to ensure it is clean and firmly mounted to the vehicle.
- Open the driver’s door, and examine the door’s seals and hinges for cracks or dry rot.
- The fuel cap should be on tight, and the fuel seal should not leak.
- Ensure that the catwalk and steps at the back are clear of any objects or debris.
In addition to the steps above, drivers should look at the following parts for damage, wear or debris buildup:
- Brake hose, chamber, lining and drum
- Drive shaft
- Frame and cross members
- U-joints and bolts
Check Your Tires (All of Them!)
The tires on your tractor-trailer should have a tread depth of no less than 0.125” and be aired according to the manufacturer’s standards. You can check the air pressure with a gauge and adjust it based on your load and the temperature .
The rims shouldn’t be bent or broken, and there shouldn’t be cracks around the bolt holes. Behind the tire, the mud flap should not be tattered or loosely attached to the vehicle. There should be space between the mud flap and the tire.
Trailer Pre-Trip Inspection
Is the truck good to go? Check! Now it’s time to inspect the trailer. Walk around the trailer and examine it for cracks, abrasions or broken parts.
- Brake hose, lining and chamber
- Frame and cross members
- Shock absorbers
You’ll also want to check that:
- The landing gear is fully-raised with the crank handle secure in its cradle. The landing gear and mud flap should be a proper distance apart.
- The tandem relief’s handle and locking pins are in the fully-locked position.
- The slack adjuster and push rod don’t move more than 1” when pulled by hand.
The back doors of the trailer should latch properly. The trailer’s lock rods and hinges must be intact and not bent. Your trailer should also have door chains for safety when loading and unloading.
Coupling: Back of Tractor, Front of Trailer
A driver’s next step is to examine where the tractor and trailer connect.
- Electric line — Ensure there are no exposed wires. The line should be secure.
- Air line — Your air line should be secured at both ends and not leaking.
- Gladhands — Check for worn or rotted seals on gladhand couplings. Make sure there are no leaks in the gladhands connected to the trailer’s air brakes.
- Trailer apron — No gap should exist between the apron and the skid plate. The skid plate should be lubed.
You should also check the kingpins, mounting bolts, and the sliding fifth wheel and locking pin.
Refrigerated Trailer Inspections
When you inspect one of Prime’s refrigerated trailers , you start by selecting the “pre-trip” option on the trailer’s display. It will take the reefer 10 to 15 minutes to complete a self-inspection and notify you of anything in need of adjustment or repair.
While the reefer’s self-test runs, you should look for any signs of damage on the bottom rail, top rail and sides of the trailer. Reefers are insulated. Drivers need to examine the trailer for cracks and exposed insulation.
You don’t want to drive off without working lights. The lights on your truck and trailer should be securely in place, not cracked and amber in color.
- Clearance lights
- Marker lights
- Headlights
- Tail lights
- Reflective tape on trailer and mud flaps
Once you’ve checked that the lights and reflectors are intact, you should test your lights and turn signals. Climb into your cab and turn the following lights and signals on:
- Left turn signal
- Right turn signal
- Four-way flashers
- Brake lights
Inside your cab, you’ll check that your seat belt latches and is not too worn. Next, check that you have a fire extinguisher that’s charged. Ensure your cab has three reflective triangles under the bunk area and electrical fuses in the glove box.
Once you’ve reviewed your safety gear, adjust your mirrors, start the engine and check the dashboard’s instrument panel:
- Oil pressure — It should be rising as the engine runs.
- Voltmeter — It should show the alternator charging between 13 and 14 volts.
- Air pressure — It should be around 120 to 125 psi.
While you’re here, test the heat and air conditioning, city horn and air horn.
Air Brake Test
With your tires chocked, you can perform an air brakes test. To do so, release both brakes and turn the truck off. When you turn the truck back on, you will apply pressure.
- Apply hard pressure to the brake.
- Watch for the gauges to stabilize.
- Hold a hard brake for one minute. You don’t want to lose more than four psi during this minute.
- Pump down on the brakes until the gauges read at or before 60 psi. Your warning light and buzzer should come on.
- Pump down on the brakes until the tractor and trailer valves pop up between 40 to 20 psi.
Parking Brake Test
After testing your air brakes, you can test your parking brake. Allow the truck to rebuild its air pressure before testing the parking brakes.
- Remove wheel chock.
- Release the tractor brakes and apply the trailer brakes.
- Put the truck in “drive.”
- Give your trailer brakes a light tug, ensuring they hold.
- Switch. Release the trailer brakes and apply the tractor brakes.
- Give your tractor brakes a light tug, ensuring they hold.
- Release both brakes.
- Pull forward to 5 mph, then use the brake pedal. The truck shouldn’t pull left or right. It should come to a smooth stop.
What to Do if There’s an Issue During Pre-Trip Inspection
Contact your fleet manager or road assistance immediately if you find an issue with your tractor or trailer. Prime will take corrective action and advise you on what to do next. Repairs must be made before the tractor-trailer can be dispatched again.
Inspection violations affect both the driver’s and carrier’s records. Violations can decrease a carrier’s CSA score . FMCSA keeps records of driver and vehicle violations. These records are updated monthly.
CDL Pre-Trip Inspection Test
Truck drivers must begin each work day with a pre-trip inspection. The Class A CDL test requires new drivers to know how to do a pre-trip inspection. Student drivers must be able to identify truck and trailer parts and understand how they operate.
You’ll walk an examiner through a pre-trip inspection for that portion of the CDL test. The best way to remember what’s on a pre-trip inspection checklist is to perform inspections the same way each time. The more you practice, the more it will become second nature.
Are you ready to become a driver?
Do you need CDL training? Our Driver Training Program prepares you for your CDL exam and offers experience hauling real loads.
Apply online to start our CDL training program, or contact our Recruiting Department at 866-290-1568 for details.
Recent Posts

10 Semi-truck Organization Ideas: Easy Cab Storage

10 Construction Zone Safety Tips for Truck Drivers

Tips for Truck Driver Parents: Ways to Connect With Your Kids
Transportation solutions, carrier solutions, drive for prime, work in house, success leasing.
Created by: Campaignium
Privacy Overview
- Company Culture
- Company Programs
- Leadership Team
- Fleet Maintenance
- Refrigerated Division
- Flatbed Division
- Tanker Division
- Intermodal Division
- Load Tracing
- Documentation
- Qualifications & Expectations
- Pay & Benefits
- Driver Training Program
- CDL Holders
- Driver Awards
- Salt Lake City
- Pittston, PA
- Springfield, MO
- Jobs At Prime
- View Available Loads
- Prime Power Fleet
- Lease & Lease Purchase
- Benefits of Leasing
- How to Get Started
- Pedigree Benefits
- Financing Information
- Equipment Inventory
- Omnitracs Logs
- Company Store
- Submit Pics from the Road
- Driver Verification
CDL Pre Trip Inspection: Step by Step Guidelines

What is a Pre-Trip Inspection?
A pre-trip inspection is a thorough checkup of your truck to keep public safety and ensure there is no malfunction before starting your journey. A common pre-trip inspection process involves inspecting fluid levels, leaks, tires, brakes, clutch, shock absorbers, fifth wheel, and many other components. After finishing your pre-trip inspection, file your work on a DVIR (Driver Vehicle Inspection Report). Any issues detected must be addressed before departing. A thorough vehicle pre-trip is required by law and takes approximately 30 minutes.
The Pre-Trip Vehicle Inspection Test
To obtain your CDL exam, you need to complete a pre-trip inspection test. You will have no more than 50 minutes to complete a pre-trip vehicle inspection for the state examiner. During the exam, you should identify each part and tell the examiner what you are looking for or inspecting. Within each area, there are multiple parts you must identify.
CDL Pre-trip inspection guide (Step by step)
Follow this four-step process for each part inspected:

After finishing the four-step pre-trip inspection process for each engine part, you can fill in your results in the Pre-trip Inspection Form .
CDL pre-trip inspection checklist
Below is a detailed CDL pre-trip inspection checklist of the different parts of a pre-trip.
Front of tractor
Your pre-trip examination begins at the front of your tractor. Make sure that the reflectors, lenses, and lighting fixtures are clean, undamaged, and properly maintained. Make sure they are reflective and functional. The headlights ought to receive the same attention. It is crucial to have a good line of sight in front of your truck when it comes to safe driving.
Engine Compartment
You specifically check the mounting and operation of your turbocharger, air cleaner, oil level, hoses, pumps, brakes, shock absorbers, brake calipers, brake pads, tires and rims, air pressure, and seals on the passenger's side of your vehicle.
Coupling area
The coupling area in Class A vehicles involves 3 main parts
- Fifth Wheel Type: Mounting Softs, Platform, 5' Wheel Skid Plate, Release Arm, Kingpin, Apron, Sliding 5" Wheel Locking Pins.
- Pintle Hook/BaII Hitch Types : Mounting Bolts/wields, Pintle Hook/Ball, Safety Latch/Locking Device, Safety Chain/Cables, Eye/Coupler, Drawbar/Tongue.
- Tow Truck - Underlift Type: Underlift Reach, Pivot Pin, Crossbar, Receiver Retaining & Safety Pins, Tie-Down Chains or Straps, Safety Chains.'Cables.
Driver door fuel system
- When it comes to airbags, you must look for cuts, abrasions, leaks, bulges, and missing bolts.
- The axle seal must be filled and should not leak in accordance with specifications.
- Ensure that neither the brake hose nor the brake chamber is leaking air.
- The catwalk and steps need to be mounted and free of any loose objects for the truck driver's safety.
Side of truck
The trailer should basically stay the same as when it was initially loaded and attached to the tractor. But before you leave, make sure that everything is in working order. The landing assembly, handles, frame & cross members, tandem release, lights, and reflective tape should all be functional. Verify the trailer for body dents or rusty areas.
Rear of truck
The rear of the trailer is rather simple to inspect. Make sure your license plate is affixed and clearly visible, and check all the reflectors and lights. Confirm that the doors are shut and secured. Ensure the brake lights are in working order.
In-cab Inspection
Here is the list of parts included in the in-cab inspection process:
- Safety Belt
- Lighting indicators
- Oil Pressure Indicator
- Air Pressure Gauge
- Ammeter/voltmeter
- Wipers and Washers
- Heater/Defroster
- Safety/Emergency Equipment
Brake Check
Here are the checklists for inspecting your braking system
- Hydraulic Brake Check/Air Brake Checks (depending on your truck)
- Breakaway Module
- Parking Brake
- Service Brakes
If your truck uses air brakes, it is important to note that the air pressure must be greater than 100 psi to 120 psi to verify the air brake. Pump brakes, 60 psi warning lights, and pump brakes, 40 psi - 20 psi valves pop. Press pedals no more than 4 psi loss.

How to remember Pre-Trip Inspection for CDL exams
Get ready for the CDL exams with our CDL Prep App , providing a variety of exam-like Questions and state-specific practice tests.
- If there are two left-hand turn lanes for you to choose from, which one should you use?
- Both federal and state law insists that all vehicles must be inspected before a trip by...?
- Which of these is NOT a rule to follow for backing safely?
- In which of the following circumstances should you make use of your vehicle's horn?
- Where should the ignition key be during the pre-trip inspection?
- You should try to park so that:
- You do not have hazardous materials endorsement in your commercial driver license. You can drive a vehicle hauling hazardous materials when:
- Which of the following must be closed while the bus is in motion?
- What is the best way to test if your vehicle's spring brakes come on automatically?
- What is the first thing you should do when a low air pressure warning comes on?

CDL Prep holds all the qualities that make it so magical!

- Mar 1, 2019
The Importance of the Pre-trip Truck Inspection
Updated: Feb 17, 2023
Every truck driver should know how to conduct a pre-trip truck inspection. However, many don’t take the time to go through this inspection every time they hit the road. It’s critical to go through this process to make sure everything is operating properly. Failure to do so can result in consequences that can cost money and take you off the road, or worse. Here are five reasons why it’s important for you to perform your pre-trip truck inspection.
Click Here to Download our "Pre-Trip Inspection Checklist"
It keeps you safe
The most important reason to perform a pre-trip inspection is for your safety . It can be dangerous to go out on the road with a load that is not secured, brakes that are damaged, wiring that is not connected, etc. Taking the 30 minutes to ensure that everything on your truck is working properly is worth it if it means you don’t hurt yourself or somebody else.

Don’t get in a habit of skipping a pre-trip inspection because you’ve never had anything go wrong before. It is important to understand that every time you hit the road without checking your truck, there is a chance you’re putting yourself or someone else in danger.
It’s the law
As a driver, you’re required to ensure your vehicle is safe to operate and free from defects. Legally, you need to do this by indicating that you performed a pre-trip truck inspection while “on-duty not driving” duty status. If you do find an issue, you will need to complete a driver vehicle inspection report to avoid violations during an audit. It’s better to catch an issue before a DOT officer does. This will help avoid a violation and a decrease in your CSA score . Depending on the case, the DOT officer could issue a fine.
It keeps you on the road
There are a few ways that not doing a pre-trip inspection can keep you off the road. First, if the DOT catches something wrong with your truck, they can give you a violation and put your vehicle out of service until the issue is fixed.
Likewise, if you don’t become aware of a minor problem for a long time, it can eventually become a major problem. It’s better to catch something minor early so that it can be fixed quickly.
Lastly, having something wrong with your truck can lead to an accident that causes damage to your truck and injuries to yourself or others. If an accident happens, it can keep you off the road for an extended period of time which further hurts your bottom line.
It saves you money
As mentioned earlier, doing your pre-trip inspection can help you catch a minor problem before it becomes something more serious. Chances are, a minor problem will cost less money and fixing it as soon as it pops up will get you back on the road quicker. This way you avoid losing money for the repair and losing money while you wait for your truck to get fixed.
Also, it is better to catch an issue prior to hitting the road so that you can get it fixed at the shop rather than on the side of the road . Roadside repairs typically cost three to five times more than repairs in the shop. This will also save you from having to pay for a tow truck to help you get to a shop.
It reduces liability
It is important to keep in mind that your truck can be involved in an accident that causes serious damage and injuries. Even if it isn’t your fault, it is possible for you to be found liable for an accident if there is no proof that a pre-trip inspection was done properly. This is a big reason why it’s so important to perform your pre-trip inspection and keep track of whether or not you found an issue that needed fixing. If you find an issue and get it fixed, make sure you keep track of when and where the repair happened. It’s possible, and highly likely, for a lawyer to find you liable for an accident if there is an issue with your truck that could have been prevented by proper pre-trip inspection.
How to perform a pre-trip truck inspection
Here is a summary of what you need to look at when performing a pre-trip truck inspection. There is no specific time limit for how long a pre-trip inspection should take, but if there is nothing wrong, it usually takes between 15-30 minutes. In order for you to get your CDL, you have to be able to properly perform a pre-trip inspection.
Engine and front of the truck
You should take a look at all of the components under the hood including the critical fluids. These include power steering, coolant, windshield washer fluid, and engine oil. You also need to check the water pump, alternator, and the air compressor. Lastly, make sure you review the suspension, brakes, and tires.
Truck side and rear
When checking the sides and rear of the truck, make sure you take a look at the air hoses, exhaust, and the catwalk. Also, make sure you review the drive axle, including the tires, brakes, and suspension.
Coupling Device
Make sure you specifically check the fifth wheel and kingpin. The tractor portions will include the skid plate, slide locking pin, and the pivot pin and release arm. You also need to check the trailer portion which includes the apron, the bottom of the trailer, and the kingpin.
Cab check and engine start
The cab check should begin with you checking your seatbelt, the shifting distance, room for the clutch, and that the parking brake is on. Once you turn the vehicle on, check the windshield wipers, the gauges, the heat and defrost, and the vehicle lights. This is also the time to build air pressure for the airbrakes for the brake check.
Brake check
Drivers must ensure that all aspects of the brake system are in proper order. This includes the air brakes, parking brakes, and hydraulic brakes.
Safety equipment check
Lastly, you must confirm the cab includes a fire extinguisher, three safety triangles, and electrical fuses.
Do I really need to perform a pre-trip truck inspection?
Yes! Don’t get lazy when it comes to your pre-trip truck inspection. Take the time to go through with the inspection to help mitigate problems on the road. There is always a chance that something could go wrong even if you’ve never had a problem before. By performing your pre-trip inspections, you’ll save yourself time, money, and potentially your life or someone else’s down the road.

Recent Posts
How to Prepare for Roadcheck 2024
Product Review: Freightliner Cascadia 18” Drop Visor
5 Benefits of Using a Truck Dash Cam
- Optimization
- Safety & Security
- Truck/Vehicle
- Dry Trailer
- INTEGRATIONS
- Utilization
- Reefer Container
- Dry Container
- AIS DATA SERVICES
- VESSEL MONITORING SYSTEMS (VMS)
- Maintenance
- Construction
- Agriculture
- Customer Experience
- Customer Success Stories
- ORBCOMM University
- Customer Care
1-800-ORBCOMM
+1-804-404-8681
- Smart Terminals
- Satellite Modems
- Tools and Apps
- CONNECTIVITY
- Vessel Monitoring Systems
- White Papers
- Success Stories
- In the Media
- CargoWatch®
- Coldchainview
- Device Cloud
- FleetManager.com
- ORBCOMMconnect
- ORBCOMM Platform
- ReeferConnect
- ReeferTrak®
- Everything you need to know about pre-trip inspection checklists
- Transportation
- Jan 18, 2024
- Cody Lirette

Embarking on a safe and efficient journey as a truck driver begins long before hitting the road. The cornerstone of every successful trip is a thorough pre-trip inspection. This guide delves into the essential aspects of a pre-trip inspection checklist. These critical checkpoints can make all the difference in your driver’s safety and the efficiency and success of the journey.
What is a pre-trip inspection?
A pre-trip inspection is a proactive measure taken by truck drivers to ensure their vehicles are in optimal condition and adhere to safety standards and other relevant regulatory requirements. This assessment checks for signs of wear, damage or malfunction on critical components like the engine, brakes, lights, tires, fluid and more.
The goal of a pre-trip inspection is two-fold: safety and compliance . A thorough vehicle examination helps identify potential issues so they can be addressed promptly, minimizing the risk of breakdowns and accidents. The inspection is crucial for compliance with industry regulations and standards. Failure to do so could result in fines, penalties or suspensions.
The importance of a pre-trip inspection
Pre-trip inspections are more than a regulatory requirement; they can help keep drivers and the public safe, maintain cargo integrity and improve vehicle longevity. Here’s why this practice is essential:
- Enhanced safety: Identifies potential mechanical issues before they escalate. This means reduced risk of breakdowns and roadside emergencies.
- Improved efficiency: Addresses issues before they happen on the road to ensure fleets deliver on time.
- Better compliance: Helps meet legal requirements, avoid unnecessary fines and penalties and comply with industry standards and safety protocols.
- Protected cargo: Ensures cargo is secure and adequately loaded, preventing damage during transit.
- Maintain equipment health: Identifies wear and tear on components, allowing for timely maintenance, reducing long-term repair costs and prolonging the longevity of the vehicle and its critical systems.
- Boosted reputation: Demonstrates a commitment to professionalism and responsibility. This enhances a fleet’s reputation and builds stronger customer relationships.
- Driver confidence: Following a standardized pre-trip inspection checklist reassures drivers that their truck is in optimal condition.
Main components of a pre-trip inspection checklist
To ensure drivers cover all the essential components of pre-trip inspections, here are the main checkpoints to keep in mind:
Tire inspection

- Tread depth: Measure tire tread depth . Inadequate tread depth can compromise traction and vehicle stability, especially in unfavorable road conditions.
- Tire inflation: Verify that all tires meet the manufacturer’s specifications. Improper inflation poses safety issues and can lead to uneven wear and reduced fuel efficiency.
- Visible tire damage: Inspect each tire for cuts, bulges or other visible damage. Address these issues promptly to prevent blowouts and other safety concerns.
- Valve stem integrity: Inspect valve stems for damage or leaks and ensure caps are in place. Damaged stems can lead to pressure loss.
Lights and reflectors
- Headlights: Ensure both high and low beams work. Check for proper alignment to maximize visibility without blinding other drivers.
- Taillights: Verify that taillights work, including brake lights and turn signals.
- Clearance lights: Ensure clearance lights work. These enhance the visibility of the vehicle’s dimensions, especially in low-light conditions.
- Reflectors: Confirm the presence and condition of reflectors on all sides of the vehicle.
- Hazard lights: Ensure hazard lights work.
- Turn signals: Ensure the turn signals work on both sides.
Brake check
- Air brakes: Check air brakes for leaks by listening for hissing sounds. Confirm that air pressure builds within a reasonable time after starting the engine.
- Parking brake: Test the parking brake to ensure it holds the vehicle securely.
- Brake fluid levels: Check the fluid reservoir for proper fluid levels. Low levels may indicate a leak or wear.
- Brake pads and shoes: Inspect brake pads and shoes for visible wear. They may need replacing if they are too thin or show uneven wear patterns.
- Brake drums and rotors: Examine brake drums and rotors for signs of scoring, grooves or heat-related damage.
- Brake lines and hoses: Pay attention to visible damage, corrosion, bulging or leaks.
- Anti-lock braking system: Check the dashboard for warning lights.
Engine compartment
- Engine oil: Check the engine oil level. Ensure it falls within the recommended range.
- Coolant: Ensure the coolant reservoir has the appropriate amount to prevent engine overheating.
- Drive belts: Examine for signs of wear, fraying or cracking.
- Hoses: Inspect hoses for leaks, bulges or soft spots. Replace any damaged hoses to prevent leaks.
- Battery: Check battery terminals for corrosion and ensure they’re securely connected. Loose or corroded connections can lead to electrical issues.
- Air compressor: Inspect the air compressor for visible damage and ensure proper functioning for optimal brake performance.
- Power steering fluid: Ensure power steering fluid levels are within the recommended range.
- Air filter: Check for decay and debris. A clogged air filter can reduce engine efficiency and fuel economy.
- Fuel levels: Ensure the fuel tank is full.
- Fuel cap: Verify the fuel cap is tightly secured to prevent spillage and contamination.
- Fuel tank integrity: Inspect the tank for visible damage, rust or signs of leakage
Fluid inspection
- Transmission fluid: Check transmission fluid levels, ensuring they’re within the recommended range.
- Windshield washer fluid: Keep the washer fluid full.
- Differential fluid: Check differential fluid levels. Low levels can lead to differential damage and affect vehicle performance.
Windshield inspection
- Cracks and chips: Inspect the windshield for any cracks or chips. Address any large ones that affect visibility.
- Windshield wipers: Ensure the windshield wipers are functioning. Replace worn or damaged blades.
- Windshield washer jets: Confirm the windshield washer jets spray fluid evenly. Malfunctioning jets can result in uneven cleaning.
Emergency kit
A well-equipped kit ensures drivers are ready to handle unexpected situations on the road, promoting safety and efficiency:
- First aid supplies: Essential medical supplies including bandages, antiseptic wipes, pain relievers and any necessary personal medications.
- Reflective triangles or flares: Confirm that you have reflective triangles or flares to enhance visibility in case of roadside breakdowns.
- Fire extinguisher: Ensure the fire extinguisher has a valid inspection tag and is not expired.
- Essential tools: Check for the basics like a wrench, pliers and screwdrivers.
- Flashlights and batteries: Test the functionality of flashlights and ensure spare batteries are available.
- Blankets or sleeping bags: Essential for unexpected delays or overnight stops.
- Communication devices: Test radios or cell phones.
- Side mirrors: Confirm side mirrors are correctly adjusted for the driver’s line of sight and are securely attached.
- Convex mirrors: Verify the alignment of convex mirrors to provide an optimal wide field of view. Ensure they are not loose.
- Motorized adjustment: If mirrors have motorized adjustment capability, ensure these work.
Front suspension
- Shock absorbers: Inspect for leaks, visible damage or signs of wear.
- Springs: Pay attention to signs of sagging, damage or cracks.
- Bushings and mounts: Ensure bushings and mounts are in good condition and don’t have any significant wear, deterioration or damage.
- Alignment: Test steering stability to identify any abnormal vibrations or wandering.
- Tie rods and ends: Examine tie rods for signs of looseness, wear or damage.
Driver door
- Door Latches: Verify that door latches engage and disengage smoothly to maintain safety while driving.
- Hinges: Inspect door hinges for signs of wear, rust or damage.
- Seals and weatherstripping: Pay attention to any gaps, tears or deterioration of seals and weatherstripping. Proper seals prevent leakage and maintain a comfortable cabin environment.
- Mud flaps: Should be securely mounted.
- License plate: Ensure the license plate is securely attached and visible. A properly displayed license is crucial for regulatory compliance.
- Exhaust: Note any damage to the exhaust system, like rust or loose components.
- Rear doors or gates: If applicable, test the operation of rear doors or gates.
Coupling system
- Fifth wheel: Inspect for damage or misalignment.
- Kingpin: Ensure there is no wear or damage. A well-maintained kingpin ensures a secure attachment to the fifth wheel.
- Locking mechanism and safety latch: Test the locking mechanism to ensure it engages securely to help prevent accidental uncoupling during transit.
- Release handle: A properly functioning handle facilitates efficient coupling and decoupling.
- Connection hardware: Confirm that all connection hardware, such as bolts and brackets, is secure. Loose components can compromise the coupling system.
- Air and electrical lines: Inspect these lines for damage or leaks and ensure the trailer brake and light systems work.
- Structural integrity: Inspect the trailer for signs of structural damage, including rust, dents or wear.
- Lights and reflectors: Check that all lights and reflectors are functional.
- Brake system: Test the trailer brake system, including service and emergency brakes.
- Suspension components: Inspect suspension components for signs of wear.
- Tires and wheels: Ensure proper tire tread depth and pressure.
- Cargo: Confirm that cargo is securely fastened and within legal limits.
- Landing Gear: Check for proper functioning to ensure stability during loading and unloading.
In-cab inspection
- Steering wheel: Ensure the steering wheel is aligned and stable.
- Seat and seatbelt: Adjust the seat for comfort and confirm the seatbelt is in good condition.
- Pedals: Test the functionality of gas, brake and clutch pedals.
- Instrument panel: Inspect gauges on the instrument panel for proper readings about the truck’s status.
- Documentation: Ensure necessary documents like permits are present and up to date. This is essential for regulatory compliance.
- Electronic devices: Test GPS and communication systems.
How to properly report a pre-trip inspection
Reporting a pre-trip inspection is not just an industry requirement. It’s also a critical communication tool between drivers and fleet management . To effectively report results, it’s important to:
- Use a standardized form provided by the company or regulatory body.
- Record observations in an organized manner.
- Be specific and descriptive.
- Prioritize safety concerns in the report.
- Include suggestions for corrective actions.
- Submit the report promptly to allow swift resolution of issues and minimize the risk of operational delays.
- If available, leverage digital reporting platforms for efficiency. Digital reports can transmit information in real-time, streamlining communication between drivers and management.
- Confirm that the report has been received and acknowledged by the appropriate personnel.
What to do if there are issues in the pre-trip inspection
Encountering issues during a pre-trip inspection is common, and educating drivers on the importance of reporting is crucial for ensuring road readiness and compliance.
If issues arise, ensure they are documented thoroughly and reported promptly. If problems are safety-related, communicate these concerns to management immediately. Always practice clear communication, like concise and descriptive language, to ensure a shared understanding and quick resolution.
Frequently Asked Questions
When should a driver perform a pre-trip inspection.
A driver should perform a pre-trip inspection before embarking on each journey. This proactive examination of the vehicle’s mechanical and safety components ensures it’s in optimal condition for the road. Conducting an inspection daily or before the start of each trip is a regulatory requirement in many jurisdictions. Plus, it can enhance driver safety, limit the risk of mechanical failures and contribute to overall road safety.
What is the first step of the pre-trip inspection?
The first step of a pre-trip inspection should involve an external assessment of the truck or commercial vehicle. This includes visually inspecting the vehicle’s overall condition, ensuring no visible defects or safety hazards. Start with a walkaround to identify any significant issues. Then, break the inspection down into components. For example, start with the tires, then move on to the lights, brakes, mirrors, and under the hood.
What is the most overlooked part of pre-trip inspection reports?
Drivers may focus on more visible components, like tires and lights, neglecting critical elements like brake lines, suspension and the exhaust system. Checking for signs of leaks, loose parts, or damage underneath the vehicle is crucial for identifying hidden issues that could compromise safety and performance. Completing every part of the checklist ensures a comprehensive assessment, reducing the risk of overlooking these critical components.
What happens if I don’t perform the inspection?
Failing to perform a pre-trip inspection can have serious consequences, both legally and in terms of safety. Regulatory bodies often mandate these inspections, and non-compliance can lead to fines, penalties or even the suspension of driving privileges.
Beyond legal implications, neglecting the inspection jeopardizes safety. Without identifying potential issues before hitting the road, there’s an increased risk of mechanical failures, accidents, and breakdowns, posing a danger to the driver and others on the road.
Additionally, failure to perform pre-trip inspections may impact insurance claims and the overall reputation of the driver and transportation company.
What is a DOT pre-inspection checklist?
A DOT pre-inspection checklist is a comprehensive list of items and components that commercial vehicle drivers must inspect before embarking on their trip, as mandated by the United States Department of Transportation (DOT).
Where should the ignition key be during the pre-trip inspection?
During a pre-trip Inspection, the ignition key should be in the “off” position. This is a standard safety practice to prevent accidents during the inspection. Keeping the ignition key off allows the driver to thoroughly examine various components without the risk of moving parts or unexpected vehicle movement. This includes checking the vehicle’s lights, brakes, tires and other essential elements. It’s a precautionary measure that promotes the safety of the driver and those in the vicinity during the inspection process.
How long should a pre-trip inspection reports take?
The duration of a pre-trip Inspection can vary depending on factors such as the driver’s familiarity with the vehicle, the complexity of the truck itself, and the thoroughness of the inspection. On average, a comprehensive pre-trip inspection typically takes around 15 to 45 minutes.

Cody Lirette is Senior Content Marketing Manager at ORBCOMM. With over seven years of marketing and communications experience for both the public and private sector, he uses his passion for innovative technology and plain language to build compelling content that provides value.

- Mar 27, 2024
- Meghana Joshi
Cargo theft has been on the rise—reaching unprecedented highs in recent years. With a 57% increase in incidents in North America in 2023 compared to the previous year, it’s an alarming trend that isn’t showing signs of slowing down. According to the FBI, cargo theft losses in the United States are estimated to be $15-35…

- Value-Added Resellers
- Mar 15, 2024
While MWC 2024 is in the rearview mirror, there’s plenty of value to be taken from the three-day event in sunny Barcelona. Each panel discussion was unique in its own way but one key takeaway was this: the cellular and satellite space is heating up with new technological developments that are creating ample business opportunities….

- Feb 21, 2024
- Colin Withers
While it may be true that the whole is greater than the sum of its parts, the parts still matter. To build a powerful IoT solution, you need world-class hardware that can support your applications and deliver ROI for your customers. The ST 9101 dual-mode terminal does just that, providing all the same comprehensive features…

Get started with ORBCOMM

- Mobile Tire Service
- Belts & Hoses
- Michelin Tires
- Bridgestone Tires
- Yokohama Tires
- Firestone Tires
- Sumitumo Tires
- Falken Tires
- Continental Tires
- General Tire
- Synergy Tires
- Venom Power Tires
- Commercial Tire Retreading
- Commercial Truck Wheels
- Passenger Tires
- Light Truck Tires
- Small Trailer Tires
- Small OTR / AG Tires
- Medium Duty Truck Tires
- Commercial Truck Tires
- Motorhome / Coach Tires
- Commercial Fleet Services
- Bell County
- Williamson County
- Milam County
- McLennan County
- Lampasas County
- Hamilton County
- Falls County
- Coryell County
- Bosque County
- Ryan Keating
DOT Pre-trip Inspection Guide
If you’re only getting paid when you’re out on the road, you want to make sure you head out as quickly as possible every day. But as great as it is to get started on your route for the day, you should never hit the open road without first doing your DOT pre-trip inspection and completing your DOT pre-trip inspection checklist.
While your CDL school will teach you how to do a DOT pre-trip inspection thoroughly, here’s a quick introduction to get you started so you and others stay safe while you’re heading down the highway.
What Is a Pre-trip Inspection?
A pre-trip inspection is simply a thorough check of your truck to make sure everything is functioning before you get behind the wheel. Completing your DOT pre-trip inspection checklist gives you a chance to make sure your vehicle is safe and allows you to address any issues or potential issues before you head out on the road. A basic DOT pre-trip inspection includes checking your fluid levels, leaks, tires, 5th wheel, brakes, clutch, shock absorbers, ball joints, kingpins, gauges, lights, and more. Once you’ve completed a check of your truck, you can log your DOT pre-trip inspection in your log books and be on your way. While doing a DOT pre-trip inspection properly takes time, it can save your life.
CDL pre-trip inspections should be taken seriously for several reasons:
- First, it’s a required activity by employers
- Second, your own safety is at stake, as well as the safety of those driving ahead of, behind and alongside you;
- Third, if you’re stopped by law enforcement or a Department of Transportation (DOT) inspector, an infraction could result in fines or instantly render your vehicle “out of service,” which could negatively impact your wallet or your career.
How Long Should a DOT Pre-trip Inspection Take?
There’s no standard or required amount of time a pre-trip inspection should take, but on average, a thorough DOT pre-trip inspection takes around 30 to 50 minutes. While some drivers try to cut corners and do their inspection faster, it’s important to take the time to perform a thorough inspection of your truck now, rather than risk having a breakdown or other issues while you’re on the road later.
Failing to do a complete DOT pre-trip inspection checklist can also land you in hot water if you’re pulled over for a DOT inspection while on route. If you fail a routine DOT inspection, there can be some pretty hefty consequences such as a written warning, fine, suspension, or even jail time if the infraction is serious enough. Long story short—don’t rush your DOT pre-trip inspection.
What Is a Level 1 DOT Inspection?
There are six levels of DOT inspections, but a Level 1 DOT inspection is the most common and most comprehensive. Sometimes you’ll need to stop along a route and complete a DOT inspection. While it might feel inconvenient, it’s important for keeping our roads and highways safe. Thankfully, you can speed the process along by keeping an accurate and up-to-date logbook and understanding what a Level 1 DOT inspection covers.
Your DOT Pre-Trip Inspection Checklist
Once you know how to properly perform your pre-trip check, it can be helpful to have a quick checklist to remind you of all the points you need to hit on your inspection. Each company is going to have its own checklist and its own safety process which comply with Federal Motor Carrier and Safety Administration (FMCSA) guidelines. Each State also follows the guidelines set by FMCSA when conducting a commercial vehicle inspection.
Here are the main points for a Level 1 DOT inspection.
☐ Drug or alcohol use ☐ Use of seatbelts ☐ Logbook record ☐ Medical examiner’s certificate ☐ Hours of service
☐ Brakes ☐ Truck frame ☐ Tires ☐ Suspension ☐ Vehicle inspection report ☐ Coupling devices ☐ Wheels and rims ☐ Turn signals ☐ Van and trailer bodies ☐ Lamps on projecting loads ☐ Windshield wipers ☐ Hazmat placarding ☐ Brake lamps ☐ Tail lamps ☐ Headlamps ☐ Safe loading ☐ Steering mechanism ☐ Exhaust system ☐ Fuel system
As you prepare for your CDL permit test you will learn how to properly conduct a DOT pre-trip inspection step-by-step. Knowing what to expect from a DOT Level 1 inspection will help you feel comfortable and prepared when you do get stopped.
Why Is It Important to Do Pre- and Post-trip Inspections?
The reasons you need to do DOT pre- and post-trip inspections are pretty self-explanatory, but it’s still important to understand why these inspections matter for you, your company, and other drivers on the road. You may have even met drivers who rush through their paperwork and pre-trip inspections to get out on the road quicker. While it’s appealing at the time, doing this can easily result in additional downtime for their vehicles, increased safety issues, and accidents on the road.
Why Are Pre-trip Inspections Important?
Pre-trip checks are in place because not all drivers understand the importance of doing a safety check before they hop behind the wheel. When you drive a massive truck, you have a massive responsibility to keep the road safe. Pre-trip inspections help you catch any safety concerns, save money on vehicle repairs, and reduce liability to yourself and your company.
Why Are Post-trip Inspections Important?
When you’ve just finished a 14-hour shift, the last thing you want to do is a post-trip check of your truck for half an hour. However, a post-trip inspection is just as important as a DOT pre-trip inspection because it gives you the opportunity to repair any issues or potential issues before you need to continue or head out on your route the following day.
Taking the time to do a thorough pre- and post-trip inspection will not only save you time and money, but also lives. Pre-trip inspections make sure you don’t start driving until you know the truck is road safe, while a good post-trip inspection will give you time to fix any issues before you need to head back out on your route.
Are Pre-trip Inspections Required?
DOT pre-trip inspections are absolutely required and are essential for trucking companies, drivers, and owner-operators to run a safe and effective trucking fleet. Drivers are required by law to check their truck before they start their shift and once every 24 hours while they’re on the road. Although companies can be held liable for DOT inspection failures, the ultimate responsibility lies with you, the driver, to conduct a proper pre-trip inspection.
Here are a few more reasons you should always take the time to complete your DOT pre-trip inspection checklist:
It’s Required by Law
As previously mentioned, DOT pre-trip inspections aren’t just there to keep you safe and your truck in good repair—they are required by law by the Federal Motor Carrier Safety Administration. Companies that fail DOT inspections can easily rack up thousands of dollars in fines.
It Protects Drivers
Something as simple as checking your tires could mean the difference between life and death for other drivers. If you get a flat or lose a tire on the interstate you could easily cause a major traffic incident for other drivers. On the flip side, a major accident of your own could mean the difference between your life and death.
It Protects Trucking Companies
Aside from protecting yourself and others, a pre-trip inspection also protects your trucking company from legal liability. Whether you work for a company or are an owner-operator, failure to do a pre-trip inspection appears negligent and can result in fines and be used against you if your case is brought to court.
It Helps Identify Problems
Pre-trip inspections also serve another, very useful service: they allow you to track vehicle repairs and maintenance issues with your trucks. If you’re noticing the same issues cropping up again and again, it may mean a part is defective or that a truck needs to be replaced. Noticing these issues before your truck is on its last leg makes everyone safer on the road.
When you only get paid for your time behind the wheel, it makes sense that some drivers try to cut corners and rush thorough inspections. However, a seasoned driver knows that it’s always better to take the time and do your inspection than to risk losing more time and money—and perhaps even your job—down the road.
Pre- and Post-Trip Inspection Dos and Don’ts

Minimizing over-the-road breakdowns and preventing out-of-service violations are two of the many benefits of pre- and post-trip inspections. Use this list of dos and don'ts to complete your inspections the right way.
Don't: Think they're optional.
They're the law. Federal Motor Carrier Safety Administration (FMCSA) regulation 392.7 requires pre-trip inspections, while regulation 396.11 mandates post-trip inspections.
Do: Know what to check.
For a pre-trip inspection, check:
- parking brakes
- service brakes
- tires and rims
- steering system
- fluid levels
- belts and hoses
- electrical and air lines
- coupling devices
- air brake warning system
- emergency kit
- lights, reflectors and signals
- all applicable paperwork
Check the same items for post-trip inspections minus the fluid checks — don't touch anything that might be hot!
Don't: Kick-check the tires.
Thump checks don't work, because a tire sounds empty only if it's nearly 100% out of air. Use a calibrated tire gauge instead. Also, make sure all tires have the proper tread depth and that all lug nuts are tight.
Do: Double-check the brakes.
More than 1 out of every 4 vehicle out-of-service violations in the U.S. during the 2023 Commercial Vehicle Safety Alliance's (CVSA's) International Roadcheck were due to brake system violations.
Don't: Do an inspection differently each time.
Instead, develop a routine, and go in the same order with each pre- and post-trip check. Consider starting at the cab, then inside the cab, the front of the vehicle, then around the truck starting at the driver's side.
Do: Take your time.
There's no rush. Budget 10-15 minutes for a proper pre-trip inspection.
Don't: Forget the interior.
A clean cab tells an inspector that the rest of the vehicle is in good shape. A dirty cab says the opposite.
Do: Check your wheels.
It's the best way to make sure your truck doesn't accidentally move when you're doing a pre- or post-trip check. Forgetting to do so could cause a serious injury — or worse.
Do: Keep accurate logs.
Whether you use electronic or paper logs, keep them updated regularly, and make sure all other paperwork (driver's license, inspection, insurance) is current.
Don't: Ignore potential problems.
If you spot something out of the ordinary during your post-trip inspection, report it to dispatch immediately.
Download and share a PDF of this Safety Bulletin with your drivers.
English Español Français

At this time the Penske website requires that you enable JavaScript in order to take advantage of our website features. Please enable JavaScript and retry.
For assistance with other Penske services, please use the numbers below.
Truck Rental
- Household Rentals: 1-800-GO-PENSKE
- Business Rentals: 1-844-906-3404
Used Trucks
- 1-866-309-1962
Truck Leasing
- 1-888-234-4201
Penske Logistics
- 1-800-529-6531

Pre-Trip Inspection Checklist for New Truck Drivers
While your CDL schools teach you how to do a complete DOT pre-trip inspection checklist, here's a fast introduction to get you started to stay safe on the road.
December 28, 2021
If you’re only paid while you’re on the road, you’ll want to make sure you leave as soon as possible each day. However, as exciting as it is to start planning your day’s journey, you should never get on the road without first doing your DOT pre-trip inspection and completing your DOT pre-trip inspection checklist .
While your CDL school will teach you how to do a complete DOT pre-trip inspection, here’s a fast introduction to get you started so you and others stay safe on the road.
What Is a Pre-trip Inspection?
Are you interested in a career as a truck driver? If you are, you will rapidly learn about DOT pre-trip inspections and how to do them. A pre-trip inspection is simply a comprehensive checkup of your truck before you get behind the wheel to ensure everything is in working order. Completing your DOT pre-trip inspection checklist helps you to ensure that your vehicle is safe and that any concerns or potential issues are addressed before you hit the road.
Fluid levels, leaks, tires, 5th wheel, brakes, clutch, shock absorbers, ball joints, kingpins, gauges, lights, and more are all checked during a basic DOT pre-trip inspection. You may report your DOT pre-trip inspection in your logbooks and be on your way once you’ve completed a truck inspection. While doing a thorough DOT pre-trip check takes time, it might save your life.
For various reasons, CDL pre-trip inspection checklist should be treated seriously:
- For starters, it is a mandatory activity for employers.
- Second, your own safety, as well as the safety of others driving ahead of, behind, and besides you, is at the stake.
- Third, if you’re stopped by law authorities or a Department of Transportation (DOT) inspector, an infraction might result in fines or place your vehicle “out of service” immediately, which could have a bad impact on your wallet or career.
What Is a Level 1 DOT Inspection?
A Level 1 DOT inspection is the most common and thorough of the six levels of DOT inspections. You may need to make a pit stop along the way to undergo a DOT inspection. While it may be annoying, it is necessary for the safety of our roads and highways. Thankfully, having an accurate and up-to-date logbook and understanding what a Level 1 DOT inspection covers will help speed up the process.
DOT Pre-Trip Inspection Checklist
Once you’ve learned how to correctly complete your pre-trip inspection, having a quick DOT pre-trip inspection checklist to remind you of all the items you need to cover on your inspection might be useful. Each company will have its own checklist and safety procedure that adheres to the Federal Motor Carrier and Safety Administration ‘s (FMCSA) regulations. When conducting a commercial vehicle inspection, each state follows the FMCSA rules.
The following are the main points of a DOT Level 1 inspection.
- Drug or alcohol use
- Use of seatbelts
- Logbook record
- Medical examiner’s certificate
- Hours of service
- Truck frame
- Vehicle inspection report
- Coupling devices
- Wheels and rims
- Turn signals
- Van and trailer bodies
- Lamps on projecting loads
- Windshield wipers
- Hazmat placarding
- Brake lamps
- Safe loading
- Steering mechanism
- Exhaust system
- Fuel system
- You’ll learn how to conduct a DOT pre-trip inspection step by step while you study for your CDL permit test. When you know what to expect from a DOT Level 1 inspection, you’ll feel more at ease and prepared if you are stopped.
Read more >> DOT Weigh Station: The Ultimate Guide 2024
How Long Should a DOT Pre-trip Inspection Take?
There is no standard or needed length of time for a pre-trip inspection, however, a complete DOT pre-trip inspection takes around 30 to 50 minutes on average. While some drivers try to save time by speeding through their inspections, it’s better to take your time and thoroughly check your vehicle now rather than risk having a breakdown or other problems while on the road later.

If you don’t complete a full DOT pre-trip inspection checklist, you might end up in hot water if you’re pulled over for a DOT inspection while driving. If you fail a normal DOT inspection, you might face a written warning, a fine, suspension, or even jail time, due to the seriousness of the infraction. To cut a long tale short, don’t rush your Department of Transportation pre-trip examination.
Why Are Pre- and Post-Trip Inspections Important?
Although the reasons for doing DOT pre- and post-trip inspections are self-evident, it’s still necessary to understand why these inspections are critical for you, your organization, and other road users. You may have even seen drivers who rush through their paperwork and pre-trip inspections in order to be on the road as soon as possible. While it may seem appealing at the moment, doing so can easily result in further vehicle downtime, greater safety concerns, and road accidents.
Because not all drivers appreciate the need of doing a safety check before getting behind the wheel, pre-trip inspections have been implemented. When you drive a large truck, you have a significant amount of responsibility for keeping the road safe. Pre-trip checks help you discover any safety problems, save money on car repairs, and decrease your own and your company’s liability.
Why Are Post-trip In spections Important?
When you’ve just done a 14-hour shift, the last thing you want to do is spend half an hour doing a post-trip inspection of your truck. A post-trip inspection, on the other hand, is just as vital as a DOT pre-trip inspection since it allows you to address any concerns or possible difficulties before continuing or departing on your route the next day.
Not only will doing a complete pre- and post-trip inspection save you time and money, but it will also save lives. Pre-trip checks ensure that you don’t start driving until you’re confident that the truck is road safe, while a thorough post-trip inspection allows you to address any concerns before returning to your route.
Are Pre-trip Inspections Required?
Pre-trip inspections by the Department of Transportation are mandated by law and are critical for trucking companies, drivers, and owner-operators to operate an efficient and safe fleet. Drivers must examine their truck before starting their shift and once every 24 hours while on the road, according to the law. Although organizations can be held accountable for DOT inspection violations, the ultimate obligation for conducting a proper pre-trip check rests with you, the driver.
Here are a few additional reasons why you should complete your DOT pre-trip inspection checklist at all times:
It’s Required by Law
As previously stated, DOT pre-trip inspections are required by law by the Federal Motor Carrier Safety Administration to keep you safe and your truck in excellent shape. Failure to pass DOT inspections can result in fines of thousands of dollars.
It Protects Drivers
For some drivers, something as easy as monitoring your tires might spell the difference between life and death. You might easily cause a big traffic situation for other drivers if you have a flat or lose a tire on the interstate. On the other hand, your own major accident might mean the difference between life and death.
It Protects Trucking Companies
A pre-trip inspection not only protects you and others but also protects your trucking firm from legal liabilities. Failure to complete a pre-trip inspection, whether you work for a corporation or are an owner-operator, seems careless and can result in penalties and be used against you if your case goes to court.
It Helps Identify Problems
Pre-trip checks also provide another important benefit: they help you to keep track of vehicle repairs and maintenance concerns. If you’re having the same problems over and over, it’s possible that a part is damaged or that the vehicle has to be replaced. Detecting these concerns before your truck reaches the end of its useful life makes everyone on the road safer.
It’s understandable that some drivers try to cut corners and rush through inspections when they’re only compensated for the time they spend behind the wheel. A seasoned driver, on the other hand, knows that it’s always best to take your time and conduct your inspection now rather than risk losing additional time, money, and maybe your job later.
Tips to Get You Through a DOT Inspection
Before you finish CDL school, you’ll learn how to do a DOT pre-trip inspection properly, but what happens when you’re pulled over in the real world? When you’re pulled over for a DOT inspection, make the procedure as simple and comfortable as possible for the inspector.
What happens during an on-the-road vehicle inspection?
Understanding what goes on in the thoughts of an inspector during a check might help you prepare appropriately before you hit the road. Keep in mind that inspectors have witnessed everything:
- Due to faulty brakes, trucks were unable to stop in time.
- Under-inflated tires flew out, colliding with other vehicles and dispersing deadly debris.
- Trailers that arrived uncoupled due to faulty locking jaws.
- Trailers that fell off the sub-frame due to improper pin locking.
- Trucks slammed into traffic as the driver dropped out of his seat on a bend while unbelted.
- An inspector’s responsibility is to safeguard the public as well as enforce the regulations. Compliance is extremely essential to the inspector, and your pre-trip inspection should be equally important to you.
If the inspection appears nitpicky, it’s because it’s typically the “small things” that cause the most serious accidents. You shouldn’t have anything to worry about if you’ve done a comprehensive CDL pre-trip check and fixed any concerns before leaving on your journey.
Tips about what inspectors look for
Even before your car comes to a complete stop, an inspector begins taking stock of the driver.
- An inspector might simply follow your car to verify if it is moving in a straight path. If it isn’t, the inspector will search for damaged center pins in the axle, among other concerns.
- As the inspector approaches your cab, he or she will listen to how your vehicle sounds and smells, which might reveal issues such as worn belts or a degraded tire seal that is leaking grease.
- The inspector takes a mental snapshot of your living conditions the moment the door to your cab swings open. Trash or debris on the floorboards, the smell of alcohol or illegal drugs, general uncleanliness, and so on. The word “disorder” conjures up images of someone who is unprofessional and careless. It’s also dangerous:
- Garbage may easily become stuck between the foot pedals.
- The windshield defroster might be hindered by trash on the dashboard.
If you look unconcerned about maintenance in your cab, the inspector may conclude that you are unconcerned about upkeep in general. Always conduct yourself in a professional way.
Other common errors that can cause you to fail an inspection
- Brakes that haven’t been properly adjusted
- If you don’t chock your wheels, you’ll get stuck
- Inadequate, up-to-date documents, such as your log and medical card
- The emergency kit that is necessary is missing (hazard triangles, fire extinguisher, spare fuses, etc., all in good working order)
- Your vehicle’s reflectors are defective
- Rust indicators, such as painted rims or telltale spots around lug nut holes, call for a closer look
- Seat belts that are frayed and worn out
Now that you know what inspectors are looking for, you can do a full CDL pre-trip check to ensure your vehicle is up to code.
Final Tips to Get Through An Inspection
- Be positive and courteous to the inspectors
- Listen to the inspectors; some of them are quite knowledgeable and can teach you a lot
- Don’t get into a debate with them. If you disagree with a ticket, take it to court rather than to the inspector. You’re not going to win, and you can wind up with even more fines
- Even if the inspector is mistaken about anything, don’t make a mockery of them
- Keep your paperwork current and up-to-date by knowing it
- To get them what they need, know how to access your e-log information
- Know what hazmat placarding to use and have it on hand.
A little courtesy and organization may go a long way toward getting you back on the road as quickly as possible. Before you go behind the wheel, do your DOT pre-trip inspection and read over your DOT pre-trip inspection checklist to ensure that any DOT inspections you face are quick and easy. Otherwise, you can read more about truck driver safety tips to keep yourself and others safe on the road.
It’s simpler than you think to find a wonderful career as a truck driver. You can get your foot in the door with a fantastic firm and expand your talents in a high-demand field with the correct education. One of the fundamentals for safely getting behind the wheel and beginning your career in the trucking industry is understanding what a DOT pre-trip inspection checklist entails and what to look for on your DOT pre-trip inspection checklist.
If you are planning to obtain a CDL License to start your career as a truck driver, let’s practice with our free CDL practice test 2021 to get ready for your coming exam!
Your message (optional)
Tennessee TN Passenger Endorsement Test Study Guide 2024
August 8, 2022

Can You Get A CDL With A DUI On Your Record?
You are going to get a CDL but have a DUI on your driving record. Are you worried that having a DUI can prevent your career opportunities? In this article, we will provide the most detailed and accurate answer to the question “Can You Get A CDL With A DUI?”
January 1, 2022

How long does it take to get a CDL in 2024?
Are you looking for information about the CDL? And, how long does it take to get a CDL? Here, you will find the information you need as well as improve more knowledge about the CDL.
An official website of the United States government Here's how you know
Official websites use .gov A .gov website belongs to an official government organization in the United States.
Secure .gov websites use HTTPS A lock ( Lock A locked padlock ) or https:// means you’ve safely connected to the .gov website. Share sensitive information only on official, secure websites.
pre-trip inspection
This page shows Department of Transportation content pertaining to a specific tag. If you cannot find what you’re looking for on this page, please use the search box in the top right of our website.
Question 1: Must a driver prepare a written report of a pre-trip inspection performed under §392.7?
§392.7 Equipment, inspection and use.
Guidance: No.
Cars for sale
Sell my car, car research, sign in, cpo programs compared: honda vs. nissan, both major automakers offer varying levels of comprehensive coverage for used cars..

QuickTakes:
- Both automakers offer three levels of CPO
- Nissan and Honda CPO details differ considerably
- Nissan's program has a longer warranty, but Honda's isn't without perks
Thanks to the existence of today's certified pre-owned (CPO) programs, buying a used car doesn't have to feel like a gamble. Nearly all mainstream automakers' used-car warranty plans are intended to provide peace of mind regarding quality and reliability when purchasing a secondhand vehicle.
They accomplish this through in-depth inspections, extensive warranty coverage, and a long list of benefits that sometimes elevate the used-car ownership experience to the same level as a new vehicle.
As with any used car, truck, van, or SUV, not all manufacturer CPO programs are created equal. Understanding the differences can help you decide which way to go when buying a used vehicle. Here we compare Nissan and Honda's CPO offerings.
Both Automakers Offer Three Levels of CPO
Nissan splits its CPO programs into three tiers, each featuring its own criteria for which vehicles can be included. The Nissan Certified program requires CPO vehicles be less than six years old with fewer than 80,000 miles on their odometer.
The same requirements apply to Nissan EV Certified used vehicles, the automaker's plan for its battery-electric Leaf. Whether powered by gas or electricity, each Nissan CPO candidate is put through a 167-point inspection with 139 points just for EVs, reflecting the Leaf's different engineering.
Any issues discovered by Nissan technicians are corrected before a Nissan Certified/EV Certified vehicle is put on sale, and a CarFax vehicle-history report is also included.
The third program, Nissan Certified Select, is much broader, encompassing used vehicles from Nissan and other automakers. Each Certified Select vehicle must undergo an 84-point inspection and can be as old as 10 years with up to 100,000 miles.
Honda does things a little differently. Its HondaTrue Certified+ level is aimed only at late-model cars with less than 12,000 miles. Nissan has no equivalent.
The HondaTrue Certified level applies to models no more than six years old with less than 80,000 miles. It's in line with the Nissan Certified option, though Honda's 182-point inspection tops Nissan's.
Honda also has a program called HondaTrue Used that works for vehicles up to 10 model years old. Its 100-day or 5,000-mile warranty is shorter than Nissan Certified Select, though. With 112 points, its inspection is shorter than HondaTrue Certified.
As of May 2024, Honda does not have an EV-specific level.

Nissan and Honda CPO Details Differ Considerably
The two main Nissan Certified/EV Certified CPO programs share warranties and benefits. A seven-year or 100,000-mile warranty from the original date of sale, with protections similar to the brand's new-car warranty, includes powertrain coverage. Nissan's coverage further features a year of prepaid maintenance or 15,000 miles, whichever comes first.
Nissan's Certified Select is a little different. The coverage period is much more limited, dropping to six months or 6,000 miles. There is a maintenance component, but it's limited to a single visit for Nissan-branded vehicles in the first year or 15,000 miles and a $50 reimbursement for non-Nissan used cars during that period.
All Nissan CPO vehicles also come with roadside assistance and trip-interruption reimbursement and are subject to a $100 deductible for warranty-related repairs.
Honda's three levels of CPO coverage are directly tied to the age and mileage of each vehicle in question. The newest used automobiles with fewer than 12,000 miles and less than a year from their original date of sale qualify for the HondaTrue Certified+ plan. For used vehicles within Honda's original three year or 60,000-mile new car warranty, Certified+ extends the existing new-car warranty to five years or 86,000 miles picking up where the original left off.
The remaining coverage and benefits also fall under HondaTrue Certified, which adds a year and 12,000 miles onto the end of the new-car warranty. If the new-car warranty has already expired, this becomes a one year or 12,000-mile protection period that starts the day the car rolls off the used lot.
Like Nissan, both Honda Certified+ and Certified vehicles also benefit from a seven year or 100,000-mile powertrain warranty, trip-interruption coverage, concierge service, a pair of oil changes during the first year, and the ability to swap for a different vehicle within the original three-day ownership window.
The last HondaTrue Used level covers models that are up to 10 years old. There's no maximum mileage qualification, but HondaTrue Used restricts warranty coverage to only 100 days or up to 5,000 miles of driving. A single oil change and the other Honda CPO perks are also available during that period.
Note that Honda's warranties don't have a deductible.

Nissan's Program Has a Longer Warranty, but Honda's Isn't Without Perks
Nissan's CPO plans pull ahead of Honda when comparing the length of non-powertrain coverage. The mileage limit for Nissan Certified and EV Certified is 14,000 miles higher than the most robust HondaTrue Certified+ offering.
It's also worth noting that if a used vehicle qualifies for Nissan's CPO coverage, it gets the maximum amount of protection, unlike Honda's multitiered approach, where the most recent used models benefit from a more extended warranty.
However, some of Honda's CPO program features may appeal to you. The chance for owners to trade in their CPO purchase for a different vehicle during those initial days of driving is unique, as are free oil changes. Also, Honda's inspections are longer than those offered by Nissan. That's balanced somewhat by Nissan Certified Select providing longer warranty coverage for up-to-10-year-old vehicles and offering CPO coverage on non-Nissan models.
Written by humans. Edited by humans.
Related articles
View more related articles
11 taken to hospital for heat-related illness at Trump town hall in Phoenix
PHOENIX (AZFamily/AP) ― Donald Trump returned to the campaign trail Thursday with a trip to the Valley, his first appearance in a battleground state since he was convicted in a hush money scandal a week ago.
“Hello, Phoenix! I’m thrilled to be back in beautiful Arizona with thousands of proud, hardworking American Patriots,” Trump greeted the enthusiastic audience at Dream City Church on Cave Creek Road in north Phoenix.
Trump fired up the crowd as he told them, “With your help, less than five months from now, we are going to win the great state of Arizona, and we are going to tell crooked Joe Biden, ‘ You’re Fired! ’”
Meanwhile, Phoenix Fire officials say 11 people attending the event were taken to hospitals after complaining of heat-related symptoms.
Many attendees had been waiting outside the venue since the early morning hours, long before Phoenix hit 110 degrees around 1:30 p.m. Thursday afternoon.
RELATED: Fact-Checking former President Donald Trump’s speech in Phoenix
Trump responded defiantly to the verdict against him a day after a New York jury found him guilty last week of a scheme to illegally influence the 2016 election through a hush money payment to a porn actor.
But he had not spoken directly to the swing-state voters who will decide the November election until Thursday when he used profanity to decry the “fake” and politically motivated case against him.
The crowd of thousands inside the mega church, where bass for the pre-show and introductory music was turned up so high that it shook seats and media camera shots, chanted the same profanity in response.
Trump repeated his critiques of the case against him as politically motivated and called for his conviction to be overturned on appeal.
“Those appellate courts have to step up and straighten things out or we’re not going to have a country anymore,” Trump said
Trump’s conviction infuriated his supporters, who pumped tens of millions of dollars into his campaign in the immediate aftermath. Trump blames his conviction on President Joe Biden, though the case was brought by the locally elected district attorney in New York, and many of his allies are calling for revenge.
“What are they going to campaign on?” Juan Arredondo of Peoria said of the Democrats as he waited to get inside Trump’s rally. “They can’t campaign on the border. They can’t campaign on the economy.”
Trump focused much of his hourlong speech and subsequent Q&A on the U.S.-Mexico border, blaming a litany of problems — from inflation to the long-term health of Social Security — on illegal immigration, characterizing Biden’s policies “a deliberate demolition of our sovereignty and our borders.”
The influx of foreign-born adults vastly has raised the supply of available workers after a U.S. labor shortage had left many companies unable to fill jobs. The availability of immigrant workers eased the pressure on companies to sharply raise wages, and then pass on their higher labor costs to their customers via higher prices that feed inflation, which remains elevated in the U.S. but has plummeted from its levels of two years ago.
Immigrants who work also pay Social Security and other payroll taxes.
Trump appeared at the town hall in Phoenix organized by Turning Point, a conservative youth organization that has seen its influence rise alongside Trump’s takeover of the GOP. Maricopa County is expected to yet again be a critical piece of the presidential election in November.
Turning Point is led by Charlie Kirk . The group has harnessed the energy of young people drawn to Trump’s Make America Great Again movement by cultivating conservative influencers and hosting glitzy events. This has made Kirk and his allies wealthy .
“The election is now bigger than Donald Trump,” Kirk said, casting the stakes in November as a “class struggle between the ruling class and you.”
Nowhere is Turning Point’s influence greater than in Arizona, the group’s adopted home state, where its loyalists have taken on prominent roles in the state GOP but have struggled to win general elections. Turning Point’s slate of conservative candidates lost in the 2022 midterms, including Kari Lake, who lost the race for governor and is now running for U.S. Senate.
The group is looking to expand its influence this year to other battleground states and got a boost when Trump ousted former Republican National Committee Chair Ronna McDaniel in February. She was replaced by Trump’s hand-picked successor, his daughter-in-law Lara Trump, who has spoken positively about working with Turning Point.
President Joe Biden won Arizona in 2020 by about 10,000 votes. It was, along with Georgia, one of two states decided by less than half a percentage point and is expected to be close again this year.
Arizona Republicans have enthusiastically embraced Trump’s lie that the 2020 election was stolen from him. State lawmakers commissioned an unprecedented partisan recount that confirmed his loss. Cochise County officials in southern Arizona are facing criminal charges for refusing to certify the 2022 midterm election results.
Hours before Trump was scheduled to speak, Jake Hoffman, a Republican state senator who is also a top Turning Point consultant, was arraigned for his role in an alleged plot to overturn Trump’s loss in Arizona. Hoffman is accused of being a fake elector who signed a document falsely claiming to represent Arizona in the Electoral College.
Trump’s former chief of staff, Mark Meadows, is scheduled for arraignment in the same case on Friday.
Despite the state’s importance on the presidential map, Trump had not campaigned in Arizona until today. In 2022, he held a rally to support his slate of midterm candidates, all of whom ended up losing.
Trump’s trip west includes several private fundraisers and a rally on Sunday in Nevada, another battleground state he lost narrowly in 2020.
The Associated Press contributed to this story.
See a spelling or grammatical error in our story? Please click here to report it .
Do you have a photo or video of a breaking news story? Send it to us here with a brief description.
Copyright 2024 KTVK/KPHO. All rights reserved.
Latest News

Arizona attorney general to investigate Gov. Hobbs for alleged ‘pay to play’

Arizona Attorney General's office opens investigation into Gov. Hobbs
Northern Arizona

Arizona AG confirms investigation into Apache County Attorney for alleged misconduct

Apache County attorney says he won't resign for alleged misconduct

Gov. Hobbs to be investigated for possible 'pay to play' scandal

Former Trump chief of staff Mark Meadows pleads not guilty in Arizona’s fake elector case

Former Trump officials plead not guilty in Arizona 'fake elector' case

Apache County Attorney under investigation for alleged misconduct

Two former Trump staffers to appear in court on Friday for role in 'fake electors' case

Arizona state senator pleads not guilty in fake elector case; 2 more in court Friday
IMAGES
VIDEO
COMMENTS
The pre-trip inspection is an integral part of every road trip for a trucker. It's probably the most disliked and most often overlooked part of the job of the professional truck driver in the trucking industry. This inspection is meant to be a thorough check of the truck, trailer and load. The check is to ensure that everything is in correct ...
Our Pre-Trip Inspection Study Guide has everything you need to prepare for the Class A CDL Pre-Trip Inspection Exam. Our study guide will cover the pre-trip inspection terminology as well as a thorough list of all of the parts you will be inspecting on the vehicle. For each part you will be inspecting there will also be a list of items you will ...
A pre-trip truck inspection is a thorough check of the truck and its major systems to maintain safety on the road. Inspections need to occur before the start of a driver's shift and at least once every 24 hours while on the road. Truck pre-trip inspection needs to be performed by the driver while on duty, but before driving starts.
In this episode: 00:00 Intro to Trucking Law myths. 00:31 Myth 1:- Pre-trip inspection report. 01:21 Myth 2: Must perform a pre-trip inspection. 01:58 Myth 3: Must record at least 15 minutes on ...
The pre-trip inspection process should take approximately 10-15 minutes and include items such as braking systems, steering & suspension systems, emergency equipment & engine compartment. Establishing a routine for pre-trip inspections with sufficient time to check all components is key to ensuring vehicle safety and regulatory compliance.
What is a pre-trip inspection? A pre-trip inspection includes checking over the tractor and trailer a truck driver will be operating. A pre-trip should be completed before the operation of a vehicle: At the beginning of a driver's shift. Any time a new trailer is picked up. After a 10-hour break. A thorough inspection usually takes anywhere ...
Performing thorough pre-trip inspections promotes safety, ensures compliance and reduces accident-related costs. The Department Of Transport (DOT) mandates that truckers with commercial driving licenses (CDL) perform a pre-trip inspection before driving a commercial motor vehicle (CMV). The inspection typically takes 15 minutes or less to complete.
This is my Pre-Trip Inspection , done my way! This Pre-Trip is done on my truck and trailer. It is a complete Pre-Trip Inspection and features everything you'll need to know. I've been working on this for a long time and my hometime finally gave me the chance to finish it all up. This is based off of Prime Inc.'s Pre-Trip Inspection pro ...
The pre-trip inspection is the process of thoroughly examining the truck before starting a new journey. It ensures the safety of the driver and the others sharing the road with them by identifying and addressing mechanical issues early on, so truckers can prevent unexpected breakdowns, delays, and potential accidents. ... How long does a pre ...
This includes checking the engine compartment, brake system, fuel system, and more. The CDL Pre-Trip Inspection Exam is an integral part of obtaining your commercial driver's license. This guide covers Class A and Class B pre-trip inspections, provides a checklist, and offers tips for memorizing the inspection process.
A pre-trip inspection of about 15 minutes should take place every day before any journey. This will flag up any potential or current problems with the cab, trailer, or coupling. This will then enable any remedial work to be done to keep the truck up to standard, keeping the driver and other road users safe.
Under the Hood: Examining the Engine. Start your pre-trip inspection by looking at the engine. Lower the gear guard so you can open the hood. Remove pins and unlatch the hood to do so. Once the hood is open, step back and look underneath the truck to see if there are any leaks.
After finishing your pre-trip inspection, file your work on a DVIR (Driver Vehicle Inspection Report). Any issues detected must be addressed before departing. A thorough vehicle pre-trip is required by law and takes approximately 30 minutes. The Pre-Trip Vehicle Inspection Test. To obtain your CDL exam, you need to complete a pre-trip ...
Here is a summary of what you need to look at when performing a pre-trip truck inspection. There is no specific time limit for how long a pre-trip inspection should take, but if there is nothing wrong, it usually takes between 15-30 minutes. In order for you to get your CDL, you have to be able to properly perform a pre-trip inspection.
Pre-trip Inspection (396.13) Before operating the vehicle, the driver must inspect the vehicle and be satisfied that it is in safe operating condition. If the last vehicle inspection report notes any deficiencies, the driver must review and sign to acknowledge and certify that the required repairs were made. Periodic Inspection (396.17, 396.21)
Look for any cuts, damages or bulges. Maintain a tread depth of at least 4/32-inch. Measure tire pressure with a gauge (not a tire thumper) and maintain 90 - 100 psi. Tighten any loose lug nuts and report any missing ones. Listen for any air leaks. Look underneath andinside your trailer.
Pre-trip and during-trip inspections can help you identify any mechanical issues that could develop while you're on the road. Post-trip inspections allow you to find problems and report them to dispatch so they're fixed before the next driver starts their shift. When you perform routine inspections, you minimize over-the-road breakdowns ...
How long should a pre-trip inspection reports take? The duration of a pre-trip Inspection can vary depending on factors such as the driver's familiarity with the vehicle, the complexity of the truck itself, and the thoroughness of the inspection. On average, a comprehensive pre-trip inspection typically takes around 15 to 45 minutes. ...
How Long Should a DOT Pre-trip Inspection Take? There's no standard or required amount of time a pre-trip inspection should take, but on average, a thorough DOT pre-trip inspection takes around 30 to 50 minutes. While some drivers try to cut corners and do their inspection faster, it's important to take the time to perform a thorough ...
Don't: Ignore potential problems. If you spot something out of the ordinary during your post-trip inspection, report it to dispatch immediately. Minimizing breakdowns and preventing violations are two of the many benefits of pre- and post-trip inspections. Use this list of dos and don'ts to complete your inspections the right way.
How Long Should a DOT Pre-trip Inspection Take? There is no standard or needed length of time for a pre-trip inspection, however, a complete DOT pre-trip inspection takes around 30 to 50 minutes on average. While some drivers try to save time by speeding through their inspections, it's better to take your time and thoroughly check your ...
This rule also harmonizes the pre- and post-trip inspection lists. It responds in part to the President's January 2011 Regulatory Review and Reform initiative, removing a significant information collection burden without adversely impacting safety. The Agency also makes a technical change to section 396.11 to eliminate redundant language.
Question 1: Must a driver prepare a written report of a pre-trip inspection performed under §392.7? §392.7 Equipment, inspection and use.
It's in line with the Nissan Certified option, though Honda's 182-point inspection tops Nissan's. Honda also has a program called HondaTrue Used that works for vehicles up to 10 model years old. Its 100-day or 5,000-mile warranty is shorter than Nissan Certified Select, though. With 112 points, its inspection is shorter than HondaTrue Certified.
FCC Public Inspection File. ... ― Donald Trump returned to the campaign trail Thursday with a trip to the Valley, ... long before Phoenix hit 110 degrees around 1:30 p.m. Thursday afternoon.