10537851 front page hits

The Cave of Dragonflies
Where the smallest bugs live alongside the strongest dragons
R/B/Y Safari Zone Mechanics
A staple of the Pokémon series since the originals is the Safari Zone: a special place with Pokémon that aren't found anywhere else (and some that are) where instead of getting to use your own Pokémon to weaken and capture them, you must employ more old-fashioned methods while the Pokémon may run at any moment. While they haven't been in every game, they shake up the usual routine of catching Pokémon and have had various interesting mechanics through the generations - however, the very most interesting has to be the original.
How It Works
In every Safari Zone, the player is unable to use their own Pokémon at all. Instead, when you encounter a Pokémon you have four options: throwing one of the limited number of Safari Balls you have; an aggressive action used to make the Pokémon easier to catch; an enticing action used to make it less likely to run away; or running away from the battle yourself.
In Red, Blue and Yellow, the aggressive action is called Rock , and the enticing action is called Bait . The basic idea is this: throwing a rock will double your chances of catching the Pokémon, but it will also make the Pokémon angry for 1-5 turns. Conversely, throwing bait will halve your chances of catching the Pokémon, but cause the Pokémon to be eating for 1-5 turns. While angry, a Pokémon is twice as likely to run on any given turn as if it were in its neutral state, while it is four times less likely to run while it is eating than in a neutral state.
However, there are several more interesting details and subtleties to how Safari Zone battles happen.
Throwing a Ball
Capturing in the Safari Zone follows the regular R/B/Y capture algorithm , though since neither the Pokémon's HP nor its status can be affected and the only balls available are Safari Balls (identical to Ultra Balls), a lot of things are abstracted out in the Safari Zone. Unfortunately, thanks to the game's flawed RNG , Safari Balls underperform against full-health Pokémon, making all capture chances in the Safari Zone lower than intended. The capture chance maxes out when the Pokémon has a catch rate of 150 or more, for which the chance will be about 27-30% depending on rounding errors; all other Pokémon are harder than that.
The catch rate C starts out being, as in regular captures, the intrinsic catch rate of the Pokémon species. However, unlike regular captures, your actions in the Safari Zone can directly modify C, as hinted above.
Throwing Rocks/Bait
Rocks and bait have two distinct effects. First, every time a rock is thrown, the catch rate C is doubled (though it is capped at 255, so if doubling would make the catch rate more than that, it is made 255 instead), and every time bait is thrown, C is halved and rounded down. This happens even if the Pokémon is already angry or eating, and it happens completely blindly - if the Pokémon has a catch rate of 235, and you throw a rock to give it a catch rate of 255, then throwing bait will take that catch rate down to 127, rather than "canceling out" to give it the same catch rate as before.
Since the capture chance maxes out when the catch rate is 150 as explained above, there is no point throwing rocks at any Pokémon with an intrinsic catch rate of 150 or more, or more than one rock at a Pokémon with a catch rate of 75 or more, or more than two rocks at one with a catch rate of 38 or more. As it happens that covers all Pokémon that can be found in the Safari Zone except for Chansey (catch rate 30) and Dragonair (catch rate 27 in Yellow), who would need three rocks to go over 150.
Secondly, while a battle in the Safari Zone is going on, the game also keeps track of two counters, the "angry counter" and the "eating counter", which stand for the number of angry or eating turns the Pokémon has left. They both start out at zero; however, when a rock or bait is thrown, a random number between 1 and 5 inclusive will be generated and added to the appropriate counter (i.e. the angry counter if it's a rock, or the eating counter if it's bait), while the other counter will be reset to zero regardless of its previous value. This means only one of the counters can be nonzero at any given time. Since the random number is added to whatever value the counter already has, throwing further rocks at a Pokémon that is already angry will prolong its angry state, and likewise with throwing bait at an eating Pokémon. The eating and angry counters are both capped at 255.
The Pokémon's Turn
You always get the first turn in the Safari Zone, but on the Pokémon's turn, two things happen.
First, the game will check if either of the angry and eating counters is nonzero. If so, then a message saying "Wild [Pokémon] is angry!" or "Wild [Pokémon] is eating!" as appropriate is shown and the counter is decreased by one. If the angry counter is decreased to zero this way, the Pokémon's catch rate will also be reset to its initial catch rate , regardless of how it has been modified in the battle before this point; note that this last bit does not happen when a Pokémon stops eating, nor when the angry counter is reset to zero because you threw a bait.
After this, the game will perform a calculation to determine whether the Pokémon will run away on this turn. The run chance depends only on which state the Pokémon is in - angry, eating or neutral - but not on how many times you've thrown rocks/bait in any way: a Pokémon that you've thrown five rocks at followed by one bait will be exactly as happy to stick around as one that you threw a bait at on the first turn. Note that the Pokémon's actual current state does not necessarily correspond to the state indicated by the message that was just shown, since the message indicates only that the counter in question was nonzero before it was subtracted from. This also means that if you throw a rock or bait and the random number generated is 1, you will see an angry/eating message, but the Pokémon will in fact be back in its neutral state before even the run check is performed.
The run calculation itself goes as follows:
- Make a variable X equal to the low byte (i.e. the remainder if you divide by 256) of the Pokémon's Speed ( not the base Speed of the species, but the individual's actual Speed).
- If the outcome is greater than 255 (i.e. if the Pokémon's Speed was 128 or more), the Pokémon automatically runs. Skip the rest of the procedure.
- If the Pokémon is angry, double X again (if it becomes greater than 255, make it 255 instead).
- If the Pokémon is eating, divide X by four.
- Generate a random number R between 0 and 255 inclusive.
- If R is less than X, the Pokémon runs away.
All in all, this means that so long as (the low byte of) the Pokémon's Speed is less than 128 (which it always will be in the actual game - the highest Speed any Pokémon actually found in the Safari Zone can have is 75), the chance that it will run is 2*Speed/256 if it's in a neutral state, min(255, 4*Speed)/256 if it's angry, or int(Speed/2)/256 if it's eating.
Crucially, since this is the actual individual Speed and not the base Speed of the species, lower-leveled individuals are less likely to run . While Scyther at level 25 or 28 have around or above a 50% chance of running every turn in a neutral state, for instance, Yellow's level 15 Scyther are considerably easier to catch, with only a 32% chance of running in a neutral state at the most. Thus, perhaps the best piece of strategic advice for the Safari Zone is to go for the lowest-leveled possible version of your desired Pokémon, given the lower-leveled version isn't unacceptably rare.
So, well, how should one go about trying to achieve success in the Safari Zone, other than trying to catch lower-leveled Pokémon? Four basic kinds of strategies come to mind:
- Balls only. This is the simplest way to go about the Safari Zone - just madly lob balls at everything you want to catch and pray that they don't run before you catch them.
- Rocks, then balls. Throw some sensible number of rocks, then lob balls and hope you catch it before it either runs or calms down and resets the catch rate. If you see it's not angry anymore, start again from scratch with the rocks.
- Bait, then balls. Throw some bait to put the Pokémon in the eating state and make it stick around, then throw balls and hope the reduced catch rate doesn't come back to bite you. Unlike with rocks, where once the Pokémon stops being angry you're back at square one, it's not quite as obvious here that you should throw more bait once the Pokémon stops eating - each bait you throw lowers the catch rate more, after all.
- Rocks to increase catch rate, then bait to get it to stay, then balls. Throw a rock or two (or three) and then immediately throw bait. Provided your first rock doesn't generate one as the number of angry turns (in which case the Pokémon will calm down immediately and reset the catch rate), you'll manage to increase the Pokémon's catch rate before the bait gets thrown, meaning you end up with a catch rate of the same, double or quadruple the original (depending on the number of rocks), but a 4x reduced chance of running and assurance that the catch rate won't reset when it returns to the neutral state.
There are other possible strategies, but they appear obviously flawed - if you were to throw bait and then a rock, for instance, you'd end up with a normal catch rate but a higher running chance after wasting two turns, which can't possibly be helpful. These are the main ones that at a glance appear to hold some kind of promise.
You may think, as I did when I was initially working this out, that the fourth strategy has the most potential. However, as it turns out, the R/B/Y Safari Zone is broken: the balls-only strategy nearly always wins by a considerable margin, at least in terms of your overall chance of catching the Pokémon per encounter. Wasting your time on bait and rocks is only worth it in a couple of very exceptional cases.
Wait, What?
Good question. If you don't care about getting an intuitive grasp on why this is true, feel free to skip to the Safari Zone calculator.
Here's the thing. The entire Safari Zone experience basically simplifies to a game where you and the Pokémon alternate turns, with each of you having a given chance of "winning" on each of your turns (you win if you catch the Pokémon, while the Pokémon wins if it runs). When you throw bait or a rock, however, you do that instead of throwing a ball on that turn, while the Pokémon will continue to have a chance of running on every single one of its turns; essentially, you are forgoing one of your turns (attempts to "win") in exchange for a later advantage.
What is that later advantage, then, and is it worth losing that turn? Well, in the case of a rock, you double your chances of winning (catching the Pokémon) for up to four subsequent turns - but you also double the Pokémon's chances of winning (running away), and because you used up your turn throwing the rock, it's the Pokémon that has the next move.
You can hopefully see how that's not really a recipe for success. However, it's not quite as bleak as it appears, thanks to the one place where the simplification breaks down: you have a limited number of Safari Balls. A rock, by doubling both yours and the Pokémon's chances of winning each turn, will shorten the average duration of the battle. Thus, if you have sufficiently few balls and the Pokémon has a sufficiently low catch rate and Speed, to the point that in an average battle against it you'd run out of balls before either catching it or it running, throwing a rock and shortening the battle so your balls will last can actually be worth it, even at the aforementioned cost. For instance, if you only have one Safari Ball left, then you can either throw that one ball with a regular catch rate or throw some rocks first, which will make your single ball much more likely to be effective once you do throw it; you'll only get one attempt to catch it either way. The risks will still outweigh the benefits if the Pokémon is pretty speedy, since then it will be likely to run before you can actually throw the ball at all, but for a sufficiently slow target (for a single Safari Ball, the highest Speed where a rock will be worth it is 25 or so), rocks can be a good idea when you don't have a lot of Safari Balls left.
Throwing multiple rocks can also help, at least in theory, since more rocks will continue to double your chances of catching the Pokémon without raising the running chance further. Primarily, in many of those situations where a lack of Safari Balls means one rock is a good idea, two (or possibly three) rocks improve your chances even further, though the range of situations where this works is even narrower than for one rock. Technically multiple rocks can also help in general for Pokémon with very low Speeds and low catch rates - however, that's low Speeds as in single digits, and no Pokémon that fit the bill are actually found in the Safari Zone, making that point kind of moot. Otherwise, if you have plenty of balls to spare, the free angry turns they usually get to run away before you even start trying to catch them just result in a disadvantage you can't make up for.
What about bait? Bait is immediately somewhat more promising than rocks, since it halves your chance of "winning" but quarters the Pokémon's. However, bait also differs from rocks in that the catch rate doesn't go back to normal after the Pokémon stops eating, and just like rocks shorten the duration of the battle, bait prolongs the battle - it makes both parties less likely to win on subsequent turns. And the longer the battle goes on, the more the up-to-four turns (remember, the counter is decreased before the run check) that the Pokémon is actually less likely to run diminish in significance compared to all the turns after the Pokémon stops eating, when it will still have a lowered catch rate but a regular chance of running. That's besides the fact that again you must forgo a turn to throw the bait in the first place. In fact, as it turns out this makes bait wholly useless: there is not even in theory a Speed/catch rate combination for which bait will do you any good.
Where does this leave that especially promising-looking "rocks, then bait" strategy? Ultimately, it's stuck in the same rut rocks are: it's normally only useful for Pokémon with such ludicrously low Speed that they don't actually exist in the Safari Zone, and unfortunately, while rocks at least have a niche when you're running low on balls, you're always going to be better off just throwing however many rocks you're going to throw and then throwing your ball than throwing the rocks and then wasting your time on bait if you only have a couple of balls left. This strategy requires wasting several turns without throwing any balls, during some of which the Pokémon will have an increased chance of running, and to make matters worse, if the number of angry turns generated is one, you're going to lose even the rock's advantage and end up with the bait's lowered catch rate after all that preparation. It just kills it.
So, again, in nearly every case the best strategy is to just throw balls and hope you get lucky. That is, however, assuming that what you want to maximize is your chance of success per encounter: since rocks shorten the battle and make for fewer Safari Balls required, rocks may actually save you time and money.
The Safari Zone calculator below includes a variety of strategies, despite their mostly limited usefulness; play around with it if you think you might go with a different one.
Safari Zone Calculator
Use this tool to calculate your chances of capturing a given Pokémon.
As it is, it only includes Pokémon that are actually found in the Safari Zone in either Red, Blue, Yellow, or the Japanese-exclusive Blue version. If there is demand for adding other Pokémon just for the hell of it, I can do that too, but in the meantime, I feel this makes more sense.
In addition to your chances of capturing the Pokémon with any or all of the provided strategies, the calculator will also provide you with the basic capture rate and run chance per turn. When you select a Pokémon and game, additionally, it will give you the locations, levels and rarities at which the Pokémon is found in the Safari Zone in that game, so that you can perhaps attempt to find your Pokémon at a lower level or in an area where it's more common.
The base percentages the calculator gives may not match exactly up with those given by my R/B/Y catch rate calculator , since this calculator makes the simplifying assumption that the Pokémon's HP and Speed are equal to the average HP/Speed a wild Pokémon of the given species/level would have, while the catch rate calculator does the entire calculation for each possible HP IV and takes the average of the actual outcomes. I chose not to do the more accurate calculation here because this calculation is both already relatively slow and involves two different stats - trying every possibility would mean doing that whole relatively slow calculation up to 256 times, which just seems like way more trouble than it's worth.
Pokémon: Chansey Cubone Doduo Dragonair Dratini Exeggcute Goldeen Kangaskhan Krabby Lickitung Magikarp Marowak Nidoran (f) Nidoran (m) Nidorina Nidorino Paras Parasect Pinsir Poliwag Psyduck Rhyhorn Scyther Slowpoke Tangela Tauros Venomoth Venonat
Game: Red Blue/JP Green JP Blue Yellow
Safari Balls remaining:
Strategy: Show all Balls only One rock Two rocks Three rocks Bait repeatedly One bait Two bait Three bait Rock, then bait Two rocks, then bait Three rocks, then bait
Page last modified August 9 2021 at 02:53 UTC
Appendix : Yellow walkthrough/Section 10
- 1.1 Mr. Psychic's house
- 1.2.11.1.1 If Eevee evolved into Vaporeon:
- 1.2.11.1.2 If Eevee evolved into Jolteon:
- 1.2.11.1.3 If Eevee evolved into Flareon:
- 1.2.12.1 VS Giovanni
- 1.3 Copycat's house
- 1.4 Fighting Dojo
- 1.5 Saffron Gym
Saffron City
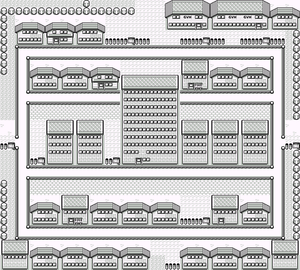
Saffron City is a sprawling metropolis located in the heart of the region between Cerulean City , Celadon City , Lavender Town , and Vermilion City . The Silph Co. headquarters dominates the city skyline, and two Pokémon Gyms stand in the northeast district. It is the most populous city in all of Kanto .
Mr. Psychic's house
The southeast house belongs to a man known as Mr. Psychic. Speak to him and he claims to know exactly why you are here, and gives you TM29 ( Psychic ).
The Silph Co . is the leading manufacturer of items like Poké Balls, Potions, and TMs. Their products are supplied to every Poké Mart in the region. The company has been a target of Team Rocket , first for their Silph Scope prototype, and now for a top-secret development project. The Rocket Grunt posted outside the building has fallen asleep, leaving a perfect opportunity to sneak inside. The building holds eleven floors, with warp tiles allowing the workers to quickly move around. This convenience ends up acting as a maze for anyone trying to reach the top floor.
It is not possible to open the electronic doors yet, so step on either warp tile to teleport to the eighth floor.
Battle the Scientist and the two Rocket Grunts, then take the elevator down to 3F.
Take the northeast warp tile back to the second floor. Speak to the woman here in the northwest room to receive TM36 ( Selfdestruct ), then warp back to 3F.
Fight the Rocket Grunt and take the warp tile in the southwest to reach 5F; pick up the TM09 ( Take Down ) from the southwest room before returning to 3F.
Climb up the stairs to 4F.
Battle another two Rocket Grunts and climb to the fifth floor.
Fight the Rocket Grunt near the stairs and the Scientist to the west. Follow the hallway southward to reach another Rocket Grunt standing next to a warp tile. Defeat him, step on the warp tile, then warp right back. Turn eastward to find a Card Key , which is used to open the building's electronic doors. Pass by the warp tile again and unlock the northwest room to reach a Protein . Take the stairs up to 6F.
Follow the western hallway past the Scientist and unlock the southwest room to get an HP Up and an X Accuracy . Climb the stairs to 7F.
Use the Card Key to unlock the east-central room and pick up TM03 ( Swords Dance ). Turn around and follow the central hallway to the southwest room. Battle the Scientist and grab the Calcium before taking the stairs up to 9F.
Defeat the Rocket Grunt at the south end of the central hallway, then open the door to the break room. Speak to the woman here, and she heals your Pokémon to full health as thanks for your efforts. Climb the stairs to the tenth floor.
Battle the Scientist and the Rocket Grunt, then pick up the Carbos , Rare Candy , and TM26 ( Earthquake ) from the southwest room. Ride the elevator all the way down to 3F.
Use the Card Key to unlock the central room. Open the door to the west-central room beyond that, defeat the Scientist, and grab the nearby Hyper Potion . Take the warp in the central room.
7F (Northwest)
When you reach the northwest room on the seventh floor, Blue is waiting for you.
Rival Battle 6
Blue has made some changes to his team since the previous battle in Pokémon Tower . He has swapped out his Fearow for a Kadabra , while his Shellder , Magnemite , Vulpix , and Eevee have all evolved.
If Eevee evolved into Vaporeon :
If eevee evolved into jolteon :, if eevee evolved into flareon :.
Afterward, he brags that he will be the world's most powerful Trainer before warping away. Once he leaves, speak to the nearby office worker. Realizing that you are here to save them all, he would like to give you a Pokémon. If you have room in your party, he gives you a Lapras . They had been keeping it in their lab, but he thinks it would be much better off with you. Take the final warp tile to the west side of 11F.
As soon as you move off of the warp tile, you are confronted by Jessie and James again. They claim that their boss is in a meeting and intend to defeat you so that he will not be disturbed.
Use the Card Key to open the door and confront Giovanni . He claims to be having some important business meeting with the company president and warns you to stay out of grown-up matters before drawing you into battle.
VS Giovanni
Giovanni 's Nidorino , Rhyhorn , and Nidoqueen all take serious damage from Ground-type attacks like Dig and Earthquake . The latter two are also vulnerable to Water moves. His Persian only takes super effective damage from Fighting attacks.
With Giovanni defeated, Team Rocket 's plans for Silph Co. have been thwarted. He vows that the group will never fall and promises to return. Giovanni and his underlings make their escape, while their co-conspirators also flee the building. Speak to the president, who is so grateful to you for saving Silph that he rewards you with the Master Ball prototype. This improved kind of Poké Ball has a 100% success rate, so be sure to save it for a hard-to-catch Pokémon.
Copycat's house
Now that the Rockets have left the city, the Grunt outside the northwest house is gone. A girl inside known as the Copycat likes to collect Pokémon dolls . Give her a Poké Doll to receive TM31 ( Mimic ) in return.
Fighting Dojo
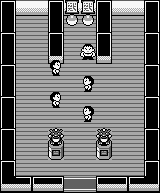
Saffron City is unique as the only city to have two Pokémon Gyms. The Fighting Dojo is located in the northeast neighborhood, next door to the Saffron Gym . The two clubs had once competed to determine which would become the city's one official Gym, and the Psychic Pokémon of Saffron Gym were victorious. There is no Badge to be won here, but defeat the Karate Master to earn the choice of two rare Fighting-type Pokémon: the hard-kicking Hitmonlee or the piston-punching Hitmonchan . Use Psychic- and Flying-type attacks here for greatest effect.
Saffron Gym
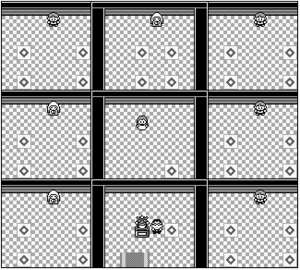
SAFFRON CITY POKéMON GYM LEADER: SABRINA The Master of Psychic Pokémon!
The Saffron Gym specializes in Psychic Pokémon. Only Bug attacks deal super effective damage to them, but the few available Bug moves are relatively weak. Psychic Pokémon typically have low Defense , so it is better to use moves that deal physical damage, like Normal -, Flying -, and Rock-type attacks.
The Gym uses a series of warp tiles to confuse and disorient any challengers. Step on the tile near the entrance to reach the southeast room. To reach the Gym Leader by using as few warps as possible, continue by stepping on the northwest, southwest, and southwest tiles in the following rooms. This leads to the center room, where Sabrina awaits anyone up to the challenge.
After the battle, Sabrina awards you the Marsh Badge , which ensures obedience from all Pokémon up to level 70. She also gives you TM46 ( Psywave ) as a prize.
The next destination is Fuchsia City to the south. There are two paths that lead there: either take Cycling Road west of Celadon City , or follow the coast south of Lavender Town .
- Yellow walkthrough
Navigation menu
Page actions.
- View source
Personal tools
- Create account
- Editor's Hub
- Frequently asked questions
- Bulbawiki forum
- Recent changes
- Random page
Bulbagarden
- Bulbagarden home page
- Bulbagarden Archives
- Bulbagarden Forums
- Bulbagarden Discord server
- What links here
- Related changes
- Upload file
- Special pages
- Printable version
- Permanent link
- Page information
- This page was last edited on 25 February 2024, at 20:57.
- Content is available under Attribution-NonCommercial-ShareAlike 2.5 . (see Copyrights for details)
- Privacy policy
- About Bulbapedia
- Disclaimers
- Mobile view
- Pokémon Yellow
- How To Get HM03 Surf in Pokémon Yellow
You’ll get HM03 Surf from a man standing in the secret house inside the Safari Zone.
The secret house is located in the west area of the Safari Zone, and you’ll need to travel through all the other areas to reach this house.
But you can get HM03 at any point after you reach Fuchsia City.
Prerequisites
This is what you need to do before you can get HM03:
- Have at least 500 Pokédollars to enter the Safari Zone
- Have access to Fuchsia City
Getting HM03 Surf (Step-by-Step)
Starting from the Fuchsia City Pokémon Center, head northeast.
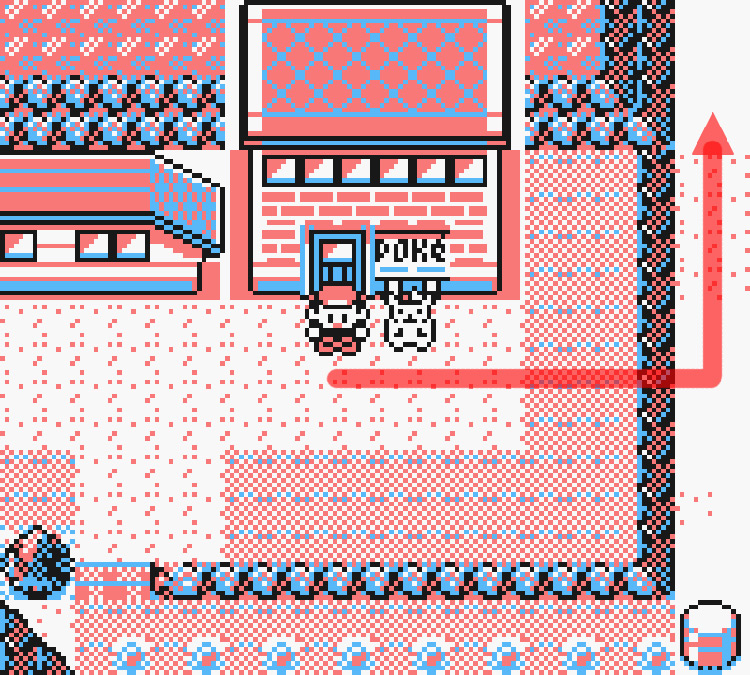
Then head east past the old man.
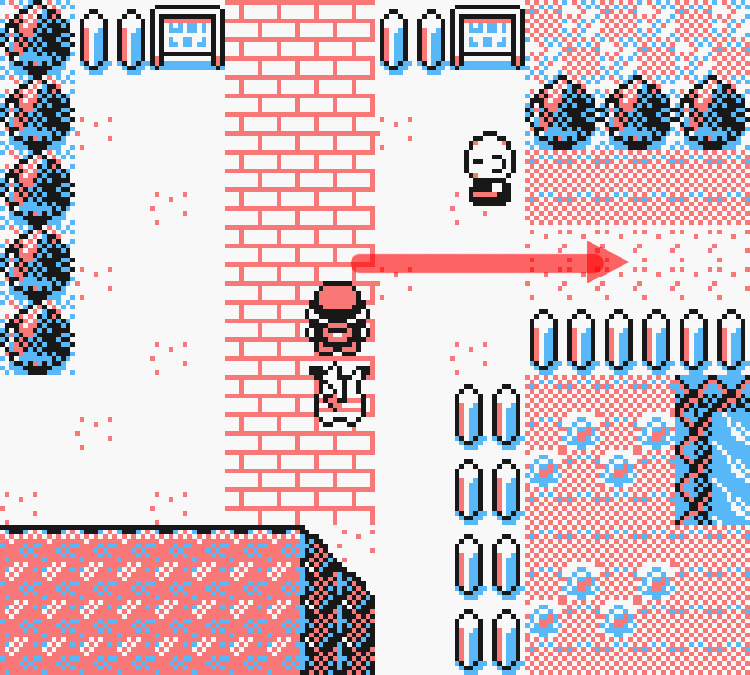
At the end of the path, head north.
Head west above the Chansey.
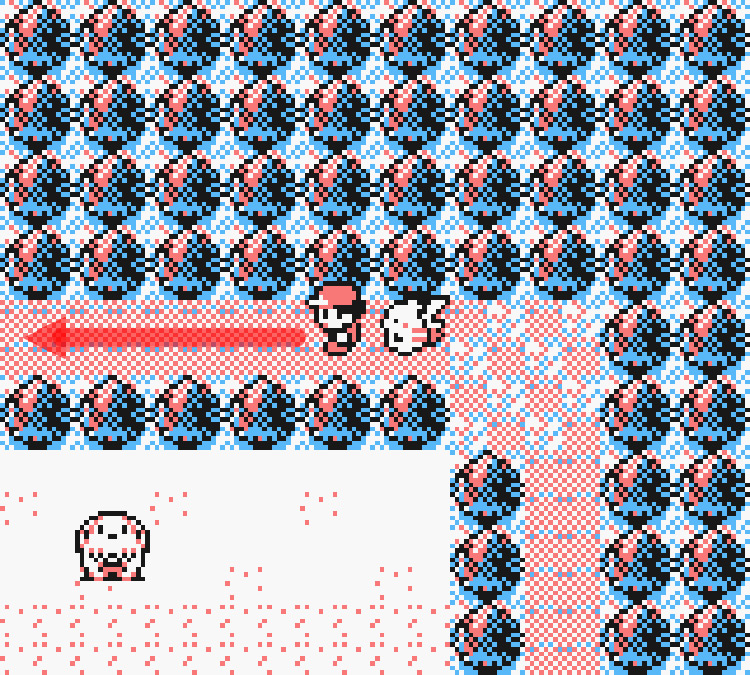
And finally go into the nearby Safari Zone Building.
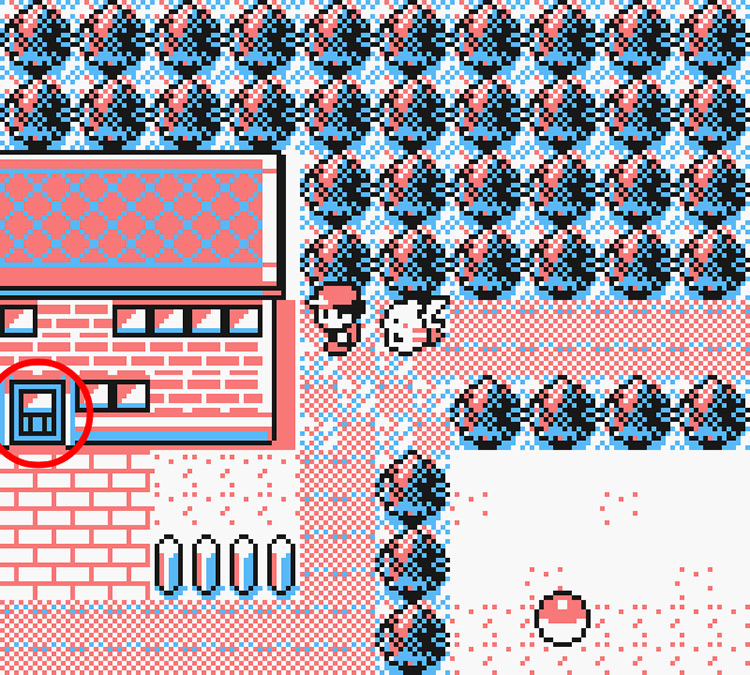
Once you’re inside, try to head up and you’ll be stopped by the man at the right counter. He says you’ll need to pay 500 Pokédollars before you can enter.
Pay your fee and then enter the Safari Zone.
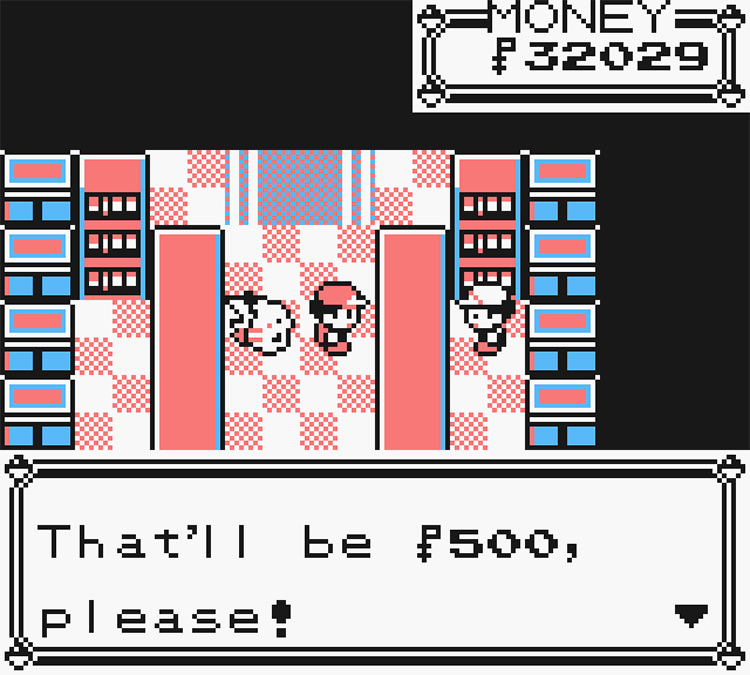
Note: Once you enter the Safari Zone, you’re allowed 500 steps before you’re automatically kicked out. You can check how many steps you have left by pressing the Start button and looking in the top left corner of the screen.
At the start of the Safari Zone, head east until you reach the bushes.
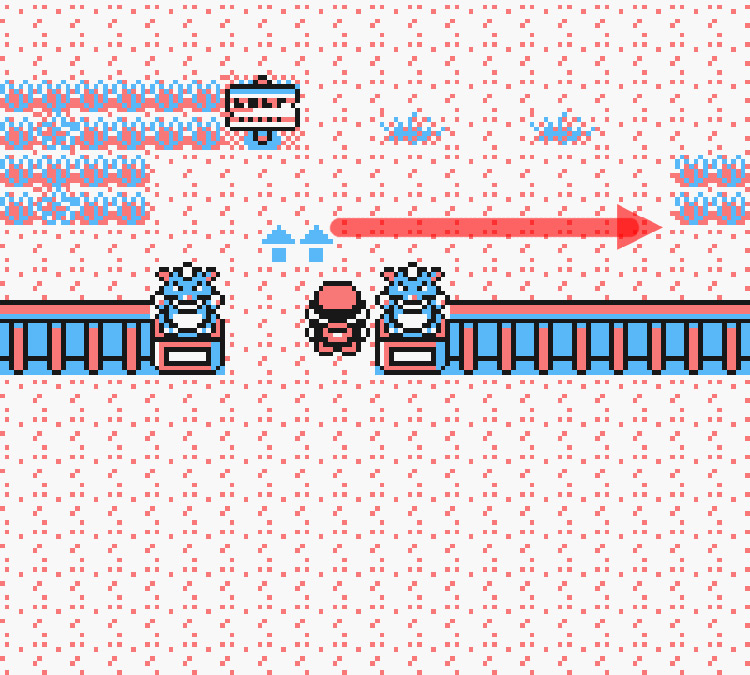
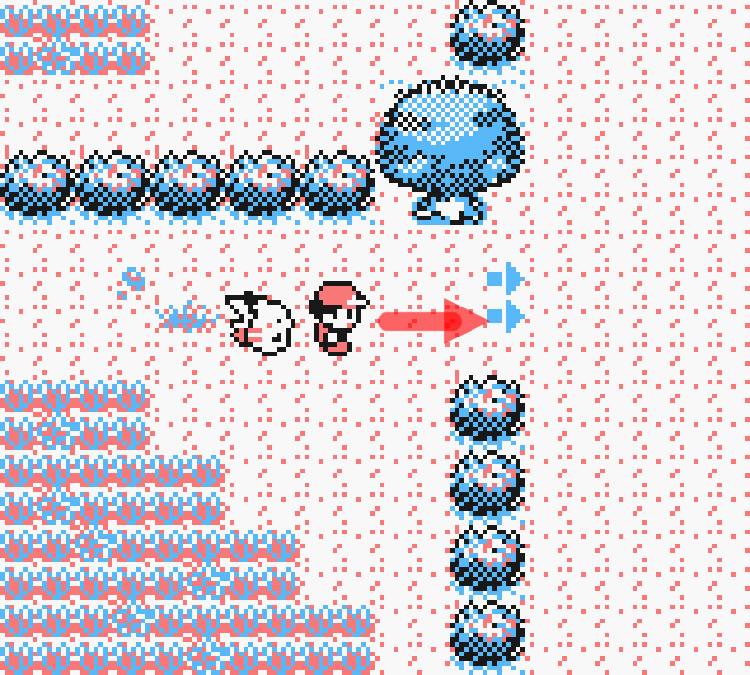
Once you reach the bushes, head north until you reach the big tree next to some blue right-facing arrows.
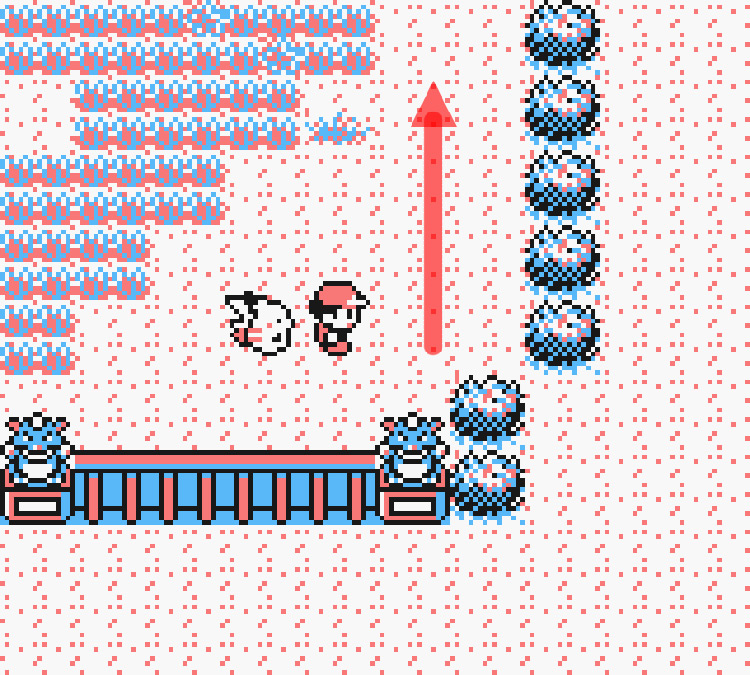
Head east following the blue arrows to enter the east area of the Safari Zone.
In this new area, head east past the sign.
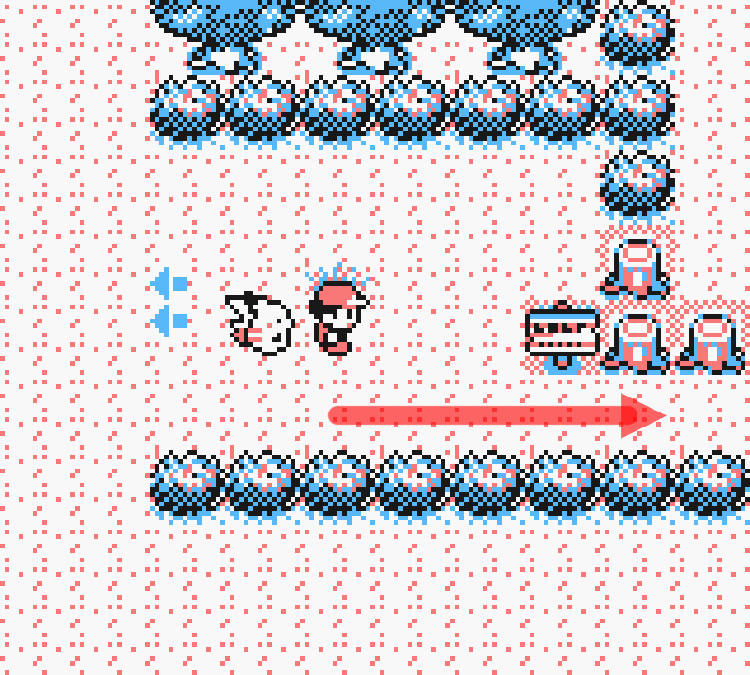
Walk up the stairs on the first rock you see, then go down the stairs on the left.
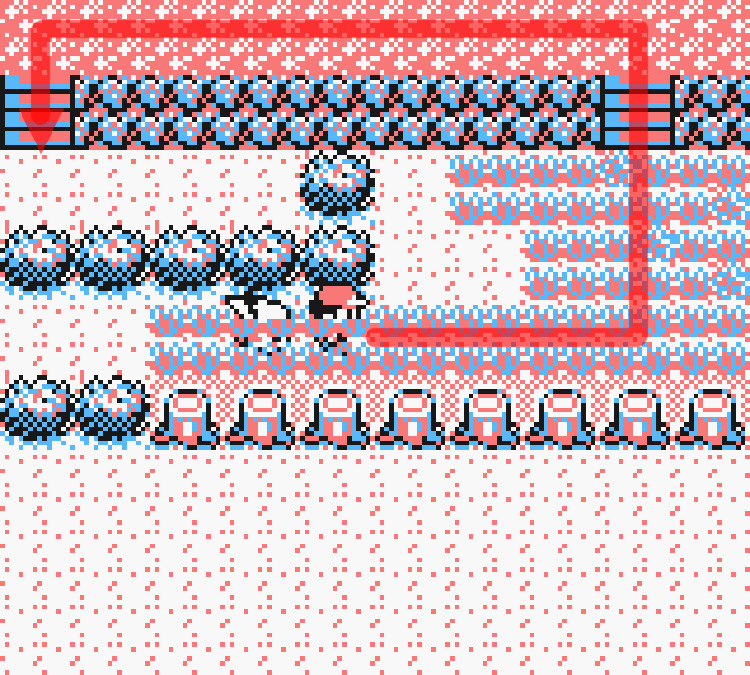
Then, head north until you see another rock with stairs.
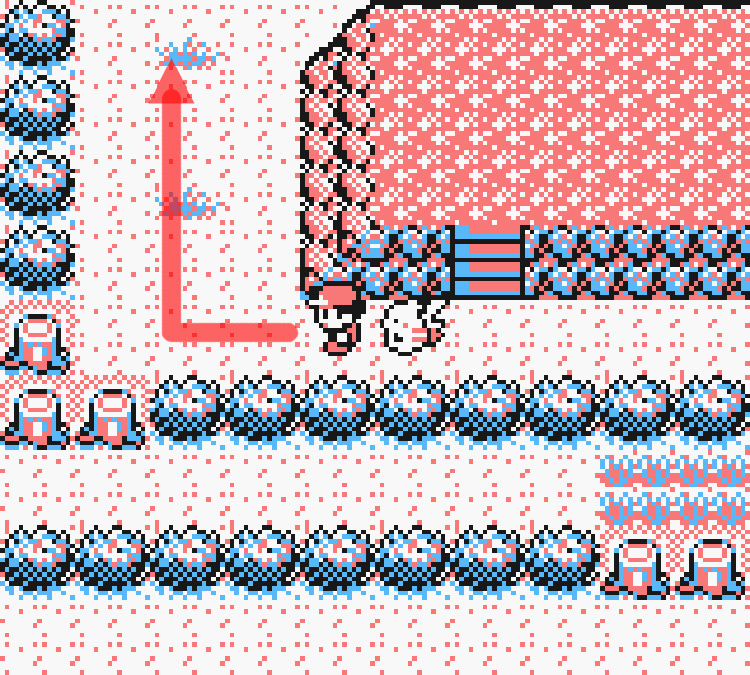
Walk up the stairs on this 2nd rock, and head east on this elevated rock platform.
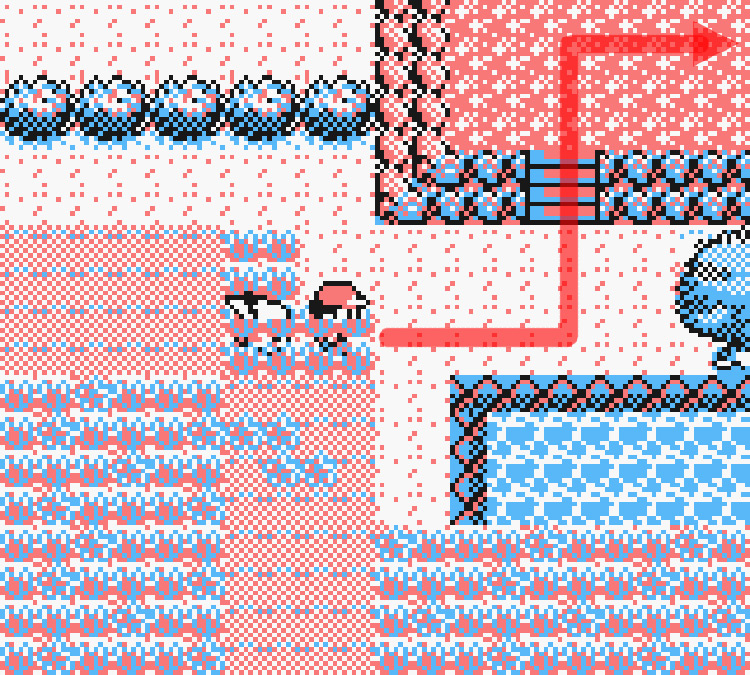
Go down the stairs and move up & around the rock.
Then head west through the grass.
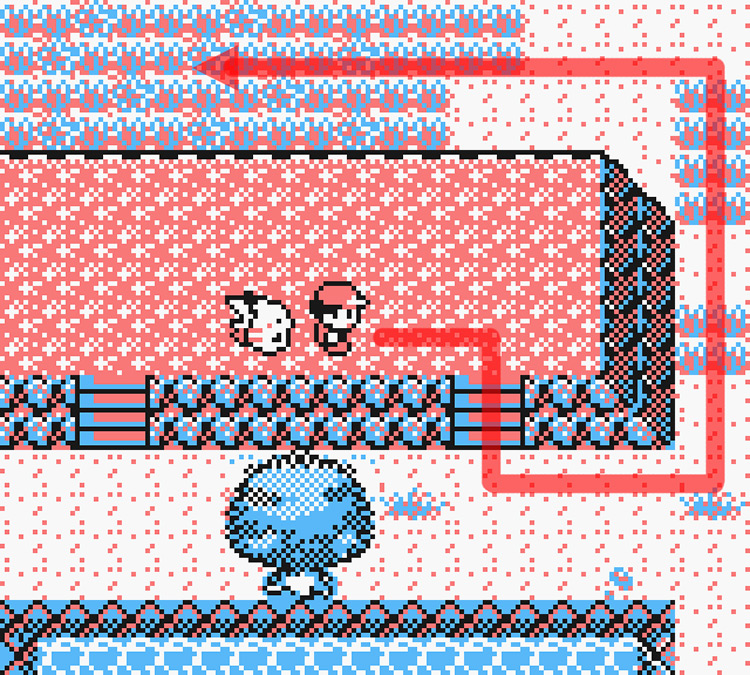
Go past the sign and towards the blue arrows on the left.
Head west following the blue arrows to enter the north area of the Safari Zone.
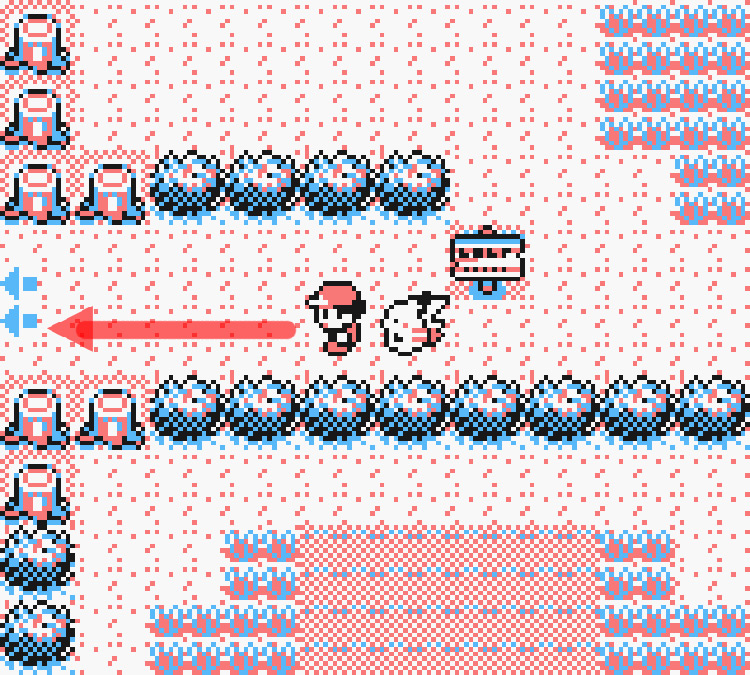
In this new area, head west into the grass.
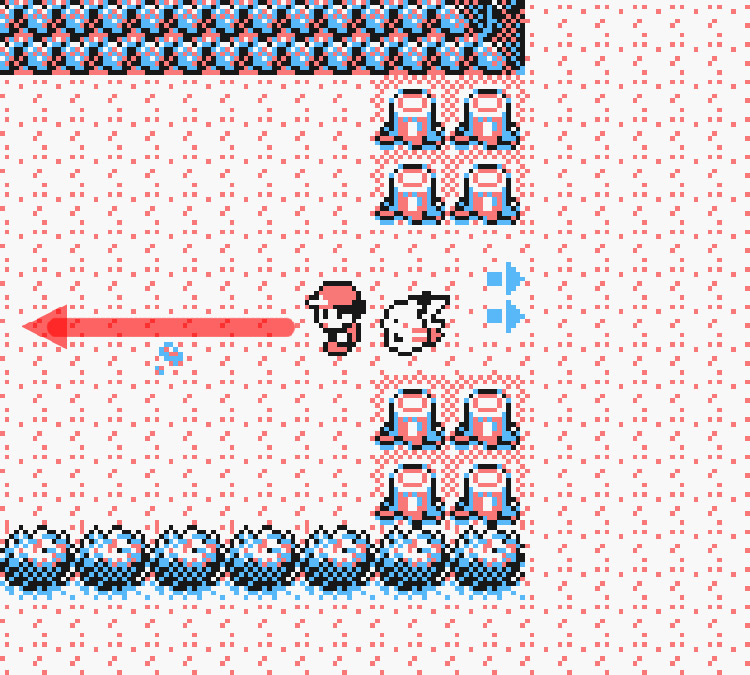
Head north and go up the stairs on the nearby large rock.
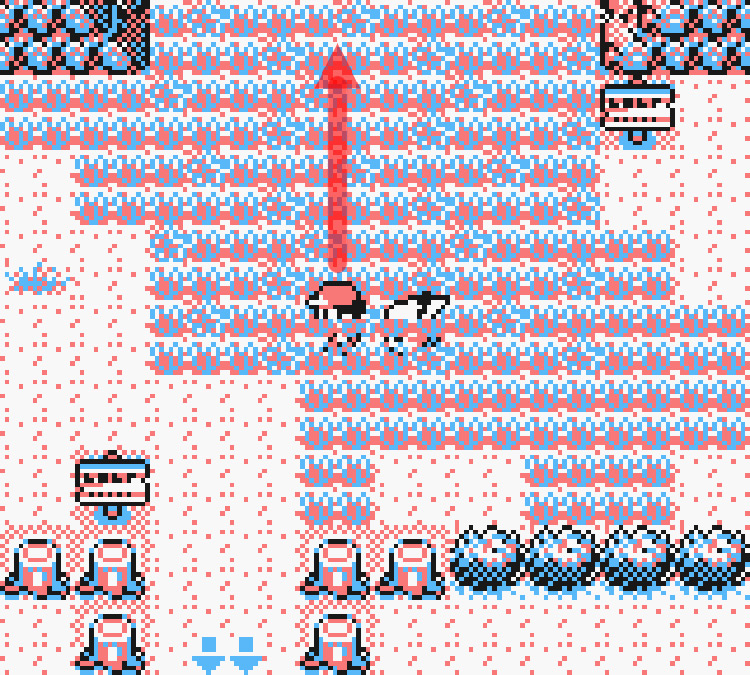
Walk over to the left & go down the stairs at the bottom of this rock platform.
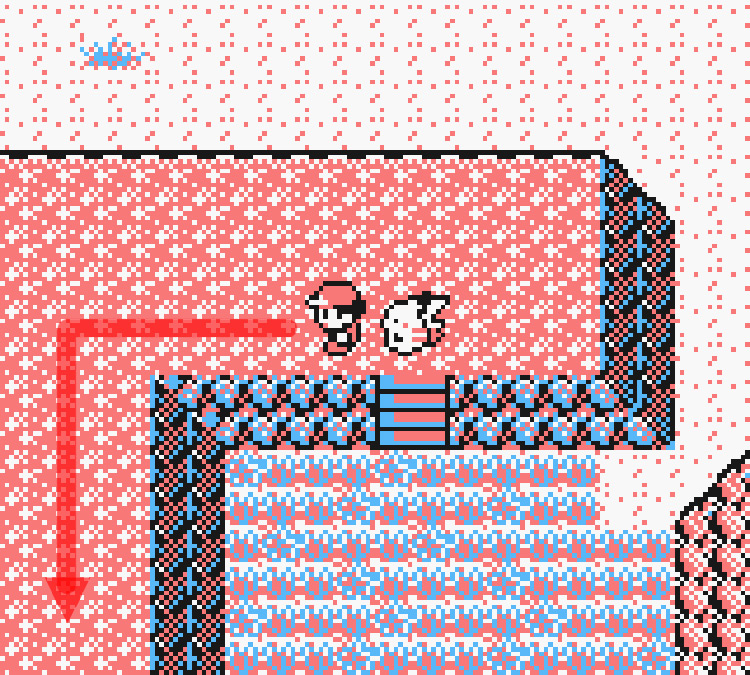
From the bottom of the stairs, head northwest through the grass until you’re standing between two big trees.
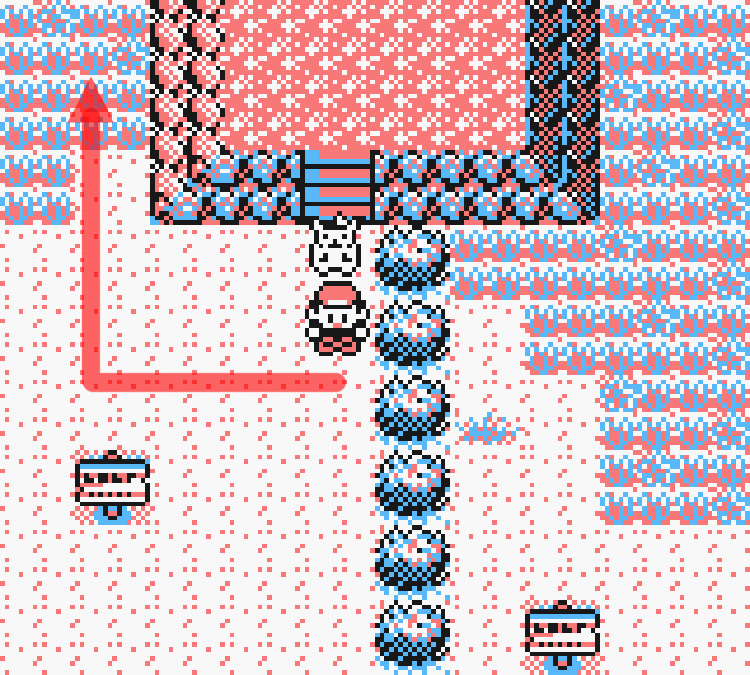
At the trees, head east until you reach some more grass.
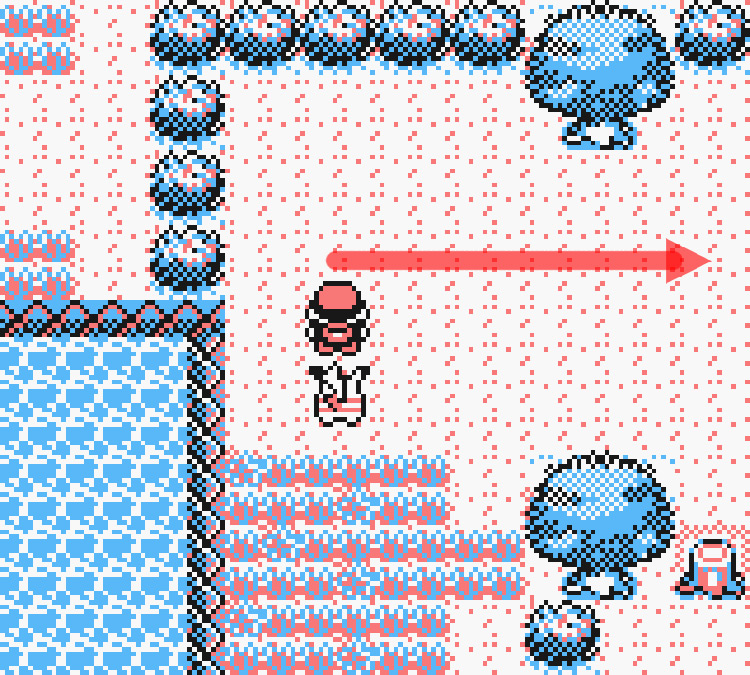
Then walk north through the grass, and turn to go west above the bushes.
Follow the path west until you reach the end with a line of bushes.
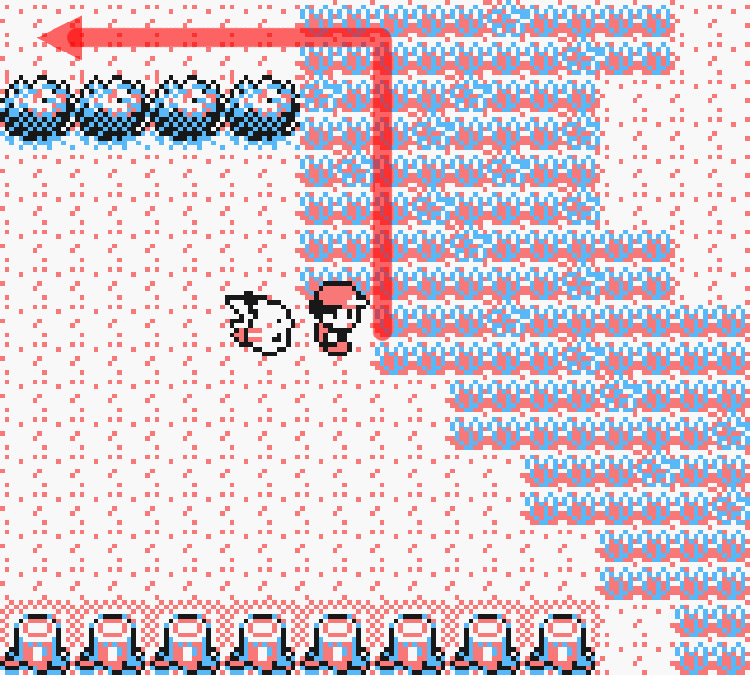
Then go south until you reach some more blue arrows pointing south.
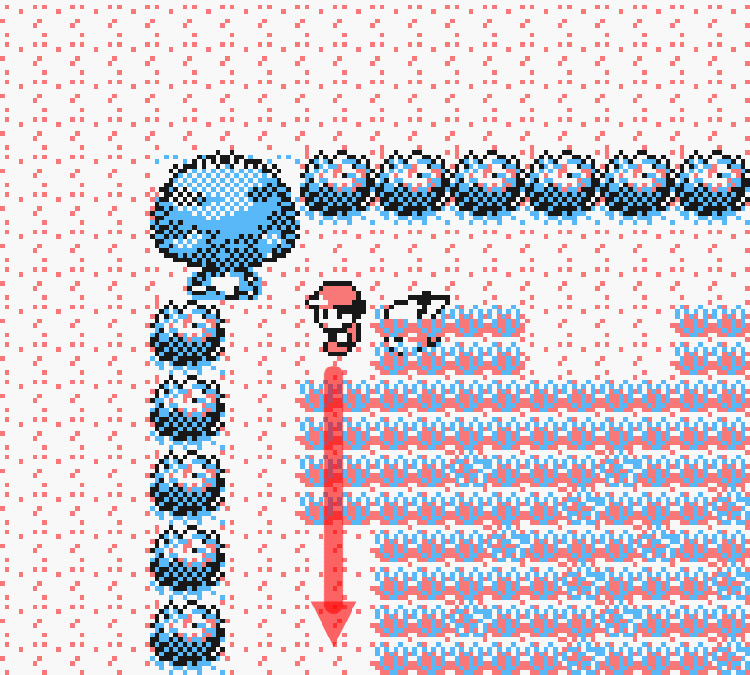
Head south following the blue arrows to enter the west area of the Safari Zone – this will lead us to the Surf house.
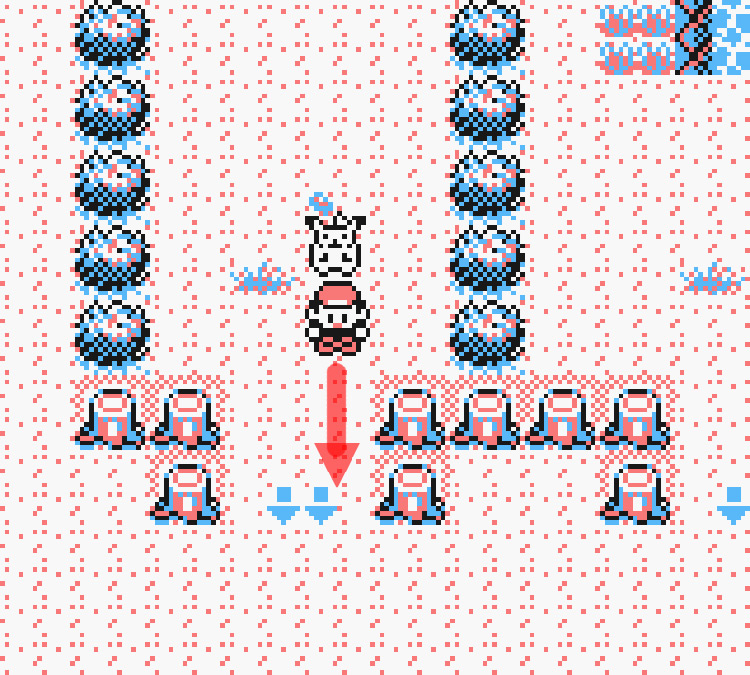
In this final area, head west towards the sign.
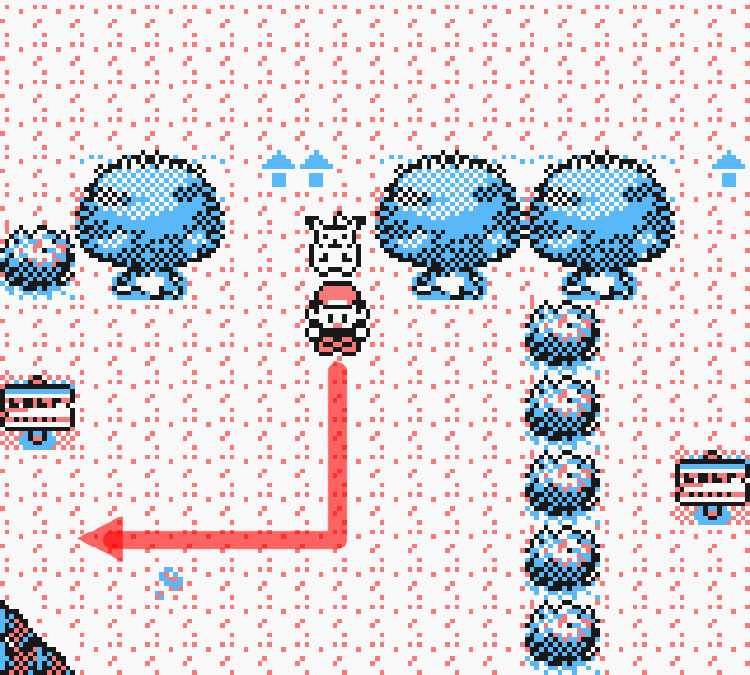
You’ll soon find a house surrounded by statues.
Enter the secret house and look for an NPC inside.
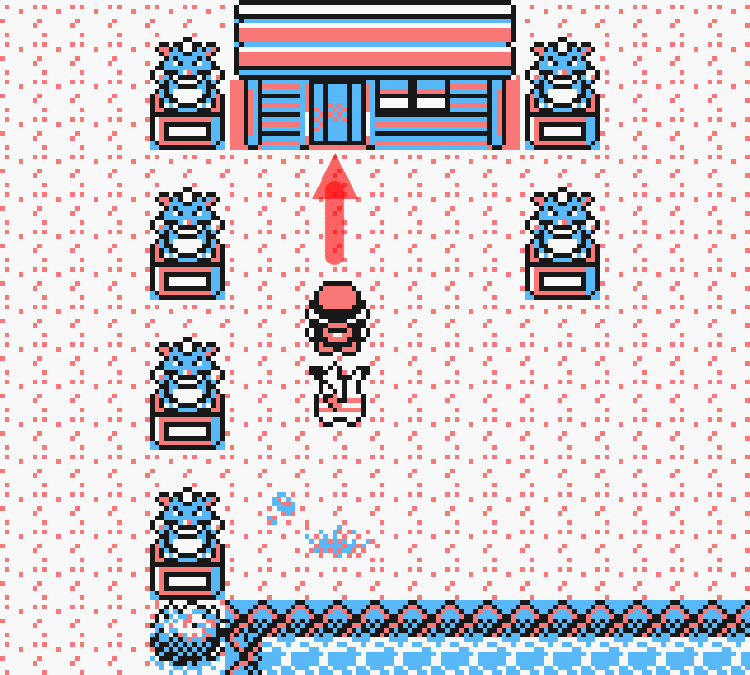
Talk to the man inside to get a prize for finding him: HM03 Surf.
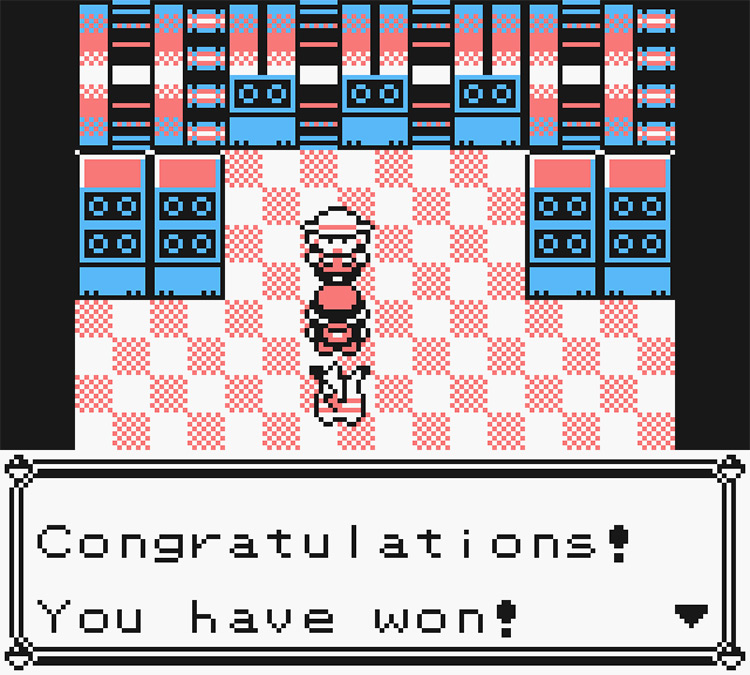
Note: To use Surf outside of battle, you first need to obtain the Soulbadge by defeating Koga in Fuchsia City.
Surf Details + Uses
With 95 power, Surf is one of the strongest Water type moves in the game.
While HM moves like Flash and Cut are typically taught to Pokémon outside your main party, Surf is a great move to teach one of your main Pokémon. (Particularly, a Water Pokémon)
Surf gives any Water Pokémon access to a strong Water type attack that will also gain a same type attack bonus (STAB) when used by a Water type.
This is especially useful for Water Pokémon that don’t learn strong Water type moves, or learn them at very high levels.
For example:
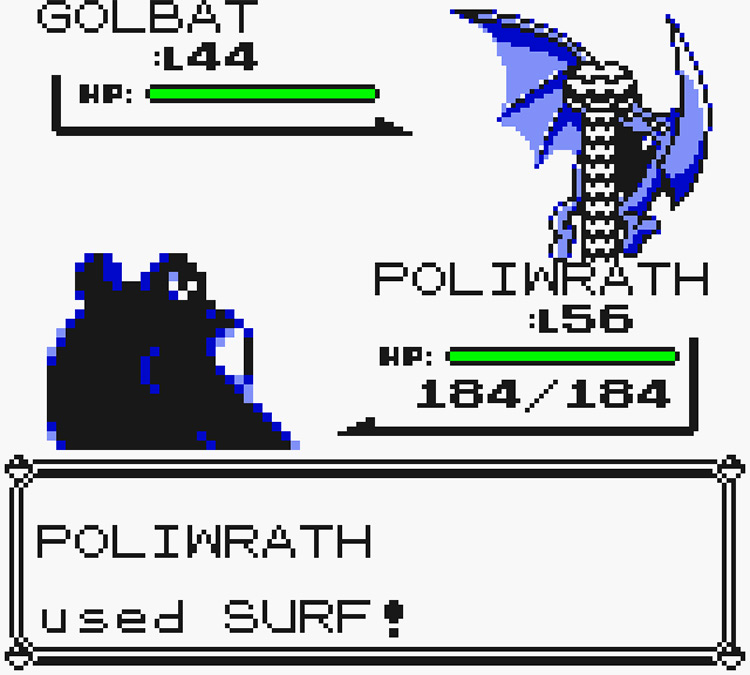
Being an HM also means that Surf can be taught an unlimited amount of times to multiple different Pokémon.
Note: Once an HM move is taught to a Pokémon, it can’t be forgotten. Make sure you choose wisely when teaching HMs to your Pokémon.
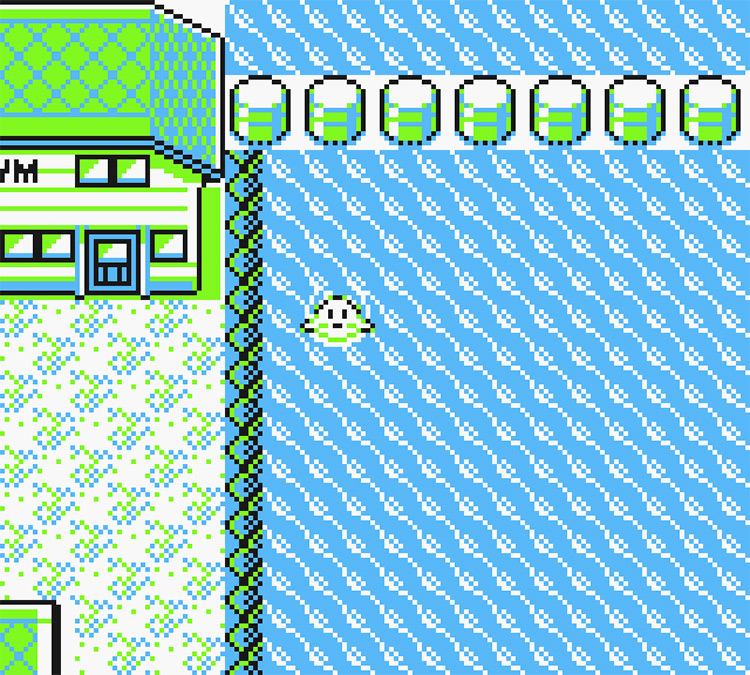
Outside of battle, Surf lets you ride your Pokémon across any body of water.
There are certain areas you can’t reach without crossing water, so getting HM03 is required to beat the game.
Andrew Brisbane
A retro game enthusiast since childhood, Andrew aka Andyb is a freelance writer from Canada. From intense games of Tetris to casual Pokémon playthroughs, he loves a wide variety of different genres. He’s also a very passionate musician.
Related Posts:


Pokémon Yellow Nuzlocke Guide
This guide contains useful information for a Yellow Nuzlocke . Lists of all of the available Pokémon, the number of encounters, and detailed overviews of all Boss battles .

Yellow Encounters
A fun aspect of Nuzlocke runs is the variety of encounters forcing you to try out new Pokémon you've never used before. That is why it's important to know which Pokémon will be available during a run. We've compiled a list of every encounter for Pokémon Yellow so you can quickly see who you might want on your team!
Pokémon Yellow has 45 different encounter locations with 94 different Pokémon available as wild encounters. Hover over a Pokémon to see where to encounter it!
1 Dragon Pokémon encounters
- Dratini - Safari Zone
2 Ice Pokémon encounters
- Dewgong - Seafoam Islands and Cinnabar Island
- Articuno - Seafoam Islands
2 Ghost Pokémon encounters
- Gastly - Pokémon Tower
- Haunter - Pokémon Tower
3 Fire Pokémon encounters
- Charmander - Route 24
- Vulpix - Celadon City
- Ponyta - Route 17
5 Electric Pokémon encounters
- Pikachu - Starter
- Magnemite - Route 10 and Power Plant
- Magneton - Power Plant
- Voltorb - Power Plant
- Zapdos - Power Plant
5 Rock Pokémon encounters
- Geodude - Mt. Moon, Rock Tunnel and Victory Road
- Graveler - Victory Road and Cerulean Cave
- Onix - Rock Tunnel and Victory Road
- Rhyhorn - Cerulean Cave
- Rhydon - Cinnabar Island and Cerulean Cave
6 Fighting Pokémon encounters
- Mankey - Route 22, Route 3, Route 4 and Route 23
- Primeape - Route 23
- Machop - Route 10 and Rock Tunnel
- Machoke - Route 5 and Victory Road
- Hitmonlee - Saffron City
- Hitmonchan - Saffron City
8 Bug Pokémon encounters
- Caterpie - Viridian Forest
- Metapod - Viridian Forest
- Paras - Mt. Moon
- Parasect - Route 18
- Venonat - Route 24, Route 25, Route 15 and Route 14
- Venomoth - Route 15 and Route 14
- Scyther - Celadon City
- Pinsir - Celadon City and Safari Zone
8 Psychic Pokémon encounters
- Abra - Route 5, Route 6, Route 8, Route 7 and Celadon City
- Kadabra - Route 8
- Slowpoke - Route 12 and Route 13
- Slowbro - Route 12 and Route 13
- Drowzee - Route 11
- Exeggcute - Safari Zone
- Mr. Mime - undefined
- Mewtwo - Cerulean Cave
9 Grass Pokémon encounters
- Bulbasaur - Cerulean City
- Oddish - Route 24, Route 25, Route 12, Route 15, Route 14 and Route 13
- Gloom - Route 12, Route 15, Route 14 and Route 13
- Bellsprout - Route 24, Route 25, Route 12, Route 15, Route 14 and Route 13
- Weepinbell - Route 12, Route 15, Route 14 and Route 13
- Tangela - Safari Zone
10 Ground Pokémon encounters
- Sandshrew - Route 3 and Route 4
- Diglett - Diglett's Cave
- Dugtrio - Route 11 and Diglett's Cave
- Cubone - Pokémon Tower and Safari Zone
- Marowak - Safari Zone
13 Flying Pokémon encounters
- Pidgey - Route 1, Route 2, Viridian Forest, Route 24, Route 25, Route 5, Route 6, Route 11, Route 12, Route 8, Route 7, Route 13 and Route 21
- Pidgeotto - Viridian Forest, Route 24, Route 25, Route 5, Route 6, Route 11, Route 12, Route 8, Route 7, Route 15, Route 14, Route 13 and Route 21
- Spearow - Route 22, Route 3, Route 4, Route 9, Route 16 and Route 18
- Fearow - Route 9, Route 16, Route 17, Route 18 and Route 23
- Zubat - Mt. Moon, Rock Tunnel and Seafoam Islands
- Golbat - Seafoam Islands, Victory Road and Cerulean Cave
- Farfetch’d - Route 12 and Route 13
- Doduo - Route 16, Route 17 and Route 18
- Dodrio - Route 17
- Gyarados - Fuschia City
18 Normal Pokémon encounters
- Rattata - Route 1, Route 22, Route 2, Route 3, Route 4, Route 5, Route 6, Route 11, Route 9, Route 10, Route 8, Route 7, Route 16, Route 18 and Route 21
- Raticate - Route 11, Route 9, Route 10, Route 16, Route 18, Pokémon Mansion and Route 21
- Clefairy - Mt. Moon
- Jigglypuff - Route 5, Route 6, Route 8 and Route 7
- Wigglytuff - Celadon City
- Lickitung - Cerulean Cave
- Chansey - Cerulean Cave
- Tauros - Safari Zone
- Ditto - Pokémon Mansion and Cerulean Cave
- Porygon - Celadon City
- Snorlax - Route 12 and Route 16
19 Poison Pokémon encounters
- Nidoran♀ - undefined
- Nidorina - Route 9 and Route 23
- Nidoran♂ - undefined
- Nidorino - Route 9, Safari Zone and Route 23
- Tentacool - Pallet Town, Vermillion City, Route 11, Route 17, Route 18, Route 13, Route 19, Route 20, Seafoam Islands and Route 21
- Tentacruel - Route 19, Route 20 and Route 21
- Grimer - Power Plant and Pokémon Mansion
- Muk - Power Plant, Cinnabar Island and Pokémon Mansion
20 Water Pokémon encounters
- Psyduck - Route 6
- Golduck - Route 6
- Poliwag - Pallet Town, Viridian City, Route 22, Route 24, Route 25, Route 6, Vermillion City, Route 11, Route 10, Route 12, Route 17, Route 18, Fuschia City, Safari Zone, Route 13, Route 19, Route 20, Seafoam Islands, Route 21, Route 23 and Cerulean Cave
- Poliwhirl - Route 22 and Route 23
- Seel - Seafoam Islands
- Shellder - Vermillion City, Route 17 and Route 18
- Krabby - Route 25, Route 10 and Seafoam Islands
- Kingler - Route 25, Route 10 and Seafoam Islands
- Horsea - Route 11, Route 10, Route 12 and Route 13
- Seadra - Route 12 and Route 13
- Goldeen - Pallet Town, Viridian City, Route 22, Route 24, Route 25, Route 6, Vermillion City, Route 11, Route 10, Route 12, Route 17, Route 18, Fuschia City, Safari Zone, Route 13, Route 19, Route 20, Seafoam Islands, Route 21, Route 23 and Cerulean Cave
- Seaking - Route 24 and Cerulean Cave
- Staryu - Pallet Town, Vermillion City, Route 19, Route 20, Seafoam Islands and Route 21
- Magikarp - Pallet Town, Viridian City, Route 22, Route 4, Route 24, Route 25, Route 6, Vermillion City, Route 11, Route 10, Route 12, Route 17, Route 18, Fuschia City, Safari Zone, Route 13, Route 19, Route 20, Seafoam Islands, Route 21, Route 23 and Cerulean Cave
1 Dragon Pokémon DRAGON
2 ice pokémon ice, 2 ghost pokémon ghost, 3 fire pokémon fire, 5 electric pokémon electric, 5 rock pokémon rock, 6 fighting pokémon fighting, 8 bug pokémon bug, 8 psychic pokémon psychic, 9 grass pokémon grass, 10 ground pokémon ground, 13 flying pokémon flying, 18 normal pokémon normal, 19 poison pokémon poison, 20 water pokémon water, yellow boss battles.
In order to complete a Yellow Nuzlocke and become the Champion, you will need to win 26 Boss battles throughout the Kanto region - ranging from bickering Rival & Evil team fights, to Gym Leaders & ultimately the Elite Four.
These can be a challenge, especially when your dear nicknamed nuzlocke mons are at risk. So below we've listed detailed overviews of all these fights! Giving you all the information you'll need to face everything from Blue's Eevee to Lance's Dragonite .
8 Gym Leader fights
5 Elite Four fights
7 Rival fights
6 Evil Team fights
Select your starter type
Like all Pokémon games, you will have to select a starter. The type will update some of the boss teams to match. For example, if your starter was a grass type Blue might have a fire type to take advantage!
Gym Leader fights
- pewter city gym.
has a team of 0, made up of a level undefined undefined. The level cap for this fight is level null.
Pewter City Gym
- cerulean city gym, cerulean city gym, - vermillion city gym, vermillion city gym, - celadon city gym, celadon city gym, - saffron city gym, saffron city gym, - fuschia city gym, fuschia city gym, - cinnabar island gym, cinnabar island gym, - viridian city gym, viridian city gym, elite four fights, - indigo plateau, indigo plateau, rival fights, - professor oak's lab, professor oak's lab, - s.s. anne, - pokemon tower, pokemon tower, - silph co., - victory road, victory road, evil team fights, - team rocket, team rocket, - rocket hideout, rocket hideout, - silph co. boss, silph co. boss.
Now that you're ready to take on the Pokémon Yellow Nuzlocke Challenge , why not keep track of all your encounters with the Nuzlocke Tracker ? Start Tracking
- PlayStation 3
- PlayStation 4
- PlayStation 5
- Xbox Series
- More Systems
Pokemon Yellow Version: Special Pikachu Edition – Guides and FAQs
Pokemon yellow version: special pikachu edition - safari zone map, by keyblade999 - last updated 06/06/2015.
Pokemon Yellow guide
Everything you need to know for Pokemon Yellow

Use this Pokemon Yellow guide to get ahead of your rivals and catch 'em all as you battle with other trainers.
Pokemon Yellow tips
Game Boy | Submitted by ([email protected])
No More Missingno
In Pokemon Yellow there is no more missingno. The glitch has been fixed!!
Game Boy | Submitted by Brandon ([email protected])
Surfing Pikachu
First go to fuscia city, and beat the Gym leader, and then go down to the water and there is a house and the guy in there will give you a Surfing Pikachu. (It is realy a pikablu.)
Game Boy | Submitted by Denis
Catch Tauros At Safari Zone
To catch Tauros at the Safari Zone is you have to be in the zones 2 or 3 walk in the grass and if you see a Tauros hold up and A tight. It might not work the first time but try it every time maybe by the time you get 27
S. balls you will get a Tauros.
Game Boy | Submitted by Kevin Walworth
Get Pikachu To Like You Quickly
Start the game and go to the pc and get the potion. Next when proffessor Oak gives a Pikachu to you, don't leave! Turn around and talk to Pikachu.(He will look sad.)Use the potion on Pikachu. It will say you can't do it. But try it 5 times and when you talk to him again he will look very happy. Then leave by defeating Gary on the way out
Game Boy | Submitted by MARK NEUHAUSER ([email protected])
Where To Get Charmander,Squirtle And Bul
First go to Cerulean and make sure you beat L.T Surge and then go up the bridge keep going straight after you get off the bridge and talk to the guy you see to get Charmander.
Get Squirtle
1. Go to Vermillion City. 2. Beat LT. SURGE and get the Thunder Badge. 3. Go to the lady in the middle of town. 4. She is OFFICER JENNY. 5. She will say that this Squirtle is making mischief. 6. She will say it needs a good trainer to set it straight, and she will give you Squirtle. In Cerulean go in the building to the left of the poke center and talk to the girl by the bulbasaur to get him.
Game Boy | Submitted by GamesRadar
Pokemon 101-151
101 - Electrode 102 - Exeggcute 103 - Exeggutor 104 - Cubone 105 - Marowak 106 - Hitmonlee 107 - Hitmonchan 108 - Lickitung 109 - Koffing 110 - Weezing 111 - Rhyhorn 112 - Rhydon 113 - Chansey 114 - Tangela 115 - Kangaskhan 116 - Horsea 117 - Seadra 118 - Goldeen 119 - Seaking 120 - Staryu 121 - Starmie 122 - Mr. Mime 123 - Scyther 124 - Jynx 125 - Electabuzz 126 - Magmar 127 - Pinsir 128 - Tauros 129 - Magikarp 130 - Gyarados 131 - Lapras 132 - Ditto 133 - Eevee 134 - Vaporeon 135 - Jolteon 136 - Flareon 137 - Porygon 138 - Omanyte 139 - Omastar 140 - Kabuto 141 - Kabutops 142 - Aerodactyl 143 - Snorlax 144 - Articuno 145 - Zapdos 146 - Moltres 147 - Dratini 148 - Dragonair 149 - Dragonite 150 - Mewtwo 151 - Mew
Game Boy | Submitted by josh
First get a cubone. Then go back to celadon city and go to the under ground tunnel and talk to the lady and then she will ask you if you want to trade a cubone for a machamp.
Game Boy | Submitted by Clint McRay "The Pokemon King" ([email protected])
Clone Pokemon
Ok they had to make it where you could do this on Yellow too! 1. Hook 2 gameboys together 2.One person must have a strong or rare pokemon, and the other person must have a weak and common one. 3. Trade 4. When the trade is almost over it will say waiting. 5.The person who had the rare pokemon 1st turns their GB off, and the other game lets theirs say TRADE COMPLETE. 6. When you turn yur gameboys back on you should both have the rare or strong pokemon.
How To Get Squirtle
First you need to get the HM01 (cut)then go to Officer Jenny in the middle of the town.
Game Boy | Submitted by pokefreak093547
Get Mew For Free
To get mew through a glitch, you should not have defeated the youngster with the slowbro near bill's house or the gambler between lavender and celadon yet. Also you must have FLY. Make sure you have a weak pokemon below or on lvl 7. Go through the underground passage just outside celadon city. As soon as you exit DON'T MOVE. Save the game then walk one step down and IMMEDIATELY press start - if done correctly the gambler will not see you. In the start menu go to a flying pokemon and fly to cerulean city. The gambler will now have noticed you. In cerulean the start won't work because it thinks you are in battle go over nugget bridge and find the youngster with the slowpoke don't walk directly at him or the game will crash let him walk to you. Defeat him and go to Lavender town. Go to route 8 where the gambler is and the START screen will automatically appear press B and you will find a battle. It will be MEW. Catch him and he is yours.
(Editor's note - this cheat is untested, but you never know...)
Sign up to the GamesRadar+ Newsletter
Weekly digests, tales from the communities you love, and more
Iain originally joined Future in 2012 to write guides for CVG, PSM3, and Xbox World, before moving on to join GamesRadar in 2013 as Guides Editor. His words have also appeared in OPM, OXM, PC Gamer, GamesMaster, and SFX. He is better known to many as ‘Mr Trophy’, due to his slightly unhealthy obsession with amassing intangible PlayStation silverware, and he now has over 550 Platinum pots weighing down the shelves of his virtual award cabinet. He does not care for Xbox Achievements.
Fan-made Pokemon RPG combines HeartGold, SoulSilver, and the best spin-off game into an overhauled Johto adventure with every modern feature you could ask for
Pokemon Sapphire engineer miraculously builds a working computer using "only assets that already exist in the game"
29 years later, a cult classic horror boomer shooter is getting an "HD revival" from the masters of retro remakes
Most Popular
- 2 The Rogue Prince of Persia Review: "a roguelite with few fresh ideas that's mainly being propped up by its slick combat"
- 3 Senua's Saga: Hellblade 2 review: "Nothing short of video game sorcery"
- 4 Lorelei and the Laser Eyes review: "Totally engrossing, effortlessly stylish, and one of the best puzzle games of 2024"
- 5 Dune: Imperium - Uprising review - "An elegant mix"
- 2 Bad Boys: Ride or Die review – "Will Smith and Martin Lawrence have enough charisma to see this fourquel through"
- 3 Young Woman and the Sea review: "Daisy Ridley pulls off this handsome biopic with style"
- 4 Sasquatch Sunset review: "An eccentric concept makes for the best Bigfoot film yet"
- 5 The Beast review: "An elegant but ultimately unwieldy sci-fi drama”
- 2 Doctor Who season 1, episode 6 review: "Loki's Kate Herron works her magic on Bridgerton-esque episode 'Rogue'"
- 3 Star Trek: Discovery season 5 review - "A spectacular but uneven final voyage"
- 4 Doctor Who season 1, episode 5 review: "'Dot and Bubble' is like a family-friendly Black Mirror"
- 5 Doctor Who season 1, episode 4 review: "A horror tour de force that will stay with you for years to come"

IMAGES
VIDEO
COMMENTS
4th Area. The Safari Zone should be your next stop and you'll find yourself coming back quite a few times in order to catch all of the Pokémon inside. You'll find tons of items including the HM03 Surf and the Gold Teeth which need to be returned to the Warden. The Warden lives beside the fishing guru and will reward you with the HM04 Strength.
Area 3. In the entrance gatehouse to the Safari Zone, pay the requisite ₽500 to enter and receive 30 Safari Balls before heading inside the Safari Zone proper. In Yellow Version, if you bother the attendant here, he will allow you to enter the Safari Zone even if you don't have ₽500. Instead, he will take all your remaining money and give ...
As it happens that covers all Pokémon that can be found in the Safari Zone except for Chansey (catch rate 30) and Dragonair (catch rate 27 in Yellow), who would need three rocks to go over 150. Secondly, while a battle in the Safari Zone is going on, the game also keeps track of two counters, the "angry counter" and the "eating counter", which ...
This is an in-depth walkthrough for Pokémon Yellow for the original Game Boy. These pages detail the original iteration, not Pokémon: Let's Go, Pikachu! and Let's Go, Eevee!. The guide for those games can be found here. Contents Main Storyline Part 1 ... Fuchsia Gym, Safari Zone: Part 12: Route 12, Route 13, Route 14, Route 15, Route 19 ...
Want to find me on the Nintendo Switch? Switch Friend Code SW-0460-8087-1529-----...
Mechanics Safari Zone mechanics. In the Safari Zone, special mechanics come into play which mean that you cannot catch Pokémon by traditional means and must instead try to influence your catch chances by throwing rocks and bait at the target Pokémon.. While fighting in the Safari Zone, you will have four option in battle: Throw a Rock; Throw some Bait, ...
Entrance. Enter the safari and head to the northeast to reach the second area. Area 1. Climb onto the larger rocky ridge to the south and pick up the Carbos.Head west to reach several patches of tall grass, TM37 on the edge of a lake, and a Max Potion to the northwest. Collect the Full Restore near the rest house and take the northeast exit.. Area 2
About Press Copyright Contact us Creators Advertise Developers Terms Privacy Policy & Safety How YouTube works Test new features NFL Sunday Ticket Press Copyright ...
In this episode, we have an adventure through the Safari Zone to obtain our HM Surf (and get HM Strength from the Warden after returning his Gold Teeth). Als...
Tips: Don't walk unless you need to get to another part of the safari zone, different parts of the zone have different rare pokemon. Instead of walking, turn in place so no steps are used. Repeat until all pokemon in a section of the zone are caught. Rocks are better than bait with this strategy, since you can always run into the pokemon again.
Description Of Safari Zone: The Safari Zone is a wildlife preserve found in Fuchsia City, and a place to go where players can go to catch many different Pokemon. Some of these Pokemon are found thoughout the game, but a few species can only be found here. Bait can please a Safari Pokemon as a rock will anger it, both, surprisingly, make them ...
Saffron City is a sprawling metropolis located in the heart of the region between Cerulean City, Celadon City, Lavender Town, and Vermilion City.The Silph Co. headquarters dominates the city skyline, and two Pokémon Gyms stand in the northeast district. It is the most populous city in all of Kanto.
Pokémon Yellow: Special Pikachu Edition is the fourth game in the Pokémon video game series in Japan, and the third in the rest of the world. It was released on the Nintendo Game Boy and features Super Game Boy and Game Boy Color enhancements. The game was released in Japan on September 12, 1998 and was simply known as Pocket Monsters Pikachu.
Safari Zone Area Guide The Safari Zone puzzled together as a guide Catching safari Pokémon [] Safari Zone - Main Area. The nice thing about the Safari is that you don't have to fight with Pokémon before you can catch them, but you can only catch them with the Safari Balls provided.. There are a few original options: throwing rocks at Pokémon to make them angry and easier to catch, but also ...
Safari zone guide gen 1. the safari zone is a pain in the ass. unless your trying to complete the pokedex, get chansey/tauros/dratini cos theyre good or just for fun, dont do it. there are 7 pokemon that are not easily obtainable to get outside of the safari zone. they are:
Getting HM03 Surf (Step-by-Step) Starting from the Fuchsia City Pokémon Center, head northeast. Standing in front of the Fuchsia City Pokémon Center. Then head east past the old man. Standing just above the Fuchsia City Pokémon Center. At the end of the path, head north. Standing near an NPC and a Pokémon sprite.
Pokémon Yellow Nuzlocke Guide. This guide contains useful information for a Yellow Nuzlocke. ... Safari Zone and Route 23 Zubat - Mt. Moon, Rock Tunnel and Seafoam Islands Golbat - Seafoam Islands, Victory Road and Cerulean Cave ... - Pokemon Tower. has a team of 0, made up of a level undefined undefined. ...
Pokemon Yellow Version Walkthrough | Safari Zone!Welcome to my Walkthrough of Pokemon Yellow! Pokemon Yellow was the game that first started my Pokemon Journ...
For Pokemon Yellow Version: Special Pikachu Edition on the Game Boy, Safari Zone Map by KeyBlade999.
Use this Pokemon Yellow guide to get ahead of your rivals and catch 'em all as you battle with other trainers. ... To catch Tauros at the Safari Zone is you have to be in the zones 2 or 3 walk in ...
Pokemon Red, Blue and Yellow Guide. Start tracking progress. Create a free account or ... The Safari Zone is home to some rare Pokémon, as well as a number of interesting items. We've already ...
This page acts as a comprehensive breakdown of the Spelunker's Cove event in Pokemon Go, including its runtime. The Spelunker's Cove event will run from Saturday, June 15th, at 10:00AM to Tuesday ...
The Scorching Steps event is on the horizon for Pokemon Go, bringing with it Field and Timed Research tasks, unique eggs, event bonuses, and
Pokemon Yellow Walkthrough - Safari Zone in Fuschia City. How to get Gold Teeth, Strength, Surf, HM in Warden's House and Safari
The Stadium Sights event within Pokemon Go has nearly arrived, and is set to bring Field and Timed Research tasks, unique Wild encounters, bonuses, and more!. This page acts as a comprehensive ...
In this episode we explore the Safari Zone and get rekt.Subscribe to PIMPNITE http://bit.ly/PIMPSubscribeBecome a Patreon here http://bit.ly/PIMPPatreo...
The Cyndaquil Community Day for June 2024 in Pokemon Go is on the horizon, and is set to bring a Featured Attack, Field and Special Research, event bonuses, and more!. This page acts as a ...
The Makuhita Spotlight Hour is live on Tuesday, June 4th, 2024, where they will appear more frequently in the wild from 6PM-7PM local time, with vastly increased spawn rates and a 2x Catch Candy ...
The June 2024 Community Day for Goomy is on its way to Pokemon Go, bringing with it a Featured Attack, event bonuses, Raid battles, alongside Field, Timed, and Special Research tasks.. This page ...