Fix: Private Browsing Greyed Out in Safari on iPhone, iPad and Mac
Is the Private Browsing Mode not working in Safari? This feature allows you to browse the internet without saving any history or syncing any browsing details with other devices, and it doesn’t even try to save AutoFill information. It is a great way to protect one’s privacy. Here’s how to make it work once again.
If you’re using Safari Private Browsing to hide your online activity, you should know that it can’t hide your search history because the DNS cache will store all your online searches. Because of that, we suggest a VPN like ExpressVPN to keep your online activity private with next-level encryption. Thus, your browsing usage will be impenetrable by third parties.
➡️ Get ExpressVPN

How to Use Private Browsing in Safari on iPhone, iPad, and Mac
Some users aren’t aware of the steps to navigate to the Private Browsing Mode in Safari and think that the feature isn’t available or not working. So, before we get into the fixes, let me run you through the steps to use the Private Browsing Mode in Safari.
Steps to open a Private Browsing Window in Safari on iPhone or iPad.
- Open Safari browser on your iPhone or iPad.
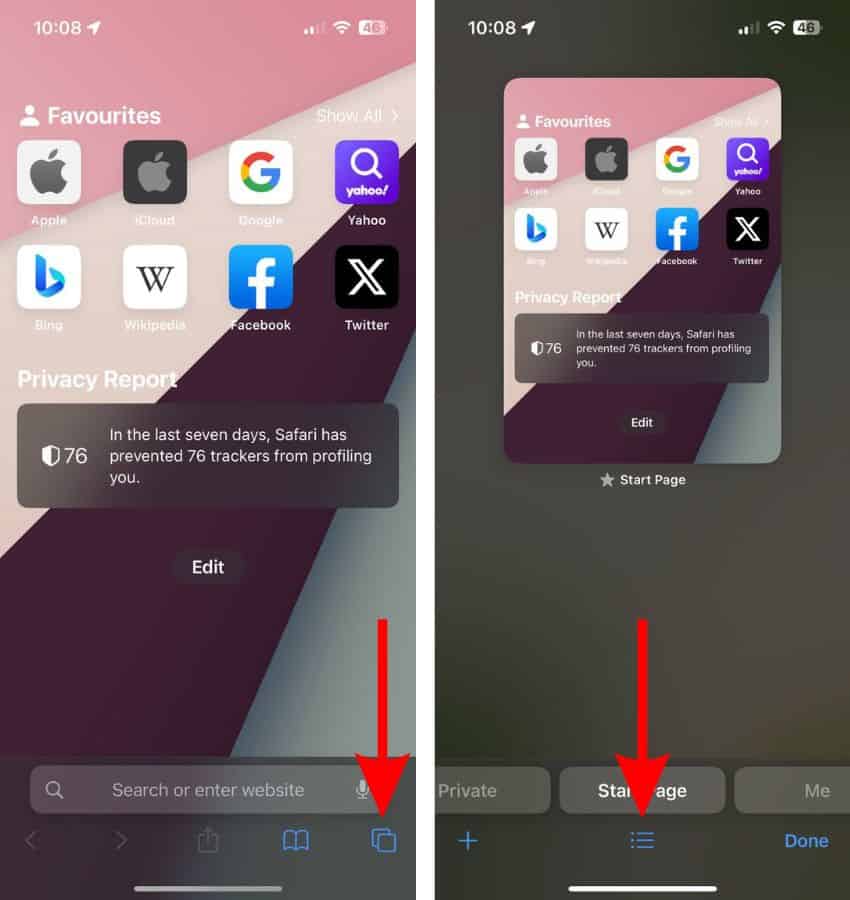
- Now, tap the “ Tab Groups ” button at the bottom.
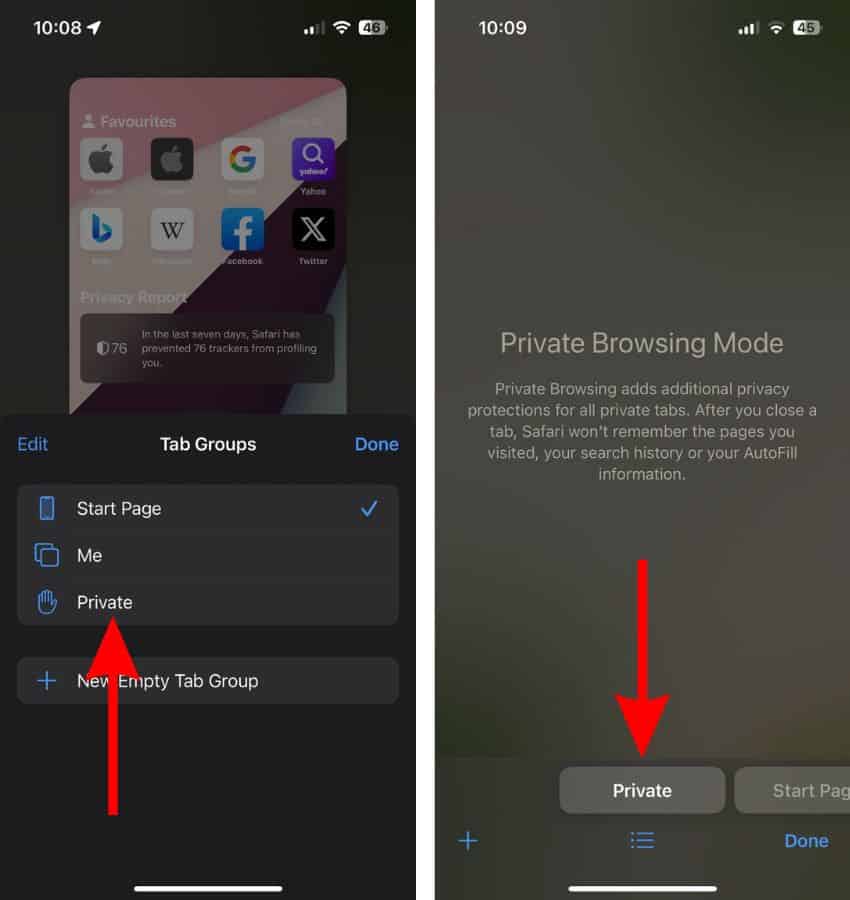
- Here, tap the + icon (Plus) to add tabs and use the Private Browsing Mode. Alternatively, you could also swipe right or tap the Private tab located at the bottom left corner.
Steps to open a Private Browsing Window in Safari on Mac.
- Open Safari on your Mac.
- Click the File option in the menu bar.
- Select the New Private Window option from the list and use Private Browsing Mode in Safari on Mac.
How to Fix Private Browsing Not Working in Safari on iPhone, iPad, Mac
Following the aforementioned steps, we’re certain that you are fully aware of the steps to access the Private Browsing Mode in Safari. But, if you still can’t access Safari even after knowing the steps, it means there’s something wrong.
Therefore, if the Private tab is grayed out or not working at all, here are some of the most effective troubleshooting methods that can help fix the Private Browsing Mode issues in Safari on iPhone, iPad, or Mac.
1. Remove Content Restrictions on Web Content
Enabling Content Restrictions for the Web Content section in the Screen Time Settings leads to the removal of the Private Browsing Mode button from Safari. If you’ve recently made this change, or have accidentally set restrictions for web content, here’s how to change these settings and retrieve the Private Browsing Mode.
Time needed: 2 minutes
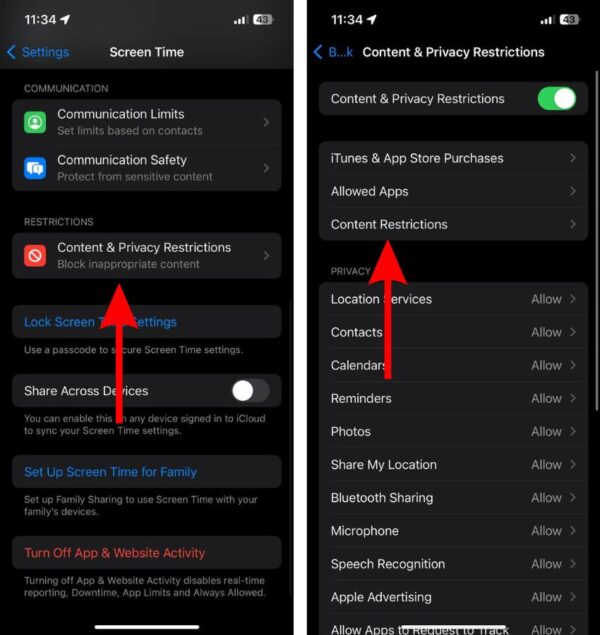
Steps to remove Content Restrictions from the Web Content section in Screen Time Settings on iPhone or iPad.
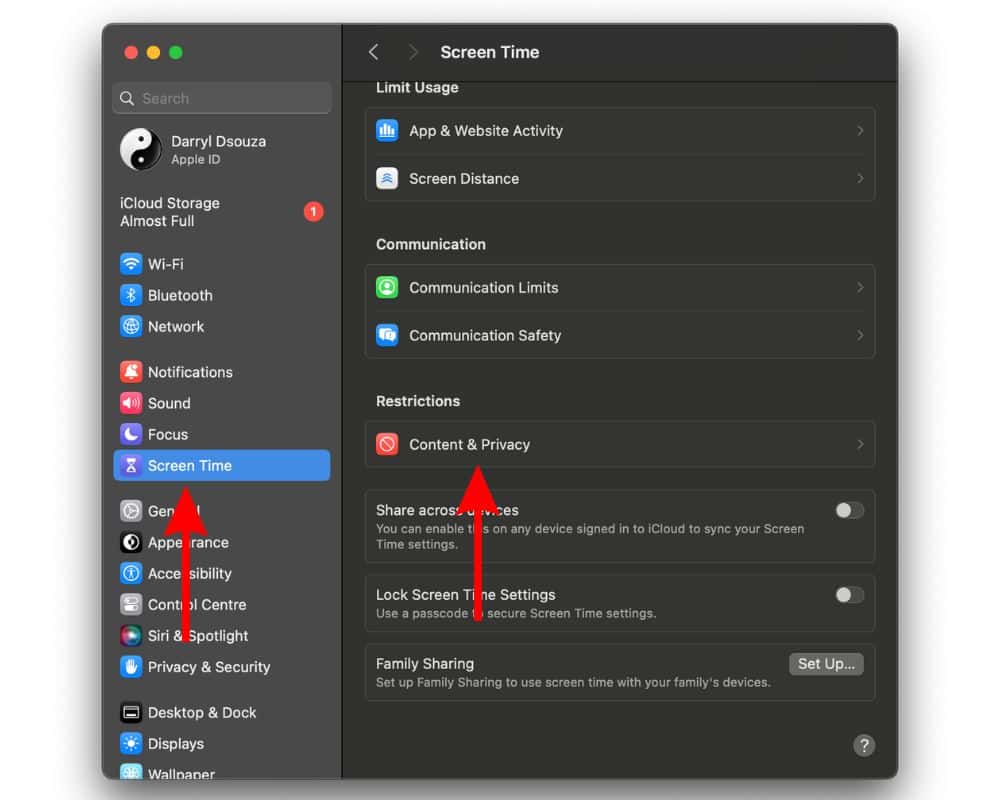
Remove Content Restrictions from the Web Content section in Screen Time Settings on Mac
- Click the Apple logo at the top left corner and click the System Settings… option.
2. Update Safari Browser to Fix Private Browsing Not Working in Safari
If removing restrictions didn’t resolve the issue, software bugs in the Safari browser might be the reason why Private Browsing Mode has disappeared from your device. Since Safari is the native browser, you cannot manually update it from the App Store. It receives updates with software updates. Moreover, updating the software can also get rid of other bugs or glitches within the software that might be causing this issue.
Update iOS or iPadOS to the latest version
- Open Settings on your iPhone or iPad and head to the General option.
- Select the Software Update option.
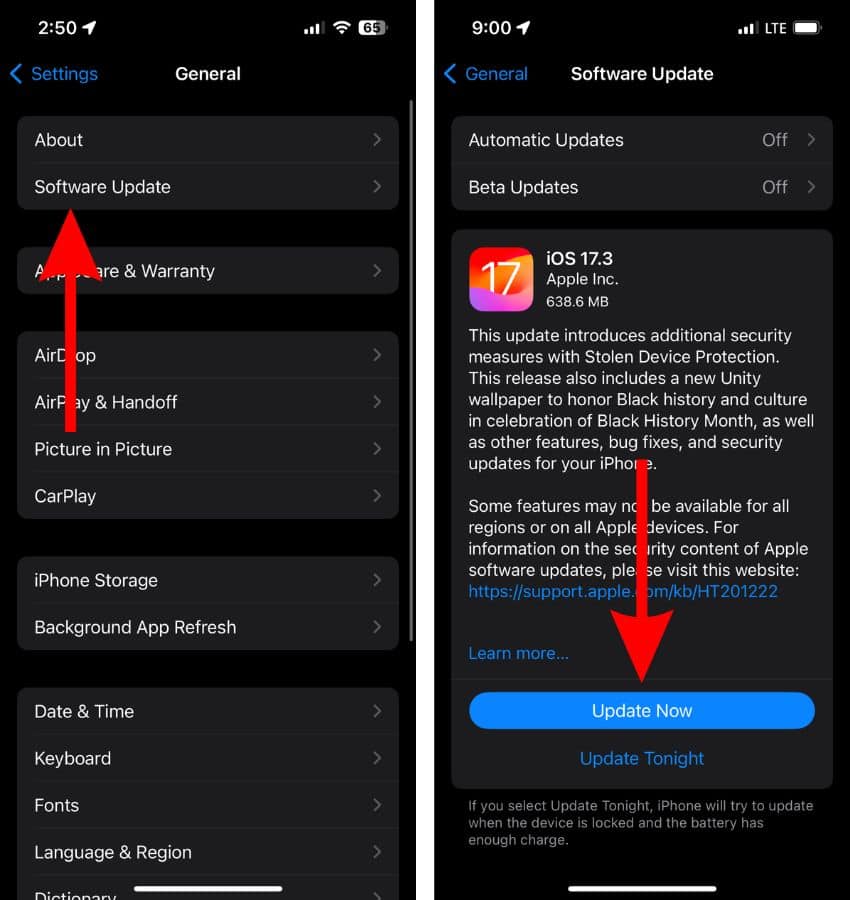
- Enter your device’s passcode to continue.
Update macOS to the latest version
- Click the Apple logo at the top right corner of the menu bar and select the System Settings… option.
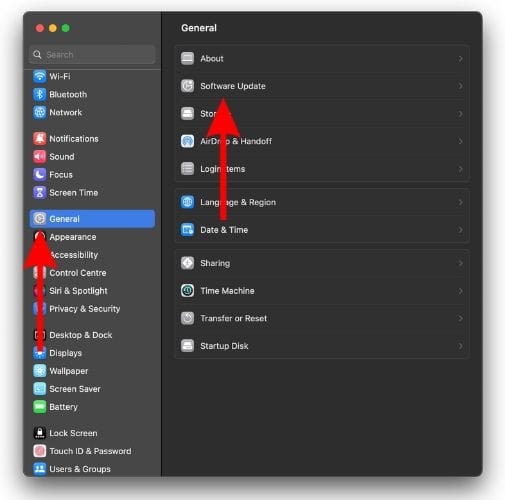
- Then click the Agree button after you’ve read the terms to update macOS to the latest version.
- Enter your Mac’s password and then click the OK button.
3. Restart iPhone, iPad, Mac to fix Private Browsing not working in Safari
Restarting the device helps resolve most temporary software bugs and glitches and you will always find it in troubleshooting guides. If you’ve tried all the steps mentioned above and cannot access your device’s Private Browsing Mode in Safari, a quick restart might fix the issue. Especially because all the services running on your iPhone, iPad, and Mac restart alongside your device.
Moreover, even the settings you’ve just changed will be applied if they haven’t already. So go ahead and restart your iPhone, iPad, or Mac and it might fix the Private Browsing greyed out in Safari issue.
Restart iPhone and iPad without a Home Button
- Press and hold the side button and either volume button until the slide to power off slider appears.
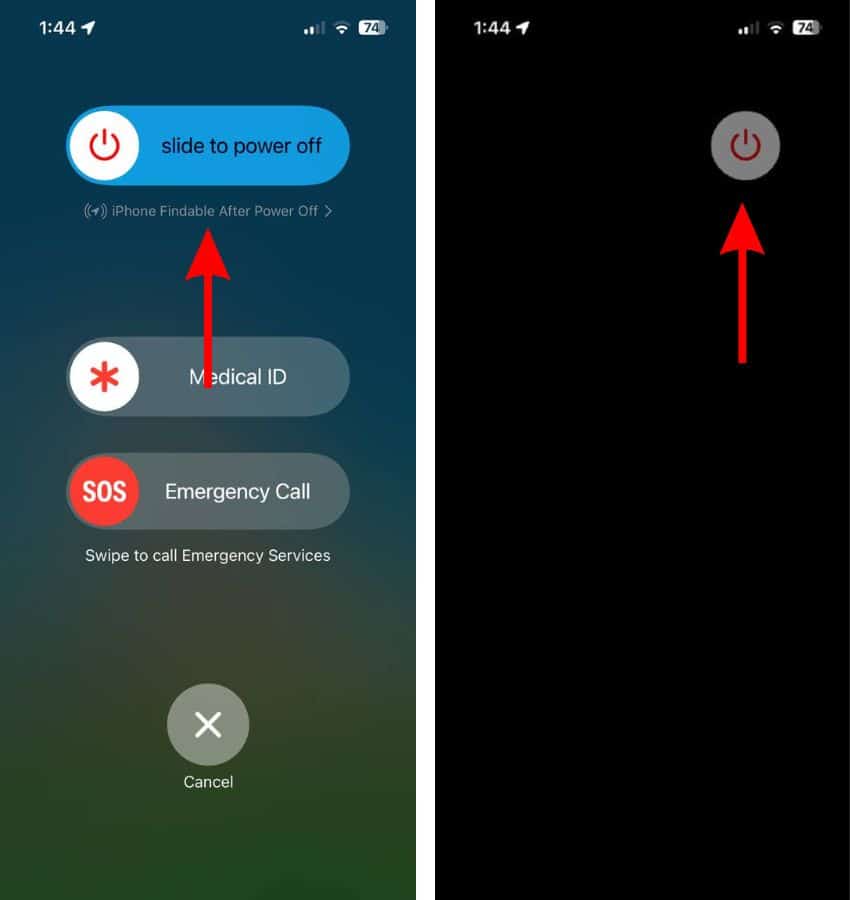
- Now, press and hold the side button until you see the Apple logo.
Restart iPhone and iPad with a Home Button
- Press and hold the side button until the slide to power off slider appears.
- Drag the slider and wait for a few minutes.
You can even ask Siri to restart your iPhone or iPad if your hands are preoccupied, etc. This is one of my favorite implementations and I use it quite often.
Restart Any Mac
- Click the Apple logo at the top right corner of the menu bar.
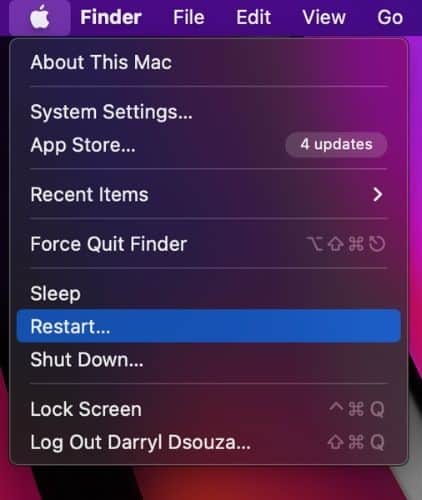
- Unselect the checkbox to the left of the “Reopen windows when logging back in” option.
- Then, click the Restart button to restart your Mac.
4. Contact Apple Support
The silver lining to every troubleshooting dark cloud is Apple Support. If you followed all of the above mentioned steps but none of them helped, the last option is to contact Apple Support . Alternatively, you could visit any official Apple Store nearby and ask the employees at the Genius Bar to inspect your device and help fix the Browsing Mode not working in Safari.
Does the Private Browsing Mode in Safari Work as Promised?
Apple promises that when you’re browsing the internet using the Private Browsing Mode in Safari it doesn’t save any history. However, there’s a workaround using which you can view your Safari Private Browsing History on Mac . So, if someone wants to view your browsing history, they can. Therefore, we recommend using a VPN alongside the Private Browsing feature to ensure utmost safety.
We hope this article helped fix the Private Browsing Mode not working in Safari on your iPhone or iPad. If you have any other doubts, do let us know in the comments below.
One thought on “ Fix: Private Browsing Greyed Out in Safari on iPhone, iPad and Mac ”
Privacy is paramount when it comes to online activities, and Utopia’s P2P web proxy function provides an exceptional solution for private browsing by encrypting internet traffic and protecting users’ identities.
Leave a Reply Cancel reply
You must be logged in to post a comment.
This site uses Akismet to reduce spam. Learn how your comment data is processed .
- Darryl Dsouza
Your Guide to Private Browsing in Safari
Private browsing is often misunderstood, but it can be a helpful feature if you know what’s what.
Quick Links
What private browsing does in safari, how to use safari private browsing on iphone and ipad, how to use safari private browsing on a mac, how to disable safari private browsing on iphone and ipad, how to disable safari private browsing on a mac, key takeaways.
- Private Browsing in Safari hides browsing history, autofill details, downloads, and locks tabs after inactivity.
- Safari on Mac groups private and non-private tabs, while on iPhone it shows all tabs regardless of mode.
- To use Private Browsing in Safari, identify it by a dark address bar, "Private" indicator, or "Private" next to the site URL.
Most browsers offer a private browsing mode that aims to keep the websites you view off the record. But what exactly does it do in Safari and how do you get the best out of it?
First and foremost, Private Browsing keeps the website pages you visit out of your History . The aim is to prevent someone else from seeing which pages you have visited if they have access to your phone or computer.
In Safari, Private Browsing does a lot more than just hide URLs. It also:
- Prevents recent searches from showing up in your history.
- Stops remembering details you enter in forms for autofill.
- Keeps downloaded items from appearing in your Downloads list.
- Locks private tabs after a period of inactivity.
- Adds tracking and fingerprinting protection.
However, it’s important to note that Private Browsing does not stop you from being tracked altogether. Websites you visit will still be able to use various methods to track you, and will still have access to all data that you send them.
On macOS, iOS, and iPadOS, Safari groups private tabs together, and separates them from non-private tabs. On Mac, each Safari window is either private or non-private, and can have as many tabs as you want.
On iPhone, you can switch between private and non-private modes, each of which shows all tabs belonging to that mode.
You can spot when you’re viewing a private tab with these signs:
- The address bar has a dark background. This may be less noticeable if you’re using Dark Mode .
- On Mac, you’ll see a prominent Private indicator in the title bar.
- On iPhone, you’ll see Private alongside the site URL at the bottom of your screen.
The steps to enter Private Browsing mode are nearly identical on an iPhone and iPad. The only difference is that the tab icon is at the bottom of the screen on iOS and the top on iPadOS.
- Long-press the tab icon (two overlapping pages) on the bottom-right (iPhone) or top-right (iPad) of your screen.
- Tap the New Private Tab menu item.
- If locked, enter your passcode to unlock Private Browsing.
You can enter Private Browsing mode on macOS using either a menu item or a keyboard shortcut:
- Open the File menu and choose New Private Window .
- Alternatively, use the keyboard shortcut Shift + Cmd + n .
- Use the browser as you normally would. Any tabs you open from this window will open in the same window, in private mode.
You may want to prevent users of an iPhone or iPad from using Private Browsing mode at all. To do so:
- Open the Settings app.
- Tap on Screen Time .
- Under RESTRICTIONS , click on Content & Privacy Restrictions .
- If not already enabled, press the toggle next to Content & Privacy Restrictions to enable.
- Tap Content Restrictions .
- Change the Web Content setting to Limit Adult Websites .
The option to enter private mode will now be gone.
On macOS, the wording of certain options differs slightly, but the overall process is near-identical to iOS:
- Open System Settings via the Apple menu.
- Click on Screen Time in the left panel.
- Under the Restrictions section, click on Content & Privacy .
- Click Content Restrictions .
- Change the Access to Web Content setting to Limit Adult Websites .
Private Browsing will now be unavailable in Safari, although any existing private windows will stay open.
Of course, anyone can re-enable Private Browsing using the same process, in reverse. However, you can use Screen Time’s Lock Screen Time Settings option to set a passcode and enforce the setting permanently.

How to Disable Private Browsing in Safari on iPhone
Dilum Senevirathne is a freelance tech writer specializing in topics related to iOS, iPadOS, macOS, Microsoft Windows, and Google web apps. Besides Guiding Tech, you can read his work at iPhone Hacks, Online Tech Tips, Help Desk Geek, MakeUseOf, and Switching to Mac.
Whenever you hand over your iPhone to someone else, it’s best to know how that person plans to use it. That is especially your concern when it comes to web browsing, and even more so when you’ve got kids in the mix . And Safari’s Private Browsing mode, which doesn’t record any browsing activity, ends up compounding the problem.

Thankfully, that’s where Screen Time comes into play. By using it, you can disable Safari’s Private Browsing mode quite easily. So let’s check out how. But rather than stopping at that, you will also find ways to prevent the usage of third-party browsers that would otherwise circumvent the restriction.
Blocking Private Browsing
Screen Time offers a dizzying array of features to monitor and control the usage of apps on your iPhone. And the built-in content and privacy restrictions let you impose limitations on the various features in the native iOS apps. In this case, you will make use of the Web Content controls to disable Private Browsing in Safari.
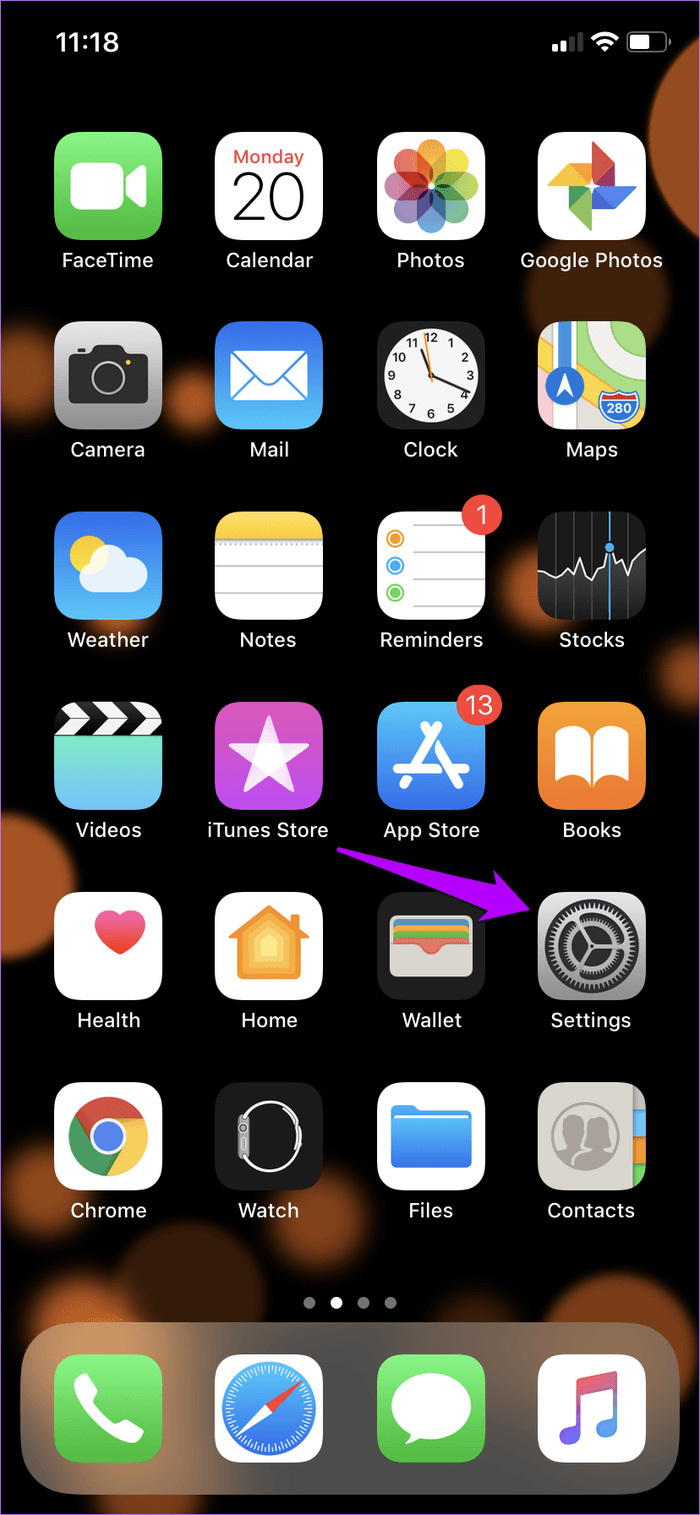
Step 1: Open the Settings app and tap Screen Time.
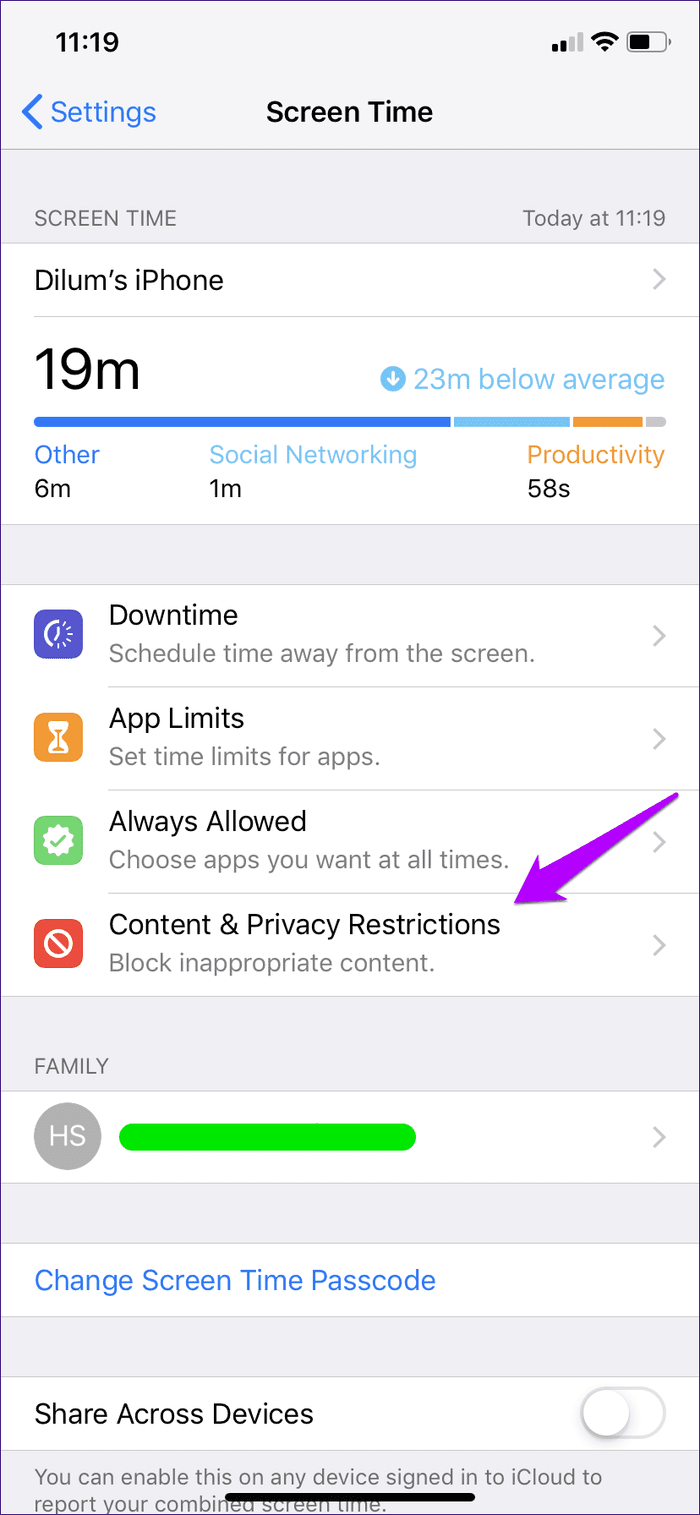
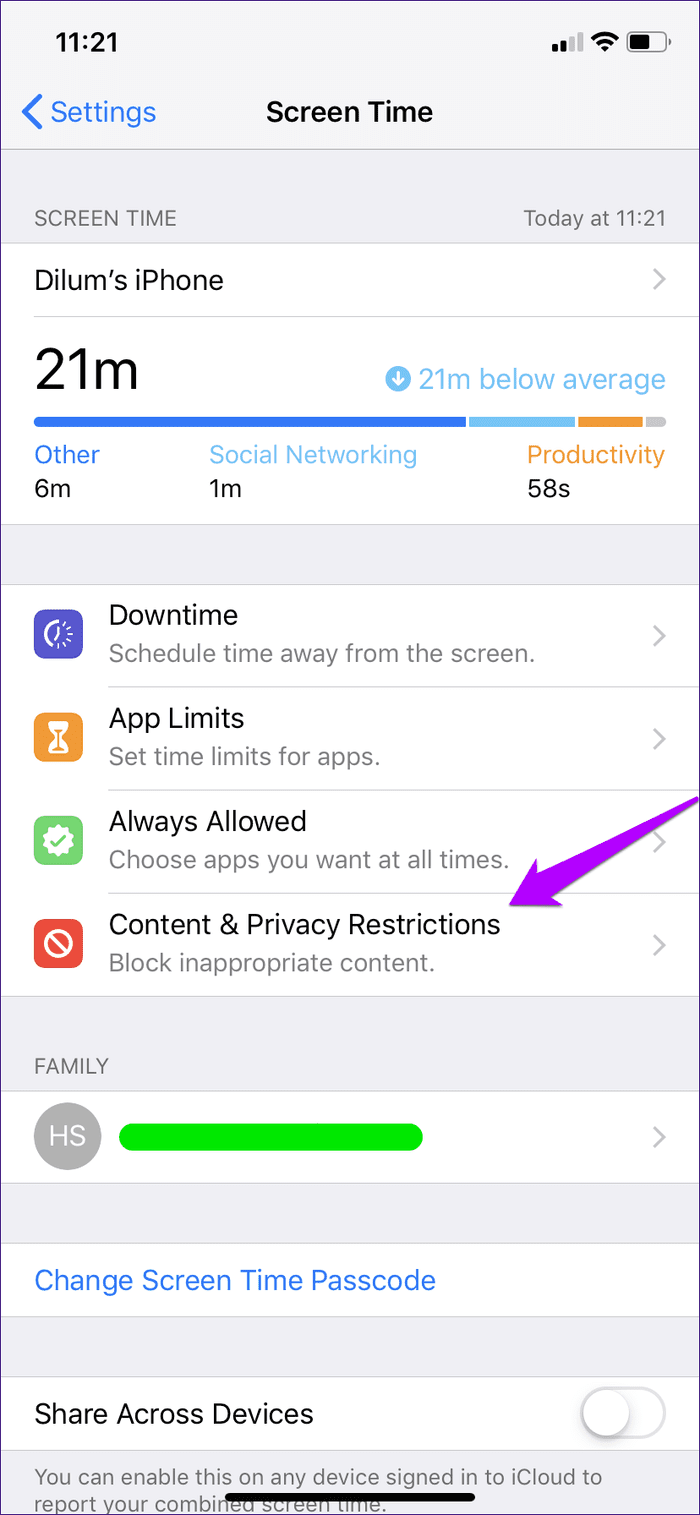
Step 2: On the Screen Time panel, tap the option labeled Content & Privacy Restrictions, and then tap Content Restrictions.
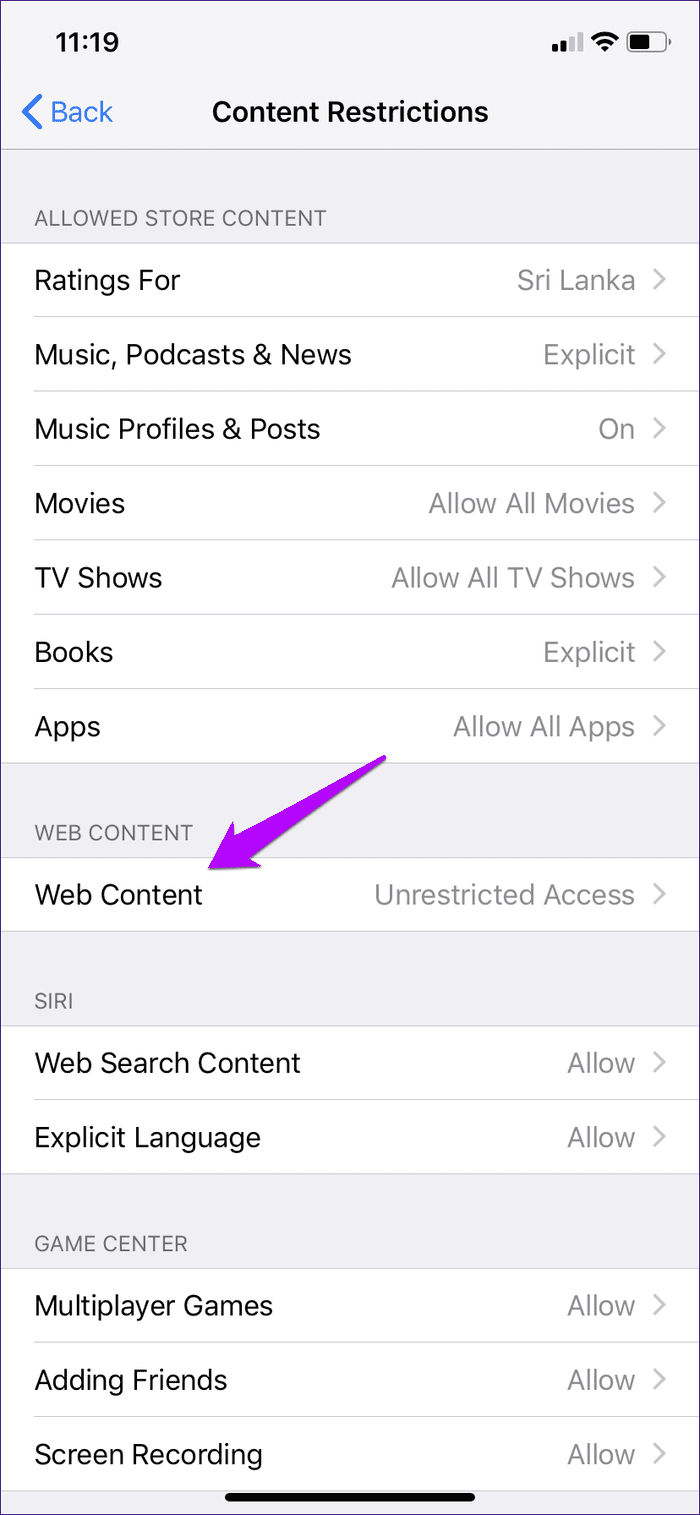
Step 3: Tap Web Content. On the subsequent screen, tap Limit Adult Websites.
Step 4: Open Safari, and then bring up the tab switcher and voila! You won’t find the option to initiate Private Browsing mode listed anymore.
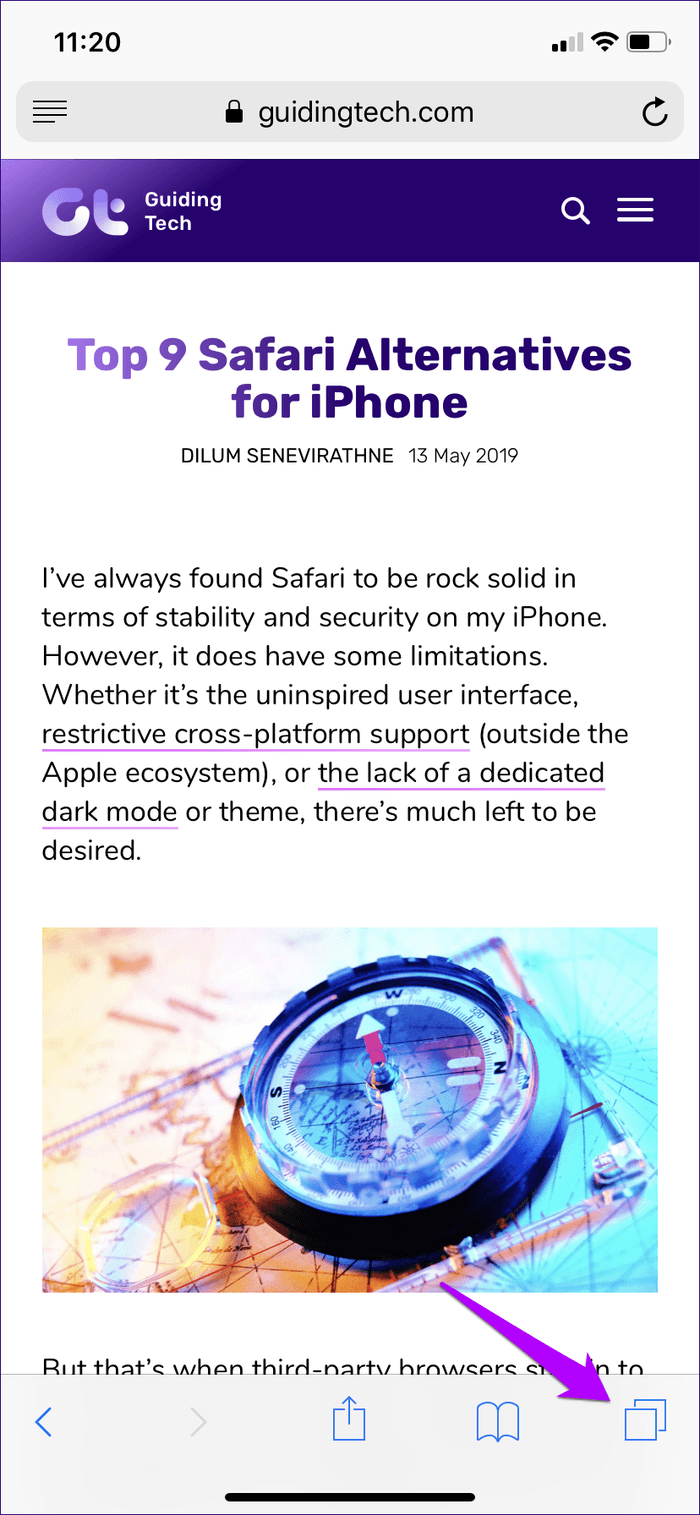
However, the Web Content controls will also block all websites that feature adult-related content. But if you’re intending on handing your device over to your kid, then consider that a bonus.
How to Restrict Third-Party Browsers Using Screen Time
While you can disable Safari’s Private Browsing mode quite easily, the Screen Time restrictions will not have the same effect on the privacy modes of third-party web browsers — such as Chrome’s Incognito mode . Hence, it’s possible that someone else can download another browser from the App Store and use it to surf anonymously instead.
Once again, Screen Time saves the day. With it, you can simply restrict downloads from the App Store.
Step 1: On the Screen Time panel, tap Content & Privacy Restrictions, and then tap iTunes & App Store Purchases.
Step 2: Tap Installing Apps, and then tap Don’t Allow.
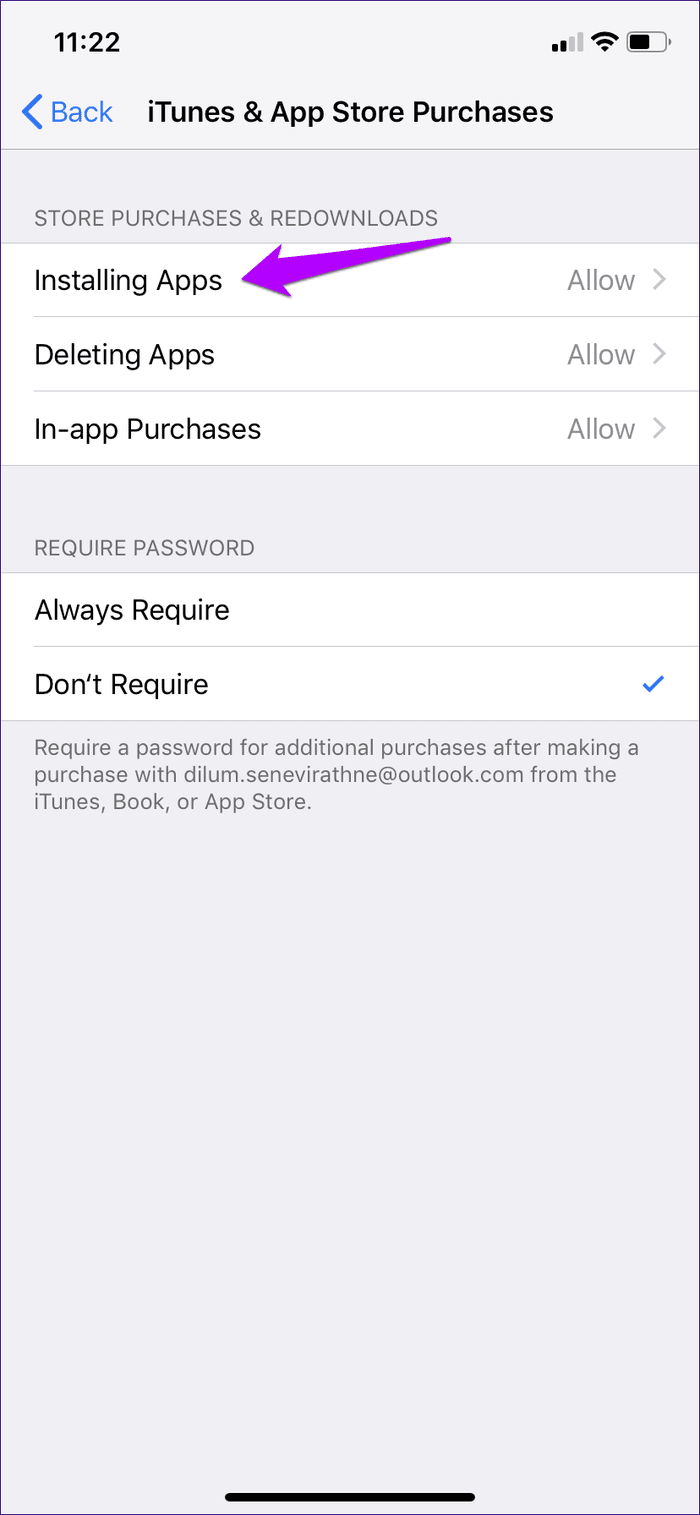
That’s it. App Store downloads are no longer possible. Remember to lift the restriction whenever you want to download an app for yourself.
How to Block Third-Party Browsers Using Screen Time
If you have a third-party browser, or several of them, already installed on your iPhone, then you really don’t have to remove them to stop someone else from surfing anonymously. With Screen Time’s App Limits feature, you can easily create a separate app category and impose the minimum time limit to restrict usage of those apps.
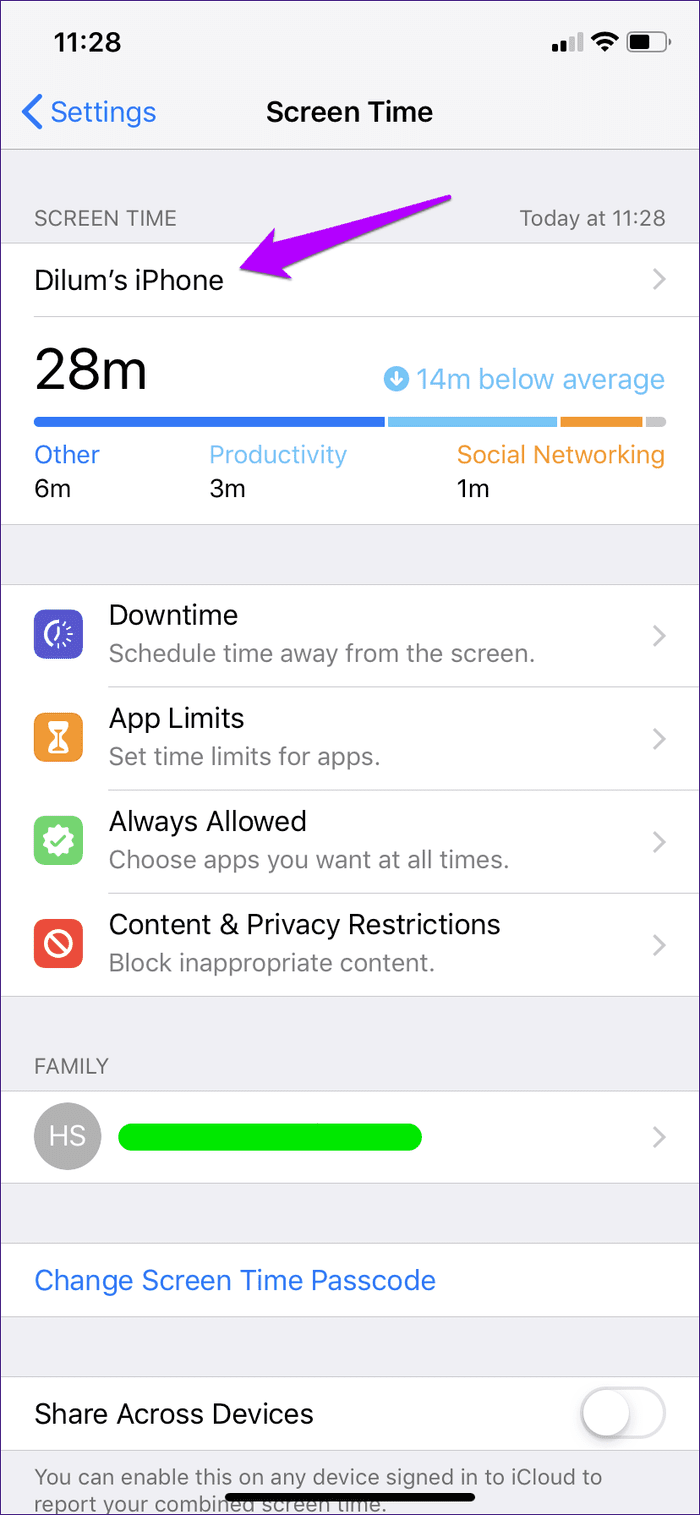
Step 1: On the Screen Time panel, tap the name of your device. On the following screen, select any one of the browsers that you want to block from underneath the Most Used section.
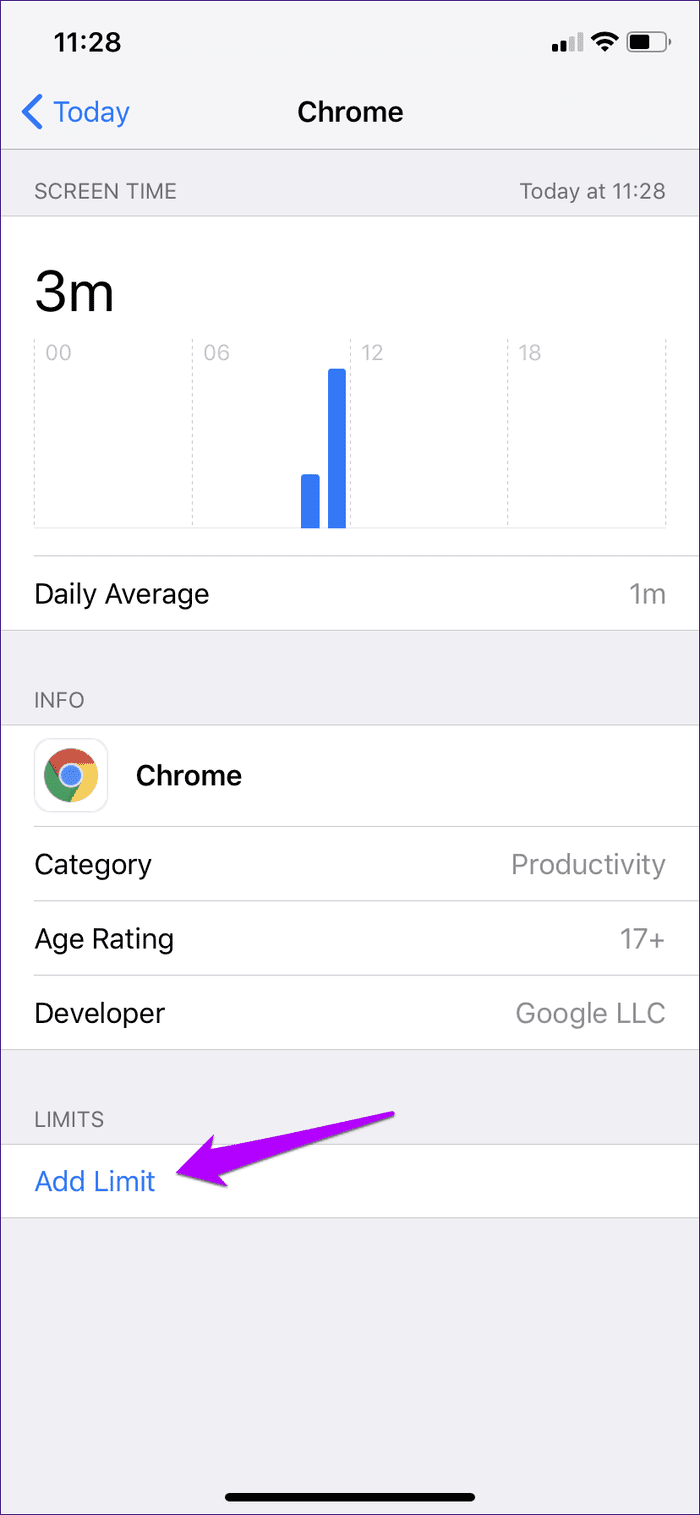
Step 2: Tap Add Limit, and then tap Edit Apps.
Step 3: Select all the third-party browsers on your iPhone, and then tap Add. Next, select the minimum time limit of a single minute, and then tap Add.
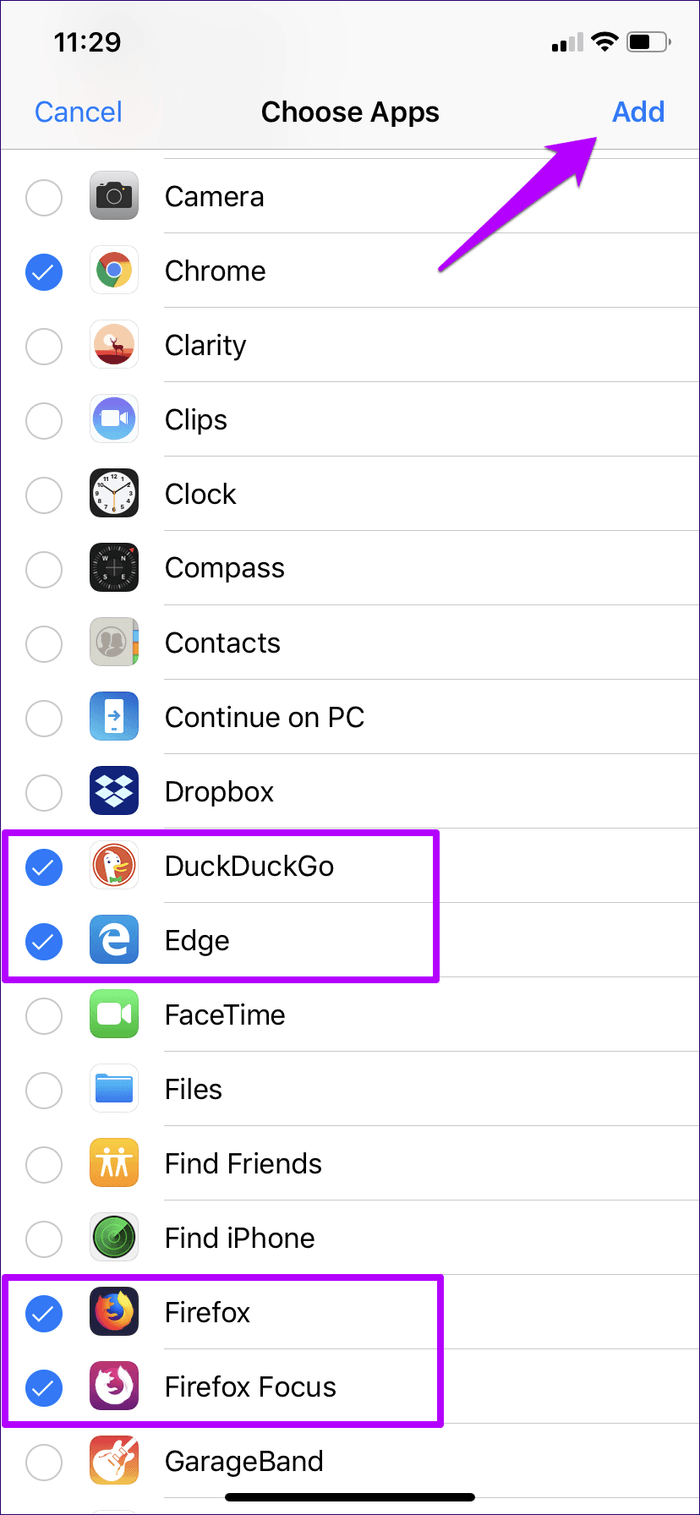
All third-party web browsers will be blocked on your iPhone after a minute of using any one of them. Not the smoothest (nor the most flawless) of ways to go about blocking browsers, but it’s the best you can do unless you want to uninstall them completely.
If you want to edit or remove the imposed time limits, head over to the Screen Time panel, tap App Limits, and then tap on the category that you just created.
Remote Management
If your child has an iPhone or iPad, you don’t have to go to the trouble of physically interacting with the device to impose any of the restrictions listed above. Instead, you can do that right from the comfort of your iOS device.
If you haven’t already, just use the Family Sharing feature (listed underneath your profile within the Settings app) to add your child’s account to your iPhone, after which it will show up within the Screen Time panel.

It’s then just a matter of adding the restrictions. The Screen Time controls layout is similar to that on your device, so you should have no trouble figuring things out.
Privacy Is Good … Just Not Always
Preserving your privacy is fine, and Safari’s Private Browsing mode is designed for that purpose. But often, it is important to know what your device is used for when sharing it with someone else, or keeping track of the activities of your kids. Thankfully, Screen Time alleviates those concerns. Kudos, Apple!
Next up: Want to go all the way out and block Safari completely? Here’s how to do that.
Was this helpful?
Last updated on 03 February, 2022
The above article may contain affiliate links which help support Guiding Tech. However, it does not affect our editorial integrity. The content remains unbiased and authentic.
The article above may contain affiliate links which help support Guiding Tech. The content remains unbiased and authentic and will never affect our editorial integrity.
DID YOU KNOW
Dilum Senevirathne
More in ios.

Top 7 Ways to Fix Depth Effect Wallpaper Not Working on iPhone

Top 8 Ways to Fix Wi-Fi Login Page Not Showing on iPhone
Join the newsletter.
Get Guiding Tech articles delivered to your inbox.
VPNoverview.com Privacy Anonymous Browsing Everything You Need to Know About Safari Private Browsing
Everything You Need to Know About Safari Private Browsing
Ever wondered what Safari Private Browsing does exactly? Chances are it might not be giving you the level of online privacy you expect. Safari Private Browsing does have some perks, including:
- Stopping Safari from remembering the websites you’ve visited
- Not storing any new usernames, passwords, payments cards, and other information you input into private browsing
- Forgetting any search engine queries you’ve run
- Allowing you to save money by avoiding marketing cookies that might inflate prices
However, this is pretty much all the privacy that you’ll get with Safari Private Browsing. This incognito mode won’t cloak your IP address, encrypt your internet traffic, or make you safe on public Wi-Fi . Private browsing still leaves you pretty exposed to a lot of the risks that come with connecting to the internet.
For true online anonymity, you’ll need to use a VPN to change your IP address . We’re big fans of ExpressVPN, one of the fastest VPNs in the industry.
Below, you’ll find more information on how to use Safari Private Browsing on all your Apple devices, as well as more details on how this incognito mode does and doesn’t protect your privacy.
If you use a Mac, iPhone, or iPad, then chances are you’ve encountered Safari Private Browsing before. Whether you’re shopping for a partner’s gift or want to snoop on a long-lost colleague’s LinkedIn, there are many reasons why you might want to use private mode in Safari.
In this article, we answer the question, what is Safari Private Browsing ? We’ll also tell you what this handy tool can’t do to save you any embarrassment or risk to your online security.
What is Safari Private Browsing?
There’s a little more to this method of browsing than meets the eye, but we’ll go into specifics further down in this article. The point is, for a more private experience, you can use Safari’s incognito mode . You’ll be logged out of all accounts, and Safari won’t autofill user logins, passwords, or payment information. When you turn on private browsing, Safari won’t remember :
- Your search engine history
- Webpages you’ve visited
- Browsing activity or history
You should, however, be aware of a major drawback of this tool on Macs: your browsing activity likely isn’t as hidden as you might think. Websites you visit can still see who you are and what you’re doing . You can read more about this in our general incognito mode article .
With Macs, Private Browsing information is logged in a different place, as well: your Terminal archive.
Beware the Mac Terminal archive
On Macs, there’s something called the Terminal archive , and it’s as scary as it sounds — well, for fans of privacy at least. It’s a treasure trove for snoops. The Terminal archive contains all of the websites you visit , whether you’re using Safari Private Browsing or not. This is because your Mac stores static images and other files when you visit a website for the first time. This makes future visits to these sites and page loading much faster, as your Mac pulls the relevant files from the Terminal archive.
This command-line function also lets you make systemic changes to your Mac . For most users, there’ll never be a need to make any changes in the Terminal archive, and you shouldn’t if you don’t know what you’re doing. You could end up breaking something critical in your computer’s operating system if you tinker with the Terminal.

However, it is good to know that, even when you’re using Safari’s Private Browsing mode, your online activity is logged here.
Make your Safari Private Browsing truly private
By now, you might be asking yourself: how do I clear the cache on my Mac? Well, today’s your lucky day. Below, you’ll find a brief, step-by-step guide to clearing the cache on a Mac . Just make sure not to do anything else while inside the Terminal.
- Open “ Finder ,” then search for “ Terminal ” in the search bar.
- Run the Terminal application.
- Paste the following text into the Terminal and hit enter: sudo killall -HUP mDNSResponder
You may have to enter your Admin password to proceed. This is going to flush the DNS cache.
Remember that you shouldn’t do anything else inside of the Terminal application unless you know what you’re doing. It only takes a short command to nuke files or entire directories in this app forever! So, tread carefully.
Why You Should Use Safari Private Browsing on Macs and iOS
We can hypothesize all we want, but you’ve probably got a good idea of why you use private browsing. According to a 2018 research study , the most common reason people use private browsing is so others that are using a shared device can’t see what they’re doing. This comes down to protecting two things from other users of your device:
- Their personal data
- Their browsing activity
Fortunately, these are two things that Safari Private Mode manages to do wonderfully. Below, you can read more about what else Safari Private Browsing does for you .
Online privacy
- Your browser won’t remember what websites you’ve visited. Anything you browse while you’re in private browsing mode won’t be remembered by Safari. So, if you start shopping online for gifts or a product that you find embarrassing, you won’t usually have to worry about your friends or family coming across your browsing history.
- Safari won’t suggest usernames, passwords, credit card numbers, and so on. You’ve probably noticed that Safari can remember usernames, passwords, credit cards, and other information when you use it for the first time. If you tell your Mac, smartphone, or tablet to remember those details, they’ll be automatically filled in the next time you visit the website. With Safari Private Mode enabled, these kinds of details won’t be stored: you won’t be prompted to save or autofill them at all.
- Your search engine queries won’t be remembered . If you’ve been shopping for gifts or trying to self-diagnose, you probably don’t want other users of the computer to see what you’ve searched for . Normally, you’ll see suggested searches popping up in search engines like Google. Based on your past searches and clicks, some links might be colored purple instead of blue, too. In private browsing mode, these won’t appear, nor will any new searches be stored.
How to pay less with Safari Private Browsing
There’s more to private mode options than just online security. You could also save money with Safari Private Browsing, as you won’t be quoted higher prices for products you’ve already viewed. When you visit a website, cookies (small text files) are stored on your computer by your browser.
These kinds of cookies aren’t delicious or rewarding at all. Instead, they allow the site to track you and figure out that you’re interested in, for example, a particular holiday destination. This can result in you seeing higher airfares, hotel booking fees, and more. Just turn on Safari’s Private Browsing to s top cookies from being stored on your browser and avoid hiked prices.
How to Go Incognito on Safari
Safari Private Browsing on a Mac
Using Safari Private Browsing on a Mac is simple. If you’re reading this on a Mac, you can skip step one in our step-by-step guide below:
- Open Safari on your Mac.
- Click on “ File ” in the menu bar at the top of the screen.
- Select “ New Private Window .” This will open a new private tab, but you can open as many private tabs in your tab bar as you need.

It’s that simple. Now, any new tab you open within this new private browsing window will be a private browsing tab. Give it a whirl by opening some new private tabs and navigating to a website you frequently log into. You’ll notice that your username and password aren’t suggested for autofill as they usually would be .
Also, you’ll know that you’re in private browsing, as the URL bar will have a gray background rather than the usual white. Just remember to ignore or close your existing browser window if you had any open. If in doubt, check the background color of the URL bar.
Finally, to turn off private browsing in Safari , simply click the red cross in the corner of the browser window as you usually would.
Safari Private Browsing on an iPhone
Using Safari’s private browsing mode on an iPhone or iPad is fairly straightforward and could increase your privacy on an iPhone . If you’re running iOS 14 or earlier , simply follow the steps below:
- Open Safari on your phone.
- Tap on the “ Tabs ” button. That’s the two small squares in the bottom-right corner of your Safari window on iPhone.
- A new option called “Private” should appear.
- Tap “ Private ” and you’ll be taken to a blank screen confirming that you’re using Private Browsing Mode . You’ll notice that it’s using the same gray color scheme as Safari for Mac.
- Lastly, click on the small “ + ” (plus) icon to launch a private browsing window.

If you’re using Apple’s latest iPhone update, iOS 15.1.1 , you’ll need to follow a slightly different (and hey, we’ll say it — more confusing) set of steps:
- Tap on the “ Tabs ” button.
- Tap where it says “ X Tab(s) ” – this number will reflect the number of windows you have open.
- Tap “ Private .”
- Now, you’re in Private Browsing mode and can click the small “ + ” (plus) icon to launch a new private window.

Again, turning off private browsing in Safari for iPhones or iPads is simple. Just press the same “ Private ” button that you used to enable the feature. Don’t forget, if you have multiple private tabs open, they won’t close automatically. Swipe each tab closed before you exit private mode if you want to leave no trace.
How to Set Safari Private Browsing as the Default
If you’d rather always browse privately, you can also set Safari Private Browsing as your default, so that it opens automatically whenever you open a new tab or window. Check out the step-by-step instructions below for a Mac :
- Make sure your active application is Safari, then select “ Safari ” from your Mac’s toolbar at the top of your screen. Click on “ Preferences ” next, which can also be accessed using the keyboard shortcut “ Command ” + “ , ” (that’s Command, plus a comma).
- Now, you should see the Privacy window for Safari. Click on the “ General ” tab.
- Next to “Safari opens with”, select “ A new private window ” from the drop-down list.
While you can’t automatically use Safari Private Browsing by default on mobile , there are some options for minimizing what’s remembered, stored, or recommended. Here’s how you get there:
- Open the “ Settings ” application.
- Scroll down until you see “ Safari ” and tap on that option.
Now, you’ll have the choice to use a number of features. You can:
- Disable search engine suggestions
- Disable Safari suggestions specifically
- Turn off autofill for Safari , either for personal information, payment information, or both
- Disable “ Favorites “, which you can save in your Safari app’s home screen
- Turn off “ Frequently Visited Sites “, which appear below your favorites
In this menu, you can also prevent cross-site tracking and block all cookies on the websites that you visit. In the event that you forget to launch Safari Private Browsing, these options should give you at least a little more privacy whenever you go online.
Is Safari Private Browsing Safe?
That last risk is surprisingly common on public Wi-Fi networks too. Bear in mind that private browsing doesn’t protect you against malware (malicious software) either, nor does it protect your payment information or other personal details . For true online anonymity and to improve your online security , you should give serious thought to using a VPN (Virtual Private Network) .
How to use a VPN with Safari Private Browsing
Using a VPN along with Safari Private Browsing should give you the online security you’re looking for. In addition to avoiding any logged browsing history or search history , you’ll be much harder to track and enjoy greater online anonymity. You can check out the many advantages of a VPN for more information. Want to get started right away? The following steps will only take a few minutes of your time:
- Choose a VPN provider and create an account. We recommend checking out our list of the best VPNs if this is new ground for you. Alternatively, ExpressVPN is a market-leading VPN provider that we’re always happy to recommend.
- Download and install the VPN software onto your Mac. You can also download ExpressVPN for mobile on your iPhone. Other premium providers like NordVPN, CyberGhost, and Surfshark all offer really slick mobile apps for iOS, too.
- Log into your account , either in the desktop software or the mobile app.
- Choose a VPN server in a country of your choice. If you’re purely interested in online security, then the location you choose isn’t too important (though some will be faster than others). However, if you want to save money on subscriptions , for example, you should give it some more thought.
- Connect to the VPN server . When you connect, you’ll be changing your IP address to mirror the VPN server’s IP. It’s safe, legal ( in most countries ), and best of all, it’ll give you far greater online security than simply using Safari Private Browsing alone.
Safari Private Browsing is perfect for hiding those Christmas or birthday purchases from your family before the big day. It’s also a great way to save money on flights, hotels , or other purchases. However, it won’t do much for your online security. If you want truly private browsing , then use a VPN along with Safari private mode.
Interested in exploring other private browsers? Check out these articles below:
- How Anonymous Is DuckDuckGo?
- Is Vivaldi Browser Safe?
- How to Set Up Firefox as an Anonymous Browser
Do you want to know how to enable private browsing on Safari? Are you wondering how much privacy Safari Private Browsing actually gives you? You’ll find these answers and more in our frequently asked questions below.
To turn on Private Browsing in Safari for Mac, follow these simple steps:
- Make sure Safari is the active application that you’re using.
- Click on File in the menu bar along the top of the screen.
- Click on New Private Window to switch to private browsing mode.
To turn on Private Browsing in Safari for iPhone or iPad, the process is much the same:
- Open the Safari application.
- Tap on the Tabs icon (the two small squares in the lower-right corner of your screen).
- Tap on Private to switch to private browsing.
- Click on the small + (plus) icon to open a new private browsing tab.
Check out our full article for more information on Safari Private Browsing.
No. Safari Private Browsing, like any browser’s private mode, won’t protect you against a lot of online threats. Your IP address will still be visible to many third-party individuals and organizations. For example, your ISP will know what websites you’ve visited, and hackers could determine your location using your IP (though some private modes do limit location tracking). For true online privacy and anonymity, you’re safer using a VPN like ExpressVPN .
With Private Browsing, it’s more difficult for websites to track you, since cookies are cleared the moment you close the browser — but it’s not impossible. Your ISP (Internet Service Provider), employer, school, or college could still see your internet history . That is, unless you use a VPN along with the incognito mode.
Yes. The owner of an internet connection can absolutely check up on your browsing session if they have the right technical knowledge. Some routers can be set up to remember all URLs a device accesses. So, if you’re trying to fly under your parents’ radar, for example, they could potentially bust you using the family router, even if you’re exclusively using private browsing modes.
For true anonymity , you’ll want to use a VPN. With a VPN connection, all of your internet traffic is encrypted, which gives you far better anonymity and privacy than using private browsing on its own.

Chris Bluvshtein Author
Senior journalist.
Chris is a tech journalist with many years’ experience covering online privacy and cybersecurity. He’s also a published author and works as a Product Manager for some of the most innovative software development companies.
Share this article
More articles from the anonymous browsing section.

Kanary Review (2024): A Cheap and Secure Data Removal Service

OneRep Review (2024): Can OneRep Protect Your Private Data?

The Best Data Removal Services (Personal Information Removal Made Easy)
Hi Chris , I’m finding while using private mode in safari my sound is being cut out and I have not been able to find a way to reconnect it. I use it on a iPad with a vpn and trend anti spam for protection as much as it can in private mode. I have not been able to find any reason as to why this is happening.
Hey Wayne, I've done a bit of digging, and I've found something that might be worth a try. It seems that recent versions of Safari have a built-in feature that can prevent audio from playing when you visit a website; it's enabled by default too. Give this a try and let me know if the issue goes away: 1. Open the Safari menu and click preferences 2. Click on the websites tab 3. Look for the setting: "When visiting other websites", which has a drop-down selection beside it 4. Change this setting so that it allows websites with media to play sound. You can alternatively add individual websites to this list if you'd rather have control over which ones can play sound by default.
Hi Chris Just tried your Terminal Commands, I am running macOS Monterey The Terminal Commands Below are not working dscacheutil -cachedump -entries Host dscacheutil -flushcache
You're right. Thank you for pointing it out to us! There is a new terminal command you'll now need instead: "sudo killall -HUP mDNSResponder". We've adjusted the article to reflect this. Hope this helps!
Looking for a VPN?
Take a look at our overview of the most trustworthy, fast, and safe VPN services. Extensively tested by our experts.

- PRO Courses Guides New Tech Help Pro Expert Videos About wikiHow Pro Upgrade Sign In
- EDIT Edit this Article
- EXPLORE Tech Help Pro About Us Random Article Quizzes Request a New Article Community Dashboard This Or That Game Popular Categories Arts and Entertainment Artwork Books Movies Computers and Electronics Computers Phone Skills Technology Hacks Health Men's Health Mental Health Women's Health Relationships Dating Love Relationship Issues Hobbies and Crafts Crafts Drawing Games Education & Communication Communication Skills Personal Development Studying Personal Care and Style Fashion Hair Care Personal Hygiene Youth Personal Care School Stuff Dating All Categories Arts and Entertainment Finance and Business Home and Garden Relationship Quizzes Cars & Other Vehicles Food and Entertaining Personal Care and Style Sports and Fitness Computers and Electronics Health Pets and Animals Travel Education & Communication Hobbies and Crafts Philosophy and Religion Work World Family Life Holidays and Traditions Relationships Youth
- Browse Articles
- Learn Something New
- Quizzes Hot
- This Or That Game
- Train Your Brain
- Explore More
- Support wikiHow
- About wikiHow
- Log in / Sign up
- Computers and Electronics
- Internet Browsers
- Google Chrome
Turn Off and Disable Private Browsing on Any Web Browser
Last Updated: May 10, 2024 Fact Checked
Turning Off Private Browsing
Disabling private browsing on windows, disabling private browsing on mac, disabling private mode in safari on mac, disabling private browsing on android, disabling private browsing on iphone and ipad.
This article was co-authored by wikiHow staff writer, Travis Boylls . Travis Boylls is a Technology Writer and Editor for wikiHow. Travis has experience writing technology-related articles, providing software customer service, and in graphic design. He specializes in Windows, macOS, Android, iOS, and Linux platforms. He studied graphic design at Pikes Peak Community College. This article has been fact-checked, ensuring the accuracy of any cited facts and confirming the authority of its sources. This article has been viewed 301,926 times. Learn more...
Incognito Mode or Private Browsing is a feature that most web browsers have that allows you to browse the internet without saving your internet use as history. However, there are many inconvenient drawbacks to browsing in private mode. It can also be a challenge for parents and companies that want to monitor internet usage. This wikiHow article teaches you how to turn off private browsing as well as how to permanently disable it.
Turn Off or Disable Private Browsing
- On most web browsers, you can tap the menu icon (with three dots or three lines) and tap the option to open a new window to exit private or incognito mode.
- On Windows and Mac, you can use Command Prompt or Terminal commands to permanently disable private or incognito mode in various web browsers.
- On mobile devices, enable content restrictions using Screen Time (iPhone/iPad) or the Family Link app (Android) to disable private mode in Google Chrome or Safari.

- Click Incognito in the upper-right corner.
- Click Close Incognito .
- Open a new window or tab.

- Tap the icon that resembles a square with numbers (tabs) in the upper-right corner (Android) or lower right corner (iPhone/iPad).
- Tap the same icon again at the top of the page to switch to normal browsing.
- Tap the Plus (+) icon to open a new tab.

- Click File in the menu bar at the top.
- Click New Window .

- Tap the icon that resembles 2 squares stacked on top of each other in the lower-right corner.
- Tap the " # Tabs " button at the bottom of the screen.
- Tap the plus (+) icon to start a new tab.

- Tap the icon that resembles a screen with a menu in the upper-left corner.
- Tap Start Page at the top of the menu.

- Click the icon with three dots ( ⋯ ) in the upper-right corner.
- Click New Windows .

- Tap the icon that resembles a square with numbers in the menu bar at the bottom.
- Tap Tabs at the top.
- Tap the plus (+) icon to open a new tab.

- Click the icon with three lines ( ☰ ) in the upper-right corner.
- Click New Window
- Tap the icon that resembles a square with numbers (tabs) in the lower-right corner.
- Tap the same icon again next to the icon that resembles a mask in the bar at the top.
- Tap the plus (+) icon in the lower-right corner.

- Click the Windows Start menu.
- RIght-click the Command Prompt icon.
- Click Run as adminitrator .

- Disable Google Chrome Incognito Mode: REG ADD HKLM\SOFTWARE\Policies\Google\Chrome /v IncognitoModeAvailability /t REG_DWORD /d 1
- Disable Google Chrome Guest Mode: REG ADD HKLM\SOFTWARE\Policies\Google\Chrome /v BrowserGuestModeEnabled /t REG_DWORD /d 0
- Disable Microsoft Edge InPrivate Mode: REG ADD HKLM\SOFTWARE\Policies\Microsoft\Edge /v InPrivateModeAvailability /t REG_DWORD /d 1
- Disable Microsoft Edge Guest Mode: REG ADD HKLM\SOFTWARE\Policies\Microsoft\Edge /v BrowserGuestModeEnabled /t REG_DWORD /d 0
- Disable Firefox Private Mode: REG ADD HKLM\SOFTWARE\Policies\Mozilla\Firefox /v DisablePrivateBrowsing /t REG_DWORD /d 1
- Disable Brave Incognito Mode: REG ADD HKLM\SOFTWARE\Policies\BraveSoftware\Brave /v IncognitoModeAvailability /t REG_DWORD /d 1
- Disable Brave Guest Mode: REG ADD HKLM\SOFTWARE\Policies\BraveSoftware\Brave /v BrowserGuestModeEnabled /t REG_DWORD /d 0
- Disable Brave Incognito Mode with Tor: REG ADD HKLM\SOFTWARE\Policies\BraveSoftware\Brave /v TorDisabled /t REG_DWORD /d 1

- Click the magnifying glass icon in the upper-right corner.
- Enter Terminal into the search bar.
- Click the Terminal app.

- Disable Google Chrome Incognito Mode: defaults write com.google.chrome IncognitoModeAvailability -integer 1z
- Disable Google Chrome Guest Mode: defaults write com.google.Chrome BrowserGuestModeEnabled -bool false
- Disable Firefox Private Mode: defaults write /Library/Preferences/org.mozilla.firefox DisablePrivateBrowsing -bool TRUE
- Disable Microsoft Edge InPrivate Mode: defaults write com.microsoft.edge InPrivateModeAvailability -integer 1
- Disable Microsoft Edge Guest Mode: defaults write com.microsoft.edge BrowserGuestModeEnabled -integer 0
- Disabling Brave Incognito Mode: defaults write com.brave.Browser IncognitoModeAvailability -integer 1
- Disable Brave Guest Mode: defaults write com.brave.Browser BrowserGuestModeEnabled -bool false

- To reinstate Incognito Mode again, re-enter the command in the Terminal and change the integer value to "0" instead of "1".

- If you want to allow certain websites, click Allowed Sites and enter the websites you want to allow.

- You must have a Google account for yourself on your devices and child's account to link to.

- Tap Google Play .
- Tap Require Approval for .
- Tap the radio option next to "All content."

- If you want to allow certain websites, tap Allow and enter the websites you approve of.
Community Q&A
- Most browsers don't support disabling of private or incognito browsing. Your best course of action when attempting to prevent unauthorized private access is to install a set of parental controls that can monitor Internet use while in incognito/private mode. Thanks Helpful 0 Not Helpful 0
You Might Also Like

- ↑ https://sc1.checkpoint.com/documents/Infinity_Portal/WebAdminGuides/EN/Harmony-Endpoint-Admin-Guide/Topics-Common-for-HEP-HB/Browser-Settings.htm
- ↑ https://www.igeeksblog.com/how-to-disable-safari-private-browsing-on-mac/
- ↑ https://www.guidingtech.com/disable-safari-private-browsing-mac/
- ↑ https://play.google.com/store/apps/details?id=com.google.android.apps.kids.familylink&hl=en_US&gl=US
- ↑ https://support.google.com/families/answer/7087030?hl=en&sjid=16404751465167313741-NA
About This Article

1. Click the Windows Start menu and type "Regedit". 2. Click Registry Editor . 3. Navigate to "HKEY_LOCAL_KEY" > "SOFTWARE" > "Policies" > "Google" > "Chrome". 4. Right-click and add a new DWORD (32 Bit) value in "Chrome. 5. Name the new value "IncognitoModeAvailability". 6. Open "IncognitoModeAvailability" and change the value to "1". 7. Click Apply followed by Ok . 8. Restart your computer. Did this summary help you? Yes No
- Send fan mail to authors
Is this article up to date?

Featured Articles

Trending Articles

Watch Articles

- Terms of Use
- Privacy Policy
- Do Not Sell or Share My Info
- Not Selling Info
Keep up with tech in just 5 minutes a week!
How To Take Private Mode Off Safari

- Software & Applications
- Browsers & Extensions
Introduction
Safari, the default web browser for Apple devices, offers a private browsing mode that allows users to surf the internet without leaving a trace of their online activity on the device. This feature is particularly useful for maintaining privacy and preventing the storage of browsing history, cookies, and other data. However, there are instances when users may want to disable private mode to resume regular browsing or to ensure that certain websites function properly. Whether it's to access saved passwords, enable extensions, or troubleshoot website issues, taking private mode off Safari is a straightforward process that can be completed in just a few simple steps.
In this guide, we'll walk you through the process of turning off private mode in Safari on your iPhone or iPad. By following these steps, you'll be able to seamlessly transition from private browsing to regular browsing, allowing you to make the most of Safari's full range of features and functionalities. Let's dive into the step-by-step instructions to disable private mode and return to standard browsing in Safari.
Step 1: Open Safari
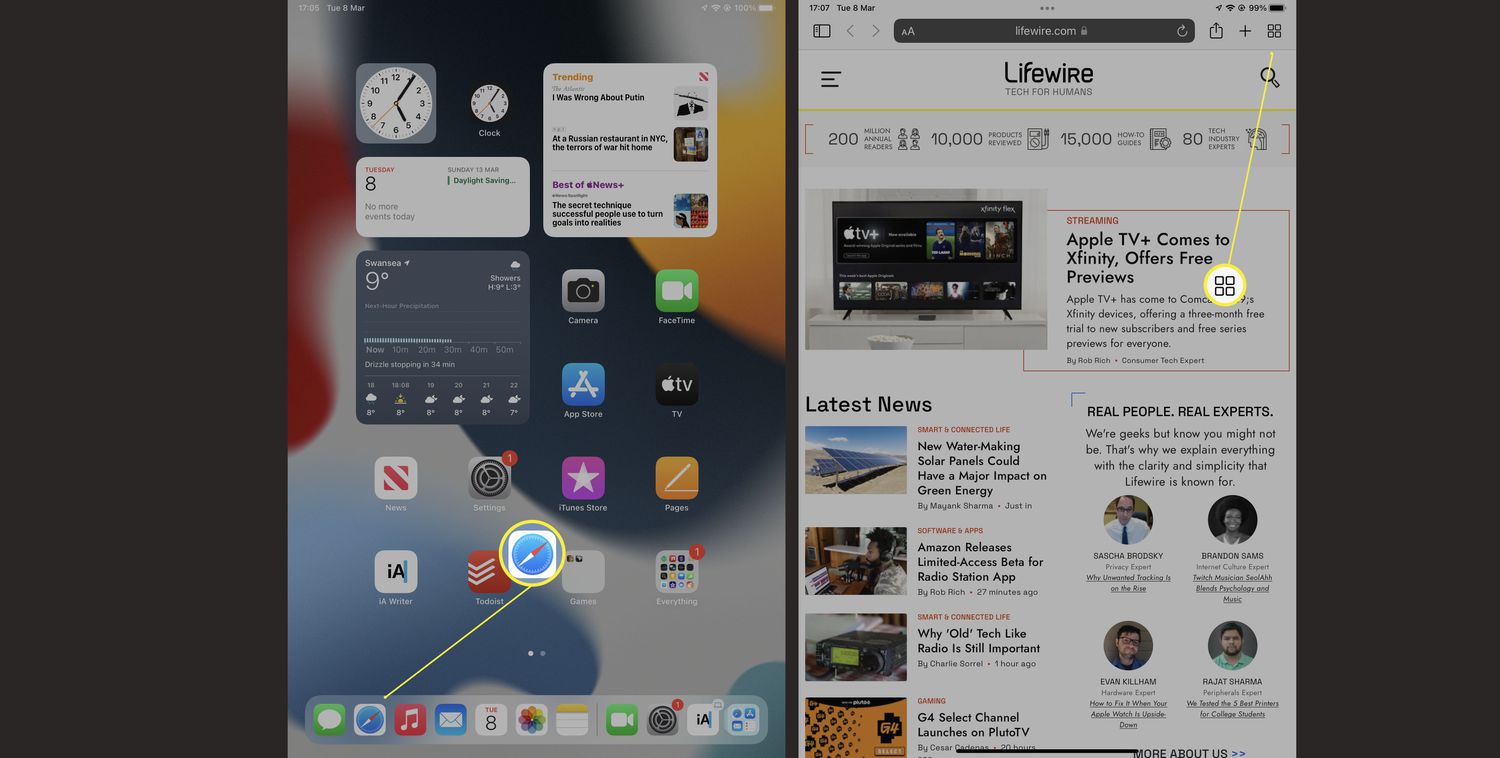
To begin the process of turning off private mode in Safari, you'll first need to open the Safari browser on your iPhone or iPad. Safari is the default web browser for Apple devices, offering a user-friendly interface and seamless integration with other Apple services. You can easily locate the Safari app on your device's home screen, typically represented by a blue compass icon with a white background.
Upon tapping the Safari icon, the browser will launch, presenting you with the familiar Safari interface. The browser's address bar, often referred to as the "omnibar," allows you to enter website addresses or search queries, while the navigation buttons and tabs facilitate smooth navigation and multitasking. As you open Safari, you'll notice the clean and intuitive design that Apple is known for, providing a comfortable and efficient browsing experience.
Once Safari is open, you'll have access to a wide range of features and functionalities, including the ability to browse the web, manage bookmarks, utilize reader mode for distraction-free reading, and more. Additionally, Safari offers seamless synchronization with iCloud, enabling you to access your browsing history, bookmarks, and open tabs across all your Apple devices.
With Safari now open on your device, you're ready to proceed to the next step in the process of disabling private mode. This initial step sets the stage for seamlessly transitioning from private browsing to standard browsing, allowing you to leverage the full capabilities of Safari for your browsing needs.
By opening Safari, you've taken the first step towards turning off private mode and gaining access to the complete set of features that Safari has to offer. With the browser now at your fingertips, you're well-positioned to continue with the subsequent steps to successfully disable private mode and resume regular browsing in Safari.
Step 2: Tap on the Tabs icon
After opening Safari, the next step in the process of turning off private mode involves tapping on the Tabs icon, which is located in the lower-right corner of the Safari interface. The Tabs icon, represented by a square containing multiple lines, provides quick access to your open tabs and allows you to manage your browsing sessions with ease.
Upon tapping the Tabs icon, you'll be presented with a visual representation of your open tabs, displayed in a card-like format that showcases the individual web pages you have accessed during your browsing session. This intuitive tab management interface enables seamless navigation between different web pages, empowering you to multitask and organize your browsing activities efficiently.
By tapping on the Tabs icon, you gain access to a comprehensive overview of your open tabs, allowing you to effortlessly switch between web pages, close unnecessary tabs, or create new tabs to explore additional content. This streamlined tab management functionality enhances your browsing experience, enabling you to stay organized and focused while navigating the web.
In addition to managing your open tabs, tapping on the Tabs icon also provides access to the private browsing tab, which is visually distinguished from regular tabs to indicate that private mode is currently active. This visual cue serves as a helpful reminder of your browsing mode and facilitates quick identification of private tabs within your browsing session.
As you tap on the Tabs icon and explore the tab management interface, you'll notice the seamless integration of private browsing tabs alongside regular tabs, allowing you to easily distinguish between the two and make informed decisions regarding your browsing activities. This cohesive tab management experience ensures that you can effectively navigate between private and regular browsing tabs, providing the flexibility to tailor your browsing experience to your specific needs.
By tapping on the Tabs icon in Safari, you gain access to a wealth of tab management features that empower you to take control of your browsing sessions and seamlessly transition between private and regular browsing modes. This pivotal step sets the stage for the subsequent actions required to disable private mode and return to standard browsing in Safari, marking a significant milestone in the process of unlocking the full potential of the Safari browser on your iPhone or iPad.

Step 3: Tap on "Private"
Upon tapping on the Tabs icon and gaining access to the tab management interface in Safari, the next crucial step in the process of turning off private mode involves tapping on the "Private" option. This action is essential for identifying and managing the private browsing tab within your browsing session, allowing you to seamlessly transition from private browsing to regular browsing with ease.
As you tap on the "Private" option, you'll be presented with a visual indicator that highlights the private browsing tab, distinguishing it from regular tabs within the tab management interface. This visual cue serves as a clear indication that private mode is currently active, providing you with a straightforward means of identifying and addressing the private browsing tab as part of the process to disable private mode.
By tapping on the "Private" option, you initiate the critical step of acknowledging and interacting with the private browsing tab, setting the stage for the subsequent actions required to effectively disable private mode and return to standard browsing in Safari. This deliberate interaction with the private browsing tab marks a pivotal moment in the process, signifying your intent to transition away from private mode and unlock the full range of browsing features available in Safari.
As you engage with the "Private" option, you'll notice the seamless integration of private browsing functionality within the tab management interface, underscoring Safari's commitment to providing a cohesive and intuitive browsing experience. This integration ensures that you can effortlessly navigate between private and regular browsing tabs, empowering you to tailor your browsing activities to suit your specific preferences and requirements.
By tapping on the "Private" option, you take a decisive step towards disabling private mode in Safari, signaling your readiness to transition to standard browsing and make the most of the browser's comprehensive set of features and functionalities. This deliberate action sets the stage for the final step in the process, as you confirm your decision to turn off private mode and seamlessly resume regular browsing in Safari.
With the "Private" option now engaged, you're poised to proceed to the conclusive step in the process of disabling private mode, marking a significant milestone in your journey to unlock the full potential of the Safari browser on your iPhone or iPad.
Step 4: Confirm to turn off Private Mode
After tapping on the "Private" option and identifying the private browsing tab within the tab management interface, the final step in the process of turning off private mode in Safari involves confirming your decision to transition from private browsing to regular browsing. This pivotal action marks the culmination of the process, allowing you to seamlessly disable private mode and unlock the full range of browsing features available in Safari.
Upon tapping on the "Private" option and engaging with the private browsing tab, you'll be presented with a prompt that provides you with the option to confirm your decision to turn off private mode. This confirmation prompt serves as a safeguard, ensuring that you have the opportunity to review and validate your choice before proceeding with the transition to standard browsing.
As the confirmation prompt appears on the screen, you'll have the option to confirm your decision to disable private mode, signaling your intent to exit private browsing and resume regular browsing in Safari. This deliberate confirmation step empowers you to take control of your browsing experience, allowing you to make informed choices regarding your browsing mode and preferences.
By confirming your decision to turn off private mode, you effectively signal your readiness to embrace the complete set of features and functionalities offered by Safari, enabling you to access saved passwords, utilize extensions, and troubleshoot website issues with ease. This seamless transition from private browsing to regular browsing ensures that you can make the most of Safari's capabilities while maintaining control over your privacy and browsing activities.
Upon confirming your decision, Safari seamlessly transitions from private mode to regular browsing, allowing you to explore the web without the constraints of private browsing restrictions. This transition empowers you to leverage Safari's full suite of features, including seamless synchronization with iCloud, intelligent tracking prevention, and enhanced privacy and security measures.
With private mode successfully disabled, you're now equipped to enjoy a comprehensive browsing experience in Safari, leveraging its intuitive interface, robust feature set, and seamless integration with the Apple ecosystem. By confirming your decision to turn off private mode, you've unlocked the full potential of Safari, enabling you to browse the web with confidence and convenience.
As the confirmation prompt fades from view, you're seamlessly transitioned to regular browsing mode in Safari, ready to explore the web, access your favorite websites, and make the most of the browser's rich array of capabilities. This successful transition marks the culmination of the process, empowering you to navigate the web with ease and flexibility while benefiting from the privacy and security features that Safari is renowned for.
Leave a Reply Cancel reply
Your email address will not be published. Required fields are marked *
Save my name, email, and website in this browser for the next time I comment.
- Crowdfunding
- Cryptocurrency
- Digital Banking
- Digital Payments
- Investments
- Console Gaming
- Mobile Gaming
- VR/AR Gaming
- Gadget Usage
- Gaming Tips
- Online Safety
- Software Tutorials
- Tech Setup & Troubleshooting
- Buyer’s Guides
- Comparative Analysis
- Gadget Reviews
- Service Reviews
- Software Reviews
- Mobile Devices
- PCs & Laptops
- Smart Home Gadgets
- Content Creation Tools
- Digital Photography
- Video & Music Streaming
- Online Security
- Online Services
- Web Hosting
- WiFi & Ethernet
- Browsers & Extensions
- Communication Platforms
- Operating Systems
- Productivity Tools
- AI & Machine Learning
- Cybersecurity
- Emerging Tech
- IoT & Smart Devices
- Virtual & Augmented Reality
- Latest News
- AI Developments
- Fintech Updates
- Gaming News
- New Product Launches
5 Ways to Improve IT Automation
- What is Building Information Modelling
Related Post
Sla network: benefits, advantages, satisfaction of both parties to the contract, what is minecraft coded in, how much hp does a diablo tuner add, what is halo-fi, what is halo lock iphone, related posts.

How To Get Private Browser On Safari
How To Sign Out Of Safari On IPhone
How To Remove Suggestions On Safari
How To Open A Private Browser On IPhone
How To Open Private Browser On Safari iPhone
How To Stop Google From Asking To Sign In On Safari
How Do I Clear Safari Tabs On IPhone
How To Turn On Incognito Mode Safari
Recent stories.

What is Building Information Modelling?

How to Use Email Blasts Marketing To Take Control of Your Market

Learn To Convert Scanned Documents Into Editable Text With OCR

Top Mini Split Air Conditioner For Summer

Comfortable and Luxurious Family Life | Zero Gravity Massage Chair

Fintechs and Traditional Banks: Navigating the Future of Financial Services

AI Writing: How It’s Changing the Way We Create Content

- Privacy Overview
- Strictly Necessary Cookies
This website uses cookies so that we can provide you with the best user experience possible. Cookie information is stored in your browser and performs functions such as recognising you when you return to our website and helping our team to understand which sections of the website you find most interesting and useful.
Strictly Necessary Cookie should be enabled at all times so that we can save your preferences for cookie settings.
If you disable this cookie, we will not be able to save your preferences. This means that every time you visit this website you will need to enable or disable cookies again.
Safari User Guide
- Get started
- Go to a website
- Bookmark webpages to revisit
- See your favorite websites
- Use tabs for webpages
- Import bookmarks and passwords
- Pay with Apple Pay
- Autofill credit card info
- View links from friends
- Keep a Reading List
- Hide ads when reading
- Translate a webpage
- Download items from the web
- Add passes to Wallet
- Save part or all of a webpage
- Print or create a PDF of a webpage
- Interact with text in a picture
- Change your homepage
- Customize a start page
- Create a profile
- Block pop-ups
- Make Safari your default web browser
- Hide your email address
- Manage cookies
- Clear your browsing history
- Browse privately
- Prevent cross-site tracking
- See who tried to track you
- Change Safari settings
- Keyboard and other shortcuts
Browse privately in Safari on Mac
When you browse privately , the details of your browsing aren’t saved, and the websites you visit aren’t shared with your other Apple devices.

Open Safari for me
Browse privately one time
A private browsing window has a dark Smart Search field with white text.
Browse as you normally would.
When you use Private Browsing:
Browsing initiated in one tab is isolated from browsing initiated in another tab, so websites you visit can’t track your browsing across multiple sessions.
Webpages you visit and your AutoFill information aren’t saved.
Your open webpages aren’t stored in iCloud , so they aren’t shown when you view all your open tabs from other Apple devices.
Your recent searches aren’t included in the results list when you use the Smart Search field.
Items you download aren’t included in the downloads list. (The items do remain on your computer.)
If you use Handoff , private browsing windows aren’t handed off to your iPhone, iPad, iPod touch, or other Mac computers.
Changes to your cookies and website data aren’t saved.
Websites can’t modify information stored on your Mac, so services normally available at such sites may work differently until you use a non-private window.
Note: None of the above applies in non-private Safari windows you may have open.
Always browse privately
Click the “Safari opens with” pop-up menu, then choose “A new private window.”
Open Desktop & Dock settings for me
Stop browsing privately
Do any of the following to further enhance privacy:
Delete any items you downloaded while using private windows.
When you use Private Browsing, “Use advanced tracking and fingerprinting protection” is turned on by default. This setting blocks connections to data collection companies that use advanced fingerprinting techniques (a way of identifying your device based on data gathered while you browse), and known tracking parameters are removed from all URLs. You can turn this setting on for all browsing; see Change Advanced settings in Safari . Some website features may be affected when advanced tracking and fingerprinting protection is turned on. If the website you’re viewing is affected, choose View > Reload Reducing Privacy Protections.
Besides using private windows, you can manage cookies and data stored by all websites and prevent cross-site tracking .
If you forget to use a private window, you can clear your browsing history .
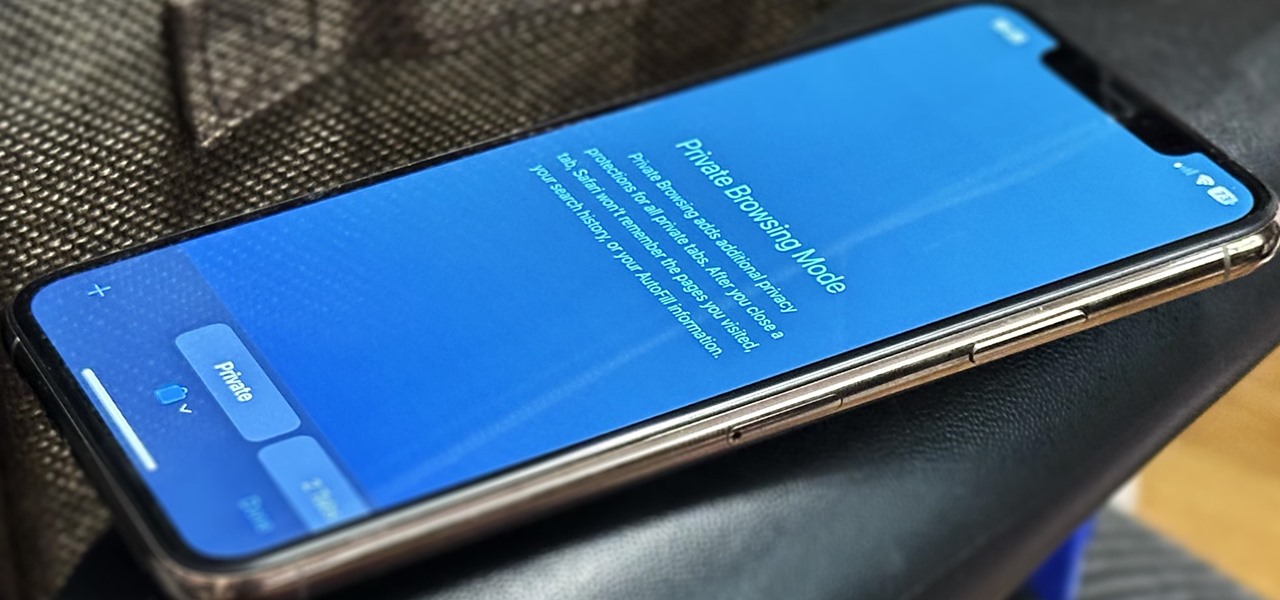
How To : Safari's Private Browsing Mode Just Made Your Private Tabs Way More Private on iOS 17

Private Browsing mode finally lives up to its name in Apple's huge Safari 17 update for iPhone, iPad, and Mac. So whether you search for things you don't want anybody to know about or want to ensure websites and trackers aren't eavesdropping on your activity, you'll want to update your devices pronto.
By default, each tab in Safari's Private Browsing mode on iOS, iPadOS, and macOS is its own environment, isolated from your other tabs, so websites can't track your activity from the current tab to another session. You also won't see any recent private searches suggested when performing new searches in other tabs.
- Don't Miss: 15+ New Apple Notes Features for iPhone and iPad That Will Finally Make It Your Go-To Notes App
Private tabs do not sync with iCloud, so they won't show up on your other Apple devices, and they won't work with Handoff or show downloaded files in Safari's downloads list. Once you close a Private Browsing tab, Safari forgets the pages you visited, your search history, your AutoFill information, and any new cookies or website data from the session.
But incognito browsing in Safari has even more protection available with the iOS 17 , iPadOS 17 , and macOS 14 Sonoma software updates. Here's everything you get with the new for-you-eyes-only browsing experience:
1. Face ID, Touch ID, or Password Protection
Safari's Private Browsing mode is now protected behind biometric authentication or your device passcode or password. So whenever you switch to Private Browsing from regular browsing or return to it from another app or window, you'll need to authenticate yourself using Face ID or Touch ID on your iPhone, iPad, or Mac.
If the biometrics scan doesn't work or your device is not equipped with biometric protection, you can use your device's passcode or password instead.
While it's more useful on iPad and Mac, devices frequently shared between family members or housemates, it can also ensure no one can access your locked incognito tabs on your iPhone whenever someone borrows it or hacks into it.

If Private Browsing is not locked on your device or you want to disable it, you can quickly turn it on or off.
- On iPhone/iPad: Go to Settings –> Safari –> Privacy & Security, toggle on or off "Require Face ID to Unlock Private Browsing" or "Require Touch ID to Unlock Private Browsing," and confirm with Face ID, Touch ID, or your passcode. ( Shown below. )
- On Mac: Go to Safari –> Settings –> Privacy, then check or uncheck "Require Touch ID to view locked tabs" or "Require password to view locked tabs."

2. A Separate Search Engine
You could already change Safari's search engine on iPhone, iPad, and Mac, but now you can choose separate search engines for regular and private browsing.
For example, you may like Google as your regular search engine, but you may want something like DuckDuckGo, which does not build user profiles and aims to prevent online tracking, as your search engine for Private Browsing mode. This can make Private Browsing even more private.
- On iPhone/iPad: Go to Settings –> Safari –> Private Search Engine, then choose the one you want. ( Shown below. )
- On Mac: Go to Safari –> Settings –> Search, click the browser next to "Private Browsing search engine," and choose the one you want.
You can choose between "Use Default Search Engine" or any available search engine, including Google, Yahoo, Bing, DuckDuck Go, and Ecosia. If you have additional languages installed on your device, you may see other options, such as Baidu, Sogou, Yandex, and 360 Search.

3. Protection Against Extensions That Access Page Content
Before, any Safari extensions you had turned on for regular browsing also applied to Private Browsing mode. Now, "extensions that inject scripts or can read information about the pages [you visit]" are disabled by default in Private Browsing mode on iOS 17, iPadOS 17, and macOS 14 Sonoma, according to Apple.
In contrast, content blockers and other extensions that don't access any content on webpages are allowed in Private Browsing mode by default. This is because they don't pose any additional privacy or security concerns.
4. Customization Options for Extensions
As you could probably guess from the previous section, Safari 17 now lets you toggle extensions on or off for Private Browsing mode without affecting their status in regular browsing mode. So if you ever want to turn on an extension that Safari automatically disabled for Private Browsing, you can do that. And you can turn off any extension in Private Browsing you don't want or need when searching incognito.
- On iPhone/iPad: Go to Settings –> Safari –> Extensions, tap an extension, and toggle the "Private Browsing" switch on or off. ( Shown below. )
- On Mac: Go to Safari –> Settings –> Extensions, click on an extension, and toggle "Private Browsing" on or off.
When an extension is completely disabled, you won't be able to turn it on for Private Browsing alone. But when enabled on your "Personal" profile , you can turn it on or off for Private Browsing and any of your other profiles .

5. Automatic Tracker Blocking on Websites
Safari 17 has more advanced tracking and fingerprinting protection. In Private Browsing mode, it completely blocks known trackers from loading on pages.
6. Automatic Removal of Tracking IDs in Links
Safari 17 also includes Link Tracking Protection automatically for Private Browsing. Link Tracking Protection disables known tracking parameters appended to URLs that websites use to monitor your movements across the web and build profiles on you. For example, it may turn this:
To ensure it's enabled for Private Browsing, follow the applicable instructions below.
- On iPhone/iPad: Go to Settings –> Safari –> Advanced –> Advanced Tracking and Fingerprint Protection, then choose either "All Browsing" or "Private Browsing." ( Shown below. )
- On Mac: Go to Safari –> Settings –> Advanced, click "in Private Browsing" next to "Use advanced tracking and fingerprinting protection," and change it to "in all browsing" or "in Private Browsing."

Link Tracking Protection is an improvement in privacy, for sure, but it's not going to stop all marketing companies as there are ways to bypass parameter removals.
Other New Safari Features Also Work in Private Browsing
While the above features improve privacy when using Private Browsing mode, you can also use many of the other new features Safari has to offer when browsing incognito. Features that work in regular browsing that also work in Private Browsing include speedier Tab Group switching, faster and more relevant search suggestions, the new screen reader, and more.
Just updated your iPhone? You'll find new features for Podcasts, News, Books, and TV, as well as important security improvements and fresh wallpapers. Find out what's new and changed on your iPhone with the iOS 17.5 update.
Be the First to Comment
Share your thoughts, how to : 7 hidden iphone apps you didn't know existed, how to : 16 harry potter spells for siri that turn your iphone into a magical elder wand, warning : sensitive info you black out in images can be revealed with a few quick edits on your iphone, how to : the easiest way to secretly record someone's conversation with your iphone, how to : apple has a killer new word game puzzle called quartiles on ios 17.5, how to : your iphone's status bar can actually be customized — here's how, how to : apple's ios 17.5 gives your iphone 32 new features and changes — here's everything you need to know about, how to : 15 hidden imessage features for iphone you probably didn't know about, how to : unlock the secret emoticon keyboard on your iphone, how to : how thieves unlock passcodes on stolen iphones (and how to protect yourself against it), how to : 8 ways to take a screenshot on your iphone 13, 13 mini, 13 pro, or 13 pro max, how to : colorize black & white photos on your iphone via shortcuts, how to : make siri say whatever you want every time you connect your iphone to a charger, how to : dial these secret codes to see if someone is hijacking calls & texts on your iphone, how to : clear your frequently used and recent emoji from your iphone's keyboard, how to : keep your night vision sharp with the iphone's hidden red screen, how to : add unsupported cards and passes to apple wallet for quick, easy access on your iphone, how to : turn any website into a full-screen app on your iphone, how to : 100+ secret dialer codes for your iphone, how to : install facebook lite on your iphone.
- All Features
- All Hot Posts
Trending Story: Messages App Tips & Tricks | Spring Wallpapers | Easter Wallpapers | iOS 17.4 New Emojis
Fixed Safari Private Browsing Greyed Out on Mac (Sonoma Added)
Is Safari New Private Window not showing on Mac or MacBook? Some Websites are not opening on Safari Mac. In this article, I’ll walk you through the solutions to bring back private browsing on the Mac. The Private Mode is an amazing option to surf websites without being tracked by anyone and storing the cache and browsing history. However, every feature has its own advantages and disadvantages; some users keep the Safari Private mode disabled to avoid any inactivity made on their system, especially parental mode on Safari Mac .
If you haven’t disabled it, then it’s just a minor bug, though; kindly go through all the mentioned steps; sometimes, the feature unknowingly triggers. Moreover, loading up Safari with Tabs, Extensions, etc., affects the performance of the app and might result in this type of situation. Let’s see how to fix the private mode on Safari Mac.
IN THIS ARTICLE
Fix Safari Private Browsing Not Showing, or Greyed Out on MacBook, Mac
1. disable screen time for safari.
When Screen Time for Safari is enabled, it won’t let you use the app, as Apple has added Screen Time to put restrictions on the apps and features. Make sure screen time for Safari is disabled. Otherwise, You can’t open any Adult website or Selected Website on a normal browser according to the restrictions applied. And the New Private Window read-only or hidden from the top Safari Menu [here’s the problem].

On MacOS Ventura
Step 1: Click on the Apple Logo from the top of the Mac Menu > Select System Settings .

Step 2: Select Screen Time > Tap on Content & Privacy .

Step 3: Click on Content Restrictions under the Content & Privacy Section.

Step 4: Select Unrestricted Access for Access to Web Content > Tap on Done .

Please make sure to verify if the issue has been resolved. If you encounter difficulties accessing the New Private Window at first, we suggest that you force-close all windows on your Mac and try accessing the New Private Window once again. If the issue persists, please try restarting your Mac and attempting to access it again .
On MacOS Monterey & Earlier
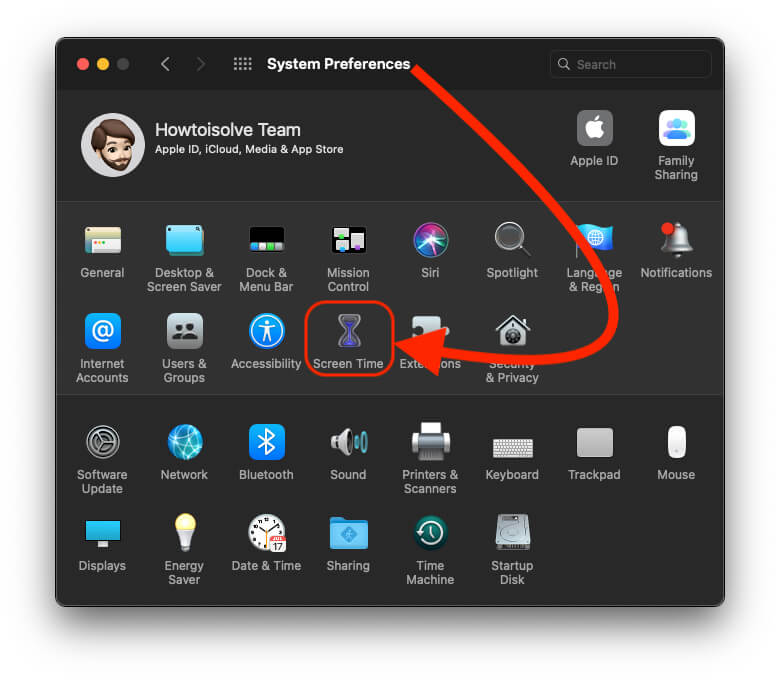
Step 1: Click on the Apple Logo From the Top Menubar > Select System Preferences .
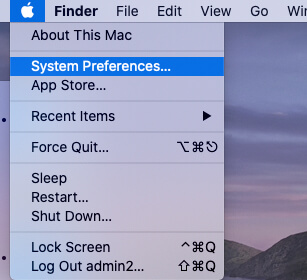
Step 2: Tap on Screen Time .
Step 3: Select Content & Privacy > Check Unrestricted Access under the Web Content to allow all Websites access on Safari.
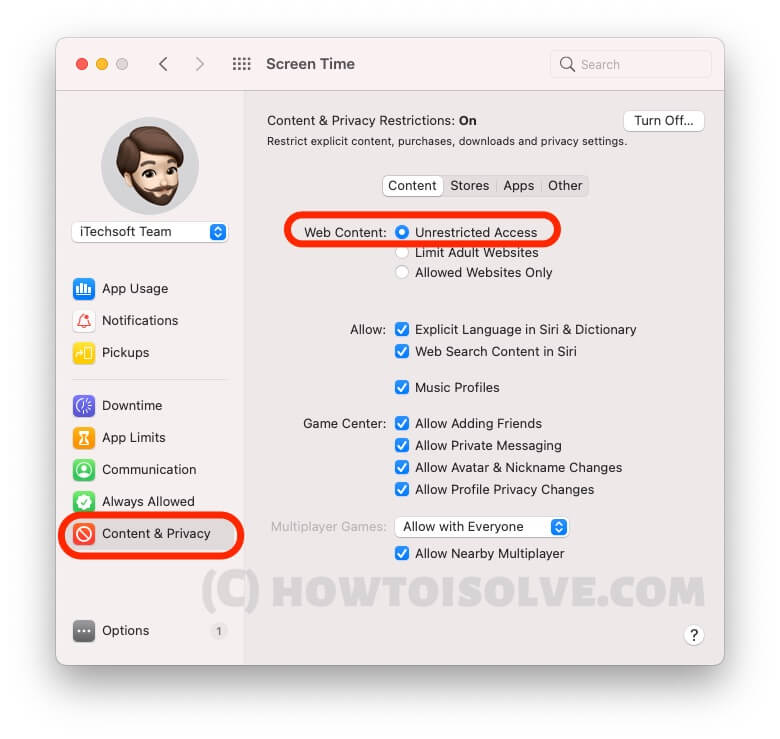
Step 4: Now, Click on the New Private window on Safari Browser from the Top Mac Menu under File Menu. That’s it.

The Above settings are useful for the Admin of Mac Users. But if you are a guest or Using a Mac on Sharing. Then Restrictions are automatically enabled for the Website limit. So, Guest Login doesn’t allow to use of Private Browsing on Safari Mac. Follow the Below steps to allow change for the Guest users on Mac Safari , and Show up Private Browsing on Safari Mac.
Tips: Fix Safari Private Browsing Greyed out on iPhone
Disable Screen Time for Safari in Guest Mode
Is Safari Private Mode not working on Mac in Guest Mode? Have you determined the guest mode settings? If you give Guest User access on Mac and the same private mode is not working, then here’s what to do.

Step 2: Now, Click on Users & Groups > Click on the Info button next to the Selected User Name.
Step 3: Verify with your Mac login Password > Click on Unlock.

Step 4: Disable the Limit Adult Website > Select OK.

That’s it.
Follow the below steps for earlier macOS.
Step 1: Click on the Apple Logo from the top Mac Menu > Select System Preferences .

Step 2: Choose Users & Groups .
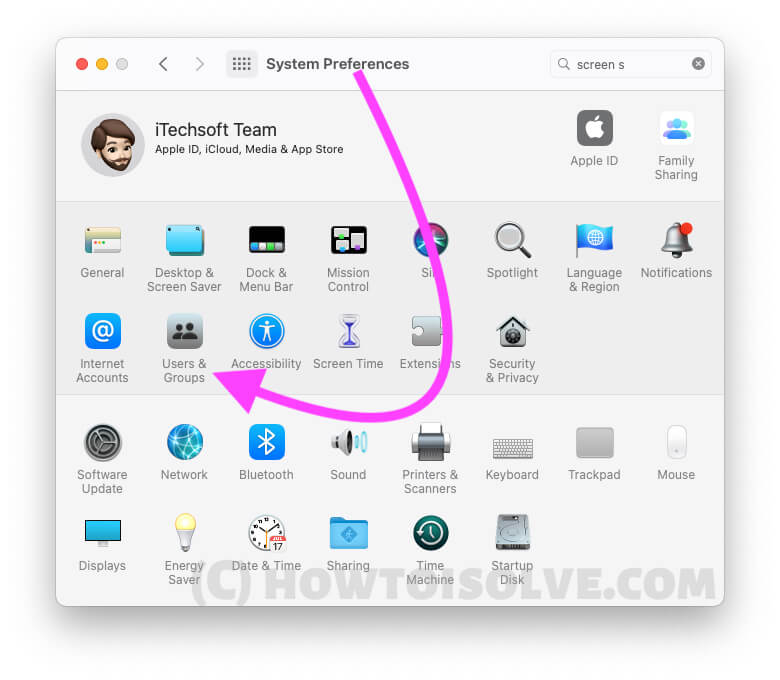
Step 3: Click on the Lock icon in the lower-left corner > Enter the administrator password to make changes > Click on the Guest User option on the side panel to Uncheck the Adult Websites option.
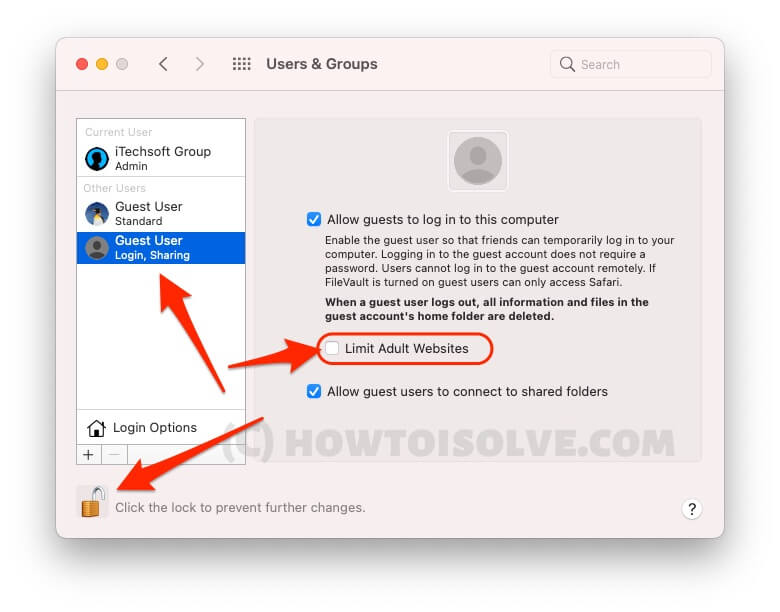
Now, the Applied changes for the user on the same Mac can able to use private browsing on Safari Mac. Easy to use, turn on Private mode, and Open and search the Website that you want.
Disable Screen Time Restrictions on Mac Remotely
if you have more than one Mac under Family sharing or Your Personal Mac signed in with the same Apple ID So, here’s a Great option to Remotely manage Restrictions for Browsing on Safari Mac.
With macOS Catalina or newer, Apple added a feature that lets you manage the Mac remotely if it is added to the Family Sharing group. Meaning if your kid has a personal Mac, then you can create a Family Sharing group add the Mac, and control your Kid’s system remotely. If this is the case and Safari private browsing not working, then disable it.
Step 1: Click on the Apple Logo from the Top of the Mac Menu > Select the System Settings.

Step 2: Click on Screen Time > Change the Apple Account From the side panel.

Step 3: Swipe Down to Select Content & Privacy .

Step 4: Enable Content & Privacy > Tap on Content Restrictions.

Step 5: Choose Unrestricted Access under the Access to Web Content > Tap on Done.

Force close Safari Browser or Restart Mac, then see applied changes. Also, Keep your Mac connected to the internet to apply changes remotely.
If the above settings are not available on your Mac, or Your Mac is not responding correctly, then you should go with More troubleshooting,
Quickly Check for Update your MacOS: Connect the MacBook, and Mac to the Wi-Fi before proceeding further. While updating macOS, all the first-party applications stored on the Mac will be updated.
On macOS Ventura or Later :
Step 1: Click on the Apple Logo From the Top of the Mac Menu > Select System Settings .

Step 2: Choose General Option > Select Software Update .

Step 3: Tap on Update Now.

On macOS Monterey & Earlier : Click on the Apple icon. > Select Software Updates > Click on the Update Now button.
- To Apply Changes or Effects, Restart your Mac once
- Make Another Administrator account on Mac, then Check
- Try Alternate Best Secure Browser for Mac .
- Disable or Uninstall Antivirus Protection that Prevents unauthorized access to your Mac, Like Searching for something in Private browsing without someone knowing .
- Still does not work, then Re-install macOS
- Take an Appointment at Apple Genius Bar.
Stay Updated with more fixes and help from this article. Share your problem with us in the comments or Q&A Forum. We are happy to help you!
Leave a Comment Cancel reply
Disable Incognito Mode and Private Browsing in Browsers
Ensure a transparent browsing experience by removing incognito mode in Chrome, Firefox, Safari, and Microsoft Edge.
Many people use incognito mode or private browsing features in their web browsers to hide their online activity from others. However, this can also pose a challenge for parents, employers, or anyone who wants to monitor or filter the content that is accessed on their devices. Fortunately, it is possible to disable incognito mode on most browsers.
Incognito mode is designed for privacy, so it makes sense that it can make monitoring websites difficult. Specifically:
- Incognito mode (or private browsing in general) automatically deletes any browsing history from the device.
- In many cases, private browsing uses a proxy , which usually bypasses content filtering.
- Other privacy features can prevent browsing history from being properly saved.
In this article, you will learn how to disable incognito mode in popular browsers such as Chrome, Firefox, Edge, Brave, and Safari. By doing so, you can prevent users from bypassing your content filtering and traffic monitoring settings and ensure a safer and more transparent browsing experience.
Considering Other Privacy Features
In addition to incognito mode, we also recommend disabling other similar features that some browsers provide.
For example, some browsers, like Google Chrome, sync browser settings and browsing history to user profiles.
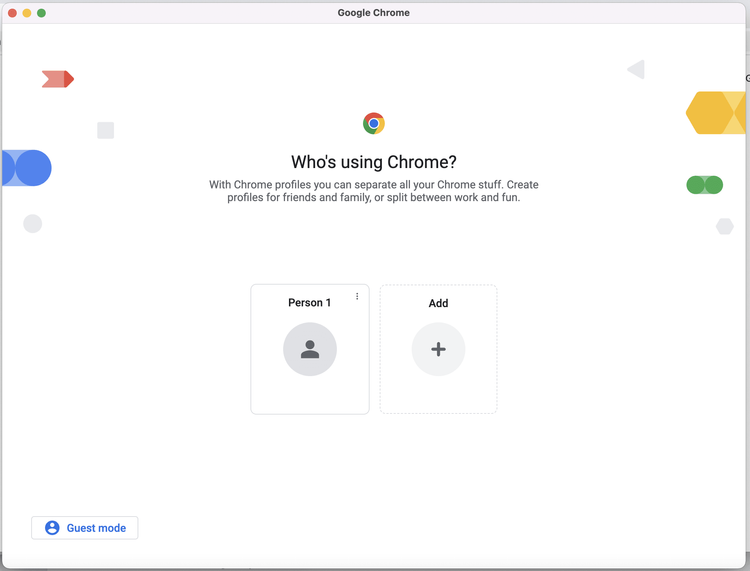
This means that a user can add a new profile and potentially gain access to something similar to incognito mode.
That's why we provided instruction to disable the following features:
- Incognito Mode.
- Guest Mode.
- Adding new profiles.
- The Ability to deleting browsing history.
- Tor Browsing (for the Brave browser).
How Do You View Browsing History When a Computer Uses Incognito Mode?
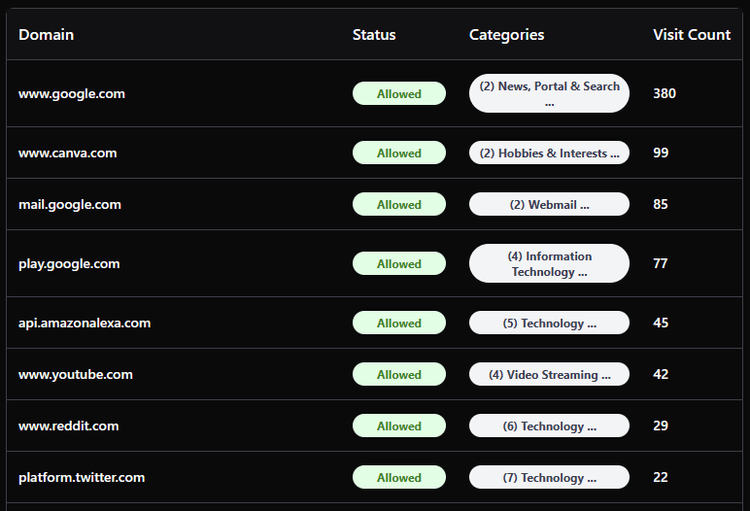
While browsing history will be deleted on a device using incognito mode, it's still possible to view which sites have been visited:
- You can use your home router to monitor websites visited on your home's Wi-Fi .
- Set a DNS content policy to monitor internet traffic on a device or your home's Wi-Fi.
In both cases, you are able to view the actual traffic that a computer uses to access a website. However, monitoring your traffic logs with your router only works if your devices are home. Instead, you can install DNS filtering on your devices to always monitor its internet traffic .
If you're using a DNS filter to view traffic logs, you also having the added ability to immediately make changes to your content policy. For example, you can add websites you don't want visited to your blocklist, which will deny access for that website on your computer:

You can also enable the filter on your home's router to monitor websites and block them across your entire home network.
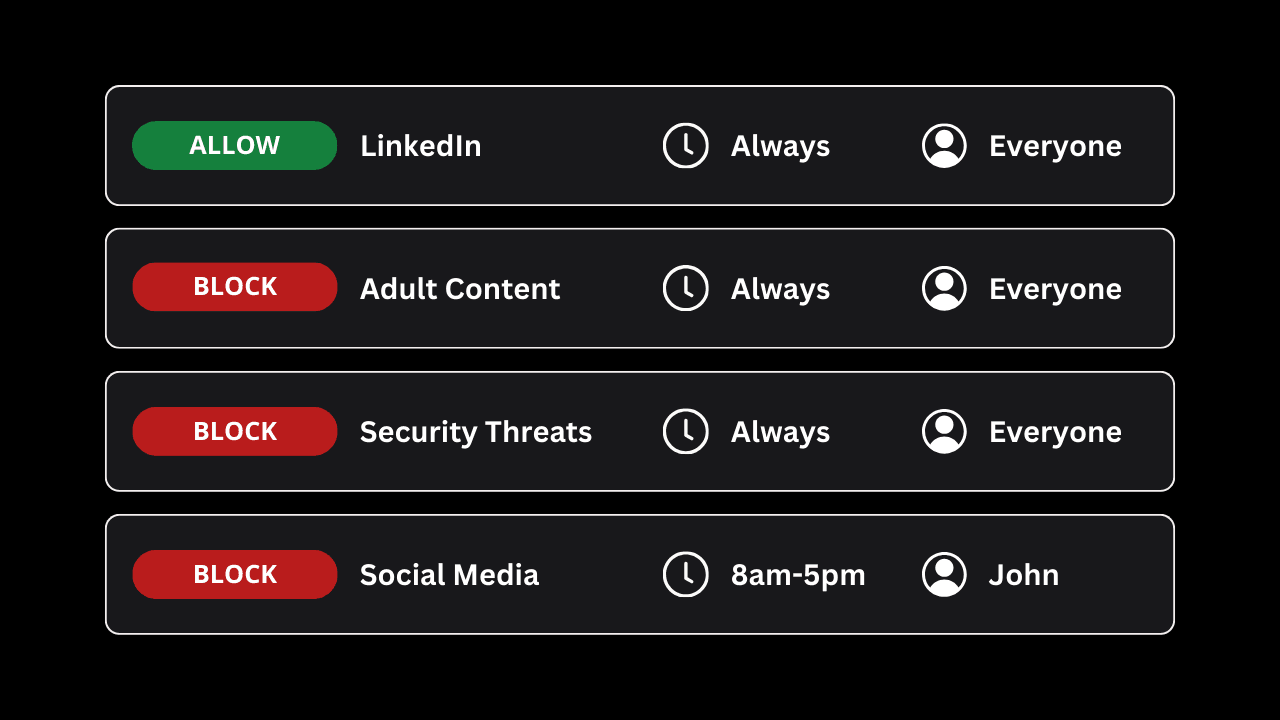
Disable Incognito Mode on Windows
If you are using a Windows computer, you may want to disable incognito mode for different browsers such as Chrome and Microsoft Edge. The easiest way to do this is using the Command Prompt application and entering commands that customize your browsing experience.
In this section, we will show you how to disable incognito mode on Windows for each browser step by step.
How to disable incognito mode in Google Chrome on Windows 10/11
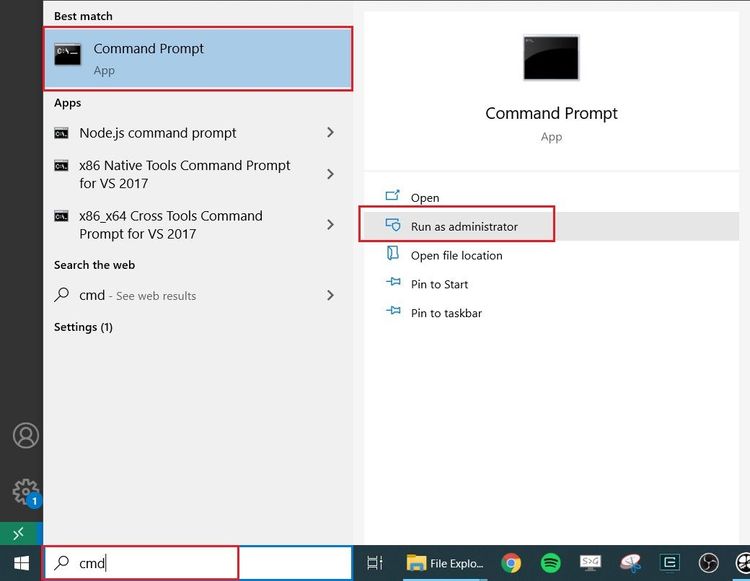
Disable guest mode:
Disable adding new user profiles:
Disable incognito mode:
Prevent user from deleting browsing history:
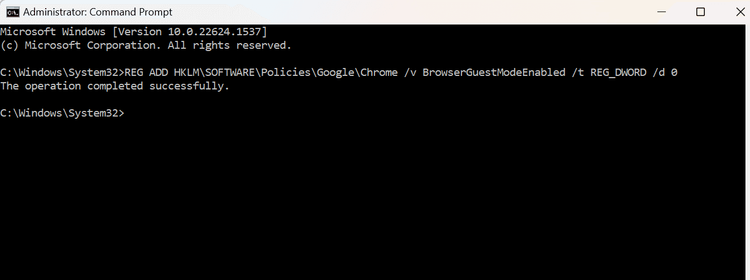
You also shouldn't be able to add new profiles:
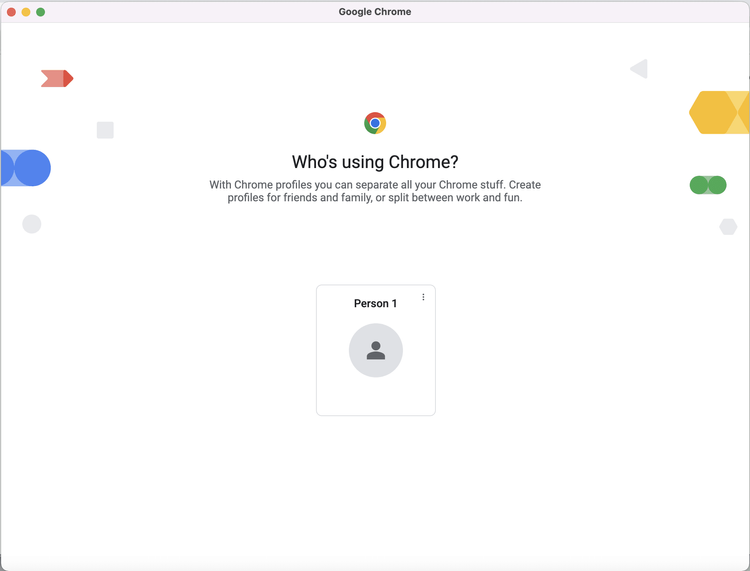
Incognito mode should no longer be an available option.
How to disable private browsing in Microsoft Edge for Windows 10/11
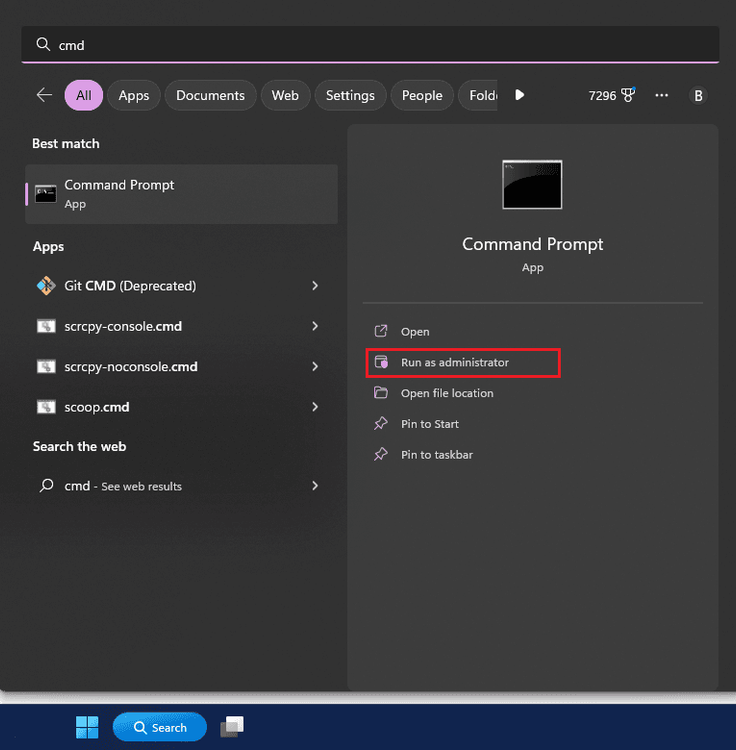
Disable adding new profiles
Disable deleting of browser history:
Disable InPrivate Window mode:
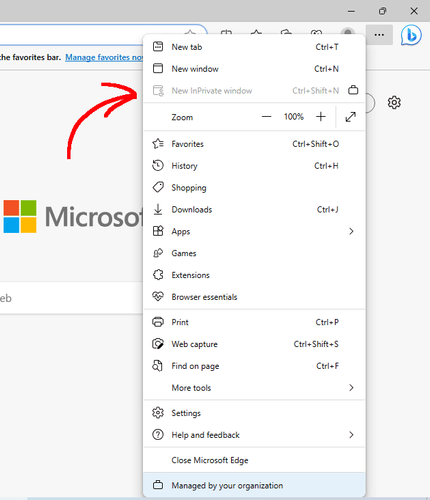
How to disable incognito mode on Brave browser for Windows 10/11
Brave browser is a bit interesting, because in addition to Incognito mode, we also recommend disabling Tor browsing.
Disable Incognito Mode:
Disable Tor Browsing:
Disable Guest Mode:
Disable adding new profiles:
Disable Incognito mode on Mac
If you are using a Mac computer like a Macbook, you can disable incognito mode for popular browsers like Google Chrome, Safari, and Microsoft Edge. The fastest way to do this is using the Terminal application and entering commands that customize your browsing experience.
In this section, we will show you how to disable incognito mode on MacOS for each browser step by step.
How to disable incognito mode in Google Chrome for MacOS
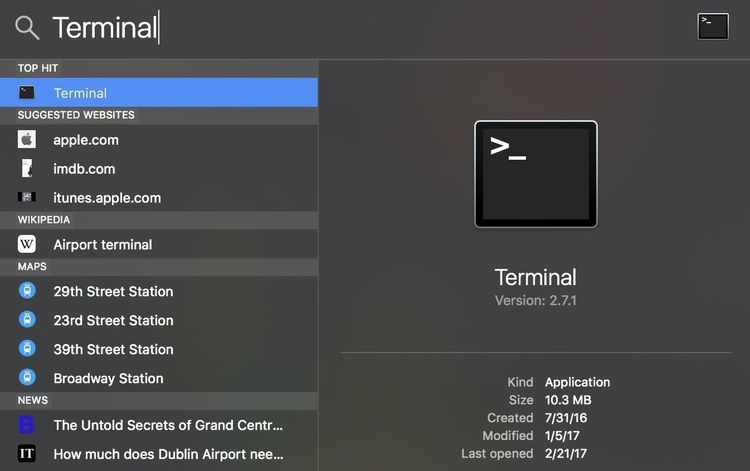
Disable Incognito mode:
Prevent deleting browsing history:
When you open the "who's using Chrome" window, it shouldn't allow you to enter guest mode or add new profiles:
You also should not be able to open an incognito window or delete browsing history.
How to Disable Private Browsing in Safari
It's not possible to disable Apple's Safari browser private browsing features using Terminal like we did for Google Chrome and Edge.
There are two ways to disable private browsing in Safari:
- Enabling Screen Time's web content filter
- Using managed mode to disable private browsing in Safari
If you open Screen Time External link icon and go to Content & Privacy, you can select Limit Adult Websites , which will also turn off the private browsing feature in Safari.
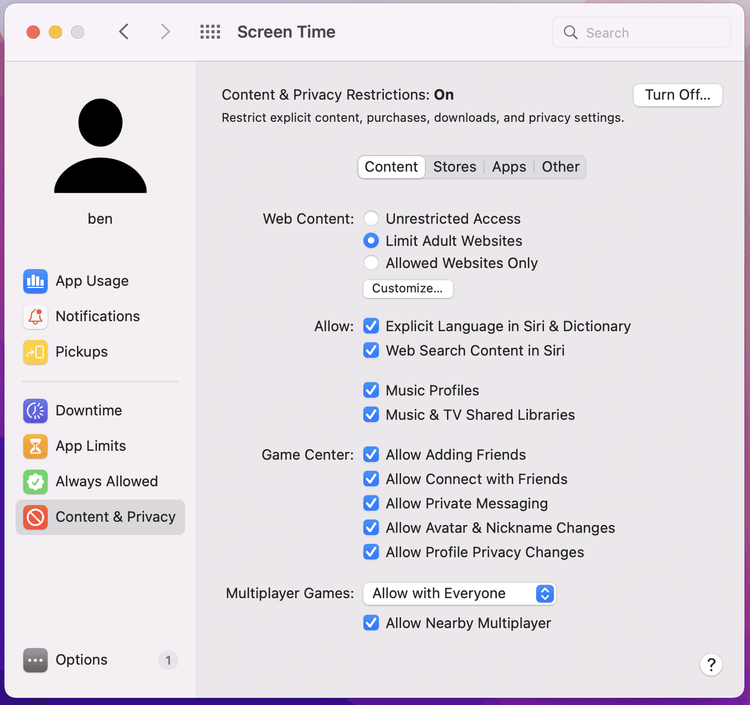
Safari should no longer have an option to open private browsing mode.
Restart Safari
If you set up your Mac as a managed device like we talked about earlier, you can configure Safari to disable private browsing in a more enforceable way.
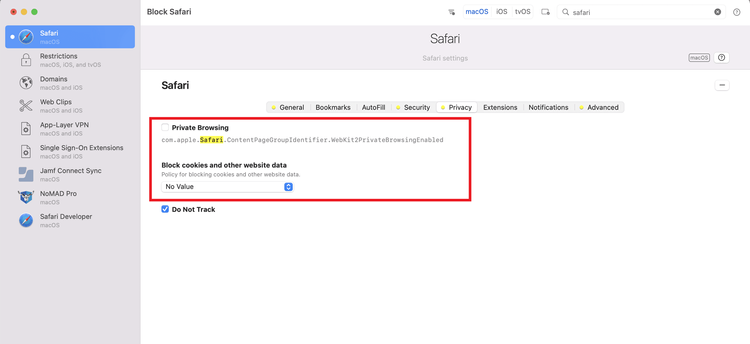
Disable InPrivate Browsing in Microsoft Edge on MacOS
There are a few ways to disable private browsing features in Microsoft edge:
- Using commands entered into terminal to remove the private browsing feature from Microsoft edge
- Using device management to configure the Microsoft Edge browser without the possibility of selecting or re-enabling private browsing.
Let's start with the terminal commands.
Disable InPrivate mode:
Prevent deleting browsing history
If you find that using terminal commands does not go far enough for your use case, consider setting your Mac up as a managed device .
Once you enable device management on your Mac, you can completely customize Microsoft edge to remove private browsing features.
We get it, making your own managed mac device can be difficult and confusing! Tech Lockdown members get access to premium guides that provide step-by-step instructions to enable managed mode, including how to use it to disable Safari. You also get access to our support team to get your questions answered!
This method is difficult to bypass and is the most restrictive setup you can achieve.
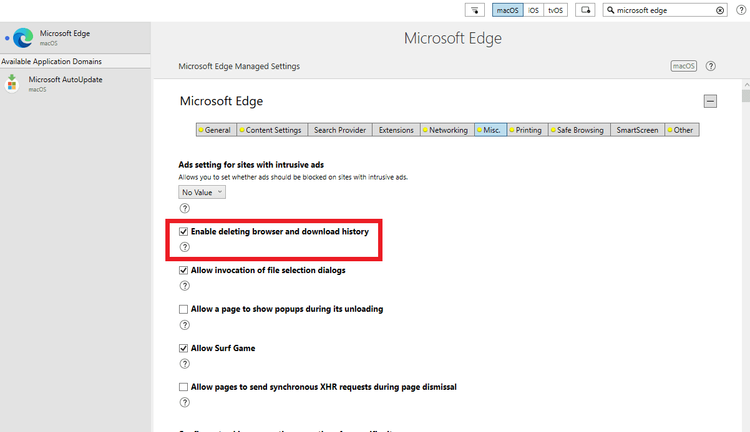
There are many other options once you manage a Mac. You can completely control and lock down the microsoft edge browser to do other things like enforce or block browser extensions. You can even convert this into a dumb browser by blocking images everywhere or on specific websites.
How to Disable Incognito Mode on Brave browser for MacOS
For Brave browser, we also recommend disabling Tor browsing, since this can be used to also hide browsing history.
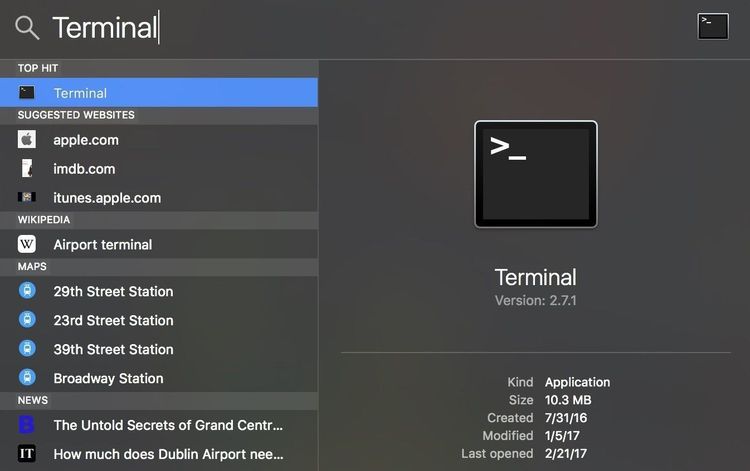
Disable Browser Privacy features on Managed Mac
If you have set up a managed MacOS device External link icon , you can enforce disabling these privacy features so that a user cannot re-enable them.
Enabling Managed Mode on a Mac can be difficult. That's why we've made available to our premium members step-by-step guides that walk you through this process.
Disable Incognito mode in Google Chrome on a managed Mac
On a managed Mac device, it is much easier to enforce browser settings using a device manager. A good example of a device manager is iMazing, which allows you to custom-configure a device.

Disable Browser Privacy Features in Microsoft Edge on a Managed Mac
Here's how to configure Microsoft Edge with iMazing.

Looks like no one’s replied in a while. To start the conversation again, simply ask a new question.
Private Mode in Safari
I know how to disable and re-enable private mode in safari. But, how do you permanently disable private mode from even being used. Setting this up in “Content Restrictions” to “limit adult web sites” does not work. When you tap in the four small squares on the top right, there is still an option to enter into “Private” mode. For me, this is unacceptable. All of my devices are secure, except one. It is the newest IPad Pro 13 inch model and I can not figure out why Private mode cannot be disabled all together other than throwing it on the floor. Thanks in advance for any help.
iPad Pro 12.9-inch, 3rd Gen, Wi-Fi
Posted on Nov 25, 2021 7:01 AM
Posted on Nov 25, 2021 7:13 AM
I do not see any settings to permanently disable Private browsing on the iPad. I was able to locate a website that claimed to be able to permanently disable it, however the site information was from 2018, and seems to no longer apply to the newer iOS.
You can provide feedback to Apple saying you would like to see this feature here, www.apple.com/feedback/ipad.html or you can use the Get Support link at the top of the page here and contact Apple Support to see if there is something we cannot seem to find to disable it.
Similar questions
- How to turn off private mode in safari on iOS 15.1 How to turn off private mode in safari on iOS 15.1 xxxx 1831 1
- How can I take off the private mode on safari? How can I take off the private mode on safari on my iPhone? 437 1
- How do you get out of private browsing mode on safari How do you get out of private browsing mode on safari on ipad? 1621 2
Loading page content
Page content loaded
Nov 25, 2021 7:13 AM in response to justanuthername
Nov 25, 2021 7:36 AM in response to ChrisJ4203
Thank you! I will do that!
Nov 25, 2021 7:51 AM in response to justanuthername
You're welcome. Just FYI, the method I found was to set Content Restriction, but you said that didn't work, so I didn't provide the link.

IMAGES
VIDEO
COMMENTS
In iOS 17. Open Safari on your iPhone. Tap the Tabs button. Swipe to the Private tab group button, then tap the tab that you want to open. For additional privacy, you can choose to lock Private Browsing when you're not using it. When you lock your device, your private tabs in Safari will also lock. Then, when you unlock your device again, just ...
When you use Private Browsing, the details of your browsing aren't saved, and the websites you visit aren't shared with your other devices. Safari won't remember the pages you visit, your search history, or your AutoFill information. How to turn on Private Browsing. Open Safari on your iPad. Touch and hold the Tabs button. Tap New Private Tab.
Next to Private Browsing, select "Require Touch ID to view locked tabs." Or unselect it, if you don't want your private windows to lock. When private windows lock. On iPhone or iPad, private windows lock when Safari isn't running in the foreground or when you switch from Private Browsing. They also lock when your device locks.
Open the Safari app and click on File . Click on New Private Window. You can also use a keyboard shortcut: Shift + Command + N. If you want to always have the Private mode turned on, you can try these steps: Open the Safari app and click on Preferences . Click on General . Click on the Safari opens with a pop-up option.
Open Safari browser on your iPhone or iPad. Tap the Tabs button at the bottom right corner. Now, tap the " Tab Groups " button at the bottom. In the Tab Groups list, tap Private to switch to ...
This will take you back to normal browsing in Safari. Note that any private tabs you have open won't close automatically when switching browsing modes. This will be called Start Page if you don't have any tabs open in the normal browsing mode. Private mode doesn't record your browsing history.
The steps to enter Private Browsing mode are nearly identical on an iPhone and iPad. The only difference is that the tab icon is at the bottom of the screen on iOS and the top on iPadOS. Long-press the tab icon (two overlapping pages) on the bottom-right (iPhone) or top-right (iPad) of your screen. Tap the New Private Tab menu item.
Then, type Settings or System Settings, and hit the Return key. Step 2: In the Settings window, go to Screen Time on the left pane. Step 3: On the right pane, scroll down, and under Restrictions ...
In this case, you will make use of the Web Content controls to disable Private Browsing in Safari. Step 1: Open the Settings app and tap Screen Time. Step 2: On the Screen Time panel, tap the ...
Open Safari on your iPhone. Tap and hold the Tabs button. Tap [number] Tabs in the pop-up menu. You may also exit out of incognito mode in Safari on iOS 17 by completing these steps: Open Safari on your iPhone. Tap the Tabs button. Tap [number] Tabs or Start Page to show the Tab Groups list. Tap Private, then tap Done.
Sep 24, 2021 10:02 AM in response to iwant97. With iOS 15 on an iPhone, open Safari, tap the the new page icon at the bottom right of the screen, tap Start Page down arrow at the bottom center of the screen, tap Private. Private browsing option missing. .
Open the Safari app on your iPhone. Tap . Swipe right on the tab bar at the bottom of the screen until Private Browsing opens, then tap Unlock. To exit Private Browsing, tap , then swipe left to open a Tab Group from the menu at the bottom of your screen. The websites you have open in Private Browsing stay open, and Private Browsing locks.
How to turn on private browsing in Safari on an iPhone. To use a private browser on an iPhone, follow these steps: Open Safari on your iPhone. Tap the tabs button in the bottom-right corner of the screen. Swipe to the "Private" tab group button and tap it. Then tap the tab you want to open.
Open Safari on your phone. Tap on the " Tabs " button. Tap where it says " X Tab (s) " - this number will reflect the number of windows you have open. Tap " Private .". Now, you're in Private Browsing mode and can click the small " + " (plus) icon to launch a new private window.
Use the following steps to turn off Private Browsing on Safari for iPhone. Tap the icon that resembles 2 squares stacked on top of each other in the lower-right corner. Tap the " # Tabs " button at the bottom of the screen. Tap the plus (+) icon to start a new tab. 5. Turn off Private Browsing in Safari for iPad.
Step 1: Open Safari. To begin the process of turning off private mode in Safari, you'll first need to open the Safari browser on your iPhone or iPad. Safari is the default web browser for Apple devices, offering a user-friendly interface and seamless integration with other Apple services. You can easily locate the Safari app on your device's home screen, typically represented by a blue compass ...
Are these the steps you're using to open a private window on your Mac: Browse privately in Safari on Mac - Apple Support. 1. In the Safari app on your Mac, choose File > New Private Window, or switch to a private window that's already open. A private window has a dark Smart Search field with white text. 2. Browse as you normally would.
In the Safari app on your Mac, choose Safari > Settings, then click General. Click the "Safari opens with" pop-up menu, then choose "A new private window.". If you don't see this option, choose Apple menu > System Settings, click Desktop & Dock in the sidebar, then turn on "Close windows when quitting an application" on the right.
Before, any Safari extensions you had turned on for regular browsing also applied to Private Browsing mode. Now, "extensions that inject scripts or can read information about the pages [you visit]" are disabled by default in Private Browsing mode on iOS 17, iPadOS 17, and macOS 14 Sonoma, according to Apple.
The Private Mode is an amazing option to surf websites without being tracked by anyone and storing the cache and browsing history. However, every feature has its own advantages and disadvantages; some users keep the Safari Private mode disabled to avoid any inactivity made on their system, especially parental mode on Safari Mac.
Remove the checkmark for Enable deleting browser and download history. Scroll down and find the Enable add person in user manager and Enable guest mode in browser. Make sure these are unchecked. Scroll down again and find the Private mode availability option. Make sure that Private mode disabled is selected.
Private Mode in Safari. I know how to disable and re-enable private mode in safari. But, how do you permanently disable private mode from even being used. Setting this up in "Content Restrictions" to "limit adult web sites" does not work. When you tap in the four small squares on the top right, there is still an option to enter into ...