- Disk & Data Manager
- Partition Wizard
- Power Data Recovery
- ShadowMaker
- Media Toolkit
- uTube Downloader
- Video Converter
- Download Partition Wizard Free Edition: Download Pro Edition: Try Demo Server Edition: Try Demo

5 Solutions to Processor Thermal Trip Error on Windows 10/11
To avoid data loss due to unexpected errors like processor thermal trip error, you’d better make a Windows backup via PC cloning software like MiniTool Partition Wizard. It helps you clone the whole system disk with ease. Besides, this multifunctional partition manager also allows you to convert MBR to GPT , migrate Windows 10, wipe disks, recover missing partitions/data, etc.
MiniTool Partition Wizard Demo Click to Download 100% Clean & Safe
If you are suffering from processor thermal trip error on Windows 10, try the methods below to get it solved.
- Check the ventilation fans
- Check thermal paste and heat sink
- Disable overclocking
- Disable background processes
- Increase RAM
Solution 1: Check the Ventilation Fans
When the processor thermal trip error occurs, the first thing you should do is check if the ventilation fans are overheating. If it gets overheating, cool down by taking some measures. For instance, remove any obstructions near the fans to get enough airflow.
Wipe the dust off the ventilation fans to make sure that the fans work properly. Besides, put the computer in a place that is not too hot or humid.

How to fix Roblox high CPU usage? You may raise this question like others. If you are suffering from it, apply the given methods to solve it.
Solution 2: Check Thermal Paste and Heat Sink
Insufficient thermal paste between the CPU and its heat sink may trigger the processor thermal trip error in Windows 10/11 too. The thermal paste acts as a cooling agent, which can drastically cool down your system through the fan.
However, if the thermal paste is not applied properly, it won’t do its job and then your processor will get overheating. Hence, it is vital to check the thermal paste and heat sink on your computer. To do that, please follow the steps below.
- Turn off the computer and then remove the fan on the top of the processor by unscrewing the bolts with care.
- Apply the thermal paste on the top of the processor.
- Screw the fan again in its place.
- After some time, reboot the PC.

What’s your SSD temperature range? If you aren’t clear about it, you can check that by referring to this tutorial.
Solution 3: Disable Overclocking
Overclocking boosts the processor clock rate for a short time period, but it also increases the temperature sharply. If overclocking doesn’t stop in time, the processor thermal trip error will occur. So, disable overclocking after you meet this error. Here’s the step-by-step guide.
Step 1: Open the Settings app and then click Update & Security .

Step 2: Tap on Recovery in the left panel.
Step 3: Then click on the Restart now button on the right side of the window.

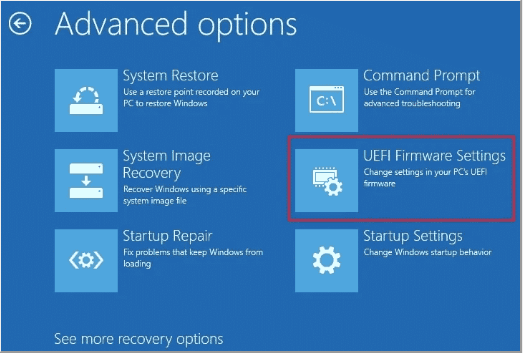
Step 4: After your computer restarts, click Troubleshoot > Advanced options > UEFI Firmware Settings > Restart .
Step 5: Then your computer will restart and open BIOS automatically.
Step 6: Click on the Advanced tab in it and then tap Performance and choose Overclocking .
Step 7: Now, disable the Overclocking option.
Step 8: Press the F10 and Enter keys to confirm and execute the changes.
Also read: 2 Simple Methods to Enable or Disable Dev Drive Protection
Solution 4: Disable Background Processes
Step 1: Right-click on the Windows icon to open the Start menu. Then click Task Manager from the menu.
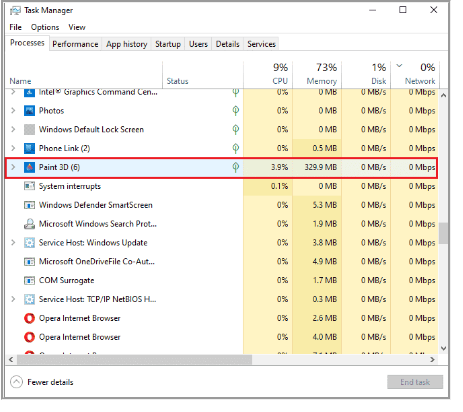
Step 2: In the Task Manager window, tap on the Processes tab and then find the processes that have high CPU usage.
Step 3: Right-click on the process with high CPU usage and then click End task . Repeat this operation to close all CPU-consuming processes.

How to enable or disable Windows Recovery Environment? If you are seeking methods, this post deserves your attention as it collects 2 ways.
Solution 5: Increase RAM
If RAM on the computer is not enough and requires more space due to less memory, it can cause the system to slow down, freeze, or overheat. Then you may receive the processor thermal trip error on Windows 10. To get rid of the processor thermal trip error in Windows 10/11, you need to increase RAM on your computer. If you don’t know how to do that, simply follow this tutorial: How to Get More RAM on Laptop – Free up RAM or Upgrade RAM
About The Author

Position: Columnist
User Comments :

Fix Thermal Trip Error in Windows 10
A thermal trip prevents the CPU from overloading and roasting. It is a cooling system that is dedicated to making sure that the processor of the system is cool at all times. In case the processor gets hot, the system shuts down. If your system has crossed the cooling threshold and has become too hot, your system might be facing a thermal trip error. If you are someone looking for solutions to this problem then you are in the right place. Not only will we educate you about solutions for the issue but we will also acquaint you with what causes thermal trip. So, let us get into detail about the issues causing your system to heat and suitable fixes for them.

Table of Contents
How to Fix Thermal Trip Error in Windows 10
The dominant and most common reason that has been seen to cause thermal trip error in Windows 10 is a failed cooling system of the process. Apart from it, what causes thermal trip has been explained in the points given below:
- An unclean computer can cause the cooling system to get blocked by dust which leads to the error.
- Another reason behind the Thermal trip can be overclocking which along with increasing clock rate also elevates the temperature.
- If the processor is not installed properly, it can also be the reason behind Thermal trip issue.
- If an application or a game on your system does not have sufficient resources, it can cause an error.
- A virus or malware in the system can also trigger thermal trip problems.
Usually, the methods used to fix Thermal trip issue are physical methods like cleaning the computer, checking the fan, and more. As basic as these solutions may seem, they are equally critical in helping you out with the problem. So, let us begin by knowing more about these troubleshooting methods first:
Method 1: Basic Troubleshooting Methods
Try the following basic and simple steps before you move to more advanced methods:
1A. Check Ventilation Fans
The first and foremost thing that needs to be checked in case of overheating is the fan. Also, you need to check if there are any obstructions near the vent that are blocking its way from performing the cooling function. If you are using a laptop, you can make sure that its airflow is not obstructed by keeping it on your lap rather than on a desk.

1B. Check the Environment
Another reason that is usually untouched is the concern of the environment in which the system is working. Too hot or humid environments have also been seen to affect how systems respond. Hence, if you are working in an overheated circumstance; it can lead to thermal trip error.
1C. Run Malware Scan
The next troubleshooting method to apply as a solution for Thermal trip fix is to run an anti-virus scan or a malware scan on your system as a virus attack has also been seen to cause the issue. You can check our guide on How do I Run a Virus Scan on my Computer .

Also Read: Fix Ntoskrnl.exe High CPU Usage
1D. Uninstall Programs
If you recently have installed a program or an application on your system and since then have started to encounter the thermal trip issue then the installed program may be behind the error. To rule out this possibility, you must uninstall the program using the following steps:
1. Right-click on the Windows icon on the screen, type Apps and Features & click Open as shown.

2. Locate the program (e.g. CCleaner ) with the help of the search list and click on it.

3. Select Uninstall .

4. Click on Uninstall to confirm.

Method 2: Close Background Processes
The next thermal trip in laptop solutions list is to check the CPU usage of the system. The fan will run faster and the system will put more strain on the resources if certain programs or processes put more strain or take up more disk space. If this is the case then you can check the issues mentioned using the Task Manager.
1. Hit the Ctrl + Shift + Esc keys simultaneously to open Task Manager .
2. Check the running processes under the Processes tab that are causing high CPU usage.

3. Right-click on such a process (e.g. Paint 3D ) and select End task .

If the above-mentioned steps did not help you with the CPU usage issue, then you can read our guide on How to Fix High CPU Usage on Windows 10 for more.
Also Read: Fix Laptop Thermal Throttling
Method 3: Disable Overclocking
The next solution that we have in front of us is related to overclocking. As discussed in the causes above, overclocking results in overheating, and eventually, it causes the error. For that reason, disabling overclocking is crucial to get over Thermal trip error and cool down your system. Following are the steps that can help you with disabling it:
1. Hit the Windows + I keys together to open Settings .
2. Then, click on Update & Security in it.

3. Select Recovery from the left pane.
4. Click on Restart now.

5. When the system restarts, select Troubleshoot .

6. Next, select Advanced options .

7. Now, click on UEFI Firmware Settings and select Restart .

8. Once the system is rebooted, it will open BIOS automatically, select the Advanced tab in it.
9. Then, click on Performance and select Overclocking .
10. Now, disable the overclocking option .
11. At last, press the f10 key to save the changes to BIOS and then start the system normally.
This is one of the effective Thermal trip in laptop solutions.
Method 4: Increase RAM
The next method that can be helpful in Thermal trip error fix is to increase the RAM. It is possible that RAM in your system is less than sufficient and requires more space due to less memory, this can trigger the system to slow down, freeze, or cause overheating and therefore the error. So, in such a case increasing the RAM from 2 GB to 4 GB can help you out. You can also check our guide How to Check RAM Frequency on Windows 10 for more information about RAM on your system.

Also Read: How to Check Your CPU Temperature in Windows 10
Method 5: Check Core Temperature
If none of the methods has helped you in resolving Thermal trip error issue then you can try checking the core temperature of your system using a third-party software program. With its help, you will be able to compare the temperature of your system with the standard core temperature.
1. Open Core Temp’s official site and download the software.

2. Once installed, launch the application and check the temperature in front of each core.
3. If the core temperature of your system is above the standard temperature that is between 40 Degree Celsius and 65 Degree Celsius (or 104 Degree Fahrenheit and 149 Degree Fahrenheit ) and none of the fixes have worked for you then you can get your system checked by a hardware expert.
Pro Tip: Check Thermal Paste and Heat Sink
The Thermal paste helps in drastically cooling down your system through the fan. If the ventilation system is working alright for your device and you are still facing Thermal trip in laptop solutions error then it is plausible that the thermal paste on your process is not correctly applied. In this case, the processor can get overheated and result in the error. Therefore, it is important to check the thermal paste and heat sink on your processor:
1. Remove the fan by carefully unscrewing the bolts just right above your processor .

2. Apply the cooling agent on top of the processor.
3. Now, screw the fan again in its place.
4. After some time reboot the PC .
Hence, these are Thermal trip in laptop solutions.
Also Read: 7 Ways to Fix CPU Fan Not Spinning
Frequently Asked Questions (FAQs)
Q1. What temperature is dangerous for a computer?
Ans. If your system runs under 65 Degree Celsius , there is nothing to worry about. But anything that crosses the 70 Degree Celsius mark is dangerous for your system and it needs to be cooled down.
Q2. What is a thermal shutdown in a PC?
Ans. A thermal shutdown in a PC happens when the processor or CPU’s temperature reaches a critical level which results in an automatic shutdown of the system to avoid any permanent damage.
Q3. What is meant by thermal trip?
Ans. A thermal trip is a bimetal thermal device that protects against overloading in a system. It results in the opening of a circuit breaker with a delay.
Q4. If my computer overheats for a long time, what will happen?
Ans. System overheating for a longer period results in your computer being unstable and eventually shutting down . It can also result in potential component damage .
Q5. How long does the thermal paste last?
Ans. Thermal pastes last for about 2-3 years in the case of normal compounds. While for higher-end compounds the limit is 7 years .
Recommended:
- How to Find Your Lost Phone Using Lookout
- Fix WASD and Arrow Keys Switched in Windows 10
- What is Clock Interrupt?
- Fix System Error 5 Access Denied in Windows 10
We hope that our guide helped you in all ways possible to fix Thermal trip error and to know about what causes thermal trip. Let us know which one of the methods guided you the most in resolving the issue. If you have any more queries or have some valuable suggestions to give then drop down a comment for us.
About The Author

Elon Decker

How to Color Code Calendar on Notion
How to Change Duolingo App Icon on Android

How to Use Plinky to Organize Links

How to Reset Tinder Matches

How to Uninstall Valorant from Riot Client

How to Clear Delivery Optimization Cache in Windows
Leave a comment cancel reply.
Your email address will not be published. Required fields are marked *
- >
Processor Thermal Trip Error in Windows 10/11: Here’s how to fix it

September 1, 2022

Typically, a CPU is configured to perform normally within a specific temperature and once its temperature exceeds a safe threshold, the thermal trip is activated. The processor thermal trip is meant to protect the CPU from being overloaded by continuous intense tasking, shutting down the system when the processor overheats, thus ensuring that the processor remains at a cool temperature. You may get the "Thermal trip failure" error message after a forced shutdown, which implies the temperature of your processor is reaching its threshold. In this post, we will discuss why could this issue happen and what to do if thermal trip error appears .
Why processor thermal trip failure would happen?
How to solve the processor thermal trip error, 1. check core temperature, 2. check the ventilation fans, 3. check thermal paste and heat sink, 4. close background process of high cpu usage, 5. disable overclocking, 6. increase ram.
- Insufficient thermal paste between the processor and heat sink or the heat sink is not securely fastened.
- Fans are not working properly or too much dust is accumulating around the vents.
- Overclocking leads to overheated processor.
- CPU-intensive applications burdened the system.
Before we performing the following fixes, it is important to note that do not turn on the computer immediately after a thermal shutdown. You will have to wait until the components inside the computer have cooled down completely. The cooling time depends on the room temperature and usually takes at least ten minutes. If the room temperature is hot, you are advised to move the computer to a cooler location.
Step 1: Download CoreTemp from the official website.
Step 2: Launch the application and all the information of your processors is involved. Pay attention to the temperature readings .

Keeping the fans running properly is the most essential step in getting your computer to cool down. Power off the computer and open your PC case, then you will first need to check that the fan blades are not damaged or not hung up on anything else. If much dust has gathered around the fan or vents, sweep it away since dust is sometimes the main cause of overheating. If the internal chassis looks both undamaged and clean, reconnect the power cable, but do not close the lid of the chassis so that good air flow can help it cool down. Then you need to turn on the computer to check if the computer fan, CPU fan and graphics card fan are spinning properly.
There is also a less common case where the processor overheats due to insufficient thermal paste between the CPU and its heat sink. Removing the old thermal paste and reinstalling the heat sink will be the only solution. Find a professional repair service if you are unable to perform this operation.
Step 1: Press Ctrl + Shift + Esc to open Task Manager.
Step 2: Choose Processes tab and find out the running processes of high CPU usage.
Step 3: Right-click on a program and select End task .

If your CPU is overheating because you have overclocked it, please stop doing so.
Step 1: Press Windows+I to open Settings and select Update & Security > Recovery . Then click on Restart now under Advanced startup.

Step 2: Once it restarts, choose Troubleshoot option and select Advanced options .

Step 3: Select UEFI Firmware Settings and click Restart .

Step 4: Then the BIOS or UEFI menu will open, choose the Advanced tab and select Performance .
Step 5: Find an option marked as overclock or something similar and disable it.
Step 6: Press F10 to save the change and then restart your system.
When you check the CPU usage of the background programs in the fourth method, you find no programs are straining the system despite the high CPU usage, then it is likely that the memory is insufficient. Also read: RAM usage high: 12 ways to free up your RAM
Related Articles

How to Check the CPU Temperature of Your PC in Windows 10

How to Check If CPU Is Overclockable: 4 Things You Need To Know

How to Cool Down My Laptop While Playing Games?

How to Know If A Processor is Compatible with A Motherboard (100% Workable)
Recent posts.

How to Use Windows File History to Back Up and Restore Files?

How to Get Into BIOS/UEFI Without Keyboard From Windows?

How to Enable CPU Virtualization on Windows

How to Bypass FRP Lock on Samsung Phone

How to Reclaim Disk Space From VMware Virtual Machine

How to Get Around Screen Time Limits on IOS Without Passcode

How to Bypass an IP Ban on Your Windows 10

How to Bypass Blocked Sites on WI-FI 10 or Windows 10

How to End Multiple Tasks at Once on Windows?

Unlock Windows God Mode: One-Stop Access to System Tasks
Popular articles.

Two Steps to Check Maximum RAM Capacity of Your Computer

AMD/AM4 Chipsets Comparison: A320, B350, B450, X370, X470, X399 and X570

Intel 300-Series Motherboards Comparison: Intel H310, B360, B365, H370, Z370, Z390

Recommended - Best Partition Size of 500GB Hard Disk for Windows 7, 8 and 10

How to Check RAM Slots Number in Laptop - Windows 10/8/7

How to Check TOTAL Size of Hard Disk Space in Windows 10/8/7
Techs & Gizmos
Hands On Review For Latest Gadgets & Gizmos
How to Fix Thermal trip error Windows 10/11 [Steps]
What is ‘Thermal Trip error’ in Windows 10/11?
In this article, we are going to discuss on How to fix Thermal Trip error Windows 10/11 . You are provided with easy steps/methods to resolve the issue. Let’s starts the discussion.
‘Thermal Trip error’ – Processor Thermal Trip error:
It is common Windows PC Problem considered as Processor Thermal Trip error. The Thermal Trip prevents the CPU from overloading and roasting. It is cooling system that is dedicated to making sure that the processor of system is cool at all times. In case the CPU gets hot, the system turned OFF, and if the system has crossed the cooling threshold and has become too hot, you might face Thermal Trip error on Windows computer. This issue prevents you from using your Windows computer comfortably.
The possible reasons behind the issue can be the interference of background processes, issue with overclocking, insufficient RAM or memory, and other issues. You can try to fix the issue by disabling overclocking CPU/GPU in your device in order to fix the issue. It is possible to resolve the issue with our instructions. Let’s go for the solution.
How to fix Thermal Trip error Windows 10/11?
Method 1: clean dust from cpu’s fan and other hardware components.
You can clean dust from CPU’s fan and other hardware components like RAM or memory in order to fix the issue. To do so, you need to shutdown your computer and open CPU case, clean dust from CPU’s fan, memory, RAM and other CPU cabinet portion using a soft cloth and then close the CPU case, and then turn ON your computer and check if the issue is resolved.
Method 2: Uninstall recently installed software
You can uninstall recently installed software or problematic software in computer in order to fix the issue.
Step 1: Open ‘Settings’ app in Windows PC and go to ‘Apps > Apps & Features’
Step 2: Find and select the recently installed apps or problematic apps, and select ‘Uninstall’ to uninstall it. Once done, restart your computer and check if the issue is resolved.
Method 3: Close background process
Step 1: Press ‘CTRL + SHIFT + ESC’ keys on keyboard to open ‘Task Manager’ app
Step 2: Right-click on process that is consuming the CPU resources, and select ‘End Task’ to kill them and once done, check if the issue is resolved.
Method 4: Disable overclocking
Step 1: Open ‘Settings’ app in Windows PC and go to ‘Update & Security > Recovery’ and click ‘Restart Now’
Step 2: Select ‘Troubleshoot > Advanced Options > UEFI Firmware Settings’ and select ‘Restart’
Step 3: Now, go to ‘Advanced’ tab and click ‘Performance > Overclocking’, and disable the overclocking option
Step 4: Once done, save the changes and exit BIOS, and restart your computer and check if the issue is resolved.
Method 5: Increase RAM
This issue can be occurred due to insufficient RAM or memory space in computer. You can increase RAM from 2GB to GB in order to fix the issue, and then check if it works for you.
Method 6: Check core temperature
You can check core temperature of your system using a third-party software in order find and fix the issue.
Step 1: Download Core Temp from its official site or visit ‘https://www.alcpu.com/CoreTemp/’ page
Step 2: Once installed, launch the application and check the temperature in front of each one.
Step 3: If the core temperature of system is above the standard temperature that is between 40 Degree Celsius and 65 Degree Celsius and none of fixes have worked for you, then you can get your system check by a hardware expert.
I hope this post helped you on How to fix Thermal Trip error Windows 10/11 with easy ways. You can read & follow our instructions to do so. That’s all. For any suggestions or queries, please write on comment box below.
Related Posts

How to Fix VirtualBox FATAL: INT18: BOOT FAILURE Error [Steps]
September 27, 2023 September 8, 2023

What is IP Spoofing? How to protect against IP Spoofing?
September 2, 2023 September 8, 2023

How to fix Local Area Connection doesn’t have a valid IP configuration issue?

About Sachin Prakash
Privacy overview.
- Forums New posts Search forums
- What's new New posts Latest activity
- Members Current visitors
- Optical PCIe 7.0 connection hits a blazing 128 GT/s
PC going through thermal shutdown but temps are nowhere near the thermal shutdown limits
- Thread starter prot7587
- Start date Sep 12, 2018
- Sep 12, 2018
Hello, this is my first post, so excuse the mistakes. My computer is going through processor thermal trip apparently but the temps are near 45-60 degrees on load, I tried changing power options in the settings to balanced,power saver and high performance. High performance used to crash as soon as I clicked it before but now it stays on for 3-4 minutes before shutting down, balanced on 80% max processor limit stays on for about half an hour without load and with load it goes shuts down within 10 minutes and power saver stays on for quite a while but it's very laggy. The temps are around 44-50 on all cores in about 70% load and the processor is an Q6600. The computer just crashes out of the blue and for no reason at all. I have a 500W PSU as well, and a new aftermarket fan with thermal compound installed and tried with case open and adding an extra case fan but nothing works.The motherboard is Intel DG31PR. Earlier, the computer was also shutting down but it was another error it was PXE ROM failure I believe and I fixed it through turning off booting in network cards in the BIOS. The thermal shutdown problem still existed back then but the main reason was the PXE ROM one but after disabling that one my PC shuts down after every 3-5 minutes because of the thermal trip. Any help would be appreciated. Thank you.
Perhaps it's not "thermal shutdown". Perhaps a voltage is going out of spec when you pull more current from the PSU under load. I would be checking PSU voltages with a voltmeter or software like HWInfo or I'd swap in another PSU.
Distinguished
Probably the PSU is going bad.
jay32267 : Perhaps it's not "thermal shutdown". Perhaps a voltage is going out of spec when you pull more current from the PSU under load. I would be checking PSU voltages with a voltmeter or software like HWInfo or I'd swap in another PSU. I'll look into the PSU matter but another thing was this problem was also happening a couple of months ago and the pc would shut down randomly the guy I took it to fix told that it was some sort of a bent capacitors issue or something, so I don't know if I have to change both the motherboard and the PSU? How will I identify that the bent capacitors isn't the issue?
gasaraki : Probably the PSU is going bad. I'll look into the PSU matter but another thing was this problem was also happening a couple of months ago and the pc would shut down randomly the guy I took it to fix told that it was some sort of a bent capacitors issue or something, so I don't know if I have to change both the motherboard and the PSU? How will I identify that the bent capacitors isn't the issue?
Bent caps aren't going to cause any issue unless they are bent into something and touching.....and even then...only the leads would matter. I would look around and see if I could see what he was talking about.....but it sounds strange.
- Sep 14, 2018
jay32267 : Bent caps aren't going to cause any issue unless they are bent into something and touching.....and even then...only the leads would matter. I would look around and see if I could see what he was talking about.....but it sounds strange. I don't know is PSU the case? Because the PC sometimes is shutting down at the windows GUI Boot screen right after the bios one and is also showing different sorts of boot drive errors as well..
Post some of the errors. Look in Windows Event Viewer, you'll have a bunch of red-flagged critical errors. These will be what's causing the shutdowns. Some can be fruitless, like ntkernal errors, but you'll prolly find just as many that'll actually point to a specific reason.
Karadjgne : Post some of the errors. Look in Windows Event Viewer, you'll have a bunch of red-flagged critical errors. These will be what's causing the shutdowns. Some can be fruitless, like ntkernal errors, but you'll prolly find just as many that'll actually point to a specific reason. PC is not even booting right now, it shows "Processor Thermal Trip" and it shuts down right after the message.
kerberos_20
start PC once it shutdowns, touch with your hand heatsink on cpu if it feels really hot, then its overheating do some vacuum cleaning of the fan and the sink, apply paste
kerberos_20 : start PC once it shutdowns, touch with your hand heatsink on cpu if it feels really hot, then its overheating do some vacuum cleaning of the fan and the sink, apply paste It's not hot at all, it's never hot, my motherboard is more hotter than the CPU according to BIOS, the motherboard is like 34-35 degrees while cpu is always at 24-28 degrees when this loop of thermal trip occurs.
so u didnt touch it
kerberos_20 : so u didnt touch it I did multiple times it's not hot.
then you have an airgap between the bottom of the heatsink and the processor heatspreade or you have used either too much of too little thermal compound
kerberos_20 : then you have an airgap between the bottom of the heatsink and the processor heatspreade or you have used either too much of too little thermal compound Don't think fan installations the issue since at 50-60% load when the PC boots up it is around 50-55 degrees and near a 100% load around 65 degrees, the TJ max is 100 degrees so it should not set of any processor alerts for damage.
Is that every core individually? Or just the single cpu temp. If you have air/paste issues above 1 core it'll hit max but the others will just read normally or slightly elevated. Do your load test but monitor all core temps instead. If you are seeing a spread of more than @10°C from lowest to highest, there's an issue with either your paste on the cooler, or the Tim inside the cpu.
Karadjgne : Is that every core individually? Or just the single cpu temp. If you have air/paste issues above 1 core it'll hit max but the others will just read normally or slightly elevated. Do your load test but monitor all core temps instead. If you are seeing a spread of more than @10°C from lowest to highest, there's an issue with either your paste on the cooler, or the Tim inside the cpu. Here is a picture of event viewer: http://prntscr.com/kug5l8 I hope it's the right one, I'm pretty nooby with these sort of stuff and here is a screenshot with core temp of four cores. I changed the power options to power saver and now I notice it's running on three cores? Core temp screenshot: http://prntscr.com/kug6ik Also, the loads fluctuate between 50-60% to 2-3% and the temps remain the same no spikes. I tried taking 2 gigs of RAM stick out of my PC and somehow I was able to boot into windows this time unlike going through auto shutdown after BIOS screen? What's wrong, I'm confused af.
The top 2 events are a network error where windows can't verify its a registered copy. The rest of those event 65's are where you have programs that use registered certificates and not being validated. Neither one should result in a crash. So windows is crashing with nothing pointing towards a crash. There are ways to fix both those events, but do require some technical expertise as they deal with the registry. These issues have seen major increase since the last few major windows updates. I'd make sure of 3 things. 1) Absolute latest bios revision. 2) Absolute latest motherboard drivers, especially LAN, audio, USB family, Sata etc. 3) open up a CMD window with Administrator permissions type sfc/ scannow . This should fix any system files that might be corrupted. Yes, running only 3 temps is odd, as is that cpu running 1.6GHz, unless that was done during an idle period. Normally a cpu is good for over 20 years if temps are good for the duration, but OC can significantly shorten that if the cpu is subjected to near max voltages. With just 3 reported temps, I'd start maybe looking into checking to make sure that your cpu hasn't cooked a core and is yelling obscenities at you by crashing..
larrycumming
Dude, is that windows 10 on an LGA775 socket t mobo? If so try going back to an older os or try it with a Linux distro, windows 10 doesn’t play nice with some of the older hardware due to driver compatibility.
Karadjgne : The top 2 events are a network error where windows can't verify its a registered copy. The rest of those event 65's are where you have programs that use registered certificates and not being validated. Neither one should result in a crash. So windows is crashing with nothing pointing towards a crash. There are ways to fix both those events, but do require some technical expertise as they deal with the registry. These issues have seen major increase since the last few major windows updates. I'd make sure of 3 things. 1) Absolute latest bios revision. 2) Absolute latest motherboard drivers, especially LAN, audio, USB family, Sata etc. 3) open up a CMD window with Administrator permissions type sfc/ scannow . This should fix any system files that might be corrupted. Yes, running only 3 temps is odd, as is that cpu running 1.6GHz, unless that was done during an idle period. Normally a cpu is good for over 20 years if temps are good for the duration, but OC can significantly shorten that if the cpu is subjected to near max voltages. With just 3 reported temps, I'd start maybe looking into checking to make sure that your cpu hasn't cooked a core and is yelling obscenities at you by crashing.. It's running at 1.6 ghz because I capped it at the power settings , otherwise my PC will crash after 30-40 minutes of use and after crashing the first time randomly crash after 5-10 minutes or even less, same "Processor thermal Trip" error every damn time but with the cap at 70% of the processors max usage the cpu can run for a few hours and not face any crash, sacrificing some performance that is, maybe the 3 cores are because of that? And, the errors I can fix but I'm not sure about how to do a BIOS update and when I check the drivers through device manager they always say "The best drivers for your device are installed." Should I try going back to Win 7? Or would that be of no good? And the CPU was never overclocked btw.
- Sep 15, 2018
To check the drivers, look in Device Manager, select a component/driver and under properties it'll list the driver version and date. Compare that to the drivers listed on the motherboards support page. Windows almost always says it has the latest drivers since windows itself has generic versions included which are newer and upto date, the downside being they are generic and not specific to your mobo. Meaning they'll work, just not to the best ability. Bios upgrade isn't hard. Just 2 rules. 1) follow the instructions exactly. 2) do not deviate, don't do something stupid like turning off the pc or pulling power cuz you assume there's a problem. If in doubt refer to rule #1. If you download and save everything to desktop, keeping it all in a group off to one side, makes life easy to deal with. Many of the drivers will have self executing updaters.
- Sep 16, 2018
Karadjgne : To check the drivers, look in Device Manager, select a component/driver and under properties it'll list the driver version and date. Compare that to the drivers listed on the motherboards support page. Windows almost always says it has the latest drivers since windows itself has generic versions included which are newer and upto date, the downside being they are generic and not specific to your mobo. Meaning they'll work, just not to the best ability. Bios upgrade isn't hard. Just 2 rules. 1) follow the instructions exactly. 2) do not deviate, don't do something stupid like turning off the pc or pulling power cuz you assume there's a problem. If in doubt refer to rule #1. If you download and save everything to desktop, keeping it all in a group off to one side, makes life easy to deal with. Many of the drivers will have self executing updaters. I'll try and post a reply, thank you.
- Sep 17, 2018
Karadjgne : To check the drivers, look in Device Manager, select a component/driver and under properties it'll list the driver version and date. Compare that to the drivers listed on the motherboards support page. Windows almost always says it has the latest drivers since windows itself has generic versions included which are newer and upto date, the downside being they are generic and not specific to your mobo. Meaning they'll work, just not to the best ability. Bios upgrade isn't hard. Just 2 rules. 1) follow the instructions exactly. 2) do not deviate, don't do something stupid like turning off the pc or pulling power cuz you assume there's a problem. If in doubt refer to rule #1. If you download and save everything to desktop, keeping it all in a group off to one side, makes life easy to deal with. Many of the drivers will have self executing updaters. PC doesn't even boot up properly and keeps hitting the infinite loop of processor thermal trips unless I take a 2 gig ram out of my PC and restart but the problem again pops up when I put it back on so is that the problem?
Could be. Check that stick individually.
- Sep 18, 2018
Karadjgne : Could be. Check that stick individually. Both stick seems to work on both sockets individually but when combined crashes again... why is this happening? But when I use one stick it doesn't cause any crash/error shutdown in my half an hour to an hour of surfing the web or mild gaming since 2 gig ram cant run crap. Edit: It is sometimes causing memory management issues while browsing in chrome when ram hits 1.7 gigabytes of 2 gigabytes limit or when I stress it.
TRENDING THREADS
- Started by Admin
- Yesterday at 11:25 AM
- Replies: 27
- Thursday at 9:40 AM
- Replies: 79
- Started by BQxNY
- Today at 7:52 AM
- Started by tecmo34
- Apr 30, 2011
- Replies: 5K
- Started by 0qksoavaidiwrngao3bewjsbI
- Today at 8:54 AM
- Started by Ayane
- Today at 9:39 AM
- Today at 9:44 AM
Latest posts
- Latest: stonecarver
- 1 minute ago
- Latest: MikeA01730
- Latest: punkncat
- 2 minutes ago
- Latest: Roland Of Gilead
- 5 minutes ago
- Latest: Eximo
- 12 minutes ago
- 13 minutes ago
- Latest: bedouinbro
- 14 minutes ago
Moderators online
Share this page
- Advertising
- Cookies Policies
- Term & Conditions
Success! Subscription added.
Success! Subscription removed.
Sorry, you must verify to complete this action. Please click the verification link in your email. You may re-send via your profile .
- Intel Community
- Product Support Forums
False Overheating on Dell Latitude E5470s
Hello all. I’ve got a two-part puzzler involving Dell Latitude E5470s, Intel drivers (specifically many versions of the Dynamic Platform Thermal Framework), and some hardware swapping.
First, the easy test case. We have a 5470 that was deployed and began being shut down by Windows quickly after boot (sometimes before login, sometimes after). Usable access was only by rebooting into Safe Mode before a shutdown. We determined the Thermal Framework driver updated (version 8.3.10209, the latest) and started falsely detecting overheating.
Event Viewer ID 86 cases, Critical Thermal Event, ACPI Thermal Zone = Intel (R) Dynamic Tuning: TCPU _CRT = 373K ( so 102 degrees C )
Even when the machine is cold, it can start, get to Windows “Please Wait” then the message becomes “Shutting Down”. We tried several versions of the Thermal Framework, but the only ones that do not trigger the shutdowns are some of the oldest. Right now we have it on 8.2.11000 and SpeedFan monitoring the temps. 40C typically and then 83C at maxing when 100% CPU. Warmer but not overheating. Searches online say this is a recurrent Dell issue…. but for the XPS models, not the Latitudes.
Is there any way to avoid keeping the machine on the old Thermal Framework? Or are we stuck using an outdated driver for temp monitoring?
Second part, the bad cases. We have six (so far) 5470s that worked the first imaging, then refused to reimage. We use MDT and a slightly custom image. They get to first reboot, Dell logo with “Preparing Drivers”, then get the error “ Windows could not complete the installation. […], restart the installation ”. A bland W10 image works so we know it is specific to our custom image. But most of our 5470s and all other models image fine, so it became a background project to diagnose. Recently had an idea for a workaround: image on a good 5470, swap that drive into a bad 5470, see if everything works, then deploy if all is good. It works…. kind of.
This is why these two issues are together and why diagnosis for part one was quick. Any drive swapped into a bad 5470 displays the SAME issue, quick Windows-initiated shutdowns. Through many drive shuffling tests, we are certain that any of the M.2 drives will be fine in a known good 5470 and will force ‘overheat’ shutdowns in a bad 5470. Rolling back drivers via multiple uninstalls of the five Intel Dynamic Platform & Thermal Framework drivers while in Safe Mode gets us to a point the machine will no shutdown. SpeedFan again confirms they can rev to ~80C but never actually overheat.
Does anyone have any idea why this would be happening to these machines and how we can address it? Or does anyone have any suggestions of what further to test or try for a diagnosis?
In case this helps, some extra points from what we have tested:
- Installing Thermal Framework different ways (manually or Dell Command Update) has no effect.
- Tried higher version numbers (8.4.x & 8.5.x are available), but these do not appear to be newer drivers consistently. Not sure on their numbering scheme, did not match formats I looked up.
- MDT driverset was updated each time Dell released more. We’ve tried to image the bad 5470s with each round. Been about 5 tries over last 8 months.
- We’ve looked over the specs and the physical hardware and have not found anything consistent that would mark a machine as a good or bad 5470. Open to suggestions of where else to look.
- Drives used and tested are all what they shipped with. Some variety: SK Hynix SC308 or SC300 / Micron 1100 / Liteon CV3
@Intel_Corporation
Well, this is interesting.
We just had 4 of our 5470’s start this shut down behavior last week and also traced it down to Inter thermal framework.
We elected to remove the program and drivers entirely. (it does show in “add/remove programs”)
What was more interesting is the problem did not manifest on older version of Windows 10, just 1903/1909.
Lets see what happens with this thread…
I fought the drivers so much I did not consider fighting the Installed Programs aspect of it.
I’ll test that on each and, if it goes well, I’ll do heat tests to make sure not having it doesn’t cause issues.
More likely to be an OS issue but it could still be that the BIOS has an incompatibility with the ACPI system of the OS. Would it be worth updating the BIOS to the latest issue just to be sure that this point is covered?
We’ve updated BIOS a few times in the process to make sure things are current (manually or through Dell Command Update), but checking again made me realize something odd. A few of our machines are on BIOS 1.21.x (mostly .4 or .6) and some are on 1.19.3. The latest on Dell’s site is 1.19.3. Seems Dell pulled it about a month or so ago.
Still, good and bad 5470s have some on 1.21.x and some on 1.19.x. So there does not look to be any correlation.
So BIOS does not seem to be the culprit. You could try a Live Linux Distro booting from a USB stick to see if you get the same issue. If you don’t then it is definitely Windows 10 and that driver.
It looks like it will not matter if the software for the Dynamic Platform & Thermal Framework is installed or not. Installing the drivers via this .exe adds the software and the 8.3.10209 drivers, but uninstalling it rolls the drivers back as well. I then extracted the drivers and installed them from the .INF files, but the forced shutdowns returned after first reboot. It looks like the drivers themselves are all that is required to trigger the false shutdowns.
So my question now is how are Intel driver versions numbered ? Tried looking up a scheme, but only find results for how their graphics drivers are numbered. If I go by Dell’s most recent versions compatible for the E5470, the order is…
That, and uninstalling drivers from Device Manager went in a sequence of 8.3.10205 >> 8.4.10500 >> 8.3.10207 >> 8.2.10900. I need to test with the 2nd latest driver for the Dynamic Platform & Thermal Framework.
Was able to get clarification from Dell that the final part of the driver is the indicator of which is the latest. In this case, 8.3.10209 is the latest because the full name ends in “A12” and the 2nd latest Dell offers is 8.2.10900 which ends in “A03”. The good news is this has worked perfectly. Thermals seem as expected even in tests with Prime95 and it has been shutdown-free.
Doing tests now to make sure the process of swapping drives after imaging in a good 5470 >> downgrading the driver >> swapping drive into bad 5470 is stable and repeatable. Do not have a good option to block the driver updating yet. As far as we can tell right now, you cannot block specific drivers in Dell Command Update …so we may have to remove DCU for those cases. Decision pending.
Final update, just for anyone who finds this and wants a solution:
We found a way to keep the driver from being updated by Dell Command Update. Trick it into thinking a newer version is installed. In the registry under HKEY_LOCAL \ SYSTEM \ CONTROLSET001 \ CONTROL \ CLASS \ { long identifier string} </b>, there are five subkey folders all containing a Driver Date and a Driver Version. By changing all of these to be a date in 2023 and the version to be 8.9.99900.990, Dell Command Update will no longer offer the bad Intel Thermal to install. We’ve verified this on four machines now and made a .REG file that applies only those two edits to each of the five subfolders.
We’re still stumped about the imaging issue, but plan to play with the reg fix here and try to apply it during MDT imaging. Maybe eventually we’ll get that hammered down.
@dwendel , @leesob : Any improvements with Win 10 2004 and / or the latest (1.22.3) BIOS? Have you tried those together with the new (8.3+) DPTF drivers?
We are still testing 2004 in our environment currently, but I’ll make a point to test it with the a bad 5470.
Also of note, I checked Dell’s driver page for the 5470. They no longer offer Thermal Framework 8.3.10209 A12, the latest listed is 8.2.10900 A03. I wonder if they removed it from reports of a few issues. Either way, I will consider A03 as the latest driver for any tests.
You’re right, they indeed removed it! It is probably not a coincidence.They must have done it pretty recently, because 3 weeks ago, when I last checked, 8.3 was still listed as the latest driver. Please share your experiences about 2004 when you’re through. Thanks and good luck with the tests.
@spiceuser-83luh , initial tests were not good. I am in-office only a few days a week so I have not had a chance to check the machine in-person yet. But the computer has not shown up in AD or on any other tools. All indications right now are it failed the same way.
And, to confirm, I did update BIOS prior to trying Win10 2004.
With the old (8.2.10900 A03) driver? You mentioned earlier that you will consider that one as the latest (Dell-approved) one for your tests. If so, it is interesting, because in the meantime I also started testing our faulty specimen, with 2004 + 8.2.10900 A03 + BIOS 1.19.3 and I have not encountered any issues so far.
Since this problem affect only the 5470’s and they were end of lease with battery problems also we retired them.
They have been replaced with 5400’s which do not exhibited the issue.
We have not yet started testing with 2004.
Thanks for the input. So far We’ve experienced this issue with E5570’s and E7470’s (Due for EOL in a few months). Systems are currently rolled back to version 8.2.10900 and have not experienced issues. I’m going to try this method of changing the registry values and get back to you. Our latest Dell 7400’s do not have this problem and are running version 8.5.10103.7263 with 1909 in testing phase.
Any updates or more specific combinations of Windows 10 level/driver level/etc that could pinpoint this problem. I am helping a non-profit that has one E5470 that has shutdown a few times with Event 86, Windows 10 2019 and the level of the Thermal Framework (at least from looking in the Device manager) is 8.3.10209.6897. I can get this far but where do go exactly to see the A3/A12 levels? Thanks, Tom
@spiceuser-f5g5z
You’ll need to download driver version 8.2.10900 found at this link from Dell’s site: https://www.dell.com/support/home/en-us/drivers/driversdetails?driverid=nwwr5 A03 is the release version name for driver version 8.2.10900. Run the EXE, it will ask about putting on older drivers than what you currently have, just accept that. Then, from an administrator user, access Registry Editor and follow what I said in the March 2nd post:
In the registry under HKEY_LOCAL \ SYSTEM \ CONTROLSET001 \ CONTROL \ CLASS \ {long identifier string} * , there are five subkey folders all containing a Driver Date and a Driver Version. By changing all of these to be a date in 2023 and the version to be 8.9.99900.990, Dell Command Update will no longer offer the bad Intel Thermal to install.*
I’ve realized since that the long identifier string is always the same, so find the one that starts with “ {c3077fcd- ” and there should be the five subkeys to alter.
Easy enough. Only additions are it is HKEY_LOCAL_MACHINE\then the rest as you have it. And I assume a reboot after all these changes. Of course, I have had this machine on for 20 hours straight and it has not shut down so who knows but we’ll see if it ever does it again. Thanks for taking the time to give me these instructions. Tom
Thank you for this thread. We have this happening in a unique case and wanted to post it.
It’s a Dell Precision 7710 that was just recently upgraded from Windows 7 to Windows 10. The forced shutdowns started almost immediately. Since it was identified as a thermal issue we replaced the thermal paste on the CPU and everything was fine for a few days until it happened again. Googled " ACPI Thermal Zone = Intel(R) Dynamic Tuning: TCPU_CRT = 373K" and found this discussion.
Very random. Laptop has been up and operational for 5 hours today with no problems. Will attempt the driver dial-back and registry edit and let you know. -KT
Related Topics

History Computer (US)
9 Easy Ways to Fix a Frozen Computer
Posted: March 12, 2024 | Last updated: March 12, 2024

Fixing a frozen computer is beyond frustrating. It always happens at the worst possible moment, like when you're on a roll with an important project and have a deadline. The most common issue is usually the most obvious, but this doesn't mean you can rule out everything else. Hopefully, it's something as easy as a software update rather than a hard drive failure.
The good news is there are some easy and effective tips to tackle that frozen computer. We'll walk through each tip step-by-step, from quick software fixes to hardware issues that should get your computer back up and running in no time.
Agree? Tell us by clicking the “Thumbs Up” button above.

Restart Your Computer
When your computer is completely frozen and Ctrl + Alt + Del won't work, the next best thing is to hold down the power button and force a shutdown. If you can't shut it down with the power button, then disconnect all power cables. On a laptop, you might have to remove the battery. It's not the best for the computer, but it will force it to shut down. When you press the power button again, it should restart normally.
However, if Windows can't boot after a few attempts, you'll see troubleshooting options. You can try running the startup repair or booting your computer in safe mode. If you can access your computer in safe mode, it'll be much easier to troubleshoot the problem. Accessing the operating system through safe mode gives you some different support options.

Check for Updates
If your computer screen keeps freezing, you could have uninstalled updates. Or maybe you recently installed an update and your computer has started freezing up. If it is the former, go to your computer's settings and install any recommended updates, then restart your computer.
If it is the latter, you can remove recently installed updates by selecting Start > Settings > Update and Security > Windows Update > View update history > Uninstall updates . Right-click the update you want to remove, then choose Uninstall .

Scan for Viruses
Malware and viruses can also cause your computer to freeze up. Malware can overwhelm your system by opening too many applications simultaneously. These malicious programs will run in the background and use up all of your computer's memory, thereby causing it to freeze.
Go to your computer's security settings and run a scan to check for infections. We also recommend antivirus software that will protect your computer from threats in real-time. With these applications installed, you can easily defend against nasty online threats.

Run a Drive Checking Tool
If you think the problem might be related to hardware, you can run an error-checking tool. Start by opening Windows Explorer, click on This PC, and right-click on the drive where Windows is installed. Next, select Properties > Tools > Check Drive . While this scan is taking place, you can continue to use your computer in the background. If an error is detected, your operating system will attempt to automatically repair it.
Another way to scan for drive errors is to use " sfc /scannow " command in Command Prompt. To do that, click on the Start Menu and type in Command Prompt . Right-click on the app and select Run as Administrator . Now type " sfc /scannow " into the terminal and press enter to start the disk repair scan. This will likely take a few minutes to complete, so it's okay to do something else while it's working. If any errors are found, your computer will attempt to make any necessary repairs.

Update Graphics Card Drivers
One reason your computer could be freezing up is because of graphics card issues. Before doing anything else, make sure you have the latest drivers installed for your graphics card. With NVIDIA, you can use GeForce Experience to download the latest drivers. For AMD graphics cards, you can use AMD's Auto-Detect software.
Alternatively, if your computer starts to freeze after updating GPU drivers, you can roll back to your previous settings. An easy way to roll back a driver is to open Device Manager , expand Display Adapters , right-click on your Graphics Card , and select Properties . Next, select the Driver tab and you should see an option called Roll Back Driver .
Another quick trick you can do is reset the graphics card driver with a key command. Press Windows Key + Ctrl + Shift + B at the same time. This key combination will reset your graphics drivers.

Test Your RAM
While rare, a computer can freeze when your installed RAM isn't working properly. To troubleshoot the RAM, test one chip at a time. If your computer freezes with one specific module, then you know your problem. Just swap out the module with a new one. As a bonus, while you're fixing an issue, replacing RAM can not only fix a frozen computer but also improve its performance.
If you want to do one more test before swapping out RAM, Windows has a built-in app called Windows Memory Diagnostic . To find it, type the name into the start menu. When enabled, it will reboot your computer and check for RAM errors before the boot process. If you see several red errors after this test is over, it's a strong indicator you should replace your RAM.

Re-Applying Thermal Paste
If you recently installed a new CPU, there's a chance it isn't making full contact with all the pins. It could also be overheating due to insufficient thermal paste. So, you may be able to fix your frozen computer by removing the CPU, removing the old thermal paste, and re-applying the new thermal paste. You can now reinstall your CPU again and see if any freezing issues are now resolved.
Just remember that when tinkering with your CPU and thermal paste, go slowly as the pins can break. Don't try to force or jam it into the CPU bracket. If it's angled correctly, it should fall right into place.

Troubleshoot Your Power Supply
Another reason your computer could be freezing is because the power supply can't keep up with the power requirements. If your power supply is completely dead, then your computer won't show any signs of life. People usually find themselves in this situation when they upgrade to a more demanding graphics card without upgrading the power supply .
Other issues like an electric surcharge can damage your power supply too. If your computer starts fine but freezes when under heavy load, the power supply may be the issue. To fix this problem once and for all, we recommend buying a new power supply.
Replace the System Drive
In some cases, you can fix a computer with freezing issues by replacing the hard drive. This is especially common on older PCs that use traditional spinning-disc hard drives (HDD). We recommend upgrading from spinning hard drives to an SSD , as they are not only faster, but also more reliable.
Installing another drive is an easy upgrade that just about every computer manufacturer supports. All you have to do is swap the hardware in your machine and install Windows (or macOS) on it. For ideas about what type of drive to buy, there are some great recommendations to consider.
- How to Force Quit on Windows in Easy Steps (with Photos)
- 4 Ways To Shut Down or Sleep Windows with Keyboard Shortcuts
- What Does the Error Message, "Windows Cannot Run Disk Checking on this Volume Because It is Write Protected," Mean?
More for You
Squatters Can Legally Steal Property in 21 States: Here’s How
Famous dads and their lookalike sons – Michael Douglas, Rob Lowe, Jack Nicholson, more
Restaurant Owners Admit There’s One Surprising Benefit to California’s $20 Fast Food Wage Law
Why Companies Don’t Want to Hire People Over 50
Video shows fan’s emotional reaction to receiving Taylor Swift’s ‘22’ hat at Edinburgh concert
Kellyanne Conway's Donald Trump Crowd Size Claim Sparks Jokes, Pushback
Vanna White Young: A Look Back at the 'Wheel of Fortune' Beauty's Early Days
Caitlin Clark Going Viral After Getting Decked By Angel Reese
“It hurt me in a way that surprised me”: Jeremy Renner Changed Matt Damon’s Mind About His Bourne Retirement With His $280 Million Worth The Bourne Legacy
So THAT'S Why Mosquitoes Bite Some People More Than Others
Company develops low-cost, Lego-like construction bricks that can withstand natural disasters — and they're made from plastic trash
Leonard Nimoy’s battle with Gene Roddenberry – and Shatner’s belly – to make The Search for Spock
10 Mistakes Everyone Makes With Blueberries
‘I talk to a lot of presidents’: Serena Williams gets testy when asked about Trump after being named on regular call list
What Retiring to The Villages in Florida Is Really Like, According to Redditors
Whole Foods CEO shares the No. 1 red flag he sees in employees: I learned it 'the hard way'
“They literally talk about how MM doesn’t eat anymore in the show”: Laz Alonso’s Extreme Weight Loss Gets Seamlessly Woven in The Boys Season 4 That Fans Have Missed
Comedian J.B. Smoove warns 'The View' against 'comedy prohibition,' says wokeness 'very discouraging'
Linda Ronstadt Through the Years: Her Life in Photos
'Yellowstone' Dads: See Your Favorite Cowboys With Their Adorable Kids

Hyte Thicc Q60 AIO cooler review
Almost more mobile phone than cpu cooler., our verdict.
The Hyte Thicc Q60 is smart, good looking and extremely quiet. It delivers exceptional cooling performance in games, too, though does trip up in more demanding thermal tests.
- Impressive cooling performance for gaming
- Handy for system monitoring
- Zero-RPM mode
- Less impressive with demanding CPU workloads
- High idle temps
PC Gamer's got your back Our experienced team dedicates many hours to every review, to really get to the heart of what matters most to you. Find out more about how we evaluate games and hardware.
Take a look at the Hyte Thicc Q60 and you might come to the conclusion that this is an all-in-one liquid cooler that pushes appearance over performance. That's not strictly true, however. Yes, the Q60 is adorned with a 5-inch screen, a litany of RGB LEDs, and some tidy cabling—but there's also a chunky CPU cooler beneath it all.
The Q60 is a big beast. It's an all-in-one liquid cooler with a radiator double as thick as some, coming in at 52 mm. That's reportedly to utilise space not often utilised to its fullest in modern PC cases, according to Hyte—it's opting for a thicker radiator in the place of a longer one.
The Q60 is billed as a 240 mm radiator, on account of the two 120 mm Thicc FP12 fans included, but it's actually 288 mm from top to bottom. The remaining space is taken up by the pump, which takes residence on the radiator rather than in the more traditional spot behind the cold plate. The benefit of this being, for the Q60 at least, more room for the enormous screen above the CPU.
The 5-inch screen on the Q60 is best described as a tiny computer. It includes a quad-core Arm Cortex CPU, with 2 GB of DDR4 running at 2,666 MT/s, and running at 1.3 GHz. It also has 32 GB of eMMC storage. All to run the many widgets, which Hyte has named 'faces', available via the Hexus application, which is pretty much a must-install with this cooler.

Compatibility: LGA 1700, 1200, 115X, 2011*, 2066* - AMD Socket AM5, AM4, TR4* (* available from Hyte support) Dimensions: 120 x 288 x 52 mm (cold plate: 56 x 56 x 1.5 mm) Radiator: 288 mm, aluminium Pump: Ceramic, up to 4,500 RPM Fans: 2x Thicc FP12 120 mm, Fluid Dynamic Bearing, up to 3,000 RPM Lighting: Full RGB on radiator logo, array behind screen Screen: 5-inch IPS, 60 Hz, 300 nits, 720 x 1280 resolution Storage: 32 GB eMMC Memory: 2 GB DDR4 Price: $300 | £330
"You can watch the entirety of Shrek on the Q60 if you want to," a Hyte representative tells me.
I've opted for a parade of system monitoring 'faces': liquid in temp, liquid out temp, CPU temp, and GPU temp. Oh, and the clock, which I cannot seem to remove. There are a lot of options to choose from and a few more 'coming soon'—clock speeds, fan speeds, and throughput are all reportedly on their way to the app. You can also set the screen to display your current media playing via Spotify. And play your own media. And you're free to change the background. It can do a lot of stuff, actually.
The screen is only capable of showing four custom faces, however, which feels pretty limited. I'd like a bunch more. Though I'm told you could also break out some Android commands and run anything you like on this thing, even ditching the entire Hyte Hexus application altogether.
"If you're a software developer and have the know-how and tools and abilities, we kept the door open."
I'm not usually a fan of sticking a screen on peripherals and parts for no discernable reason except 'we could'. But I'm sorta into the Q60's central screen. It's impressive and not at all as domineering as I had originally expected. The subtle two-tone design of the rest of the cooler helps—if the fans were also adorned with RGB lighting, it'd probably feel a bit too much. As it stands, the screen is pretty wicked.
Yet as I mentioned at the beginning, the Q60 isn't only about appearances. It is a capable liquid cooler in its own right.
In balanced mode, with the PC idling, the Q60 is nominally audible. During gaming it's only a little noisier—I've been running the Metro Exodus benchmark many times over and the only noise coming from the Q60 throughout is a steady, polite hum. It doesn't noticeably fluctuate between speeds, either, which makes the noise it does produce much less distracting.
Only during more CPU intensive workloads did I begin to take note of the sound coming from the fans and pump unit. Moreover, for adequate cooling performance, I found I needed to crank up the cooler to performance mode. This increases the fan RPM considerably, even when idling, which makes for a notably louder buzz.
Though, in return, this cooler delivered the lowest temperatures while gaming out of those I tested, which included a 360 mm AIO.
The Q60 isn't quite as capable as others when it's really pushed to the limit, however. The Q60 didn't fair as well in Cinebench R23. There was no thermal throttling, but the Q60 was the only cooler to hit 90°C.
It couldn't quite cope with the bouncy demand of the X264 benchmark, either, which seemed to get the better of the Q60 more than any other. That might be because the Q60 also appeared the slowest cooler to reset back to idle temperature. At a certain threshold, around 35°C, the fans switch off completely, which means the CPU tends to stay hotter than with other coolers that don't do this.
It's possible to reduce idle temperatures into the twenties by setting the Q60 to be controlled by a firmware-set curve. There are a few control options to choose from in the Hexus application: Hexus, firmware, or motherboard. Firmware is made up of two simple curves: one for fans, the other for the pump. With this set I saw the idle temperature drop to 27°C, as the fans were never fully off.
The fans will go up to a whopping 3,000 RPM, and they do not get anywhere close with Hyte's preset fan curves. That said, I've tried running at full RPM and it's not worth the extra noise generated—I recorded only marginal reduction in CPU package temperature through Cinebench R23.
A bit of a mixed bag then. If you want pure cooling performance for the money, look elsewhere. Though if you want to strike a balance between performance and noise levels, and mostly plan on gaming, the Q60 is a stronger pick.
✅ You want always on system monitoring: If you like to keep track of what your PC is up to at all times, the 5-inch screen on the Q60 is a good way to do it. Providing you can actually see it, of course.
✅ You don't have the room for a 360 mm radiator: You can get pretty spectacular cooler performance for gaming out of the Q60, even matching much larger units.
✅ You crave a tidy PC: The way the few cables required connect to the radiator block on the Q60 make for very easily hidden cable runs. It's extremely neat.
❌ You need the best cooling performance for the money: The extra features on the Hyte Q60 add up, and that means it costs a pretty penny where even larger AIOs don't.
❌ You don't want more software on your PC: The Hyte Hexus application is just another piece of software to run in the background. It's pretty much a necessity to make the most of the Q60's screen, unless you're a dab hand with Android commands.
There are other reasons to consider the Q60.
It's extremely neat and tidy, for one. It requires only a handful of cables, collected into a single dual-USB Type-C connector, and plugged seamlessly into the radiator. It's then easy to keep this single cable run out sight, and, unlike most liquid coolers, there's no need to run any cables around the VRM or RAM. The screen is controlled via cables embedded into the mesh-covered tubing, which is thicker than most liquid coolers on the market as a result.
The fans can also be bought separately and daisy-chained together with a dedicated cable-free connector or specially fitted cables. Same goes for the RGB lighting kit, which hooks together via USB-C. The Q60 offers one spare port for both connections, which are called Nexus Link ports, and means it can act as a hub for a heap of other stuff.
It also comes with a six-year warranty, which matches the likes of Corsair and Arctic.
I do end up coming back to the Q60 on looks alone. Though they have to mean a lot to you—not only can be matched by simpler devices but often significantly cheaper ones, too. The Q60 is priced at the tremendous sum of $300 / £330 . With a massive screen attached to the centre of it, I can see why. Though for that much money, and for being so thicc, I'm a bit disappointed it couldn't match a more traditional 240 mm cooler in demanding tests.
Though I'll be damned if it doesn't look good.
Jacob earned his first byline writing for his own tech blog. From there, he graduated to professionally breaking things as hardware writer at PCGamesN, and would go on to run the team as hardware editor. Since then he's joined PC Gamer's top staff as senior hardware editor, where he spends his days reporting on the latest developments in the technology and gaming industries and testing the newest PC components.
Gigabyte A620I AX review
FromSoftware boss addresses gaming industry layoffs: 'As long as this company's my responsibility, I would not let that happen'
Asus agrees to a whole raft of US warranty service improvements after it meets with Gamers Nexus
Most Popular
IMAGES
VIDEO
COMMENTS
Solution 1] Check the Task Manager for high CPU usage. The fan runs faster and the system puts more resources to use when a certain process uses more of system resources and strains the system. 1] Press CTRL+ALT+DEL to open the Security Options menu. 2] Select Task Manager from the list and expand the window to show all processes.
Solution 2: Check Thermal Paste and Heat Sink. Solution 3: Disable Overclocking. Solution 4: Disable Background Processes. Solution 5: Increase RAM. To avoid data loss due to unexpected errors like processor thermal trip error, you'd better make a Windows backup via PC cloning software like MiniTool Partition Wizard.
If you want to fix the processor thermal trip issue on your Windows 11/10 computer, then you should disable CPU overclocking, clean the CPU fan, and power supply fan, check the thermal paste, etc ...
Therefore, it is important to check the thermal paste and heat sink on your processor: 1. Remove the fan by carefully unscrewing the bolts just right above your processor. 2. Apply the cooling agent on top of the processor. 3. Now, screw the fan again in its place. 4.
Step 1: Download CoreTemp from the official website. Step 2: Launch the application and all the information of your processors is involved. Pay attention to the temperature readings. 2. Check the ventilation fans. Keeping the fans running properly is the most essential step in getting your computer to cool down.
Kevin Arrows is a highly experienced and knowledgeable technology specialist with over a decade of industry experience. He holds a Microsoft Certified Technology Specialist (MCTS) certification and has a deep passion for staying up-to-date on the latest tech developments.
A. Check the Fans. Fans are the main part of the cooling system. If the fans stop working, CPU and other components will overheat and cause the processor thermal trip. 1. Shut down your system. Make sure that you have the power switch also turned off. 2. Then, carefully open the rear cabinet. 3.
What is 'Thermal Trip error' in Windows 10/11? In this article, ... To do so, you need to shutdown your computer and open CPU case, clean dust from CPU's fan, memory, RAM and other CPU cabinet portion using a soft cloth and then close the CPU case, and then turn ON your computer and check if the issue is resolved. ...
WARNING : Processor Thermal Trip. Press any key to continue. . . These types of warning messages are always thrown went the CPU of the desktop or laptop's processor gets heated up above its threshold temperature. The reasons why this happened on the Windows system are listed below. Many heavy applications are running simultaneously on any system.
Overheating or thermal issues in an Intel® NUC can cause the following symptoms: The Intel NUC turns off randomly for no apparent reason. Windows blue screen errors (BSOD). Processor thermal trip errors. Temperatures appear too high on the Performance Monitor pane in BIOS Setup. Temperature monitoring software reports high temperatures.
Hello, this is my first post, so excuse the mistakes. My computer is going through processor thermal trip apparently but the temps are near 45-60 degrees on load, I tried changing power options in the settings to balanced,power saver and high performance. High performance used to crash as soon...
Then about a minute later the computer shut itself down. Now everytime I try to boot the computer, it all loads fine but the fan(s) is still going crazy to cool itself down then shuts down. Then if I try to reboot you hear what sounds like an warning alarm then the message comes up: "Warning: Processor Thermal Trip" But nothing else.
Resolution. The Processor Thermal Trip event initially means the processor got so hot that its over-temperature protection was triggered and the system was shut down to prevent damage (qtd. on page# 49 of the System Event Log (SEL) Troubleshooting Guide). If this was a one-time event; if the fans are currently working fine and temperature is normal, proceed clearing the System Event Log and ...
Rather, pushing the power button causes a 1 sec flash of the keyboard backlight and then the computer remains off. This continues as I keep pushing the power button and on the fifth or sixth attempt it turns on and displays a while Pre Boot Systems Check screen that reports that a thermal trip occurred.
There is no threshold for CPU Thermal-trip shutdown. Regardless of whether Thermal Monitor is enabled, in the event of a catastrophic cooling failure, the processor will automatically shut down when the silicon has reached an elevated temperature. At this point, the THERMTRIP_N signal will go active and stay active. ...
Hello all. I've got a two-part puzzler involving Dell Latitude E5470s, Intel drivers (specifically many versions of the Dynamic Platform Thermal Framework), and some hardware swapping. First, the easy test case. We have a 5470 that was deployed and began being shut down by Windows quickly after boot (sometimes before login, sometimes after). Usable access was only by rebooting into Safe Mode ...
Go to "Dell Power Manager" (If you have that installed, otherwise you'll have to edit it in the BIOS - talk to your IT department), select "Cool" under the "Thermal Management" tab, if this doesn't resolve the problem, select "Ultra Performance". We've had to switch all our laptops to "Cool" aside from some where that setting effectively turns ...
Thermal trip is a CPU internal hardware over heat protection. Once the CPU detects the temperature is over the limitation, it will trigger a system shutdown. It is a pure hardware control in the CPU and depends on which CPU you use. IPMI will only monitor this status, once it is triggered it will logged. ...
Need help: WARNING: Processor thermal trip. My pc keeps rebooting, sometimes while using (mostly while playing videos on youtube) , I noticed sometimes when left idle for few mins ,say 10 mins , after that it reboots when started using again. Before restart pc gives away 4 beep sounds , four times and then boots to os .
Restart Your Computer. When your computer is completely frozen and Ctrl + Alt + Del won't work, the next best thing is to hold down the power button and force a shutdown. If you can't shut it down ...
The Hyte Thicc Q60 is smart, good looking and extremely quiet. It delivers exceptional cooling performance in games, too, though does trip up in more demanding thermal tests. PC Gamer's got your ...