How-To Geek
4 ways to open a private safari tab on iphone and ipad.
Hide your activity quickly and easily!

Quick Links
Use the drop-down on safari's toolbar, use the pages button on safari's toolbar, use 3d touch or haptic touch, say a siri command.
Private Browsing mode in Safari lets you view sites without adding anything to your history on your iPhone and iPad. Here are four different ways to open a private tab in Safari when you need it.
When you use a private tab, Safari doesn't store your browsing history, AutoFill your information, suggest recent searches, or save cookies once you close the tab.
With iOS 15 and iPadOS 15 arrived several changes, including how you can use private browsing mode in Safari . That said, there are easier and lesser-known ways to quickly open a private tab in Safari on your iPhone or iPad.
Related: How Private Browsing Works, and Why It Doesn't Offer Complete Privacy
To get started, open Safari on your iPhone or iPad. On the iPhone, tap the "Pages" button (cascading squares icon) in the bottom-right corner.
You'll see a windows or webpages management screen with the grid of thumbnails representing the open tabs. The toolbar at the bottom will show the "Tab Groups" option with a drop-down button next to it. Tap the drop-down button.
Select the "Private" option from the menu that pops up to switch to the private browsing mode.
Select the "+" icon in the bottom-left to open a new private tab. Or tap "Done" in the bottom-left corner if you're opening a private tab for the first time.
On the iPad, you'll need to tap the "Sidebar" option on the upper-left corner.
When the sidebar panel slides open, choose the "Private" option to turn on the private browsing mode and open a new private tab.
Related: How to Always Start Any Browser in Private Browsing Mode
A quick way to open a private tab in Safari is to use the "Pages" button on the bottom toolbar on your iPhone.
Fire up Safari. Long-press or hard-press the "Pages" button (cascading squares icon).
Select the "New Private Tab" option with a hand icon next to it from the menu that pops up.
You'll need to follow the same method on the iPad by tapping the "Pages" button (four squares) in the top-right corner and then select "New Private Tab."
Related: How to Open Chrome's Incognito Mode with a Keyboard Shortcut
You can open a private tab directly from the Safari app icon using the hard-press or long-press gesture powered by 3D Touch or Haptic Touch feature. The 3D Touch is available only on the older (pre-iPhone 11) modes.
Long-press or hard-press the Safari app icon on the homescreen.
Select "New Private Tab" from the menu that pops up.
Follow the same on the iPad.
The iPhone models from iPhone 6s to iPhone X (including XS) support 3D Touch. All iPhone models from iPhone XR and higher support Haptic Touch.
Another neat method to launch a private tab in Safari is to use Siri commands on your iPhone and iPad. This method works if you have the "Listen For 'Hey Siri'" option enabled from the Settings app.
While your iPhone or iPad is unlocked, say "Hey Siri" and ask it to open a private Safari tab. Here's an example of what you can ask Siri:
- Open a private tab in Safari
That's it! Have fun opening the private tab quickly in Safari on iPhone and iPad.
Related: How to Set Up and Use "Hey Siri" on iPhone and iPad
How to use Private Browsing with Safari on iPhone and iPad
Private Browsing is a useful feature built-in to Safari in iOS that limits what information is saved and shared as you browse the web. Let’s look at how to use Private Browsing on iPhone and iPad.
Here’s how Apple describes the feature for iPhone and iPad:
Private Browsing protects your private information and blocks some websites from tracking your search behavior. Safari won’t remember the pages you visit, your search history, or your AutoFill information.
Note: You may notice that some websites won’t function normally when using Private Browsing, so try turning it off if you’re running into issues.
How to use Private Browsing on iPhone and iPad
For iOS 15, read along here for how Private Browsing works
With iOS 14
- Open Safari and tap the two square-icon at the bottom of your screen (if you don’t see the icon, tap near the bottom of the screen)
- Tap Private
- Now tap the + icon to open a new site in a Private window (you’ll also see any existing Safari windows in Private Browsing)
- When you want to use a standard window, head back to the Safari page manager (two-square icon) and tap Private again to turn it off, then tap Done
If you turn on Private Browsing and haven’t used it before or don’t have any open windows this is what you’ll see:

You can quickly tell if you are using Private Browsing as the url/search bar will appear with a dark theme instead of white or gray for standard windows. Also, the white highlight around Private shown above on the right) means it is turned on.
Tap the + symbol at the bottom middle of the screen and start browsing. When you’re finished using Private Browsing, tap the double square-icon and tap Private and Done.
Your open Safari windows in Private Browsing and standard mode will remain open if you go back and forth between them without closing the windows.
Keep in mind that you won’t be able to utilize Handoff between your Private Browsing Safari windows and other Apple devices.
Read more 9to5Mac tutorials:
- How to use the Magic Keyboard shortcuts on the iPad Air and iPad Pro
- 7 tips and tricks for typing faster and more accurately on your iPhone
- iPhone: How to scan directly to iCloud Drive or local storage
- iPhone: How to improve Face ID with a mask, including new Apple Watch Unlock feature
FTC: We use income earning auto affiliate links. More.
Check out 9to5Mac on YouTube for more Apple news:

A collection of tutorials, tips, and tricks from…

Michael is an editor for 9to5Mac. Since joining in 2016 he has written more than 3,000 articles including breaking news, reviews, and detailed comparisons and tutorials.
Michael Potuck's favorite gear

Satechi USB-C Charger (4 ports)
Really useful USB-C + USB-A charger for home/work and travel.

Apple Leather MagSafe Wallet
My slim wallet of choice for iPhone 12

Manage push notifications
- Irresistible Tech Gifts for That Special Dad
- Killer Smartphone Deals We Love
How to Turn Off Private Browsing Mode on iPad
Go public with browsing again
:max_bytes(150000):strip_icc():format(webp)/JenAllen-214879-65542c15d7fa42b6ba2c61cc14c4a8b8.jpg)
- Swansea University, Staffordshire University
:max_bytes(150000):strip_icc():format(webp)/jonfishersquare-93eb80e77a004035887f56816d3623c5.jpg)
- Wichita Technical Institute
What to Know
- Disable private browsing mode: Open Safari > tap tabs button > Private > Tabs to change back.
- You can also open a new non-private Tab by holding down on the Safari icon then tapping New Tab.
This article teaches you how to turn off the private browsing mode on an iPad. It also looks at any limitations with the mode.
How Do I Disable Private Browsing on Safari?
Private browsing on Safari is a useful tool on your iPad and other Apple devices as it blocks websites from tracking your search behavior and your browser remembering what you looked at. However, sometimes you may want to disable it or turn it off so those same functions are restored. Here's how to disable private browsing on Safari.
These instructions refer to iPadOS 15 and above.
On your iPad, tap Safari .
Tap the tabs button in the top right hand corner of the screen.
If you're using your iPad in landscape mode, you may not need to complete this step as the tabs menu can sometimes already be open.
Tap Private .
Tap Tabs at the top of the Tabs Group list to switch back to non-private browsing.
You can now browse in a non-private fashion so cookies and search history can be stored on your iPad.
When you switch back to normal tabs, it does not close the private tabs. If you want to close those so that whoever uses it after you can't see what you were browsing, close the tabs first before going back into regular mode.
How Do I Remove Private Browsing Mode?
It's not possible to permanently remove private browsing mode from your iPad but there are other ways to avoid using it and in an even quicker fashion than before. Here's what to do.
Private browsing is disabled by default on Safari. You need to turn on private browsing to be able to switch it off.
While on your iPad's home screen, hold your finger down on the Safari icon.
When a new menu opens up, tap New Tab .
Safari will now open a new tab for you to use and it won't be one with private browsing enabled.
Why Would I Want Private Browsing?
Private Browsing offers numerous features when browsing online and these are both useful and not so useful, depending on your needs. Here's a brief look at what happens when Private Browsing is enabled.
- The iPad does not keep track of your history. With Private Browsing enabled, it doesn't keep track of the websites you visit or your search history. Retracing your steps is harder but it means maximum security if someone looks at your iPad.
- Safari blocks certain cookies. Safari automatically blocks certain types of cookies from external websites. It already does this to an extent, blocking unwanted trackers, but it does so more so in Private Browsing mode.
- The search/URL bar turns black. When Private Browsing is enabled, the Safari search bar goes black to highlight you have the mode enabled.
- Private Browsing isn't an ultimate fix. If you don't want a website to know the IP address you're browsing from or similar, you need to use something like a VPN rather than rely on Private Browsing.
Unfortunately, History only shows what you've visited in Regular mode. Even if you view your History from Private Mode, only the sites visited in Normal Mode will show.
In Safari, tap the History icon in Safari to open the History list. Then, select Clear at the bottom of the screen to delete it. If you've been using private browsing, you can also clear a window's history by closing it: Select the Tabs button and then tap the X in the upper-right corner of a pane to close it.
Get the Latest Tech News Delivered Every Day
- How to Turn on Private Browsing on Your iPad
- How to Turn On Private Browsing in Safari for iOS
- How to Use Private Browsing on iPhone
- How to Clear Search History on iPhone
- How to Manage History and Browsing Data on iPhone
- How to Manage Your Browsing History in Safari
- How to Check Router History
- How to Turn off Incognito Mode
- How to Activate InPrivate Browsing Mode in IE
- How to Activate InPrivate Browsing Mode in IE 10
- How to Use the Safari Web Browser on iPhone
- How to Turn on Incognito Mode in Chrome, Edge, Firefox, Safari and Opera
- How to Use Safari Extensions on the iPhone, iPad, or iPod Touch
- How to Turn Off Google Location Tracking
- 10 Hidden Features in macOS Sonoma
- Does the iPad Support Multiple Users?
Your Guide to Private Browsing in Safari
Private browsing is often misunderstood, but it can be a helpful feature if you know what’s what.
Quick Links
What private browsing does in safari, how to use safari private browsing on iphone and ipad, how to use safari private browsing on a mac, how to disable safari private browsing on iphone and ipad, how to disable safari private browsing on a mac, key takeaways.
- Private Browsing in Safari hides browsing history, autofill details, downloads, and locks tabs after inactivity.
- Safari on Mac groups private and non-private tabs, while on iPhone it shows all tabs regardless of mode.
- To use Private Browsing in Safari, identify it by a dark address bar, "Private" indicator, or "Private" next to the site URL.
Most browsers offer a private browsing mode that aims to keep the websites you view off the record. But what exactly does it do in Safari and how do you get the best out of it?
First and foremost, Private Browsing keeps the website pages you visit out of your History . The aim is to prevent someone else from seeing which pages you have visited if they have access to your phone or computer.
In Safari, Private Browsing does a lot more than just hide URLs. It also:
- Prevents recent searches from showing up in your history.
- Stops remembering details you enter in forms for autofill.
- Keeps downloaded items from appearing in your Downloads list.
- Locks private tabs after a period of inactivity.
- Adds tracking and fingerprinting protection.
However, it’s important to note that Private Browsing does not stop you from being tracked altogether. Websites you visit will still be able to use various methods to track you, and will still have access to all data that you send them.
On macOS, iOS, and iPadOS, Safari groups private tabs together, and separates them from non-private tabs. On Mac, each Safari window is either private or non-private, and can have as many tabs as you want.
On iPhone, you can switch between private and non-private modes, each of which shows all tabs belonging to that mode.
You can spot when you’re viewing a private tab with these signs:
- The address bar has a dark background. This may be less noticeable if you’re using Dark Mode .
- On Mac, you’ll see a prominent Private indicator in the title bar.
- On iPhone, you’ll see Private alongside the site URL at the bottom of your screen.
The steps to enter Private Browsing mode are nearly identical on an iPhone and iPad. The only difference is that the tab icon is at the bottom of the screen on iOS and the top on iPadOS.
- Long-press the tab icon (two overlapping pages) on the bottom-right (iPhone) or top-right (iPad) of your screen.
- Tap the New Private Tab menu item.
- If locked, enter your passcode to unlock Private Browsing.
You can enter Private Browsing mode on macOS using either a menu item or a keyboard shortcut:
- Open the File menu and choose New Private Window .
- Alternatively, use the keyboard shortcut Shift + Cmd + n .
- Use the browser as you normally would. Any tabs you open from this window will open in the same window, in private mode.
You may want to prevent users of an iPhone or iPad from using Private Browsing mode at all. To do so:
- Open the Settings app.
- Tap on Screen Time .
- Under RESTRICTIONS , click on Content & Privacy Restrictions .
- If not already enabled, press the toggle next to Content & Privacy Restrictions to enable.
- Tap Content Restrictions .
- Change the Web Content setting to Limit Adult Websites .
The option to enter private mode will now be gone.
On macOS, the wording of certain options differs slightly, but the overall process is near-identical to iOS:
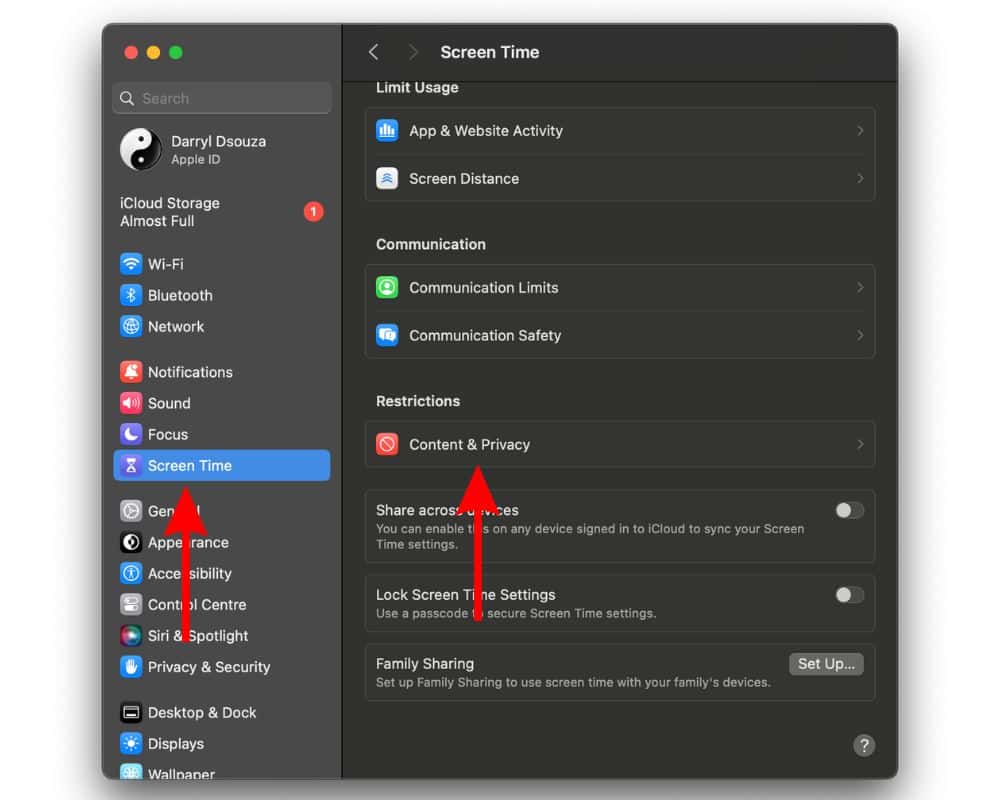
- Open System Settings via the Apple menu.
- Click on Screen Time in the left panel.
- Under the Restrictions section, click on Content & Privacy .
- Click Content Restrictions .
- Change the Access to Web Content setting to Limit Adult Websites .
Private Browsing will now be unavailable in Safari, although any existing private windows will stay open.
Of course, anyone can re-enable Private Browsing using the same process, in reverse. However, you can use Screen Time’s Lock Screen Time Settings option to set a passcode and enforce the setting permanently.
How to Do Private Browsing on Your iPad: A Step-by-Step Guide
Want to keep your browsing history under wraps on your iPad? Private browsing is the way to go. It’s a nifty feature that keeps your online activities away from prying eyes. In just a few taps, you can surf the web without leaving a trace. Ready to learn how? Keep reading to become a private browsing pro on your iPad.
Step by Step Tutorial: Private Browsing on Your iPad
Private browsing on your iPad is like going undercover. It’s perfect for when you want to buy a surprise gift or explore sensitive topics without leaving a digital footprint. Let’s dive into how you can activate this feature.
Step 1: Open Safari
Open the Safari app on your iPad to get started with private browsing. Once you’ve launched Safari, you’re one step closer to private browsing bliss. Safari is the default web browser on iPads, and it’s where all the magic happens.
Step 2: Tap the Tabs icon
Look for the Tabs icon, which looks like two overlapping squares, and tap it. The Tabs icon is your gateway to managing your browsing sessions. It’s where you can switch between normal and private browsing modes.
Step 3: Select ‘Private’
Once the Tabs interface is open, find and select the ‘Private’ option to switch modes. After tapping ‘Private,’ you’ll notice the interface changes to a darker color scheme. This visual cue lets you know that you’re now in private browsing mode.
Step 4: Tap ‘+’ to open a new tab
With private browsing active, tap the ‘+’ button to open a new private tab. When you hit the ‘+’ button, a fresh private tab springs to life, ready for your undercover online adventures.
After completing these steps, your browsing won’t be saved in your history, and cookies won’t track you across the web. It’s like you were never there—digital ghost mode activated!
Tips for Private Browsing on Your iPad
- Remember, private browsing doesn’t make you invisible on the internet. Your internet service provider and websites can still track your activity.
- Private browsing isn’t just for secret shopping—it’s great for logging into accounts on shared devices without leaving your info behind.
- When you’re done with a private session, close all private tabs to ensure the next person using the iPad doesn’t stumble upon your activity.
- Private browsing can also help with troubleshooting website issues, as it doesn’t use cached data.
- If you’re a fan of shortcuts, holding down the Tabs icon gives you a quick option to jump straight into private browsing.
Frequently Asked Questions
Does private browsing on my ipad hide my activity from everyone.
Private browsing on your iPad keeps your activity hidden from other users of your device, but it doesn’t make you completely anonymous online.
Can I set Safari to always open in private browsing mode?
Unfortunately, Safari on the iPad doesn’t have an option to always open in private browsing mode. You’ll have to switch manually each time.
Will private browsing protect me from malware and viruses?
Private browsing doesn’t protect you from malware or viruses. It’s essential to use reliable security software for that.
Can I use bookmarks in private browsing mode?
Yes, you can use bookmarks in private browsing mode, but remember that adding new bookmarks will be saved and visible outside of private browsing.
Does private browsing affect my auto-fill information?
Private browsing doesn’t save auto-fill information during your session, so you’ll have to enter details manually each time.
- Open Safari on your iPad.
- Tap the Tabs icon.
- Select ‘Private’ to switch modes.
- Tap ‘+’ to open a new private tab.
Private browsing on your iPad serves as your personal cloak of invisibility in the digital world. It’s a simple yet effective tool for maintaining your privacy while browsing the web. Whether you’re planning a surprise or you’re just conscious about your digital footprint, knowing how to go incognito with private browsing can come in handy.
Remember, while private browsing can keep your local browsing history clean, it’s not a silver bullet for online anonymity. Be mindful of other ways your online activity can be tracked and consider additional privacy measures if necessary.
Now that you’re equipped with the knowledge of private browsing on your iPad, it’s time to put it into practice. Enjoy the freedom and peace of mind that comes with a more private browsing experience. And if you ever find yourself needing a refresher, this article will always be here to guide you through the steps. Happy browsing!

Matt Jacobs has been working as an IT consultant for small businesses since receiving his Master’s degree in 2003. While he still does some consulting work, his primary focus now is on creating technology support content for SupportYourTech.com.
His work can be found on many websites and focuses on topics such as Microsoft Office, Apple devices, Android devices, Photoshop, and more.
Share this:
- Click to share on Twitter (Opens in new window)
- Click to share on Facebook (Opens in new window)
Related Posts
- How to Close All Private Tabs on iPhone: A Step-by-Step Guide
- How to Use Private Browsing on the iPhone 5: A Step-by-Step Guide
- Why Can’t I Create a Private Browsing Tab in Safari on iPhone?
- How to Exit Private Browsing on an iPhone 12: A Step-by-Step Guide
- How to Close All Private Tabs on iPhone: Step-by-Step Guide
- How to Turn Off Private Browsing on the iPhone 5: A Step-by-Step Guide
- How Can I Tell If I Am In Private Browsing Mode on iPhone?
- How to Do Private Browsing on iPhone 15: A Step-by-Step Guide
- How to Enable Firefox Private Browsing on iPhone: A Step-by-Step Guide
- iOS 17: How to Close All Private Tabs on iPhone Quickly
- How to Start a Private Browsing Session in iOS 17 on Your iPhone
- How to Delete Tabs on iPhone 14
- How to Return to Private Browsing in iOS 17: A Step-by-Step Guide
- How to Clear Browsing History on iPhone 14
- How to View Safari History on iPhone
- How to Put an iPad in Sleep Mode: Quick and Easy Steps
- iPhone Guide: How to Close All Safari Tabs
- iPhone 15: How to Clear Safari History in Just a Few Steps
- How to Close All iPhone 14 Tabs
- How to Close All Open Tabs at Once in Safari on iPhone 12
Get Our Free Newsletter
How-to guides and tech deals
You may opt out at any time. Read our Privacy Policy
How to Turn Off Private Browsing Mode on Your iPad: A Step-by-Step Guide
Turning off private browsing mode on an Apple iPad is a straightforward process. Simply open Safari, tap the tabs icon in the bottom right corner, and then tap “Private” to turn off private browsing. This will return you to regular browsing mode where your search history and website data will be saved.
After completing this action, your iPad will no longer be in private browsing mode. This means that any websites you visit or searches you perform will be saved in your browser history, and website data such as cookies will be stored on your device.
Introduction
The internet is a vast and amazing place filled with endless information and entertainment. But sometimes, we want to keep our browsing history private, whether it’s to surprise someone with a gift or for personal reasons. That’s where private browsing mode comes in handy, especially on an Apple iPad. But what happens when you’re done browsing privately and want to switch back to regular mode? Knowing how to turn off private browsing mode on your iPad is just as important as knowing how to turn it on.
This topic is particularly relevant for those who share their iPad with others and want to maintain some level of privacy. It’s also crucial for parents who want to monitor their children’s internet usage or for anyone who simply prefers to keep their browsing history visible. Whether you’re a tech-savvy individual or someone who’s still getting the hang of their iPad, understanding how to manage private browsing is an essential skill.
Step by Step Tutorial: Turning off Private Browsing Mode on an Apple iPad
Before we dive into the steps, let’s talk about what we’ll achieve here. Following these steps will take your iPad out of private browsing mode, allowing your browser to keep track of your history and website data.
Step 1: Open Safari
Open the Safari app on your iPad.
Safari is the default web browser for Apple devices, and it’s where private browsing mode is accessed. Make sure you’re starting from the Safari app to follow these steps correctly.
Step 2: Tap the Tabs Icon
Tap on the tabs icon in the bottom right corner of the screen.
The tabs icon looks like two squares stacked on top of each other. Tapping this will show you all your open tabs.
Step 3: Turn Off Private Browsing
Tap “Private” to turn off private browsing mode.
You’ll see the “Private” button in the bottom left corner of the screen, next to the “+” button. If it’s highlighted, you’re in private browsing mode. Tapping it will take you back to regular browsing.
Additional Information
Beyond simply turning off private browsing mode, it’s essential to understand the implications of browsing in regular mode. For instance, your iPad will now save cookies, which can be useful for staying logged in on websites or preserving website preferences, but it also means advertisers can track your behavior across sites. It might be a good idea to clear your cookies and history regularly to maintain some privacy while not in private mode.
Furthermore, private mode can be helpful for secure browsing when using public Wi-Fi networks, as it can reduce the risk of your data being intercepted. But once you’re back on a secure network, turning private browsing off will allow for a more personalized and convenient browsing experience.
Lastly, it’s worth noting that turning off private browsing doesn’t mean you can’t maintain some level of privacy. You can still use content blockers and privacy settings to control what data is stored and who can track your online activity.
- Open Safari
- Tap the tabs icon
- Turn off private browsing
Frequently Asked Questions
Will turning off private browsing mode delete my private tabs.
No, turning off private browsing mode won’t delete your private tabs. They will remain open, but any further browsing won’t be private.
Can I turn private browsing on and off as needed?
Yes, you can switch between private and regular browsing modes as needed.
Do I need to close Safari to turn off private browsing?
No, you don’t need to close the app; simply follow the steps outlined above.
Will disabling private browsing affect my saved passwords?
No, saved passwords are stored separately and won’t be affected by switching browsing modes.
Can private browsing be permanently disabled?
No, private browsing is a feature that can be turned on and off but can’t be permanently disabled.
Understanding how to turn off private browsing mode on an Apple iPad is crucial for anyone who values their privacy but also wants to take full advantage of their device’s capabilities. While private browsing has its place, turning it off when it’s no longer needed allows for a more connected and personalized browsing experience.
Remember, managing your privacy is about finding the right balance between convenience and security, and knowing how to switch between browsing modes is a key part of that balance. So, go ahead and enjoy your iPad to the fullest – both privately and publicly!

Matthew Burleigh has been writing tech tutorials since 2008. His writing has appeared on dozens of different websites and been read over 50 million times.
After receiving his Bachelor’s and Master’s degrees in Computer Science he spent several years working in IT management for small businesses. However, he now works full time writing content online and creating websites.
His main writing topics include iPhones, Microsoft Office, Google Apps, Android, and Photoshop, but he has also written about many other tech topics as well.
Read his full bio here.
Share this:
Join our free newsletter.
Featured guides and deals
You may opt out at any time. Read our Privacy Policy
Related posts:
- Safari History iPhone: How to See It [2023 Guide]
- Why Can’t I Create a Private Browsing Tab in Safari on My iPhone?
- How to Do Private Browsing on iPhone 15: A Step-by-Step Guide
- How to Get Out of Incognito Mode on iPhone 14
- 15 Ways to Fix Safari Not Working on iPhone in 2023
- iOS 17: How to Close All Private Tabs on iPhone Quickly
- Can I Quickly Close All of My Private Tabs in Safari on My iPhone?
- How to Turn On Private Browsing on iPhone 13
- How to Close All Private Tabs on iPhone 13
- How to Go Incognito in YouTube on an iPhone
- How to Delete YouTube History on iPad
- How to Clear History in Firefox on iPhone: A Simple Guide
- How to Delete History on iPhone 14: A Step-by-Step Guide
- How to Clear History on iPhone 14
- 15 iPhone Settings You Might Want to Change
- How to Silence Apple Watch
- iPhone 15: How to Clear Safari History Quickly and Easily
- How to Do Private Browsing on Your iPad 2
- How to Do Private Browsing on iPhone 14
- iPhone 14 – How to Clear Browsing History
VPNoverview.com Privacy Anonymous Browsing Everything You Need to Know About Safari Private Browsing
Everything You Need to Know About Safari Private Browsing
Ever wondered what Safari Private Browsing does exactly? Chances are it might not be giving you the level of online privacy you expect. Safari Private Browsing does have some perks, including:
- Stopping Safari from remembering the websites you’ve visited
- Not storing any new usernames, passwords, payments cards, and other information you input into private browsing
- Forgetting any search engine queries you’ve run
- Allowing you to save money by avoiding marketing cookies that might inflate prices
However, this is pretty much all the privacy that you’ll get with Safari Private Browsing. This incognito mode won’t cloak your IP address, encrypt your internet traffic, or make you safe on public Wi-Fi . Private browsing still leaves you pretty exposed to a lot of the risks that come with connecting to the internet.
For true online anonymity, you’ll need to use a VPN to change your IP address . We’re big fans of ExpressVPN, one of the fastest VPNs in the industry.
Below, you’ll find more information on how to use Safari Private Browsing on all your Apple devices, as well as more details on how this incognito mode does and doesn’t protect your privacy.
If you use a Mac, iPhone, or iPad, then chances are you’ve encountered Safari Private Browsing before. Whether you’re shopping for a partner’s gift or want to snoop on a long-lost colleague’s LinkedIn, there are many reasons why you might want to use private mode in Safari.
In this article, we answer the question, what is Safari Private Browsing ? We’ll also tell you what this handy tool can’t do to save you any embarrassment or risk to your online security.
What is Safari Private Browsing?
There’s a little more to this method of browsing than meets the eye, but we’ll go into specifics further down in this article. The point is, for a more private experience, you can use Safari’s incognito mode . You’ll be logged out of all accounts, and Safari won’t autofill user logins, passwords, or payment information. When you turn on private browsing, Safari won’t remember :
- Your search engine history
- Webpages you’ve visited
- Browsing activity or history
You should, however, be aware of a major drawback of this tool on Macs: your browsing activity likely isn’t as hidden as you might think. Websites you visit can still see who you are and what you’re doing . You can read more about this in our general incognito mode article .
With Macs, Private Browsing information is logged in a different place, as well: your Terminal archive.
Beware the Mac Terminal archive
On Macs, there’s something called the Terminal archive , and it’s as scary as it sounds — well, for fans of privacy at least. It’s a treasure trove for snoops. The Terminal archive contains all of the websites you visit , whether you’re using Safari Private Browsing or not. This is because your Mac stores static images and other files when you visit a website for the first time. This makes future visits to these sites and page loading much faster, as your Mac pulls the relevant files from the Terminal archive.
This command-line function also lets you make systemic changes to your Mac . For most users, there’ll never be a need to make any changes in the Terminal archive, and you shouldn’t if you don’t know what you’re doing. You could end up breaking something critical in your computer’s operating system if you tinker with the Terminal.

However, it is good to know that, even when you’re using Safari’s Private Browsing mode, your online activity is logged here.
Make your Safari Private Browsing truly private
By now, you might be asking yourself: how do I clear the cache on my Mac? Well, today’s your lucky day. Below, you’ll find a brief, step-by-step guide to clearing the cache on a Mac . Just make sure not to do anything else while inside the Terminal.
- Open “ Finder ,” then search for “ Terminal ” in the search bar.
- Run the Terminal application.
- Paste the following text into the Terminal and hit enter: sudo killall -HUP mDNSResponder
You may have to enter your Admin password to proceed. This is going to flush the DNS cache.
Remember that you shouldn’t do anything else inside of the Terminal application unless you know what you’re doing. It only takes a short command to nuke files or entire directories in this app forever! So, tread carefully.
Why You Should Use Safari Private Browsing on Macs and iOS
We can hypothesize all we want, but you’ve probably got a good idea of why you use private browsing. According to a 2018 research study , the most common reason people use private browsing is so others that are using a shared device can’t see what they’re doing. This comes down to protecting two things from other users of your device:
- Their personal data
- Their browsing activity
Fortunately, these are two things that Safari Private Mode manages to do wonderfully. Below, you can read more about what else Safari Private Browsing does for you .
Online privacy
- Your browser won’t remember what websites you’ve visited. Anything you browse while you’re in private browsing mode won’t be remembered by Safari. So, if you start shopping online for gifts or a product that you find embarrassing, you won’t usually have to worry about your friends or family coming across your browsing history.
- Safari won’t suggest usernames, passwords, credit card numbers, and so on. You’ve probably noticed that Safari can remember usernames, passwords, credit cards, and other information when you use it for the first time. If you tell your Mac, smartphone, or tablet to remember those details, they’ll be automatically filled in the next time you visit the website. With Safari Private Mode enabled, these kinds of details won’t be stored: you won’t be prompted to save or autofill them at all.
- Your search engine queries won’t be remembered . If you’ve been shopping for gifts or trying to self-diagnose, you probably don’t want other users of the computer to see what you’ve searched for . Normally, you’ll see suggested searches popping up in search engines like Google. Based on your past searches and clicks, some links might be colored purple instead of blue, too. In private browsing mode, these won’t appear, nor will any new searches be stored.
How to pay less with Safari Private Browsing
There’s more to private mode options than just online security. You could also save money with Safari Private Browsing, as you won’t be quoted higher prices for products you’ve already viewed. When you visit a website, cookies (small text files) are stored on your computer by your browser.
These kinds of cookies aren’t delicious or rewarding at all. Instead, they allow the site to track you and figure out that you’re interested in, for example, a particular holiday destination. This can result in you seeing higher airfares, hotel booking fees, and more. Just turn on Safari’s Private Browsing to s top cookies from being stored on your browser and avoid hiked prices.
How to Go Incognito on Safari
Safari Private Browsing on a Mac
Using Safari Private Browsing on a Mac is simple. If you’re reading this on a Mac, you can skip step one in our step-by-step guide below:
- Open Safari on your Mac.
- Click on “ File ” in the menu bar at the top of the screen.
- Select “ New Private Window .” This will open a new private tab, but you can open as many private tabs in your tab bar as you need.

It’s that simple. Now, any new tab you open within this new private browsing window will be a private browsing tab. Give it a whirl by opening some new private tabs and navigating to a website you frequently log into. You’ll notice that your username and password aren’t suggested for autofill as they usually would be .
Also, you’ll know that you’re in private browsing, as the URL bar will have a gray background rather than the usual white. Just remember to ignore or close your existing browser window if you had any open. If in doubt, check the background color of the URL bar.
Finally, to turn off private browsing in Safari , simply click the red cross in the corner of the browser window as you usually would.
Safari Private Browsing on an iPhone
Using Safari’s private browsing mode on an iPhone or iPad is fairly straightforward and could increase your privacy on an iPhone . If you’re running iOS 14 or earlier , simply follow the steps below:
- Open Safari on your phone.
- Tap on the “ Tabs ” button. That’s the two small squares in the bottom-right corner of your Safari window on iPhone.
- A new option called “Private” should appear.
- Tap “ Private ” and you’ll be taken to a blank screen confirming that you’re using Private Browsing Mode . You’ll notice that it’s using the same gray color scheme as Safari for Mac.
- Lastly, click on the small “ + ” (plus) icon to launch a private browsing window.

If you’re using Apple’s latest iPhone update, iOS 15.1.1 , you’ll need to follow a slightly different (and hey, we’ll say it — more confusing) set of steps:
- Tap on the “ Tabs ” button.
- Tap where it says “ X Tab(s) ” – this number will reflect the number of windows you have open.
- Tap “ Private .”
- Now, you’re in Private Browsing mode and can click the small “ + ” (plus) icon to launch a new private window.

Again, turning off private browsing in Safari for iPhones or iPads is simple. Just press the same “ Private ” button that you used to enable the feature. Don’t forget, if you have multiple private tabs open, they won’t close automatically. Swipe each tab closed before you exit private mode if you want to leave no trace.
How to Set Safari Private Browsing as the Default
If you’d rather always browse privately, you can also set Safari Private Browsing as your default, so that it opens automatically whenever you open a new tab or window. Check out the step-by-step instructions below for a Mac :
- Make sure your active application is Safari, then select “ Safari ” from your Mac’s toolbar at the top of your screen. Click on “ Preferences ” next, which can also be accessed using the keyboard shortcut “ Command ” + “ , ” (that’s Command, plus a comma).
- Now, you should see the Privacy window for Safari. Click on the “ General ” tab.
- Next to “Safari opens with”, select “ A new private window ” from the drop-down list.
While you can’t automatically use Safari Private Browsing by default on mobile , there are some options for minimizing what’s remembered, stored, or recommended. Here’s how you get there:
- Open the “ Settings ” application.
- Scroll down until you see “ Safari ” and tap on that option.
Now, you’ll have the choice to use a number of features. You can:
- Disable search engine suggestions
- Disable Safari suggestions specifically
- Turn off autofill for Safari , either for personal information, payment information, or both
- Disable “ Favorites “, which you can save in your Safari app’s home screen
- Turn off “ Frequently Visited Sites “, which appear below your favorites
In this menu, you can also prevent cross-site tracking and block all cookies on the websites that you visit. In the event that you forget to launch Safari Private Browsing, these options should give you at least a little more privacy whenever you go online.
Is Safari Private Browsing Safe?
That last risk is surprisingly common on public Wi-Fi networks too. Bear in mind that private browsing doesn’t protect you against malware (malicious software) either, nor does it protect your payment information or other personal details . For true online anonymity and to improve your online security , you should give serious thought to using a VPN (Virtual Private Network) .
How to use a VPN with Safari Private Browsing
Using a VPN along with Safari Private Browsing should give you the online security you’re looking for. In addition to avoiding any logged browsing history or search history , you’ll be much harder to track and enjoy greater online anonymity. You can check out the many advantages of a VPN for more information. Want to get started right away? The following steps will only take a few minutes of your time:
- Choose a VPN provider and create an account. We recommend checking out our list of the best VPNs if this is new ground for you. Alternatively, ExpressVPN is a market-leading VPN provider that we’re always happy to recommend.
- Download and install the VPN software onto your Mac. You can also download ExpressVPN for mobile on your iPhone. Other premium providers like NordVPN, CyberGhost, and Surfshark all offer really slick mobile apps for iOS, too.
- Log into your account , either in the desktop software or the mobile app.
- Choose a VPN server in a country of your choice. If you’re purely interested in online security, then the location you choose isn’t too important (though some will be faster than others). However, if you want to save money on subscriptions , for example, you should give it some more thought.
- Connect to the VPN server . When you connect, you’ll be changing your IP address to mirror the VPN server’s IP. It’s safe, legal ( in most countries ), and best of all, it’ll give you far greater online security than simply using Safari Private Browsing alone.
Safari Private Browsing is perfect for hiding those Christmas or birthday purchases from your family before the big day. It’s also a great way to save money on flights, hotels , or other purchases. However, it won’t do much for your online security. If you want truly private browsing , then use a VPN along with Safari private mode.
Interested in exploring other private browsers? Check out these articles below:
- How Anonymous Is DuckDuckGo?
- Is Vivaldi Browser Safe?
- How to Set Up Firefox as an Anonymous Browser
Do you want to know how to enable private browsing on Safari? Are you wondering how much privacy Safari Private Browsing actually gives you? You’ll find these answers and more in our frequently asked questions below.
To turn on Private Browsing in Safari for Mac, follow these simple steps:
- Make sure Safari is the active application that you’re using.
- Click on File in the menu bar along the top of the screen.
- Click on New Private Window to switch to private browsing mode.
To turn on Private Browsing in Safari for iPhone or iPad, the process is much the same:
- Open the Safari application.
- Tap on the Tabs icon (the two small squares in the lower-right corner of your screen).
- Tap on Private to switch to private browsing.
- Click on the small + (plus) icon to open a new private browsing tab.
Check out our full article for more information on Safari Private Browsing.
No. Safari Private Browsing, like any browser’s private mode, won’t protect you against a lot of online threats. Your IP address will still be visible to many third-party individuals and organizations. For example, your ISP will know what websites you’ve visited, and hackers could determine your location using your IP (though some private modes do limit location tracking). For true online privacy and anonymity, you’re safer using a VPN like ExpressVPN .
With Private Browsing, it’s more difficult for websites to track you, since cookies are cleared the moment you close the browser — but it’s not impossible. Your ISP (Internet Service Provider), employer, school, or college could still see your internet history . That is, unless you use a VPN along with the incognito mode.
Yes. The owner of an internet connection can absolutely check up on your browsing session if they have the right technical knowledge. Some routers can be set up to remember all URLs a device accesses. So, if you’re trying to fly under your parents’ radar, for example, they could potentially bust you using the family router, even if you’re exclusively using private browsing modes.
For true anonymity , you’ll want to use a VPN. With a VPN connection, all of your internet traffic is encrypted, which gives you far better anonymity and privacy than using private browsing on its own.

Chris Bluvshtein Author
Senior journalist.
Chris is a tech journalist with many years’ experience covering online privacy and cybersecurity. He’s also a published author and works as a Product Manager for some of the most innovative software development companies.
Share this article
More articles from the anonymous browsing section.

Kanary Review (2024): A Cheap and Secure Data Removal Service

OneRep Review (2024): Can OneRep Protect Your Private Data?

The Best Data Removal Services (Personal Information Removal Made Easy)
Hi Chris , I’m finding while using private mode in safari my sound is being cut out and I have not been able to find a way to reconnect it. I use it on a iPad with a vpn and trend anti spam for protection as much as it can in private mode. I have not been able to find any reason as to why this is happening.
Hey Wayne, I've done a bit of digging, and I've found something that might be worth a try. It seems that recent versions of Safari have a built-in feature that can prevent audio from playing when you visit a website; it's enabled by default too. Give this a try and let me know if the issue goes away: 1. Open the Safari menu and click preferences 2. Click on the websites tab 3. Look for the setting: "When visiting other websites", which has a drop-down selection beside it 4. Change this setting so that it allows websites with media to play sound. You can alternatively add individual websites to this list if you'd rather have control over which ones can play sound by default.
Hi Chris Just tried your Terminal Commands, I am running macOS Monterey The Terminal Commands Below are not working dscacheutil -cachedump -entries Host dscacheutil -flushcache
You're right. Thank you for pointing it out to us! There is a new terminal command you'll now need instead: "sudo killall -HUP mDNSResponder". We've adjusted the article to reflect this. Hope this helps!
Looking for a VPN?
Take a look at our overview of the most trustworthy, fast, and safe VPN services. Extensively tested by our experts.

- a. Send us an email
- b. Anonymous form
- Buyer's Guide
- Upcoming Products
- Tips / Contact Us
- Podcast Instagram Facebook Twitter Mastodon YouTube Notifications RSS Newsletter
How to Use Safari's Private Browsing Mode
This article explains how to use Safari's Private Browsing mode, which prevents your browsing history from being logged on your Apple devices. It's a useful feature if you're buying gifts online for friends or family, for instance, and you don't want anyone with access to your devices to find out what you're up to.
Using Safari's Private Browsing Mode
Enabling Private Browsing limits Safari in three important ways: It prevents the browser from creating a history of the pages you visit, it stops AutoFill information like website usernames and passwords from being remembered, and any tabs you open won't be stored in iCloud .
Also, for added peace of mind when you browse privately, Safari automatically prevents cross-site tracking , and requests that sites and third-party content providers don't track you as a rule. Additionally, the privacy mode stops sites from modifying any information stored on your iOS device, and deletes cookies when you close the associated tab.
To enable Private Browsing in Safari, follow these steps.
- Open Safari on your iPhone or iPad , tap the Pages icon (consisting of two squares) to bring up the open tabs view, and then tap the profile icon, centered at the bottom of the screen.
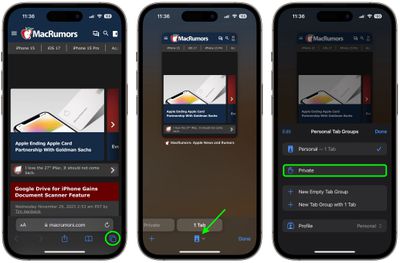
- When you're done browsing, return to the open tabs view, individually swipe any open tabs to close them if you wish.
- Tap the profile icon again, then choose your regular profile at the top. Your private browsing session is now cleared from memory.
Clearing Existing Browsing History
When you clear your browsing history on a device running iOS 11 or higher, the same logs are cleared on any other devices signed into your iCloud account. The following methods also clear all cookies and web data on the device you're currently using, although AutoFill information remains unchanged.
The first method outlined below allows you to either limit the clearing of history, cookies and website data to a specific timeframe, or to delete your existing web history altogether.
- Open Safari and with a tab open, tap the Bookmarks icon (the open book) located at the bottom of the screen.
- Tap the tab at the top of the screen with a clock symbol, and you'll see a history of your browsing activity.
- To remove instances of recorded visits to specific web pages, swipe leftwards across individual logs in the list and tap the red delete button that appears.
- To delete the entire browsing history list, tap Clear .
- Choose the timeframe to clear ( Last hour , Today , Today and yesterday , or All history ), choose the profile or select All Profiles , then tap Clear History .
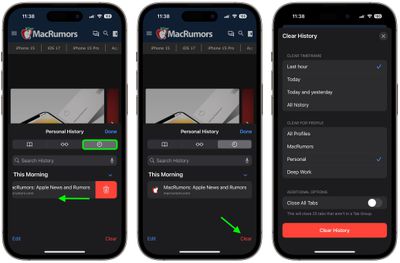
The second method of wiping your browsing history might be considered the 'nuke' option, since it clears all history, cookies and website data on that device, regardless of when the sites were accessed.
- Open the Settings app and scroll down to Safari in the list.
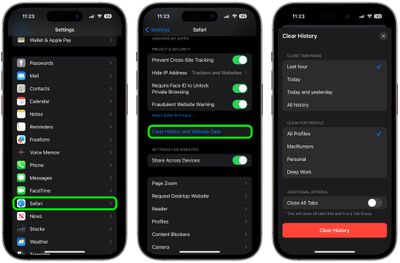
And that's it. Note that these built-in Safari features only make you safer from discovery by other people in the same household.
If your privacy concerns extend to a desire for enhanced security and anonymity online, consider subscribing to a Virtual Private Network (VPN) service that offers an iOS client or supports OpenVPN ( Private Internet Access and ProtonVPN are two popular options), and using a Tor-powered browser for iOS .
Get weekly top MacRumors stories in your inbox.
Top Rated Comments
This article explains how to use Safari's Private Browsing mode, which prevents your browsing history from being logged on your Apple devices. It's a useful feature if you're buying gifts online for friends or family, for instance, and you don't want anyone with access to your devices to find out what you're up to.
I can really use this info, because I’m always “buying gifts”. ;) :cool:

Popular Stories

Some AT&T, T-Mobile and Verizon Customers Report Issues With Calls [Update: Fixed]

iOS 18: These iPhones Likely Won't Support Some AI Features

Sonos Ace Headphones vs. AirPods Max

Revealed: Complete iPhone 16 Pro and iPhone 16 Pro Max Dimensions

iOS 18 Beta Available Next Week With These 25 New Features Expected
iPhone 16 Pro Could Break Record for Thinnest Bezels on a Smartphone
Next article.
Our comprehensive guide highlighting every major new addition in iOS 17, plus how-tos that walk you through using the new features.

Apple News+ improvements, cross-platform tracker alerts, website app downloads for the EU, and more.

Get the most out your iPhone 15 with our complete guide to all the new features.
A deep dive into new features in macOS Sonoma, big and small.

Apple's annual Worldwide Developers Conference will kick off with a keynote on June 10.

Expected to see new AI-focused features and more. Preview coming at WWDC in June with public release in September.

AI-focused improvements, new features for Calculator and Notes, and more.
Action button expands to all models, new Capture button, camera improvements, and more.
Other Stories

10 hours ago by Tim Hardwick

11 hours ago by Tim Hardwick

2 days ago by Tim Hardwick

6 days ago by MacRumors Staff

2 weeks ago by Tim Hardwick
Fix: Private Browsing Greyed Out in Safari on iPhone, iPad and Mac
Is the Private Browsing Mode not working in Safari? This feature allows you to browse the internet without saving any history or syncing any browsing details with other devices, and it doesn’t even try to save AutoFill information. It is a great way to protect one’s privacy. Here’s how to make it work once again.
If you’re using Safari Private Browsing to hide your online activity, you should know that it can’t hide your search history because the DNS cache will store all your online searches. Because of that, we suggest a VPN like ExpressVPN to keep your online activity private with next-level encryption. Thus, your browsing usage will be impenetrable by third parties.
➡️ Get ExpressVPN
How to Use Private Browsing in Safari on iPhone, iPad, and Mac
Some users aren’t aware of the steps to navigate to the Private Browsing Mode in Safari and think that the feature isn’t available or not working. So, before we get into the fixes, let me run you through the steps to use the Private Browsing Mode in Safari.
Steps to open a Private Browsing Window in Safari on iPhone or iPad.
- Open Safari browser on your iPhone or iPad.
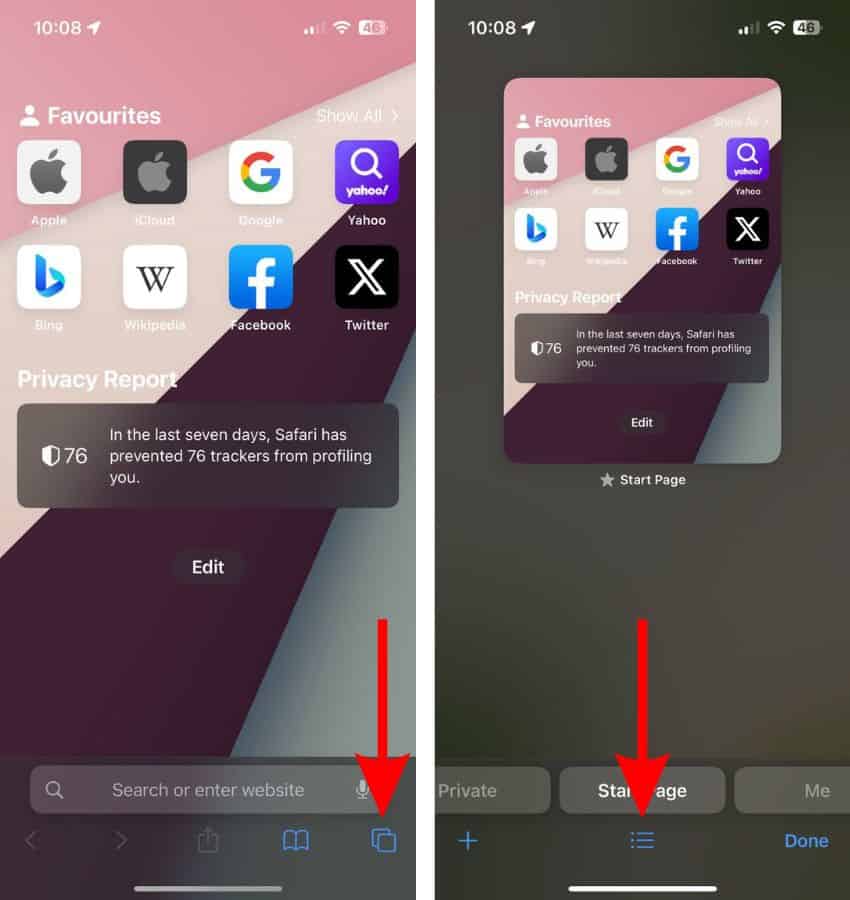
- Now, tap the “ Tab Groups ” button at the bottom.
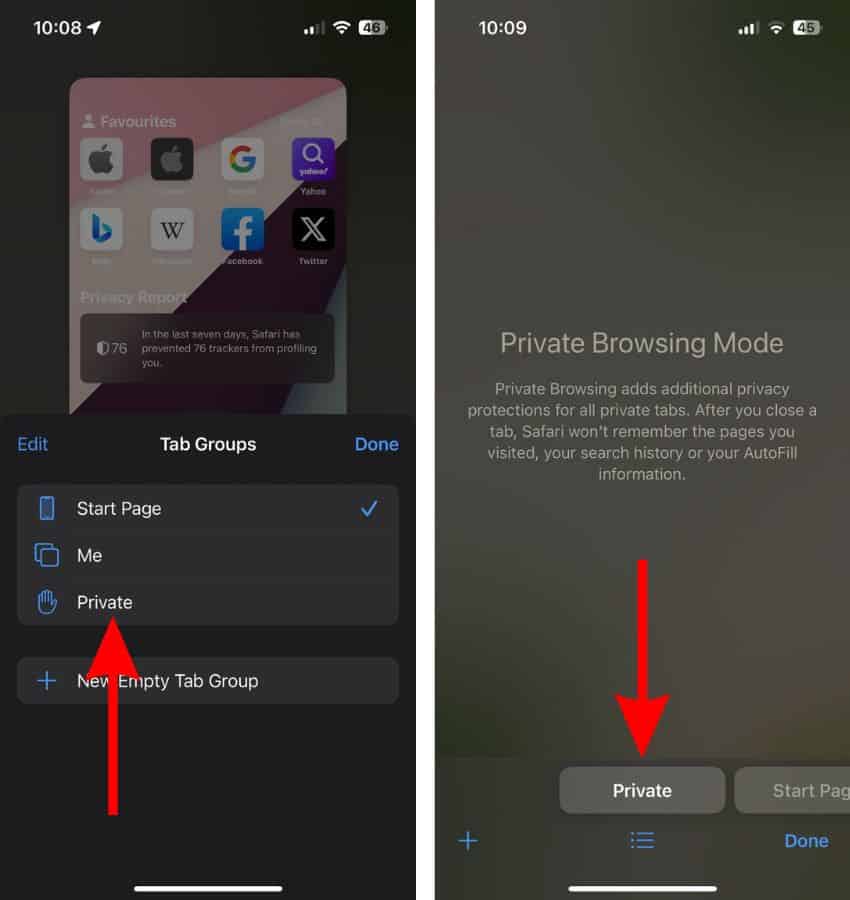
- Here, tap the + icon (Plus) to add tabs and use the Private Browsing Mode. Alternatively, you could also swipe right or tap the Private tab located at the bottom left corner.
Steps to open a Private Browsing Window in Safari on Mac.
- Open Safari on your Mac.
- Click the File option in the menu bar.
- Select the New Private Window option from the list and use Private Browsing Mode in Safari on Mac.
How to Fix Private Browsing Not Working in Safari on iPhone, iPad, Mac
Following the aforementioned steps, we’re certain that you are fully aware of the steps to access the Private Browsing Mode in Safari. But, if you still can’t access Safari even after knowing the steps, it means there’s something wrong.
Therefore, if the Private tab is grayed out or not working at all, here are some of the most effective troubleshooting methods that can help fix the Private Browsing Mode issues in Safari on iPhone, iPad, or Mac.
1. Remove Content Restrictions on Web Content
Enabling Content Restrictions for the Web Content section in the Screen Time Settings leads to the removal of the Private Browsing Mode button from Safari. If you’ve recently made this change, or have accidentally set restrictions for web content, here’s how to change these settings and retrieve the Private Browsing Mode.
Time needed: 2 minutes
Steps to remove Content Restrictions from the Web Content section in Screen Time Settings on iPhone or iPad.
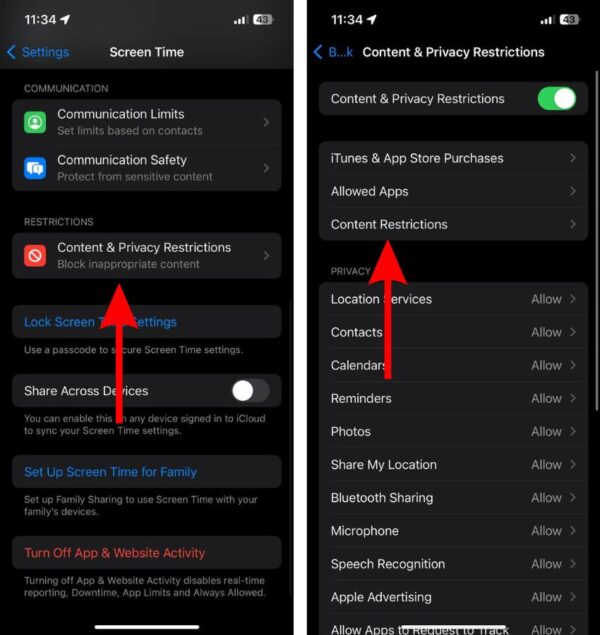
Remove Content Restrictions from the Web Content section in Screen Time Settings on Mac
- Click the Apple logo at the top left corner and click the System Settings… option.
2. Update Safari Browser to Fix Private Browsing Not Working in Safari
If removing restrictions didn’t resolve the issue, software bugs in the Safari browser might be the reason why Private Browsing Mode has disappeared from your device. Since Safari is the native browser, you cannot manually update it from the App Store. It receives updates with software updates. Moreover, updating the software can also get rid of other bugs or glitches within the software that might be causing this issue.
Update iOS or iPadOS to the latest version
- Open Settings on your iPhone or iPad and head to the General option.
- Select the Software Update option.
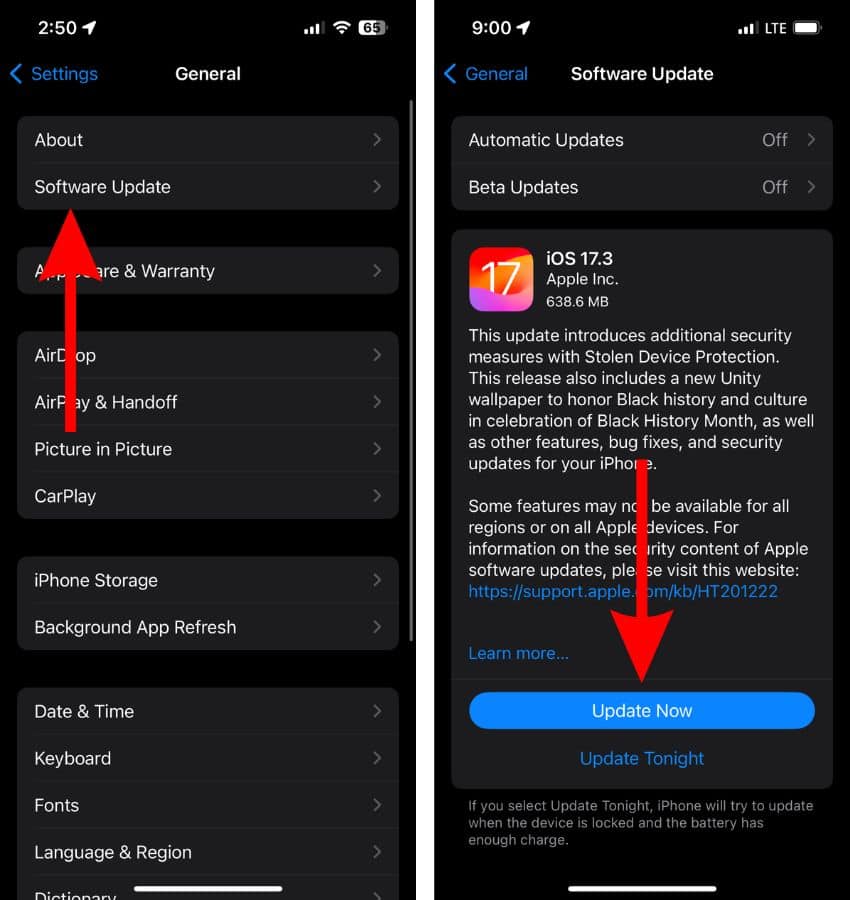
- Enter your device’s passcode to continue.
Update macOS to the latest version
- Click the Apple logo at the top right corner of the menu bar and select the System Settings… option.
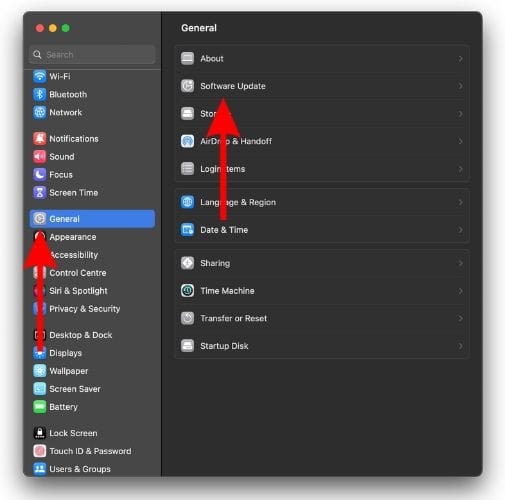
- Then click the Agree button after you’ve read the terms to update macOS to the latest version.
- Enter your Mac’s password and then click the OK button.
3. Restart iPhone, iPad, Mac to fix Private Browsing not working in Safari
Restarting the device helps resolve most temporary software bugs and glitches and you will always find it in troubleshooting guides. If you’ve tried all the steps mentioned above and cannot access your device’s Private Browsing Mode in Safari, a quick restart might fix the issue. Especially because all the services running on your iPhone, iPad, and Mac restart alongside your device.
Moreover, even the settings you’ve just changed will be applied if they haven’t already. So go ahead and restart your iPhone, iPad, or Mac and it might fix the Private Browsing greyed out in Safari issue.
Restart iPhone and iPad without a Home Button
- Press and hold the side button and either volume button until the slide to power off slider appears.
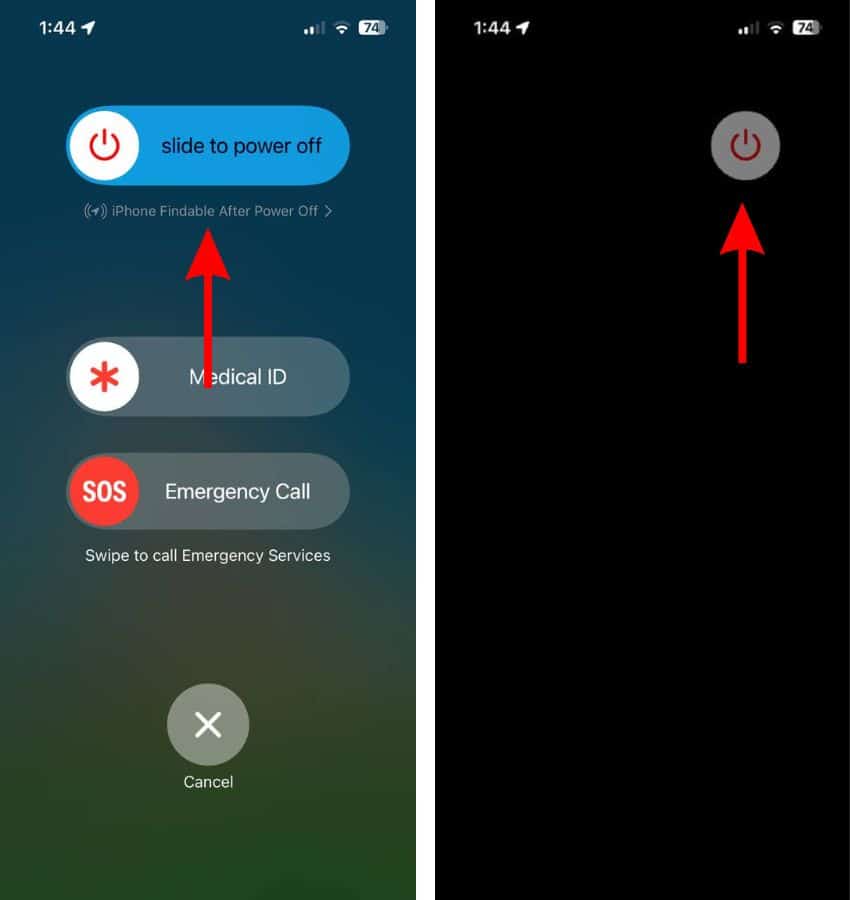
- Now, press and hold the side button until you see the Apple logo.
Restart iPhone and iPad with a Home Button
- Press and hold the side button until the slide to power off slider appears.
- Drag the slider and wait for a few minutes.
You can even ask Siri to restart your iPhone or iPad if your hands are preoccupied, etc. This is one of my favorite implementations and I use it quite often.
Restart Any Mac
- Click the Apple logo at the top right corner of the menu bar.
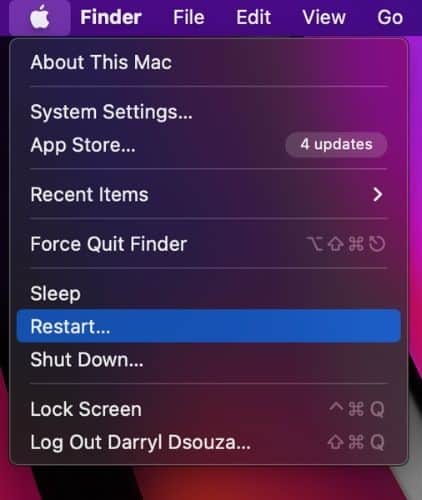
- Unselect the checkbox to the left of the “Reopen windows when logging back in” option.
- Then, click the Restart button to restart your Mac.
4. Contact Apple Support
The silver lining to every troubleshooting dark cloud is Apple Support. If you followed all of the above mentioned steps but none of them helped, the last option is to contact Apple Support . Alternatively, you could visit any official Apple Store nearby and ask the employees at the Genius Bar to inspect your device and help fix the Browsing Mode not working in Safari.
Does the Private Browsing Mode in Safari Work as Promised?
Apple promises that when you’re browsing the internet using the Private Browsing Mode in Safari it doesn’t save any history. However, there’s a workaround using which you can view your Safari Private Browsing History on Mac . So, if someone wants to view your browsing history, they can. Therefore, we recommend using a VPN alongside the Private Browsing feature to ensure utmost safety.
We hope this article helped fix the Private Browsing Mode not working in Safari on your iPhone or iPad. If you have any other doubts, do let us know in the comments below.
One thought on “ Fix: Private Browsing Greyed Out in Safari on iPhone, iPad and Mac ”
Privacy is paramount when it comes to online activities, and Utopia’s P2P web proxy function provides an exceptional solution for private browsing by encrypting internet traffic and protecting users’ identities.
Leave a Reply Cancel reply
You must be logged in to post a comment.
This site uses Akismet to reduce spam. Learn how your comment data is processed .
- Darryl Dsouza
- PRO Courses Guides New Tech Help Pro Expert Videos About wikiHow Pro Upgrade Sign In
- EDIT Edit this Article
- EXPLORE Tech Help Pro About Us Random Article Quizzes Request a New Article Community Dashboard This Or That Game Popular Categories Arts and Entertainment Artwork Books Movies Computers and Electronics Computers Phone Skills Technology Hacks Health Men's Health Mental Health Women's Health Relationships Dating Love Relationship Issues Hobbies and Crafts Crafts Drawing Games Education & Communication Communication Skills Personal Development Studying Personal Care and Style Fashion Hair Care Personal Hygiene Youth Personal Care School Stuff Dating All Categories Arts and Entertainment Finance and Business Home and Garden Relationship Quizzes Cars & Other Vehicles Food and Entertaining Personal Care and Style Sports and Fitness Computers and Electronics Health Pets and Animals Travel Education & Communication Hobbies and Crafts Philosophy and Religion Work World Family Life Holidays and Traditions Relationships Youth
- Browse Articles
- Learn Something New
- Quizzes Hot
- This Or That Game
- Train Your Brain
- Explore More
- Support wikiHow
- About wikiHow
- Log in / Sign up
- Computers and Electronics
- Internet Browsers
- Safari Browser
How to Disable Private Browsing in Safari on iPhone or iPad: Quick Guide
Block or turn off Safari's private browsing feature on your iPhone
Last Updated: April 8, 2023 Fact Checked
Switching Back to Regular Browsing
Disabling private browsing permanently.
This article was co-authored by wikiHow staff writer, Kyle Smith . Kyle Smith is a wikiHow Technology Writer, learning and sharing information about the latest technology. He has presented his research at multiple engineering conferences and is the writer and editor of hundreds of online electronics repair guides. Kyle received a BS in Industrial Engineering from Cal Poly, San Luis Obispo. This article has been fact-checked, ensuring the accuracy of any cited facts and confirming the authority of its sources. This article has been viewed 104,153 times. Learn more...
Trying to disable the private browsing feature in Safari on an iPhone? You can do so easily by using the built-in content restrictions settings. If you're just trying to turn off private browsing and get back to normal browsing, you can switch modes directly in the Safari app. This wikiHow guide will show you how to turn off or permanently disable Private Browsing on an iPhone or iPad.
Things You Should Know
- To turn off private browsing, open Safari, tap the tabs button, and tap Private to switch to normal browsing.
- To disable private browsing, go to Settings > Screen Time > Content & Privacy Restrictions > Content Restrictions > Web Content.
- On the Web Content page, select "Limit Adult Websites" to disable private browsing.

- Private browsing is a great way to avoid cookies. When you switch to normal browsing, you'll need to manually delete cookies in Safari .

- This will be called Start Page if you don't have any tabs open in the normal browsing mode.
- Private mode doesn't record your browsing history. For normal browsing mode, you can delete your browsing history if needed.

- This method uses the built-in content and privacy restriction features to limit access to adult websites. This setting turns off the ability to use private browsing in Safari. Note that this will also prevent the user from accessing most websites with adult content.

- Note that this will also prevent you from accessing most websites with adult content.
Expert Q&A
- If you're trying to keep your browsing information off iCloud, you can turn off Safari iCloud syncing on your iPhone . Thanks Helpful 0 Not Helpful 0

You Might Also Like

- ↑ https://support.apple.com/en-us/HT203036
- ↑ https://support.apple.com/en-us/HT201304
About This Article

- Send fan mail to authors
Is this article up to date?

Featured Articles

Trending Articles

Watch Articles

- Terms of Use
- Privacy Policy
- Do Not Sell or Share My Info
- Not Selling Info
wikiHow Tech Help Pro:
Level up your tech skills and stay ahead of the curve

9 Fixes for ‘This Connection Is Not Private’ in Safari on iPhone and iPad
Supreeth is passionate about technology and dedicates himself to helping people figure it out. An engineer by education, his understanding of the inner workings of all types of gadgets and devices ensures he provides top-notch guidance, tips, and recommendations to his readers. When away from the desk, you will find him traveling, playing FIFA, or hunting for a good movie.
The Safari browser on iPhone and iPad regularly notifies you of elements that can compromise your online safety. This includes details of cookies , trackers , and other warnings to keep you safe. One such warning is the ‘your connection is not private’ in Safari, and sometimes, it persistently pops up even when everything is right.
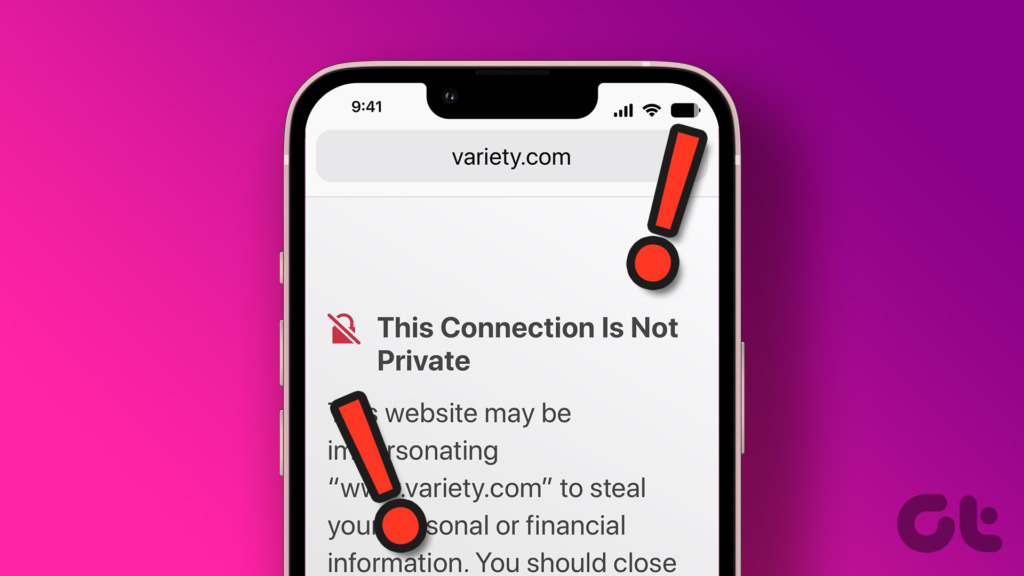
Therefore, in this article, we present you with nine different methods to fix the issue. But before we get into these methods, let us understand more about the ‘your connection is not private’ warning in Safari and the reasons behind this.
What Is ‘Your Connection Is Not Private’ in Safari
An error message stating ‘Your connection is not private’ is displayed when your browser is unable to authenticate a secure connection between the website and your device. This implies that your browser is unable to check whether a website is secure. Any browser can experience this issue including Safari on iPhone and iPad.
To safeguard your privacy and the security of your data, your web browser examines the security certificate of the website. Your personal information may be exposed to cyber-attacks if a certificate is weak and outdated.
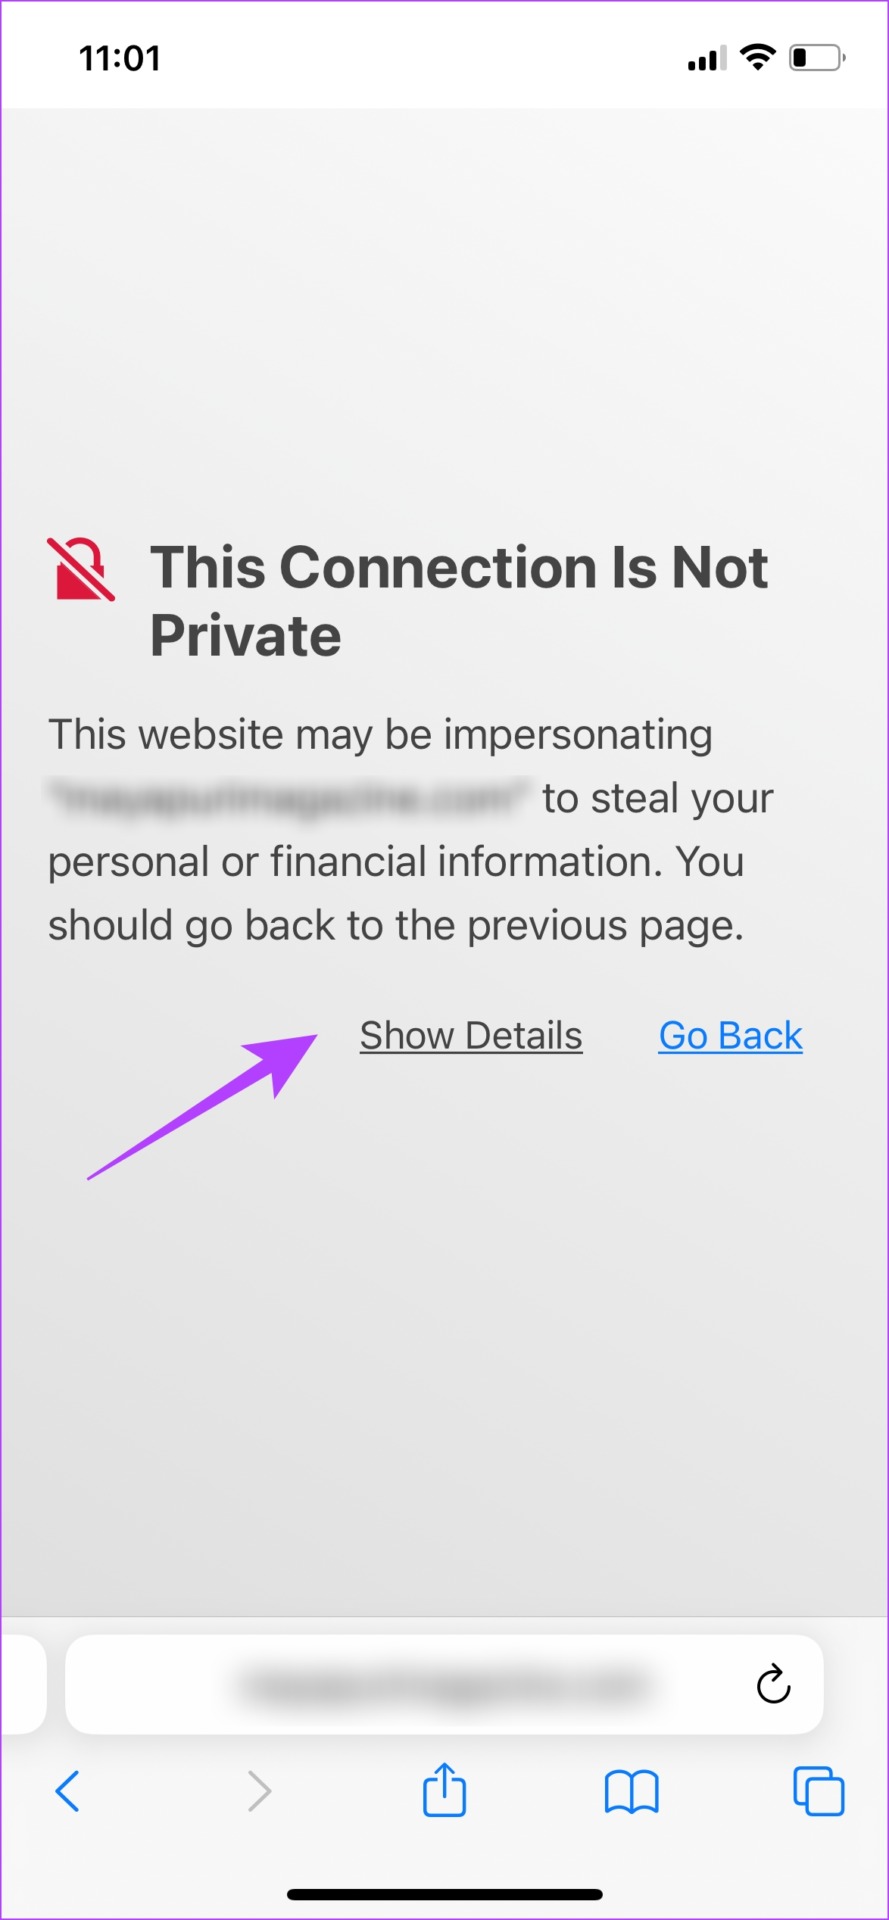
Overall, it means that your connection isn’t secure, and the error shouldn’t be disregarded. You might see an error message like this, in Safari.

Although it is mostly a warning to help you stay safe, there are also instances where this is just a bug, or an error and the site you are trying to visit is safe. However, the good part is that we have multiple tried-and-tested methods to get rid of this issue. Read our next section to know more.
How to Get Past ‘This Connection Is Not Private’ Warning in Safari on iPhone
Here are nine methods using which you can try and fix the issue. Let us get started with trying to delete the browsing data on Safari.
1. Clear Safari Data
Safari, like any other web browser, tends to accumulate a lot of temporary data over time. This is so that Safari can load a few elements directly from your local storage, instead of downloading it online every time. This can save some time, however, a lot of caches can slow down your browser and cause a few issues.
Hence, clearing browser data and cache can potentially remove the ‘your connection is not private’ warning on websites.
Step 1: Open the Settings app and tap on Safari.
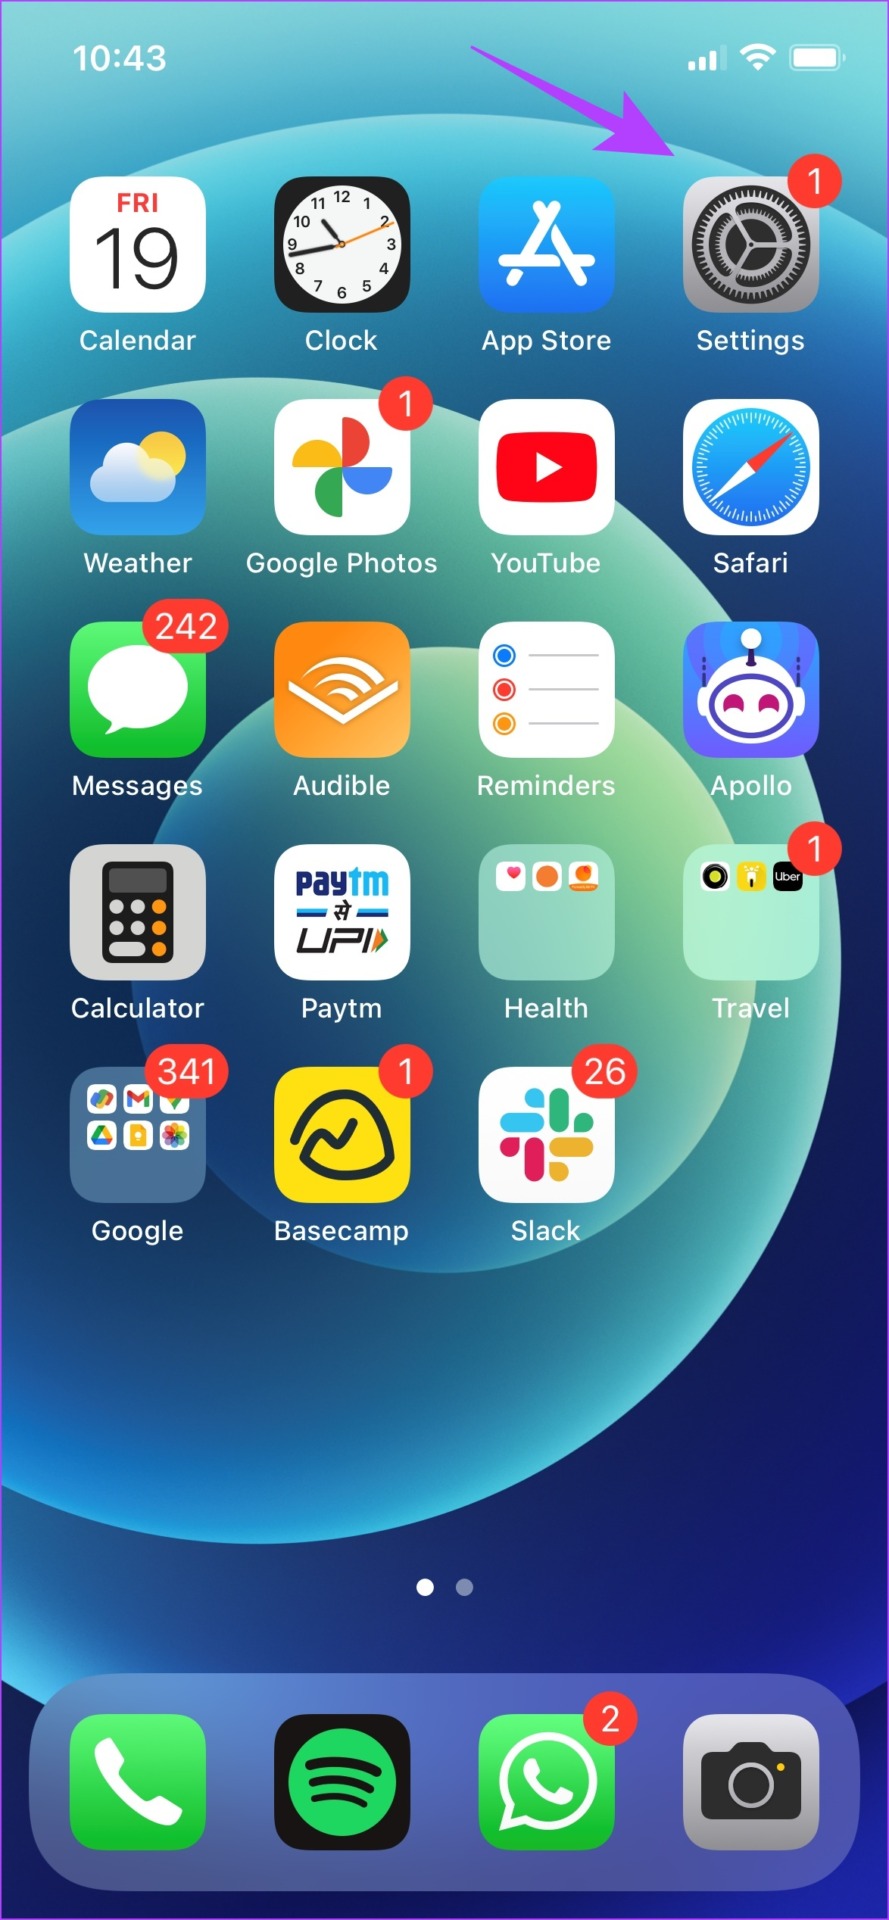
Step 2: Tap on ‘Clear History and Website Data’.
Step 3: Select ‘Clear History and Data’.
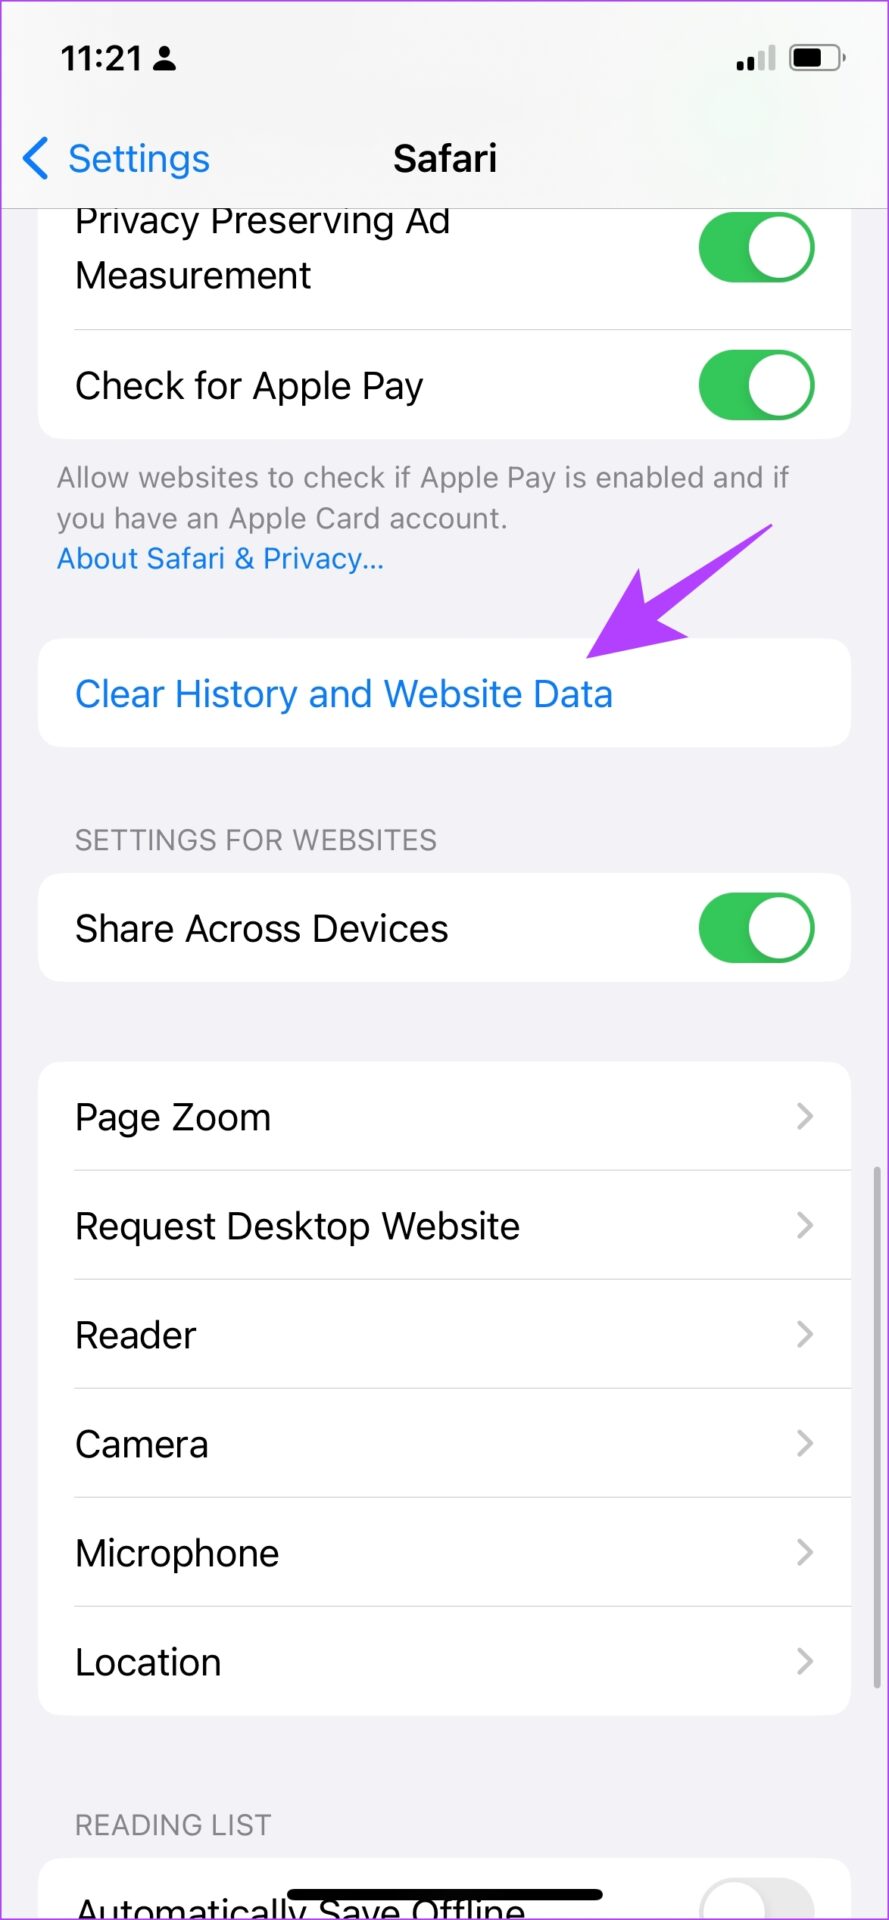
This is all you need to do to clear the browsing data on Safari. If this does not work, let us try to restart your iPhone or iPad, or router.
2. Restart iPhone/iPad and Wi-Fi Router
Restarting the devices that are in context – your iPhone or iPad, and your Wi-Fi router can be quite an effective fix to this problem, despite sounding rudimentary. Therefore, try switching your Wi-Fi router off and turning it back on.
However, if you are looking for steps to restart your iPhone or iPad, follow along:
Step 1: First, shut down your device.
- On iPhone X and above : Press and hold the volume down and the Power button.
- On iPhone SE 2nd or 3rd gen, 7, and 8 series : Press and hold the power button.
- On iPhone SE 1st gen, 5s, 5c, or 5 : Hold the power button at the top.
- On iPad: Hold the power button at the top.

Step 2: Now, drag the power slider to turn off the device.
Step 3: Next, turn on your device by long pressing the power button on your iPhone.
This is how you restart your iPhone or iPad. If this does not fix the issue, you can try accessing the website using Private Mode on Safari.
3. Use Private Mode
When you view a webpage in private mode, your data won’t be saved locally, and you will not be signed into any account. Thus, you can try to dismiss the error by accessing the website in private mode.
Step 1: Tap on the tabs icon and select the tab groups icon.
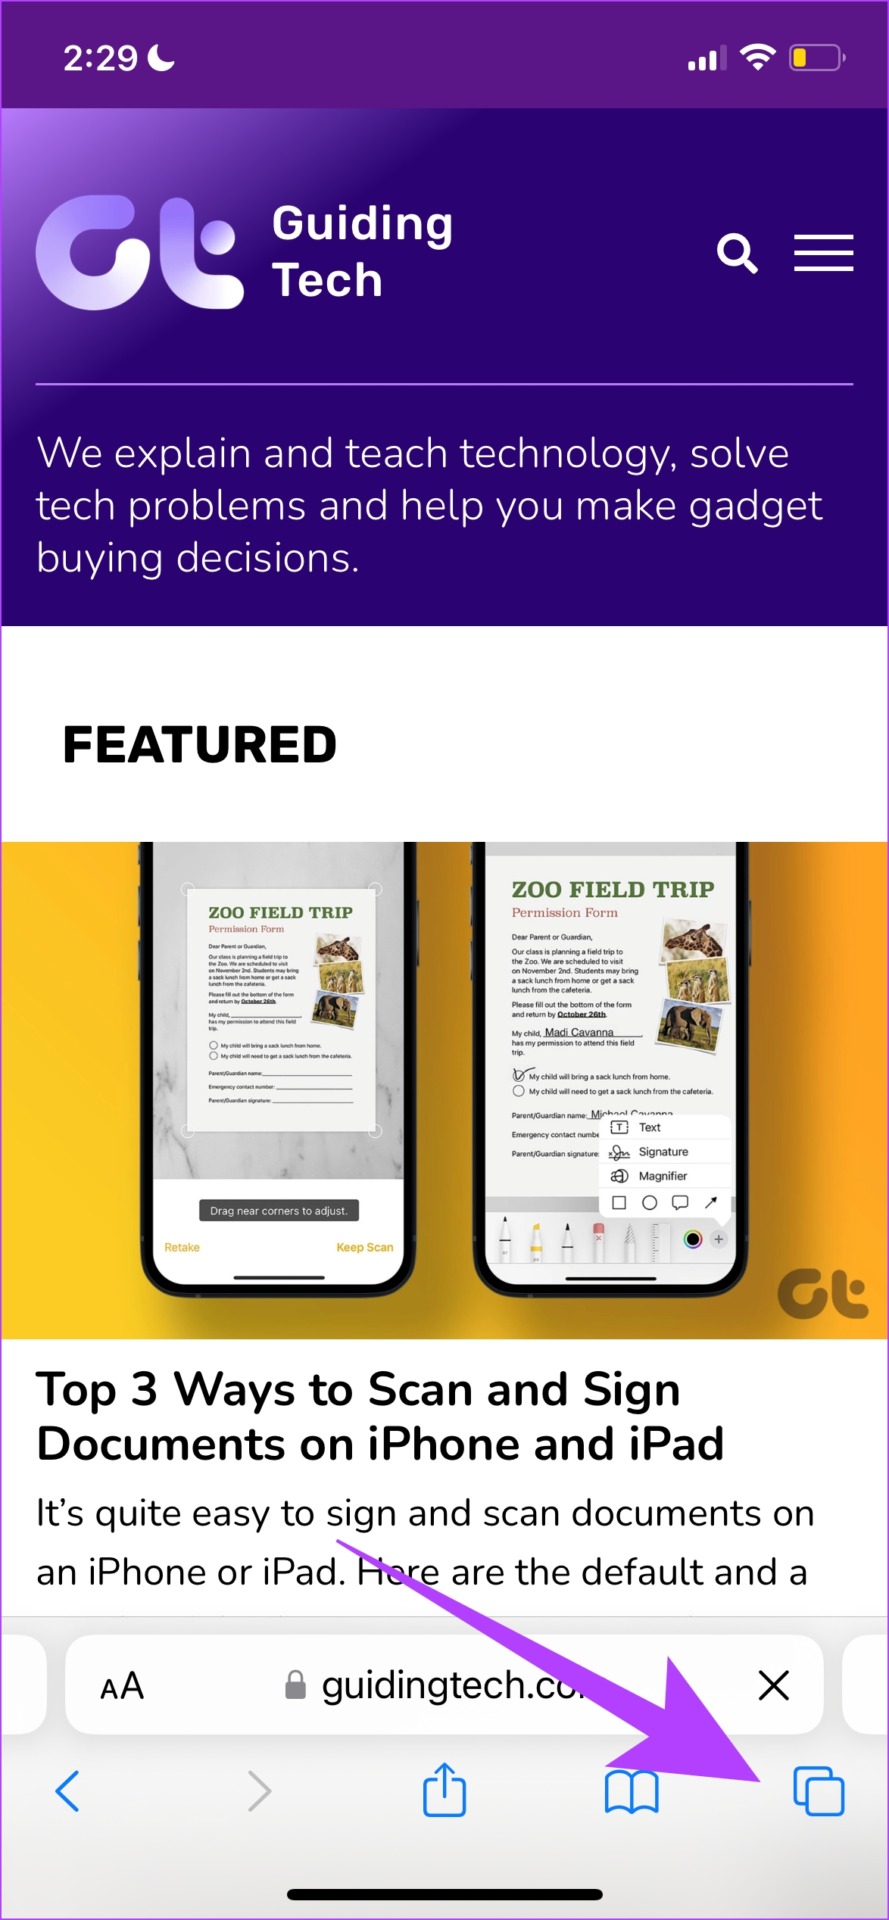
Step 2: Now, select Private.
Step 3 : Tap on the plus icon. This will open a private tab. You can then view the website.
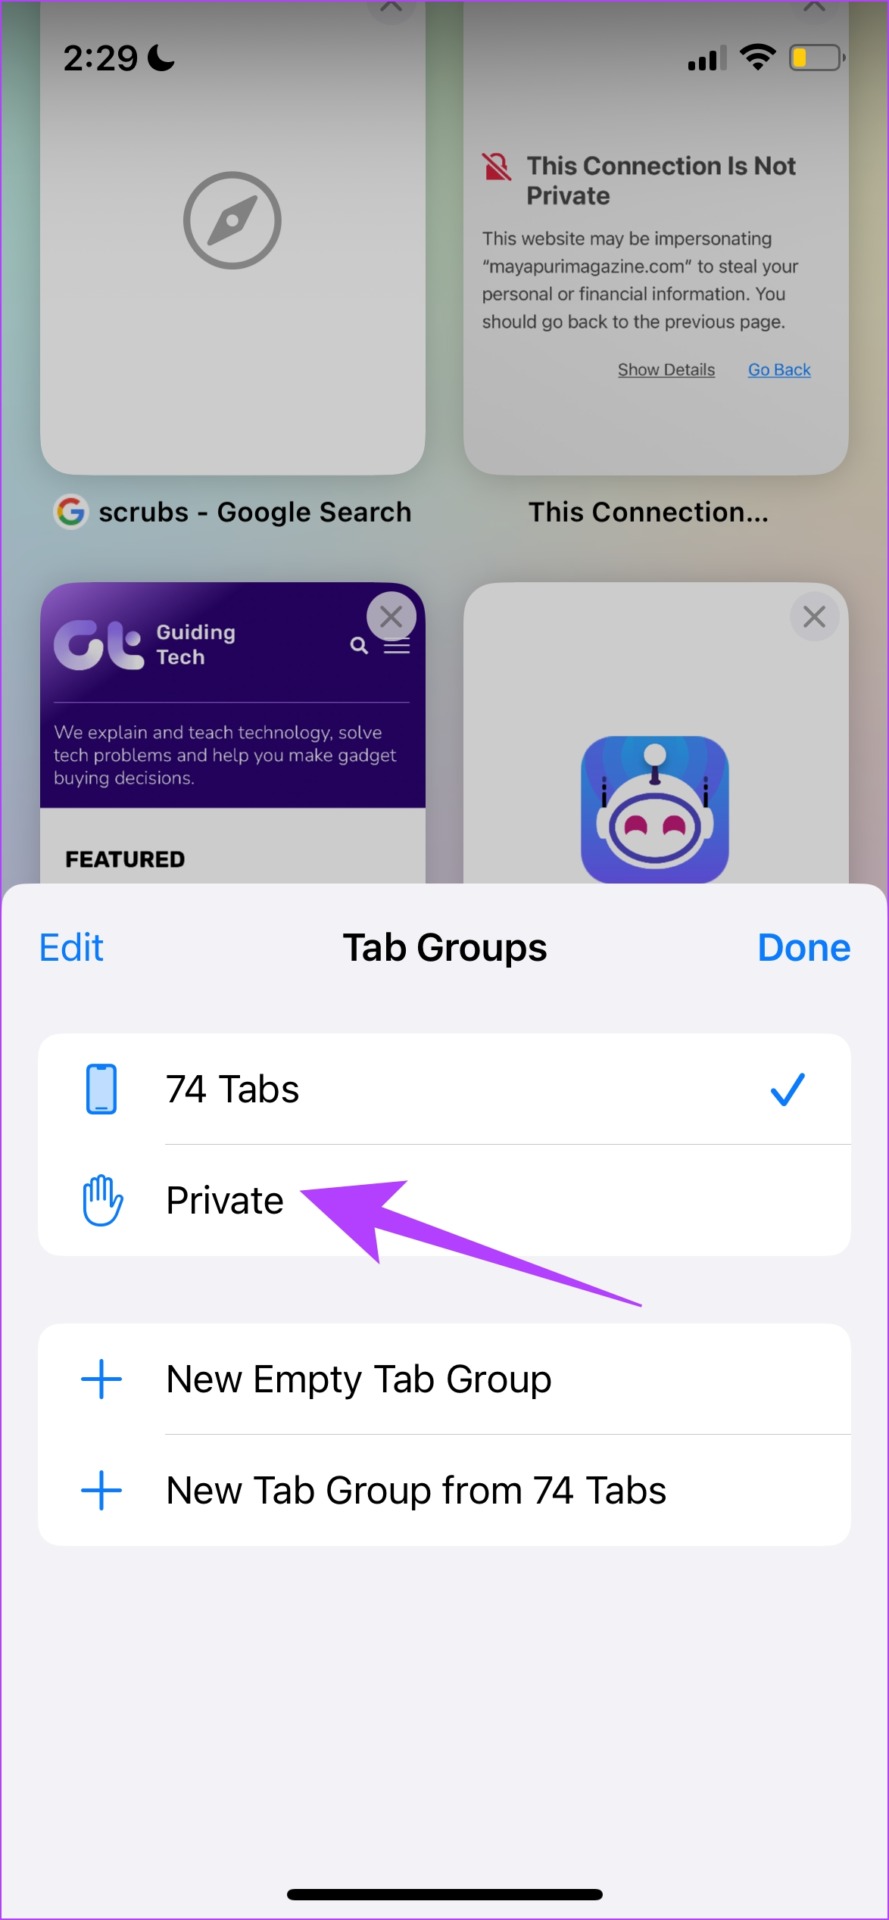
This is how you can access a website in private mode. However, you can encounter this error message if you are working on an incorrect date and time. Therefore, let us try and correct it to fix the issue.
4. Check Date and Time
Here’s how you can check the date and time on your iPhone or iPad and correct it accordingly.
Step 1: Open the Settings app and select General.
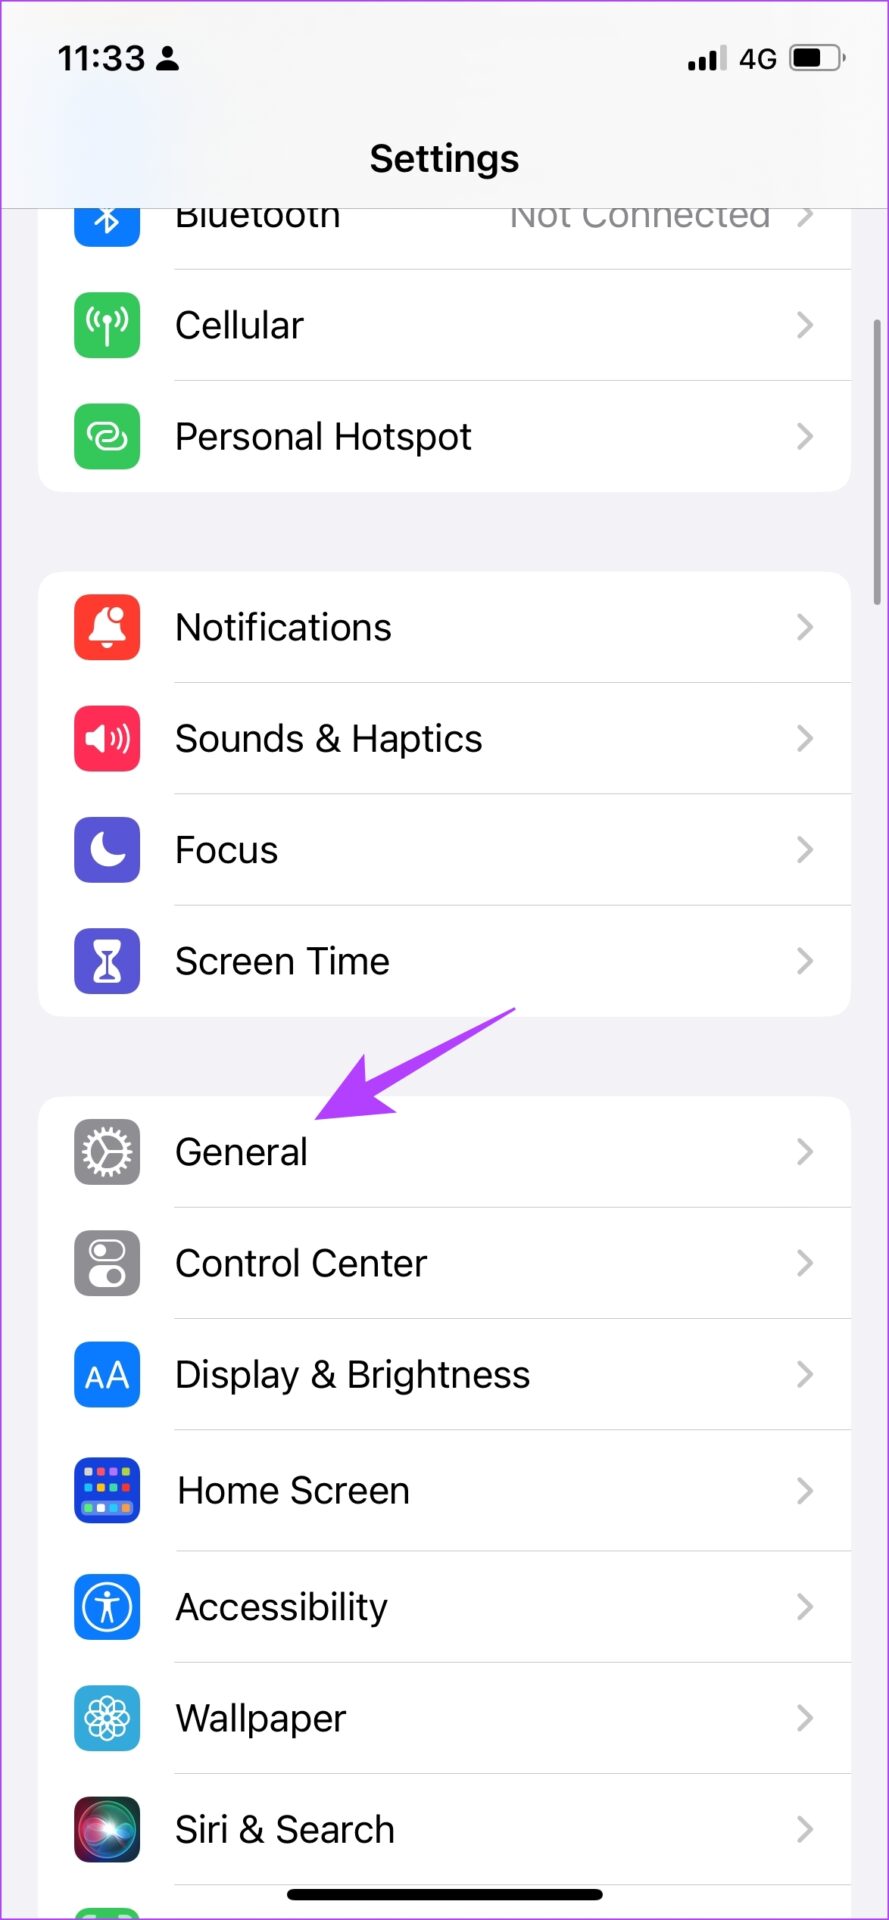
Step 2: Now, select ‘Date & Time’.
Step 3: Turn on the toggle for ‘Set Automatically’.
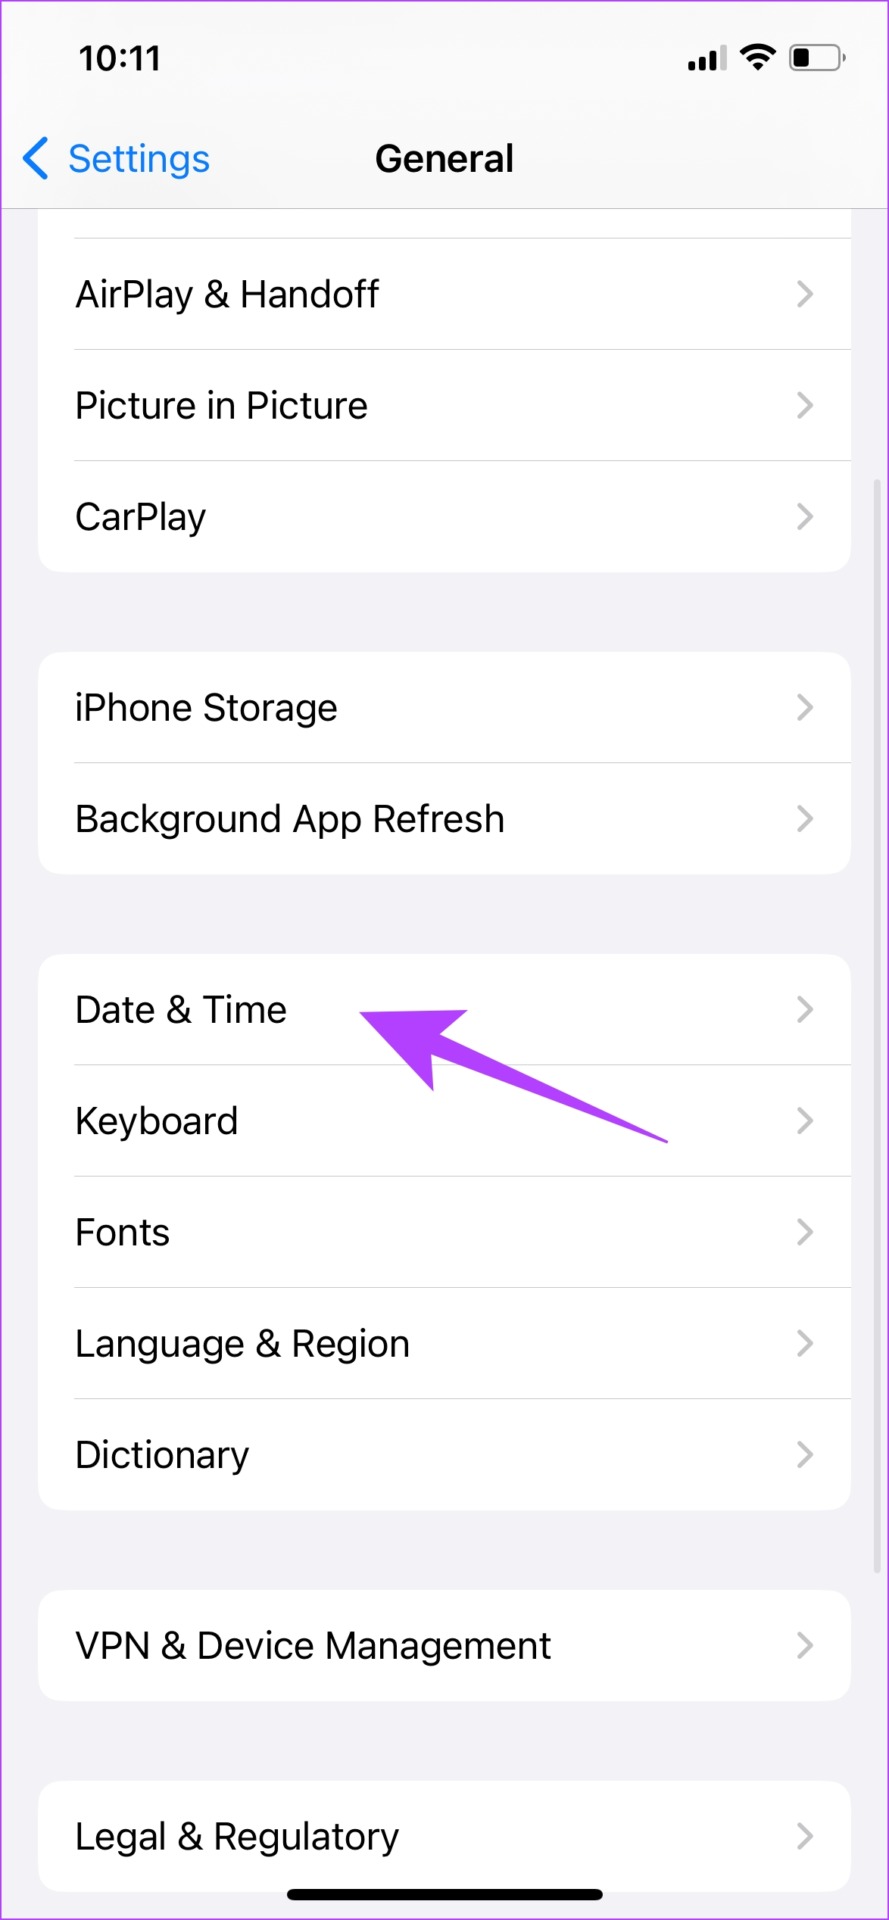
This ensures that the date and time on your iPhone are set automatically from the internet, according to your time zone. However, if this does not work too, perhaps it’s time to check the URL of the website and ensure you are on HTTPS.
5. View HTTPS Sites Only
Websites today predominantly use the latest protocol called HTTPS. However, a few sites also tend to use an outdated HTTP protocol. This is less secure and not as encrypted as the HTTPS protocol. Therefore, ensure you are always viewing a website running on HTTPS. To know more, read our article explaining the differences between HTTP and HTTPS .

6. Disable VPN
A VPN is a mode using which your internet traffic is routed through a private server. However, if there are any issues with the server, it might be one of the reasons why you see the message ‘your connection is not private’ in Safari on your iPhone and iPad.
Hence, let us ensure VPN is disabled.
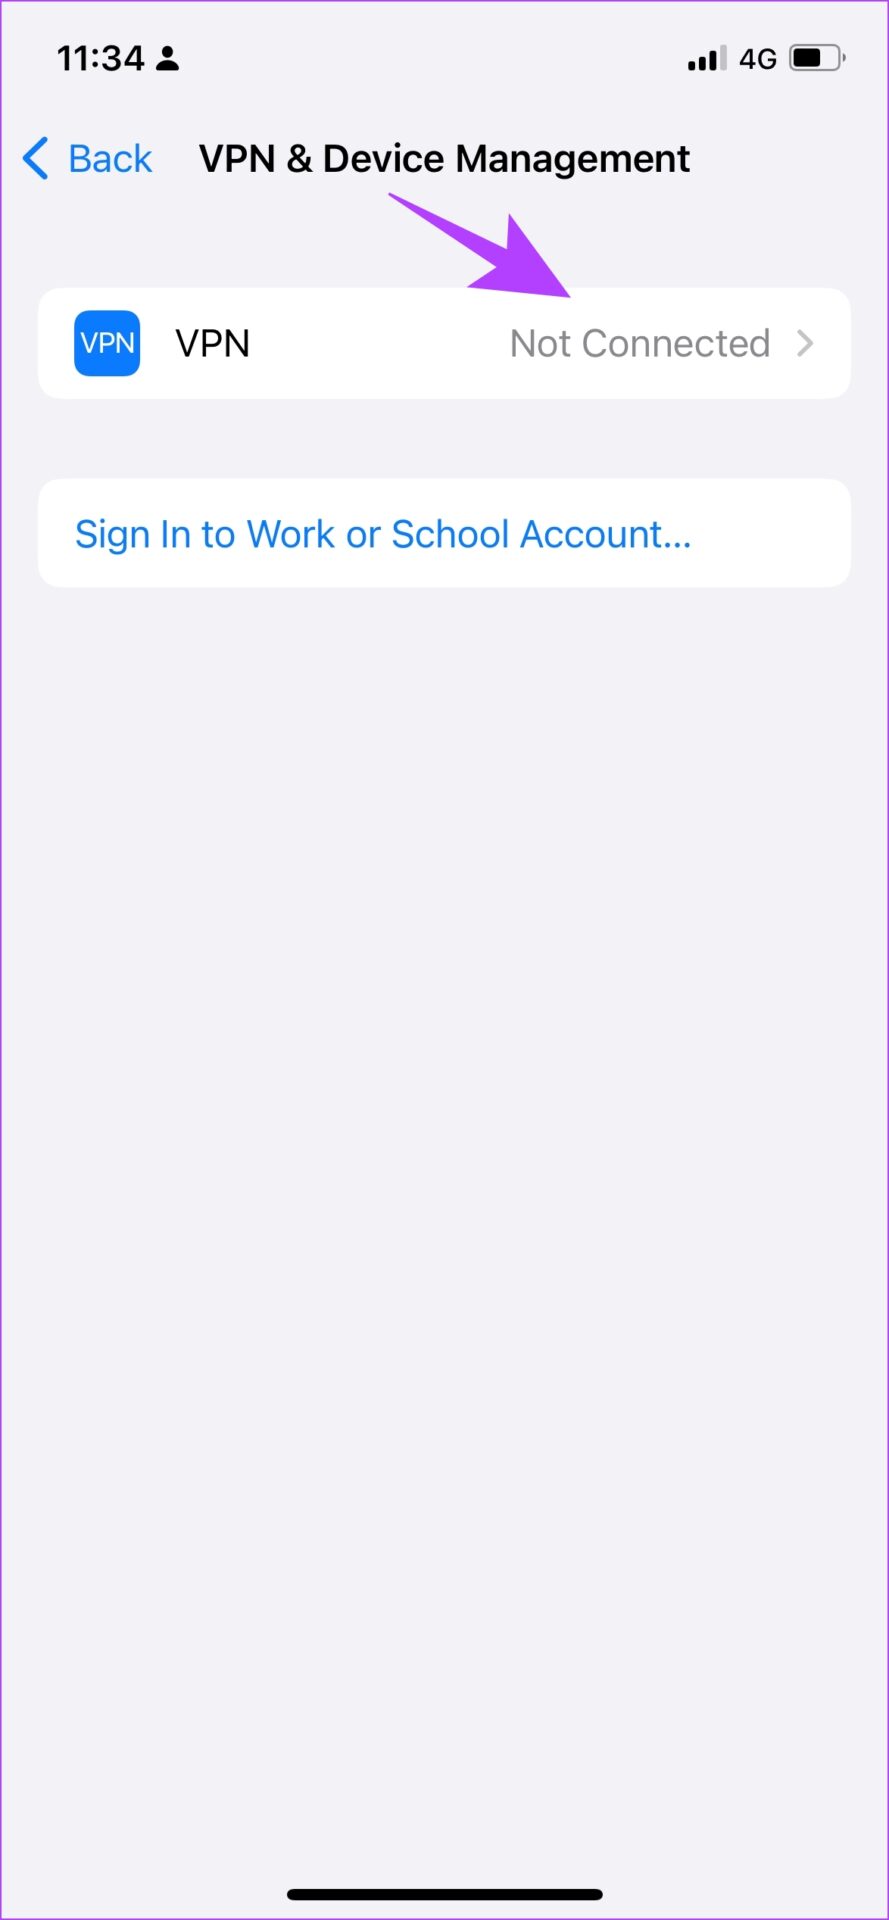
Step 2: Select ‘VPN & Device Management’.
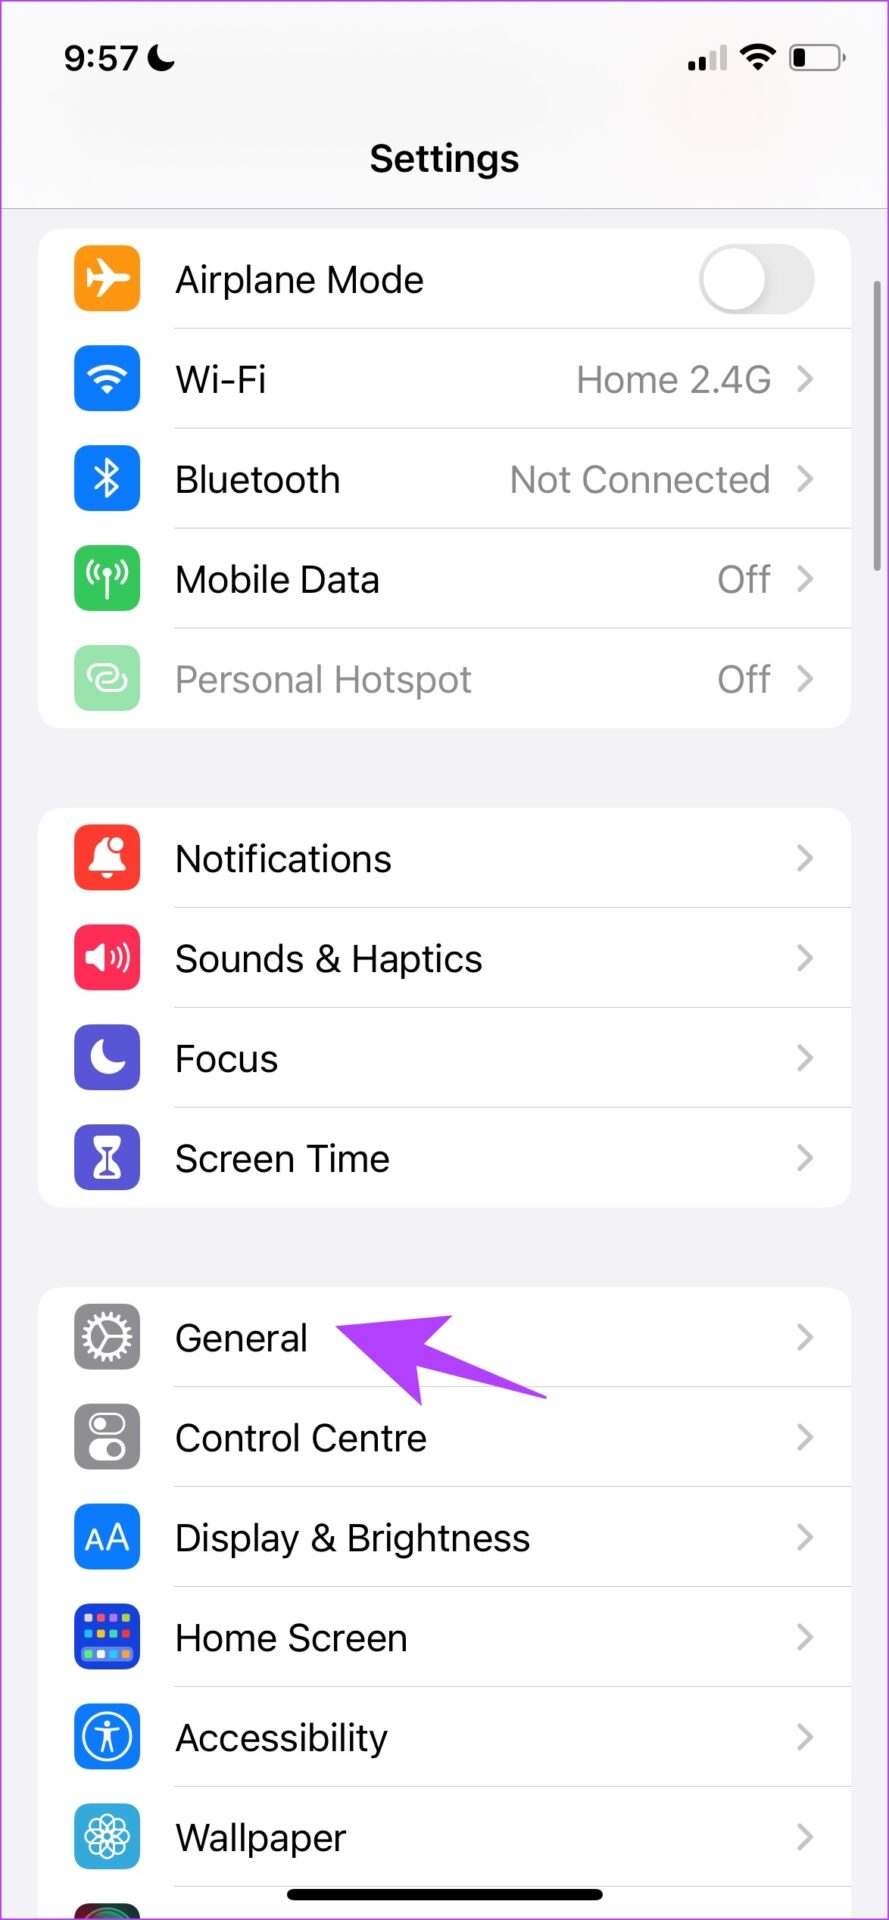
Step 3: Ensure you are not connected to any VPN service.
Now that we know how to disable VPN, there is another service that can trigger the ‘this connection is not private’ warning on iPhone, and that is using extensions on it. Here’s how you can disable the same.
7. Disable Third Party Extensions
Extensions can be handy tools to block content or provide extra security as your use Safari. However, they can also cause some issues, and therefore, you can try disabling them to see if they help bypass the ‘this connection is not private’ error in Safari.
Step 1: Open the Settings app and select Safari.
Step 2: Select Extensions.
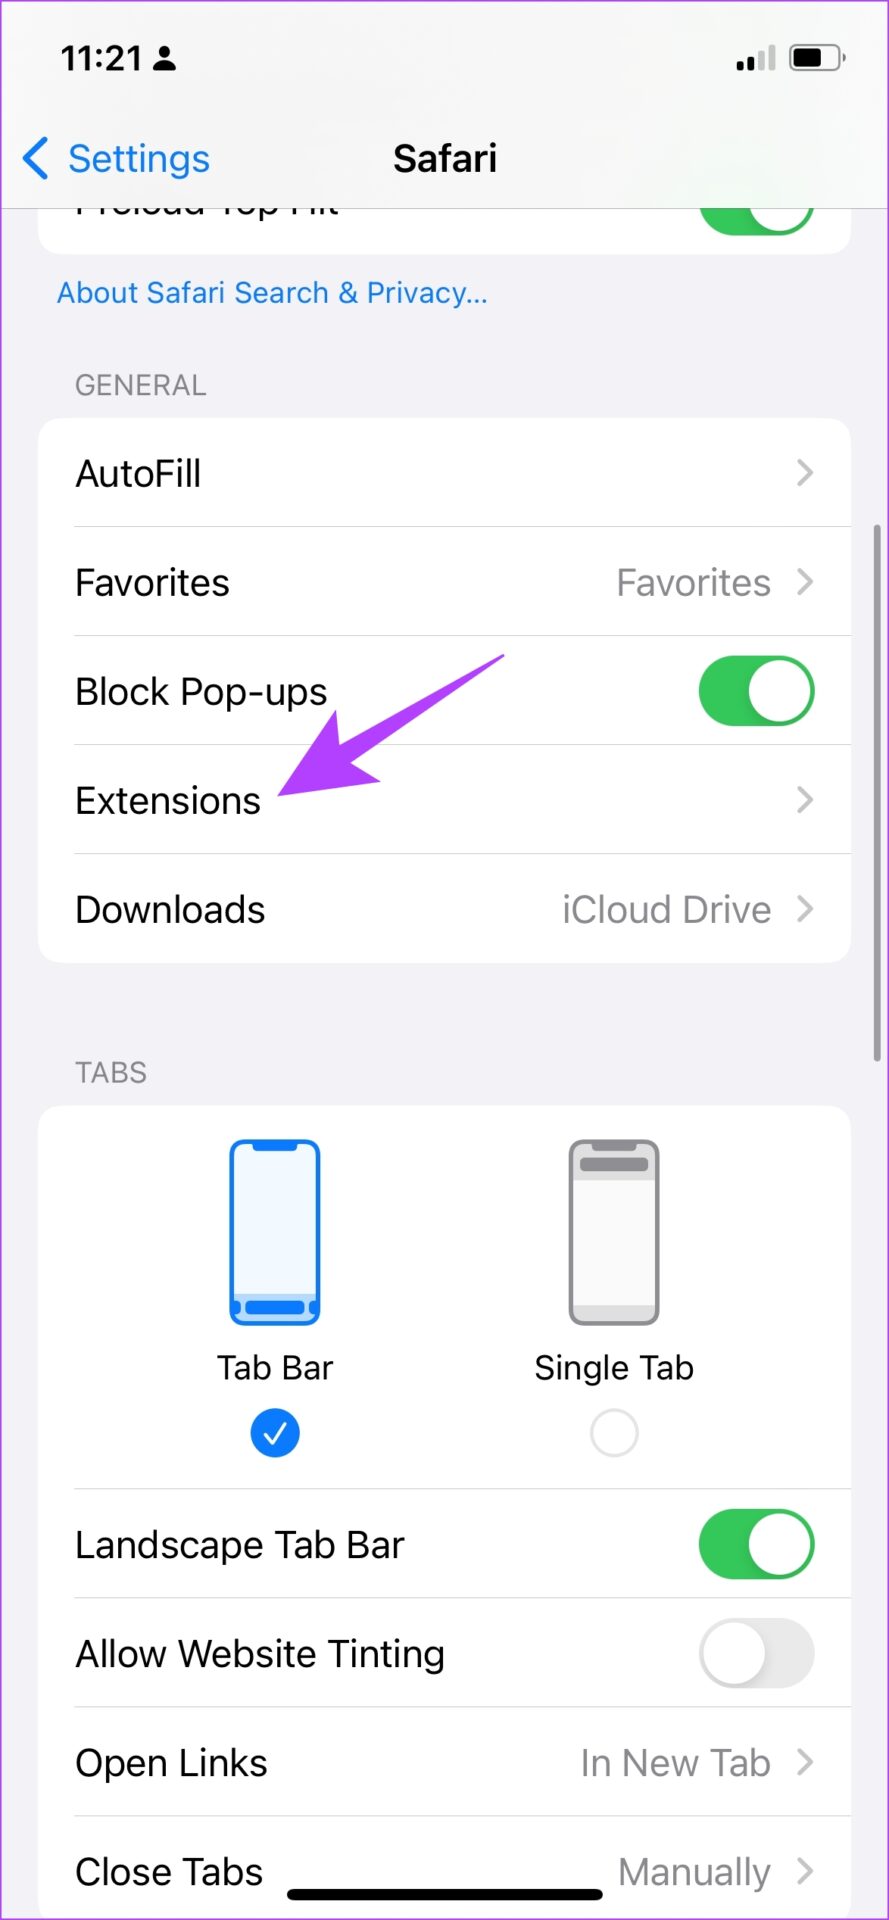
Step 3: Tap on the extension.
Step 4: Turn off the toggle to disable the extension.
Note : We are disabling the extension in the image, for demonstration only. This extension does not cause any issues with Safari.
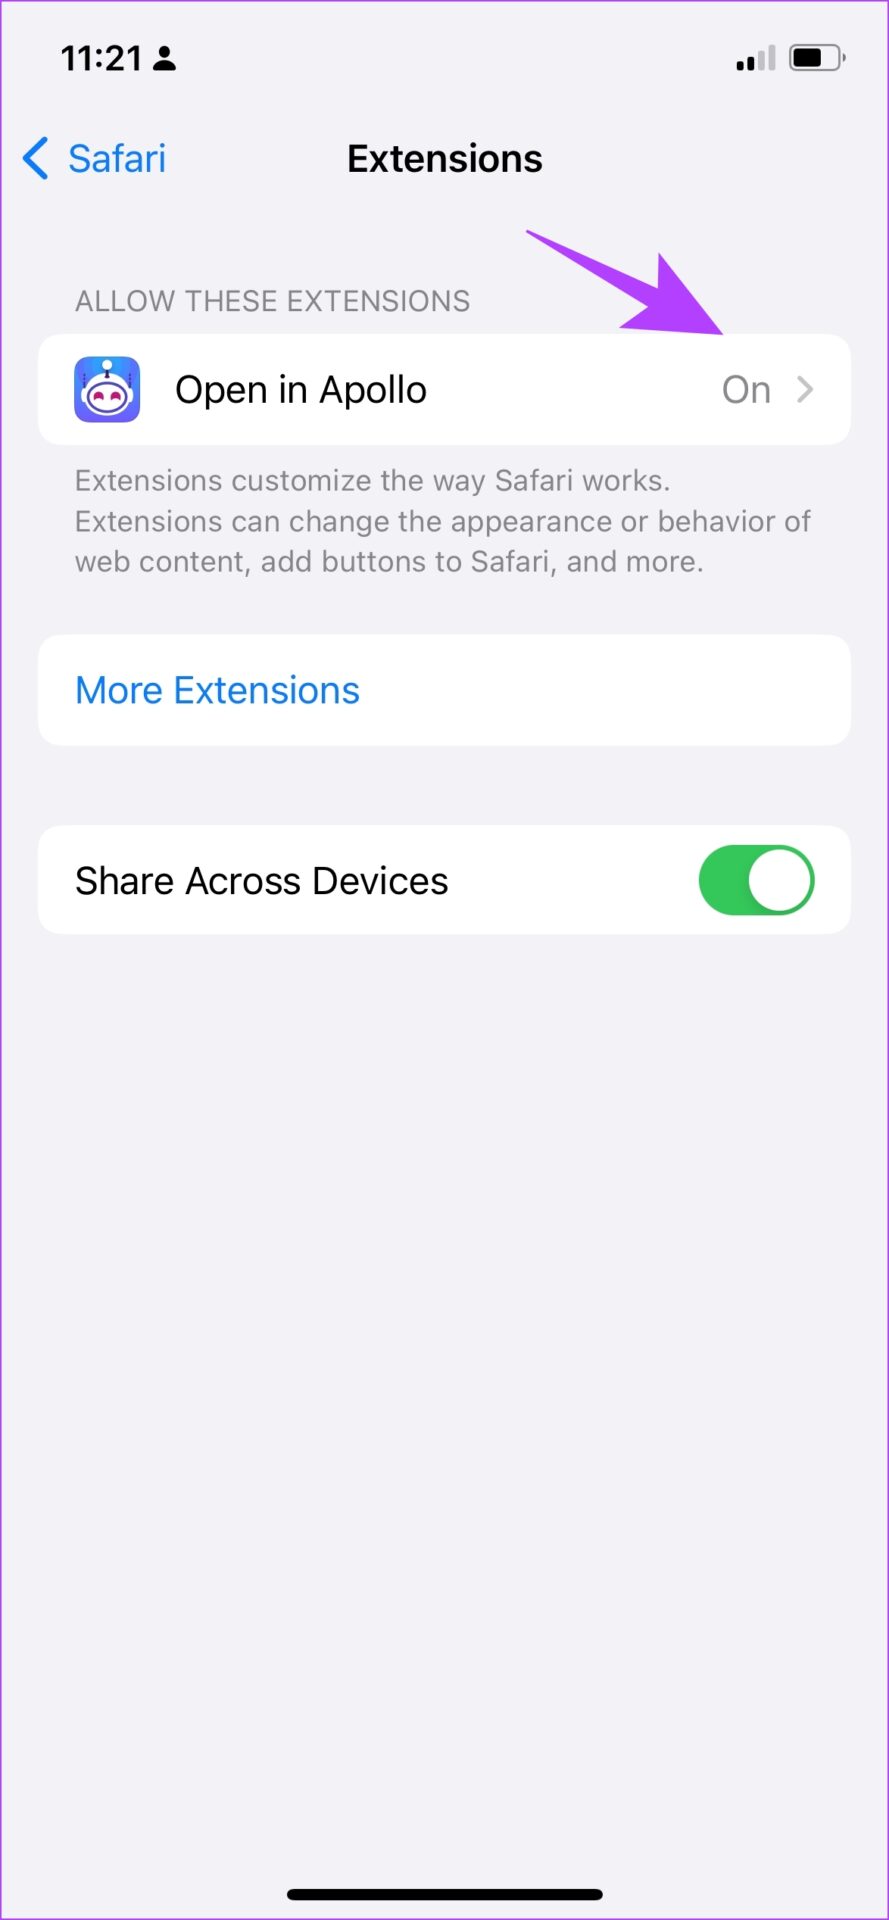
This is how you can disable a Safari extension . However, if you still keep getting the ‘this connection is not private’ warning, you can jump to the next few sections of this article, as we show you options as a last resort.
8. Use a Different Web Browser
Although Safari is a solid web browser, it is far from being a bug-free and flawless option . For reasons unknown, there might just be a bug within Safari that’s popping up the connection error repeatedly.
Therefore, you can try and use a few other good offerings on the App Store, like Google Chrome or Mozilla Firefox.
Download Google Chrome for iPhone
Download Firefox for iPhone
Lastly, although unsafe, you can try to bypass the error message and access the site.
9. Get Past ‘Your Connection Is Not Private’ in Safari
If none of the above methods work, and you want to access the website at any cost, you can simply bypass the error warning. However, we recommend against this as this can cause some potential harm to your online safety.
If you could contact the web developer and confirm the reasons for this error message, it would be a better option.
Step 1: Select Show Details in the error message.
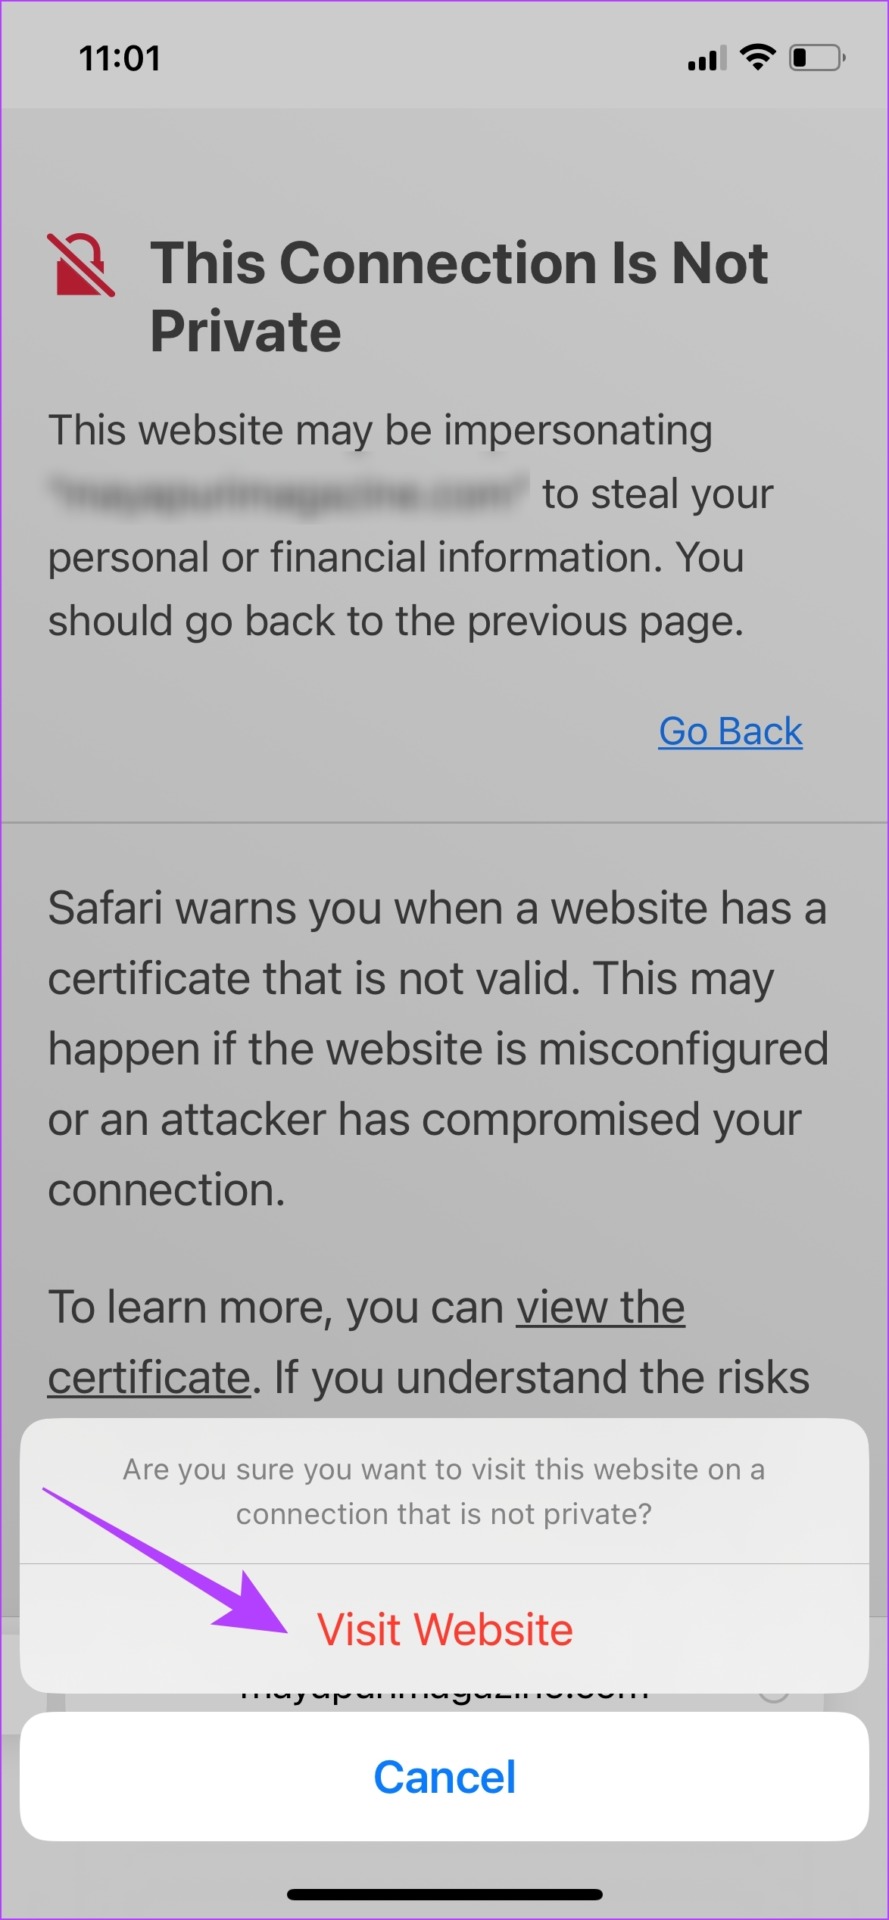
Step 2: Tap on ‘visit this website’.
Step 3: Lastly, tap on Visit Website to open it.
So, these are all the ways using which you can fix this issue. However, if you still have any questions, you can read the FAQ section below.
FAQs on ‘Your Connection is Not Private’ in Safari
No, unless you are fully sure that the contents of the website are safe to access.
It is a digital certificate that authenticates a website’s identity and provides an encrypted connection. It is safe to visit websites with SSL certificates.
No, it is not hacked. The problem is mostly caused by the website.
You can get this warning when you use public networks as the security certificates of the network might not be up to the mark. In that case, we suggest you check these tips to use public Wi-Fi safely .
You can block third-party trackers, disable cookies, and mostly visit safe-to-access websites in Safari.
You can use this website to check if the site you want to access is safe or not.
Browse Safari Safely
These are all the methods that you can use to fix the ‘this connection is not private’ warning on your iPhone and iPad. However, be aware that this warning does not always pop up as a result of a bug, and it might mean that the website is compromised. Therefore, it is a good practice to stay away from such websites. Stay safe, folks!
Was this helpful?
Last updated on 06 September, 2023
The above article may contain affiliate links which help support Guiding Tech. However, it does not affect our editorial integrity. The content remains unbiased and authentic.
Leave a Reply Cancel reply
Your email address will not be published. Required fields are marked *
The article above may contain affiliate links which help support Guiding Tech. The content remains unbiased and authentic and will never affect our editorial integrity.
DID YOU KNOW
Supreeth Koundinya
More in ios.
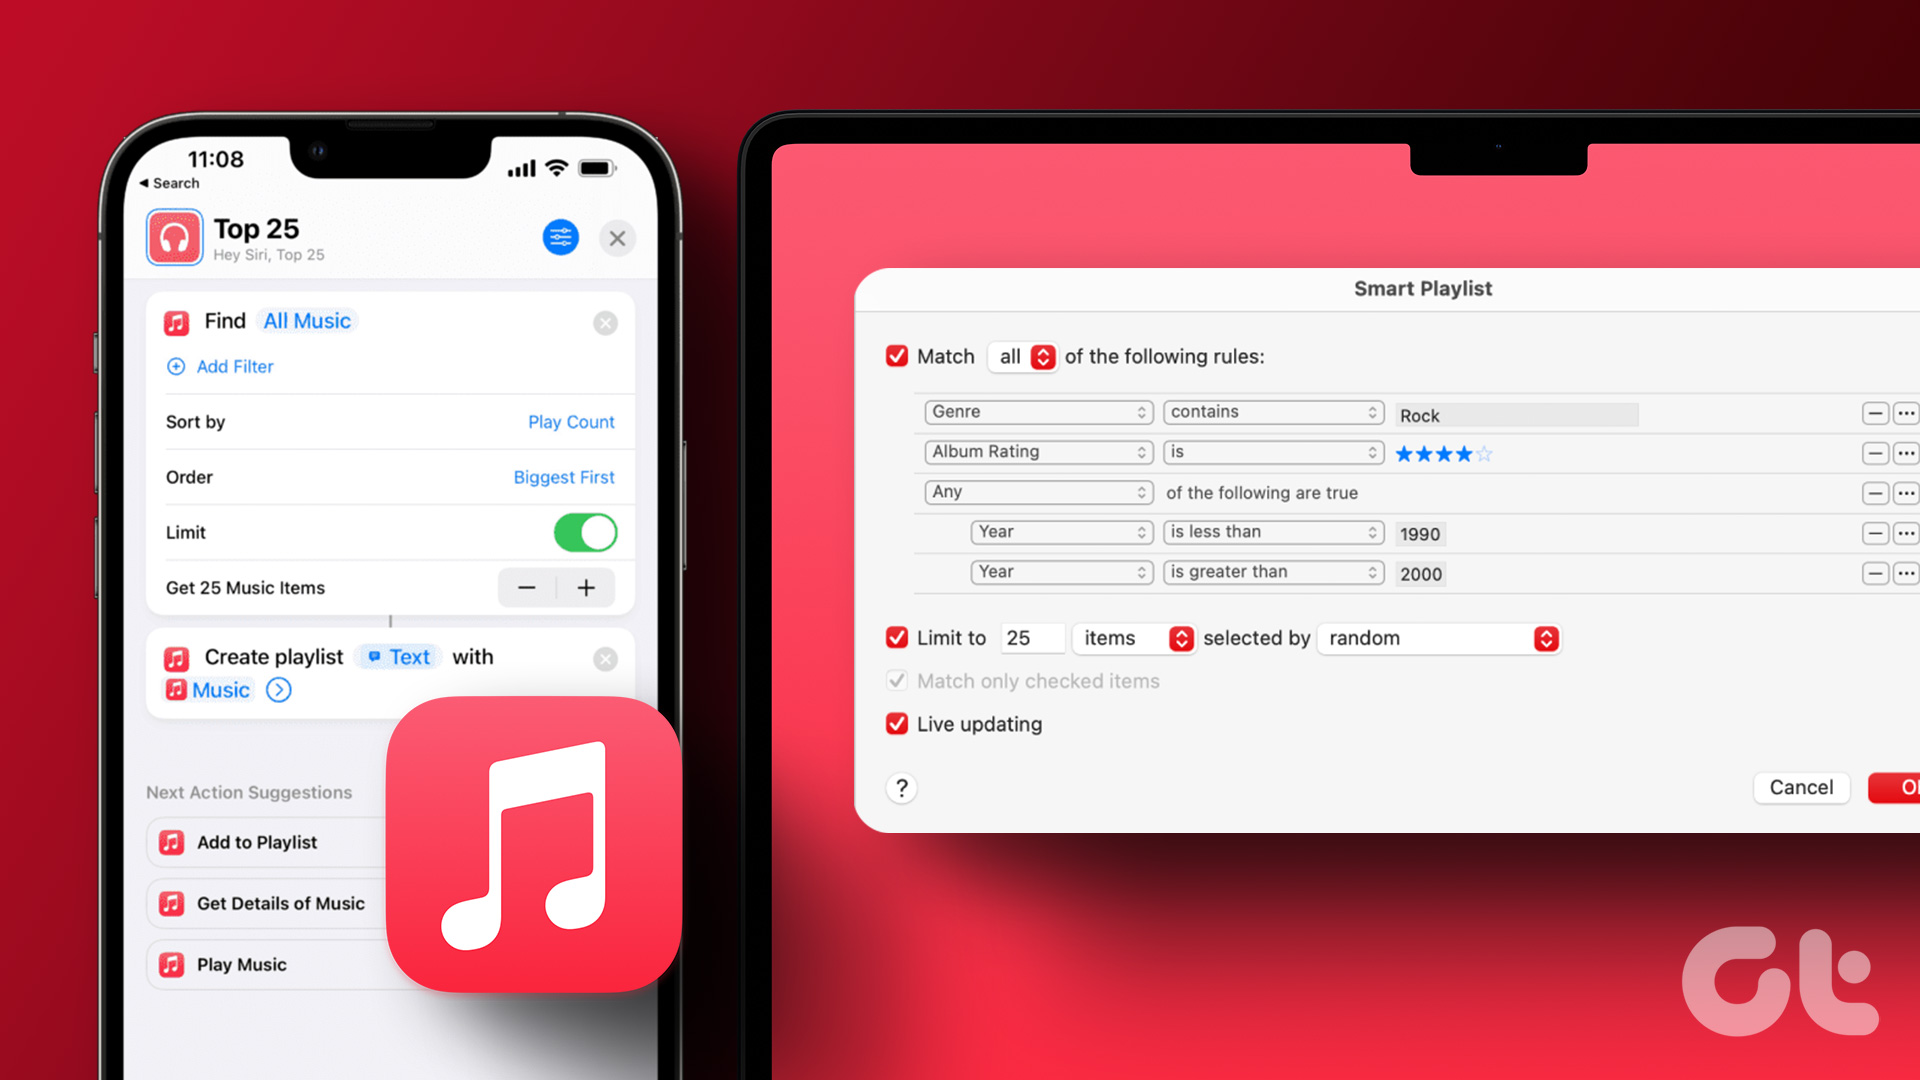
How to Create Smart Playlists in Apple Music (iPhone and Mac)

How to View Only Camera Photos on iPhone
Join the newsletter.
Get Guiding Tech articles delivered to your inbox.
Apple’s Worldwide Developers Conference to kick off June 10 at 10 a.m. PDT with Keynote address
The Keynote will be available to stream on apple.com , the Apple Developer app, the Apple TV app, and the Apple YouTube channel. On-demand playback will be available after the conclusion of the stream.
How to turn off private browsing iOS 17.4.1?
Using Safari I cannot seem to turn off private browsing. Went to settings, selected Safari and cleared hi story and data as suggested here. Still I’m in private browsing. Help please.
iPad, iPadOS 17
Posted on Jun 5, 2024 9:49 AM
Loading page content
Page content loaded
Jun 5, 2024 9:57 AM in response to swimmy
See >>> Turn Private Browsing on or off on your iPad - Apple Support
To access Private Browsing in iPadOS15 and later, it is necessary to first summon the Safari Sidebar using the button at upper left of the screen [1] - and from the menu tap the Private toggle button [2].
To return to regular browsing, tap the sidebar n Tabs button, that appears above the Private button.
I gave Google Chrome on iPad Pro a second chance but I still prefer browsing the web on my MacBook — here's why
Google Chrome on iPad isn't as bad as I thought, though it's not perfect.
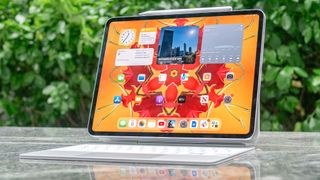
Apple's new iPad Pro 2024 has become my favorite tablet. Its stunning 13-inch OLED panel is arguably its best feature, but I’m also a fan of its updated lightweight design. The Apple M4 processor under the hood ensures everything runs smoothly, but the processor is somewhat overkill for my day-to-day. Even if I don’t take as full advantage of the iPad Pro’s features, it’s won me over.
As I do every time I review a new iPad Pro, I tried using Apple's latest premium slate as a laptop . While the M4 has plenty of power to handle my everyday workflow and the new Magic Keyboard is more pleasant to type on, I didn’t find the iPad Pro a suitable replacement for the best MacBooks or best Windows laptop s. The main reason is that iPadOS isn’t great for productivity.
I use Google’s various applications both for work and for personal use. I thought you had to download discrete apps for Google Drive, Gmail , Calendar and such. Juggling all these apps, even with iPad’s Stage Manager , was a chore. Thanks to one of our awesome readers, I learned I can have these apps open as tabs within iPad’s version of Google Chrome. Knowing that, I decided to give Google Chrome on iPad Pro another try.
While the experience wasn’t terrible, I still prefer Google Chrome on Macs and Windows PCs. Here’s why.
Using Google apps on the iPadOS version of Chrome
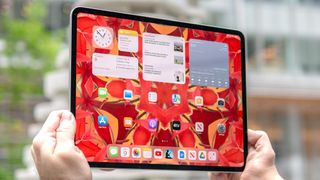
Like I said in my previous article, Google apps (and most apps in general) on iPad can be quite different than their desktop counterparts — sometimes dramatically so. Thankfully, the iPadOS versions of the apps I use, such as Chrome, GMail, Drive, Maps, and Calendar are more or less the same as on desktop.
One thing that tripped me up when using Chrome on iPad is that there’s no list of Google apps on the right-hand side beside your profile picture. Because of that, I thought you couldn’t use Google applications on the browser. Thankfully, I was wrong. And while you can have tabs containing Google apps, things aren’t as straightforward as on desktop.
For example, you have to type the Google app’s name into the search bar to then be sent to search results. After clicking on a link (usually the first one on the list of results), you can either continue on the browser or download the discrete app. In some cases, such as with Google Calendar, it not-so-subtly encourages you to use the downloadable app. As you can see, you have to go through a few extra steps to get to your apps on iPad than on desktop.
I should note that, if you have the corresponding Google app already downloaded on your iPad, it will always pop up even if you select it from the Chrome browser. I had to delete apps like Drive and Gmail so that I could use their browser-based counterparts on Chrome for iPad.
As for the apps themselves, most function as they do on desktop, albeit with a different layout that’s better suited for an iPad’s touchscreen. In some cases, such as Gmail, the apps appear identical to their iOS17 counterparts. That makes the apps easy to use since I'm accustomed to them on my iPhone 13 Pro . But as I said, I don't like cycling through various apps. Having them all in a single Chrome browser is much easier, even if they can be a bit clunky to use.
Bottom line
I’m glad I was wrong about Google Chrome on iPad Pro. Even if the experience isn’t as seamless as on desktop, using Google’s apps on the iPadOS’ Chrome browser is much easier than trying to juggle multiple discrete apps.
I still don’t think iPadOS is good for productivity, so I won’t be ditching MacBooks or Windows laptops for the iPad Pro any time soon. That said, if I’m ever on the road and need to use the iPad Pro as a computer in a pinch, I now know it won’t be a daunting task.
More from Tom's Guide
- MacBook Air M3 vs MacBook Air M1: Should you upgrade?
- Apple’s first foldable could be an iPad or even a MacBook
- iPad Air 2024 vs iPad Pro 2024: Biggest differences explained
Sign up to get the BEST of Tom’s Guide direct to your inbox.
Upgrade your life with a daily dose of the biggest tech news, lifestyle hacks and our curated analysis. Be the first to know about cutting-edge gadgets and the hottest deals.
Tony is a computing writer at Tom’s Guide covering laptops, tablets, Windows, and iOS. During his off-hours, Tony enjoys reading comic books, playing video games, reading speculative fiction novels, and spending too much time on X/Twitter. His non-nerdy pursuits involve attending Hard Rock/Heavy Metal concerts and going to NYC bars with friends and colleagues. His work has appeared in publications such as Laptop Mag, PC Mag, and various independent gaming sites.
Act fast! The iPad 10th Gen just hit its lowest ever price on Amazon
Apple teases a new orientation for future iPads and it could be just what its tablets need
Win! Score the amazing Apple Watch 9 for $100 off right now
- KalMadda I noticed you said that you’re having to search the names of the Google apps every time you want to use them, and I thought you might find this helpful. I don’t use Chrome, so I don’t know how this shows up in Chrome, but in Safari, I have Google set as my default search engine. And if I go to the Google search home page, the Google apps menu is at the top right. I hope this helps you out, also, you also could potentially use bookmarks to make it faster, though I don’t know how bookmarks work in the Chrome browser. Also, I noticed that using the Google Calendar web app in Safari, I didn’t get that full screen pop-up advertising the native app. 👍🏻. I don’t know if that was just because I didn’t have it open long enough, but the app adds may just be a Chrome thing. And I compared the app UI of Calendar and GMail on my Mac’s browser vs Safari on my iPad, and they were the same, so that may also be helpful for you as well! 👍🏻 Thanks for your review, it was a fun read! 👍🏻 Reply
- View All 1 Comment
Most Popular
- 2 Samsung unveils new OLED gaming monitors with crazy fast .03ms response times and HDR10+
- 3 5 things you need to know before buying a cheap mattress for $400 or less
- 4 Samsung Galaxy S25 spec leak just revealed huge performance boost
- 5 ‘Pachinko’ season 2: Everything we know so far
- 2 I'm a runner and here are my 5 favorite deals for Global Running Day
- 3 Intel finally unveils Lunar Lake — here’s why Qualcomm should be scared
- 4 How long does a hybrid mattress last? Plus 3 signs you need to replace yours
- 5 Samsung unveils new OLED gaming monitors with crazy fast .03ms response times and HDR10+

How to Clear Your History in Any Browser
Quick links, clear browsing history in google chrome for desktop, clear google chrome browsing history on android, clear chrome browsing history on iphone or ipad, clear browsing history in safari on iphone and ipad, clear browsing history in mozilla firefox, clear browsing history in microsoft edge, clear browsing history in safari on a mac.
Press Ctrl+Shift+Delete to clear your browsing history on a Windows PC, or press Command+Shift+Delete on a Mac. Check your browser's settings to find this option on a mobile device.
All web browsers remember a list of the web pages you've visited. You can delete this list at any time, clearing your browsing history and erasing the tracks stored on your computer, smartphone, or tablet. Each browser has its own separate history, so you'll need to clear the history in multiple places if you've used more than one browser.
In the future, you can use private browsing mode to browse sensitive websites without your browser saving any history. You won't have to clear your history afterward.
To clear your browsing history in Chrome , on Windows , Mac , or Linux , click the three-dot menu icon found in the top-right corner of the browser, hover your mouse cursor over "More Tools," and choose "Clear Browsing Data." You can also press Ctrl+Shift+Delete to open this screen on Windows, or press Command+Shift+Delete on a Mac.
On a Mac, the backspace key is labeled "Delete." Pressing the Delete key beside the Home and Edit keys doesn't work.
To delete your entire browsing history, select from "the beginning of time" in the drop-down box at the top of the screen and check the "Browsing history" option. You can also choose to clear other private data from here, including your download history, cookies, and browser cache.
To clear your browsing history in Google Chrome on Android tap the three-dot menu icon, then select "Clear Browsing History."
The default settings will clear your browsing history, cookies and site data, and your cached images and files from the last 15 minutes once you tap "Clear Data."
If you want to customize what information is removed, tap "More Options." You'll need to choose a time range that you want to delete from the drop-down list at the top of the screen. Select "from the beginning of time" to clear everything.
Ensure the "Browsing history" option is checked here and tap the "Clear Data" button. You can also choose to clear other types of personal data from here, including cookies and cached files.
To clear Chrome's history on your iPhone , or iPad , tap the three-dot menu icon, then select "Clear Browsing History." Choose what information you'd like to delete and a time range, then tap 'Clear Browsing Data.'
To clear your browsing history on Safari on an iPhone or iPad , open the Settings app and then navigate to Safari > Clear History and Website Data. Tap the "Clear History and Data" option to confirm your choice.
This button will clear all sensitive browsing data, including your cookies and cache.
To clear your browsing history in Firefox on the desktop, click the three-line menu icon in the top-right corner of the browser and then navigate to History > Clear Recent History. You can also press Ctrl+Shift+Delete to open this tool on Windows or press Command+Shift+Delete on a Mac.
To delete your entire browsing history, select "Everything" at the top of the window and check "Browsing & Download History" in the detailed list of items to clear. You can also choose to clear other types of private data from here, including your cookies, browser cache, offline website data, and website-specific preferences.
To clear your browsing history in Microsoft Edge , click the Three-Dot Menu > History, then select the trash can icon. You can also press Ctrl+Shift+Delete to open these options on Windows or Command+Shift+Delete on Mac.
Ensure the "Browsing History" box is checked and click "Clear." You can also choose to clear other types of private data from here, including your download history, cached data, cookies, and tabs you've set aside . Just check the type of data you want to delete and click the "Clear Now" button.
To clear your browsing history in Safari on a Mac , click History > Clear History from the menu bar at the top of your screen. Select the time period you want to clear history from and click "Clear History." To clear everything, select "all history".
Safari will delete your browsing history as well as your cookies, cached files, and other browsing-related data.
If you're using another browser, you should be able to easily find a "clear browsing history" option somewhere in its menus or on its settings screen.

How to quickly translate web pages in Safari on iOS and iPadOS
Easily translate web pages in Safari for iPhone and iPad.
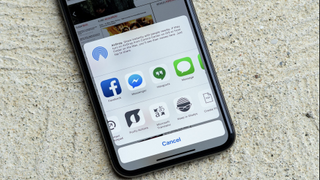
What you'll need
- How to translate web pages in Safari in iOS 16 and iPadOS 16
How to activate the Microsoft Translator extension in Safari
How to translate a web page on iphone with microsoft translator.
If you're running iOS 17 , Safari now comes with a translation feature baked into the browser, making it easier than ever to translate a web page on iPhone and iPad.
Once enabled, text is translated in-line on the webpage that you're viewing. It's a handy tool if you want to read websites that are written in different languages, and it's available right in the address bar in Safari.
With this in mind, here's how you can translate web pages in Safari on iPhone and iPad.
iPhone 15 Pro, iPad 9th gen, and Apple Watch SE for free at Verizon
Choose Verizon's Unlimited Ultimate Plan and trade in an old device to get Apple's iPhone 15 Pro , iPad 9 , and an Apple Watch SE for absolutely nothing. A fantastic deal if you're looking to upgrade all of your Apple devices.
iPad Pro M4 | $999
The brand-new iPad Pro M4 is the best tablet Apple has ever released. With an OLED display and the fastest chip Apple has ever made, this is a very powerful iPad.
How to translate a web page on iPhone in iOS 16 and iPadOS 16
In iOS 15 and later, the ability to translate a web page's language to your native language is now a built-in part of Safari. As such, you no longer need a third-party app to translate. Here's how to use built-in language translation in Safari in iOS 14, iOS 15, and later.
- Tap the action button on the left side of the address bar while visiting a site that you need to translate. The button looks like two A's next to each other.
- Tap Translate to [Your Device Language] .

- Tap Enable Translation if prompted.
Your page will then be translated into the primary language that you've set on your device. If you want to revert back to the page's original language, take the following steps.
- Tap the translate button in the Safari address bar. It takes the place of the standard action button on the left side of the address bar.
- Tap View Original .

The page will revert to its original language.
If you're running a version of iOS 13 or earlier on your device, then a third-party app with a translation extension is what you'll want to use. Microsoft's Translator extension is an excellent tool for the task, as it translates the web page in place when activated.
Master your iPhone in minutes
iMore offers spot-on advice and guidance from our team of experts, with decades of Apple device experience to lean on. Learn more with iMore!

Microsoft Translator
Microsoft Translator is a great third-party solution for translating web pages, and its translations take place in-line on the web, rather than taking you to another, translated version of the page like some other apps.
Once you've got it downloaded, you can set up the action extension for translation web pages.
- Open Safari on your iPhone or iPad.
- While viewing a web page, tap the share button .
- Scroll to the left on the bottom row of icons.
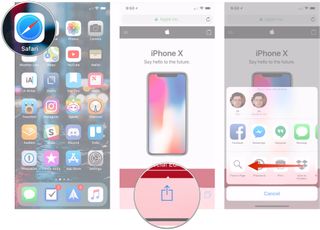
- Tap the More button.
- Turn the switch next to Microsoft Translator to the green 'on' position.
Now that you have the app installed, you can use it in Safari from the share menu.
- Head to the web page that you want to translate.
- Tap the share button at the bottom of the display.
- Tap the Microsoft Translator button. The extension will then translate the entire page for you.
Joseph Keller is the former Editor in Chief of iMore. An Apple user for almost 20 years, he spends his time learning the ins and outs of iOS and macOS, always finding ways of getting the most out of his iPhone, iPad, Apple Watch, and Mac.
Apple just dropped another hint at iOS 18's massive Siri upgrade — WWDC 24 logo latest sign of the change we've all been waiting for
Here are the five biggest changes coming to iPhone with iOS 18
Get the latest Apple TV 4K streamer for just $89.99 while this rare deal lasts — and it might not stick around for long
- Annie_M Thank you for this... it's good to know. Reply
- View All 1 Comment
Most Popular
- 2 Apple's AirPods Conversation Awareness needs this AI upgrade
- 3 The thinnest bezels ever? Another iPhone 16 Pro rumor suggests Apple might be focusing on all the wrong things for its next flagship release
- 4 Apple just dropped another hint at iOS 18's massive Siri upgrade
- 5 Spotify Premium is now more expensive than Apple Music — But is it worth the extra?
This Hidden Safari Feature Makes Multitasking a Breeze
Safari's Picture-in-Picture mode is tucked away, but it's easy to get to if you know where to enable it.

You can watch videos while using different apps on your Mac.
Your Mac has several features tucked away that are designed to provide flexibility to people who want it but stay out of sight for folks who don't. That also means there's potential for some missed opportunities if you aren't looking. Luckily, some of the best hidden features, like the built-in Picture-in-Picture mode in Safari, are easily accessible.

Much like other modes, PiP in Safari will let you shrink a video you're watching down to a small floating window you can move around so you can work on other tasks while you watch. There are also multiple ways to enable the feature, which we'll detail below for you.
Don't miss how to find your stored Wi-Fi passwords on your iPhone and the full list of devices that support Circle to Search .
How to find Safari's PiP button
If a video is playing in Safari, go to the address bar at the top of the window, right-click the blue audio button to the right of the website URL in the address bar and click Enter Picture in Picture . The video will then automatically move to a floating window.
You can also mute the tab and configure auto-play settings from here.
The floating window playing the video will appear above all other open applications, including Safari, and will snap into any of the four corners of your desktop. You can adjust the size by hovering the mouse over the window's borders and corners and then clicking and dragging to make it bigger or smaller.
The window also has two buttons: One to pause/play the video and the other to snap the floating window back into the web browser. You can also just close the floating window with the X button on the top left.
The floating video window can be moved and resized across your desktop.
More ways to enable Picture in Picture on MacOS
If you don't see the blue audio button in the address bar or have multiple videos playing in Safari, there are two other ways to use Picture in Picture.
The first is by clicking the PiP button in the video's playback controls. Not every video player will have the PiP button, so you're limited in use. The PiP button appears as two rectangles with an arrow pointing from one to the other, but you can also just hover your mouse over the various buttons to find the Open Picture in Picture mode option.
You'll find Picture in Picture between the AirPlay and Full Screen buttons on YouTube.
If you don't see a PiP button, you can right-click the video and see if you get an Enter Picture in Picture option. On YouTube, you have to right-click twice to get the correct menu, but you may only need to right-click once on other websites to find the PiP setting.

You can also use this menu to enter full screen and show the video player's controls.
For more, did you know your iPhone's Apple Cash now has virtual card numbers ? And this hidden iPhone feature helps you relax or focus on demand .
Computing Guides
- Best Laptop
- Best Chromebook
- Best Budget Laptop
- Best Cheap Gaming Laptop
- Best 2-in-1 Laptop
- Best Windows Laptop
- Best Macbook
- Best Gaming Laptop
- Best Macbook Deals
- Best Desktop PC
- Best Gaming PC
- Best Monitor Under 200
- Best Desktop Deals
- Best Monitors
- M2 Mac Mini Review
- Best PC Speakers
- Best Printer
- Best External Hard Drive SSD
- Best USB C Hub Docking Station
- Best Keyboard
- Best Webcams
- Best Laptop Backpack
- Best Camera to Buy
- Best Vlogging Camera
- Best Tripod
- Best Waterproof Camera
- Best Action Camera
- Best Camera Bag and Backpack
- Best E-Ink Tablets
- Best iPad Deals
- Best E-Reader
- Best Tablet
- Best Android Tablet
- Best 3D Printer
- Best Budget 3D Printer
- Best 3D Printing Filament
- Best 3D Printer Deals
About the security content of iOS 16.7.5 and iPadOS 16.7.5
This document describes the security content of iOS 16.7.5 and iPadOS 16.7.5.
About Apple security updates
For our customers' protection, Apple doesn't disclose, discuss, or confirm security issues until an investigation has occurred and patches or releases are available. Recent releases are listed on the Apple security releases page.
Apple security documents reference vulnerabilities by CVE-ID when possible.
For more information about security, see the Apple Product Security page.
iOS 16.7.5 and iPadOS 16.7.5
Released January 22, 2024
Accessibility
Available for: iPhone 8, iPhone 8 Plus, iPhone X, iPad 5th generation, iPad Pro 9.7-inch, and iPad Pro 12.9-inch 1st generation
Impact: An app may be able to access sensitive user data
Description: A privacy issue was addressed with improved private data redaction for log entries.
CVE-2023-42937: Noah Roskin-Frazee and Prof. J. (ZeroClicks.ai Lab)
Apple Neural Engine
Impact: An app may be able to execute arbitrary code with kernel privileges
Description: The issue was addressed with improved memory handling.
CVE-2024-23212: Ye Zhang of Baidu Security
Impact: Processing a maliciously crafted image may result in disclosure of process memory
Description: The issue was addressed with improved checks.
CVE-2023-42888: Michael DePlante (@izobashi) of Trend Micro Zero Day Initiative
Power Manager
Impact: An app may be able to corrupt coprocessor memory
CVE-2024-27791: Pan ZhenPeng (@Peterpan0927) of STAR Labs SG Pte. Ltd.
Entry added April 24, 2024
Impact: A user's private browsing activity may be visible in Settings
Description: A privacy issue was addressed with improved handling of user preferences.
CVE-2024-23211: Mark Bowers
Impact: Processing web content may lead to arbitrary code execution
WebKit Bugzilla: 266619
CVE-2024-23213: Wangtaiyu of Zhongfu info
Impact: Processing maliciously crafted web content may lead to arbitrary code execution
Description: Multiple memory corruption issues were addressed with improved memory handling.
WebKit Bugzilla: 265129
CVE-2024-23214: Nan Wang (@eternalsakura13) of 360 Vulnerability Research Institute
Impact: A maliciously crafted webpage may be able to fingerprint the user
Description: An access issue was addressed with improved access restrictions.
WebKit Bugzilla: 262699
CVE-2024-23206: an anonymous researcher
Impact: Processing maliciously crafted web content may lead to arbitrary code execution. Apple is aware of a report that this issue may have been exploited.
Description: A type confusion issue was addressed with improved checks.
WebKit Bugzilla: 267134
CVE-2024-23222
Information about products not manufactured by Apple, or independent websites not controlled or tested by Apple, is provided without recommendation or endorsement. Apple assumes no responsibility with regard to the selection, performance, or use of third-party websites or products. Apple makes no representations regarding third-party website accuracy or reliability. Contact the vendor for additional information.

IMAGES
VIDEO
COMMENTS
Safari won't remember the pages you visit, your search history, or your AutoFill information. How to turn on Private Browsing. Open Safari on your iPad. Touch and hold the Tabs button. Tap New Private Tab. While Private Browsing is on, the Safari address bar appears black or dark instead of white or gray, and the buttons are black instead of blue.
Open the Safari app on your iPad. Tap , then tap Private. Follow the directions onscreen to unlock Private Browsing. To exit Private Browsing, tap , then tap a Tab Group. The websites you have open in Private Browsing stay open, and Private Browsing locks. To prevent Private Browsing from locking, go to Settings > Safari, then turn off Require ...
How to turn on Private Browsing. Open Safari on your iPad. Touch and hold the Tabs button. Tap New Private Tab. While Private Browsing is turned on, the Safari address bar will appear black or dark instead of white or grey, and the buttons will be black instead of blue. How to turn off Private Browsing. Tap the Tabs button.
Open the Safari app on your iPhone or iPad, then tap the Tabs button in the bottom-right corner to view your open pages. In the bottom-left corner, tap Private to enable private browsing mode. Then tap the Add ( +) button to open a private browsing window. Tap the Tabs button in the bottom-right corner.
To activate Private Browsing, first launch Safari. If you don't see the toolbar at the top of the screen, tap anywhere once to reveal it. Then tap on the "New Window" button in the upper-right corner. On Safari's window management screen, tap the "Private" button in the upper-right corner. After Private Mode is enabled, tap the plus (+) button ...
Select the "Private" option from the menu that pops up to switch to the private browsing mode. Select the "+" icon in the bottom-left to open a new private tab. Or tap "Done" in the bottom-left corner if you're opening a private tab for the first time. On the iPad, you'll need to tap the "Sidebar" option on the upper-left corner.
How to Use Private Browsing Mode on iPad. Safari has a dedicated area just for private tabs that you can access by choosing Private. Tap the Private button to put Safari in incognito mode. Tap the Tabs button. Select Private . Tap the Plus sign. Use Safari as you normally would. It won't remember the pages you visit.
With iOS 14. Open Safari and tap the two square-icon at the bottom of your screen (if you don't see the icon, tap near the bottom of the screen) Tap Private. Now tap the + icon to open a new ...
With your Safari Private Browsing Mode window open, tap the X to close it. With Safari still open, go to the Mac menu bar and click File. Click on New Window. iOS 17. To turn off Safari Private Browsing on your iPhone running iOS 17, follow these three simple steps: Open Safari on your iPhone. Tap and hold the Tabs button.
Safari Private Browsing on iPhone or iPad. To enter private browsing mode, tap the 'tabs' button in the top right-hand corner. Then tap the button labeled Private. That then gets highlighted ...
On your iPad, tap Safari . Tap the tabs button in the top right hand corner of the screen. If you're using your iPad in landscape mode, you may not need to complete this step as the tabs menu can sometimes already be open. Tap Private . Tap Tabs at the top of the Tabs Group list to switch back to non-private browsing.
The steps to enter Private Browsing mode are nearly identical on an iPhone and iPad. The only difference is that the tab icon is at the bottom of the screen on iOS and the top on iPadOS. Long-press the tab icon (two overlapping pages) on the bottom-right (iPhone) or top-right (iPad) of your screen. Tap the New Private Tab menu item.
To enable or disable private browsing mode on iPad, you need to use Safari browser and tap on the Private button in the Tabs menu. Private browsing mode on your iPad is limited in what it can hide, but using the Ghostery tracker & ad blocker extension for Safari blocks trackers and enhances your privacy. Learn how to turn private browsing mode ...
Step 4: Tap '+' to open a new tab. With private browsing active, tap the '+' button to open a new private tab. When you hit the '+' button, a fresh private tab springs to life, ready for your undercover online adventures. After completing these steps, your browsing won't be saved in your history, and cookies won't track you ...
A quick swipe up from the Bottom Tab Bar on iOS 15 and newer gets you there even quicker. Tap the + button. How to open a new tab in Safari: Open Safari, tap the show pages icon, tap the + icon (Image credit: iMore) Alternatively, tap and hold the show pages icon, then tap New Tab. For those who like gestures, a quick swipe to the left on the ...
Next to Private Browsing, select "Require Touch ID to view locked tabs." Or unselect it, if you don't want your private windows to lock. When private windows lock. On iPhone or iPad, private windows lock when Safari isn't running in the foreground or when you switch from Private Browsing. They also lock when your device locks.
Step 3: Turn Off Private Browsing. Tap "Private" to turn off private browsing mode. You'll see the "Private" button in the bottom left corner of the screen, next to the "+" button. If it's highlighted, you're in private browsing mode. Tapping it will take you back to regular browsing.
To turn on Private Browsing in Safari for Mac, follow these simple steps: Make sure Safari is the active application that you're using. Click on File in the menu bar along the top of the screen. Click on New Private Window to switch to private browsing mode. To turn on Private Browsing in Safari for iPhone or iPad, the process is much the same:
To enable Private Browsing in Safari, follow these steps. Open Safari on your iPhone or iPad, tap the Pages icon (consisting of two squares) to bring up the open tabs view, and then tap the ...
Steps to open a Private Browsing Window in Safari on iPhone or iPad. Open Safari browser on your iPhone or iPad. Tap the Tabs button at the bottom right corner. Now, tap the " Tab Groups ...
This will take you back to normal browsing in Safari. Note that any private tabs you have open won't close automatically when switching browsing modes. This will be called Start Page if you don't have any tabs open in the normal browsing mode. Private mode doesn't record your browsing history.
5 Ways to Fix Safari Private Browsing Not Available on iPhone or iPad Private Browsing, aka, the incognito mode allows you to surf the internet without leaving a trace of your online activities. 5 ...
Using Safari I cannot seem to turn off private browsing. Went to settings, selected Safari and cleared hi story and data as suggested here. Still I'm in private browsing. Help please. Show more Less. iPad, iPadOS 17 Posted on Jun 5, 2024 9:49 AM Me too Me too Me too ...
In iOS 17. Open Safari on your iPhone. Tap the Tabs button. Swipe to the Private tab group button, then tap the tab that you want to open. For additional privacy, you can choose to lock Private Browsing when you're not using it. When you lock your device, your private tabs in Safari will also lock. Then, when you unlock your device again, just ...
I use Google's various applications both for work and for personal use. I thought you had to download discrete apps for Google Drive, Gmail, Calendar and such.Juggling all these apps, even with ...
Clear Browsing History in Safari on a Mac . To clear your browsing history in Safari on a Mac, click History > Clear History from the menu bar at the top of your screen. Select the time period you ...
If you're running iOS 17, Safari now comes with a translation feature baked into the browser, making it easier than ever to translate a web page on iPhone and iPad. ... Open Safari on your iPhone or iPad. While viewing a web page, tap the share button. Scroll to the left on the bottom row of icons. (Image credit: iMore)
Open the Safari app on your iPhone. Tap . Swipe right on the tab bar at the bottom of the screen until Private Browsing opens, then tap Unlock. To exit Private Browsing, tap , then swipe left to open a Tab Group from the menu at the bottom of your screen. The websites you have open in Private Browsing stay open, and Private Browsing locks.
If a video is playing in Safari, go to the address bar at the top of the window, right-click the blue audio button to the right of the website URL in the address bar and click Enter Picture in ...
Safari. Available for: iPhone 8, iPhone 8 Plus, iPhone X, iPad 5th generation, iPad Pro 9.7-inch, and iPad Pro 12.9-inch 1st generation. Impact: A user's private browsing activity may be visible in Settings. Description: A privacy issue was addressed with improved handling of user preferences. CVE-2024-23211: Mark Bowers. WebKit