How to Inspect Element on Safari for Mac
This is how you Inspect Element on Safari for macOS

When you know how to Inspect Element on Safari for Mac, you can delve into the HTML and CSS code of a web page, to see how it's really functioning behind the scenes or to make changes to how the site looks or functions (these are only temporary and the changes will be discarded after you close your browser).
If you're on a website you've built, you can use Inspect Element to debug issues with a page's front end.
Chrome and Firefox users will be used to simply right clicking on a page element and then selecting Inspect Element. However, with Safari the Inspect Element feature is not enabled by default, so you may be scratching your head about where to find it, especially if you're unfamiliar with Apple's browser. To enable Inspect Element, you first have to switch on Safari's Developer Menu.
If you aren't sure how, fear not, as this guide will show you exactly how to Inspect Element on Safari. All you need to do is read on.
- In Safari, click Safari in the tool bar
- Click Settings and head to Advanced
- Check Show Develop menu in menu bar
- On a webpage, right click an element
- Click Inspect Element
Read on to see illustrated instructions for each step.

1. Open Safari's settings

With the browser open, click Safari in the top left, then click Settings .
2. Under Advanced, enable the Develop menu

Click the Advanced tab , then check Show Develop menu in the menu bar . You can now close the Settings window .
3. Right click and select Inspect Element

Right click a page element and select Inspect Element from the menu.
4. Inspect the page code

You can now inspect the page code in HTML and CSS. Have fun!
If you'd like to learn more ways to get the most out of your Mac, we have lots of helpful tutorials just like this one. Find out how to enable macOS beta updates , so you can see and test the new features coming to your Mac in upcoming OS releases. I
f your Mac is behaving a little sluggishly, learn how to clear the cache on Mac , as this may help speed things back up. If you're sick of screenshots sitting on your desktop and spoiling your clean background, discover how to change the screenshot save location on Mac . Messy desktop? Learn how to use desktop stacks on Mac .
Sign up to get the BEST of Tom’s Guide direct to your inbox.
Upgrade your life with a daily dose of the biggest tech news, lifestyle hacks and our curated analysis. Be the first to know about cutting-edge gadgets and the hottest deals.
Peter is Reviews Editor at Tom's Guide. As a writer, he covers topics including tech, photography, gaming, hardware, motoring and food & drink. Outside of work, he's an avid photographer, specialising in architectural and portrait photography. When he's not snapping away on his beloved Fujifilm camera, he can usually be found telling everyone about his greyhounds, riding his motorcycle, squeezing as many FPS as possible out of PC games, and perfecting his espresso shots.
Android apps that open Chrome just got a new picture-in-picture feature
Gotta collect 'em all — Opera adds Gemini AI to its browser
Max top 10 movies — here’s the 3 worth watching right now
Most Popular
- 2 Hogwarts Legacy's free summer update adds photo mode, a new quest, and more — here's everything new
- 3 Top 11 trailers you need to see from Summer Game Fest 2024
- 4 Are Saatva mattresses organic? Here’s what I discovered
- 5 5 apps that should be really worried ahead of WWDC
How to Use Inspect Element in Chrome, Safari, & Firefox
Published: May 20, 2024
When I started my coding journey, I couldn’t always pinpoint what made a web page great — all of the code underneath that craft a well-designed experience. So, I would use the inspect element on my browser to peel back the curtain. Here, I could see how pages were coded so I could understand how to recreate elements for my own projects.

The inspect element feature lets us view and even modify any website’s front end. This simple trick can help you understand how websites work and even help you build your own.
In this post, I’ll discuss what it means to “inspect” page elements and how to do so on three common web browsers. If you’re in a pinch, jump ahead to what you’re looking for.
Table of Contents
How to Inspect Elements in Chrome
How to inspect elements in safari, how to inspect elements in firefox, get a closer look with inspect, what does “inspect element” mean.
Inspect element is a feature of modern web browsers that enables anyone to view and edit a website’s source code, including its HTML, CSS, JavaScript, and media files. When the source code is modified with the inspect tool, the changes are shown live inside the browser window.
Inspect is a web professional’s scout team. Developers, designers, and marketers frequently use it to peek inside any website (including their own) to preview content and style changes, fix bugs, or learn how a particular website is built. For instance, if I find an intriguing interface on a competing website, the inspect element lets me see the HTML and CSS that make it up.
I also think of my browser’s inspect feature as a “sandbox” of sorts. I can play around with a web page as much as I want by changing content, colors, fonts, layouts, etc. When finished, I just refresh the page to revert everything to normal.
Inspect doesn’t change the website itself — only how it appears in your browser. You can then experiment without worry!
Inspect is also an incredibly valuable tool for those learning web development. Instead of viewing plain source code, I can use the inspect element to interact with the page and see how each line of code maps to an element or style.
By better understanding what constitutes the typical web page, I can communicate effectively with developers in the case of an error or if I want to make a change.
Inspect may be a “developer tool,” but you don’t need to write any code or install any additional software to use it. You can do everything I’ve described right inside your browser. Let’s learn how.
How to Inspect Elements
To inspect elements, you have to right-click any part of a web page and click Inspect > Inspect Element. Alternatively, you can press Command+Option+i on your Mac or F12 on your PC to do the same.
Every modern web browser has a native tool for inspecting elements. It can be accessed in any browser, but some browsers like Chrome and Safari have slight differences. Let’s discuss how to use the inspect tool in three desktop web browsers: Google Chrome, Apple’s Safari, and Mozilla Firefox.
Chrome comes with a handy developer tool that allows you to inspect individual elements. This allows you to see the code behind a web page and even edit it on your own browser. (Note that the changes are only visible to you, not to anyone else across the web.)
Here's how to get started.

Free Guide: 25 HTML & CSS Coding Hacks
Tangible tips and coding templates from experts to help you code better and faster.
- Coding to Convention
- Being Browser-Friendly
- Minimizing Bugs
- Optimizing Performance
Download Free
All fields are required.
You're all set!
Click this link to access this resource at any time.
1. Launch Chrome and navigate to the page you want to inspect.
To use the element inspector in Google Chrome, I first navigate to any web page. In these examples, I’ll be using HubSpot.com .
2. Open up the Inspect panel.
Once I arrive at my desired page, I have several ways to open Chrome's Inspect tool.
- Option 1 : I can right-click any part of the page and choose Inspect . Right-clicking a specific page element will open that element in the inspector view.
- Option 2 : In the top menu bar, I can select View > Developer > Developer Tools .
- Option 3: I can click the three-dot icon in the top right corner of the browser window. From there, I can choose More Tools > Developer Tools . Then, I can click the Inspect tab in the popup.
- Option 4 : I can use the shortcut control-shift-C on Windows or command-option-C on macOS.
3. Change the location of the inspect panel.
To better view the code, I can change the position of the inspector window.
The Chrome Developer Tools panel will open at the bottom of the browser window, but sometimes it opens in a separate window altogether.
If I want to change the location of the panel, I can click the three-dots icon in the top right corner of the panel (next to the X icon), and then choose my preferred dock position.
Pro tip: Choosing Dock to right makes it easier to view the rendered page and its source:

Along the top of the inspect panel, I see tabs for Elements , Console , Sources , etc. These are all tools I can use to assess a page’s contents and performance. However, everything I need to inspect is under the Elements tab.
4. Look at the source HTML code of the page.
The biggest area of the panel will contain the source HTML of the current page. I always spend some time exploring this region. Hovering the cursor over the piece of code highlights the corresponding element on the page.
Blue indicates the contents of an element, green corresponds to padding, and areas in orange are margins.
Pro tip: If you’re a beginner and want to learn more about the different elements you’re inspecting, check out this HTML guide for beginners.
5. Select a specific element to inspect.
Rather than trying to read through the code to find an element, I can also do the opposite. I can locate a piece of code by hovering over the page element itself. To do this, I click the Element select icon in the top left corner of the panel.

8. Edit the page's CSS code.
Moving down the Chrome inspect panel, I see the Styles tab. This shows me what CSS styling has been applied to the selected element. I can click on lines of code to rewrite them, or I can activate/deactivate certain declarations by checking/unchecking the boxes next to them. I’ll do this for my <h1> element’s font-weight property:
9. View the page's mobile version.
Finally, let’s cover one more feature of Chrome’s inspect feature: mobile view. When building a site, designers need to consider how its pages appear on desktop, mobile, and tablet screens alike.
Fortunately, Chrome lets me preview the same web page in multiple screen resolutions. Start by clicking the Toggle device icon in the top left corner of the panel:

Now, when I click a page element, the Web Inspector reveals the corresponding source code.
7. Edit, add, or delete page elements.
Like Chrome’s inspector, Safari lets me modify, add, and remove page elements. To edit the page, I can right-click an HTML element in the inspect panel. I can then choose an option from the Edit menu.
Web Inspector will prompt me for a new text input and then display my changes in real time:

If I want to delete a page element, I just select some code and delete it. Or, I can right-click and choose Toggle Visibility to hide an element without deleting it.
8. Activate or deactivate the page's CSS code.
To the right, I have the Styles column, where I can change or activate/deactivate CSS declarations for any element, like so:
When testing content and style changes, I want to see the effect on mobile screens as well as desktops. I’ll cover that next.
Pro tip: When seeking inspiration from other web pages, I always take advantage of the Styles tab in my browser’s developer tools to tailor the CSS according to how I envision it on my own page. Try it out. This allows you to refine and adapt design elements to suit your specific preference before moving forward with coding it in your own workspace.
Safari’s Responsive Design Mode allows me to preview a website across common devices.
To view the page in a mobile viewport, I choose Develop → Enter Responsive Design Mode . In this mode, I can use the same inspector tools on pages formatted for Apple devices or set the dimensions myself:

What I like: Safari’s responsive design tab not only lets you test your web page’s responsiveness on devices, but you can also test its behavior across different browsers. Serving as a one-stop-shop for testing responsiveness, the Safari dev tools are a huge time saver.
Firefox is another great option for inspecting a web page in either macOS, Windows, or Linux. Here’s how to get started.
1. Open Firefox's inspect element tool.
To open the Firefox Inspector, I have several options:
- Option 1: I can right-click any part of the page and choose Inspect Element . Right-clicking a specific page element will open that element in the inspector view.
- Option 2: I can select Tools → Browser Tools → Web Developer Tools from the top menu bar.
- Option 3: I can use the shortcut control-shift-I or press f12 in Windows or command-option-I in macOS.
Next, I go to the web page I’d like to inspect. I’ll be using HubSpot.com again.
3. Change the location of the inspector panel.
The Firefox inspector appears along the bottom of the window by default. To change its position, I can select the three-dots icon in the top right corner of the inspector, then choose an alternative display option.

4. Look at the HTML code of the page.
Firefox’s inspector panel is comparable in features to Chrome’s and Safari’s. The HTML source code indicates the corresponding page element with color codes — content is blue, padding is purple, and margins are yellow:
I can also find code by selecting elements on the page. To enter selection mode, I click the cursor icon in the top left corner:

I can then click any page element to reveal its source code in the inspect panel.
6. Modify or delete page elements.
To modify or delete a page element, I select its code in the inspector. Then, I can either double-click to change the text, right-click and choose Edit as HTML, or click Plus Button next to the “Search HTML” bar to add code. Or I can simply delete the code and see the resulting changes on the page.

7. Toggle the page's CSS styles.
To toggle the CSS styling of an element, I use the Filter Styles region at the bottom of the inspect panel. There, I can uncheck the box next to a CSS declaration to deactivate it (or write in new code myself):
8. View the page's mobile version.
Finally, Firefox’s tools also come with a mobile preview option. To use it, I can click the Responsive Design Mode icon in the top right corner of the panel:

Responsive Design Mode lets me choose from several preset screen resolutions or set my own. I can also toggle connection speed and device pixel ratio:

What I like: As a software developer, it is very important that I make web pages that can be easily used by anyone. Firefox’s accessibility tab in its inspector tool allows me to check if my nodes accessibility tree is missing any important properties. I can verify color contrasts too.
The quickest way to access this feature is by right clicking on the page → choose Inspect → select the two arrows next to debugger → select Accessibility .
Once you learn the basics of your browser’s inspect tool, you might realize just how much information about your favorite websites is publicly available. With a few clicks, you can explore how exactly web pages are built, what styles they use, how they optimize for search engines, how they format on mobile screens, and a lot more.
Editor's note: This article was originally published in December 2020 and has been updated for comprehensiveness.

Don't forget to share this post!
Related articles.

XML Files: What They Are & How to Open Them

The Beginner's Guide to Website Development

Are .io Domains Good? Why Tech Startups Love .io Domains

15 Backend Project Ideas for Your Developer Portfolio

37 Backend Interview Questions and Answers: The Ultimate Guide 2022
![How to Build & Run an Effective Website With a Small Team or Budget [Startup Tips]](https://blog.hubspot.com/hubfs/website-on-a-budget.jpg "safari inspector element console")
How to Build & Run an Effective Website With a Small Team or Budget [Startup Tips]

How to Code a Website for Free in 6 Easy Steps

How Long Does it Take to Build a Website?

Flush DNS: What It Is & How to Easily Clear DNS Cache
![How to Make a Website With User Accounts and Profiles [With WordPress, Wix, and More]](https://blog.hubspot.com/hubfs/how-to-create-user-accounts-and-profiles.jpeg "safari inspector element console")
How to Make a Website With User Accounts and Profiles [With WordPress, Wix, and More]
CMS Hub is flexible for marketers, powerful for developers, and gives customers a personalized, secure experience
How To Use Inspect In Safari

- Software & Applications
- Browsers & Extensions

Introduction
Safari, Apple's widely used web browser, offers a powerful tool known as the Inspector, which allows users to delve into the inner workings of web pages. Whether you're a web developer, designer, or simply a curious user, the Inspector can provide valuable insights into the structure, layout, and functionality of websites. By understanding how to use the Inspector effectively, you can gain a deeper understanding of web development and design, and even troubleshoot issues that may arise while browsing the web.
In this article, we will explore the various features of the Inspector in Safari, guiding you through its different tabs and demonstrating how each can be utilized to analyze and manipulate web content. From inspecting and modifying HTML elements to examining network activity and debugging JavaScript, the Inspector offers a wide array of tools to aid in understanding and enhancing the web browsing experience.
Whether you're looking to customize the appearance of a webpage, optimize its performance, or gain insights into its underlying code, the Inspector in Safari is a versatile and indispensable tool. By the end of this article, you will have a comprehensive understanding of how to leverage the Inspector to gain valuable insights into web development and design, empowering you to make the most of your browsing experience.
Opening the Inspector
To begin exploring the powerful capabilities of the Inspector in Safari, you first need to open it. There are several ways to access the Inspector, each providing quick and convenient access to its robust features.
Using the Menu Bar
One of the simplest methods to open the Inspector is through the Safari menu bar. By navigating to the "Develop" menu and selecting "Show Web Inspector," you can swiftly launch the Inspector, ready to delve into the inner workings of any webpage.
Keyboard Shortcuts
For those who prefer to streamline their workflow with keyboard shortcuts, Safari offers a quick and efficient way to open the Inspector. By pressing "Option + Command + I" on a Mac, or "Ctrl + Option + I" on a Windows PC , you can instantly access the Inspector, saving valuable time and effort.
Right-Click Context Menu
Another convenient way to open the Inspector is by right-clicking on any element within a webpage and selecting "Inspect Element" from the context menu. This method allows for immediate inspection of specific elements, making it ideal for targeted analysis and modification.
Using the Address Bar
Safari also provides a direct method to open the Inspector by entering a special command in the address bar. By typing "inspect" or "inspector://" followed by the Enter key, the Inspector will promptly appear, ready for exploration.
Docked Inspector
Once the Inspector is open, it can be docked to the bottom, right, or left of the browser window, providing a customizable layout that suits your preferences. This feature allows for seamless multitasking, as you can simultaneously view the Inspector and the webpage, making it easier to analyze and modify elements in real-time.
By familiarizing yourself with these various methods to open the Inspector, you can seamlessly integrate its powerful capabilities into your web browsing and development workflow. With the Inspector readily accessible, you are well-equipped to embark on a journey of exploration and discovery within the intricate world of web development and design.
Elements Tab
The Elements tab within the Inspector in Safari serves as a gateway to the underlying structure of a web page. Upon opening the Inspector and navigating to the Elements tab, you are presented with a visual representation of the Document Object Model (DOM) of the current webpage. This hierarchical view allows you to inspect and manipulate various elements, providing valuable insights into the composition and layout of the page.
Understanding the DOM Tree
At the core of the Elements tab lies the DOM tree, which organizes the HTML elements of the webpage in a nested structure. Each HTML element, such as headings, paragraphs, images, and more, is represented as a node within the tree. By expanding and collapsing nodes, you can navigate through the DOM tree to locate specific elements and understand their relationships to one another.
Inspecting Elements
The Inspector empowers you to inspect individual elements within the DOM, revealing a wealth of information about each element. By hovering over elements in the Inspector or on the webpage itself, you can visually highlight the corresponding elements, making it easier to identify and select specific components for further analysis.
Modifying Attributes and Styles
One of the most powerful features of the Elements tab is the ability to modify attributes and styles of HTML elements in real-time. By double-clicking on an element's attributes or styles, you can directly edit them within the Inspector, instantly observing the visual changes on the webpage. This dynamic editing capability is invaluable for experimenting with different design and layout modifications without altering the actual source code.
Event Listeners
In addition to visual and structural inspection, the Elements tab provides insights into event listeners attached to various elements. This feature is particularly useful for understanding the interactivity and functionality of a webpage, as it allows you to view and manage event listeners associated with specific elements.
Accessibility and Validation
Furthermore, the Inspector in Safari includes accessibility and validation tools within the Elements tab, enabling you to assess the accessibility of elements and validate the HTML structure for compliance with web standards. This functionality is essential for ensuring that web content is accessible to all users and adheres to best practices in web development.
By mastering the Elements tab in the Inspector, you gain the ability to dissect and manipulate the building blocks of web pages, fostering a deeper understanding of web development and design. Whether you're fine-tuning the layout, debugging issues, or optimizing accessibility, the Elements tab equips you with the tools to navigate the intricate web of HTML elements with confidence and precision.
The Styles tab, a pivotal component of the Inspector in Safari, serves as a gateway to the visual presentation and styling of a web page. Upon navigating to the Styles tab within the Inspector, you are greeted with a comprehensive overview of the CSS (Cascading Style Sheets) rules that define the appearance and layout of the current webpage. This powerful tool provides invaluable insights into the styling hierarchy, inheritance, and applied styles, empowering you to analyze, modify, and optimize the visual aspects of web content.
Comprehending the Style Rules
At the heart of the Styles tab lies a detailed display of CSS rules that dictate the appearance of elements on the webpage. Each rule encompasses selectors, properties, and values, collectively shaping the visual presentation of the content. By examining these rules, you can gain a profound understanding of how styles are applied and inherited throughout the DOM, unraveling the intricacies of the cascading nature of CSS.
Visualizing Box Model and Layout
The Styles tab offers a visual representation of the box model for selected elements, illustrating the dimensions, padding, borders, and margins that define the layout of each element. This feature provides a clear and intuitive depiction of the spatial attributes of elements, facilitating precise adjustments to the layout and spacing without the need to decipher complex CSS code.
Modifying Styles in Real-Time
One of the most compelling capabilities of the Styles tab is the ability to modify CSS styles directly within the Inspector, observing instantaneous visual updates on the webpage. By clicking on individual style properties, you can alter their values, experiment with different design variations, and witness the immediate impact on the layout and appearance of the content. This dynamic editing functionality empowers you to fine-tune the visual presentation of web pages with unparalleled efficiency and precision.
Understanding Computed Styles
In addition to the explicit CSS rules, the Styles tab provides insights into the computed styles of elements, revealing the final, computed values of all CSS properties. This feature is instrumental in understanding how styles are resolved and applied to elements, shedding light on the intricate process of style computation and inheritance within the DOM.
Optimizing Performance and Responsiveness
Furthermore, the Styles tab includes tools for analyzing and optimizing the performance and responsiveness of web content. By inspecting and managing styles related to layout and rendering, you can identify opportunities to enhance the speed and efficiency of webpage display, ensuring a seamless and responsive user experience across various devices and screen sizes.
By harnessing the capabilities of the Styles tab within the Inspector, you gain a profound understanding of the visual presentation and styling of web content. Whether you're refining the layout, optimizing performance, or experimenting with design variations, the Styles tab equips you with the tools to navigate the intricate realm of CSS with confidence and finesse.
Resources Tab
The Resources tab in Safari's Inspector serves as a comprehensive resource management tool, offering insights into various aspects of web content, including network activity, storage, and more. Upon navigating to the Resources tab within the Inspector, you gain access to a wealth of information that enables you to analyze, monitor , and optimize the resources utilized by web pages.
Resource Overview
The Resources tab provides a holistic overview of the resources loaded by the current webpage, encompassing a wide range of elements such as documents, stylesheets, scripts, images, fonts, and more. This comprehensive view allows you to understand the composition of resources that contribute to the rendering and functionality of the webpage, providing valuable insights into the underlying assets that shape the user experience.
Network Requests
One of the key features of the Resources tab is the network request log, which meticulously records all HTTP requests initiated by the webpage. This log includes details such as request and response headers, timing, and resource size, enabling you to assess the performance and efficiency of network requests. By analyzing the network activity, you can identify potential bottlenecks, optimize resource loading, and ensure swift and seamless delivery of content to users.
Storage and Caching
In addition to network activity, the Resources tab offers visibility into various forms of storage utilized by web pages, including cookies, local and session storage, and application caches. This feature allows you to monitor and manage the storage of data, ensuring compliance with privacy regulations and optimizing the utilization of storage resources for enhanced user experience.
Initiating and Analyzing XHR/Fetch Requests
The Resources tab facilitates the inspection and analysis of XMLHttpRequest (XHR) and Fetch requests made by web pages, providing detailed insights into the data exchanged between the client and server. By monitoring XHR and Fetch requests, you can troubleshoot data retrieval and transmission issues, validate response data, and ensure the seamless operation of dynamic web applications.
Performance Analysis
Furthermore, the Resources tab includes tools for performance analysis, enabling you to assess the loading times of individual resources, identify potential performance bottlenecks, and optimize the delivery of content for enhanced user experience. This functionality is instrumental in fine-tuning the performance of web pages, ensuring swift and efficient resource loading across diverse network conditions and devices.
By leveraging the capabilities of the Resources tab within the Inspector, you gain a comprehensive understanding of the resources utilized by web pages, empowering you to optimize network activity, storage, and performance for an unparalleled user experience. Whether you're analyzing network requests, managing storage, or fine-tuning performance, the Resources tab equips you with the tools to navigate the intricate realm of web resources with precision and efficiency.
Network Tab
The Network tab within Safari's Inspector is a vital tool for analyzing the network activity of web pages, providing valuable insights into the loading and transmission of resources. Upon navigating to the Network tab, you gain access to a comprehensive log of network requests initiated by the webpage, along with detailed information about each request and response.
Monitoring Network Activity
The Network tab meticulously records all network requests, including HTTP requests for documents, stylesheets, scripts, images, and other resources. Each request is accompanied by essential details such as request and response headers, timing, resource size, and the initiator responsible for the request. This comprehensive log allows you to monitor the sequence and performance of network requests, enabling you to identify potential bottlenecks and optimize resource loading.
Request and Response Details
By selecting individual network requests in the log, you can delve into the specifics of each request and response. This includes insights into request headers, response headers, status codes, and response content, providing a granular understanding of the data exchange between the client and server. Analyzing these details allows you to troubleshoot issues related to resource loading, validate response data, and ensure the efficient delivery of content to users.
Performance Analysis and Timing
The Network tab offers tools for performance analysis, allowing you to assess the loading times of individual resources and the overall timeline of network activity. By examining the timing of network requests, you can pinpoint potential performance bottlenecks, optimize resource loading, and ensure swift and efficient delivery of content. This functionality is instrumental in fine-tuning the performance of web pages, ensuring a seamless user experience across diverse network conditions.
Filtering and Sorting Capabilities
To streamline the analysis of network activity, the Network tab provides filtering and sorting capabilities, enabling you to focus on specific types of requests or isolate requests based on various criteria. This feature empowers you to efficiently identify and address issues related to resource loading, network latency, and content delivery, fostering a responsive and optimized web browsing experience.
Initiating XHR/Fetch Requests
In addition to monitoring network requests initiated by the webpage, the Network tab facilitates the inspection and analysis of XMLHttpRequest (XHR) and Fetch requests. This feature provides detailed insights into the data exchanged between the client and server, allowing for thorough validation of response data and troubleshooting of dynamic web application functionality.
By harnessing the capabilities of the Network tab within the Inspector, you gain a comprehensive understanding of the network activity of web pages, empowering you to optimize resource loading, troubleshoot performance issues, and ensure seamless content delivery. Whether you're analyzing network requests, fine-tuning performance, or validating response data, the Network tab equips you with the tools to navigate the intricate realm of network activity with precision and efficiency.
Console Tab
The Console tab within Safari's Inspector serves as a dynamic interface for interacting with the JavaScript console of web pages, offering a powerful set of tools for debugging, logging, and executing JavaScript code. Upon navigating to the Console tab, you gain access to a versatile environment that enables you to monitor runtime errors, log messages, inspect JavaScript objects, and execute ad-hoc scripts, providing invaluable insights into the behavior and functionality of web applications.
Error Logging and Debugging
One of the primary functions of the Console tab is to capture and display runtime errors and exceptions encountered by JavaScript code within the webpage. By monitoring the console output, you can swiftly identify and address errors, ensuring the smooth operation of web applications. Additionally, the console provides detailed stack traces and contextual information for each error, facilitating thorough debugging and troubleshooting of JavaScript code.
Logging Messages and Variables
The Console tab allows for the logging of custom messages, variables, and objects, providing a means to track the execution flow and state of JavaScript code. By utilizing the console.log() method, you can output informative messages and inspect the values of variables and objects at specific points in the code, enabling you to gain visibility into the internal workings of web applications and pinpoint potential issues.
Interactive JavaScript Execution
In addition to logging and debugging, the Console tab offers an interactive environment for executing JavaScript code directly within the Inspector. This feature allows you to experiment with JavaScript expressions, test functions, and manipulate objects in real-time, fostering a dynamic and exploratory approach to understanding and modifying the behavior of web applications.
Network Request Monitoring
Furthermore, the Console tab provides visibility into network requests and responses, allowing you to monitor the exchange of data between the client and server. By capturing network-related messages and errors, you can assess the performance and integrity of data transmission, troubleshoot connectivity issues, and validate the handling of network requests within web applications.
Performance Profiling
Moreover, the Console tab includes tools for performance profiling, enabling you to analyze the execution time and memory usage of JavaScript code. By leveraging the built-in profiling capabilities, you can identify performance bottlenecks, optimize code efficiency, and ensure the responsive and efficient operation of web applications.
By harnessing the capabilities of the Console tab within the Inspector, you gain a comprehensive understanding of JavaScript runtime behavior, empowering you to debug, log, and execute JavaScript code with precision and agility. Whether you're troubleshooting errors, monitoring network activity, or profiling performance, the Console tab equips you with the tools to navigate the intricate realm of JavaScript development with confidence and insight.
In conclusion, the Inspector in Safari is a multifaceted and indispensable tool that empowers users to delve into the inner workings of web pages, gaining valuable insights into web development and design. By exploring the various tabs of the Inspector, including Elements, Styles, Resources, Network, and Console, users can unravel the complexities of web content, optimize performance, troubleshoot issues, and gain a deeper understanding of the technologies that drive the modern web.
The Elements tab provides a window into the hierarchical structure of web pages, allowing users to inspect, manipulate, and validate HTML elements with precision. From understanding the Document Object Model (DOM) to modifying attributes and styles in real-time, the Elements tab equips users with the tools to dissect and fine-tune the building blocks of web content.
Moving on to the Styles tab, users can gain a comprehensive understanding of the visual presentation and styling of web pages. By analyzing CSS rules, visualizing the box model, and modifying styles on the fly, the Styles tab facilitates the optimization of layout, performance, and design, empowering users to craft visually compelling and responsive web experiences.
The Resources and Network tabs offer invaluable insights into the resources utilized by web pages and the network activity that drives content delivery. From monitoring network requests and performance analysis to managing storage and optimizing resource loading, these tabs provide the tools to ensure swift, efficient, and seamless delivery of web content to users across diverse network conditions and devices.
Finally, the Console tab serves as a dynamic interface for interacting with the JavaScript console, enabling users to log messages, debug errors, execute scripts, and profile performance. This feature-rich environment empowers users to troubleshoot JavaScript code, monitor network activity, and validate the behavior of web applications, fostering a deeper understanding of client-side development and interactivity.
In essence, the Inspector in Safari transcends its role as a mere debugging tool, evolving into a comprehensive suite of features that cater to the diverse needs of web developers, designers, and enthusiasts. By mastering the capabilities of the Inspector, users can navigate the intricate realm of web development and design with confidence, creativity, and precision, ultimately enhancing the quality and user experience of web content across the digital landscape.
Leave a Reply Cancel reply
Your email address will not be published. Required fields are marked *
Save my name, email, and website in this browser for the next time I comment.
- Crowdfunding
- Cryptocurrency
- Digital Banking
- Digital Payments
- Investments
- Console Gaming
- Mobile Gaming
- VR/AR Gaming
- Gadget Usage
- Gaming Tips
- Online Safety
- Software Tutorials
- Tech Setup & Troubleshooting
- Buyer’s Guides
- Comparative Analysis
- Gadget Reviews
- Service Reviews
- Software Reviews
- Mobile Devices
- PCs & Laptops
- Smart Home Gadgets
- Content Creation Tools
- Digital Photography
- Video & Music Streaming
- Online Security
- Online Services
- Web Hosting
- WiFi & Ethernet
- Browsers & Extensions
- Communication Platforms
- Operating Systems
- Productivity Tools
- AI & Machine Learning
- Cybersecurity
- Emerging Tech
- IoT & Smart Devices
- Virtual & Augmented Reality
- Latest News
- AI Developments
- Fintech Updates
- Gaming News
- New Product Launches
5 Ways to Improve IT Automation
- What is Building Information Modelling
Related Post
Sla network: benefits, advantages, satisfaction of both parties to the contract, what is minecraft coded in, how much hp does a diablo tuner add, what is halo-fi, what is halo lock iphone, related posts.

How To Enable Inspect In Safari

How To Debug In Safari

How To Inspect On Safari IPhone

How To Open Developer Tools On Safari

How To Inspect In Safari On IPad

How To Get Developer Tools In Safari

How To Inspect On IPhone Safari

How To Inspect Page On Safari
Recent stories.

What is Building Information Modelling?

How to Use Email Blasts Marketing To Take Control of Your Market

Learn To Convert Scanned Documents Into Editable Text With OCR

Top Mini Split Air Conditioner For Summer

Comfortable and Luxurious Family Life | Zero Gravity Massage Chair

Fintechs and Traditional Banks: Navigating the Future of Financial Services

AI Writing: How It’s Changing the Way We Create Content
- Privacy Overview
- Strictly Necessary Cookies
This website uses cookies so that we can provide you with the best user experience possible. Cookie information is stored in your browser and performs functions such as recognising you when you return to our website and helping our team to understand which sections of the website you find most interesting and useful.
Strictly Necessary Cookie should be enabled at all times so that we can save your preferences for cookie settings.
If you disable this cookie, we will not be able to save your preferences. This means that every time you visit this website you will need to enable or disable cookies again.
Zhenyi Tan And a Dinosaur

Safari Web Inspector on iOS
So, I made another app.
It’s called Web Inspector, a browser console for Safari on iOS and iPadOS.

It works pretty much as you would expect: tap the blue “ i ” button to open Web Inspector, tap it again to close.
It has 6 tabs: DOM and Elements let you inspect elements on a webpage, Console is your JavaScript console, Network lists network requests and responses, Timing displays the loading time of resources, and Resources shows you cookies, local storage, etc.
It’s not as powerful as the Web Inspector on the desktop because it’s basically a glorified JavaScript bookmarklet. Think Firebug Lite instead of Firebug .
Web Inspector will be free, with no in-app purchases, no ads, and no tracking, because I feel like this kind of developer tool should be free. I mean, Firebug was free, right?
Update: Web Inspector is out . Update: Web Inspector 1.2.1 is out ! This is a major update.
Productivity
How to use Inspect Element in Chrome, Safari, and Firefox

There's a powerful tool hiding in your browser: Inspect Element.
Right-click on any webpage, click Inspect , and you'll see the innards of that site: its source code, the images and CSS that form its design, the fonts and icons it uses, the JavaScript code that powers animations, and more. You can see how long the site takes to load, how much bandwidth it used to download, and the exact color in its text.
Or, you could use it to temporarily change anything you want on the page.
Inspect Element is a perfect way to learn what makes the web tick, figure out what's broken on your sites, mock up what a color and font change would look like, and keep yourself from having to Photoshop out private details in screenshots. Here's how to use Inspect Element—your browser's secret superpower—to do all the above and more.
Table of contents:
Why should I use Inspect Element?

If you've never peeked at a website's code out of curiosity, you might wonder why you should learn how to use Inspect Element. Below are just a few reasons why different roles can benefit from learning this trick of the trade.
Designer: Want to preview how a site design would look on mobile? Or want to see how a different shade of green would look on a sign-up button? You can do both in seconds with Inspect Element.
Writer: Tired of blurring out your name and email in screenshots? With Inspect Element, you can instantly change any text on a webpage.
Support agent: Need a better way to tell developers what needs to be fixed on a site? Inspect Element lets you make a quick example change to show what you're talking about.
Web developer: Need to look for broken code, compare layouts, or make live edits to a page? Inspect Element does that, too.
For these and dozens of other use cases, Inspect Element is a handy tool to know. For now, let's see how to use the main Elements tab to tweak a webpage on your own.
How to inspect element on Google Chrome
Method 1: Right-click anywhere on the webpage, and at the very bottom of the menu that pops up, click Inspect .

Method 2: Click the hamburger menu (the icon with three stacked dots) on the far-right of your Google Chrome toolbar, click More Tools , then select Developer Tools .

Once you take your preferred route to opening the Developer Tools pane, by default, it will show the Elements tab—that's the famed Inspect Element tool we've been looking for.
If you want to change the orientation of the Inspect Element pane, click the three vertical dots on the top-right side of the Inspect Element pane near the "X" (which you'd click to close the pane). Now, you'll see options to move the pane to the bottom, left, or right side of your browser or to open the pane in a completely separate window (undock view).

For this tutorial, let's dock the pane on the right side of our browser window to give us more space to work. You can make the Developer Tools panel wider or narrower by hovering over the left-side border. Once the ↔ cursor appears, drag the pane left to widen it or right to narrow it.
How to inspect element on Firefox
To get to Inspect Element on Firefox you have three options (just like on Chrome).
Method 1: Right-click anywhere on the page and click Inspect at the bottom of the menu.

Method 2: Click the hamburger menu (three horizontal lines at the top-right corner of the window), select More tools , then click Web Developer Tools .

Method 3: The keyboard shortcut on Firefox is command + option + I for Macs and Control + Shift + C for PCs.
The Element pane in Firefox likes to pop up at the bottom of the window, which doesn't give you much room to work with. To move that pane to the side and free up more room, click the hamburger menu (three horizontal dots, next to the "X" in the top-right corner) and click Dock to Right (or left, if you prefer).

If you like, you can also move the pane into a separate window in this menu. You can also expand the pane further or narrow it by hovering over the edge until your cursor changes, and then drag it to the left or right.
How to inspect element on Safari
To launch Inspect Element with Safari, you'll need to activate the developer capabilities in the advanced settings first. Here's how.
Click the Safari dropdown in the top navigation bar above the Safari window, and then click Preferences .

Navigate to Advanced , and check the box at the bottom of the window by Show Develop menu in the menu bar . Close the window.

Now, you should be able to right-click anywhere on the page and click Inspect Element to open the Elements pane.

The pane should appear along the bottom of your window. To move it to a side alignment and give yourself a little more space to look at the code, click the Dock to right of window (or left of window) option on the top-left corner of the pane, next to the "X."

I prefer right, but you can easily switch this to the other side or detach the pane into its own separate window if you prefer. To make the pane wider or narrower, just hover over the edge until the cursor changes to the dragger, then drag to move the edge.
Tools you can access through Inspect Element (+ tutorials)
Now that we're in Inspect Element, there's an array of useful tools at our fingertips that we can use to make any site look exactly how we want. For this tutorial, we'll focus on the Search , Elements , and Emulation tabs. These aren't the only useful tools Inspect Element opens up—not by a long shot—but they're extremely helpful ones that beginners can start putting to use right away.
Note that, for simplicity, I'll be using Chrome to demonstrate, but the instructions should be essentially the same for all three browsers.
Use Inspect Element Search to find anything on a site
Wondering what goes into your favorite sites? Search is your best tool for that, aside from reading a site's entire source code.
You can open the default Elements view, press Ctrl + F or command + F , and search through the source code. But the full Search tool will also let you search through every file on a page, helping you find text inside CSS and JavaScript files or locate an icon image you need for an article.

In the search field, you can type anything— anything —that you want to find on this webpage, and it will appear in this pane. Let's see how we can use this.
Type meta name into the search field, press Enter, and you'll immediately see every occurrence of "meta name" in the code on this page. Now, you can see this page's metadata, the SEO keywords it's targeting, and whether or not it's configured to let Google index it for search. That's an easy way to check what your competitors are targeting—and to make sure you didn't mess anything up on your site.

Search is an effective tool for designers as well since you can search by color, too. Type #ff4a00 into the search field and press Enter (and make sure to leave the Match Case button unchecked to view all of the results). You should now see every time the color #ff4a00, Zapier's shade of orange, appears in this site's CSS and HTML files. Then, just click the line that reads "color: #ff4a00;" to jump to that line in the site's HTML and tweak it on your own (something we'll look at in the next section).

This is a handy way for designers to make sure a site is following their brand's style guide. With the Search tool, designers can easily check the CSS of a webpage to see if a color is applied to the wrong element, if an incorrect font family is used on a webpage, or if you're still using your old color somewhere on your site.
The Search tool is also the perfect way to communicate with developers better since you can show them exactly where you've found a mistake or exactly what needs changing. Just tell them the line number where the problem exists, and you'll get your fix that much quicker.
Or you can change the webpage yourself with Elements , the core part of Chrome's Developer Tools.
Change anything with Elements
Front-end developers use the Inspect Element tool every day to modify the appearance of a webpage and experiment with new ideas—and you can, too. Inspect Element lets you tweak the appearance and content of a webpage by adding temporary edits to the site's CSS and HTML files.
Once you close or reload the page, your changes will be gone; you'll only see the changes on your computer and aren't actually editing the real website itself. That way, you can feel free to experiment and change anything—and then copy and save the very best changes to use later.
Let's see what we can do with it.
Click the Elements tab in the Developer Tools pane—and if you want more room, tap your Esc key to close the search box you had open before. You should see the HTML for this page—now you know how the sausage gets made.

In the top-left corner of the Developer pane, you'll see an icon of a mouse on top of a square. Click it, then you can select any element on the page you want to change. So let's change some things!
Change the text on a webpage
Ever wanted to change text on a site? Perhaps to see how a new tagline would look on your homepage or to take your email address off a Gmail screenshot? Now you can.
Click the icon of a mouse cursor on a square in the top-left corner of the pane.

Double-click the highlighted text in the Developer Tools pane (not the text on the live page) to turn it into an editable text field.

Type anything you want in this text field ("Auri is a genius" should work just fine), and press Enter .
Voila! You've just (temporarily) changed the text on the webpage.

Refresh the page, and everything will go back to normal.
Fun? Let's try another way to change some things on this page by closing out of the Developer pane altogether. You can then highlight any part of the live webpage you want to edit, then right-click it and hit Inspect .

When your Developer Tools pane opens, it should automatically highlight that sentence. Pretty neat, huh? It's the little things that count.
Now that we've selected a sentence to change on our blog, let's change how it looks.
Change the color and font of elements
On the lower half of the Developer Tools pane, you'll see a sub-pane with a few additional tabs that allow you to change how this text looks on the page. Let's get started on the Styles tab.

You may notice that some things are crossed out. This means that these styles are not active for the element we've selected, so changing these values will have no effect.
Let's try changing something.
Look through the code for the "font-size" field and click into it. Let's change it from 34px to 42px.

Now scroll down to "color" and change it to Zapier's signature #ff4a00.

This will look a bit cramped, so let's finish by changing the "line-height" to 44px.

Now check the blog post to see the difference.

Now let's try something really cool.
Change element states
Want to see how a button or link will look once someone interacts with it? Inspect Element can show that, too, with force element state tools. You can see how the element will look once a visitor hovers over the element (hover state), selects the element (focus state), and/or has clicked that link (visited state).
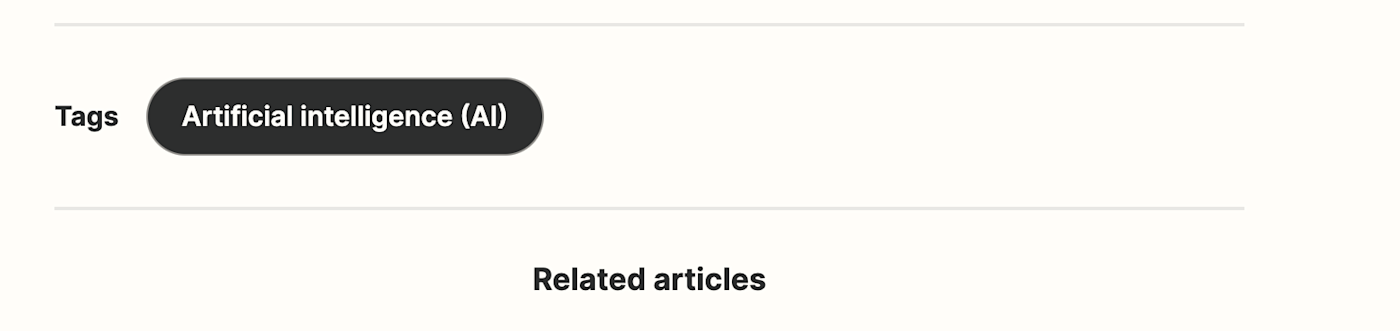
As with the other examples, you'll need to click the mouse cursor/box icon. For this example, we'll select the "Artificial Intelligence (AI)" tag on the "What is AI" article to try a color change.
In the Developer Tools pane, right-click on that code in the Elements tab, hover over Force state , and click the :active: option. Do this one more time, but click the :hover: option this time.
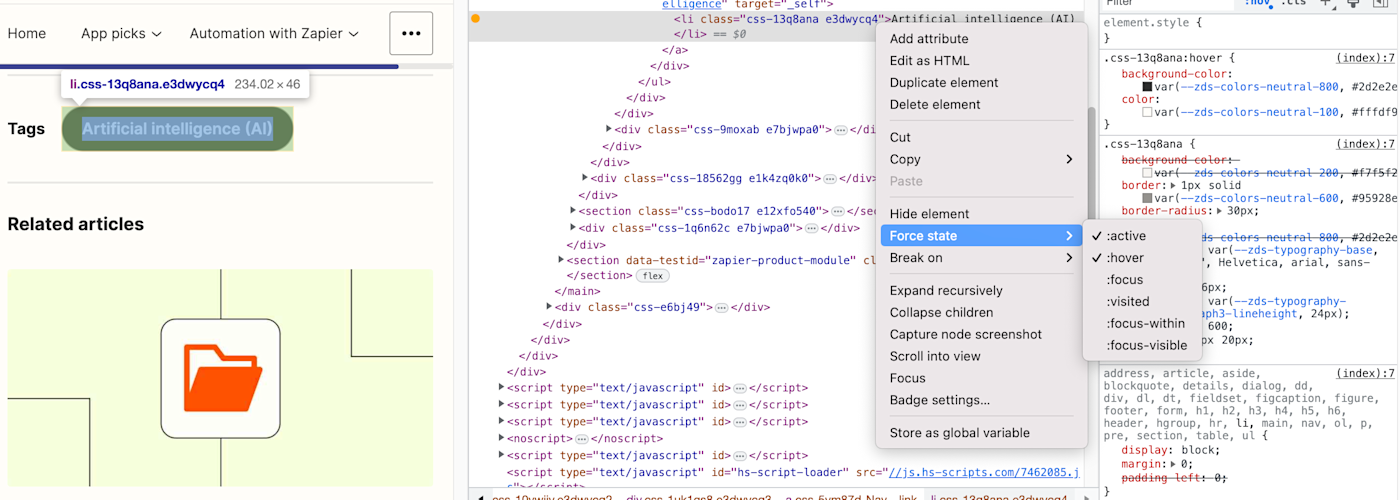
That will change the button's background to black, which is what happens when you hover over the button on the live site.
Now, change the "background-color" value to #ff4a00.

You should instantly be able to see what the new hover color will look like.

Try experimenting—change the :hover: color, then uncheck :hover: in the right-click menu and drag your mouse over the button to see the new button color.
Change images
You can easily change images on a webpage with Inspect Element, too. Using the same "What is AI?" blog post as an example, let's replace the orange solid color background on the "Power your automation with AI" button with a dramatic photo of a solar flare from NASA.
First, copy this link to the image: https://c1.staticflickr.com/9/8314/7931831962_7652860bae_b.jpg
Open Inspect Element on the orange background of the "Power your automation with AI" button and look for the "background-color" code in the pane.

Click "background-color" and replace color with image —this should cause an error. Just replace the color code with url and then paste the URL you copied into the parentheses.

This should automatically replace that boring single-color background with a flashy new image.

Note: You can also change a photo to a GIF or a video—all you need is a link to the file, and you can add it in.
Editing text is handy, swapping out images is fun, and changing colors and styles just might help you quickly mock up the changes you want made to your site. But how will that new tagline and button design look on mobile?
That's where Emulation comes in—it's where everything we've reviewed so far can be applied even further. Let's see how.
Test a site on any device with Emulation
Everything has to be responsive today. Websites are no longer only viewed on computers—they're more likely than ever to be viewed on a phone, tablet, TV, or just about any other type of screen. You should always keep that in mind when creating new content and designs.
Emulation is a great tool to approximate how websites will look to users across various devices, browsers, and even locations. Though this does not replace actual testing on a variety of devices and browsers, it's a great start.
In the Developer Tools pane, you'll notice a little phone icon in the top-left corner. Click it. This should change the page into a tiny, phone-styled page with a menu at the top to change the size.

Resize the small browser to see how things would look if you were browsing on a tablet, phone, or even smaller screen. Or, click the menu at the top to select default device sizes like Surface Duo or iPhone 12 Pro—let's go ahead and select the latter.
The webpage screen should shrink down to the device's size, and you can zoom in a bit by clicking the percentage dropdown next to the dimensions.
If you change the device preset to "Responsive," you can enlarge the view by dragging the right edge of the webpage emulation right. See what happens? Dragging the screen along the grid allows you to see how the webpage will change as the screen size changes. You can even toggle portrait and landscape views by clicking the little rotation icon at the end of the top menu.
Play around with the other devices to see how the webpage and screen resolution changes. All of the other developer tools we've gone over so far will also react to the device view.
Emulate mobile device sensors
When you start interacting with a device preview, you may notice that your mouse now appears as a little circle on the webpage. This allows you to interact with the page as if you're on your mobile device.
If you click while dragging the page down, it doesn't highlight text like it normally would in your browser—it drags the screen down like you're on a touchscreen device. Using this view, you can see how large touch zones are on a webpage. This means you can see which buttons, icons, links, or other elements are easily touchable with the finger.
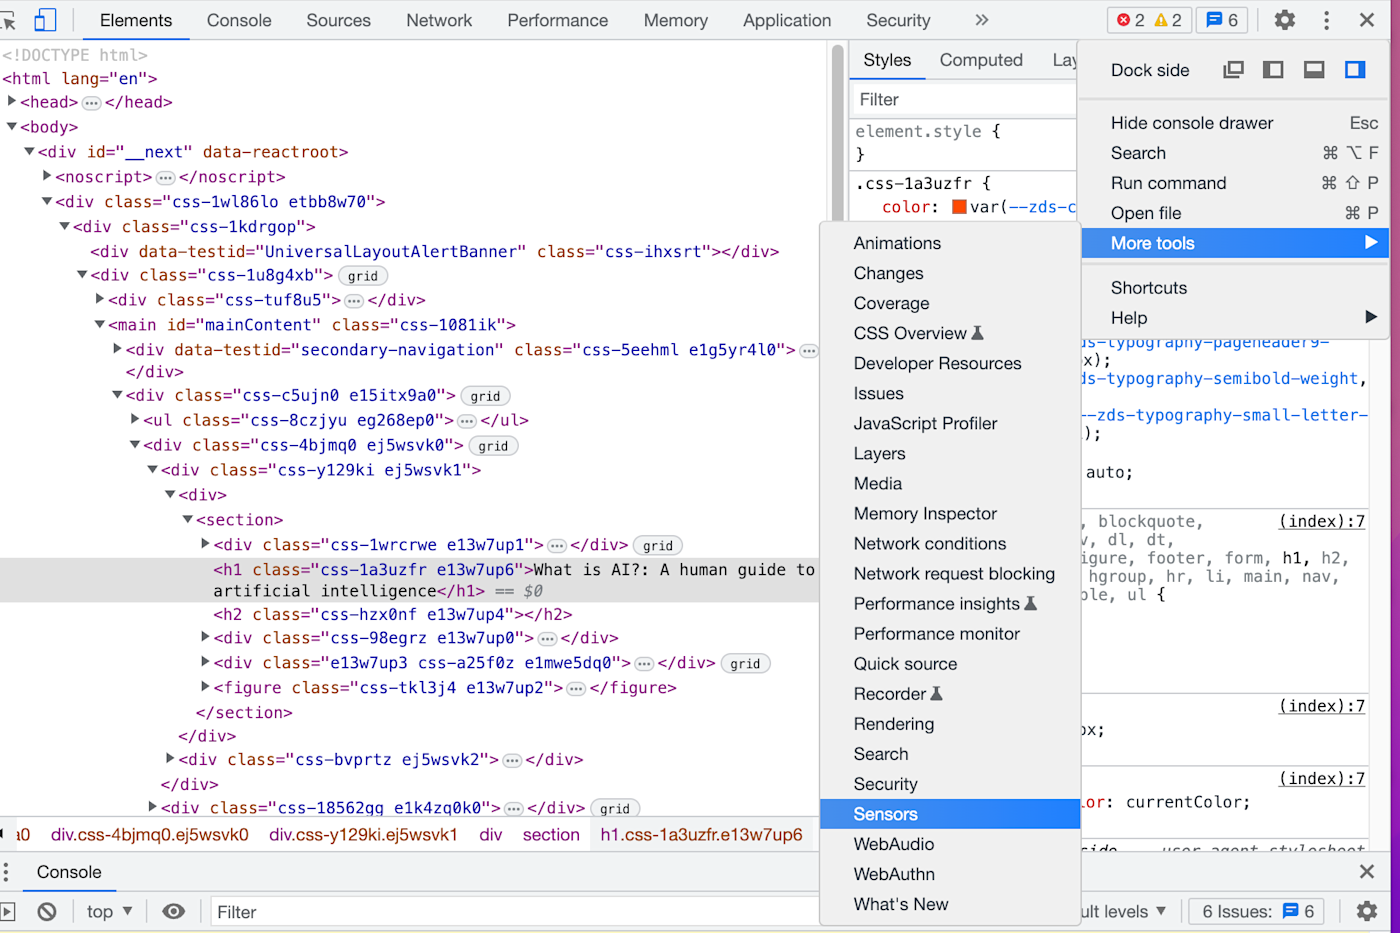
You can even make your browser act like a phone. Press your Esc key to open the Search pane in Inspect Element again, and this time click the hamburger menu on the top-right. Select More tools and then Sensors to get four new tools: Location, Orientation, Touch, and Emulate Idle Detector state.
Touch lets you choose whether the circle selector that acts more like a finger than a normal mouse cursor is forced or device-specific.
Orientation lets you interact with motion-sensitive websites, such as online games that let you move things by moving your phone.
Location lets you pretend you're in a different location.
Emulate Idle Detector state allows you to toggle between different idle user conditions.
Let's try viewing this site from Berlin. Just click the dropdown and select the city—nothing changes, right?
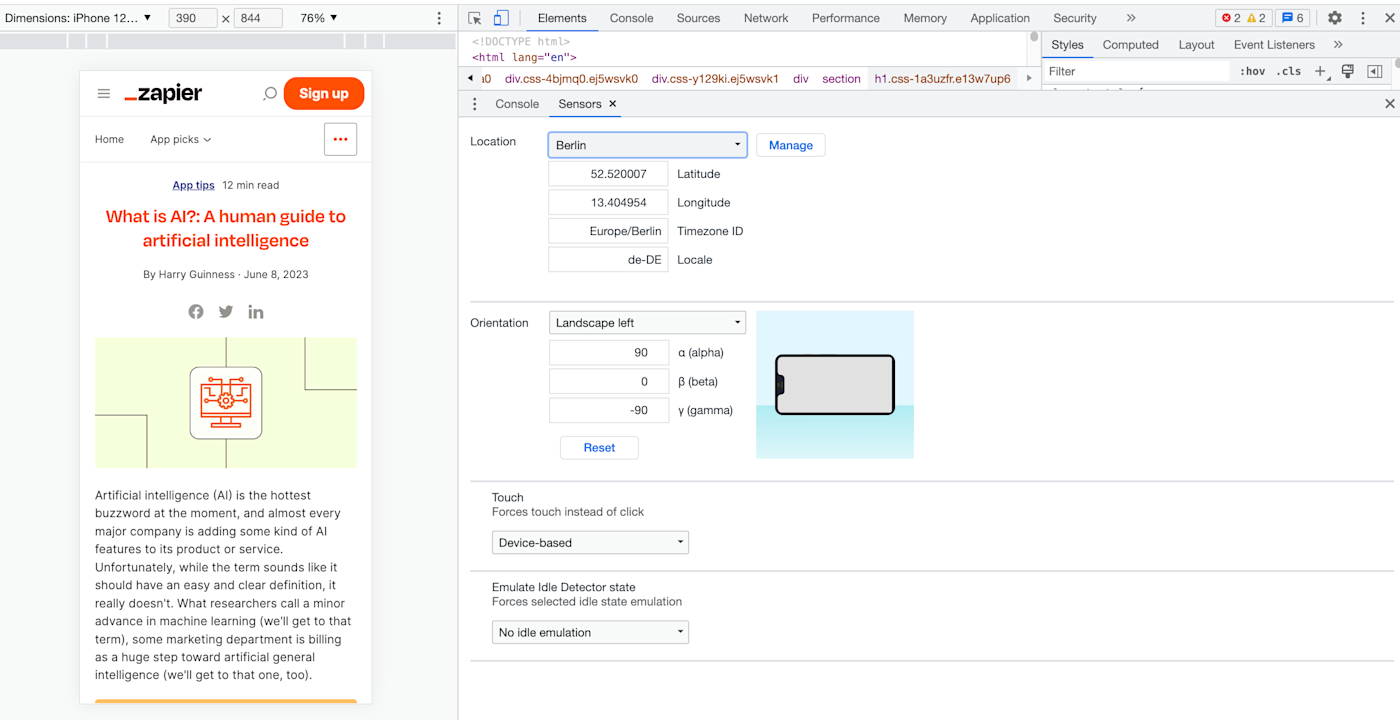
This is because there isn't content on this page that changes based on your location. If you change the coordinates on a site like Groupon.com that uses your location to show localized content, though, you would get different results. Go to Google.com in a different location, and you'll perhaps see a new Google logo for a holiday in another country, or at least will get the results in a different language.
Emulation is a great way to put yourself in your user's shoes and consider what the user may be seeing on your webpage—and it's a fun way to explore the international web.
Emulate mobile networks
You can also see what it's like to browse a site on different networks—perhaps to see if your site will load even if your users are on a slower 3G network.
To give it a try, click the hamburger menu in the top-right corner of the pane, hover over More tools , and select Network conditions .

There, you can choose from fast or slow 3G, or offline to see how the page works without internet. Or, click Add... to include your own testing (perhaps add 56Kbps to test dial-up internet). Now, reload the page, and you'll see just how long it'd take for the site to load on a slow connection—and how the site looks while it's loading. That'll show why you should improve your site to load faster on slow connections.

You can also change your user agent—uncheck Use browser default in the User agent field and select Firefox — Mac perhaps to see if the site changes its rendering for other browsers on different devices. That's also a handy hack to make webpages load even if they claim they only work in a different browser.
Inspect Element keyboard shortcuts
Now that you've learned the ropes, here are some Inspect Element keyboard shortcuts that'll make using it even easier.
Related reading:
This article was originally published in January 2015 by Auri Pope. The most recent update, with contributions from Dylan Reber, was in May 2024.
Get productivity tips delivered straight to your inbox
We’ll email you 1-3 times per week—and never share your information.

Bryce Emley
Currently based in Albuquerque, NM, Bryce Emley holds an MFA in Creative Writing from NC State and nearly a decade of writing and editing experience. His work has been published in magazines including The Atlantic, Boston Review, Salon, and Modern Farmer and has received a regional Emmy and awards from venues including Narrative, Wesleyan University, the Edward F. Albee Foundation, and the Pablo Neruda Prize. When he isn’t writing content, poetry, or creative nonfiction, he enjoys traveling, baking, playing music, reliving his barista days in his own kitchen, camping, and being bad at carpentry.
- Software & web development
- Internet browsers
Related articles

How to screenshot on Windows: 4 easy methods

How to create a spreadsheet CRM with Google Sheets (with a free template)
How to create a spreadsheet CRM with Google...

How does ChatGPT work?

Asana AI: How to use Asana Intelligence
Improve your productivity automatically. Use Zapier to get your apps working together.

How to Edit Webpages on Safari Using Inspect Element
Here's how you can tinker with text and images on a website through Safari's nifty Inspect Element developer tool.
With its Inspect Element tool, Safari lets you tinker with the front-end code of any webpage. If you want to test what a page would look like with different text or images, you can do so by altering its code with Inspect Element.
This is a simple guide aimed at beginners to explain how you can begin experimenting with Inspect Element in Safari to edit a website's text and images with minimal coding knowledge.
What Is Inspect Element?
Inspect Element is a developer tool. It's available on Safari, though also on other web browsers like Chrome, Firefox, and Edge. With Inspect Element, you can peek behind the curtain of a website to reveal its front-end code, like the HTML and CSS. However, it doesn't grant you visibility of the back-end, like its databases.
Not only can you see this code, but you can tweak it too. This means that you can change the appearance of a website. You can replace an image, rephrase some text, use a different font, switch its color scheme, and more. However, these edits are local. They won't appear to anyone else except you; they disappear once you refresh or move away from the page.
Why Should You Use Inspect Element?
Inspect Element is a great tool if you're a budding web developer. You can literally see the code that powers your favorite website, tweaking it as you wish in a real-world environment. There are many fun insights you can gain from using Inspect Element .
For example, business owners can look at keywords included in a competitor's website, or designers can use Inspect Element to identify a font that they find attractive or to quickly test a different color scheme on their website .
For now, we're going to focus on editing the basics of a webpage using Inspect Element.
How to Access Inspect Element on Safari
You can open Inspect Element on Safari using the developer menu:
- Open Safari.
- Click Safari in the top menu bar.
- From the dropdown menu, select Preferences .
- Select the Advanced option.
- Check the box that says Show Develop menu in menu bar .
After selecting this option, you can right-click on a webpage and select Inspect Element . Alternatively, you can select Develop in the menu bar, and then Show Web Inspector .
How to Find Web Elements in Inspect Element
To begin editing an element, right-click what you wish to edit and click Inspect Element . This will open the developer window, with the relevant section highlighted. You might find that the particular element you wish to element (the image or the text, say) is hidden; to locate it, use the arrows on the left to expand the nested sections.
To help narrow your selection down, click the target icon from the Inspect Element toolbar. Now, as you navigate through the code, it highlights that section on the website. Or you can use your cursor to pinpoint a section on the site. This is handy for when you want to hone in on something particular in a crowded area of a webpage.
How to Edit a Website's Text Using Inspect Element
To make a piece of text editable after finding it in a site’s source code, double-click it. You can type new text directly into the code, or delete existing text. When editing is complete for a given string of text, hit Enter , and the text on the webpage will change.
It's really as simple as that! The only times this won't work are when the text is actually part of an image, like a logo.
How to Edit a Website's Images Using Inspect Element
While images appear visually to you on the front-end, in the website code they appear as links. You can right-click and image and choose Inspect Element to jump to where that image is in the code. Website images typically have JPG, GIF, or PNG file extensions, though not exclusively.
Double-click these image strings and you can edit them, or just save them to your system if desired. If you want to replace the image, switch it out for a replacement image URL. Or you can delete the code string entirely to remove the image from view.
Dig Into Websites Using Safari
Safari's Inspect Element tool lets you easily find and change the code corresponding to text and images, which is as easy as switching out a text or URL string. Once you're done editing a website with Inspect Element, simply refresh the page and everything will be back to normal.
- Irresistible Tech Gifts for That Special Dad
- Killer Smartphone Deals We Love
How to Inspect an Element on a Mac
Learn more about the sites you view
:max_bytes(150000):strip_icc():format(webp)/JenAllen-214879-65542c15d7fa42b6ba2c61cc14c4a8b8.jpg "safari inspector element console")
- Swansea University, Staffordshire University
:max_bytes(150000):strip_icc():format(webp)/GlamProfile-7bfa34647d8e4c8e82097cc1daf8f5ec.jpeg "safari inspector element console")
- Saint Mary-of-the-Woods College
What to Know
- In Safari: Right-click on a webpage and select Inspect Element .
- In Chrome, you can right-click and click Inspect .
- To enable the feature in Safari: Safari > Preferences > Advanced > check the Show Develop menu in menu bar box.
This article teaches you how to inspect a website's element on Mac. It looks at how to do so via Safari and Google Chrome.
How Do You Use the Inspect Element Feature on a Mac?
Before inspecting elements on Mac when using Safari, you need to enable the developer menu within the browser. Here's a look at how to switch it on and what to do to inspect an element.
If you can see Develop between Bookmarks and Window, the Developer Menu has already been enabled, and you can skip to step 4.
Using the Inspect Element Feature in Safari
Here's how to use Inspect Element in Safari, the default browser on Mac computers.
In Safari, click Safari > Preferences .
Click Advanced .
Click Show Develop menu in menu bar then close the window.
When browsing a website, right click on the item you wish to inspect.
Click Inspect Element .
You can now view the code behind the website you've inspected.
Using the Inspect Element Feature in Chrome on a Mac
If you use Chrome instead of Safari on your Mac, it's even easier to view an element as there's no need to enable the feature. Here's what to do.
In Chrome, browse to a website.
Right click on the element you wish to inspect.
Click Inspect .
You can now view the code in a side window on Chrome.
Why Can’t I Inspect on My Mac?
You might not be able to inspect an element on your Mac if you haven't enabled the Developer menu within Safari. Here's a reminder of how to do it.
How to Make Website Changes by Inspecting the Element
Besides allowing you to view the code on a website, it's also possible to temporarily change any website element through Inspect Element. Here's how to do so via Safari.
The process is very similar on other browsers.
When browsing a website, right click on the item you wish to inspect.
Double click on the text in the code to make it editable.
Delete it or enter a new string of text.
The code has now been temporarily changed just for your benefit.
Why Would You Want to Use the Inspect Element Feature?
Being able to inspect an element is helpful for many reasons.
- To change code on the fly . Website designers can temporarily change things around on a website to see how the changes affect things.
- To check the code . Both designers and marketing people can check the code to confirm that things like Google Analytics details are there.
- To view images separately from a site . If a site doesn't allow you to open an image in a new tab or window, viewing the element makes it possible.
- Tinker . Seeing the code of a web page can help you understand what you see, removing the mystery of what and why of what's up with the site you are on. It's like taking apart an appliance to see how it works, but there are no screws to lose in this case.
Yes. However, if you plan to use any code or assets from a website, be sure to check with the owner and add a copyright note.
In Chrome, right-click the page and select Inspect , then go to the top section and right-click the <html> tag (e.g. <!doctype html>). Select Copy > Copy outerHTML , then paste the code into a text or HTML file.
Yes. Right-click the element you want to copy and choose Inspect . Right-click on highlighted code and select Copy > Copy styles .
To reveal hidden passwords, right-click on the password text box and select Inspect . In the highlighted section, look for type=”password” and replace password with text . There are easier ways to show all your passwords in Chrome .
Get the Latest Tech News Delivered Every Day
- How to Pin Sites in Safari and Mac OS
- What Is a Home Page?
- How to Turn on Location Services on a Mac
- How to Activate the iPhone Debug Console or Web Inspector
- How to Turn Off AdBlock on Mac
- How to Allow Pop-Ups on a Mac
- Add More Features by Turning on Safari's Develop Menu
- How to View HTML Source in Safari
- How to Turn Off a Pop-Up Blocker on a Mac
- How to Activate and Use Responsive Design Mode in Safari
- What Is Safari?
- How to View Internet Explorer Sites on a Mac
- How to View the HTML Source in Google Chrome
- How to Use WhatsApp on a Mac
- How to Enable and Allow Cookies on Mac
- How to Reset Safari to Default Settings
- Web Browser
- Google Chrome Browser
- Mozilla Firefox Browser
- Microsoft Edge Browser
- Apple Safari Browser
- Tor Browser
- Opera Browser
- DuckDuckGo Browser
- Brave Browser
- Basic and advance shortcut keys in Apple Safari Browser
- Hidden tricks inside Apple Safari Browser
- Bookmark in Apple Safari Browser
- Architecture of Apple Safari Browser
- Apple to Launch Search Engine to Rival Google
Safari for Developement
- DevTools in Apple Safari Browser
- Developer Mode in Safari Browser
- Debugger In Apple Safari Browser
Safari Tabs
- Console Tab in Safari Browser
- Sources Tab in Apple Safari Browser
- Storage Tab in Apple Safari Browser
- Elements Tab in Apple Safari Browser
- Network Tab in Apple Safari Browser
- Web Capture Tabs in Apple Safari Browser
How to .. in Safari
- How to enable or disable split view in Apple Safari Browser ?
- How to disable or enable auto-play videos in Apple Safari Browser ?
- How to Allow Pop-Ups in Safari?
- How to use Safari for web development
How to use inspect element in Chrome, Firefox and Safari ?
- How to Browse in Apple Safari Browser ?
Inspect Elements , as the name suggests, is a part of identifying and observing the different elements of a web page. It is a Development tool, that helps us manipulate the Front-end base, but temporarily , to check which changes fit where, which image might look good, or debug the page, etc. In this article, we’ll be covering the steps to inspect an element in the web browser.
Table of Content
Google Chrome
Benefits of using inspect elements.
There can be multiple ways to inspect elements on the browser window:
1. Right-click on the web page and select inspect elements from the dropdown list.

Inspect Elements Option
2. Click on the three dots at the topmost right side and click More Tools . Select the option of Dev Tools.

Developer Tools
3. Shortcut – Ctrl+Shift+I: The dev tools have features such as inspect elements, console window etc. They are of much use a they let us make changes in CSS, content and let us check the meta data of the file. It also helps in knowing the search engine optimization (SEO) of the page.

Inspect Elements & Console Window
1. The method of inspecting elements is similar to that of Chrome. Right click and click on inspect element(Q) will show the browser console.

Inspect Element
2. Second method is to click on the three lines made at the topmost right side of the browser and click on Web Developer and then either of the two – Inspector or Web Console.

Web Developer -> Inspector
3. Shortcuts can also be used: Inspector – Ctrl + Shift + C
Console Window: Ctrl + Shift + K

Console Window
Safari is another web browser on which we can inspect elements. However, a major point that needs to be noted is that Safari can no more be used on Windows Applications, it can be used only on Mac OS. But before inspecting elements in safari browser, one needs to enable it. Go to the top let corner of the browser page and click on settings. Then click on Preferences and click advanced. The option of inspect elements is now enabled.

Go to preferences

Click on Advanced
Now follow the same steps as the other browsers:

Enable Inspect Elements
1. Right click and click on inspect elements.
2. More tools -> Developer tools
3. Shortcut: Cmd + Option + I
or simply press F2 to get the console window.
- Helps in Search Engine Optimization (SEO)
- Front End Manipulation
- Debugging software as errors are displayed in the console window
- Design and content can be changed according to user demands for temporary purposes
- Handling of meta data

Please Login to comment...
Similar reads.
- Apple Safari
- Geeks Premier League 2023
- Mozilla Firefox
- Geeks Premier League
- Web Browsers
Improve your Coding Skills with Practice
What kind of Experience do you want to share?
Freelance iOS, macOS, Apple Watch, and Apple TV Developer
Web inspector on ios devices and simulators.
Want to keep up to date? Sign up to my free newsletter which will give you exclusive updates on all of my projects along with early access to future apps.
Over the past few weeks I’ve worked on a number of projects that have necessitated me working with HTML and JavaScript be that via Safari on iOS, an SFSafariViewController, or in an embedded WKWebView. In all of these cases, I’ve needed to dive into the DOM to see what styles are being applied to certain elements or dig into a JavaScript Console to work out why some code isn’t working. On desktop, this is trivial as Safari has a Web Inspector panel built in similar to other browsers. It turns out it is also trivial on mobile as the exact same tool can be used with both iOS simulators and physical devices.

If you select the ‘Develop’ tab from the menu bar of Safari on macOS, you’ll see a list of all of your connected devices and actively running simulators 1 . Drilling into this will then show all of the active web instances you can interact with; notice how the content within Safari has highlighted blue within the Simulator as I’ve moused over the twitter.com web instance above. When you click, a web inspector panel is then produced which allows you to make all the usual interrogations and changes you can within desktop Safari such as interacting with the console or changing CSS values of elements to see how they would look in realtime.
Here’s an example using a WKWebView within one of my client projects, Yabla Spanish :

Discovering that simulators and devices could be interacted with in this way has been a huge timesaver for me. Whilst developing Browser Note , I was constantly needing to tweak CSS values and investigate the current state of the DOM as websites have various tricks to try and make ads or cookie notices appear on top of all content (and the note needed to be on top at all times - you should totally take a look at Browser Note whilst you’re here). In doing this, I was then able to put this knowledge to use on no less than 3 client projects in the past month; this validates my theory that by working on your own side projects you can improve your efficiency when it comes to work projects.
There are a few caveats to be aware of when using the Web Inspector with an iOS device or simulator:
- If you want to use this on an actual device you’ll first need to enable the Web Inspector on iOS. To do this, go to the Settings app and then Safari > Advanced and toggle the Web Inspector on.
- Whilst the Web Inspector can interrogate WKWebView, it can only do this for apps you are running via Xcode. You cannot look at the WKWebView of apps you did not create nor of your own apps from TestFlight / the App Store. However, you can inspect debug builds installed via Xcode even if the debugger is not active (i.e. you build to the device then quit Xcode).
- Conversely, you can use the Web Inspector with any SFSafariViewController even if it is not in your own app.
- Whilst it is still possible to submit apps that use UIWebView, the web inspector will not work with them; it needs to be WKWebView .
- This also works for AppKit, SwiftUI, and Catalyst apps on macOS.
I use an “iDod” naming prefix for all of my devices; a throwback pun to my first Apple product, the iPod. ↩︎
How to Use Your Browser’s Inspect Element Tool to Edit Webpages

There are numerous valuable web development resources , be it books, videos, online courses , and more. Learning how to use a browser’s Inspect Element tool is one such powerful ability. It’s an invaluable learning tool — one that’s right under your fingertips and always accessible.
With the Inspect Element feature, you get to see the website’s inner workings. Although you can only see frontend markup such as HTML, CSS, and sometimes JavaScript, it gives you a way to see precisely how the developers built a website.
In this post, we’re going to show you how to use the Inspect Element tool and some of the related technologies, features, and functionality you’ll come across. First, let’s give you a formal introduction to the Inspect Element tool itself.
Introducing the Inspect Element Tool
In the web’s early days, there was only one way to look at a website’s code — the View Source feature.

This situation was prevalent in the days before we had Cascading Style Sheets (CSS) and JavaScript in abundance. Web developers used HTML for all site elements, including content, design, and… well, everything.
Once the web started to evolve, and the underlying technologies increased in power, it was necessary to develop better tools. Firefox’s Firebug was an early solution for finding out how a website performed and worked under the hood:

After a while, that functionality found its way into almost all browsers. Today, we know that feature as the Inspect Element tool:

It’s a powerful way to see the underlying technology and code of a website. As such, you can find it in a few different places — often through a toolbar menu, right-clicking on a page and selecting the option, or with a keyboard shortcut.
While the Inspect Element tool’s primary focus is on the HTML and CSS of a page, there’s more you can do with it.
Touring the Inspect Element Panel

The Inspect Element tool is much more than a way to display code . There are often several panels to access:
- Inspector — This is called Elements in some browsers. It’s the main screen in the Inspect Element tool and shows you the page code, along with element-specific CSS. You’ll also find further details on a site’s “grid system” and other aspects.
- Console — This is a frontend warning log for a site, and it’s a place you can also enter code snippets to perform a quick test of an idea.
- Network — Here, you’ll see the requests made to and from a server, such as all POST and GET requests.
- Performance — Of course, a site has to be performant . As such, there’s a dedicated tool to help you gauge some essential site metrics. Some browsers do better than others here.
- Memory — This panel lets you see how a site uses memory, and again, some browsers offer extensive metrics.
- Application — Within this panel, you can see a whole range of information on the site’s cache, background services, and more.
On top of this, there are more panels you can add:

There are simple panels, such as Media , and more complex ones like the JavaScript Profiler and the Performance monitor . In a nutshell, the Inspect Element tool’s name is doing a disservice to all functionality under the hood. It has immense power and should be central to any web developer’s workflow.
Why You’d Want to Use Inspect Element?
The Inspect Element tool is almost the only “nailed-on” solution you’ll need to have at your side during development. We’ll get into the technical details as to why throughout the rest of the article. First, though, it’s worth talking about your motivation for using Inspect Element.
There are a few reasons why you’d want to use the tool:
- You can browse other websites for inspiration on how to work on yours.
- You’ll learn how other sites or developers achieve specific techniques.
- It gives you a license to experiment on your site without consequences.
- In most Inspect Element tools, you get the opportunity to debug the sites.
- It’s good to find out more about the website in question.
In short, learning about web development involves looking at good examples of websites and finding out what makes them tick.
The Inspect Element tool lets you check out the exact HTML and CSS used on a site, giving you a great chance to implement those aspects and techniques in your work.
How to Find Your Browser’s Inspect Element Tool?
The good news is that finding the Inspect Element tool is straightforward. In most cases, you’ll right-click on a page and select Inspect or Inspect Element .

By default, it’ll open the tool in a split window. It often defaults to the right-hand side. But you can customize this to your liking and even pop the tool out into its window.

Of course, you can also access Inspect Element from the browser toolbar or through a keyboard shortcut. The exact location will vary depending on the browser. For example, in Firefox , you’ll find the Web Developer Tools in the Tools > Browser Tools menu. In contrast, Brave (and other Chromium-based browsers) have the Developer Tools option in the View > Developer menu.

The keyboard shortcuts are often similar cross-browser: Command + Shift + C ( Control + Shift + C for Windows). This shortcut makes it quick to bring up the tools you need to work with straight away.
If you’ve never opened the Inspect Element tool before, it’s often displayed on the right-hand side of your menu, as we mentioned earlier. To change this, click on the traffic light menu in the Inspect Element’s toolbar. Here, you can switch the side the “dock” is displayed:

Note that Firefox also uses a “triple pane” view by default, which helps you to get as much information in the Inspect Element tool as possible:

Now that you have the tool open, it’s a good idea to find out what you can do with it. We’ll talk about this next.
3 Situations for Using the Inspect Element Tool
We’ve touched on some ways you’ll use the Inspect Element tool, but we can go further than this to offer some use cases. Let’s discuss these in brief.
1. Searching for Specific Elements on a Webpage
The primary goal of the Inspect Element tool is in its name — inspecting website elements. To do this, you’ll head to the desired webpage and then choose your method of opening the development tools .
Once the panel is open, you’ll click the arrow that acts as a selector for your desired element:
From here, you can hover over any element on the page, and you’ll see it highlighted in the Inspector/Elements window:

It’s a simple process — one of the reasons why the Inspect Element tool is so valuable and popular with web developers.
2. Emulating a Target Device, Display, and Browser
The Inspect Element also functions as a device emulator of sorts. In other words, you’re able to see how a website looks on a specific device. The options are numerous:

This emulator will be great for judging whether your mobile-first strategy or responsive design is accurate and working. It’s invaluable and also more cost-effective than having 200 devices floating around your desk.
You’ll often access device emulation from a small icon somewhere on the Inspect Element panel:
Clicking this icon will display your site as it looks on the device you’ve selected:

We’ll dig into this in more detail later, but it’s a rock-solid way of making your designs consistent across devices.
3. Ascertaining the Performance of Webpage
The Inspect Element tool can also help you judge the speed and performance of a website through the Performance panel:

This feature works by “recording” the loading times of specific elements and scripts. Chromium-based browsers perform brilliantly at offering this information. You’ll record the page as it loads, and then view the results in a timeline format.
It’s an excellent way to ascertain whether a page is performant on a general level. From there, you’ll want to use a tool such as Google PageSpeed Insights or Lighthouse to work on your site’s performance further. Chromium-based browsers will have a Lighthouse report generator built-in:

You’re also able to see a summary of the performance testing within a few other tabs. For example, you can view a Call Tree , an overall summary, and an Event Log :

It’s conceivable that you wouldn’t need any other tool to judge how your website performs or works. Learning how it works in practice is something we’ll discuss next.
Tricks and Tips for Using the Inspect Element Tool
We’ve already talked about how the Inspect Element tool is more powerful than it may appear to be at first glance. Let’s take a look at some tricks and tips to get the best out of its feature set, starting with the basics.
1. Changing Element Properties, Values, and States
So far, we’ve only touched on the concept of using the Inspect Element tool to make temporary changes to a site. Let’s discuss how to do this in more detail.
The steps are straightforward. First, use the arrow icon to select your chosen element. You’ll see an overlay that highlights the various components as you hover over them:

Once you get to your desired element, you can double-click almost anywhere you see a tag within the Elements panel and type in a change. For example, we want to change the original hero text on the Kinsta homepage to something different:

You can also work with CSS in the same way as HTML. For example, take the call to action (CTA) buttons on the Kinsta home page:

If you select the button using the pointer, you can see its related CSS in the right-hand Styles panel:

As with HTML elements, you can change values and add your CSS in too:

Of course, for elements such as buttons, you may want to work with its various states. In this case, the :hover state is worth changing too. To do this, click the :hov link in the Style panel. Choosing this will bring up a list of element states, and you can select those you want to see the hover-state CSS for:

The webpage will show how the state looks without you having to act. Here, we’ve changed the hover colors to differentiate it from the default button state:

You can even take image URLs and swap them out for others. On the Kinsta home page, we show a screenshot of the MyKinsta dashboard :

Through locating the element and changing the source URL of the image, you’re able to test out other pictures in its place:

As you’d expect, these changes aren’t permanent, and with a quick refresh of the page, you can get things back to normal. As an alternative, you can also copy the HTML and CSS over to your editor and include them in your code to make those changes permanent.
2. Searching for Elements
It could be that before you can alter an element, you need to find it. The Inspect Element tool has straightforward search functionality that can help you find any aspect of a webpage.
That said, it’s tough to find if you don’t know where to look. The “official” way in Chromium-based browsers is to head to the “traffic light” menu on the right-hand side of the page and select the Search option:

Using this will open the Console panel, along with a Search tab. From here, type your desired tag into the text box, and you’ll see a list of associated elements on the page:

Note that in other browsers, you may find the functionality elsewhere. For example, Firefox includes a search box at the top of its Inspector panel:

Here’s another quick tip: You can carry out recursive expansion of the various nodes and elements by right-clicking within the Elements pane, and choosing Expand recursively :

If you take a look at the Styles panel, you’ll also spot a Filter text box. This field lets you filter by CSS properties, making it a great companion to the global search functionality:

On the whole, it shouldn’t be tough to find what you need with two dedicated filter and search tools.
3. A Quick Primer on the Box Model
One of the best ways the Inspect Element tool can help you learn more about how CSS properties act upon elements is the visual “box model” panel.

This overview gives you a representation of how a specific box (such as “element” or “div”) appears on the screen. In other words, it’s an overview of how the margins, padding, border, and content combine to become the section you see on-screen.
Explaining the complete CSS box model and how it interacts with a webpage’s HTML is beyond the scope of this article, though Mozilla has a fantastic guide to the ins and outs of the concept.
You’ll often find the Box Model panel within the Layout or Computed sections of the right-hand pane of the Inspect Element tool:

As with any elements and properties, you can also change the values and settings of a particular box. There will also be a list of other properties to help you position the box, set a z-index, apply float and display settings, and much more.
While working with the box model, you may also benefit from seeing the grid system in play on the page. To do this, take a look at the Layout panel — the options you need will be under the Grid menu:

Clicking your desired display settings and then choosing a relevant overlay will show it on-screen, allowing you to make more accurate decisions using the box model to manipulate site elements.
4. Emulating Devices Using Inspect Element
They’ve turned from buzzwords into integrated lexical terms, but “responsive” and “mobile-friendly” are key web development factors. As such, the Inspect Element tool tackles this facet through a couple of features.
In most browsers, the Inspect Element tool will have a mobile device icon along the top toolbar:
Safari, however, is different. Instead, there’s an Enter/Exit Responsive Design Mode toggle in the Develop menu:

Regardless of how you get there, once you choose the option, the webpage will display as though you’re viewing it in on a smaller device:

While Safari only gives you the choice of different Apple devices, other browsers dig in to provide you with the tools you need to design with mobile-first principles. For example, you can choose the viewport’s orientation, as well as which device you’d like to emulate:

There are two other interesting features here. First, you can choose an emulated network speed. Safari doesn’t include any options for this, and Chromium-based browsers offer a small, general choice of network throttling:

Firefox does the best here, with a decent selection of network choices to pick from:

To round things out, you’re able to simulate haptic feedback and sensor recognition too. It’s the default in Chromium-based browsers, and in Firefox, you have to toggle it on:

Firefox falls behind here, as Chrome, Brave, and others show your cursor as a small “fingertip-like” overlay. The functionality isn’t perfect for any browser, though it’s a reliable way to determine how your site might act on other devices.
This sort of testing often falls by the wayside for many web developers. That said, there’s no excuse now when browsers offer comprehensive solutions like this.
5. Keyboard Shortcuts When Using the Inspect Element Tool
Most browser keyboard shortcuts are often the same across browsers. That’s good news if you flit between various tools to test your sites.
Here’s a quick list of some of the most popular (and valuable) shortcuts:
Of course, there are many more shortcuts available. Mozilla has exceptional documentation for Firefox, while Chrome, Brave, Edge, and others share shortcuts . Apple is less helpful with Safari developer shortcuts, as there is no defined list within their help pages. Instead, we suggest reading through the official documentation for Safari’s developer tools.
Web development is no longer just HTML. There are many technologies involved. Even sticking with the holy trinity of HTML, CSS, and JavaScript, you’ll still need to see how a website pulls all of these components together.
The browser’s Inspect Element tool is one of the best ways to look under the hood of a website and find out in explicit detail how it works. While it’s fantastic as a learning aid, it can also help you test changes to your site and find how it functions on different devices and mobile networks.
Do you use the Inspect Element often? If so, what are your favorite features? Share your opinions in the comments section!

Salman Ravoof is a self-taught web developer, writer, creator, and a huge admirer of Free and Open Source Software (FOSS). Besides tech, he's excited by science, philosophy, photography, arts, cats, and food. Learn more about him on his website , and connect with Salman on Twitter .
Related Articles and Topics

Powerful Managed WordPress Hosting

6 Most Secure Browsers to Stay Safe and Protect Your Privacy
- Application Development
- Content Management Systems
I love the depth and detailed information provided in this article.
I’ve been exploring the Inspect Element tool and Source pages for a few years on my own. I’ve been using it to determine if a site was constructed with WordPress or another CMS. I also checked the published dates and studied visual elements like images and gifs.
Now I’ve found three more ways to use the Inspect Element tool.
Also loved that the author of this piece didn’t dumb down words or concepts.
Thanks for this resource!
Leave a Reply Cancel reply
By submitting this form: You agree to the processing of the submitted personal data in accordance with Kinsta's Privacy Policy , including the transfer of data to the United States.
You also agree to receive information from Kinsta related to our services, events, and promotions. You may unsubscribe at any time by following the instructions in the communications received.
Advisory boards aren’t only for executives. Join the LogRocket Content Advisory Board today →
- Product Management
- Solve User-Reported Issues
- Find Issues Faster
- Optimize Conversion and Adoption
- Start Monitoring for Free
Understanding the latest Webkit features in Safari 17.4

Compared to other modern web browsers, Safari is a bit slower in rolling out feature updates, possibly due to Apple’s cautious approach or reliance on the slower-evolving Webkit rendering engine. Since these features are not user-facing and mainly concern developers, Safari’s slow-paced implementation of new features and updates can largely impact the overall DX.

Although skipping Safari to deploy apps faster may sound smart from a developer’s point of view, it may backfire since Safari holds a significant position in the Apple ecosystem and has a sizeable market share.
The good news is that Safari has been continuously improving and rolling out new features more frequently this year. The Safari 17.4 update brought in almost 46 modern features and over 145 bug fixes, followed swiftly by the 17.5 update with significantly fewer development-centric updates.
This article highlights all the major development-specific updates in Safari 17.4 that you, as a web developer, should be aware of. Let’s dive right in.
CSS features
Safari 15.4 and subsequent releases have introduced and maintained important CSS features, like cascade layers , container queries , the :has() pseudo-class, and the subgrid .
With Webkit 17.4, Safari continues to improve the DX by adding support for additional CSS features that were previously expected but unavailable. Below, you’ll find a breakdown of some of the major CSS features and updates you will experience with Safari 17.4.
Style scoping
Style scoping simplifies CSS specificity and overriding by allowing the creation of style boundaries. It provides the @scope rule and the :scope selector to target DOM subtree elements with loosely coupled selections.
Keep in mind that style scoping is still an under-developed feature. However, considering its benefits, some of the major browsers have already started providing support for style scoping, including Safari 17.4.
You can now use the @scope at-rule in Safari to apply scoped styles to a particular selector and encapsulate the styles within it. The below code covers an example of how scoped styles simplify working with different component patterns that have similar elements while keeping the styles encapsulated and less specific:
For a more illustrated explanation, you should explore and compare the following demos. This first CodePen demonstrates the leaking styles problem:
See the Pen A demo of CSS styles leaking out by Rahul C ( @_rahul ) on CodePen .
Meanwhile, here is its solution using scoped styles:
See the Pen Style leaking fixed with @scope rule by Rahul C ( @_rahul ) on CodePen .
In the future, this approach is expected to help developers create easily maintainable and reusable components without relying heavily on naming methodologies like BEM .
The improved :has() pseudo-class
One of the best additions in CSS Selectors Level 4 was the :has() pseudo-class , which allows you to select the parents inside-out based on their children. The :has() pseudo-class is now widely supported in all modern browsers, including Safari 15.3 and beyond.
It’s now a bit more polished in Safari 17.4. You can now use :link and :any-link pseudo-classes as an argument to :has() to specify the criteria of an element having a link of a certain nature, which was not possible in the earlier versions:
But there’s a catch. The :any-link pseudo-class is still pretty new and has varying levels of support across different browsers. Its sole purpose is to select links regardless of their visited state. Since it’s still in its experimental phases, it might not perform as expected.
The inconsistent browser support for :link and :any-link makes their use with :has() unreliable, which can result in :link selecting everything and :any-link and :visited not selecting anything at all. As a result, you should use them with caution.
Vertical writing mode for form elements
Safari now supports vertical writing mode for form controls. This mode allows text boxes, buttons, sliders, progress bars and other form elements to be displayed vertically, which is particularly useful for CJK scripts and languages.
Vertical writing mode supports elements such as button , textarea , progress meters, input , and <select> . Here’s an example of how to use it:
The result might look something like the following:
See the Pen Demonstrating vertical-rl writing-mode by Rahul C ( @_rahul ) on CodePen .
It’s worth noting that the <select> box popup will always be displayed the same way, regardless of its writing mode, as it is normally displayed. If you are working with vertical mode, you might also find it helpful to read about vb and vi viewport units .
Content alignment inside blocks and tables
Another interesting addition to modern-day CSS is to be able to align the element’s content without having to be concerned much about its display.
The align-content property now works out of the box to align the content vertically within its block-level or table-level parent. Currently, block-level alignment is well-supported on Chrome and Firefox, while Safari 17.4 fully supports the alignment in both block and table formatting contexts.
Here’s an example usage of the align-content property:
See the Pen Using `align-content` prop in block-level elements by Rahul C ( @_rahul ) on CodePen .
Better text handling
The traditional white-space property in CSS determines and controls two tasks: collapsing whitespaces and wrapping lines. In the ever-evolving world of CSS, these tasks are expected to have separate properties for better context and more granular control.
There are now two separate properties to control each of these tasks — white-space-collapse and text-wrap-mode — which are also pretty much self-explanatory in what they do:
Note that the text-wrap-mode property currently lacks support in Chromium-based browsers. Also, the letter-spacing and word-spacing props on Safari can now have percentage values relative to the font size, which is a nice addition when it comes to typography.
Transition for discrete properties
From CSS4 onwards, the developers can enable transitions for discrete CSS properties like display and content-visibility using the allow-discrete transition behavior.
The feature is new to Safari and has yet to settle down and become stable. It has great potential to redefine the general interaction design in the browser without needing JavaScript for interactivity.

Over 200k developers use LogRocket to create better digital experiences
Here’s an example of how to use it:
However, keep in mind that Safari still does not support display and some other major discrete properties through the allow-discrete behavior of CSS transitions.
Check out this example of list-style , another discrete CSS property, using the allow-discrete transition behavior and changing values after the delay added by the transition duration:
See the Pen list-style with allow-discrete transition behavior by Rahul C ( @_rahul ) on CodePen .
Custom properties support for ::backdrop
Safari is perhaps the first browser that enables you to apply CSS variables or custom properties to the ::backdrop pseudo-element. Note that ::backdrop is only supported by certain special elements like dialogs, popovers, or anything that enters full-screen using the FullScreen API.
Again, you need to use this feature mindfully, as it’s unavailable with other major browsers:
Better error highlighting
The new ::grammar-error and ::spelling-error pseudo-elements allow the developers to decorate spelling and grammar errors in user-inputted text if the browser provides the spell-check facility.
Although previously unsupported, these under-developed features are now available for you to play with in Safari 17.4. You can highlight spelling and grammatical errors in text added through HTML text-field , textarea , and contenteditable elements and attributes. For example:
Here’s the result:
HTML features
Some browser features, such as source prioritization of media, are often delayed due to the browser’s inability to provide the necessary support and APIs. The recent Safari update has improved its capabilities, which have affected the usage, functionality, and usefulness of the following HTML features.
Native switch
The native checkbox switch looks like an unconventional feature at the moment, as it’s not at all supported anywhere other than Safari. It’s said that support for the native switch is expected everywhere soon, as the switch pattern is becoming more common in frontend design systems.
You can implement this native switch in Safari just by adding a switch attribute to the checkbox input in your web pages as shown below:
The native switch also allows you to customize itself using the ::track and ::thumb pseudo-elements. Furthermore, unlike the CSS trickery we do normally to emulate the checkbox switch, we can use the labels separately which is pretty neat.
Horizontal rules inside <select> elements
Normally, you’ll find using horizontal rules inside the <select> element a bit unconventional, even though modern browsers actually allow you to do so. Modern browsers support this behavior to improve the way option groups are grouped and separated, which also helps users read and scan them efficiently.
Here’s a simple example of this behavior, which should work well in Chrome 119+, Firefox 122+ and Safari 17.4+:
See the Pen Horizontal Rules inside Select Inputs by Rahul C ( @_rahul ) on CodePen .
However, this behavior is not supported universally yet. You should rely on the traditional approach by adding borders as a fallback to optgroups to show the distinction and spacing between the <select> element’s options.
Source prioritization in videos
Safari added media extension support for WebCodecs HEVC and VP8/VP9 video, along with Vorbis audio codec support for iOS and iPadOS. With this support for additional media formats, Safari now also allows you to prioritize video sources directly through your HTML markup.
For instance, in the code below, the browser will go through the list of sources and choose the first source it can play based on the video format support and the media query provided. It will keep moving down the list to find a playable source; if it doesn’t, it will show just a fallback message at the end:
JavaScript features
There are a number of bug fixes and new introductions in JavaScript features and different JavaScript APIs in Safari 17.4. Let’s go through some of the major ones.
Ownership transfer in the ArrayBuffer API
Webkit has improved how effectively its JavaScript ArrayBuffer API manages the buffer ownership. It did so by adding two new methods for enhanced responsibility: transfer and transferToFixedLength , both of which are ready to be used in Safari 17.4.
Previously, multiple variables referencing an ArrayBuffer object could lead to unwanted behavior. The new ownership concept ensures a single owner using these new transfer methods, which is as simple as shown in the code below:
AbortSignal composition with the any method
In modern JavaScript, the AbortSignal interface serves as a communication channel between the code initiating an operation and the operation itself. It allows for a graceful cancellation of async operations such as network requests, timeouts, and more.
The any method is a new feature of the AbortSignal interface that accepts multiple AbortSignals as an array and acts as a combined signal for all these inputs. It returns a single AbortSignal object that gets triggered when any of its input signals are aborted:
The withResolvers method
Traditionally, creating and resolving promises involved defining an executor function within the Promise constructor. However, this is a bit of a messy practice now.
More great articles from LogRocket:
- Don't miss a moment with The Replay , a curated newsletter from LogRocket
- Learn how LogRocket's Galileo cuts through the noise to proactively resolve issues in your app
- Use React's useEffect to optimize your application's performance
- Switch between multiple versions of Node
- Discover how to use the React children prop with TypeScript
- Explore creating a custom mouse cursor with CSS
- Advisory boards aren’t just for executives. Join LogRocket’s Content Advisory Board. You’ll help inform the type of content we create and get access to exclusive meetups, social accreditation, and swag.
To simplify the creation of promises with explicit resolve and reject handlers, you can now use the Promise.withResolvers method to return an object containing a new promise object, along with functions that you can call to resolve and reject the promise from anywhere in your code:
The checkVisibility method
The checkVisibility method is a general Web API feature in modern browsers. This method categorizes an element as visible or not visible in the viewport by considering multiple CSS factors like opacity , visibility , content-visibility , display , and more.
With Webkit 17.4, Safari now provides a bit of partial support to this method where you may use the checkOpacity and checkVisibilty parameters to determine specific property values. However, the checkContentVisibility parameter is not yet supported.
Here’s an example of how to use this method:
Better array grouping
The Object.groupBy() method gets full support in Safari 17.4 which makes it easy to group datasets as can be seen below:
You should check out this demo and observe the inputs along with the corresponding output in the developer console to see Object.groupBy in action.
A similar method, Map.groupBy , is also now available in Safari. This method returns a Map object instead.
The setHTMLUnsafe() method
The setHTMLUnsafe method is a new way to completely replace the contents of an element, shadow root, or document with a provided HTML string.
The use of “unsafe” in the method implies one potential risk to use this method: it doesn’t sanitize the HTML it injects, which — if not managed carefully — could make it vulnerable to XSS attacks.
Accessibility features
With all the hard work you put into your websites and web apps, it’s critical to ensure that all users can view and interact with your web content . Let’s discuss some of the accessibility enhancements in Safari 17.4.
Better screen reader support
The new Safari update now avoids unnecessary announcements for certain ARIA landmark roles when navigating to landmarks using the rotor.
It consistently announces the focus of form elements with the VoiceOver screen reader and provides additional information about form controls such as checked checkboxes and radios. The live region ARIA elements now support announcements, making real-time updates more accessible.
Alternative generated content
Developers often use Unicode characters or images in ::before , ::after , and ::marker pseudo-elements for different purposes. By default, these don’t convey anything about the element itself.
To ensure that elements with dynamically generated content are accessible to screen readers and other assistive technologies, you can add alternative generated content using the content property directly:
This significant accessibility enhancement is now supported by all major browsers, including Safari 17.4, and is expected to receive some semantic sugar in future updates.
Performance features
As developers, we’re constantly looking for ways to improve performance, much of which relies on the browser’s capabilities. The Safari 17.4 release supports this with a few enhancements, which we’ll go through below.
JavaScript execution
Safari claims numerous architectural improvements have resulted in a noticeable performance boost in version 17.4 compared to previous versions. We have to wait for some developer feedback on JavaScript performance in the new Safari, as there are no JavaScript execution benchmarks available currently.
Rendering performance
WebGL in Safari now features improved Multisample Anti-Aliasing (MSAA) rendering, which results in smoother 3D graphics.
Additionally, nested workers are enabled for flexible multi-threading. Some new extensions have also been added for better clip control, different polygon modes, additional polygon offsetting control, and prevention of primitive clipping based on depth.
Better Web Inspector
The Web Inspector in the new Safari has been updated with a bunch of crucial improvements, including:
- Grouped source map load errors to simplify debugging by grouping related errors in the console
- Lockdown mode font load logging to aid in troubleshooting by logging messages when font loading is blocked
Other enhancements likely include various bug fixes, performance optimizations, and potential UI tweaks for a smoother debugging experience.
Web browsers can help make the lives of developers easier by continuously adding new features that allow them to focus more on utilizing the actual features rather than using polyfills.
At the time of writing this article, Safari introduced the 17.5 technical preview, released it as a stable version, and then introduced the 17.6 technical preview. This reflects the frequent updates and rapid development by Webkit developers to improve the browser engine and Safari as a whole.
Do you consider Safari feature support when working on projects? How do these recent updates in Safari affect your workflow? Share with us in the comments section.
Share this:
- Click to share on Twitter (Opens in new window)
- Click to share on Reddit (Opens in new window)
- Click to share on LinkedIn (Opens in new window)
- Click to share on Facebook (Opens in new window)

Stop guessing about your digital experience with LogRocket
Recent posts:.

The top tools for implementing e-commerce search in React
Explore top frontend tools for implementing e-commerce search functionality with React demo implementations.
Signals vs. ngOnChanges for better Angular state management
Angular is evolving in some exciting ways. Explore how signals enhance state management compared to the “old” approach using ngOnChanges .

An advanced guide to Vitest testing and mocking
Use Vitest to write tests with practical examples and strategies, covering setting up workflows, mocking, and advanced testing techniques.

Optimizing rendering in Vue
This guide covers methods for enhancing rendering speed in Vue.js apps using functions and techniques like `v-once`, `v-for`, `v-if`, and `v-show`.

Leave a Reply Cancel reply
- Español – América Latina
- Português – Brasil
- Tiếng Việt
- Chrome DevTools
- More panels
Elements panel overview

Use the Elements panel to inspect and edit DOM elements.
The Elements panel provides a robust interface to inspect and manipulate the DOM. You can use the DOM tree, which resembles an HTML document, to select specific DOM nodes and modify them with other tools.
The Elements panel also has the following tabs that contain relevant tools:
- View and debug CSS rules applied to an element from all style sheets.
- Find any invalid, overridden, inactive, or other CSS that don't work as intended.
- Edit elements by adding a declaration , applying a class , and by interacting with the Box model .
- Access container editing options with Badges found in the DOM tree.
Computed : Lists resolved properties applied to an element as they are rendered by Chrome.
Layout : Contains options to modify grid and flexbox overlays.
Event listeners : Lists all event listeners and their attributes. Lets you find the source of event listeners and filter for passive or blocking listeners .
DOM breakpoints : Lists DOM change breakpoints added from the Elements panel and lets you enable, disable, remove, or reveal them.
Properties : Select a DOM node to inspect and sort the object's own and inherited properties .
Accessibility : Lists elements that have ARIA labels and their properties. Lets you toggle and inspect an accessibility tree (experimental).
Open the Elements panel
By default, when you open DevTools the Elements panel opens. You can also inspect a node anywhere on the page to automatically open the Elements panel.
To manually open the Elements panel:
- Open DevTools .
- macOS: Command + Shift + P

- Start typing Elements , select Show Elements , and press Enter . DevTools displays the Elements panel in the Drawer at the bottom of your DevTools window.
Except as otherwise noted, the content of this page is licensed under the Creative Commons Attribution 4.0 License , and code samples are licensed under the Apache 2.0 License . For details, see the Google Developers Site Policies . Java is a registered trademark of Oracle and/or its affiliates.
Last updated 2024-03-13 UTC.
Safari Technology Preview 196 Release Notes
Jun 5, 2024
by Jon Davis
Safari Technology Preview Release 196 is now available for download for macOS Sonoma and macOS Ventura. If you already have Safari Technology Preview installed, you can update it in System Settings under General → Software Update.
This release includes WebKit changes between: 278844@main…279360@main .
Resolved Issues
Fixed toggling the visibility on a canvas parent undoing the effect of clearRect() . ( 279302@main ) (128226178)
Fixed the Canvas drawImage() API to throw an exception when the image is in broken state. ( 279319@main ) (128588063)
- Fixed incorrect inline element size when using font-variant-caps: all-small-caps with font-synthesis . ( 279183@main ) (121314557)
- Fixed RegEx lookbehinds differing from v8. ( 278863@main ) (127440248)
New Features
- Added support for bytes() to Blob and PushMessageData. ( 279263@main ) (128418858)
Web Inspector
- Added support for fuzzy search code completion in the CSS source editor. ( 2791444@main ) (125030691)
- Fixed console code completion to be case-insensitive. ( 279195@main ) (124544458)
- Fixed compiling shaders without variables that are arrays and start with underscore. ( 278880@main ) (126944294)
- Fixed a delay in getUserMedia promise resolution. ( 278851@main ) (128112002)
View in English
Tools, documentation, forums, videos, and more.
Safari Technology Preview
Get a sneak peek at upcoming web technologies in macOS and iOS with Safari Technology Preview and experiment with these technologies in your websites and extensions.
- Safari Technology Preview for macOS Sonoma Requires macOS 14 or later
- Safari Technology Preview for macOS Ventura Requires macOS 13 or later
- Release Notes
June 5, 2024
Safari beta
Try out the next version of Safari for upcoming macOS releases. To access the latest beta versions of Safari, sign in with your Apple ID.
View downloads
Release Date
September 20, 2021
Guides and sample code
Get details on implementing web technologies with guides, reference, and sample code.
- Safari Web Extensions
- Apple Pay on the Web
- Security Keys
- Video Content in Safari
- More Safari Documentation
Watch and learn from our engineers as they show how to bring the latest web technologies to your websites on Safari.
- Watch Safari and Web Videos
Ask questions and discuss a variety of web development topics with Apple engineers and other developers.
- Apple Developer Forums
Featured web technologies
Safari extensions.
Safari extensions are a powerful way to add new features to Safari. They are built in Xcode with web technologies, such as HTML5, CSS3, and JavaScript and powerful native APIs. Now you can distribute and sell them through the App Store on Mac, iPhone and iPad.
- Meet Safari Web Extensions on iOS
- Explore Safari Web Extension improvements
- Converting a Web Extension for Safari
- Creating a Content Blocker
- Submit Your Extension
Universal links
Seamlessly link to content within your app or on your website in iOS, iPadOS, and macOS. With universal links, you can always give users the most integrated mobile experience, even when your app isn’t installed on their device.
- Universal Links
Smart App Banners
Make it easy for people to discover and download your app using iOS, iPadOS, and macOS. With Safari Smart App Banners, you can display a banner that provides a direct link to your app on the App Store, or opens the app if the user already has it installed. Smart App Banners integrate seamlessly and are easy to implement.
- Promoting Apps with Smart App Banners
HTTP Live Streaming (HLS)
Deliver streaming media to apps on iOS and iPadOS or HTML5-based websites using an ordinary web server.
- HTTP Live Streaming
Safari iCloud Keychain
Easily create more secure logins for users in iOS 15, iPadOS 15, and macOS Monterey or later using iCloud Keychain verification codes. Take advantage of verification codes, AutoFill, iCloud Keychain sync, and two-tap setup to simplify the multistep sign-in process.
- Secure login with iCloud Keychain verification codes
- Securing Logins with iCloud Keychain Verification Codes
- Safari Push Notifications
Use the Apple Push Notifications Service to send notifications to your website vistors, right on their Mac desktop — even when Safari isn’t running. These notifications display your website icon and notification text, which people can click to go right to your website.
- Certificates, Identifiers & Profiles
Introduced by Apple, WebKit is the most advanced rendering engine, drawing the web pages in Safari on iOS, iPadOS, and macOS.
- WebKit Open Source Project
Write automated tests to exercise web content in Safari to ensure a good user experience, and run those same tests against other browsers with a WebDriver-compliant driver.
- macOS WebDriver Commands for Safari 11.1 and earlier
- macOS WebDriver Commands for Safari 12 and later
- About WebDriver for Safari
- Testing with WebDriver in Safari
IMAGES
VIDEO
COMMENTS
229. In your Safari menu bar click Safari > Preferences & then select the Advanced tab. Select: "Show Develop menu in menu bar". Now you can click Develop in your menu bar and choose Show Web Inspector. See the detailed guide here for more info: LINK. You can also right-click and press "Inspect element". EDIT As suggested by @dennis in the ...
Elements. View and inspect the elements that make up the DOM of a webpage. Clicking elements from the fully editable markup tree on the left reveals the node's styles in the middle sidebar, with more details in the right sidebar. Console. Type JavaScript commands in the console to interactively debug, modify, and get information about your ...
The first is via the Develop menu. With the webpage you wish to inspect frontmost in Safari, go to the Develop menu and choose Show Web Inspector (⌥⌘I). Web Inspector will then appear, and will be inspecting the webpage. The second was to show Web Inspector is to right click on the webpage and choose Inspect Element from the context menu.
Follow the steps below to Inspect Element on macOS using Safari: 1. To enable the Developer Menu open the Safari browser and click Safari > Settings. 2. Click on Advanced. Check the Show Develop menu in Menu bar checkbox. Doing this also allows you to Inspect Elements on iPhones by connecting them. 3.
In Safari, click Safari in the tool bar. Click Settings and head to Advanced. Check Show Develop menu in menu bar. On a webpage, right click an element. Click Inspect Element. Read on to see ...
Here's how: Open the iPhone Settings menu. On an iPhone with an early version of iOS, access the Debug Console through Settings > Safari > Developer > Debug Console. When Safari on the iPhone detects CSS, HTML, and JavaScript errors, details of each display in the debugger. Scroll down and tap Safari to open the screen that contains everything ...
Web development tools. Apple has brought its expertise in development tools to the web. Safari includes Web Inspector, a powerful tool that makes it easy to modify, debug, and optimize websites for peak performance and compatibility on both platforms. And with Responsive Design Mode, you can preview your web pages in various screen sizes ...
3. Open up Web Inspector. There are three ways to open Web Inspector in Safari: Option 1: I can right-click any part of the page and choose Inspect Element. Right-clicking a specific page element will open that element in the inspector view. Option 2: I can choose Develop → Show Web Inspector from the top menu bar.
There are two ways to inspect an element in Safari Developer Tools: In the browser window, right-click on any element and select 'Inspect Element'. In the menu toolbar, select Develop > Show Web Inspector (or use the keyboard shortcut Option-Command-I ). This will display the current DOM of the page.
The Elements tab within the Inspector in Safari serves as a gateway to the underlying structure of a web page. Upon opening the Inspector and navigating to the Elements tab, you are presented with a visual representation of the Document Object Model (DOM) of the current webpage. ... Console Tab. The Console tab within Safari's Inspector serves ...
It's called Web Inspector, a browser console for Safari on iOS and iPadOS. It works pretty much as you would expect: tap the blue " i " button to open Web Inspector, tap it again to close. It has 6 tabs: DOM and Elements let you inspect elements on a webpage, Console is your JavaScript console, Network lists network requests and responses ...
To get to Inspect Element on Firefox you have three options (just like on Chrome). Method 1: Right-click anywhere on the page and click Inspect at the bottom of the menu. Method 2: Click the hamburger menu (three horizontal lines at the top-right corner of the window), select More tools, then click Web Developer Tools.
Method 2: Using Web Inspector for Debugging on Safari. Furthermore, developers can leverage the Web Inspector to inspect any particular element and debug a specific issue for a specific screen size. One can find the web inspector in the Develop menu. Once the web inspector is active, inspect a particular element using the element selector.
Open Safari. Click Safari in the top menu bar. From the dropdown menu, select Preferences . Select the Advanced option. Check the box that says Show Develop menu in menu bar . After selecting this option, you can right-click on a webpage and select Inspect Element. Alternatively, you can select Develop in the menu bar, and then Show Web Inspector .
Enable Web Inspector on iOS : Open the Settings app on your iPhone or iPad. Scroll down and tap Safari. Scroll to the bottom of the page and tap Advanced. Tap the toggle next to Web Inspector to the On position. Enable Safari Developer Mode on Mac : Open Safari on your Mac. Click Safari in the top left corner of your Menu Bar.
In Safari: Right-click on a webpage and select Inspect Element. In Chrome, you can right-click and click Inspect. To enable the feature in Safari: Safari > Preferences > Advanced > check the Show Develop menu in menu bar box. This article teaches you how to inspect a website's element on Mac. It looks at how to do so via Safari and Google Chrome.
Google Chrome. There can be multiple ways to inspect elements on the browser window: 1. Right-click on the web page and select inspect elements from the dropdown list. Inspect Elements Option. 2. Click on the three dots at the topmost right side and click More Tools. Select the option of Dev Tools. Developer Tools.
After updating to 16.5 closing the mini console by any method will persist. Here's the relevant change from the Safari 16.5 release notes: Fixed "Selected element" console entry filling an entire row. Fixed an issue causing the mini console to always opens when choosing "Inspect Element", even if it was previously closed.
When you click, a web inspector panel is then produced which allows you to make all the usual interrogations and changes you can within desktop Safari such as interacting with the console or changing CSS values of elements to see how they would look in realtime. Here's an example using a WKWebView within one of my client projects, Yabla Spanish:
Enabling inspecting your device from a connected Mac. Before you can connect your device to a Mac to inspect it, you must allow the device to be inspected. Open the Settings app. Go to Safari. Scroll down to Advanced. Enable the Web Inspector toggle. Now, connect the device to your Mac using a cable. In Safari, the device will appear in the ...
I have had the issue for a long time. Here is the solution. Right-click on a web page and select inspect element. The console window appears in Fullscreen. Minimize the window like any Safari web page and it should a window like below. Just above the 'Elements' tab, you should be able to see 2 icons.
7. In Safari 12, select the row in the network tab. The response will be displayed in the main area. Above it will be a few tabs. Select the Headers tab and take a look in the request part of the displayed data for some request info. For details on the request data, take a look under "Request Data".
While the Inspect Element tool's primary focus is on the HTML and CSS of a page, there's more you can do with it. Touring the Inspect Element Panel Brave's DevTools. The Inspect Element tool is much more than a way to display code. There are often several panels to access: Inspector — This is called Elements in some browsers. It's the ...
The checkVisibility method. The checkVisibility method is a general Web API feature in modern browsers. This method categorizes an element as visible or not visible in the viewport by considering multiple CSS factors like opacity, visibility, content-visibility, display, and more. With Webkit 17.4, Safari now provides a bit of partial support ...
Safari on visionOS 2 beta supports immersive-vr sessions. WebXR scenes are displayed using hardware-accelerated graphics driven by WebGL. Try out the Chess Garden demo to see WebXR in action. Safari for visionOS 2 beta supports the new WebXR transient-pointer input mode. It lets you make the most of natural input on visionOS, and allow your ...
In Chrome, Firefox, and Edge Inspector I can see and inspect all the elements. I attached a screenshot of the Element inspector in the exact same spot, one in Safari and one in Edge. What I see in Safari: What I see in Edge: I've tried quitting and reopening safari, refreshing, checking the settings. I'm expecting the elements to show up ...
Elements Console Sources Network Performance Memory Application Recorder Rendering Autofill Security Sensors WebAudio WebAuthn Animations Changes Coverage ... Inspect, modify, and debug web apps, test cache, view storage, and more. Read the docs. Recorder
Open the Elements panel. By default, when you open DevTools the Elements panel opens. You can also inspect a node anywhere on the page to automatically open the Elements panel. To manually open the Elements panel: Open DevTools. Open the Command menu by pressing: macOS: Command + Shift + P. Windows, Linux, ChromeOS: Control + Shift + P.
Safari Technology Preview Release 196 is now available for download for macOS Sonoma and macOS Ventura. ... Fixed incorrect inline element size when using font-variant-caps: all-small-caps with font-synthesis. (279183@main) (121314557) ... Fixed console code completion to be case-insensitive. (279195@main) (124544458) WebGL
WebDriver. Write automated tests to exercise web content in Safari to ensure a good user experience, and run those same tests against other browsers with a WebDriver-compliant driver. Powered by the WebKit engine, Safari offers leading performance, compatibility, and a great set of built-in web development tools.