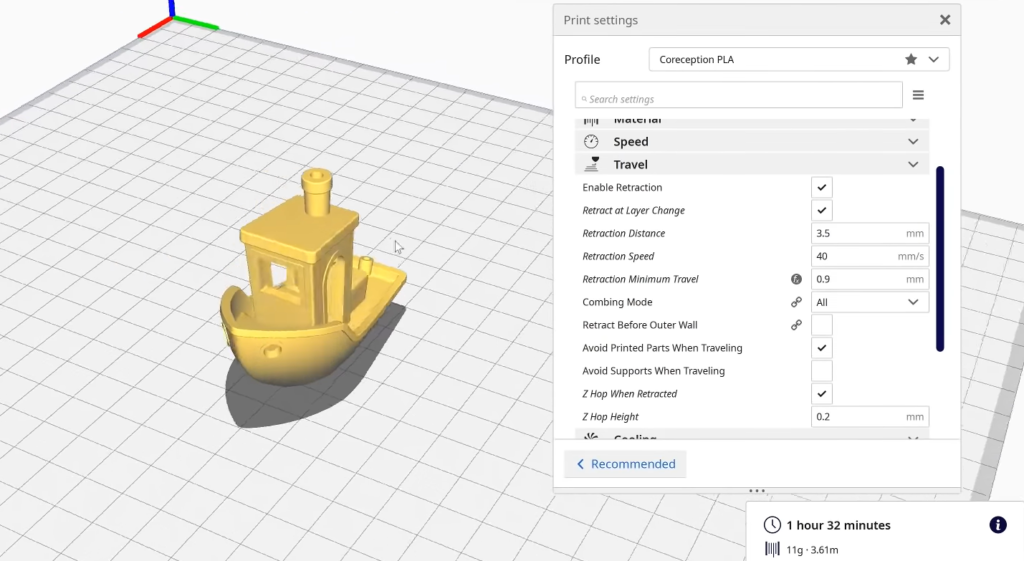
Travel settings
Nov 8, 2022 • knowledge, information, article details, enable retraction.
Retraction is used at the places in a print where the printer has to do a travel move between two printed parts. Without retraction, extruded material will hang between the parts. By using retraction, “stringing” (thin threads of plastic in between the printed parts) is prevented, resulting in a much cleaner model. Exercise caution when using flexible materials or models that require a lot of retractions as it may lead to grinding of the filament.

Retract at layer change
This setting forces the printer to retract the filament before it starts printing the next layer.
Retraction distance
This is the distance in millimeters that the material is retracted from the nozzle. A long retraction creates more stress on the material, takes time and minimizes oozing. A short retraction has an increased chance of oozing, but keeps the material secure and print time shorter.
Retraction speed: retract and prime
This refers to the speed, in millimeters per second, at which the material is retracted and primed. A high-speed retraction minimizes oozing, but can cause material grinding. A low-speed retraction has an increased chance of oozing, but will protect the material.
Retraction extra prime amount
This is the extra amount of material that is extruded after a retraction to compensate for oozed material after a travel move. This setting can be useful, especially with flexible filaments as these require extra pressure to print properly. By increasing the retraction extra prime amount, more pressure is added which helps compensate for the material.
Retraction minimum travel
This setting determines the minimum distance the print head must travel before a retraction move is initiated. With retraction-intensive models, you could increase the value, which decreases the number of retractions and reduces the possibility of grinding. However, the value must not be set too high as this might lead to stringing and cause ugly “blobs” to form on the print.
Maximum retraction count
The maximum retraction count sets the maximum number of retractions on a certain length of filament (see minimum extrusion distance window). All retractions above this value will be ignored. The benefit of maximizing the amount of retractions is that it decreases the possibility of grinding. However, for models with a lot of holes (e.g. a voronoi print), this can lead to stringing if the value is too low.
Minimum extrusion distance window
This is the length of filament over which the maximum retraction count is enforced. This value protects the number of retractions on the same piece of filament.
For example: If you set the maximum retraction count to 25 and the minimum extrusion distance window to 1.0 mm, it will do a maximum of 25 retractions per 1.0 mm extruded filament.
Combing Mode
Combing will reduce the chance of defects on outer surfaces of the print by recalculating all nozzle travel moves to stay within the perimeter of the print. This results in greater travel distances, but with a reduced need for material retraction.
If combing is disabled, the material will retract and the print head will move in a straight line to the next point.
Avoid printed parts
By enabling this setting, the print head will avoid printed parts when traveling. When the shortest route from one point to another in the print is obstructed, the print head will move around it. This decreases the possibility of coming into contact with parts of the model that have already been printed, in turn reducing the chance of surface defects or material mixing. To use this setting, you must first enable combing.
Avoid distance
This setting defines the distance (in mm) between the nozzle and the print when avoid already printed parts is enabled. A greater avoid distance means a reduced chance of contact with the printed model, however a large avoid distance will significantly affect the length of the travel moves, impacting the print time, and chance of oozing.
Layer start X-Y
This setting defines the position closest to these coordinates to start the next layer. The setting is normally set to the far-right corner because that is where the Ultimaker 3's switching bay is located.
Note: This is a different setting than the Z-seam. The z-seam alignment setting only adjusts the start position of the outer wall, where this setting normally starts at the infill.
Z-hop when retracted
With this setting, the build plate will move down by the set value when a retraction is performed, allowing the print head to travel over the print without the nozzle touching it. This prevents the nozzle from hitting the object or leaving “blobs” or scratches on the print surface. Please note that for prints with lots of retractions/travel moves, this can increase the print time.
Z-hop only over printed parts
The 'Travel' category includes the option 'Avoid printed parts'. When this is enabled, the nozzle will avoid these parts when possible in order to reduce scratching the model’s surface. When there is no way to avoid the part, the printer will perform a Z-hop when traveling over the part.
Z-hop height
This setting specifies the height (in mm) at which all Z-hop moves are performed during the print.
Z-hop after extruder switch
This feature will trigger a Z-hop when the nozzle moves to the switch bay, reducing the chance that oozed material will come in to contact with the printed model.
Continue reading about Cooling settings.

The 3D Printer Bee
Creality K1 Max – Perfect Cura Settings for PLA, ABS, PETG, TPU
- Recent Posts

- Creality CR-Scan OTTER Review: Testing the 0.02 mm Accuracy - June 4, 2024
- Game-Changer or Gimmick? Testing PEY, PEO & H1H - May 29, 2024
- Printing BIG with the JUPITER SE – A Review - May 13, 2024
Disclosure: Links marked with * are Affiliate Links. I earn from qualifying purchases if you decide to make a purchase through these links – at no additional cost for you!
The standard slicer for the Creality K1 Max is Creality Print, but it can also be operated with Cura. Compared to Creality Print, Cura offers greater flexibility and customizability in the settings. And since Creality Print is based on Cura, you always have the latest features when using Cura.
Therefore, during my detailed testing of this 3D printer, I optimized the settings in Cura for the K1 Max. In this article, I’ll share them with you and also show you how to create a new profile for this 3D printer.
Tip: The values shown here will deliver good results, but you will only achieve perfect results after calibration.
You can find out how to calibrate the K1 Max in this article . For an even more comprehensive understanding, here is the link to my 3D printing course , which covers the topic of calibration in more detail.
Table of Contents:
- 1 How to Create a Cura Profile for the Creality K1 Max
- 2.1 Print Temperature
- 2.2 Print Bed Temperature
- 2.3 Print Speed
- 2.4 Accelerations & Print Jerk
- 2.5 Retraction
- 2.7 First Layer
- 3 Conclusion
How to Create a Cura Profile for the Creality K1 Max
The Cura profile is divided into two main areas: the machine settings, which define the physical and technical specifications of the 3D printer, and the print settings, which define specific parameters such as print speed, layer height and temperature.
First, we need to define the machine settings correctly, for which Cura provides an empty profile as a starting point.
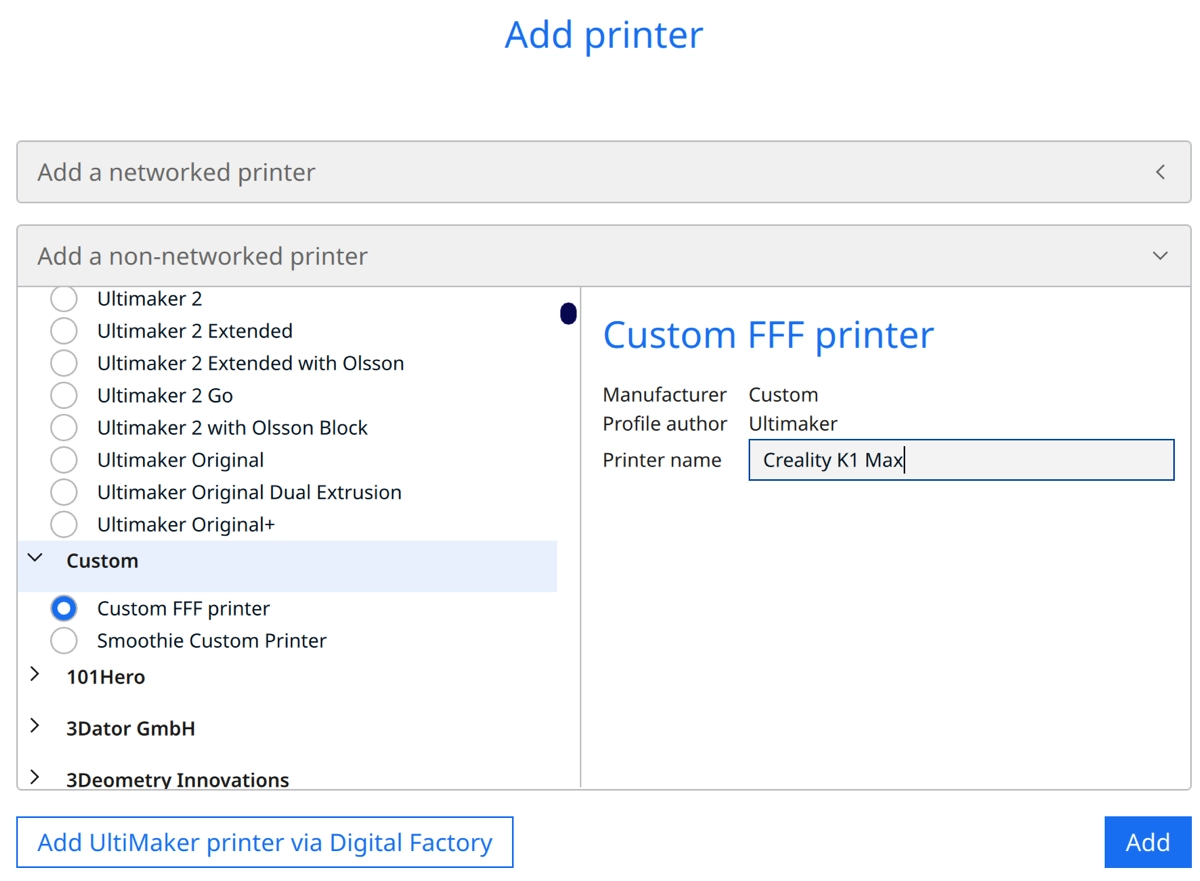
To add a 3D printer in Cura, follow these steps:
- Click on ‘Settings’, then on ‘Printers’, and select ‘Add printer’.
- Click on ‘Non-networked printer’.
- Select ‘Custom’ from the list and then ‘Custom FFF printer’.
- Enter the name of your printer.
- Finally, click on ‘Add’ to integrate the printer into Cura.
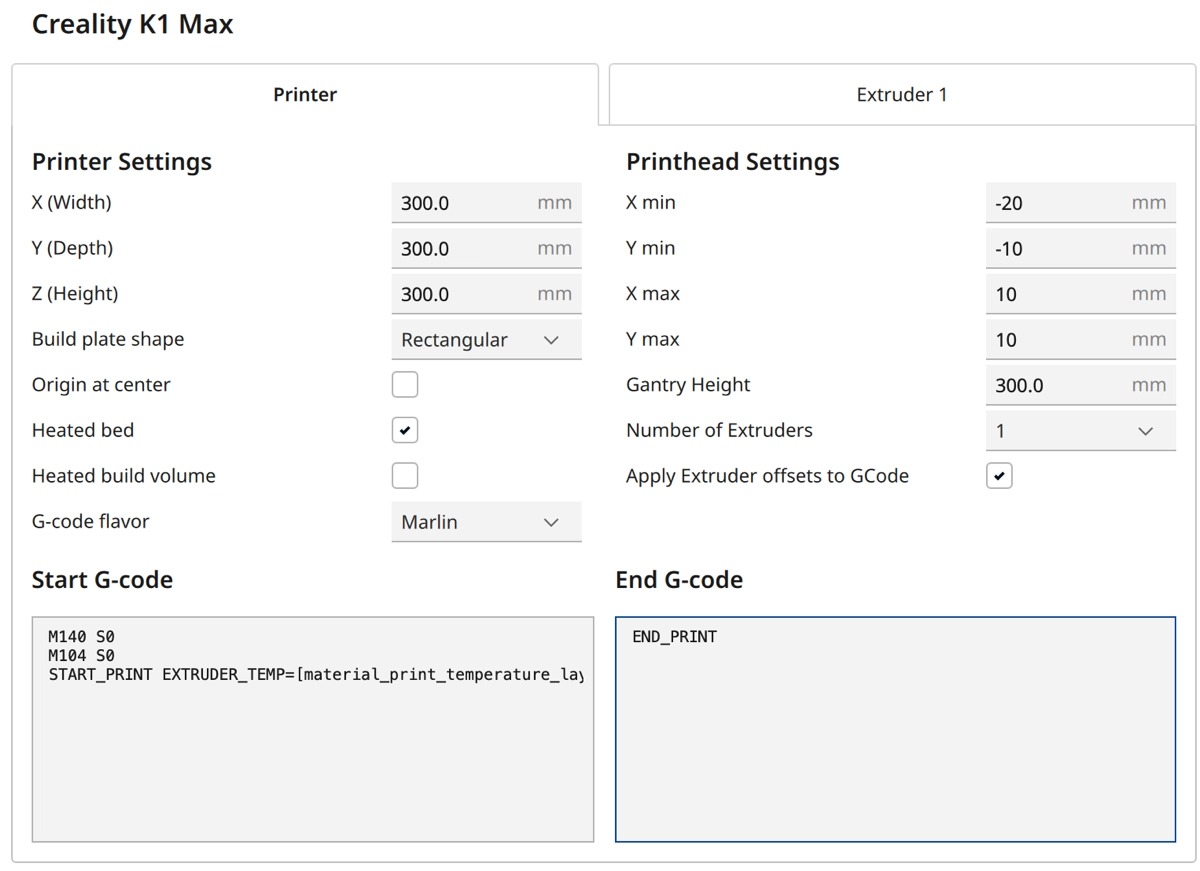
The machine settings for your K1-Max are shown in the screenshot above so that you can easily adopt them. You will find the G-code snippets listed again directly below so that you can copy them more easily:
Start G-Code:
- START_PRINT EXTRUDER_TEMP=[material_print_temperature_layer_0] BED_TEMP=[material_bed_temperature_layer_0]
End G-Code:
Once you have created the printer profile in Cura, the next step is to define the print settings. These settings include important parameters such as layer height, infill pattern, print temperature and speed.
You can find more information on how to create a 3D printer profile in Cura and what you need to pay attention to in this article: How to Create a Custom 3D Printer Profile in Cura
The Cest Cura Settings for the K1 Max
Now that I have introduced the machine settings for the Creality K1 Max, let’s focus on the specific print settings and how to calibrate them optimally to achieve excellent print results.
Print Temperature
The best printing temperatures for the K1 Max in Cura:
- PLA : 230 °C
- ABS : 260 °C
- TPU : 220 °C
- PETG : 250 °C
Incorrect printing temperatures for 3D printers can lead to a number of problems:
- Too low a temperature can lead to the filament not melting properly, resulting in poor adhesion between the layers and therefore a weak structure of the printed object.
- However, too high a temperature can cause the filament to overheat and become too liquid, leading to deformation and stringing.
It is therefore crucial to determine and set the correct printing temperature for the specific filament.
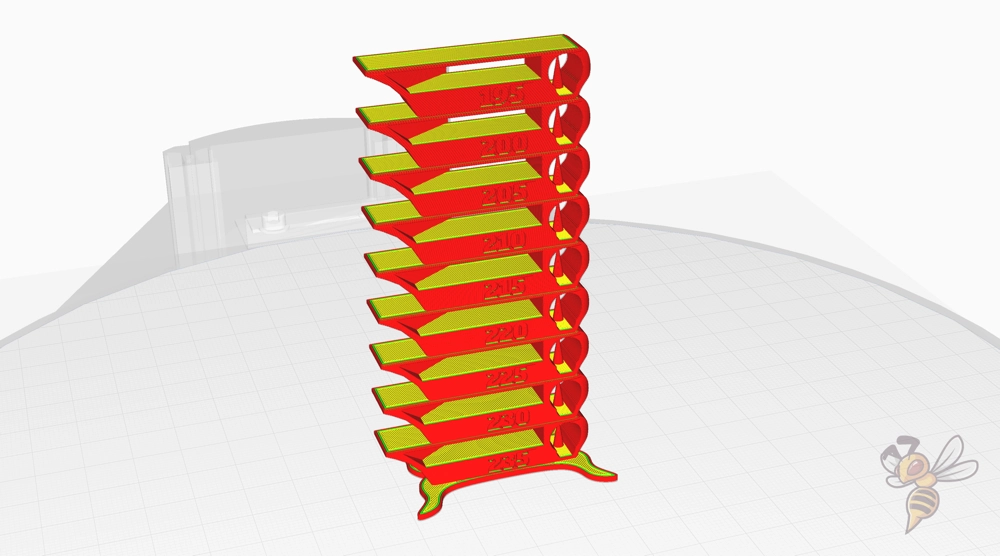
To calibrate the printing temperature of your FDM 3D printer, using a temperature tower is an effective method. A temperature tower is a specially designed 3D model that is printed at different temperature levels.
Start printing at the highest temperature at the bottom of the tower and gradually reduce the temperature with each segment as you move upwards. By observing at which temperature the best results are achieved, you can determine the ideal printing temperature for your specific filament.
It’s a simple and accurate approach to optimizing print quality and avoiding problems caused by inaccurate temperature settings.
Print Bed Temperature
The best print bed temperatures for the K1 Max in Cura:
- PLA : 55 °C
- ABS : 100 °C
- TPU : 70 °C
- PETG : 80 °C
The PEI coating on the print bed of the K1 Max provides excellent adhesion, making it easier to find the right temperature. The above temperature values should work reliably in most cases.
The heating of the print bed should be switched on five to ten minutes before printing with ABS filament so that a homogeneously warm temperature environment is present in the closed print volume as soon as printing is started.
Print Speed
The best printing speeds for the K1 Max in Cura:
- PLA : 300 mm/s
- ABS : 300 mm/s
- TPU : 80 mm/s
- PETG : 200-300 mm/s
The K1 Max is characterized by an impressive printing speed, which is achieved by the integrated vibration compensation. This technology enables the printer to work quickly without compromising the quality of the print result.
Despite the high theoretical print speed of the K1 Max, I found that the above values worked most reliably for my projects.
Accelerations & Print Jerk
The best acceleration and print jerk settings for the K1 Max in Cura:
- Infill & Travel accelerations : 12000 mm/s²
- All other accelerations : 5000 mm/s²
- Travel Jerk : 30 mm/s
- All other Jerk values : 8 mm/s
The acceleration values in Cura play a decisive role in controlling the movements of the 3D printer. They determine the speed at which the printer starts and ends its movements, which has a direct influence on the print quality.
High acceleration values can lead to faster printing times, but also to more vibrations and potential printing errors. Lower acceleration values, on the other hand, lead to smoother movements, which can improve print quality but reduce print speed.
Print Jerk in Cura is another important factor that controls the movements of the 3D printer. It determines the maximum speed at which the printer can change its movement in a new direction without stopping. The right balance is also crucial here, as values that are too high can lead to vibrations and printing errors, while values that are too low unnecessarily extend the printing time.
The values given above are recommended by Creality and I have had good results with them.
The best retraction settings for the K1 Max in Cura:
- PLA : 0.5 mm at 40 mm/s
- ABS : 0.5 mm at 40 mm/s
- TPU : 0.5-1.0 mm at 30-40 mm/s
- PETG : 0.5-1.0 mm at 30-40 mm/s
Incorrect retraction settings can lead to printing errors, such as so-called “stringing”. Thin threads of molten filament appear between the parts of the print object, which affects the surface quality of the print result.
The above values are a good starting point for setting the retraction, but do not guarantee perfect printing results. Careful calibration of the 3D printer is necessary for optimum results. Every printer and every filament behaves differently, so individual adjustments and tests are essential to achieve the best possible print quality.
Calibrating the retraction is an essential step in achieving optimal printing results. A simple test object such as two columns can be used to gradually adjust and improve the settings.
Start by calibrating the retraction distance. Observe the print result closely and adjust the retraction distance if you notice stringing. Gradually increase the distance until stringing no longer occurs.
You can then calibrate the retraction speed. Repeat the print, this time with the optimal retraction distance, and adjust the speed. If the retraction is too slow, dripping/oozing could occur, while too fast a retraction can damage the material. Gradually increase the speed until you achieve the best possible print quality.
Repeat this process iteratively until you have found the perfect balance between speed and retraction distance. Keep in mind that any change in filament type or brand will likely require a recalibration.
The best infill density for the K1 Max in Cura:
- Decorative objects : 0-15%
- Standard objects : 15-50%
- Stable objects : 50-100%
The infill density has a significant influence on the stability and weight of the printed objects. When selecting the correct density, it is important to consider the intended use of the object. Decorative objects that do not require high stability can be printed with a low infill density of 0-15%, which saves material and speeds up the printing process.
For standard objects that require moderate stability, a density of 15-50% is recommended. For objects that have to withstand high forces or need to be structurally stable, an infill density of 50-100% should be selected. It should be noted that a higher infill density will result in a heavier object and a longer printing process, but will significantly improve the structural integrity and durability of the object.
First Layer
These are the best Cura settings for the first layer with the K1 Max :
- Layer height: 100-200%
- Line width : 100-200%
- Print temperature: Same as the rest of the object or 5-10 °C higher to achieve better adhesion to the print bed.
- Print speed: 10 to 20 mm/s
- Raft/Brim/Skirt: Skirt as standard, Brim/Raft only if you have problems with adhesion.
A warmer filament has more time to bond to the print bed. This is an important factor in achieving a stable first layer and therefore a successful print result. The above settings aim to extend the time the filament remains liquid.
By increasing the printing temperature and decreasing the printing speed, the time the filament is hot on the print bed is maximized, resulting in better adhesion and a higher quality first layer.
The first in this series of measures is to reduce the print speed to the values indicated above. It is by far the most effective measure against poor print bed adhesion.
If you have problems with print bed adhesion, you should take another look at this article: 3D Print Not Sticking to the Bed: How to Fix it Step-by-Step
The K1 Max is an ingenious 3D printer. However, it can only deliver perfect results if it is fed with the right slicer settings.
I hope that the values in this article will help you. And if not, the calibration article linked above or my course should help you! Have fun with your K1 Max!
Disclosure: This website is the property of Martin Lütkemeyer and is operated by Martin Lütkemeyer. Martin Lütkemeyer is a member of the Amazon Services LLC and other Affiliate Programs. These are affiliate advertising programs designed to enable websites to earn advertising revenue through advertising and linking to Amazon.com and others. Links marked with * are affiliate links.

Most Important Cura Settings for 3D Printing (Print Quality, Speed & More)
If you have a 3D printer, then there’s a 99.99% chance you know about Ultimaker Cura. It’s only the most popular 3D slicer for FDM 3D printers out there (and it’s free)!
Cura is home to literally hundreds and hundreds of different settings and options, making it perhaps the most versatile 3D printer slicer software. While most experienced 3D printing enthusiasts can read and understand these settings like basic English, they can be a bit confusing for those new to the hobby.
And, to be honest, the technical terms in Cura, such as “Infill Overlaps Percentage” and “Combing Mode” sounds a lot more intimidating than they actually are. But, nonetheless, knowing how to use these settings is very important if you want to achieve the highest-quality prints.
Today, I’ll be going over the most important settings in Cura in simple terms , explaining what each one does and how you can use it. In no time, you’ll be able to figure out what settings to change to improve your 3D prints!
Table of Contents
Why Use Cura?
Cura settings for 3d printing, layer height, initial layer height, wall thickness, wall line count, top/bottom thickness , top/bottom layers, enable ironing, infill density, infill pattern, infill overlap percentage, printing temperature, printing temperature initial layer, build plate temperature, build plate temperature initial layer, print speed, initial layer speed, travel speed, enable retraction, retract at layer change, retraction distance, retraction speed, combing mode, avoid printed parts when traveling, avoid supports when traveling, z hop when retracted, enable print cooling, initial fan speed, regular fan speed at height, generate support, support structure type, support density, support overhang angle, support z distance, build plate adhesion type, skirt/brim line count, dual extrusion, print sequence, surface mode, spiralize outer contour, make overhang printable, use adaptive layers, tuning settings.
But before we dive into the settings, you might be wondering why you should even use Cura. The simple answer: it’s the best and most versatile slicing platform around .
Furthermore, Cura has the most adjustable slicer settings than any other slicer software (including PrusaSlicer and Simplify3D). This means you have the most opportunities to fine-tune the print quality.
Additionally, Cura’s interface and layout make the platform usable for anyone, whether it’s their first day with a 3D printer or their thousandth. Moreover, beginners benefit from Cura’s default setting selection, which only covers the high-level, basic settings, like layer height and infill density. This makes slicing 3D prints a lot easier!
But, at the same time, 3D printing professionals can set Cura’s setting selection to “Expert” or “Show All” to have more setting options so they can make more specific adjustments to the print quality.
It’s also worth pointing out that Cura is open-source and has a large community following , so it’s always being developed and new features are added monthly. Plus, there’s a repository of plug-ins that expand what Cura is capable of. Check out our article about the best Cura plug-ins to learn more about this.
With that in mind, let’s get started!

There are hundreds of different adjustable slicer settings within Cura’s interface, and below, I’ll be explaining the most useful and practical ones. As there are so many settings, I’ve organized them into their respective sections in Cura, like “Quality” and “Infill”.
And, if you can’t see a setting, it’s probably because your Cura setting selection is not set to “All”. To fix this, click the settings menu in Cura and then click the three-dashed-bars icon in the top right. Finally, select “All” to show all of Cura’s available settings!
Now, let’s get to it!
Our first section of Cura settings is Quality. The heavy hitters in the Quality section include settings like layer height, line width, and more! These settings are usually the most impactful on the print quality and visual appearance of your 3D prints.
The first setting is layer height . Layer height controls the Z-axis distance of each layer of your print; in other words, it’s how much the nozzle moves up after each layer.
The layer height is usually considered the most relevant setting for what we call print quality, which is basically how good and detailed your 3D model comes out. The smaller the layer height, the more layers make up a 3D print, giving the machine more space to include detail and small features on the 3D model.
On the reverse side, a larger layer height yields larger layers and less detail on your 3D print. But, on the upside, a larger layer height provides more strength for your 3D prints , making it useful for printing functional models (e.g. mechanical gear).
The most common layer height for FDM 3D printers is 0.2 mm , and this provides a good mix between detail and strength on your 3D prints. Feel free to change this value, though, if you’re printing high-detail models or parts that require a lot of strength.
The initial layer height setting controls the layer height ONLY for the first layer of your print job. This is a useful setting because too small or too large of a layer height may cause issues with the bed adhesion for the first layer of your print.
Moreover, if you’re using a very high or very low layer height but don’t want issues with first-layer bed adhesion, you can use an initial height of 0.2 mm, which usually works great regarding bed adhesion.
The line width setting controls the width of each line (of melted filament) that the nozzle lays down. For example, if this value is set to 0.4 mm, a single nozzle pass will create a strand of plastic that’s 0.4-mm in width.
Make sure to keep this setting at Cura’s default value, which should be equivalent to the size of your nozzle. For example, if you have a Creality Ender 3, which (by default) uses a 0.4-mm nozzle, then the line width should be set to 0.4 mm.

The Walls section in Cura includes all of the relevant slicer settings for 3D printed walls (sometimes called “shells”). For reference, the walls on a 3D print are the completely-solid structures that separate the infill portion of your model from the outside of the part.
Perhaps the most important wall-related setting in Cura is the Wall Thickness. This setting, as it sounds, controls how thick the walls of your print are . The thicker the walls, the more durable and sturdy your 3D print is. Also, if you’re printing a model that you want to be waterproof, then use a high wall thickness value.
For standard, normal 3D prints, I like to use a wall thickness of 0.8 or 1.2 mm.
The Wall Line Count setting is directly related to the Wall Thickness setting we just went over. Moreover, this setting is set to the wall thickness divided by the line width setting. If you want a certain number of walls, then make sure to adjust this setting which will automatically change the wall thickness setting.
Next, the Top/Bottom section in Cura includes settings related to the top and bottom layers of your 3D print. The top and bottom layers of your print, just like the walls, are another part of the “shell” of your model. These sections of your print are completely solid and separate the infill portion of the model from the outside.
The Top/Bottom Thickness setting controls how thick the top and bottom sections of your 3D print are. The higher this value, the more filament will be used, the longer your print will take, but, also, the stronger and more durable your model will be!
I like to use a Top/Bottom Thickness of 0.8 or 1.2 mm, but feel free to increase or decrease this value depending on if you want strength or speed for your 3D print.
Just like with the Wall Line Count setting, the Top/Bottom Layers setting is directly related to the Top/Bottom Thickness setting. Moreover, this value is automatically set to the Top/Bottom Thickness divided by the set line width. You can change this value if you want to set the wall thickness as a number of layers rather than a distance.
Ironing is a very special slicing feature that uses the heat from the nozzle to essentially iron (just like you would with clothes) the top layer of a 3D print. This smooths out the layer lines on the topmost layer of a 3D printed model to make it look better.
To activate ironing, you can turn on the “Enable Ironing” setting in Cura, and a list of ironing-specific slicer settings will appear. While I won’t dive into these settings, I do recommend turning on ironing if you’re printing a mid-large-size 3D model that you want to look super smooth, like a trophy.

The next Cura settings section is Infill. If you didn’t already know, infill is specific to 3D printing and basically, no other manufacturing style allows you to control the internal density of a part. As such, the infill settings listed below, like Infill Density and Infill Pattern, are super important.
The Infill Density setting is a percentage value that controls the “full-ness” of the inside of your 3D print. An infill density of 100% means your part will be 100% solid, while a 0% infill density makes your 3D model hollow (with the walls and top/bottom layers still present).
Obviously, the higher this percentage, the more filament your print will consume, the heavier your 3D model will be, and the longer your print will take. But, it also makes your model more sturdy and durable!
For most prints, I suggest using a 20-30% infill density . And, if you’re printing a part that needs to be strong, consider going up to 50-80%.

The infill pattern is the arrangement in which the infill material is laid out inside your 3D model. While you can’t see the infill pattern on a 3D print, it’s still an important slicer setting as it impacts the strength of your print, as well as its weight and print time.
I recommend the cubic infill pattern as it provides strength across all three axes (X, Y, Z), and doesn’t make your prints too long or too heavy. The grid, lines, and triangle patterns also are available in Cura and work well for any type of 3D model, whether it needs to be strong or contains a lot of detail.
Check out our related articles on the best Cura infill patterns and strongest infill patterns here to learn more.
The Infill Overlap Percentage controls how much the infill portion of your 3D print overlaps with the walls of your 3D print. In Cura, the default value for this setting is 30%, and I recommend leaving it at this so the infill is well-bonded to the shell of your model. This makes your part stronger!

The Material section in Cura covers everything related to heat, including the nozzle and bed temperatures.
The Printing Temperature setting in Cura is the nozzle temperature, and it is one of the most important settings on any 3D slicer. That’s because the nozzle temp is directly correlated with the flow of filament.
Moreover, the higher the Printing Temperature is set, the hotter the nozzle gets, and the faster filament will be melted. As such, if you want to increase the print speed, make sure you also increase the printing temperature.
And, if you’re experiencing under-extrusion in your 3D prints, consider raising the Printing Temperature. The reverse is true for over-extrusion.
Sometimes you may want to use a higher Printing Temperature for the first layer, and the Printing Temperature Initial Layer setting allows you to do this. When I’m having bed adhesion issues, I like to make this setting about 5 °C higher than my normal Printing Temperature to ensure no under-extrusion occurs.
The Build Plate Temperature setting, also known as the bed temperature, controls how hot your printer’s heated bed gets . A heated bed is practically a necessity on a 3D printer as it helps a ton with achieving good first-layer bed adhesion and preventing issues like warping and elephant’s foot.
You should set the Build Plate Temperature to the value suggested by the manufacturer of your filament. And, if you’re having bed adhesion issues, try increasing the bed temp by 5 or 10 °C.
Just like with the Printing Temperature, you may want a different Build Plate Temperature for the first layer of your print. If so, use Cura’s Build Plate Temperature Initial Layer setting. When I’m printing in a cold room, I like to set this value to 10 °C above what my normal Build Plate Temperature is to ensure no warping occurs on my print.

Next, in this section, I’ll go over some of the most important settings related to the speed of your printer.
The Print Speed setting in Cura is a blanket setting that controls how fast filament is pushed out the nozzle . Obviously, the higher this value, the faster your 3D model will be printed.
And, as I mentioned, this setting is a blanket setting, meaning changing it will adjust a handful of sub-settings, each related to a specific print action. For example, changing the Print Speed from 60 mm/s to 30 mm/s will make the default Wall Speed go from 30 mm/s to 15 mm/s.
Also, it’s worth noting that you should accompany any increase (or decrease) in your Print Speed with a similar adjustment in the Printing Temperature setting.
Check out our more in-depth article on the best print speed settings for different types of filament here to learn more.
The Initial Layer Speed setting controls how fast filament is pushed (and the printhead moves) during the first layer of your print job. By default, the Initial Speed value is set much lower than the regular Print Speed setting, and I recommend keeping it this way.
The Travel Speed controls how fast your machine’s printhead moves during non-extrusion moves, such as when it’s moving from one section of a print to another. A higher travel speed will yield faster prints (lower print times), but don’t go too crazy. A Travel Speed as high as 200 mm/s should work fine, but be careful of raising it past this as it could cause some printing issues.
The Travel section in Cura contains a handful of useful settings related to retraction (when filament is pulled back from the hot end) and anti-stringing actions.
First in this section is the “Enable Retraction” setting. Retraction describes the process of the extruder pulling back filament from the hot end assembly to relieve pressure in the hot end and prevent stringing from occurring.
I suggest turning this setting on. Doing so will reveal a handful of retraction-related settings, some of which, I’ve gone over in the other sections.
The Retract at Layer Change setting is a boolean setting (can be turned on or off) that tells the printer to make a retraction move every time a layer is finished. This helps eliminate stringing, and I suggest turning this setting on.
The Retraction Distance is one of the most important settings related to retraction and it is the distance of filament that’s pulled back each time a retraction occurs. The higher this value, effectively, the more pressure will be relieved from the hot end, so increasing this setting is a good way to reduce stringing on prints. However, increasing the retraction distance too much can cause nozzle and hot end jams, so don’t increase it too much.

The retraction speed is another important setting related to refraction and it controls how fast the extruder pushes and pulls filament from the hot end during retraction moves . Just like the retraction distance, increasing the retraction speed can help reduce stringing on prints.
Make sure to check out our article on the best retraction speed and distance settings to learn more.
The combing mode is a multi-option setting in Cura that controls how the printhead moves around the print space. There are a few different options for the combing mode, including “Off”, “All”, “Not In Skin”, “Within Infill”, and “Not On Outer Surface”.
I won’t go into how each combing mode works, but it’s worth noting that the “Not In Skin” and “Within Infill” options are most effective at reducing stringing on prints.
There’s not much to explain here; the name says it all! I suggest turning this setting on!
Just like the previous setting, the Avoid Supports When Traveling works just like it sounds. Moreover, when this setting is turned, the printhead won’t go over the support structures when moving around the print space. This reduces the chances of the printhead accidentally knocking over a support structure.
I suggest leaving this setting turned on!
The Z Hop When Retracted setting tells your printer to move the printhead up every time a retraction move occurs. It helps reduce stringing and the chances of the printhead hitting a section of the print.
I recommend turning tis setting turned on!

Next, the Cooling setting section in Cura covers all the fan settings which impact how filament is cooled when it comes out of the nozzle. Cooling is very important to the 3D printing process, so make sure you know how to use these settings.
First off, the “Print Cooling” setting is just as it sounds: it turns on the part cooling fan on your machine’s printhead. You should turn it on most of the time as cooling is helpful for printing most filament materials (e.g. PLA , PETG ).
However, when printing certain materials, like ABS or ASA, you might want to turn print cooling off as cooling can hurt prints made with these filament materials.
If you enabled print cooling, you’ll have the ability to set the Fan Speed setting, which controls how fast the part cooling fan spins . The higher the Fan Speed, which is expressed as a percentage, the more cooling on your printer. As such, if you notice droopy sections of a print, consider increasing the Fan Speed.
The Initial Fan Speed setting in Cura controls the fan speed for the first layer . It’s common practice to leave this value at 0% as cooling the first layer can cause warping and other bed adhesion issues.
Next, the Regular Fan Speed at Height sets the layer at which your printer switches from using the Initial Fan Speed to the regular Fan Speed percentage. I like to keep this setting at 3-5 layers, as this gives enough time for the first layer to properly adhere to the build plate.
Next, the Supports section controls the settings related to support structures on 3D prints. For reference, supports on 3D prints are structures generated by your 3D slicer software that help your machine successfully print overhangs on models.
First, you’ll have to decide whether to use support structures or not on your 3D print. I recommend turning the “Generate Support” setting on only when you’re printing a model that has somewhat large overhangs that you don’t think your 3D printer can handle without help.
There are two different types of support structures you can choose from in Cura, including Normal and Tree supports. I’ve discussed each type below:
Normal supports in Cura are support structures that have regular geometries. They start right beneath the overhang on the model and end right below the overhang to make it easy for the printer to successfully lay down filament in the overhang.
On the other hand, Tree overhangs are a special, algorithmically-generated type of support structure that’s meant to reduce filament usage, and print time, and make the bottom surface of the overhang as smooth as possible. Using Tree supports, though, does increase the chance of a print failure as these structures are a bit more complicated than Normal supports.
The Support Density is the infill density of the support structure. This setting is expressed as a percentage, and raising the value is a good way to ensure your supports are sturdy and don’t fall over. However, I recommend leaving this setting at the default 10-20%, as supports don’t need to be too strong to function properly.
The Support Overhang Angle is one of the most important support settings and it’s a threshold value for overhang angles on prints. So, if you’re printing a model that has an overhang that has a 40° angle, but your Support Overhang Angle is set to 50°, then no support structures will be generated for that overhang.
I suggest leaving this value at 45°, as this is a limit that most printers can handle.
The Support Z Distance setting controls how much space is placed between the final layer of the support structure and the first layer of the overhang area of the actual 3D model. A higher Z distance will make support structures easier to remove!
Build Plate Adhesion
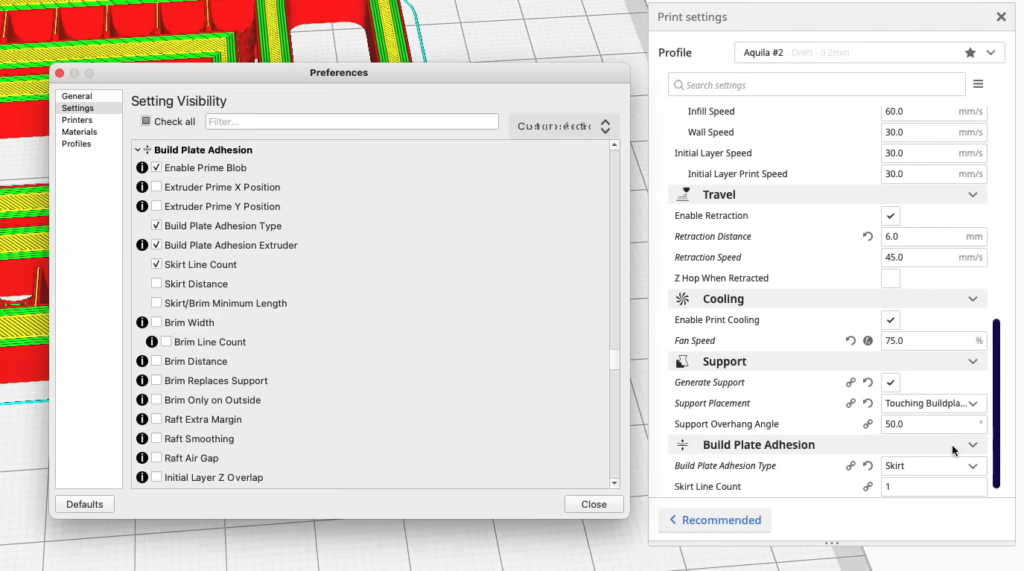
Next, the Build Plate Adhesion section has all of the settings related to bed adhesion, like for skirts, brims, and rafts .
The most important setting in this category is the Build Plate Adhesion Type, and there are three of them you can choose from. I’ve gone over each below:
A Skirt is the least-intensive bed adhesion assistant, and it is simply a few single-layer outlines of your 3D model that aren’t connected to the base of the part. As such, a Skirt provides no help with bed adhesion. But it does get your hot end ready to go for the real print by priming the extruder!
A Brim is my personal favorite Build Plate Adhesion Type and it’s like a Skirt, but only more outlines it’s actually connected to the base of your 3D model, so it does help with bed adhesion.
Lastly, a Raft is basically a base surface, standing a few layers tall, that is printed first and serves as a base for printing your actual 3D model. It provides the most bed adhesion for your print and helps the most with eliminating warping and other bed adhesion issues.
If you chose to go with a Skirt or a Brim, then you can set the Line Count, which is the number of nozzle passes (AKA outlines) that your printer makes for the skirt/brim. I like to use 4 for both skirts and brims!
While most people use Cura with single-extruder 3D printers, like the Creality Ender 3 , the slicer also has features to cater to dual-extruder 3D printers .
Moreover, there are a handful of settings related to dual extrusion in Cura, such as “Union Overlapping Volumes”, which merges internal sections of a 3D model so prints are less likely to fail. There are also settings like “Extensive Stitching”, “Remove All Holes”, and “Maximum Resolution”, which enable further control over your dual extruder printer. You won’t see these settings, though, unless you’ve configured your machine to have two extruders in Cura’s “Machine Settings” tab.
If I’m being honest, though, Ultimaker Cura probably isn’t the best slicer for dual-extruder printers, and other options, like Simplify3D and IdeaMaker, are better suited for these types of machines.
Special Modes
Special Modes is another section of useful slicer settings in Cura and, here, you’ll find many options (AKA “modes”) that enable very special and specific printing styles. I’ve gone over the most important special modes settings below:
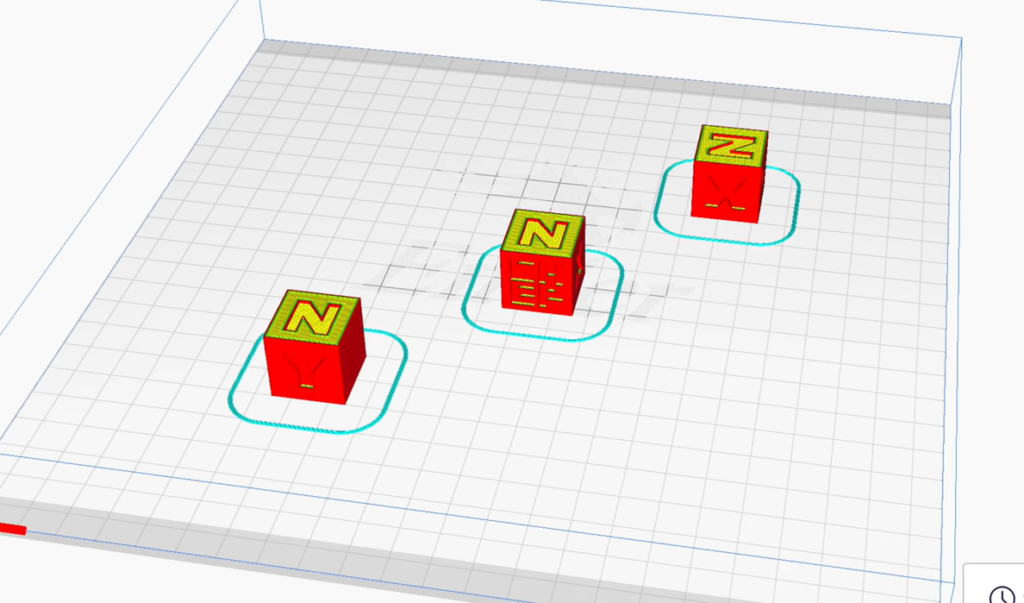
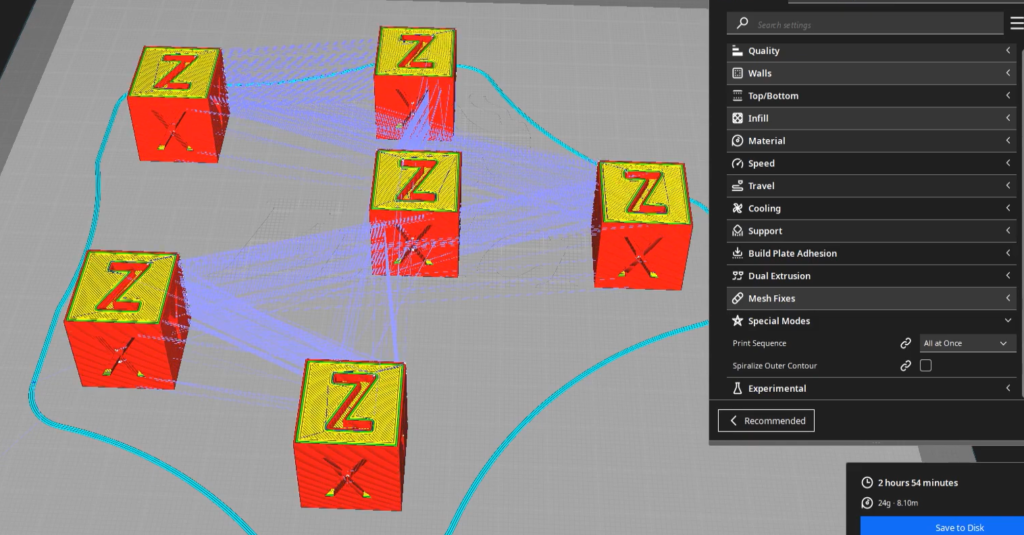
Print sequence controls the order in which models are printed. Due to FDM 3D printers’ layer-by-layer approach, the default option for this setting is “All At Once”. However, in special scenarios, you can switch this to “One At A Time” if you want to print your 3D models one after another.
As you might expect, printing models one at a time requires them to be spaced out a good bit. If you don’t space them out enough, Cura won’t be able to slice the model.
Surface mode controls how Cura’s slicing engine treats the imported 3D models. The default option for this setting is “Normal”, which tells Cura to view your model like a regular volume and print every part of it, including enclosed areas.
However, you also have two other options for surface mode, including “Surface” and “Both”. The “Surface” mode, unlike the normal surface mode, tells Cura to treat your model like a non-volume surface, meaning your part will be printed with no infill or top/bottom layers. Finally, the “Both” option entails printing your part’s enclosed volumes regularly but treating the rest of the model as a mesh surface.
You shouldn’t need to change this setting at all unless you have a really niche print and want to try out the feature!
Next, the “Spiralize Outer Contour” feature in Cura is what most people call “ vase mode ”. Turning this setting on will tell Cura to print just the outer wall of your imported 3D model as well as a few bottom layers. This creates a vase-like version of your model.

Additionally, using the Spiralize Outer Contour setting will make your machine print the model with continuous extrusion. This yields a much higher-quality surface on your vase-like 3D model because continuous extrusion eliminates many printing issues like stringing.
You can check out our article all about Cura’s vase mode to learn more about this setting.
Experimental
Next, Cura’s Experimental section contains new, special-purpose settings that aren’t finished products yet. In other words, these settings are still in the works and might have a few bugs here and there, but offer next-gen printing abilities.
The make Overhang Printable option in Cura is a tool you can use to automatically modify the geometry of your imported 3D model so that the Minimum Support Overhang Angle isn’t met.
This, as the name of the setting says, makes the overhangs on your model printable (without supports). I suggest leaving it turned off unless you don’t mind a slight change in the shape of your 3D model.
The Fuzzy Skin option is a very fun setting in Cura that, when turned on, will adjust how Cura tells your machine to print your 3D model so that the outer-most layer is…fuzzy. It’s not a super useful or practical setting, but, in some situations, it proves useful.
Finally, the Use Adaptive Layers option in Cura is a super practical setting that allows Cura to automatically change the layer height in some sections of your print when it makes the most sense. Moreover, when Adaptive Layers is turned on, Cura will use a larger layer height in the more basic sections of a print and a smaller layer height in the more heavily-detailed areas.
If you’ve familiarized yourself with the settings I discussed above, you might be wondering how to use them to your advantage. Well, if you want to employ your settings knowledge to improve the print quality, then you’ll have to be able to diagnose an issue, pick the right settings to change, and adjust them in the right amount and direction.
To help you out, I’ve provided a few examples of common print quality issues and some slicer setting adjustments you can use to solve them:
- Increase Printing Temperature
- Decrease Print Speed
- Lower Retraction Distance
- Decrease Printing Temperature
- Increase Print Speed
- Increase Retraction Distance
- Increase Retraction Speed
- Activate Spirzalize Outer Contour setting
- Use a Brim or Raft
- Increase Line Count (for a Brim)
- Turn on Z Hop When Retracted
- Increase Support Density
- Increase Fan Speed
- Increase Support Overhang Angle
Overall, there are many different settings in Cura, and all have a purpose and control of a different aspect of how your 3D printer actually prints a 3D model. But learning each and every setting is almost impossible and, to be honest, not very practical.
There are, though, many Cura settings that you should definitely know if you want to be able to solve different print quality issues, whether it’s under-extrusion, stringing, zits, or something else! Make sure you’ve read through each of the settings I went over in the above sections as all can be used to improve your print quality!
Hope this helps!
Related Articles:
- Best Cura Settings for Ender 3 (Pro/V2/S1)
About The Author

Jackson O'Connell
Cura retraction settings explained

03 May, 2022

Adjusting retraction settings can prevent stringing and other issues
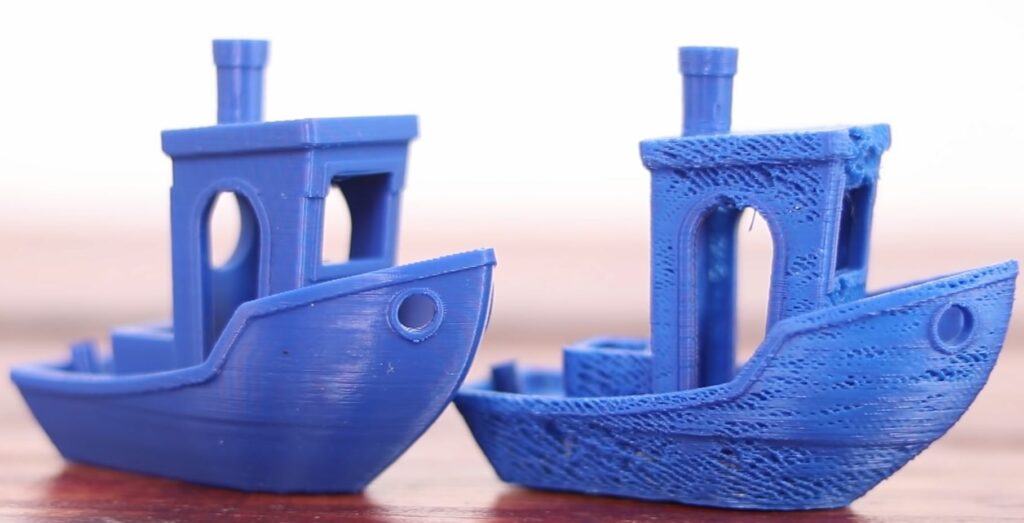
Retraction is a useful feature of FDM 3D printers that helps to prevent common issues like oozing and stringing. Cura retraction settings enable precise control over the retraction process, but the parameters can be confusing to beginners.
Most newcomers to 3D printing don’t think about retraction settings until they’ve succumbed to stringing. This is a common printing problem during which the nozzle leaks excess filament over the printed part, resulting in a mess of plastic strands that look like cobwebs.
Stringing can be caused by several factors. Too much heat in the hot end is a common culprit, while some materials — PETG , for instance — are more prone to stringing than others.[1] When reducing the printing temperature doesn’t fix the problem, a great way to counter stringing is to adjust the retraction settings found in software like Cura, the popular slicer owned by 3D printer company Ultimaker.
There are several Cura retraction settings to play with, including retraction distance, retraction speed, and minimum travel distance, and knowing how these parameters affect the printing process is a great weapon in the fight against stringing.
This article lists all of the Cura retraction settings available to users, explaining what they do and how they can be optimized to suit different prints.
Recommended reading : 3D printer stringing: How to fix it
What is retraction?
During FDM 3D printing, the printer’s extruder uses gears to move plastic filament to the hot end, where the filament is melted and pushed through a nozzle onto the build area below. Meanwhile the print head is constantly moving around in order to deposit the molten material in the right places.
Every now and again, the print head needs to move from one area to another without depositing any material. In 3D printing terminology, this type of movement is called travel. However, since there is always a bit of melted filament in the printer’s hot end, the plastic can sometimes accidentally ooze out of the nozzle and onto the build during travel. This is a problem for printer users, because that oozed material can cause an ugly, stringy mess over the printed parts.
One way to counter oozing and stringing is retraction.[2] This is when the extruder stops pushing the filament towards the hot end and pulls it back instead. It can do this by reversing the direction in which the extruder gears move.
Retraction cannot magically eliminate oozing, because the already-melted section of the filament cannot itself be retracted. However, by retracting the solid section of filament immediately above the melt zone, pressure is relieved on the molten material, making it less likely to ooze out from the nozzle during travel movements.
By adjusting Cura retraction settings, the slicer can adjust the g-code sent to the printer, altering the retraction process in various ways. Users can specify when retraction should happen, how much filament should get retracted, how quickly it should get retracted, and more.
Cura retraction settings
Cura’s retraction settings can be found in Print Setup. Most are grouped under Material settings, while some others are grouped under Travel.
The first two retraction settings, which can be checked or unchecked, are fairly self-explanatory: “Enable retraction” allows users to toggle whether retraction takes place at all, while “Retract at layer change” instructs the printer to perform retraction once a 2D layer is complete.
The remaining Cura retraction settings, most of which are defined using numerical values, may be less intuitive to beginners. Related settings like print speed and coasting are not discussed here, but may be adjusted in conjunction with retraction settings to deliver the best results.
Retraction distance
Retraction distance refers to the amount of filament pulled back by the extruder.[3] If the value is greater, then a longer length of filament is retracted.
The retraction distance is usually set in the range of 0.5–15 mm, depending on the extruder and material type. A greater retraction distance can help to prevent stringing, but this can cause stress on the filament and potentially cause clogs, as well as resulting in longer print times.
Bowden and direct-drive extruders require different retraction distances. Bowden extruders can require a retraction distance of up to 15 mm, while direct-drive systems generally only need a few millimeters.
Retraction speed
Retraction speed is the rate at which the extruder retracts the filament. In Cura, retraction speed settings are divided into two values:
Retraction retract speed is the speed (in mm/s) at which the extruder pulls back the filament
Retraction prime speed is the speed (in mms) at which the extruder returns the filament back to its original position at the tip of the nozzle
Faster retractions can help to prevent oozing but run the risk of damaging the section of filament by grinding it. Most users set their retraction speed in the range of 30–80 mm/s.
Retraction extra prime amount
During retraction, priming is when the extruder returns the filament to its original position — by pushing it forwards after it has temporarily pulled it backwards. However, since a bit of material may have oozed during the travel movement, it can be helpful to extrude extra material to compensate for this loss.
The retraction extra prime amount is defined in cubic millimeters. A greater value helps to build pressure in the nozzle, which can prevent issues like under-extrusion. However, the required amount depends on several factors, including nozzle size and travel distance.
Cura users can download plugins that set the retraction extra prime amount automatically based on travel distance.
Retraction minimum travel
During printing, a travel move is when the print head moves from one area of the build to another without depositing material. Sometimes the print head travels just a few millimeters, but sometimes it moves all the way across the build.
The retraction minimum travel distance setting allows users to define whether the printer should perform retraction even during short travel moves, or just for very large jumps. A small minimum travel distance (in mm) can help to prevent stringing but can cause issues like filament grinding.
Though not specifically a retraction setting, users can also adjust parameters like travel speed, with faster travel moves potentially reducing oozing and stringing.
Maximum retraction count
This print setting lets users set a maximum number of retractions on a given length of material (defined in the “Minimum extrusion distance window” box).
Setting a maximum retraction count can be useful, because repeatedly retracting the same piece of filament makes it more susceptible to grinding, which can ultimately reduce print quality. However, capping retractions can potentially make the print more vulnerable to oozing and stringing.
Nozzle switch retraction
Cura can instruct the 3D printer to carry out a retraction when the nozzle is put in standby mode. It offers two adjustable parameters for this situation:
Nozzle switch retraction distance (mm) works in the same way as general retraction distance, but users can set a higher value as there is less negative impact on overall print times
Nozzle switch retraction speed (mm/s) works in the same way as general retraction speed

Found under Travel settings, combing is a feature that instructs the printer to avoid any travel moves that stray beyond the perimeter of the build.
Combing can be useful for several reasons. Although it can result in greater travel distances, it allows for a degree of looseness during printing, since any oozing or stringing can take place inside the part and therefore be invisible. This makes retraction less of a necessity and allows users to print faster, with fewer retractions.
Users can select from the following combing modes:
Not on outer surface
Not in skin
Within infill
Sometimes called vertical travel, Z-Hop is a feature of Cura that instructs the print head to move upwards (or the build platform to move downwards) while retracting and making a travel move. This can prevent the nozzle from dragging along the top of the build and causing scratches or blobs.
If Z-Hop is enabled, users can adjust the following parameters:
Z-hop only over printed parts
Z-hop height
Z-hop after extruder switch
Testing retraction settings
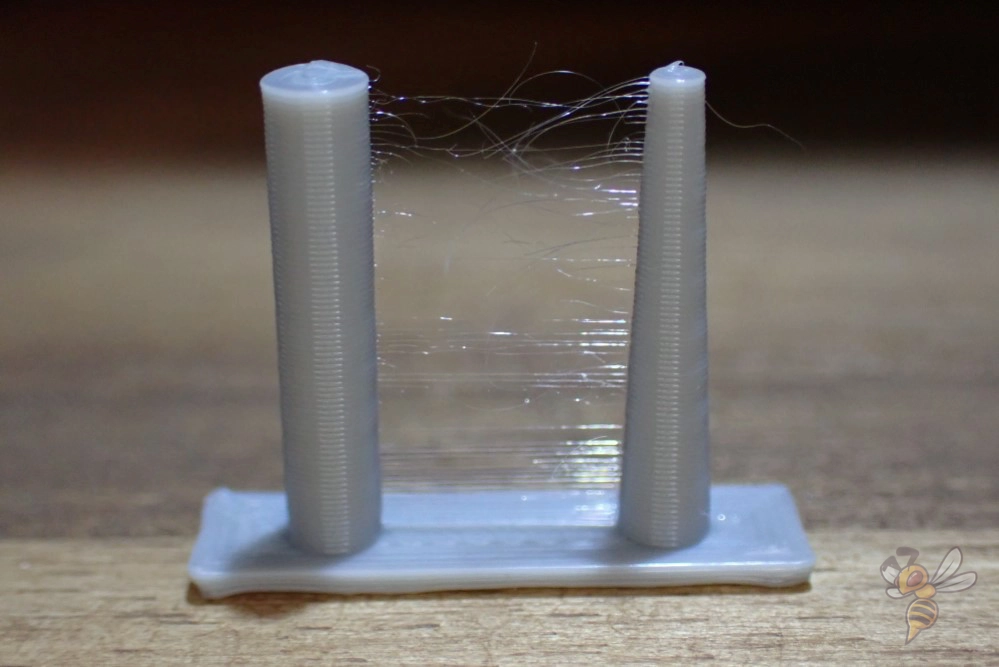
With so many Cura retraction settings to play with, it can be useful to carry out test prints after adjusting certain parameters in small increments. A good retraction test print is a stringing tower, a simple model purposely designed to be susceptible to stringing. If the stringing tower exhibits a large amount of stringing, then calibration has not been carried out successfully.
It is best to use Cura’s default settings as a starting point, then make small adjustments and test the new retraction settings with the stringing tower.
Key takeaways
Finding the best retraction settings depends on different factors, like the type of material, the purpose of the printed part, and the dimensions of the printed part. However, Cura’s range of adjustable parameters gives users a great degree of control over their prints, meaning that there is a suitable set of retraction settings for any project.
[1] Mueller T, Elkaseer A, Charles A, Fauth J, Rabsch D, Scholz A, Marquardt C, Nau K, Scholz SG. Eight weeks later—the unprecedented rise of 3D printing during the COVID-19 pandemic—a case study, lessons learned, and implications on the future of global decentralized manufacturing. Applied Sciences. 2020 Jan;10(12):4135.
[2] How to fix stringing [Internet]. Ultimaker Support. [cited 2022 May 2]. Available from: https://support.ultimaker.com/hc/en-us/articles/360012016280-How-to-fix-stringing
[3] Saini P, Garg D, Choudhury T. 3D Printing: Factors Influencing its Quality and Nature. In2018 International Conference on Computational Techniques, Electronics and Mechanical Systems (CTEMS) 2018 Dec 21 (pp. 480-486). IEEE.
Search for articles and topics on Wevolver
- UltiMaker Cura

- Existing user? Sign In Sign in with Ultimaker Account
UltiMaker uses functional, analytical and tracking cookies. Tracking cookies enhance your experience on our website and may also collect your personal data outside of Ultimaker websites. If you agree with the use of tracking cookies, click “I agree, continue browsing”. You can withdraw your consent at any time. If you do not consent with the use of tracking cookies, click “Refuse”. You can find more information about cookies on our Privacy and Cookie Policy page.
Reduce Travel Lines
By AlfredTheGrey2 February 4, 2021 in UltiMaker Cura
Recommended Posts
Alfredthegrey2 0.
I'm really strugling to eliminate travel lines inside this print and really don't undestand why, the combing mode is active and the printer head should travel inside the infill lines but this doesn't happen.

AC_Part1.gcode Part1.STL
Link to post
Share on other sites.

Strange. Your stl and gcode aren't helpful. Instead post the project file. Do "file" "save...". Then post that here.
Make sure "enable retraction" is checked.
Make sure "maximum retraction count" is 10 or greater and "minimum extrusion distance window" is less than 5.
Make sure "retraction minimum travel" is less than 5mm.
Check "max comb distance with no retract". Not sure if the latest cura has this setting only the burtoogle versions.
"Combing mode" is not on "off"?
4 hours ago, gr5 said: Strange. Your stl and gcode aren't helpful. Instead post the project file. Do "file" "save...". Then post that here. Make sure "enable retraction" is checked. Make sure "maximum retraction count" is 10 or greater and "minimum extrusion distance window" is less than 5. Make sure "retraction minimum travel" is less than 5mm. Check "max comb distance with no retract". Not sure if the latest cura has this setting only the burtoogle versions. "Combing mode" is not on "off"?
Every option you said was already good but the problem still persist, this happen with all my prints
AC_Part1.3mf

GregValiant 1,300
Still over 10 hours to print. I just kept fooling with it. 7% grid infill.
The angled area is still kind of random. Z-seam is "User Specified", "Front", "Seam Corner Preference" = None.

GV_Part1.3mf
You had "max comb distance with no retract" set to 30mm so all moves longer than 30mm were getting a retraction. Just set that to zero. Or something very large like 200.
Is your goal to get rid of retractions or was your goal to speed things up? If you want to speed things up the quickest thing to do is do thicker layers. In my opinion 0.2mm layer height looks great. Or put a larger nozzle in there like a 0.8mm and just do 2 or 3 shells instead of 5. And do thicker layers like 0.4mm layer height with a 0.8mm nozzle.
I sell parts where I do 0.3mm layer height with a 0.8mm nozzle and I think the parts look good enough for my customers. None of them said "your part looks like crap with all those layer lines" (they all own 3d printers themselves).
Another great option is to do the gradual infill. That way infill starts increasing as you get close to the top surfaces but is basically non-existant through 90% of the part.
17 hours ago, gr5 said: Strange. Your stl and gcode aren't helpful. Instead post the project file. Do "file" "save...". Then post that here. Make sure "enable retraction" is checked. Make sure "maximum retraction count" is 10 or greater and "minimum extrusion distance window" is less than 5. Make sure "retraction minimum travel" is less than 5mm. Check "max comb distance with no retract". Not sure if the latest cura has this setting only the burtoogle versions. "Combing mode" is not on "off"?
I wanted to reduce the printing time by removing all the unnecessary travel moves and make them pass inside the infill lines, because when finished, the print will be inaccessible inside and some times all those travel moves create inside it little debris that you can hear while shaking it.
12 hours ago, GregValiant said: Still over 10 hours to print. I just kept fooling with it. 7% grid infill. The angled area is still kind of random. Z-seam is "User Specified", "Front", "Seam Corner Preference" = None. GV_Part1.3mf 248.01 kB · 0 downloads
Not a bad idea for the time being, but i think in some print with thin walls could lead to structural weakening in that point
I don't know the vector of the load. For radial and longitudinal loading I would design internal spokes rather than rely on the infill. My only criteria in the exercise was to align the travel moves. I didn't pay any attention to the number of walls.
A few months ago I made a feature request on GitHub for "Radial" infill. The Cura Team made a thoughtful reply but determined that because the varying density (as a function of the distance from the center) made it seriously problematic to program, coupled with the very few people who would see any benefit, declined.
"Triangle" infill with "Infill Line Directions" = "[0]" and "Infill Line Multiplier" = 5, and with the "Wall Count" = 5, makes a very robust part that would take 30 hours to print. I'm not sure what to make of the "rattle" criteria. I've never noticed it as a problem.
On 2/4/2021 at 4:14 PM, gr5 said: You had "max comb distance with no retract" set to 30mm so all moves longer than 30mm were getting a retraction. Just set that to zero. Or something very large like 200.
So you tried this? It worked perfectly as desired?
5 hours ago, gr5 said: So you tried this? It worked perfectly as desired?
Unfortunately no, the problem still remain, i'm desperate 😭
I loaded your project and changed the "max comb distance with no retract" set to 0 and all the movements went from light blue to dark blue indicating retraction. Are you 100% sure you tried that? I'm very confused now.
Maybe there have been too many posts in this topic and skipped one of my posts? The one that gives you the answer to the question you asked?
Please post a new project file if "max comb distance with not retract" isn't working for you. Or go back to the project that you posted above because that solution works perfectly.
I swear it's frustrating when I post the exact correct answer and then a week later someone else posts the same thing and the original poster is like "dude #2! It Worked!". Please read all my posts above. Sorry to make many small posts.
gr5 - please forgive my snickerin'. It was totally unintentional I assure you.

Create an account or sign in to comment
You need to be a member in order to leave a comment
Create an account
Sign up for a new account in our community. It's easy!
Already have an account? Sign in here.

Introducing the UltiMaker Factor 4
ArunC posted a topic in UltiMaker 3D printers , May 6

UltiMaker Cura 5.7 stable released
ArunC posted a topic in UltiMaker Cura , April 3
- Existing user? Sign In
- Official support
- Thingiverse
- UltiMaker Academy
- Code Of Conduct
- All Activity
- UltiMaker.com
- Create New...
Cura Jerk Settings: How to Set Them
If your 3D printer is shaking everything around it and the extruder head comes to an abrupt stop every time it needs to move to a new position your jerk settings are probably to blame. I had a similar issue when I was first setting up my 3d printer and was able to solve it by enabling jerk control in Cura and cutting speeds in half. Jerk is the maximum instantaneous speed change of the print head.
In Cura 4.X jerk control is disabled by default, which means your printer will fall back to what’s on its firmware. You can override this at the printer console but I prefer to have all the settings in the G-code file as it provides less room for error. On my 3D printer, I set the Travel Jerk speed to 30 mm/s and all other jerk control setting to 20 mm/s. This significantly reduced the abrupt stops for me but you may need to play with the settings some to see what works best for your printer.
In 3D printing, different speed settings can be used to suit specific sections of the print.
Jerk settings describe the speed of the print head before a hard stop and following change of print direction and velocity. This means that while printing, the print head makes a complete halt at certain points of the printing process before continuing to print a different section.
If the change is made at high speeds, the move is damaging to the printer head and the quality of the print. A high-speed jerk can be noticed from vibrations of the printer head and a screeching sound.
Think of a high-speed jerk in the analogy of the brakes of a car. If braking is done at high speed, the ride is uncomfortable and the brake parts are compromised.
Read on to understand jerk setting among other speed settings and also explore enabling Cura jerk settings.
Jerk Setting Among Other Speed Setting
Because 3D printing takes a lot longer than normal document printing, Cura offers several settings to control print speed. A general rule of thumb is higher quality 3D printers can print faster, without issues, than cheaper made ones.
Print speed is measured in mm/s. It is the velocity of the print head while printing is in motion. Print speed settings are found in the Speed option of the Custom settings. The default Cura print speed is 60mm/s. Note, this value may differ based on the printer profile selected.
I recommend you review the documentation for your printer to see if they have any recommendations on speed and jerk settings or if they provide a printer profile that you can import into Cura with the settings already defined.
When printing speed is high, shorter printing time is expected and vice versa. But high printing speed can compromise quality if other factors are not considered. For example, if printing speed is increased, the filament may not melt at the same rate. This means that the temperature must also be amplified to ensure that the filament melts fast enough to keep up with the increased printing speed.
Increased print speed also makes the printer head to jerk and vibrate , compromising print quality.
To create a balance, Ultimate Cura has different speed settings depending on the specific aspect of the printing task. They include:
Travel speed
The speed of the print head when in motion from one point to another (when not extruding). High-speed travel gives a cleaner print by preventing filament leak. If too high, the nozzle can overprint on already printed sections.
Initial layer print speed
It specifies the print speed for the first layer. Low speed allows the print to stick better.
Initial layer travel speed
It defines the travel speed for the first layer and should be kept low.
Skirt speed
Also known as brim speed and specifies the printing speed of the skirt . It should be the same as the initial layer speed.
Maximum Z-speed
The setting that alters the speed for the built plate movement. It should be set at maximum.
Number of slower layers
Specifies the number of layers needed to obtain the print speed from the bottom layer. Set at a higher value, this setting reduces the possibility of warping even though printing time is increased.
Equalize filament flow
The setting allows higher speeds when printing thin walls.
Enable acceleration control
Enabling acceleration control allows you to adjust firmware settings for speed. For example, you can reduce firmware speed for accurate printing at lower speeds. If you opt for maximum acceleration, it’s enough to disable the option.
Jerk control
As indicated earlier, jerk settings control the speed before a hard stop.
Cura Jerk Settings: Enable Jerk Control
3D printers come with a firmware jerk setting. Usually, this setting is high implying a minimum jerk. As a rule, however, Cura software settings override firmware settings.
Cura jerk settings decrease the speed settings of the firmware. This makes the printing slower but increases print quality and accuracy.
If the jerk setting is disabled, a maximum jerk is activated. As a general principle, the Cura ‘Enable Jerk Control’ option should always be enabled .
When you start Cura , click the Preferences menu and then the Setting option. The Settings option has all the different sub-options including Quality, Shell, Infill and Speed. Under speed, choose the Enable Jerk Control.
Under the Enable Jerk Control are all the specific jerk settings that you can choose depending on the specifics of your printing. They include:
- Infill jerk
- Top service skin jerk
- Support jerk
- Travel jerk
- Skirt/brim jerk
Enabling the jerk settings under Preferences allows Settings Visibility when you get to the Custom Print setup. Enable Jerk Control settings here will typically override the settings defined in the printer’s firmware and will give you more control over your print.
With the jerk control settings in place, Cura will add the G-code to effect these settings every time printing requires it. If they are not set, then the printer goes for the firmware jerk settings.
Related Articles
- Create a Temperature Tower Using Cura – The Easy Way
- Cura First Layer Settings
- Cura Profiles
- How to Remove the Disallowed Areas in Cura
Cura offers many options to control the jerk settings and speed of your printer . I set the Travel Jerk speed to 30 mm/s and all other jerk control settings to 20 mm/s. This has worked well with my printer but it’s not a one size fits all setting as no two printers are completely alike.
If the above settings don’t work well with your printer, I recommend reviewing the documentation to see if they have any recommendations or if they provide a printer profile that you can import into Cura with the settings already defined. If you’re looking for a new 3d printer, I recommend one of the Creality ones. I have owned a couple of them and they are great for the price.
Also, if your printer is producing good quality prints with jerk control disabled in Cura I would not mess with it. I like to follow the “ifs it’s not broken don’t fix it” rule. Though if that was the case you probably wouldn’t have ended up coming across, or reading, this article.
Make sure you check out our YouTube channel, and if you would like any additional details or have any questions, please leave a comment below. If you liked this article and want to read others click here .
I'm Rob, the founder of 3dprintscape.com. I’m a Marine Corps vet with a master’s degree in Information Systems and have been working in the technology field for over a decade. I started working with 3D printers because I was fascinated by the technology and wanted a hobby that my kids and I can enjoy together.
Leave a Reply Cancel reply
You must be logged in to post a comment.
Recent Posts
Meet Creality Falcon2 Pro 60W, The First 60W Enclosed Laser Engraver & Cutter
CrealityFalcon Is Founding! Over the years, the technology behind laser engraving has seen significant advancements, with machines becoming more efficient, compact, and powerful. Yet, for all its...
How To Split A Model In Cura
Even though Cura isn’t really meant for altering 3D models, there are a couple of basic ways to get the job done. Splitting a model inside Cura is very straight forward but there are a few things...

Best Ender 3 Cura Profile Settings (V2/Pro/Neo)

Written by: Tom Bardwell
December 10, 2023
As one of the best-selling printers of all time, the Ender 3 and its successors, including the Ender 3 V2, Ender 3 Pro, and more recently the Ender 3 S1 and Ender 3 Neo, are favorites among newcomers and seasoned makers alike. It’s well-priced, versatile, and offers a gentle introduction to 3D Printing. But, as with most 3D printers, the Ender 3 takes some targeted tweaking and slicer setting adjustments to get the most out of it, notably in the ever-popular Cura.
In this guide, we’ll cover the best Cura profile settings for Ender 3, touching on parameters like print speed, infills, temperatures, different filaments, and much more to help you tune the very best Cura profile.
Initial Layer Height
How to find ender 3 profiles in cura.
To find the Ender 3 profile in Cura:
- Tap on Settings, then select ‘Add Printer.’
- Click on ‘Add a non-networked printer’ to expand a list of printers.
- Scroll down and click on ‘Creality3D’.
- Select the Ender 3 from the list of options, and tap the ‘Add’ button.
- On the next screen, make sure the build volume, heated bed, etc. line up with your printer’s specifications, then click the Next button.
What Are the Best Cura Settings for Ender 3?
Print speed.
Print speed is arguably the most important slicer setting, with a huge effect on both print times and print quality. Slower speeds tend to produce better details, surface finish, and overall quality – but extends print times.
For standard filaments like PLA and ABS, a print speed of 50-60 mm/s offers a strong balance of quality and speed. If you’re working with large parts or models and quality isn’t all that important, don’t hesitate to increase print speeds up to 80 mm/s and even higher, though expect blemishes and imperfections as a result.
These recommendations apply for all Ender 3 models including the newer Ender 3 S1 and Ender Neo models. For more specific advice, we also have an article on Ender 3 print speeds .

Hot End Temperature
The correct temperature settings in your Cura profile is vital. The wrong parameter can condemn a print to failure before it’s even started, causing blemishes, poor layer adhesion, and extrusion issues.
Above are our recommendations for each filament type, though we highly suggest following the manufacturer’s recommendations for your specific brand of filament for the best results. If you’re not getting good results, adjust the temperature in small increments of 5°C until you see improvements.
For PLA, 200°C tends to get the best out of the Ender 3. Note that the original Ender 3’s nozzle temperature is capped at 240°C, slightly below the upper limit for ABS and PETG, so, depending on the brand, it may struggle to hit the optimum temperature for those filament types.
All other Ender 3 models (S1, Neo, Pro, V2, Max) push a 250°C nozzle temperature or higher, covering all the most popular material types.
Print Bed Temperature
There’s no universal best bed temperature setting for the Ender 3 – the right temperature is contingent on the type of filament being printed.
Also, though we can estimate ballpark heated bed temperature ranges for each filament, these can vary between brands, so double-check manufacturer recommendations.
The above recommendations apply to all Ender 3 models, as all variants, including the Pro, S1, Neo, Max, have a heated bed.
For ABS, you’ll want to pair a 100-110 °C bed temperature with an enclosure for your Ender 3 , such as a DIY tent or even one of Creality’s own pop-up chamber tents. The idea here is to remove temperature fluctuations caused by gusts and natural shifts in ambient temperature to maintain a stable thermal environment for ABS to perform at its best.
Layer Height
Layer height determines not just the richness or detail and features, but also overall print times. This is because dialing in a smaller layer height means more layers to complete a print, and, therefore, longer print times.
As such, the balance is between quality and print times, so the optimal layer height depends more on your needs, expectations, the type of print, and its application.
For example, a decorative piece with lots of surface details will benefit more from a lower layer height, while a large, functional piece subject to wear and tear is best printed with a higher layer height to reduce print times but also because aesthetics aren’t all that important.
For the Ender 3, layer heights are best dialed in increments of 0.04 mm because the Ender 3’s z-axis stepper motor moves by a multiple of that distance per step. This is down to the way the threaded rod lifts the x carriage per revolution and how that relates to the number of steps per rotation.
Retraction determines by what distance and at what speed the extruder pulls back filament into the nozzle during non-printing travel movements.
Retraction settings oozing, stringing, and other forms of excess filament deposition, aiming to produce sharper and overall higher-quality prints with fewer artifacts and unsightly material build-up.
Again, the right settings depend on your filament type, and which Ender 3 you have. The Bowden extruder Ender 3s, including the Ender 3, Ender 3 Neo, Ender 3 Pro, Ender 3 V2, and Ender 3 Max require a shorter but slower retraction to compensate for the longer filament path through the tubing.
While Ender 3s equipped with the Sprite Direct Drive extruder setup benefit most from a longer retraction distance and faster retraction speed to make the most of the precision of the onboard print assembly extruder. For upgrading, we also have an article on Ender 3 direct drive upgrades .
For stringing-prone filaments like TPU and PETG, a tighter retraction distance, as low as 4 mm, works best, with the speed dialed around 25 mm/s.
Retraction can be quite temperamental, so it’s worth dialing in these general settings, then running stress test prints and adjusting up/down in small increments until you eliminate most, if not all, instances of stringing. We’ve also written an in-depth article on Ender 3 retraction settings .
Infill Density

Infill refers to the innards of a print, and infill density in particular, measured as a percentage, determines how much filament and what pattern is used to create the infill.
As with other settings like bed temperature and hot end temperature, the ‘best’ infill density is print specific.
For display pieces destined for a life on a shelf, use a lower density. This will cut down on filament usage and print times. Typical densities for these types of prints range anywhere from 0% (check out Cura Vase Mode , for example) up to 15-20% for more durable models.
As for more functional models and parts subject to wear and tear or regular handling, then a higher infill density improves overall structural integrity, strength, weight, durability, and longevity. Common infill density for these types of prints is usually above 50%. But for Ender 3 infill Cura settings, this will be rare.
There’s also an in-between for prints that don’t quite fall into either category, with densities ranging between 15% and 50%. As you can see, this variety means it’s hard to know the best infill density without knowing the specifics of a project and the target application.
Infill Patterns

Diving into Cura’s infill patterns reveals a selection of options, 14 different patterns to be exact. Not all of these are created equal, nor are they suited to all types of prints.
The pattern dictates the shape of the infill, and affects the print’s overall strength and flexibility, and how much filament is required.
Here’s a breakdown of the different attributes of the most popular infill patterns found in Cura:
Unless you’re determined to have strength or flexibility in a print, then standard infill patterns like Triangles, Cubic, Lines, and Zig-Zag will work for the majority of prints.
Initial Layer Print Speed
Initial layer speed is similar to the global print speed, except that it relates only to the first layer laid down by the printer.

A lower initial layer speed promotes better adhesion, setting the rest of the print up for success. If you’re struggling to get a clean first layer down, this is the setting to save the day.
We recommend dropping it down to around 25 to 30 mm/s for the best results, as the slower speed allows the filament to create a much stronger and more durable bond to the bed and between those first few layers.
As the setting only affects the first few layers, it doesn’t increase overall print times by much at all, so it’s well worth slowing down to avoid print failures and errors later on.
As a general rule, you’ll want an initial layer height larger than the global layer height, typically somewhere around 0.20 mm. We also recommend tuning the Initial Bottom Layers to 5 or 6 layers to nail that bed adhesion.
Does Cura Work with Ender 3?
Yes, the Cura slicing software is indeed compatible with the Ender 3. Ultimaker’s popular slicer even includes a pre-configured stock profile for Creality’s flagship printer and the Ende 3 Pro variant. These profiles offer an excellent starting point, from which you can tweak and adjust the Ender 3 settings to suit your needs, project, and filament type.
What Speed is Ender 3 Cura?
The default speed for the stock Ender 3 profile in Cura is dialed to 50 mm/s. This is a solid average speed that should be ideal for a wide range of models and parts printed using filaments like PLA and ABS. That said, common Ender 3 speeds in Cura sit somewhere between 40 mm/s and 70 mm/s. If you’re printing with flexibles, we recommend lowering the print to around 30 mm/s to reduce instances of stringing and to get the best results.
Was this content helpful? Give us your feedback here.

Tom Bardwell
Learn More About 3D Sourced

6 Best Large 3D Printers in 2024 (All Budgets)

5 Best 3D Printers for Miniatures & Terrain in 2024

4 Fastest 3D Printers in 2024 (All Budgets)
The 56+ Coolest Things To 3D Print in 2023

44 Common 3D Print Problems – Troubleshooting Issues 2023

13 Best Free 3D Modeling Software (For Beginners) 2024

11 Best 3D Printers in 2024 (All Budgets)

5 Best 3D Printers For Beginners in 2024
Exceptional value with anycubic’s latest 3d printer deals.

40+ 3D Printing Industry Statistics (2024 Update)

22+ Coolest 3D Printed Robotics Projects (2024 Update)

8 Best DIY 3D Printer Kits in 2024 (From $150!)

3D Printing In Space – Top Projects in 2023

Best 3D Printed Shoes in 2023 (Sneakers, Heels & More)

The Best 3D Printer Buyer's Guide Resource & 3D Printer Reviews
[email protected]
3D Printers 3D Scanners 3D Software Guides Rankings Interviews News
Most Popular
Best 3D Printers Best 3D Scanners Best 3D Modeling Software Best 3D Slicers Best Resin 3D Printers Fastest 3D Printers Best Large 3D Printers
Useful Links
About us About the team How we do our reviews Careers Contact Us
Sign up to our newsletter
Privacy policy
Affiliate disclaimer
Editorial policy
- Tips & Tutorials
Cura Settings Cheat Sheet for CR-10, CR-10S CR10 v2/S4/S5 and Ender 3 3D Printers
by daydull · Published August 26, 2020 · Updated April 27, 2023

Simple cheat sheet showing a range of values for the most important settings in the Cura slicer for CR-10 and Ender 3 (and variants.)
For many reasons you may want to tweak a preset Cura profile. Perhaps to fix a problem, or to try to get the perfect print. A default profile will not give you any idea how much you can change a setting. Entering values that are wildly off can lead to a lot of headaches and potentially even damage to your printer. Using the ranges and explanations in this guide can prevent these problems.
These settings were tweaked and perfected on a Creality CR10-S . I’ve experimented with a ton of settings and Cura profile variations over the past 3-4 years and below are my conclusions.
The following printers (and many other 3d printers) are all very similar and use the same settings we will cover:
- Creality CR-10
- Creality Ender 3
- Creality Ender 3 v2
- Creality Ender 3 Pro
- Creality CR-10 S
- Creality CR-10 v2
- Creality CR-10 S4
- Creality CR-10 S5
Cura Settings Cheat Sheet for CR-10S & Similar 3D Printers:
- The below settings assume you are using a standard 0.4 mm nozzle that comes installed by default on most printers.
- If you don’t see a setting that is listed here in your Cura, go to the Settings Menu and click “Settings Visibility” then search for it.
- Disclaimer: The author takes no responsibility for any damage that might occur from use or misuse of information presented here.
- If you see a mistake or want to make a suggestion please leave a comment below!

FLASHFORGE PLA Filament 1.75mm, 3D Printer Filament 1kg (2.2lbs) Spool, Dimensional Accuracy +/- 0.02mm, 3D Printing Filament Easy to Use and Fits for…
$24.99 Available for Amazon Prime
Replacement Nozzles, Multiple Sizes: It’s important to always have spare nozzles on hand to quickly troubleshoot any problems due to clogs or worn out nozzles. A variety pack of nozzles also helps for different sizes of prints. For larger prints, you can shave off days by increasing to a 0.6 or 0.8mm nozzle! On smaller prints like miniature figures, smaller nozzles like 0.2 and 0.3mm can get you far more detail.

Creality Official MK8 Ender 3 Nozzles 24 pcs 3D Printer Brass Nozzles Extruder for Ender 3 Series and Creality CR-10 0.2mm, 0.3mm, 0.4mm, 0.5mm, 0.6mm…
$9.59 Available for Amazon Prime
Easy Print Smoothing: PvB filament is very similar to PLA and uses the same print settings, but offers a huge advantage: you can smooth prints using Isopropyl Alcohol (IPA.) This is a major time saving shortcut that lets you skip the long process of sanding and painting to hide layer lines and other small print defects. 3D prints made with PvB filament can be smoothed by brushing or rubbing with IPA, or letting the print sit in a sealed container with IPA on the bottom–the IPA vapor does the smoothing automatically!

Polymaker PolySmooth PVB Filament 1.75mm Blue Filament, 750g Cardboard Spool – Blue PVB Filament Print Like PLA Filament 1.75, Easy Smoothable Post Pr…
$36.99 Available for Amazon Prime
Nozzle Cleaning and Changing Tools make it easier and safer to clean and replace your nozzle. Nozzle clogs are probably the most common causes of sudden drops in print quality. This kit includes several effective options for cleaning a nozzle while it’s still installed, and wrenches to safely remove and replace the nozzle without burning your fingers! Remember to heat up the replacement nozzle before fully tightening to compensate for thermal expansion.

16 Pieces 3D Printer Nozzle Wrench Cleaning Kit,10 Nozzle Cleaning Pins with Storage Box 2 Tweezers 2 Cleaning Copper Wire Brushes 2 L-Shaped Wrench T…
10% Off $9.99 $8.99 Available for Amazon Prime
3D Printer Enclosures are not always necessary, but in some cases they will solve problems. For printing some filaments like ABS, an enclosure is required. Enclosures can help prevent warping and improve print quality for all filament types. They can also reduce noise, save electricity, and allow you to print in what would normally be a cold environment, such as a garage.
![[Multifunction Structure] hinged doors on the front of Enclosure. 25.6” ×21.6” ×29.5” Size Compitable with 99% FDM printers,Ender 3, Ender 3 Pro, Ender 3 V2,Ender 3 S1 PRO,Ender 3 S1,Ender 5,Ender 7,Anycubic Kobra, Anycubic Mega Pro.ELEGOO Naptune 3....](https://i0.wp.com/m.media-amazon.com/images/I/410WGz8ZmoL._SL240_.jpg?ssl=1 "travel settings cura")
3D Printer Enclosure for Creality Ender 3/ Ender 3 Pro/Ender 3 V2-Fireproof & Dustproof Tent Constant Temperature Protective Cover for Anycubic Elegoo…
27% Off $48.99 $35.99 Available for Amazon Prime
Filament Recommendations
Over 4+ years, thousands of hours, and dozens of rolls of filament, I wanted to share my favorites. I always have at least one roll of each of these on hand:

HATCHBOX 1.75mm Black PLA 3D Printer Filament, 1 KG Spool, Dimensional Accuracy +/- 0.03 mm, 3D Printing Filament
$24.99 ($0.71 / Ounce) Available for Amazon Prime
Hatchbox PLA – Silver, Gray, and Black Filament – I like Hatchbox the best for consistency, it’s my default for any prints. You are looking for a consistent diameter, a neatly wound roll that doesn’t tangle, and low humidity in the filament. I haven’t had any issues clogging or adhesion on Hatchbox, which is not true for other brands. For anything you plan to paint a neutral, medium tone PLA like gray or silver is your best choice. The silver has a nice glossy shine that makes it look like a metal sculpture if you don’t plan to paint. When I don’t want the shine, I go with a standard gray. For functional prints like a headphone stand I also always have a roll of black PLA on hand.

Silk PLA Filament 1.75mm for 3D Printer -ERYONE Silk Dual/tri Color Shiny PLA Dimensional Accuracy +/- 0.03 mm 3D Printing Filament 250g*4 Spools
Above is my current favorite choice for the dual / tri color filament. This is a more recent, and very cool effect. Unlike rainbow or gradient filament–which looks great too–this filament has all listed colors on each strand of the filament. So, instead of the color changing as your print is goes upward, the color changes depending on which angle you are viewing it! I like this effect for way more uses; it looks like a multi-chromatic, color-shifting paint job you might see on ultra high end custom cars.

AMOLEN PLA 3D Printer Filament, 1.75mm, Tri Color Changing with Temperature, Pine Green to Brown to Yellow,1KG
Zi-Rui Tri Color Thermal Reactive PLA Filament – This is thermal reactive filament–heat makes it change colors! I’ve tried a few, but several of them didn’t have a very dramatic effect or had ugly colors. This was my favorite — it goes from a dark, very dark neutral green (actually it is a dark gray, which is ideal, but they say dark green in the description) then changes to red, then orange, then yellow, then white as temperature increases. This is a great color combination that really looks like it’s getting super hot. Tons of possibilities for using this. This filament generally will go from the dark gray color at room temperature, to a reddish orange with heat from your hands. To get up to yellow/white it needs higher heat, like a blow dryer or sitting in the sunlight. It’s a really cool effect that I highly recommend trying on your next print that will be handled, worn, or placed in varying amounts of sunlight! Honestly this is my favorite filament for impressing people with what’s possible from 3D printing!
Leave a comment if you have any questions or suggestions. Thanks for reading!
Share this:
Tags: 3d printing cura troubleshooting
- Next story Containers for Elegoo Saturn Print Cleaning – The Best Wash and Rinse Plastic Tubs for Resin 3D Prints (Medium and Large Size)
- Previous story Black Friday RTX 2070 and RTX 2080 – Best Deals for BF and Cyber Monday Graphics Cards
You may also like...

LoL Dominion – Common & Recommended Bans for Draft Mode (Spring and Summer 2012)
April 15, 2012
by daydull · Published April 15, 2012 · Last modified July 5, 2017

Dark Souls 3: The Best Starting Classes! Class Rankings: What Should You Start With for Each Build?
April 12, 2016
by daydull · Published April 12, 2016 · Last modified March 31, 2017

How to Fix Chrome Browser Flickering, Flashing, Darkening Briefly in Windows [Solution]
February 11, 2024
by daydull · Published February 11, 2024
25 Responses
- Comments 24
- Pingbacks 1
Thank you for the list of Cura settings for CR-10. So I can finally start with my new CR-10-V3 and Cura.
Thank you, this is very helpful. I have had pretty good luck with PLA, but am trying to print with wax (Print2Cast) filament with far less success. Any advice about that would be very much welcome.
Thank you so much! This will get me started.
I have since discovered that the CR-10 has a default “cold extrude prevent” command set at 170 degrees. Wax filament is supposed to print at 140, but the extruder will not extrude because of this error. I have not been able to crack this problem although I have read that a “M302” instruction for the g-code is said to disable the cold extrude prevent problem. I remain baffled.
Just bought a CR 10 V2 … it was a big mess. I’ve applied your value recommandations and, now, its work like a charm. It’s strange these recommended values are not provided by CREALITY. (maybe I did not find) Now I’ve a base of work, I can adapt these values to understand better the impact on the quality.
You save my day! … Thanks!
Could you please make this a pdf we could download and print? Thank you !
European glory, and even after
Thanks So much for these settings. I have a CR-10s Pro V2 using Cura 4.8.0 and your post has really helped me out like you wont believe! If you could please make recommendations on all the rest of the Cura settings that would be amazing.
Thanks again! :-)
@Richard Lasjunies – the creality documentations are non existent :(
it works very well. recommened
A couple of comment on your post from someone who runs an S4 and an S5. First off your right, a flat, level bed is absolutely critical you cannot get any decent print without a flat bed. yes, auto bed levelers help a lot, and I wouldn’t run any of my printers without one, but you need to have a mechanically flat bed before you start. That is a key factor to bed adhesion. Note that I run both wham bam systems PEX sheets, and TH3D sheets on both printers, and magnetic build plates have basically changed my printing life. Also note that I run a volcano on my S5. In my head, that is the only way to do really big prints. I mean, who wouldn’t want to run a 1.2mm nozzle on a 500mm print? I typically run a .6 mm nozzle on my S4.
Having set up the machines, jerk and acceleration are critically important on larger printers and larger prints, especially in y-axis. I used to get regular layer slips and shifts even with a properly tuned and tightened belt, as soon as I adjusted my acceleration and jerk down (YAccel max 600, VY jerk, 6 on my S4) all of those defects went away. I sometimes adjust it with the model even. If I’m running a really large model I may get the Y accel down to 500 and y jerk down to four. That mass matters and you’re moving a lot of it. I leave the x and Z acceleration where they are. I also find that I can run speeds upwards of 100 mm/s for anything but the highest quality of model.
Enjoyed this article very much! Thank you!!
Thank you ! Much Appreciated ! I was lost in the overwhelming settings . This gets me a solid foundation!
This has been a great help as I am just starting out in 3d printing and the default values were not producing the greatest prints. Look forward to seeing the rest of the settings!!
Hi DANYAAL79, I basically just put the build plate dimensions (3m X 3m X 4m), nozzle diameter (0.m), and anything it asked that I could answer in Cura to create a profile for the CR-10. I typically use the recommended settings in Cura for the type of filament (usually PLA) and for the resolution (usually fine). I only use custom settings if the object I intend to print requires it. The recommended settings have worked great on my CR-10 so far. I’m no expert, and I’m not a paid endorser, but I’ve had GREAT success with my CR-10. Happy printing.
Thanks so much for taking the time to help those of us with Creality printers. I just purchased the CR10 S5. I can not find this printer listed on Cura version 4.6. Does anyone know where I can locate the info (such as the g-code flavor) to input into Cura for my printer? Thanks.
I believe you should be able to just select a similar CR10 printer like the CR-10S / CR10 S4 etc. Gcode type should be Marlin. I just checked and the CR-10S5 is listed by default in the 4.9 version of Cura, so you could also try that.
I just received a CR-10 Smart printer and don’t see a default profile for it in the latest version of Cura. Do you have a recommendation of where I should start as a baseline. Also, great web page, thanks for sharing all of this information!
1.2mm or .12mm? .8mm? Wow! 2.0mm HOLY COW!
I think there was confusion with total wall thickness vs. the thickness of individual walls. I updated that section to clarify. For example where it says 1.2mm, 3 walls, that means 0.4mm per wall, times 3 = 1.2mm total thickness of walls (which would be an average starting point.)
Just dropped into say these are still great settings more than a year and several versions of cura etc later. There are some better infill patterns now (depending on your use case) but overall these remain super solid settings. Thanks!
Juste un très grand MERCI ….De nous simplifier cette douloureuse tâche …^_^… Effectivement c’est une usine à gaz, tellement de paramètres disponibles….lol Ils en ont rajouté et pas dans l’ordre :)
J’ai 3/4 profils différents(fin/normal/dens50/dens100)…et une bien meilleur compréhension de tous ces paramètres… EN plus de personnaliser les paramètres selon le cas de figure…Plus qu’à tester ! Et découvrir le reste avec le temps…Merci pour le temps gagné et les ÉCHECS du départ évités :) On part tout de suite du bon pied…
I have 3/4 different profiles (fine/normal/dens50/dens100)…and a much better understanding of all these parameters… IN addition to customizing the parameters according to the case… Just to test! And discover the rest over time… Thank you for the time saved and the FAILURES of the departure avoided :) We start right away on the right foot…
(Google translated from French) ^ Thanks for the comment @ammilgaoul ! Glad it has helped
[…] Yes, Cura settings can help adjust the darkness or lightness of your prints. The best way to find the best Cura […]
Leave a Reply
Your email address will not be published. Required fields are marked *
Save my name, email, and website in this browser for the next time I comment.
Notify me of follow-up comments by email.
Notify me of new posts by email.
I hope you find the articles here on Daydull helpful! We may earn a small commission from purchases made through some affiliate links to Amazon and eBay .
This is how we keep the site running. If you see any products that interest you, you can learn more or purchase through the link. Thanks for reading!
Trending Reviews

Gaming / Reviews
Is My Keyboard Lagging? SOLUTION: Keyboard Latency Tests: Wired vs. Bluetooth vs. Wireless USB – The Best Wireless Keyboards Review

Diablo 4 Video Card Recommendation List – The Best Value GPU for Your Budget
Trending Articles

Gaming / Tips & Tutorials
[Solution] Will 2 GPUs fit in my PC? How to know if dual video cards will fit on your motherboard before buying!
- Darklight FX – Blacklight, UV, Glow Effects, Art and Photography Products Store
Article Categories
Recent comments.
- CORRADO on SOLVED – Quark Xpress 8, 8.5, 9, 10, etc Won’t start! Crashing or Freezing on Launch (PC Windows 7, 8, 10, Vista)
- Lee on LoL Patch 7.15 Bans: Who Should I Ban Right Now in League of Legends? (August 2017)
- Peter Mann on SOLVED – Quark Xpress 8, 8.5, 9, 10, etc Won’t start! Crashing or Freezing on Launch (PC Windows 7, 8, 10, Vista)
Reader Favorites
Product Links
IMAGES
VIDEO
COMMENTS
Stringing can ruin the quality of your 3D prints, but you can avoid it with the right Cura retraction settings. Learn how to adjust the speed, distance, and coasting parameters to get smooth and clean results.
Today we are coverinf retraction and travel settings on cura settings in 5 minutes or less! i am using cura 4.9but all the settings we discuss have been the ...
Stringing and Oozing are among the most annoying 3D printing problems. Get rid of them with the right Cura Retraction Settings!
UltiMaker Cura; Cura Print settings; Travel settings. Nov 8, 2022 • Knowledge. Information. Title. Travel settings. URL Name. 1667411336660. Article Details. Answer. Enable retraction. Retraction is used at the places in a print where the printer has to do a travel move between two printed parts. Without retraction, extruded material will ...
Learn how to utilize Cura's travel speed settings, and what they entail and contain.
Cura has plenty of settings that contribute to creating some great 3D prints with filament 3D printers, but a lot of them can be confusing. There are pretty good explanations on Cura, but I thought I'd put together this article to explain how you can use these settings. ... The Travel Section of the print settings controls the motion of the ...
Download The FDM 3D Printing Glossary Here:https://pages.itsmeadmade.com/fdm-glossaryIn this video, we'll walk you through all the settings you need to know ...
The best acceleration and print jerk settings for the K1 Max in Cura: Infill & Travel accelerations: ... These are the best Cura settings for the first layer with the K1 Max: Layer height: 100-200%; Line width : 100-200%; Print temperature: Same as the rest of the object or 5-10 °C higher to achieve better adhesion to the print bed.
The Travel section in Cura contains a handful of useful settings related to retraction (when filament is pulled back from the hot end) and anti-stringing actions. Enable Retraction First in this section is the "Enable Retraction" setting.
So, what are the most optimal TPU settings for Cura? Below are the Cura settings we recommend using for printing TPU: Print Speed - 20 to 30 mm/s; ... We recommend setting the travel speed parameter in Cura to a value between 150 mm/s to 200 mm/s for printing TPU.
Cura retraction settings enable precise control over the retraction process, but the p ... Found under Travel settings, combing is a feature that instructs the printer to avoid any travel moves that stray beyond the perimeter of the build. Combing can be useful for several reasons. Although it can result in greater travel distances, it allows ...
Combing mode in Cura can reduce stringing and improve print quality. Learn how to use this setting and what it does in this simple guide.
My searches resulted in Cura travel settings, where I already modified a few settings and can't find any that change the travel path. Aside from a reduction in print time, the areas where the travel occurs leaves some artifacts I'd rather not have. I reduced my travel speed and increased my retraction.
Trying to get the best settings in Cura for the Ender 3 can be quite challenging, especially if you don't have a lot of experience with 3D printing.
Learn Cura's Travel Settings in 5 minutes or Less!Hi Folks! Technivorous here! Welcome to my Cura playlist! before we get started hit that subscribe button, ...
The best temperature, print speed, and retraction settings, among others. Read on for the best Ender 3 S1 & S1 Pro Cura slicer profiles.
Cura 5.7 is here and it brings a handy new workflow improvement when using Thingiverse and Cura together, as well as additional capabilities for Method series printers, and a powerful way of sharing print settings using new printer-agnostic project files! Read on to find out about all of these improvements and more.
Cura First Layer Settings; Cura Profiles; How to Remove the Disallowed Areas in Cura; Summary. Cura offers many options to control the jerk settings and speed of your printer. I set the Travel Jerk speed to 30 mm/s and all other jerk control settings to 20 mm/s. This has worked well with my printer but it's not a one size fits all setting as ...
Get the perfect 3D prints with every Ender 3 3D printer by using these best Cura profile settings. Increase print quality and speed with our expert tips.
Discover the hidden features of the Cura slicer software. We'll show you how to take your 3D printing to the next level for perfect prints!
In today's video I wanted to show you how you can remove the nozzle scratching on the top layer by choosing the right combing. In combing all, I find out you...
Simple cheat sheet showing a range of values for the most important settings in the Cura slicer for CR-10 and Ender 3 (and variants.) For many reasons you may want to tweak a preset Cura profile.
Discover the best Cura settings for Creality Ender 3 V3 Ke. Follow our guide to optimize your 3D printing experience with detailed configurations and tips
The initial layer is the foundation of the entire 3D model. Learn all about Cura first layer settings and how to get them perfect!