- Tips & Tricks
- Getting Started
- Virtual Tour Prep
- Integrations/Partnerships
- Don't See What You're Looking For?
- LCP Media - Knowledge Center
- LCP Media Support

How to Embed a Google Virtual Tour on Your Website
Simple steps on how to embed a google virtual tour on your website..
If your business has a Google virtual tour, chances are you probably want to use it in more channels than just Google - including your website.
Here are six simple steps on how to embed a Google virtual tour on your website.
Step 1: Go to Google Maps
Go to Google Maps and search for the business listing with the virtual tour you wish to embed.
Please note: Y ou can only retrieve the embed code from Google Maps. You will not find a code available if you navigate to your listing from Google Search.
Step 2: Click on a 360 thumbnail
Click on the 360 thumbnail. If you do not see a 360 thumbnail, you can click on any one of the images you see. You may then browse through your 360s from there.
Step 3: Choose a starting point
The beauty of embedding a Google virtual tour is that you may choose a starting point from which the embedded tour will begin.
To do so, navigate through your 360 images, choose the one you wish to start with, and rotate the image to the correct starting point. In most cases, you'll want to choose the entrance of the property.

Step 4: Click the three dots and select "Share or embed image"
Once you've chosen your desired starting point, click on the three dots located in the top left portion of the 360 image and select "Share or embed image".

Step 5: Copy the embed code
You can choose between a small, medium, large, and custom size for your embedded tour. If you're happy with the size, copy the HTML code.

Step 6: Paste the code on your website
Paste your virtual tour code into a source code embedder on the page you wish it to appear. Finding out where you can embed the code in your website will largely depend on the content management system you are using.
The final product
Below is how your Google virtual tour should appear once it is embedded.
How to get a Google virtual tour
Scheduling a photo shoot for your business is easy.
Contact us today to learn how to get a virtual tour of your business up on your Google profile.
How To Add Your Google Virtual Tour To Your Website

Basic Instructions
To add your Google Virtual Tour to your website, you can use Google Maps on a desktop computer to create an iframe that can be easily embedded. Follow the instructions below to embed your virtual tour on your website:
- Open Google Maps on your desktop computer
- Search for your business or location in Google Maps
- Select the virtual tour from the image gallery
- Navigate through the tour and choose the view you wish to share
- Click on the three dots in the upper left-hand corner of the page to open the menu
Click on “Share or embed image”
Click on “Embed map”
Choose the size of the iframe that you want to embed on your website
Copy the code that is generated
Paste the code into the HTML or code editor of your website where you want to embed your virtual tour.
Detailed Step By Step Instructions With Images
Open Google Maps on your desktop computer.
Search for your business or location in Google Maps.

Select the virtual tour from the image gallery. The virtual tour can be found in the image gallery by selecting the Street View & 360° category in your Google Business Profile or by selecting a photo in your gallery with the 360° symbol in the bottom left hand corner of the image.

Navigate through the tour and choose the view you wish to share.
Use the arrow buttons on your keyboard or click and drag with your mouse to change your viewpoint. As you move through the virtual tour, you can also use the navigation controls in the lower right corner of the screen to zoom in and out, rotate the view.

The view you choose in (Step 4.) will be represented exactly as it was chosen when you add the virtual tour to your website. Choosing Here are a few bonus tips to make your tour look amazing on your website.
- Center the most important content in the center of the view.
- When possible, drag the viewpoint to allow all of your vertical lines to appear straight up and down.
- Keep an eye on the navigation arrows. It is a best practice to share a view in the tour that allows the viewer to step forward, when possible.

Not so good
Click on the three dots in the upper left-hand corner of the page to open the menu.

iframe Code Example
Embedded virtual tour example.
“How do I add my virtual tour to my website?”, is by far, the most common question we receive from our clients. If you have any questions or issues adding your virtual tour to your website feel free to reach out to us anytime. We are always happy to help.
To learn about even more ways you can share your virtual tour online or for more in-depth information about best practices, check out our, Ultimate Guide to Sharing Your Virtual Tour.

How To Embed a Google 360 Virtual Tour On Your Website (Illustrated Guide)
The competition is ever-increasing in Google’s search engine result page, as more businesses are becoming aware of the importance of optimizing their listings so that it appears at the top of the search results. With Google Virtual Tours , your business can differentiate itself from the rest by giving a 360-degree tour of your business to users without them actually being there.
How to Embed Google Street View Virtual Tour on WordPress
Step 1: go to google maps and find your google my business listing.

Step 2: Click on your Google 360 Virtual Tour image

Step 3: Chose the initial view of your Google virtual tour that will appear on the website

Step 4: Click on the 3 dots in the top right corner of your virtual tour information and select ”share or embed image”

Step 5: Copy the embed code from Google Maps

Step 6: Paste the embed code on your website
Final result: see a 360 virtual tour | maui nui luau - sheraton maui resort & spa.
Embedding a Map or a Virtual Tour on the Squarespace website
After you completed steps 1 to 5, please do following steps:
- In Squarespace, open the editor for the page or post where you’ll place the file.
- Click an Insert Point and add a Code Block.
- Paste the embed code into the Code Block and click Apply.
- Click Save.
Embedding a Map or a Virtual Tour in a Blog Post on Blogger
- Open your posts on Blogger. A usual place to put a map is on the contact us page.
- Make sure you are in HTML editor mode. Go back to Google Maps and copy the HTML embed code from the Step 5 on this list. Paste the embed code on Blogger.
- A preview of the map will be available if you switch to compose mode, or you can preview the total page. Click the Publish button.
- Finally, view the post again to make sure that everything looks OK.
Embedding a Map or a Virtual Tour in the Sidebar
Blogger does not currently have a gadget or widget that will add a Google Map or Street View in your blog sidebar. However, you can add these to your sidebar with a simple procedure similar to the above method for adding to a blog post. Firstly, copy the “iFrame” embed code. Set a custom width and height that will ensure the size of the map or tour fits into your sidebar. Go your blog dashboard and go to the Layout section. Then, click to add a Gadget. Select “HTML/JavaScript gadget” in the options and paste the embed code into the content box. Click on Save. That’s it, you have now added your business location to the blog sidebar.
Embedding a Google Street View Virtual Tour on Any Website
Google has provided a solution for developers to insert a code which enables any websites to display Google Map in an interactive form. The Maps Embed API allows users to incorporate interactive maps, or Street View photos onto their websites with just a simple HTTP request. Meaning that features such as indoor floor plans, directions, and Street View can also be implemented onto your website. Visitors can now preview your virtual tours straight from your website, regardless of which backend system you used to build your site. This creates a more enjoyable experience for visitors as they can get everything they need all in one place, as opposed to navigating to a different page to view your virtual tour. Now, here’s a step-by-step guide on how you can insert Google Street View Virtual Tour onto any website: Step 1: Search for a location on the Google Maps page on your preferred browser. Step 2: Enter Street View mode, and click on the settings icon, which is located in the bottom right-hand corner. Step 3: There is an option to embed images, as well as the necessary code to be applied. Step 4: Take the code and apply it to your site onto the appropriate page And as simple as that, your virtual tour is now shared onto your website! In addition, developers have the option to define a latitude and longitude or a panorama ID to specify a location and even the pitch of the camera. You can enjoy the freedom of embedding as much as you want as they are no usage limits. Here’s how to insert the Google Street View virtual tour on any website. The first step will be to search a location in the normal Google Maps page in your browser. Enter Street View mode, then click on the settings cog, which is in the lower right-hand corner. There is an option to embed your image, as well as the necessary code. Take the code and drop it into your site on the appropriate page. You’ve now shared the virtual tour on your site. As a developer, you have the option to specify a latitude and longitude or panorama ID to pick your location, and the pitch of the camera. There are no usage limits, so you can embed as much as you want.
How to get a Google Street View 360 Virtual Tour?
Scheduling a photo shoot to enhance your Google listing is easy. Contact us today to learn how to get a virtual tour of your business up on Google.
A typical business receives 59 actions from their Google My Business listing each month. 16% of businesses receive more than 100 calls each month from GMB. We can optimize your Google My Business listing to make it one of your primary online traffic sources.

© 23e2 Business Services Inc. | Working With 3rd Parties
Advanced Online Insights
How to Embed Your Google Virtual Tour into Your Website

Embed A Google Virtual Tour Into Your Website in 4 Easy Steps
- Open your internet browser and navigate to www.maps.google.com

Iframe Embedded Google Virtual Tour Example
More Examples

Subscribe to Our Newsletter

A Year With Advanced Online Insights

See Inside: Radius Apartment Virtual Tour

The Ultimate Guide to Google Street View for Business Virtual Tours

Google's Year In Search 2020

How To Add Or Update Roads On Google Maps

Google My Business Feature Update: Add A Business Description

Get More Reviews on Your Google My Business Page

How Many Places on the Internet Does Your GMB Listing Show Up?

Optimizing Images for Google My Business
Recent comments, contact form.
How To Embed Google Virtual Tour On Website And Facebook
Part a. embed google virtual tour on facebook.
1. Log in to your Facebook account and go to 'Wooboox Custom Tab' and install it. You may access the app from here .

2. Add the tab to your designated page.

3. Go back to your page and click on a new tab call 'Welcome'. Then click on 'Setup your tab'.

4. On a separate tab on desktop, search for your business on Google Maps and click on '360 view' tab under Photos , bringing you to your virtual tour.

5. Navigate to your Google virtual tour 's preferred start point.
6. Click on the 'menu' button found on the top left hand corner of the screen and click on 'share or embed image'.

7. Click on 'embed a map' and customize your iframe dimension/size and copy.

8. Paste code in the Page Source and save.

9. Go to 'Tab Settings' and customize your 'tab name'. Save and we are done!

Part B. Embed Google Virtual Tour On Website
1. Repeat step 4 to 7 and paste the code into your website. That's all!

+65 6906 2513
100 Peck Seah StreetPS100 Building, #08-14,079333
Quick links

- How to add your virtual tour to your website
Adding your Matterport virtual tour to your website is very easy – just add the line of HTML to your site where you’d like your virtual tour to appear.
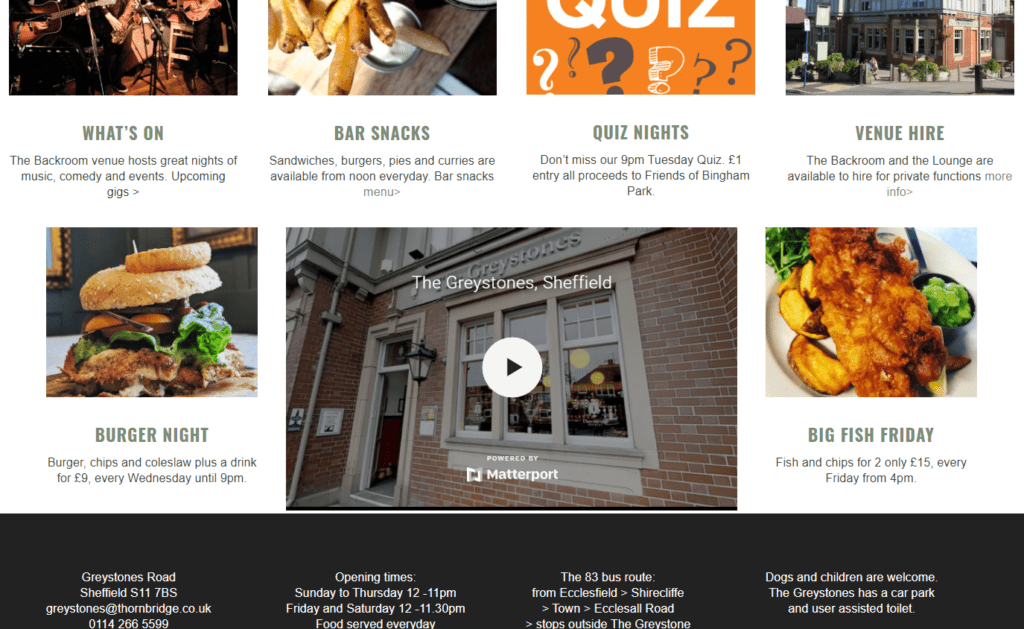
This tutorial shows you how to add your virtual tour to your website using the Greystones Pub (Sheffield) as the example. Your virtual tour:
- can be any size you want within your website
- can display anywhere you want within your site
- can be shared on social media or sent by email
- can be password protect your virtual tour – only people with the password can view it
Your virtual tour can also be added to a site on as many different pages as you like and to several different sites at the same time
Adding your virtual tour to your website (using an iFrame)
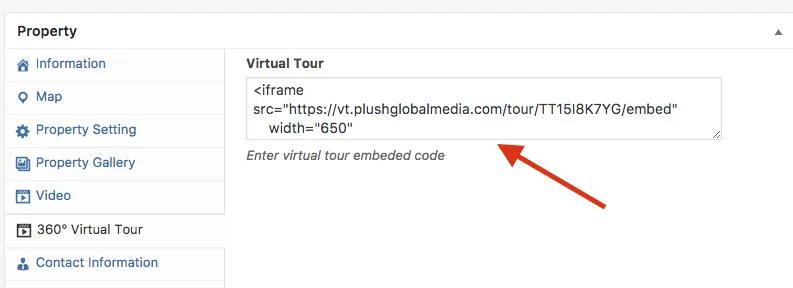
Once your virtual tour is ready, we’ll send you a short line of HTML code which you can use to add to any website to display your virtual tour. It will look like this:
Just change the WIDTH and HEIGHT values to the dimensions you’d like your virtual tour to display on your site. You may need to experiment with these to get the tour to display exactly how you’d like it to:
The example above is the code used to display the virtual tour for the Greystones Pub in Sheffield. The number values say how wide and high the virtual tour should display in pixels. Here’s how they decided to display it on their home page:
And here is what the code looks like in their website source code (see lines 276 and 277):

Wherever and however your virtual tour is embedded, you will still have the option to view it in full screen using the option at the bottom-right corner of the virtual tour (it’s next to the virtual reality option and the sharing options):

If you don’t want to allow people to view the virtual tour in full screen, delete the ‘allowfullscreen’ attribute from the iframe code
Sharing you virtual tour on Social Media
Along with the iFrame code for embedding your virtual tour within your website, I’ll also send the direct link to your virtual tour. This can be added to social media sites and sent directly in emails. Your direct link will look something like this (this example is the Greystones Pub again):
Help and support
We provide full help and support for adding your virtual tour to your website. Call on Sheffield 0114 383 0711 or Bakewell 01629 337 955 or mobile 07930 944 001
Stunning virtual tours from 360 Virtual View
360 Virtual View is based in Sheffield & Bakewell and specialises in virtual tours, photography, drone film, drone photography, 3D walkthroughs, virtual reality tours, and other promotional photography.
Perfect for showrooms, shops, hotels, holiday lets, B&Bs, restaurants, gastro pubs, wedding venues, tourist attractions, bars, estate agencies, letting agents, holiday lets, etc.
Call us on 0114 383 0711 (Sheffield) or 01629 337 955 (Bakewell) Email [email protected]
Main navigation
- Virtual tours & promo films
- What is a Virtual Tour?
- Get a quote for a virtual tour
- Matterport Virtual Tour – editing options
- Getting your business into Google Street View, Google Maps, Google search & Google Image search
- How to navigate the virtual tours
- Drone Photography & Aerial Photography
- Matterport embedding & URL parameters – reference
- You’ve had you virtual tour created – what next?
- Matterport Photography
- Film, slideshow & alternative tour examples
- VR examples
- Creating a video from a virtual tour
- Explore spaces in virtual reality
- Adding your virtual tour to your website & sharing options
- Other marketing & design services
- Virtual tours for showrooms
- Assets for Architecture, Engineering, & Construction – virtual tours, OBJ & XYZ files
- BIM files for Autodesk Revit (Building Information Modelling)
- Cutting edge technology to help sell homes
- Floor plan options – which is best for me?
- Full range of Estate Agency services
- Adding your virtual tour to Zoopla & RightMove
- Schematic floor plans from virtual tours & the in-built measurement tool
- Universities case study
- Nursery school
- Shop virtual tour
Student Accommodation Virtual Tours
- Liv Student Accommodation, Sheffield – Apartments – Virtual Tour
- Liv Student Accommodation, Sheffield – 9th Floor – Virtual Tour
- Sunrisestar, Student Accommodation, Sheffield – Promotional Video
- Liv Student Accommodation, Sheffield – reception – Virtual Tour
- Virtual Tours for Estate Agents
Virtual tour examples
- Bank View Farm – holiday Cottage and Bed & Breakfast, Sheffield – Virtual Tour
- Caudwell’s Mill, Rowsley – Virtual Tour
- Buxton Junior School – Virtual Tour
- Royce Translational Centre, Sheffield – Virtual Tour
- Moscar Kennels, Sheffield – Virtual Tour
- Sir Robert Hadfield Building, Sheffield – Virtual Tour
- Upper Chapel, Sheffield – Virtual Tour
- University of Sheffield – Department of Engineering & Materials – Virtual Tour
- Induja Holiday Home – Virtual Tour
- Matterport photographer
- Running blog
- Sheffield SEO
- Virtual tours Sheffield
- Web Design Sheffield
Legal links
- Privacy Policy
- Terms & conditions
- GDPR compliance & ICO registration
360 Virtual View is a trading name of Seven Creative Ltd. Registered England and Wales company number 5586090. VAT registration number GB 100-4940-63. Sheffield virtual tours // Virtual tour presentation // Matterport photographer near me // VR examples
- Real Estate
- Hospitality
- Architecture
- Factory & Office
- Submit Ticket
- Panoee Features
- Delete 360-degree images
- Rename the project
- Share a Project
- Publish Projects
- Set Default View
- Control The Scene View
- Manage Projects
- Create & Manage Scene
- Create new Project
- Add a Form to your virtual tour
- Add Facebook Messenger plugin to your Virtual Tour
- SEO: Title and Meta description
- SEO: Customize SEO thumbnail
- Add a Call to action (CTA)
- Update Favicon
- Setup Brand Logo
- Setup Google Analytics for your virtual tour
- Edit Hotspot Compact
- Customize the Polygon hotspot appearance in bulk
- Hide Title on Preview Box (When Hovering) in bulk
- Hide Preview Box (When Hovering)
- Hide the Title on the top of the hotspot in bulk
- Fix the position of your hotspot in bulk
- Edit hotspot Media Text
- Edit hotspot article
- Edit hotspot Tour Guide (Green screen)
- Use Last Config
- Customize Polygon Color
- Edit hotspot Polygon
- Change the color of your Hotspot in bulk
- Edit hotspot Product
- Edit Hotspot Link
- Edit hotspot sound
- Edit hotspot Video
- Edit hotspot Image
- Edit hotspot Media – Image
- Edit hotspot Media – Video
- Edit Hotspot Street Direction
- Manage Hotspots
- Link Scenes with Navigation Hotspot
- Turn on the Panoee notification on your browser
- Manage Profile
- Change Password
- Forgot Password
- Panoee S3 Hosting Tutorial
- How to Export a virtual tour?
- Author name and Copyright
- Custom slug
- Add a password to your virtual tour
Embed Virtual Tour to website via iFrame
- Setup Custom Domain
- Integrate Tour 3D in WordPress
- Customize the Control bar interface
- Customize Popup Color
- Select Theme & Customize Color
- Set up Default Projection
- Change the virtual tour location
- Change the virtual tour Category
- Add Background Sound to your virtual tour
- Set up the initial view of your virtual tour
- Make a Virtual Tour Description pop up
- Collaboration mode: Team-working Virtual Tour
- Add Nadir Logo at bottom of Virtual Tour
- Setup Auto Rotate effect
- Setup Auto Change Scene effect
- Manage Floorplans
- Manage Products
- Manage Posts
- Show / Hide Scene from Scene List
- Multi-language virtual tour
- Change the Virtual tour Control mode
- Popup Intro
- Publish Google Street View
- Virtual Staging: Day to Dusk effect
- Display Google Map
- Virtual Staging: Add Split Screen Effect
Using iFrame is one of the most popular and easiest way to “publish” the Virtual Tour in your website. The embeded Virtual Tour works like any Youtube video.
This method is supported by any website platform like WordPress, Wix, Webflow,…
? Learn more:
- How to add Virtual Tour to website (step-by-step)
- Self-hosting your Virtual Tour
Sample embeded Virtual Tour with iframe code.
--> 651 NBroad St, Suite 201, Middletown, New Castle, Delaware.
--> +84 96-561-5905
- 360 Tour Builder
- 11 Hotspot Types
- Publish 360 Virtual Tour
- Marketing Virtual Tour
- 360 Photography Portfolio
- Customize Design & Brand
- Virtual Staging
- 360 Panorama Cloud Storage
- Collaboration
- Multi-Language
Tour Creator
Sample tours, testimonials.

The Best Virtual Tour Creator
The place to create professional virtual tours

About Our Tour Creator
Gothru Tour Creator helps you build a layer of information on top of your panoramic images, taken with any 360 cameras, from DSLR to Richo Theta and Insta360. With the help of this layer anyone can easily navigate the Virtual tour. Gothru offers you a multitude of themes and tools allowing you to build a unique experience for your virtual tour.

Predefined Themes
Simple Transparent , Stylish Berlin , Real Estate , Architecture , Carousel

Side Menus , Hotspots (POI) , Floor Plan, Map , Password, Control Bars, Carousell, Multi Language , Panorama Comparison

Progress Web Application (PWA)
Have the option to install the virtual tour on your iOS or Android device, by creating an app with an icon on your home screen.

Statistics Dashboard
Best in class Statistics that are not blocked by AD Blockers, with insight into your tour usage: View Sample Tour Stats

Native Virtual Reality (VR)
Experience your Virtual Tour in VR mode using our native applications for Oculus Go , Oculus Quest or Google Cardboard on Android and iOS

Tour Creator Editor allows you to test your Overlay mobile-first
Download the Virtual Tour and host it on your own server or just access it offline from your table or phone

The GoThru overlay editor is one of the easiest, intuitive tour building software packages available at the moment. As this is all based on browser technology rather than a program or an app, the system is always up to date with the latest additions available.
Greg Hughes
The GoThru overlay editor has been an incredible asset that we have been able to use, to add significant value to high end virtual tours for numerous clients over the years. It's our go to solution for customising virtual tours.
Sam Kynman-Cole
Quiero dar mi más amplia recomendación para "GoThru Overlay System" Sus mayores fortalezas las encuentro en la limpieza de su interface y lo amigable que es. Para mí GoThru significa soporte, confianza y calidad.
Overlay Editor is the best tool to create and publish hosted 360 Tours online. It is an easy, fast and cheap way to publish business and real estate tours that includes a lot of features that perform a complete tool for 360 photographers. GoThru has been dedicated a great job for Brazilian professionals with fast support
Rafael Starobole
GoThru is a necessity for my workflow of creating immersive virtual tours. With the Overlay editor we are able to give our clients extra power to put their tours to work on their website and other social media outlets. They are always attentive to our needs. Great Team!
Steven Johnson

- UP TO 100 GB SPACE TO USE
- Nadir Patching
- 5 360VIDEOS/DAY
- UNLIMITED HOSTED TOUR OVERLAYS
- UNLIMITED GOOGLE TOUR OVERLAYS
- $10 USD/Download Tour Overlay
- Panorama Leveling

PAY AS YOU GO
- UP TO 10 GB SPACE TO USE
- $15 USD/YEAR PER GOOGLE OVERLAY
- $25 USD/YEAR PER HOSTED OVERLAY
- $35 USD/Download Tour Overlay
Frequently Asked Question
A Virtual Tour Overlay adds a layer of information over a regular Virtual Tour for the purpose of easier navigation and for providing information about specific areas in the Virtual Tour.
It’s a tour that has a layer of data (menus, hotspots) over Google Street View images, and you need a Google Map Javascript API key. As a Note the Overlay data is not available directly on Google Street View, but only via unique URL that can be shared directly or embed on a website via an iframe tag.
It is similar to Google Overlay, but the tour has nothing to do with Google and the images are hosted by GoThru. The Virtual tour URL can be shared directly or embed on a website via an iframe tag.
Not yet. We are working on our next Viewer version and when that is ready you will be able to download the Virtual Tour for a fee.
The Virtual Tours links will stop working and you will have a few options:
- Pay per Tour
- Download the Virtual Tour and host it yourself, when that function will be available.

Plugin Directory
WP VR – 360 Panorama and Virtual Tour Builder For WordPress
Installation.
- Development
Description
🏆 #1 virtual tour creator and 360 panorama viewer for wordpress..
WPVR allows you to take their properties, shops, hotels, and exhibitions online in a virtual platform and keep them open for business 24/7.
Create complete virtual tours on your own, where your visitors can navigate through your places in a 360 panoramic view and get an overall idea of how they look in real life.
Simply upload a 360 panorama image, and the plugin will help you transform it into a realistic virtual tour.
🌟 Why Use WPVR?
WPVR gives you all the features needed to create a quality virtual tour on your own.
👉 Get WPVR – Virtual Tour Creator For WordPress (Pro) Today
Virtual tour creation could not be easier! 👇
🌟 Simple & Easy To Use Virtual Tour Builder 🌟
WPVR has a simple & user-friendly interface, designed for you to create virtual tours real quickly, even without any expertise.
In fact, you can create a virtual tour in less than 5 minutes!!
We also have Video Tutorials, Detailed Documentation, and Virtual Tour Creation Guides in case you need any help.
✅ WPVR Video Tutorials | ✅ WPVR Documentation | ✅ Guides on Virtual Tour
✨ Publish Virtual Tours with Any Theme or Page Builder ✨
WPVR has global Shortcode support for publishing virtual tours .
With this, you can publish your virtual tours with any theme or page builder.
It also has dedicated support to publish & customize virtual tours:
- 360 view & Virtual Tour Widget for Elementor .
- 360 Image Viewer & Virtual Tour Block for Gutenberg .
- Virtual Tour & 360 Panorama Module for Divi .
- Panoramic image 360 view & Virtual Tour Element for Oxygen .
- 360 Panoramic Viewer & Virtual Tour Element for Visual Composer .
- Publish Virtual Tours with Password Protection
These along with the shortcode will allow you to set custom height, width, and radius for your published virtual tours.
You can also set them to be fullwidth of the section and even full-page or full-screen virtual tour by default.
🌟 Show Information with Interactive Hotspots 🌟
You can use engaging hotspots to give information using:
✅ Texts. ✅ Images. ✅ GIFs. ✅ URLs. ✅ Videos. ✅ Buttons.
Or a combination of any of these in 2 ways:
- Show information for Hotspot On-hover action.
- Show information after Hotspot On-click action.
You’ll have full HTML Editor/ WYSIWYG Editor support to set up Hotspot content .
Also, you’ll have over 900+ custom icons for these hotspots which you can further customize with any color you want and a ripple animation option.
It’s a great way to grab your viewer’s attention!
🌟 Create A Complete Virtual Tour In Just Easy 3 Steps 🌟
Use multiple 360° panorama images to create a complete virtual tour of any house or location in a virtual tour to create Scenes covering different rooms, corners, or spots.
- Connect these Panorama Scenes
- Use Scene-type Hotspots so all the 360 degree images join together
- Show information in the virtual tours using info hotspots and hit publish!
And that’s it, you’ve created a complete virtual tour!
Your viewers can move inside or back and forth in this virtual tour as if it’s a real-life tour.
You can connect up to 5 scenes, and add 5 hotspots per scene on a virtual tour in the free version.
👉 Create Tours With Unlimited Scenes And Hotspots
🌟 use high quality 360 panorama images without wordpress restriction 🌟.
Is WordPress automatically compressing and reducing the panorama image quality?
A good 360 panorama image usually comes with a very high resolution that can easily go over 3000×1500 pixels.
No worries.
WPVR comes with the option to disable this restriction so that you can easily upload panorama images that can be more than 3000 pixels in width.
You can use any high-quality jpeg, png, webp etc. panorama images to make your own 360 virtual tour with WP VR
🌟 Interactive Virtual Floor Plan for Meaningful Direction (Pro) 🌟
You can easily create a complete floor plan for your property, store, showroom, or any other place you own.
Real Estate Floor plans are really popular among realtors and agencies and you can also utilize them to spice up your real estate tours.
Upload the floor plan to WPVR, set pointers on that floor map for every 360 panorama scene you’ve created, and simply connect the pointers with the scenes.
A complete & interactive virtual floor plan is ready inside your tour.
You can customize the pointer designs however you want with different colors.
🔗 Share the Virtual Tours on Different Social Platforms (Pro) 🔗
With WP VR you can easily share your 360 degree virtual tours on different Social Media Platforms like
without having it published on the Web page!
🌟 Generate QR Codes For Your 360 Degree Virtual Tours (Pro) 🌟
Generate a QR Code automatically for your virtual tour which will help you showcase your tours without having it published on the Web page.
▶️ The Simplest 360 Video Player for WordPress
WPVR lets you add 360 degree videos in the easiest way in WordPress.
You can either,
- Self-host the 360 degree videos on your media folder,
- Embed a YouTube 360 video, or
- Set up a Vimeo 360 video on your WordPress site without any hassle.
🔐 Private & Password Protected Tours For Your Premium Clients (PRO) 🔐
You can create private tours or password protected virtual tours for your premium clients and also offer special services like private art gallery tour or private museum virtual tour for your clients.
🌟 Cardboard & VR Headset Support for Full Immersive Experience (Pro) 🕶️
Now you can activate the VR headset support for your virtual tours with just one click.
Visitors of your site can put on their Google Cardboard or VR Headset and experience a realistic virtual tour experience using their phones.
🌟 Mobile First VR Approach 🌟
WPVR is designed with a mobile-friendly output in mind and all the tours you make will be fully responsive and weightless for mobile devices.
👉 Faster Interactive VR Tour Loading on Phone:
Enable the Auto-resize feature to produce a lighter version of your 360 panoramic images only for mobile phones.
👉 Custom Virtual Tour Height for Mobile View:
To show interactive VR tours on a mobile device, set mobile-only virtual tour height for each 360 degree virtual tour.
👉 Notice for Smartphones:
You can show custom front-end notices to help out the virtual tour viewers from smartphones.
Who Should Use WP VR?
- Real Estate Industry ( Virtual house tours 🏡 )
- Schools and Colleges ( Virtual campus tours 🏫 )
- Hotels and Resorts .
- Restaurants.
- Travel/Tourism .
- Art Galleries & Exhibitions.
- Car Showrooms .
- Furniture Showrooms.
- Clothing Stores .
- Grocery and Retail Stores.
And many more.
👉 Check out Virtual Tours For Different Industries Made With WPVR
To have more control over creating a virtual tour, learn about the Premium version .
FREE FEATURES
- An unlimited number of 360 Panorama VR tours
- 360 Degree Video Support (Self-hosted, Youtube, & Vimeo Videos).
- Full-window Virtual Tours.
- VR Glass support for Video Tours.
- Shortcode Support.
- Gutenberg Block Support.
- Elementor Widget Support.
- Webp image support
- Live Preview of Tour On The Back-end.
- Tour Preview Image.
- Tour Autoload Feature.
- Scene Fade Animation.
- Auto Rotation with Speed Control.
- Auto Rotation Direction, Pause and Stop control.
- Basic Control Buttons (Zoom In, Zoom Out, and Fullscreen).
- Mouse Drag Control on Virtual Tour.
- Zoom In and Out with Mouse Scroll on Virtual Tour.
- Zoom In and Out with ‘+’ and ‘-‘ keyboard buttons.
- Add Multiple Scenes and Hotspots.
- Scene Type Hotspot to Connect Scenes.
- Info Type Hotspots to Give Information.
- On Hover and On-Click Content Option for Hotspots.
- Embed Texts, Videos, Images, GIFs, and Website Links on Hotspots.
- Hotspot Customization with Custom CSS.
- Full-width Tour Tag.
- Radius Tag for tour border-radius.
- Multi-Site Support.
- WP User Role Support (Editors and Authors).
- Disable FontAwesome Option.
- Disable WordPress Default Large Image Handler.
- Control Plugin Assets To Load on Specific Pages/posts Only.
- Enable Front-end notice for Mobile Visitors.
- Mobile Media Resize Option.
- Plugin Version Rollback Option.
- Password Protected Tour.
- Support From the Support Forum.
PREMIUM FEATURES
- All Free Features.
- Unlimited 360 Panorama VR (Scenes).
- Unlimited Hotspots.
- Publish Tours anywhere (Embed Add-on).
- WooCommerce Add-on for Hotspots.
- WooCommerce Products – Add To Cart.
- Scene Gallery (Panorama Image Gallery).
- VR Glass/Cardboard support.
- Floor Plan support.
- Explainer Video.
- Background Audio
- Autoplay, Loop, and pause for
- Gyroscope Support for Virtual Reality (Mobile Devices).
- VR Glass Support for Video Tours.
- 900+ Premium Icons for Hotspot.
- RGB Color Support for Hotspots.
- Partial Panorama / Mobile Panorama.
- Google Street View Support.
- Cubemap Image Support.
- Import & Export Virtual Tours.
- Custom Zoom Settings for 360 images.
- Background 360 Panorama Viewer.
- Fluent Forms Add-on.
- Company Logo & Description (White-label).
- Duplicate Tours with One Click.
- Control Horizontal & Vertical 360 view.
- Custom Loading Point (Face) for 360 views.
- Scene Title, Author Name & URL.
- On-Screen Compass for 360 Image Viewer Mode.
- Direct Social Media Share.
- Share virtual tours with a QR Code.
- Priority Support.
👉 Upgrade to Pro ✨
We have many more amazing features planned. Take a look at our development roadmap.
Upcoming Features
- Contact Form/Booking Option Button.
- Storytelling.
- Mail Mint Integration for Lead Generation.
Privacy Policy
WP VR uses Appsero SDK to collect some telemetry data upon the user’s confirmation. This helps us to troubleshoot problems faster & make product improvements.
Appsero SDK does not gather any data by default. The SDK only starts gathering basic telemetry data when a user allows it via the admin notice . We collect the data to ensure a great user experience for all our users.
Integrating Appsero SDK DOES NOT IMMEDIATELY start gathering data, without confirmation from users in any case.
Learn more about how Appsero collects and uses this data .
Screenshots

This plugin provides 1 block.
- Upload WPVR to the /wp-content/plugins/ directory
- Activate the plugin through the ‘Plugins’ menu in WordPress
- Follow the setup wizard to configure the plugin for use
1. Why Do I Need WP VR?
You can easily create a Virtual Tour of your place using WP VR to build a virtual presence of your business.
Simply provide a 360 degree panoramic photo and this plugin will create a virtual tour that your visitors can navigate easily.
Allow your prospects to have a realistic tour of your facility before they decide to purchase your service and increase your conversion rate.
2. How to Install and Activate WP VR?
Once you have downloaded the file, go to your dashboard. Under Plugins, select Add New, and upload the file. Then Install and activate the plugin.
Once activated, on the left side under your dashboard, you will find the option WP VR at the bottom.
3. What Kind of Images Should I Use To Create A Virtual Tour?
To make a perfect equirectangular image, you need to use a 360 degree panoramic photo of the area you want to preview.
However, you can also capture panorama images with your smartphone and use them to create a partial panorama tour.
5. Can I Customize The Hotspot Icons?
Yes. You can create a custom class on your theme, stating whatever style you want.
Then you can input the class name on the Hotspot Custom Class section in a hotspot, and the content displayed will be customized according to the style you set.
6. Can I Create A 360 Degree Video Tour With WPVR?
Yes, with WP VR, you can create a 360 Degree video tour.
You can either upload the video to create a tour or set a link to a Youtube/Vimeo 360 degree video.
7. How To Embed A Virtual Tour Using Gutenberg Block Editor?
Under common blocks, you will find a block called WPVR. Select the block and on the dynamic toolbar on the right, you will get the options to add ID, Height, and Width.
Collect the ID from the virtual tour you created. Assign the height and width as you desire.
8. The Tour Is Not Loading On The Webpage.
Go to your WordPress Dashboard > WPVR > Get Started > Settings.
Check the Enable Script Control option status.
If the Enable Script Control option is turned On, turn it off and reload the tour page.
If you wish to use this feature, you have to set the URLs of all the pages on your site with a virtual tour in the List of Allowed Pages To Load WPVR Scripts field.
9. What To Do If I Get “THE FILE (image link) COULD NOT BE ACCESSED” Error?
Sometimes when you add a tour to your site, you might face this issue, rather than loading the tour it will give the error “THE FILE (…) COULD NOT BE ACCESSED.”
This error shows up when you are running a website under “HTTPS” (secured with SSL certificate) whereas your image link is under “HTTP” (unsecured).
To solve this issue, go to your WordPress Dashboard > Settings > General.
Here make sure you have “HTTP” added to both “WordPress Address (URL)” and “Site Address (URL)”.
And that’s it. Your virtual tour should load with no issues.
10. Can I make The Virtual Tours Full-width?
Yes, you can publish the tours as the full width of your page/post.
For Gutenberg, Elementor, and Oxygen builder, set fullwidth on the Width field. For shortcodes, set width = “fullwidth”.
11. What If I Use An Optimization or Caching Plugin?
If you use any Optimization or Caching plugins, then you need to exclude WP VR from its optimization function.
Simply add ‘/plugins/wpvr’ to the exclusion field (or use the location where you store plugins).
12. Can I Allow The Users of My Site To Create Virtual Tours?
You can only allow the backend users like Admins, Editors, and Authors of your site to create virtual tours.
Admins & editors will have access to all virtual tours on the site to modify, update and delete them.
Authors can access their own tours only and modify, update, or delete them.
Admins can remove access from Authors and Editors at any time.
13. How can I report security bugs?
You can report security bugs through the Patchstack Vulnerability Disclosure Program. The Patchstack team help validate, triage and handle any security vulnerabilities. Report a security vulnerability.

Very easy to use and deploy

Great plugin with great support

Fantastic support

Support very good

Support on this product is one of the best

I can highly recommend
Contributors & developers.
“WP VR – 360 Panorama and Virtual Tour Builder For WordPress” is open source software. The following people have contributed to this plugin.
“WP VR – 360 Panorama and Virtual Tour Builder For WordPress” has been translated into 3 locales. Thank you to the translators for their contributions.
Translate “WP VR – 360 Panorama and Virtual Tour Builder For WordPress” into your language.
Interested in development?
Browse the code , check out the SVN repository , or subscribe to the development log by RSS .
8.4.7 (21-05-2024)
- Fix: Optimize Scene Render issue.
8.4.6 (15-05-2024)
- Improvement: Support for editing the Scene ID.
8.4.5 (14-05-2024)
- New: Review Engine for WP VR
- Improvement: Streamline scene navigation with preview section image and image navigation in WP VR
8.4.4 (02-05-2024)
- New: Add Copy option to WP VR All Tours page Shortcodes.
- Improvement: WP VR Scene Navigation menu now allows showing Scene Title / Image Title / Scene ID.
- Improvement: Brought Scene Upload to the top to make Scene upload easier.
8.4.3 (08-04-2024)
- Fix: Page redirection issue with WP 6.5
8.4.2 (04-04-2024)
- Compatibility with WP 6.5
8.4.1 (01-04-2024)
- Bug Fix: Hotspot text support for Turkish language.
- Improvement: “Add to Cart” & “View Cart” layout update for WooCommerce Add-on.
8.4.0 (13-03-2024)
- New: Lazy Loading Images to improve load time.
- New: Right-to-Left (RTL) language support.
- Improvement: Localization support (All PHP, JS, and static contents are now translatable).
- Improvement: FontAwesome Library updated to version 6.5.1.
8.3.20 (07-02-2024)
- Fix: Issue with Cubemap Scene Type
8.3.19 (03-01-2024)
- Fix: Divi theme compatibility
8.3.18 (29-12-2023)
- New: Generate Dynamically Scene and Hotspot ID
8.3.17 (25-12-2023)
- Fix: PHP warning from hotspot
8.3.16 (19-12-2023)
- Fix: Compatibility with WP 5.2.19
8.3.15 (12-12-2023)
- Fix: Security patch based on the user’s role
8.3.14 (07-12-2023)
- Fix: Security patch
- Fix: Video Tour issue for vimeo
8.3.13 (30-11-2023)
- Fix: Tour view issue for Mobile
8.3.12 (30-11-2023)
- Fix: Gyroscope Issue
- Fix: Fix the wrong position for on-hover content
- Fix: Admin reloading issue
- New: Dynamically load the current Scene in the Tour Preview
8.3.11 (23-11-2023)
- Fix: Mouse hover issue in the preview section
- Fix: Tooltip issue on hover in hotspot
8.3.10 (07-11-2023)
- Fix: PHP warning from scene Floor Plan
8.3.9 (27-10-2023)
- Fix: Z-Index on mouseovers issue
- Fix: Floor plan indicators wrong direction
- Fix: Gallery & audio button overlap issue
8.3.8 (20-09-2023)
- Hotfix: WP VR shortcode compatibility with VR mode
8.3.7 (19-09-2023)
- Fix: YouTube 360 video tour not working
8.3.6 (07-09-2023)
- Fix: Shortcode fullwidth tag was not working with Twenty Twenty Three theme
- Fix: Shortcode mouse control was not working
- Fix: WPVR Gutenberg block style issue
8.3.5 (18-08-2023)
- Fix: JS error from video js file
- Fix: XSS vulnerability issue
- Fix: Gutenberg custom class not working
8.3.4 (16-08-2023)
- Fix: PHP warning from scene.
- Fix: Mismatched Video Warning Message
- Fix: Console Errors on Video JS Enabled URLs
- Fix: Script Control and Video JS Control Fail to Function
- Fix: Go to pro link redirection issue
8.3.3 (11-07-2023)
- Fix: JS & PHP Error Notice.
8.3.2 (12-05-2023)
- Hotfix: Security issue.
- Fix: Function WP_Scripts::localize was called incorrectly.
8.3.1 (28-04-2023)
- Update: Checked compatibility with WordPress 6.2.
- Fix: CDN issue (disabling Cloudflare).
- Fix: Conflict with General Admin Notice.
8.3.0 (27-03-2023)
- Fix: Security patch.
- Fix: Issue on Safari browser.
- Fix: Issue with tour height settings for WPVR Gutenberg Block.
- Update: Checked Compatibility with Elementor 3.11.5
- Update: Checked Compatibility with Visual Composer 45.1.3
- Update: Checked Compatibility with WooCommerce 7.5.1
- Update: Checked Compatibility with Gutenberg 15.4.0
- Update: Checked Compatibility with Fluent Forms 4.3.25
8.2.9 (20-03-2023)
8.2.8 (13-02-2023).
- Hotfix: Security Patch.
8.2.7 (11-01-2023)
- Fix: Validation missing for shortcode attributes.
8.2.6 (15-12-2022)
8.2.5 (25-11-2022).
- BFCM banner & notice added.
8.2.4 (09-11-2022)
- Update: Checked compatibility with WordPress 6.1
- Fix: Hotspot Image Content Conflict with WP 6.1
8.2.3 (02-11-2022)
- New: Multiple Tour Support Inside Elementor Tabs.
- Fix: Summernote Image Upload Issue.
- Fix: Hotspot IDs hovering over Scene-type hotspots on Preview mode.
- Fix: Floor Plan option appearing for Video Tours & Street View Tours.
- Fix: Options are appearing over the Preview Image on the front end.
- Tweak: Improvements on WPVR Gutenberg Block & Oxygen Module.
8.2.2 (17-10-2022)
- New: WPVR Gutenberg Block Support re-designed & refined with new options (Height, Width, Radius, Mobile Height, Border Width, Style & Color).
- New: WPVR Divi Module Support re-designed & refined with new options (Height, Width, Radius, & Mobile Height).
- New: WPVR Visual Composer Module re-designed & refined with new options (Height, Width, & Radius).
- New: WPVR Oxygen Element re-designed & refined with new options (Height, Width, Radius, & Mobile Height).
- New: Two Options for Scene Gallery Icon (Small & Large).
- Fix: Timeout error for image content in hotspots.
- Fix: Issue while importing tours.
- Fix: Uncaught TypeError: Cannot access offset of type string on string.
- Fix: Company Logo Changes position – tour published with Divi.
- Fix: Scene Gallery Moves to Left – published with Divi.
- Fix: Floor Plan & Explainer Video buttons overlapping – published with Divi.
- Fix: Floor Plan pointer & Close option lost style – published with Divi.
- Fix: Removed ‘RexTheme’ text on right-click in pro.
- Tweak: Warning Message improved for Free version missing.
- Tweak: Content & Tooltips improved on the Floor Plan section.
8.2.1 (12-09-2022)
- Fix: Floor Plan looping issue.
8.2.0 (12-09-2022)
- New: Floor Plan for virtual tours.
- Fix: Disable option for On-hover content not working.
8.1.2 (19-08-2022)
- New: WPVR – Divi 360 Panorama & Virtual Tour Builder Module.
8.1.1 (03-08-2022)
- New: Custom Color Support for Individual Hotspots.
- Fix: Custom Hotspot Icon Class is not working.
- Tweak: Explainer Video & Global Zoom Settings not shown.
8.1.0 (25-07-2022)
- New: VR Glass Support for virtual tours.
8.0.2 (14-07-2022)
- Fix: Undefined Variable – PHP Error Notice.
- Fix: Issue with Gutenberg Block.
- Fix: Missing Language Files.
- Update: Compatibility with PHP 8.1.7.
- New: Automated the Rollback Function.
8.0.1 (23-06-2022)
- Fix: View Details option doesn’t work from the Plugins page.
- Update: Content for Free vs Pro page.
- Tweak: Scene Upload design
8.0.0 (15-06-2022)
- Update: Plugin Code restructured.
- Update: Improvement on tour creation tabs.
- New: Welcome page.
- New: Guided Tour.
- Tweak: Global Preview button.
- Fix: Conflict with Divi Page Builder.
7.3.11 (03-06-2022)
- Fix: URL Redirect Issue while Publishing Tour
7.3.10 (01-06-2022)
- Fix: JS file missing issue
7.3.9 (01-06-2022)
- New: WYSIWYG Editor Integration for Hotspot Content
- New: Close On-click windows on any click.
7.3.8 (25-05-2022)
- Update: Checked compatibility with WordPress 6.0.
- Update: Get Started page content updated.
- New: Updated support for Elementor function register_controls().
- Fix: Loading wrong tabs on tour editing mode.
- Fix: Radius not working for self-hosted video tours – Shortcodes.
- Fix: Radius not working for self-hosted video tours – WPVR Gutenberg Block.
- Fix: Radius not working for self-hosted video tours – WPVR Elementor Widget.
7.3.7 (19-05-2022)
- Fix: ZenCDN Removed.
- Fix: Conflict between On-click Content & URL fields
- Fix: Reset inserted data when Hotspot Type is changed (Info, Scene).
- Tweak: Better loading logic while Previewing Tour on General, Scenes, & Hotspots tabs.
- Tweak: Better loading logic for Getting Started & Settings pages
7.3.6 (04-04-2022)
- New: Google Cardboard, Oculus Rift, HTC Vive, & GearVR Support for Video Tours.
- New: Support for Multiple Tours Inside Elementor Tabs.
- New: Custom Mobile Height for the Tours using WPVR Gutenberg Block.
- New: Custom Mobile Height for the Tours using Shortcode.
- Fix: Custom Preview Image Text not Working in Elementor Tabs.
- Fix: PHP Warnings on Front-end.
- Fix: PHP Warnings on Settings Page.
- Fix: PHP Warnings on Hotspots Page.
7.3.5 (27-01-2022)
- Update: Checked Compatibility with WordPress 5.9.
- Update: Checked Compatibility with WooCommerce 6.1.1.
- Update: Checked Compatibility with Gutenberg 12.4.1.
- Update: Checked Compatibility with Elementor 3.5.4.
- Update: Checked Compatibility with Visual Composer 42.1.
- Update: Checked Compatibility with Fluent Forms 4.3.0.
- Update: Rollback version updated to 7.3.4.
- New: Disable On-hover content for mobile devices.
- New: Open URL in the same tab from hotspots.
- Fix: Height field doesn’t work for YouTube videos – WPVR Elementor widget.
- Fix: Width and Height fields don’t work for YouTube video tours – WPVR Gutenberg block.
7.3.3 (16-09-2021)
- Update: Checked Compatibility with WordPress 5.8.1.
- Update: Checked Compatibility with PHP 8.0.
- Update: Rollback Versions Updated to 7.3.2.
- Fix: PHP Error Notices.
- New: Full-window Virtual Tour Support.
- New: Control video.js loading on specific pages.
7.3.2 (04-08-2021)
7.3.1 (27-07-2021).
- Update: Checked Compatibility with WordPress 5.8.
- Fix: PHP Error Notice.
- Tweak: Dual Action Warning for Auto-Rotation redesigned & updated.
- Tweak: Invalid Pitch Value Warning redesigned & updated.
- Tweak: Invalid Yaw Value Warning redesigned & updated.
- Tweak: Invalid Default Zoom Value Warnings redesigned & updated.
- Tweak: Invalid Max-zoom Value Warning redesigned & updated.
- Tweak: Max-zoom Value Exceeded Warning redesigned & updated.
- Tweak: Invalid Min-zoom Value Warning redesigned & updated.
- Tweak: Low Min-zoom Value Warning redesigned & updated.
7.3.0 (18-06-2021)
- Tweak: WP VR logo & Text Aligned on Dashboard.
- Tweak: Scene Image Missing Notice redesigned & updated.
- Tweak: Scene ID Missing Notice redesigned & updated.
- Tweak: Invalid Scene ID Notice redesigned & updated.
- Tweak: Duplicate Scene ID Notice redesigned & updated.
- Tweak: Default Scene Change Notice redesigned & updated.
- Tweak: Scene Deletion Notice redesigned & updated.
- Tweak: Scene Limit Reached Notice redesigned & updated.
- Tweak: Invalid Hotspot ID Notice redesigned & updated.
- Tweak: Duplicate Hotspot ID Notice redesigned & updated.
- Tweak: On-click Content + URL Dual Input Notice redesigned & updated.
- Tweak: Custom Icon + Custom Icon Class Dual Input Notice redesigned & updated.
- Tweak: Target Scene Missing Notice redesigned & updated.
- Tweak: Hotspot Limit Reached Notice redesigned & updated.
- Tweak: Hotspot Deletion Notice redesigned & updated.
- Fix: Autoplay bug for 360 degree videos.
7.2.9 (25-05-2021)
- New: Warning message added for Street View tab.
- Tweak: Rollback versions updated.
7.2.8 (06-05-2021)
- Fix: PHP Warnings on Backend & Frontend
- Fix: Audio Issue for self-hosted videos on hotspots
7.2.7 (12-04-2021)
- Tweak: Video tab warning pop-up redesigned.
- New: Preview Image Text is made dynamic.
- New: On the Hotspots tab, the active Scene ID will be mentioned.
- Fix: Elementor Widget Issue.
- Fix: Preview Image Text font mismatch.
7.2.6 (22-03-2021)
- Tweak: Rollback versions updated
- Fix: Dummy notice removed
- Fix: AppSero Updater Error
7.2.5 (11-03-2021)
- Update: Checked compatibility with WordPress 5.7
- New: Visual Composer element support
- Fix: PHP warnings on the dashboard
7.2.4 (24-02-2021)
- Tweak: Made the Enable Script Control option conditional
- Tweak: Added pop-up warning when switching to a video tour
- Fix: Style conflict issue with Phlox Pro theme
- Fix: Tour ID Dropdown responsiveness issue for WP VR Elementor Widget
- Fix: Icons of deleted scenes showing up
7.2.3 (09-02-2021)
- Tweak: Removed Export tab alert
- Fix: PHP warnings on the activation
7.2.2 (21-12-2020)
- Tweak: Removed dummy functions
- Fix: Browser JS conflict
7.2.1 (17-12-2020)
- New: Warning message added for video tours
- Fix: VR audio JS error
- Fix: Tab and accordion issue
- Tweak: Modified rollback options
7.2.0 (09-12-2020)
- Update: Checked compatibility with WordPress 5.6
- Fix: VR audio conflict
7.1.0 (19-11-2020)
- Tweak: Modified Black Friday banner
7.0.0 (19-11-2020)
- New: Added Black Friday banner
6.9.0 (16-11-2020)
- New: Accordion support for Elementor
- Fix: Iframe conflict
- Fix: Control button overlap issue
6.8.0 (22-10-2020)
- New: Display Scene Gallery by default
6.7.0 (18-09-2020)
- Tweak: Modified Import/Export
- Tweak: Added switch for Mobile Media Resizer
- Fix: Conflict with OceanWP Theme
6.6.0 (09-09-2020)
- Tweak: Modified Scene Gallery preview
- Tweak: Modified Mobile Media Resizer
- Fix: Video tab bug
- Fix: Error handled for allow open URL
6.5.0 (31-08-2020)
- Update: Updated Appsero version
- Fix: Empty needle warning
6.4.0 (19-08-2020)
- Fix: Media Resizer fixed
6.3.0 (14-08-2020)
- Update: Checked compatibility with WordPress 5.5
- New: Mobile Media Resizer option added
- Fix: Google Street View responsive issue
6.2.0 (07-08-2020)
- New: Oxygen Builder Element support added
- New: Multi-site support added
- New: Dynamic Front-end Notice option added
6.1.0 (31-7-2020)
- Fix: Style issue for On-click content
6.0.0 (28-7-2020)
- Fix: Safari browser issues
- Fix: JS error for optimization
5.9.0 (27-7-2020)
- Fix: Export/Import SSL error
- Fix: JS errors
5.8.0 (25-7-2020)
- New: Submit restriction to control gyro for SSL
- New: Add-on compatibility added
- New: Mobile notice added
- Tweak: License input type changed to password
- Fix: On-click content container responsive issue
5.7.0 (20-7-2020)
- Update: User Interface updated
- New: Rollback feature added
- Tweak: Gallery image size changed to thumbnail
- Tweak: Gallery Scene IDs replaced with Scene Titles
- Fix: Youtube 360 video autoplay issue
- Fix: Company logo style issue
- Fix: Saving draft issue
5.6.0 (15-06-2020)
- New: Tour Background Music support added
5.5.0 (12-05-2020)
- Tweak: Self-hosted videos pause on closing window
- Fix: Custom control button conflict
- Fix: On-click content container issue
5.4.0 (27-04-2020)
- Fix: Device Orientation control issue
5.3.0 (16-04-2020)
- New: Keyboard zoom control added
- Tweak: Style modified for Company Logo
5.2.0 (02-04-2020)
- New: Author URL field added
5.1.0 (26-03-2020)
- New: Auto device based gyro option added
- New: Home button added for returning to the default scene
- New: Scene title field added for Scene Gallery
- Tweak: Script & Style files control modified
- New: High-resolution image upload option added
- Fix: Gyroscope conflict with default controls
- Fix: Input type error
- Fix: Gyroscope support issue for custom controls
- Update: Library updated
- Fix: Default icon issue on android smartphones
- New: Option to Control plugin scripts and styles to load them on specific pages only
- Fix: Draggable error fix
- New: Added option to enable/disable Draggable feature
- Tweak: Settings titles capitalized
- New: Added option to enable/disable Keyboard Controls
- Fix: Font-Awesome conflict
- New: Autoplay and Loop options added for 360 degree videos
- New: Mouse scroll support added
- New: Option to control User Roles for the plugin
- Fix: Gallery toggle issue
- Tweak: Loading box design changed
- New: Partial Panorama support
- Update: JS optimization removed
- Fix: Front-end errors
- Tweak: JS & CSS loading optimized
- Tweak: Optimized the backend preview loading
- Google street view embed
- Custom control feature
- WordPress 5.3 bug fix
- WordPress.com hosting support fixed
- Rotation fix on default scene face
- Rotation fix on hotspots to target scene face
- Plugin library update
- Autorotation error fix
- Ziparchive class error fix
- Gallery carousel design fix
- CSS and js restricted
- Gallery carousal fix
- Repeater delete confirmation fix.
- Placeholder change.
- Custom scene gallery conflict and a bug fix for iPhone and iPad.
- Custom scene gallery.
- Border radius tag added.
- Modified preview window.
- File import & export system added.
- Full width tag added.
- Placeholder color changed.
- Tour selector updated on VR block.
- Dynamic error reporting added.
- Post memory limit fix.
- Duplicate tour.
- Blink animation automated.
- Language issue fixed.
- Gyroscope support on the premium version.
- Appsero error fix.
- Gutenberg block column layout fix.
- Font-awesome icon load fix.
- Plugin conflict fix.
- Rextheme link removed from premium version.
- Elementor widget support for free.
- Mozilla Firefox bug fix.
- CDN load fix.
- Block input dropdown added.
- Hotspot based scene face added.
- Scene title and author tag support.
- Elementor widget support.
- Dynamic Font-Awesome icon added for hotspots.
- Dynamic color picker added for hotspot color.
- Custom panorama compass support.
- Default zoom level.
- Maximum and minimum zoom range.
- Customize each scene’s default face on load.
- Scene grab control and custom boundary for each scene.
- Save draft fixed.
- Error handling fixed.
- Video support added.
- Slider revolution conflict fix.
- Auto rotation
- Rotation pause and stop control
- Gutenberg block support
- Default scenes can be selected from the scene tab.
- Default height and width are given for shortcodes.
- Hotspot custom icon support.
- On screen control available.
- Version 8.4.8
- Last updated 4 days ago
- Active installations 10,000+
- WordPress version 5.0 or higher
- Tested up to 6.5.4
- PHP version 7.0.0 or higher
English (US) , German , German (Austria) , and German (Switzerland) .
Translate into your language
- Tags 360 panorama panorama panorama viewer real estate tour Virtual Tour
- Advanced View
Contributors
Issues resolved in last two months:
View support forum
Would you like to support the advancement of this plugin?
Donate to this plugin
In Spring 2018 Google launched their VR Tour Creator. This free tools lets anyone create their own virtual tour that can be viewed on a computer, tablet, or phone web browser, or using Google Cardboard. When creating a tour, one has the option on utilizing any of the street-view images on Google Maps, or uploading their own images using a 360° camera or iOS apps like "Google Street View" or "Google Cardboard". Creator also allows you to add points of interest as well as audio to your tour locations.

View my first use of Tour Creator using only Google Maps images.
Google Tour Creator has the ability to have a huge impact in teaching and learning. Teachers can create tours that allow students to get a stronger sense of "Setting" when reading a novel or learning about a historical event. Students can create tours showing what they have learned about a place. Google Tour Creator also has templates available so that users do not have to necessarily start from scratch.
Some of the educational uses of this tool may include:
- Virtual Setting Tour of a Novel- Imagine creating a tour following Chris McCandless in "Into the Wild"
- Paul Revere's Ride
- Travels of Marco Polo
- Tour of Paris, Rome, New York City, etc.
- Our Solar System (template)
Watch some of these videos that will show you not only how to create tours, but how they can be used in a classroom.
Interactive 3D Virtual Tour Specialists
- 3D Virtual Tours for Businesses
- 3D Virtual Tours for Real Estate
- 3D Virtual Tour Add-Ons
- Custom Virtual Tours
- Drone Photography & Video
- Google Street View Photography
- Digital Twins for Insurance Documentation
- Virtual Staging of 3D Virtual Tours
- Facebook 360 Photography
- 360° Video Tour
- Retirement Villages
- Event Centres
- Retail Shops
- Hotels & Accommodation
- Cafes, Bars, Restaurants (Hospitality)
- Healthcare Centres, Dentists & Medical Industry
- Childcare & Early Learning Centres
- Schools & Universities
- Mechanics, Vehicle & Automotive
- Yachts, Boats & Marine
- RVs & Motorhomes
- Hibiscus Coast Virtual Tour
- See All Examples
- 0800 867 843
How To Embed Your 360° Google Street View Tour On Your Website
This tutorial post covers how to embed your Google Street View tour of inside your business onto your own website.
Firstly, here is what the final embedded tour looks like:
There are four simple steps, as explained in detail below, but here is the short version:.
- Go to Google Maps and locate your business, click on one of the 360° photos to go into the tour.
- Navigate to the view you want to embed in the tour.
- Click the three dots up the top left > ‘Share or embed image’ and select the 2nd tab ‘Embed image’
- Copy the generated HTML code, and paste this on to your website where you want to embed the tour.
Easy. Below is more detail with screenshots on each step, and I have also recorded a video of the process for you to watch.

Next you generate the embed code. Once you have your view up the top left is a information box, click on the three dots to open a drop down menu. Select ‘Share or embed image’.

Copy and paste the HTML code onto your website. In this example I am using WordPress as my website content management system (CMS). There are lots of different systems out there for updating websites. You want to find the page you want to add the 360° tour to, and you want to find a way of updating or adding HTML code. Then you simply paste the code in and save or preview your changes.
Video showing the process:
- Português – Brasil
- All developers actively developing experiences for Google Cardboard should use the open source Cardboard SDKs for iOS , Android NDK , and Unity XR Plugin .
- The Daydream View VR headset is no longer available for purchase as of October 15, 2019. As of November 2023, previously supported devices will no longer be able to download and install Google VR Serivces (Android application ID com.google.vr.vrcore ) for new users.
360° Media
360° media, consisting of 360° videos and images, is a great way for developers to enhance traditional apps with immersive content. You can embed a 360° video into a travel app to provide viewers with an Underwater scuba diving tour as they plan a vacation, or into a home-building app that takes prospective buyers on a virtual walkthrough of their home before it’s built.
Although 360° media supports true stereoscopic VR playback through compatibility with VR platforms like Google Cardboard, it can also be displayed in a simple “magic window” that can be viewed from desktop browsers and mobile apps without any special VR hardware.
Common formats
You can create 360° media in either mono or stereo format. Images and video generally need to be stored in the equirectangular-panoramic (equirect-pano) format, which is a common format supported by many capture solutions.
360° images
360° images can be stored as png, jpeg, or gif. We recommend you use jpeg for improved compression.
For maximum compatibility and performance, image dimensions should be powers of two (e.g., 2048 or 4096).
Mono images should be 2:1 aspect ratio (e.g. 4096 x 2048).
Stereo images should be 1:1 aspect ratio (e.g. 4096 x 4096).
360° videos
360° videos should be stored as mp4s encoded with h264.
Mono videos should be 2:1 aspect ratio.
Stereo videos should be 1:1 aspect ratio.
Some older devices cannot decode video larger than 1080p (1920x1080). If maximum compatibility and quality is a priority, we recommend that developers provide both a monoscopic 1920x1080 video and a stereo video at 2048x2048 or higher.
How to embed your media
For Android and Web developers, VR View allows you to embed 360° media into websites on desktop and mobile and native apps on Android.
- VR View on Android
- VR View on the Web
For iOS developers, the GVRkit library (provided as part of the Google VR SDK for iOS) provides similar functionality and includes samples demonstrating its usage.
- Panorama demonstrates how to embed 360° images.
- VideoWidgetDemo demonstrates how to embed 360° video.
Media capture
Here are some basic guidelines for how to capture and host 360° media.
Real world capture
There are multiple options for taking 360° photos and videos that support the equirect-pano format described above. These options include:
Cardboard Camera App : This app for Android allows users to quickly capture 360° images. To use these images with VR View, download the image, and then use our conversion tool to create a stereo 360° image that meets Cardboard's image specifications.
Ricoh Theta : A very popular, relatively inexpensive solution for capturing mono 360° images and videos.
Imagery for 360° media isn’t limited to captures from the real world. CGI software can generate 360° images and videos for everything from architectural walkthroughs to movie previews. Some of the most popular capture solutions are listed below:
360 Panorama Capture for Unity : A free, easy-to-use 360° capture plugin for Unity.
Unreal : Stero panoramic capture in Unreal.
(Unsupported) Domemaster3D : A free solution for capturing mono and stereo 360° images from Maya / Autodesk 3ds Max.
Renderman : Open-source library for capturing 360° content.
Rendering Omnidirectional Stereo Content : A whitepaper for anyone interested in writing their own 360° capture solutions.
You can host 360° videos on YouTube . The advantages of hosting on YouTube are:
- Ease of use
- Large built-in audience
- High-quality hosting infrastructure
Alternatively, you can host the media on your own web server via HTTP/HTTPS.
All rights reserved. Java is a registered trademark of Oracle and/or its affiliates.
Last updated 2022-01-06 UTC.

- Real Estate
- Photographers
- Dealerships
Support Topics
- Live Video Chat
- Subscriptions
- My360 Portals
General faq's
- How does it work?
- Step by step guide
- How to embed
- How to share
- Adding a Pop-Up
- Adding floating hotspots
- Adding a floorplan
- White Label configurarion
- Using the Video Chat
- Becoming a reseller
- Use a Smartphone
- Example tours
- How to sign up
- What are your prices ?
- Where is my invoice ?
- What's included ?
- Additional charges
- Multiple offices or clients
- Does Google pay for vt's?
- Switch to Hosting Only
- Earn Free Credits
- Buy a 360º Camera
- Buy My360 VR Kit
- Buy Insta360 ONE X
- Buy Ricoh Theta
- Buy Trisio360
- Camera FAQ's
The company
- About My360
- Our history
- My360 Partners
- My360 Photographers
- My360 Real Estate
- Privacy policy
- How to embed a virtual tour
- My360 Knowledgebase

- 1. 1. Click on"iframe" in the tab"virtual tours"
- 2. 2. Copy the embed code
- 3. 3. Go to your website (or send the code to your webmaster) and paste it into your page
1. Click on”iframe” in the tab”virtual tours”
- Navigate to the Virtual Tours Tab and click on “iframe”

2. Copy the embed code

3. Go to your website (or send the code to your webmaster) and paste it into your page
- For wordpress, make sure you paste it in the “text” version of your site:
- Sometimes a theme already has a place to put the tour, you can then paste the code there:
Related articles
- How can I share my virtual tours?
- Can I remove the destination label from my tours?
- Where do I sign up?
- How to make my tours white label? (Advanced White Label)
Ready to start creating your own virtual tours?
Virtual tour software.
My360 is the leading Virtual Tour Software Provider Online.
The software allows you to create your own virtual tours quick, easy & affordable.
This virtual tour software can be used with any 360º camera and is so easy to use, anyone can do it!
- Real Estate Agents
- Schools & Universities
- Interior Designers
- Start Free Trial
- How Does it Work?
- What Camera is Best?
- Subscription Prices
- Hosting Only Accounts
- Documentation
The Company
- Our History
- Privacy Policy
Subscribe to our newsletter
Stay up to date about our software updates and exclusive discounts!
We send out 1 email per month (max) so don’t worry, we won’t spam you!

Houston 360 Photography
Google trusted, commercial virtual tours, welcome to the world of 360 virtual tour photography.
At Houston360Photo we believe that your business deserves the best online presence. That’s why we offer 360 photography virtual tours that bring your products and services to life. With our interactive tours, customers can get a better feel for your business without ever having to leave their homes.
We understand that every business is unique and has its own needs, so we offer custom tours that are tailored to fit your specific needs. Our experienced team of photographers will work with you to capture the perfect images and create a tour that highlights your business in the best possible way.
Houston360Photo virtual tours are optimized for both desktop and mobile, ensuring that all potential customers have the best experience possible. Get in touch today to learn more about our 360 photography virtual tours and see how 360 helps your business succeed.
Why choose Houston 360 Photo ?
Certified and trusted by Google ensures every business receives the same exceptional quality virtual tour regardless of the size of the business.
Google Optimized
Houston360Photo has produced hundreds of virtual tours with nearly 100 million views on Google.
Google Hosted
Your virtual tour resides on Google for no additional cost. Being hosted by Google gives your business more visibility across all of Google.
Share Your Tour
The virtual tour html code and share links are included with every tour. Share your virtual tour on your website and social media pages.
Still Photos Included
Point of Interest still photos are provided for every tour. The photos are yours to use on your Google business profile, social media pages and website.
No Hidden Costs
Google virtual tours by Houston360Photo are yours to keep. There are no hidden costs or annual subscriptions.
Service & Support
Houston360Photo provides outstanding service and support before, during and after the photoshoot.
Custom Add-Ons
Houston360Photo tours are compatible with custom add-ons such navigation menus, video hotspots, info callouts. Custom add-ons are available by quote.
See What Others are saying about Houston360Photo…
“ gorgeous commercial 360 photography with heaps of customer service”.
Houston360Photo never compromises. From showrooms to chocolate shops, dental clinics to hospitals, every business receives the same professional 360 virtual tour photography with the same attention to detail and customer service. Your 360 panoramas will look amazing!
What’s Included with Your Google Virtual Tour by Houston360Photo?
- Gorgeous 360 panoramas of your business for Google Maps, Search, Website & Social Media
- Beautiful Point of Interest Still Photos
- Expertly Produced Google Street View 360 Virtual Tour by a Certified and Trusted Google Photographer
- Iframe html embed code for your website
- Copies of all 360 panoramas to share on Facebook
- Service & Support Before, During and After the Photoshoot
Houston 360 Virtual Tours | Delivery & Support
360 photo shoots are scheduled at a time that’s convenient for the business when it’s least disruptive to operations. When the photo session is complete the images are stitched and edited into high resolution 360 panoramas to Google’s specifications. The panoramas are then added to the virtual tour project to be carefully moderated and quality checked before uploading to Google’s servers. From shoot to publishing you will see your 360 virtual tour online in about 10 days or maybe sooner. I will keep you updated during every step of the process. Included with the virtual tour is the iframe embed code and social share link to use on your website and Facebook pages. I am happy to answer questions about iframe html code and will make it super easy for your web developer to embed the virtual tour in your company’s website. Your Google Business Profile is your most visible and valuable online asset. It’s important to protect it. Visit your Google Business Profile to verify your business has the correct ownership credentials, street address and map pin location. I am happy to answer questions about your business profile. Call 713-622-5620 or email me here .
Embedding Your Virtual Tours and Snaps in other websites
Find out the 4 simple reasons why you NEVER want to embed with iFrames, what happens next will SHOCK you!
Okay, I can’t think of 4 reasons, but hey, I can see a Buzzfeed writing career in my future! If you’ve not already deleted this email, you’ll be pleased to know that SeekBeak just got a big update to the way that we manage to embed. Now, when you get the embedding code from your Snap, you’ll see it uses a small, clever piece of JavaScript, instead of just an iFrame. This has many benefits, and solves an infrequent, but major issue that certain people were experiencing with mobile browser crashes:
When you embed an iFrame on a page, it’s basically a ‘dumb’ container that just loads whatever page it’s pointing to. This is fine in a lot of cases, but it falls apart when you want to have many iFrames. i.e. in a gallery situation.
Loading a bunch of iFrames simultaneously can cause your main web page to load terribly slowly, and more often than not, will crash mobile phone browsers because of their low amounts of memory.
So, how do we fix it?
Self Aware Scripting
Using ‘smart’ scripting to manage the embeds, instead of an iFrame, allows each embed to be aware of other embeds on the page, and only load a couple at once. If the user clicks and activates more than the maximum allowed, one of the other embeds turns off, saving memory and CPU cycles. Great!
But wait, there’s more!
Responsive by Default
Your Snaps will resize automatically to fit depending on the size of the screen. By default, they’re displayed at a 16:9 ratio for that HD feel. But only If you want them to, you can always go into the…
Advanced Settings
For those who like to tinker, you can also combine custom aspect ratios, fixed sizes, maximum sizes in pixels or percentages… and all with a handy visualizer!
Thumbnails and Animations
Using the new embedder, your viewers will be able to… dig… to the new animated thumbnail images, and activate your Snaps with a simple click or touch.
I can’t use Scripts!
Fair enough, some people don’t like running random JavaScript from other sites on their page. If your web host doesn’t support running <script> tags, don’t worry, you can still use the old iFrame code, (just without thumbnails or the automatic shutoff). The iFrame code is located in a separate tab in the Sharing dialog.
The good news is that even though it’s old, we realize that old things need love too. The iFrame area also received an update, letting you customize it to your whim.
As this is the first release of our fancy script, there may be some issues we’ve not found yet. If you encounter something that doesn’t seem right, please let us know! This is all available right now for everyone to play with, for free. It’s in the same location as always, in the “Sharing” icon at the bottom of the Snap Editor and Viewer.
Till next time!
Tim Allan Founder/CEO SeekBeak.com

One Reply on Embedding Your Virtual Tours and Snaps in other websites

This is a great article on how to embed your SeekBeak virtual tours and snaps in other websites. This is a great way to share your tours and snaps with others and promote your business. SeekBeak is a great platform for creating virtual tours, 360 photos, and interactive images!
Leave a reply Cancel reply
You may use these HTML tags and attributes: <a href="" title=""> <abbr title=""> <acronym title=""> <b> <blockquote cite=""> <cite> <code> <del datetime=""> <em> <i> <q cite=""> <s> <strike> <strong>
Save my name, email, and website in this browser for the next time I comment.

Checkbot: SEO, Web Speed & Security Tester 🚀
927 ratings
Test SEO/speed/security of 100s of pages in a click! Check broken links, HTML/JavaScript/CSS, URL redirects, duplicate titles...
Checkbot is a powerful website testing tool that tells you how to improve the SEO, page speed and security of your website. Checkbot crawls 100s of pages at the same time checking for 50+ common website problems based on web best practices recommended by Google and Mozilla. These checks include: 📊 SEO TESTS: Broken link checker, missing or long page titles/descriptions/headings, duplicate page content, HTML/CSS/JavaScript validator, canonical URLs, image ALT tags, robots.txt, URL naming, mobile friendly pages, deprecated web features, 404 pages, meta tags, temporary/meta redirects, thin pages & sitemap setup. 🚀 PAGE SPEED TESTS: Minification, network compression, resource caching, render blocking or duplicate CSS/JavaScript, excessive inlining of CSS/JavaScript, redirecting URLs & redirect chains. 🔒 WEB SECURITY TESTS: Security headers, HTTPS and mixed content checker, HSTS with preloading, content sniffing, iframe restrictions & password forms security. See https://www.checkbot.io/guide/ for the 50+ web best practices Checkbot will test for you to help make your site faster, more secure and rank higher in search results. ★ REVIEWS ★ 🏆 HubSpot, Best Chrome Extensions 2021 - "Checkbot combines technical SEO with modern security to help you analyze both how safe and how optimized a website is for search engines" https://blog.hubspot.com/marketing/best-chrome-extensions 🏆 Enleaf, Andy Drinkwater: "I honestly believe every SEO should have this in their SEO toolbox" https://enleaf.com/blog/free-seo-tools/ 🏆 Einstein Marketer, "11 Must-Have Google Chrome Extensions (for Marketers, Entrepreneurs and Businesses)...If you own a website, this Chrome extension is going to help you supercharge your load speed, rank higher in Google and improve the security" https://www.einsteinmarketer.com/chrome-extensions-marketers/ 🏆 Product Hunt, #3 Product of the Day award https://www.producthunt.com/posts/checkbot-for-chrome ★ PAID FEATURES ★ The free version lets you check unlimited small websites as often as you want but you need to upgrade to run website audits with these features: - Check localhost sites - PDF audit reports - Export crawl results to CSV - Advanced crawl settings to exclude pages by URL pattern, type, folder and subdomain - Crawling websites behind HTTP Auth passwords See https://www.checkbot.io/#pricing for more. ★ SOCIAL ★ Follow Checkbot for updates: https://twitter.com/GetCheckbot https://facebook.com/GetCheckbot https://www.checkbot.io/newsletter/ ★ SUPPORT ★ Visit https://www.checkbot.io/faq/ for support, answers to frequently asked questions and to give feedback. ★ PERMISSIONS ★ Checkbot will ask for the "Read and change all your data..." permission for the sole purpose of crawling and testing the websites you ask Checkbot to check. This is currently the most restrictive permission we can ask for that allows this and Google has also reviewed this extension to check it follows best practices on requesting permissions. Your regular browsing will be unaffected: Checkbot does not observe or modify anything outside of the Checkbot tab. If you still have concerns, you can opt to create a new Chrome user profile to install Checkbot inside of to isolate it from your regular browsing.
4.9 out of 5 927 ratings Google doesn't verify reviews. Learn more about results and reviews.

360 Virtual Tour Solutions May 7, 2024
One of the best tools out there!!! Thank you to the development team.

Kickstarter May 2, 2024
Super Tool!

Polybush Apr 18, 2024
A great tool, very impressed so far.
- Version 2.0.11
- Updated January 31, 2024
- Features Offers in-app purchases
- Report a concern
- Size 1.67MiB
- Languages English
- Developer www.seanw.org 19 Bryson Road Edinburgh EH11 1ED GB Website Email [email protected]
- Trader This developer has identified itself as a trader per the definition from the European Union.
Checkbot: SEO, Web Speed & Security Tester 🚀 has disclosed the following information regarding the collection and usage of your data. More detailed information can be found in the developer's privacy policy .
Checkbot: SEO, Web Speed & Security Tester 🚀 handles the following:
This developer declares that your data is.
- Not being sold to third parties, outside of the approved use cases
- Not being used or transferred for purposes that are unrelated to the item's core functionality
- Not being used or transferred to determine creditworthiness or for lending purposes

Website SEO Checker: Free Audit & Analysis
Get free on-page SEO report with the best website SEO checker. Use SEO analysis to do audit for the most valuable pages at first.

SEO Checker Tool - Get Free SEO Audit
Analyze your on-page SEO in one click, get customized suggestions and improve your rankings. Use our SEO Checker Tool, it's free!

Site SEO Analysis
Analyze a website's SEO with Site SEO Analysis summaries and detailed SEO reports.

WP Hive | A Better WordPress Plugin Repo
Show plugin report in WordPress.ORG

SEO Search Simulator by Nightwatch
Simulate search engine queries from any location on Google and easily check and track your website or your competitor's rankings.

SEO META in 1 CLICK
Displays all meta data and main SEO information for the best SEO

SEO Analysis & Website Review by WooRank
Instant SEO analysis and website reviews for SEO, mobile, usability and social media. The freshest data when and where you want it.

Web Developer Checklist
Analyses any web page for violations of best practices

SEO Minion helps you in your daily SEO tasks such as On-Page SEO analysis, Broken Link Checking, SERP Preview and more

Serpstat Website SEO Checker
Instantly check your website's SEO, analyze competitors and get advantage of powerful search analytics in one place.

Link Research SEO Toolbar
Enjoy looking at the most advanced SEO metrics while you search the Web.

Essential SEO Toolkit (SEO Analysis Tool)
The Essential SEO Toolkit is a collection of useful SEO tools, which when clicked opens the tool using the current URL.
- Español – América Latina
- Português – Brasil
- Tiếng Việt
- Web Platform
Full control with the VirtualKeyboard API

Browser Support
Devices like tablets or cellphones typically have a virtual keyboard for typing text. Unlike a physical keyboard that is always present and always the same, a virtual keyboard appears and disappears, dependent on the user's actions, to which it can also adapt dynamically, for example, based on the inputmode attribute.
This flexibility comes at the price that the browser's layout engine has to be informed of the virtual keyboard's presence and potentially needs to adjust the layout of the document to compensate. For example, an input field the user is about to type into might be obscured by the virtual keyboard, so the browser has to scroll it into view.
Traditionally, browsers have dealt with this challenge on their own, but more complex applications may require more control over the browser's behavior. Examples include multi-screen mobile devices where the traditional approach would result in "wasted" screen real estate if the virtual keyboard is displayed on just one screen segment, but where the available viewport is shrunk on both screens nonetheless. The image below shows how the VirtualKeyboard API could be used to optimize the layout of the document dynamically to compensate for the virtual keyboard's presence.

Situations like this is where the VirtualKeyboard API comes in. It consists of three parts:
- The VirtualKeyboard interface on the navigator object for programmatic access to the virtual keyboard from JavaScript.
- A set of CSS environment variables that provide information about the virtual keyboard's appearance.
- A virtual keyboard policy that determines if the virtual keyboard should be shown.
Current status
The VirtualKeyboard API is available from Chromium 94 on desktop and mobile.
Feature detection and browser support
To detect if the VirtualKeyboard API is supported in the current browser, use the following snippet:
Using the VirtualKeyboard API
The VirtualKeyboard API adds a new interface VirtualKeyboard to the navigator object.
Opting in to the new virtual keyboard behavior
To tell the browser that you are taking care of virtual keyboard occlusions yourself, you need to first opt in to the new virtual keyboard behavior by setting the boolean property overlaysContent to true .
Showing and hiding the virtual keyboard
You can programmatically show the virtual keyboard by calling its show() method. For this to work, the focused element needs to be a form control (such as a textarea element), or be an editing host (for example, by using the contenteditable attribute). The method always returns undefined but triggers a geometrychange event if the virtual keyboard previously was not shown.
To hide the virtual keyboard, call the hide() method. The method always returns undefined but triggers a geometrychange event if the virtual keyboard previously was shown.
Getting the current geometry
You can get the current geometry of the virtual keyboard by looking at the boundingRect property. It exposes the current dimensions of the virtual keyboard as a DOMRect object. The inset corresponds to the top, right, bottom, and/or left properties.
Being informed of geometry changes
Whenever the virtual keyboard appears or disappears, the geometrychange event is dispatched. The event's target property contains the virtualKeyboard object which (as discussed above) contains the new geometry of the virtual keyboard inset as a DOMRect .
The CSS environment variables
The VirtualKeyboard API exposes a set of CSS environment variables that provide information about the virtual keyboard's appearance. They are modeled similar to the inset CSS property, that is, corresponding to the top, right, bottom, and/or left properties.
- keyboard-inset-top
- keyboard-inset-right
- keyboard-inset-bottom
- keyboard-inset-left
- keyboard-inset-width
- keyboard-inset-height
The virtual keyboard insets are six environment variables that define a rectangle by its top, right, bottom, and left insets from the edge of the viewport. The width and height insets are calculated from the other insets for developer ergonomics. The default value of each keyboard inset is 0px if a fallback value is not provided.
You would typically use the environment variables as in the example below:
The virtual keyboard policy
Sometimes the virtual keyboard should not appear when an editable element is focused. An example is a spreadsheet application where the user can tap a cell for its value to be included in a formula of another cell. The virtualkeyboardpolicy is an attribute whose keywords are the strings auto and manual . When specified on an element that is a contenteditable host, auto causes the corresponding editable element to automatically show the virtual keyboard when it is focused or tapped, and manual decouples focus and tap on the editable element from changes in the virtual keyboard's current state.
You can see the VirtualKeyboard API in action in a demo on Glitch. Be sure to explore the source code to see how it is implemented. While geometrychange events can be observed in the iframe embed, the actual virtual keyboard behavior requires opening the demo in its own browser tab .
Useful links
- Specification
- ChromeStatus entry
- Chromium bug
- W3C TAG review
- Mozilla standards position request
- WebKit standards position request
Acknowledgements
The VirtualKeyboard API was specified by Anupam Snigdha from Microsoft, with contributions from former editor Grisha Lyukshin, likewise from Microsoft. Hero image by @freestocks on Unsplash .
Except as otherwise noted, the content of this page is licensed under the Creative Commons Attribution 4.0 License , and code samples are licensed under the Apache 2.0 License . For details, see the Google Developers Site Policies . Java is a registered trademark of Oracle and/or its affiliates.
Last updated 2021-09-09 UTC.
Omar Apollo Plots North American ‘God Said No’ Tour, With Stops at the Hollywood Bowl and Forest Hills Stadium
By Thania Garcia
Thania Garcia
- Howard University Retracts Sean ‘Diddy’ Combs’ Honorary Degree 3 days ago
- Ariana Grande’s Catwoman Stalks Mayor Penn Badgley in ‘The Boy Is Mine’ Video 3 days ago
- Luke Combs’ New Album ‘Fathers & Sons’ to Arrive Next Week 4 days ago

After making multiple appearances at international festivals and headlining shows, Omar Apollo is coming home for a North American tour in support of his upcoming album, “God Said No.”
The Grammy-nominated singer will perform in amphitheaters across the country including two dates in Los Angeles at the Hollywood Bowl and the Greek Theatre. He’s also set to appear at the Red Rocks and Forest Hills Stadium, starting with a launch date of Aug. 20 in his home state of Indiana. Apollo will be supported by Kevin Abstract, Malcolm Todd and and Rayvn Lenae.
Popular on Variety
Related stories, pixar key to hdr cinema expansion, taraji p henson returns to host the bet awards (tv news roundup).
The album title is said to be Apollo’s interpretation of “ lo que sera, sera ” which translates to “whatever will be, will be” or “it is what it is.” In a press release, the album is described as embodying “Omar’s tongue-in-cheek humorous outlook on the suffering that comes from surrendering and accepting whatever is thrown at you by life, a relationship or lover.”
Tickets for the tour will be available starting with Citi and AMEX presales beginning June 11. An artist presale will begin June 12, starting at 10am local time. Additional pre-sales will run throughout the week ahead of the general on-sale on June 14.
Tour Dates
8/20 – Indianapolis, IN @ Everwise Amphitheater at White River State Park
8/21 – Sterling Heights, MI @ Michigan Lottery Amphitheatre
8/23 – Chicago, IL @ Huntington Bank Pavilion at Northerly Island
8/25 – Philadelphia, PA @ Skyline Stage at The Mann
9/3 – Columbia, MD @ Merriweather Post Pavilion
9/4 – Toronto, ON @ Pavilion at Budweiser Stage
9/6 – Boston, MA @ Leader Bank Pavilion
9/7 – Forest Hills, NY @ Forest Hills Stadium
9/10 – Cincinnati, OH @ The ICON Festival Stage at Smale Park
9/11 – Raleigh, NC @ Red Hat Amphitheater
9/13 – Charlotte, NC @ Skyla Credit Union Amphitheatre
9/16 – Miami, FL @ FPL Solar Amphitheater at Bayfront Park
9/17 – Orlando, FL @ Orlando Amphitheater
9/19 – Houston, TX @ The Lawn at White Oak Music Hall
9/21 – Austin, TX @ Moody Amphitheater at Waterloo Park
9/22 – Irving (Dallas), TX @ The Pavilion at Toyota Music Factory
9/24 – Bentonville, AR @ The Momentary *
9/26 – Morrison, CO @ Red Rocks Amphitheatre
9/29 – Vancouver, BC @ Doug Mitchell Thunderbird Sports Centre
10/1 – Seattle, WA @ WAMU Theater
10/2 – Troutdale, OR @ McMenamins Edgefield *
10/4 – Berkeley, CA @ The Greek Theatre *
10/5 – Los Angeles, CA @ Hollywood Bowl
10/8 – Santa Barbara, CA @ Santa Barbara Bowl *
10/10 – Mesa, AZ @ Mesa Amphitheatre
10/11 – San Diego, CA @ The Rady Shell at Jacobs Park
* Non-Live Nation Date
More from Variety
Nbc taps big advertisers to support ‘snl’ 50th season, price chart for leading subscription video streaming services: updated with new max prices, nbc drama ‘hunting party’ adds ‘la brea’ alum josh mckenzie to cast (exclusive), seth meyers renews ‘late night’ hosting deal through 2028, how generative ai has entered concept art creation — and why it’s a slippery slope, ed scanlon remembered: nbc’s ‘fixer’ exerted influence behind the scenes for decades, more from our brands, charli xcx drops expanded ‘brat’ album with 3 new songs, this 285-foot explorer yacht is the star of james cameron’s new docu-series, a bad week for pro leagues’ modern embrace of sports betting, the best loofahs and body scrubbers, according to dermatologists, michael mosley, british tv presenter, dead at 67 — had been missing for days, verify it's you, please log in.
IMAGES
VIDEO
COMMENTS
Step 1: Go to Google Maps. Go to Google Maps and search for the business listing with the virtual tour you wish to embed. Please note: Y ou can only retrieve the embed code from Google Maps. You will not find a code available if you navigate to your listing from Google Search.
Open Google Maps on your desktop computer. Search for your business or location in Google Maps. Select the virtual tour from the image gallery. Navigate through the tour and choose the view you wish to share. Click on the three dots in the upper left-hand corner of the page to open the menu. Click on "Share or embed image". Click on ...
Step 1: Search for a location on the Google Maps page on your preferred browser. Step 2: Enter Street View mode, and click on the settings icon, which is located in the bottom right-hand corner. Step 3: There is an option to embed images, as well as the necessary code to be applied. Step 4: Take the code and apply it to your site onto the ...
A quick tutorial on how to get your iframe/HTML code from your Google Virtual Tour.
The virtual tour should already be available on the Google My Business page. You will see it underneath the Photos tab. Within the Photos carousel, you should see an option to view "Street View & 360" photos. This subcategory contains 360 degree photos including your virtual tour. Find your virtual tour, and then select the bullet icon in ...
Open your internet browser and navigate to www.maps.google.com; Search for your business and click on the virtual tour. Navigate through the tour and choose the view you wish to share. Click the 3 vertical dots in the top left hand corner of the screen, next to the business name, and choose the "Share Embed Image" option.
This tutorial shows you how to embed Google virtual tour on your Facebook business page. -----23e2 Digital Marketing2220 Midland Avenue, Unit 118, Toronto, ...
This is part one on how to embed a Google virtual tour into your webpage. This tutorial will show you how to position your virtual tour, and extract the IFra...
1) Images appear directly on Google Search Results. 2) Searchable on Google Maps and Google+ Local. 3) Prominently featured on your Google+ page. 4) Easy to embed on your website. 5) Link to share on social network, blogs, emails, and more! Here are the easy steps to embed the tour on your website.
Navigate to your Google virtual tour's preferred start point. 6. Click on the 'menu' button found on the top left hand corner of the screen and click on 'share or embed image'. 7. Click on 'embed a map' and customize your iframe dimension/size and copy. 8. Paste code in the Page Source and save. 9. Go to 'Tab Settings' and customize your 'tab ...
Step 2: Enter Your Tour and Find The Best Spot. Click one of the 360° photo action buttons on the business listing on the left panel (outlined in red in the picture) or use the yellow stickman on the lower right and then select one of the blue dots to enter your virtual tour. Next, navigate the tour to find a perfect starting position photo ...
Adding your virtual tour to your website (using an iFrame) Once your virtual tour is ready, we'll send you a short line of HTML code which you can use to add to any website to display your virtual tour. It will look like this: Just change the WIDTH and HEIGHT values to the dimensions you'd like your virtual tour to display on your site. You ...
1. Open Editor and add your tour by clicking "+" to add a new section. 2. Click Embed > Custom embeds > Embed a widget. How to Embed Virtual Tour on Website Step by Step 23. 3. Open Panoee > Click the share button on Panoee Studio and copy the Iframe link from Embedded Code.
Step 4. Once you have found your Google virtual tour, click the settings sprocket icon to access the menu. Select Share or embed image. Click on Embed image and copy the iframe code in the dialog box that appears. Select the largest size in the embed menu or adjust the iframe width & height as needed.
Create your Real EstateVirtual Tours with Panoee. Get Started. It's FREE. 651 NBroad St, Suite 201, Middletown, New Castle, Delaware. +84 96-561-5905. Using iFrame is one of the most popular and easiest way to "publish" the Virtual Tour in your website. The embeded Virtual Tour works like any Youtube video.
What is Google Virtual Tour Overlay? It's a tour that has a layer of data (menus, hotspots) over Google Street View images, and you need a Google Map Javascript API key. As a Note the Overlay data is not available directly on Google Street View, but only via unique URL that can be shared directly or embed on a website via an iframe tag.
Use multiple 360° panorama images to create a complete virtual tour of any house or location in a virtual tour to create Scenes covering different rooms, corners, or spots. Connect these Panorama Scenes. Use Scene-type Hotspots so all the 360 degree images join together. Show information in the virtual tours using info hotspots and hit publish!
Google Tour Creator. In Spring 2018 Google launched their VR Tour Creator. This free tools lets anyone create their own virtual tour that can be viewed on a computer, tablet, or phone web browser, or using Google Cardboard. When creating a tour, one has the option on utilizing any of the street-view images on Google Maps, or uploading their own ...
Go to Google Maps and locate your business, click on one of the 360° photos to go into the tour. Navigate to the view you want to embed in the tour. Click the three dots up the top left > 'Share or embed image' and select the 2nd tab 'Embed image'. Copy the generated HTML code, and paste this on to your website where you want to embed ...
For Android and Web developers, VR View allows you to embed 360° media into websites on desktop and mobile and native apps on Android. For iOS developers, the GVRkit library (provided as part of the Google VR SDK for iOS) provides similar functionality and includes samples demonstrating its usage. Panorama demonstrates how to embed 360° images.
1. Click on"iframe" in the tab"virtual tours". Navigate to the Virtual Tours Tab and click on "iframe". 2. Copy the embed code. 3. Go to your website (or send the code to your webmaster) and paste it into your page. For wordpress, make sure you paste it in the "text" version of your site:
Call 713-622-5620 or email me here. Gorgeous Houston 360 photography virtual tours for your business. Commercial Quality, Google trusted. Boost audience engagement and your SEO.
This is all available right now for everyone to play with, for free. It's in the same location as always, in the "Sharing" icon at the bottom of the Snap Editor and Viewer. Till next time! Tim Allan. Founder/CEO. SeekBeak.com. Add a 2D map or floor-plan to your 360 image or virtual tour.
Checkbot is a powerful website testing tool that tells you how to improve the SEO, page speed and security of your website. Checkbot crawls 100s of pages at the same time checking for 50+ common website problems based on web best practices recommended by Google and Mozilla.
The CSS environment variables. The VirtualKeyboard API exposes a set of CSS environment variables that provide information about the virtual keyboard's appearance. They are modeled similar to the inset CSS property, that is, corresponding to the top, right, bottom, and/or left properties. keyboard-inset-top.
10/5 - Los Angeles, CA @ Hollywood Bowl. 10/8 - Santa Barbara, CA @ Santa Barbara Bowl *. 10/10 - Mesa, AZ @ Mesa Amphitheatre. 10/11 - San Diego, CA @ The Rady Shell at Jacobs Park. * Non ...