Understanding Snowflake Time Travel: A Comprehensive Guide

Snowflake Time Travel is a cloud-based data warehousing feature that allows users to query, clone, and restore historical data in tables, schemas, and databases. It's a valuable tool for auditing and analytical purposes, and can be used for data recovery, auditing changes, tracking data modifications, and analyzing data usage.

What is Snowflake Time Travel?
Snowflake Time Travel is a feature that allows users to analyze historical data, restore deleted objects, and clone objects. It takes a snapshot of the data's state before every update to a table, and this snapshot is available for a specified number of days, known as the data retention period. This feature is automatically enabled with a standard 1-day retention period, but users can specify a longer period when creating or altering a database.
CREATE OR REPLACE DATABASE my_database DATA_RETENTION_TIME_IN_DAYS = 30;
This SQL query creates a database with a 30-day retention period. Users can also change the retention period for an object using the following parameters: AT | BEFORE clause, DATA_RETENTION_TIME_IN_DAYS object parameter, and MIN_DATA_RETENTION_TIME_IN_DAYS account parameter.
How does Snowflake Time Travel work?
Snowflake Time Travel works by taking snapshots of data before any changes are made. These snapshots are stored for a specified retention period, allowing users to query, clone, or restore data to its previous state. The retention period can be set in hours, days, or indefinitely, depending on the account type and configuration.
- Data Recovery: Users can restore data-related objects that were accidentally deleted or modified. This is done using commands like UNDROP TABLE and UNDROP SCHEMA .
- Auditing Changes: Time Travel allows users to track changes made to the data over time, which is useful for auditing and compliance purposes.
- Data Analysis: Historical data can be queried to analyze trends and patterns, providing valuable insights for decision-making.
What are the key features of Snowflake Time Travel?
Snowflake Time Travel offers several key features that make it a powerful tool for data management and analysis. These features include the ability to restore deleted objects, clone objects, and analyze historical data. Additionally, Time Travel is included with all Snowflake accounts, although extended retention periods require Snowflake Enterprise Edition.
- Restore Deleted Objects: Users can restore tables, schemas, and databases to their most recent state before deletion using commands like UNDROP TABLE and UNDROP SCHEMA .
- Clone Objects: Time Travel allows users to create clones of complete tables, schemas, and databases as they existed at or before certain dates.
- Analyze Historical Data: Users can query past data to analyze usage patterns, track changes, and gain insights into data trends.
How to Use Snowflake Time Travel: A Step-by-Step Guide
Enable time travel.
Time Travel is automatically enabled with a standard 1-day retention period. However, users can specify a longer retention period when creating or altering a database.
This command creates a database with a 30-day retention period.
Restore Deleted Objects
To restore deleted objects, users can use the following commands:
UNDROP TABLE my_table; UNDROP SCHEMA my_schema;
These commands restore the table or schema to its most recent state before the DROP command was issued.
Query Historical Data
Users can query historical data using the AT or BEFORE clause to specify the point in time they want to query.
SELECT * FROM my_table AT (TIMESTAMP => '2023-01-01T00:00:00');
This query retrieves the state of the table as it existed at the specified timestamp.
Clone Objects
Users can create clones of tables, schemas, and databases as they existed at a specific point in time.
CREATE CLONE my_table_clone OF my_table AT (TIMESTAMP => '2023-01-01T00:00:00');
This command creates a clone of the table as it existed at the specified timestamp.
How Does Secoda Integrate with Snowflake?
Secoda is a modern data management platform that simplifies data integration and enhances data governance and collaboration. When integrated with Snowflake, Secoda can significantly boost the efficiency and effectiveness of data teams. The integration combines Snowflake's robust data warehousing capabilities with Secoda's advanced data management features, creating a powerful solution for data teams.
- Centralized Data Management: Secoda consolidates data cataloging, lineage, governance, and monitoring into a single platform. When integrated with Snowflake, it provides a centralized view of all data assets, making it easier to manage and use data effectively.
- No-Code Integrations: Secoda offers no-code integrations with various data sources and tools, including Snowflake. This reduces the need for extensive technical expertise and allows data teams to quickly set up and manage data pipelines.
- AI-Powered Search: Secoda's AI-powered search capabilities enable users to quickly find and understand data across the organization. When combined with Snowflake's data storage and processing power, it enhances the ability to retrieve and analyze data efficiently.
- Enhanced Collaboration: Features like real-time multiplayer editing, async commenting, and integration with communication tools like Slack improve collaboration among data teams. This ensures that everyone has access to the same data and can work together seamlessly.
- Data Lineage and Quality: Secoda provides automated lineage tracking and data quality tests, helping maintain data integrity and providing insights into data usage and dependencies. This is particularly useful when dealing with large datasets stored in Snowflake.
Why Should Data Teams Focus on Data Integration?
Data integration is a critical process for data teams, and understanding its importance and the tools available, such as Snowflake and Secoda, can significantly enhance their efficiency and effectiveness. Here are some reasons why data teams should prioritize data integration:
- Enhanced Decision-Making: By integrating data from various sources, organizations can create a unified view that provides comprehensive insights, enabling better and faster decision-making.
- Improved Data Quality and Accuracy: Data integration helps in identifying and rectifying inconsistencies and errors, ensuring that the data used for analysis is accurate and reliable.
- Increased Efficiency: Automating data integration processes reduces the time and effort required to gather and prepare data, allowing data teams to focus on analysis and strategic tasks.
- Better Collaboration: Integrated data systems facilitate better collaboration across departments by providing a single source of truth that everyone can access and use.
- Cost Savings: By reducing manual data handling and improving data accuracy, data integration can lead to significant cost savings and increased productivity.
Common Challenges and Solutions
While using Snowflake Time Travel, users may encounter some common challenges. Here are a few solutions:
- If the retention period is too short, consider upgrading to Snowflake Enterprise Edition for extended Time Travel up to 90 days.
- Ensure that the data_retention_time_in_days field is set correctly to avoid unintentional data loss.
- Be aware of the additional storage costs associated with Time Travel and Fail-safe features.
Recap of Snowflake Time Travel
Snowflake Time Travel is a powerful feature for data recovery, auditing, and analysis. It allows users to restore deleted objects, clone objects, and query historical data. Here are the key takeaways:
- Time Travel is automatically enabled with a 1-day retention period but can be extended up to 90 days with Snowflake Enterprise Edition.
- Users can restore deleted objects and query historical data using specific commands and clauses.
- Be mindful of the additional storage costs and ensure proper configuration to make the most of Snowflake Time Travel.

Keep reading

Unity Catalog Value Levers
Explore the five main value levers of Unity Catalog: mitigating data risks, ensuring compliance, accelerating innovation, reducing complexity and cost, and enabling data collaboration.

Common challenges in data quality management
Explore common challenges in data quality management, their impacts, and solutions to overcome them, including human error, duplicate data, and outdated data.
Set up and manage Unity Catalog
Learn how to set up and manage Unity Catalog for efficient data management in Azure Databricks. Discover the benefits, prerequisites, and additional resources available.
Get started in minutes
Built for data teams, designed for everyone so you can get more from your data stack.
Get the newsletter for the latest updates, events, and best practices from modern data teams.
© 2024 Secoda, Inc. All rights reserved. By using this website, you accept our Terms of Use and Privacy Policy .

Use Kanaries Cloud for free as students and educators
Snowflake Time Travel: Clearly Explained
Published on 7/24/2023
In the realm of cloud computing and big data analytics , Snowflake has emerged as a leading data warehouse solution. Its architecture, designed for the cloud, provides a flexible, scalable, and easy-to-use platform for managing and analyzing data. One of the standout features of Snowflake is Time Travel . This feature is not just a novelty; it's a powerful tool that can significantly enhance your data management capabilities.
Snowflake Time Travel is a feature that allows you to access historical data within a specified time frame. This means you can query data as it existed at any point in the past, making it an invaluable tool for data retention and data governance . Whether you're auditing data changes, complying with data regulations, or recovering from a data disaster, Time Travel has you covered.
Want to quickly visualize your snowflake data? Use RATH (opens in a new tab) to easily turn your Snowflake database into interactive visualizations! RATH is an AI-powered, automated data analysis and data visualization tool that is supported by a passionate Open Source community. check out RATH GitHub (opens in a new tab) for more. Here is how you can visualize Snowflake data in RATH:
Learn more about how to visualize Snowflake Data in RATH Docs .

Understanding Snowflake Time Travel
Snowflake Time Travel is a feature that allows you to "travel back in time" to view and operate on historical data. This is achieved by retaining all changes made to the data in your Snowflake database for a specified period, known as the Time Travel retention period . This period can be set anywhere from 1 to 90 days, depending on your needs and the edition of Snowflake you're using.
The way Time Travel works is simple yet ingenious. Whenever a change is made to a table in Snowflake, instead of overwriting the existing data, Snowflake keeps a copy of the old data. This allows you to query the table as it was at any point within the retention period, effectively giving you a time machine for your data.
The role of Snowflake Time Travel extends beyond just viewing historical data. It plays a crucial role in data retention and data governance . With Time Travel, you can easily comply with data regulations that require you to keep a history of data changes. It also allows you to recover data that was accidentally deleted or modified, making it an essential tool for disaster recovery.
Benefits of Using Snowflake Time Travel
The benefits of using Snowflake Time Travel are manifold. First and foremost, it provides a robust solution for data auditing . By keeping a history of all data changes, you can easily track who changed what and when. This is invaluable in industries where data integrity and traceability are paramount, such as finance and healthcare.
Time Travel also plays a crucial role in data compliance . Many data regulations require businesses to retain a history of data changes for a certain period. With Time Travel, complying with these regulations becomes a breeze. You can easily demonstrate to auditors that you have a full history of data changes at your fingertips.
Another key benefit of Time Travel is in disaster recovery . Accidental data deletion or modification can be disastrous, especially if the data is critical for your business. With Time Travel, you can quickly restore the data to its previous state, minimizing downtime and data loss.
To illustrate the power of Time Travel, consider a scenario where a critical table in your database is accidentally dropped. Without Time Travel, recovering this table would require a restore from backup, which could take hours or even days, depending on the size of the table and the speed of your backup system. With Time Travel, you can simply query the table as it
existed just before it was dropped, and then recreate it with a single command. This can be done in minutes, regardless of the size of the table.
How to Enable and Use Snowflake Time Travel
Enabling Time Travel in Snowflake is straightforward. When you create a table, you can specify the Time Travel retention period by setting the DATA_RETENTION_TIME_IN_DAYS parameter. For example, the following command creates a table with a Time Travel retention period of 14 days:
Once Time Travel is enabled, you can query historical data using the AT or BEFORE keywords in your SQL queries. For example, the following query retrieves the state of my_table as it was 1 hour ago:
Restoring deleted data is just as easy. If you accidentally drop my_table , you can restore it using the UNDROP TABLE command:
This will restore my_table to its state just before it was dropped, effectively undoing the DROP TABLE command.
In conclusion, Snowflake Time Travel is a powerful feature that can greatly enhance your data management capabilities. Whether you're auditing data changes, complying with data regulations, or recovering from a data disaster, Time Travel has you covered. So why not take it for a spin and see how it can benefit your business?
Best Practices and Limitations of Snowflake Time Travel
While Snowflake Time Travel is a powerful tool, it's essential to understand its best practices and limitations to use it effectively.
One best practice is to set an appropriate Time Travel retention period for each table. The retention period should be long enough to allow for data recovery in case of accidental deletion, but not so long that it unnecessarily increases storage costs.
Another best practice is to use Time Travel in conjunction with a robust data backup strategy. While Time Travel can recover data within the retention period, it's not a substitute for regular backups, especially for data that needs to be retained for a long time.
As for limitations, one key limitation of Time Travel is that it can't recover data beyond the retention period. Once the retention period has passed, the historical data is permanently deleted. Therefore, it's crucial to ensure that your retention period is adequate for your needs.
Another limitation is that Time Travel can increase storage costs, as it requires keeping multiple versions of your data. However, Snowflake uses advanced compression techniques to minimize the storage impact.
Snowflake Time Travel for Data Compliance and Disaster Recovery
Snowflake Time Travel can play a crucial role in data compliance and disaster recovery. For data compliance, Time Travel allows you to keep a history of data changes, which is often required by data regulations. You can easily demonstrate to auditors that you have a full history of data changes, helping you comply with regulations and avoid penalties.
For disaster recovery, Time Travel can be a lifesaver. If critical data is accidentally deleted or modified, you can quickly restore it to its previous state using Time Travel. This can significantly reduce downtime and data loss, helping your business recover quickly from data disasters.
In conclusion, Snowflake Time Travel is a powerful tool that can significantly enhance your data management capabilities. It allows you to access historical data, comply with data regulations, recover from data disasters, and more. However, it's essential to understand its best practices and limitations to use it effectively.
We encourage you to explore Snowflake Time Travel further. Check out tutorials and documentation to learn more about this powerful feature and how it can benefit your business.
1. What is Snowflake Time Travel?
Snowflake Time Travel is a feature that allows you to access historical data within a specified time frame. This means you can query data as it existed at any point in the past.
2. How does Snowflake Time Travel work?
Whenever a change is made to a table in Snowflake, instead of overwriting the existing data, Snowflake keeps a copy of the old data. This allows you to query the table as it was at any point within the Time Travel retention period.
3. What are the benefits of using Snowflake Time Travel?
The benefits of using Snowflake Time Travel include data auditing, data compliance, and disaster recovery. It allows you to track data changes, comply with data regulations, and recover data that was accidentally deleted or modified.

How to do time travel in Snowflake
Are you looking to find what is the time travel in the snowflake cloud data warehouse or maybe you are looking for a solution to the scenario where you can use the snowflake, how you can use the snowflake. You may also want to learn what is the cost of time travel in the Snowflake or maybe what is fail-safe in the snowflake. In this article, I will take you through a step-by-step process of enabling time travel, querying the tables based on time travel. After going through this article you will be able to understand and operate fully around the time travel in snowflake. I will also share my expertise and experience as well about time travel. Let’s don’t waste the time and I will take you quickly to the code directly where I will show you how you can use time travel.
- 1 What is the time travel in the Snowflake?
- 2 How to get the history data at a specific time using time travel in Snowflake?
- 3 How to get the history data that exist at a specific time using offset in time travel in Snowflake?
- 4 How to get the history data existing before a specified query or transaction using time travel in Snowflake?
- 5 How to get the history data as of seconds ago using the time travel in Snowflake?
- 6 How to get the history data as of minutes ago using the time travel in Snowflake?
- 7 How to get the history data as of hours ago using the time travel in Snowflake?
- 8 How to check the data retention time in days in Snowflake
- 9 How to check the data retention time in days for the database in Snowflake
- 10 How to check the data retention time in days for SCHEMA in Snowflake
- 11 How to check the data retention time in days for TABLE in Snowflake
- 12 How to set/Alter the data retention time for the table in Snowflake
- 13 How to show all the dropped or delete Databases in the Snowflake?
- 14 How to show all the dropped or delete Schemas in the Snowflake?
- 15 How to show all the dropped or delete Tables in the Snowflake?
- 16 How to retrieve the deleted databases in the Snowflake?
- 17 How to retrieve the deleted schema in the Snowflake?
- 18 How to retrieve the deleted table in the Snowflake?
- 19 Final Thoughts
What is the time travel in the Snowflake?
Time Travel is one of the most important functionalities provided by the snowflake cloud data warehouse. As a part of this functionality, you can access the historical data, the data which has been changed over time that can also be accessed up to a certain limit. Time travel would help in recovering the data which has been deleted accidentally or intentionally.
There has been a defined retention period. Once the retention period gets over, that data can’t be accessed by Snowflake users. It will automatically move into the Snowflake Fail-safe.
The retention period is configurable and can be ranged from 1-90 days .
How to get the history data at a specific time using time travel in Snowflake?
Using the time travel feature of the Snowflake, we can select and retrieve the data from the table, present at the specified time in the table. For example, table data is changing continuously and you wanted to get back the data available at a specific previous date-time (like at 1 AM, at 2 PM, etc.).
For this purpose we can use AT clause along with select query as follows:

How to get the history data that exist at a specific time using offset in time travel in Snowflake?
Using the time travel feature of the Snowflake, we can select and retrieve the data from the table, present before the specified time in the table. For example, table data is changing continuously and you wanted to get back the data available before a specific date time (like 2 days ago, 2 hours ago, etc.).
For this purpose, we can use AT clause with the OFFSET Parameter along with the select query. In the offset, you can pass the offset in terms of the seconds. For example, if you want to get the data 1 hour ago, you can provide the offset value is 60.
OFFSET value needs to be provided in SECONDS only.
How to get the history data existing before a specified query or transaction using time travel in Snowflake?
Using the time travel feature of the Snowflake, we can select and retrieve the data from the table, present before the specified query or transaction is executed. This may be very useful in multiple cases. For example, you have accidentally deleted the data, now for every query execution, you get the query id. If you to see what was the data there before this delete query you can pass the query id.
For this purpose, we can use the BEFORE clause with QUERYID Parameter along with the select query. In the query id, you can pass the query id.
How to get the history data as of seconds ago using the time travel in Snowflake?
Using the time travel feature of the Snowflake, we can select and retrieve the data from the table, present before the specified number of seconds ago in the table. For example, table data is changing continuously and you wanted to get back the data available before a few seconds ago then use the following snippet.
How to get the history data as of minutes ago using the time travel in Snowflake?
Using the time travel feature of the Snowflake, we can select and retrieve the data from the table, present before the specified number of minutes ago in the table. For example table data is changing continuously and you wanted to get back the data available before few minutes ago then use the following snippet.
How to get the history data as of hours ago using the time travel in Snowflake?
Using the time travel feature of the Snowflake, we can select and retrieve the data from the table, present before the specified number of hours ago in the table. For example, table data is changing continuously and you wanted to get back the data available before a few hours ago then use the following snippet.
How to check the data retention time in days in Snowflake
Data retention time can be set at various level. For example at topmost data retention time is set at the Account level. You can also set the retention time at Database, SCHEMA and table level as well.
How to check the data retention time in days for the database in Snowflake
Data retention time can be set at various levels. For example, data retention time can be set at the database level. You can also check the retention time at Database level as follows:
How to check the data retention time in days for SCHEMA in Snowflake
Data retention time can be set at various levels. For example, data retention time can be set at the SCHEMA level. You can also check the retention time at SCHEMA level as follows:
How to check the data retention time in days for TABLE in Snowflake
Data retention time can be set at various levels. For example, data retention time can be set at the table level. You can also check the retention time at TABLE level as follows:
How to set/Alter the data retention time for the table in Snowflake
Snowflake data retention time can be set for the table at the time of table creation. You can also change or alter the data retention time for the specific table using the following SQL.
How to show all the dropped or delete Databases in the Snowflake?
Using the history command along with the show command will show all the dropped databases. However, only the databases which are still in the retention period will be shown. Once the retention time is over it won’t be displayed using the SHOW command.
How to show all the dropped or delete Schemas in the Snowflake?
Using the history command along with the show command will show all the dropped schemas. However, only the schemas which are still in the retention period will be shown. Once the retention time is over it won’t be displayed using the SHOW command.
How to show all the dropped or delete Tables in the Snowflake?
Using the history command along with the show command will show all the dropped tables. However, only the tables which are still in the retention period will be shown. Once the retention time is over it won’t be displayed using the SHOW command.
How to retrieve the deleted databases in the Snowflake?
If by mistake a database got deleted or dropped then you might want it to restore or undrop again. In the snowflake it is possible to restore the deleted database only if it is still under the DATA RETENTION period.
SQL to restore the database as follows:
How to retrieve the deleted schema in the Snowflake?
If by mistake a schema got deleted or dropped then you might want it to restore or undrop again. In the snowflake it is possible to restore the deleted schema only if it is still under the DATA RETENTION period.
SQL to restore the schema as follows:
How to retrieve the deleted table in the Snowflake?
If by mistake a table got deleted or dropped then you might want it to restore or undrop again. In the snowflake it is possible to restore the deleted table only if it is still under the DATA RETENTION period.
SQL to restore the table as follows:
Snowflake official Documentation Link
Final Thoughts
By this, we have reached to end of this insightful article about the Snowflake time traveling. In this post, we have learned what is time travel, how to use time travel in Snowflake. I have also taught you, how to set the retention time in Snowflake at multiple levels like account, database, schema, and table. Besides this, I have also shared the tips to use the retention time effectively within Snowflake as per my long experience in the Snowflake cloud data warehouse.
Please share your comments and suggestions in the comment section below and I will try to answer all your queries as time permits.
- For Azure Study material Join Telegram group : Telegram group link :
- Azure Jobs and other updates Follow me on LinkedIn: Azure Updates on LinkedIn
- Azure Tutorial Videos: Videos Link

Deepak Goyal is certified Azure Cloud Solution Architect. He is having around decade and half experience in designing, developing and managing enterprise cloud solutions. He is also Big data certified professional and passionate cloud advocate.
Snowflake Time Travel
By: koen verbeeck.
Snowflake works with immutable cloud storage as the storage layer for the data. This means it doesn’t change a file, it rather creates a new version of the file. This way of working opens new and exciting possibilities and one of them is time travel.
Introduction to Time Travel
Imagine that every time you make a change to a table, a new version of the table is created. Each time you run an INSERT, UPDATE or DELETE (or any other DML statement), a new version of the table is stored alongside all previous versions of the table. This would mean you could read previous versions of the data in your table. Time travel in Snowflake is exactly that.
You can compare it with temporal tables in SQL Server . In fact, you’ll see the syntax to query with time travel is fairly the same as in SQL Server. The biggest difference however is SQL Server stores all the versions indefinitely, while Snowflake only maintains the different versions of your table for a specific period in time. Depending on your edition, this is either one day or up to 90 days. After those 90 days, the versions are lost. Well, actually they are kept for 7 more days, but only Snowflake support can access those. An overview:

To query the current version of your table, you use the standard SQL you’ve been using all along. To query the previous versions, you need specific syntax, which we’ll cover in the next paragraph. The fail-safe cannot be queried. By default, time travel is enabled on every table. You can however shorten the data retention period or you can turn it completely off for a table. Those tables are called transient tables . Good candidates for transient tables are staging tables or tables which are truncated and re-loaded every day. Keep in mind storing all of those different versions of your table actually consumes storage for which you have to pay.
Currently, Snowflake doesn’t have a back-up mechanism. It relies on the underlying cloud to make sure the data is safe and replicated. However, if you do something wrong, like accidentally deleting some data, you can use time travel to fetch the data before you made the change.
Querying Time Travel Data
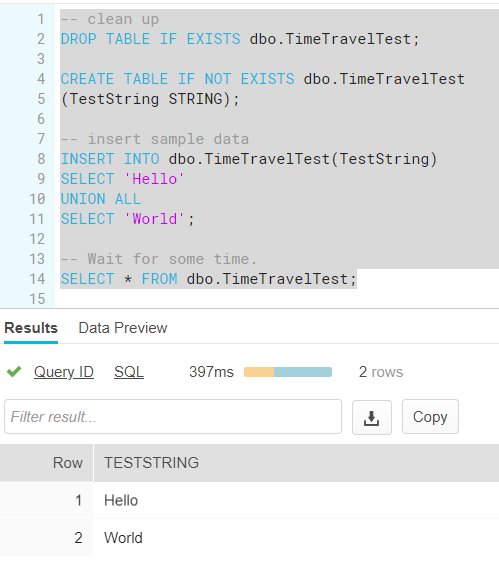
Let us first create a new table:
With some sample data:
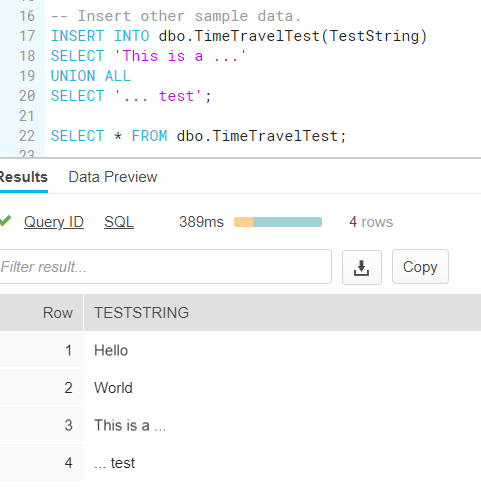
Wait for a couple of minutes, then insert some extra sample data:
We now have 4 rows in the table, and 3 versions (1 with no rows, 1 with 2 rows and 1 with 4 rows).

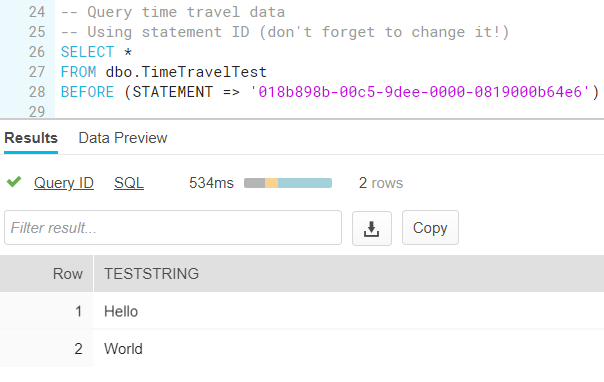
Using the query history, we can fetch the query ID of our last INSERT statement.

Using the BEFORE clause, we can fetch the version of the table before our last INSERT:
This returns two rows:

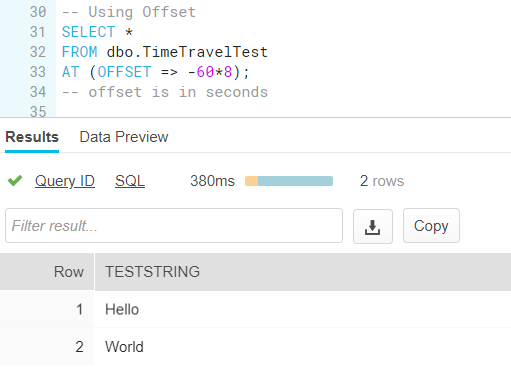
Using the OFFSET clause, we can go back a specific period in time.
In the example here, we retrieved the version of the table before any row was inserted.

If you go too far back in time, you’ll get an error because the table didn’t exist yet.

If you truncate a table, time travel still works. If you drop a table however, you cannot query the data anymore. You can restore the table though using the UNDROP command. Once the table is restored, time travel works again.
Additional Information
- You can also query time travel data for a specific time stamp.
- Introduction to SQL Server Temporal Tables
- Options to Retrieve SQL Server Temporal Table and History Data
- SQL Server 2016 T-SQL Syntax to Query Temporal Table
- More temporal table tips .
Next >>
Comments for this article.

Cool Stuff in Snowflake – Part 8: Time Travel
I’m doing a little series on some of the nice features/capabilities in Snowflake (the cloud data warehouse). In each part, I’ll highlight something that I think it’s interesting enough to share. It might be some SQL function that I’d really like to be in SQL Server, it might be something else.
This blog post is one of the more awesome features in Snowflake: Time Travel.

Time travel in Snowflake is similar to temporal tables in SQL Server : it allows you to query the history rows of a table. If you delete or update some rows, you can retrieve the status of the table at the point in time before you executed that statement. The biggest difference is that time travel is applied by default on all tables in Snowflake, while in SQL Server you have to enable it for each table specifically. Another difference is Snowflake only keeps history for 1 day, configurable up to 90 days. In SQL Server, history is kept forever unless you specify a retention policy.
How does time travel work? Snowflake is built for the cloud and its storage is designed for working with immutable blobs. You can imagine that for every statement you execute on a table, a copy of the file is made. This means you have multiple copies of your table, for different points in time. Retrieving time travel data is then quite easy: the system has only to search for the specific file that was valid for that point in time. Let’s take a look at how it works.
First I create a sample table and insert some sample data:
Next, we insert some other data as well:
We can now retrieve the status of the table before we executed this last statement. There are three options:
- you specify a specific point-in-time
- you specify an offset, for example 5 minutes ago
- you specify a query ID. Time travel will return the data before the specified query was executed.
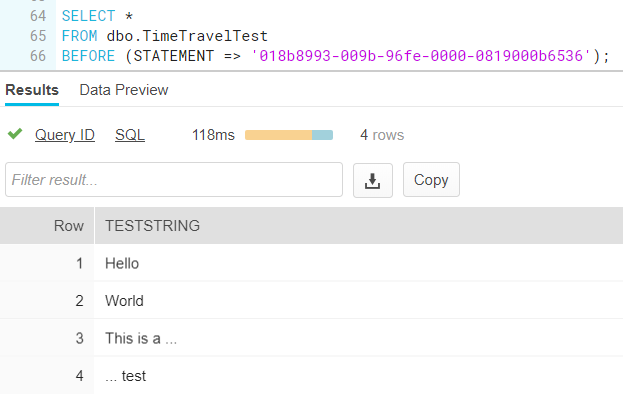
Let’s try the last option (you can read more about finding the query ID in the blog post Cool Stuff in Snowflake – Part 6: Query History ):
We can also use an offset, which is measured in seconds. In the example below we go 8 minutes back in time:
Does it also work with TRUNCATE TABLE? Why yes, it does:

And what about dropping the table? Let’s first insert some sample data again (because we truncated the table, remember?) and then try it out.
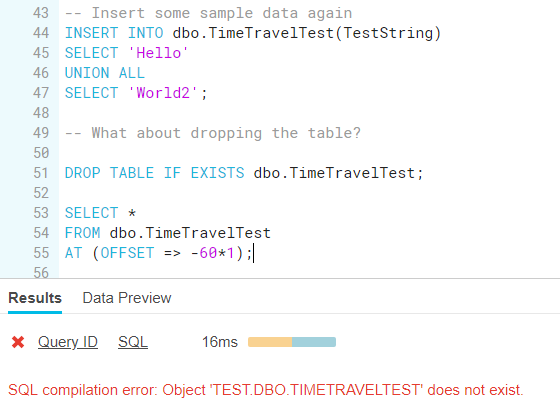
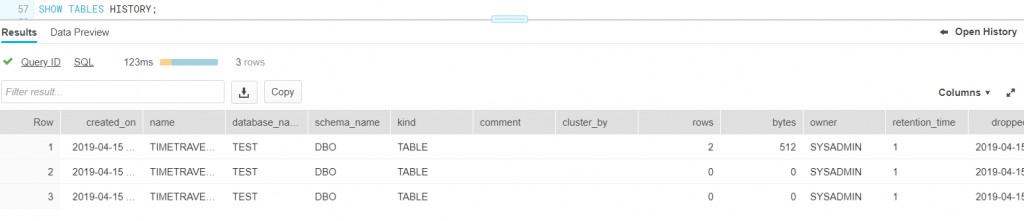
That doesn’t sound too good. Luckily we can use another time travel feature: UNDROP TABLE. This statement is important, not only because it’s your best friend when you accidentally dropped a table (or other objects like a schema or a database), but also because Snowflake doesn’t have back-ups like you know them in SQL Server. If something goes wrong, you have to correct it using time travel features. You can find info about all tables and if they are dropped with the statement SHOW TABLES HISTORY:
Now we can restore the table:
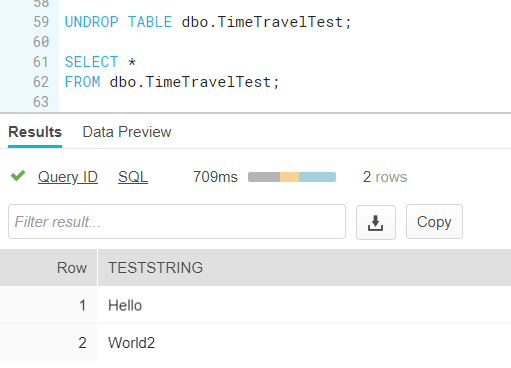
Once the table is restored, time travel works again:
Pretty nifty, right? You can read more about time travel in the documentation .
Koen Verbeeck
Koen Verbeeck is a Microsoft Business Intelligence consultant at AE, helping clients to get insight in their data. Koen has a comprehensive knowledge of the SQL Server BI stack, with a particular love for Integration Services. He's also a speaker at various conferences.
2 thoughts to “Cool Stuff in Snowflake – Part 8: Time Travel”
The one thing it won’t do that would be really nice would be to give you something like a type-2 slowly changing dimension for the last 24 hours.
Hey Andrew, can’t you just self join the table to an 24 hours earlier version of it and write out all changed rows to an SCD2 table?
Leave a Reply Cancel reply
Your email address will not be published. Required fields are marked *
Notify me of followup comments via e-mail. You can also subscribe without commenting. (No notifications? Check your spam filter)
This site uses Akismet to reduce spam. Learn how your comment data is processed .
- Today's news
- Reviews and deals
- Climate change
- 2024 election
- Fall allergies
- Health news
- Mental health
- Sexual health
- Family health
- So mini ways
- Unapologetically
- Buying guides
Entertainment
- How to Watch
- My Portfolio
- Latest News
- Stock Market
- Biden Economy
- Stocks: Most Actives
- Stocks: Gainers
- Stocks: Losers
- Trending Tickers
- World Indices
- US Treasury Bonds
- Top Mutual Funds
- Highest Open Interest
- Highest Implied Volatility
- Stock Comparison
- Advanced Charts
- Currency Converter
- Basic Materials
- Communication Services
- Consumer Cyclical
- Consumer Defensive
- Financial Services
- Industrials
- Real Estate
- Mutual Funds
- Credit Cards
- Balance Transfer Cards
- Cash-back Cards
- Rewards Cards
- Travel Cards
- Student Loans
- Personal Loans
- Car Insurance
- Mortgage Calculator
- Morning Brief
- Market Domination
- Market Domination Overtime
- Asking for a Trend
- Opening Bid
- Stocks in Translation
- Lead This Way
- Good Buy or Goodbye?
- Fantasy football
- Pro Pick 'Em
- College Pick 'Em
- Fantasy baseball
- Fantasy hockey
- Fantasy basketball
- Download the app
- Daily fantasy
- Scores and schedules
- GameChannel
- World Baseball Classic
- Premier League
- CONCACAF League
- Champions League
- Motorsports
- Horse racing
- Newsletters
New on Yahoo
- Privacy Dashboard
Yahoo Finance
Snowflake is working to beef up security controls as firms probe breaches.
(Bloomberg) -- Snowflake Inc. is trying to get its clients to impose stronger security controls as companies including Advanced Auto Parts Inc. and Live Nation Entertainment Inc. investigate potential data breaches.
Most Read from Bloomberg
Putin Is Running Out of Time to Achieve Breakthrough in Ukraine
There’s Still a Way to Snag a 3% Mortgage Rate
Singapore Retail Tycoon’s Son Seeks $62 Million Mansion Sale
Here’s Everything Apple Plans to Show at Its AI-Focused WWDC Event
The Banks That Hold Most Money in Singapore Laundering Scandal
The cloud-based data analytics firm has said that hackers were targeting some of its customers’ accounts and had used either information-stealing malware or purchased credentials in an attempt to breach users that didn’t have multifactor authentication set up. In a Friday blog, the company said it’s developing a plan that would require customers to take advanced security measures such as establishing MFA, which requires someone to verify their identity in two or more ways.
The move comes a week after Ticketmaster owner Live Nation said it had discovered “unauthorized activity” within a third-party cloud database containing the company’s data and that someone was trying to sell alleged customer data on the dark web. The ticket seller’s database was hosted on Snowflake, a person familiar with the situation said, asking not to be identified because the information isn’t public.
A day later, the Australian government issued a warning of “increased cyber activity” involving Snowflake customers, saying it was aware of “successful compromises.” And on Friday, Advanced Auto Parts said that it was looking into reports that the company was involved in a “security incident related to Snowflake.” Axios previously reported on Advanced Auto Parts’ statement.
The company has said it wasn’t responsible for a breach of Live Nation’s data and that it was working with Google’s Mandiant cybersecurity unit and CrowdStrike Inc. as part of an investigation. When asked about Advance Auto Parts’ and the Australian government’s statements, the company referred back to the posts on its website.
In its blog, Snowflake said the company hadn’t identified evidence suggesting that the recent activity by hackers was caused by a vulnerability on Snowflake’s platform.
A cybercriminal was offering to sell a trove of data about 560 million Ticketmaster customers on the dark web, but Bloomberg News couldn’t immediately verify the accuracy of the data.
Information-stealing malware has existed in some form or another for more than a decade. Hackers use such tools to compromise and gather data such as credit card numbers, web-browser activity and bank account information. The demand for this malware is on the rise, with some criminals offering the tools through $250 monthly subscriptions, cyber firm Flashpoint Inc. said.
ShinyHunters has claimed to be the gang behind the sale of the alleged Ticketmaster data. It is among several cybercrime groups with a history of attacking large organizations. The gang, which emerged in 2020, has also claimed to steal data from Microsoft Corp., the news website Mashable and the clothing brand Bonobos in recent years.
--With assistance from Ashley Carman.
Most Read from Bloomberg Businessweek
Legacy Airlines Are Thriving With Ultracheap Fares, Crushing Budget Carriers
Sam Altman Was Bending the World to His Will Long Before OpenAI
David Sacks Tried the 2024 Alternatives. Now He’s All-In on Trump
Is There Room for Common Ground on Congestion Pricing?
Elon and Donald Seem to Have Made Up
©2024 Bloomberg L.P.
Recommended Stories
Snowflake stock is the cheapest it has ever been. time to buy.
Snowflake's stock is near all-time lows in both price and valuation.
Alibaba (BABA) Boosts Logistics Services With Alibaba Guaranteed
Alibaba (BABA) launches Alibaba Guaranteed to facilitate sourcing of products for global small and medium-sized enterprises, strengthening its logistics services.
Is Most-Watched Stock Snowflake Inc. (SNOW) Worth Betting on Now?
Snowflake (SNOW) has received quite a bit of attention from Zacks.com users lately. Therefore, it is wise to be aware of the facts that can impact the stock's prospects.
Why DocuSign Stock Dropped Today
It technically beat expectations, but it didn't give investors much to look forward to.
FCC wants change of US court hearing challenges to net neutrality rules
WASHINGTON (Reuters) -The Federal Communications Commission on Friday asked the U.S. 6th Circuit Court of Appeals in Cincinnati, Ohio to transfer a series of industry legal challenges to its decision to reinstate landmark net neutrality rules to a federal court in Washington. Net neutrality rules require internet service providers (ISPs) to treat internet data and users equally rather than restricting access, slowing speeds or blocking content for certain users. The rules also forbid special arrangements in which ISPs give improved network speeds or access to favored users.
22 Chinese nationals sentenced to long prison terms in Zambia for multinational cybercrimes
A Zambian court on Friday sentenced 22 Chinese nationals to long prison terms for cybercrimes that included internet fraud and online scams targeting Zambians and other people from Singapore, Peru and the United Arab Emirates. The Magistrates Court in the capital, Lusaka, sentenced them for terms ranging from seven to 11 years.
AI Boom Giving Taiwan Semiconductor Sales A Boost
Taiwan Semiconductor Manufacturing reported better-than-expected sales in May thanks to artificial intelligence chips and a recovery in PC demand.
Time Travel snowflake: The Ultimate Guide to Understand, Use & Get Started 101
By: Harsh Varshney | Published: January 13, 2022
Related Articles
To empower your business decisions with data, you need Real-Time High-Quality data from all of your data sources in a central repository. Traditional On-Premise Data Warehouse solutions have limited Scalability and Performance , and they require constant maintenance. Snowflake is a more Cost-Effective and Instantly Scalable solution with industry-leading Query Performance. It’s a one-stop-shop for Cloud Data Warehousing and Analytics, with full SQL support for Data Analysis and Transformations. One of the highlighting features of Snowflake is Snowflake Time Travel.
Table of Contents
Snowflake Time Travel allows you to access Historical Data (that is, data that has been updated or removed) at any point in time. It is an effective tool for doing the following tasks:
- Restoring Data-Related Objects (Tables, Schemas, and Databases) that may have been removed by accident or on purpose.
- Duplicating and Backing up Data from previous periods of time.
- Analyzing Data Manipulation and Consumption over a set period of time.
In this article, you will learn everything about Snowflake Time Travel along with the process which you might want to carry out while using it with simple SQL code to make the process run smoothly.
What is Snowflake?
Snowflake is the world’s first Cloud Data Warehouse solution, built on the customer’s preferred Cloud Provider’s infrastructure (AWS, Azure, or GCP) . Snowflake (SnowSQL) adheres to the ANSI Standard and includes typical Analytics and Windowing Capabilities. There are some differences in Snowflake’s syntax, but there are also some parallels.
Snowflake’s integrated development environment (IDE) is totally Web-based . Visit XXXXXXXX.us-east-1.snowflakecomputing.com. You’ll be sent to the primary Online GUI , which works as an IDE, where you can begin interacting with your Data Assets after logging in. Each query tab in the Snowflake interface is referred to as a “ Worksheet ” for simplicity. These “ Worksheets ,” like the tab history function, are automatically saved and can be viewed at any time.
Key Features of Snowflake
- Query Optimization: By using Clustering and Partitioning, Snowflake may optimize a query on its own. With Snowflake, Query Optimization isn’t something to be concerned about.
- Secure Data Sharing: Data can be exchanged securely from one account to another using Snowflake Database Tables, Views, and UDFs.
- Support for File Formats: JSON, Avro, ORC, Parquet, and XML are all Semi-Structured data formats that Snowflake can import. It has a VARIANT column type that lets you store Semi-Structured data.
- Caching: Snowflake has a caching strategy that allows the results of the same query to be quickly returned from the cache when the query is repeated. Snowflake uses permanent (during the session) query results to avoid regenerating the report when nothing has changed.
- SQL and Standard Support: Snowflake offers both standard and extended SQL support, as well as Advanced SQL features such as Merge, Lateral View, Statistical Functions, and many others.
- Fault Resistant: Snowflake provides exceptional fault-tolerant capabilities to recover the Snowflake object in the event of a failure (tables, views, database, schema, and so on).
To get further information check out the official website here .
What is Snowflake Time Travel Feature?

Snowflake Time Travel is an interesting tool that allows you to access data from any point in the past. For example, if you have an Employee table, and you inadvertently delete it, you can utilize Time Travel to go back 5 minutes and retrieve the data. Snowflake Time Travel allows you to Access Historical Data (that is, data that has been updated or removed) at any point in time. It is an effective tool for doing the following tasks:
- Query Data that has been changed or deleted in the past.
- Make clones of complete Tables, Schemas, and Databases at or before certain dates.
- Tables, Schemas, and Databases that have been deleted should be restored.
As the ability of businesses to collect data explodes, data teams have a crucial role to play in fueling data-driven decisions. Yet, they struggle to consolidate the data scattered across sources into their warehouse to build a single source of truth. Broken pipelines, data quality issues, bugs and errors, and lack of control and visibility over the data flow make data integration a nightmare.
1000+ data teams rely on Hevo’s Data Pipeline Platform to integrate data from over 150+ sources in a matter of minutes. Billions of data events from sources as varied as SaaS apps, Databases, File Storage and Streaming sources can be replicated in near real-time with Hevo’s fault-tolerant architecture. What’s more – Hevo puts complete control in the hands of data teams with intuitive dashboards for pipeline monitoring, auto-schema management, custom ingestion/loading schedules.
All of this combined with transparent pricing and 24×7 support makes us the most loved data pipeline software on review sites.
Take our 14-day free trial to experience a better way to manage data pipelines.
How to Enable & Disable Snowflake Time Travel Feature?
1) enable snowflake time travel.
To enable Snowflake Time Travel, no chores are necessary. It is turned on by default, with a one-day retention period . However, if you want to configure Longer Data Retention Periods of up to 90 days for Databases, Schemas, and Tables, you’ll need to upgrade to Snowflake Enterprise Edition. Please keep in mind that lengthier Data Retention necessitates more storage, which will be reflected in your monthly Storage Fees. See Storage Costs for Time Travel and Fail-safe for further information on storage fees.
For Snowflake Time Travel, the example below builds a table with 90 days of retention.
To shorten the retention term for a certain table, the below query can be used.
2) Disable Snowflake Time Travel
Snowflake Time Travel cannot be turned off for an account, but it can be turned off for individual Databases, Schemas, and Tables by setting the object’s DATA_RETENTION_TIME_IN_DAYS to 0.
Users with the ACCOUNTADMIN role can also set DATA_RETENTION_TIME_IN_DAYS to 0 at the account level, which means that by default, all Databases (and, by extension, all Schemas and Tables) created in the account have no retention period. However, this default can be overridden at any time for any Database, Schema, or Table.
3) What are Data Retention Periods?
Data Retention Time is an important part of Snowflake Time Travel. Snowflake preserves the state of the data before the update when data in a table is modified, such as deletion of data or removing an object containing data. The Data Retention Period sets the number of days that this historical data will be stored, allowing Time Travel operations ( SELECT, CREATE… CLONE, UNDROP ) to be performed on it.
All Snowflake Accounts have a standard retention duration of one day (24 hours) , which is automatically enabled:
- At the account and object level in Snowflake Standard Edition , the Retention Period can be adjusted to 0 (or unset to the default of 1 day) (i.e. Databases, Schemas, and Tables).
- The Retention Period can be set to 0 for temporary Databases, Schemas, and Tables (or unset back to the default of 1 day ). The same can be said of Temporary Tables.
- The Retention Time for permanent Databases, Schemas, and Tables can be configured to any number between 0 and 90 days .
4) What are Snowflake Time Travel SQL Extensions?
The following SQL extensions have been added to facilitate Snowflake Time Travel:
- OFFSET (time difference in seconds from the present time)
- STATEMENT (identifier for statement, e.g. query ID)
- For Tables, Schemas, and Databases, use the UNDROP command.

How Many Days Does Snowflake Time Travel Work?
How to specify a custom data retention period for snowflake time travel .
The maximum Retention Time in Standard Edition is set to 1 day by default (i.e. one 24 hour period). The default for your account in Snowflake Enterprise Edition (and higher) can be set to any value up to 90 days :
- The account default can be modified using the DATA_RETENTION_TIME IN_DAYS argument in the command when creating a Table, Schema, or Database.
- If a Database or Schema has a Retention Period , that duration is inherited by default for all objects created in the Database/Schema.
The Data Retention Time can be set in the way it has been set in the example below.
Using manual scripts and custom code to move data into the warehouse is cumbersome. Frequent breakages, pipeline errors and lack of data flow monitoring makes scaling such a system a nightmare. Hevo’s reliable data pipeline platform enables you to set up zero-code and zero-maintenance data pipelines that just work.
- Reliability at Scale : With Hevo, you get a world-class fault-tolerant architecture that scales with zero data loss and low latency.
- Monitoring and Observability : Monitor pipeline health with intuitive dashboards that reveal every stat of pipeline and data flow. Bring real-time visibility into your ELT with Alerts and Activity Logs
- Stay in Total Control : When automation isn’t enough, Hevo offers flexibility – data ingestion modes, ingestion, and load frequency, JSON parsing, destination workbench, custom schema management, and much more – for you to have total control.
- Auto-Schema Management : Correcting improper schema after the data is loaded into your warehouse is challenging. Hevo automatically maps source schema with destination warehouse so that you don’t face the pain of schema errors.
- 24×7 Customer Support : With Hevo you get more than just a platform, you get a partner for your pipelines. Discover peace with round the clock “Live Chat” within the platform. What’s more, you get 24×7 support even during the 14-day full-feature free trial.
- Transparent Pricing : Say goodbye to complex and hidden pricing models. Hevo’s Transparent Pricing brings complete visibility to your ELT spend. Choose a plan based on your business needs. Stay in control with spend alerts and configurable credit limits for unforeseen spikes in data flow.
How to Modify Data Retention Period for Snowflake Objects?
When you alter a Table’s Data Retention Period, the new Retention Period affects all active data as well as any data in Time Travel. Whether you lengthen or shorten the period has an impact:
1) Increasing Retention
This causes the data in Snowflake Time Travel to be saved for a longer amount of time.
For example, if you increase the retention time from 10 to 20 days on a Table, data that would have been destroyed after 10 days is now kept for an additional 10 days before being moved to Fail-Safe. This does not apply to data that is more than 10 days old and has previously been put to Fail-Safe mode .
2) Decreasing Retention
- Temporal Travel reduces the quantity of time data stored.
- The new Shorter Retention Period applies to active data updated after the Retention Period was trimmed.
- If the data is still inside the new Shorter Period , it will stay in Time Travel.
- If the data is not inside the new Timeframe, it is placed in Fail-Safe Mode.
For example, If you have a table with a 10-day Retention Term and reduce it to one day, data from days 2 through 10 will be moved to Fail-Safe, leaving just data from day 1 accessible through Time Travel.
However, since the data is moved from Snowflake Time Travel to Fail-Safe via a background operation, the change is not immediately obvious. Snowflake ensures that the data will be migrated, but does not say when the process will be completed; the data is still accessible using Time Travel until the background operation is completed.
Use the appropriate ALTER <object> Command to adjust an object’s Retention duration. For example, the below command is used to adjust the Retention duration for a table:
How to Query Snowflake Time Travel Data?
When you make any DML actions on a table, Snowflake saves prior versions of the Table data for a set amount of time. Using the AT | BEFORE Clause, you can Query previous versions of the data.
This Clause allows you to query data at or immediately before a certain point in the Table’s history throughout the Retention Period . The supplied point can be either a time-based (e.g., a Timestamp or a Time Offset from the present) or a Statement ID (e.g. SELECT or INSERT ).
- The query below selects Historical Data from a Table as of the Date and Time indicated by the Timestamp:
- The following Query pulls Data from a Table that was last updated 5 minutes ago:
- The following Query collects Historical Data from a Table up to the specified statement’s Modifications, but not including them:
How to Clone Historical Data in Snowflake?
The AT | BEFORE Clause, in addition to queries, can be combined with the CLONE keyword in the Construct command for a Table, Schema, or Database to create a logical duplicate of the object at a specific point in its history.
Consider the following scenario:
- The CREATE TABLE command below generates a Clone of a Table as of the Date and Time indicated by the Timestamp:
- The following CREATE SCHEMA command produces a Clone of a Schema and all of its Objects as they were an hour ago:
- The CREATE DATABASE command produces a Clone of a Database and all of its Objects as they were before the specified statement was completed:
Using UNDROP Command with Snowflake Time Travel: How to Restore Objects?
The following commands can be used to restore a dropped object that has not been purged from the system (i.e. the item is still visible in the SHOW object type> HISTORY output):
- UNDROP DATABASE
- UNDROP TABLE
- UNDROP SCHEMA
UNDROP returns the object to its previous state before the DROP command is issued.
A Database can be dropped using the UNDROP command. For example,
Similarly, you can UNDROP Tables and Schemas .
Snowflake Fail-Safe vs Snowflake Time Travel: What is the Difference?
In the event of a System Failure or other Catastrophic Events , such as a Hardware Failure or a Security Incident, Fail-Safe ensures that Historical Data is preserved . While Snowflake Time Travel allows you to Access Historical Data (that is, data that has been updated or removed) at any point in time.
Fail-Safe mode allows Snowflake to recover Historical Data for a (non-configurable) 7-day period . This time begins as soon as the Snowflake Time Travel Retention Period expires.
This article has exposed you to the various Snowflake Time Travel to help you improve your overall decision-making and experience when trying to make the most out of your data. In case you want to export data from a source of your choice into your desired Database/destination like Snowflake , then Hevo is the right choice for you!
However, as a Developer, extracting complex data from a diverse set of data sources like Databases, CRMs, Project management Tools, Streaming Services, and Marketing Platforms to your Database can seem to be quite challenging. If you are from non-technical background or are new in the game of data warehouse and analytics, Hevo can help!
Hevo will automate your data transfer process, hence allowing you to focus on other aspects of your business like Analytics, Customer Management, etc. Hevo provides a wide range of sources – 150+ Data Sources (including 40+ Free Sources) – that connect with over 15+ Destinations. It will provide you with a seamless experience and make your work life much easier.
Want to take Hevo for a spin? Sign Up for a 14-day free trial and experience the feature-rich Hevo suite first hand.
You can also have a look at our unbeatable pricing that will help you choose the right plan for your business needs!

Harsh comes with experience in performing research analysis who has a passion for data, software architecture, and writing technical content. He has written more than 100 articles on data integration and infrastructure.
No-code Data Pipeline for Snowflake
- Snowflake Commands
Hevo - No Code Data Pipeline

Continue Reading

Chirag Agarwal
Snowflake Storage Integration: The Only Guide You Need for Configuring

Nitin Birajdar
Enhance Data Management with Snowflake Create Schema

Sarad Mohanan
Enhance Data Integrity With Snowflake Date Format
Leave a reply cancel reply.
Your email address will not be published. Required fields are marked *
Save my name, email, and website in this browser for the next time I comment.
I want to read this e-book
How the largest cannabis greenhouse in Arizona helped revamp Snowflake's rural economy

SNOWFLAKE — As the sun rises across the White Mountains, many in northern Arizona are still trying to catch a few more hours of sleep.
But at Copperstate Farms, nearly 200 employees are already hard at work throughout the 40-acre cannabis greenhouse on the northwest side of Snowflake.
Workers dressed head to toe in personal protective equipment to safeguard their highly sensitive crop are busy at work monitoring the thousands of plants in the latest harvest and trimming the top-tier flower by hand to get it ready for sale.
Now eight years into operation, the greenhouse is the largest in the state and home to every aspect of growing and harvesting cannabis. With a process fine-tuned over the years, it now takes just about 140 days from when a seed is planted to when it reaches a consumer at an Arizona dispensary.
And the economic impact is clear, Snowflake town manager Brian Richards said.
“Over the last eight years our revenues have increased, our populations increased, our building has increased and Copperstate has been a part of that,” Richards told The Arizona Republic.
According to annual financial reports , local sales tax revenue for Snowflake increased just under 287% between 2016 and 2023.
“This is a very tight-knit, family-oriented community — big families, lots of kids — and you could really start to see businesses thriving, new businesses opening up and not just opening up and closing,” said greenhouse general manager Barbara Hansen.
When cannabis came to town
In the years leading up to Copperstate Farms moving in, the area saw two of the largest employers close.
The Snowflake paper mill closed when operations moved to Willcox in 2012 and the NatureSweet vegetable greenhouse closed three years, later resulting in the loss of about 300 total jobs.
By the time Copperstate Farms CEO Fife Symington IV came to town in 2016, the greenhouse had sat unused, and the local economy was reeling from the widespread job losses.
Symington, the son of former Arizona Governor Fife Symington III, worked hard to win over residents who were skeptical of bringing such a large cannabis operation into town.
“I would meet with anybody that wanted to meet with me and talk about what I wanted to do here, my vision for the place,” Symington said.
The operation eventually got its special use permit from the town council and had its first harvest in August 2017.
To some, the tight-knit and heavily religious community might have seemed like an odd choice for the state’s largest cannabis operation.
But eight years in, Copperstate Farms is now an unlikely but welcome neighbor in a community where the vast majority are members of the Church of Jesus Christ of Latter-day Saints. The greenhouse sits just 3 miles away from the town’s temple.
“We have a lot of members of that community and the church who work here,” according to Hansen.
Why Snowflake?
While northern California might be the most well-known area in the country for large-scale cannabis production, the high desert in northern Arizona offers a unique environment that is ideal for this growing industry.
“It really is the perfect place to grow cannabis,” said Tim Nolan, COO at Copperstate.
Nolan has been in the cannabis industry for 15 years working previously in indoor grow operations in Colorado and Nova Scotia before coming to Arizona where he transitioned to working in a greenhouse.
The greenhouse allows them to control the temperature and humidity and utilize the natural light coming in while avoiding the dust and wind that would impact the plants if they were a completely outdoor operation.
The high desert also allows them to utilize the dry air that they have outside to maximize operations on the inside of the greenhouse, Nolan said.
“We wouldn’t be able to do this in the Valley,” he said.
And while the natural climate in the White Mountains benefits the cannabis operation, so to does the knowledge and skill that come from a community with a rich history in agriculture.
“It’s remarkable how many great growers and talented people that we’ve pulled out of a relatively rural community,” Nolan said.
Symington, Nolan and lab director Mitch Lindback are some of the only Copperstate employees who travel from the Valley for work. The rest of the nearly 200 employees live locally in Snowflake and Taylor or in neighboring towns across the White Mountains including Show Low, Pinetop-Lakeside and onto the Navajo Nation.
It was all part of the promise that Symington made when he first pitched his vision for Copperstate Farms to local residents and community leaders.
“It was a huge commitment I made to the town saying, ‘I’m going to hire up here whenever I possibly can for all of these jobs,’ and if you look around at this facility, there’s only four or five people who are from somewhere else,” Symington said.
An economic boom in rural Arizona
Hansen, the general manager of the greenhouse, was one of the first people to start working for Copperstate and helped lead the hiring process.
“She’s Snowflake through and through,” Symington said.
Hansen joined the company before it even really existed because she was so optimistic about what it could mean for the town economically after so many years of hardship.
The economic impact at the time of the closures was so widespread that the home improvement center that Hansen was managing in Taylor during that period was forced to close as well.
By the time Copperstate first began hiring, the demand for jobs in the area was obvious, especially when the company received 1,600 applications in the first hiring round.
Those initial applicants were sorted by, “who used to work here, who lost their job and who lives in Snowflake and Taylor,” Hansen said.
“Everyone that applied that used to work here that was interested in what we were doing, we brought them back and many of them still work here,” she said. “They’ve lasted longer than anybody else.”
In the hiring rounds that followed, they widened their net across the region into surrounding towns like Show Low, Heber, McNary and more.
With so many people finally back at work, the small town’s economy eventually started recovering. One way that Copperstate was able to do this directly was to rely exclusively on local contractors as they grew and expanded over the years, she said.
“We got to put our hometown to work,” she said. “Anything that we could get locally, we got.”
Providing opportunities for local workers
At the same time, Copperstate has become a premier employer across the White Mountains, offering a competitive $17 starting hourly wage and providing opportunities for job growth and advancement in a burgeoning industry.
Ana Grajeda initially applied for a job at the company because despite not being a cannabis user, she was curious about the growing process. For four years, she commuted an hour to work from St. Johns before buying a house in Snowflake three years ago.
She initially started in the greenhouse but like most of her coworkers, she was trained in all the roles throughout the growing process from propagating to harvesting and everything in between.
Now, Grajeda utilizes her background as a hairstylist to lead the team in charge of meticulously trimming the company’s top-tier flower — what Nolan described as “a deceptively difficult thing to do.”
“I love it,” Grajeda said as she leaned over a bin full of cannabis and made precise cuts to get the product ready for sale.
Cross-training employees like Grajeda allows for the company to better utilize their staff while also avoiding the monotony of the growing process that repeats itself every three weeks.
So while employees develop a more holistic understanding of the business, they also achieve a higher level of job enrichment because they’re more deeply involved in the process, she said.
“We wanted to have a small business feel with a big business mentality,” she said.
Reach the reporter at [email protected] .
The Republic’s coverage of northern Arizona is funded, in part, with a grant from Report for America. To support regional Arizona news coverage like this, make a tax-deductible donation at supportjournalism.azcentral.com .
Advertisement
Supported by
How A.I. Made Mark Zuckerberg Popular Again in Silicon Valley
After some trying years during which Mr. Zuckerberg could do little right, many developers and technologists have embraced the Meta chief as their champion of “open-source” artificial intelligence.
- Share full article

By Mike Isaac
Mike Isaac has written about Facebook, Meta and Mark Zuckerberg since 2010.
When Mark Zuckerberg , the chief executive of Meta, announced last year that his company would release an artificial intelligence system, Jeffrey Emanuel had reservations.
Mr. Emanuel, a part-time hacker and full-time A.I. enthusiast, had tinkered with “closed” A.I. models, including OpenAI’s, meaning the systems’ underlying code could not be accessed or modified. When Mr. Zuckerberg introduced Meta’s A.I. system by invitation only to a handful of academics, Mr. Emanuel was concerned that the technology would remain limited to just a small circle of people.
But in a release last summer of an updated A.I. system, Mr. Zuckerberg made the code “open source” so that it could be freely copied, modified and reused by anyone.
Mr. Emanuel, the founder of the blockchain start-up Pastel Network, was sold. He said he appreciated that Meta’s A.I. system was powerful and easy to use. Most of all, he loved how Mr. Zuckerberg was espousing the hacker code of making the technology freely available — largely the opposite of what Google, OpenAI and Microsoft have done.
“We have this champion in Zuckerberg,” Mr. Emanuel, 42, said. “Thank God we have someone to protect the open-source ethos from these other big companies.”
Mr. Zuckerberg has become the highest-profile technology executive to support and promote the open-source model for A.I. That has put the 40-year-old billionaire squarely on one end of a divisive debate over whether the potentially world-changing technology is too dangerous to be made available to any coder who wants it.
Microsoft, OpenAI and Google have more of a closed A.I. strategy to guard their tech, out of what they say is an abundance of caution. But Mr. Zuckerberg has loudly stood behind how the technology should be open to all.
“This technology is so important, and the opportunities are so great, that we should open source and make it as widely available as we responsibly can, so that way everyone can benefit,” he said in an Instagram video in January.
That stance has turned Mr. Zuckerberg into the unlikely man of the hour in many Silicon Valley developer communities, prompting talk of a “glow-up” and a kind of “Zuckaissance.” Even as the chief executive continues grappling with scrutiny over misinformation and child safety issues on Meta’s platforms, many engineers, coders, technologists and others have embraced his position on making A.I. available to the masses.
Since Meta’s first fully open-source A.I. model, called LLaMA 2, was released in July, the software has been downloaded more than 180 million times, the company said. A more powerful version of the model, LLaMA 3, which was released in April, reached the top of the download charts on Hugging Face, a community site for A.I. code, at record speed.
Developers have created tens of thousands of their own customized A.I. programs on top of Meta’s A.I. software to perform everything from helping clinicians read radiology scans to creating scores of digital chatbot assistants.
“I told Mark, I think that open sourcing LLaMA is the most popular thing that Facebook has done in the tech community — ever,” said Patrick Collison, chief executive of the payments company Stripe, who recently joined a Meta strategic advisory group that is aimed at helping the company make strategic decisions about its A.I. technology. Meta owns Facebook, Instagram and other apps.
Mr. Zuckerberg’s new popularity in tech circles is striking because of his fraught history with developers. Over two decades, Meta has sometimes pulled the rug out from under coders. In 2013, for instance, Mr. Zuckerberg bought Parse , a company that built developer tools, to attract coders to build apps for Facebook’s platform. Three years later, he shuttered the effort , angering developers who had invested their time and energy in the project.
A spokeswoman for Mr. Zuckerberg and Meta declined to comment. (The New York Times last year sued OpenAI and its partner, Microsoft, claiming copyright infringement of news content related to A.I. systems.)
Open-source software has a long and storied history in Silicon Valley, with major tech battles revolving around open versus proprietary — or closed — systems.
In the internet’s early days, Microsoft jockeyed to provide the software that ran internet infrastructure, only to eventually lose out to open-source software projects. More recently, Google open sourced its Android mobile operating system to take on Apple’s closed iPhone operating system. Firefox, the internet browser, WordPress, a blogging platform, and Blender, a popular set of animation software tools, were all built using open-source technologies.
Mr. Zuckerberg, who founded Facebook in 2004, has long backed open-source technology. In 2011, Facebook started the Open Compute Project, a nonprofit that freely shares designs of servers and equipment inside data centers. In 2016, Facebook also developed Pytorch, an open-source software library that has been widely used to create A.I. applications. The company is also sharing blueprints of computing chips that it has developed.
“Mark is a great student of history,” said Daniel Ek, Spotify’s chief executive, who considers Mr. Zuckerberg a confidant. “Over time in the computing industry, he’s seen that there’s always been closed and open paths to take. And he has always defaulted to open.”
At Meta, the decision to open source its A.I. was contentious . In 2022 and 2023, the company’s policy and legal teams supported a more conservative approach to releasing the software, fearing a backlash among regulators in Washington and the European Union. But Meta technologists like Yann LeCun and Joelle Pineau, who spearhead A.I. research, pushed the open model, which they argued would better benefit the company in the long term.
The engineers won. Mr. Zuckerberg agreed that if the code was open, it could be improved and safeguarded faster, he said in a post last year on his Facebook page.
While open sourcing LLaMA means giving away computer code that Meta spent billions of dollars to create with no immediate return on investment, Mr. Zuckerberg calls it “good business.” As more developers use Meta’s software and hardware tools, the more likely they are to become invested in its technology ecosystem, which helps entrench the company.
The technology has also helped Meta improve its own internal A.I. systems, aiding ad targeting and recommendations of more relevant content on Meta’s apps.
“It is 100 percent aligned with Zuckerberg’s incentives and how it can benefit Meta,” said Nur Ahmed, a researcher at MIT Sloan who studies A.I. “LLaMA is a win-win for everybody.”
Competitors are taking note. In February, Google open sourced the code for two A.I. models, Gemma 2B and Gemma 7B, a sign that it was feeling the heat from Mr. Zuckerberg’s open-source approach. Google did not respond to requests for comment. Other companies, including Microsoft , Mistral, Snowflake and Databricks, have also started offering open-source models this year.
For some coders, Mr. Zuckerberg’s A.I. approach hasn’t erased all of the baggage of the past. Sam McLeod, 35, a software developer in Melbourne, Australia, deleted his Facebook accounts years ago after growing uncomfortable with the company’s track record on user privacy and other factors.
But more recently, he said, he recognized that Mr. Zuckerberg had released “cutting edge” open-source software models with “permissive licensing terms,” something that can’t be said for other big tech companies.
Matt Shumer, 24, a developer in New York, said he had used closed A.I. models from Mistral and OpenAI to power digital assistants for his start-up, HyperWrite. But after Meta released its updated open-source A.I. model last month, Mr. Shumer started relying heavily on that instead. Whatever reservations he had about Mr. Zuckerberg are in the past.
“Developers have started to see past a lot of issues they’ve had with him and Facebook,” Mr. Shumer said. “Right now, what he’s doing is genuinely good for the open-source community.”
Mike Isaac is a technology correspondent for The Times based in San Francisco. He regularly covers Facebook and Silicon Valley. More about Mike Isaac
Explore Our Coverage of Artificial Intelligence
News and Analysis
Humane’s Ai Pin was supposed to free people from smartphones, but sales have been slow. Now Humane is talking to HP and others about a potential sale. Here’s how the device flopped .
Federal regulators have reached a deal that allows them to proceed with antitrust investigations into the dominant roles that Microsoft, OpenAI and Nvidia play in the A.I. industry.
Google appears to have rolled back its new A.I. Overviews after the technology produced a litany of untruths and errors.
The Age of A.I.
After some trying years during which Mark Zuckerberg could do little right, many developers and technologists have embraced the Meta chief as their champion of “open-source” A.I.
D’Youville University in Buffalo had an A.I. robot speak at its commencement . Not everyone was happy about it.
A new program, backed by Cornell Tech, M.I.T. and U.C.L.A., helps prepare lower-income, Latina and Black female computing majors for A.I. careers.
IMAGES
VIDEO
COMMENTS
Snowflake Time Travel enables accessing historical data (i.e. data that has been changed or deleted) at any point within a defined period. It serves as a powerful tool for performing the following tasks: Restoring data-related objects (tables, schemas, and databases) that might have been accidentally or intentionally deleted.
Snowflake Time Travel is a feature that allows users to analyze historical data, restore deleted objects, and clone objects. It takes a snapshot of the data's state before every update to a table, and this snapshot is available for a specified number of days, known as the data retention period. This feature is automatically enabled with a ...
FAIL-SAFE. Snowflake provides the Fail-safe feature to ensure data protection. Fail-safe is the part of the continuous data protection lifecycle provided by Snowflake. It provides non-configurable ...
The Time Travel feature is not new to those who have have been users of Snowflake in recent years. It allows Snowflake users the ability to query data up to 90 days by using a simple SQL statement…
1. As others have commented, time travel is not positioned for fulfilling the need of slowly changing dimensions. The most constraining factor is the 90 day limit. Most SCD applications will require more than 90 days history. Either streams or dynamic tables would be a better option.
Snowflake Time Travel is a fascinating feature that grants you the power to access historical data. ... which plays a pivotal role in preserving your data history. When data within a table ...
Understanding Snowflake Time Travel. Snowflake Time Travel is a feature that allows you to "travel back in time" to view and operate on historical data. This is achieved by retaining all changes made to the data in your Snowflake database for a specified period, known as the Time Travel retention period. This period can be set anywhere from 1 ...
How to get the history data that exist at a specific time using offset in time travel in Snowflake? Using the time travel feature of the Snowflake, we can select and retrieve the data from the table, present before the specified time in the table.For example, table data is changing continuously and you wanted to get back the data available before a specific date time (like 2 days ago, 2 hours ...
The Time Travel feature allows database administrators to query historical data, clone old tables, and restore objects dropped in the past. However, given the massive sizes databases can grow into, Time Travel is not a drop-in equivalent of code version control. Every time a table is modified (deleted or updated), Snowflake takes a snapshot of ...
Migrating Time Travel history when Cloning an object with Time Travel. Ask Question Asked 11 months ago. ... and means the new 'production' table now has no further Time Travel permitted. This could be problematic if we discover a further issue that requires an older restore. ... snowflake time-travel micro-partition can rewriteable when update
In all Snowflake editions, It is set to 1 day by default for all objects. This parameter can be extended to 90 days for Enterprise and Business-Critical editions. The parameter "DATA RETENTION PERIOD" controls an object's time travel capability. Once the time travel duration is exceeded the object enters the Fail-safe region.
In fact, you'll see the syntax to query with time travel is fairly the same as in SQL Server. The biggest difference however is SQL Server stores all the versions indefinitely, while Snowflake only maintains the different versions of your table for a specific period in time. Depending on your edition, this is either one day or up to 90 days.
Snowflake Time Travel is a fascinating feature that grants you the power to access historical data. ... which plays a pivotal role in preserving your data history. When data within a table ...
The biggest difference is that time travel is applied by default on all tables in Snowflake, while in SQL Server you have to enable it for each table specifically. Another difference is Snowflake only keeps history for 1 day, configurable up to 90 days. In SQL Server, history is kept forever unless you specify a retention policy.
Snowflake's Dynamic Tables, now Generally Available as of April 29 2024, represent a significant advancement in data transformation and… 10 min read · May 1, 2024 Ivan Jimenez
In recent memory, I cannot think of a company that fetched more attention for its IPO than Snowflake (SNOW-0.63%), which had the biggest IPO for a software company in history.
In this article: SNOW. AAP. LYV. (Bloomberg) -- Snowflake Inc. is trying to get its clients to impose stronger security controls as companies including Advanced Auto Parts Inc. and Live Nation ...
Snowflake Time Travel is an interesting tool that allows you to access data from any point in the past. For example, if you have an Employee table, and you inadvertently delete it, you can utilize Time Travel to go back 5 minutes and retrieve the data. Snowflake Time Travel allows you to Access Historical Data (that is, data that has been ...
0:45. SNOWFLAKE — As the sun rises across the White Mountains, many in northern Arizona are still trying to catch a few more hours of sleep. But at Copperstate Farms, nearly 200 employees are ...
Nov 28, 2023. Learn how to leverage Snowflake's Time Travel feature in conjunction with DbVisualizer to effortlessly explore historical data, restore tables to previous states, and track changes ...
He said he appreciated that Meta's A.I. system was powerful and easy to use. Most of all, he loved how Mr. Zuckerberg was espousing the hacker code of making the technology freely available ...