
6 Ways to Fix Safari Not Loading Pages on iPhone and iPad

Mehvish Mushtaq is a computer engineer by degree. Her love for Android and gadgets led her to develop the first Android app for Kashmir. Known as Dial Kashmir, she won the prestigious Nari Shakti award from the President of India. She has been writing about technology for 6+ years and her favorite categories include how-to guides, explainers, tips and tricks for Android, iOS/iPadOS, social media, and web apps.

Ankita enjoys exploring and writing about technology. Starting as a script and copywriter, her keen interest in the digital world pulled her towards technology. With GT, she has found her calling in writing about and simplifying the world of tech for others. On any given day, you can catch her chained to her laptop, meeting deadlines, writing scripts, and watching shows (any language!).
- Open Settings and tap on Safari > turn off Prevent Cross-Site Tracking toggle.
- Go to Settings > Safari > Hide IP Address and select Off.
- Open Settings > Screen Time > Content & Privacy Restrictions > turn the toggle off.
Basic Fixes:
- Restart phone and modem: Long-press the power button and use the slider to turn your device off. Then, turn off your modem. Wait a while and turn the modem back on. Once powered on, turn your Apple device back on and wait for it to connect to the Wi-Fi. Then, open Safari and check.
- Turn off VPN: Certain websites block VPN servers and can break if you open them when connected to a VPN. So, disable the VPN on your iPhone or iPad and load the page again on Safari.
- Clear Safari cache and browsing data: Safari uses cache and browsing data from your previous visits to enhance your browsing experience. However, corrupted data can cause issues when loading pages. So, use the settings menu to clear all Safari cache and browsing data.
- Disable Safari extensions: Certain Safari extensions, like ad-blockers, can block page elements. This can prevent the page from loading. When this happens, turn off ad-block and other Safari extensions. Then, try loading the page again.
- Update software: As Safari is part of Apple’s ecosystem, the only way to update the browser is by installing the latest software updates. So, ensure the recent iOS or iPadOS updates have been installed on your Apple device. Then, reopen Safari and load the page again.
Fix 1: Disable Prevent Cross-Site Tracking
Safari lets users prevent cross-site tracking to ensure their browsing habits are not recorded by the relevant website. However, this can cause webpages not to load properly on Safari. When this happens, disable this feature and check again. Here’s how.
Step 1: Open Settings and tap on Safari . Turn off the Prevent Cross-Site Tracking toggle.

Fix 2: Turn off ‘Hide IP Address’ in Safari
You can hide your IP address using Safari’s built-in tools. However, this can sometimes prevent Safari from loading pages that require IP access. So, disable this option and reload the page in Safari. Here’s how to do it.
Step 1: Open Settings → Safari . Tap on Hide IP Address and select Off .

Fix 3: Check Content Restrictions
If enabled, content restrictions can restrict certain site content in Safari, preventing the page from loading. So, open the relevant setting and disable all content restrictions on your Apple device. Here’s how.
Step 1: Open Settings and tap on Screen Time . Tap on Content & Privacy Restrictions .
Step 2: Turn off the Content & Privacy Restrictions toggle.

Also Read: What are Safari content blockers and should you use them
Fix 4: Enable JavaScript
Certain webpages require JavaScript to load properly. So, if JavaScript is disabled for Safari, it can also cause page loading issues. Open Safari settings and enable JavaScript. Follow the below steps to do it.
Step 1: Go to Settings → Safari . Scroll down and tap on Advanced .
Step 2: Turn on the toggle for JavaScript .

Also Read: How to fix Safari not loading images on iPhone
Fix 5: Switch to Google DNS
Your current DNS server can also be the culprit behind Safari not loading pages. To fix this, change your DNS server to Google DNS and try again. Here’s how.
Step 1: Open Settings and tap on Wi-Fi . Tap the i icon next to your Wi-Fi network.

Step 2: Tap on Configure DNS . From the options, select Manual .
Step 3: Here, remove the currently added DNS servers . Then, tap on Add Server .

Add 8.8.8.8 and 8.8.4.4 for Google DNS and tap on Save . Then, reopen Safari and reload the page.
Fix 6: Reset Network Settings
If pages still don’t load properly in Safari, reset all network settings on your iPhone or iPad. This will delete any custom Wi-Fi settings causing the Safari page-loading issues. Follow the below steps to do it.
Step 1: Open Settings and tap on General → Transfer or Reset iPhone .

Step 2: Tap on Reset → Reset Network Settings .

Follow the on-screen instructions to finish the process. Then, reopen Safari and try loading the page again to see if the issue has been fixed on your iPhone or iPad.
Was this helpful?
Last updated on 28 June, 2024
The above article may contain affiliate links which help support Guiding Tech. However, it does not affect our editorial integrity. The content remains unbiased and authentic.
Thanks. I had been having this problem for a year and now it is finally resolved!
Leave a Reply Cancel reply
Your email address will not be published. Required fields are marked *

The article above may contain affiliate links which help support Guiding Tech. The content remains unbiased and authentic and will never affect our editorial integrity.
DID YOU KNOW

More in iOS
5 Best Flight Tracking Apps for iPhone and Android (Free)

5 Ways to Fix Live Location Not Updating on Android and iPhone
Join the newsletter.
Get Guiding Tech articles delivered to your inbox.
Tips & Tricks
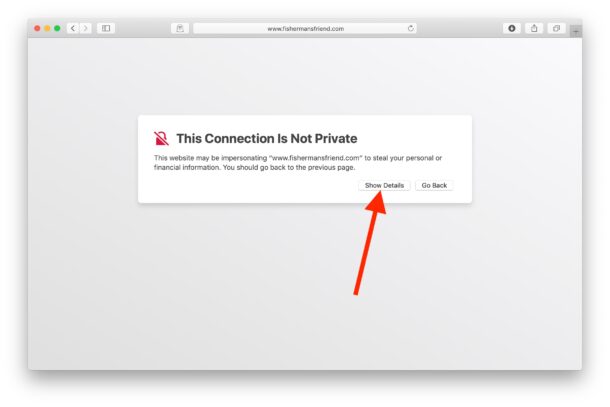
Troubleshooting, how to fix safari “this connection is not private” warnings.
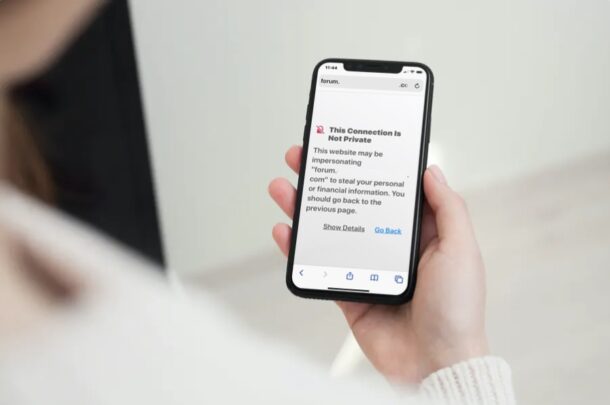
Are you receiving an error message saying “This connection is not private” when you’re trying to access a website in Safari from iPhone, iPad, or Mac? Many users have seen this error at some point as they browse the web, and this can be bypassed or ignored quickly fixed regardless of what device you use.
This message pops up when Safari’s security check on the website’s certificate fails. You’ll likely face this issue when you’re visiting a website that uses an expired certificate, or HTTP instead of HTTPS when it’s not configured properly. The difference between the two is that the older HTTP doesn’t have an SSL certificate, and therefore they aren’t ‘secure’ by default. However, SSL certificates aren’t valid forever, so you might still face this issue on HTTPS sites when the SSL certificate has expired, if it’s setup incorrectly, or if it’s not issued by a legitimate certificate authority. Finally, you can also face this issue if the device viewing the website has a clock that isn’t set to the proper time, since that breaks the certificate check too.
In any event, if you use Safari on an iPhone, iPad, or Mac, you can still bypass the “This connection is not private” warning and access the site.
Important note: if you encounter a “This connection is not private” error message on a banking website, financial services site, email site, or anything where critically important data is submitted or exchanged, there may be something else going on and you should not attempt to bypass the warning message. Instead, check the URL to make sure it is correct, try again later, or contact the company directly.
How to Fix Safari “This Connection Is Not Private” Warnings on iPhone & iPad
Bypassing this error is actually a pretty simple and straightforward procedure, but most people don’t seem to read the error message completely. Just follow the steps below to get started.

Now, you’ll be able to view all the contents of the website like normal, but you’ll notice a “Not Secure” notice in the address bar .
How to Fix Safari “This Connection Is Not Private” Warnings on Mac
The procedure to bypass the warning is pretty similar on a macOS system too. Here’s how it works:
And there you have it, you’re viewing the site. Again on the Mac you’ll find the “Not Secure” website message in the address bar, indicating you should not transmit any important personal data like banking details, login information, etc on the URL. But if it’s simply an informational site where you are not inputting any personal data, there usually isn’t much concern.
Now you know how easy it is to fix “This connection is not private” warnings in Safari.
Although this warning is mostly a website-related issue, entering the wrong URL, an incorrect system clock, a VPN issue, or even corrupted browser cache can sometimes also be the reason why you see this warning. Therefore, you might want to double-check that you have the proper URL entered, that the device has the date and time and clock set properly (you can check in Settings on iPhone/iPad or System Preferences on Mac), and consider clearing your Safari browser cache . To do this on an iPhone or iPad, head over to Settings -> Safari and tap on “Clear History and Website Data”. For clearing the Safari cache on your Mac , just go to Safari -> Preferences from the menu bar. Additionally, if you’re using a VPN on your device, turn it off and visit the site again to see if you’re still getting the warning. If you read the warning message carefully, you’ll see that fixing your clock can also resolve this issue too.
You may see this error with or without browsing in Private mode in Safari too .
Similarly, you can run into a connection not private error in Google Chrome, with a similar resolution though the Chrome issue is almost always related to improper SSL certificates, expired certs, or a time/date error on the device itself.
We hope you were able to stop getting this error on your iPhone, iPad, and Mac. How often do you get these warnings while browsing in Safari? Share your experiences, thoughts, and advice in the comments.
Enjoy this tip? Subscribe to our newsletter!
Get more of our great Apple tips, tricks, and important news delivered to your inbox with the OSXDaily newsletter.
You have successfully joined our subscriber list.
Related articles:
- Use Private Browsing Mode in Safari for Mac OS X on a Per Window Basis
- How to Completely Disable Private Browsing in iOS on iPhone and iPad
- How to Tell if Safari Private Browsing is Enabled When in Dark Mode for MacOS
- How to Use Private Relay in Safari to Hide Your IP address on iPhone & iPad
10 Comments
» Comments RSS Feed
Not so simple. When you go to “visit website anyway” it then tells you website has been blocked. We don’t even have a choice.
So really, this article is misleading.
The article is accurate Heidi.
A blocked warning is a different warning from “This connection is not private”, you might be experiencing a blocked website form a firewall or from your ISP.
There is no way to access this website. The warnings do not give access in any way shape or form. It’s a Godaddy site but my iPad Pro 11 will not allow me to access. There is not “enter anyway” or “visit Webite” button, the site is basically completely locked from me and I have to use my Microsoft Windows 10 to get there.
What website are you trying to access, and what is the exact error message that you see?
It is possible that your iPad Pro clock is set improperly, which can also cause issues with connections to websites. Do other HTTPS sites load fine on the iPad?
Yeah, does anyone know how to do it now?
visit website option is no longer available.
This crap has been going over and over and over and they never fix it, same with the audio crackling noise. These days nothing really works with Apple, it’s unbelievable the software they put out, zero QA literally.
My Safari (13.1.2, MacOS 10.13.6, MacBookPro8,1) just goes into an infinite loop. I keep on getting the warning, clicking on the “visit the website”, supplying the password, over and over, and I never actually see the web page. I have to switch to Google Chrome or Firefox to be able to see it. This behavior has been consistent over multiple Safari and OS versions.
Mine always asks for a password to make a change to Keychain in order to bypass the warning. Is there a way to fix that? I always switch to another browser which is quite inconvenient
Leave a Reply
Name (required)
Mail (will not be published) (required)
Subscribe to OSXDaily
- - Which Apple Watch Models Support WatchOS 11? Here’s the List
- - iPadOS 18 is Compatible with These iPads
- - iOS 18 is Compatible with These iPhone Models
- - MacOS Sequoia is Compatible with These Macs
- - Listen to Apple Podcasts on the Web
- - iOS 18 Release Candidate Available to Download Now
- - iPhone 16 & iPhone 16 Pro Announced with Faster Chips & Apple Intelligence Support
- - Apple Watch Series 10 with Thinner Design, Larger Screen, & Temperature Sensors, Announced
- - Public Beta 6 of MacOS Sequoia, iOS 18, iPadOS 18, Available Now
iPhone / iPad
- - iOS 18 Beta 8 Available to Download
- - iPhone 16 Expected to Debut at September 9 Apple Event
- - MacOS Sequoia 15 Beta 8 Available to Download
- - How to Run Llama LLM on Mac, Locally
- - MacOS Sequoia 15 Beta 7 Available for Testing
- - Launch All Apps & Documents Related to a Project with Stapler for Mac
- - How to Recover an Unsaved PowerPoint on Mac
- - How to Uninstall VMWare Fusion on Mac
- - chronod on Mac – High CPU Use & Network Access Requests Explained
- - Why Are iPhone Videos Low Quality & Blurry When Sent to Android Users?
- - Fix brew Error “The arm64 architecture is required for this software” on Apple Silicon Mac

About OSXDaily | Contact Us | Privacy Policy | Sitemap
This website is unrelated to Apple Inc
All trademarks and copyrights on this website are property of their respective owners.
© 2024 OS X Daily. All Rights Reserved. Reproduction without explicit permission is prohibited.
How-To Geek
How to view a desktop site on mobile safari.

Your changes have been saved
Email is sent
Email has already been sent
Please verify your email address.
You’ve reached your account maximum for followed topics.
Quick Links
How to view desktop site in safari.
Safari is fast and optimized for mobile devices. That's usually a good thing. But there are still a few websites that refuse to adapt to mobile Safari or provide an inferior experience on their mobile site. In times like these, you can switch to the desktop version of the website.
Like many iOS features, especially ones for Safari, the Request Desktop Site feature is hidden. With iOS 13, Apple has changed the placement of this option, which makes it a bit easier to find. As iPadOS 13 automatically loads desktop websites, iPad users won't need to look for this feature after updating.
Here's how this feature works on devices running iOS 12 and iOS 13.
Related: iPadOS Will Almost Make Your iPad a Real Computer
iOS 12 and Below
Open the Safari app on your iPhone or iPad and load a website. Now, tap and hold on the "Refresh" button next to the URL bar.
You'll see a popup at the bottom of the screen. From here, select "Request Desktop Site."
The website will reload, and you'll now see the desktop version of the site . To go back to the mobile version, tap and hold on the "Refresh" button again and select "Request Mobile Site."
iOS 13 and Above
With the iOS 13 update, Apple has improved the Safari browser in a couple of important ways. While most improvements are seen on the iPad version, iPhone users get access to the new Safari Download Manager as well as a new customization menu for websites.
Tap on the "Aa" icon to see a couple of new menu options. From here, select the "Request Desktop Website" button to open the desktop version of the website.
Come back to the same menu to switch back to the mobile version.
And that's it. You now know how to access desktop websites on your iPhone and iPad using mobile Safari.
- Web Browsers
How to Link iPhone to iPad: A Step-by-Step Guide for Seamless Syncing
Connecting your iPhone to your iPad can make it easier to share files, sync apps, and even answer calls on either device. You’ll be setting up features like Handoff and Continuity to make your devices work seamlessly together. Let’s walk through the process step by step so you can link your iPhone to your iPad.
How to Link iPhone to iPad
By the end of these steps, your iPhone and iPad will be connected, allowing you to share tasks, files, and even take calls between the two devices.
Step 1: Update Both Devices
Make sure both your iPhone and iPad are running the latest version of iOS.
Updating your devices ensures they have the latest features and security updates. To do this, go to Settings > General > Software Update on both devices and follow the prompts to update if necessary.
Step 2: Enable Wi-Fi and Bluetooth
Ensure Wi-Fi and Bluetooth are turned on both devices.
Go to Settings > Wi-Fi and Settings > Bluetooth on both devices to enable these features. This is crucial because Wi-Fi and Bluetooth are needed for devices to communicate with each other.
Step 3: Sign Into iCloud
Use the same Apple ID to sign into iCloud on both devices.
Open Settings, tap your name at the top, and sign in with your Apple ID if you haven’t already. Make sure you’re signed into the same Apple ID on both your iPhone and iPad to link them.
Step 4: Enable Handoff
Turn on Handoff on both devices to allow seamless activity transition.
Navigate to Settings > General > Handoff and toggle it on. Handoff lets you start an activity on one device and pick it up on the other, like emailing or browsing a webpage.
Step 5: Activate Text Message Forwarding
Allow your iPad to send and receive SMS texts through your iPhone.
On your iPhone, go to Settings > Messages > Text Message Forwarding and select your iPad. Now you’ll receive and send texts from either device.
Step 6: Set Up Continuity
Ensure Continuity is enabled to take calls across devices.
Go to Settings > Phone > Calls on Other Devices on your iPhone, and toggle it on. Then select your iPad. This lets you take calls on your iPad using your iPhone’s cellular connection.
Once you’ve completed these steps, your iPhone and iPad will be linked. You’ll notice that tasks, messages, and calls will sync between your devices, making it easier to switch from one to the other without missing a beat.
Tips for How to Link iPhone to iPad
- Keep Devices Updated: Regularly check for software updates on both devices to ensure compatibility and access to new features.
- Use the Same Apple ID: Always use the same Apple ID on both devices to maintain a seamless connection.
- Enable Personal Hotspot: Use your iPhone’s personal hotspot to share its internet connection with your iPad when Wi-Fi is unavailable.
- iCloud Sync: Enable iCloud for apps like Photos, Notes, and Reminders so they sync across both devices automatically.
- Privacy Settings: Regularly review your privacy settings to ensure that your shared data is secure.
Frequently Asked Questions
How can i make calls from my ipad.
By enabling Continuity and Calls on Other Devices in your iPhone settings, you can make and receive calls on your iPad.
What if I don’t have the same Apple ID on both devices?
You need to use the same Apple ID on both devices to link them and use features like Handoff and Continuity.
Will linking my devices drain the battery faster?
Using features like Handoff and Continuity may use more battery, but it’s typically not significant. Ensure both devices are charged regularly.
Can I use these features without Wi-Fi?
Wi-Fi is necessary for most features like Handoff and file sharing, but Continuity and Text Message Forwarding can work over cellular data.
What happens if I lose one of my devices?
Using the same Apple ID allows you to track your device using the Find My app, and you can also remotely erase it to protect your data.
- Update Both Devices.
- Enable Wi-Fi and Bluetooth.
- Sign Into iCloud.
- Enable Handoff.
- Activate Text Message Forwarding.
- Set Up Continuity.
Linking your iPhone to your iPad opens up a world of convenience, letting you share tasks, sync important data, and even make calls across devices. By following the steps outlined above, you can easily connect your devices and enjoy a seamless Apple ecosystem experience.
While the process might seem a bit technical, the steps are straightforward, and Apple has designed its devices to work effortlessly together. Whether you’re switching from emailing on your iPhone to browsing on your iPad or taking calls on your tablet, the link between your iPhone and iPad ensures you stay connected and productive.
For further reading, you might want to explore Apple’s official support pages or community forums for tips and troubleshooting. Now that you’re all set, dive into the interconnected world of Apple devices and enjoy the seamless experience of a linked iPhone and iPad.

Matthew Burleigh has been writing tech tutorials since 2008. His writing has appeared on dozens of different websites and been read over 50 million times.
After receiving his Bachelor’s and Master’s degrees in Computer Science he spent several years working in IT management for small businesses. However, he now works full time writing content online and creating websites.
His main writing topics include iPhones, Microsoft Office, Google Apps, Android, and Photoshop, but he has also written about many other tech topics as well.
Read his full bio here.
Share this:
Related posts:.
- How to Change Bluetooth Name on iPhone (2024 Guide)
- How to Pair iPhone to iPad: A Step-by-Step Guide for Seamless Syncing
- How to Pair iPhone and iPad: A Step-by-Step Guide for Seamless Syncing
- How to Connect Sony Headphones to iPhone
- How to Sync Messages from iPhone to iPad Without iCloud: A Simple Guide
- How to Pair iPhone with iPad: A Step-by-Step Guide for Seamless Syncing
- How to Connect iPad to MacBook Wirelessly: A Step-by-Step Guide
- How to Make All Columns the Same Width in Excel 2013
- Can I Have Two Bluetooth Devices Connected to an iPhone at Once?
- How to Turn off Bluetooth on iPhone 14: A Step-by-Step Guide
- How to Forget a Bluetooth Device on the iPhone 5
- How to Connect a Bluetooth iPhone to a Mac: A Step-by-Step Guide
- How to Connect iPad and iPhone: Simple Steps for Seamless Integration
- Does the iPad Pair With Bluetooth Headphones? Find Out Here!
- How to Enable Handoff in iOS 9
- How to Set up Bluetooth Headsets With IPhones: A Step-by-Step Guide
- iOS 17 Guide: How to Turn Off Bluetooth on iPhone Easily
- How to Connect iPad to iPhone: A Step-by-Step Guide for Seamless Syncing
- How to Use Phone on iPad: A Comprehensive Guide for Seamless Connectivity
- How to Disconnect an iPad from an iPhone: A Step-by-Step Guide
How to force your iPhone or iPad to load the desktop version of a website
Most of the time using a mobile-friendly website is just fine -- until it's not, and you need the full desktop version of a site.

One drawback to relying on an iPhone or iPad for your web browsing needs is that you're almost always using the mobile version of a website. And for the most part, mobile websites are fully capable versions of the same experience you would have using a full desktop-class browser.

However, there are times when the mobile version of a website lacks a feature or capability that the full website offers. If you find yourself in need of the full desktop version of a website, you can force mobile Safari to request and load the full version of a website with just a couple of taps.
When viewing a webpage in Safari, long-press on the Refresh button. A small prompt will show up just below the button, giving you the option to Request Desktop Site . Tap on the drop-down, which will prompt Safari to reload the current page, but this time it should reflect the same experience you would have on a Mac or PC.
Mobile Guides
- Best iPhone
- Best Galaxy S24 Deals
- Best iPhone Deals
- Samsung Galaxy S24 Review
- Best Android Phones
- Best Samsung Galaxy Phone
- Pixel 8 Pro Review
- iPhone 15 Pro/Pro Max Review
- Best iPhone 15 Deals
- Best Foldable Phones
- Galaxy Z Fold 5 Review
- OnePlus Open Review
- Best Galaxy Z Flip Deals
- Best Wireless Earbuds
- Best Noise Canceling Headphones
- Best Headphones
- Best Over Ear Headphones
- Best Wireless Earbuds and Headphones for Making Calls
- Best Headphones for Work at Home
- Best Noise Canceling Wireless Earbuds
- Best Sounding Wireless Earbuds
- Best Cheap Wireless Earbuds
- Best Wireless Headphones
- Best iPhone 15 Cases
- Best iPhone 14 Cases
- Best Power Bank for iPhone
- Best Airpods Pro Accessories
- Best Magsafe iPhone Accessories
- Best Speakerphone
- Best Wireless Car Charger and Mount
- Best iPhone Fast Charger
- Best Portable Chargers and Power Banks for Android
- Apple Watch Series 8 vs Series 7
- Best Apple Watch Bands
- Best Android Smartwatch
- Apple Watch Ultra Review
- Best Smartwatch
- Best Prepaid Phone Plans
- Best Cheap Phone Plans
- Best Unlimited Data Plans
- Best Phone Plans
- Best Phone Plan Deals
- Best Senior Phone Plans
- Best Family Phone Plans
- Best Travel Phone Plans
- Best Verizon Plans
Looks like no one’s replied in a while. To start the conversation again, simply ask a new question.
safari cannot open the page because your iPhone is not connected to the internet
iPhone 11, iOS 14
Posted on Aug 11, 2021 3:51 AM
Posted on Aug 12, 2021 6:48 AM
Hi kamogelo275,
Welcome to Apple Support Communities! We're glad you've reached out for help with this issue you're experiencing when using Safari on your iPhone. Let's get to the bottom of this together.
To start, let us know more about what's going on. Which iPhone model and iOS version are you using? The version can be found under Settings > General > About.
Have you had a chance to restart your device since noticing this behavior? You mentioned that Chrome is working as expected. Are all other apps able to go online without issue?
Let's verify that cellular data for Safari hasn't somehow been inadvertently disabled. You can check this by heading into Settings > Cellular and locating Safari. Ensure that it's turned on.
Here's a guide to help:
View or change cellular data settings on iPhone - Apple Support
We're here for you if you've got any questions.
Have a great day!
Similar questions
- Safari I have a problem with safari, it doesn't work when my Iphone is connected to mobile internet, when I try to get on internet I get a message: Safari cannot open the page beacuse your Iphone is not connected to the internet. In the same timeI can open all others apps like facebook, linkedin, whatsapp, telegram... Do I have to change something in settings to make it work? 695 1
- safari cannot open the page because your iPhone is not connected to the internet what do i do if it shows on the screen while trying internet 749 1
- Safari no longer works. When I open it I get a message that the site can not be found Safari on my IPhone 11 no longer works. When I open it a message appears that says web page not available 1033 1
Loading page content
Page content loaded
Aug 12, 2021 6:48 AM in response to kamogelo275
How to request the desktop version of a website for your iPhone or iPad

While many websites in this day and age have embraced responsive design, which rescales a full webpage to properly fit on smaller screens, there are still a pesky number who insist on serving "slimmed down" mobile versions to iPhone and iPad users. This can be a pain, especially if you're using an iPad and are triggering a far-too-big-for-your-screen mobile display, or you're trying to find a feature that the website owner simply hasn't provided in mobile form.
Thankfully, you can disregard the website owner's wishes and get whatever version you prefer with a quick Safari trick.
Note: While this will work for "m.[domain].com" websites—you just have to retype the original "domain.com" in the URL bar to get the site—you won't get a "desktop"-sized version if the site you're visiting has been responsively designed to scale to certain screen sizes.
How to request the desktop version of a website in mobile Safari
- Visit the affected site in Safari.
- Tap and hold the Refresh button in the URL bar.
- Tap Request Desktop Site .

- The website will then reload as its desktop version.
This will last as long as you have that tab open for that website; close the tab, or enter in a new web address in that tab, and you'll revert to the mobile version if you return.
Master your iPhone in minutes
iMore offers spot-on advice and guidance from our team of experts, with decades of Apple device experience to lean on. Learn more with iMore!
Serenity was formerly the Managing Editor at iMore, and now works for Apple. She's been talking, writing about, and tinkering with Apple products since she was old enough to double-click. In her spare time, she sketches, sings, and in her secret superhero life, plays roller derby. Follow her on Twitter @settern.
A surprising new Beats product launched at Apple's latest event: iPhone 16 cases
iPhone 16 battery life stats reveal that you'll get hours extra from the latest iPhones
The new Apple Watch Series 10 bands will work with older Apple Watch models
Most Popular
- 2 iPhone 16 battery life stats reveal that you'll get hours extra from the latest iPhones
- 3 The new Apple Watch Series 10 bands will work with older Apple Watch models
- 4 Apple loses $14bn Irish tax case against the EU
- 5 iPhone 16 models still come with a SIM card tray everywhere outside the US
One app to find it all.
The Find My app makes it easy to keep track of your Apple devices — even if they’re offline. You can also locate items using AirTag or Find My technology. Or pinpoint friends and family with Precision Finding. Everyone's location stays private every step of the way.
Find your stuff on iCloud.com
Find your Apple devices.
You take your devices everywhere. Which means you might leave them anywhere. Get help finding them in the Find My app or new Find My widget, which lets you track your devices at a glance, right on the Home Screen of your iPhone or iPad.
See all your devices on a map.
Is your iPad at home or back at the office? Use the map to get a full picture of where your devices are — and where a missing one might be. For more info, just tap on a product icon. Some devices can still send their location for up to 24 hours after they’ve been turned off or have low battery life.
- iPod touch
- Apple Watch
- Find My–compatible products
Play a sound to find your device.
When you can’t find something but think it’s nearby or around others who might hear it, you can play a sound to pinpoint its location. The latest AirPods cases have built‑in speakers that deliver louder tones, so it's even easier to locate them.
Set it so you won’t forget it.
Find My can even let you know if you leave your devices in an unfamiliar location. Just turn on Notify When Left Behind on your iPhone, Apple Watch, or iPad. Want to leave your MacBook at the studio? Easy. You can fine tune your notifications by device and location.
Display a message for someone who finds it.
If your device or AirTag goes missing, you can put it in Lost Mode. That starts tracking its location, sends you a notification when it pings the network, and sets your passcode to protect your data. You can also let people know how to reach you. They can simply view your message on your device’s Lock Screen, or tap your AirTag with their smartphone to get your contact info. 1
Erase it with ease.
Worried that your device has fallen into the wrong hands? You may want to erase it remotely to delete your personal data and reset your iPhone, iPad, iPod touch, Apple Watch, or Mac. If you retrieve it, you can restore your data from your iCloud backup.
Lock it down. Automatically.
Activation Lock is designed to prevent anyone else from using or selling your device. When you enable Find My on your device, Activation Lock is turned on automatically.
Your Apple ID and password will then be required in order to erase or reactivate it. And if someone is able to erase your device, the Hello screen will show that it’s locked, locatable, and still belongs to you.
You can even find devices that are offline or powered off.
If your missing device can’t connect to the internet or has little to no battery life, the Find My app can still help you track it down using the Find My network — hundreds of millions of iPhone, iPad, and Mac devices around the world. Nearby devices securely send the location of your missing device to iCloud, then you can see where it is in the Find My app. It’s all anonymous and encrypted to protect everyone’s privacy.
AirTag can help you find just about anything.
Misplaced your keys? Forgot your purse? If they have AirTag attached, they won’t be lost for long. The Find My network lets you track items on a map, play a sound on your AirTag — and even get the distance and direction to your AirTag with Precision Finding. Share AirTag or Find My network accessories with up to five people, so friends and family can track items, too.
Learn more about AirTag
Find your friends.
Invite people to share their location with you, using Find My friends. Then you can keep in touch with one another, easily find your friends in a crowd, or know when a family member has arrived home safely.
See where everyone is on a map.
Live Locations lets you share your location with friends and family in real time — for an hour, a day, or indefinitely — it’s up to you. If someone’s on the move, you can get a sense of the direction they’re traveling in and how fast. Making it even easier for you to find each other and stay connected.
Find your friends in a crowd.
Want to find a friend in a crowded train station or busy park? Look no further than Precision Finding. It’s powered by the second-generation Ultra Wideband chip, now with three times greater range, so it can lead you right to them. (Only on iPhone 15 or iPhone 15 Pro.)
Know when they leave. Know when they arrive.
If you like, you can get notifications when your child arrives at school or a family member leaves work. Notifications are easy to set up, and each person gets the choice to opt in. So everyone’s privacy is respected.
Let friends know how remote you go.
If you’re on an adventure without cell service or Wi‑Fi, you can use Find My on iPhone 15 and iPhone 15 Pro to share your location over satellite. 2 So everyone’s in the loop.
What else can Find My find?
Find My technology can now be built into all kinds of things — like bikes, backpacks, and more. So anything that works with Find My can be added right next to all your Apple stuff in the Find My app and widget.
Products that work with Find My.
From strollers to smart tags, all these products are compatible with the Find My network — and there’s more on the way. Check this list for the latest information.
Soundform Immerse TWS earbuds
Soundform Pro True wireless earbuds
Knog Scout bike alarm and finder
Orbit Velo bike finder
VanMoof S3 & X3 e‑bike
Pebblebee Clip
Swissdigital Design
Swissdigital Design Finder Keychain
Ultion KeyTag
qborn stroller
Multipurpose tags
4smarts Sky Tag
Chipolo One Spot
eufy Security
Smart Finder
Kashimura My Tag
Minew F6 Smart Finder
Nutale Smart Tag
onn. Item Locator
iTag item locator
TingTing Airt My
Tranjan Finder
verbatim My Finder
Yip Smart Tag
Hyper HyperPack Pro
Swissdigital Design backpack
Swissdigital Design Finder
Swissdigital Design luggage
Swissdigital Design handbag
Targus EcoSmart Hero backpack
Targus 15.6" Cypress Eco Hero Backpack
Wallet cards
Chipolo Card Spot
Pebblebee Card
Rolling Square
Everyone’s location data stays private.
Just like every Apple product, Find My is designed to put you in control of your data. Apple receives location information only when you actively locate your device, mark it as lost, or enable Send Last Location. Location data is encrypted on Apple’s servers and only retained 24 hours. And when the Find My network is used, everyone’s information is kept private — even from Apple.
Learn more about Apple and privacy
How to set up and use Find My
How to share locations with friends and family, how to locate your device.
If your iPhone or iPad is lost or stolen
If you lost your iPhone or think it might be stolen, Find My can help protect your device, accounts, and personal information.
Mark as Lost on iCloud.com/find to lock your device
To sign in to iCloud.com/find , you don't need to enter a verification code — so you can use Find Devices, even if your trusted device is lost or stolen.
If you're asked to enter a verification code after signing in with your Apple ID and password, instead select the Find Devices button.
When you mark your iPhone or iPad as lost, your device is put in Lost Mode — it's locked with a passcode, payment cards and passes that you use with Apple Pay are suspended, and you can display a phone number and message for someone who finds your device.
Sign in to iCloud.com/find .
Select your iPhone or iPad. If available, the map zooms in on your device's location.
Select Mark As Lost, then follow the onscreen instructions to leave a phone number and message.
Select Activate to lock your iPhone or iPad with its existing passcode. If you don't have a passcode set, you're asked to create one.
Learn more about using Lost Mode on iCloud.com
If Find My wasn't turned on for your device before it was lost or stolen, it won't appear at iCloud.com/find or in the Find My app and you can't mark it as lost or remotely erase it. To protect your personal information, you should sign in to appleid.apple.com and change your Apple ID password right away.
Find your iPhone or iPad
When you select your iPhone or iPad, the map zooms in on its location.
If your iPhone or iPad was stolen or it appears on the map at a location that you don't recognize (such as an unfamiliar address), don't try to recover the device yourself. Instead, contact local law enforcement.
If you have Stolen Device Protection turned on for your iPhone
If your iPhone isn't in a familiar location, you need to authenticate with Face ID or Touch ID to turn off Lost Mode.
If you or someone else tried to change your Apple ID password on your iPhone at an unfamiliar location, your iPhone might not appear on the map at iCloud.com/find . You're still able to Mark as Lost to lock your device.
Learn more about Stolen Device Protection for iPhone
Other ways to find your iPhone or iPad
If you have another Apple device — one that’s signed in with your Apple ID or one that belongs to a member of your Family Sharing group — you can use the Find My app to lock your iPhone or iPad and help you find it.
Use your Apple Watch
Think your iPhone is nearby? If you have an Apple Watch, open Control Center and tap the Ping your iPhone button. You can tap to play a sound on your iPhone or hold the button down to flash the iPhone flashlight, and you can even get directions to your phone's location right on your watch.*
Use the Find My app on another device
If you have another Apple device that's signed in with your Apple ID, use Find My on that device to lock and find your iPhone or iPad.
Use Find My on another Apple device
Use a family member's device
If you're part of a Family Sharing group, your devices can appear in Find My on your family members' devices.
Use a family member's iPhone
*To use Precision Finding to get directions to your iPhone with the Ping your iPhone button, you need Apple Watch Series 9 or Apple Watch Ultra 2 and iPhone 15 or later. If your Apple Watch is in Low Power Mode , you can't get directions to your iPhone with the Ping your iPhone button.
If your iPhone or iPad is lost permanently or was stolen
If your iPhone or iPad is lost and you're unable to find it, or if your device was stolen, follow these additional steps to protect your accounts and personal information, and replace your device (if applicable).
Report your missing iPhone or iPad
Report it to local law enforcement. They might request the serial number of your iPhone or iPad, which you can find even if you don't have the device.
Contact your wireless carrier to report your missing iPhone, ask them to disable your account, and file a claim if your iPhone is covered under your wireless carrier plan.
Learn how to find the serial number of your device
Update your account information
Change your Apple ID password: Sign in to appleid.apple.com , then choose Sign-in and Security. Select Password and follow the onscreen instructions.
Remove your iPhone or iPad from your Apple ID trusted devices: Sign in to appleid.apple.com , then choose Devices from the sidebar. Select your device, scroll down, and select Remove from account.
If you filed a claim with AppleCare+ with iPhone Theft and Loss, don't remove the iPhone from your Apple ID (or from Find My) until your claim has been fully approved.
If you have Stolen Device Protection turned on for your missing iPhone, you might not be able to update some account information on the web (such as changing your Apple ID password or removing your device from your Apple ID). To make these account changes, you can use another trusted iPhone, iPad, or Mac.
Remotely erase your iPhone or iPad
Before you erase your device, make sure that you've tried everything else to find it. Erasing your device can't be undone.
You can remotely erase your device using the Find My app or at iCloud.com/find .
If your device has iOS 15 or later, or iPadOS 15 or later, you can still use Find My or iCloud.com/find to locate it after you erase it.
If you have AppleCare+ with Theft and Loss, don't remove the device from Find My or your Apple ID, even if you remotely erase it.
File a claim with AppleCare+ Theft and Loss
If your iPhone is covered by AppleCare+ with Theft and Loss, file a claim for an iPhone replacement .
Don't remove your iPhone from Find My or your Apple ID until your claim has been fully approved.
AppleCare+ with Theft and Loss is not available in all countries and regions.
Information about products not manufactured by Apple, or independent websites not controlled or tested by Apple, is provided without recommendation or endorsement. Apple assumes no responsibility with regard to the selection, performance, or use of third-party websites or products. Apple makes no representations regarding third-party website accuracy or reliability. Contact the vendor for additional information.

Related topics
Explore Apple Support Community
Find what’s been asked and answered by Apple customers.
Contact Apple Support
Need more help? Save time by starting your support request online and we'll connect you to an expert.
- a. Send us an email
- b. Anonymous form
- Buyer's Guide
- Upcoming Products
- Tips / Contact Us
- Podcast Instagram Facebook Twitter Mastodon YouTube Notifications RSS Newsletter
How to Access iCloud on iPhone, iPad, Mac, Windows, and the Web
iCloud is Apple's cloud platform that serves and secures all Apple devices. It can save and synchronize all your photos, contacts, files, reminders, and notes, and you can also use it to store device backups. You can access and manage your iCloud data on iPhone , iPad , Mac, Windows, and the web. Keep reading to learn how.

iCloud Backups are another indispensable service from iCloud. With an iCloud Backup of your iPhone or iPad, you can restore it on a new device, or use it if you need to erase or restore a device.
iCloud comes with 5GB of free storage and you can add more storage at any time. The 50GB plan costs $0.99 per month, while the 200GB and 2TB plans cost $2.99 and $9.99 per month, respectively.
How to Access iCloud on iPhone and iPad
- Launch the Settings app on your iPhone or iPad.
- Tap your name in the banner at the top.
- Tap iCloud .

- Scroll down and tap iCloud Backup to automatically make backups of your iOS device to the cloud.
- Keep scrolling down to manage any third-party apps you have installed that can sync with iCloud.
How to Access iCloud on Mac
- Click the Apple symbol in the top-left corner of your screen.

There's no option to back up your entire Mac to iCloud, but you can do so locally by using an external drive and Time Machine .
How to Access iCloud in Windows
With iCloud for Windows, the photos, documents, and bookmarks on your PC are updated automatically on your Apple devices.
- Download iCloud for Windows .
- Restart Your Computer.
- Make sure iCloud for Windows is open. If it doesn't open automatically, go to Start , open Apps or Programs , and open iCloud for Windows .

- Use the checkboxes to select the features and data that you want to keep up to date across your devices.
- Click Apply .
How to Access iCloud From a Web Browser
- Visit the iCloud.com website on your web browser of choice.

- Once logged in, you can use the iCloud web apps to access your data, documents, and photos. You can also use tools in Settings -> Advanced to recover files that have been deleted from iCloud , as well as recover Contacts, Calendars, and Reminders that have been lost.
Note that accessing iCloud via the web is also handy for immediately signing out of all browsers that are signed into iCloud should you suspect someone has gained unauthorized access to your account and for managing apps that let people look you up using your Apple ID. It also displays all devices you're signed into, offers up a look at available storage, and displays the members of your Family Sharing group.
Get weekly top MacRumors stories in your inbox.
Popular Stories

Apple Announces iPhone 16 Pro and iPhone 16 Pro Max with Larger Displays, New Camera Control, and More

Apple Event Live Blog: iPhone 16, Apple Watch 10, and New AirPods!

First iPhone 16 Carrier Deals Include iPhone 16/16 Pro For Free, $1,000 Off iPhone 16 Pro Max

Apple Discontinues iPhone 15 Pro, iPhone 15 Pro Max and iPhone 13

Apple Updates AirPods Max With USB-C Port and New Colors

Apple Announces Thinner Apple Watch Series 10 With Bigger Screen Than Ultra

Apple Shares Full List of Over 250 New Features and Changes Coming With iOS 18
Next article.

iOS 18 brings major changes to the Messages app, with Apple adding several fun features.

The Photos app redesign has been one of the most controversial changes that Apple made in iOS 18.

iOS 18 is an update designed for the iPhone, but it adds several new features to the AirPods

The Phone app doesn't often get updated, but with iOS 18 and Apple Intelligence, it's getting a major overhaul.

Action and Camera Control buttons, A18 chip, camera improvements, and more.

Larger displays, new Camera Control button, camera improvements, and more.

Updates to Mail, Photos, Messages, and more, with Apple Intelligence features throughout.

iPhone Mirroring, Safari improvements, new Passwords app, and Apple Intelligence features throughout.
Other Stories

7 hours ago by Joe Rossignol

5 days ago by Joe Rossignol

6 days ago by Joe Rossignol

1 week ago by Tim Hardwick
IMAGES
VIDEO
COMMENTS
Follow the below steps to do it. Step 1: Open Settings and tap on General → Transfer or Reset iPhone. Step 2: Tap on Reset → Reset Network Settings. Follow the on-screen instructions to finish ...
Connect to a different network. Try to load a website, like www.apple.com, using cellular data. If you don't have cellular data, connect to a different Wi-Fi network, then load the website. If you're using a VPN (Virtual Private Network), check your VPN settings. If you have a VPN turned on, some apps or websites might block content from loading.
It's tricky to switch back to the mobile version of the website in Safari. Let's see how to request mobile website in Safari on your iPhone or iPad.#Safari #...
Next, after you go through the description of the warning, click on the "visit this website" hyperlink located all the way at the bottom, as shown below. Now, you'll get a pop-up in Safari. Choose "Visit Website" to confirm your action and access the website. And there you have it, you're viewing the site. Again on the Mac you'll ...
Hello bwh, If you are unable to access specific sites in Safari on your iPhone, follow these steps from If Safari displays a blank page or quits on your iPhone, iPad, or iPod touch to start:. Connect to a different networkTry to load a website, like www.apple.com, using cellular data.If you don't have cellular data, try connecting to a different Wi-Fi network and then try loading the website.
To visit sites without leaving a history, turn Private Browsing on. Clear cookies and cache, but keep your history. Go to Settings > Safari > Advanced > Website Data. Tap Remove All Website Data. When there's no website data to clear, the button to clear it turns gray. The button might also be gray if you have web content restrictions set up ...
As iPadOS 13 automatically loads desktop websites, iPad users won't need to look for this feature after updating. Here's how this feature works on devices running iOS 12 and iOS 13. Related: iPadOS Will Almost Make Your iPad a Real Computer. iOS 12 and Below Open the Safari app on your iPhone or iPad and load a website.
Open Safari. Go to the website you want to load. Tap the aA icon. Tap Request Desktop Site. To revert the changes, follow the steps above, but tap Request Mobile Site. Of course, if you know that ...
Step 1: Update Both Devices. Make sure both your iPhone and iPad are running the latest version of iOS. Updating your devices ensures they have the latest features and security updates. To do this, go to Settings > General > Software Update on both devices and follow the prompts to update if necessary.
Launch Safari on your iOS device and navigate to the website in question. Long press the Reload button in the far right of the address bar. On iPhone, tap Request Desktop Site at the bottom of the ...
Our Goal Is to Make URTechSupport Your number one online Source for Consumer Tech support content For the non Technical if find our content helpful you can s...
When viewing a webpage in Safari, long-press on the Refresh button. A small prompt will show up just below the button, giving you the option to Request Desktop Site. Tap on the drop-down, which ...
Sounds like a developer problem. The web server providing the app may be detecting that the version of Safari on your iPad Pro as not compatible, especially if the app is pretty old and predates the version of Safari. Are you sure the app can run on the version of iOS or iPadOS on this iPad Pro? -
Let's verify that cellular data for Safari hasn't somehow been inadvertently disabled. You can check this by heading into Settings > Cellular and locating Safari. Ensure that it's turned on. Here's a guide to help: View or change cellular data settings on iPhone - Apple Support.
View a webpage open on another device. In the Safari app on your Mac, click iCloud Tabs in the sidebar. If the sidebar isn't shown, click the Sidebar button in the toolbar. Scroll to the list of your other Apple devices. Click a webpage listed below a device to open it. Webpages in private tabs and windows aren't shown.
Visit the affected site in Safari. Tap and hold the Refresh button in the URL bar. Tap Request Desktop Site. The website will then reload as its desktop version. This will last as long as you have that tab open for that website; close the tab, or enter in a new web address in that tab, and you'll revert to the mobile version if you return.
To send your device to Apple for service, you need to take a few extra steps to prepare your device. After you back up your device, erase it to protect your personal information and remove it from your Apple ID: In Settings, tap General > Transfer or Reset iPhone (or iPad), then tap Erase All Content and Settings.
Find your Apple devices. You take your devices everywhere. Which means you might leave them anywhere. Get help finding them in the Find My app or new Find My widget, which lets you track your devices at a glance, right on the Home Screen of your iPhone or iPad.
Tap the (i) button and toggle on the Show in Share Sheet option. Now, open the Safari browser and visit a web page of your choice. View source code shortcut on share sheet on Safari. Touch the Share button on the Safari app and scroll down to find the View Source Code shortcut.
Select your iPhone or iPad. If available, the map zooms in on your device's location. Select Mark As Lost, then follow the onscreen instructions to leave a phone number and message. Select Activate to lock your iPhone or iPad with its existing passcode. If you don't have a passcode set, you're asked to create one.
How to Access iCloud on iPhone and iPad. Launch the Settings app on your iPhone or iPad. Tap your name in the banner at the top. Tap iCloud. Use the toggles next to the apps and data ...