
Vintage Travel Poster Tutorial
Learn how to make your very own Vintage Travel Poster in Illustrator.
- Post author By Jeremy Chabot
- Post date March 9, 2021

Introduction
Welcome to my Vintage Travel Poster Illustrator Tutorial. I wanted to make this to teach and inspire others how I make my Vintage Travel Posters, which you can check out here. Art should be shared and celebrated, not hoarded and kept a secret. If you asked me, I wouldn’t say that I’m an expert at Illustrator and this tutorial should work for someone with a decent understanding of the program. I developed my skills and abilities over many years and slowly created this process. If you want to learn more about my “why,” click here . Basically, what I do is trace real images in Illustrator in order to create my posters.
Alright, that’s enough about my story. Let’s dive right in. In order to help you follow along and get started, I’ve included the original image and an SVG File Template that you can download. I like to have the original image open at all times so I can reference it. If you don’t feel comfortable, then you can create your own illustrator template and try to match it to my specifications.
If you don’t feel comfortable, then you can create your own illustrator template and try to match it to my specifications. Keep in mind that you’ll have to try and match the photo up with mine for the rest of the tutorial to work.
- Artboard Width: 1296px
- Artboard Height: 1728px
- Border Width: 1152px
- Border Height: 1476px
If you open the Poster Background Layer, you’ll see that I’ve already included the image I used as my model. You can find the original image here . I like to use images I’ve taken myself, whenever I can; however, there are so many places in the world and traveling can be difficult and expensive, so I rely on images I find on the internet. Pixabay is a great website for finding free images and vectors.

Warning, this is a pretty long tutorial and it actually takes a few hours to actually accomplish the entire thing. So, if you’ve had to take a break and you need to jump to a different section, you can do so here: Section 1 , Section 2 , Section 3 , Lighthouse Method 1 , Lighthouse Method 2 , Sky and Water , Finishing Touches and Text .

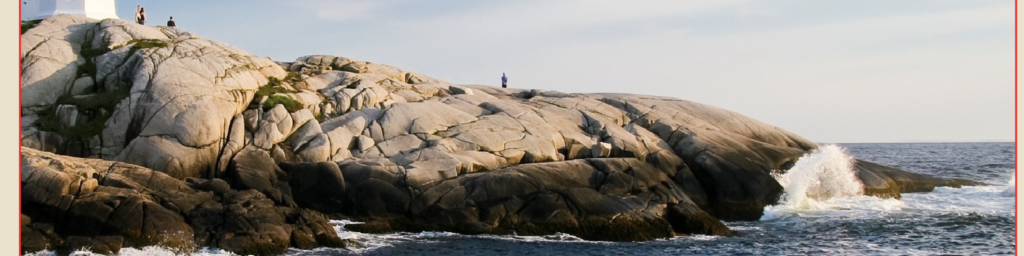
The way I start my posters is by breaking it down into smaller sections. It is much easier to tackle a smaller section. Typically, I also start at the front and work my way back. So, in this image, the best place to start is with the rocks directly in front of us.

I’ve broken this up into 3 smaller sections as well. The area on the right, the large section in the middle and the small rocks on the left. Start with making an outline of the area using the Pen tool. Then connect anchor points all around to make the shapes. From there, just add some detail.
Subsection 1

So as we can see on the left rock, there is a crack and some dark spots near the bottom.
So, using the pen tool again, begin drawing the detail. For the purpose of this tutorial, I used different outlines to designate the different elements. The teal outline is the dark spots and the blue outline is the crack in the rock. Keep everything in outlines until you’re absolutely finished drawing or editing. Next, let’s move onto the main section in the middle.
Subsection 2

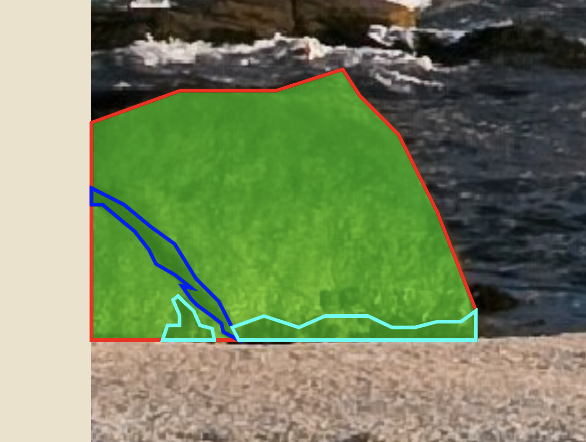
Again, just connect the anchor points and follow along with the general shape of it. There’s no right or wrong way to do this. Just connect points until you’re happy with the shape. Then start adding some details. Notice that this area has a puddle and some small cracks in the rock.

Starting with the cracks, start making a bunch of anchor points and kind of following with the actual crack. It is okay to freestyle a bit, because that’s what makes it unique. These posters don’t have to be perfect replicas of the scene. They just need to capture the essence.

As you can see, my cracks are larger than the real ones. The bottom crack was pretty small though, so I just drew a simple path and adjusted my stroke size to match the real one.

The problem with this is that you can’t get the pointy ends that many of these cracks have, so you’ll want to go to Object, Expand, expand the “Stroke,” then add some anchor points on each end and drag them outwards to make it pointy.

Next, is the puddle. This is made up of 2 parts, the dark ring and the water itself. Starting with the water, use the border of the poster as your edge and connect anchor points around the water to create a similar shape.

Next, to add the dark ring, trace the edge of the puddle and take your cursor slightly outwards and go back around and follow along. This ensures you don’t have any space showing underneath.

The final thing is to trace the shadow of where the indention in the rock begins. Again, retrace the lines you already made for the dark part of the puddle, move your cursor outwards and then follow the image.
Subsection 3

The last subsection is very similar. Draw by drawing the outline of the rocky area.

Then draw the detail, which in this case is really only the cracks. It simplifies the detail, but it still looks great when you’re done. If you wanted to go into more detail, you could try to draw each rock individually and line them up and create the cracks that way. I chose to take the simpler route, because I wanted to keep it looking more uniform for the rest of the poster.

So, when you decide you’re ready, you can begin adding color from the rocks. An easy way to do this is to select the object or path you want and use the eyedropper tool to match the color from the image. Here’s how mine turned out.
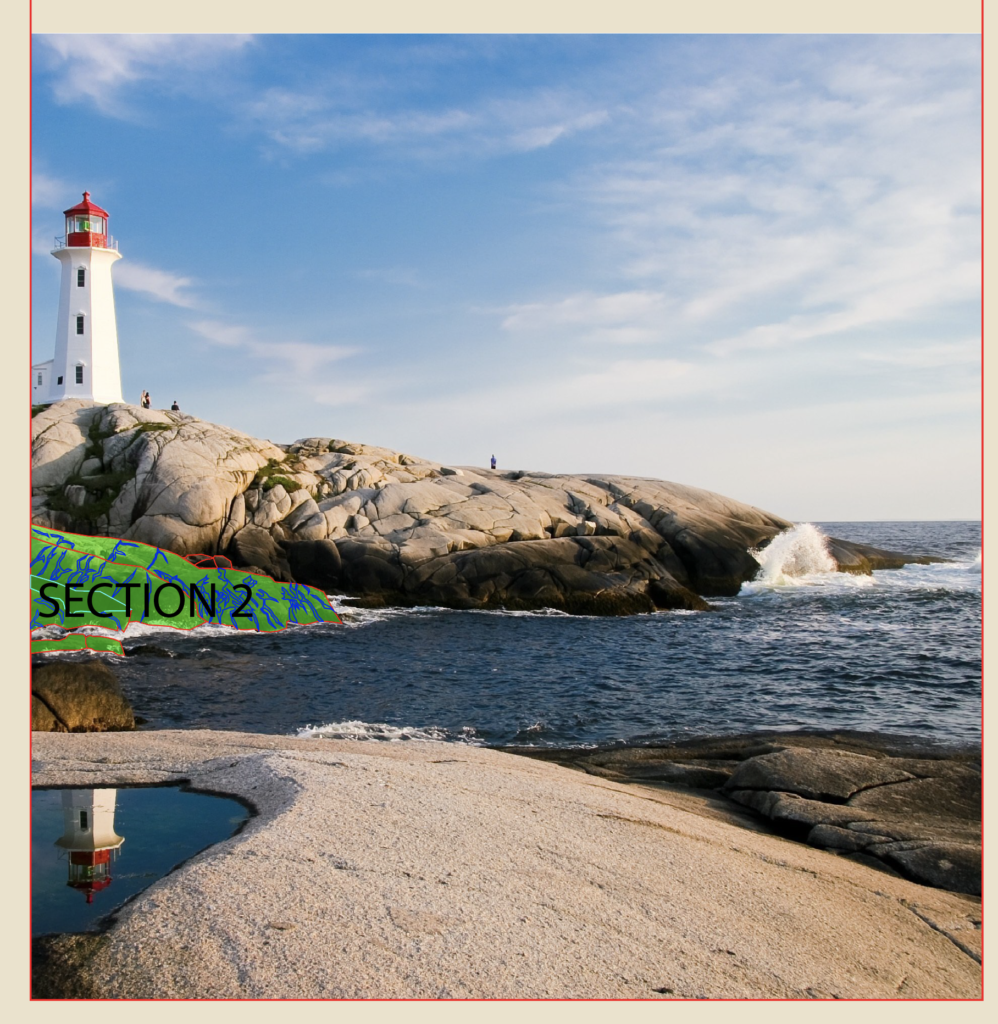
I’m going to quickly go over these next two sections, since the process is basically the same as the first one. So the second section is what I marked in the image above. I broke it down into four smaller ones.

Divide the rocks into smaller groups, outline them and then add the color to the rocks and the cracks. The closer rocks are slightly darker and the further rocks are slightly lighter in color. Here’s how mine turned out.

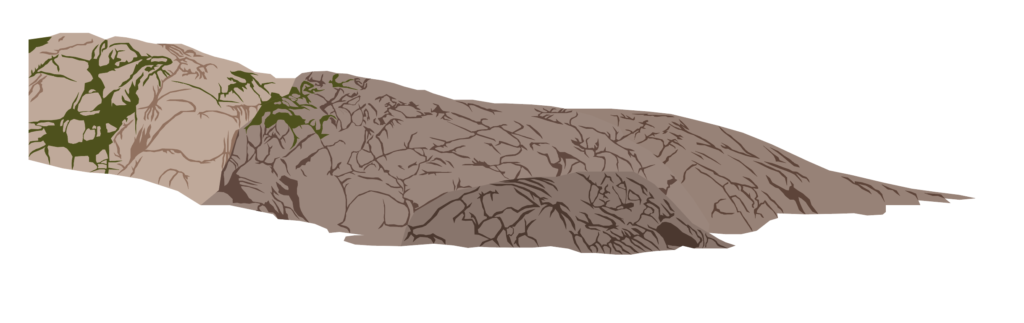
Again, this section is pretty much identical to the previous two.

Divide this large rock structure into smaller groups and then trace the shapes and add detail. This one does have a twist though. Instead of only having cracks, there is some moss and grass on part of the rock. There’s no wrong way to go about this. Just do your best and use the same technique you used to make the cracks.
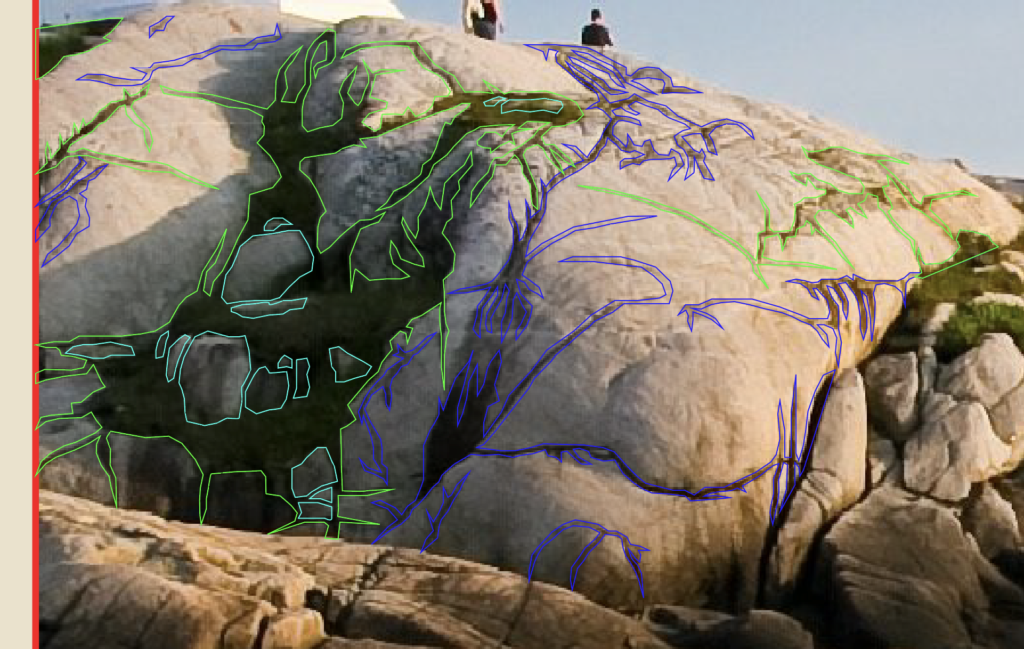
If we zoom in on the image, you can see that there were some rather large areas of detail in the picture. Blue lines mean it is a crack, green means grass and the teal means it is a rock I had to draw back in. I ended up doing this for all sub-sections, but I just wanted to highlight it here.
Either way, here is how mine turned out after I finished outlining and adding color to the rocks.
Optional Step: I initially chose a darker color for all the cracks, but wanted to soften it up a bit, so I messed with the blending mode. You can find all sorts of options in the Transparency menu. For mine, I chose “Soft Light” and I applied it to all the cracks I drew in the picture.
Lighthouse Method 1

Now, the part we’ve all been waiting for, the lighthouse. I will outline two methods you can use. I ended up going with the second method, but I wanted to demonstrate both so that you could choose how you want to handle situations like this in the future. The reason I have two methods is because the details can be pretty fuzzy when examining the original image in Illustrator, especially when you zoom in really close to trace the lighthouse. While this first method is more true to the picture, it is also more difficult to get to look right in my opinion. If you want to simplify things, then I would recommend that you click here to skip ahead to Method two , otherwise just keep going.
Side Entrance

This first way is to simply trace the lighthouse as is and try to get the perspectives right. Start with the side entrance, draw the roof, the roof perspective (dark area), then the body of the structure, then the door and the doorknob and door perspectives to give it some semblance of depth. Now, I tend to maybe overdo it on the details of my buildings. The truth is that you could probably do without the perspectives and your structure would look perfectly fine.

Let’s move onto the center of the lighthouse. Trace the body and the curves.

Then make the first of the three windows. Outline the glass and where the perspective around the window are. Because it is slightly at an angle, you’ll have to skew the larger rectangle.

Then, add the cross sections across the window.

Next, fill in the gap between the window and the larger rectangle by connecting anchor points to make three shapes. A top and bottom part (which I like to make the same color when finalizing the shape’s color) and a side part (which will be slightly different colored than the top and bottoms).

Lastly, make the triangle roof detail that sits above the window. Because it is at an angle, there needs to be a side perspective and a bottom one as well. Start with the main part, then add the side perspective and finally the bottom one. If you really wanted to get technical, you could follow this process two more times and tweak the perspectives slightly to match the angles of the windows perfectly, but I promise it doesn’t really matter that much.

Next, select all the window shapes together and group with CTRL/CMD + G, then hit CTRL/CMD + C, then CTRL/CMD + F to paste a copy of the first window in place and use the mouse to drag it upwards. Do it one more time for the last window.

Next, use the pen tool to trace the left side of the lighthouse, then the right side. If you look closely, you’ll see that there are actually two areas to the right of the section with windows (in green and purple). Each section basically has five parts (numbered 1-5 in red), designated by where you placed anchor points. From bottom to top, there’s a bottom lip, an angled part, the large body, another angled part and a final lip. So the way I handled this was to start with my outline like above, then use the pen tool to make each of the five parts by tracing over them and closing them off (like the red shape on number two). I did that for all five parts on all four sides of the lighthouse. Don’t forget the little window on the left section.
Top Section

Moving upwards, mark the six spots where there are posts and add the chains. Make sure the chains stop at the bounds of the red structure, otherwise it will look like your chains don’t go around.

Similar to the body of the tall area below, you’re going to want to outline the entire red structure. Make sure you mark the roof perspective and outline the roof and the window frame. Then, just like before, section off each of the parts using each anchor point as a boundary, since they each represent a different angle of the red structure. Remember to keep some space in between the windows since they have individual frames. Those places are designated by a teal line.

Next, we have to draw the actual light fixture. Don’t worry about lining it up exactly with the frame of the structure. This will sit behind the window outline and the actual red structure pieces. Again, this image’s quality is pretty heavily reduced when you zoom in, so I looked for another picture of this lighthouse on Google and modeled it after that. There’s a main body, the light itself, a top area and a base structure on which it sits.

Don’t forget the top section on the roof. this one is basically a small version of the main red section, I went ahead and made it “flat,” meaning I didn’t include the perspectives and alternative angles. It was hard to match the picture because the quality is so reduced. So I would start by making bottom section, the middle, the “roof” and the perspective (in yellow) where it attaches to the middle part and the top pointy thing in that order.

The final thing to remember is the perspective on the ceiling and the back of the structure that is visible through the glass. This is outlined in purple.

Then, just start adding your color to the shapes you made. I like to use the eye dropper tool and pull from the actual image. So, once you put it all together it might look something like mine.
Lighthouse Method 2

Out of the two methods I’m covering, this is the one that I used. I felt like it was easier and that the accuracy of the exact positioning of the lighthouse didn’t matter that much. At first this might seem just as complex, but what you’ll find with Method one is that getting the perspective to look right can be difficult and frustrating.
For this method, I found a different, closer up picture of the lighthouse; which can be found here . Basically, I got a higher resolution photo of the lighthouse so that I could see more detail and trace it more easily. Another difference is that this picture is taken from such an angle that you only see 3 sides and it is more symmetrical than the original picture, which again simplifies the process greatly. However, keep in mind that we want to keep the side facing us from the other picture, so we are going to trace this angle, but keep the features from the other one.

What I mean by that is begin by tracing the middle body section of the lighthouse, but then add the three windows to this section, like the other photo of the lighthouse has. So although this version of the photo is from a different angle, you’re going to use it to match the generic structure while keeping the details from the original photo. Start off by dividing this middle section into five parts: the base, the angle, the main body, the upper angle and the top lip.

Next, move onto creating the window. Because this angle is straight on, it is easier to get the glass and window perspectives right. Build a rectangle for the glass and then duplicated it and make it larger to create the window’s frame. Repeat this process another time to line up where the window’s frame perspective lines up (blue outline), since the window is technically inset in the building.
Lastly, add the horizontal cross sections on the window. Do this by making a small rectangle across the inner-most rectangle, put it in the center of the object and duplicated it. Then move each one upwards and downwards the same distance. An easy way to move shapes and objects is to use Shift + Arrows. This moves it greater distances than just the arrows. It also makes it easier to keep track of how far you move objects by counting how any Arrow presses you do.

The next step is to use the pen tool and fill in the gaps between the second and third rectangles on the window. As seen in blue and magenta outlines, create a left and right perspective followed by a top and bottom one. These are to help give the window the illusion of being inset in the building.

The last step on the window is to create the triangular overhang part above the window (Red). Again, this will need a perspective shape (teal) behind it in order to give it the illusion of being three dimensional. Next, select the objects that are part of your window and group them with CTRL/CMD + G, hit CTRL/CMD + C, then CTRL/CMD + F to paste a copy in place and drag the window upwards. Do it one more time to place the bottom window. Group your middle section and the windows together using CTRL/CMD + G.

Since this method creates a symmetrical lighthouse, we only need to worry about making one of the side sections. I started with the side with the right. Use the middle section to help you align everything and try to match the body of the lighthouse. Don’t forget to curve the line to match the shape of the lighthouse. You can quickly access the Anchor Point Tool to manipulate the curvature of lines with Shift + C. Once you’re happy with how it looks, group it together and duplicated it.

You can either right click, transform, reflect and then drag the group to the opposite side, or you can press O on the keyboard to open up the reflect tool. Left click to place your reflection point in the middle of the middle body section and then just left click and drag your mouse to spin the side area around. Either way works.

Now that the base of the lighthouse is complete, it’s time to move up to the upper section. Mark the four spots where there are posts around the perimeter of the top section. Make sure the chains stop at the bounds of the red structure, otherwise it will look like your chains don’t go around. You’ll notice that this picture isn’t perfectly symmetrical, but for the purposes of this tutorial, we can pretend that it is. Again, you only need to make one side of this area first. Once you’ve done that, group and duplicate and use the same techniques I mentioned in the above section to create the entire rail area. Keep in mind that when you order the layers, you’ll want to place this in front of the next section we create, but after the body section below.

Alright, so the next section is going to be the Red area that houses the light and makes up the roof. Start with a square-like rectangle for the base. Then make another one for the area that houses the window. Duplicate that rectangle with CTRL/CMD + C then CTRL/CMD + F to paste it in place. Now shrink it to match the size of the glass. Select both of those rectangles, make sure the smaller one is on top in the layers panel, navigate to the Pathfinder panel and choose Minus Front. This creates a complex path that basically hollows out the square.

This way, you can create the frame of the window. Remember, you’re going to want to see through in order to see the light. You can fill in that area with another rectangle and adjust the transparency in order to create a glass effect.

Next, add the sliver that’s above the window and create the roof that goes up to the top detail. Don’t forget to leave some space so you can add some perspective to make it look like the roof hangs over the window. The topmost part of this section will attach to the top detail.

This section is basically a small version of the main red area. Make a bottom section, the middle, the “roof” and the perspective (in yellow) where it attaches to the middle part and the top pointy thing. The picture makes the outlines look disconnected from each other, but that’s just because of the sharp angles and the difference in line thickness.

Next, we move onto the side next to the middle of the red area. Duplicate the middle area, move it over to the right, align your anchor points and then adjust the perspective to match. If you wanted to, you could build this side from scratch, but I find it easier to duplicate the middle and then adjust it to match what I need from there.

Using the duplication and reflection techniques I previously mentioned, create the left side. There, you’ve just recreated the entire top area. All that’s left is to make the light.

Next, we have to draw the actual light fixture. There’s a main body, the light itself, a top area and a base structure on which it sits. Make sure to place it behind the Red Structural pieces in the layers panel.

Another thing to remember on this top section is the perspective on the ceiling and the back of the structure that is visible through the glass. This section is filled in with magenta.

The last part we need to draw is the entrance on the side of the lighthouse. For this, I went back to the original image, because I wanted to get the perspective right. Go ahead and switch back to the original image if you haven’t yet. Select and group all the objects that make up your lighthouse. Then move the group over top of the lighthouse from the original image, shrink it and try to line it up as best as you can.
To draw the side entrance, start by drawing the roof, roof perspective (dark area), then the body of the structure, then the door and the doorknob and door perspectives to give it some semblance of depth. Now, I tend to maybe overdo it on the details of my buildings. The truth is that you could probably do without the perspectives and your structure would be perfectly fine.

Sky and Water

I always do these sections last since they are at the back of the image. Just draw a rectangle that covers the area where they sky is. Then match up a second rectangle and draw it downwards to create the water area. The sky is pretty simple, because you can just use the eye dropper tool to match the blue from the image.

Another option is to open up the Swatches Menu by going to Window, then Swatches. In the bottom left corner, there is an icon that resembles several books. Click that, then gradients, then sky. This will bring up several pre-made sky gradients.
There are lots of options that range from daytime to overcast and beautiful sunsets. Once you find one you like, just click on it and make sure the angle is correct in the “gradient” window. For some reason, mine always defaults to a zero-degree angle, so I have to change it to ninety degrees. The nice part too is you can always edit the colors to make it your own.

But for this poster I just used a pre-set, daytime gradient that I felt matched the picture. The last step to complete the sky is to add in the clouds. I often find that clouds are difficult to draw. Which is why I almost always simplify them.

As you can see, in the original image, they are quite wispy and drawing these would be pretty difficult.

So, to make this easier, try to draw long, skinny clouds that look pretty wispy. Use the pen tool and the Anchor Point tools to draw the shapes and eliminate any jagged edges by rounding them.

Then, instead of leaving them as outlines, select them all and use the eye dropper tool to pull the color from the clouds on the image. As you can see in the image above, it still doesn’t look right. The color is too harsh and they don’t look like real clouds.

There’s a pretty cool tool that might get overlooked by a lot of people. In the Transparency menu, you can use the dropdown next to where it says “normal.” This is the blend mode drop down. What you’re going to want to do is select all of them, then find the blend mode menu and select soft light. As you can see in the picture, it adds some transparency to them. Since they are on top of the sky, which has a gradient, they pick up that color change and look more like real clouds. If you want to add your own flair, you can add some birds or a boat in the distance (not pictured here).

Next, we move onto the water. Water can also be very difficult to capture. However, I’ve discovered a technique that I’ll share with you. If you’d like to find the tutorial where I originally found it, you can click here . So what you’re going to do is select the rectangle you created for the water earlier, hit CTRL/CMD + C, then CTRL/CMD + F to paste it in place. Next, select the copy and expand it so that it is larger than the original one.

I like to call the original layer, “water base” because when we apply the effect to the top layer, this will serve as the detail for the waves. I also typically make the “water base” layer white. You’ll see why in a little bit.

Next, let’s focus on the layer you duplicated and scaled up. Let’s call this “water top.” Just like the sky, I like to try and give my water a gradient. You can use the same method as the sky, or simply use the eye drop tool on the sky layer and then adjust the colors manually. If you hit “G” on your keyboard, you’ll get the gradient tool. You can click and drag to create it along the layer and select individual nodes to find a different color. I like to use the eye dropper tool and try to match the original image as much as possible.

Here’s where the fun starts. Select “water top” and go to Effect, Stylize, and Scribble.

Then try to match similar values to what I did in the image. This creates gaps in the shape and it exposes the “water base” layer, which creates the illusion of waves. Feel free to mess with the values in the scribble menu as much as you want.

Now, we need to capture only the area that is going to appear on our final illustration. To do this, select the “water top” layer, go to Object, Expand Appearance. This turns the scribbles into an editable object.

Duplicate the “water base” layer, rename it “crop area” and move it over the expanded “water top” layer in the layer side bar. It should look like the image above.

Select both the “crop area” and “water base” layers and find the Crop option in the Pathfinder menu.

What you’re left with is a rectangle that resembles water.

Here is how both my sky and water ended up turning out. If you wanted to, you could manipulate the water areas so that it looked more like it was going around the shoreline and the rocks or draw your own shapes, but I’m pretty happy with how it turned out.
Finishing Touches and Text

It is time to put on the finishing touches. In the original image, there is a reflection of the lighthouse in the puddle on the nearest rocks.

So what you’re going to want to do is duplicate the lighthouse from earlier, reflect it so that it is upside down and move it over top of the puddle. Then duplicate the puddle layer, move it on top of the lighthouse in the layers panel so that it looks like the image above.
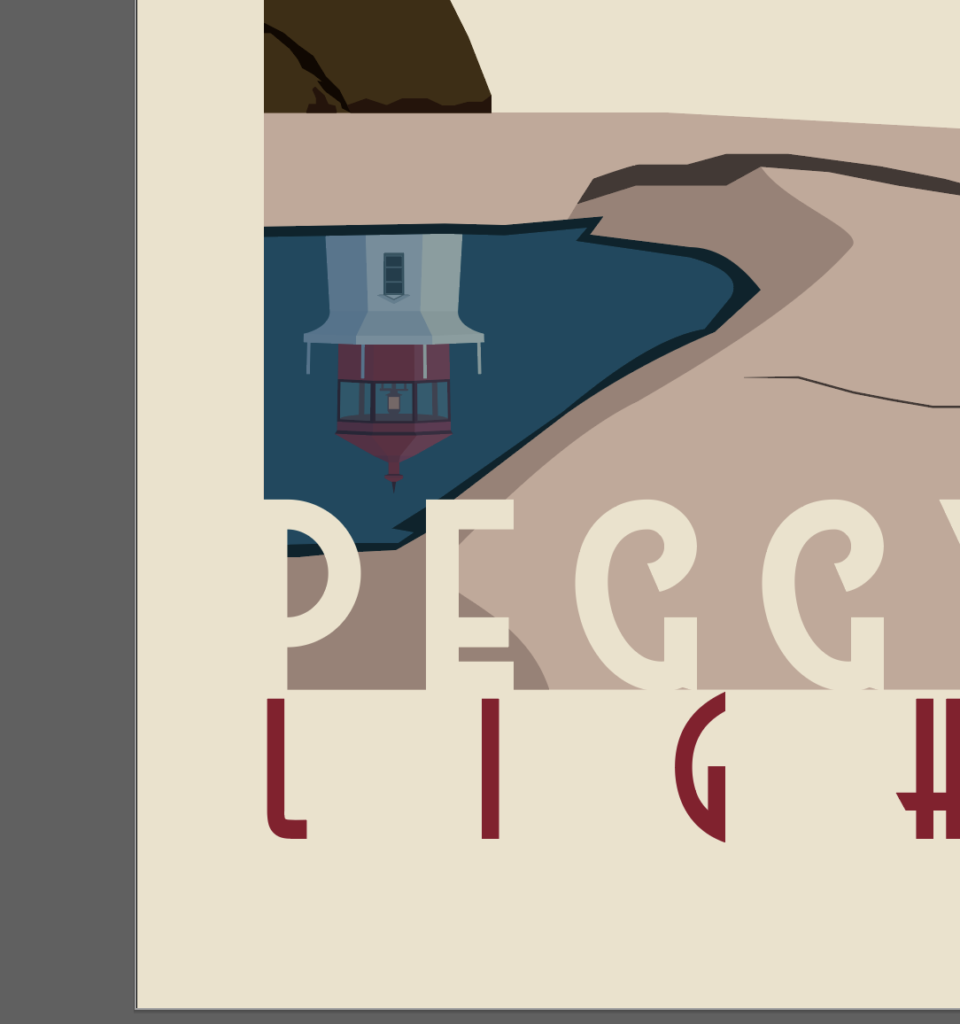
Next, select both layers and use the crop option in the pathfinder menu, like you did with the water earlier. Either mess with a blend layer or drop the transparency, or both and it’ll look like a reflection.

Now when it comes to the text layers, there are 2 main sections. The top and the bottom. I’m going to start with the top. You’re free to do whatever you think looks best, but I’m going to show you what I did so you have an example to reference. All these fonts are free and are available for commercial use.
In the top section, I always try to write something like, “Visit” then “City/Town, State/Country.” Let’s start by writing the word “VISIT.” I used the High Summit Font , but you could use any handwritten font you like. Next, write “PEGGY’S COVE” in the Better Book Font , or whatever you choose. Then, write “Nova Scotia” in Astrud Font below that.

In order to get the shadow look on Peggy’s Cove, duplicate it in place, go to Effect, Distort & Transform, Transform and use the values I entered in the image and place it below the original Peggy’s Cove layer.

Next, group Peggy’s Cove, the shadow and Nova Scotia together. Then go to Effect, Warp, Rise and use the values from the image.

Finally, make Visit and the Original Peggy’s Cove text layers the same color as the tan background. For the shadow and the Nova Scotia text layers, I used the red from the lighthouse roof. I always try to find an accent color that looks good and sticks out from the illustration. And that’s it for the top section.

For the bottom section I typically write the name of the specific thing that was created in the illustration, rather than just the place. In this case, the town is called “Peggy’s Cove,” but the scene we drew is called, “Peggy’s Point Lighthouse.”
To get started, write “PEGGY’S POINT” in the Westmeath Font , or whatever you want. Try to make it line up with the bottom of the red outline and just spill over on the left and right side. You want it to blend in seamlessly on each side with the poster background. Then, underneath, write “LIGHTHOUSE.” I reused the Astrud font from earlier. Try to make this one line up at the top with the bottom of the red outline and stretch across widthwise without spilling over the side. Make the top text the same as the background (tan) and make the bottom text the same as the red text above.

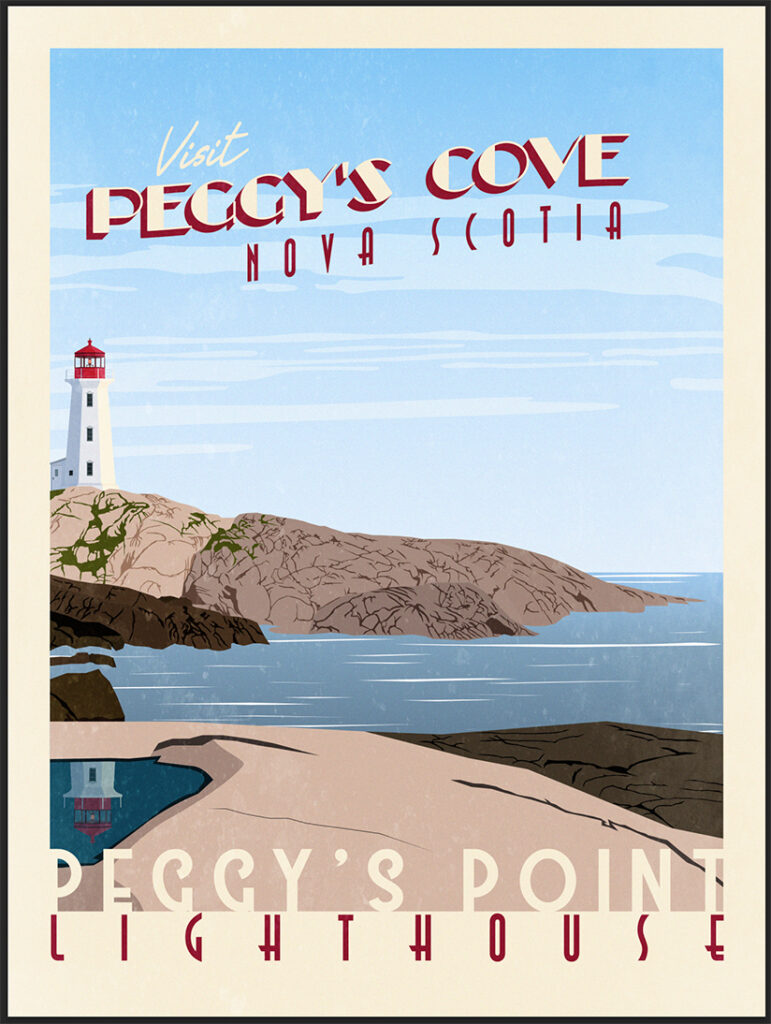
Make sure that you’ve got all your layers in the correct order. It’ll be pretty obvious if things aren’t in their proper positions. You might have named your layers differently, but it should resemble mine.

Now if you put it all together, you get a pretty nice-looking poster. But we aren’t done yet. It might look nice, but it is missing that gritty-ness and roughness that makes it look vintage. So open up Photoshop and create a new project that is 18 inches wide by 24 inches tall, since that’s the size of the illustrator artboard.

Go back to Illustrator, select all the layers (Poster background, Illustration and Text), then hit CTRL/CMD + C and move over to your Photoshop canvas and press CTRL/CMD + V to paste it as a smart object. What’s nice about this is if you notice something is off on illustration, you can double click the image part on the Vector Smart Object layer and it’ll re-open in Illustrator so you can make any changes. When you save the illustrator file, it’ll update in Photoshop.

Next, I would recommend downloading some grunge or dirt brushes and adding them to your photoshop. I don’t recall where I got mine, but you can find a bunch of free brushes here . Create a new layer above your illustration and using the grunge or dirt brush, start painting on that layer using either white or a very light color. In the image above, I added a black background behind my grunge layer so you could see how I did it.

Then, I like to duplicate it and reflect it so it adds even more texture. Make sure you use the Blend Mode drop down (similar to the Illustrator one I mentioned previously) and select “soft light.”

What you end up with is some texture that creates a more “vintage” look. There are plenty of other ways you can mess with Photoshop effects to create your own unique Vintage look, but I have just one more step that I like to take.

Go to Filter, Filter Gallery and under Texture, select to Grain. I try not to make it too intense, but I do like the way it looks. Choose soft grain type, make the intensity about 35 and the contrast anywhere from 45 to 60, depending on how dark your scene is. Since this one is daytime, I chose 60. When you’re done, click “OK” to apply it.
Here is how mine turned out. The grain didn’t change much, but it did make it brighter and older looking. Anyways, I know that was very long, but you just created your very own Vintage Travel Poster. Let me know what you think of my tutorial or my process. I’d love to hear some feedback. If you’ve got any tips and tricks for me, I’d love to hear them also. You can use my contact form and I’ll make sure to respond.
- Tags adobe , adobe illustrator , adobe tutorial , illustrator tutorial , tutorial , vintage travel poster , vintage travel poster tutorial
Don't forget to visit my store! Dismiss
Design an Authentically Vintage Travel Poster
WHAT WE’RE CREATING:
Hey Design Cutters, Simon here!
Today I’m really excited to show you how to use your new vintage resources, to create an authentic old time travel poster. We’ll be looking at plenty of fun techniques, from extracting vintage objects from their backgrounds, to applying tons of grungy textures, and bringing your entire piece together.
Let’s get started shall we?

AN EXTENSIVE LIBRARY OF REAL VINTAGE ELEMENTS
What’s interesting with Design Cuts’ latest bundle is that it’s filled with REAL vintage assets. These are not just elements that were drawn or created to look vintage, they’re the real deal. So we’re talking about stuff that was created, and released before the turn of the last century. That means that we can make use of all the artifacts that come along with that: not so precise printing, aged paper textures, 100+ year-old wear and tear, etc.

While this is great, one of the biggest challenges we’ll face when using these resources will be to extract just the element we want for our piece. Don’t be afraid, there’s a technique for that. Other than that, we’ll have loads of fun with textures, type, and all the rest.

BEFORE WE GET STARTED
Before we get started, I need you to grab a very helpful set of Photoshop actions . They were created by the good folks at Media Militia, and are free.

These actions allow to quickly and efficiently remove the white background of some of the assets we’ll use for our composition. Will just a bit of careful masking, the use of the level palette, and this actions, you’ll be able to extract just that one element you’d like to use in your piece. They are a set of very useful tools.
Consider reading the accompanying post , as it contains background information on what the actions leverage to work, and on how to install them.
Once you have the actions set up, we’ll be ready to get started!
STEP 1: CONCEPTUALIZATION
In my case, a complex piece always starts the same way: with pens and a piece of paper.

Using analog tools to quickly create generate ideas allows me to come up with so many more concepts than just dabbling with tools in Photoshop. I highly recommend doing this versus diving straight onto the computer. And I’m not the only one, there has been plenty of literature on the subject ( #1 , #2 , and #3 ).
After 15 to 45 minutes of browsing the bundle’s content and brainstorming, I came up with 8 primary ideas.

Today, we’ll focus on this one. It’s a poster inspired by some of the travel-oriented assets found in the bundle: globes, maps, and trunk.

The primary assets we’ll use
Here’s a quick rundown of the main assets we’ll use for the poster.
1. This vintage envelope, for its cool postage stamp

2. This XIXth century map of Kirviller, a French village in north-eastern France

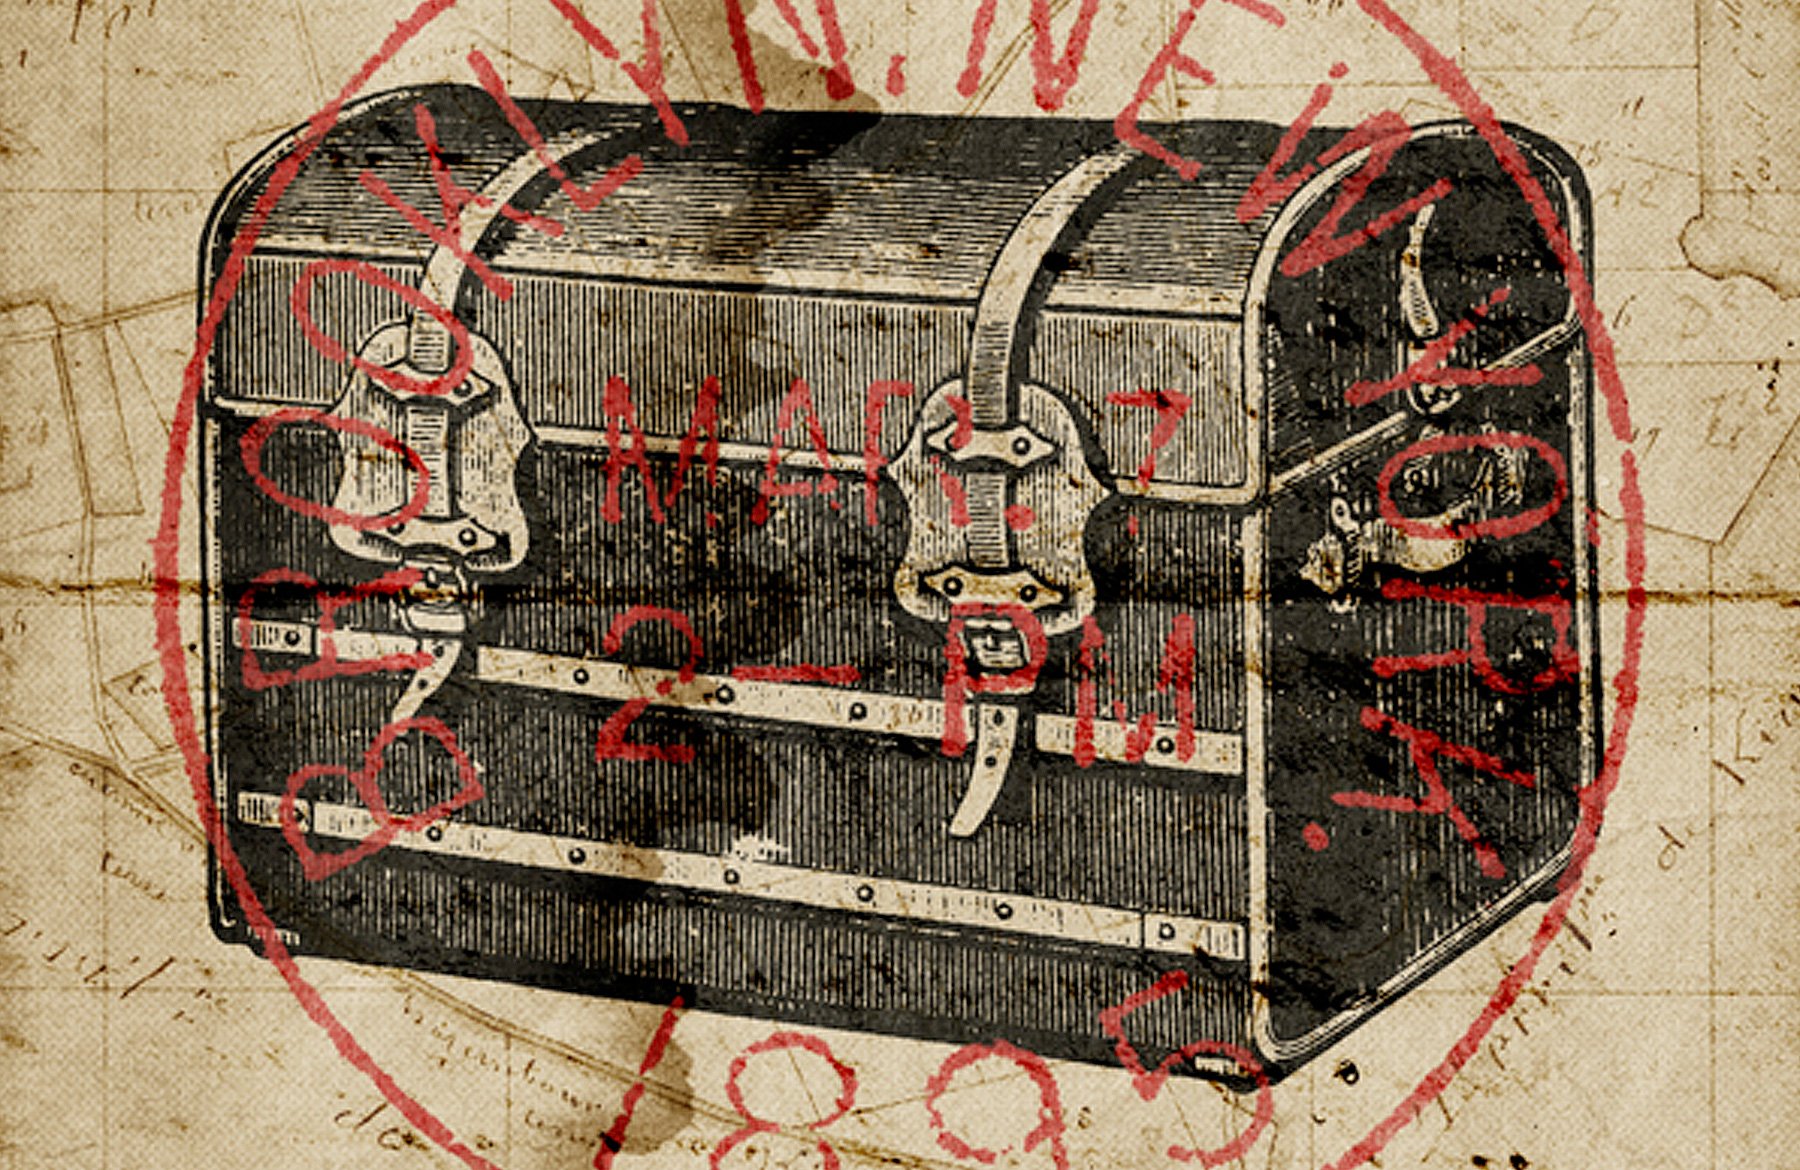
3. This old engraving of a travel trunk

4. These engravings of old globes

5. These engravings of an colonial hat, and of binoculars

STEP 2: COLORS
We should talk about the color scheme of our future poster now. In order to get a convincing retro feel for our piece, we’ll grab our colors straight from the source. The bundle features a collection of matchbox tops, and adult beverages labels. It’s time to get the eyedropper tool out, and to sample colors away!

Printing techniques weren’t as diverse as today, or as accurate as today, over a hundred years ago. Printing wasn’t a commodity the way it is now either. This explains why we typically see old labels featuring less colors than today: it was cheaper, faster, and presented less opportunities for a misshape. The artists had to be quite creative to convey often times complex compositions with a reduced array of colors.

I went through both packs of labels, and selected a few. I created my color palette from there, sampling colors that faded because of real exposure, and not thanks to a vintage filter.

We’ll use the first color scheme. Our piece will have a light background, so the textures can shine through our tan color ( #cfbc97 ), with dark iconography (off-black – #2f302d ), and with a bright highlight color (faded red – #c13d34 ).
STEP 3: PREPARING THE ASSETS
Now that we know our general layout, and how our colors are going to flow, we can start preparing our assets for the piece. This is the step in which we’ll extract the various elements we want to use in the piece from their white background.
The postage stamp will be the most demanding of all. This is because it isn’t passed on to use on a white background.
Start by opening up the envelope’s file ( AirMailEnvelopes_12953_piddix.jpg ).

Select the stamp.

Crop the image ( Image > Crop ).

Convert the locked background layer to an independent layer by double-clicking on it. Use a hue/saturation adjustment layer to desaturate the image.

Finally, use a levels adjustment layer to “wash out” the paper texture behind the stamp.

Once that’s done, save this file in a safe place – we might use it again later. I created a Piece assets folder in which I’m placing all of source assets to have them at hand while I’m designing. Save also a flattened copy of the leveled stamp for our next step. The format doesn’t matter (JPG or PNG), as long as the image properly flattened.
Once you have the flattened image ready, open it.

The next step is to run one of Media Militia’s actions. I personally like White BG Removal – Maximum Opacity the most, as it offers a good ratio between background removal and opacity left to the elements that are kept.

Once the action has run its course, we’re left with our element on a transparent background. Victory!

Save the cropped, and isolated stamp as a PNG in your assets folder.

One more version we need to save of that stamp is one featuring only the ring of the stamp.

From there, simply repeat the background removal process on the other assets (trunk, globes, hat, and binoculars). Save the result as transparent PNGs in that asset folder. I’d suggest to start from the white background version of the asset, as you won’t have to fiddle with levels.

Now that we have all of our assets ready, we should probably get started, like, for real.
STEP 4: DOCUMENT SETUP
I’m working with an 18″x24″ canvas, at 300 dpi (RGB).

I’ve placed a few guides for reference. I’m marking the center of the canvas, a border at 1″ from the edges, and another one at 2″ from the edges.

STEP 5: THE BACKGROUND
Start by filling the background with our tan color ( #cfbc97 ).

Next, locate our map ( po_20140825_130507.jpg ) in \Authentic-Vintage-Magic-tees\Vintage Texture Pack4 .

Place it in your document. Don’t forget to keep it as a smart object, as we’ll try ot keep a workflow as non-destructive as possible.

Desaturate it with a clipped hue/saturation adjustment layer .

Adjust its contrast thanks to a clipped levels adjustment layer .

Change its blending mode to Color burn @ 75% opacity .

Finally, we’re going to erase some of the map’s markings at the bottom right corner.

Add a layer mask to the map layer, and paint the spots away. Don’t worry about erasing the map’s grid, as we’ll place another element in there later that will camouflage that removal.

Our background is now ready. Don’t forget to organize your layers properly.

STEP 6: PLACING THE ELEMENTS
It’s time to place our main elements in the frame. Let’s have another look at the sketch I made.
The center of the piece is occupied by the travel trunk, and by the postage stamp. The other travel icons (globes, hat, and binoculars) are located at the corners.
Let’s start by placing the trunk. I’m making it roughly 14″ wide.

Next, add the isolated stamp. It should cover the trunk, and be slightly wider than it.

Next, we’ll be placing the various corner icons. I’m using the grid of the map to place them, rather than the grid I created with the guides. Size wise, I’m trying to have each corner object to have the same visual importance.

Here’s a view with the guides, to get a sense of placement and proportions.

Organize you layers now, because it’s going to get more complicated soon.

Remember the version of the postal stamp we created that only contains the circle? It’s time to get it out of our asset folder. We’ll be enclosing each icon in its own circle. You can rotate the circle each time, so it doesn’t look the same for each icon. Don’t hesitate to use the layer alignment tools to facilitate the job ( Layer > Align and Layer > Distribute ).
It took me a good deal of time to adjust the circle size compared to the icons. There was actually some back and forth tweaking for the sizes of the icons, and of the circle.

And here’s a view of my layers.

STEP 7: ASSIGNING COLOR
This step is actually fairly simple. We’ll leverage the option to give a color overlay to layers.
Start by making the postage stamp red ( #c13d34 ). Double-click on the layer to bring up the blending options panel .

Next, let’s color the trunk with our off-black ( #2f302d ).

The contrast level between the red and the off-black isn’t very strong. To increase it, we’ll darken the trunk a little bit by changing its blending mode to Multiply . Because the color has been assigned to the object through a color overlay , we’ll need to go through a few additional steps.
Start by reducing the trunk layer’s Fill to 0 .

Next, head back to the layer blending options to set the color overlay’s blending mode to Multiply @ 100% opacity .

Next, we need to assign a red color overlay ( #c13d34 ) to the circles around our icons. Let’s start with the one around the hat.

The result looks nice, but the circle is a bit thin.

In order to fix this, we’ll simply give the circle a red stroke of a few pixels. I’m using 8 pixels .

The result is satisfying. From there, we’ll simply apply the same settings to the other circles. In order to do so very quickly, start by right-clicking on the layer of the circle you just edited. Select the Copy layer style option.

Then, select all the circle layers, right-click, and choose the Paste layer style option.

We just applied the color overlay and stroke effortlessly to the three remaining circles.

In a similar fashion, you can now quickly apply an off-black ( #2f302d ) overlay to all the icons.

With that done, it’s time to group each icon with its container. This will be helpful later.

STEP 8: TYPE
A poster wouldn’t be complete without some type. We’ll use the beautiful Governor font, from Lost Type Co-op .

The text we’ll include is Vintage travels . It’ll be split at the top and at the bottom of the poster. My type is set at 90 points . The placement of my type object isn’t final.

Next, we’ll give each type object a warp effect , in order to visually match the curvature of the postage stamp.
Highlight your Vintage type layer, and head to Type > Warp text . Choose Arc , with a 25% bend value .

Repeat the process for the Travels type object, but with a -25% bend value.

From there, you can tweak the placement of the type objects, to line them up with the icons nearby.

Time to organize things neatly.

The type elements look like they are floating in the canvas. In order to fix this, we’ll be adding some framing elements. The various frames available are often of a style that doesn’t match our piece. The solution? To grab ornaments from some of the more complex vintage labels, and cards at hand.
Track down 2LO Vintage Cabinet Card 10.jpeg from \Authentic-Vintage-2-Lil-Owls-Vintage-Other\Vintage Cabinet Cards . We’re going to grab one of curve ornaments that’s shown above the word “Gallery.”

I’d suggest to follow the same process that when isolating the postage stamp.

Once ready, place it twice in your document, to frame the word Vintage .

Don’t forget to give the ornaments an off-dark overlay. This will make them fit the piece better.

You can tweak the warp effect , and the rotation of the text layer to match the curvature of the ornament better as well.

Repeat the process to frame Travels .

And here are the layers so far.

Now, we can finally move to masking (grunge effects), and texturing!
STEP 9: MASKING ELEMENTS
We’ll be leveraging 2 Lil’ Owls dirty grunge textures for our masking, and weathering, effects. These textures might be lifted from old paper, their grain, stains, and tears will work wonders to fade and age our various design elements.

The technique we’ll use for our weathering is simple: we’ll paste the textures in layer masks attached to the various elements.
To paste a texture in a layer mask, simply ALT/OPTION+CLICK a layer mask to access its content. From there, you can do almost whatever you want: painting, erasing, copy and pasting… Make sure the element’s layer and its layer mask are unlinked, so you’ll be able to transform the layer and its layer mask independently from each other.
Let’s start with the icons and their respective circles. Start by adding an unlinked layer mask to each of the layer groups.

Next, open 2LO Dirty grunge 19.jpg . This is the texture we’ll use for each element. In order for the wear pattern to look organic, we’ll simply rotate it and/or resize it a bit each time.

Let’s start with the binoculars’ layer group. Copy the texture, and paste it in the layer mask.

Resize it to fit closer to our icon.

Make it a bit stronger by using the levels palette ( CTRL/CMD+L ).

Admire the result!

Repeat for each icon, simply rotating the texture by 90° each time to change the wear pattern on the icon. You could also copy and paste the layer mask’s content around.

If you look closer, each circle features some artifacts. That comes from the extraction process that was slightly imperfect.

Paint these away by adding a layer mask to the circles themselves.

The result of that speckle erasing makes the overall piece look cleaner.

Next, we’ll be masking the postage stamp. This will give it a vibe closer to a real stamp. We’ll use 2LO Dirty grunge 7.jpg for that.

Next, we need to weather the type elements. We’ll use 2LO Dirty grunge 2.jpg for that.

Start with Vintage . The process is the same.

Finally, we’re going to mask off Travels . I’m using the same layer mask content, rotated so that the wear pattern is different.

And here’s a view of all the layer masks we just added.

And now, let the fun begin.
STEP 10: TEXTURES!
Working with textures is not only fun, it’s also a very good way to unite the piece together. The various grains, stains, and other artifacts the textures will bring to the piece will unite all the disparate elements together visually.
Because we want to stick to our non-destructive workflow, we’ll always use adjustment layers to manipulate the textures. Let’s get to it.
locate po_20140901_205149.jpg from \Authentic-Vintage-Magic-tees\Postage Texture Pack1 . It’s a beautiful paper texture, with a very thick grain, and some faint stamps.

Place it to cover your whole canvas.

Use a clipped hue/saturation adjustment layer to desaturate the texture.

TWeak it using a levels adjustment layer .

Change its blending mode to Soft light @ 50% opacity .

The next texture is po_20140831_122519.jpg , from \Authentic-Vintage-Magic-tees\Postage Texture Pack5 .

Blending mode: Soft light @ 50% opacity .

The next texture is VictorianScrapbook_13061_piddix.jpg . You’ll find it in \Authentic-Vintage-Piddix-Other-Vintage\VictorianScrapbook_piddix\VictorianScrapbook_CoverAndBacks_piddix .

Next is po_20140825_103933.jpg . You’ll find it in \Authentic-Vintage-Magic-tees\Postage Texture Pack5 . This one will give us some nice fake folds.

Blending mode: Color burn @ 100% opacity .

The final texture is the mother of all water stain textures. It’s called 2LO Dirty grunge 2 – 21.jpg , and you’ll find it in \Authentic-Vintage-2-Lil-Dirty-Grunge-Textures\Dirty Grunge 2 .

Blending mode: Soft light @ 100% opacity .

Let’s look at our layers.

We’re almost there!
STEP 11: THE FINISHING TOUCH
Before we can call it a day, we need to add one thing: a halftone effect. This will allow us to emulate some of the feel of that old style printing.
Start by creating a merged copy of all visible layers ( CTRL/CMD+SHIFT+ALT/OPTION+E ). I renamed that layer Halftones .

Transform that layer into a smart object ( Filter > Convert for smart filters on Photoshop CC).

We’ll apply a halftone effect from the Filter gallery ( Filters > Filter gallery > Sketch > Halftone pattern ). I’m using values of 8 for the dot size , and 25 for contrast .

Next, we need to change the effect’s blending mode. Double-click on this symbol in the layer palette.

Change the blending mode to Soft light @ 100% opacity .

Finally, change the layer’s blending mode to Lighter color @ 35% opacity .

And we’re finally done with our poster!
CONCLUDING THOUGHTS
Phew, that was a long one.
I hope you had as much fun going through the tutorial as I had writing it. If you’ve grabbed the bundle, I hope you enjoy your new resources.
If you haven’t yet, go check out the bundle’s collection of vintage design treasures . The diversity of the gems that have been harvested by the bundle’s participants is fantastic, and their uses are many. You can grab all of these best-selling resources for the next few days only, for 97% off the regular price.

Finally, I’d love to see your tutorial outcomes! Please share them on the Design Cuts Facebook page! If you have questions or concerns, don’t hesitate to get in touch! Use the comments below, the Design Cuts Facebook page , or tweet at us .
That’s it for today. Until next time, cheers!
Share this article
Keep learning.
5 lovely comments from our community
Well, it took me a while, but I did it! Great tutorial, lots of fun. Can’t wait to do another one.
Woohoo! That is fantastic news, Nathalie! :) I’m so pleased to hear you enjoyed this tutorial!
I hope you enjoy our other tutorials on offer, if you had a suggestion for any techniques, tips & tricks you’d like to learn please do let me know!
Thanks again, Nathalie! If there is ever anything I could assist you with please do get in touch. I’m always happy to help.
Where is the maps located? I am having difficulty finding that graphic. There are so many of them. Found the one I need. It was a long tutorial but a good one. Thank you.
Hey Jeanne,
The map Simon used in this tutorial is located in the Magic Tees part 1 > Vintage Texture Pack 4 under image file number po_20140825_130507.jpg. I hope this helps, and you’ll enjoy the tutorial. :)
Thank you for your kind words Jeanne! That pack indeed has a bunch of resources, and the file naming scheme isn’t the clearest.
Leave us a comment Cancel reply
Your email address will not be published. Required fields are marked *
How to Create Vintage Travel Postcards in Adobe Illustrator
“Vintage” is always one of the top search terms in our library, and we can see why! Vintage graphics are a great way to inject some pizzazz into any project, so we’re going to show you how to turn stock photos into a vintage masterpiece. Whether you’re ramping up for your next advertising campaign or trying to make your friends jealous, this tutorial is an easy way to create show-stopping graphics.
Adobe Illustrator can be a little intimidating, but if you take your time (and take a deep breath) we promise that you’ll become a master of this vintage postcard technique. We’ve already done some of the leg work and created a gallery of stock travel photos that are perfect for this tutorial.
Step 1. Create a New Illustrator File.
Open Adobe Illustrator and create a new file. Typically, postcards have a height of 3-4 inches and a width of 5-6 inches, but feel free to branch out! You can create a vintage postcard on almost any canvas size, which makes it great for marketing campaigns.
Note: If using your design for postal mail, most carriers require extra postage for square and over-sized postcards.
Step 2. Create the Large Text.
Go to Type > Font and select a simple font that has thick lines. If you don’t see anything that you like, you can explore Adobe’s other fonts online by going to Type > Add Fonts from Typekit .
Once you’ve selected a font, type out the word that you want to be the focus of your postcard. For our postcard, we used the Program OT Black font . If the size of the text is too small, click on the Selection Tool (or hit “ V ” on your keyboard), select the text, then drag the corners to adjust the width and height.
You’ll also want the letters to be close together. To adjust the letter spacing, select the text, go to the Character tab (or Command/Ctrl + T ), and adjust the Tracking for the characters (you can see how this is done in the images below).

Step 3. Warp the Text.
Select the text and go to Effect > Warp > Rise . A window will open that will allow you to adjust the shape of the text. Make sure the Preview box is checked and only adjust the Bend slider. You only want a slight bend so it’s probably best to set it below 25 percent, but this will change depending on how long the word is.

Step 4. Expand Appearance.
When you’re done warping the text, click OK. With the text still selected, go to Object > Expand Appearance .

Step 5. Extrude and Bevel.
Make sure that the text is still selected, then go to Effect > 3D > Extrude & Bevel . Set the x and y rotations to anywhere from 10-15 degrees (this changes the length of the shadow under the text) and make sure the last setting is kept at 0 degrees. Click OK.
Click Object > Expand Appearance again.
You can also change the color of the shadow and text to make it easier to see the adjustments that you just made.

Step 6. Separate the Text from the Shadow.
Select the Direct Selection Tool (or hit “ A ” on your keyboard). Click on the middle of the first letter of the text, then shift + click on the middle of each of the remaining letters. Do not select the shadow. Once the letters are selected, cut and paste them onto the canvas ( Command/Ctrl + X , then Command/Ctrl + V ).
Move the letters back into their original position on top of the shadow.

Step 7. Open the Text Photo.
Select a photo that will be the text filler. To open the image, just drag it onto the canvas from a folder on your computer. Right click ( Command/Ctrl + click ) on the image and go to Arrange > Send to Back . Use the Selection Tool to adjust the size and rotation of the photo so that it lines up well with the text.

Download the photo of a tropical coastline we used.
Step 8. Copy the Photo.
Make a copy of the photo and put it behind the text ( right click + Arrange > Send to Back ). Align it with the original photo. In a few steps, we’ll explain why we’re doing this.

Step 9. Make a Clipping Mask.
Click on the Direct Selection Tool and click on the photo. Hold the shift key down and click on the middle of the first letter. Go to Object > Clipping Mask > Make , or hit Command/Ctrl + 7 on your keyboard.
At this point, you will see one copy of the photo disappear and the letter should be filled in with the photo. Now, only one copy of the photo remains in the background of the canvas.
Copy and paste the photo onto the canvas again. Send the new copy to the back and align it with the existing photo.
We do this because every time you create a clipping mask, you need to paste another copy of the photo onto the canvas so that it can be used for the next letter. If you paste a new copy of the photo while the previous one is still on the canvas, you can make sure that they both line up exactly so that the filler inside each letter looks like a single, continuous photo.

Step 10. Outline the Text.
Once you fill in each letter, you might decide that you want to outline the letters to add definition. To do this, click on the Direct Selection Tool and click on the path outlining each letter (not the shadow). To find the path, hover your mouse over the edges of the letter until a pink line shows up and the word “ path ” or “ anchor ” shows up, then click. Shift + click on the paths of each letter, go to the Appearance panel, click on the Stroke button , and select a color.
If the Appearance panel is not already open on the right sidebar, go to Window > Appearance .

Step 11. Open the Background Photo.
Select an image for your background, then drag it onto your Illustrator canvas. Move it behind the text like the previous photos. Adjust the size as needed.

Download the photo of Dubrovnik, Croatia we used.
Step 12. (Optional) Add a Border.
Select the Rectangle Tool and draw a rectangle around the border of the image. Change the outline color and the Stroke weight to adjust the appearance of the border. When you make the stroke thicker, the border might extend beyond the edges of your canvas. Just use the Selection Tool to make the rectangle slightly smaller and bring the entire border back onto the canvas.

Step 13. Add the Script.
Most vintage postcards in this style also feature script that goes before and/or after the large text. Sometimes the script will say, “Welcome to,” or “Greetings from,” followed by the location written out in the large block letters.
For our postcard, we’re going to have the script say, “Wish you were,” right before the “here” that we’ve already created on the canvas. We used the Kon Tiki Lounge JF Regular font.
Type the script onto your canvas. Adjust the color and size as needed.

Step 14. (Optional) Warp the Script.
Select the script then go to Effect > Warp > Rise . Adjust the Bend until you are satisfied with how the script looks with the block letters. Once you’re done, go to Object > Expand Appearance .

You’re all done! Adobe Illustrator is no easy feat, so give yourself a pat on the back. Now you have a great vintage trick up your sleeve for your next graphic design adventure.
Looking for more inspiration? Embrace your wanderlust with more royalty-free cityscape images from our library .
Discover the World
Recommended for you

How to add subtitles in DaVinci Resolve

Premiere Pro tutorial: How to do a freeze frame

YouTube Live: Everything you need to know to live stream on YouTube

DIY Art Adventure: How to Create Your Own Vintage Travel Posters
- On 15/04/2024
Key Takeaways:
- Designing vintage travel posters can be done using software programs like Illustrator and Photoshop, which provide a step-by-step design process.
- For those who prefer a personalized touch, MixPlaces offers customized travel posters with various customization options and provides inspiration and reminders for creating unique designs.
- Customers can conveniently order and receive their personalized travel posters, while also supporting sustainability through the company’s eco-friendly practices.
YouTube Information

Photo Credits: Printography.Com.Au by Roger Davis
Delve into the world of YouTube as we explore key areas, including:
- Press and copyright information
- Contact details
- Creators and advertising
- Developers and legal notice
- Transparency report and complaints
- Canceling contracts and terms of use
- Privacy guidelines and security
Get ready to navigate through this vibrant platform and uncover valuable insights and resources.
Press and Copyright Information
YouTube provides comprehensive guidelines and policies to ensure protection of intellectual property and transparency in the media industry. There’s a dedicated page with press resources like releases, kits, logos, and more. Plus, copyright policies to help creators understand their rights and responsibilities.
To provide an overview, here’s a table:
These resources help creators, advertisers, journalists, and users navigate YouTube safely. It emphasizes fair use guidelines and provides clear channels to report infringements through DMCA. Furthermore, the Content ID system helps rights holders manage their property.
In conclusion, YouTube puts press transparency and copyright protection first. It offers information to reporters and creators for a fair environment, where creativity is respected and copyrights are honored. Contact us – we won’t put you on hold listening to YouTube’s greatest hits.
Contact Details
Welcome to the section that gives you all the contact info you need. Check out these six key points:
- If you need help, email us at [email protected] .
- Tell us your ideas and suggestions via our website’s feedback form.
- Send press-related inquiries or copyright concerns to [email protected] .
- Report copyright issues by using the copyright complaint form on our platform. We care about intellectual property rights.
- Content creators who want to collaborate, email [email protected] .
- Developers in need of technical support or wanting to integrate with YouTube’s API should email [email protected] .
Also, please note: don’t share personal customer information via email unless our support team tells you to. Use the platform’s channels for individual concerns.
We aim to respond to queries quickly and have teams working hard to make sure YouTube is a good experience. Please explore other sections of this article for more YouTube info. For creators wanting money, YouTube advertising is great, but there’s a price.
Creators and Advertising
YouTube is home to a variety of talented people who make great content. From funny-men to artists , from gamers to fashion designers , these creators fascinate audiences with their one-of-a-kind views and creative expression.
To make money, creators can use various ad formats like pre-roll ads, display ads, or sponsored content . This helps them to take advantage of their devoted fan base and form ties with brands that fit their content.
Co-operation between creators and brands is now an important part of YouTube advertising. By partnering with creators who share their values, brands can access the creator’s influence and communicate with their desired audience.
Advertisers can get useful information via data-driven advertising on YouTube . This allows them to target a particular group and modify their campaigns accordingly.
Because of the rise of influencer marketing, creators have become influential themselves. Their evaluations and recommendations have great power among their viewers, making them great partners for brands seeking genuine connections with buyers.
When collaborating with brands, YouTube creators keep creative control over their content . This means authenticity remains at the center of the creator-brand relationship.
YouTube also makes sure to be transparent in its operations. This is reflected in its open policies about ads and disclosures. Plus, they value user feedback by giving ways for users to report complaints or worries about ads or the creators’ content.
Developers and Legal Notice
Developers help to make YouTube better. They quickly address technical problems so users can access the platform with ease. They also create new tools and features. It is vital for YouTube users to know their rights and responsibilities. They should read the platform’s legal notice which contains info on copyright, intellectual property and rules for content. This helps to protect original work and keep the YouTube community fair. The legal notice also explains consequences for not following policies. This ensures users act ethically and responsibly. YouTube wants to create a safe environment for creators and viewers. To make YouTube a positive experience, users must understand the developers’ contributions and comply with legal obligations. This lets creators share their content and build an inclusive community.
Transparency Report and Complaints
YouTube’s Transparency Report and Complaints section is dedicated to transparency and user concerns. It shows the steps taken to ensure operations are transparent, and encourages users to report complaints or issues.
A reporting system is in place for inappropriate content, copyright infringement, or other violations . A dedicated team reviews and handles complaints, taking appropriate action – such as removing content or issuing warnings.
Privacy is prioritized when handling complaints. Guidelines and protocols are in place to confidentially handle personal information.
This section is a means for YouTube to communicate with its users. It aims to address any issues promptly, demonstrating user feedback is taken seriously. YouTube strives for a balance which allows diverse voices to be heard, while maintaining a safe and respectful environment.
The regular publication of transparency reports is a notable feature. These detail the number of government takedown requests, information about copyright claims, and video removals. This publicly available info shows YouTube’s commitment to transparency.
In summary, the Transparency Report and Complaints section plays a crucial role in transparency, addressing user concerns, and upholding community guidelines. It ensures YouTube remains accountable and values users’ feedback, resolving reported violations.
Canceling Contracts and Terms of Use
When it comes to canceling contracts on YouTube, creators & users must stick to the platform’s policies. These policies give details on how to end contracts, so both parties know their rights & responsibilities. Before making any decisions, it is important to read these guidelines.
YouTube’s Terms of Use outline what users can do on the platform, such as content ownership & usage rights. These terms also explain user responsibilities & security measures.
To understand canceling contracts & abiding by the Terms of Use , it’s essential to consult YouTube’s documents. This includes press releases, copyright info, contact info, legal notices, transparency reports, complaints procedures, privacy guidelines, & security protocols.
By understanding these resources, users can confidently navigate contract termination processes & stick to YouTube’s regulations. It is important to follow their policies for a smooth experience as a creator or user.
Privacy Guidelines and Security
YouTube keeps user data secure and private. To do this, they use advanced security measures. They also encrypt user information and use account authentication. Plus, they comply with regulations.
Data protection is a priority for YouTube. User info isn’t shared without permission. And, they follow rules to prevent unauthorized access.
Data encryption is used to protect sensitive data. Encryption makes sure info can’t be accessed by potential threats.
Account authentication is important too. Users have to make an account with a unique username and password. This helps keep accounts secure.
YouTube follows relevant regulations. They follow GDPR in Europe, which sets guidelines for handling personal information.
Privacy guidelines and security are taken seriously on YouTube. They use the latest technology and adhere to regulations to ensure a secure environment to protect user privacy.
Designing Vintage Travel Posters

Photo Credits: Printography.Com.Au by Dylan Adams
Discover the fascinating world of designing vintage travel posters in this captivating section. From a tutorial introduction to the design processes in Illustrator and Photoshop , we’ll take a creative journey through each sub-section. Get ready to unlock valuable insights, tips, and tricks that will empower you to create stunning and nostalgia-inducing travel posters. So, grab your artistic tools and let’s embark on this DIY art adventure together !
Tutorial Introduction
This tutorial focuses on designing vintage travel posters . It shows how to make stunning posters with Illustrator and Photoshop . It is a great resource for individuals wanting to learn the art of creating captivating travel posters.
It starts by highlighting Illustrator’s vector graphics capabilities . It covers the techniques and tools available in Illustrator to bring ideas to life. It also covers composition, color palette selection, typography, and other design elements needed for vintage travel posters.
In the next section, it dives into Photoshop – which offers image editing tools and features. Aspiring designers will learn how to enhance their poster designs by manipulating images, applying filters and effects, and making visually pleasing compositions.
The tutorial goes more in-depth with tools and techniques that maximize creativity while staying true to traditional travel poster aesthetics . It emphasizes attention to detail and provides practical guidance throughout. This ensures engaging and effective learning for budding designers wanting to master vintage poster creation.
Design Process in Illustrator
- Create captivating vintage travel posters with Adobe Illustrator!
- Start by importing images, fonts, and textures .
- Then, make a new document with the desired dimensions for your poster.
- Trace or draw key elements with the pen tool .
- Utilize tools and features to add color, texture, and effects.
- Export the design in a suitable format for printing or sharing online.
- Consider unique details when designing. Try blending modes and different brushes for interesting visuals.
- Utilize layer masks and adjustment layers for non-destructive editing.
- With this process, designers have made stunning vintage travel posters that inspire others in their creative endeavors.
- Unlock your creative potential and make extraordinary vintage travel posters with Illustrator!
Design Process in Photoshop
- Understand the tutorial introduction.
- Open Photoshop and create a new document with the right dimensions.
- Think about the theme and style you want.
- Enhance the poster with tools and features. Adjust colors, add texture or filters, and include images or graphics.
- Pay attention to details like typography, layout, and composition. Try different fonts and arrange the elements nicely.
- Explore various techniques and tools to get your desired effect. With practice and creativity, make unique designs that evoke nostalgia.
- Prepare for the captivating final design that will take you back in time.
Final Design
The design of vintage travel posters is the ultimate result of Adobe Illustrator and Photoshop processes . Using reference data, creators can craft impressive, genuine-looking posters that express the spirit of vintage travel.
A table is useful to present the design information in an attractive way. It can show columns like “Software Used,” “Components,” “Colour Scheme,” “Fonts,” and “Look.” This helps creators keep track of their choices and compare various designs.
Every poster is exceptional and has its own narrative. The design portrays not only the place but also the creator’s artistry and style. Mixing elements from diverse periods and adding individual flourishes, these posters become everlasting works that can take viewers to a different era and location.
MixPlaces Personalized Travel Posters: Give your travel memories a stylish upgrade!
MixPlaces Personalized Travel Posters

Photo Credits: Printography.Com.Au by Arthur Carter
Unleash your creativity with MixPlaces Personalized Travel Posters ! Discover a world of exciting possibilities as we dive into the realm of customizations, seek inspiration and reminders for your DIY art adventure, explore the seamless process of ordering and delivery, and embrace the sustainable side of this artistic journey. Get ready to create your own vintage travel posters that reflect your unique style and wanderlust spirit. Let’s embark on this creative voyage together!
Customization Options
MixPlaces Personalized Travel Posters are the perfect way to keep your wanderlust alive! You can customize your poster with various details. Choose any destination you desire- your favorite city or dream holiday spot. Select a typography style from a wide variety of fonts and sizes. Play with colors and create a vibrant or subtle color scheme. Arrange the layout in a way that complements the overall design. And finally, select a background that enhances the visual appeal of your vintage travel poster. With all these customization options, you can make your poster truly unique!
Inspiration and Reminders
The ‘Inspiration and Reminders’ section of MixPlaces covers customization options. These let individuals add their own flair to the design. Plus, posters can serve as a source of inspiration and reminders for travelers.
MixPlaces offers various customization options. Customers can select designs, themes, and layouts for their vintage travel posters. They can use personal photos, preferred fonts and colors, and meaningful quotes or messages. These elements remind them of special moments or memories associated with the travel destination.
MixPlaces emphasizes the importance of using these posters as sources of inspiration. By displaying them prominently, individuals can stay motivated to explore new or beloved destinations. The posters act as visual prompts to keep travel aspirations alive and motivate individuals to plan future adventures.
MixPlaces recommends incorporating design elements that evoke wanderlust and capture the essence of each location. Such elements include iconic landmarks or local attractions. Vibrant colors and nostalgic imagery reminiscent of vintage travel posters add charm and authenticity.
Ordering and delivery of personalized travel posters should be easier than finding parking at a tourist hotspot.
Ordering and Delivery
MixPlaces puts customer satisfaction first, by offering a seamless ordering process. They have various customization options, such as templates, themes, colors and fonts . They provide inspiration and tips to help with the design. Their website is user-friendly and easy to navigate. Plus, they make sure delivery is prompt, depending on location.
In addition, MixPlaces is committed to sustainability . They encourage DIY art adventures and eco-friendly practices. This allows customers to express themselves while reducing their environmental impact .
So, when it comes to ordering personalized travel posters, MixPlaces is a great choice. They provide customization, inspiration, easy ordering, timely delivery, and sustainability initiatives.
Sustainability
It’s essential to remember that sustainability goes beyond materials and processes. We also focus on ethical business practices and social responsibility . We partner with local artisans and communities, promoting fair trade principles and economic development in disadvantaged areas.
By choosing MixPlaces for vintage travel posters, you are not only getting a unique piece of art but also contributing to a more sustainable future .
To make it even greener, here’s what we can do:
- Offer incentives, like exclusive online discounts or extra customization features, to customers opting for digital versions rather than physical prints.
- Create a recycling program where customers can return their old or unwanted posters for proper disposal or reuse.
- Partner with eco-friendly brands to create limited edition poster series to raise awareness about conservation initiatives or causes.
These suggestions don’t just reduce the ecological impact of vintage travel posters – they also align with customers’ sustainability values , providing additional value. By pursuing sustainable practices, we can make a positive difference in both the art and travel industries.
Some Facts About “DIY Art Adventure: How to Create Your Own Vintage Travel Posters”:
- ✅ The tutorial provides step-by-step instructions on how to design a vintage-style travel poster. (Source: design.tutsplus.com)
- ✅ The tutorial utilizes both Adobe Illustrator and Photoshop to create the poster. (Source: design.tutsplus.com)
- ✅ The tutorial includes information on creating basic vector shapes, distorting text, and applying textures. (Source: design.tutsplus.com)
- ✅ Resources such as photos, fonts, icons, and texture brushes are provided to complete the project. (Source: design.tutsplus.com)
- ✅ The tutorial emphasizes the importance of using different layers, opacity adjustments, and blending modes to achieve the desired vintage look. (Source: design.tutsplus.com)
FAQs about Diy Art Adventure: How To Create Your Own Vintage Travel Posters
How does youtube work and how can i contact them.
You can find detailed information about how YouTube works and how to contact them by visiting their official website. You can also refer to their privacy guidelines, terms of use, and legal notice for more information.
Can I cancel my YouTube contract and what are the terms of use?
You can cancel your YouTube contract by following the cancelation process outlined in the terms of use. It is important to review the terms of use to understand the conditions and requirements for cancelation.
Where can I find information about YouTube’s copyright policies and complaints?
You can find information about YouTube’s copyright policies and how to file complaints on their official website. They also provide a transparency report that highlights their efforts in addressing copyright-related issues.
Can I test new features on YouTube and how do creators advertise on the platform?
YouTube occasionally tests new features, and you may have the opportunity to participate in these tests. Creators can advertise on YouTube by utilizing the platform’s advertising options such as display ads, sponsored videos, and promotional campaigns.
How do I create my own vintage travel posters and what materials do I need?
You can create your own vintage travel posters by following step-by-step tutorials available on various platforms such as Envato Tuts+ and MixPlaces. These tutorials provide instructions on using design software like Illustrator and Photoshop, applying textures, and using specific resources like fonts, icons, and photos.
What are the customization options offered by MixPlaces for personalized travel posters?
MixPlaces offers various customization options for personalized travel posters, including design, style, color, size, and finish. Customers can choose from sky maps, street maps, landmark posters, and coordinates posters. They can also select different finishes, sizes, and materials for their posters.
- Cocktail Posters
- Fashion Posters
- Modern Gallery
- Sneaker Art
- Vintage Posters

- Pablo Picasso
- Leonetto Cappiello
- Payment methods
- Account details
- Lost password
- Login / Register
BUNDLE DISCOUNT: Buy 2 or more and receive 10% off
15+ Best Tutorials for Creating Posters in Illustrator
Posters are an incredibly versatile medium for promotion – not only for events, but also for businesses and causes. With various design styles, illustrations, and typography at your disposal, you can convey your message in a visually appealing manner.
If you’re looking to take your poster design skills to the next level, we’ve got you covered. Our curated collection of the best Illustrator tutorials will equip you with the knowledge to create stunning posters for a range of projects and industries. Whether you’re new to Illustrator or a seasoned professional, these tutorials offer valuable insights and inspiration for your next poster design project.
From mastering typography to creating eye-catching illustrations, these tutorials will help you hone your skills and develop your own unique style. So, dive in and discover the endless possibilities of poster design with Adobe Illustrator!
You might also like our collection of Photoshop poster design tutorials .
The Top Poster Design Tutorials for Illustrator
How to create a retro vhs cassette poster (video tutorial).
Were you ever inspired by the art on those VHS covers from the 80s or 90s? Well, you can follow along with this video tutorial and learn how to create your very own artwork based on that long-gone design style.

Abstract Art Poster Collection for Illustrator
With bold and vibrant designs, unique shapes, and striking colors, this stunning collection of abstract art poster templates for Illustrator are perfect for adding a touch of modernity to any living or workspace.

How To Create a Geometric Collage Poster (Video Tutorial)
By combining the capabilities of Illustrator and Photoshop, you will be able to follow along with this video tutorial to create a collage poster reminiscent of an album or abstract poster.

15 Vintage Poster Templates for Illustrator
The posters have a classic, old-world charm with various designs ranging from travel destinations to advertisements. East to edit Illustrator and are perfect for adding a touch of nostalgia and sophistication to any office wall.

How to Create a 1950s Advertisment Poster
Travel back in time with this step-by-step tutorial to create a 1950s-style poster. You will be creating everything using basic shapes and tools and then transforming them to give an aged look.

Geometric Patterns, Shapes & Posters
This collection offers a variety of playful seamless vector patterns, vector poster templates, and geometric shapes in vibrant colors. This set is perfect for adding a modern and dynamic look to any design project.

How to Create a Colorful Retro Poster
Creating a colorful retro poster is as easy as finding a photograph that you love, and using Photoshop and Illustrator to change small portions to create a whole new image. Learn how with this step-by-step tutorial.

Abstract Background Patterns for Illustrator
This abstract background and poster template collection features editable objects and colors in AI, EPS, and PNG formats. The well-organized and grouped layers make it easy to customize and create a unique poster design.

How to Create a Colorful Spring Poster (Video Tutorial)
Spring into this video tutorial and learn how to use Illustrator to make a simply divine spring-themed poster. You will be transforming simple shapes into colorful leaves and wildlife in no time.

How To Create a Colorful Abstract Poster
Colors and geometric shapes are all it takes to create this wonderful poster. Learn how Chris used a series of tessellating shapes created with the help of Illustrator’s Pathfinder tool, then added color swatches and gradients to bring the design to life.

How to Create a Desert Landscape Flat Design Poster (Video Tutorial)
Ever wanted to create your own desert landscape? Now you can, with this video tutorial. You will learn how to make use of flat design , simple patterns, and basic shapes to create your own desert landscape.

How to Create a Retro Theatre Poster
When you follow this step-by-step tutorial, you will learn how to make a vintage-looking theatre poster. By combining clipping masks, vector brushes , basic shape tools, and great typography, you’ll be able to apply your new skills to any poster design project that comes your way.

How to Design a Vintage Travel Poster
With this tutorial, you will rediscover the golden age of travel posters. You will learn how to capitalize on Illustrator’s drawing tools and then leverage Photoshop’s brushes and blending modes to make these vintage-looking posters.

How to to Create a Geometric Poster Vector Design
Use shapes instead of letters for your next poster! With this step-by-step tutorial, you will learn how to use geometric shapes to make letters and then transform them into your next poster.

How to Create a Hand-Lettered Textured Poster
Need to unleash your inner creativity with some hand-lettered posters? Then get your coffee ready and dive in with this step-by-step tutorial that will show you how to bring your hand lettering to life!

How to Create a Geometrical Abstract Poster (Video Tutorial)
With this video tutorial, you will be able to take a simple pattern and transform it into an abstract geometric poster. You will see how to make use of swatches to create a 3d randomized pattern that you transform into a fully-fledged poster.

How to Create a Daft Punk Poster in Illustrator
Want to make your own Daft Punk-inspired artwork? Then you’ll enjoy this step-by-step tutorial showing you how to make a Daft Punk poster using Adobe Illustrator. You’ll then finish off the design in Photoshop.

How to Create a Retro Poster with Astronaut Child
Were you ever inspired by the art on the VHS covers? Intrigued to see what that artwork was? Well, join us with this video tutorial to learn how to create your own artwork based on that long-gone cassette type.

Frequently Asked Questions (FAQ)
- What will I learn from these Illustrator tutorials? These tutorials teach you how to use Adobe Illustrator to create various types of posters. You’ll learn about layout, color schemes, typography, and incorporating images and graphics properly.
- Are these tutorials suitable for beginners? Yes, most tutorials are designed for beginners. They’re a great way to build your skills in Illustrator.
- What types of posters can I create with these tutorials? You can learn to design a wide range of posters, including event advertisements, movie posters, informational graphics, and artistic or promotional posters.
- Do I need the latest version of Illustrator for these tutorials? Most tutorials can be followed using basic tools and features found in various versions of Illustrator. However, having the latest version might offer additional helpful features.
- How long does it take to complete a poster design tutorial? It varies. Some tutorials can be completed in a short time, focusing on specific aspects, while others might take longer, covering more complex designs.
- Can beginners in Illustrator start with these poster design tutorials? Definitely! Many tutorials are tailored to be easy to follow, even for those new to Illustrator, and are a great way to learn by doing.
- What skills will I develop from these tutorials? You’ll improve your skills in vector graphic design, learn about effective visual communication, and explore creative ways to convey messages through poster design.
- Is learning poster design in Illustrator beneficial for my portfolio? Absolutely! Being able to create visually appealing and effective posters is a valuable skill in graphic design and can make your portfolio stand out to potential clients or employers.
Create Stunning Posters in Illustrator
Poster design can make or break your event, cause, or campaign, which is why it’s important to get the poster design just right. With the help of the tutorials in this collection, you’ll learn how to create stunning posters for all kinds of projects and campaigns.
More Illustrator Tutorials
Related topics.
- Illustration
- Illustrator Tutorials
- Poster Design
- Fright-Fall
" > " > RetroSupply Co.
29 best retro and vintage illustrator tutorials.
Creating top-class, super-affordable illustration tools that make your design workflow faster and more efficient is just one part of what we do at RetroSupply. The other part is inspiration: we’re dedicated to producing and finding the best creative resources out there – from tutorials to pro tips, tricks and techniques – for becoming better designers and illustrators. That’s why we’ve collated this list of the very best retro and vintage tutorials for Adobe Illustrator, which we’ve divided into the following categories for ease of use: retro and vintage techniques , logos , effects , characters and typography . Whether you’re a beginner or a pro, you’ll find something here to help take your skills up a notch.
Scroll down for our hand-picked selection of the best retro and vintage tutorials for Illustrator… Also read:
- Best Free Illustrator Brushes for Retro and Vintage Effects
- 50 Best Retro and Vintage Photoshop Tutorials
- Retro Photoshop Brushes : 50 of the Best
- 50 Free Retro and Vintage Fonts
- 10 of the Best Places to Make Your Products
Retro and vintage techniques
HOW TO USE THE PERSPECTIVE GRID TOOL FOR LOGO DESIGN
Retrosupply co..
Designer Emir Ayouni of Responsive Branding Training with Emir Ayouni shares how he created factories, warehouses, and other buildings in Adobe Illustrator using the Perspective Grid.

create complex shapes with illustrator's shape builder tool
Astute graphics.
Design ninja Tony Harmer demonstrates a quick way to create compound shapes in Illustrator, in this two-minute video walkthrough. Find out how to create unique forms in seconds by merging, extracting or erasing intersecting objects.
HOW TO CREATE A T-SHIRT DESIGN IN ILLUSTRATOR
Creative bloq.
Design some cool retro graphics for a T-shirt by creating simple vectors and textures in Adobe Illustrator, with this step-by-step guide. Key skills covered include how to use the Pathfinder panel to knock out and combine shapes, and how to apply vector textures to shapes.
HOW TO DRAW AN AUTHENTIC COMIC PANEL
Learn how to create a vintage-looking comic panel with our step-by-step tutorial. You'll be able to add color halftones, wear and tear, and other effects to achieve a convincing vintage aesthetic.
CREATE A BIRDS EYE VIEW OF RETRO CARS IN ILLUSTRATOR
Yulia sokolova.
Get to grips with basic shapes, gradient, blending modes and the Pathfinder panel in this intermediate Illustrator tutorial, which walks through how to make a retro 1950s ‘Greased Lightning’ car.
CREATE A SET OF SIMPLE LINE ICON IN 20 MINUTES OR LESS
Produce a set or retro icons in less than 20 minutes with this intermediate Illustrator tutorial. Topics covered range from creating basic Shapes to using the Arc tool and Blob Brush tool.
HOW TO DESIGN A VINTAGE BOOK COVER
Grace fussell.
Recreate the look of a clothbound, vintage book cover and decorative spine with woodcut-style illustrations and calligraphy in this intermediate tutorial, which uses Illustrator, Photoshop and InDesign.

CREATE A RETRO-STYLE COMIC IN ILLUSTRATOR
From initial sketches to a polished piece of final artwork, illustrator Toby Leigh walks through how to develop a narrative-based artwork in his retro graphic style, using Illustrator and Photoshop.
HOW TO MAKE A RETRO MATCHBOOK DESIGN IN ILLUSTRATOR
Learn how to make a mid-century-inspired matchbook cover design in Adobe Illustrator. Whether or not you think you'll ever create a matchbook design for a client project, it's a great exercise. Matchbooks are a perfect example of an economical design that grabs attention.
Retro and vintage logos
HOW TO MAKE AN ENGRAVED ILLUSTRATION EFFECTS IN ADOBE ILLUSTRATOR
Learn how to make an engraving effect in Adobe Illustrator with ease. This tutorial teaches you how to create a simple eye engraving illustration fast. Check out the technique they use here and never be intimidated to add an engraving effect to your work again.
HOW TO Create a set of retro icon illustrations in adobe illustrator
Learn how to create retro-inspired icons in Adobe Illustrator. We'll be starting by creating a food truck illustration and then use that illustration to build out a full set of icons.
retro badge logo design illustrator tutorial
Spoon graphics.
Create an outdoors themed badge design featuring a simple mountain graphic and colorful sunset effect using a retro color scheme. This tutorial uses Illustrator’s basic shape tools to construct the vector badge design and ends with an easy way to make your digital design look real with stitching and embroidery effects.
HOW TO CREATE A RETRO INSPIRED BADGE IN ILLUSTRATOR
Ever wanted to create a retro style badge design in Illustrator? This time-lapse tutorial will show you how I created a really simple one using just two fonts and a few graphics. You can find links to the fonts I used below the video!
HOW TO MAKE A VINTAGE LOGO TUTORIAL FOR ILLUSTRATOR
Create an eye-catching vintage logo design with this Illustrator tutorial walkthrough from Chris Spooner. Based in inspiration taken during a raid trip through Canada, this tutorial will have you creating vintage-style badges in no time.
HOW TO CREATE A VINTAGE LOGO USING ILLUSTRATOR
Retro and vintage effects.
HOW TO GET VINTAGE HALFTONES IN ADOBE ILLUSTRATOR
New to halftones, Illustraor, or both? Have you heard about our best selling DupliTone halftone kit and wonder what it's all about? We've got you covered!
Watch below our quick demonstration of DupliTone Halftone Swatches for Illustrator. We'll color in this quirky cat illustration in our dot and line halftones in two colors.
CREATE A RETRO TRIANGULAR PATTERN DESIGN IN ILLUSTRATOR
Spoon graphics.
Find out how to create a retro pattern design made up of a limited color palette, and lots of squares and triangles, in this step-by-step Illustrator tutorial.
5 MUST-KNOW TIPS FOR USING PATTERNS IN ADOBE ILLUSTRATOR
Want to add more visual interest to your illustrations? Check out these tips for using patterns in Adobe Illustrator. Includes methods for applying patterns, resizing patterns, and changing pattern colors.
HOW TO MAKE NO-STRETCH CROSS-HATCHING PATTERN BRUSHES IN ILLUSTRATOR
Learn how to make no-stretch cross hatching pattern brushes in Adobe Illustrator with this step-by-step tutorial.
HOW TO USE TEXTURE IN ILLUSTRATOR LIKE A PRO
True grit texture supply.
HOW TO USE PAPER TEXTURES IN ADOBE ILLUSTRATOR
Not sure how to best use your new paper textures? We're here to help!
Follow the video below for step-by-step instructions on how to use paper textures in Adobe Illustrator. We will be using the Paper Boy paper textures that come with every purchase of the ColorLab Comic Color Kit .
Retro and vintage characters
HOW TO MAKE A RETRO STYLE CHARACTER IN ILLUSTRATOR
In this tutorial, we're going to make a retro style character in Illustrator from a simple drawing.
Learning how to draw cartoon characters, character design, and creating mascots is just awesome.
Whether your dreams are to create shirts for legends like Johhny Cupcakes, offer mascots for brands, or make an epic children's book.
Consider this tutorial your chance to dip your toes into the intoxicating waters of drawing retro characters.
Learn how to create a retro mascot character design of a hot dog, using inspiration from the classic cartoon style of the 1930s known as “rubber hose”.
This tutorial teaches you to use a combination of the brush and blob tools to construct the illustration from scratch, then incorporate a limited color palette and subtle texturing to suit the retro look. Plus, Spoon Graphics will show you their favorite illustrating techniques and brush settings to help you draw your own fun character designs.
Creating Retro Characters with the VectorHero Brush Pack
Freelance illustrator Rocky Roark walks through how to create stylised retro characters with the RetroSupply VectorHero ink brush set – using a handy trick for creating natural strokes with Illustrator’s Width tool.
How to Create a Retro Style Cartoon Character illustration
Spoon Graphics takes you through the process of creating a mid-century illustration, complete with distressed print effects. Learn how to achieve the visual traits that give the artwork the appearance of a retro matchbook print, such as the use of limited colors, halftone shading, misregistration effects, and the all-important old paper texture that turns the clean and crisp vector illustration into a nostalgic cartoon that is full of character!
Retro and vintage typography
How to create speed lines typography in adobe illustrator
Retrosupply co..
Learn how you can achieve a typography effect seen on our favorite motor oil cans: speed lines. In this tutorial, you will learn how to add speed lines (and speed line shadows) to your type in Adobe Illustrator.

HOW TO CREATE AN EDITABLE RETRO TEXT STYLE IN ILLUSTRATOR
Learn some handy techniques for creating a graphic style that works with live text, using the Appearance panel in Illustrator. You’ll find out how a range of fills and strokes can be layered to produce a retro style text effect, while retaining the ability to alter the text and font.

A FASTER WAY TO VECTORIZE HAND LETTERING WITH ILLUSTRATOR'S PEN TOOL
Designer Will Paterson reveals a faster way to digitise hand-lettering and logotypes using Illustrator’s Pen tool, in this super-quick tutorial. He explains how to shave hours from your vector workflow by mastering anchor points and handles – and says that if you don’t already know this technique, it might just change your life.
The Easy Way to Roughen Your Typography in Adobe Illustrator
In this quick tutorial, RetroSupply Co. shares a pro tip for giving your typography a subtle grungy, roughened effect. It is perfect for adding an old print effect to your designs, and the imperfections can even create a hand lettering feel.
- Photoshop Brushes
- Illustrator
- Screencasts
- Inspiration
- About CN Premium
Access To 100's Of Premium Design Resources
20 Tutorials for creating posters using Illustrator
- August 5th, 2019
This round up is aimed at helping you maximize your creative potential by utilizing the various tools available in Illustrator to design unique and visually appealing posters. The compilation comprises of 20 of the best tutorials that will walk you through the process of creating exceptional posters using Adobe software. Each tutorial presents a unique approach, catering to different preferences and skill levels. These approaches range from typography-focused designs to abstract shapes and much more.
Whether you’re just starting out or an experienced user, this round up has something for everyone, providing a range of posters that will help you expand your knowledge of designing posters using Illustrator. With the help of these tutorials, you’ll be able to take your design skills to new heights, and create posters that stand out in a crowd, leaving a lasting impression on your audience. So, start exploring these tutorials today and unleash your creative potential!
Premium design assets for your next project
Acess to a huge libary of design resources from Photoshop brushes to vector resources.
1. How To Create a Colorful Abstract Poster in Illustrator
Follow this step by step tutorial to create a colourful and vibrant abstract poster design. We’ll create a series of tessellating shapes using Illustrator’s Pathfinder tool, then begin adding colour swatches and gradients to bring the design to life. To finish the poster off, we’ll then import it into Photoshop to add some polish in the form of subtle textures.

2. Create an Inspirational Vector Political Poster
This tutorial is inspired by Sheppard Fairey’s famous political poster series for the Obama campaign in the US. We’ll be showing you how to create this style of design. We’ll start with basic image editing techniques in Adobe Photoshop to get our guide layers setup, and then we’ll jump into Adobe Illustrator. You don’t need any fancy equipment to do this. I used an older mouse that still has the rubber ball.

3. How To Create a Tessellating Geometric Poster Design
Follow this step by step tutorial to create a trendy geometric poster design with a series of tessellating three dimensional cubes. We’ll be creating the colourful shapes in Adobe Illustrator, then bring everything over to Photoshop to finish off the poster with subtle textures and colour casts.

4. 7 Steps to Create a Geometric Poster Vector Design
Let’s have fun with pops of color in this text treatment tutorial! We’ll use simple shapes to transform text into a fantastic geometric poster vector design in seven steps flat!

5. Daft Punk Poster in Illustrator
Daft Punk is releasing their new album next month, titled Random Access Memories. While biking around in San Francisco I started seeing some posters and billboards on walls advertising the new album and was inspired by the amazing artwork. Of course, I’ve always wanted to do something for Daft Punk so this post’s timing seems just about right.

6. How to Create a Retro Poster With an Astronaut Child in Adobe Illustrator
In this tutorial you will learn how to create an astronomy-inspired retro poster. We will use the Clipping Mask a lot, as well as Warp Effects, and at the end we will apply a texture to add a vintage look to our poster.

7. Create a 50s Ad Poster in Illustrator
It seems that the 50s are back, not just in advertising and design, but also on clothes, TV shows, and elsewhere.

8. Create a super bright and colourful vector poster in Illustrator
In this tutorial, Ben guides you through some of his favourite tools in Illustrator. These include the relatively new – and very smooth – Variable Stroke-Width tool, the tidied-up dashed-line functions, the improved shape-building tools, and most excitingly of all, the new perspective tools.

9. Design a geometric pattern for an poster
This tutorial explains how to create one of Simon C Page’s seemingly complicated posters via some nifty tricks in Illustrator and InDesign. Usually he uses Flash Pro’s ActionScript language – but here he shows you how to do it in Illustrator, using that application’s ExtendScript toolkit.

10. How to Design a Retro Theatre Poster in Adobe Illustrator
In this tutorial, we’ll be designing an illustrated tribute poster for the original production of Once Upon a Mattress , though the design could just as easily be used for a current production. We’ll use Illustrator’s basic shape tools and the Pen Tool to layer shapes for the base of our illustration, and then we’ll add details and texture with vector brushes and clipping masks, along with some fun typography.

11. How to Create a Hand-Lettering Textured Poster in Adobe Illustrator
Are you a coffee lover with a passion for beautiful fonts and hand-lettering? Follow this tutorial to create a beautiful retro-style coffee-inspired poster that you can print and hang on a wall in your kitchen! We’ll be using simple shapes, free fonts and some drawing tools of Adobe Illustrator to create a balanced composition with a coffee cup, whimsical text, and intricate hand-lettering. Then we’ll finish up by adding a gentle textured touch to our poster.

12. How to Design a Vintage Travel Poster in Adobe Illustrator and Photoshop
In honor of St. Patrick’s day, this tutorial will walk you through the steps of creating an Ireland travel poster in a vintage style.

13. Making of Robot Earth 3009 Typographic Illustration
During this tutorial, I’ll show you the process for creating one of my illustrated type posters. I love to work type into all of my illustrations for the balance and rhythm it provides to a layout, but I especially love creating images out of type itself… the graphic designer inside me compels me to do it!

14. Master retro poster design
In this tutorial, Fabio Sasso will show you how to create a poster-style illustration that taps into American style from the first half of the 20th century. We draw on the Art Deco style that grew out of Paris in the 1920s and spread internationally in the 1930s, but we also reference US TV and film studio branding from the 1940s and 1950s, which often used Art Deco. The most famous example is the ‘radio tower’ logo and ident of RKO Radio Pictures, but here Fabio’s main reference is a poster for US TV channel NBC.

15. How to Get More Out of Low-Resolution Images Using Adobe Photoshop & Illustrator
For this tutorial we will use the Noise Tool in Adobe Photoshop in order to be able to use a low-resolution image for print and create a type poster. Then we’ll finish off the poster in Illustrator.

16. Create a typographic poster in Adobe Illustrator
Today, I’m going to show you how to create an inspirational typographic poster using some of Illustrator’s basic tools and handy keyboard shortcuts. Truth be told, I love inspirational and witty quotes, especially on design and creativity.

17. Create a Vibrant Abstract Vector Design Illustrator
Follow this step by step Illustrator tutorial to create a vibrant abstract design. We’ll put Illustrator’s Gradient Mesh tool to use to create a colourful shape, then build up layers of objects to create an abstract design with lots of vibrancy, bright colours and transparency effects.

18. How To Create an Abstract Geometric Poster Design
Some of the coolest designs can be created with the simplest of tools. In this tutorial we’ll create a cool abstract poster design using nothing more than a hexagon. With careful composition, an enticing colour scheme and a series of textures you can easily create a great looking design that would work perfectly as a poster, or even artwork for a book or album cover.

19. The Making of 3 – A Limited Edition Poster Design
Here’s a detailed walkthrough of the design process, showing how the design of “3” was conceptualised as a sketch, constructed in Illustrator and given some digital polishing with a range of final touches in Photoshop.

20. Create a Distressed Vector Typographic Poster Design
Follow this step by step walkthrough of my recent design process for the ‘Spectrum’ poster. Starting with custom made type in Illustrator, we’ll move our vector graphics into Photoshop for some serious distressing with Photoshop brushes, blending modes and more!

RELATED POSTS
How to create pencil sketch photo effect in photoshop, how to create a 3d style cylinder text effect, 10 photoshop poster design tutorials, how to remove a person from a photograph in seconds in photoshop, unlock high-quality resources to unleash your creativity, regular updates.
New content is continually added throughout each month, so frequently visit back to see new resources added.
1 year membership
Download as many resources as you like throughout lifetime of your membership with over 100 resources.
Unlimited access
Your membership lasts for 12 months, which cost less than a cup of coffee a month.
- Bahasa Indonesia
- Slovenščina
- Science & Tech
- Russian Kitchen
7 things to know prior to coming to Chechnya (even if you don’t go)
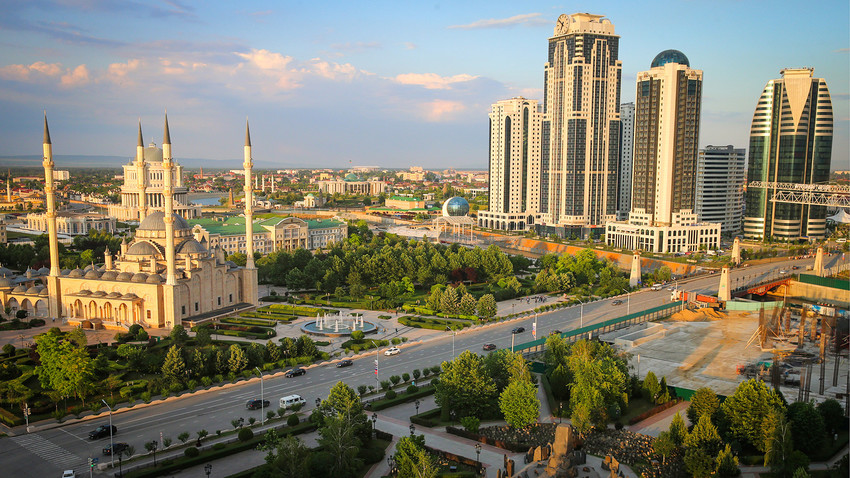
1) Is it safe to go to Chechnya ?

Yes , it is. But remember that this is a conservative region with an Islamic population. You can’t misbehave as if on some island getaway - drunken brawls and outbursts are simply unacceptable.
Local police officers will always be polite to you, but they won’t hesitate to twist your arm behind your back and slap on the handcuffs if you overstep the line. They can also be pretty quick to reach for their guns. In Chechnya, the police are armed with AKs and handguns and they know how to use them: For years the region was ravaged by war as terrorists and Russia went head to head.
So it’s a trade-off: No college-like drunken parties in exchange for total safety. Anyway, alcohol is banned.
2) How to get to there?

There are two ways to get there. You can take a direct flight from Moscow to Grozny from Vnukovo Airport, and planes fly there and back twice a day.
Or you can fill up the car with fuel and embark on a road trip. Grozny is 1,850 km south of Moscow and unlike much of the country, the route is paved with new roads. The trip will take you through cities like Voronezh and Rostov-on-Don, and you’ll also see provincial Russia in all its glory.
3) How to communicate with the locals ?

Residents of the region, which was a war zone only a decade ago, are sociable and curious people. They don’t get to see a lot of tourists as people are still afraid to visit due to Chechnya's history - but the locals really are very welcoming.
One small warning: If you get to know a family, you should never reject their offer to come for dinner. If you can’t go right away, schedule it for another day. Otherwise, they’ll feel offended and any friendship could be ruined.
People are extremely eager to show how much their world has changed since the war, which can result in sometimes excessive demonstrations of hospitality. Our advice, just enjoy the ride.

As a region with a dominantly Islamic population, Chechnya has some specific rules for clothes. A girl in should never expose her bare legs and arms.
As for the men, keep one thing in mind; No shorts or fancy T-shirts.
5) Where to go and what to see

You won’t find any booze, pot, or anything of that kind in Chechnya. Not even cigarettes or hookah. Such things can’t be found even in fancy hotels and restaurants – again, because of Muslim traditions. Having no other options, locals tend to lead a healthy lifestyle and enjoy sports, culture, guns and traveling.
Sports are sacred for them as they traditionally see their mountain region as the homeland of warriors. Every man in Chechnya has tried his hand at martial arts at least once in his life. The first thing our guide showed me was his son wrestling in a local Judo tournament. The venue for this event - a dilapidated sports gym with frayed walls - was swarming with people. Locals enjoy watching sports and there are a number of big arenas recently built for such events. The most impressive is the Ahmat Arena.
If you enjoy cultural events then head to the Center Theater and the largest mosque of the region - The Heart of Chechnya. Both are situated in Grozny.
You’ll love Chechnya if you’re a gun enthusiast. The region’s leader Ramzan Kadyrov personally oversees the ongoing construction of the Russian University of Spetsnaz . It’s situated 33 km outside of Grozny near the city of Gudermes.
Some parts of the center are under construction but the shooting ranges are open, where you can literally shoot anything you want from pistols to heavy machine guns and grenade launchers (yes, you read it right). In 2020, once construction is complete, you’ll be able to go underwater shooting and even defuse mines (if you are crazy).
Besides shooting and blowing things up, I would recommend going on a hike. If you’re into camping, walking through forests, and mountaineering, this is the place to go. Start in Grozny and travel in any direction you like - the countryside is stunning.

You won’t find any pork here. That’s for sure.
Try the local shashlik and kebab, especially the mutton . There are numerous cafes serving local cuisine and any local taxi driver will get you to whichever joint in 20 minutes max - Grozny is a small city compared to Moscow.
7) What else should you know before going to Chechnya

Exchange dollars (or whatever currency you have) for rubles prior to traveling there - doing this will save you time as you don’t want the hassle of having to look for a local bank in Chechnya to change money.
You’ll also need cash as you won’t be able to pay with your credit card (except in big fancy restaurants and hotels where you won’t be spending time if you wish to get stuck into the local culture).
You should not also avoid conversing with the local girls as you might in another big city. Different rules apply here, trust us, don’t make any moves.
But my main advice to you would be to remain open-minded and outgoing. Chechnya turned out to be totally different from what I’ve seen on the TV or horror stories I’d heard from friends. Chechnya is definitely a place to go.
If using any of Russia Beyond's content, partly or in full, always provide an active hyperlink to the original material.
to our newsletter!
Get the week's best stories straight to your inbox
- QUIZ: Which one is Russia? Test your intuition!
- 24 or 48 hours in Rostov-on-Don: Where to go and what to do in 2018
- 20 of the hottest dames supporting their team at the World Cup in Russia
- 24 or 48 hours in Vladivostok: What to do in Russia’s most eastern metropolis
This website uses cookies. Click here to find out more.

Grozny Travel Guide: All You Need To Know

Grozny, the capital city of the Republic of Chechnya in Russia, is a place where modernity meets tradition. Grozny has experienced significant transformations in recent years, evolving into a vibrant city with a rich cultural heritage. In this guide, we’ll explore the places to visit, the best time to plan your trip, activities and things to do, transportation options, dining recommendations, accommodation choices, and essential travel tips to help you make the most of your visit to Grozny.
Table of Contents:
Places to Visit in Grozny Best Time to Visit Grozny Things to Do in Grozny Getting Around in Grozny Where to Eat in Grozny Where to Stay in Grozny Travel Tips for Grozny
- Places to Visit in Grozny Grozny boasts a range of attractions:
Akhmad Kadyrov Mosque: This stunning mosque is an architectural masterpiece known for its intricate design and grandeur.
Grozny City: A modern development with impressive skyscrapers, shopping centers, and entertainment options.
Heart of Chechnya: This cultural complex is dedicated to Chechen culture and features a historical museum, art galleries, and a library.
The Presidential Palace: While not open to the public, you can admire its architecture from the outside.
- Best Time to Visit Grozny The best time to visit Grozny largely depends on your preferences:
Spring and Autumn (April to May and September to October): These months offer pleasant weather, ideal for sightseeing.
Summer (June to August): This season is great for enjoying outdoor activities and experiencing the vibrant atmosphere.
- Things to Do in Grozny Explore the City: Stroll through the city’s streets and experience its vibrant atmosphere.
Visit the Akhmad Kadyrov Mosque: Explore the interior of this beautiful mosque and learn about its cultural significance.
Experience Chechen Culture: Engage in cultural activities, attend local events, and visit museums and art galleries.
Grozny City: Explore the modern side of Grozny, with shopping, dining, and entertainment options.
- Getting Around in Grozny To get around Grozny, you can use the following transportation options:
Taxis: Taxis are readily available and can be a convenient way to explore the city.
Walking: In the city center, you can comfortably explore on foot, taking in the sights and local life.
Local Buses: Public buses operate in and around the city, providing an affordable mode of transportation.
- Where to Eat in Grozny Grozny offers a range of dining options:
Cafes and Restaurants: You can find local eateries offering traditional Chechen and Russian dishes. Don’t miss the opportunity to savor khinkal, a type of dumpling, and other meat-based dishes.
Local Markets: Visit local markets to try fresh produce, snacks, and street food.
- Where to Stay in Grozny Accommodation options in Grozny include:
Hotels: The city has various hotels, from budget to luxury, offering a comfortable stay.
Guesthouses: Staying in guesthouses can provide a more authentic experience and the chance to interact with locals.
Hostels: Budget travelers can find hostels that offer affordable accommodation and a social atmosphere.
- Travel Tips for Grozny Respect Local Customs: Chechnya has a strong Islamic culture. When visiting religious sites, dress modestly and ask for permission before taking photos.
Language: Russian is the main language spoken in Grozny, so knowledge of Russian can be helpful.
Currency: The official currency is the Russian Ruble (RUB).
Grozny is a city of contrasts, where contemporary architecture blends with a rich cultural heritage. Whether you’re admiring the architectural wonders, immersing yourself in Chechen culture, or exploring modern developments, Grozny offers a unique travel experience. Just remember to be respectful of local customs and traditions while enjoying your visit to this vibrant city.
You might also enjoy:
Nanning travel guide: all you need to know, kirov oblast travel guide: all you need to know, muan travel guide: all you need to know, exploring kurdistan province: a journey into iranian kurdistan, leave a comment cancel reply.
Your email address will not be published. Required fields are marked *
Save my name, email, and website in this browser for the next time I comment.
Chechnya: Images of a Forgotten War
Thomas Dworzak's coverage of the First Chechen War, 25 Years On

A quarter of a century ago, ill-prepared and ill-equipped Russian troops were sent into Chechnya, a breakaway republic whose leadership had in 1991 recently declared itself free from Moscow’s influence. Magnum photographer Thomas Dworzak had been working in the country for some time before hostilities commenced, and his images of the war reflect his connection to the place and its people. Lawrence Sheets, Moscow Bureau Chief covering the Caucasus region for National Public Radio (NPR), was with Dworzak during the bloody, and under-scrutinized conflict. Here, Sheets reflects upon the war, Dworzak’s images, and the legacy of Russia’s campaign.
Warning: The following feature includes images which readers may find disturbing
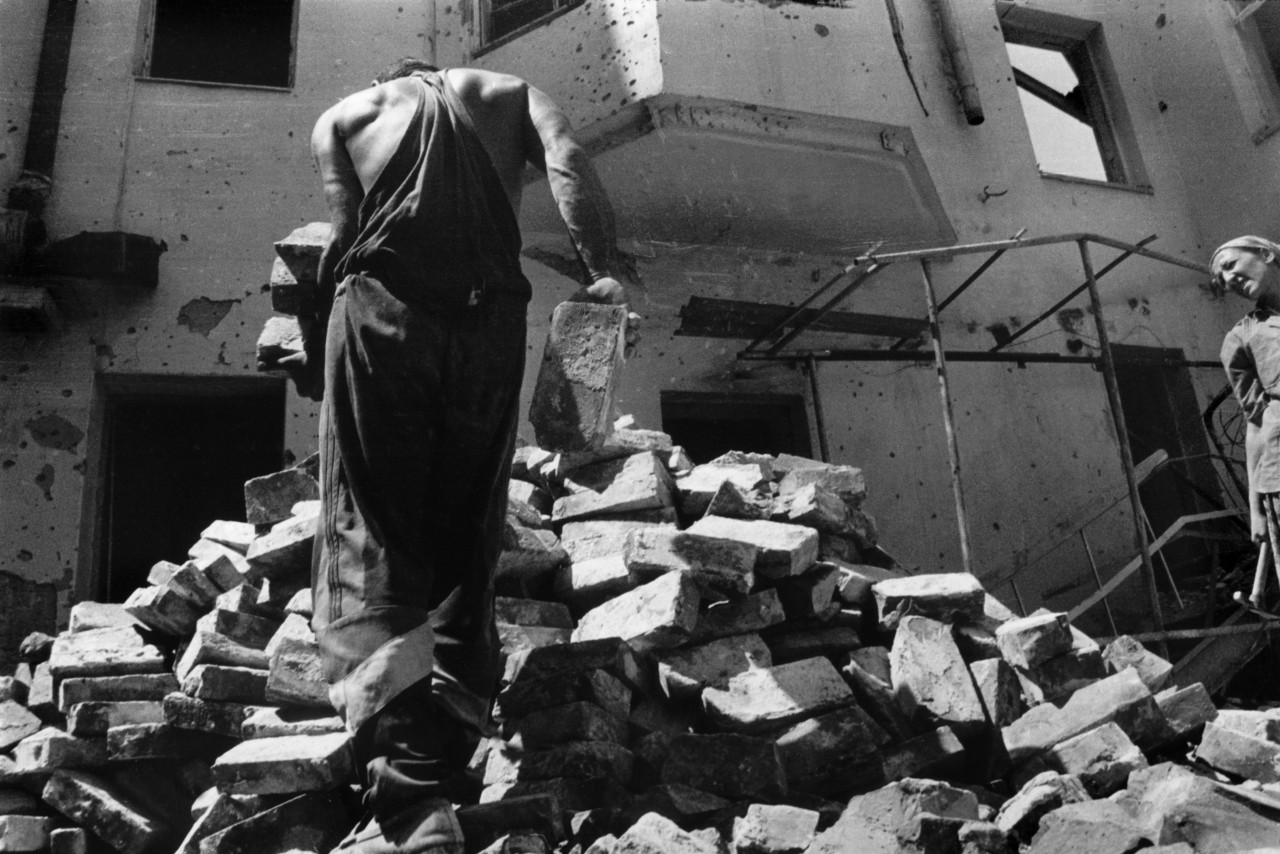
Thomas Dworzak was all of 19 years old when he first showed up in Chechnya. It was June 1993, well before the first Chechen War began. Those of us who were there at that time were a tiny lot. Thomas told his father he was coming home, to Bavaria, in two months. In actuality he remained working in the region for 20 years.
The images presented here are the most empathetic made during that first, senseless Chechen war. Thomas was by far the most hard-working of us. He operated on a shoestring budget. While we waited for drivers and escorts, Thomas was usually awake by 5am and gone, departed on smoke-belching old Ukrainian buses.
There were plenty of photographers coming in and out of Chechnya by the time the war had started. In 1994-95 alone 19 journalists died or disappeared, in a territory about the size of Rhode Island or Luxembourg.

Thomas Dworzak’s Kavkaz
Thomas dworzak.
The images you see here are the best of that horrible time. They are not accusatory or politicized. Many were taken over a year before the war began. They reflect the realities of life in Chechnya at the time. Chaos. Disorder. Contradictions. Normalcy and anarchy. Solitude and bedlam. Bullet strewn walls. Russian conscripts totally unaware of the hell they had descended into, often begging for cigarettes or abandoning the battlefield. It is all here. The images demonstrate subtlety, power, and an unmatchable range in Dworzak’s work.
Beyond Sochi
The most surprising – and tragic – thing was that the war took place at all. During the unbridled assault that came, a greater tonnage of bombs was dropped on the regional capital, Grozny, than was on Dresden during World War II. Three years of indiscriminate use of force of every type, left most of the city of 400,000 a smoking ruin, and, by the time the conflict was over – in 1997 – there were at least 50,000 casualties, mostly among civilians, but also among the Russian soldiers ill-equipped for combat and left traumatized. The war also created hundreds of thousands of Chechen refugees, bombed of their homes.
Feldpost: A Global Vision of the Great War
What at the time seemed equally unbelievable was that the Chechens were prepared to fight at all. Almost all journalists had scoffed at the notion in the lead-up to the war. After all, Chechnya, with a population of around 1 million, would be taking on Russia – population 150 million. Chechnya had no real army, just mostly volunteers with AK-47s, a few pieces of old military hardware, no air force, no real air defense system. Never truly independent, Chechens were nonetheless scarred by their mass deportation in 1944 when the entire population was sent in cattle cars to Central Asia, only to be allowed to return in the 1950s after the death of dictator Joseph Stalin.

The exact date of the commencement of hostilities is hard to pinpoint. Russia began moving regular troops into the region in December, 1994, but in reality had been using Kremlin-backed local Chechen proxy militias – mostly from the more pro-Moscow north of the republic – from much earlier. All of these proxy groups failed in every attempt to topple nominal president Jokhar Dudayev, a former Soviet Nuclear Squadron commander who returned to Chechnya in 1990, even though he was highly unpopular and likely would have been deposed by his own people, given the chaos in the tiny republic. The real large-scale battles did not commence until January of 1995, a quarter century ago, and Russia never gained full control of much of the territory, especially in mountain regions.

The prelude to all of this had begun with a unilateral, non-recognized declaration of independence by pro-Dudayev forces in Chechnya. At the time few international journalists had even heard of the place, nor was there much interest in it, given the larger meltdown of the USSR that was at hand, and the obscurity of tiny Chechnya.
But Thomas was there, in the middle of 1993, almost 2 years before “official” hostilities began, one of only a very few journalists who expressed interest. It gave him a unique perspective on what was unfolding and what would evolve into that savage, if somewhat forgotten, war.
Many of the photos emphasize themes which most pundits missed. For instance, Grozny, first established as a forward line during the Tsarist conquest of the area in the 19 th century, was home to a very large number of ethnic Russians. Chechens often had extended families to stay with outside the city, but the Russians were relatively recent arrivals and had no place to hide the constant bombardments. They suffered as much as anyone else.
The “end” of the formal war came in 1997 when the Russians conceded defeat. Unfortunately, Grozny, which had formerly been a largely secular place with a large, broadly moderate sufi-based population was transformed during the horrors of the war into a cause for radical sects of Islam to infiltrate. The republic, still unrecognized, was a hotbed of kidnappings for ransom, radicalization, public firing squads, and became complete no-go area for most. In late 1999, the Russian army returned, this time not making the mistake of sending untrained conscripts to the area. Instead, they pummeled the place for weeks on end with airstrikes, artillery bombardments, and the like until there was even less left than after the first war. Finally, all real resistance receded.
Chechnya today is “formally” a part of Russia, and receives more than 80% percent of its budget from Moscow. Yet local Chechen laws fly in the face of Russian legislation, a discrepancy seemingly ignored by Moscow for reasons of expediency and head-scratching about what to do next. Instead of discouraging terrorism, Russia stoked it mightily.
They Will Have to Die Now
Paolo pellegrin, explore more.
Theory & Practice
In the Balkans: States of Transit and Transition
Nikos economopoulos.
The 75th Anniversary of the Battle of the Bulge
Robert capa.

War Lingers: Srebrenica 25 years on
In Pictures: 75 Years Since the Start of the Pacific War
Magnum photographers.
Abbas by Abbas
The Art of Street Photography
IMAGES
VIDEO
COMMENTS
In honor of St. Patrick's Day, this tutorial will walk you through the steps of how to design a poster in a vintage style. By starting in Illustrator and then switching over to Photoshop, we'll have the benefit of Illustrator's easy-to-use drawing tools for crisp illustrations, but also take advantage of Photoshop's brushes and blending modes to finish it off with authentic-looking ink ...
Making a flat scenery artwork in Adobe Illustrator and Photoshop Travel Poster Style In this lesson we are going to search of those fantastic places in the c...
This video will walk you through the steps of creating a "Visit Ireland" travel poster in a vintage style, using both Illustrator and Photoshop. Download u...
Outlines of each subsection of section 1. I've broken this up into 3 smaller sections as well. The area on the right, the large section in the middle and the small rocks on the left. Start with making an outline of the area using the Pen tool. Then connect anchor points all around to make the shapes.
In the following intermediate level tutorial you will learn how to create a vintage graphic of a vector stamp set in Adobe Illustrator CS5. Learn how to build a retro graphic stamp illustration, shape by shape. We'll construct the stamp border vector shape, highlight the edges, create the branding, and give the vector postage stamp a vintage ...
Time to illustrate.Learn How to illustrate a vintage travel poster Part 3Guatemala vintage travel poster
Step 1. Create a New Layer (Control-N) and place it beneath the brown line art layer in the Layers panel. Starting with the hair, use the Pen Tool (P) to carefully trace the contour of your line art and fill in each space with a flat color. Work each large area in smaller sections.
Highlight your Vintage type layer, and head to Type > Warp text. Choose Arc, with a 25% bend value. Repeat the process for the Travels type object, but with a -25% bend value. From there, you can tweak the placement of the type objects, to line them up with the icons nearby. Time to organize things neatly.
Learn to create a captivating vintage-style "Visit Ireland" travel poster in this 27-minute video tutorial. Master the art of combining Adobe Illustrator's precise drawing tools with Photoshop's texture-enhancing capabilities. Begin by setting up your Illustrator document and crafting a gradient background.
Step 1. Create a New Illustrator File. Open Adobe Illustrator and create a new file. Typically, postcards have a height of 3-4 inches and a width of 5-6 inches, but feel free to branch out! You can create a vintage postcard on almost any canvas size, which makes it great for marketing campaigns. Note: If using your design for postal mail, most ...
Key Takeaways: Designing vintage travel posters can be done using software programs like Illustrator and Photoshop, which provide a step-by-step design process. For those who prefer a personalized touch, MixPlaces offers customized travel posters with various customization options and provides inspiration and reminders for creating unique designs. Customers can conveniently order and receive ...
By combining the capabilities of Illustrator and Photoshop, you will be able to follow along with this video tutorial to create a collage poster reminiscent of an album or abstract poster. 15 Vintage Poster Templates for Illustrator . The posters have a classic, old-world charm with various designs ranging from travel destinations to ...
RETROSUPPLY CO. In this tutorial, we're going to make a retro style character in Illustrator from a simple drawing. Learning how to draw cartoon characters, character design, and creating mascots is just awesome. Whether your dreams are to create shirts for legends like Johhny Cupcakes, offer mascots for brands, or make an epic children's book.
To do this, go to Type > Create Outlines, then Object > Expand (leave the default settings) > OK. To finish the process, select Window > Pathfinder > Unite. Now copy and paste 'COFFEE' to duplicate it. Change the color to gold / #F9B31C and position the copy slightly below and to the left of the original word.
Hi Everyone! Do you want to learn Travel poster design or Flyer design illustration?In this illustrator tutorial, I will show you how to create a creative t...
Hi all I'm new to Illustrator. I have some landscape photos I've taken that I'd like to turn into retro style travel posters similar to what's found here: https://etsy.me/2O9g0gZ. Is this possible in Illustrator? If so I'd be grstfofor any tutorials or how-to's.
We will use the Clipping Mask a lot, as well as Warp Effects, and at the end we will apply a texture to add a vintage look to our poster. 7. Create a 50s Ad Poster in Illustrator. It seems that the 50s are back, not just in advertising and design, but also on clothes, TV shows, and elsewhere.
5) Where to go and what to see. You won't find any booze, pot, or anything of that kind in Chechnya. Not even cigarettes or hookah. Such things can't be found even in fancy hotels and ...
Skip to main content. Discover. Trips
The best time to visit Grozny largely depends on your preferences: Spring and Autumn (April to May and September to October): These months offer pleasant weather, ideal for sightseeing. Summer (June to August): This season is great for enjoying outdoor activities and experiencing the vibrant atmosphere.
Step 1. First, select everything you have on the page so far (Command/Control-A) and select Type > Create Outlines. With everything still selected, go to Object > Expand Appearance. Because the circle, the 'H', and the 'P' all have strokes, we have to do a little extra to get them ready for a color change.
A quarter of a century ago, ill-prepared and ill-equipped Russian troops were sent into Chechnya, a breakaway republic whose leadership had in 1991 recently declared itself free from Moscow's influence. Magnum photographer Thomas Dworzak had been working in the country for some time before hostilities commenced, and his images of the war reflect his connection to the place and its people.