

How To Plan A Trip With Google Maps: 7 Easy Steps
This page may contain affiliate links which earn us a commission at no extra cost to you to support the site. Thank you!
Wondering how to plan a trip with Google Maps? Below, we’ll show you how we plan all our trips on Google Maps – get ready for every Google Maps hack you’ll ever need!
There is a lot that goes into planning the perfect trip. What are you going to do? Where will you stay? How are you going to plan your days? How long do you even need to see everything? It’s overwhelming!
I love travel planning. As you can see on this website, I kind of made my career out of it. Because I want to make the most out of my trips (and write the best possible guides about the destinations I visit), I take travel planning pretty seriously.
There is so much research that goes into it, and I couldn’t do it without my favourite travel planning tool: Google Maps. In this guide, I’m sharing how I use Google Maps as a trip planner, along with some handy hacks to help you on your next adventure. Let’s take a look!
Add Directions
Embed your map on your site, 3. it is easy to plan your driving miles/time.

7 Steps to Plan a Trip With Google Maps
Here is how to use Google Maps trip planner:
1. Create a Map
To create a map on Google, you do need a Google account. Once signed up/logged in, go to this page .
Click on “ Saved” >> “My Maps “, which will take you to your maps. If you have created any maps in the past, you will also find them here. As you can see in the screenshots below, I’ve already created quite a few!
Alternatively, you can go to this page , where you see and access your maps in an instant.

To create a new map, click on “ Create Map ”. This will open a new tab with an empty map.

By clicking on “ Untitled Map ”, you can give your map a name and a description. And ta-da! You’re ready for some travel planning on Google Maps. Time to create the perfect itinerary .

2. Add Locations
Now it’s time to start brainstorming. What do you want to do and see on your trip? There are so many ways to find the best places to visit.
For starters, you can find things to do by reading travel guides, blog posts , and itineraries from other travel bloggers. It’s also a good idea to go through Instagram hashtags and location tags. And, of course, good old printed travel guides (by Lonely Planet and Rough Guides, for example) are always a good shout too.
You don’t have to worry about how to plan out your days in detail. For now, you simply want to get an idea of what you want to do on your trip.
Whenever you find something that seems interesting, you can add these to your map by typing the location into the search bar. This can be the name of the location or the address, or you can use the coordinates. Usually, you’ll see a drop-down menu with suggestions as you type.

By pressing enter or selecting one of the options, Google Maps will take you to the location. Here, you can add these locations to your maps. Simply click on “ Add to map ”. Afterwards, you’ll see it appear on the Untitled Layer .

Alternatively, you can use the “ Add Market ” tool (shown in the screenshot below) to add a marker on the map. You can use this when a location isn’t on the map but you don’t have the coordinates, for example.

Before adding all your locations, make sure to read step 3. We explain how to customize your pins on Google Maps, making it much easier to plan your daily itineraries later on.

Planning a road trip on Google Maps? Start by adding the places you want to see/visit. Later on (see step 5), you can add directions to help you find the fastest routes. You can create on Google Maps for the overall road trip, and make another map for daily itineraries of your road trip.
3. Customise Your Categories (Icons and Colours)
The customisation options are another reason why planning trips on Google Maps is one of the best travel planning tools out there. By using colours, icons, pictures and notes, your map will be even easier to navigate.
These options let you break down your locations into categories, such as things to do, photography spots, restaurants, cafes, hotels, shops, etc.
You can change the colour of your pin and add an icon under the “ Style ” option – it looks like a paint bucket. There are hundreds of different icons to choose from.
At this stage, it’s best to stick to changing the icons for now. I normally change the colours to divide the days on my itineraries. Obviously, you can completely style this the way you want.

You can also change the colour and icon of your pins in the side menu.

When clicking on the “ Edit ” icon, you can change the title and add a description for your location. This can be handy to help yourself remember any specifics about this place, such as good photography spots, opening times and whether you need to book a ticket in advance or not.

You can add an image or video to your pins, too. And lastly, you can delete the pin by clicking on the trash icon.

4. Create Layers
Now you’ve added all the things you want to do and given them some icons, it’s time to take a look at the layers. You can add a layer by clicking the “Add layer” option in the sidebar. This automatically creates a brand new untitled layer on your map.

You can rename and delete the layers by clicking on the three dots next to the name of the layer.

You can make layers invisible by unchecking the box next to the name of your layer.

To move points of interest from one layer to another, you can simply drag them over with your mouse.
Layers are an easy way to categorize and organise the locations on your map. There are multiple ways to do this, and you can choose a way that works best for your trip. For example, you can create one layer for restaurant options in Tokyo, one for sightseeing in Tokyo, one for hotels in Tokyo , etc.
When I’m planning a big trip, I like to use layers to break down my individual days or cities. This way, I can quickly see what I’m doing every day while I’m travelling. To make it even clearer, I change the colours of all my pins to match the different layers.
5. Plan Your Itinerary (with Directions)
After following these steps, we should have a good overview of all the things we want to do and see during our trip. This will make it much easier to break down the trip into days.
For the Tokyo itinerary I’ve been planning as part of this Google Maps tutorial, I’m going to spread it out over two days.
I created two layers to match my time in Tokyo in Google Maps.

Because I can see where all my hotspots are located, I can see which activities and sights I want to pair together. This way, I can efficiently plan what I want to see each day. You can even make squares to group things together with the “ Line Drawing ” tool.
For example, it makes sense to group these pins together per day – this will save me a ton of time travelling from one place to the other.

Always check whether these things actually work together, though. Sometimes, a ton of restaurants are located near each other, but there’s no point in planning to visit four restaurants on the same day.
Sometimes, there are museums that take way too long to visit alongside other sights or you can combine certain parts of the city in one day.
Take a look at your itinerary and plan it accordingly. As mentioned before, I like to use the colour tool to add the same colour per day to make it even easier to spot. My Google Map itinerary turned out like this:

If you’re planning a road trip on Google Maps or want directions for walking from one point to another, you can use the direction tools. Click on one of the locations and select “ Directions to here ”.

This will create a new layer on your map. From here, you can add different locations to create a route. You can select points of interest on your map to easily add them to your route. Click on “ Add Destination ” to add more stops.
You can also change whether you want directions by car, bike, or on foot by clicking on the car icon. This opens up a small window with a car, bike and pedestrian. Changing the mode of transport will automatically change the directions to find the best route for you.
This tool allows you to create road trip itineraries or city walks with just a few clicks. I find this especially handy to plan a road trip with Google Maps, as it allows me to estimate the driving time and the amount of money I’ll have to spend on petrol.

By clicking on the three dots next to the name of this direction layer, you can click on “ Step-by-step directions ”. This will give you detailed directions, distances, and an estimation of how long it’ll take for you to get there. Super handy!

6. Book Your Hotels
Now you know exactly what your daily plans are for our trip, it makes it much easier to pick the perfect location for your accommodation . Since you know what parts of the city you’ll be visiting, you can pick a spot that’s near these locations. This will save you so much time (and money), as you won’t have to travel too far to go to start your daily itinerary.
I usually book hotels on Booking.com . The website’s map feature makes it perfect for choosing the location. Because I have my itinerary ready on Google Maps, I know exactly what area of the city I prefer to stay in.
Once you’ve booked your accommodation, you can add the location to your map too.
7. Share Your Trip & Access it on Your Phone
Once you’ve finished your map, you can share it with your travel buddies and download it onto your phone. Here is how to do it.
Access Your Map on Your Phone
To view the map on your phone (with an internet connection), simply download the Google Maps app. Log into your account and click on the “ Saved ” button at the bottom.
Then scroll down and click on “ Maps ”. This will take you to all the maps you created. Click on the map you want to access, and all your saved spots will appear.

Share Your Map
To share your map with your travel company or friends, click on the “ Share ” button. Make sure to enable link sharing , which will allow you to copy the shareable link. You can share this link with friends, who can then access your map and download it themselves.

If you’ve read any of my itineraries or travel guides , you have probably noticed some Google Maps. As I always use these maps for my own trips, I try to include them in my articles for you to use. If you want to embed your map onto your site, click on the three dots >> “Embed on site” .

This will give you a code that you can include on any site for an interactive map to appear.
Why Use Google Maps for Trip Planning?
Google Maps is one the best travel tools because it’s so easy to use for both planning your trip and using it during your trip. We use it for planning city trip itineraries and road trip routes, plus it allows us to save our favourite locations and hotspots.
Whenever we come across a location on social media that we’d like to check out, we add it to a bigger map so we can organise it into smaller itineraries when we’re ready to visit.
Here are some of the main reasons to use Google Maps:
1. It Allows You to Access Your Maps Anywhere
You can access Google Maps anywhere you want. After creating a map on your desktop, you can open it on your phone or tablet. Plus, you can download it so you can access it without being connected to the internet. This is especially handy when you’re abroad and internet access isn’t a given.
2. It Makes it Easy to Find the Best Hotel Location
Using Google Maps to plan my city breaks gives me insight on the perfect location for my accommodation. Because I have a visual representation of all the things I plan to do during my holiday, I know exactly what the best hotel spot is. I compare the map from Booking.com and my own map, and ta-da!
When planning road trip routes on Google Maps, you can easily estimate the time it takes to drive from one place to the next. You can use this to properly budget your trip in terms of petrol cost, too. And when on the road, you can use the directions from your own map while driving.
Conclusion: Using Google Maps Trip Planner
That concludes my tutorial on how to plan a trip with Google Maps. I hope this has shown you all the amazing features this tool offers and how easy it is to use when planning a road trip or city break.
Ever since I started using it, I’ve never looked back. It has saved me so much time and always takes away a ton of travel planning stress. I hope it can do the same for you!
Nele (Nay-la) graduated from Manchester Metropolitan University with an English and Creative Writing Degree and has lived in the UK for nearly 10 years. She has had an interest in Japan and its culture for as long as she can remember. Since her first trip in 2018 surpassed all expectations, she has continued to return to Japan to explore more of all it has got to offer. You can read her full story here .
10 thoughts on “How To Plan A Trip With Google Maps: 7 Easy Steps”
WOW!! I had no idea this resource existed. Your detailed steps and screenshots make it easy for me to take the plunge and start using this tool. Thank you.
Thank you so much for the lovely comment, Anne! So glad the post was able to teach you a few things – it’s such a great tool to use for planning trips!
Hi, Thank you for sharing this interesting feature. I was looking for a hard copy of a plan for my travel in Malaysia.
Great guide, exactly what I was looking for, Great work, Thank you!
- Pingback: Blogs To Read This September - Bournemouth Girl
This was very helpful. Thank you 🙂
Amazing tutorial! I am so glad you came up in Google search just as I was looking for this kind of resource. And best of all its free and a tool that I am so used to. How did I not know this before about G Maps?!
So glad to hear the tutorial was helpful! It’s been such a useful tool in my travels, hopefully you can use it on your next trip too!
Very detailed explanation and very well explained too. Thanks for making this blog…
Great post! I recently planned a trip to a nearby city using Google Maps, and it was incredibly helpful in navigating unfamiliar roads and finding the best routes. I especially appreciated the feature that allowed me to save my route and share it with friends. Will definitely be using this method for future trips!
Leave a Comment Cancel reply
This site uses Akismet to reduce spam. Learn how your comment data is processed .
Must-Read Articles

50+ Best Things To Do In Japan

Is The Japan Rail Pass Worth it?

The Perfect Three Week Japan Itinerary
Japan Travel Tips Group

The Japan Travel Newsletter
Sign up to get inspired! Receive insider tips, special discounts and more to plan your perfect Japan trip.
You have successfully joined our subscriber list.
japan travel Blog
Tokyo Kyoto Osaka Hiroshima Hakone Kobe Nikko Nara Kyushu All Japan Content
Plan Your Trip
Best Things To Do Japan Rail Pass 2 Week Itinerary 3 Week Itinerary Accommodation Japanese Phrases
About The Navigatio Work With Us
How to Use Google Maps to Plan Your Next Road Trip (Step-By-Step Tutorial With Examples)
Post summary: A comprehensive guide on how to use Google Maps to plan a road trip itinerary and why Google Maps is the best tool/app for planning a trip. Includes a road trip planning tutorial!
Author’s Note: This post was originally published in 2020 and was updated in April 2023 for accuracy and comprehensiveness.
So, you want to plan a road trip. But, where do you start? Better yet: How do you start?
I’m often asked about my trip planning process. Where to go, what to do, and how exactly to fit everything into a cohesive itinerary that, well, makes sense .
Planning a road trip can be hard. But, with the right tools and resources, it doesn’t have to be. I’ve already put together a list of my most trusted travel booking resources , and the best apps for road trips , but now I want to talk about one of my favorite road trip planning tools: Google Maps.
Google Maps is like a trip planning goldmine, and it’s always my very first step in organizing my itinerary whenever I take a trip.
Google Maps is one of the best tools for planning a cohesive and successful road trip, because it allows you to create a highly customizable, visual representation of your trip (shoutout to all my fellow visual learners out there). And its FREE!
Basically, if you’re planning a road trip, knowing how to customize Google Maps is going to make your life so much easier.
So if you’re wondering how to get started, then you’ve come to the right place. I’m breaking the entire process down into an easy to follow step-by-step tutorial on exactly how to use Google MyMaps to plan your next road trip. So, lets get started!
GOOGLE MAPS TRAVEL PLANNING OVERVIEW
Here’s exactly what we cover in this guide:
- Create a new Google Map for your trip.
- Add location pins to your map
- Customize and color code your location pins.
- Create Google Map layers to plan your day-to-day itinerary.
- Add driving directions to your map.
- Download your custom Google Map to your phone.
- Share your map with friends.
- Calculate gas milage for your road trip.
Scroll down for a super detailed step-by-step guide to planning your own travel itinerary for free using Google Maps or skip ahead with the table of contents.
Table of Contents
Need some road trip inspiration? Visit my most popular travel guides:
Las Vegas to Sedona Road Trip (3 Jam-Packed Itineraries to See it All in Less Time)
5-Day British Columbia Road Trip Itinerary
1-Day Yoho National Park Road Trip Itinerary
The Perfect 2-week Costa Rica Itinerary
. Don’t forget to grab my FREE Travel Expense Planner Download below to help you plan your next trip . Use it to easily and automatically calculate how much money you’ll spend on gas, flights, accommodation, food + more
WHY GOOGLE MAPS IS THE BEST TRAVEL PLANNING TOOL FOR YOUR NEXT TRIP
Google Maps is the best tool for planning your next trip , whether you’re just using it for adventure inspiration, to share ideas with your friends, or creating a detailed step-by-step road trip itinerary. Here’s why!
IT CREATES A VISUAL REPRESENTATION OF YOUR ROAD TRIP
If you’re a visual learner, Google Maps is going to be your best friend. But even if you’re not a visual learning, using Google Maps to plan your trip is still going to be incredibly helpful.
Planning your trip with Google Maps is the fastest way to familiarize yourself with the layout of an area. It allows you to wrap your head around how large an area is and where everything is in relation to each other, which, in my opinion, is the best way to start planning any trip.
Here’s an example of the Google Map I created for our 4-day road trip in Iceland.
Click here to access the interactive map.

GOOGLE MY MAPS HELPS YOU FIGURE OUT WHERE TO SPEND YOUR TIME
Have you ever had a list of places you wanted to see, only to find out that they’re super far away from each other?
Pinning your locations to your custom Google Map will show you where your stops are. This will help you figure out where to spend your time and plan accordingly.
Are your pins clustered in one place? If so, then you might want to allocate more time to that area. Or maybe your pins are spread out all over the map? If this is the case, then it might be best to prepare yourself for a lot of driving or focus on a smaller area instead.
YOUR GOOGLE MAP IS HIGHLY CUSTOMIZABLE
Whether you’re touring NYC, road tripping cross country, or backpacking to Beaver Falls in the Grand Canyon , you can create a highly customizable Google Map to help plan your adventure.
Handy features like customizable locations, adding multiple stops, pinning by GPS coordinates, organizing by categories, and overlaying direction layers, all make it incredibly easy to customize your Google Map to plan your travel itinerary.
Need to remember entrance fees, operating hours, or best places to see? You can even add notes to your location pins so you don’t forget important details!
IT HELPS YOU NAVIGATE AND PLAN YOUR ROUTE
Quickly learn how to navigate between stops by adding directions between multiple locations to your map.
This is an incredibly useful tool for figuring out the best routes to take, roads to avoid, and to plan for drive time. You can even choose between walking, biking, or public transportation directions. This is especially helpful for choosing the best entrance to Yellowstone National Park , taking the scenic route on an Ecuador road trip , or mapping out the best Hudson Valley wineries .
IT’S EASY TO COLLABORATE AND SHARE YOUR TRIP
Traveling with friends? Google Maps makes it super easy to collaborate by allowing you to share your map with your travel partners. You can even give them editing access so that everyone can add their must-do’s to the map.
YOUR MAP IS EASY TO SHARE BETWEEN DEVICES
You’ll have to create your Google Map on desktop. But, luckily, you can seamlessly share your custom map straight to your iPhone or Android using the Google Maps App!
Sharing your custom map to your phone makes it super convenient to access your itinerary on the go. You can even set up your map for offline use if you’re traveling without cell phone service.
HOW TO CREATE A CUSTOM MAP IN GOOGLE MAPS: A STEP-BY-STEP GUIDE
1. create a new google map, login to google drive on your desktop.
Before you start planning your road trip using Google Maps, make sure you’re signed into your Google Drive.
- Visit www.google.com/maps from your desktop and log in .
- If you don’t have a Google Drive account, create one now.
CREATE A NEW GOOGLE MAP
To create a new map, select “Saved” in the sidebar on the left > “Maps”. You can also click on the menu (the three lines) in the upper left corner > “Saved” > “Maps”.
For now, your list is probably empty. But as you create more maps, this is where they’ll be stored.
Begin creating your first custom map by selecting “CREATE MAP”

This opens a new blank map. Start by giving your map a title and a description.
Once you’ve named your map, you’re ready to start pinning stops! Keep reading to learn about adding and customizing location pins.
2. ADD LOCATIONS TO YOUR GOOGLE MAP
This is where you start adding the places you want to go!
HOW TO ADD LOCATION PINS
Add multiple stops to your Google map by pinning their locations. There are a few different ways to add location pins to your Google Map :

- Add a pin using coordinates if you can’t find the exact location in the search bar drop down list. You may have to use this method for extremely specific or remote locations, such as a backcountry campsite or an unmarked trailhead. Simply type the location’s latitude and longitude coordinates into the search bar. .
- To pin a general area, click on the “Add Marker” button below the map search bar . You’ll be able to drop a blank pin by clicking anywhere on the map. A box will appear asking you to add a title and description
NOTE: You’re allowed to pin 10 location pins per layer. Continue reading to learn how to use layers to add more than 10 location pins to your map.
3. CUSTOMIZING LOCATION PINS
Once you save your pins to the map, they’ll be blue by default. However, you can customize a pin by changing the color, icon style, description, and title . You can even add pictures or videos if you’re feeling extra fancy.
To change the color and style , begin by clicking on your location pin (either in the list to the left or directly on the map) > “Style” (the little paint can) in the lower right hand corner of the text box. Click “More Icons” to view more options.

To change the location title , click”Edit” (the pencil icon) in the text box. You can also add notes in the “Notes” box. Use the notes box to add more details about finding trail heads, hiking logistics, packing reminders etc. I also like to use it to keep track of specific places to see within a general location, such as a National Park.
To add media (i.e. photos or videos) , click “Add Image or Video” (the camera icon) in the text box. I found this especially helpful on my first Iceland road trip to remember which waterfall was which, since they all sound the same (if you’ve been there, you know what I mean!). You can also add your own photos and videos if you want to create a map to share with others.
To delete a pin , click on it and then click on the trash can icon. .

. 4. CREATING MAP LAYERS TO PLAN YOUR TRIP IN GOOGLE MAPS
What are google map layers.
Google Map layers are a really useful tool for organizing your road trip itinerary. But, what exactly is a layer? A layer in Google Maps is, by definition, a way to contain arbitrary geospatial data.
Okay, English please ?
In other words, each layer can be used to display different types of information on your map. You can dedicate different layers to different types of places like restaurants, cafe’s, hotels, hiking trails, etc. Or you can dedicate layers to different days of your trip. Or you can stick to one layer. Its up to you.
Here’s an example of how I broke up my Iceland itinerary, using a different layer for each day of our road trip:

HOW TO ADD LAYERS
When you create your map, you’re automatically using one layer (“Untitled Layer”). This is the layer that your location pins are added to by default, unless you add additional layers. You can add up to 10 location pins per layer, and 10 layers per map.
To add a new layer to your Google Map , simply click “Add Layer”. This creates a new “Untitled Layer”, which you can rename accordingly. To rename layers, click on the title name or click the 3 dots next to the title > “Rename Layer”.
To move a pin between layers , click on the location pin in the list, then drag and drop it into the desired layer.
Choose which layers to display by turning individual layers “on” and “off”. You can do this by checking/unchecking the box next to the layer’s name.
To delete a layer , click the 3 dots next to the layer’s title > “Delete this layer” > “Delete”.

. TIPS FOR USING LAYERS TO PLAN YOUR ITINERARY IN GOOGLE MAPS
When planning my road trip itineraries, I usually give each day its own layer (unless the trip is longer than 10 days, in which case then I’ll combine days or make another map). Then I color code all of my pins by day.
For example, all of my stops (i.e. location pins) on day 1 (layer 1) would be orange, all of my stops on day 2 (layer 2) would be red, and all of my stops on day 3 (layer 3) would be blue. Organizing pins and layers this way makes it a lot easier to visualize your day-to-day itinerary on the map.
That’s just what works for me, so obviously you don’t have to do it that way. You can organize your pins and layers in any way that makes sense to you.
WHEN TO MAKE SEPARATE MAPS
Personally, I prefer to make a single map for my road trip itineraries whenever possible. But that won’t work for everything or for everyone.
Sometimes maps can get confusing if you have a lot of stops to make. Other times you’ll find that you need more than 10 layers or directions between more locations than Google Maps allows.
To solve these problems, you may opt to create several maps. Perhaps you’ll find it easier to create a separate map for each day of your road trip, or create one map dedicated just to a certain type of location or activity.
For example, we created two separate maps for our road trip through New Zealand. One map for the North Island and one map for the South Island.
5. ADDING DIRECTIONS TO YOUR GOOGLE MAP
. What good would a Google Maps itinerary be if you couldn’t get driving directions?
To add driving directions to your Google Map , click on “Add Directions” (the arrow icon) under the search bar. A new layer will appear (you cannot add directions without it adding a new layer).

Click on “Add Directions” simply by clicking on a pinned location on the map. It will populate in point “A” . Click on a second location on the map, which will populate in point “B” . The route will show up as a blue line on the map.
The original directions will only give you the option to add points “A” and “B”. To add more destinations, click on “Add destinations”. You can add up to 10 destinations.
NOTE: This may seem obvious, but I’ll say it anyway: When you connect locations, make sure to do it in the order that makes sense. Don’t just add directions between two random locations. Make sure to do it in order!

To choose between driving, walking, or bicycle directions , click on the Directions button in the layer (the blue car icon). Then click on the appropriate mode of transportation.
VIEW STEP-BY-STEP DIRECTIONS
To view step-by-step directions, click the three dots to the right of the little of the directions layer > click “Step-by-step directions”.

ADJUSTING YOUR ROUTE
Google maps will automatically calculate the shortest route between locations. But you can easily change the route if you prefer to take a different one (i.e. to take the more scenic route, avoid tolls/highways, etc.).
To adjust the route between two points , hover your cursor anywhere along the blue line. Your cursor will change from a hand to an arrow over a white dot. A dialogue box will say “Drag to change route”. Click and drag the white dot to the desired road or highway on the map.

. 6. HOW TO ACCESS CUSTOM GOOGLE MAPS ON YOUR PHONE
. There are two ways to access your custom Google Maps on your phone. You can (1) reference your map through the Google Maps app or (2) export the entire map for offline access using Maps.me . Which method you use depends on your personal preference.
Steps are the same for iPhone and Android.
1. To view your maps in the Google Maps app:
- You will need to download Google Maps, if you haven’t done it already
- Sign into the same Google Drive account you used to create the map
- Click on the search bar > “…More” > scroll to the right and click “Maps”
- Select your custom map

How to view your custom Google Map on your phone using the Google Maps app .
Essential tips for using the Google Maps app:
- Accessing step-by-step directions: When you open your map in the Google Maps app, your directions layer will be visible, but you won’t be able to click on it and get the step-by-step directions. . Instead, navigate to the individual location pins on the map. Click the pin and the directions instruction will populate in the search bar. Click on the search bar and then hit “Search”. This will exit your custom map and open up the regular Google Maps navigation screen. .
- Accessing your map offline: You can’t. There is currently no way to access your custom map offline in the Google Maps app. Which is obviously not ideal if you’re traveling without cell phone service or wifi. . You can download an area for use offline by clicking on your photo (the circle in the upper right corner) > “Offline maps” > “select your own map”. However, when you do this, the map will be blank and you’ll have to repin/save all of your pins. You can repin/save locations by searching for the location > “save” > and then either add to an existing list or create a new list.
2. To export your custom map to Maps.me:
This method is quite a workaround, but (unlike the Google Maps app) it allows you to access your custom map offline without having to repin anything.
On your desktop:
- Open your map on desktop
- Click the 3 dots next to the map title > select “Export to KML” > check the box next to “Export to .KML file instead of .KMZ”.
- Make this file accessible through your phone by uploading it to Dropbox, Google Drive, email, or any other file sharing app.
On your phone:
- Download the Maps.me app
- Search for the city, state, or country your map is based in and then download
- Go to your photo sharing app and open your .KML file with Maps.me
- You’ll be directed to your custom map in Maps.me
Tips for using Maps.me
If you download your map in Maps.me, you’ll be able to use it offline. However, the major drawback is that you will only be able to access step-by-step directions from your current location. So, even though your directions layers will populate on your map, you’ll only be able to view the drive times and not the actual directions, unless one of those points is your current location.
That being said, I am not a Maps.me expert. So, if you have an update or workaround for this issue, please reach out and let me know :)
7. CREATE A SHARED GOOGLE MAP
You might want to share your map if you’re planning a trip with someone else, collaborating on an itinerary, or sharing your map on a website.
To share your Google Map , open the map > click “share” in the gray bar above the layers. Make sure the slider for “Anyone with this link can view” is set to blue. Then copy the link and send it to friends!
To embed your map on a website , check that your sharing sliders are set to “Anyone with this link can view” and “Let others search for and find this map on the internet”. Next, click the menu (the three dots) next to the map title > then click “Embed on my site”. Copy the HTML and paste it in the source code for your page.
8. BONUS: CALCULATE GAS MILEAGE
. Download my customizable Travel Expense Planner below for free . Use it to easily and automatically calculate how much money you’ll spend on gas, using your custom Google Map!
And there you have it! All the tips, tricks, and general instructions on how to use Google Maps as a road trip planning tool . As always, if you have any questions or have anything to add, leave a comment below. I love to hear from you!
Happy adventuring!
Did you find this Google Maps road trip planning tutorial helpful? Don’t forget to pin it for later!

Hi, I’m Jackie! I’m a travel photographer and content creator based near the Adirondack Mountains of Upstate New York. I’m also a millennial who works full-time, yet I still find ways to travel frequently without breaking the bank, because traveling is what makes me feel most alive. Now I help fellow travelers who also work 9-5 and are looking for ways to travel more with limited PTO.
Related Posts

15 Useful Apps to Download Before Your Next Road Trip (for Free!)

All You Need to Know About Renting a Car in Belize | Cost, Tips, FAQs – Updated Guide 2023

19 Important Things to Know About Ecuador Before You Go
28 comments.
[…] Krawiecki, J. (n.d.). How To Plan Your Road Trip With Google Maps. The Adventure Atlas. Retrieved from How To Plan Your Road Trip With Google Maps (Tutorial With Examples) | The Adventures Atlas […]
[…] that an SUV or an RV is better suited for the whole family. Once you’ve secured your vehicle, map out your route, research the stops that you want to make, and make a list of the things that you’ll need to […]
[…] You won’t have service once you get there though, so I suggest downloading offline Google Maps of the area before you go. To learn how to download offline Google Maps, visit my blog post on How To Plan Your Road Trip Using Google Maps […]
[…] How to Plan Your Road Trip Using Google Maps […]
[…] How to Plan Your Trip Using Google Maps […]

All I needed when I googled “how to plan a trip in google maps” was to be pointed in the right direction of where to look for the feature. This went WAY beyond what I could have ever asked for and helped SO MUCH! Thank you, thank you, thank you!

Hi Nicole – I’m SO glad to hear you found this post helpful!
[…] How to plan a road trip using Google Maps […]

Hello Jackie, and thanks for the very informative article! It was well written and I used Google Maps on my last trip to the Baja in Mexico. One other tool I used was the free trip planner from Geovea https://geovea.com/trip_plan/new_trip to create and share my trip, and estimate my trip budget. You can also take your itinerary with you on your phone for navigation. I really appreciate all of the great travel guides and already planning my next trip :-)

Thank you for sharing all of this valuable information! I see how to view the turn-by-turn directions, but is there a way to start the route so you can follow it while driving? Thanks!!
[…] How to Plan Your Road Trip using Google Maps […]

This literally just changed my life! Thank you for sharing how to use google maps to plan a road trip. I will use this all the time now!
Hey there – so happy to hear you found this post useful!
[…] Planning a Costa Rica road trip? Read: How To Plan Your Road Trip With Google Maps (Tutorial With Examples) […]
[…] a large geographical area you need to give your trip a bit of structure. You can start by using Google Maps to plot and plan your journey so you can make a note of all the destinations you are interested in. You can then agree on a few […]
[…] Read next: How To Plan Your Road Trip With Google Maps (Tutorial With Examples) […]

said no driving directions from point a to point b, so i couldn’t get started. E.G. Badland SD to Mt Rushmore to Custer Nat. Park, I need a little more direction, i’m not to good with comp. thanks
Hey Billy – Sometimes Google Maps won’t recognize directions to very general areas because it wants you to use something more specific. This most often happens with National Parks and wilderness areas. In those cases, Google Maps will generally present you with a list of specific locations you can choose from, such as the park’s ranger stations, visitors centers, etc. However, in your situation, I was able to pull up directions using “Badlands National Park”, “Mount Rushmore National Memorial”, and “Custer National Forest”. Hope that helps!
[…] necessary than you suppose to sleep, bathe and plan for slower days. A very good rule of thumb is to plan in rest time each three days. That method, you possibly can push your self however forestall exhaustion in your […]
[…] essential than you assume to sleep, bathe and plan for slower days. An excellent rule of thumb is to plan in rest time each three days. That means, you possibly can push your self however stop exhaustion in your […]

I’ve been a user of paper maps, since before the Internet, or color TV for that matter. For an up coming trip, basically Texas to FL, and back, I decided to make better use of Google Maps. A google search brought me to this page. Super helpful, and the pins per layer note answered a long standing confusion of mine. Thank you. I do have one question. Is there a way to to add waypoints based on distance or travel time? For example, this is going to be a two day trip. I want to find the halfway point (easily)? Or in the case of a longer trip, I want to drive X miles or Y hours? I know I can trial and error it, but what if I want the half-way point? What’s the easiest way to find it? Or where will I be in 8 hours of driving? Thank so much! Cheers, Eric
Hey Eric – thanks so much for your comment! Unfortunately, I don’t know of an easy way to calculate your half way point or location after x amount of hours. I typically eyeball it, which might be the only way to find your answer

Thanks very much, it is really helpful

This was most helpful for creating a personal map. I tried it and created a practice map on my laptop; named it and accessed it exactly like your instructions indicate. The part that has me puzzled is the accessing it from your phone. I have used Google maps on my phone for a long time and believe I am signed in using the same account. The Google Maps app on the phone identifies me (the right end if the search bar has my initial and shows the account when tapped.) When I tap the search bar I get to the … More but that is it. All I then see is the opportunity to set my Home and Work Locations but no listing of My Maps.
On the laptop going to the Menu (bars at left side of Search) allows access to Lists, Labeled, Visited, and Maps. (Maps is the one, as you indicate, to get to your personal Maps.) On my phone the only thing that seems to be available is the Labeled option. What am I missing to get to the Maps? I feel like there must be a switch somewhere to have the Maps come through … but I can’t seem to find it! Hoping you or someone can point me in the right direction. Thank you.

Without creating a custom map, is there a way to display a route in Google Maps and show attractions at the same time?

You’ve written a terrific guide and I’m learning a lot more about Google maps. Is there some way to print this guide or download a printable copy? Thanks.

Hey so this is the most amazing thing ive ever seen, however i wasnt able to access the travel expense planner or gas mileage calculator things, i was wondering if there was another way to access those:)
Leave A Comment Cancel reply
Save my name, email, and website in this browser for the next time I comment.
WANT TO SAVE MONEY TRAVELING?
Check out the travel resources →
Check out my list of reliable budget-friendly travel resources that are guaranteed to save you the most money, without compromising your experience.
This error message is only visible to WordPress admins Error: There is no connected account for the user 17841400792270379.
Get in touch
Contact Portfolio Let’s work together
Explore the blog
Destinations Guides and itineraries Travel planning tips
Let’s connect
Never miss an adventure, privacy policy | terms of service | disclaimer | by zazen designs.
Back to top
- PRO Courses Guides New Tech Help Pro Expert Videos About wikiHow Pro Upgrade Sign In
- EDIT Edit this Article
- EXPLORE Tech Help Pro About Us Random Article Quizzes Request a New Article Community Dashboard This Or That Game Happiness Hub Popular Categories Arts and Entertainment Artwork Books Movies Computers and Electronics Computers Phone Skills Technology Hacks Health Men's Health Mental Health Women's Health Relationships Dating Love Relationship Issues Hobbies and Crafts Crafts Drawing Games Education & Communication Communication Skills Personal Development Studying Personal Care and Style Fashion Hair Care Personal Hygiene Youth Personal Care School Stuff Dating All Categories Arts and Entertainment Finance and Business Home and Garden Relationship Quizzes Cars & Other Vehicles Food and Entertaining Personal Care and Style Sports and Fitness Computers and Electronics Health Pets and Animals Travel Education & Communication Hobbies and Crafts Philosophy and Religion Work World Family Life Holidays and Traditions Relationships Youth
- Browse Articles
- Learn Something New
- Quizzes Hot
- Happiness Hub
- This Or That Game
- Train Your Brain
- Explore More
- Support wikiHow
- About wikiHow
- Log in / Sign up
- Computers and Electronics
- Website Application Instructions
- Google Applications
- Google Maps
How to Plan a Route with Google Maps
Last Updated: July 21, 2024 Fact Checked
On a Browser
On the mobile app.
wikiHow is a “wiki,” similar to Wikipedia, which means that many of our articles are co-written by multiple authors. To create this article, volunteer authors worked to edit and improve it over time. This article has been fact-checked, ensuring the accuracy of any cited facts and confirming the authority of its sources. This article has been viewed 122,089 times. Learn more...
Google Maps can be useful to navigate through a new location or place. You can also use it to find the best route or route alternatives, and plan your trip accordingly. You can get turn by turn directions, and different routes depending on your method of transportation. You will also be able to tell how long it will take you to get to your destination.

- A list of possible results will drop down. Click your selection, and the map will automatically expand to show you the routes from this starting location to your destination.

- Repeat this step for all the other stops you will make in the same trip.

- For driving—If you’re driving, click the car icon on the toolbar. This is generally the default route.
- For transit—If you are commuting via bus, train, subway, or other public transit, click the train icon on the toolbar. The routes on the map will slightly change to accommodate all public transit routes.
- For walking—If you’re walking, click the pedestrian icon on the toolbar. The routes on the map will slightly change to accommodate walking routes.
- For cycling—If you’re biking or cycling, click the cycling icon on the toolbar. The routes on the map will slightly change to accommodate safe biking routes.

- Metro—You can identify metro or subway stops by the blue “M” icon on the map.
- Hotel/motel—You can identify hotel and motels by the brown bed icon on the map.
- Coffeehouse—You can identify coffeehouse locations by the orange coffee cup icon on the map.
- Restaurant—You can identify restaurant or fast-food locations by the orange spoon-and-fork icon on the map.
- Bank—You can identify bank locations by the blue dollar icon on the map.
- Shopping center—You can identify shopping center or store locations by the blue handbag icon on the map.
- Market. You can identify grocery or market locations by the blue shopping cart icon on the map.
- Church—You can identify church locations by the brown church icon on the map.
- Park—You can identify park locations by the green tree icon on the map.
- Hospital—You can identify hospital locations by the red “H” icon on the map.
- School—You can identify school locations by the brown hat icon on the map.
- Library—You can identify library locations by the brown book icon on the map.

- 2 Identify your destination. Use the search box on the upper left corner of the page and type in the location or address of your destination. A shortlist of possible results will drop down. Tap your selection, and the map will automatically draw you to the location you’ve set. [7] X Research source [Image:Plan a Route with Google Maps Step 10 Version 2.jpg|center]]

- A list of possible results will drop down. Tap your selection, and you will be shown the best transportation method and route from your starting location to your destination, with the total distance and time. Most of the time this will be via car or rail, since these are the faster options.

- Driving—If you’re driving, tap the car icon on the toolbar.
- Transit—If you commuting via bus, train, subway, or other public transit, tap the train icon on the toolbar.
- Walking—If you’re walking, tap the pedestrian icon on the toolbar.

- Hotel/motel—You can identify hotel and motel locations by the brown bed icon on the map.
- Restaurant—You can identify restaurant or fast-food locations by the orange spoon and fork icon on the map.
- Shopping center—You can identify shopping center or store locations by the blue hand bag icon on the map.
- Market—You can identify grocery or market locations by the blue shopping cart icon on the map.
- Hospital—You can identify hospital locations by the red H icon on the map.
Community Q&A
You Might Also Like

- ↑ https://support.google.com/maps/answer/3092445
- ↑ https://support.google.com/maps/answer/144349
- ↑ https://support.google.com/maps/answer/144339
- ↑ https://support.google.com/maps/answer/3273406?hl=en
About This Article
- Send fan mail to authors
Is this article up to date?

Featured Articles

Trending Articles

Watch Articles

- Terms of Use
- Privacy Policy
- Do Not Sell or Share My Info
- Not Selling Info
wikiHow Tech Help Pro:
Level up your tech skills and stay ahead of the curve
How To Make Tour Route Maps On Google For Customers & Guides
How-to • Operations • February 19, 2018 • Rebecca
One of the must-haves of any tour guide, and indeed, of any tour information you design, is a tour route map. Whether there are multiple destinations to be covered as part of your tour, or whether it is giving turn-by-turn directions to a specific site, tour route maps give your customers a visualization of the route between multiple places and help you devise the most optimised route.
You can use Google Maps to create custom maps for your entire itinerary. It’s a simple process that anyone can use for free.
1. Start by creating a custom map

Open Google Maps and navigate to Your Places > Maps > Create Map. Enter the desired name for your map and a description. Use a naming convention in line with your tour to make it obvious to travellers what the map is about and what it is documenting.
READ: How To Optimize Your Listing On Google Places
2. Get as detailed as you want
With Google Maps, you can get as specific as you want. You can design the map to display only the route between different cities and towns you’ll be visiting with your customers. Scale the map further and you can design routes between popular sites in a particular city or get more specific by displaying restaurants, shopping streets and historical sites in a specific neighbourhood. Use markers for various locations with labels, descriptions and images.
3. Add layers to group locations together

Imagine being able to group locations together – say you want to highlight all the restaurants in a particular part of the city. You can do this by creating a layer. Select a place of interest then add it to the appropriate layer. A pop-up displays information related to the site including the street address, website and phone number.
READ: Destination Marketing For Tour Operators
4. Design routes on the map
You can also use layers to add different paths for walking and driving. You can draw lines to indicate optimum paths between sites and even switch between default map view, terrain or satellite view if you desire to give your map a different feel.
For the step-by-step process click here . To know how to embed it into your tour website, connect with us at Vacation Labs . We make it our business to get to the depth of what makes travel businesses successful. If you’d like to receive more of such insights or experience a trial version of a tour system , get in touch with us right now.
Get more tour operator fundamentals here!
Related articles.
How-to • Operations
How To Run A Tour Business From Your Mobile Phone How To Run A Tour Business From Your Mobile Phone
Want to know the journey of registering your travel business want to know the journey of registering your travel business.
Guide • How-to
Get Your Travel Website In One Day- No Developer Needed Get Your Travel Website In One Day- No Developer Needed
Set-up dynamic pricing for your tours right away
Sign up today and get a free 14-day trial!

Vacation Labs
- We Are Hiring
- Affiliate Program
- Terms of Service
- Travel Website Templates
- Marketplaces
- Free Travel Website
System Modules
- Tour Operator Website
- Tour Operator Booking Engine
- Tour Operator Backoffice
- Tour Operator Agent Login
- Tour Operator Mobile App
- Itinerary Builder
Find Your Business
- Water Sports
- Nature Trails
- Bicycle Tours
- Aerial Adventures
How to use Google Maps as a trip planner and make a full itinerary
- You can use Google Maps as a trip planner through the "Places" and "My Maps" features.
- Both the Google Maps website and app let you save locations to lists, which you can then get immediate directions to.
- When getting directions, you can look up reviews and add multiple stops to your route.
Google Maps has become an essential part of any road trip. After all, it's a GPS, business directory, and reviews platform all-in-one.
But if you spend some time with it, you can integrate Google Maps even more seamlessly into your next vacation. Google Maps has a variety of features you can use to plan your trip and save any interesting spots you find on the way.
Here's how to make Google Maps your trip planner, using the Places feature, My Maps, and more.
How to use Google Maps as a trip planner
Use the 'places' feature to save points of interest.
Let's say you're traveling, and happen to stumble upon the cutest coffee shop you've ever seen. You want to visit, but don't have time right now — what's the best way to remember it?
Google Maps' Places feature can help you out. Both the Google Maps website and app let you save any location on the map to a list, which you can then easily find later.
1. Open Google Maps and click, tap, or search for the location that you want to save.
2. Find the Save icon , which has the icon of a bookmark. You'll find it right under the location's name, but you might need to swipe to find it in the mobile app.
3. Pick where you want to save the location to. You've got three lists to start with — Favorites , Starred places , and Want to go — but you can make a new one by tapping New list .
4. Once you've saved the location, you can find it again by opening the list. In the mobile app, tap Saved at the bottom of the screen; on the website, click the three stacked lines in the top-left and then Your places .
Tap on a location in your list to have the map jump straight to it.
Look at Google Reviews to find the best shops
Nearly every point of interest on Google Maps has a section for user reviews. Similar to sites like Yelp, these reviews can be a great way to see which stops are must-sees and which you can pass.
To check out reviews:
1. Open Google Maps and find the location that you're interested in.
2. At the top of its information page should be a star rating and a number, showing how many people have left reviews.
3. Scroll down until you hit the Reviews section, and you'll find reviews from other users who've visited the location. They'll include a star rating, a date, and occasionally a picture.
If you're interested in leaving a review of your own, check out our article on how to write Google reviews .
Make a custom My Maps page to share your road trip plan
Only available on a computer as of this month , Google's My Maps program lets you make a custom map or plot out a route with as many waypoints as you like, and then save and share it with others.
1. Head to the My Maps homepage and click Create a New Map .
2. You'll be given a world map. In the menu in the top-left, click the Untitled map name to give your map a name.
3. Use the search bar at the top of the page to find any location, then click Add to map to save it. You can add as many points of interest as you like.
4. You can also save multiple separate lists of locations to the same map; just click Add layer in the top-left menu.
5. To save directions between multiple locations, click the Add directions icon that looks like a curved arrow. It'll add a new layer that you can use to plot a path.
6. When you're done, click Share or Preview in the top-left window.
Add multiple stops to one trip
Driving from one city to another is simple. But if you want to make stops along the way — lunch, the beach, a mall — things get complicated.
Luckily, you don't need to start a new Google Maps route for every stop. You can create one navigation route that includes every stop from the start, giving you a clear way to see how long it'll all take.
1. Open the Google Maps app and start navigating to another location.
2. On the screen that lets you pick your starting and ending location, tap the three dot icon .
3. Select Add stop .
4. A third waypoint — labeled "B" — will appear. Tap it to choose your second destination, or drag it to reorder the waypoints.
On a computer
1. On the Google Maps app website, find a location and start getting directions to it.
2. Underneath the menu that lets you pick your starting and ending location, click Add destination .
3. A new field will appear. Enter your third waypoint.
4. Once you pick a new waypoint, you'll be able to click Add destination again and pick another one, as well as reorder them.
You can add up to nine destinations on both the website and mobile app.
- Main content
HOW TO USE GOOGLE MAPS TRIP PLANNER IN 7 STEPS

Google Maps Trip Planner allows you to create detailed travel plans while simplifying those confusing things related to travel planning.
Planning a trip often seems like trying to put together a million-piece puzzle. It is understandable that a trip to a place that we’ve only ever seen through a laptop screen can be confusing.
But it won’t be that way when you start planning a trip on google maps.
Most of the confusion related to travel planning is because we have no sense of orientation for that place or destination that we’re about to visit. All we have is a bunch of ideas – places we want to go and see, hotels we like, activities, but we have no idea where those things are located.
Creating a trip plan on google maps puts everything into perspective because it gives you a visualization of those things on a map.
When you have those ideas clearly pointed out on an organized google maps travel plan, it will be easier to choose the area you want to stay (and eliminate the surprise of booking a hotel in the middle of nowhere) , group together certain activities in a practical way and you can also plan a route in google maps for your daily itinerary.
Basically, planning a trip on google maps will make travel planning a whole lot easier. And best of all, it’s free and pretty simple to use.
Before we start, you may want to save the URL link to this post in case you need it for future reference.
Ok then let’s get right to it.
If you want to know something specific about creating a travel plan in google maps you can skip straight to what you want in the table of contents below.

1. CREATE A NEW GOOGLE MAP
2. add all your ideas to google maps, 3. changing the pins colors and icons, 4. categories a google maps travel plan, 5. access you google maps travel plan on mobile, 6. use maps offline, 7. share map with friends.
Do this if you’re soon going on vacation or planning a trip.
Before you go on vacation make sure to purchase travel insurance. I know, most times it seems like a waste of money. But the thing is, you don’t know you need it until you do so it’s good to minimize those risks that you could face while traveling. Keep in mind, that medical bills or hospitalization can cost 1000’s of $$. And
CLICK HERE FOR A FULL RUNDOWN ON TRAVEL INSURANCE STARTING AT JUST $1.50
In this guide, we are laying out a step-by-step guide to create a travel plan using google maps on desktop (laptop). Although it is possible to create a map on your smartphone, the options are limited. But don’t worry, the map created on your desktop will be synced to all your devices, even mobile phones and tablets.
If you already have a Google account (Gmail), go onto your search engine (Google, or whatever you usually use) and type in google maps. Or you can click here to get started.
You will need a google account so that your maps will be saved and also so the maps that you create can be accessed from all your devices like mobile phones and tablets.
If you don’t have a Google account click on this link to create one. Don’t worry it’s free and only takes about 5 minutes. Once you’ve created an account you follow the same steps from above.
Make sure that you’re logged in before you start creating a new google maps trip plan. If you’re logged in there should be a round icon with your initials on it in the top right corner of the screen. If there isn’t you’ll see a sign-in button.
After signing in, first go to the hamburger icon near the search bar on the map. It’s in the top left corner. And then click on your places, the first option in the drop-down menu.

In the menu click on MAPS , the last option on the right. This is where all the maps that you create are saved. So, if this is the first time that you’re creating a google map, this section should be empty.
At the bottom of the current menu, click on CREATE MAP .
Ok then, great the map has now been created.
All you need to do now is to give your new google maps a title and a description. If you only have one map, you barely need a title let alone a description. But as you create more maps, those titles and descriptions will help you easily find the map you’re looking for rather than searching through a bunch of unorganized maps.
In the menu in the top left corner of the screen, Click on Untitled Map . And in the text box that pops up, give your map a title. Think of giving specific names to your maps. For instance, if you’re making a map of New York, instead of just writing a title “New York”, write “New York Trip – October 2021”. And write a description, like places I have to visit, or the best hotels, restaurants, activities, for example.

Not everyone follows the same steps to create their personal travel plan on google maps. For example, our favorite way is to start off by putting all our ideas on the map.
We start off by making a list of places that we want to go, activities that we want to do, hotels and restaurants we like, and anything else that comes to mind that we could possibly consider while in that destination.
Because you can visualize Adding all our ideas onto a map offers a visualization of that destination and puts everything into perspective. For instance, if certain activities are too far away we can determine
For instance, we can easily understand if an activity is too far away or maybe choose a hotel that is centrally located in the middle of the things that we want to do.
Seeing all those places on a map will help you understand what you can realistically do within your trip duration. For instance, you will be able to determine if certain activities are too far away. Or if a hotel you like is in the middle of nowhere.
Adding all those ideas to the map is straightforward.
Step. 1. Go to the search box in the middle of the screen and type in the name of the place. You can search for anything you want, like hotels, restaurants, beaches, waterfalls, parks. Basically, on google maps you’ll find almost every place you look for. If that place doesn’t come up in the search, you’ll need to type in the street address.
Step. 2. Once you’ve found the place you want, a green will come on the map in the location of that place. And a small description box will be next to it.
Step. 3. To save that place to the map, click +add to map in the description box.
Repeat these 3 steps for all those places that you want to add on you new Google Map travel plan.

TIP: if only the green pin comes on the map, click on the green pin. When you click on the pin the description box will come up and you can add that place to the map.
Too many ideas but not much time? When we plan short trips, sometimes we book tours or at least we book a tour if they’re any good. Tours save us time because they combine the must visit spots in the destination we visit. And surprisingly, some tours have cost us less than if we did everything by ourselves.
Whenever we are considering a tour in a popular destination, we always make sure to book with a reputable company and also to book in advance. Because you know, the good things easily run out. Below are links of 2 companies that we personally use.
PRE BOOK & GET THE LATEST DEALS WITH VIATOR HERE
OR PREBOOK WITH KLOOK FOR THE BEST DEALS ON TOURS & TICKETS IN ASIA
At this point, we have a good idea of where all those places – like activities, tourist spots, hotels, restaurants – are located. And by default, all the pins will be in blue color.
But having a load of identical pins isn’t a great way to visualize a google maps travel itinerary.
So now, what we need to do is to give meaning to each pin by color coding and/or changing the pins into icons.
Color coding the pins or changing them into different icons will make your google map a lot more visually understandable.
For example, what we do is color code each place into different categories. For example, if we have beaches we make yellow pins, for hikes we use brown pins, for restaurants red pins, and so on.
And we also customize the icons. Don’t worry, both color and icons are pretty straightforward.
How to color code pins in google maps
Step 1. Click on the pin that you want to change the color. A description box will open up.
Step 2. Next click on the style, the icon resembling a tipping paint bucket. The first icon at the bottom of the description box.

Step 3. A small window with color samples will open. Choose a color that will help you easily identify that specific place.
How to change pins to specific icons
Changing those identical pins into icons that actually mean something will further help you visualize what those places are on your google maps trip planner.
For instance, if you have a beach add a palm tree or an umbrella. If you have a restaurant, add a knife and fork icon.
Color coding and icons work simultaneously. So don’t worry, you don’t need to choose either the icon OR the color.
To change icons follow steps 1 and 2 from above. When the window with color samples opens, there will also be a number of icons to choose from. However, you can further expand that icon window by clicking on more icons.
TIP: alternatively you can change color or icons of pins when you’re adding your ideas to the map. After you click +add to map
Adding layers in google maps trip planner is a key feature because it allows you to categories your trip itinerary into different sections.
Creating different layers is a way of grouping together certain things on the map. Because although you may have defined all the pins with specific colors, the map still doesn’t have much organization. It’s like having a bunch of pins with not much value.
The way in which you group together the pins will depend entirely on your choice and also on what is the purpose of the google maps that you’re creating. We’ll give a few ideas on how you could categories all those pins.
We group together our pins in 3 ways, depending on what makes the most sense for that specific travel plan.
If we want an easy to follow travel itinerary, we group together pins in days. So if a number of things can be done in a day, we group those together and call that a day plan.
Or, when we go to countries made up of loads islands like Indonesia or the Philippines, we categories all the pins by islands.
Or, we create a different layer for each different type of place that we want to visit. For instance, we make categories for hotels, restaurants, malls, historical places, activities, etc.
How to add layers on a google maps travel plan
Step 1. In the menu, in the top left corner, click on add layer. You can add up to 10 different layers.

Step 2. Categorize each layer with a title. Click on Untitled layer . A text box will open up and here you can write the title for that layer. If you don’t see the text box, click again until it comes on the screen.

Step 3. All the places that you had previously added to the map will be in the first layer. Once you’ve created different layers, all you need to do is to click on the place you want to move and drag it into the layer/category that you want.
Make sure the box next to each layer is ticked. If next to the layer title there is no tick, it means that layer is closed and you won’t be able to see the things in that layer when use the map on your mobile phone.
Now that you’ve created your Google Maps travel plan you will need to be able to access that plan easily with your mobile phone.
To access your plan on mobile phone go to google maps (make sure you go to google maps and not maps go) and click on saved at the bottom of your screen.
In the next window scroll all the way down and click on maps on the bottom right side of the screen. This is where the maps you create are saved.
Now choose the map you and click on it.
Now you can access your google maps travel plan when offline. And also use google maps to get directions even if you don’t have a connection.
So from now on it won’t really matter if you’re connected to the internet or not. You can easily find google maps travel plans and get directions even in remote places with unreliable wifi service.
You’ll need to plan these things ahead because the only way to access your maps or get directions is to download what you need in advance.
I will explain exactly how to download google maps for directions and how to download your google maps trip planner.
Accessing Google Maps travel plan offline
- Download Google Earth App on your mobile phone.
- Go to your google maps travel plan on desktop and click on the 3 dots next to the title.
- In the pop up box click export to KML/KMZ. In the next pop up leave the boxes unchecked and click download.
- Send a downloaded copy to yourself by email.
- Now, on your phone go to that email, click on the file and open it with Google earth.

And follow these steps to use Google directional maps offline
- On your mobile phone, open the google maps app. Be sure the app is Google Maps and not “Google Maps Go”.If you haven’t got the app on your mobile phone you can download it here.
- In the top right corner of your mobile screen you will see a round icon. Click on the icon to access your account and go to offline maps.
- On the next page click “select your map”. This will open the page where you download your map. By default, the area of the map will be of your location. However, you can scroll to find whichever part of the world you want to download.
Keep in mind that for google to work offline you need to download the map over a connection. By default, maps will only download over wifi connections. If you want to include mobile data for downloads head to the settings wheel on the “select your own map” page and go to download preferences.
Whether you are planning a trip with google maps or not you should always share your travel plan with someone you trust.
Especially if you’re traveling solo, someone should always know what your plans are. At least, if something happens in those places you’re going to visit someone will know where you are.
Besides safety reasons, you can also share your google maps and let friends or your travel buddies contribute and give their own input on things they want to do.
Follow the steps below to share your google maps travel plan:
- To share from desktop go to the map you want to share and under the main title click on the share button. In the pop up window click the button next to “anyone with this link can view”. Copy the link and share it either by email or message.
- To share on mobile open google maps mobile app, click saved at the bottom of the screen. In the next window scroll all the way down and click on maps. Open the map you want to share and click on “view map legend”. Click the share option and choose how and to who you want to share that google maps travel plan.
Sharing your map will give your loved ones some peace of mind. At least, if they don’t hear from you they will know where you were at that time.
Using google maps to create detailed travel plans takes out a lot of the unnecessary stress of travel planning. It also makes a travel plan organized and easy to understand because of the visual aspect of planning a trip on a map.
So I hope this article gives you a better understanding of how to plan a trip with google maps. But if you have any other ideas or alternate ideas on certain things we mentioned please let us know in the comments below. There is no better way to improve than to get ideas from other travelers.
Our love for travel started off in South East Asia and continues to attract us each year. If you want you can read a bunch of interesting articles about beaches, waterfalls, food, itineraries by clicking the link below.
CLICK HERE TO READ A BUNCH OF INTERESTING ARTICLES!!
Do you want to know useful travel tips without even searching?
Subscribe to our email list to receive tips and detailed itineraries for amazing places around the world that will spark your travel inspiration.
Your Name (required)
Your Email (required)
Follow Us On Pinterest .
2 thoughts on “HOW TO USE GOOGLE MAPS TRIP PLANNER IN 7 STEPS”
The articles you write help me a lot and I like the topic
I like this. I posted this on my LinkedIn and my followers enjoyed it! Keep up the good work. 🙂
Leave a Comment Cancel reply
Save my name, email, and website in this browser for the next time I comment.

Der Blog für Städtereisen, Kurz- und Erlebnisreisen
Wie du mit google maps deine reise vorbereiten kannst.

Google Maps hat viele Funktionen, die die Vorbereitung auf deine Reise bzw. den Städteaufenthalt erleichtern kann. Nutze Offlinekarten auf deinem Smartphone, erstelle eigene Städtekarten, plane einen Städtebummel oder reise virtuell an fremde Orte.
Ich weiß noch, wie spannend ich es fand, wie der Autor Saroo Brierley mit Hilfe von Google Earth nach langen Recherchen sein Heimatdorf in Indien fand, aus dem er im Alter von nur fünf Jahren verschwand. Er wuchs als Adoptivkind in Australien aus und erinnerte sich nur noch optisch an die Straßen mit dem Bahnhof, zu lesen in „ Mein langer Weg nach Hause „.
Inhaltsverzeichnis
- 1 Karten speichern und offline nutzen
- 2 Eigene Karten erstellen
- 3 Eine Route planen über Google Maps
- 4 Virtuell fremde Orte anschauen und spazieren gehen
- 5.1 Sharing is Caring:
- 5.2 Gefällt mir:
- 5.3 Ähnliche Beiträge
Karten speichern und offline nutzen
Du kannst dir Karten auf deinem Handy aufrufen und dann speichern, um sie später offline zu nutzen. Öffne die Google Maps App und Rufe dir den gewünschten Ort in Google Maps auf, klicke dann auf den roten Pin. Wähle den gewünschten Kartenausschnitt aus, tippe auf Herunterladen.
Vom Rechner aus schickst du über „An mein Smartphone senden“ die Karte an dein Handy. Die Karte kannst du 30 Tage nutzen. Es ist auch möglich, eine Karte vom Rechner an dein Handy zu schicken. Wie das direkt auf deinem Smartphone geht, liest du hier.
Eigene Karten erstellen
Unter Google My Maps kannst du deine eigene Karte kreieren. Dazu benötigst du ein Konto bei Google. Rufe My Maps in deinem Internetbrowser auf, melde dich an und gehe auf „Neue Karte erstellen“ . Oben links unter „Unbekannte Karte“ vergibst du den Namen der Karte. Unter dem Reiter „Basiskarte“ wählst du die gewünschte Kartenart wie z.B. einfacher Atlas.
In verschiedenen Ebenen kannst du dann jeweils Hotels, Sehenswürdigkeiten, Restaurants und Bars eintragen. Über das Suchfeld mit der Lupe suchst du den jeweiligen Ort. Mit dem „+zur Karte hinzufügen“ kannst du die einzelnen Highlights in deiner Karte sammeln. Den Orten kannst du typische Symbole geben (Zug, Seilbahn, Shopping, Aussichtspunkt) und auch unterschiedliche Farben, um z.B. Sehenswürdigkeiten von Restaurants zu unterscheiden.
Eine Route planen über Google Maps
Möchtest du im Vorfeld schon einen Stadtrundgang planen, legst du eine neue Ebene „Stadtbummel“ an. Klicke dann unter dem Suchfeld auf das Routensymbol (der abknickende Pfeil) und wähle die einzelnen Orte nacheinander aus. Unter Vorschau kannst du das Ergebnis überprüfen und dann mit der Teilen-Funktion per E-Mail verschicken. Die Karte wird in Google Drive unter „Meine Orte und Karten“ gespeichert. Du kannst damit auch einen Ausflug planen und als Einladung an deine Freunde schicken.
Virtuell fremde Orte anschauen und spazieren gehen
Du möchtest im Vorfeld schauen, wie die Umgebung deines Hotels aussieht? Suche das Hotel in Google Maps. Neben der Hotelmarkierung sollten Symbole erscheinen. Mit einem Klick auf das Bild vergrößert es sich. Wenn das Bild einen Kreispfeil hat, kannst du dir die Umgebung in allen Richtungen ansehen.
Über Street View kannst du nicht nur virtuell durch Städte gehen, du findest auch Innenansichten z.B. von Museen und Restaurants. Street View findest du in Google Maps über das kleine orangefarbene Männchen rechts am Bildschirm. Wo sich hellblaue Linien auf der Karte befinden, kannst du den ganzen Weg entlanggehen.
So bin ich mal am Bildschirm den ganzen Weg entlang des weißen Strandes von Clearwater Beach gegangen. Wenn du die Maus über das Foto hältst, siehst du einen hellgrauen Pfeil, mit dem du dich fortbewegen kannst. Nutze einfach die Pfeiltasten auf deiner Tastatur. Das war eine schöne Vorbereitung auf unsere Reise nach Clearwater.
Photo Sphere sind 360 Grad-Panoramabilder , die sich mit der Photo-App von Google erstellen lassen. Viele User stellen diese gerne in Google Maps ein.
Routen für Rollstuhlfahrer
Ganz neu bei Google Maps ist die Funktion, sich eine Route für Rollstuhlfahrer anzeigen zu lassen. Bisher ist das nur in den Metropolen New York, London, Boston, Tokio und Mexiko City möglich, es werden aber weitere Städte hinzukommen. Du findest die Funktion unter Google Maps, Routenplaner und dann den Pfeil links oben der zu den Routenoptionen führt. Hier kannst du ein Häkchen unter rollstuhlgerecht machen. Ich finde es klasse!

Nutzt du die vielen Funktionen von Google Maps und hast du noch weitere Tipps? Meine Leser würden sich freuen.
Vielleicht interessiert dich passend dazu auch mein Beitrag: Tipps, wie du dich in einer fremden Stadt orientieren kannst. Hier geht es um das Training deines Orientierungssinns.
Sharing is Caring:
- Klicken zum Ausdrucken (Wird in neuem Fenster geöffnet)
- Klicken, um einem Freund einen Link per E-Mail zu senden (Wird in neuem Fenster geöffnet)
- Klicken, um auf WhatsApp zu teilen (Wird in neuem Fenster geöffnet)
Gefällt mir:
Ähnliche beiträge, 3 kommentare.
- 17. Juli 2018
Hallo, ich versuche mich gerade in der „einfachen“ Routenplanung: * ausgehend von „Google Maps“ ( https://www.google.CC/maps , Beschreibung siehe hier: https://www.online-marketing-forum.at/experten-blog/2017/serie-kaum-bekannte-google-perlen-4-google-maps-specials.html ) mit dem eine Route sehr einfach erstellt werden kann (Start + Ziel-Adressen eingeben oder in Karte anklicken und „nach/von hier navigieren“, danach einfach mit der Maus in die angezeigte Route klicken, um Wegpunkte zu erstellen bzw. zu verschieben). Auch können Routenplanungsoptionen eingestellt werden: Fahrzeugtyp, welche Straßen vermieden werden sollen, etc Die Route kann man einfach „teilen“, indem von Google Maps ein Link/URL erstellt wird, welcher kopiert und versendet werden kann (per Mail, WhatsApp u.ä. oder auch direkt an das Smartphone gesendet wird) Der Empfänger kann mit diesem Link die Route in seinem Browser ansehen (und auch bearbeiten).
* Dann kam der Wunsch auf, die Route irgendwie für ein (Garmin-)Navi zu exportieren. Nach kurzer Online-Recherche kam ich auf einen Artikel, in dem erklärt wurde, wie in „Google My Maps“ erstellte Routen in KML/KMZ exportiert und anschließend mit „GPSies“ ( http://www.gpsies.com/convert.do ) in das bei Navis gebräuchlichere GPX-Format umgewandelt werden können. Aber genau hier taucht wieder ein Problem auf: das Erstellen von Routen ist in „Google My Maps“ zwar möglich, aber leider habe ich hier keine Such-/Routenplanungsoptionen wie in „Google Maps“ gefunden :-(
Daher suche ich nach einer Methode, wie in „Google Maps“ erstellte Routen nach „Google My Maps“ exportiert werden können – gibt es hier eine Möglichkeit? Oder ist das aus dem einfachen Grund nicht möglich, weil beide Tools ja von der gleichen Firma angeboten werden :-(
Natürlich wäre ich auch glücklich, wenn es in „Google My Maps“ doch irgendwo versteckte Planungs-Optionen gäbe…
DANKE im Vorhinein für einen kleinen Tipp, Hans
Hallo Hans, ich kann dir die Frage leider nicht beantworten. Vielleicht hilft dir der folgende Link weiter https://www.plejadium.de/google-maps-mit-gpx-und-kml/
Wenn ich in GoogleMy Maps eine neue Karte erstelle, finde ich oben den Pfeil für Route erstellen. Dann öffnet sich links das Fenster und ich kann das Verkehrsmittel (Auto, Fahrrad, Fußgänger) und die Route von / nach wählen. Wenn ich wieder auf Routen hinzufügen gehe, kann ich eine weitere Route bearbeiten und in die Karte einfügen. Mehr habe ich in GoogleMyMaps leider nicht gefunden.
Viele Grüße Renate
- 5. Dezember 2019
[…] Um keine Probleme auf der Autobahn zu haben und für eine angenehme Fahrt zu sorgen, gilt es die Route für eine Städtereise sehr genau zu planen. Kleinere Haltestopps an einer Raststätte, sowie das Auffüllen von Motoröl […]
Schreibe einen Kommentar Antworten abbrechen
Deine E-Mail-Adresse wird nicht veröffentlicht. Erforderliche Felder sind mit * markiert
CAPTCHA Code *
Benachrichtige mich über nachfolgende Kommentare via E-Mail.
Benachrichtige mich über neue Beiträge via E-Mail.
How to Plan a Road Trip with Google Maps: A Step-by-Step Tutorial
This post may include affiliate links. As an Amazon Associate, I (The Winding Road Tripper) earn from qualifying purchases. Read more .
This post was originally published on August 8, 2021, and updated on February 16, 2023.
Ready to start planning your road trip using the power of Google Maps?
Then you’ve come to the right place.
Google has two amazing tools to help you plan your road trip: Google Maps and Google My Maps.
Google Maps is a great tool for plotting out your route, while Google My Maps is an amazing tool for road trip planning and organization.
In this post, I’ll teach you how and when to use each of these powerful free tools.
Let’s start by looking at Google Maps since it’s the simpler of the two.
But if you are looking for how to use Google My Maps, then click here .
How to Use Google Maps to Plot Your Road Trip Route
Google Maps is a great tool if you want to plot out your road trip route.
We use it as a starting point for all of our road trip planning to get a sense of how long our trip will be or what we can accomplish in the time we have.
Step 1: Open Google Maps
Start by opening up Google Maps on your desktop or phone.
When trip planning, we like to use our desktop computers to make use of the bigger screen.

Step 2: Plot Your Road Trip Route
To start plotting your road trip route, click on directions.

Then enter your starting point and your first destination.

Continue to add stops to your road trip by clicking on the (+) to add destinations.

Stop when you have all your road trip stops added to your map. Google Maps allows you to add up to 10 points to your map. If you want to add more, then Google My Maps is the tool for you.
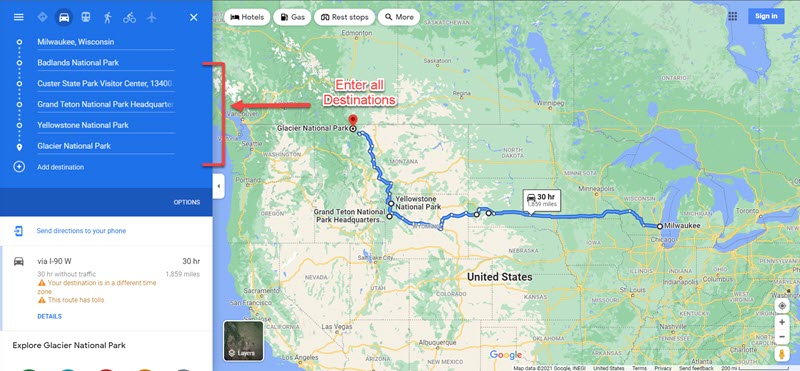
Step 3: Reorder Road Trips Stops
If you want to play around with your route and reorder your stops, Google Maps makes it easy to do so.
On the left, where your stops are listed, you can drag and drop the stops to reorder them.

Step 4: Move the Driving Route
Google Maps will choose the fastest route between your road trip stops. But sometimes, there may be a scenic route you want to take.
You can easily move your driving route as desired by dragging and dropping your route.
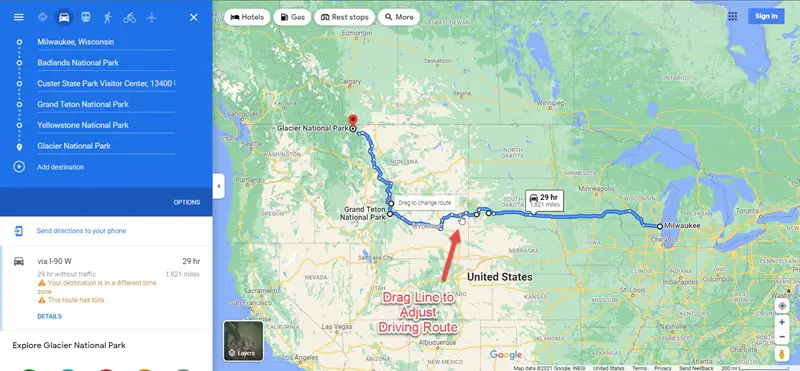
Step 5: Send the Driving Route to Your Phone
Once you plan your road trip, you can send the directions to your phone for easy access during your trip. Directions can be sent via text message or email.
Note: You will have to have a Google Account to send directions to your phone.

Google Maps is a great starting point for planning a road trip.
But if you want to harness the power of Google and use it to plan your road trip and as a resource throughout your trip, Google My Maps is the choice for you.
Google My Maps: The Best Road Trip Planning Tool
Planning a road trip can be a daunting task. It’s hard to know where to start, and all the research can feel overwhelming. But that is where the ultimate road trip planning tool, Google My Maps, comes to the rescue.
Google My Maps is a very similar tool to traditional Google Maps, but it’s much more powerful and customizable.
In this section, we’ll start with detailed information on the features of Google My Maps. And then, we’ll get into exactly how we use Google My Maps to plan each one of our road trips.
Using this tool will help you seamlessly organize and plan your road trip.
Once we tried it, we never looked back.
Let’s start by giving you a little introduction to Google My Maps.
What is Google My Maps?
Google My Maps utilizes all of the data in Google Maps to allow you to create your very own custom map for your road trip. It’s a way for you to create a map containing the places important to you .
Once you create your map, you can access all of the personalized information you’ve added, so you never miss a beat while on the road.
Why is Google My Maps the Ultimate Road Trip Planning Tool?
Google My Maps is our favorite tool for planning a road trip. Here is why:
- It Helps You Visualize Your Trip Plotting all of your points of interest on a map helps see how your road trip may take shape. At the start of road trip planning, we typically have no idea what route we may take until we see all of the things we want to do on a map. And this is where Google My Maps can help.
- It Helps Organize Your Research When planning a road trip, you are likely gathering information from many sources, including websites, tourist bureaus, and recommendations from friends and family. Google My Maps can help you organize all of your research so you can more easily plan your road trip itinerary.
- It Consolidates Your Entire Itinerary Using Google My Maps allows you to have all of your road trip information in one place. There will be no need for a separate spreadsheet with your day-to-day itinerary or to bring your travel books with you.
What Are the Limitations of Google My Maps?
- Google My Maps Can Not Be Used Offline You will need access to wifi or cellular data to use your map on your road trip. But don’t let that stop you from using it to plan your road trip. There are ways to download your map to other apps for offline use, which I’ll take you through in the tutorial.
- You Can Only Add 2,000 Locations to Your Map Likely, you will not need over 2,000 locations when planning your road trip. And if you do, you can make separate maps, possibly divided by days or weeks, to get around this limitation.
- You Can Only Add 10 Layers to Your Map Layers are ways to categorize your location points. When using Google My Maps, you can only have ten layers per map.
- Planned Routes Can Not Be Accessed for Driving Directions on Google Maps When planning your trip, you may add a direction layer on your map to display the route you plan to take. Unfortunately, you can not use those directions to give you turn-by-turn navigation on your road trip. You’ll have to use Google Maps or click on a destination point on your custom Google My Map to bring up directions. I go through this in detail here .
How to Use Google My Maps to Plan a Road Trip
Now that you know why Google My Maps is the best road trip planning tool, let’s dive into the nuts and bolts of Google My Maps.
We’ll start with an in-depth overview and then show you exactly how we use Google My Maps to plan our road trips. Use the screenshots I’ve provided to help guide you through all of the steps.
Overview of Google My Maps
If you want to know how we use Google My Maps to plan our road trips, then feel free to skip down to the step-by-step guide for planning a road trip here .
But if you want to learn the ins and out of Google My Maps, this is where to start.
You can start from the beginning or jump to the section you want to learn more about by clicking on the links below.
Here is what we will cover to familiarize you with how Google My Maps works so you can start road trip planning like a boss.
Google My Maps Layout
- Markers/Locations
Google My Maps allows you to add locations and driving directions to your map while allowing you to organize them as you wish.
To get started, let’s get familiar with the layout of Google My Maps.
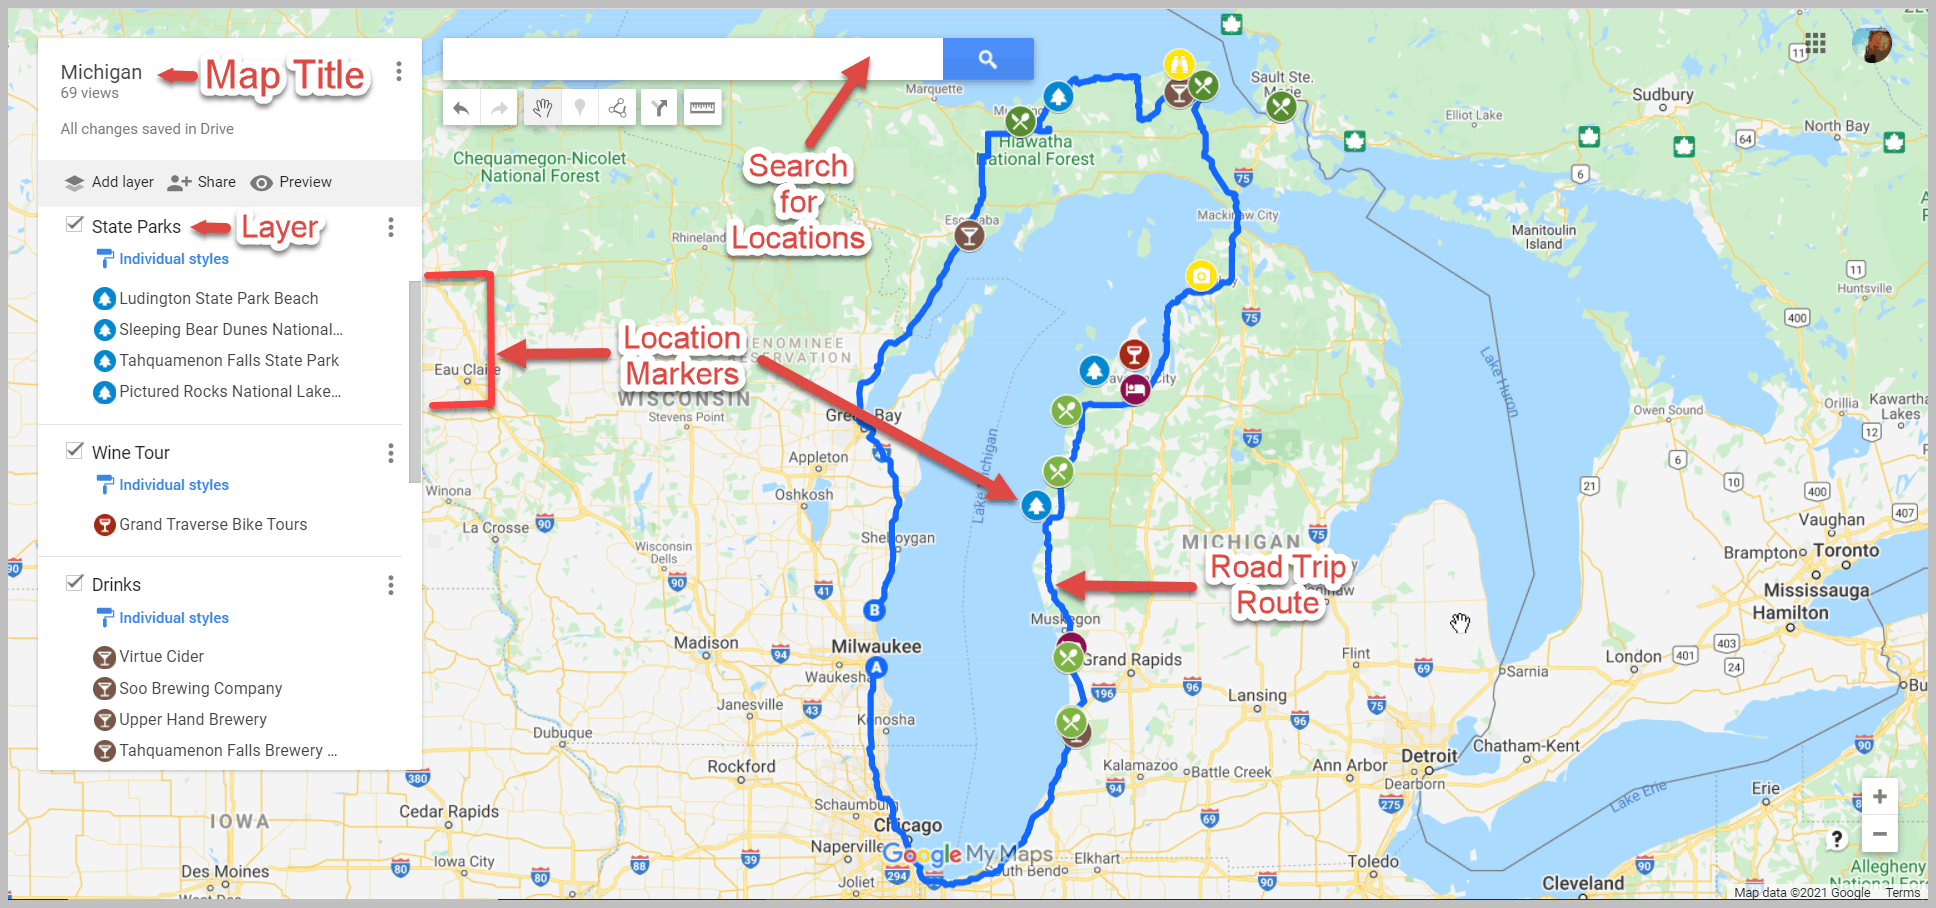
I suggest creating your first Google My Map and playing around with the functions of the map to help you get familiar with them.
Note: You must either create a Google Account or sign in to your Google account to start using Google My Maps .
Location Markers
Location markers are points that you add to a map. They can be things like restaurants, hotels, sights-to-see, bathroom stops, etc.
Find things to do along your route with our Favorite Tools to Find Things to Do Along Your Road Trip Route .
Each point you add to a map will include any information that Google already has for that point.
These include things like:
- GPS coordinates
- Website address
- Phone Number
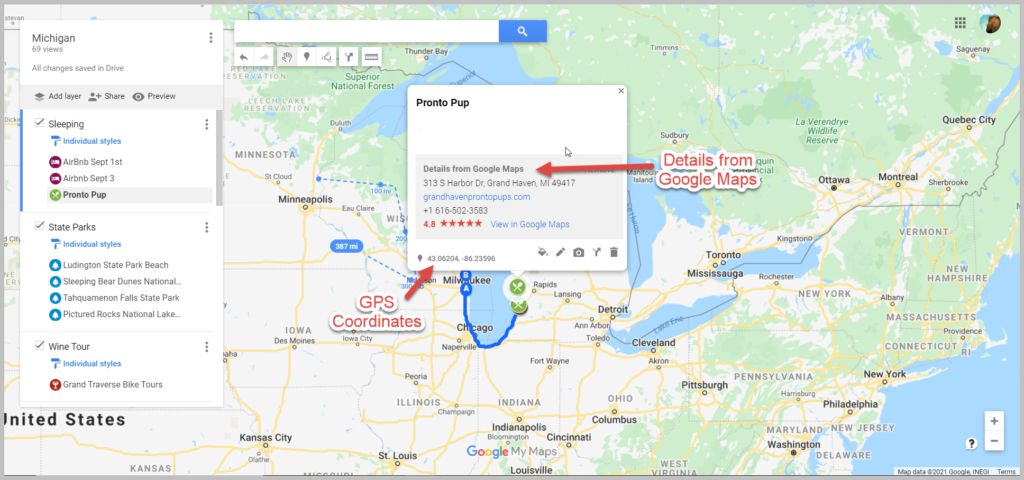
Three Ways to Add Markers to Your Google My Map
You can add markers to your road trip map in three ways:
- Using the search function
- Selecting a Point already on Google Maps to add to your own map
- Add a point manually
Let’s look at how to do all three.
Search Function
You can find a marker by typing in the name, address, or GPS coordinates into the search bar.
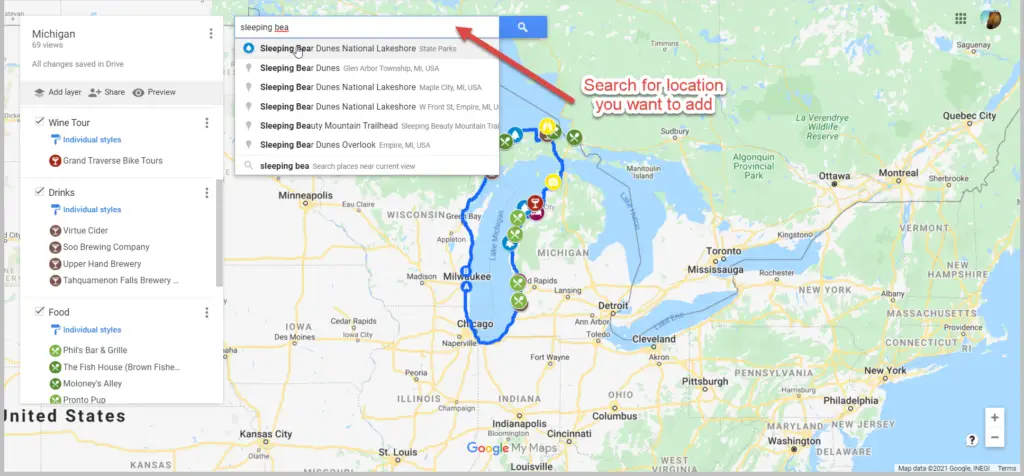
Adding a Marker That is Already on Google Maps
Google Maps already has many markers in its database. When you zoom into an area, many points of interest will start to show up. If any of these markers look appealing to you, you can add them to your own map by clicking on them.
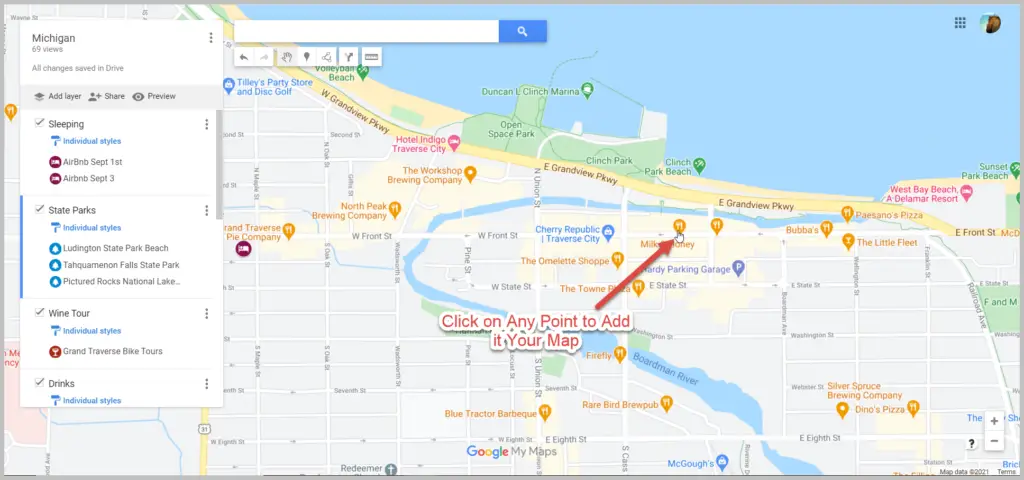
Adding a Marker Manually
You may need to add markers manually when you can not find them via the search function and don’t have the location’s GPS coordinates.
For example, sometimes, I struggle to find the exact location of a trailhead via the search bar. In these cases, I find the location of the trailhead via a different resource and plot it on the map myself.
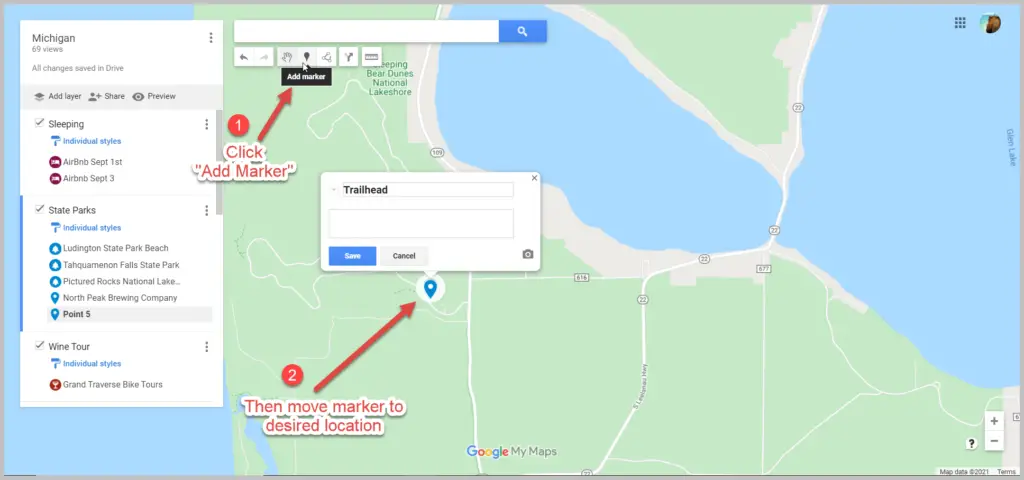
Color Code and Change the Icons of Your Markers
To keep your map organized, you’ll want to customize and color-code your icons to help you group locations together.
Luckily, Google lets you fully customize your markers.
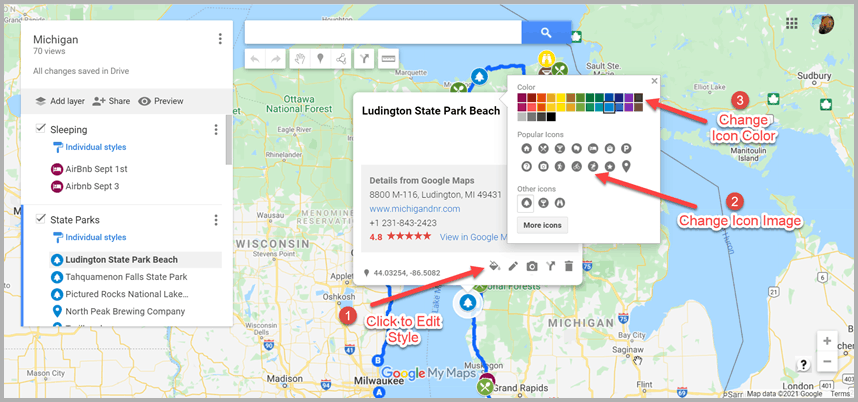
Map layers are a great way to organize your maps.
But before we dive into adding layers, let’s talk about map layers.
What are Map Layers?
A map layer is a set of markers that are layered on top of an existing map. You can see your different layers on the left-hand side of your map.
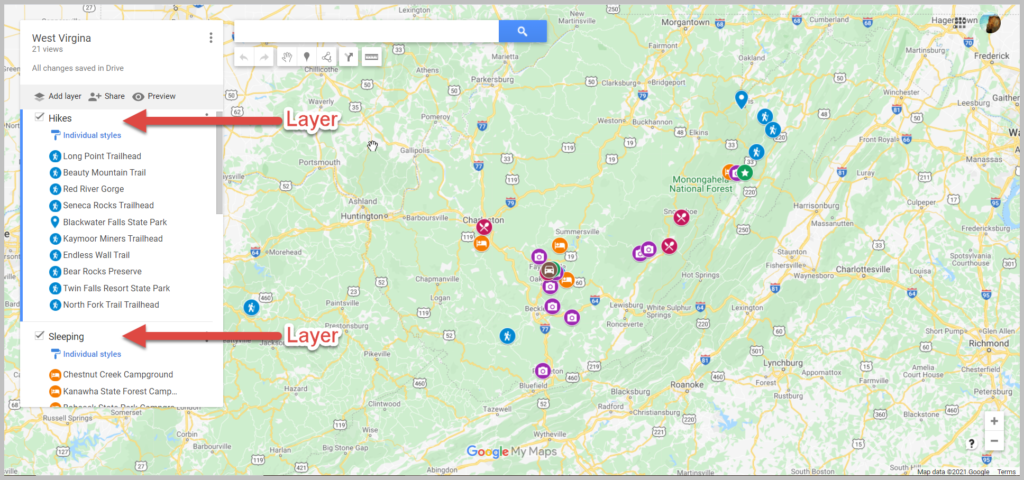
When you add a marker to a map, Google My Maps will add it to a layer. You can then use these layers to organize your map.
The added marker will appear on the selected layer. If you want to move a marker to a different layer, click and drag that marker to the desired layer.
For example, I made a map of Wisconsin Campgrounds to help me find campgrounds nearby during our road trips.
I have chosen to use separate layers for different types of campgrounds; National Forests, State Parks, and County Parks.
The benefit of using separate layers versus adding all of the campgrounds to a single layer is that I can check and uncheck specific layers depending on what information I want to see on my map.
If I don’t want to see the State Parks on my map, I can uncheck “Wisconsin State Parks,” and they will not be plotted on my map until I recheck the box.
How to Add Layers
Within Google My Maps, you can have up to 10 layers on a single map.
To add layers, click on “add layer” on the left-hand side of your map just below the map title and description.

Google My Maps then adds an “untitled layer” to your map.
To change the title, click on “Untitled layer,” and it will give you the option to rename the layer.
The current layer selected will have a solid vertical blue bar on the left side of the layer panel. Any new markers created will be added to the selected layer.

You can use Google My Maps to plot your driving route. Unfortunately, you can’t use these routes for navigation in Google Maps. This is one of the downfalls of Google My Maps.
But that is not to say that adding driving directions to your Google road trip map isn’t helpful. Adding driving directions helps you visualize your route so you can better understand where you are going while on your road trip. It also will help you figure out how long you can drive in one day .
Here’s how to add and use Directions on your Google Map:
Start by clicking on the direction icon located below the search bar.

You will then continue to add stops along your route to get a visual of your driving route.

Google Maps will default to the quickest route when creating your driving route. The quickest driving route will likely be the main highways and not always the most scenic. Therefore, there may be times you want to deviate from the quickest route and take a more scenic route.
Fortunately, you can adjust your route by dragging it to where you want it to go.
Start by clicking on the route, and a small circle will appear.

Then drag this route to where you want the route to go.
How to Plan a Road Trip with Google My Maps – A Step-by-Step Tutorial
Now that we know the ins and outs of Google My Maps let’s learn how to use it to create your very own customized road trip map.
- Create a New Google Map
- Add Layers for Different Types of Locations
- Add Locations to Your Map
- Plan Your Road Trip Route
Step 1: Create a New Google Map
You will need to sign in to your Google Account or create a new account to create your own Google My Map.
Once you’re logged into Google, follow this link to bring you to Google Maps .
Click on the hamburger ( 𝄘 ) in the top left-hand corner of Google Maps.
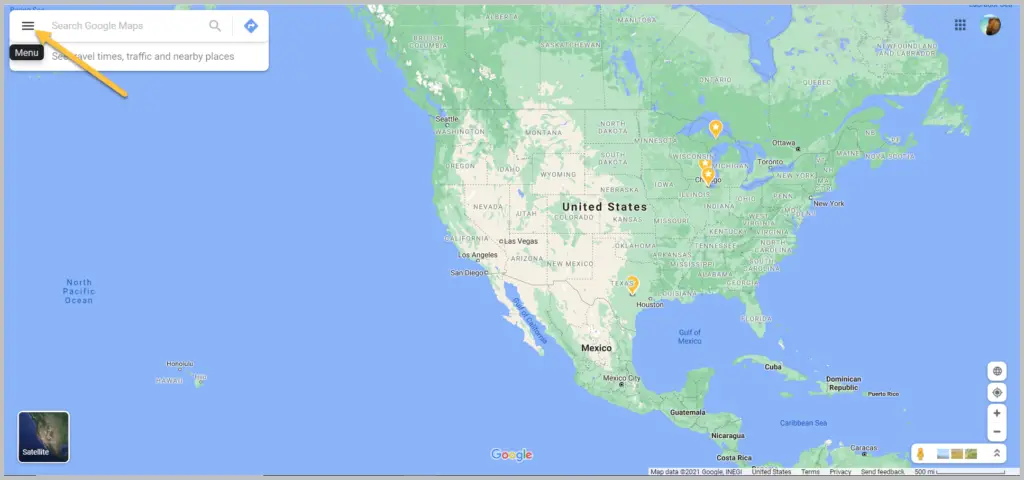
Click on “Your Places”.
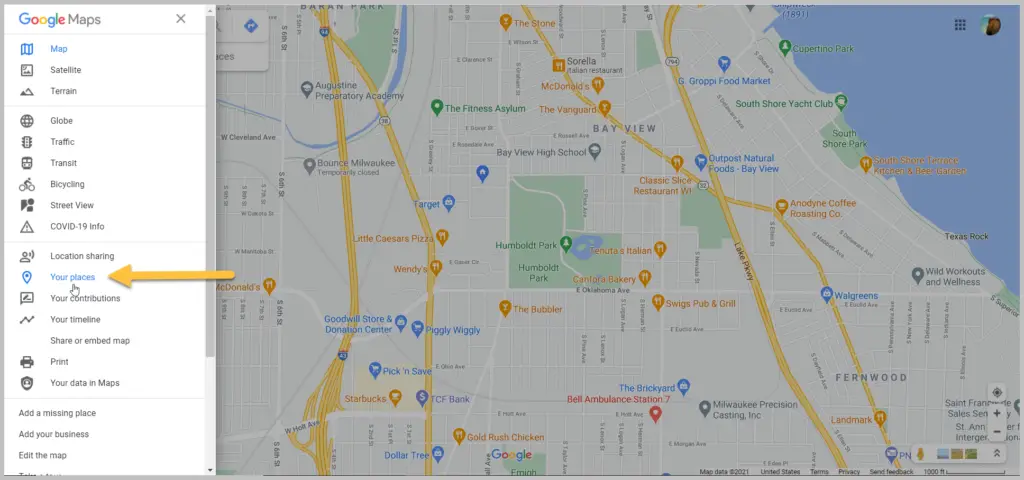
This brings up any saved information you’ve stored in Google maps, like your favorites
Now it’s time to bring up your very first map.
Click on Maps on the top left →, then click “create map” on the bottom left.
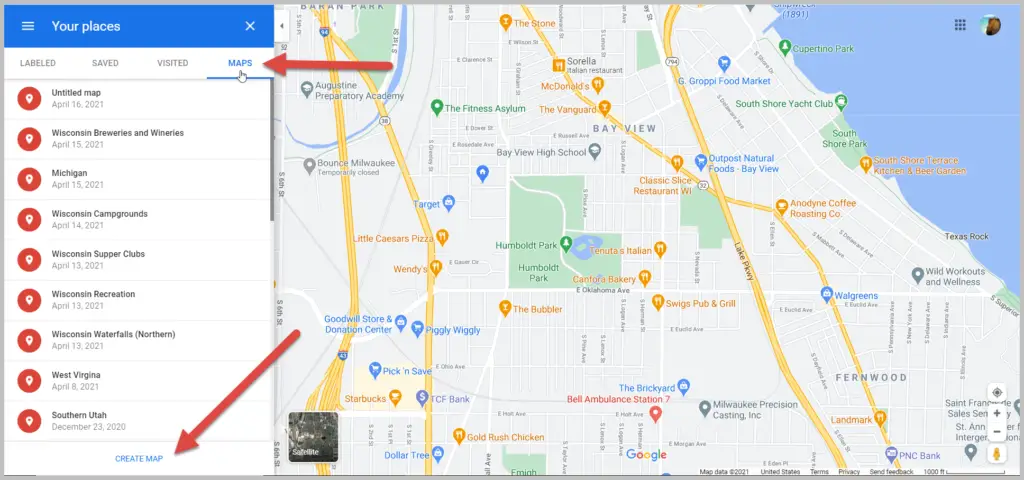
You now have your blank map!
Give your map a title, and get ready to create your first custom road trip map.
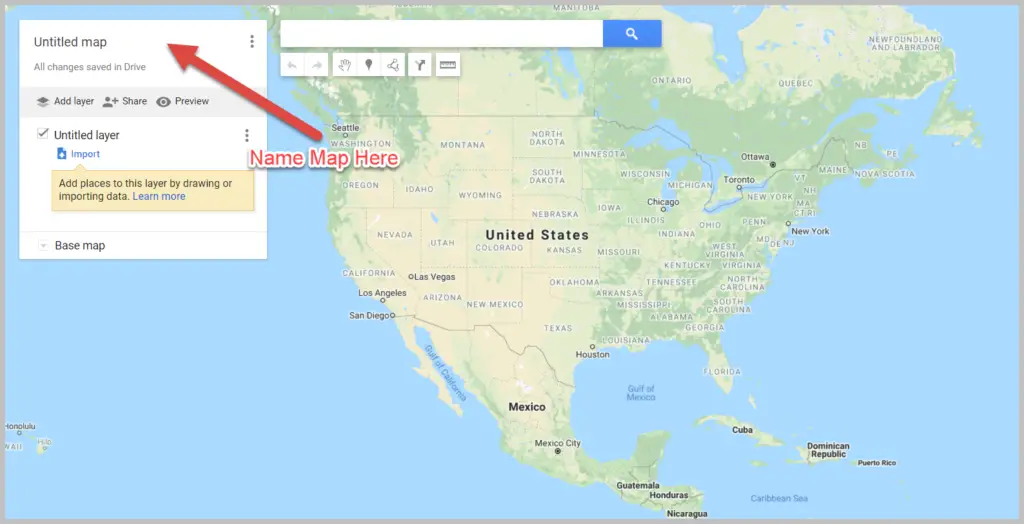
Step 2: Create Layers for Different Types of Markers
I like to start trip planning by creating different layers for the types of markers I plan to add to my map.
The layers I typically use are: – Places to Sleep – Places to Eat – Places to Drink – Things to Do
You can always add layers while you plan. But I find it easier to stay organized if I start with some layers on my map before adding locations.
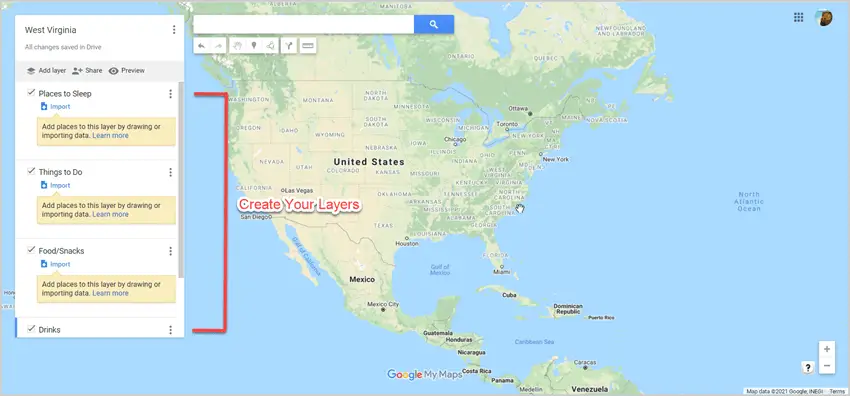
Step 3. Add Markers to Your Map
This is the best part of planning your road trip with Google My Maps.
Whether you are in your brainstorming stage of travel prep or you already know where you want to go, this step is where your trip starts to come together.
To start, you’ll research your destinations to find markers to add to your map.
I like to use the following resources for trip research:
- Google: Search for things to do, places to eat, places to stay, etc., in the areas you plan to visit or pass through
- Visitor Centers: Find tourism information online or request info from your destinations’ tourism bureaus to be mailed to you
- Travel books: We like to get ours from the library
- Facebook groups: Join a Facebook Group for the area you are traveling to. They are filled with tons of suggestions on the best things to do in the area.
When you find a location you want to make note of, add it to your map.
Do this by entering it into the search bar.
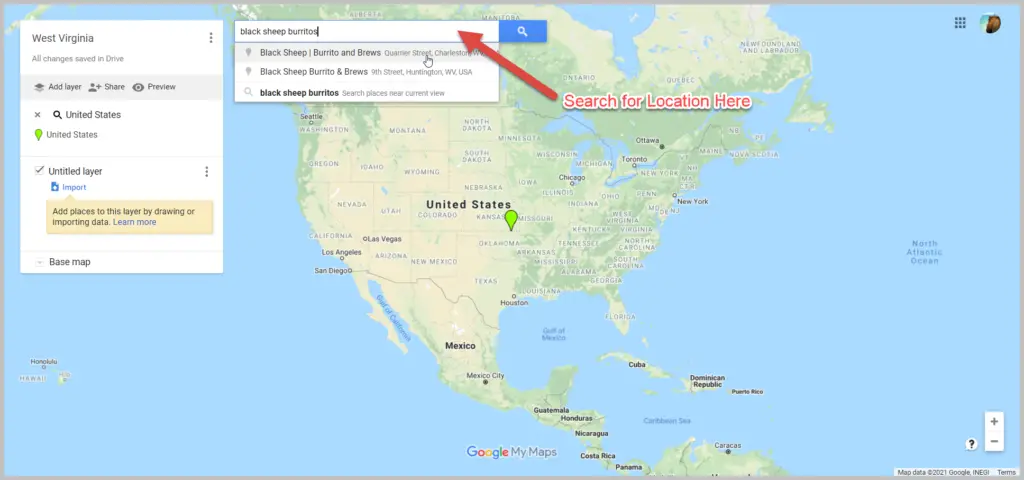
The great thing about Google Maps is that it pulls up all of the information on a location that Google has. If available, you can find the exact address, reviews, and website address.
If the location looks good, you can then add it as a marker to your map by clicking “add to map”.
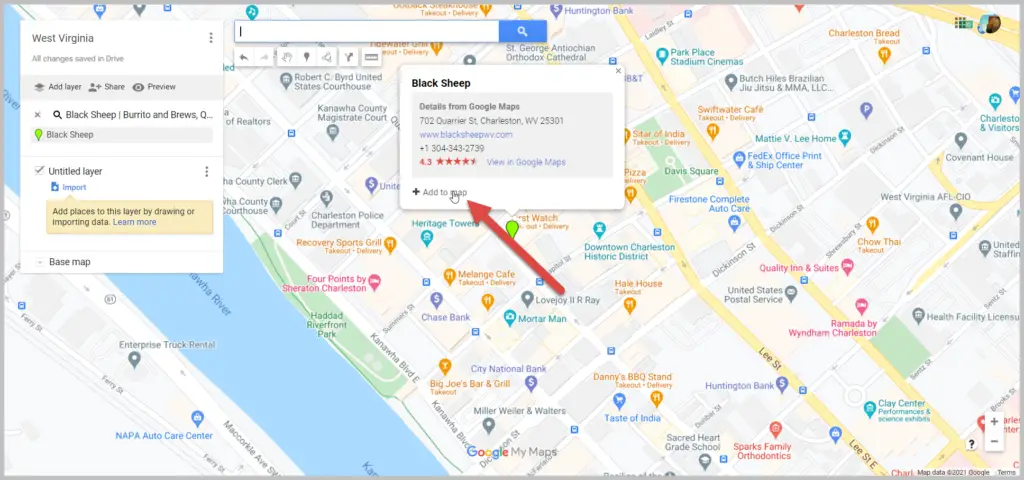
Once added to your map, you can customize your marker by changing your icon’s color and/or shape by clicking on the paint bucket icon labeled “style”.
I like picking a specific color and icon for each marker category. For example, my “restaurants” may all be blue with a fork and spoon icon, while my “sights to see” will be yellow with a binocular icon.

One of my favorite features of Google My Maps is that I can add my own info to the marker. Typically, this info comes from the research I’ve done on the location. If I found a blog post recommending a specific restaurant, I’ll add that to the marker, so I have that info at my fingertips when we are on the road.
Add any info you want to your marker and click save.

Your marker will now be added to your map.
You can see your marker in two places: one on the map and the other in the layer it was added to in the layers menu on the left-hand side of the screen.
Continue to add locations until your map starts to take shape.
Here is an example of a map we made for a West Virginia Road Trip .

Step 4: Determine Your Route / Itinerary
Now that you have location markers on your map, you can determine your route and day-to-day itinerary.
Take a look at where all your location markers are situated and start planning your route.
Start by creating a directions layer on your map.
Once you have your directions layer, rename it, and begin plotting your route.
First, you will need to enter your starting point. This can be done by either entering an address manually or clicking on a marker on your map.
Continue to add stops until your route is complete.
Here is an example of what our Lake Michigan Circle Tour Road Trip looked like.

Google Maps will default to the quickest route from two points. If you want to go a different route than the one suggested, you can drag the route to force it to go a different way than it was originally displayed.
You now have your own customizable Google Map for your road trip.
We use these maps for both planning our trip and for reference during our trip.
Now let’s look at how to use your awesome map during your trip.
How to View Your Google My Map on Your Phone
Now that you have your map customized, you’ll likely want to be able to view it on your phone.
You will first need to download the Google Maps app from your phone’s app store.
Once you have the Google Map app, here is how you access your map:
- Click on “Saved” on the lower toolbar on your phone
- Click on “Maps” on the lower right
- Select your customized map
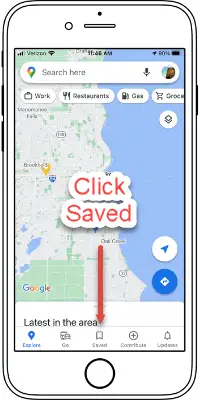
Now you can view your location markers and all the customized information you added to your map.
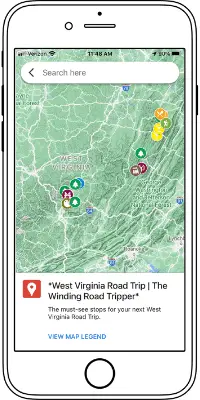
Click on your marker to bring up basic information. For the more detailed information you added, swipe up.
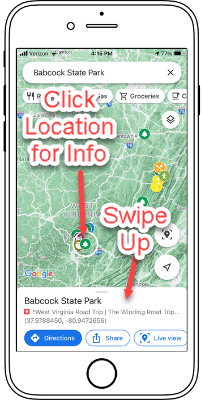
How to Use Your Google Map to Get Directions During Your Road Trip
Unfortunately, you can’t use the turn-by-turn directions you may have added to your map for actual driving instructions for your trip.
But not all is lost; you can still get directions to the next stop by using your customized map and Google Maps.
To do this, click on the location you want directions to and click on directions.
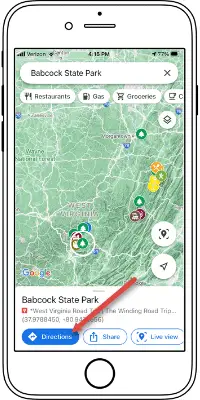
This will launch your Google Map app and allow you to get turn-by-turn directions to your next stop.
How to Export Your Map for Offline Access
Google My Maps works great when you have cell phone service on your trip. Unfortunately, you will not always have service, and you can’t download your Google My Map for offline use like you can in Google Maps.
Thankfully, there are ways to export your map for use offline.
To do this, we use Gaia GPS .
Let’s walk you through downloading your Google My Map for importing into Gaia GPS, an offline mapping app.
On your computer, click on the ( ⋮ ) in the top left corner by the map’s name. Then click on Export to KML/KMZ.
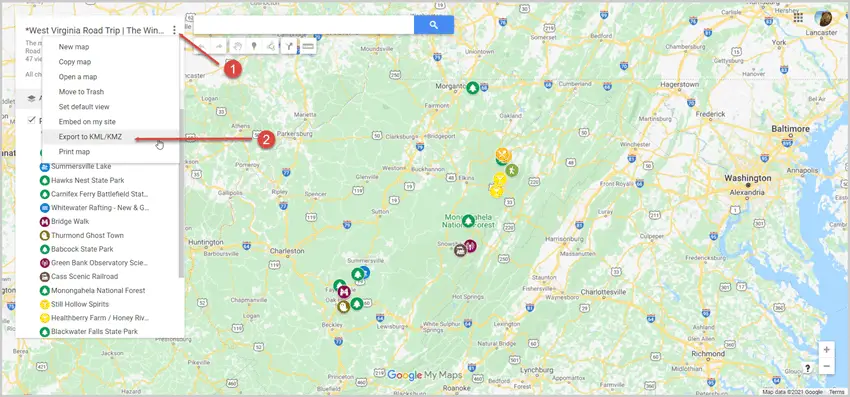
A pop-up will appear. Keep the default of “entire map” and click “download”.
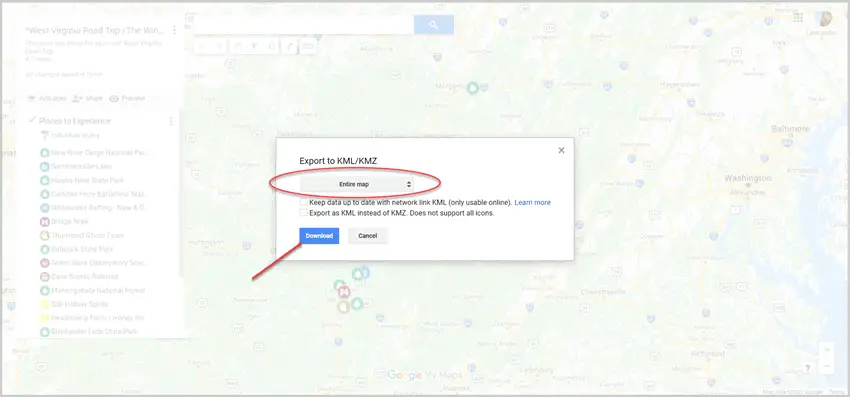
Now you can import this map into Gaia GPS.
Start by creating a Gaia GPS account .
Once logged in, click “Import Data” and select the .KMZ file you downloaded from Google My Maps.
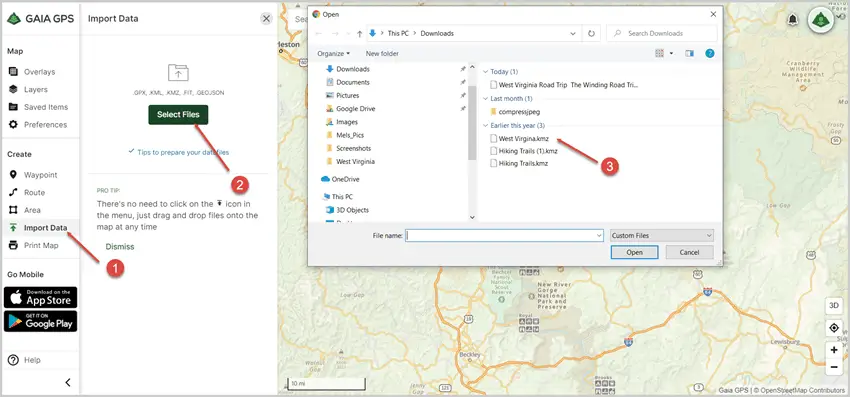
Your locations will now populate in your Gaia GPS map. Make sure to click “save” .
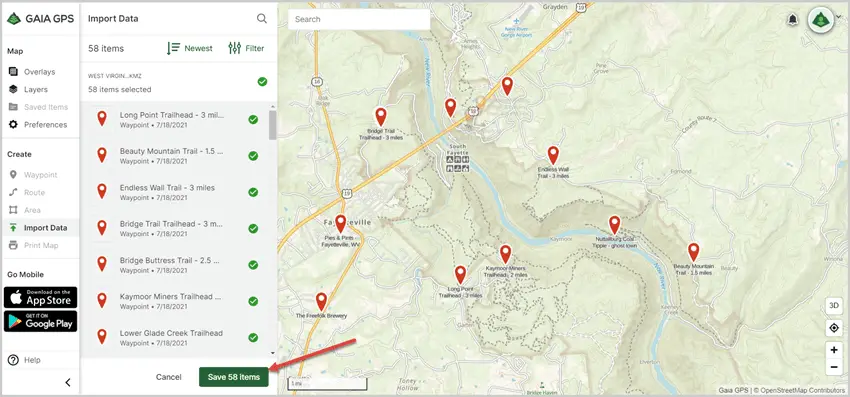
You can now access your map locations offline on your phone via Gaia GPS.
To do this, download the Gaia GPS App on your phone and log in.
Once logged in, you will see a notification that you have a saved location available.
Click on the Saved folder
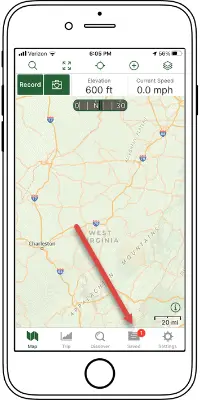
You can now see all your locations on your Google My Map. Including the details, you added.
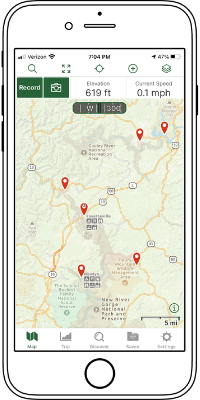
More Road Trip Tips: Road Trip Hacks for a Stress-free Trip Road Trip Activities for a Long Car Ride Road Trip Meal and Snack Ideas Money-Saving Tips for Your Next Road Trip How to Budget for a Road Trip
How-To Geek
How to plan a road trip with multiple destinations in google maps.

Your changes have been saved
Email is sent
Email has already been sent
Please verify your email address.
You’ve reached your account maximum for followed topics.
Quick Links
Add multiple stops using the website, add multiple stops using the mobile app.
Whether you're planning a day out on the town, or want to orchestrate the perfect road trip across the country, Google Maps allows you to add up to nine stops, excluding your starting point, when you make directions from both the website and the Maps app. Here's how you do it.
First, open up your browser and head on over to Google Maps. Click the "Directions" button to the right of the search bar.
By default, Maps will use your device's location for the starting point. If you want this to be a different location, enter it now.
Next, enter the location of your first destination into the field provided, and then hit Enter. Alternatively, you can click any location on the map to get the same results.
Make sure you have either the driving or walking option selected, as Maps only lets you make multiple destinations with these two travel modes.
To add another destination, all you have to do is click either the "+" or the space below your first destination, and then start typing a new location. You can repeat this to add up to nine total stops. If you have more stops than is allowed, you may need to make another map from where you left off.
If at any point you decide you want to change up the order of your destinations, just drag any location up or down on the list using the circles on the left.
And once you've created your map in your web browser, you can click the "Send directions to your phone" link to send it to your mobile device by email or text message. Assuming you've got the Google Maps app installed, you can open it right up.
If you want to optimize your travel, you can also turn a multi-stop Google Maps trip into a round-trip .
Related: How to Find Public Restrooms Near You with Google Maps
You can use the Google Apps mobile app (free for iPhone , iPad , and Android ) to create a map with multiple destinations in much the same way.
Related: How to Download Google Maps Data for Offline Navigation on Android or iPhone
Fire up the Google Maps app on your mobile device, and then tap the blue "Go" button on the bottom right of your screen.
By default, Maps uses your device's location for the starting point. If you want this to be a different location, enter it now.
Start typing in your first destination or tap a location on the map below to start your journey.
Next, open the menu (the three dots at the top right), and then tap the "Add Stop" command.
Enter the location of your next stop, or tap anywhere on the map to add the next destination.
To change the order of your destinations, just drag any of the locations up or down the list using the "Hamburger" (three stacked lines) on the left.
When you've added all the stops to your trip, go ahead and tap "Done" so you can start your journey.
Related: How to View and Delete Your Google Maps History on Android and iPhone
- Google Maps
Perfekte Routenplanung mit Google Maps: Multi-Stopp-Navigation leicht gemacht

- Google Maps: Die beliebte Navigations-App mit über einer Milliarde Nutzern!
- Schritt-für-Schritt-Anleitung für effektive Routenplanung mit mehreren Zwischenstopps.
- Nutzen Sie die Desktop-Version für einen besseren Überblick.
- Optimieren Sie Ihre Routen mit flexibler Reihenfolgeanpassung für bis zu 10 Zwischenstopps.
- Sparen Sie Zeit und steigern Sie die Effizienz durch die Optimierung der Routenreihenfolge.
- Übertragen Sie Routen einfach auf Ihr Smartphone und navigieren Sie mühelos.
- Profitieren Sie von Tipps zur gemeinsamen Routennutzung und zur Nutzung von Google My Maps.
- Google My Maps bietet bis zu 2.000 Standorte und zusätzliche Anpassungsmöglichkeiten.
Google Maps.
Was verbinden Sie mit der App?
Es ist nicht umsonst die Lieblings-App vieler Menschen auf der ganzen Welt. Mit über einer Milliarde Nutzer ist sie die unangefochtene Nummer eins unter den Navigations-Apps. Sie ist kostenlos, kinderleicht zu bedienen und vor allem zuverlässig.
Aber was ist, wenn Sie mehr vorhaben, als nur von A nach B zu gelangen? Stellen Sie sich vor, Sie wollen einen spannenden Roadtrip mit Ihren Freunden oder einen gemütlichen Ausflug mit Ihrer Familie planen.
Keine Sorge, mit Google Maps ist das ein Kinderspiel. Es ermöglicht Ihnen spielend leicht, Routen mit mehreren Zieladressen zu planen!
In diesem Tutorial zeigen wir Ihnen Schritt für Schritt, wie das genau funktioniert. Und keine Angst, es ist wirklich einfacher, als es klingt: 1. Teil: Wir führen Sie durch die Planung einer Route mit bis zu 10 Stopps in Google Maps. 2. Teil: Und für die, die noch mehr zu entdecken haben: Erfahren Sie hier, wie Sie mit Google My Maps auch längere Routen spielend bewältigen können.
Aber auch Google Maps und My Maps haben ihre Grenzen. Sie bieten keine fein abgestimmten und effizienten Routenoptimierungen . Sollten Sie mit vielen Zwischenstopps planen, bekommen Sie möglicherweise nicht die sparsamste oder zeitsparendste Route vorgeschlagen. Wenn dies für Sie eine wichtige Rolle spielt, sollten Sie vielleicht über den Einsatz professioneller Routenoptimierungssoftware nachdenken.
Auch besonders in der Logistik oder bei der Planung von Lieferstrecken wird oft ein ausgeklügelterer Ansatz als der herkömmliche Google-Routenplaner benötigt. Unsere favorisierte Methode haben wir in unserem Blogbeitrag zum Google-Routenplaner für Lieferungen ausführlich beschrieben. Werfen Sie gerne einen Blick darauf. Schauen Sie dazu doch mal bei uns vorbei! Wir stehen Ihnen bei Fragen und Anliegen zu diesen Themen mit Rat und Tat zur Seite.
Tutorial Teil 1: So planen Sie Mehrfachstopp-Routen mit Google Maps
Hier erfahren Sie nun Schritt für Schritt, wie Sie mit Google Maps eine Route mit mehreren Zwischenstopps erstellen können.
Dafür können Sie auf jeden Fall auch direkt, die Google Maps-App auf Ihrem Android- oder iOS-Smartphone nutzen. Wir empfehlen Ihnen jedoch, die Routenplanung auf Ihrem Desktop über Ihren Browser durchzuführen.
Unserer Meinung nach ist es dort leichter, den Überblick über Ihre gesamte Route und die einzelnen Zwischenstopps zu behalten, während es auf dem Smartphone doch leicht passieren kann, dass man den Faden verliert und dann von vorn beginnen muss.
Also, machen Sie sich bereit und lassen Sie uns loslegen!
Schritt 1. Ab ins Abenteuer - Google Maps aufrufen!

Öffnen Sie Ihren Browser und geben “google.de/maps“ in die Adressleiste Ihres Browsers ein. Für unsere visuellen Beispiele heute haben wir die faszinierende Hansestadt Hamburg im Norden Deutschlands und einige sehr interessanteste Orte in und um die Stadt herum gewählt.
2. Die Reise beginnt - Startadresse eingeben!

Suchen Sie zunächst nach dem Ort oder der genauen Adresse, welche(n) Sie als erstes Ziel Ihrer Route in die Suchleiste von Google Maps eingeben möchten. Google wird Ihnen direkt eine Liste von Vorschlägen anzeigen. Wenn Sie Ihren Wunschort sehen, einfach darauf klicken. Falls nicht, keine Sorge, einfach weiter tippen, bis Sie das richtige Ziel sehen - aber achten Sie darauf, dass Sie sich in der richtigen Stadt befinden! Alternativ können Sie auch einfach irgendwo auf die Karte klicken, um Ihren ersten Stopp festzulegen. Hier in unserem Beispiel starten wir mit dem Elbstrand als erstes Ziel unserer Route.
3. Auf geht's - Route anzeigen!

Jetzt, da Sie Ihre erste Adresse festgelegt haben, klicken Sie auf die Schaltfläche “Routenplaner", um das Routenfenster zu öffnen. Und damit geht es dann erst richtig los.
4. Weitere Ziele, neue Möglichkeiten!

Beim Hinzufügen einer weiteren Adresse wird vorerst Ihr Startpunkt festgelegt, anstatt Ihr nächstes Ziel, was dann im nächsten Schritt folgt. Wenn Ihre Route von zu Hause oder Ihrem aktuellen Standort aus starten soll, klicken Sie einfach auf “Mein Standort“, und schon wird Ihre Route erstellt. Soll die Route hingegen woanders beginnen, einfach die Adresse in der Suchleiste eingeben, und Google erstellt die Route automatisch von dort aus.
Zu diesem Zeitpunkt, wenn es nur um zwei Ziele geht, ist die Chance noch sehr groß, dass Sie die schnellste Route erhalten. Die Navigation von Punkt zu Punkt, mit geschätzter Reisezeit und Live-Verkehrsaktualisierungen ist wirklich das, worin Google Maps absolut brilliert. Wir haben den Trampolinpark im Osten Hamburgs als unseren Startpunkt der Route ausgewählt.
5. Auf geht's zum nächsten Stopp!

Ein Klick auf "Reiseziel hinzufügen", und schon können Sie die nächste Adresse für Ihre Route eingeben. Jetzt ist auch eine perfekte Gelegenheit, um sicherzugehen, dass Sie den richtigen Transportmodus für sich ausgewählt haben. Für Autofahrten sollte das Auto-Symbol, in der obersten Reihe blau markiert sein, und der Rest ausgegraut.
Für Spaziergänge oder Radtouren hingegen wählen Sie das entsprechende Symbol aus. Leider erlaubt der Modus für öffentliche Verkehrsmittel bisher nicht das Hinzufügen mehrerer Zwischenziele bei Google Maps. Wir arbeiten daher mit den anderen Modi.
6. Entdecken Sie weitere Ziele

Jetzt können Sie gerne weitere Ziele hinzufügen, bis Sie mit Ihrer Route fertig sind oder das Limit von 10 Stopps erreicht haben.
Wenn Sie mehr als 10 Stopps für Ihre Routenplanung benötigen, kein Problem. Werfen Sie einen Blick auf unsere fortgeschrittenen Anweisungen in Teil 2 weiter unten auf dieser Seite.
Das klingt doch großartig, oder? Nun haben Sie Ihre Route schon sehr weit ausgearbeitet.
Allerdings sieht sie möglicherweise noch wie ein Wirrwarr aus Spaghetti aus. Google hat die Adressen in der Reihenfolge belassen, wie Sie sie eingegeben haben, was jedoch nicht immer die effizienteste Reihenfolge ist. Im nächsten Schritt zeigen wir Ihnen, wie Sie Ihre Route kürzer und ausgefeilter nach Ihren Wünschen gestalten können.
7. Optimieren Sie den Routenverlauf

Um mit der Optimierung zu beginnen, bewegen Sie den Mauszeiger über eine Ihrer Adressen in der Auflistung. Sie werden dann auf der linken Seite ein Symbol mit sechs Punkten sehen sowie den Hinweis "Zum Ändern der Reihenfolge ziehen". Klicken und halten Sie die Punkte mit der Maus fest, um eine Adresse an eine neue Stelle in der Liste zu ziehen. Sie können genau die Reihenfolge wählen, die Sie für sinnvoll und passend halten.
Wir haben entschieden, im Osten von Hamburg zu beginnen und im Westen mit unserer kleinen Reise durch die Stadt zu enden. Unsere neu geordnete Route ist viel einfacher und vermeidet einen langen Umweg durch die Innenstadt mit dichtem Verkehr. Statt 2 Stunden und 54 Minuten auf der Straße verbringen wir nur 1 Stunde und 49 Minuten - das ist über eine Stunde in der Planung gespart!
Dieser Unterschied wird nicht immer so groß sein, aber auf diese Weise können Sie definitiv einiges an Zeit einsparen oder eine für Sie ideale Reihenfolge für die Fahrt wählen.
8. Senden Sie Ihre Route direkt auf Ihr Smartphone

Jetzt ist es ein Klacks, diese Anweisungen auf Ihr Mobilgerät zu schicken, und schon können Sie sich auf den Weg machen! Klicken Sie dafür auf "Wegbeschreibung an mein Smartphone senden" und wählen Sie eine Option aus dem Pop-up-Menü, um die weiteren Anweisungen zu erhalten. Für einen reibungslosen Ablauf sollten Sie mit Ihrem Google-Konto sowohl auf Ihrem Smartphone als auch im Browser angemeldet sein. So klappt das Teilen zwischen den Geräten wunderbar.
9. Öffnen Sie die Route auf Ihrem Smartphone

Nachdem Sie die Route von Ihrem Browser aus mit Ihrem Smartphone geteilt haben, klicken Sie nun einfach auf die Benachrichtigung, die auf dem Display Ihres Smartphones erscheint, und schon wird Ihre Route bereit sein, navigiert zu werden!
Wenn Sie bereits an Ihrem Startpunkt stehen, wird Ihnen die "Starten" Schaltfläche unten in der App angezeigt und Sie können Ihre Reise jederzeit beginnen. Sind Sie zurzeit noch an einem anderen Ort, wird dort "Vorschau" stehen, bis Sie bereit sind, loszulegen.
Tipps und Tricks: Teilen Sie Ihre Google Maps Route mit Leichtigkeit!

Möchten Sie Ihre Google Maps Route mit anderen Leuten teilen? Kein Problem! Dieser kurze Leitfaden zeigt Ihnen, wie das geht.
Sie können Ihre Google Maps-Route ganz einfach von Ihrem Smartphone aus teilen. Klicken Sie, während Sie sich in der Routenplanung der Google-Maps-App befinden, auf die drei Punkte (das sogenannte "Kebab"-Menü), am oberen rechten Displayrand und wählen dann den Punkt "Wegbeschreibung teilen" im Pop-up-Menü aus.
Also los geht's - teilen Sie Ihre Route und machen Sie Ihre Reise zum gemeinsamen Abenteuer.
Tutorial Teil 2: Planen Sie Ihre Mehrfachstopp-Routen mit Google My Maps!
Google My Maps ist eine wirklich spannende und vor allem auch kostenlose Alternative zum herkömmlichen Google Maps-Routenplaner. Perfekt für all die Abenteuerlustigen da draußen, die gerne im Voraus planen!
Ob Roadtrip oder Sightseeing-Tour - mit Google My Maps können Sie bis zu 2.000 Standorte markieren und zusätzliche Infos wie Notizen und benutzerdefinierte Symbole hinzufügen. Wir halten das für eine tolle Möglichkeit, Ihre Reise zu organisieren und all die spannenden Zwischenstopps einzuplanen. So haben Sie stets einen guten Überblick.
Aber hey, wir geben zu, My Maps ist nicht der absolute Meister der effizienten Routenplanung. Sie erhalten keine absolut durchoptimierten Routen und es gibt keine Live-Navigationsanweisungen. Dafür empfehlen wir Ihnen die Nutzung einer professionellen Routenoptimierungssoftware .
Aber wissen Sie was? My Maps macht trotzdem Spaß, hat viele hilfreiche Seiten, und ist daher definitiv einen genauen Blick wert, unserer Meinung nach! Also, warum nicht mal ausprobieren und sich selbst ein Bild machen?
Schritt 1. So nutzen Sie Google My Maps für Ihre Routenplanung!

Es gibt zwei einfache Wege, um zu My Maps zu gelangen:
- Direkt über diesen Link zu My Maps
- Oder nutzen Sie Google Maps, indem Sie auf das 'Hamburger'-Menüsymbol ☰ klicken, dann auf den Unterpunkt "Gespeichert" > "Karten" > "My Maps öffnen".
2. Los geht’s! So fügen Sie Zielorte in Ihre My Maps-Karte ein!

Jetzt kann es losgehen. Wenn Sie im Hauptmenü der My Apps sind, können Sie über die Schaltfläche "Neue Karte erstellen" ein neues Projekt öffnen. Dann ist es an der Zeit, sie mit interessanten Orten zu füllen. Einfach in die Suchleiste klicken, den Namen des gewünschten Ortes eingeben und aus der Liste auswählen, um ihn Ihrer Karte hinzuzufügen.
Sie können auch über die Karte gehen und einfach einen bereits vorhandenen Ort auswählen und ihn ebenfalls zu Ihrer Liste hinzufügen. Mit My Maps können Sie bis zu 2.000 verschiedene Orte in Ihre Karte aufnehmen – perfekt also, wenn Ihre Route das 10-Stopp-Limit von Google Maps sprengt.
3. Starten Sie mit dem Erstellen Ihrer eigenen Route

Jetzt wird es spannend – wir starten mit dem Zusammenstellen einiger Routen! Eine richtig interessante Sache bei My Maps ist, dass Sie unterschiedliche Arten von Wegen auf derselben Karte planen können, sei es zum Autofahren, Wandern oder Radfahren. Da können Sie sich richtig austoben.
Um das zu verdeutlichen, lassen Sie uns mit einer Radtour beginnen. Klicken Sie oben auf Ihrem Bildschirm auf das "Linie zeichnen"-Symbol und wählen Sie dann den Routen-Typ aus, den Sie erstellen möchten. Setzen Sie den Startpunkt fest und wählen Sie den nächsten Ort aus, den Sie ansteuern möchten – My Maps erledigt den Rest und zeichnet Ihre Route für Sie ein.
4. Beleben Sie Ihre Route: Fügen Sie weitere Orte hinzu!

Im Fenster auf der linken Seite Ihres Bildschirms werden Sie nun sehen, dass My Maps eine neue Ebene erstellt hat, auf der Ihre Route angezeigt wird. Sie können der jeweiligen Ebene, einfacher gesagt der Route, auch jederzeit einen passenden Namen geben, wenn Sie möchten.
Jetzt wird es Zeit, dieser Route noch etwas mehr Leben einzuhauchen! Klicken Sie auf "Ziel hinzufügen", um weitere spannende Stopps entlang Ihrer Route einzufügen. Wenn Sie sich für eine Radtour entschieden haben, werden die Radwege auf der Karte sogar grün hervorgehoben.
5. Entdecken Sie neue Wege: Verschiedene Routen erstellen!

Jetzt begeben wir uns einmal auf eine neue, erweiterte Ebene in diesem Zusammenhang. Folgen Sie einfach denselben Schritten wie zuvor, um eine Fahrtroute mit dem Auto zu erstellen. Im Bild können Sie sehen, wie wir zwei verschiedene Routen in zwei separaten Ebenen erstellt haben: eine zum Radfahren und die jetzt neu hinzugefügte Route per Auto.
In unserem Beispiel können Sie die Anordnung der einzelnen Orte in Hamburg übersichtlich auf der linken Seite einsehen. Auch hier können Sie Ihre Route(n) und Listen ganz nach Ihren Wünschen zusammenstellen.
6. Entdecken Sie alle Details Ihrer Route!

Bei My Maps werden die Zeit- und Entfernungsangaben nicht direkt wie bei Google Maps unter der Route angezeigt. Aber keine Sorge, wir zeigen Ihnen, wie auch das möglich ist.
Klicken Sie einfach auf die drei Punkte neben dem Namen einer Ihrer Ebenen und wählen Sie "Detaillierte Wegbeschreibung" aus. Dort erhalten Sie eine detaillierte Übersicht Ihrer Route inklusive Zeit- und Entfernungsangaben. Und wenn es mal etwas unübersichtlich werden sollte, können Sie Ebenen mit den Kontrollkästchen auf der linken Seite neben ihren Namen ganz einfach ein- oder ausblenden.
Übrigens müssen Sie Ihre Routen nicht manuell speichern. Sie werden automatisch gesichert, sodass Sie jederzeit zurückkehren und dort weitermachen können, wo Sie aufgehört haben.
7. Teilen Sie Ihre eigene Karte mit anderen!

Das Teilen Ihrer Karte ist auch bei My Maps ein Kinderspiel! Sobald Sie alle Orte für Ihre Routen auf den verschiedenen Ebenen festgelegt haben, klicken Sie einfach auf "Teilen". Wählen Sie die Freigabeebene aus und kopieren Sie die resultierende URL. Die erste Auswahloption, "Jeder, der diesen Link hat, kann die Karte ansehen", ist am unkompliziertesten.
Achten Sie jedoch darauf, keine sensiblen Informationen wie zum Beispiel Ihre Heimatadresse oder die Schule Ihrer Kinder preiszugeben!
Jetzt können Sie Ihre Karte jederzeit per E-Mail, WhatsApp, SMS usw. mit anderen teilen. So einfach kann es sein, gemeinsam neue Abenteuer zu planen und zu erleben.
8. Ihre Karte auf einen Blick – Und überall dabei!

Möchten Sie Ihre Karte auch unterwegs nutzen und praktisch immer direkt zur Verfügung haben? Kein Problem! Öffnen Sie dafür einfach die Google Maps App auf Ihrem Smartphone und tippen Sie in der unteren Zeile auf "Gemerkt". Von dort aus wählen Sie "Karten" und finden sofort die Karte(n), die Sie erstellt haben.
So können Sie alle Stopps, die Sie gesetzt haben, sowie die geplanten Routen, vollständig einsehen und haben Ihre Abenteuer immer griffbereit, egal wo Sie sich gerade befinden.
9. Klarer Kurs: Ihre Route beginnt!

Beim Start der Routenausführung kann es ein wenig knifflig werden, aber keine Sorge, wir haben einen Trick für Sie!
Da es bisher keine spezielle My Maps-App für Mobilgeräte gibt, können Sie Ihre erstellte Route nicht einfach wie bei Google Maps öffnen und sofort los navigieren.
Es gibt einen einfachen Workaround dafür. Sobald Sie Ihren Startpunkt Ihrer Route erreicht haben, öffnen Sie einfach Ihre Karte, tippen auf den nächsten Punkt/Zwischenstopp (in unserem Beispiel der Jenischpark in Hamburg ), den Sie anfahren möchten, und klicken dann auf "Route".
Voilà! Ihre Route wird mit allen gewohnten Google Maps-Funktionen für Sie dargestellt, und über “Vorschau” geht’s dann in die Liveaktualisierung der Route. Wiederholen Sie diesen Schritt einfach bei jedem Stopp, und schon sind Sie unterwegs zu Ihrem nächsten Abenteuer!
10. Genialer Tipp zum Schluss! Ihre Routen, Ihre Regeln: Anpassungen leicht gemacht!

Im obigen Beispiel haben wir ja bereits zwei Ebenen erstellt, eine für jeden verschiedenen Transportmodus. Aber wussten Sie, dass Sie darüber hinaus noch viel mehr mit den einzelnen Ebenen machen können?
So ermöglicht Ihnen My Maps, eine Ebene für Ihre Lieblingsorte zu erstellen, welche Sie regelmäßig besuchen, oder verschiedene Arten von Orten in Ebenen zu gruppieren. Die Möglichkeiten sind so vielseitig wie ein gutes Schweizer Taschenmesser!
Sie können die einzelnen Orte sogar problemlos zwischen bis zu 10 Ebenen hin und her verschieben, um Ihre Pläne organisiert und strukturiert zu halten. My Maps erlaubt Ihnen auch, Ihren Orten weitere Informationen hinzuzufügen, wie zum Beispiel Farbcodes und Notizen.
Klingt vielseitig, oder?
Wenn Sie zusätzliche Informationen zu einem Ort hinzufügen möchten, klicken Sie einfach auf den jeweiligen Ort in der Liste und dann auf eines der verfügbaren Symbole, welches für Sie am besten zu diesem Ort passt.
Schauen Sie, wie wir in unserem Beispiel hier einem Restaurant aus unserer Liste ein benutzerdefiniertes Symbol und eine spezifische Farbe gegeben haben, um es als leckeren Essensplatz für unseren Hamburg-Trip zu markieren. Dazu haben wir sogar eine weitere Ebene erstellt, die einige Hamburger Parks enthält, welche wir gerne für ein paar erholsame Naturmomente besuchen möchten.
Das Hinzufügen von persönlichen Details und das Entdecken neuer Orte macht das Planen nicht nur einfacher und effizienter, sondern auch bunter und aufregender! Da sind wir auf jeden Fall dabei!
Dieser Artikel hat Ihnen hoffentlich gezeigt, wie einfach es ist, Routen mit mehreren Stopps in Google Maps und Google My Maps zu planen. Mit diesen praktischen Tools können Sie Ihre Reisen besser organisieren und wertvolle Zeit sparen. Und das Beste ist, dass Sie dabei auch noch Spaß haben können!
Wenn Sie noch weitere Fragen haben oder Unterstützung benötigen, zögern Sie nicht, uns zu kontaktieren. Wir sind immer für Sie da und helfen Ihnen gerne weiter.
In Vorfreude auf viele spannende Routenabenteuer!
Frequently Asked Questions
Gibt es eine app zum erstellen einer route.
Mit Google Maps können Sie kostenlos Routen mit bis zu 10 Stopps planen. Wenn Sie jedoch eine längere Route oder spezifische Anforderungen haben - zum Beispiel, wenn Sie eine Wander-, Lauf- oder Radroute, eine Lieferstrecke oder eine Lkw-Route planen möchten, benötigen Sie möglicherweise eine spezialisierte App.
Kann ich in Google Maps eine Route mit unbegrenzten Stopps planen?
Related articles.
Liked this article? See below for more recommended reading!

7 Best Free Route Planners in 2024

Route Planners For All Purposes: Ultimate Guide

3 Ways To Plan A Delivery Route With Excel (With FREE Template)
- SUCHEN Über Uns Gemeinschaftsportal Zufällige Seite Kategorien
- Kategorien durchsuchen
- Über wikiHow
- Anmelden/ Registrieren
- Urlaub & Reisen
- Sonstiges zu Ferien Reisen Urlaub
Eine Reiseroute mit Google Maps erstellen
Dieser Artikel wurde unter Mitarbeit von Stan Kats erstellt. Stan Kats ist ein professioneller Technologe und der Geschäftsführer und Cheftechnologe von The STG IT Consulting Group in West Hollywood, Kalifornien. Stan bietet umfassende Technologielösungen für Unternehmen durch verwaltete IT-Dienste und für Privatpersonen durch sein Verbraucherservice-Unternehmen Stan's Tech Garage. Stan hat einen Bachelor in Internationalen Beziehungen von der University of Southern California. Er begann seine Karriere in der IT-Welt der Fortune 500. Stan gründete seine Unternehmen, um kleinen Unternehmen und Privatpersonen Fachwissen auf Unternehmensniveau zu bieten. In diesem Artikel werden 8 Referenzen angegeben, die am Ende des Artikels zu finden sind. Dieser Artikel wurde 12.055 Mal aufgerufen.
Wenn du einen Trip planst, dann fragst du dich bestimmt, welche Route du nehmen solltest, um am besten ans Ziel zu kommen. Zum Glück hat Google ein kostenloses Werkzeug, das dir beim Erstellen deines Reiseplans helfen kann. Wir erklären dir in unserem Artikel, wie du mit Google Maps eine Reiseroute durch die „My Maps“-Funktion erstellen kannst. Diese exzellente Google-Funktion wird dir helfen, die bestmögliche Strecke für deine Reise zu finden.
Vorgehensweise
Deine karte erstellen.

- Leider unterstützt Google seit Oktober 2021 nicht mehr die „My Maps“-App für das Handy. Wenn du also dein Smartphone nutzt, musst du den Browser des Telefons verwenden, um auf die Seite zugreifen zu können. [2] X Forschungsquelle
- Wenn du noch kein Google-Konto hast, dann kannst du dir schnell einen Account erstellen. Einen Google-Account bietet verschiedene Vorteile wie eine neue Gmail-Adresse. Klicke auf den folgenden Link, um ein Konto zu erstellen: https://accounts.google.com/signup/v2/webcreateaccount?flowName=GlifWebSignIn&flowEntry=SignUp

- Du kannst deine Karte zum Beispiel „Kalifornien Sommerurlaub 2022“ nennen und du kannst die folgende Beschreibung eingeben: „Sehenswürdigkeiten und Orte, an denen man Essen kann.“

- Wenn du zum Beispiel einen Roadtrip durch Kalifornien planst, wirst du wahrscheinlich „Golden Gate Bridge“ im Suchfeld eingeben. My Maps wird dir den Standort automatisch anzeigen.

- Wenn du zum Beispiel nach „Golden Gate Bridge“ gesucht hast, wirst du ein weißes Feld mit einigen Informationen zur Brücke angezeigt bekommen. Außerdem wirst du dort auch die Bewertungen anderer Google-Nutzer finden. Klicke auf die „Zur Karte hinzufügen“-Schaltfläche, um den Ort zu deinen gespeicherten Orten hinzuzufügen.

- Du kannst zum Beispiel im „Golden Gate Bridge“-Feld schreiben „Hier mindestens eine Stunde einplanen – Top-Sehenswürdigkeit.“

- Du kannst die Farben des Reißnagels so ändern, dass er die Bedeutung des einzelnen Ortes für deine Reise reflektiert. So können zum Beispiel Orte, die du unbedingt sehen möchtest, mit einer roten Reißzwecke versehen werden, während Übernachtungsmöglichkeit mit einem grünen Symbol markiert werden und optionale Besuchsziele können weiterhin mit einer blauen Stecknadel gekennzeichnet werden.
Routenplanung und Erstellen einer Reiseroute

- Du kannst zum Beispiel eine Ebene haben, die „Sehenswürdigkeiten“ heißt, die nächste heißt „Verpflegung“ und die dritte „Unterkünfte“. Du kannst dann alle Sehenswürdigkeiten, Restaurants und Hotels in die entsprechenden Ebenen verschieben.

- Du kannst mehr als nur einen Ort zu einer einzigen Reisestrecke hinzufügen. Wenn du zum Beispiel eine Strecke von Big Sur zur Golden Gate Bridge planst und dann nach Palo Alto möchtest, kannst du diese drei Orte zu deiner Ebene hinzufügen und eine Route mit mehreren Stopps erstellen. [11] X Forschungsquelle
- Indem du auf die drei Punkte klickst (neben der Ebene mit deiner Reisestrecke) und dann „Schrittweise Wegbeschreibung“ auswählst, wird dir My Maps eine Route erstellen. Praktisch!

- In dem du zum Beispiel My Maps verwendest, kann dir auffallen, dass die Besichtigung der Golden Gate Bridge, ein Bummel durch San Francisco und Abendessen in Berkeley durchaus an einem Tag machbar sind, während du für Big Sur besser einen ganzen Nachmittag einplanen solltest. My Maps kann dir helfen, die effizienteste Reiseroute zu planen, sodass du deinen Urlaub noch mehr genießen kannst.

- Wenn du deine Karte teilst, kannst du auch die Option auswählen, die anderen Leuten erlaubt, deine Strecke zu bearbeiten. Wenn du diese Option anklickst, können auch deine Freunde und Freundinnen interessante Orte auf der Karte markieren, sodass du alles auf einem Blick sehen kannst. [13] X Forschungsquelle

- Obwohl man My Maps offline nicht ansehen kann, kannst du eine Offline-Karte der Gebiete herunterladen, die dich interessieren. In der Google Maps App tippe den Ort in die Suchleiste, tippe auf den Namen des Ortes und gehe dann zur Option: „Offline-Karte hterunterladen“. [15] X Forschungsquelle
Verwandte wikiHows

- ↑ https://support.google.com/mymaps/answer/3024925?visit_id=637744367666134651-2428484219&p=lite_addplaces&rd=1
- ↑ https://9to5google.com/2021/07/20/google-my-maps-android-shutdown/
- ↑ https://support.google.com/mymaps/answer/3024454?hl=en&ref_topic=3024924
- ↑ https://support.google.com/mymaps/answer/3024925?visit_id=637744500327517491-717751493&p=lite_addplaces&rd=1
- ↑ https://support.google.com/mymaps/answer/3024925?hl=en&co=GENIE.Platform%3DDesktop
- ↑ https://support.google.com/mymaps/answer/3502610?hl=en&ref_topic=3024924
- ↑ https://support.google.com/mymaps/answer/3109452?hl=en
- ↑ https://support.google.com/maps/answer/6291838?hl=en&co=GENIE.Platform%3DiOS
Über dieses wikiHow

War dieser Artikel hilfreich?
Verwandte artikel.

Melde dich für den kostenlosen wikiHow Newsletter an!
Du erhältst hilfreiche Tipps und Anleitungen jede Woche direkt in deine Inbox.
- Nutzungsbedingungen (Englisch)
- Datenschutz Bestimmungen
- Do Not Sell or Share My Info
- Not Selling Info
Registriere dich für den wöchentlichen
wikiHow Newsletter.
- Help Center
- Google Maps
- Privacy Policy
- Terms of Service
- Submit feedback
Plan your commute or trip
Find ways to get to relevant places.
- On your computer, open Google Maps . Make sure you’re signed in.
- Get directions to relevant places : Click a place in the list. You’ll get places based on your Gmail, Calendar, and recent travel history.
- Get directions to saved places: If you saved your work or home address in your Google Account, click Home or Work . You can edit your home or work addresses in your Google Account. Learn how to set your work and home addresses .
Learn more about your surroundings
- Find places of interest: Click an option, such as Restaurants, Hotels, or More.
Was this helpful?
Need more help, try these next steps:.
- How to Use Points for Free Flights
- The Best Carry-On Luggage
- The Ultimate Guide to Traveling Like a Pro
- My Favorite Travel Credit Cards
- lake louise
- new orleans
- new york city
- palm springs
- packing lists
- product reviews
- How to Use Vitamin C Serum
- Easy Step-by-Step Skincare Routine
- Drunk Elephant: Best & Worst Products
- Fitness & Wellness
- How I Edit My Photos for Instagram
- Furniture My Interior Designer Loves
- Best Strapless Bras
- blogging & business
- Amazon Finds
- Hotel Lobby Candle
- Shop My Faves
- Promo Codes and Discounts
- Shop My Instagram
How To Use Google Maps Trip Planner

With so many different travel apps and websites available, it’s now easier than ever to keep yourself organized while planning a trip. One of my favorite tools to use, regardless of where I’m going, is Google Maps Trip Planner.
If you’re the type of person that gets easily overwhelmed when putting together an itinerary , you’ll want to follow this step-by-step guide which details exactly how I use it. Google Maps Trip Planner is not only a highly-visual way to get your bearings of an area, but it’s extremely useful for figuring out where you can realistically travel to during the duration of your trip.
It’s a fantastic way to use Google Maps for multiple stops in a single itinerary , and also comes in handy if you’ve received a TON of recommendations from friends, because you can add destination after destination, and then refer back to the map as you’re out and about exploring.
For example: if you’re visiting NYC and find yourself in Soho looking for a cute cocktail spot , rather than endlessly scrolling through Yelp or TripAdvisor, you’ll be able to pull out your trip planner to see if you’re near places that your friends have recommended! It’s also a particularly handy tool to use when creating a road trip itinerary.
Here’s the step-by-step outline that we’ll go over:
- Create a new Google map for your destination.
- Choose categories for your map.
- Start adding your locations and ideas.
- Customize and color-code your map.
- Decide which activities to group together.
- Plan your day-by-day itinerary.
- Download the Google Maps app on your phone.
- Share your map with friends.
This will all make more sense once I walk you through everything with screengrabs.
Whether you’re thinking about a girlfriends getaway or a honeymoon , Google Maps Trip Planner will be a game changer for you. Take my word for it! Here’s a step-by-step guide to using Google Maps to coordinate your next getaway — with a completely flawless travel plan.
How to Use Google Maps Trip Planner
1. make a new google map..
To get started, you’ll need to create a new Google Map by visiting this link .
It will take you to the main maps page, which you’ve likely seen before. (Make sure you’re logged into a Google account, and if you don’t already have one, you can sign up for free here .)
Once you’re signed in, simply click on the three bars icon in the top left corner and select “Your Places” from the menu.

Next, you’ll want to click on “Maps” in the far right corner of the menu.
You won’t see anything listed yet, unless you’ve created a map previously.
Click “Create Map” (which is at the bottom of the menu.)

After that, you’ll be directed to an untitled map that you’ll want to name and add a description to.
Do this by clicking on “Untitled Map” and a text box will appear and allow you to fill out this information. Remember to be as specific as possible so you stay organized throughout the entire planning process.

2. Categorize Your Map.
Create a list of all the things you want to spend your time doing on your trip. Here are the categories I typically use:
- Restaurants & Bars
- Cities & Towns (this is good if you’re road-tripping or visiting multiple destinations during a single trip)
- Hotels (I’d only use this category if you’re staying in more than one)
- Activities (beaches, hikes, Instagram spots, etc)
Now that you have your category ideas solidified, you’ll create a “layer” for each one by clicking on the “Add Layer” button on the left hand-side of your screen.
Be sure to name each individual layer by clicking on “Untitled Layer” text box, just like you did when you first named your map. I named my first layer “Hotels” as an example.

More: How I Use Points & Miles to Travel for Free
3. Add Your Ideas to the Google Map.
If you’re planning a trip to a destination you’ve been thinking about visiting for a while, it’s likely that you already have some things on your bucket list, whether it be from friends, bloggers, travel sites, or Instagram.
This is your chance to put those thoughts in one organized space and see which ones you’ll be able to make time for. (Shameless plug: I have guides for Tokyo , Maui , New York City , Thailand , Mykonos , Santorini , Positano , Miami , St Barths , and more. Feel free to use them for inspiration should you be heading to any of these locations!)
To add an idea you have for your trip, click on the layer (the category) that you want to add a location marker to.
For example, I added this hotel to my map by checking the box on my “Hotels” layer and then typing the hotel name into the search bar. When the place you’re searching for pops up on the menu, click “Add to Map” and you’ll see that a marker is placed on the map. You’ll also notice that the name of the location is added underneath the layer description on the left side of the screen.
- If you accidentally put a location into the wrong layer: not to worry. You can easily drag the location and drop it into the correct category.
- If the place you’re searching for doesn’t auto-populate: it’s probably because Google hasn’t made a location for it yet. But don’t fret! You can just as easily add that spot to your map by typing the address into the search bar and writing the location name manually.

Need some trip inspiration? Check out my travel guides, go-to airport looks, and carry-on essentials here.
4. Customize Your Map.
One of the best ways to keep things visually organized is by color-coding your markers by their category.
To do this, click on the paint bucket that’s located at the bottom of the location marker’s pop-up window.
You can also add additional notes about a location (i.e. “LindsaySilb’s favorite bar; order their signature Bloody Mary) or write down other ideas that you have for that place by clicking on the pencil icon directly next to the paint bucket.
To remove an idea from your trip, just click the trash can icon that’s on the same panel.

There are a number of ways to use color coding:
- For example, you could mark all the restaurants that were on your “Must Visit” list in red, the ones you’d like to go to in yellow, and the ones you would stop by if you have the time in green. This will help you make sure that you get everything checked off of your “must-see” and “must-do” list first.
- For example, pricier sit-down restaurants can be marked in blue, while casual “grab and go” places could be labeled in green.
- You might have just one layer named “Activities” but instead of color coding all those places green, for example, you could mark the museums in purple, mark parks in blue, and stores in gray.
Pro tip: Even if you don’t want to color code everything, I recommend changing the default color from blue to something brighter, like red or yellow. In my experience, the blue location markers can be a bit hard to find on the map.
When you’re done organizing your categories, hit the save button and you’ll notice that they all show up underneath their accompanying layer.
Each location should be saved along with its phone number, address, and website information. This is super helpful because if you decide you want to make a reservation at a restaurant or purchase tickets to a theater show, you have all the tools you need to get there in one space.
5. Decide Which Activities to Group Together.
At this stage, you’ll be able to see a zoomed-out version of the map, with all of your points of interest plotted.
This might help you make decisions about which neighborhood to stay in, which hotel to book (if you’ve been debating between a few), which restaurants you can walk to, or which activities should be grouped together.
It’s nice to see your entire itinerary on a map and use a process of elimination approach to determine which pitstops make the most sense on which days. Seeing things on a map also makes it easier to keep track of the amount of time you’ll need to dedicate to get from place to place.

6. Plan Your Day-by-Day Itinerary.
I like to create a Google Doc that has a little outline of each day of the trip. I also use the doc as the place to store hotel confirmation numbers, car rental info, and flight info.
If you’re planning on driving when you get to your destination, you can easily pull up directions to your first stop by clicking on the arrow icon on the bottom of the pop-up’s panel.
This will automatically create a new layer on the left side of your screen with the location’s name on it. You’ll need to type in your starting location, like the airport, in the text box above it that’s labeled “A” and then click on the icon with the three dots to get step-by-step driving directions.

7. Download Google Maps on Your Phone & Log In.
Finally, to make the map you created accessible on your phone while you’re traveling, you’ll need to have Google Maps downloaded if you don’t already.
Then, be sure to sign in with the same Google account that you used to first create the map. Once you’re signed in, go to “Your Places,” and scroll to the last tab on the right called “Maps.”
8. Share Your Map with Friends and Travel Buddies.
One of the best parts about using Google Maps Trip Planner is being able to share the map. If you’re traveling with a group, sharing the map ahead of time will ensure that everyone is on the same page about where things are located.
And better yet, after you’ve returned from your trip, you now have a full list of everything that you can share with friends who are headed to that location.
To share the map on desktop, simply open the map like you’ve done previously. You’ll notice the “share” button directly underneath the title of your map. Click it, and you’ll have the option to share via Twitter, Facebook, or email.
To share the map on mobile, open the Google Maps app, then click the three bars > your places > maps. Select your preferred map, then select “View Map Legend,” and finally click share. You’ll be able to share your map via text, airdrop, Facebook, Twitter, email etc.
If you’re feeling particularly generous, I recommend going back into the map and adding notes about places that you went, what to order there, places that were worth skipping, etc. Your friends will thank you for it!
The verdict? This tool is a travel game changer .
Rather than sifting through an endless number of routes on Google Maps each time you want to go somewhere, using this process will help you streamline all of your travels. You can put together so many trip itineraries by using Google Maps Trip Planner, and it honestly offers the perfect way to plan a road trip.
Are there other apps or hacks that you use to plan trips? I’d love to hear about them. Drop your suggestions in the comments below.
Pin this post for later:

You Also Might Like

Here’s Exactly How To Pack Jewelry For Travel

What to Wear in Hawaii

The Most Instagrammable Places in LA
10 comments.

I do that all the time Lindsay! Since 2009, believe it or not! I always add a google maps to my travel posts so that people can follow exactly what I did. It’s so helpful!

This is the best thing ever! I love Google maps for making places I want to go but they were always just on my”normal” map and it really bothered me that I couldn’t colour code. I won’t be doing any work today I’m the office, just rearranging my whole maps! Thank you for this amazing tip & detailed guide!

Lindsay Silberman
yay!! So happy you found it helpful!

I had no idea about this, wow!!!! Incredible. Thank you, Lindsay 🙂

I love this and the Visit a City app, which figures out the grouping for you!

This was a great write up explaining the how to… only thing missing is multiple people cannot edit the map.

Actually, multiple people can edit: Just share your map with editor rights

How can you share the map with editor rights? I’m trying to do this right now, and I can’t quite figure it out! Thank you!!

How do you view all maps at once ?

love this tutorial!! thank you
Leave a Reply Cancel Reply
Save my name, email, and website in this browser for the next time I comment.
How to Apply Fake Nails Like a Nail Artist (in 15 Minutes or Less)
Here's exactly how to pack jewelry for travel.
- Work With Me
- Barbados Vlogs
- Travel Guide
- Accommodation Guide
- Packing Guide
- Island Tour Guide
- Amazon Picks
- Gift Guides

Travel planning 101: Using Google Maps for Travel Planning
by Stace | Aug 10, 2018 | Travel Tips + Packing Lists
How to Plan Your Trip
Pick a destination & research flight prices, research visas.
I’m lucky to have a British passport but Jason still only has a Barbados passport which means we need to check and make sure if he needs Visas for travelling. Make sure you do this early so that you can get your passport sent off if you need to get your visa overseas.
Research Accommodation
You could have done a quick overview before booking your flights to make sure that average prices suit your budget. Or you could just book your flight and search for the most affordable accommodation you can find. Most places have hostels, and budget hotels so you can always find something suitable. For us, we also like to search campervan companies to see if we can find any good deals, we usually just start doing google searches and see what names come up regularly. Tip 1: Sign up for booking.com if you make five booking you receive a 10% genius discount.
Book flights and accommodation
When you finally find the cheap flight then go straight into google flights and book it. Usually google flights will give you the airline codes so you can go directly to the sites to book or you can click one of the book now options which will forward all the google flight information to the booking site. Booking.com is once again my favorite site to book accommodation with because a lot of hotels also offer free cancellation up until the week before you arrive. This means that if you find an awesome deal you can book it right away to keep that price but if you do find a nicer location closer to your travel dates, you can cancel and book the new place. Tip 1: Book your hotels after you’ve booked and confirmed your flights especially if they don’t offer free cancellation. But… if you do find something amazing offering free cancellation and you haven’t confirmed your flight yet, book it! If the flights don’t go down or you change your plans then you can always cancel it.
Compare and Save!
Download it now!
Google Maps for Travel Planning
This is where we use the power of google maps for travel planning. You will go to Google My Maps . This is where you can build your own maps. Now don’t freak out, we will go through this step by step.
1. Create Your Map
Press ‘Create New Map’. Name your map, and your first layer.

Click To Create A New Map

Rename Your Layers
2. Add A Location to Your Google Maps
In the search bar type in a place of interest that you would like to see. A little green marker should pop up showing you the location and the name should appear in the left sidebar. Click the ‘+’ which will add this location to the current layer. You can create many different layers for restaurants or places of interest or national parks, it’s up to you.

Add a Map Location
3. Create A Driving Route
Once you have dropped all the locations that interest you, you can start to map out a route. Under the search bar click ‘add directions’. This will bring up a new layer in the left sidebar. Click on ‘A’ and put your starting point, then click on ‘B’ and type in the first sight and then ‘add new destination’. You can add up to 10 locations in one directions layer, but you can add multiple directions layers. I like to breakdown the directions by days which keeps things even more organized.

Add Your Driving Route
4. Name Your Map
Name it and save it. Once you have done this, log onto your google maps. Click the menu and then ‘Your Places’ from there slide the bar at the top across and click on ‘maps’. This should show you all your maps that you created with all your layers. You can turn off any of the layers at any time. Your route is also already planned out so all you need to do is zoom in and follow the roads!

Finding your map in Google Maps

Select Your Map
Pack and Prepare
Buy any travel necessities.
We bought ourselves some nice cozy winter jackets for our trip so that we are prepared. Make sure you have everything you need! What I like to do is write up a super basic packing list stating how many shirts we need, pants, socks, underwear. Of course I add in our toiletries and everything else so we get an idea for things that are necessities. If anything comes to mind closer to the time I will add it to the list.
We tend to pack a week in advance. Why? Well when you are travelling carry on only you want to make sure that your bag isn’t exploding full when you leave, it means you probably have too much stuff that is unnecessary. We pack early so that we can see if we have too much stuff and adjust to suit by taking out certain luxury items or adding in that extra pair of pants.
Compile all Travel Documents and details
I know that you can get everything online now but what happens if you cannot connect to the internet and your booking information wont load? I normally take screenshots of my boarding passes before I leave home or I go old school and print them out. On your phone’s notepad you can also write all your flight details, times, hotel bookings, hotel address and phone number. Make sure that everything is easily accessible, you don’t want to walk out of the airport and get in a taxi with no idea where you are going. IF you are on of those people who likes to live on the edge with a phone battery at 10% all the time, write out these details on a piece of paper.
Keep all your travel documents safe
Make sure you store these documents somewhere that is easily accessible but hidden away. Make sure you have a pen as well!
Enjoy your trip!
Don’t forget to pin this for later.

Very nice tips! Thanks for sharing your knowledge!
Submit a Comment Cancel reply
Your email address will not be published. Required fields are marked *
Watch our latest video!
It’s stacey.

Stacey is a personal trainer and Social Media Manager. She loves travel and sharing her adventures with you!
Next Trip: ???
Follow along on Instagram!

Let’s Get Social
- Buy Me A Beer!
Search the Site
- Budget Travel
- Bucketlist Experiences
- Hiking + Camping
- Travel Tips + Packing Lists
Destinations
- New Zealand
- South Africa
Travel Essentials
Nikon d7500.

Osprey Sirrus 36L
Awesome Backpack
Eagle Creek Packing Cubes
Packing Cubes
Heavy Duty Tripod
Rain Jackets

Rain Jacket
Grab Our Dream Trip Saver Spreadsheet!
Track your monthly income and expenses, estimate your travel expenses and see how long you need to save up for that dream trip!
Get it now!
Privacy Overview
Pin it on pinterest.
Share this post with your friends!
- StumbleUpon
- Anleitungen
Google Maps: So plant ihr Routen mit mehr als 10 Etappen
Mit einem Trick könnt ihr bei Google Maps auch Routen mit mehr als 10 Orten planen. Wir zeigen, wie ihr beliebig viele Zwischenstopps festlegen könnt.

Google Maps ist für viele die Standard-App für Online-Karten und Navigation. Für besonders komplexe Routen mit mehr als zehn Orten ist der Dienst nur scheinbar nicht geeignet.
Mit einem simplen Trick könnt ihr aber über die Web-App beliebig viele Etappenziele festlegen und die Route auch auf eurem Smartphone zur Navigation nutzen.
Die Oberfläche von Google verweigert nach zehn Orten auf der Karte lediglich das Hinzufügen weiterer Punkte. Über die URL können diese aber problemlos ergänzt werden. Das Erstellen von Routen mit 20 Zwischenstopps und mehr ist auf diesem Weg deshalb kein Problem.
Hier zeigen wir euch, wie ihr diesen "Workaround" einfach nutzen könnt, um zusätzliche Etappen für die Navigation hinzuzufügen und die Route auch auf eurem Smartphone aufruft.
Google Maps-Navigation mit mehr als 10 Zielen nutzen
Startet in Google Maps die Navigation und erstellt eure Route mit den ersten 10 Orten. Damit Google Maps für die URL keine Ortsnamen, sondern Koordinaten benutzt, solltet ihr die Reiseziele per Rechtsklick auf der Karte hinzuzufügen.
Anschließend kopiert ihr die Adresse der Route in die Zwischenablage.
Danach öffnet ihr den Editor, um die kopierte URL bearbeiten zu können.
Dort fügt ihr die Google Maps-URL ein und entfernt danach am Ende das "@"-Symbol und alle folgenden Zeichen.
Jetzt wechselt ihr wieder zur Web-App von Google Maps und wählt auf der Karte die nächsten Etappenziele für die Navigation aus. Für den direkt nächsten Zwischenstopp nach der zuvor gespeicherten Route könnt ihr auf der Karte "Route von hier" klicken und danach alle weiteren Orte wie zuvor hinzufügen.
Die URL der fertigen zweiten Route kopiert ihr wieder in die Zwischenablage und wechselt danach wieder zum Editor.
Dort fügt ihr die Adresse der zweiten Route mit etwas Abstand unter der bereits bestehenden URL als neuen Block ein und kopiert daraus alle Zeichen zwischen "/dir/" und "@" in die Zwischenablage.
Am Ende des ersten URL-Blocks fügt ihr die Zeichenkette aus der Zwischenablage ein und kopiert anschließend den kompletten ersten Block mit der URL in die Zwischenablage. Über diese Adresse könnt ihr die manuell erzeugte Route mit mehr als 10 Etappen dann aufrufen.
Dazu fügt ihr diese in die Adresszeile des Web-Browsers und bestätigt mit der Enter-Taste. Eure extra-lange Route mit mehr als 10 Etappen wird dann von Google Maps geladen.
Um die lange Route auch auf dem Smartphone zu nutzen könnt ihr diese über den Knopf in der Seitenleiste an euer Endgerät schicken.
Welche Orte ihr besonders häufig besucht, könnt ihr euch übrigens dank des Standortverlaufs von Google Maps auch als Heatmap anzeigen lassen .
- » Tipp: Die besten VPN-Anbieter für mehr Sicherheit und Datenschutz
- » Balkonkraftwerk kaufen: Vergleich der besten Solaranlagen
Nichts verpassen mit dem NETZWELT- Newsletter
Jeden Freitag: Die informativste und kurzweiligste Zusammenfassung aus der Welt der Technik!
- Bei Facebook teilen
- Bei Twitter teilen
- Bei GetPocket speichern
- Apps & Downloads
- Apps auf GIGA
- Google Maps: Route erstellen & speichern – so geht's
Google Maps: Route erstellen & speichern – so geht's
Mit „ Google Maps “ Routen speichern, ist nicht so einfach, wie es klingt. Google hat die Funktion sehr gut versteckt – wir zeigen, wie es geht. Gespeicherte Routen ruft ihr entweder vom Android-Smartphone, iPhone, Tablet oder dem PC ab.
- 1. Google Maps: Route über Teilen-Button speichern
- 2. Google-Maps-Route speichern für Android und iOS
- 3. Gespeicherte Google-Maps-Route mit Android-Smartphones oder -Tablets öffnen
- 4. Google-Maps-Route wieder schließen
- 5. Gespeicherte Google-Maps-Route am PC oder Mac öffnen
Google Maps: Route über Teilen-Button speichern
Am einfachsten und schnellsten speichert ihr Routen mit dem Teilen-Button. Über den so generierten Link könnt ihr jedes Mal wieder eure Route öffnen – egal auf welchem Endgerät.
1. Schritt:

Erstellt in „Google Maps“ eine Route, indem ihr Startpunkt, Ziel und gegebenenfalls auch Zwischenziele hinzufügt. Stellt dabei gleich das richtige Verkehrsmittel ein. Drückt nun auf „ Details “, um die gesamte Route mit allen Stopps anzuzeigen.
2. Schritt:

Klickt oben links auf den Teilen-Button und dann neben dem angezeigten Link auf „ LINK KOPIEREN “. Der Link ist nun in eurer Zwischenablage gespeichert. Drückt am PC die Tastenkombination [ Strg ] + [ V ], um den Link an anderer Stelle einzufügen – beispielsweise in einem Textdokument. Auch könnt ihr den Link bei Bedarf mit euren Kontakten teilen.
Alternativ könnt ihr den Link selbst aufrufen und im Browser als Lesezeichen speichern. So könnt ihr genau diese Router auch immer wieder schnell anzeigen lassen. In den meisten Browsern speichert ihr die aktuelle URL als Lesezeichen mit der Tastenkombination [ Strg ] + [ D ]. Um die Lesezeichen-Verwaltung zu öffnen, funktioniert oft [ Strg ] + [ Umschalt ] + [ O ]. Die letzte Taste ist der Buchstabe „O“ – nicht die Null.
Google-Maps-Route speichern für Android und iOS
Unsere Bilderstrecke zeigt, wie ihr bestimmte Routen aus „Google Maps“ für eure Android-Smartphones oder iPhones jederzeit abrufbar speichert:

- Öffnet die Webseite „ Google My Maps “, meldet euch gegebenenfalls mit dem Google-Konto an.
- Klickt bei der Willkommens-Begrüßung auf „ + Neue Karte erstellen “.
- Oben findet ihr das Routen-Icon mit den Pfeilen , klickt darauf.
- Links hat sich eine neue Unbenannte Ebene geöffnet mit A und B als Routenpunkte.
- Gebt dort Abfahrts- und Zielort ein.
- Oben Links in der Navigation benennt ihr eure Route, sonst heißt sie „ Unbenannte Karte “.
Die Route wird automatisch in eurem „Google Drive“ gespeichert.

Mehr Tipps für Google Maps haben wir im Video für euch zusammengefasst:
Gespeicherte Google-Maps-Route mit Android-Smartphones oder -Tablets öffnen
Mit den beiden folgenden Punkten ruft ihr eure gespeicherte Route entweder per Android-Smartphone- und Tablet oder auch am PC ab. Für iOS und macOS sollte der Vorgang ähnlich sein:
- Öffnet die Google-Maps-App eures Smartphones beziehungsweise Tablets.
- Öffnet die Sidebar der App, indem ihr oben links auf das Einstellungssymbol mit den drei waagerechten Streifen tippt (≡).
- Wählt „ Meine Orte “ aus.
- Tippt auf den Reiter „ Karten “.
- Wenn ihr keinen Namen vergeben habt, heißt sie „ Unbenannte Karte “, wählt sie aus. In unserem Beispiel war es die Route Berlin-München.

Google-Maps-Route wieder schließen
Auch wenn ihr „Google Maps“ schließt, wird die gespeicherte Route in der Sidebar und am unteren Rand der Routen-Suche weiterhin angezeigt. Um die gespeicherte Route auszublenden, müsst ihr sie schließen:
- Klickt dazu auf die Einblendung der Route am unteren Rand von „Google Maps“, gegebenenfalls steht dort auch noch „ KARTENLEGENDE ANZEIGEN “.
- Wählt nun „ SCHLIESSEN “ aus.
Tipp: „Google Maps“ offline nutzen .
Gespeicherte Google-Maps-Route am PC oder Mac öffnen
- Öffnet die Webseite „ Google Maps “.
- Tippt oben links auf das Symbol mit den drei waagerechten Strichen ( ≡ ).
- Wählt „ Meine Orte “ aus und klickt auf „ Karten “.
- „Google Maps“ zeigt nun eure gespeicherten Routen an.
- Klickt sie an, um die Route zu öffnen.
- Android-Betriebssystem: Tipps & News
- Entsperrmuster und PIN vergessen: So entsperrt man das Smartphone
- WhatsApp-Kontakte löschen & Teilnehmer entfernen
- Kein Netz im Ausland – was tun bei Android & iPhone?
- Black Friday 2024: Wann ist er, Insider-Tipps & die besten Deals
Hat dir der Beitrag gefallen? Folge uns auf WhatsApp und Google News und verpasse keine Neuigkeit rund um Technik, Games und Entertainment.
- Grab These Gaming Controllers
- Hot Deal: AirTags on Sale RN!
The 5 Best Ways to Use Google Maps Trip Planner
Simplify your vacation whether you're walking, checking traffic and more
:max_bytes(150000):strip_icc():format(webp)/RyanDube-214359-8f50cb3133cd47c7ae1f3d4f09349f4e.JPG "google maps tour planen")
- University of Maine
- Using Google Maps Trip Planner
Use the Distance Tool to Plan City Walks
Use markers to highlight locations.
- Send Your Realtime Location
Embed Maps Into Blog or Social Posts
Check traffic before heading out.
- Other Things You Can Do
If you've never used Google Maps Trip Planner before, you're going to be amazed at just how much it helps you organize and streamline your next trip. With the Google Maps Trip Planner, plot out walking tours, put place markers to highlight areas you want to visit, and even use real-time location tracking to make sure you always know where your family members are.
So if you're ready to plan your next trip, log into your Google account, and log into Google Maps Trip Planner to follow along.
Using the Google Maps Trip Planner
When you first log into the Google Maps Trip Planner page, you'll see a map and seemingly nothing else. That's because the main page is the display map for your planned trips.
This display map can contain many layers (individual maps) on top of one another. But before you can add layers, you need to create your trip maps first. To do this, click on the square View larger map icon at the upper right corner of the window.
Next, click on the menu icon in the upper left corner of the window. In the menu, select Create new map .
Now you're ready to start planning your first trip!
Imagine you're planning a trip to New York City. You've made reservations to stay at the Roosevelt Hotel near Park Avenue.
You want to take a walking tour of the city, but you're unsure how far popular attractions are from the hotel.
Google Trip Planner has a useful distance measurement tool you can use to measure how far roads or trails may be when you're actually in a location.
Here's how to use the measurement tool.
On your untitled map editing screen, click the Measure distances and areas tool (the ruler icon).
The mouse icon will change to a crosshair. Use this crosshair to chart your planned walking route along the city streets and to your planned hot spots.
Each time you click the mouse, it'll add a new segment to your route. Clicking at each intersection is a good way to measure a city walk.
Set the name of this map to NYC Walking Tour .
In this example, when walking just under two miles, you can visit The PlayStation Theater, Radio City Music Hall, The Museum of Modern Art, Rockefeller Center, and of course, a whole lot of shopping along the way. That's an amazing walk around the block.
Now that you know all of the locations you want to visit, you can create a set of markers on this map so you'll remember later.
To set a new marker on the map, click on the Add marker tool (the thumbtack icon).
The mouse icon will change to crosshairs. Click the crosshair on the map at the locations you are planning to visit. When the marker is placed, you'll see a pop-up window where you can fill in the name of the location, along with any notes.
The notes area is a great place to add any reservations or itinerary plans for that location.
Click Save to add that marker to your new map.
An alternative method to add markers is to search for the location using the search field. A marker of that spot will show up on the map. Click Add to map in the informational pop-up to add that marker to your map.
Send Your Realtime Location to Your Family
In a city like New York, it would be very easy for any of your family members to get lost. However, in an age where every mobile phone has built-in GPS tracking , there's really no reason for this.
Gone are the days of parents carrying around walkie-talkies to stay in touch with their kids while traveling. Now you can monitor your family's location during vacations by looking for their little blue dot on a map.
To enable GPS tracking in Google Maps, install the Google Maps app for Android or iOS . When you and your family are splitting up during vacation, have everyone launch the Google Maps app . To launch real-time location sharing:
Tap the menu icon at the upper left corner of the screen.
Tap Location sharing from the menu.
Tap the Get Started button.
Choose Until you turn this off , and select all the family members to share your location with.
Tap the Share button to start sharing your location.
Now you can view the location of your family members as blue dots on a map of the area, right from your phone.
View your saved Trip Planner maps in Google Maps by clicking the menu icon, tapping on Your places , and tapping MAPS from the menu.
If your vacation is a little more off the beaten path, such as a hiking trip up into the mountains, it's always a good idea to let people know where you're headed.
Embedding your Google Maps trip planner is easy.
In Google Maps Trip Planner, on the map you've created, click the Share link under your trip name.
Click Embed on my site .
Change the privacy setting to Public for embedding into a blog post, or to individual family members for a social post.
Click the Done button.
Click the three dots to the right of the trip name.
Copy the embed code displayed inside the code window.
If you're embedding the map to your blog, make sure to switch the post-edit mode to Code View, and paste the iframe embed code that you copied from Google Maps Trip Planner.
Save and publish the post, and everyone will be able to see your trip plans.
If you want to share your Trip Planner map with friends and family on Facebook or X (formerly Twitter), click the Share link on your map and copy the link in the Link to share field.
When you paste this link in a Facebook or X post, it will embed an image of the map into the post. It's a perfect way to let people know where you're headed and how long you plan to be there.
Sharing that you won't be home for an extended period with the public can be dangerous, since thieves often scour the internet for opportunities to break into homes. It's best to keep your map shares limited to friends and family, unless you're a public figure and want your travels to be published to a wide audience.
If you want to have a day out during vacation and visit places that are within driving distance of the hotel, it can be difficult when you don't know the traffic patterns of a new area.
The perfect solution for this is Google Map's built-in traffic map. However, before you can use it, you need to open your Trip Planner map inside of Google Maps.
Log into Google Maps using the same account you used to log into Google Maps Trip Planner.
Click on the Menu icon, and then click on Your places .
Click Maps , and choose your saved vacation map from the list.
Click X to close the Layers menu.
Click on the Menu icon again, and click on Traffic.
You'll see your saved vacation map with current traffic conditions overlayed on top. Now you can use this map to plan out your route to your first tourist destination and avoid the traffic.
Other Things You Can Do With Google Maps Trip Planner
The features above are just a few of the best features you'll find in the Google Map Trip Planner. There are a few more you may find useful when planning, or during, your next trip.
- Layers : Layer one map on top of another, adding or removing layers as you wish. This lets you create a map view that contains only the locations you want on a single map.
- Share links : Directly share your maps to Facebook, X, or Gmail.
- Draw a line : This tool lets you draw routes onto your map. It'll snap to known roads or trails on the map.
- Add directions : Use this tool to insert step-by-step directions one location at a time. You can add driving, biking, or walking directions.
- Export to KML/KMZ : This feature lets you export your maps in a format you can import into other mapping programs like Google Earth or ESRI ArcGIS. ( Learn more about KML files .)
Google Maps Trip Planner looks like a simple mapping tool on the surface. But all of the features and functions you'll discover while using it will make it an invaluable tool for your next family vacation.
Get the Latest Tech News Delivered Every Day
- Our 7 Favorite Google Maps Alternatives in 2024
- How to Drop Multiple Pins on Google Maps
- How to Use Google Maps Cycling Directions
- How to Avoid Highways on Google Maps
- How to Drop a Pin on Google Maps
- How to Avoid Tolls on Google Maps
- Use Google My Maps to Send a Custom Route to Your Phone
- How to Create a Custom Route on Google Maps
- How to Calibrate Google Maps for Better Directions
- How to Save a Location on Google Maps
- How to Plan an Alternate Route With Google Maps
- How to Get Street View on Google Maps
- How to Find Elevation on Google Maps
- Best Free GPS Turn-By-Turn Navigation Apps
- How to Fix It When Google Maps Is Not Showing Alternate Routes
- How to Use Google Maps With Voice Guidance
Google Maps Route planen: So erstellen Sie Ihre Reise

Google Maps eignet sich gut zum Planen einer Route. Doch außer Ihnen den direkten Weg anzuzeigen, kann der Kartendienst auch beispielsweise Zwischenziele mit einbeziehen.
Unabhängig und kostenlos dank Ihres Klicks
Die mit einem Symbol gekennzeichneten Links sind Affiliate-Links . Erfolgt darüber ein Einkauf, erhalten wir eine Provision ohne Mehrkosten für Sie. Die redaktionelle Auswahl und Bewertung der Produkte bleibt davon unbeeinflusst. Ihr Klick hilft bei der Finanzierung unseres kostenfreien Angebots.
Route planen bei Google Maps am PC
Das Planen der Route im Voraus am PC ist praktisch und einfach. Durch Google Maps wird Ihnen nicht nur die gewünschte Route geboten, sondern auch die Möglichkeit mehrere Zwischenziele einzufügen. Dadurch wird Ihre Fahrt möglichst effizient gestaltet.
- Um eine Route zu planen, müssen Sie zunächst das Ziel der Fahrt in die Suchleiste bei Google Maps eingeben. Damit Ihnen Ihre gesuchte Route angezeigt werden kann, klicken Sie anschließend auf "Routenplaner".
- Von dort aus können Sie entweder den Start der Reise manuell eintippen oder Ihren aktuellen Standort auswählen.
- Über "Reiseziel hinzufügen" unter Ihren Eingaben ergänzen Sie einen Zwischenstopp zu Ihrer Route.
- Halten Sie die Punkte neben den Eingaben gedrückt und verschieben Sie sie, können Sie außerdem die Reihenfolge Ihrer Ziele noch einmal ändern.

Routenplanung bei Google Maps auf dem Smartphone
Auf Ihrem Smartphone können Sie auf ähnliche Weise eine Route über Google Maps planen. Hier gibt es auch die Möglichkeit der Offline Nutzung.
- In der "Google Maps"-App geben Sie zunächst ebenfalls Ihr Ziel in die Suchleiste ein und klicken auf "Route".
- Um nun die gewünschte Route angezeigt zu bekommen, geben Sie im nächsten Schritt einen Startort ein oder belassen es bei "Mein Standort".
- Wollen Sie auf Ihrer Route einen Zwischenstopp einplanen, drücken Sie auf die drei Punkte neben Ihrem Startort und dann auf "Stopp einfügen".
- Wenn Sie dann in die neue Leiste einen Ort eingegeben haben, können Sie auch die Reihenfolge der Ziele verändern. Halten und schieben Sie dafür die drei Striche in den entsprechenden Leisten.
- Um Ihre Routen in einem bestimmten Gebiet offline nutzen zu können, müssen Sie Bereiche der Karte vorab herunterladen. Drücken Sie oben rechts auf Ihr Profil und dann auf "Offlinekarten". Unter "Eigene Karte auswählen" können Sie einen Bereich festlegen, der anschließend offline verfügbar ist. Er sollte Ihre Route einschließen.
Außerdem interessant:
- Google Maps: Routen speichern - geht das?
- Google Maps: Route aufs Smartphone übertragen – geht das?
- Google Maps als Routenplaner - die besten Tipps
Aktuell viel gesucht
Pokémon Infinity: Alles über den ROM-Hack

- Amazon Hotline: So erreichen Sie den Kundenservice

- Payback-Punkte auf Konto überweisen lassen - so einfach geht's

Payback-Punkte auf Konto überweisen lassen - so einfach geht's
- Arcor: Posteingangsserver und Postausgangsserver einrichten

Handynummer suchen und Besitzer herausfinden - so geht's

Handynummer suchen und Besitzer herausfinden - so geht's
Arcor-Mail auf dem iPhone einrichten - so geht's

Arcor-Mail auf dem iPhone einrichten - so geht's
YouTube Musik runterladen - so klappt der Download

Windows 10: Screenshot erstellen - so klappt's

Windows 10: Screenshot erstellen - so klappt's
Arcor: Login geht nicht - daran kann's liegen

Arcor: Login geht nicht - daran kann's liegen
Anruf von 02283822567: Wem gehört die Telefonnummer?

Word: Seitenzahl ab Seite 3 - Nummerierung von 1 beginnend

Audiodeskription ausschalten: So deaktivieren Sie den Blindenton am TV

Beliebteste Internet-Tipps
- Kostenlos E-Mail-Adresse erstellen: 5 Anbieter im Vergleich
- DHL Kundenservice: So erreichen Sie die DHL-Hotline
- WLAN verbunden aber kein Internet: Daran kann's liegen
Neueste Internet-Tipps
- GMX Pop Server: Wo finde ich die Einstellungen?
- Kostenlose Online-Fotoalben: Ein Vergleich
- Samsung AllShare: Eine Kurz-Anleitung
- Wie lange dauert eine Zahlung über Paypal?
- Excel: Einzelne Zellen schützen
- Fragebogen erstellen: Welches Tool ist geeignet?
Die besten Shopping-Gutscheine
- Gutscheine von OTTO
- Deinhandy.de-Gutscheine
- Rabatte bei Saturn
IMAGES
VIDEO
COMMENTS
Create a new map through the home screen. At the top left of the "My Maps" home screen, you'll see a red box with the text "+Create a New Map.". Click on it to be redirected to a map screen. [3] 3. Give your map a descriptive name. To keep yourself organized, give your map a name to remind you what it contains.
Find local businesses, view maps and get driving directions in Google Maps.
Go to Google My Maps from your desktop browser. Check the Google icon in the top right corner to make sure you're using the Google account you want to. Click "Create A New Map" and a window will open with a blank map. To give your map a name and description, click the map name ("Untitled Map").
Here is how to use Google Maps trip planner: 1. Create a Map. To create a map on Google, you do need a Google account. Once signed up/logged in, go to this page. Click on " Saved" >> "My Maps ", which will take you to your maps. If you have created any maps in the past, you will also find them here.
Thomas Trutschel/Photothek via Getty Images. To create a route in Google Maps, open "Your places" and then choose "Create Map" in the "Maps" tab. To draw a route, click "Add directions," choose ...
Post summary: A comprehensive guide on how to use Google Maps to plan a road trip itinerary and why Google Maps is the best tool/app for planning a trip.Includes a road trip planning tutorial! Author's Note: This post was originally published in 2020 and was updated in April 2023 for accuracy and comprehensiveness.
Google Maps can be useful to navigate through a new location or place. You can also use it to find the best route or route alternatives, and plan your trip accordingly. You can get turn-by-turn directions, and different routes depending on your method of transportation. You will also be able to tell how long it will take you to get to your ...
1. Start by creating a custom map. Open Google Maps and navigate to Your Places > Maps > Create Map. Enter the desired name for your map and a description. Use a naming convention in line with your tour to make it obvious to travellers what the map is about and what it is documenting. READ: How To Optimize Your Listing On Google Places.
1. Open Google Maps and click, tap, or search for the location that you want to save. 2. Find the Save icon, which has the icon of a bookmark. You'll find it right under the location's name, but ...
Accessing Google Maps travel plan offline. Download Google Earth App on your mobile phone. Go to your google maps travel plan on desktop and click on the 3 dots next to the title. In the pop up box click export to KML/KMZ. In the next pop up leave the boxes unchecked and click download.
Öffne die Google Maps App und Rufe dir den gewünschten Ort in Google Maps auf, klicke dann auf den roten Pin. Wähle den gewünschten Kartenausschnitt aus, tippe auf Herunterladen. Vom Rechner aus schickst du über „An mein Smartphone senden" die Karte an dein Handy. Die Karte kannst du 30 Tage nutzen. Es ist auch möglich, eine Karte vom ...
Step 1: Create a New Google Map. You will need to sign in to your Google Account or create a new account to create your own Google My Map. Once you're logged into Google, follow this link to bring you to Google Maps. Click on the hamburger ( 𝄘 ) in the top left-hand corner of Google Maps. Click on "Your Places".
Step 1 to Plan a Trip with Google Maps: Create A Custom Map. Step 2 to Plan a Trip with Google Maps: Add Your Major Stops. Step 3 to Plan a Trip with Google Maps: Add Destination Info. Step 4 to Plan a Trip with Google Maps: Outline Your Itinerary. Conclusion. Your Turn.
First, open up your browser and head on over to Google Maps. Click the "Directions" button to the right of the search bar. By default, Maps will use your device's location for the starting point. If you want this to be a different location, enter it now. Next, enter the location of your first destination into the field provided, and then hit Enter.
Es ermöglicht Ihnen spielend leicht, Routen mit mehreren Zieladressen zu planen! In diesem Tutorial zeigen wir Ihnen Schritt für Schritt, wie das genau funktioniert. Und keine Angst, es ist wirklich einfacher, als es klingt: 1. Teil: Wir führen Sie durch die Planung einer Route mit bis zu 10 Stopps in Google Maps. 2.
2. Plane deine Reiseroute, indem du Google Maps verwendest. Mit der „My Maps"-Funktion kannst du leicht die Entfernung zwischen zwei Orten bestimmten. Wähle aus der weißen Box am linken Bildschirmrand einen Ort aus und klicke dann auf das Pfeilsymbol, das dir angezeigt wird.
On your computer, open Google Maps. Make sure you're signed in. On the left, choose an option: Get directions to relevant places: Click a place in the list. You'll get places based on your Gmail, Calendar, and recent travel history. Get directions to saved places: If you saved your work or home address in your Google Account, click Home or ...
Next, you'll want to click on "Maps" in the far right corner of the menu. You won't see anything listed yet, unless you've created a map previously. Click "Create Map" (which is at the bottom of the menu.) After that, you'll be directed to an untitled map that you'll want to name and add a description to.
This is where we use the power of google maps for travel planning. You will go to Google My Maps. This is where you can build your own maps. Now don't freak out, we will go through this step by step. 1. Create Your Map. Press 'Create New Map'. Name your map, and your first layer. 2.
Mit einem Trick könnt ihr bei Google Maps auch Routen mit mehr als 10 Orten planen. Wir zeigen, wie ihr beliebig viele Zwischenstopps festlegen könnt.
Öffnet die Webseite „ Google Maps ". Tippt oben links auf das Symbol mit den drei waagerechten Strichen (≡). Wählt „ Meine Orte " aus und klickt auf „ Karten ". „Google Maps ...
Layers: Layer one map on top of another, adding or removing layers as you wish. This lets you create a map view that contains only the locations you want on a single map. Share links: Directly share your maps to Facebook, X, or Gmail. Draw a line: This tool lets you draw routes onto your map.
Dadurch wird Ihre Fahrt möglichst effizient gestaltet. Um eine Route zu planen, müssen Sie zunächst das Ziel der Fahrt in die Suchleiste bei Google Maps eingeben. Damit Ihnen Ihre gesuchte Route angezeigt werden kann, klicken Sie anschließend auf "Routenplaner". Von dort aus können Sie entweder den Start der Reise manuell eintippen oder ...