🔥 Get official iPhone 16 wallpapers now!

How to use QuickTime Player on Mac ( macOS Ventura )
Updated on:

QuickTime Player is a multimedia player introduced back in 1991. Since then, it has been holding up as the go-to media player for many Mac users. Every new macOS update adds new features to the application, which is consistent with macOS Ventura.
Unfortunately, many still don’t know the things they can do with this application. In this article, I’ll take you through everything you need to know about QuickTime Player and how you can use it on your Mac in your everyday life.
How to open and play a file in QuickTime Player on Mac
How to use quicktime to record screen on mac, how to edit a video in quicktime player on mac, how to delete video or audio from a movie in quicktime player on mac, clear quicktime viewing history on mac.
Since QuickTime is a media player, let’s start by looking at how. Here, we will look at how to open and play a file or multiple files in Quick Time player.
Open a file
There are three main ways to open a file in QuickTime Player.
1st method:
- Visit the location where the file is stored.
- Double-click on the file.
2nd method:
- Visit the location of the file.

3rd method:
- Launch QuickTime Player .
- Select the file from the Finder .

Play and control the playback of a file
- Open a file in QuickTime Player on your Mac.
- To open the playback controls, move the pointer anywhere. For audio files, the playback will already be visible .
- You can use the playback controls to control the playback.
Also, you can adjust the playback speed using the forward and backward buttons. Playback speeds range between 2x, 5x, 10x, 30x and 60x. Hold the option key and select the playback speed icon to control the playback speed in increments.
Navigate a video using timecode
Other than navigation using the playback control, you can also navigate using the timecode of a video. Here’s how:
- After opening QuickTime Player, select View from the menu bar.
- Select Time Display .
- Choose Go To Timecode .
- Now, enter the timecode you want.
This feature will be mainly available for lengthy videos.
Play a video with picture-in-picture
- Open a file in QuickTime Player .
- Move the cursor to open playback controls .

That’s it! From here, you can drag the picture-in-picture window to the place of your choice. To close the window, click the x icon.
Change screen size in QuickTime Player
You can adjust how the video appears in QuickTime Player. There are many options to play around with the dimensions.
- Open a video or audio file in QuickTime Player.
- Enter Full Screen : The movie will be displayed on full screen and hide the menu bars. To exit, press Esc or click the green button in the window’s top-left corner. You can also use the green button to view it on full screen.
- Actual Size: The movie will be displayed at its original size.

- Natural size : Fills the entire screen with the current playback screen.
- Fit to screen : The movie is scaled to fit your screen.
- Fill screen : The movie will be scaled and cropped to fill your screen, eliminating black areas on the top or side, but it may hide or distort the content.
- Panoramic : After entering full-screen mode, selecting this option will stretch the playback to crop out the black borders from the sides.

Other than playing the content, you can also use QuickTime Player to make content. You can screen record in QuickTime Player on Mac .
Record audio in QuickTime Player on Mac
Besides recording the screen with audio, you can also use QuickTime Player to only record audio.
- Open QuickTime Player .

- Click the grey square to stop recording.

The best part about audio recording using QuickTime player is that you can hear the live recording if a headphone is connected to your Mac . Other than that, there is an option to customize. You can choose from which mic you want to hear and what quality the audio recording should be.
Create a movie with image sequence in QuickTime Player on Mac
Besides recording your screen, you can also use QuickTime player to create a movie (video/slideshow) with images. Here’s how:
- Click File → Open Image Sequence .
- Select the images and click Choose media .
- Select Resolution, Frame rate, Encode for, and click Open .
- You can save it from File → Save .
By now, you already know that QuickTime Player is not just a media player but is also capable of making media. Then it won’t be surprising that it is also capable of editing videos, not as great as those dedicated video editors for Mac , but it has what it takes to do some simple editing. Let’s look at them.
To edit a file or multiple files in QuickTime Player, you must select them first and then press the Space bar .
- Rotate an item: Click the Rotate icon to rotate left. Holding the Option key will rotate it to the right. Keep clicking the button until it’s in the position of your choice.
- Mark up an item : If you open an image, you will see a pen icon. Upon clicking the icon, you will be taken to the Markup page to add signs, draw, or crop the image.
- Trip audio or video : For multimedia options such as audio and video, you can select the trim icon and drag the yellow handles to trim the video accordingly. There is even the option to revert if you mess things up. Once making the necessary results, you can click Done.
- Browse items : If you have selected multiple items, you can jump between them using arrow keys.
- Show items in a grid : For those who have selected multiple files, you can organize and show them in a grid. All you have to do is click the four boxes.
- Share an item : Click the Share button and choose where you want to share.
Rearrange a movie clip on QuickTime Player
- Select a media file and press the Space bar .

- Move the playhead (the red vertical line) to where you want to split.

- To rearrange, click and drag the file to where you want to place it.

Note: You can use the left and right arrow keys to move the playhead incrementally. Using these keys along with Option will help you go to the beginning or end of the clip.
Open the file by selecting it and then pressing the Space bar . After that, do the following:
To remove sound from a movie
- Click Edit .
- Select Remove Audio .
To remove the video from the movie
- Choose Remove Video.
Once any option is selected, the result will be instant.
The QuickTime Player also stores the recent history of your opened files. If you are a privacy-concerned person and want to remove them, then here’s how:
- Click File.
- Select Open Recents .
- Now, click Clear Menu .
With its existence for more than 30 years, QuickTime Player can now support almost all media formats available today.
The best way is to restart your Mac and try to open the app. If not solved, you can check out our detailed guide .
After opening the app, Click QuickTime Player and select Update Existing Software .
That’s it!
Despite being one of the oldest media players, QuickTime Player stays in the game by providing great features. I think It was my responsibility to let you know what all these features are, especially when many are using this app to open media files. Got any queries? Drop them in the comments. Read more:
- How to screen record on iPhone and iPad
- Beginner-friendly video editing software for Mac: Filmora 1 2
- How to use iMovie on Mac (Beginner’s guide with images)
Want to read more like this?
Join 15,000+ Apple enthusiast to get the latest news and tips from iGeeksBlog+.
We won’t spam, and you will always be able to unsubscribe.
Leave a Reply Cancel reply
Your email address will not be published. Required fields are marked *
Save my name, email, and website in this browser for the next time I comment.
Similar posts you might also like

Best iOS 18 features you should check out!

iOS 18 supported devices: All compatible iPhone models

iPhone OS 1 to iOS 18 – A brief history of the iPhone software
Editorial Guide
Review Policy
© 2024 iGeeks Media Private LTD. All rights reserved.
Privacy Policy
How to Fix ‘This File Isn’t Compatible With QuickTime Player’ Error

Arshmeet has been a tech tinkerer since childhood, but she realized her love for technology and writing about 5 years ago. Since then, she has been honing her skills and helping people figure out how things work, troubleshoot problems, choose the right app and products, and dig deep into the new and old concepts of technology. She is a self-professed Apple Enthusiast who loves debating what’s good and what’s not. It is her passion for finding techniques, hacks, apps, and products that make everyday life simpler.
- The key reason behind the ‘This File Isn’t Compatible With QuickTime Player’ Error is an incompatible format.
- Thankfully, macOS has a built-in encoder. Right-click the file → Encode Selected Video Files → Setting → select a suitable codec → Continue.
- If nothing works either convert the video via a video converter or download a compatible app.
Why Am I seeing ‘This File Isn’t Compatible With QuickTime Player’ Error
The infamous macOS video player error can pop up from time to time. As per an Apple Support article , this compatibility issue is something that Apple expects. The tech giant suggests two solutions updating the app or using another app, but we have more to offer.
However, before we move in to fix the file that isn’t compatible with the QuickTime player issue, it’s wiser to check the reasons behind the error.
- QuickTime Player or macOS is outdated.
- QuickTime Player doesn’t support your file’s codec.
- There’s a file format name mismatch with the QuickTime Player’s codec database.
- The video or audio file is corrupted.
- The QuickTime Player app not responding anymore.
Whatever the reason, trying the following troubleshooting steps in the order of their appearance below should solve the issue quickly.
Basic Fixes
- Quit and restart the QuickTime player – Sometimes, the video player may get stuck in the back-end processing phase. Thus it doesn’t respond well to file execution commands and shows random errors. Force quitting and restarting the app should easily resolve the issue.
- Update the QuickTime player and macOS – Apple doesn’t offer separate update schedules for QuickTime Player. As a result, you can only update these apps by updating the OS.
- Check for video or audio file corruption – If QuickTime can’t open the video file, you must cross-check the file for any corruption. The easiest way to do so is to use any other media player available on your device to run the video.
Fix 1. Double-Check the File Format
QuickTime Player doesn’t offer as extensive file format support as some of the more advanced media players. However, it can comfortably support formats including QuickTime movie files (MOV), MPEG-4 files (MP4, MP3, M4V, M4A), MPEG-2, AVI, Mjpeg, DV Stream, and audio files such as AIFF, WAV, and AAC.
So maybe the video file is out of the scope, and the ‘The file isn’t compatible with QuickTime Player’ error occurs because it’s simply incompatible.
However, there’s still a chance that the extension name is incorrect or mistakenly changed by you. In such a scenario, renaming the file in the correct format name should help. You may try the following steps on a MacBook or iMac.
Step 1 : Open Finder and navigate to the location where the file is stored. Select the File , right-click, and select Get info .
Step 2 : Here, check the More info and Name & Extension and ensure all is in order.

If you feel the extension is not what it should be, try changing it. Now, try to run the file on QuickTime Player to test if you can resolve the issue or not.
Fix 2. Encode Video or Audio Files for QuickTime Player
Macs come with an out-of-the-box multimedia encoder. You can use this tool to re-encode a faulty multimedia file so that macOS can play it on the QuickTime Player app.
Step 1 : Open Finder and select the video file . Right-click the file and select ‘ Encode Selected Video Files ’.

Step 2 : Here, click the drop-down arrow beside the Setting .
Step 3 : Select a suitable codec (you can select any, as QuickTime Player supports all of these). Click Continue .

Once the encoding session is complete, you’ll spot a converted video file in the same folder. Try playing it, hopefully, you can now play it.
Fix 3. Look for a Compatible App on the App Store
If you’re in this section, it means you tried all the previous methods to troubleshoot and couldn’t fix the ‘This File Isn’t Compatible With QuickTime Player’ error. Now, the last option is getting another video player that could play the file you’re facing issues with.
To find the right app for the file, right-click the file → select Open With → App Store . Look through the available options and find the one that suits you the best.
Was this helpful?
Last updated on 30 July, 2024
The above article may contain affiliate links which help support Guiding Tech. However, it does not affect our editorial integrity. The content remains unbiased and authentic.
Leave a Reply Cancel reply
Your email address will not be published. Required fields are marked *

The article above may contain affiliate links which help support Guiding Tech. The content remains unbiased and authentic and will never affect our editorial integrity.
DID YOU KNOW

Mitch Bartlett
More in internet and social.

Microsoft Edge vs Safari: What’s Best on iOS

How to Find and Manage Flagged Emails in Outlook
Join the newsletter.
Get Guiding Tech articles delivered to your inbox.
17 things you can do with QuickTime Player on Mac
QuickTime Player is a versatile application that comes pre-installed on Mac, with features that extend beyond basic video playback. In this article, we’ll explore 17 things you can do with QuickTime Player on Mac to enhance your media experience and streamline your workflow.

Loop a video
If you like to watch a video on repeat, you don’t have to start playing it again and again. The loop feature will keep playing it over and over . To do this, play a video in QuickTime and click View > Loop .
Zoom in on a video
When you’re playing a clip and want to zoom in, all you have to do is press the Command + Plus (+) keys. And to do the opposite, hit Command + Minus (-) keys.
Play multiple videos at the same time
You can open multiple videos in separate QuickTime windows and play or pause them all together in one stroke. It’s very cool. Give it a try:
- Hold the Command key and select several videos in your Mac’s folder.
- Right-click and choose Open With > QuickTime Player . All videos will open in their own QuickTime windows. Decrease their sizes so that you can see more than one window on your screen.
- Now, hold the Command key and hit the return/enter key to play or pause all those videos at once.

Play videos from the internet
Since QuickTime is a video player, you can obviously open most downloaded video and audio files in it.
Besides that, if you have the video link, you can play it directly in QuickTime instead of downloading the file and then playing it. To do that, open QuickTime and click File > Open Location > paste the video URL and hit Open .
See metadata of media files
After you open a video in QuickTime Player, simply press Command + I to see its details like original resolution, size, data rate, current size/dimensions, video & audio format, FPS (frames per second), aspect ratio, audio channel, and more.
Besides using the keyboard shortcut, you can click Window > Show / Hide Movie Inspector from Mac’s top menu bar to see the metadata.

Record your Mac’s screen
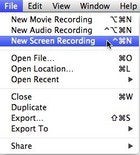
In addition to using Command + Shift + 5, you can also use QuickTime Player to record your Mac’s screen . To do this, open QuickTime and click File > New Screen Recording or press the Command + Control + N keys together.
Record your iPhone’s screen or FaceTime, WhatsApp, and other calls
iOS has a built-in screen recorder , but at times, like when you want to record a FaceTime call or WhatsApp video call, you can connect your iPhone to your Mac and record the call with audio. Here’s how:
- How to record FaceTime calls
- How to record a WhatsApp call on iPhone
Take screenshots or screen recordings of your Apple TV
Ever wanted to grab what you see on your Apple TV screen? It’s easy. Just make sure your Apple TV and Mac are on the same Wi-Fi network, and use QuickTime to take a screenshot or make a movie recording .
Record videos
All you need to do is open it and hit File > New Movie Recording .
Use it as an audio recorder
Mac has a built-in Voice Memos app , but that’s not your only option. You can record high-quality audio in QuickTime Player:
- Open QuickTime.
- Click File > New Audio Recording .
- Hit the tiny arrow next to the red record button and choose Maximum quality.
- Finally, hit the white-red record button.

Your Mac will now record 44100 Hz, uncompressed Linear PCM 24-bit AIFF-C audio.
Edit a video
Though not as robust as iMovie or Final Cut Pro, QuickTime Player does offer some handy options to edit your video. This includes tools to rotate the clip , flip it , remove audio or video , trim it , etc. You can access these by clicking Edit from the top menu bar. Our dedicated tutorial shows you how to do all this .
Merge two or more videos into one
- Open the first video in QuickTime Player.
- Click Edit > Add Clip to End > select one or more videos and hit Choose media . You will see the videos appear side by side on a thin timeline at the bottom of the QuickTime screen. Tip: You can also drag a video and drop it over QuickTime to add it to the editing timeline.
- To change the order of a clip, select it on the timeline and drag it before the other video.
- With all done, click File > Export As > choose a resolution and hit Save .

Split a video
- Open the video in QuickTime Player on Mac.
- From the top menu bar, click View > Show Clips .
- Now, drag the red line to the position from where you want to split the video clip.
- Click Edit > Split Clip .
- Next, choose the other unwanted clip and hit the delete key to get rid of it.
- Finally, save the remaining video. You can do it simply by clicking the red close window button.

Reduce the video quality or change video codecs
Suppose you have a 4K video that you want to downgrade to 1080p so that it can be played on low-end phones and tablets . Instead of downloading an extra app, you can let QuickTime handle this. Here’s how:
- Click File > Export As and choose 1080p or any other lower quality. When you pick 1080p, you may also see an additional menu to change the codec, where you can select Smaller File Size (HEVC) or Greater Compatibility (H.264) .
- Finally, click Save to export the converted video.

Extract the audio from a video file
You can open the video in QuickTime and click File > Export As > Audio Only > Save to extract the audio part of any video file. The audio will be saved as an m4a file.
Create a video or GIF using an image sequence
If you took many photos in a sequence, like burst photos , you can turn them all into a video using these steps:
- Open QuickTime Player on your Mac.
- Click File > Open Image Sequence from the top menu bar.
- Now, select all the photos or a folder with those photos and click Choose media .
- Change the resolution, frame rate, and codec if needed. Finally, click Open . QuickTime will prepare the video, and then you can play it or save it as a MOV file by hitting the red window close button.
- Once you have the short video of a few seconds, you can use sites like ezgif.com to convert it into a GIF.
Save a video frame as an image
Why take a screenshot when you can save the video frame as a photo? Let me show you how:
- Open a video in QuickTime Player on Mac.
- Pause the playback and scroll to the frame you want to save as a picture. Use the arrow keys for precision.
- Now, click Edit > Copy . That video frame is copied as an image to your Mac’s clipboard.
- Finally, open any app like Notes , Keynote , Pages , Word , etc., where you can paste the image and press Command + V .

Note: You can’t paste the image directly into a Finder folder. But you can open Apple’s Preview app and click File > New from Clipboard . Now, hit the red close button and save the image to any Finder location you want.
Bonus: Best QuickTime alternatives for watching videos
Finally, even though QuickTime Player is a feature-packed and free app, you may want to know about a few excellent alternatives, like when you have to play files in MKV format . Here are two that I use on my Mac in addition to Apple’s built-in video player:
- VLC Media Player
Fun fact: QuickTime player was also available for Windows PC but was discontinued in 2016. However, you can still download QuickTime 7.7.9 for Windows from Apple’s official website.
- Apple Watch
- Accessories
- Digital Magazine – Subscribe
- Digital Magazine – Info
- Smart Answers
- Back To School
- Apple’s Big September
- Apple Watch 2024
- New AirPods
- M4 Mac mini
- 11th-gen iPad
- Best Mac antivirus
- Best Mac VPN
When you purchase through links in our articles, we may earn a small commission. This doesn't affect our editorial independence .
Getting started with QuickTime Player X
As a newish Mac user, you may wonder what allows your computer to display pictures and play music and movies. Wonder no longer. This bit of media magic is performed by something called QuickTime. Originally developed in 1991 as a multimedia technology that accompanied the System 6 operating system, QuickTime has been built in to every version of the Mac’s operating system since.
Before we take another step, let’s a peer a little more carefully into what QuickTime is and isn’t. As I’ve outlined up to this point, QuickTime is a technology rather than an application. If you think of the Mac OS as a series of blocks, each of which is part of the sturdy wall that is the Macintosh computing experience, QuickTime would be one layer of those blocks. When the operating system needs to play media, it looks to this QuickTime layer to do the job.
However, when you hear people talking about QuickTime on their Mac, they’re invariably speaking of the QuickTime Player application. Before iTunes came along, QuickTime Player is how most people watched movies on their Macs. And that player what we’ll talk about in this lesson.
The anatomy of QuickTime Player
Launch QuickTime Player (which is found in the Applications folder at the root level of your startup drive) and…well, nothing much happens. You’ll see the QuickTime Player name appear next to the Apple logo in the Mac’s menu bar, along with QuickTime Player’s menus, but that’s about it. For the application to actually do something, you need to open a media file that QuickTime can play. You have many to choose from.
QuickTime supports audio, image, and movie file formats too numerous to list. So instead, I’ll mention a couple of popular media formats used largely in the Windows and Linux worlds that QuickTime doesn’t support. Unsupported audio files include Windows Media (they bear a .wma extension), Ogg Vorbis, and FLAC. The Windows Media movie format (.wmv) isn’t supported either. If you’d like QuickTime to play Windows media files, you can download and install the free Windows Media Components for QuickTime from Microsoft’s website.

Once you’ve opened a compatible file (which you can do by dragging the media file on top of the QuickTime Player icon in the Dock or by choosing QuickTime Player’s File > Open File command), you’ll see a black window. In the case of audio files, that window will be fairly small and will have just a few controls. You’ll find rewind, play/pause, and fast-forward buttons that work just as they do on a DVD player or a car’s CD player. (These buttons are referred to as transport controls .) To start or pause playback, press the Mac’s spacebar. When you click the rewind or fast-forward buttons, the media will skip back or forward (respectively) at 2X speed. Click again to move to 4X speed. Then again for 8X. To play at normal speed, just click the play button.
Below these controls is a volume control. Drag the gray ball that appears in this line to the left to decrease the volume and drag to the right to make the volume louder. Below the volume control is the timeline. The diamond-shaped icon in the timeline (called the playhead ) indicates how far along you are in the track. To the left of the timeline is the current-time display. To its right is the remaining-time display.
Movie windows have a bit more going on. Here, too, you find rewind, play/pause, and fast-forward buttons; and, as with audio files, rewind and fast-forward offer 2X, 4X, and 8X speed options as well. However, you can scrub movies. This means that as you drag the playhead, the movie’s images move forward or back as you drag, allowing you to see where you are in the movie. Stop scrubbing, and the movie will continue to play from the current location of the playhead. If you click and hold on the playhead, the timeline will display a series of lines. This indicates that you can now scrub in small increments, which helps you zoom in on just the frame you want to view.
Unlike with audio files, you can make movie files fill the entire screen. Just click the full-screen icon in the movie’s top-right corner, choose View > Enter Full Screen , or press Command-Control-F. If a movie has chapters, you’ll see a Chapters menu, which allows you to pick and move to a different chapter.

Sharing and exporting media
From within QuickTime Player, you can share your media with the outside world. You do this via the File > Share command. (To the right of the transport controls in a movie window, you’ll also see a Share menu.) Click it, and you find a list of export destinations including Email, Message, AirDrop, Facebook, YouTube, Vimeo, and Flickr.
When you choose Email , Apple’s Mail will open, create a new message, and add the movie as an attachment. Select Message, and the movie is attached to a multimedia message. Selecting AirDrop attaches the movie to an AirDrop window. (The names of other people on your local network who have their AirDrop windows open will appear in this window. Select a recipient and click Send .)

When you choose Facebook (and you’ve configured a Facebook account on your Mac), a sheet appears where you name and describe your movie. Click Upload , and that’s exactly what happens. Choosing YouTube does something similar. Enter your YouTube name and password and—again, if you have a YouTube account—you’ll be prompted to assign a category to your movie, and enter a title, description, and tags. The Vimeo option will upload the movie to that service if you have an account. And when you choose Flickr (and yes, have an account), you can upload the movie to Flickr provided that it’s no longer than 90 seconds (as Flickr maintains this minute-and-a-half limit for videos).
Although it sounds like a duplication of efforts, you can additionally export media from QuickTime Player. The advantage of doing this versus sharing media is that you can choose to convert the media as you export. Choose File > Export when an audio file is active, and you see just two options in the Format pop-up menu—Movie and Audio Only. Choosing Movie does nothing more than export the audio file as a .mov QuickTime file, which will play in iTunes and on media players that support these files. If you choose Audio Only, the audio file will be converted to the AAC format encoded at 256 kilobits per second. This is an audio format supported by Apple’s iTunes, mobile devices, and computers as well as modern Windows computers and Android devices. Older MP3 players, however, can’t play these files.
When working with a movie file, you have a few more options. You can choose to export it in one of two resolutions: 480p (with dimensions of 640 pixels by 480 pixels) and 720p (1280 pixels by 720 pixels). You can also choose to export the movie so that it will be playable on an iPod touch and iPhone 3GS; an iPad, iPhone 4, and Apple TV; or as audio only (which exports just the movie’s audio track).
But your export options don’t stop there. Explore that File menu, and you’ll also find the Export To command. This command is largely for people who don’t want to worry about dimensions and resolution. Instead, they just want their media to work where it will be played. Choose this command, and you see three options—Web, iTunes, and iMovie.
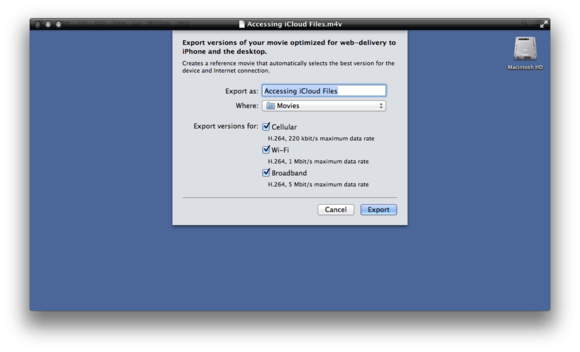
Choose Web, and you can opt to export up to three versions of the movie—one for transmission over a cellular network (meaning the movie will be smallish), Wi-Fi transfer (bigger), and broadband (bigger still). Select iTunes, and a sheet appears that presents you with three options: iPod & iPhone; iPad, iPhone 4 & Apple TV; and Mac & PC. Select the one you want, and click Share to begin the export. Finally, if you choose iMovie , that app opens and the movie is added to that iMovie’s assets. (We’ll discuss iMovie and the other iLife applications in other lessons.)
Editing movies
If you ask old-time Mac users who once edited movies in the earlier QuickTime Player Pro, they’ll tell you that QuickTime Player X’s editing features are pretty weak. (And as one of those old-timers, I agree with them.) But editing isn’t entirely missing from the current version of QuickTime Player.
To begin with, you can trim your movie. This means that you can remove material from the beginning and end of a selected movie (or clip within that movie). This is helpful if you want to remove the two minutes of you begging little Jo-Jo to stop mugging for the camera in the family’s What I Did On Summer Vacation video.
To trim a movie, choose Edit > Trim . A gray bar will appear at the bottom of the movie window. Within that bar, a yellow border surrounds thumbnail images taken from the movie. To trim the thing, just drag a trim handle at one end or the other toward the middle of the bar. As you do, you can see a preview of the movie at the location where you’ve dragged the front or back handle. Click the yellow Trim button when you’re happy with your selections.

You can also split a movie into sections. To do this in a useful way, choose View > Show Clips . Another gray bar appears at the bottom of the window. Drag the red line, which represents the playhead, to the place where you want to split your movie. Choose Edit > Split Clip . The bar will now show two highlighted sections (or clips ).
Great. So now what? Click on one of the clips to highlight it. You can now trim just that clip by choosing Edit > Trim or you can drag the selected clip to a new location. This is a very quick way to make quick (and rough) edits to your movies. For far more control, you’re better off exporting your movie to iMovie and using it to edit your work.
Recording with QuickTime Player
While editing may not be QuickTime Player’s strong suit, it’s hard to gripe too mightily about its simple recording capabilities. With this application, you can record movies captured with the Mac’s camera or an attached (and compatible) video camera; you can capture audio through the Mac’s microphone (or from an attached microphone); and you can capture a video of the actions on the Mac’s screen. You’ll find each option under the File menu. They work this way.
Movie recording: Choose File > New Movie Recording; if your Mac has one, its camera will switch on and display what it sees. A gray control bar will appear that contains a red Record button as well as a downward-pointing triangle. Click the triangle, and you’ll find options for recording from a different camera (a USB camcorder, for example, if one is attached to your Mac), recording from a different microphone (if one is attached), and setting the video quality. The higher the video quality you choose, the larger the resulting video window (and, ultimately, recorded movie).
To begin the movie capture, just click the Record button. To stop recording, click that same button, which has now turned into a square Stop button. When you stop the recording you’ll see an Untitled window. Just click the window’s red Close button (or choose File > Close ), and you’ll be prompted for a name and format (the same format options you found when exporting a movie). Click Save, and you’re done.
Audio recording: Creating an audio recording is just as easy. Choose File > New Audio Recording, and a small black window appears. It too has a downward-pointing triangle, from which you choose a microphone and select a recording quality. (Both High and Maximum sound good—the only difference between them is that Maximum is recorded at a higher bit rate, which makes for a larger file that may sound better if you have a great microphone and discerning ears.) To record, click the red Record button. To stop, click the Stop button. Again, close the window and you’re prompted for a name for your recording. Click Save to save.
Screen recording: Termed a motion screen capture , a screen recording is a great way to show someone how to do something with their computer rather than simply tell them. And they’re easy to create.
Choose File > New Screen Recording . Yep, once again, the black window appears. Click its triangle, and you can choose to capture audio along with your video, select a video quality setting, and choose whether to capture mouse clicks as you record. Click the Record button, and a message appears, telling you that you can record the entire screen just by clicking it. To record just a portion of the screen, drag over the portion you wish to capture. Either way, the recording begins. Perform the necessary actions and then click Stop . A window appears that contains the movie of your movements. Press the spacebar to play it. Any time you clicked the mouse during the recording, a black circle appears around the cursor; at the point where you stopped clicking, the circle vanishes.
You know the drill. Close the window, and the sheet appears prompting you to enter the movie’s name and choose its format. Click Save .
Beyond QuickTime Player X
As I said, QuickTime Player X is a perfectly fine media player, but if you’ve had a taste of QuickTime 7 Pro, which had scads of features, the current version is wan and feeble in comparison. Fortunately, QuickTime 7 Pro lives on and is compatible with Mountain Lion. If you’re interested, take a gander at Apple’s page devoted to it . For $30 it can all be yours.
Next week: Our first look at iLife.
Author: Christopher Breen , Senior Editor
Chris has covered technology and media since the latter days of the Reagan Administration. In addition to his journalistic endeavors, he's a professional musician in the San Francisco Bay Area.
Recent stories by Christopher Breen:
- How to remove MacKeeper Part II (the pop-up edition)
- Troubleshooting your Apple products: The last word
- Your Photos for OS X questions answered
How-To Geek
What happened to quicktime player.

Your changes have been saved
Email is sent
Email has already been sent
Please verify your email address.
You’ve reached your account maximum for followed topics.
Quick Links
The origins of quicktime, quicktime isn't dead (yet), alternatives to quicktime player, key takeaways.
- QuickTime Player was integral in the evolution of digital media formats, particularly in the Mac and Windows ecosystems.
- Despite its decline in popularity, QuickTime Player remains a default media player on macOS. It's no longer supported on Windows.
- QuickTime's functionality now includes basic video and audio playback, recording, and screen mirroring, with alternatives like VLC Player available.
Apple's QuickTime technology used to be one of the main ways to watch videos across web browsers, Macs, and Windows PCs. Those days are over, but QuickTime Player is still a core application on Mac computers.
QuickTime might be most recognizable as a media player, but it was originally an all-encompassing framework for digital media. There was a QuickTime Player application for Mac and Windows, a QuickTime plug-in for web browsers, a PictureViewer tool for viewing photos, and other components.
The iTunes music player was also closely integrated with QuickTime, which is why QuickTime Player was required when installing iTunes on a Windows PC.
QuickTime Player and QuickTime web plug-ins could view many different video and audio formats—some of which Apple helped create, and some of which were third-party technologies. Apple Video was the earliest format built for QuickTime Player, but as video compression improved over time, QuickTime added support for more video and audio codecs. There was even a QuickTime VR file format for viewing panoramic images.
QuickTime is commonly associated with the QuickTime file format , which usually has a file ending with MOV or QT. QuickTime movie files are just container formats, though, and they can use any number of different video and audio codecs. Most of the MOV files you find online will probably have MPEG-4 video (mostly H.264) with AAC audio.
QuickTime Player 7, released in 2005 alongside Mac OS X 10.4 Tiger, was the final major release of the classic player application. The rise of HTML5 media playback in web browsers made plug-ins, like the one offered by QuickTime, unnecessary for streaming videos and audio. Windows Media Player on Windows also eventually added proper support for H.264, AAC, and other codecs that previously only worked in QuickTime and other third-party players.
Mac OS X Snow Leopard was released for Mac computers in 2009, which replaced the legacy QuickTime Player 7 with a simpler QuickTime X application. It still functioned as the main video and audio player for Mac computers, but editing and other features were mostly ripped out, with iMovie and Final Cut Pro serving as the main alternatives.
Apple continued supporting QuickTime on Windows for a while, but the final update was QuickTime 7.7.9 in 2016 , and it is no longer supported.
Even though the QuickTime framework and file formats have been replaced by newer and better technology, some components are still around to this day. The MOV file format is still used for video and screen recordings on Apple devices, as well as some online videos, typically using the H.264 or HEVC/H.265 video codec, similar to most MP4 files.
QuickTime Player is still included in macOS as the default video player, like Media Player on Windows 11, and it's mostly the same as the "QuickTime X" app that first arrived in 2009. You can use it to open video and audio files on your Mac. It also powers the Quick Look video preview in Finder—you can press the spacebar on your keyboard while a file is selected to see a preview, without opening the entire QuickTime Player app.
QuickTime Player can also record video or audio files from a mix of input devices, or mirror and record the screen from a connected iPhone or iPad. There's also an option to record your Mac's screen, but the same capture and record tool is available with the Command+Shift+5 keyboard shortcut without opening QuickTime.
Even though QuickTime Player is still present on macOS, it's much more basic than the old QuickTime Player 7 and its Pro edition. The only editing capabilities are removing video or audio tracks from files (the entire track, not sections), trimming the file, and rotating. The file conversion options are also limited.
QuickTime Player is discontinued on Windows (and likely an active security risk), and the Mac version is usable but lacks support for some video and audio formats. Thankfully, there are some great alternatives to check out.
VLC Media Player is one of the best media player applications, with support for nearly every type of media file and internet stream imaginable. It's available for Windows, Mac, Linux, Android, iPhone, and other platforms. If you have a media file, VLC can probably play it. However, the settings and other panels can be a bit overwhelming at times.
If you have a PC with Windows 10 or Windows 11, the built-in Media Player app can handle many video and audio files, and the music organization features can be a decent alternative to iTunes. However, the file format support isn't quite as extensive as VLC.
- Press Releases
- Industry News
- Product Spotlight
- Fresh from Apple
- Video Production
- Installation Videos
- Explainer Videos
- Testing Lab
- Networking & Security
- Special OWC Deals
- The Other World
- Powered by OWC
- Space & Beyond
- Random Thoughts & Topics
- OWC Unplugged
- Article Archives
- Make a Suggestion
Send us a Topic or Tip
Have a suggestion for the blog? Perhaps a topic you'd like us to write about? If so, we'd love to hear from you! Fancy yourself a writer and have a tech tip, handy computer trick, or "how to" to share? Let us know what you'd like to contribute!
How to Change QuickTime Playback Speed in macOS (and Other Tricks)

QuickTime player in macOS has long natively supported different playback speeds. But in the latest version of macOS—as of this writing, Monterey—QuickTime made selecting different playback speeds much easier.

When you open a video in QuickTime, you’ll notice that in the playback chrome there is a button with two symbols on the right side: > >. If you click that button (not the fast-forward button mind you) you’ll be presented with Playback Speed options of 0.5x (half-speed), 1.0x (normal speed), 1.25x, 1.5x, and 2.0x.
If you want more granular control, you can hit the play button and then click the fast-forward button while holding down Option (⌥). Each time you Option-click the fast-forward button the play back screen will increase one-tenth (1.1x, 1.2x, 1.3x, etc.) all the way up to 2.0x. In older versions of macOS, this was the only way to adjust playback speed. It persists in Monterey, but mainly to give you more precise control.
How to record your screen using QuickTime in macOS
Of course, to adjust playback speed, you need a video on which to adjust it. If you’d like to test out this new knowledge, or you were ever curious whether screen recording was possible on macOS, it comes built in! Here’s how to record your screen in QuickTime:
° Open QuickTime.
° Choose File > New Screen Recording to open Screenshot and display the tools.

° Click Options to control what you record. For example, you can set the location where you want to save your screen recording, or include the pointer or clicks in the screen recording.
° Click Record.
° To stop recording, click the Stop Recording button.
Another app may open depending on where you save your recording.
How to use QuickTime to record a movie on macOS
You can also record a movie inside QuickTime using the built-in camera on your Mac. The recording controls that appear let you to start recording, control the volume, and choose recording options. Launch QuickTime Player and:
° Choose File > New Movie Recording. When the recording controls appear, you see a green light next to the built-in camera in your Mac.

° Click the Options pop-up menu, then choose any of the following recording options:
Camera : Choose a camera if you have more than one camera available.
Microphone : Choose a microphone if you have more than one microphone available.
Quality : Choose the recording quality. Maximum-quality recordings produce uncompressed files, which can use large amounts of storage space.
° Adjust the volume control to hear the audio you’re recording.
° Click the Record button to start recording.
° To pause recording, Option-click the Record button; click it again to resume recording.
° Click the Stop button to stop recording.
° Choose File > Save to save and name the recording.
Other Topics You Might Like:
Leave a Reply Cancel reply
Save my name, email, and website in this browser for the next time I comment.
Notify me of follow-up comments by email.
Notify me of new posts by email.
Thanks. Also useful would be an article about how to edit movies with QuickTime. I mean, trim or delete parts, etc.
You Might Also Like

Getting the Most Performance out of Spinning Hard Drives, Part 5: Validating Hard Drive Performance, Especially for RAID

How to Use the Awesome New Features in macOS Sonoma’s Reminders App
Future-proof Your Setup With the OWC Express 1M2: All the SSD You Need—and Then Some

Getting the Most Performance out of Spinning Hard Drives, Part 4: the Many Ways to Configure 4/8 Hard Drive Enclosures
Email Address
- Brand Assets
8 Galaxy Way Woodstock, IL 60098 1-800-275-4576 +1-815-338-8685 (Int)
All Rights Reserved, Copyright 2020, OWC – Since 1988 | Terms of Use | Privacy Policy
We use cookies to provide you with a full shopping experience, including personalized content, and to help us improve your experience. To learn more, click here .
By continuing to use our site, you accept our use of Cookies, Privacy Policy and Terms of Use .
QuickTime Player for Mac
For Mac OS X 10.6.3 through 10.12.
QuickTime Player overview
QuickTime Player 7 supports older media formats, such as QTVR, interactive QuickTime movies, and MIDI files. It also accepts QuickTime 7 Pro registration codes, which turn on QuickTime Pro functions. This version of QuickTime Player is unsupported and is provided for compatibility with legacy media workflows on macOS Sierra and earlier.
QuickTime Player 7 will not be compatible with future macOS releases.
Learn how to use the latest version of QuickTime Player (version 10) included with macOS here .
What’s new in version 7.6.6
Note: This product is not compatible with macOS High Sierra and later.
- Release notes were unavailable when this listing was updated.
Write your thoughts in our old-fashioned comment
( 170 reviews of quicktime player ).
User Ratings
Sourcing the best Mac apps and software for over a million users since 1997.
How to use QuickTime to record screen and audio: Ultimate Guide
Wondering how to record your screen with audio using QuickTime? Here're fairly easy ways to get QuickTime screen recording with external audio and internal audio.

Does QuickTime screen recording record audio?
- You can record screen and audio in QuickTime if your MICROPHONE is set up.
- To get QuickTime to screen record with your voice and other audio, choose File > New Screen Recording, then select a microphone from the dropdown menu.
- By default, QuickTime record DOES NOT capture Mac's video screen with audio due to security reasons.
- Only if you install a third-party Screen Recorder tool, or an additional audio device working with QuickTime should the audio being recorded on the screen recording process.

QuickTime Player allows you to record a video of your screen with video and sound captured at the same time.
For many Mac users, using QuickTime to record screen and audio comes simpler – whether you're near a stunning movie playing on the browser and you want to capture the video footage for sharing, or you're trying to creating a tutorial or demonstrating how to use a particular macOS app. Whatever the reason, taking a QuickTime screen recording with audio is actually an effortless process with the help of New Screen Recording function built into QT Player.
Related: How to Record YouTube Videos on any Mac
If you're sitting in front of your Mac's screen, you're ready to open QuickTime and start to screen record with both audio and video. You'll also get a dedicated Screen Recorder utility as a means of capturing audio for a screen recording.
Jump to key parts:
How to use QuickTime to record screen and audio at the same time
- QuickTime screen recording with audio from computer (A little setting up needed)
QuickTime alternative – Record Mac's screen with both video and any sound in one click
A Note: Apple has no longer supported QuickTime 7 for Windows, and disabled the QuickTime Pro functionality including the screen & audio recording ability.
QuickTime is a popular multimedia player for Mac, with an added benefit of a screen recorder that you can use to record a screencast of what's on the computer screen. It's a good choice if you want to record your screen and audio simultaneously without having to pay any money for another application.
1. Open the screen you want to record, be it a video, a browser, an application, etc.
2. Launch QuickTime Player.
3. Choose File > New Screen Recording from the menu bar at the top.

Click New Screen Recording option to begin the QuickTime video recording affair.
On macOS Mojave and higher
If you're running macOS Mojave or higher, you will get the Screenshot Toolbar for screen capture with sound on Mac . The screenshot looks like this:

You can also press Shift + Command + 5 to bring up recording options on Mac.
- Choose Record Entire Screen , or Record Selected Portion . Decide if you want to record a video of the full or a certain section of the screen.
- Click Options , and then choose [your Mac name] Microphone if you want to record your voice to add narration to the video.
- Hit Record . Now you're recording both the video and audio on your screen.
- Perform whatever actions and talk yourself while recording your screen at the same time.
- When you're ready to stop QuickTime recording, click the Stop button at the top menu bar.

If you select "None" under Microphone, there will be no audio for screen recordings.
Tip: You can set 5-second delay for a screen recording to begin after you press Record, so you have time to hide any playback controls or any other window you don't want to capture.
Your recording will automatically save to the Desktop as a .mov file. Double-click on it and you'll able to watch the entire video recording and test out the audio you've captured.
On older version of macOS
In case you own a Mac with macOS version earlier than macOS Mojave, after you click File > New Screen Recording within QuickTime, you will see the Screen Recording window, shown as below:

Have your microphone checked if you don't want to get a muted screen recording from QuickTime Player.
- In QuickTime Screen Recording window, click the arrow next to the red Record button, and choose Internal Microphone . This will enable recording audio in screen recordings. You can also select an external microphone if there's one connected for recording.
- Click Record button.
- Click anywhere on the screen to start a full screen recording in QuickTime immediately, or choose your desired area with your mouse which you wish to have recorded.
- Use the application or play the media until anything has been recorded.
- To stop QuickTime screen recording, hit the Stop button in the menu bar.
As soon as you stop recording in QuickTime:
- Your recorded video opens in QuickTime Player for viewing. Play the recording to test the sound.
- You can split the recording into clips, or sharing the recording.
- To output your QuickTime screen recording with audio, click File > Save, then rename the video and choose a location and hit Save.
QuickTime screen recording with audio from computer
Being able to record screen and voice is one of QuickTime's best features. But there is a catch: QT has never recorded internal sound during a screen recording, and can only capture your voice from the microphone if it's been enabled. The audio from a video playing on a browser won't get picked up.
This is why many users reported that screen recording through QuickTime doesn't have system sound, only the video screen. So to take a simultaneous screen recording of video and audio with QuickTime, you need additional software like Soundflower - but a little setting up needed.
To use Soundflower with QuickTime for recording screen with internal audio together, you have to have the macOS Sound output set to "Soundflower (2ch)" via System Preferences (or System Settings since macOS Ventura 13) > Sound . Note that you won't be able to hear anything from your Mac but it will record and you'll have audio on the playback.

Then open QuickTime and use the steps above to get audio recorded while you're capturing what's happening on your screen, expect the step of choosing "Soundflower (2ch)" in the QuickTime screen recording options instead of Microphone.

After QuickTime recorded your screen with audio included:
- Return System Preferences > Sound and then switch the sound output back to your speakers so that you can hear anything from your Mac's applications.
If you're going to let go of QuickTime and you're looking for a streamlined screen recording tool for Mac, your best bet is Screen Recorder . It's an all-in-one toolkit that packs with Video Recorder, Audio Recorder, Webcam Recorder and Screen Capture together.
In this case of recording the screen with a video playing from either QuickTime Player or browser, you just employ Video Recorder function and it will capture any screen activities, system sound, as well as microphone audio so you won't miss a thing.
for Windows | for macOS
Thanks to the user-friendly layout built into this alternate screen recorder to QuickTime, the process is straightforward:
Step 1- Launch the program then pick Video Recorder to continue.

Step 2- Full & Custom . Choose if you'd like to have the whole screen or a specific area of the screen recorded.
Step 3- System sound & Microphone . Switch on the toggle for "System sound" to record audio playing from Mac, and if you need to capture your voice during a screen recording, click to turn on "Microphone."

Step 4- Hit the REC button to get both video and any internal & external audio recorded. Unlike Soundflower working with QuickTime on recording screen and routed audio, you're able to hear what is playing back from the system, as you record.

Step 5- Finally hit the Stop button on the float bar to end the screen recording right away. You will get a preview window where you can play the recorded video to see if the video clip and audio are included.

Optional Step. Before you start recording on screen, there're options available for customizing the screen recording the way you like. Click the gear icon which is located right above the "Microphone" to open Preferences window, you can change the video format from MOV to MP4 or whatever (QuickTime screen recordings are limited to MOV.)

Happy Recording! You've got QuickTime screen recording with audio.
Don't Miss: How Do I Record Screen on Windows 11
FAQ— Does QuickTime also record audio while doing a screen recording?
QuickTime Screen Recording does not and never support recording the Mac's audio out-of-the-box. It has allowed third-party apps to access the system audio to record, as long as you give the app permission to do so.
1. With QuickTime Player open, go to File > New Screen Recording.
2. To allow simultaneous recording video and any other audio, click the arrow to the right of the Record icon and choose the built-in mic or a connected peripheral.
3. Click Record button.
4. Select to begin a fullscreen recording, or a partial screen recording by dragging your mouse.
5. When finished, click Stop Record icon on the menu bar.
FAQ— Screen recording has no sound in QuickTime. I can record sound externally, i.e., myself talking, but not internally. How to fix? Upgraded to Mojave.
Since upgrading to Mojave, you're no longer able to get audio when you make a recording directly off the screen. Instead, Screenshot Toolbar utility invoking with Shift + Command + 5 appears to record screens and include audio and any ambient sound coming through the microphone.
The fact is that it's not possible to record the system audio when using the screen recorder within QuickTime. But all hope is not lost. You can give AppGeeker Screen Recorder for macOS a shot. It's a capable application that offers smart techniques to get a high-quality audio recording of what's happening on the Mac's screen. That means you will manage to record audio while simultaneously recording video on your Mac.
FAQ— How do I record both screen and audio on a Mac?
Here're the best screen recorders for capturing the Mac screen video and audio at the same time.
- QuickTime Player's New Screen Recording
- macOS Screenshot Toolbar
- AppGeeker Screen Recorder
- Soundflower audio device that routes internal audio to QuickTime's screen recorder
If you're looking for a simple video and audio recording app without setting up, AppGeeker Screen Recorder will probably suit you best: it's full-fledged, all-in-one, and easy to use.
QuickTime and Screenshot toolbar satisfy the screen recording for most users. However, they lack audio capabilities to record system audio unless a plugin is downloaded and set up properly.

How to Record Audio on Windows 10 PC

iPhone Is in Security Lockout. The Fixes

How to Record YouTube Videos in Windows

iPhone Text Messages Disappeared
How to Record Screen on HP Laptop Running Windows 10
How to Screen Record iPad with Sound in 3 Ways

Free screen recorder , Record MP3 on Mac , Record YouTube Live Stream , Record MP3 audio files in Windows 10 , Screen record Windows 10 with audio , QuickTime record screen and audio , Record computer audio on Mac , screen record Windows 10 , Record YouTube video on Mac , Record desktop entire screen on Windows 10
QuickTime Player User Guide
- Open and play a file
- Choose a screen size
- Show subtitles or captions
- Choose the soundtrack for a movie
- View information about a movie file
- Record your screen
- Record a movie
- Create a movie with an image sequence
- Record audio
- Split a movie into clips
- Rearrange movie clips
- Add a movie or clip
- Rotate or flip a clip
- Trim a movie or clip
- Remove audio or video
- Automation tips
- Save or rename a recording
- Share your movies
- Export movies
- Keyboard shortcuts and gestures
Record audio in QuickTime Player on Mac
You can make an audio-only recording with QuickTime Player.
Open QuickTime Player for me

Click the Options pop-up menu, then choose any of the following recording options:
Microphone: Choose a microphone (if you have more than one available).
Quality: Choose the recording quality. Maximum-quality recordings produce uncompressed files, which can use large amounts of storage space.
Adjust the volume control to hear the audio you’re recording.
Choose File > Save to save and name the recording. You can also choose a location where you want to save it.
After you have an audio recording, you can trim or split your audio recording into clips, rearrange the clips, or add other audio clips. See Split a movie into clips .
Coming soon: Apple Event on 9/9 at 10 a.m. PT
> Learn more
> Add to your calendar
Looks like no one’s replied in a while. To start the conversation again, simply ask a new question.
What is latest Quicktime Player?
I'm using a MacBook Pro 14" M1 Max (2021) recently updated to Sonoma OS 14.1 (64GB memory). Quicktime player completely freezes my system when playing iPhone videos. I am forced to hard re-start because no controls are responsive. Screen freezes and nothing works. Quicktime version is Version 10.5 (1170.4.13.1).
Problem seems to have started when I started using Sonoma. Anyone else seeing this and have you any suggestions?
Posted on Nov 8, 2023 6:29 AM
Similar questions
- Quicktime Player has Problems on macOs Monterey 12.6.4 Quicktime Player Problems on macOS Monterey 12.6.4 after latest OS security patch. Now Quicktime cannot play ANY file. I have a MacBook Pro (16-inch, 2021), Apple M1 Max, 64 GB 1486 6
- Quicktime player quit unexpectedly I have been using QuickTime without an issue for a long time. However today it has crashed and every time I try to open it displays the following:-When I try to click re-open it just keeps showing the same message. Any support please on how to fix?? Thanks 2581 6
- QuickTime Player QuickTime Player won't start. How to reinstall? When I try to open it I get a message: QuickTime Player unexpectedly quit. 303 1
Loading page content
Page content loaded

Nov 8, 2023 9:06 AM in response to JimmyWhite
The version of QuickTime Player is bound to the version macOS. They’ll update together, if version changes are available. I have the same version. My iPhone recordings play well? I can't replicate your issue.
For macOS troubleshooting, try these:
- How to use safe mode on your Mac - Apple Support . ‘Safe mode’ can help you to determine whether an issue is caused by software that loads as your Mac starts up.
- How to test an issue in another user account on your Mac - Apple Support . If an issue stops happening when you log out of your macOS user account and log in with another, the issue could be related to the files or settings in your user account.
Let us know the results of these tests. Then we can advise on subsequent steps.
Nov 24, 2023 8:44 AM in response to JimmyWhite
I had exactly this issue: a complete freeze after I upgraded to Sonoma and tried to play back .mov or .mp4 files using Quicktime or TVapp: I identified that this happened only when my external monitor was connected. Since my external monitor (LG) cost over £1000, it's very annoying, and Apple's response has been very disappointing : I reported to Apple and they did little to reassure me that the problem was being looked at.
I have defaulted .mov and .mp4 files to open with a third party video player, rather than disconnect my external monitor.
Nov 28, 2023 1:18 AM in response to nagarjunaseelam
I haven't heard of a fix, but please post if you hear of one! I think the best thing is to contact Apple and report the issue directly to an Apple staff member, so that more pressure is put on the Apple software developers to produce an update to Sonoma.
I'm guessing that the delay in an update, even if they've found a fix, is that there are other bugs they want to take care of at the same time, so rather than updating now, we have to wait until other things have been sorted before the next Sonoma version is released. At least, I hope that's the reason for the delay.
But if anyone knows of a temporary fix, do tell us!
Dec 4, 2023 10:56 AM in response to nagarjunaseelam
In the last few days I've upgraded to Sonoma 14.1.2, but the problem is still there: the crash isn't quite as bad, as when I power up again my windows are correctly sized and located, but I still have to power down to get out of the crash.
Nov 14, 2023 1:18 PM in response to JimmyWhite
Same here. Quicktime has been freezing for a while. I unplugged the monitor and everything is fine. I'm also have Sonoma installed.
Nov 28, 2023 12:53 AM in response to Urquhart1244
I am also facing the same issue while using Quicktime player as I am using a Samsung monitor, is there any way to fix this problem, currently I am using VLC player
Nov 8, 2023 9:43 AM in response to Urquhart1244
Thank you for the response. I have isolated the problem to my external monitor (Dell Ultrasharp 27"). Videos play just fine with the monitor unattached. When I connect the monitor (with either USB-C or HDMI) the Quicktime freezing problem starts. This is new behavior and seems to have started with the switch to Sonoma. Any thoughts on how I might troubleshoot this problem? Thank you.
Nov 8, 2023 11:11 AM in response to JimmyWhite
If the media files had DRM , then the lack of HDCP support (if applicable) could be an issue. That could be in the cable, adapter, or monitor. Verify for HDCP support.
Else I wouldn’t know. Then hopefully someone else has more ideas.
Nov 20, 2023 7:23 PM in response to JimmyWhite
Hi! I'm having the exact same issue! I'm using a Macbook Pro 14' M1 Pro (2021) and also recently updated to Sonoma 14.1 (16GB).
I'm using the iPhone to record football matches through OBS and I need to duplicate 4 of the same video to go to the different moments in the match. I've tested the recording output file of both .mp4 and .mov however it hasn't helped.
I have tried using VLC instead, and that has solved the problem. The only thing is that I needed to follow a guide to create an apple script to create 4 duplicates of the video. This has solved the problem of freezing, so it seems it is a Quicktime issue?
Nov 8, 2023 11:29 AM in response to Urquhart1244
I'll look into the HDCP support question. Thank you for your assistance! I very much appreciate it.
COMMENTS
QuickTime Player User Guide for Mac
Download QuickTime Player 7 for Mac OS X v10.6.3
To open a video or audio file in the QuickTime Player app on your Mac, do any of the following: Double-click the file in the Finder. If your videos or audio files are in iCloud Drive, click iCloud Drive in the Finder sidebar, then double-click your file. See Store files in iCloud Drive on Mac. Choose File > Open File, then select a file, and ...
There are three main ways to open a file in QuickTime Player. 1st method: Visit the location where the file is stored. Double-click on the file. 2nd method: Visit the location of the file. Right-click and choose Open with. 3rd method: Launch QuickTime Player.
Step 1: Open Finder and select the video file. Right-click the file and select ' Encode Selected Video Files '. Step 2: Here, click the drop-down arrow beside the Setting. Step 3: Select a ...
Basic Use. The player's basic features are opening, saving, exporting, and copy-and-paste. There are also the usual standard file commands: Open, Close, and Save. If you hold down the Option key ...
Things to do in QuickTime Player on Mac: hide. 1) Loop a video. 2) Zoom in on a video. 3) Play multiple videos at the same time. 4) Play videos from the internet. 5) See metadata of media files. 6) Record your Mac's screen. 7) Record your iPhone's screen or FaceTime, WhatsApp, and other calls. 8) Take screenshots or screen recordings of ...
An audio file that's open in QuickTime Player X. Once you've opened a compatible file (which you can do by dragging the media file on top of the QuickTime Player icon in the Dock or by ...
Elmedia Player. Elmedia is one player that lets you adjust the speed of your videos, if you must. Elmedia Player aims to be particularly easy to use, and to offer fine controls on features such as ...
Click the arrow next to the record button, and select iPhone or iPad under Camera. QuickTime Player will resize and change the image to mirror the iOS device's screen. Use the same menu to ...
What Happened to QuickTime Player?
Launch QuickTime Player and: ° Choose File > New Movie Recording. When the recording controls appear, you see a green light next to the built-in camera in your Mac. New Movie Recording. ° Click the Options pop-up menu, then choose any of the following recording options: Camera: Choose a camera if you have more than one camera available.
In there, there is a container/package/directory called Unsaved QuickTime Player Document.qtpxcomposition that contains a Screen Recording.mov file with the actual video. You can copy-paste that mov file wherever to save it permanently. You can also double-click the Unsaved QuickTime Player Document file directly. That file opens in QuickTime ...
Download QuickTime Player for Mac
QuickTime Player allows you to record a video of your screen with video and sound captured at the same time. For many Mac users, using QuickTime to record screen and audio comes simpler - whether you're near a stunning movie playing on the browser and you want to capture the video footage for sharing, or you're trying to creating a tutorial ...
How to capture your iPhone, iPad, or iPod touch screen. To explore the QuickTime Player User Guide, click Table of Contents at the top of the page, or enter a word or phrase in the search field. Learn how to use QuickTime Player on your Mac to play, record, and edit movies or audio recordings.
QuickTime for Mac Tech Specs. Documents. QuickTime Player User Guide. Software. Download QuickTime Player 7 for Mac OS X v10.6.3. QuickTime 7.6.4 for Tiger. QuickTime 7.6.4 for Leopard. QuickTime Broadcaster 1.5.3. QuickTime 7.6 for Tiger. Show more Show less. Apple Footer
Change default save location for Quicktime screen recordings. Hello, I need to Quicktime to save to Documents/screen_recordings instead of the Desktop by default every time. I can get this to work once by manually selecting the folder I want to save to, but it does not remember my selection for the next recording.
Record your screen in QuickTime Player on Mac
In the QuickTime Player app on your Mac, choose File > New Audio Recording.. Click the Options pop-up menu, then choose any of the following recording options: Microphone: Choose a microphone (if you have more than one available). Quality: Choose the recording quality. Maximum-quality recordings produce uncompressed files, which can use large amounts of storage space.
What is latest Quicktime Player?